

Page 1
Instruction Manual
Typhoon 20001
Bluetooth
TM
USB-Adapter
Art.Nr. 20001
HTTP://WWW.TYPHOONLINE.COM
Page 2
Article Number: #20001
Version 1.0 Specifications and procedures subject to changes without prior notificat ion
- 1 -.
DECLARATION OF CONFORMITY
We, the manufacturer / importer
Anubis Electronic GmbH
Am Langfeld 38
66130 Saarbrücken
Germany
Declare that the product
Kind of product: BluetoothTM USB Adapter
Type designation: TYPHOON 20001
Bluetooth (TM) USB-Adapter
Is herewith confirmed to comply with the
requirements set in the Council Directive on
the Approximation of the Laws of the
Member States relating to EN301 489-17,
EN301 489-1, EN61000-3-2, EN61000-3-3,
EN61000-4-4, EN61000-4-5, EN61000-4-6,
EN61000-4-11, EN60950
Page 3

Article Number: #20001
Version 1.0 Specifications and procedures subject to changes without prior notificat ion
- 2 -.
P
P
RREEFFAACCE
E
RR&&TTTTEE CCoommpplliiaannccee SSttaatteemmeenntt
This equipment complies with all the requirements of the
DIRECTIVE 1999/5/EC OF THE EUROPEAN
PARLIAMENT AND THE COUNCIL OF 9 March 1999 on
radio equipment and telecommunication terminal equipment
and the mutual recognition of their conformity (R&TTE).
SSaaffeettyy
This equipment is designed with the utmost care for the
safety of those who install and use it. However, special
attention must be paid to the dangers of electric shock and
static electricity when working with electrical equipment. All
guidelines of this manual and of the computer manufacturer
must therefore be allowed at all times to ensure the safe use
of the equipment.
FFeeddeerraall CCoommmmuunniiccaattiioonnss CCoommmmiissssiioonn RRaaddiioo
((FFCCCC)) SSttaatteemmeenntt
This equipment has been tested and found to comply with
the limits for a Class B digital device, pursuant to Part 15 of
the FCC Rules. These limits are designed to provide
reasonable protection against harmful interference in a
residential installation. This equipment generates, uses, and
can radiate radio frequency energy and if not installed and
used in accordance with the instruction manual may cause
harmful interference to radio communications. However,
there is no guarantee that interference will not occur in a
particular installation. If this equipment does cause harmful
interference to radio or television reception, which can be
determined by turning the equipment off and on, the user is
encouraged to try to correct the interference by one or more
of the following measures:
− Reorient or relocate the receiving antenna.
− Increase the separation between the equipment
and receiver.
Page 4

Article Number: #20001
Version 1.0 Specifications and procedures subject to changes without prior notificat ion
- 3 -.
− Connect the equipment into an outlet on a circuit
different from that to which the receiver is
connected.
− Consult the dealer or an experienced radio TV
technician for help.
Page 5

Article Number: #20001
Version 1.0 Specifications and procedures subject to changes without prior notificat ion
- 1 -.
Table of Contents
Software Installation............................................. 1
Start Here............................................................ 1
For Windows 98(SE)/ME/2000/XP..................... 1
Software Un-installation....................................... 5
Hardware installation........................................... 6
Precaution........................................................... 6
Getting Hooked Up ............................................. 7
Setup Diagnostics .................................................. 9
GERMAN ............................................................ 10
Software-Installation .......................................... 10
Beginnen Sie hier .............................................. 10
Für Windows 98(SE)/ME/2000/XP................... 10
Software-deinstallation....................................... 15
Hardware-installation......................................... 16
Vorsicht............................................................. 16
Erste Verbindung .............................................. 17
Setup-Diagnose.................................................... 19
SPANISH ............................................................. 20
INSTALACIÓN DEL Software......................... 20
Inicio ................................................................. 20
Para Windows 98(SE)/ME/2000/XP................. 20
desinstalación del Software ................................ 25
INSTALACIÓN DEL Hardware....................... 26
Precauciones..................................................... 26
Conectándose.................................................... 27
DIAGNÓSTICO DE CONFIGURACIÓN ....... 29
Page 6

Article Number: #20001
Version 1.0 Specifications and procedures subject to changes without prior notificat ion
- 2 -.
FRENCH.............................................................. 30
Installation DU Software (LOGICIEL) ............ 30
Commencez ici .................................................. 30
Pour Windows 98(SE)/ME/2000/XP................. 30
Desinstallation du logiciel................................... 35
installation du Hardware (materiel).................. 36
Précaution......................................................... 36
Comment s’accrocher ....................................... 37
Diagnostiques de montage.................................. 39
DUTCH................................................................ 40
Software InstallatiE ............................................ 40
Start Hier .......................................................... 40
Voor Windows 98(SE)/ME/2000/XP................. 40
Software DE-installatiE...................................... 44
Hardware installatiE........................................... 45
Voorzorg ........................................................... 45
Verbinden.......................................................... 46
Setup Diagnose .................................................... 48
PORTUGUESE................................................... 49
INSTALAçãO DO SOFTWARE ....................... 49
Comece Aqui ..................................................... 49
Para Windows 98(SE)/ME/2000/XP................. 49
DESINSTALAçãO DO SOFTWARE ......... 54
INSTALAçãO DO Hardware............................. 55
Precaução ......................................................... 55
Conectando-se................................................... 56
DIAGNÓSTICOS DE AJUSTES....................... 58
Page 7

Article Number: #20001
Version 1.0 Specifications and procedures subject to changes without prior notificat ion
- 3 -.
ITALIAN ............................................................. 59
Installazione di Software .................................... 59
Cominciate qui.................................................. 59
Per Windows 98(SE)/ME/2000/XP ................... 59
DISINSTALLAZIONE DEL Software ............. 64
installaZionE DEL Hardware............................ 65
Precauzione....................................................... 65
Conessione ........................................................ 66
stabilire Diagnostici............................................. 68
Page 8
Article Number: #20001
Version 1.0 Specifications and procedures subject to changes without prior notificat ion
- 1 -
SOFTWARE INSTALLATION
Note: The BTW Software (Version 1.2.2.6 or above)
should be installed well prior to the hardware
installation.
Start Here
Once the installation CD is inserted into the
computer’s CD-ROM drive, the Auto-Run function
will automatically guide you to start the software
installation. If the Auto-Run function is not working,
however, please open the installation CD to find the
“setup.exe” file and double-click the “setup” icon to
continue.
Note: Before you install an upgraded version of the
software, be sure to uninstall any previous version,
which already exists on your computer. For details
of un-installation procedures, refer to the later
section titled “Software Un-installation”.
For Windows 98(SE)/ME/2000/XP
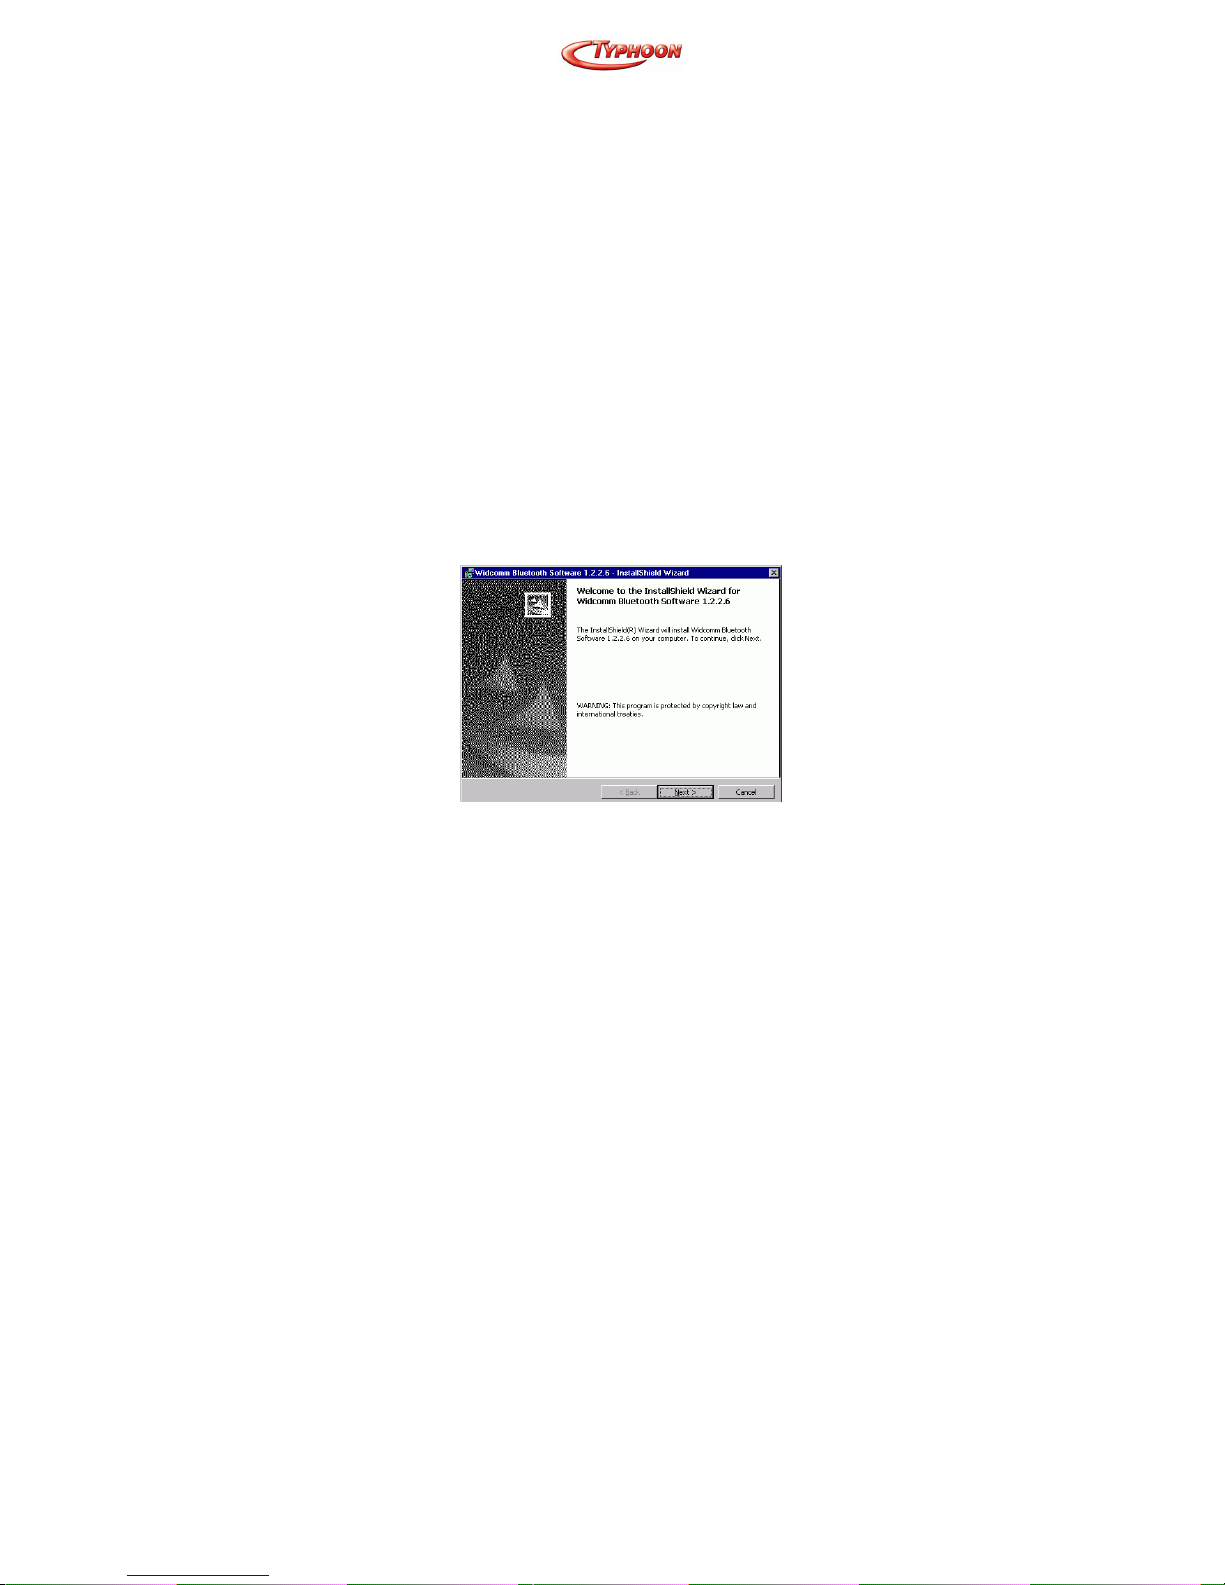
1. On the Welcome screen, click the Next button.
Page 9
Article Number: #20001
Version 1.0 Specifications and procedures subject to changes without prior notificat ion
- 2 -
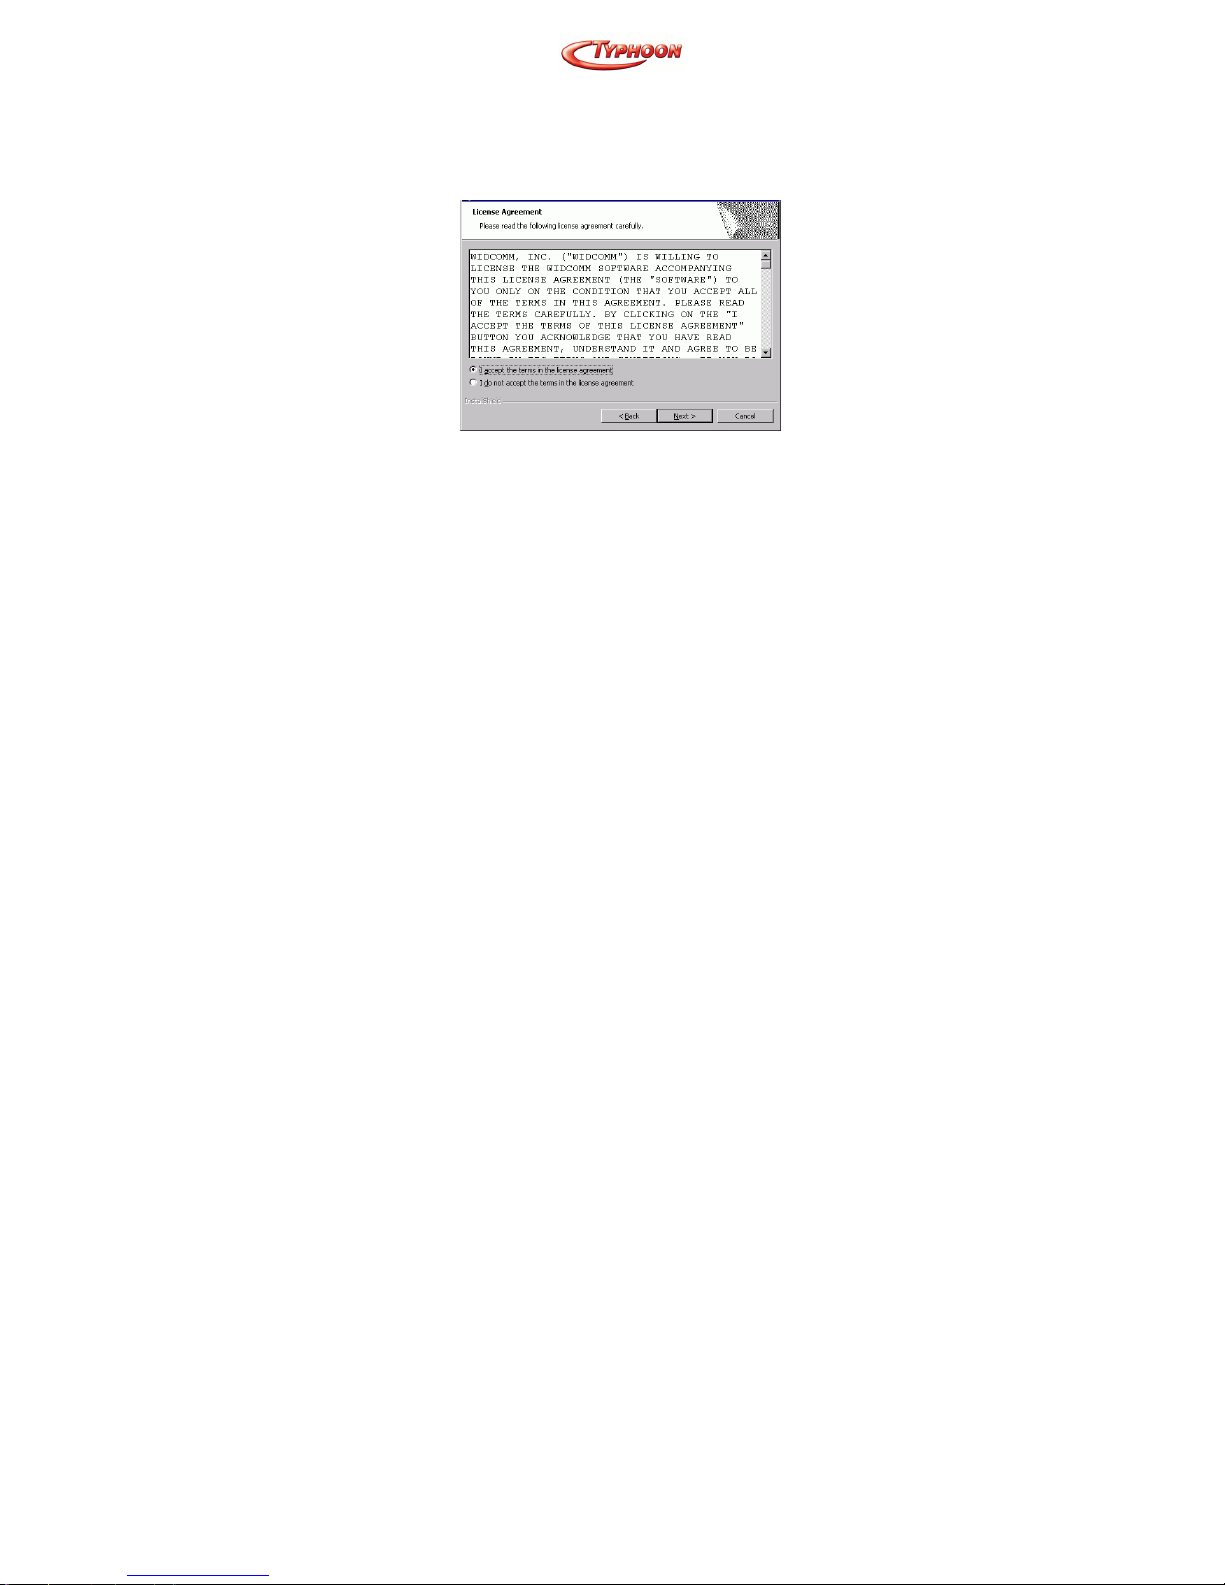
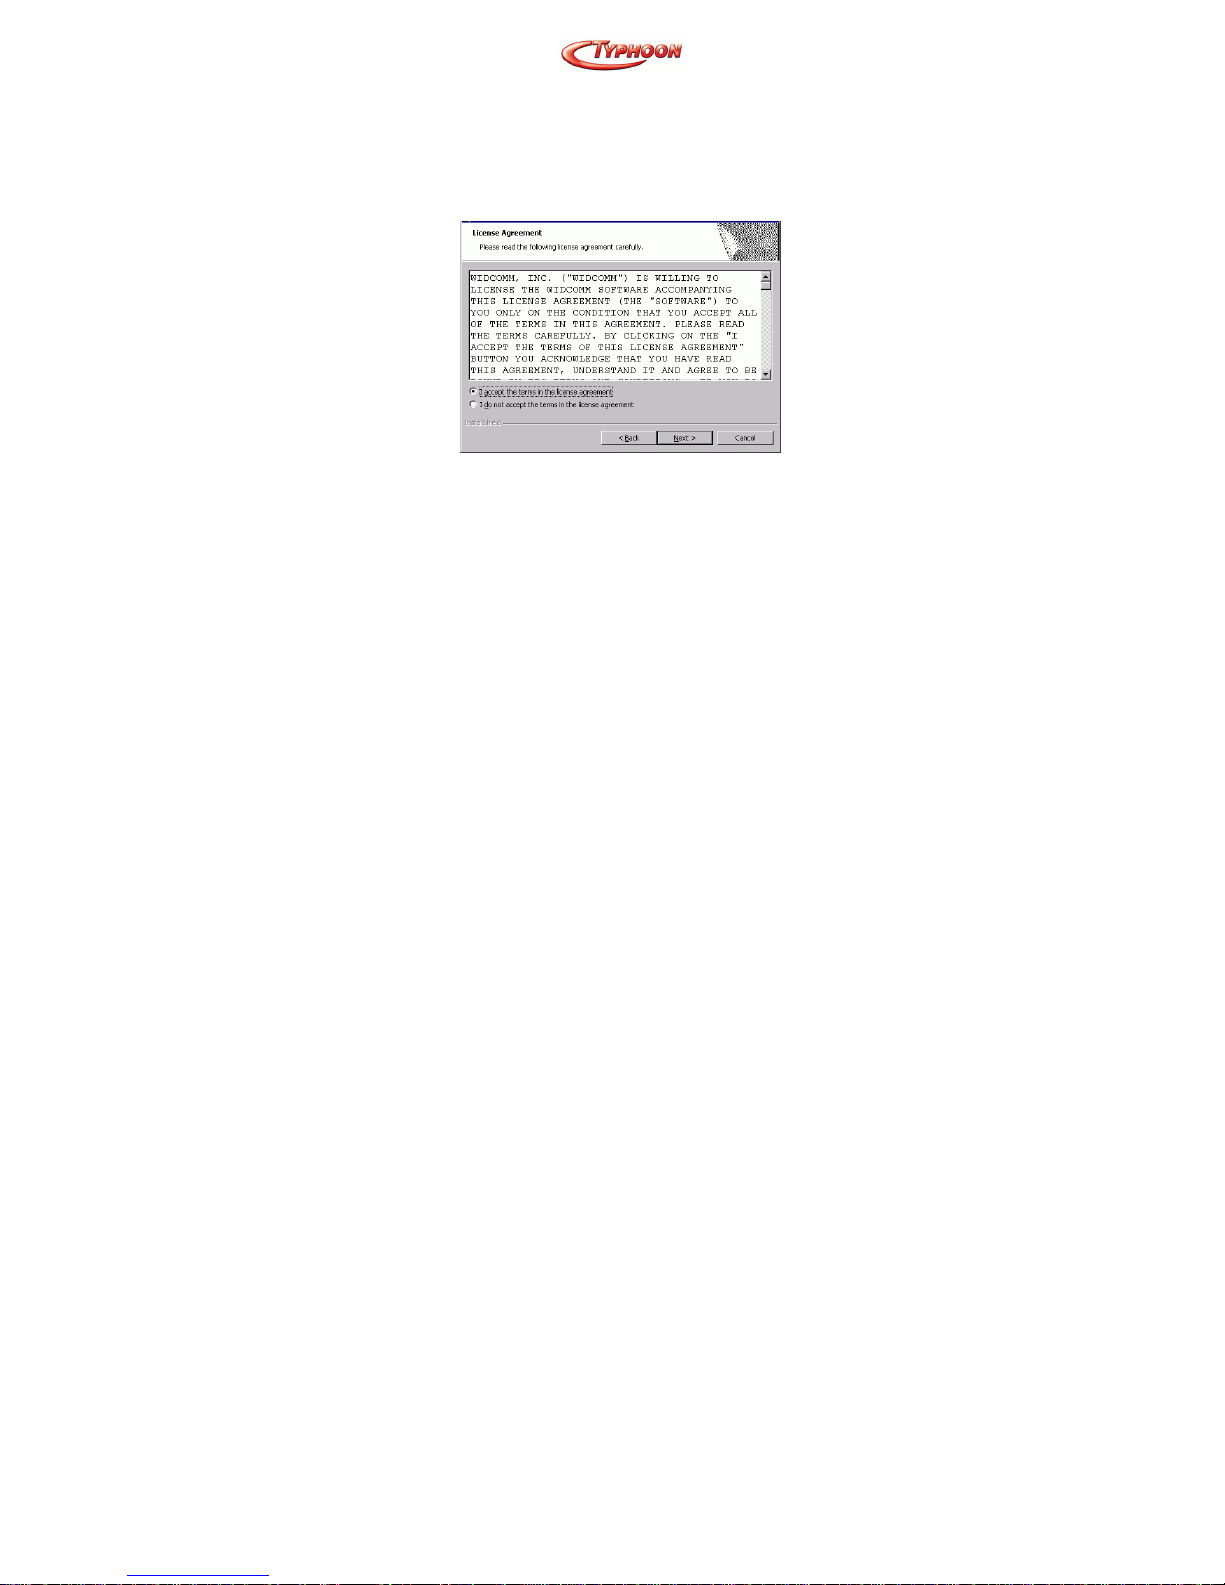
2. When the License Agreement screen is displayed,
read the License Agreement, then click the radio
button to the left of “I accept the terms in the
license agreement” and click the Next button.
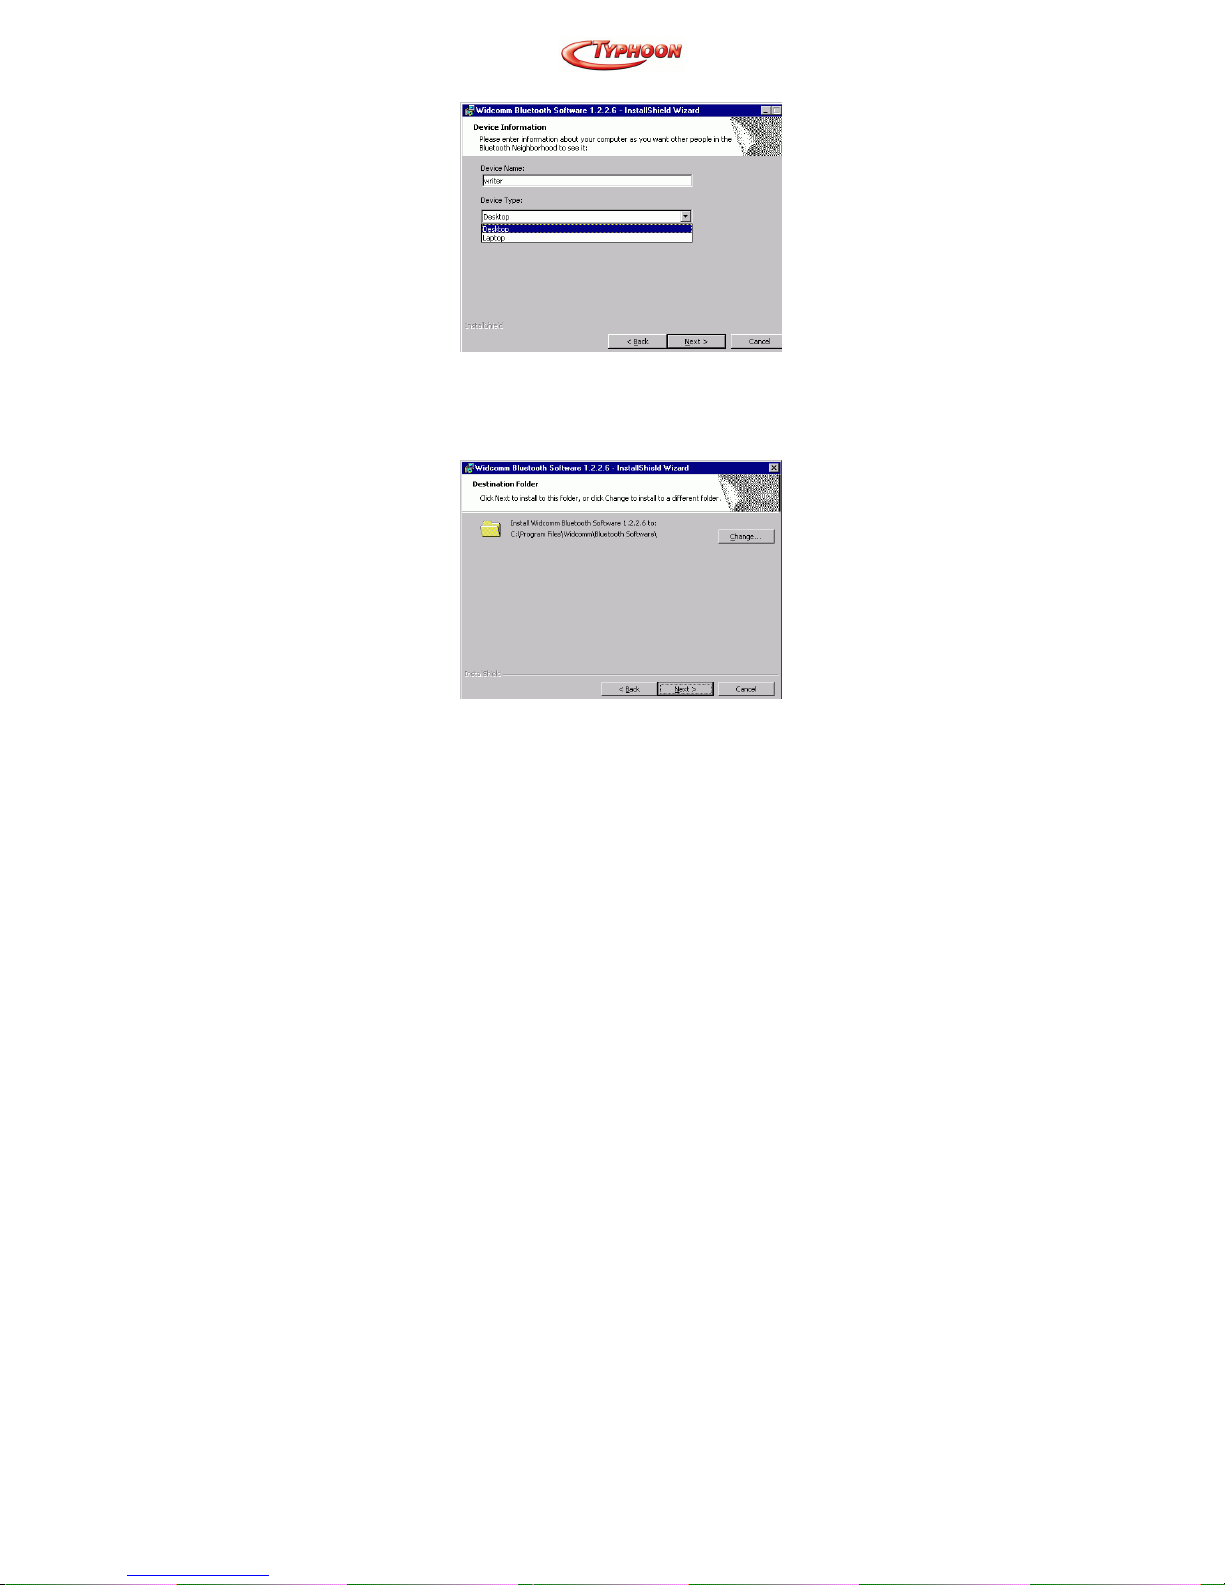
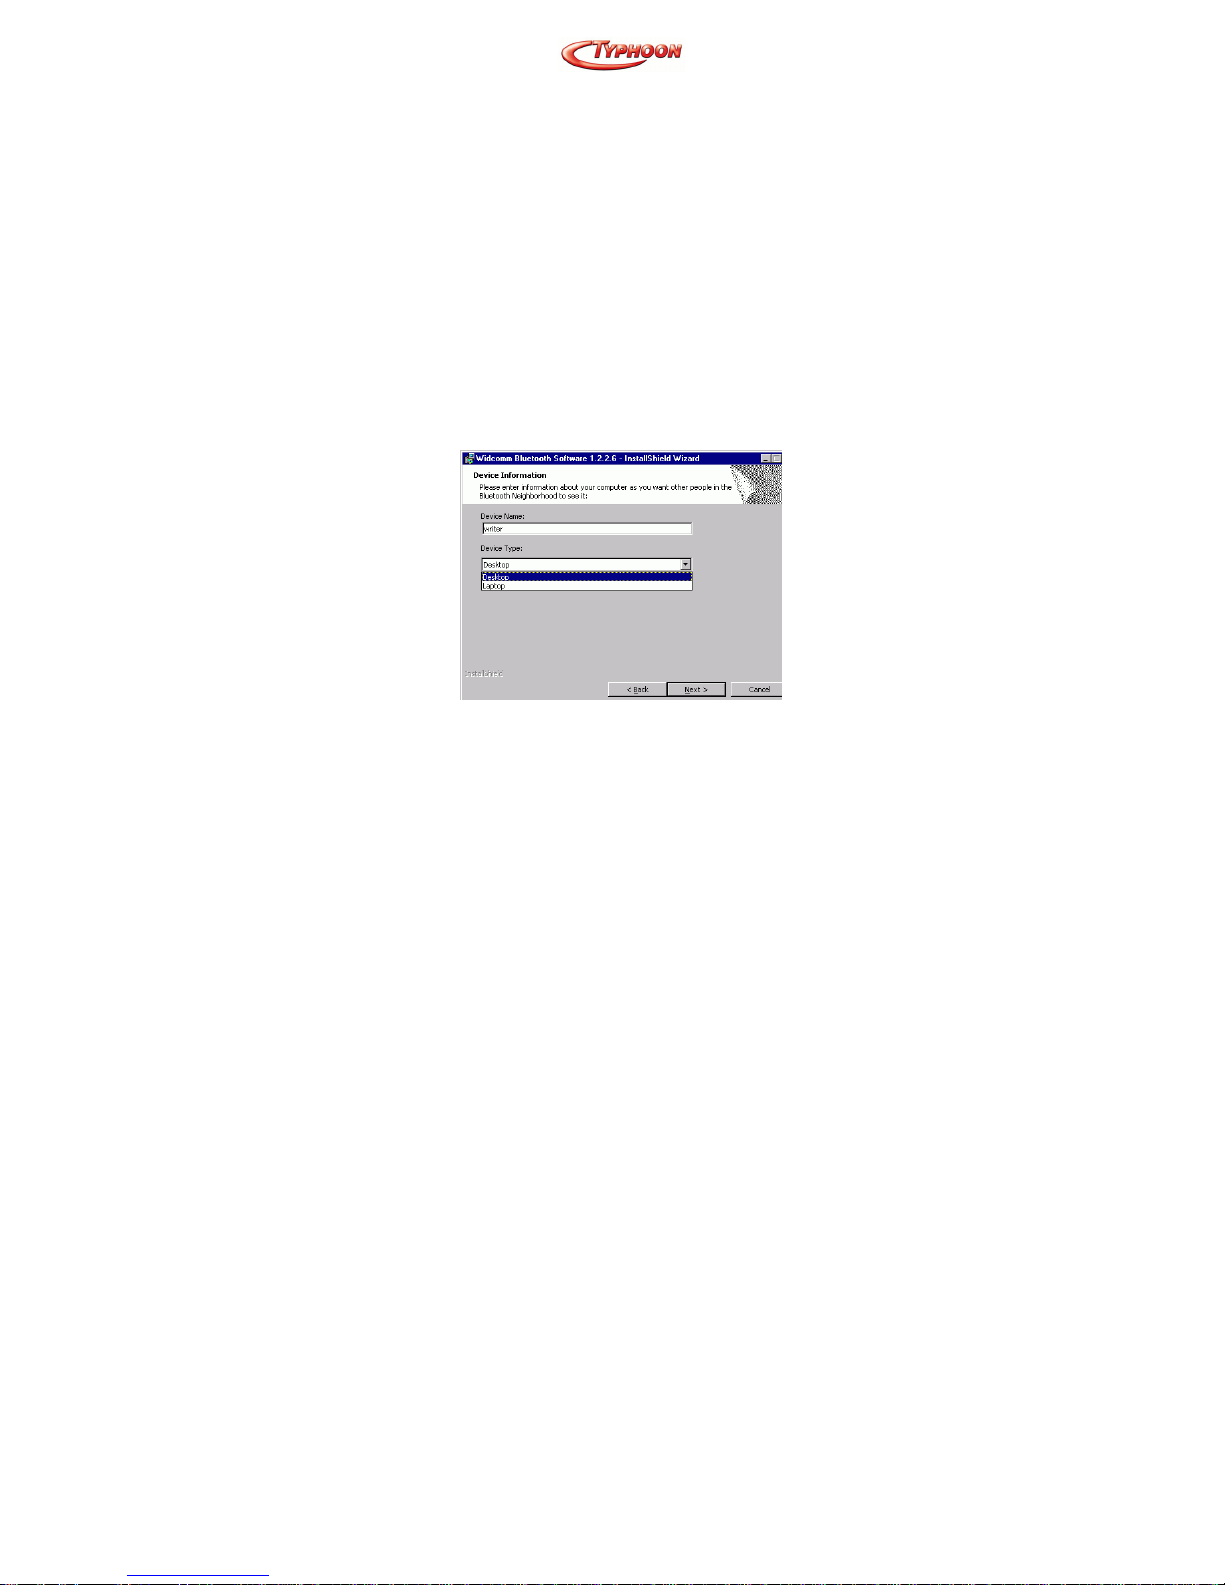
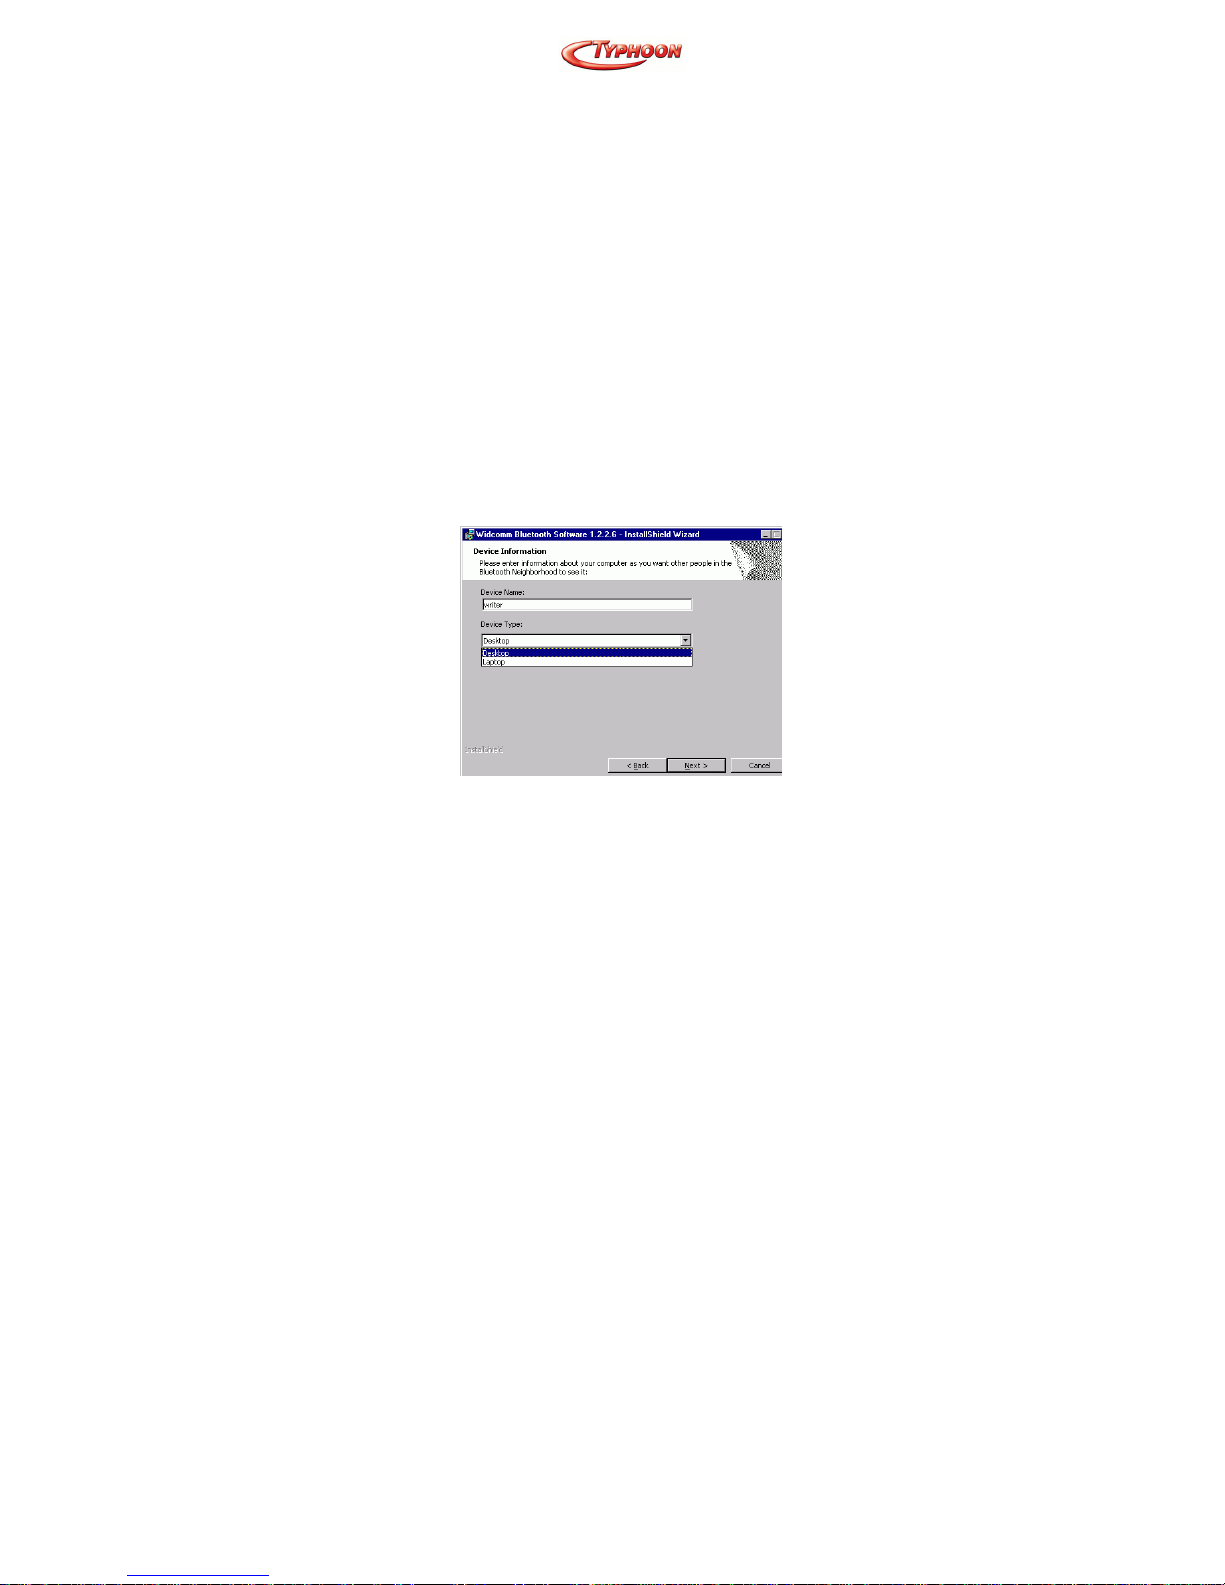
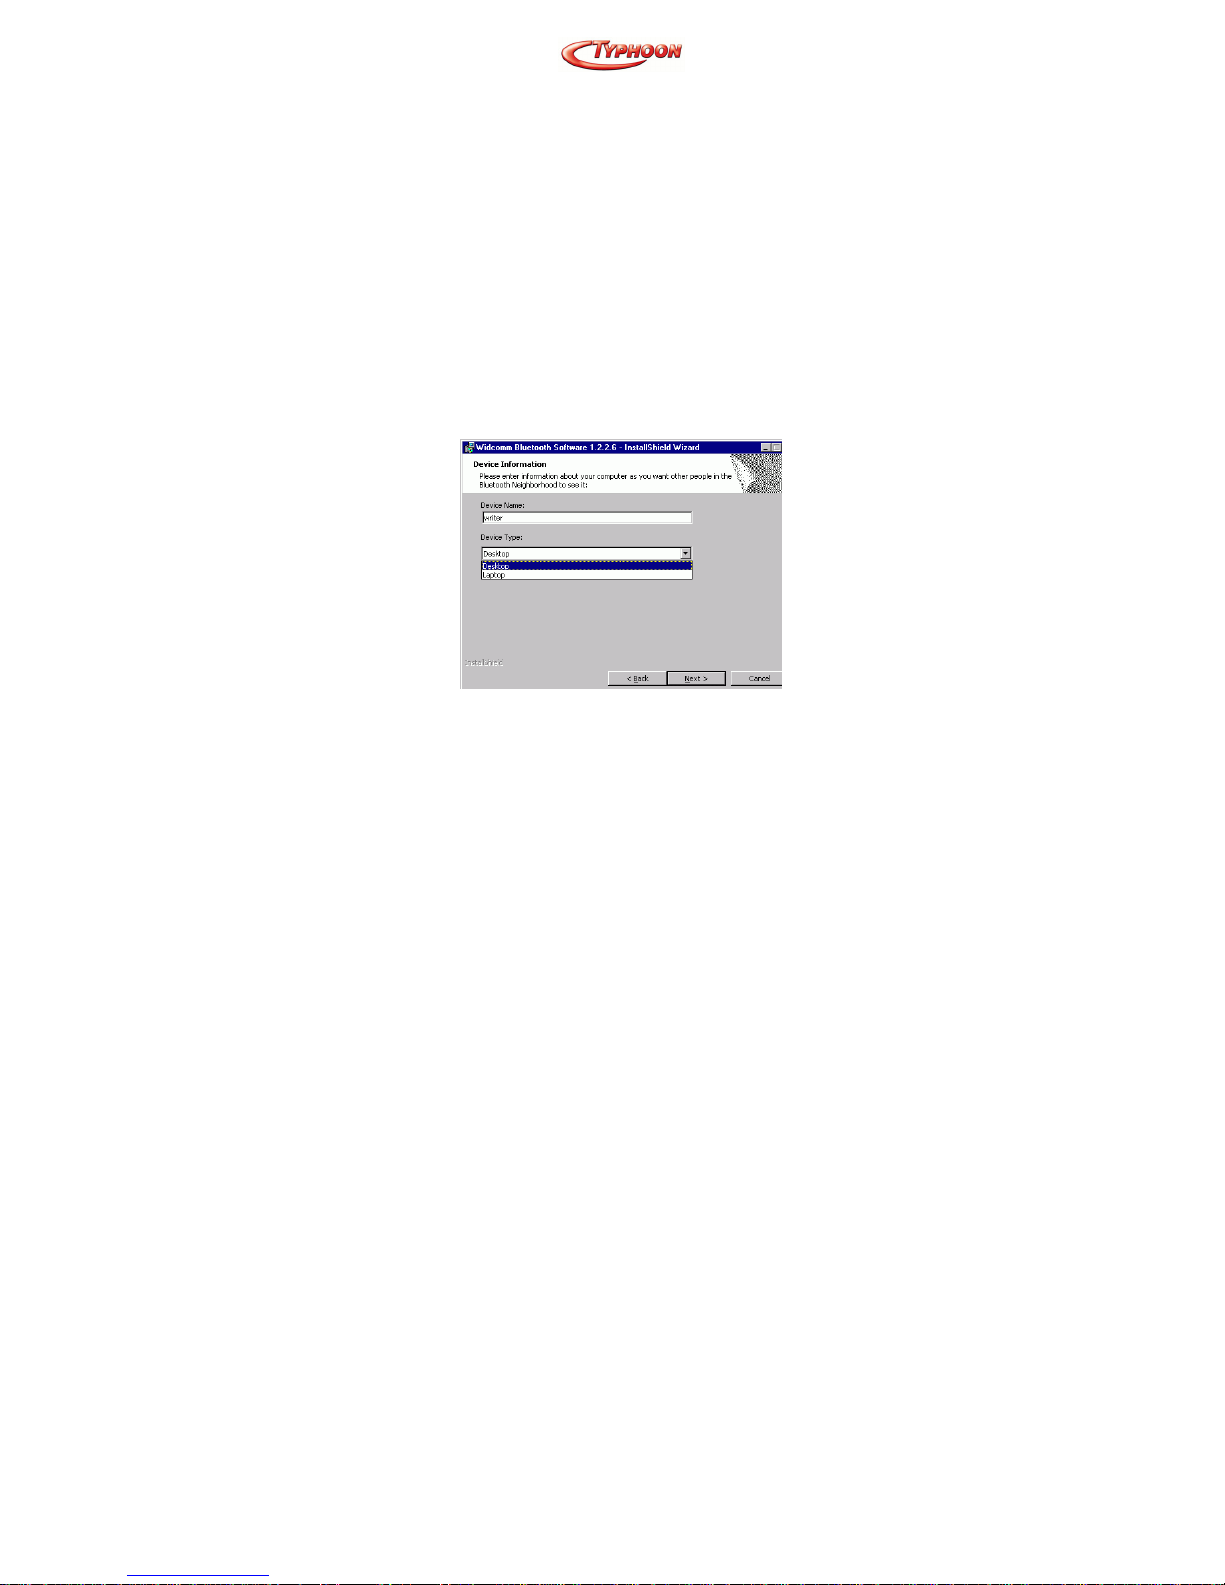
3. On the Device Information screen, enter the
required information:
Device Name—other Bluetooth-enabled devices,
when inquiring about devices within radio range,
will see this user-configured device name.
The name can be changed after the installation
process through the BTW Configuration Panel.
Device Type—click the down arrow and
choose Desktop or Laptop from the drop-down
list. The device type can be changed after the
installation process through the BTW
Configuration Panel.
Click the Next button.
Page 10
Article Number: #20001
Version 1.0 Specifications and procedures subject to changes without prior notificat ion
- 3 -
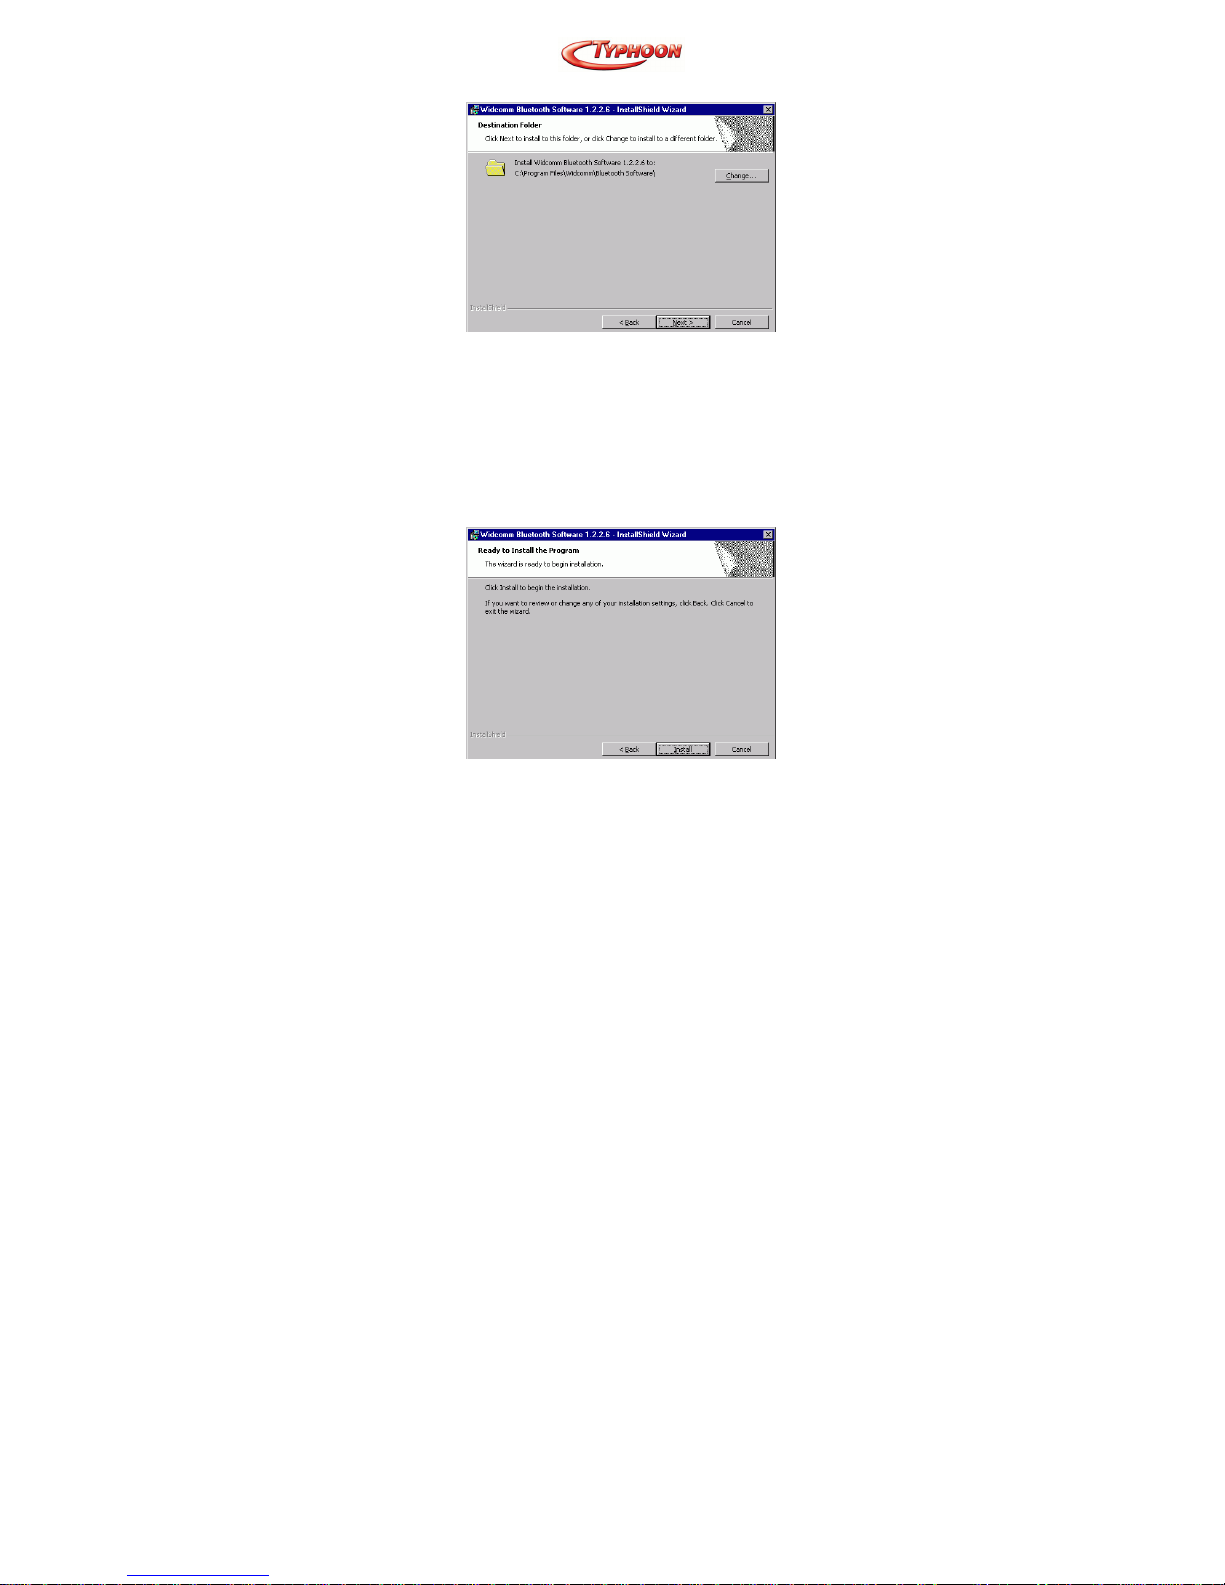
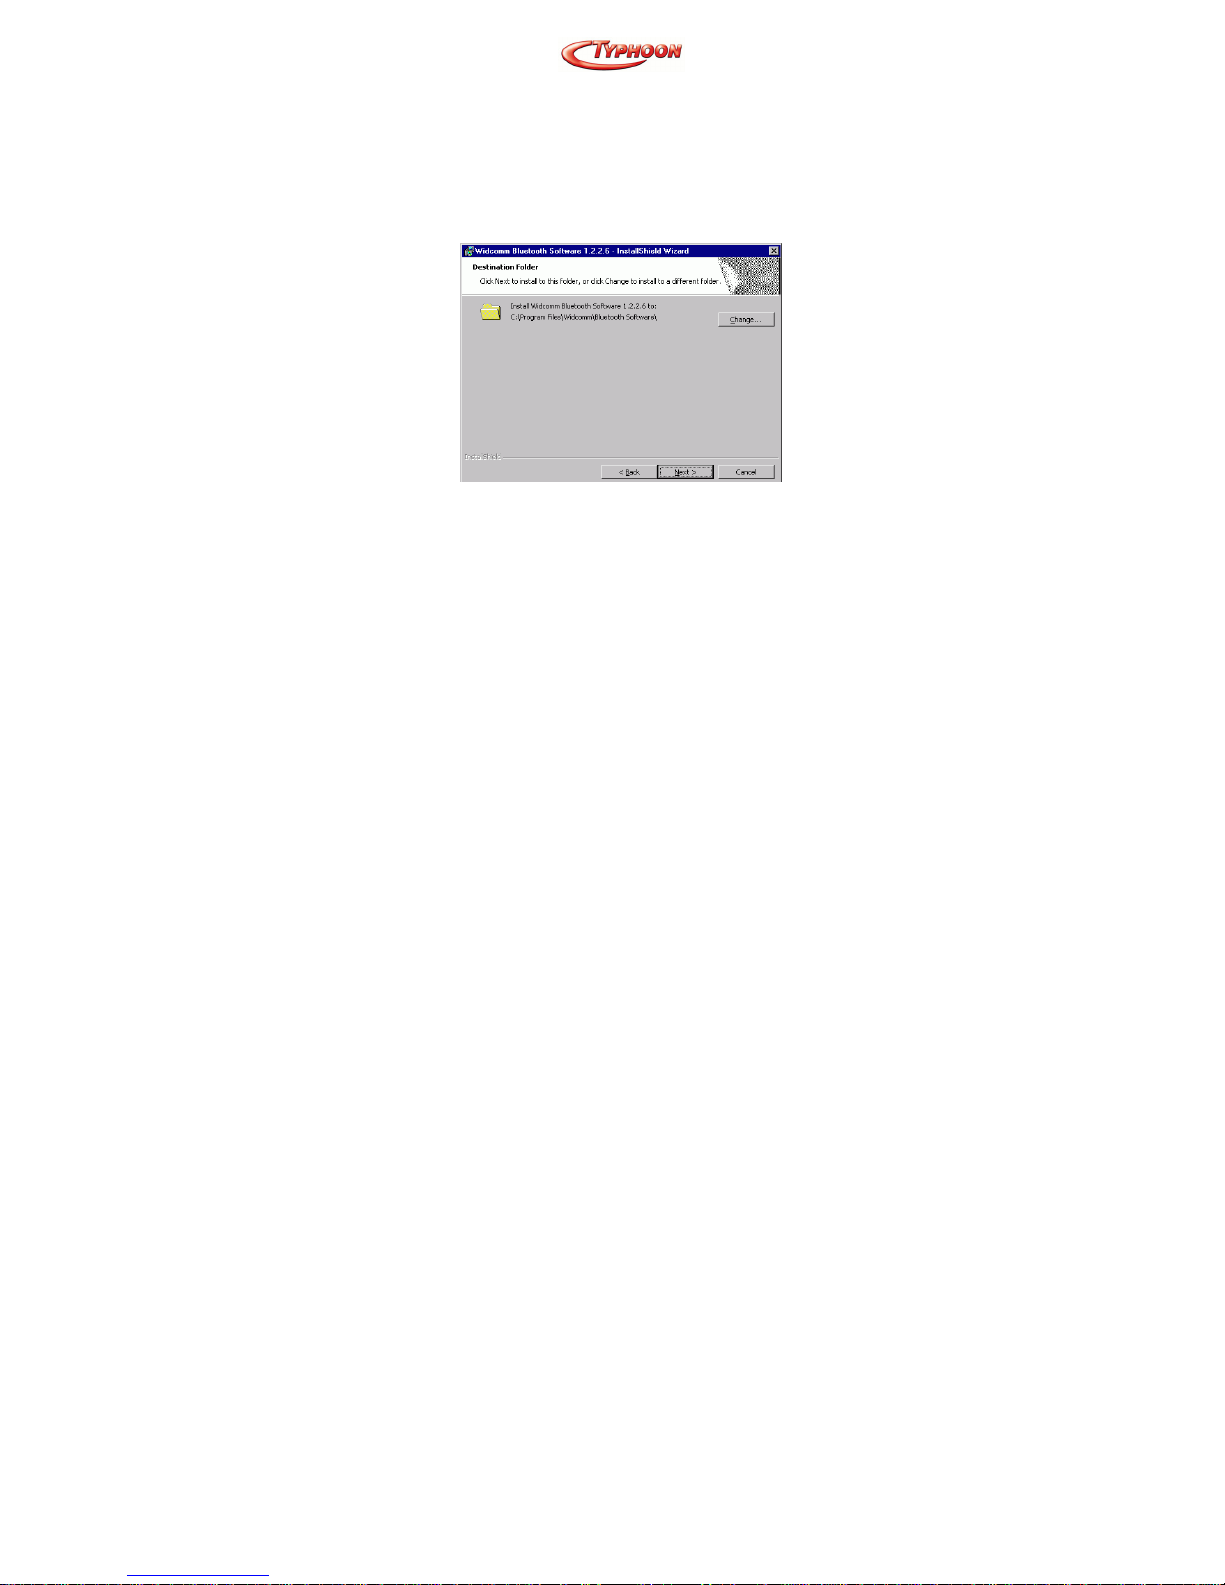
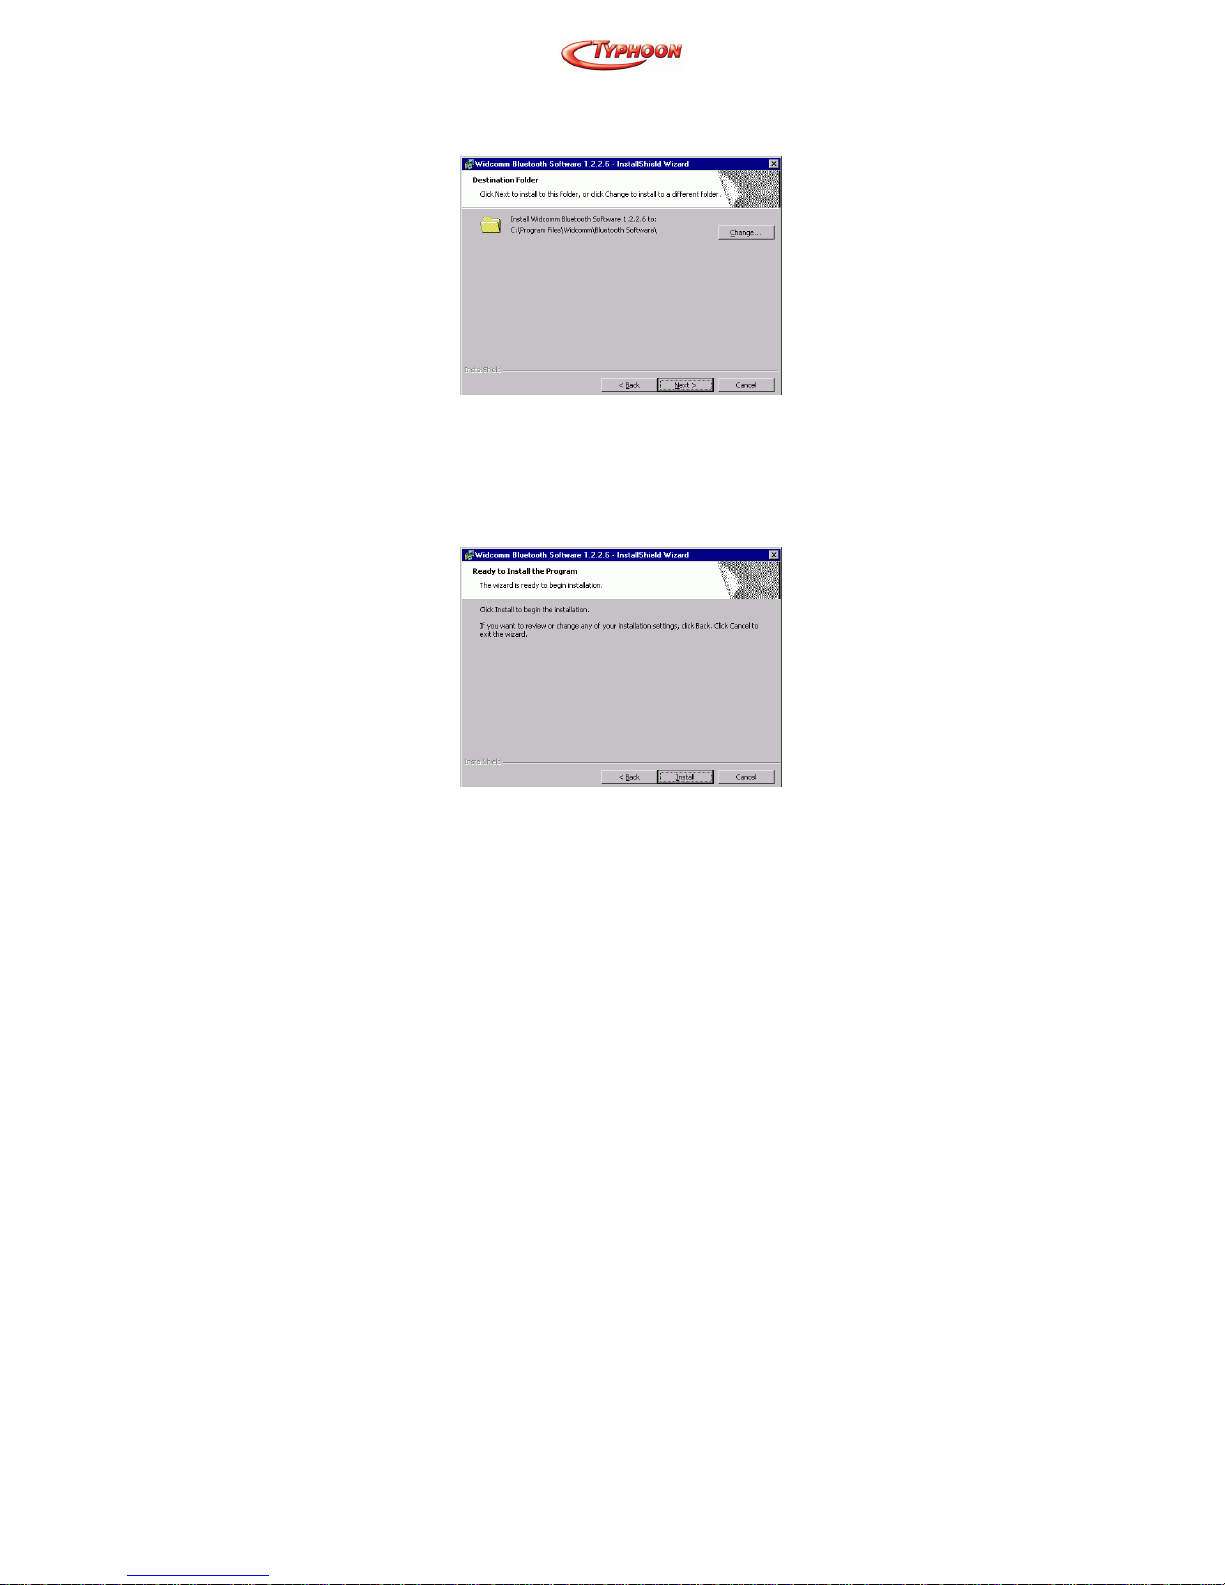
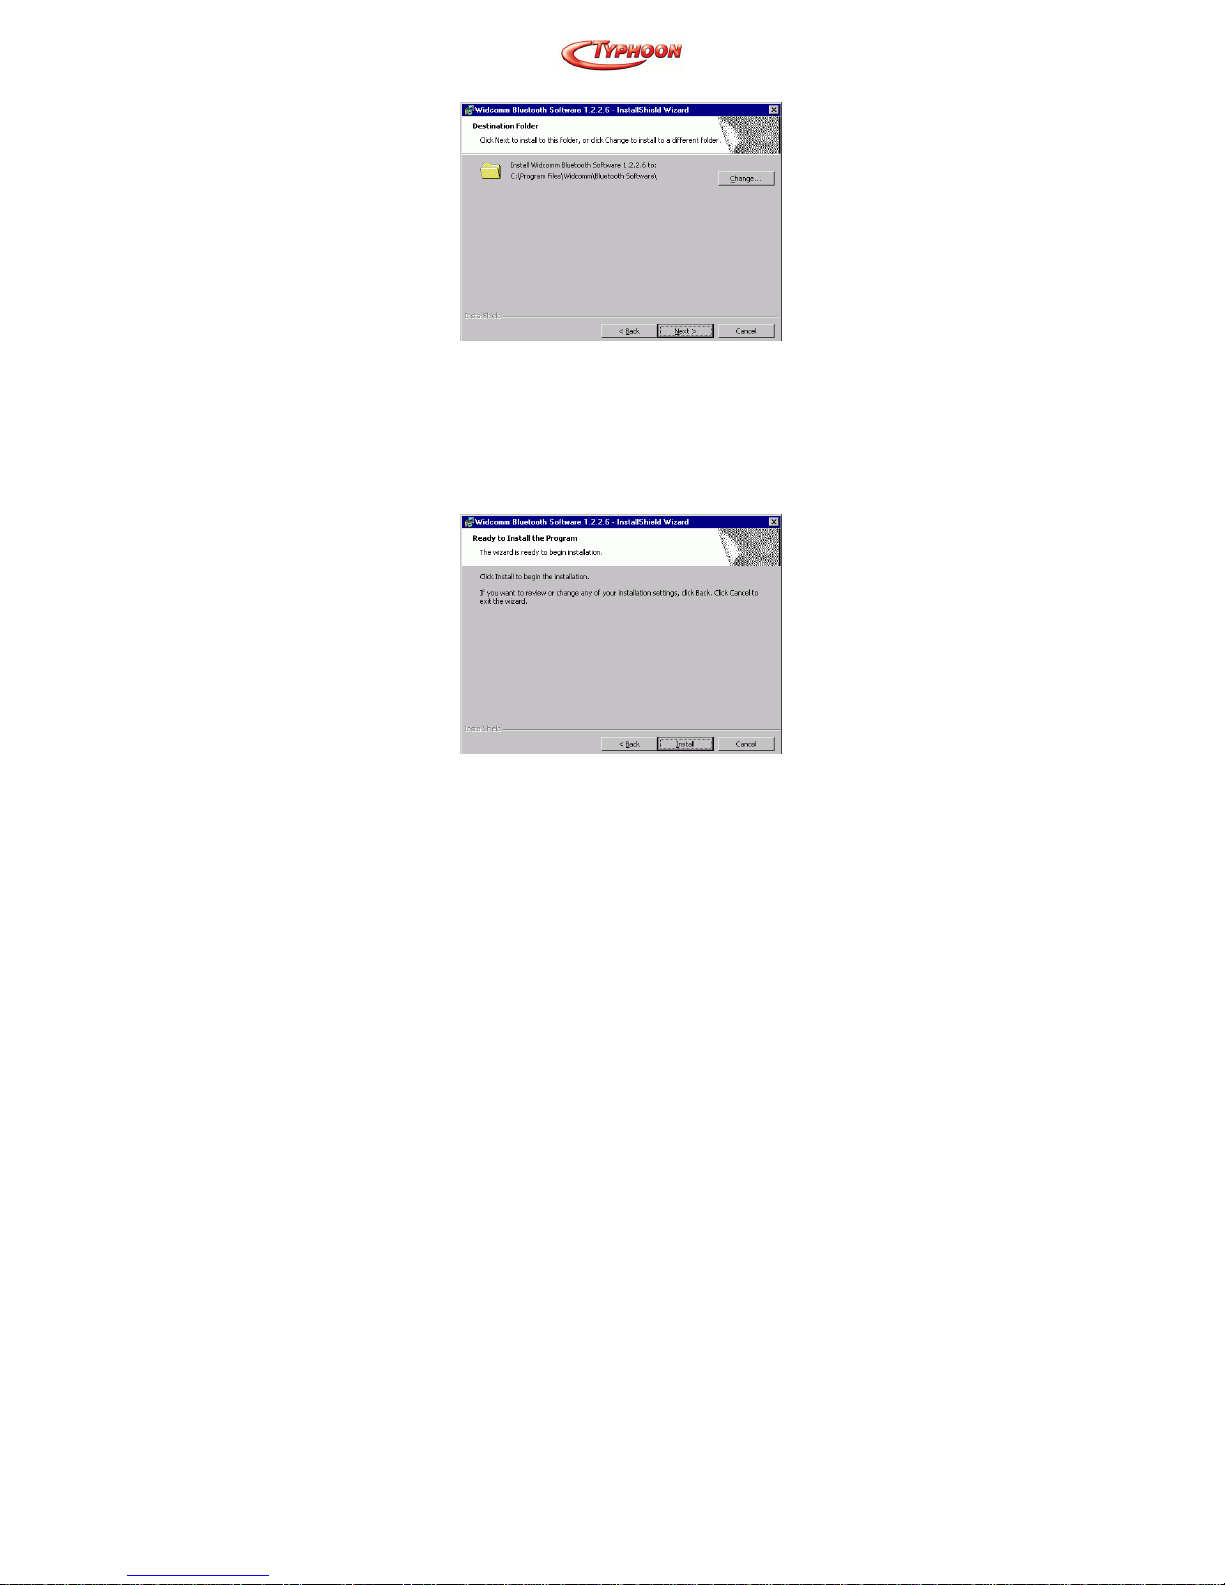
4. On the Destination Folder screen, click the
Change button to browse to a new destination
folder for the BTW software. Otherwise, click the
Next button to accept the default folder.
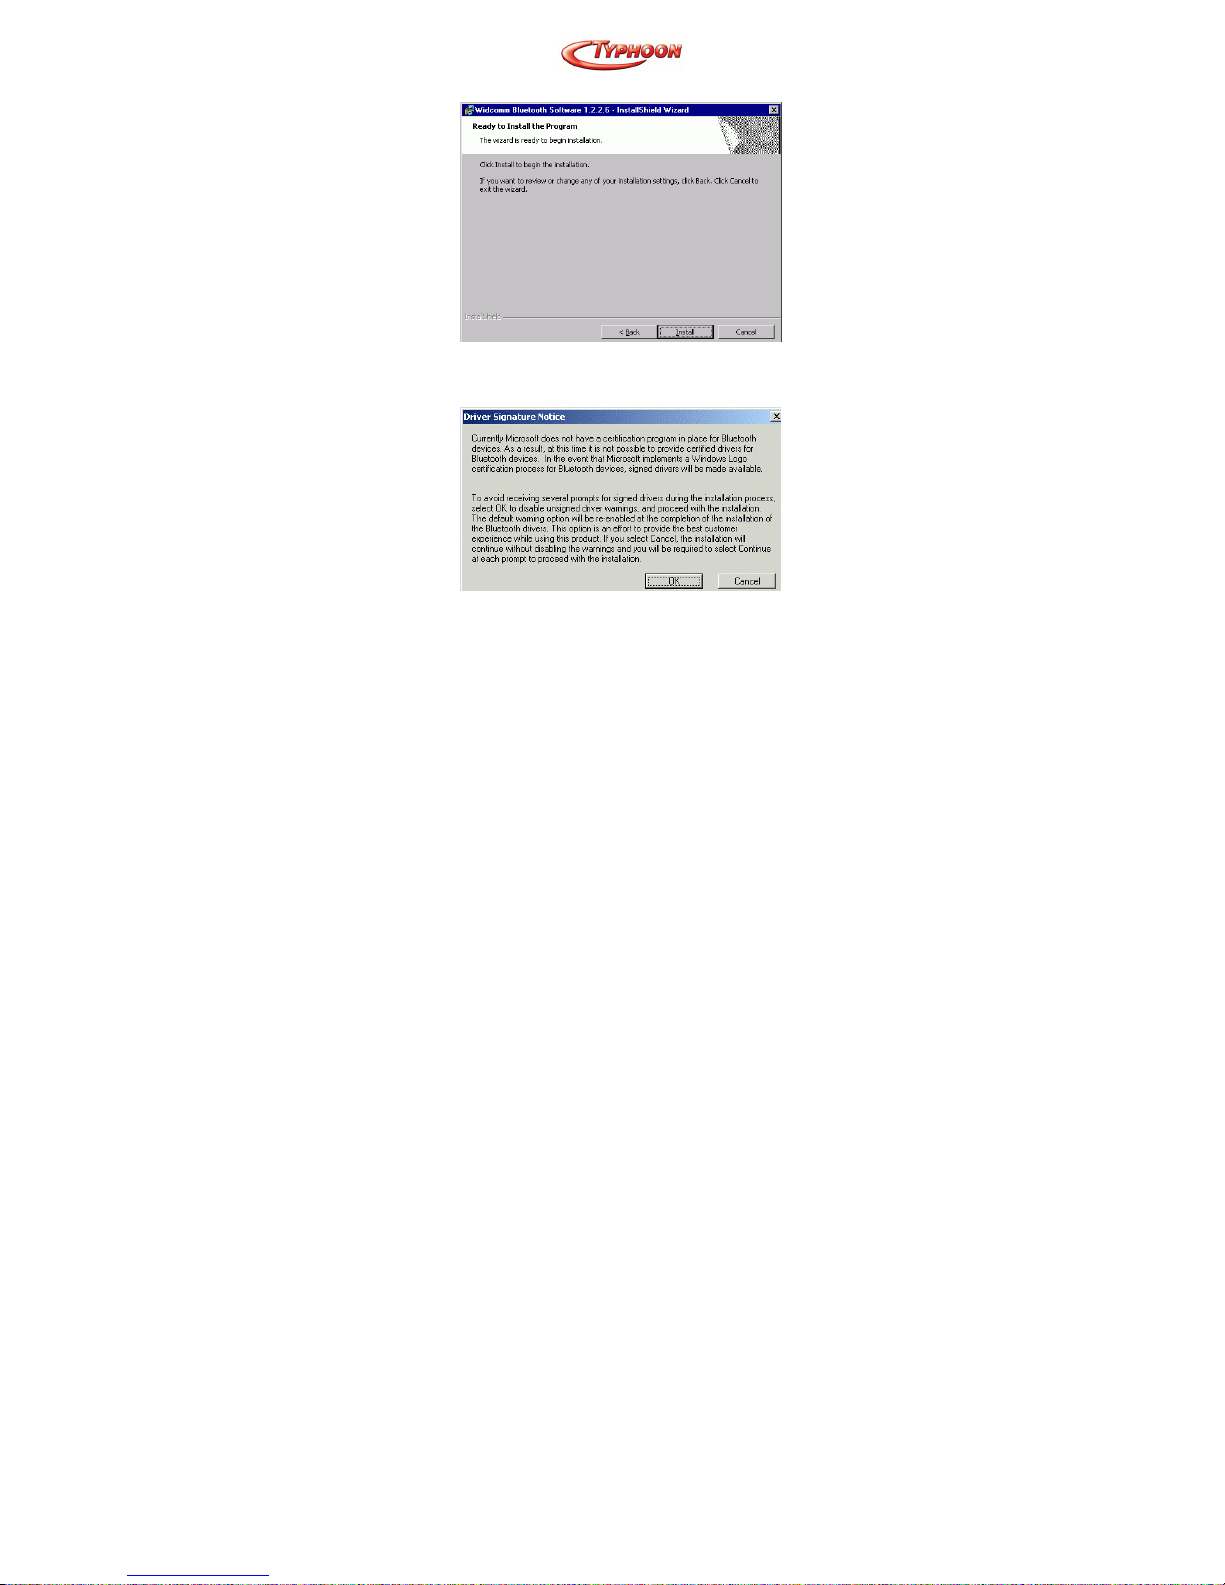
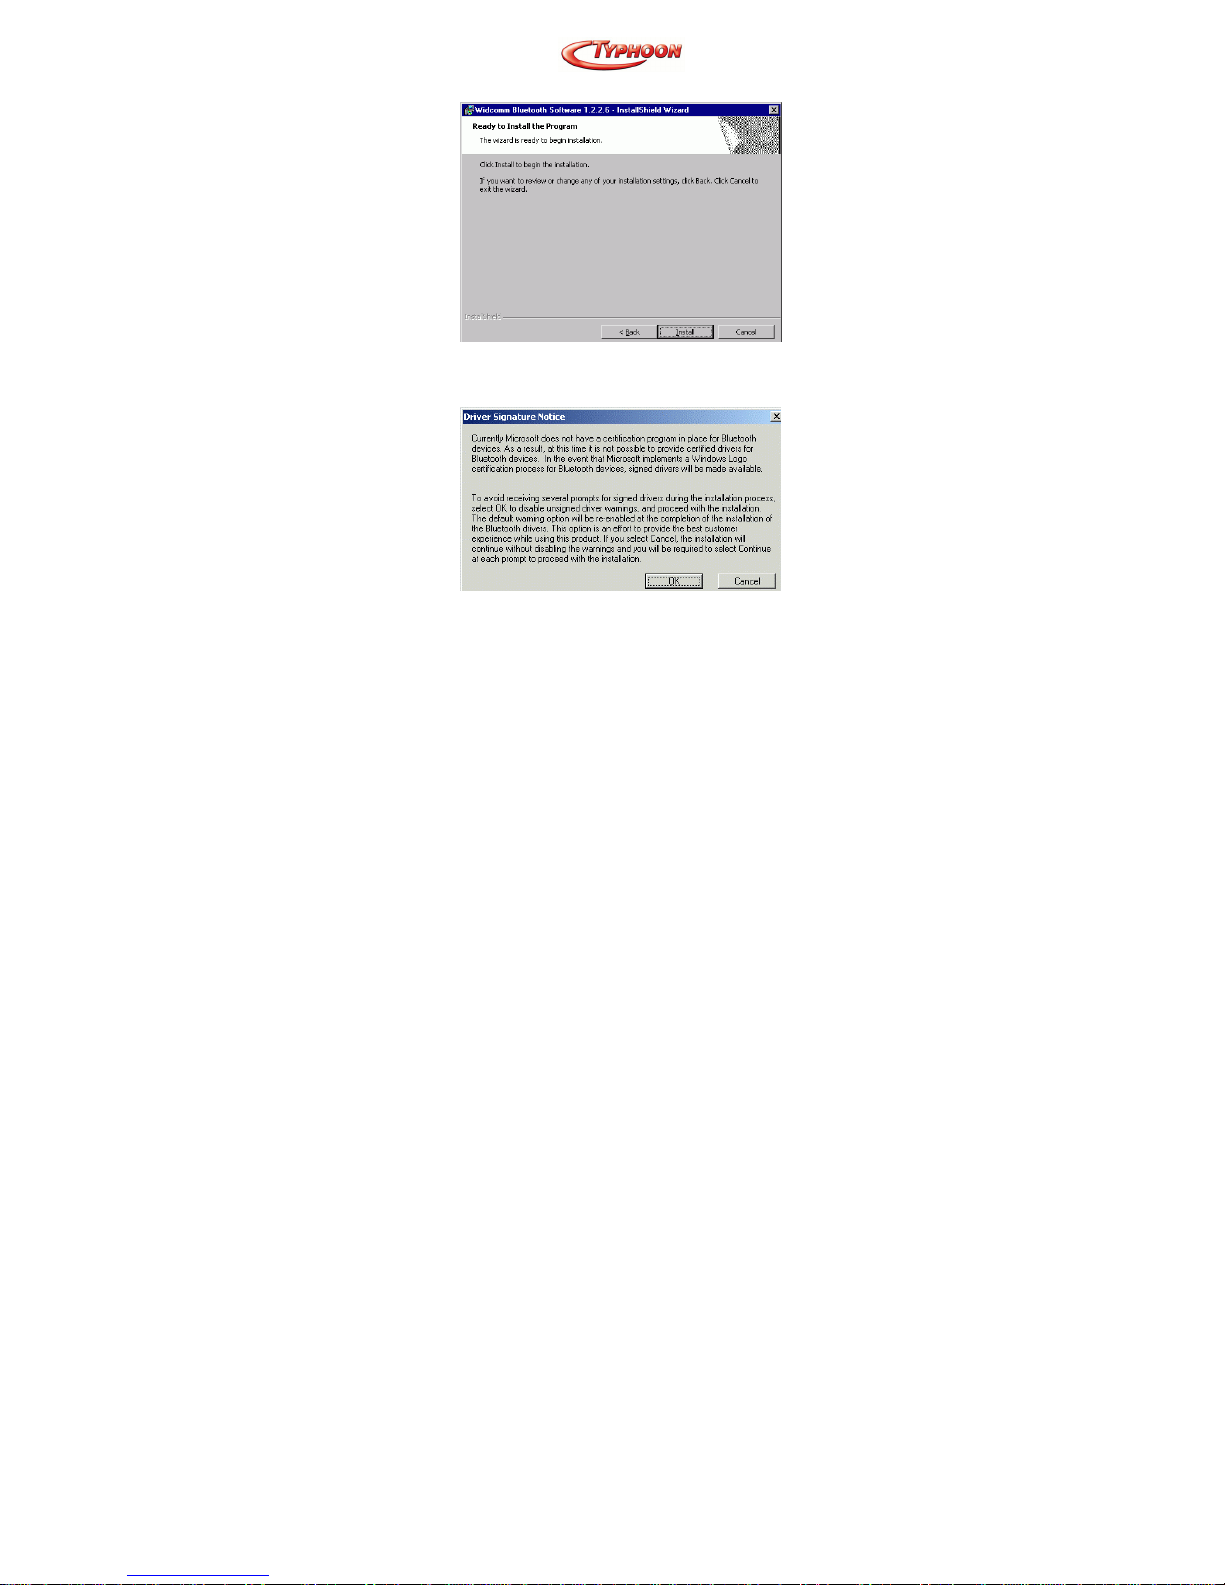
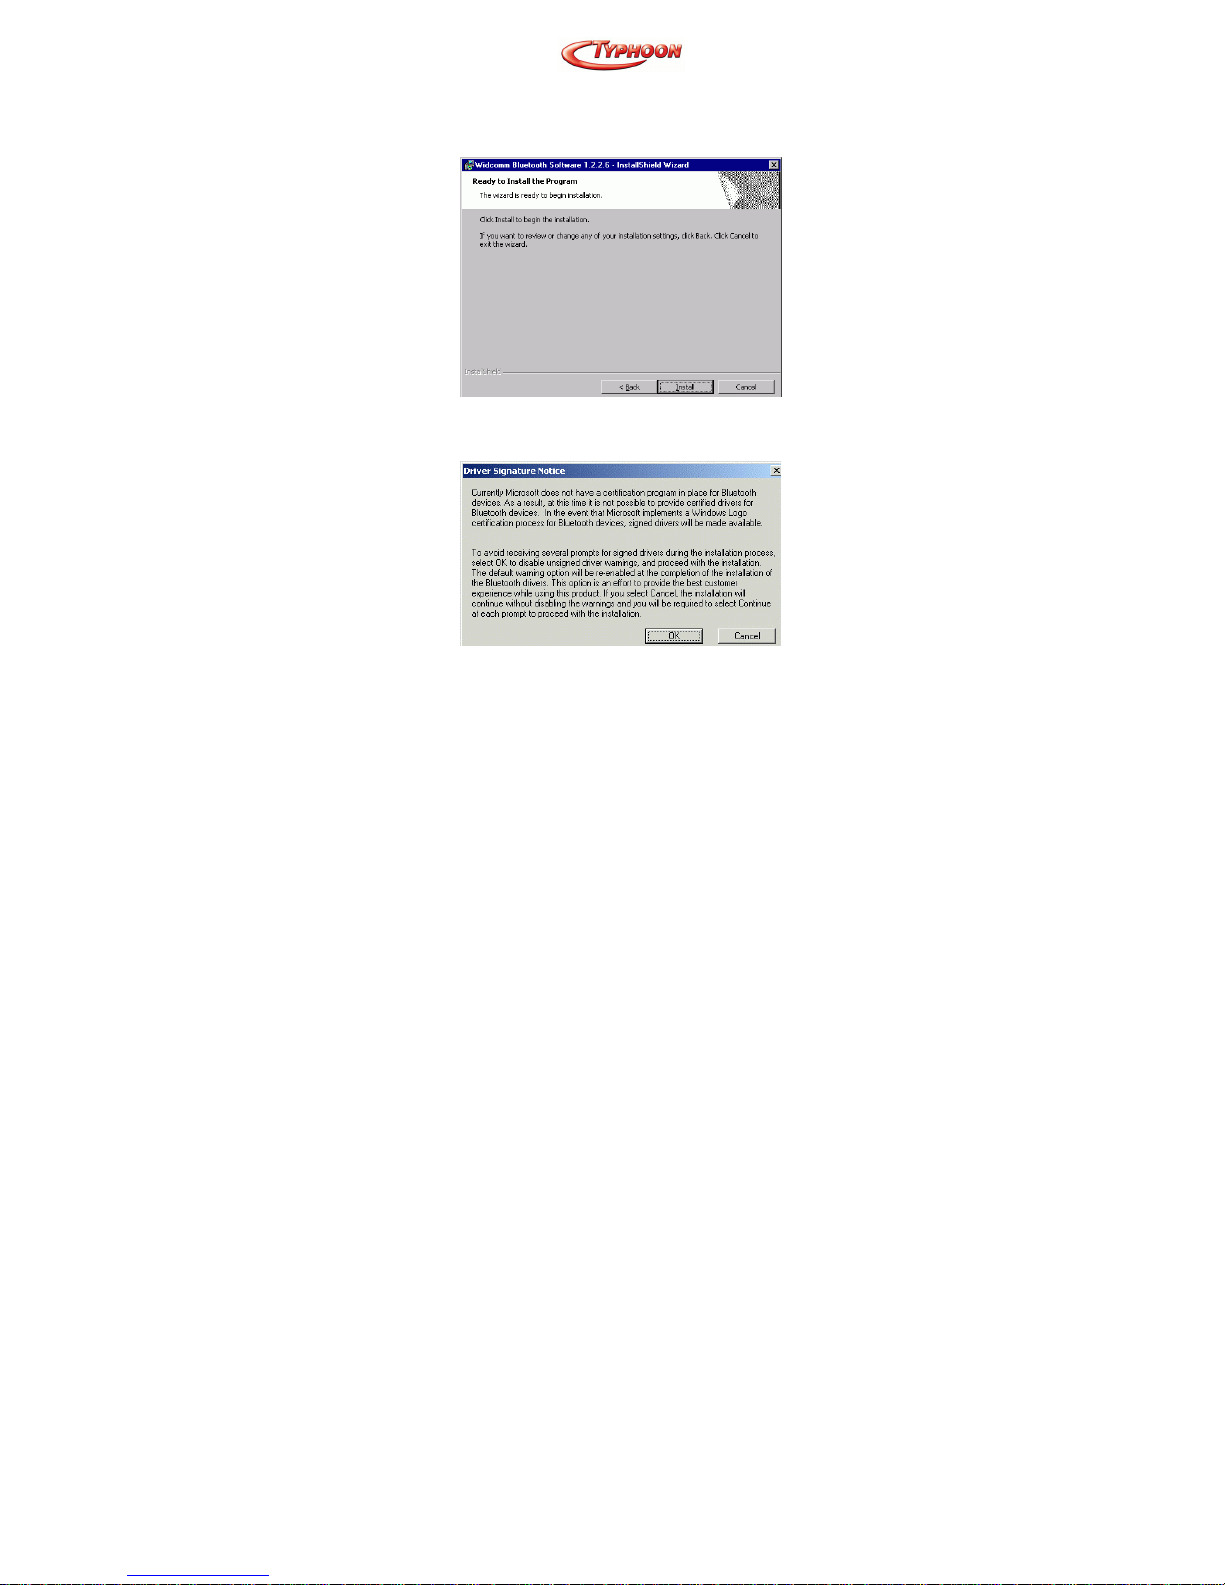
5. The InstallShield Wizard is ready to install the
BTW software. If you need to review or change
any settings, click the Back button. Click the
Cancel button to exit the Wizard. Otherwise,
click the Install button
Page 11
Article Number: #20001
Version 1.0 Specifications and procedures subject to changes without prior notificat ion
- 4 -
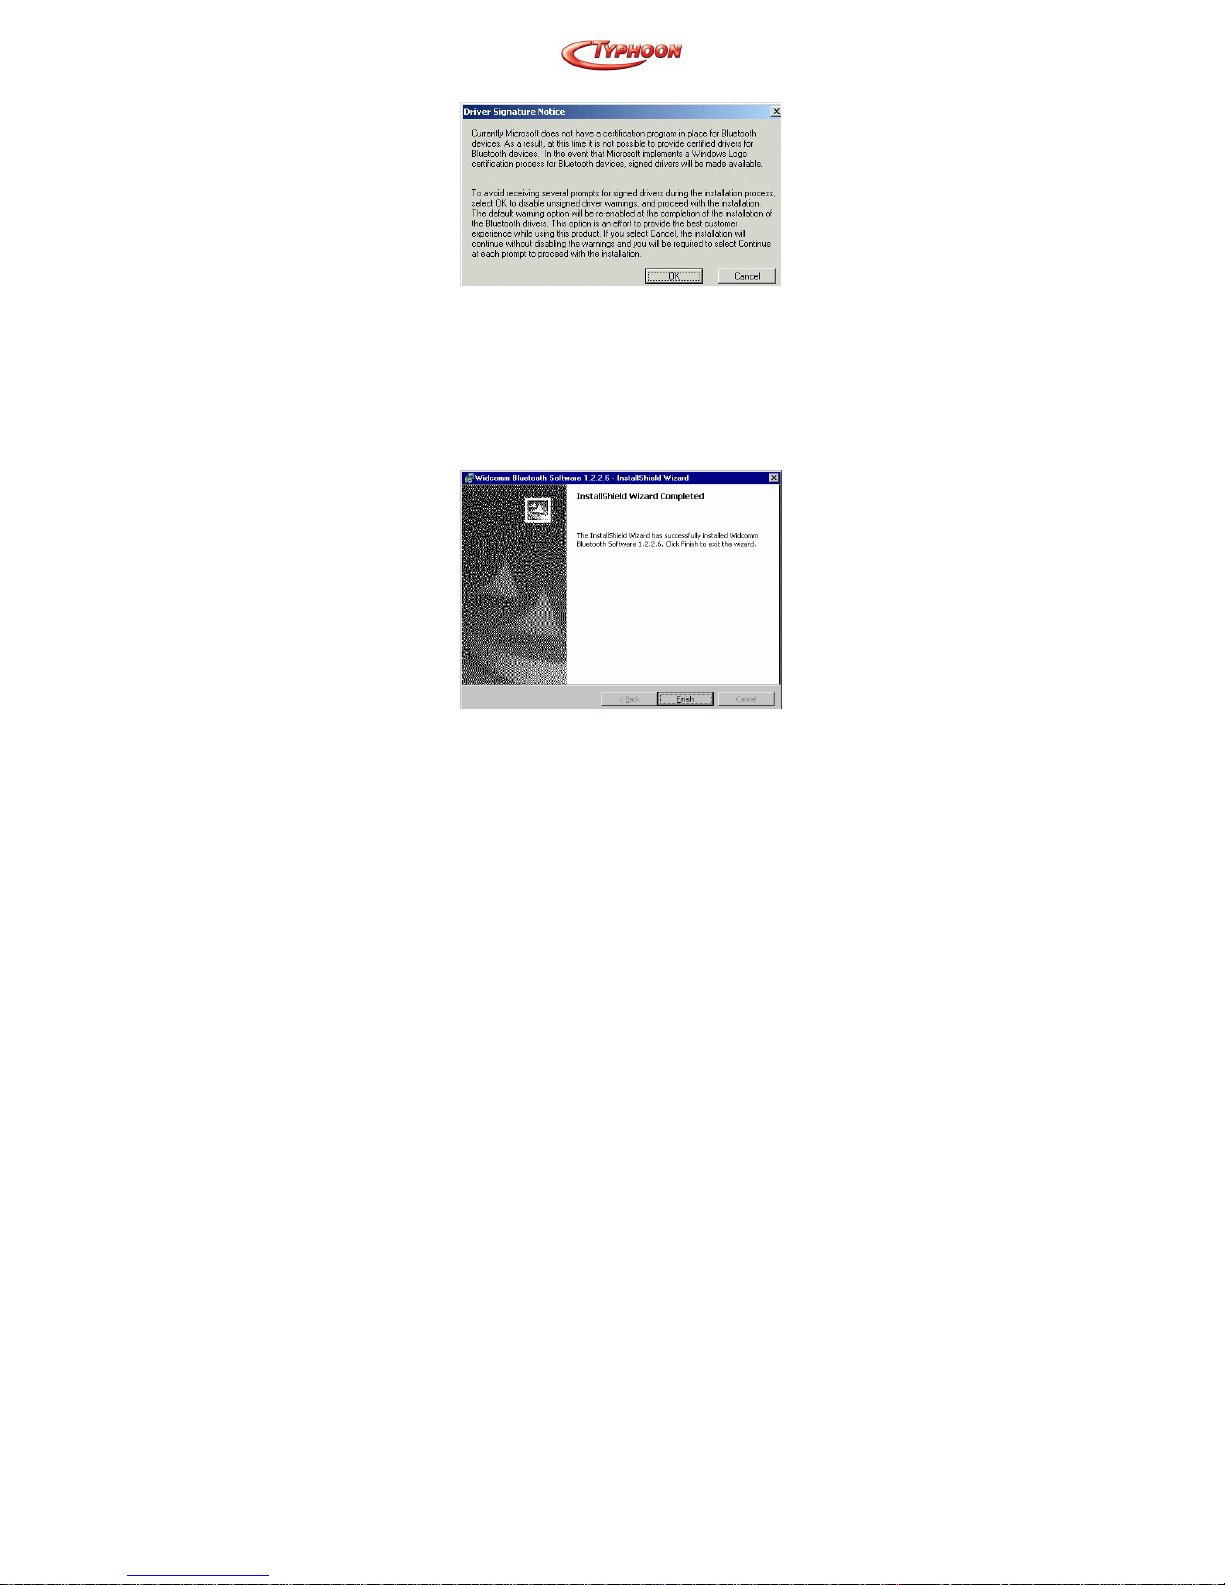
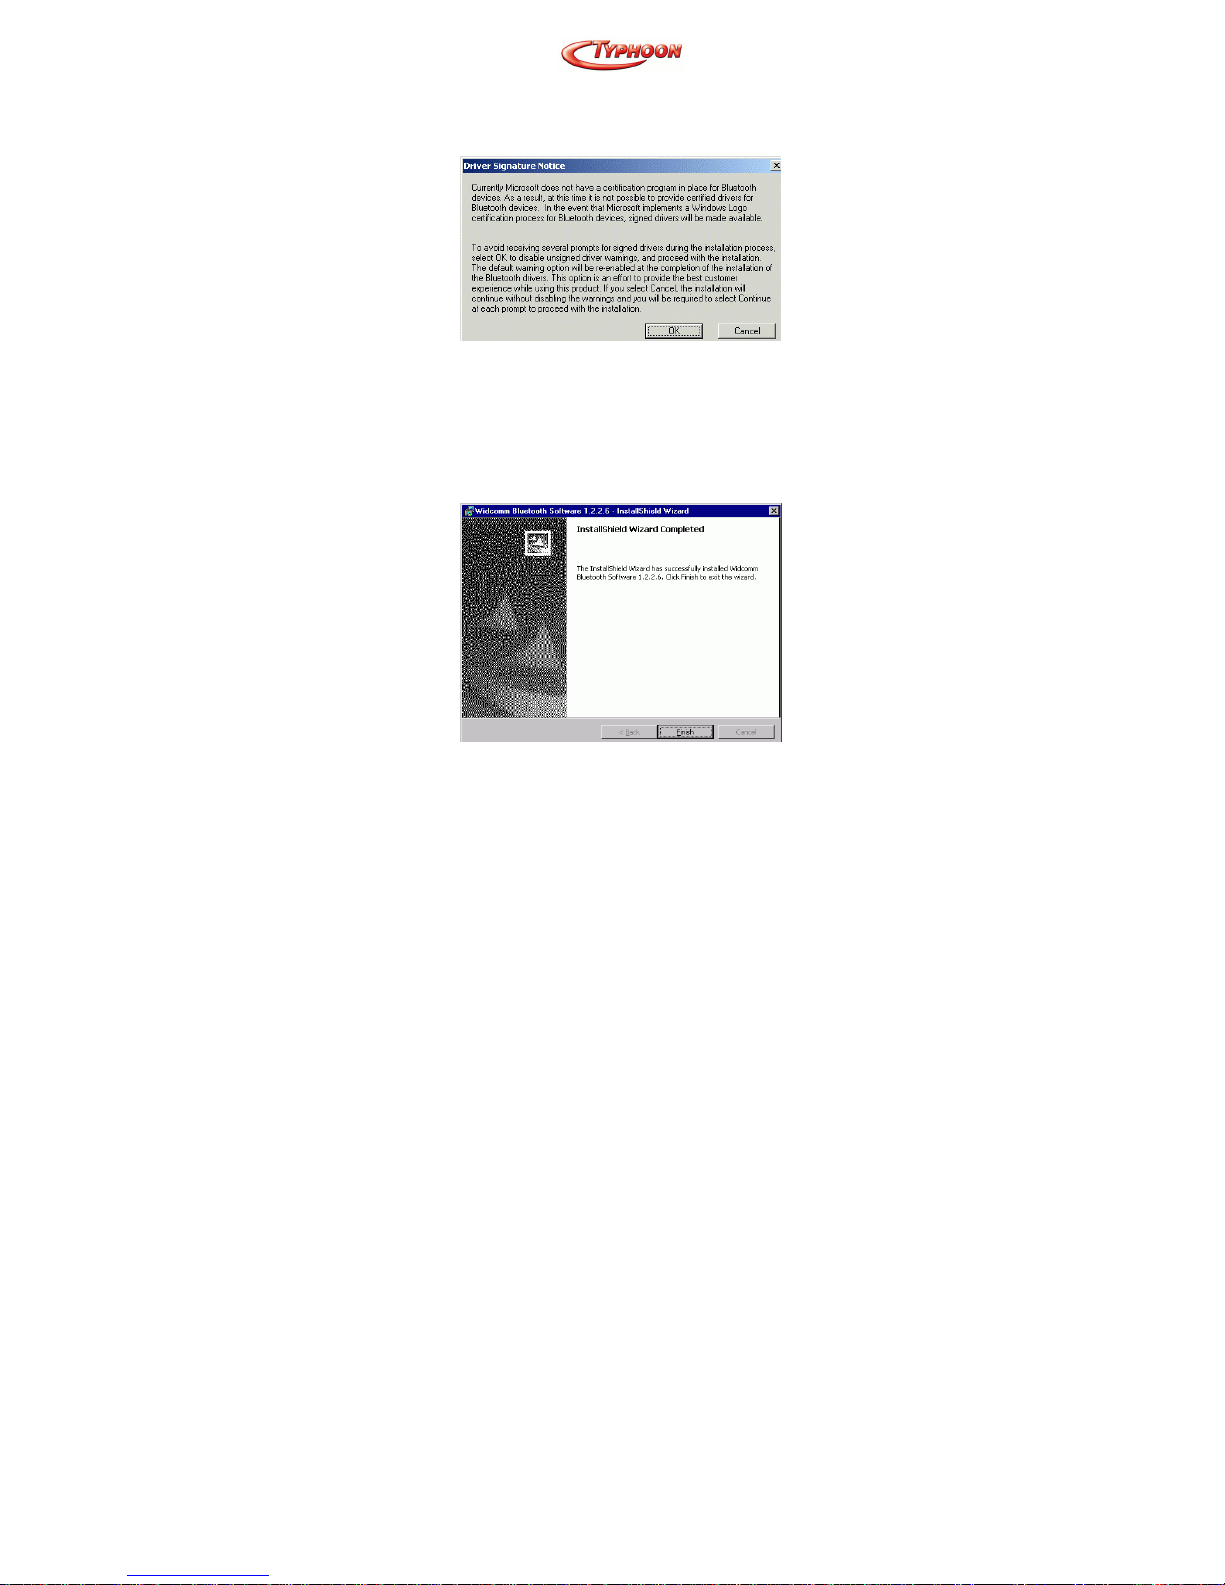
6. Click OK at the following message (only for
Windows 2000/XP installation).
7. The Installing Bluetooth Software screen displays
the installation progress. If prompted to insert the
Windows CD, do so and follow the on-screen
instructions.
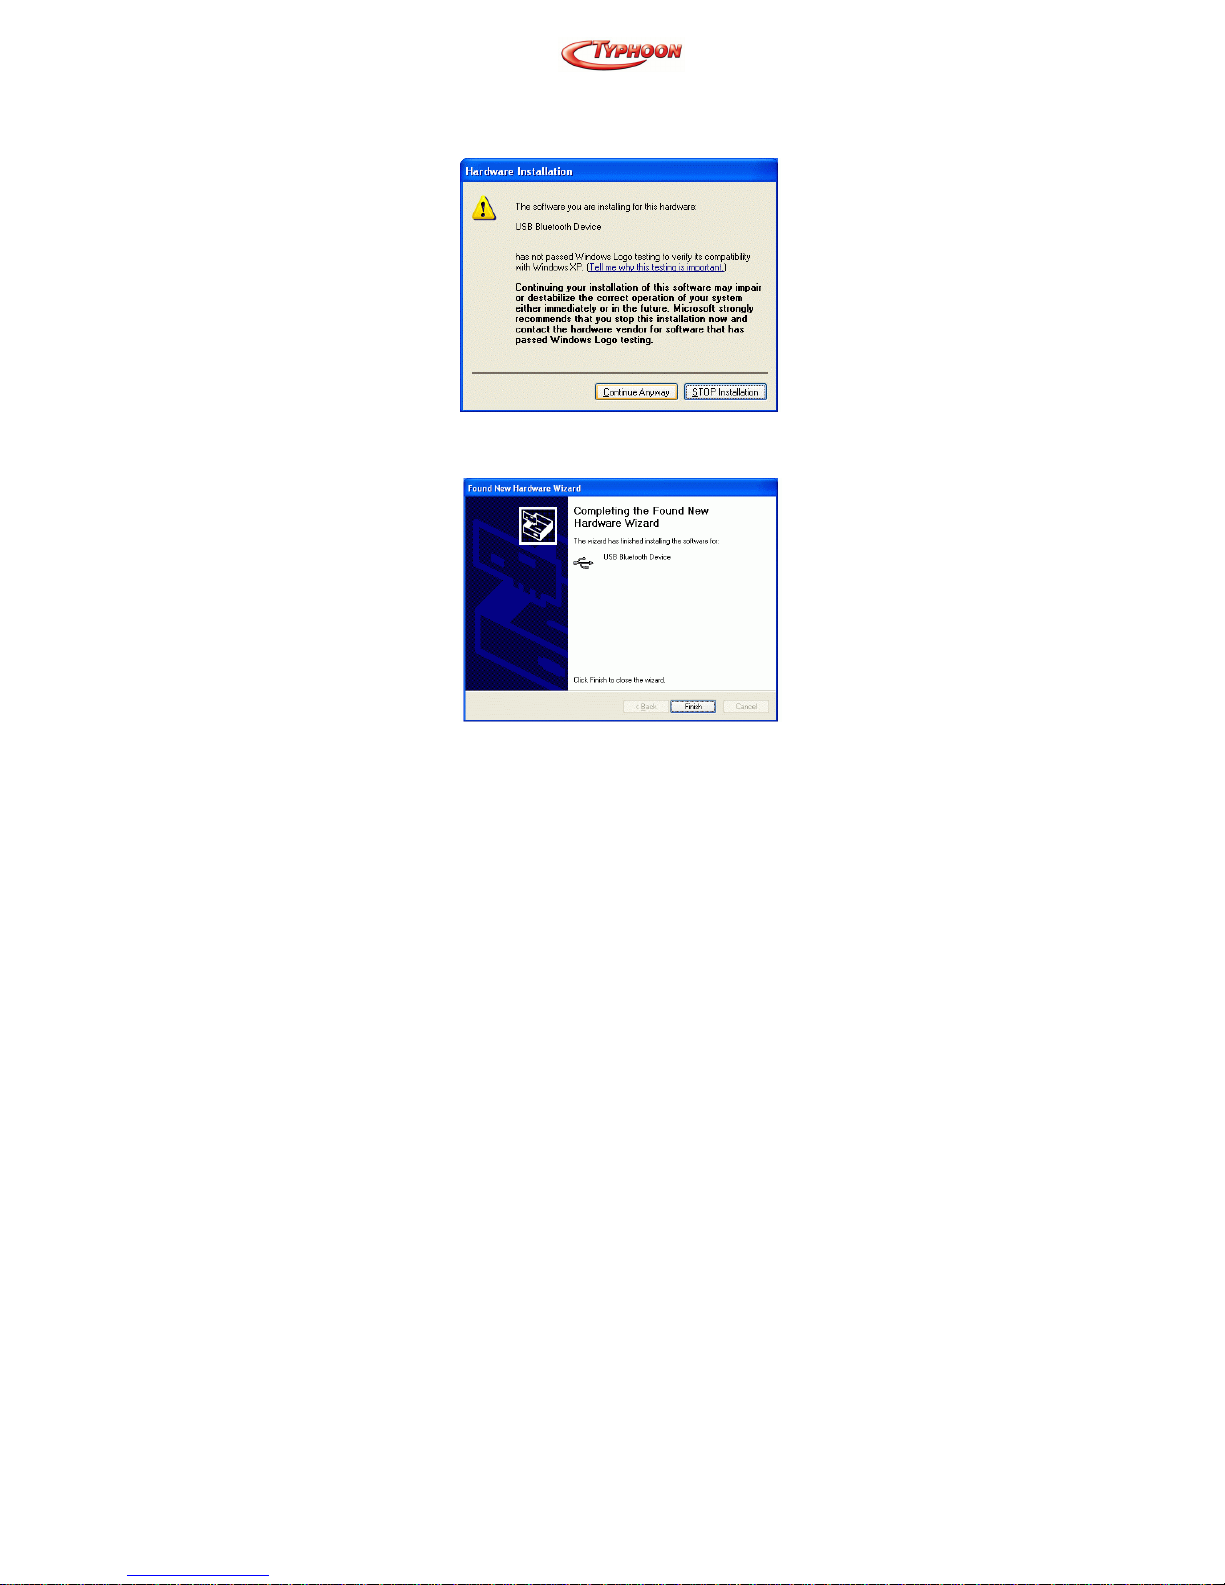
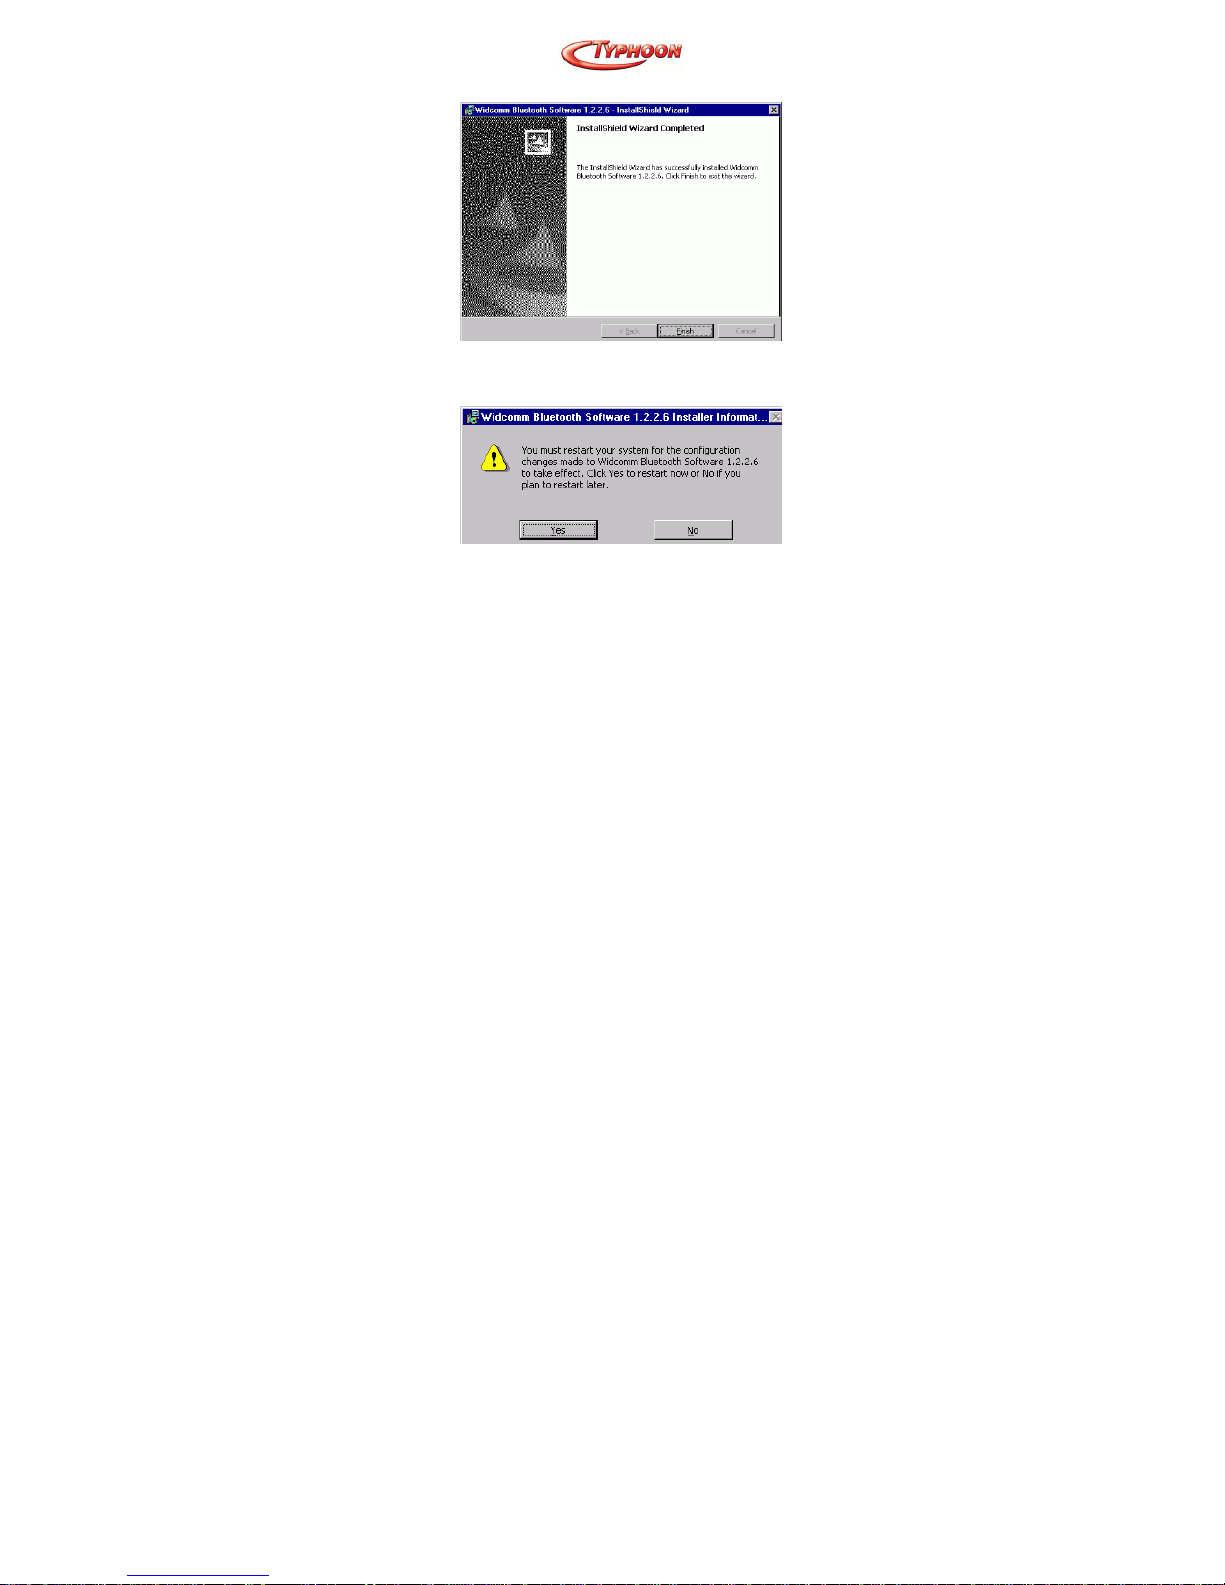
8. When finished, click Finish to end the
Installation Wizard.
Page 12

Article Number: #20001
Version 1.0 Specifications and procedures subject to changes without prior notificat ion
- 5 -
9. Remember to restart your computer to have the
new configuration take effect.
SOFTWARE UN-INSTALLATION
1. In Windows, go to Start →Settings→ Control
Panel→ Add or Remove Programs.
2. Select Widcomm Bluetooth Software… and
click the Remove button.
Page 13
Article Number: #20001
Version 1.0 Specifications and procedures subject to changes without prior notificat ion
- 6 -
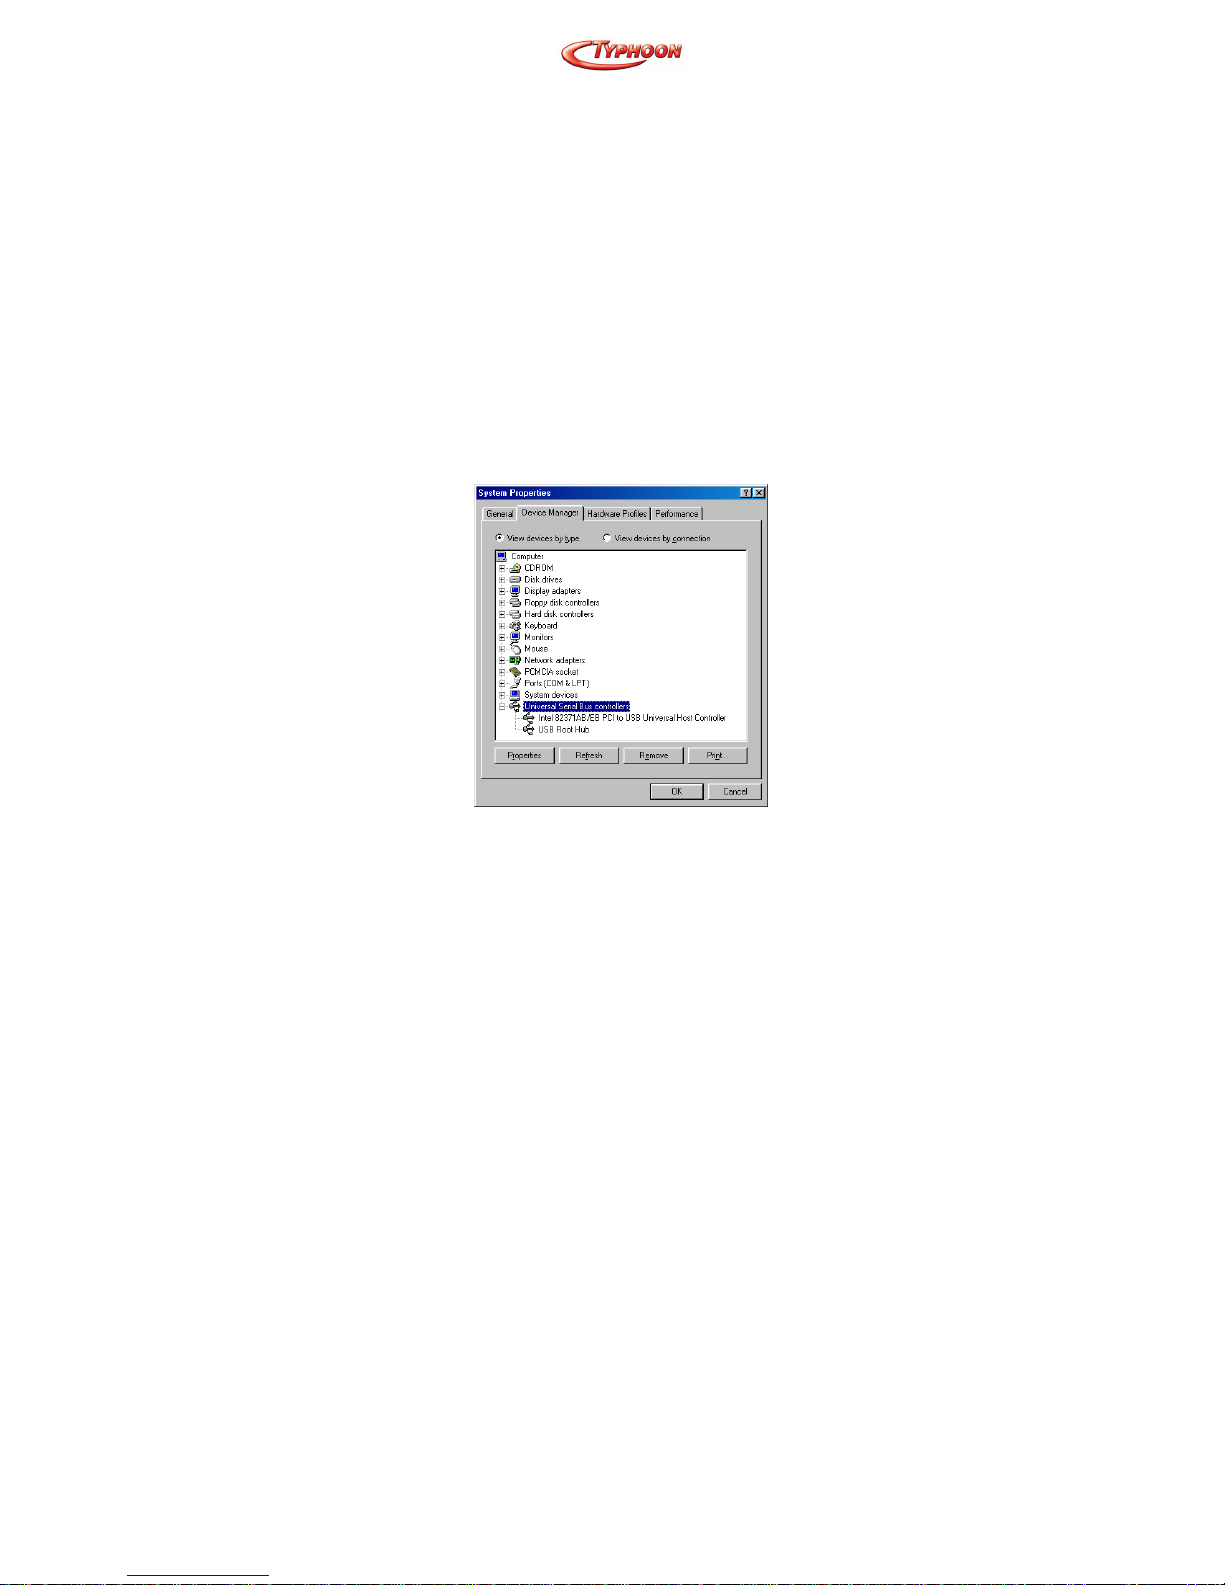
HARDWARE INSTALLATION
Note: The hardware installation should be only
performed when the software is well installed.
Precaution
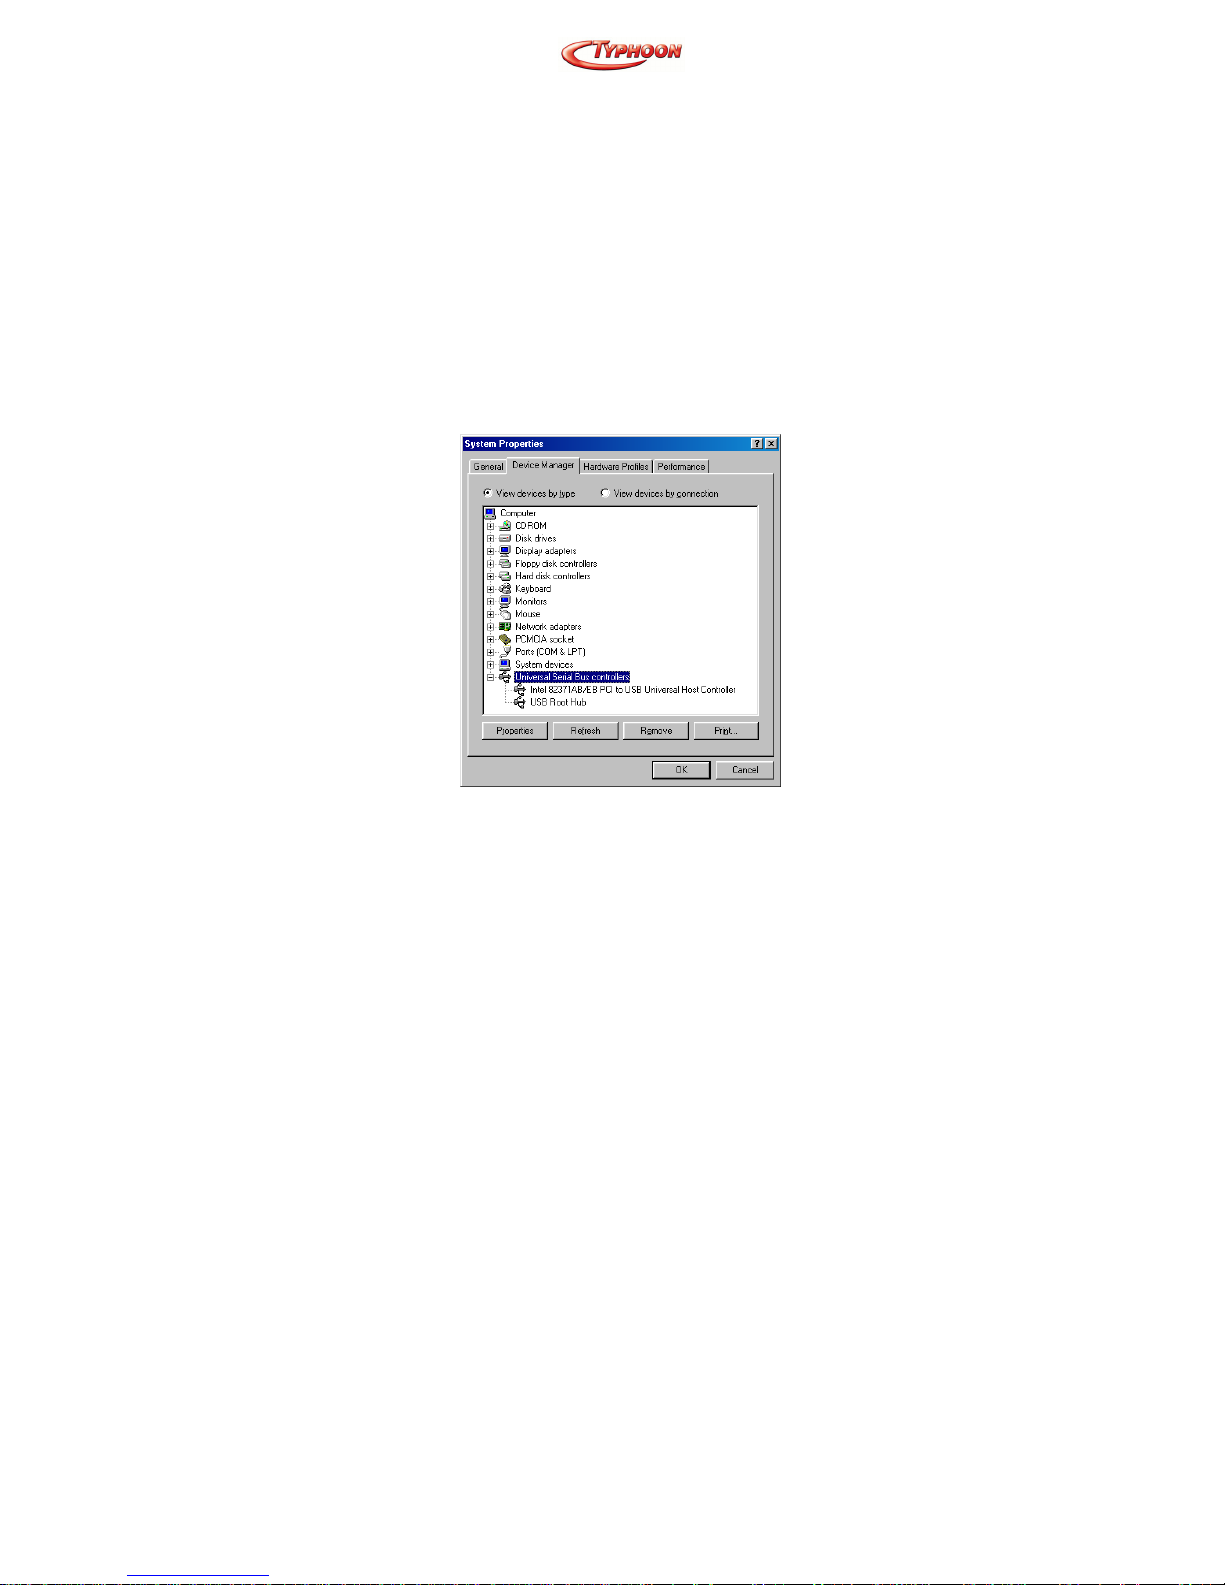
Before the installation, make sure the USB port
exists in your computer and is enabled. To check this,
go to My Computer
Æ
Control Panel ÆSystem.
Open the Device Manager tab. If the Universal
Serial Bus controller device is found, it means your
USB port is installed and enabled. If not, either no
USB port is installed or the USB BIOS is not
properly enabled. In this case, consult your computer
dealer for USB support.
Page 14
Article Number: #20001
Version 1.0 Specifications and procedures subject to changes without prior notificat ion
- 7 -
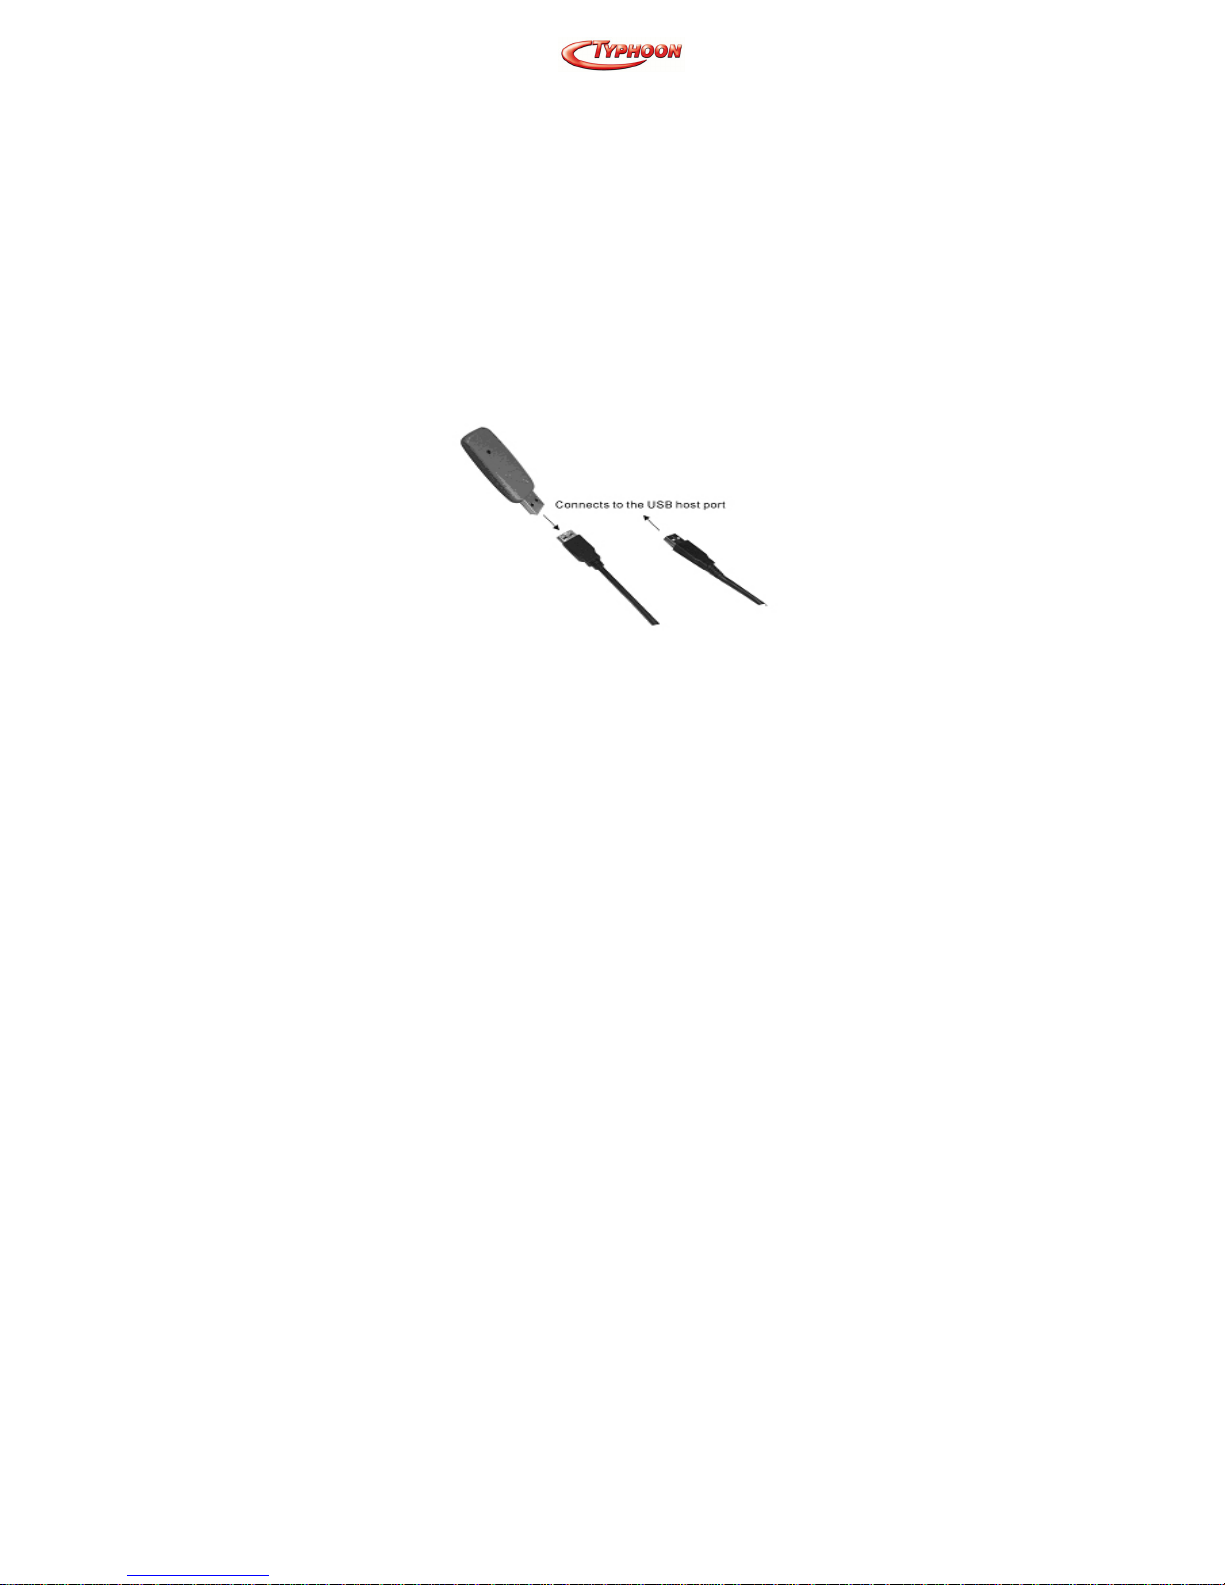
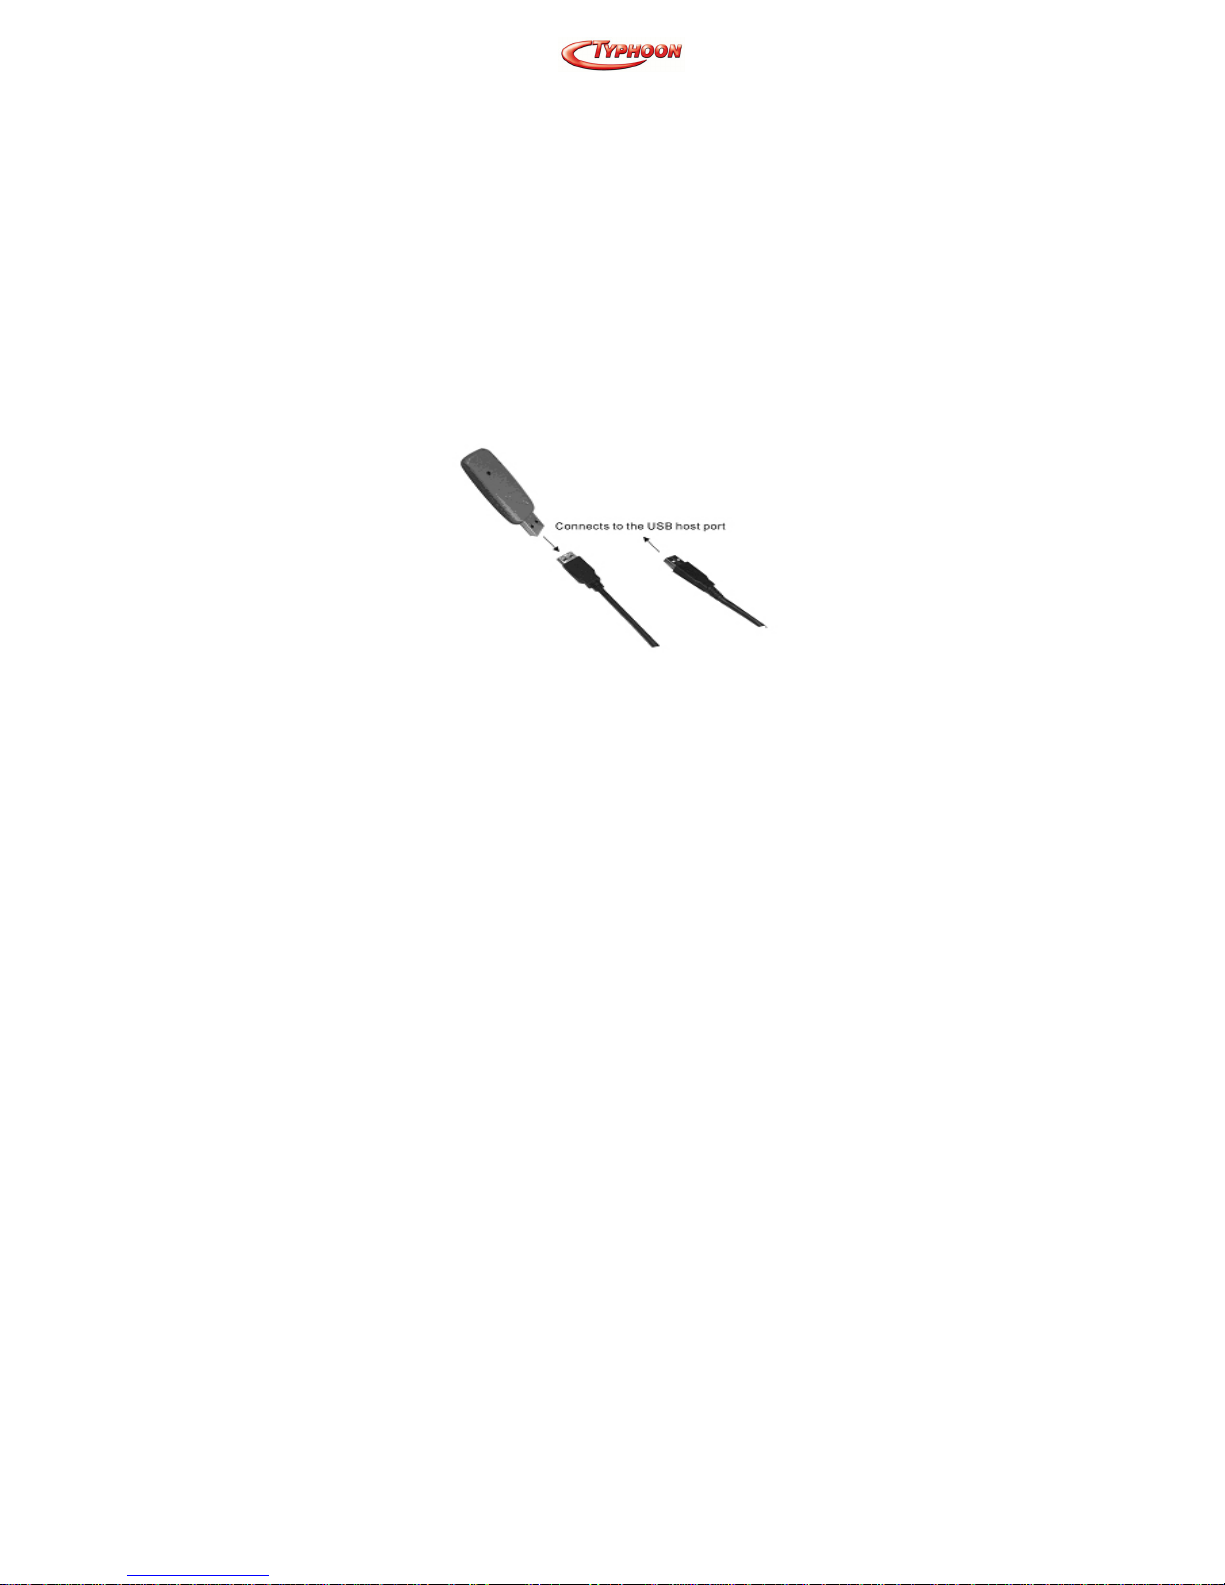
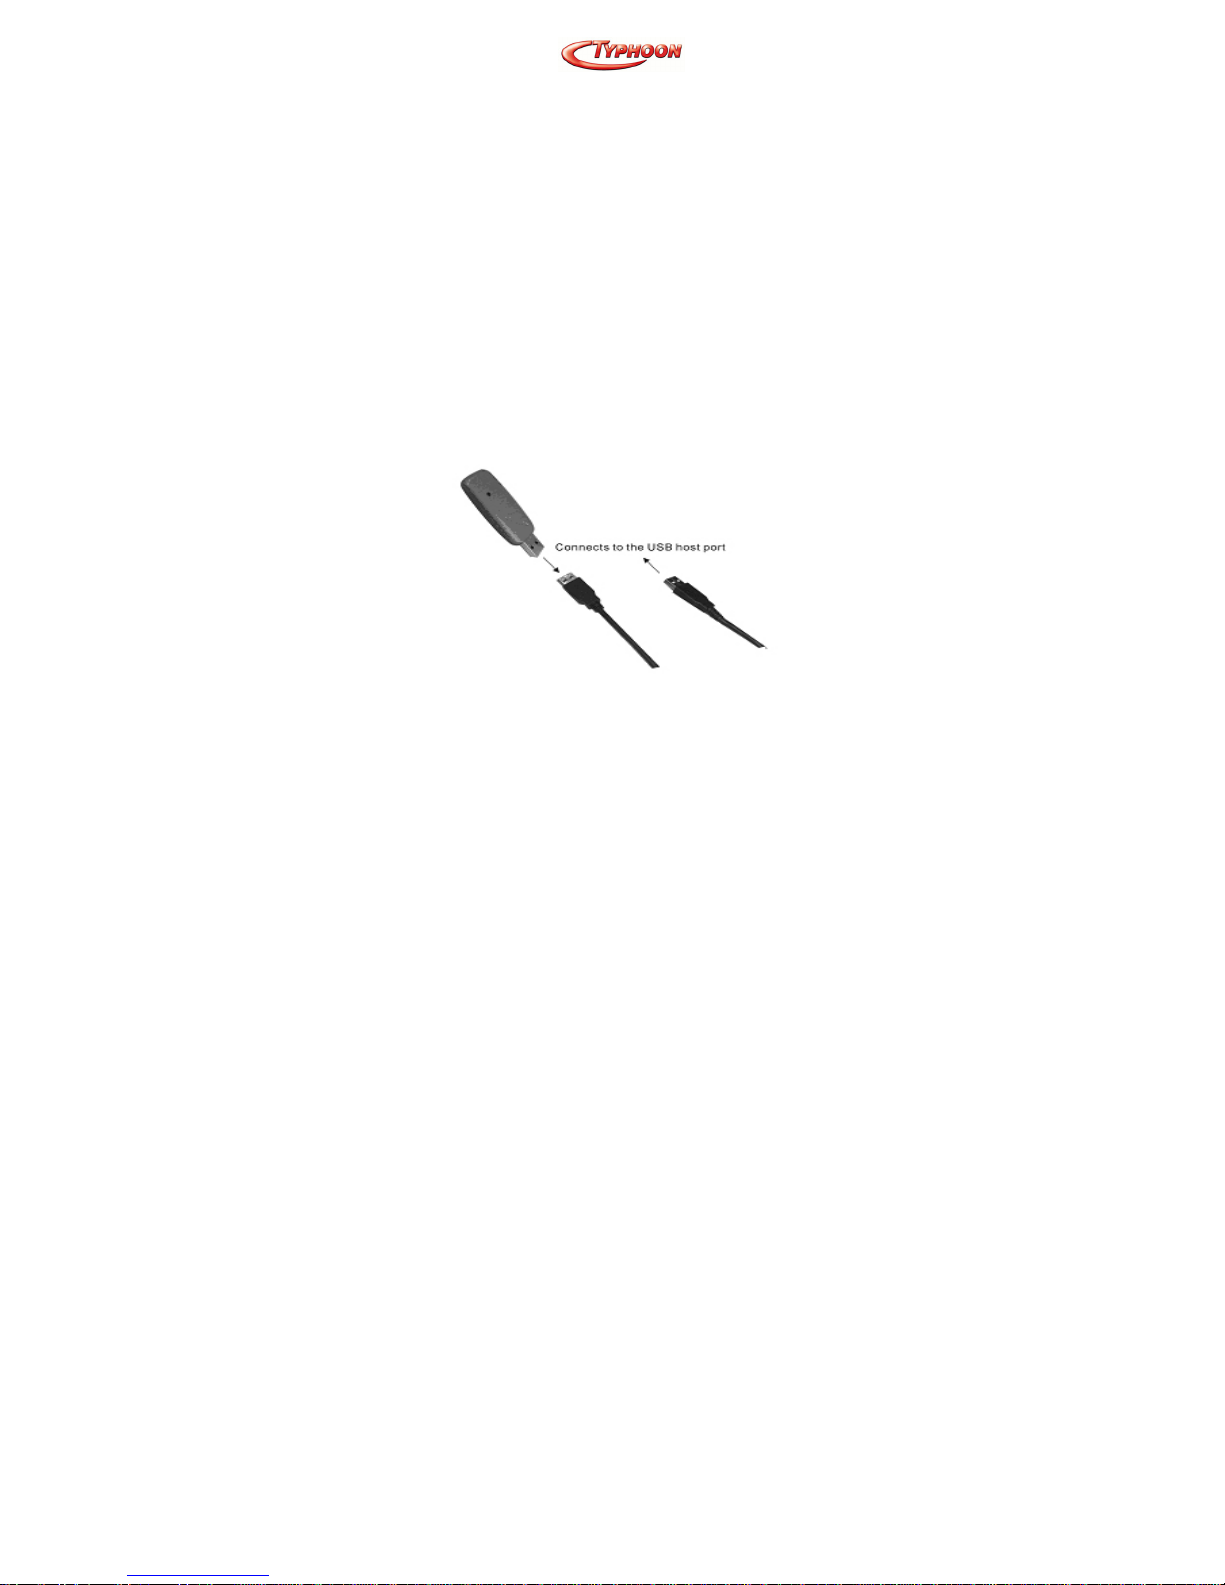
Getting Hooked Up
1. If the device is connected to the USB port on a
desktop computer, use the included USB
adapter cable to connect your Bluetooth
TM
USB
Adapter with your computer.
2. Firstly, you have to locate the USB host port of
your system. Align the USB connector (the
thinner end) of the USB adapter toward the
USB host port, push evenly and steadily until it
is seated.
3. Plug your Bluetooth
TM
USB Adapter into the
thicker end of the USB adapter cable.
4. As soon as the device is properly plugged to
your computer, Windows will automatically
detect the device and prompt the following
message. Select “Install the software
automatically (Recommended)” And press
Next to continue.
Page 15
Article Number: #20001
Version 1.0 Specifications and procedures subject to changes without prior notificat ion
- 8 -
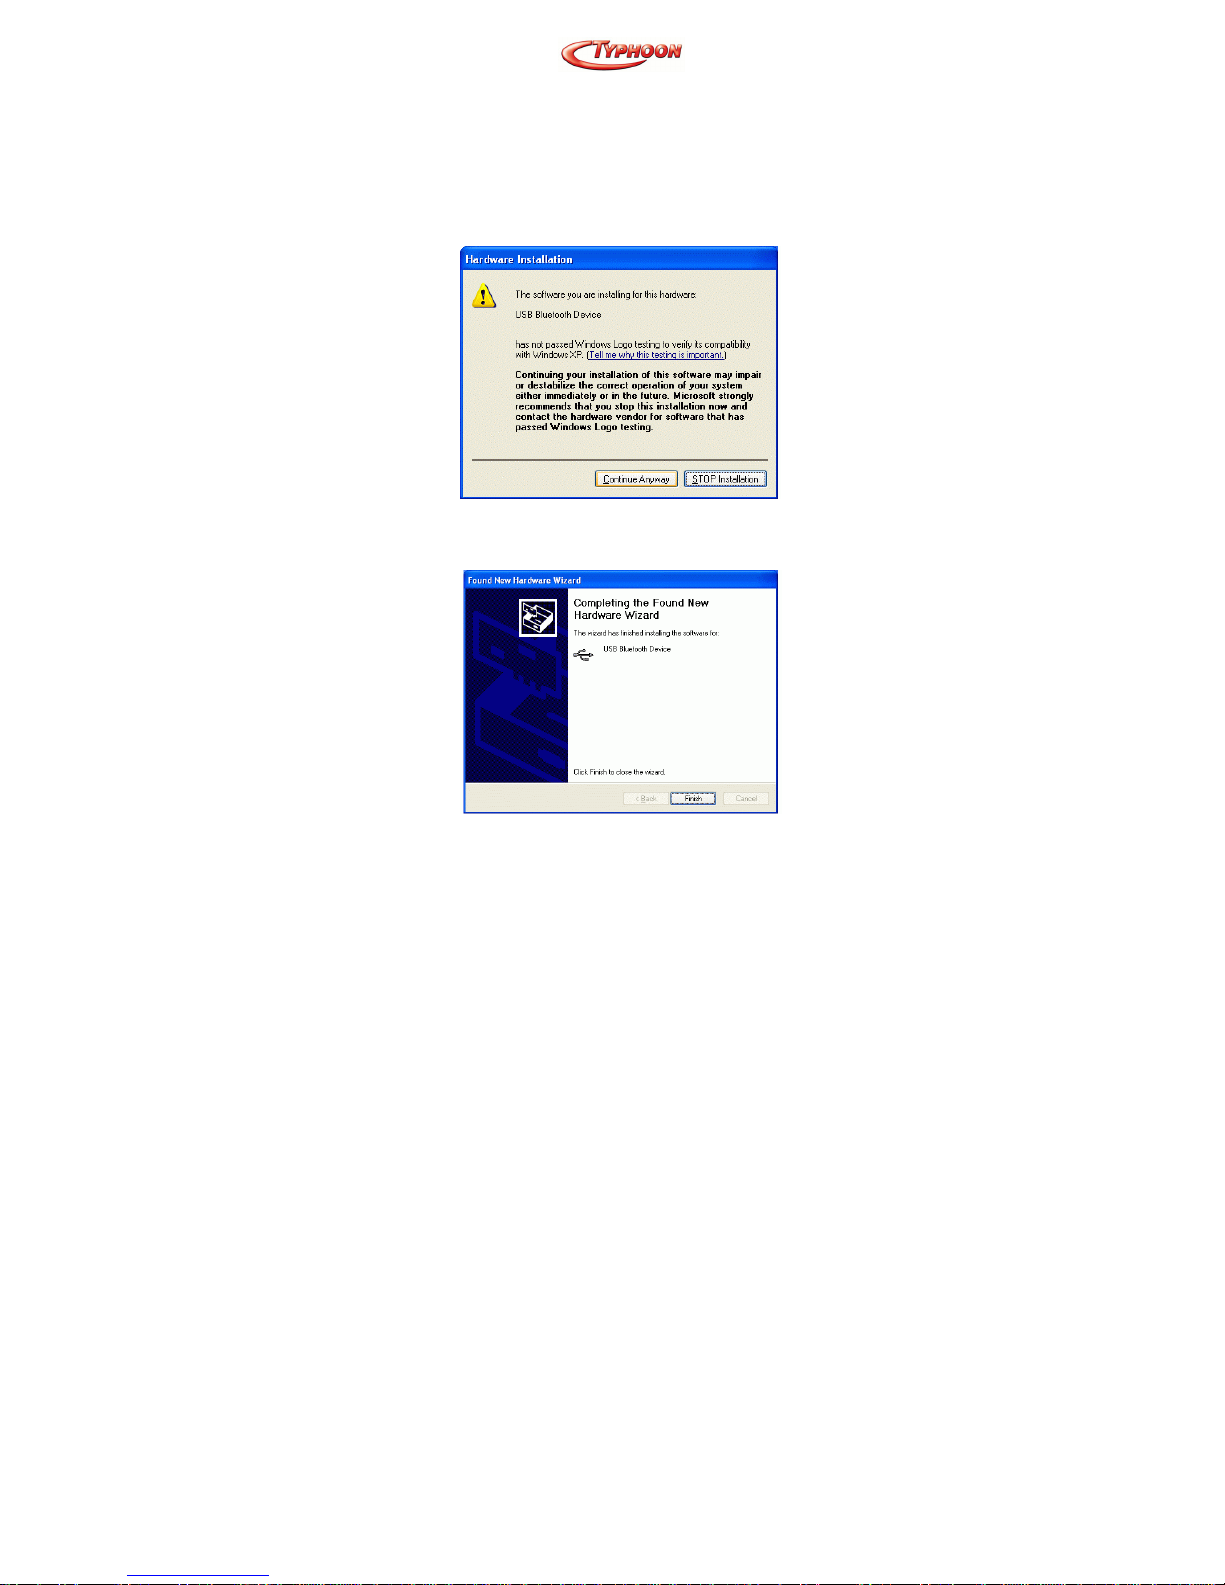
5. Select “Continue Anyway” with the following
message.
6. Press Finish to complete the hardware
installation.
Page 16
Article Number: #20001
Version 1.0 Specifications and procedures subject to changes without prior notificat ion
- 9 -
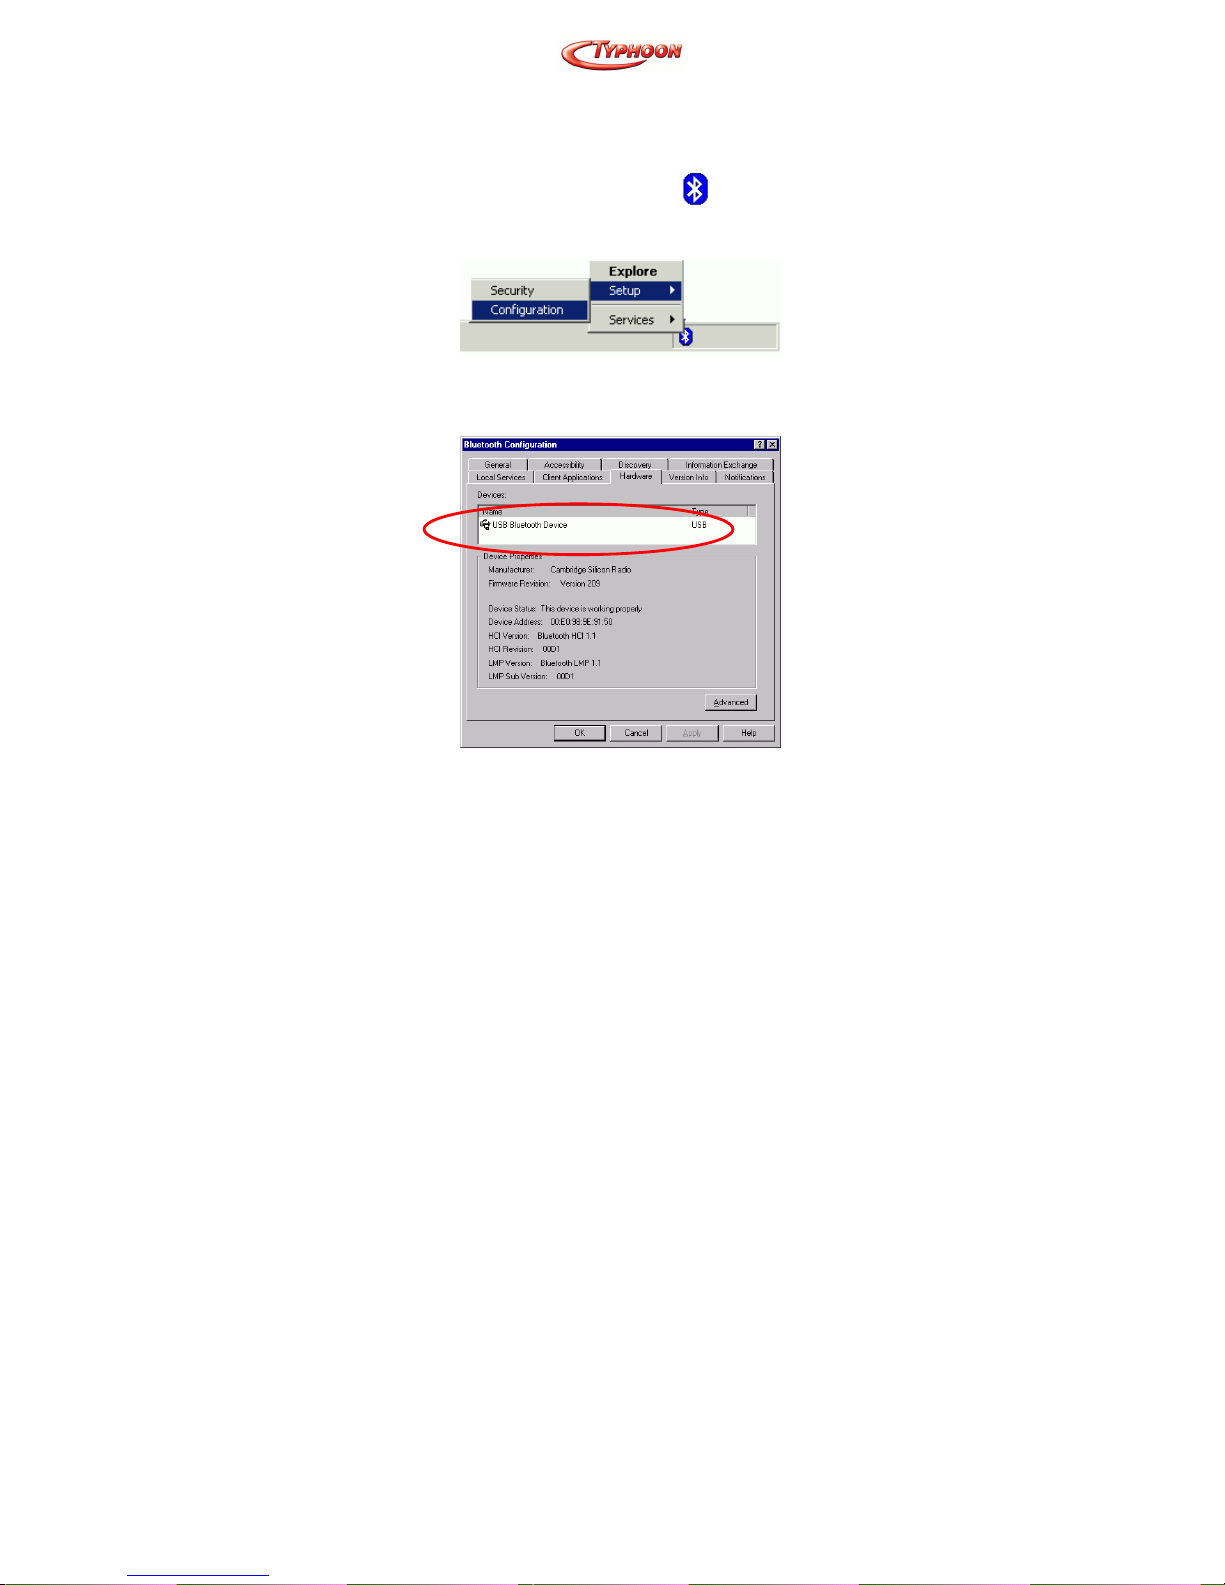
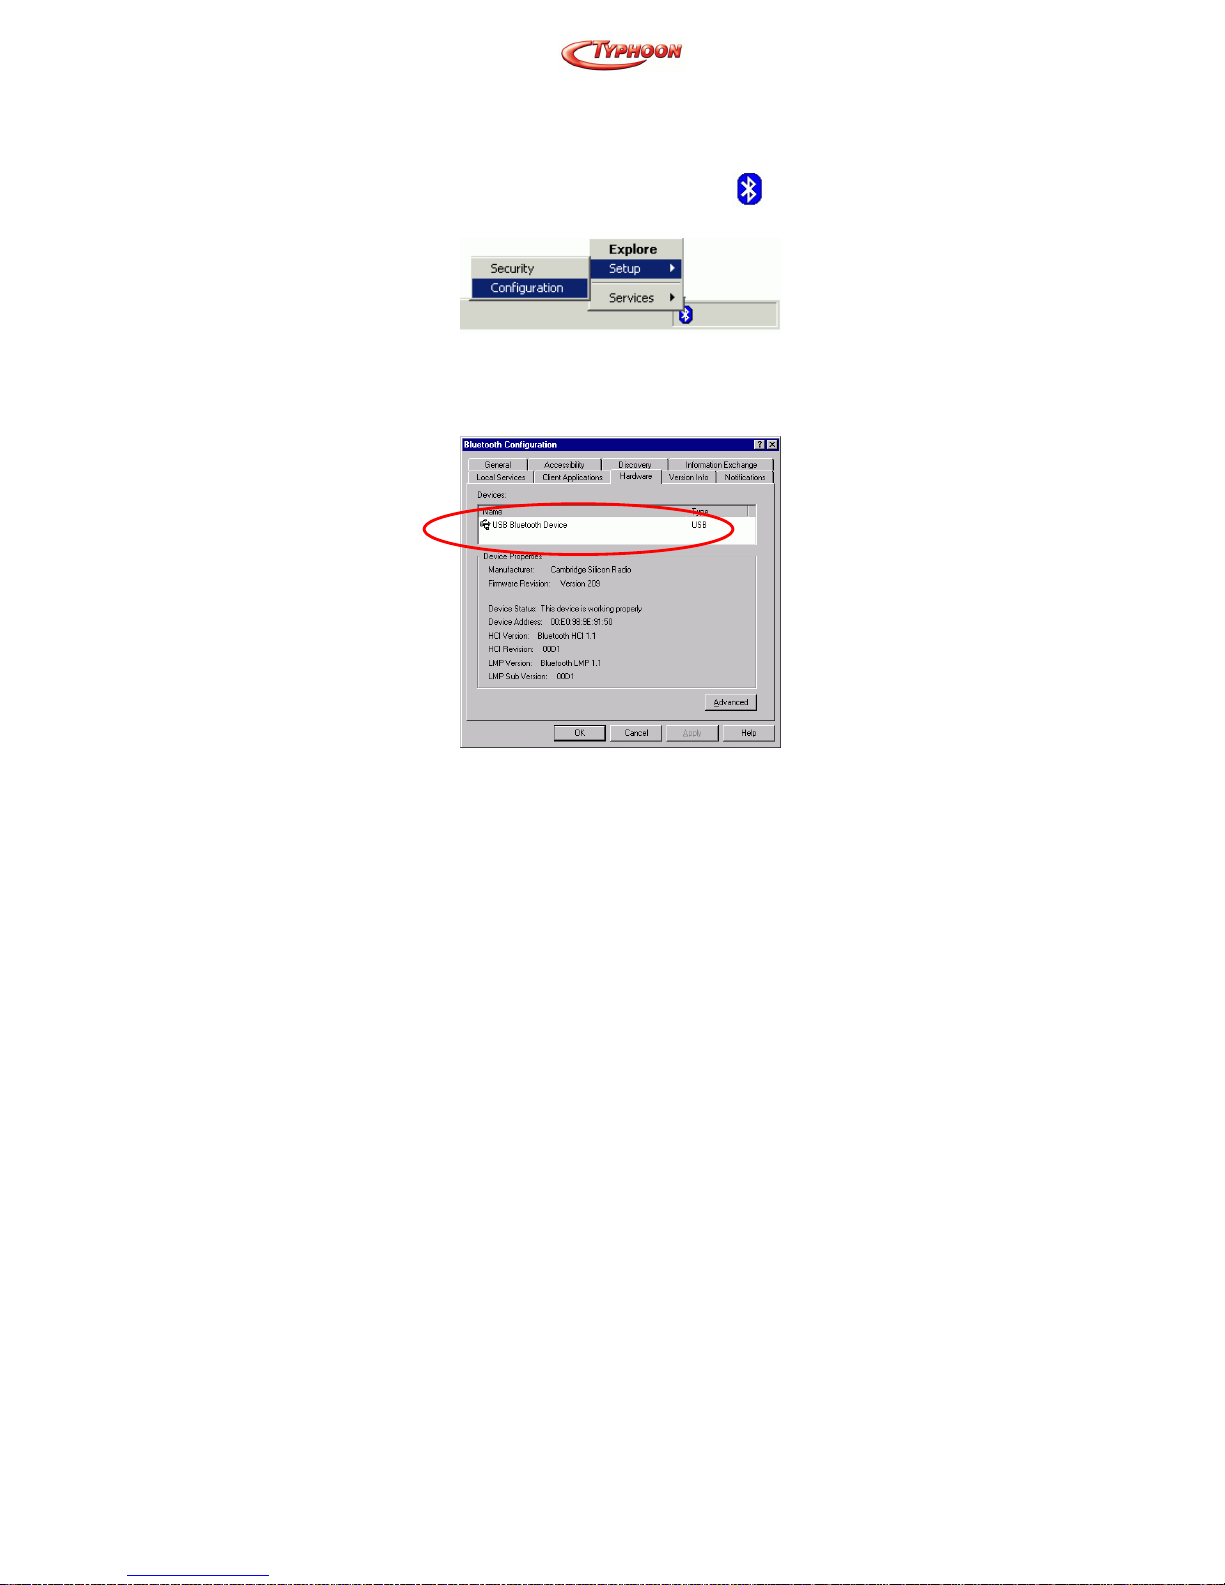
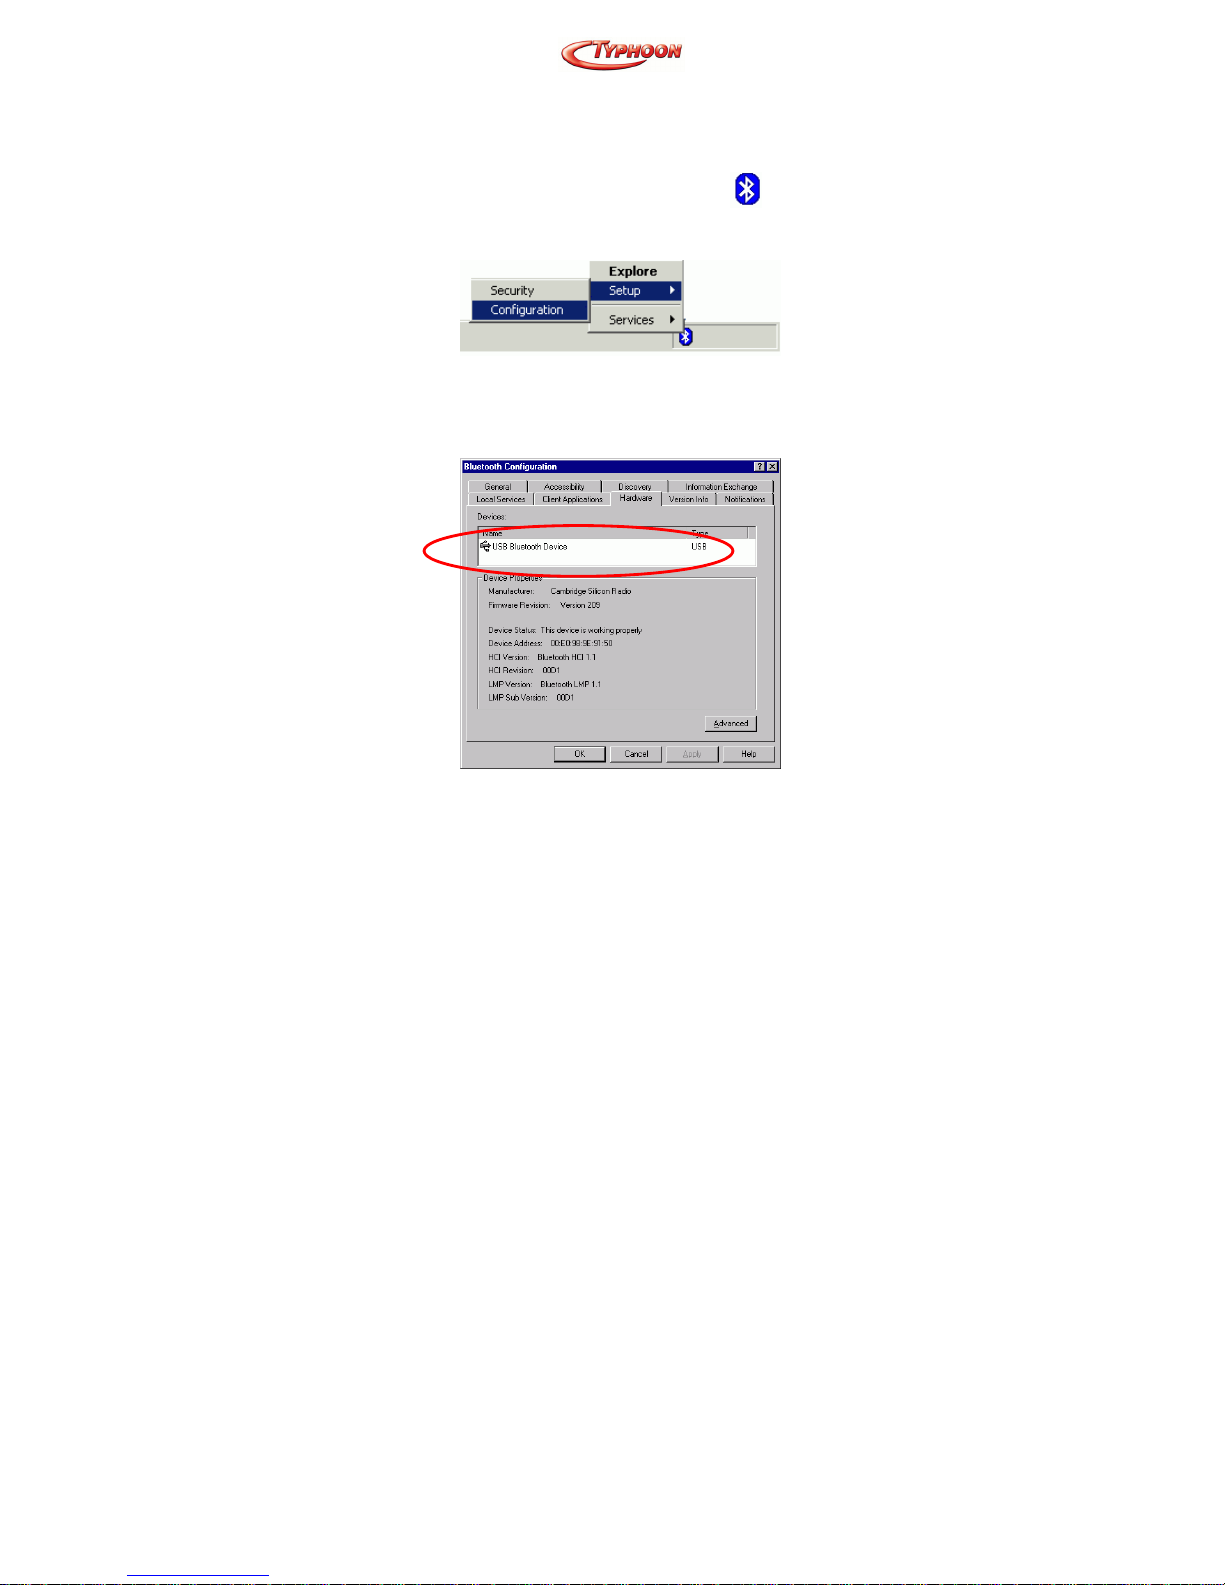
SETUP DIAGNOSTICS
Once the software is well installed, your computer
should prompt a Bluetooth icon
on the bottom
right corner. You may right click to set up the
configuration.
Select Hardware. Check if USB Bluetooth device is
on the devices list as below. If yes, it means your
Bluetooth USB Adapter is well installed.
Page 17

Article Number: #20001
Version 1.0 Specifications and procedures subject to changes without prior notificat ion
- 10 -
GERMAN
SOFTWARE-INSTALLATION
Beachten: Die BTW-Software (Version 1.2.2.6 oder
höher) sollte vor der Hardware-Installation
ordentlich installiert werden.
Beginnen Sie hier
Sobald die Installations-CD in das CD-ROMLaufwerk des Computers eingelegt wird, führt Sie
die Auto-Run-Funktion automatisch zum Beginn der
Software-Installation. Falls die Auto-Run-Funktion
nicht ausführbar ist, öffnen Sie die Installations-CD,
um die Datei „setup.exe” zu finden und klicken Sie
zur Fortsetzung zweimal auf das „setup“-Symbol.
Beachten: Bevor Sie eine aktuellere SoftwareVersion installieren, deinstallieren Sie jede vorherige
Version, die noch auf Ihrem Computer vorhanden ist.
Einzelheiten der Deinstallation entnehmen Sie bitte
dem späteren Abschnitt „Software-Deinstallation“.
Für Windows 98(SE)/ME/2000/XP
1. Auf dem Willkommen-Schirm klicken Sie auf
die Schaltfläche Next (Weiter).
Page 18

Article Number: #20001
Version 1.0 Specifications and procedures subject to changes without prior notificat ion
- 11 -
2. Wenn der Schirm Lizenzabkommen gezeigt wird,
lesen Sie das Lizenzabkommen, wählen Sie
dann links die Optionsschaltfläche „I accept the
terms in the license agreement“ (Ich nehme die
Bedingungen des Lizenzabkommens an) und
klicken Sie auf die Schaltfläche Next (Weiter).
3. Auf dem Schirm Geräte-Information, geben Sie
die verlangte Information ein:
Page 19
Article Number: #20001
Version 1.0 Specifications and procedures subject to changes without prior notificat ion
- 12 -
Device Name (Gerätename)—von anderen
Bluetooth-fähigen Geräten, die innerhalb des
Funkbereiches nach Geräten suchen, wird dieser
vom Benutzer konfigurierte Gerätename erkannt.
Nach dem Installations-Verfahren kann der Name
über das BTW-Konfigurationsfeld geändert
werden.
Device Type (Gerätetyp)—klicken sie auf den
Abwärtspfeil und wählen Sie in der
Dropdown-Liste Desktop (Desktop) oder Laptop
(Laptop). Nach dem Installationsverfahren kann
der Gerätetyp über das BTW-Konfigurationsfeld
geändert werden.
Klicken Sie auf die Schaltfläche Next (Weiter).
4. Klicken Sie auf dem Schirm Zielordner auf die
Schaltfläche Change (Wechsel), um zu einem
neuen Zielordner zu browsen. Anderenfalls
klicken Sie auf die Schaltfläche Next (Weiter),
um den Standard-Ordner anzunehmen.
Page 20
Article Number: #20001
Version 1.0 Specifications and procedures subject to changes without prior notificat ion
- 13 -
5. Der InstallShield Wizard ist zum Installieren der
BTW-Software bereit. Falls Sie irgendwelche
Einstellungen durchsehen oder ändern wollen,
klicken Sie auf die Schaltfläche Back (Zurück).
Klicken Sie auf die Schaltfläche Cancel
(Abbrechen), um den Wizard zu verlassen.
Anderenfalls klicken Sie auf die Schaltfläche
Install (Installieren).
6. Bei der folgenden Nachricht klicken Sie OK
(nur bei der Installation auf Windows 2000/XP).
Page 21
Article Number: #20001
Version 1.0 Specifications and procedures subject to changes without prior notificat ion
- 14 -
7. Der Schirm Bluetooth-Software installieren zeigt
den Installations-Fortgang. Wenn Sie
aufgefordert werden, die Windows-CD
einzulegen, tun Sie dies und folgen Sie den
Anweisungen auf dem Bildschirm.
8. Nach Beendigung klicken Sie Finish (Ende), um
die Wizard-Installation zu beenden.
9. Denken Sie daran, Ihren Computer neu zu
starten, damit die neue Konfiguration wirksam
wird.
Page 22

Article Number: #20001
Version 1.0 Specifications and procedures subject to changes without prior notificat ion
- 15 -
SOFTWARE-DEINSTALLATION
1. Gehen Sie unter Windows zu Start →Settings
(Einstellungen)→ Control Panel
(Systemsteuerung)→ Add or Remove
Programs (Software).
2. Wählen Sie die Widcomm-Bluetooth-
Software… und klicken Sie auf die Schaltfläche
Remove (Entfernen).
Page 23

Article Number: #20001
Version 1.0 Specifications and procedures subject to changes without prior notificat ion
- 16 -
HARDWARE-INSTALLATION
Beachten: Die Hardware-Installation sollte nur
vorgenommen werden, wenn die Software
ordentlich installiert ist.
Vorsicht
Stellen Sie vor der Installation sicher, dass der USBPort in Ihrem Computer vorhanden und freigegeben
ist. Um dies zu prüfen, gehen Sie zu My Computer
(Arbeitsplatz)
Æ
Control Panel (Systemsteuerung)
Æ
System (System). Öffnen Sie den Geräte-Manager.
Wenn der Universal Serial Bus controller (USBTreiber) gefunden wird, bedeutet dies, dass Ihr USBPort installiert und freigegeben ist. Anderenfalls ist
entweder kein USB-Port installiert oder das USBBIOS ist nicht aktiviert. Ziehen Sie in diesem Fall
Ihren Computer-Händler zwecks USB-Unterstützung
zu Rate.
Page 24

Article Number: #20001
Version 1.0 Specifications and procedures subject to changes without prior notificat ion
- 17 -
Erste Verbindung
1. Falls das Gerät an den USB-Port eines Desktop-
Computers angeschlossen wird, benutzen Sie das
beigefügte USB-Adapter-Kabel, um Ihren
Bluetooth
TM
–USB-Adapter mit Ihrem Computer
zu verbinden.
2. Zuerst müssen Sie den USB-Host-Port Ihres
Systems ausfindig machen. Richten Sie den
USB-Stecker (das dünnere Ende) des USBAdapters auf den USB-Host-Port aus, drücken
Sie bestimmt und ständig, bis er einrastet.
3. Stecken Sie Ihren Bluetooth
TM
USB-Adapter in
das dickere Ende des USB-Adapter-Kabels.
4. Sobald das Gerät richtig in Ihren Computer
eingesteckt ist, erkennt Windows automatisch
das Gerät und fordert die nächste Meldung auf.
Wählen Sie „Install the software
automatically“ (Recommended) (Software
Page 25

Article Number: #20001
Version 1.0 Specifications and procedures subject to changes without prior notificat ion
- 18 -
automatisch installieren (Empfohlen)) und
drücken Sie Next (Weiter) zur Fortsetzung.
5. Wählen Sie „Continue Anyway“ (Trotzdem
fortfahren) bei der nächsten Nachricht.
6. Drücken Sie Finish (Ende), um die Hardware-
Installation zu vervollständigen.
Page 26
Article Number: #20001
Version 1.0 Specifications and procedures subject to changes without prior notificat ion
- 19 -
SETUP-DIAGNOSE
Sobald die Software ordentlich installiert ist, sollte
Ihr Computer ein Bluetooth-Symbol
in der
rechten unteren Ecke anzeigen.
Wählen Sie die Hardware. Prüfen Sie, ob das
Bluetooth-Gerät in der Geräteliste so wie unten
erscheint. Falls ja, bedeutet dies, dass Ihr BluetoothUSB-Adapter korrekt installiert ist.
Page 27

Article Number: #20001
Version 1.0 Specifications and procedures subject to changes without prior notificat ion
- 20 -
SPANISH
INSTALACIÓN DEL SOFTWARE
Nota: El software BTW (Versión 1.2.2.6 o superior)
debe instalarse previamente a la instalación del
hardware.
Inicio
Una vez que se ha insertado el CD en la lectora de
CD-ROM de la computadora, la función Auto-Run
(ejecución automática) lo guiará automáticamente
para comenzar la instalación del software. Si la
función Auto-Run no pudiera emplearse, no obstante
se puede abrir el CD de instalación hasta encontrar el
archivo “setup.exe” y hacer doble clic en el icono de
“setup” (instalación) para continuar.
Nota: Antes de instalar una versión actualizada del
software, asegúrese de desinstalar cualquier versión
previa, que haya en su computadora. Para mayores
detalles acerca del procedimiento de desinstalación
consulte la sección posterior titulada
“Desinstalación del software”.
Para Windows 98(SE)/ME/2000/XP
1. En la pantalla de Welcome (Bienvenido), haga
clic en el botón Next (Continuar).
Page 28

Article Number: #20001
Version 1.0 Specifications and procedures subject to changes without prior notificat ion
- 21 -
2. Cuando aparezca la pantalla de License
Agreement (Acuerdo sobre licencia), lea el
Acuerdo sobre Licencia, luego haga clic en el
botón de opción de la izquierda que indica “I
accept the terms in the license agreement”
(“Acepto los términos del acuerdo sobre
licencia”) y haga clic en el botón Next
(Continuar).
Page 29
Article Number: #20001
Version 1.0 Specifications and procedures subject to changes without prior notificat ion
- 22 -
3. En la pantalla de Device Information
(Información del equipo), ingrese la siguiente
información:
Device Name (Nombre del equipo)—otros
equipos compatibles con Bluetooth, verán este
nombre de equipo, configurado según el usuario,
al buscar equipos dentro del rango radial.
El nombre puede cambiarse a través del Panel de
Configuración BTW luego del proceso de
instalación.
Device Type (Tipo de equipo)— haga clic en la
flecha que apunta hacia abajo y elija Desktop
(PC) o Laptop (Computadora de mano) de
la lista desplegable. El tipo de equipo puede
cambiarse a través del Panel de Configuración
BTW luego del proceso de instalación.
Haga clic en el botón Next (Continuar).
Page 30
Article Number: #20001
Version 1.0 Specifications and procedures subject to changes without prior notificat ion
- 23 -
4. En la pantalla de Destination Folder (Carpeta de
destino), haga clic en el botón Change
(Cambiar) para examinar una nueva carpeta de
destino para el software BTW. De lo contrario,
haga clic en el botón Next (Continuar) para
aceptar la carpeta preestablecida.
5. El InstallShield Wizard (Asistente de
InstallShield) ya está listo para instalar el
software BTW. Si necesita revisar o cambiar
alguno de los parámetros, haga clic en el botón
Back (Atrás). Haga clic en el botón Cancel
(Cancelar) para abandonar el Asistente. De lo
contrario, haga clic en el botón Install
(Instalar)
Page 31
Article Number: #20001
Version 1.0 Specifications and procedures subject to changes without prior notificat ion
- 24 -
6. Haga clic en OK en el siguiente mensaje (sólo
para la instalación de Windows 2000/XP).
7. La pantalla Installing Bluetooth Software
(Instalando el software Bluetooth) muestra el
progreso en la instalación. Introduzca el CD de
Windows si es solicitado, y siga las
instrucciones en pantalla.
8. Una vez concluido, haga clic en Finish
(Finalizar) para finalizar el Asistente de
Instalación.
Page 32
Article Number: #20001
Version 1.0 Specifications and procedures subject to changes without prior notificat ion
- 25 -
9. Recuerde reiniciar su computadora para que la
nueva configuración tenga efecto.
DESINSTALACIÓN DEL SOFTWARE
1. En Windows, ir a Start →Settings→ Control
Panel→ Add or Remove Programs. (Inicio
→Configuración→ Panel de control→
Agregar o quitar programas).
2. Seleccione Windcomm Bluetooth Software… y
haga clic en el botón de Remove (Quitar).
Page 33

Article Number: #20001
Version 1.0 Specifications and procedures subject to changes without prior notificat ion
- 26 -
INSTALACIÓN DEL HARDWARE
Nota: La instalación del hardware sólo debe
realizarse cuando el software está instalado
correctamente.
Precauciones
Antes de la instalación, asegúrese de que haya un
puerto USB en su computadora y que esté activado.
Para verificar esto vaya a My Computer
Æ
Control
Panel
Æ
System. (My PCÆPanel de control
Æ
Sistema) Abra la solapa del Device Manager
(Administrador del equipo). Si se encuentra el
equipo del Universal Serial Bus controller
(controlador del Bus Serial Universal), significa que
su puerto USB está instalado y activado. De lo
contrario, no se ha instalado un puerto USB o el bios
del USB no está activado correctamente. En este
caso, consulte con su proveedor de computación
para tener asistencia sobre el USB.
Page 34
Article Number: #20001
Version 1.0 Specifications and procedures subject to changes without prior notificat ion
- 27 -
Conectándose
1. Si el equipo está conectado al puerto USB en
una PC, utilice el cable adaptador incluido USB
para conectar el Bluetooth
TM
USB Adapter
(Adaptador de USB Bluetooth
TM
) a su
computadora.
2. En primer lugar, ubique el puerto host USB de
su sistema. Alinee el conector USB (el extremo
más fino) del adaptador USB con el puerto de
host USB, presione en forma pareja y sostenida
hasta que quede firme.
3. Conecte su adaptador de USB Bluetooth
TM
al
extremo más grueso del cable adaptador USB.
4. Ni bien el equipo se encuentre conectado
correctamente a su computadora, Windows
detectará automáticamente el equipo y enviará el
siguiente mensaje. Seleccione “Install the
software automatically
(Recommended)”(“Instale el software
Page 35

Article Number: #20001
Version 1.0 Specifications and procedures subject to changes without prior notificat ion
- 28 -
automáticamente (Recomendado)” Y luego
presione Next (Continuar) para continuar.
5. Seleccione “Continue Anyway” (Continuar
igual) con el siguiente mensaje.
6. Presione Finish (Finalizar) para completar la
instalación del hardware.
Page 36

Article Number: #20001
Version 1.0 Specifications and procedures subject to changes without prior notificat ion
- 29 -
DIAGNÓSTICO DE CONFIGURACIÓN
Una vez que el software se ha instalado
correctamente, su computadora debe mostrar el ícono
de Bluetooth
en el costado inferior derecho.
Puede hacer clic derecho para establecer la
configuración.
Seleccione el hardware. Verifique si el equipo de
USB Bluetooth está en la lista de equipos como se
muestra abajo. En caso afirmativo, significa que su
adaptador de USB Bluetooth está bien instalado.
Page 37

Article Number: #20001
Version 1.0 Specifications and procedures subject to changes without prior notificat ion
- 30 -
FRENCH
INSTALLATION DU SOFTWARE (LOGICIEL)
Note: Le Logiciel BTW (Version 1.2.2.6 ou plus)
doit être installé avant l'installation du hardware
(matériel) .
Commencez ici
Une fois que le CD d’installation est inséré dans le
dispositif d’entraînement CD-ROM, la fonction
Auto-Run vous guidera automatiquement pour
commencer l'installation du software (logiciel). Si la
fonction Auto-Run n’est pas à même d’opérer,
ouvrez cependant le CD d’installation pour trouver
l'archive “setup.exe” (montage) et cliquez deux fois
sur l'icône “setup” pour continuer.
Note: Avant d’installer une version améliorée du
software (logiciel), assurez-vous de désinstaller la
version préalable, qui existe déjà dans l'ordinateur.
Pour les détails de la désinstallation consulter la
section intitulée “Software Un-installation”.
Pour Windows 98(SE)/ME/2000/XP
1. Sur l'écran Welcome , cliquez le bouton Next
(prochain)
Page 38

Article Number: #20001
Version 1.0 Specifications and procedures subject to changes without prior notificat ion
- 31 -
2. Lorsque les mots License Agreement (accord
de licence) sont visibles, lisez cet accord de
licence, après cliquez le bouton radio vers la
gauche, vous verrez le texte suivant “J’accepte
les termes de l’accord de licence » et vous devez
cliquer le bouton Next
3. Sur l'écran Device Information(information sur
les dispositifs), rentrez l'information demandée:
Page 39

Article Number: #20001
Version 1.0 Specifications and procedures subject to changes without prior notificat ion
- 32 -
Dispositif Nom—autres dispositifs “Bluetooth”
permis, lorsque vous poserez des questions sur
les dispositifs de la gamme radio, vous verrez ce
nom de dispositif configuré.
Le nom peut être changé après le procédé
d’installation à travers le panneau de
configuration BTW .
Type de dispositif—cliquez sur la flèche de
direction inférieure et choisissez Desktop
(ordinateur de bureau) ou Laptop (portable)
sur la liste. Le type de dispositif peut être
changé après le procédé d'installation à travers le
panneau de configuration BTW.
Cliquez sur le bouton Next
4. Sur l'écran Destination Folder (dossier de
destination), cliquez sur le bouton Change
pour examiner dans un nouveau dossier de
destination le software (logiciel) BTW.
Page 40
Article Number: #20001
Version 1.0 Specifications and procedures subject to changes without prior notificat ion
- 33 -
Autrement, cliquez sur le bouton Next pour
accepter le dossier par défaut.
5. Le cache d’installation Wizard est prêt pour
installer le software BTW. Si vous avez besoin
de réviser ou de changer des positionnements
cliquez sur le bouton Back. Cliquez sur le
bouton Cancel pour sortir de Wizard.
Autrement, cliquez sur le bouton Install
Page 41
Article Number: #20001
Version 1.0 Specifications and procedures subject to changes without prior notificat ion
- 34 -
6. Cliquez OK pour le message suivant (seulement
pour l'installation Windows 2000/XP ).
7. L'écran du logiciel d’installation Bluetooth
affiche le progrès de l’installation. Si vous êtes
pressé d’insérer le CD Windows, faites-le et
suivez les instructions affichées sur l’écran.
8. Quand vous aurez fini, cliquez sur Finish pour
conclure l’installation de Wizard.
9. Rappelez-vous de redémarrer votre ordinateur
afin de rendre effective la nouvelle configuration.
Page 42

Article Number: #20001
Version 1.0 Specifications and procedures subject to changes without prior notificat ion
- 35 -
DESINSTALLATION DU LOGICIEL
1. Dans Windows, allez à Start (Démarrage)
→Settings (Positionnement)→ Control Panel
(Panneau de contrôle) → Add or Remove
Programmes. (Ajouter ou retirer des
programmes)
2. Sélectionnez le Logiciel Windcomm Bluetooth
Sof… et cliquez sur le bouton Remove.
Page 43
Article Number: #20001
Version 1.0 Specifications and procedures subject to changes without prior notificat ion
- 36 -
INSTALLATION DU HARDWARE
(MATERIEL)
Note: L’installation du matériel doit être effectuée
seulement quand le logiciel est déjà bien installé.
Précaution
Avant de procéder à l’installation, assurez-vous que
le port USB existe dans votre ordinateur et qu’il est
en bonnes conditions. Pour vérifier cela allez à My
Computer
Æ
Control Panel ÆSystem. Ouvrez le
lecteur de gestion de dispositifs. Si vous trouvez
Universal Serial Bus controller (Contrôleur de
Canal Sériel Universel), cela veut dire que votre
port USB est installé et en bonne conditions. Si non,
le port USB n’est pas installé ou bien il n’est pas en
bonnes conditions. Dans ce cas, consultez votre
fournisseur pour obtenir un support d’ USB.
Page 44

Article Number: #20001
Version 1.0 Specifications and procedures subject to changes without prior notificat ion
- 37 -
Comment s’accrocher
1. Si le dispositif est connecté au port USB dans un
ordinateur de bureau , utiliser le câble adaptateur
d’USB inclus pour connecter l’adaptateur
Bluetooth
TM
USB à votre ordinateur.
2. Premièrement, vous devez localiser le port de
l’ordinateur central USB de votre système.
Alignez le connecteur de l’ USB (le bout le plus
mince) de l’adaptateur de l’USB vers le port de
l’ordinateur central USB, poussez fermement
jusqu’à ce qu’il soit placé.
3. Branchez votre adaptateur Bluetooth
TM
USB
dans le bout le plus gros du câble adaptateur
d’USB.
4. Dès que votre dispositif est correctement
branché à votre ordinateur, Windows va
rapidement détecter le dispositif et affichera
rapidement le message suivant. Sélectionnez
“Install the software automatically
Page 45

Article Number: #20001
Version 1.0 Specifications and procedures subject to changes without prior notificat ion
- 38 -
(Recommended)” “Installe le logiciel
automatiquement (Recommandé)” Pressez sur
Next pour continuer.
5. Sélectionnez “Continue Anyway” (continuez de
toutes façons) avec le message suivant.
6. Pressez Finish pour compléter l’installation du
matériel.
Page 46

Article Number: #20001
Version 1.0 Specifications and procedures subject to changes without prior notificat ion
- 39 -
DIAGNOSTIQUES DE MONTAGE
Une fois que le logiciel est bien installé, votre
ordinateur affichera promptement une icône
Bluetooth
à l’angle droit en bas de l’écran. Vous
pouvez cliquer à droite pour monter la configuration.
Sélectionnez Hardware (Matériel). Vérifiez si le
dispositif USB Bluetooth se trouve dans la liste de
dispositifs que vous voyez en haut. Si oui, cela veut
dire que votre adaptateur USB Bluetooth est bien
installé.
Page 47

Article Number: #20001
Version 1.0 Specifications and procedures subject to changes without prior notificat ion
- 40 -
DUTCH
SOFTWARE INSTALLATIE
Let op: de BTW Software (version 1.2.2.6 of later)
moet voor
de hardware geïnstalleerd worden!
Start Hier
Als de installatie-CD eenmaal in de CD-ROM drive
van de computer is geladen, zal de Auto-run functie
U door de software installatie gidsen. Als de Auto-
run functie niet werkt, zoekt U dan het bestand
“setup.exe” op de CD op en dubbelklik op het
bijbehorende icoon.
Let op: Voordat U een latere versie van de software
installeert, de-installeer de eerdere versie. Voor
details over de-installeren, zie “Software deinstallatie”.
Voor Windows 98(SE)/ME/2000/XP
1. Op het Welcome scherm, klik de Next
(Volgende) knop.
Page 48
Article Number: #20001
Version 1.0 Specifications and procedures subject to changes without prior notificat ion
- 41 -
2. Lees de License Agreement (licentieovereenkomst) door en klik op “I accept the
terms in the license agreement” (Ik accepteer
de termen van de licentie-overeenkomst) en dan
op de Next knop.
3. Op het Device Information (apparaatinformatie)
scherm, vul de benodigde informatie in:
Device Name (apparaat naam) — andere
Bluetooth-apparaten; indien U informatie inwint
omtrent apparaten binnen bereik, zult U de (zelf
ingestelde) namen van deze apparaten zien.
Na het installatieproces kan de naam veranderd
worden via het BTW configuratie paneel.
Device Type (apparaat type) — klik op pijl naar
beneden (down arrow) en kies Desktop of
Laptop uit de lijst. Na installatie kan het
apparaat veranderd worden via het BTW
configuratie paneel.
Klik op de Next knop.
Page 49

Article Number: #20001
Version 1.0 Specifications and procedures subject to changes without prior notificat ion
- 42 -
4. Op het Destination Folder (bestemmingsfolder)
scherm, klik de Change knop om naar een
nieuwe bestemmingsfolder te zoeken voor de
BTW software, of klik op de Next knop om de
standaard folder te accepteren.
5. De InstallShield Wizard is nu klaar voor de
BTW software installatie. Indien U een
instelling moet veranderen, klikt U op de Back
knop; klik de Cancel knop om de Wizard te
Page 50
Article Number: #20001
Version 1.0 Specifications and procedures subject to changes without prior notificat ion
- 43 -
verlaten, of klik de Install knop om de
installatie te vervolgen.
6. Klik OK op de volgende melding (alleen voor
Windows 2000/XP).
7. Het Installing Bluetooth Software scherm Toont
de voortgang van de installatie. Indien U
gevraagd wordt om de Windows-CD te laden,
doet U dit dan en volg de instructies op het
scherm.
8. Wanneer gereed, klik Finish (“beëindigen”) om
de Installation Wizard te verlaten.
Page 51

Article Number: #20001
Version 1.0 Specifications and procedures subject to changes without prior notificat ion
- 44 -
9. U dient Uw computer te herstarten om de
nieuwe configuratie effectief te maken.
SOFTWARE DE-INSTALLATIE
1. In Windows, ga naar Start →Settings→
Control Panel→ Add or Remove Programs.
2. Selecteer Windcomm Bluetooth Software… en
klik op de Remove (“verwijderen”) knop.
Page 52

Article Number: #20001
Version 1.0 Specifications and procedures subject to changes without prior notificat ion
- 45 -
HARDWARE INSTALLATIE
Let op: De hardware installatie kan alleen
succesvol uitgevoerd worden als de software goed is
geïnstalleerd!
Voorzorg
Alvorens te installeren, verzekert U zich ervan dat de
betreffende USB poort bestaat en actief is. Om dit te
controleren, ga naar My Computer
Æ
Control Panel
Æ
System. Open het Device Manager
(apparaatbeheer) tab. Als U de Universal Serial Bus
controller kunt vinden, betekent dat, dat Uw USB
poort geïnstalleerd en actief is. Zo niet, is Uw USB
poort niet geïnstalleerd of de USB BIOS is niet
geactiveerd. In dat geval, raadpleegt U dan Uw
computer dealer voor USB ondersteuning.
Page 53

Article Number: #20001
Version 1.0 Specifications and procedures subject to changes without prior notificat ion
- 46 -
Verbinden
1. Indien Uw apparaat met de USB poort van Uw
computer verbonden is, gebruik dan de
meegeleverde USB adapter kabel om Uw
Bluetooth
TM
USB Adapter met Uw computer te
verbinden.
2. Allereerst dient U de USB poort te lokaliseren
op Uw systeem. Lijnt U de USB stekker op met
de USB poort op Uw systeem en druk deze
gelijkmatig aan.
3. Steek Uw Bluetooth
TM
USB Adapter in het
dikkere uiteinde van de USB adapter kabel.
4. Zodra het apparaat goed is aangesloten zal
Windows het automatisch detecteren en U het
onderstaande bericht tonen. Selecteer “Install
the software automatically (Recommended)”
(“Installeer de software automatisch”) en klik
Next om te vervolgen.
Page 54

Article Number: #20001
Version 1.0 Specifications and procedures subject to changes without prior notificat ion
- 47 -
5. Selecteer “Continue Anyway” (vervolgen) op
het volgende bericht.
6. Klik Finish om de hardware installatie te
completeren.
Page 55
Article Number: #20001
Version 1.0 Specifications and procedures subject to changes without prior notificat ion
- 48 -
SETUP DIAGNOSE
Als de software goed geïnstalleerd is, verschijnt er
rechtsonder in beeld het Bluetooth icoon
. U kunt
daarop klikken met de rechter muisknop om te
configureren.
Selecteer Hardware. Controleer of het USB
Bluetooth-apparaat zoals beneden getoond wordt
aangegeven. Zo ja, betekent dat dat Uw Bluetooth
USB adapter goed geïnstalleerd is.
Page 56

Article Number: #20001
Version 1.0 Specifications and procedures subject to changes without prior notificat ion
- 49 -
PORTUGUESE
INSTALAÇÃO DO SOFTWARE
Nota: O software BTW (Versão 1.2.2.6 ou superior)
deverá ser instalado bem antes do hardware.
Comece Aqui
Uma vez que o CD de instalação está inserido no
drive de CD-ROM do su computador, a função Auto-
Run (Execução Automática) irá automáticamente te
guiar para iniciar a instalação do software. Se a
função Auto-Run ( Execução Automática) não se
ativar, por favor abra o CD de instalação e encontre
o arquivo“setup.exe” e dê um duplo clique no ícone
“setup” para continuar.
Nota: Antes de você instalar uma versão de
atualização do software, certifique-se de desinstalar
qualquer versão prévia, que já exista o seu
computador.Para detalhes dos procedimentos de
desinstalação, consulte a sessão posterior entitulada
“Desinstalação do Software”.
Para Windows 98(SE)/ME/2000/XP
1. Na tela de Boas Vindas, clique o botão de Next
(Próximo).
Page 57

Article Number: #20001
Version 1.0 Specifications and procedures subject to changes without prior notificat ion
- 50 -
2. Quando a tela de Acordo de Licença aparecer,
leia-o, e então clique no botão de opção à
esquerda para “I accept the terms in the license
agreement”(“Eu aceito os termos no Acordo
de Licença”) e então clique o botão Next
(Próximo).
3. Na tela de Informação do Dispositivo, entre a
informação requerida:
Page 58
Article Number: #20001
Version 1.0 Specifications and procedures subject to changes without prior notificat ion
- 51 -
Device Name (Nome do Dispositivo)—outros
dispositivos habilitados para Bluetooth, quando
perguntado sobre dispositivos dentro do alcance
do raio, você irá ver o nome deste dispositivo
configurado pelo usuário. O nome pode ser
alterado após o processo de instalação atravéz do
Painel de Configuração BTW.
Device Type (Tipo de Dispositivo)—clique a
flecha para baixoe escolha Desktop
(Escritório) ou Laptop (Laptop) de uma lista
que aparecerá. O tipo de dispositivo pode ser
alterado depois do processo de instalação através
do Painel de Configuração BTW.
Clique no botão Next (Próximo).
4. Na tela de Pasta de Destino, clique no botão de
Change (Alterar) para se dirigir à uma nova
pasta de destino para o seu software BTW. De
outra forma, clique no botão de Next (Próximo)
para aceitar a pasta pré-estabelecida.
Page 59
Article Number: #20001
Version 1.0 Specifications and procedures subject to changes without prior notificat ion
- 52 -
5. O InstallShield Wizard (Ajuda de Instalação)
está pronto para instalar o software BTW. Se
você necessitar revisar ou alterar quaisquer
ajustes, clique o botão de Back (Voltar).
Clique o botão de Cancel (Cancelar), para
sair do Wizard(Ajuda de Instalação). Senão,
clique o botão Install (Instalar).
Page 60

Article Number: #20001
Version 1.0 Specifications and procedures subject to changes without prior notificat ion
- 53 -
6. Clique OK (Confirma) na seguinte mensagem
(somente para a instalação em Windows
2000/XP).
7. A tela de Instalando o Software Bluetooth
mostra o progresso da instalação. Se alertado
para inserir o CD do Windows, faça-o e siga as
instruções da tela.
8. Quando terminado, clique Finish (Fim) para
finalizar o Installation Wizard (Ajuda de
Instalação).
Page 61

Article Number: #20001
Version 1.0 Specifications and procedures subject to changes without prior notificat ion
- 54 -
9. Lembre-se de reiniciar seu computador para que
a nova configuração seja aceita.
DESINSTALAÇÃO DO SOFTWARE
1. Em Windows, vá a Start →Settings→ Control
Panel→ Add or Remove Programs
(Início→Ajustes→Painel de
Controle→Adicionar ou Remover
Programas).
2. Selecione Windcomm Bluetooth Software… e
clique o botão Remove (Remover).
Page 62

Article Number: #20001
Version 1.0 Specifications and procedures subject to changes without prior notificat ion
- 55 -
INSTALAÇÃO DO HARDWARE
Nota: A instalação do hardware somente deverá ser
realizada quando o software estiver bem instalado.
Precaução
Antes da instalação certifique-se que o porto USB
existe no seu computador e está habilitado. Para
checar isto, vá a My Computer
Æ
Control Panel
Æ
System(Meu ComputadorÆPainel de ControleÆ
Sistema). Abra a aba de Gerenciamento de
Dispositivo. Se o dispositivo Universal Serial Bus
controller (Controlador Universal de Bus Serial) for
encontrado, isto significa que seu porto USB está
instalado e habilitado. Caso contrário, ou nenhum
porto USB está instalado ou o bios USB não está
apropriadamente habilitado. Neste caso, consulte
seu revendedor de computador para suporte de USB.
Page 63
Article Number: #20001
Version 1.0 Specifications and procedures subject to changes without prior notificat ion
- 56 -
Conectando-se
1. Se o dispositivo está conectado ao porto USB
em um computador de mesa, use o cabo
adaptador de USB incluído para conectar seu
Adaptador USB Bluetooth
TM
ao seu
computador.
2. Primeiramente, você vai ter que localizar o porto
USB do seu sistema. Alinhe o conector USB (a
ponta mais fina) do adaptador USB com o porto
hospedeiro USB, empurre de maneira igual e
firme até que esteja posicionado.
3. Plugue seu Adaptador USB Bluetooth
TM
á ponta
mais grossa do cabo adaptador de USB.
4. Logo que o dispostivo esteja apropriadamente
conectado ao seu computador, o Windows
automáticamente detectará o dispositivo e
emitirá a seguinte mensagem. Selecione “Install
the software automatically
Page 64
Article Number: #20001
Version 1.0 Specifications and procedures subject to changes without prior notificat ion
- 57 -
(Recommended)”(Instale o software
automáticamente (Recomendado)). E
pressione Next (Próximo) para continuar.
5. Selecione “Continue Anyway”(Continue
Assim Mesmo) com a seguinte mensagem.
6. Pressione Finish (Fim) para completar a
instalação do hardware.
Page 65

Article Number: #20001
Version 1.0 Specifications and procedures subject to changes without prior notificat ion
- 58 -
DIAGNÓSTICOS DE AJUSTES
Uma vez que o software esteja bem instalado, seu
computador deverá apresentar um ícone
Bluetooth no botão do lado direito. Você deverá
clicar com o botão da direita do mouse para ajustar a
configuração.
Selecione Hardware. Cheque se o dispositivo USB
Bluetooth está na lista de dispostivos como abaixo.
Caso afirmativo, isto significa que o Adaptador USB
Bluetooth está bem instalado.
Page 66

Article Number: #20001
Version 1.0 Specifications and procedures subject to changes without prior notificat ion
- 59 -
ITALIAN
INSTALLAZIONE DI SOFTWARE
Nota: Il Software BTW (Versione 1.2.2.6 o superiore)
deve essere correttamente installata prima
dell’installazione del hardware.
Cominciate qui
Una volta inserito il CD d’installazione nel CDROM drive del computer, la funzione Auto-Run vi
guiderà automaticamente per cominciare
l’installazione del software. Nel caso che la funzione
Auto-Run non sia praticabile, volete comunque aprire
il CD d’installazione per trovare il file “setup.exe” e
fate doppio clic sul icona “setup” per continuare.
Nota: Prima d’installare una versione aggiornata
del software, assicuratevi di disinstallare qualsiasi
versione precedente già esistente nel vostro
computer. Per le procedure dettagliate di
disinstallazione, vedete l’ultima sezione:
“Disinstallazione del Software”.
Per Windows 98(SE)/ME/2000/XP
1. Nella schermata Benvenuti, cliccate sul bottone
Next (Seguente).
Page 67

Article Number: #20001
Version 1.0 Specifications and procedures subject to changes without prior notificat ion
- 60 -
2. Quando apparirà la schermata License
Agreement (Contratto di licenza), leggete questo
Contratto di Licenza, poi cliccate con il tasto
sinistro sul bottone radio: “I accept the terms in
the license agreement” (“Accetto i termini del
contratto di licenza”) e cliccate sul bottone
Next (Seguente).
3. Nella schermata Device Information
(Informazione sui dispositivi), completate
l’informazione richiesta:
Page 68

Article Number: #20001
Version 1.0 Specifications and procedures subject to changes without prior notificat ion
- 61 -
Device Name (Nome del dispositivo)—altri
dispositivi abilitati Bluetooth. Quando si chiede
sui dispositivi entro la portata radio, vedrete
questo nome di dispositivo configurato per
l’utente.
Il nome può essere modificato dopo il processo
d’installazione attraverso il pannello di
configurazione BTW .
Device Type (Tipo di dispositivo)—cliccate
sulla freccia in basso e scegliete Desktop o
Laptop nell’elenco che vi appare. Il tipo di
dispositivo può essere modificato dopo il
processo d’installazione attraverso il pannello di
configurazione BTW.
Cliccate sul bottone (Next) Seguente.
4. Nella schermata Cartella di destinazione,
cliccate sul bottone Change (Cambiare) per
cercare una nuova cartella di destinazione per il
software BTW. Oppure cliccate sul bottone
Page 69

Article Number: #20001
Version 1.0 Specifications and procedures subject to changes without prior notificat ion
- 62 -
(Next) Seguente per accettare la cartella per
difetto.
5. Il InstallShield Wizard è pronto per installare il
software BTW. Se avete bisogno di rivedere o
modificare qualsiasi parametro, cliccate sul
bottone, Back (Indietro). Cliccate il bottone
Cancel (Cancellare) per uscire del Wizard.
Oppure, cliccate sul bottone Install (Installare)
Page 70

Article Number: #20001
Version 1.0 Specifications and procedures subject to changes without prior notificat ion
- 63 -
6. Cliccate OK nel seguente messaggio (soltanto
per l’installazione di Windows 2000/XP).
7. La schermata Software d’Installazione Bluetooth
mostra il progresso dell’installazione. Se siete
pronto per inserire il CD Windows, fattelo e
seguite le istruzione sullo schermo.
8. Quando sarà finito, cliccate Finish (Finire) per
concludere il Wizard d’installazione.
9. Ricordate di riavviare il vostro computer per
mettere in atto la nuova configurazione.
Page 71

Article Number: #20001
Version 1.0 Specifications and procedures subject to changes without prior notificat ion
- 64 -
DISINSTALLAZIONE DEL
SOFTWARE
1. In Windows, andate a Start →Settings→
Control Panel→ Add or Remove Programs.
(Cominciare →Parametri→ Pannello di
controllo → Aggiungere o Rimuovere
Programmi. )
2. Scegliete il Software Windcomm Bluetooth … e
cliccate il bottone Remove (Rimuovere).
Page 72

Article Number: #20001
Version 1.0 Specifications and procedures subject to changes without prior notificat ion
- 65 -
INSTALLAZIONE DEL HARDWARE
Nota: L’installazione del hardware deve essere
effettuata soltanto dopo che il software è
correttamente installato.
Precauzione
Prima dell’installazione, verificate che nel vostro
computer esista una porta USB e che sia abilitata.
Per verificarlo andate a My Computer
Æ
Control
Panel
Æ
System. (Mio ComputerÆ Panello di
controllo
Æ
Sistema). Aprite la linguetta Manager di
dispositivi. Se trovate il dispositivo di controllo
Universal Serial Bus, significa che la vostra porta
USB è installata e abilitata. Caso contrario, la porta
non è installata o il USB bios non è adeguatamente
abilitato. In questo caso, consultate il vostro agente
di computazione per ottenere supporto USB.
Page 73

Article Number: #20001
Version 1.0 Specifications and procedures subject to changes without prior notificat ion
- 66 -
Conessione
1. Se il dispositivo è connesso alla porta USB di un
computer di scrivania, usate il cavo adattatore
USB fornito per connettere il vostro adattatore
USB Bluetooth
TM
con il vostro computer.
2. Primo, dovete localizzare la porta USB
ricevitrice nel vostro sistema. Collocate il
connettore USB (l’estremo più assottigliato)
dell’adattatore USB di fronte alla porta USB
ricevitrice, premete uniformemente e con
fermezza finché sia a posto.
3. Collocate il vostro adattatore USB Bluetooth
TM
nell’estremo più assottigliato del cavo adattatore
USB.
4. Appena il dispositivo sia correttamente connesso
al vostro computer, Windows rintraccerà
automaticamente il dispositivo e mostrerà il
seguente messaggio. Scegliete “Install the
software automatically (Recommended)”
Page 74

Article Number: #20001
Version 1.0 Specifications and procedures subject to changes without prior notificat ion
- 67 -
(“Installare il software automaticamente
(Raccomandato))” e premete Next (Seguente)
per continuare.
5. Scegliete “Continue Anyway” (“Continuare
in ogni modo”) per il seguente messaggio.
6. Premete Finish (Finire) per completare
l’installazione del hardware.
Page 75

Article Number: #20001
Version 1.0 Specifications and procedures subject to changes without prior notificat ion
- 68 -
STABILIRE DIAGNOSTICI
Una volta installato correttamente, il vostro computer
mostrerà un’icona Bluetooth
nell’angolo
superiore destro. Potete cliccare con il tasto destro
per stabilire la configurazione.
Scegliete Hardware. Verificate se il dispositivo USB
Bluetooth si trova sull’elenco dei dispositivi come si
vede qui di sotto. Se vi è, il vostro adattatore USB
Bluetooth è installato correttamente.
 Loading...