

WIRELESS BACKUP CAMERA
Solar Powered With 6.8” Widescreen HD Monitor
ITM. / ART. 1344584
WP ITM. BT57132
Care & Use Instructions
Important, retain for future reference:
Read carefully

TABLE OF CONTENTS
1. Introduction ...............................................................................................................................................................................1
2. Package Contents ...................................................................................................................................................................2
3. Product Specications .......................................................................................................................................................... 3
4. Before You Install ...................................................................................................................................................................... 4
5. Installation Guide ....................................................................................................................................................................4
6. Settings and Operation ........................................................................................................................................................9
7. Safety Information ................................................................................................................................................................14
8. Maintenance & Warranty ...................................................................................................................................................17
9. General Information ............................................................................................................................................................20

1. INTRODUCTION
Please read all of the installation instructions carefully before installing the product. Improper
installation will void manufacturer’s warranty. The installation instructions do not apply to all types
of vehicles, and are written as guidelines to assist in installing the system.
Consult an experienced technician if you are not comfortable installing the product. You can also
contact Type S at 866.294.9244 to speak to one of our installation specialists if you have any specic
questions regarding the Solar Wireless Backup Camera.
BEFORE using the Solar Wireless Backup Camera with 6.8” Widescreen HD Monitor, please
read the safety information provided in this user manual. ALWAYS use the product as
outlined in this user manual.
Please make sure to read and understand all local laws and regulations regarding cameras and their
use in a vehicle. Laws vary by state.
1
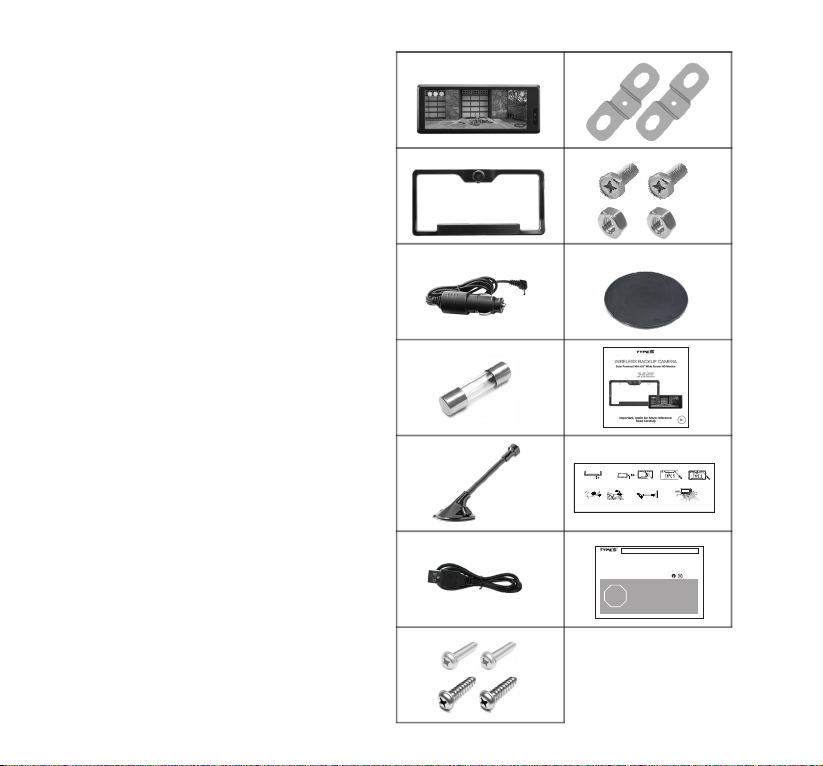
2. PACKAGE CO NTENTS
1. 6.8” Motion Activated
HD Monitor
2. Solar Wireless Backup Camera
3. 12V / 24V Power Adapter
4. 250V 2A Spare Fuse
5. Windshield Mount
6. 33” MicroUSB Charging/Data Cable
7. 2 x License Plate Machine Screw
(Optional)
2 x License Plate Self-Tapping Screw
(Optional)
8. 2 x Two Way Mounting Tab (Optional)
9. 2 x Mounting Screw & Nut (Optional)
10. Dash Mount
11. Instruction Manual
12. Quick Install Guide
13. Warranty Card
1.
2.
3.
4.
5.
6.
8.
9.
10.
11.
12.
QUICK INSTALLATION GUIDE
1.
Plug in monitor, power on camera, and test connection.
Fully charge camera. Fold back camera power port
(Camera and monitor come pre-paired)
plug and insert included charging cable. Most AC
wall adapters will work with the USB charging cable.
or
Windshield
Dash Mount
Place Windshield Mount on the windshield or Dash Mount and lower
the lever to secure. Attach Dash Monitor onto the Windshield Mount
and adjust to your desired position.
13.
Product code / Code de produit / C—digodel producto : BT57132
Register this product within 30 days of purchase to receive 1 FREE YEAR of additional warranty coverage
(beyond the standard one year warranty), along with special product offers and announcements.
Enregistrez ce produit dans les 30 jours suivant l'achat pour recevoir une couverture supplŽmentaire
GRATUITE DE 1 AN (au-delˆ de la garantie standard d'un an), ainsi que des offres et des annonces spŽciales.
www.typesauto.com/register
STOP
ARRæT
DETƒNGASE
3. Unscrew your license plate.
Mount and power the monitor. Power using the 12V/24V
After the monitor has been connected to power, wake up the
7.6.5.
adapter provided. Remove overlay and adjust angle as need.
screen and camera by waving your hand in front of the monitor.
NOTE: Fully charge and test camera before installation.
Please contact our customer service before returning this product to
the store. Our friendly representatives are happy to help with any
questions or concerns you have.
Veuillez communiquer avec notre service ˆ la clientle avant de
retourner le produit au magasin. Nos reprŽsentants se feront un plaisir
de vous assister pour toute question ou prŽoccupation.
P—ngase en contacto con nuestro servicio a clientes antes de regresar
este producto a la tienda. A nuestros amables representantes les dar‡
mucho gusto ayudarle con cualquier pregunta o inquietud que tenga.
Mon-Fri, 8am-5pm PST / Lundi au vendredi, 8h ˆ17h HNP /
Lun-vie, 8 a. m. a 5 p. m. Hora del Pac’fico
info@typesauto.com / (866) 294-9244
ML-57132DNR_V3
4. 2.
Align camera with license plate and
secure to vehicle. See Manual for
additional mounting guidance.
@TypeSAuto
7.
2

3. PRODUCT SPECIFICATIONS
Frequency: 2.4GHz
Operating Voltage: Monitor - DC 12V/24V, Backup Camera - DC 5V
Operating Temperature: 14ºF ~122º F (-10ºC~50ºC)
Camera Water Resistance: IP65 Rating
Battery Capacity: 3350mAh
Maximum Signal Range: 33 feet/10 meters
(without interference or obstruction)
Power Button
6.8” Motion Activated HD Monitor
Solar Wireless
Backup Camera
MicroUSB input
DC 12 / 24V
Power Button
3
4. BEFORE YOU INSTALL
Please charge and test the Camera / Monitor before you install on your vehicle.
1. Fully charge camera. Fold back camera power port plug and insert included charging cable.
Most AC wall adapters will work with the USB charging cable.
2. Plug in monitor, power on camera, and test connection. (Camera and monitor come pre-paired)
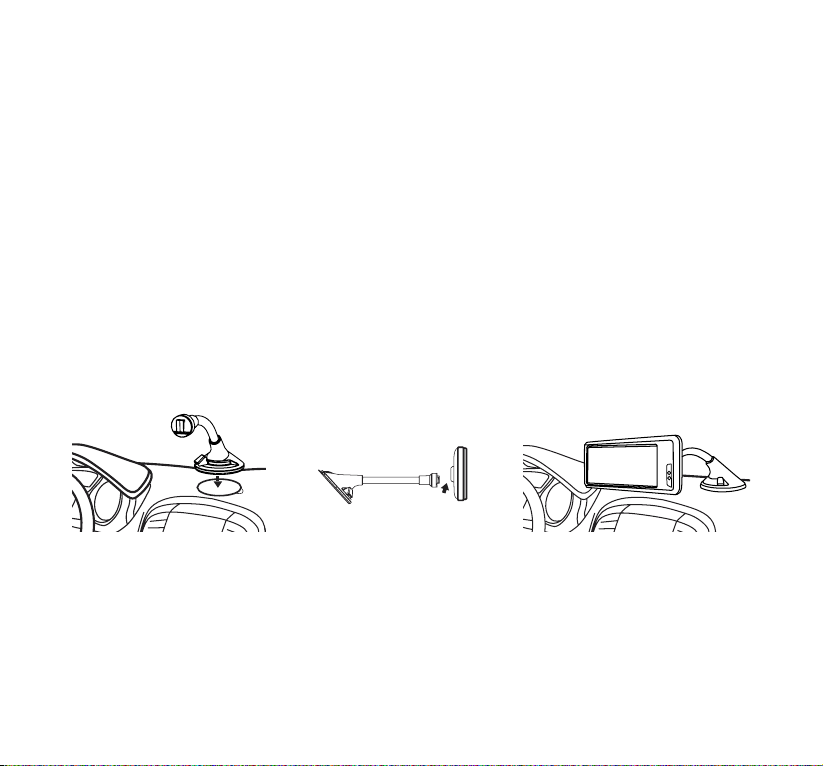
5. INSTALLATION GUIDE
DASH MONITOR INSTALLATION DASH MOUNT
1. 2. 3.
1. Remove the backing tape on the Dash Mount and attach it to the dashboard. Place the suction
cup of the Windshield Mount on top of the Dash Mount and push the knob counter clockwise to
lock in place.
2. Attach Dash Monitor to the Windshield Mount and adjust to your desired position.
3. Adjust the tube of the Windshield Mount so the base of the Dash Monitor is touching the surface
of the dashboard in order to reduce vibration rattling.
4

DASH MONITOR INSTALLATION WINDSHIELD MOUNT
1. 2. 3.
1. Place the Windshield Mount on the windshield and push the knob counter clockwise to lock in
place.
2. Attach Dash Monitor to the Windshield Mount and adjust to your desired position.
3. Adjust the tube of the Windshield Mount so the base of the Dash Monitor is touching the surface of
the dashboard in order to reduce vibration rattling.
POWER UP THE DASH MONITOR
1. Take the 12V/24V power adapter and plug adapter
into the right side of the Dash Monitor. Plug the
other end into 12V/24V power port in your car.
2. Now, the Dash Monitor is ready to be activated
by the motion trigger when you wave your hand
in front of the monitor or tap once on the Dash
Monitor screen.
WARNING: Many vehicles provide constant power to the
12V outlet. If your outlet provides constant power,
please remember to unplug the Dash Monitor when
not in use to avoid draining the vehicle battery.
CHARGING THE SOLAR WIRELESS BACKUP CAMERA
Fold back camera power port plug and insert included charging
cable. Most AC wall adapters will work with the USB charging cable.
12V/24V
Power adapter
5

SOLAR WIRELESS BACKUP CAMERA INSTALLATION
A STANDARD INSTALLATION:
1. Unscrew your license plate.
Blue LED light
2. Secure the Solar Wireless Backup Camera
and license plate with screws back onto
the rear of your vehicle.
3. Push and hold the power button of
the Solar Wireless Backup Camera
for 1 second, the blue LED light
will ash 2 times.
4. Power on the Monitor with the 12V/24V
adapter. You can see the parking view when
you wake up the Solar Wireless Backup
Camera by tapping once on the screen or
motion trigger in front of Monitor.
*Please follow your local laws and regulations regarding constant monitoring while driving. It is
recommended that you glance at the image only when in reverse, and use as an aid. Do not rely
solely on the camera view to back up.
6
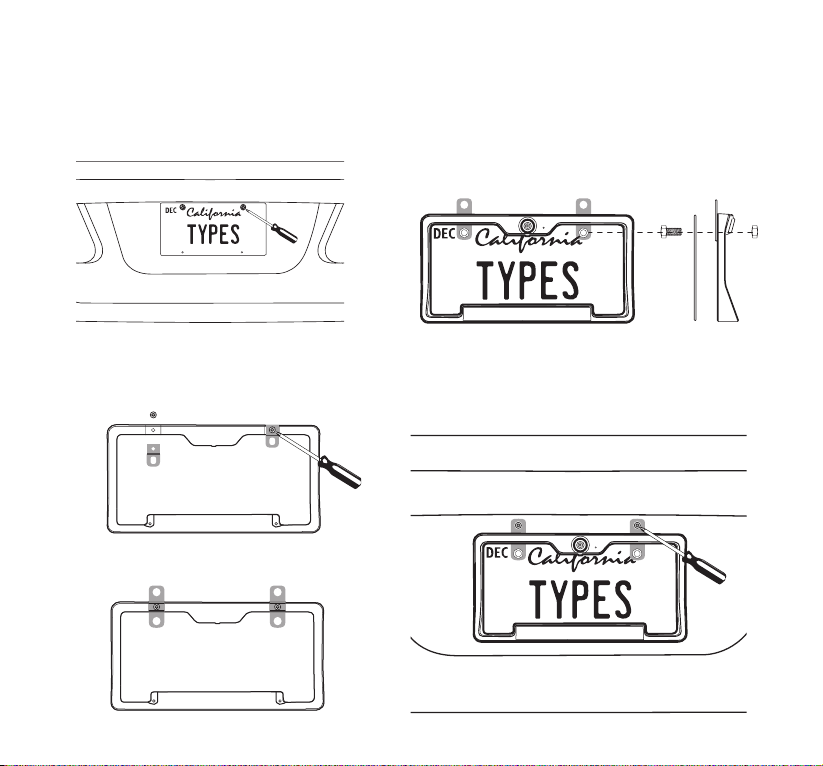
B LOWERING INSTALLATION FOR VEHICLES WITH TRUNK OR HATCH DOOR RELEASE
(This allows more clearance for nger tips to release door latch)
1. Unscrew and remove your license plate.
2a. Unscrew and detach the original
Mounting Tabs from the back of the
Solar Wireless Backup Camera.
2b. Install the Two Way Mounting Tabs onto
the Solar Wireless Backup Camera.
3. Install the license plate onto the Solar Wireless
Backup Camera with the Mounting Screws &
Nuts.
4. Secure the Solar Wireless Backup Camera
with the license plate back onto the rear of your
vehicle.
7

C RAISED INSTALLATION FOR TRUCKS & SUV WITH STEP BUMPERS
(This will raise the camera frame out of the cavity of the step bumper)
1. Unscrew and remove your license plate.
2. Install the Two Way Mounting Tabs using
original Plates Screws and Mounting Screws.
Mounting
Screw
Two Way
Mounting Tab
Mounting
Nut
3. Finally, install the Solar Wireless Backup
Camera and license plate onto the rear of
your vehicle and tighten the Mounting Nuts
with a wrench.
Step Bumper
Original Plate Screw
Warning: Lower tailgate on pickup trucks slowly and check for minimum ¼ inch clearance between
gate and top of camera frame. This check is because some bumpers are installed higher than others.
8

6. SETTINGS AND OPERATION
Power
Button
The 6.8” Motion Activated HD Monitor contains touch panel; all the operations can be done by tapping
and swiping on the monitor screen. Tap on the Tips icon for on-screen instructions. Push the power
button on the side to turn o the Dash Monitor while driving. NOTE: Please remember to turn the Dash
Monitor back on once the vehicle is stopped and ready to reverse.
SPLIT SCREEN
If you purchase one set of Solar
Powered Backup Camera with 6.8”
Widescreen HD Monitor (BT57132)
and extra Solar Powered Backup
Camera (BT56780), you can tap on
the Split Screen icon to switch
between dierent screen modes
after you pair the extra camera with
the Dash Monitor.
NOTE: Other than BT57132 and
BT56780, DO NOT pair this monitor
with other Type S backup cameras.
BATTERY INDICATOR
The battery indicator shows the
battery level of the Solar Wireless
Backup Camera.
NOTE: Fully charge and test the
camera before operation.
9

PAIRING
The Solar Wireless Backup Camera is pre-paired with the Monitor, and it is set as rear camera as default.
You should see the following screen that shows the rear view if the Dash Monitor is powered and the
Solar Wireless Backup Camera is fully charged.
If you can not see camera image showing on Dash Monitor, pair the Camera with the following steps:
Blue LED light
1. Press and hold the Power Button under the
camera for 6 seconds, or until the LED ashes
Blue continuously. The camera will be turned
on and enter Pairing Mode for one minute.
2. Or press and hold the Power Button for 5
seconds to enter Pairing Mode if the camera
is already on.
3. On the Dash Monitor, tap
the Settings icon and then
tap Pair Camera to enter
the pairing screen. Tap Front/
Rear Camera - Click to pair.
10

4. The camera should be paired
within 30 seconds. If the pairing
is successful, the display will
show “Pair OK”.
5. If no camera is found, then the
display will show “Pair Fail”. In
this case, cut o power and
reboot the Dash Monitor. If you
keep receiving the “Pair Fail”
message after several attempts,
please call our technical support
to assist in troubleshooting.
ROTATE CAMERA
Tap on the setting to reverse the
camera view.
BRIGHTNESS
Swipe to adjust screen brightness
11

CONTRAST
Swipe to adjust screen contrast
OPERATION TIME
Tap to choose dierent operation
time. The Dash Monitor’s parking view
operation time will start to count down
when you wake up the Solar Wireless
Backup Camera. When the timer runs
out, the parking view will automatically
switch to stand-by mode.
MOTION DETECTION
Tap to choose motion detection
range. Motion detection range
can help you adjust the detection
distance between you and the Dash
Monitor when you drive. You can also
disable the function by turning it o.
PARKING AID LINE
You can turn ON/OFF the parking aid
line by tapping the icon.
Hold 1 second and swipe up and
down to adjust the parking aid line.
12

ADJUST CAMERA VIEW
Swipe up and down to adjust view.
NOTE: You cannot adjust the
parking aid line and camera view in
the split screen mode.
BACKUP CAMERA POWER, MODES & LED INDICATORS
Power / Mode Status LED Indicators
Power On
Press and hold Power button for 1 second, Camera will power on.
Power O
Press and hold Power button for 2 seconds and release, Camera will
power o.
Pairing Mode
To begin Pairing Mode, press the Power button on Camera until
blue LED light ashes quickly. Now Camera is in Pairing Mode.
Low Battery Power O
Camera will power o when the battery is used up.
USB Charging
This LED light is next to the MicroUSB port.
Blue LED light ashes 2 times when Camera is powered on.
Red LED light ashes 1 time when the Camera is powered o.
Blue LED light ashes quickly for 1 minute or until pairing success
is complete.
Red LED light ashes to indicate low battery.
While charging, the Red LED light will remain solid. When Camera is
fully charged, Red LED light turns o.
DASH MONITOR INDICATOR
If you see this message on the Dash
Monitor, that means the battery of
the Solar Wireless Backup Camera is
lower than working voltage. Please
fully charge the camera.
13

7. SAFETY INFORMATION
IMPORTANT SAFETY INSTRUCTIONS
1. SAVE THESE INSTRUCTIONS– This manual contains important safety and operating instructions of
12V Car charger for Model BT57132.
2. Before using the product, read all instructions and cautionary markings.
3. Do not expose car charger to rain, moisture, or snow.
4. Use of an attachment not recommended or sold by the product manufacturer may result in a risk
of re, electric shock, or injury to persons.
5. To reduce risk of damage to cigarette lighter connector and cord, pull by cigarette lighter
connector rather than cord when disconnecting car charger.
6. Make sure cord is located so that it will not be stepped on, tripped over, or otherwise subjected to
damage or stress.
7. Do not operate car charger with damaged cord or cigarette lighter connector – replace it
immediately.
8. Do not operate car charger if it has received a sharp blow, been dropped, or otherwise damaged
in any way; take it to a qualied serviceperson.
9. Do not disassemble car charger; take it to a qualied serviceperson when service or repair is
required. Incorrect reassembly may result in a risk of electric shock or re.
10. To reduce risk of electric shock, unplug charger before attempting any maintenance or cleaning.
Turning o controls will not reduce this risk.
WARNING: A failure to read and follow these warnings and instructions may result in a serious
accident, including damaged property or a serious injury, including loss of life.
• The Solar Wireless Backup Camera is designed as an aid to the driver in detecting large
stationary objects to help avoid damaging the vehicle. However, you, the driver, must use it
safely and properly. Use of the Solar Wireless Backup Camera is not a substitute for safe, proper
and legal driving.
• Never back up while looking only at the screen. You should always check behind and around the
vehicle when backing up just as you would if the vehicle did not have the Solar Wireless Backup
Camera. Always make sure your intended path is clear. If you back up while looking only at the
Monitor, you may hit a vehicle, pedestrian, bicyclist, child, pet or other object resulting in injury
or death. Always back up slowly.
14

• Never depend on the Solar Wireless Backup Camera entirely when backing up. The image on
the screen is dierent from actual conditions. Objects viewed in the Dash Monitor dier from
actual distance because a wide-angle lens is used. Objects in the Dash Monitor will appear
visually opposite than when viewed in the rear view and outside mirrors. Use the inside mirror
or glance over your shoulder to properly judge distances to other objects.
• The Solar Wireless Backup Camera “night vision” feature that is high performance brightness
with colorful image is an aid to a driver but is limited. Always use your own eyes to conrm the
vehicle’s surroundings, as the displayed image may be faint or dark, distorted, or not entirely
visible. Always check behind and all around the vehicle visually with mirrors before proceeding.
• The area displayed by the Solar Wireless Backup Camera is limited. The Solar Wireless Backup
Camera does not display objects that are close to or below the bumper, underneath the
vehicle, or objects out of the Camera’s eld of view. The area displayed on the screen may vary
according to vehicle orientation or road conditions.
• Be sure to check the Camera’s position and mounting angle before each use.
• Make sure the trunk, hatch, or backdoor is completely and securely closed when backing up.
• If the back of the vehicle is hit, the position and mounting angle of the Solar Wireless Backup
Camera may change.
• When washing the vehicle with high pressure water, be sure not to spray it around the
Solar Wireless Backup Camera. Otherwise, water may enter the Camera unit causing water
condensation on the lens, a malfunction, re or an electric shock.
• Do not strike the Solar Wireless Backup Camera. It is a precision instrument. Otherwise, it may
malfunction or cause damage resulting in a re or an electric shock.
• This product will only provide images of items that are within the eld of view of the Solar
Wireless Backup Camera. Thus, it is imperative that the Solar Wireless Backup Camera should be
kept clean and unobstructed, and should be mounted so that its eld of view includes the entire
area behind your vehicle.
• Adhere to all applicable trac laws and motor vehicle regulations applicable to the device.
• Consult local laws and regulations for any restrictions on installation or use.
• Never allow children to play with the device. Small parts may be a choking hazard.
• There is a plastic cover over the Solar Wireless Backup Camera. Do not scratch the cover when
cleaning dirt or snow from the cover.
15

• The Solar Wireless Backup Camera has a water resistant construction. Do not detach,
disassemble or modify it. This may cause incorrect operation. Solar Wireless Backup Camera is
waterproof.
• Do not submerge Solar Wireless Backup Camera in water, which can cause internal damage to
the Camera.
• If the temperature changes rapidly, such as when hot water is poured on the vehicle in cold
weather, the system may not operate normally. The Digital Camera can withstand the eects of
rain, snow, and inclement weather.
• When strong light directly enters a camera, objects may not be displayed clearly.
• The screen may icker under uorescent light.
• The colors of objects on the Dash Monitor may dier somewhat from those of the actual object.
• If dirt, rain or snow attaches to the Camera, the Monitor may not clearly display objects. If water
droplets, snow or mud adhere to the Camera lens, rinse with water and wipe with a dry cloth.
• Do not use alcohol, benzene or thinner to clean the Camera. This will cause discoloration. To
clean the Camera, wipe with a clean cloth dampened with mild cleaner diluted with water and
then wipe with a dry cloth.
• Will work up to 33 feet.
• ALWAYS engage Parking/Emergency/Hand Brakes of the vehicle when testing the system.
SAFETY AROUND AND BEHIND OTHER VEHICLES
Using a Solar Wireless Backup Camera is not enough to completely overcome a vehicle’s blind spot.
Many preventable injuries and deaths occur in driveways or parking lots when drivers do not see
children, pets, or others near their vehicles. Here are a few safety tips that will help you to avoid a
back-over accident:
• Walk completely around your vehicle before getting in. Check for kids, toys, and pets before
entering the vehicle and starting the engine.
• Know where children are. Have children stand in a place where they are in full view.
• Be aware of young children. Young children are small and hard to see.
• Parents, caregivers and all adults need to be vigilant in supervising children, especially when
children are in the yard, driveway or parking lot playing near parked cars.
16

• Roll down your window so you will be able to hear what is happening outside your vehicle.
• Owners of SUVs, trucks, and vans need to take extra care to avoid hitting or running over a child.
• Teach children to move away from a vehicle whenever it is started.
8. MAINTENANCE & WARRANTY
CLEANING
• If dirt, rain or snow attaches to the Camera, the Monitor may not clearly display objects. If water
droplets, snow or mud adhere to the Camera lens, rinse with water and wipe with a dry cloth.
• Do not use alcohol, benzene or thinner to clean the Camera. This will cause discoloration. To
clean the Camera, wipe with a clean cloth dampened with mild cleaner diluted with water and
then wipe with a dry cloth.
WARRANTY
• Ty pe S
LIMITED WARRANTY
Type S warrants, to the original purchaser, that its products are free from defects in material and
workmanship for 1 year from the date of original purchase. Where permitted by law, Type S’s
liability shall be limited to that set forth in this limited express warranty. This limited express
warranty shall be the exclusive remedy of the purchaser and Type S makes no other warranty of
any kind aside from the limited express warranty stated above.
NOTE: Warranty only applies for North American customers of purchases made in North
America.
CONDITIONS OF WARRANTY
If during the 1 year warranty period your new product is found to be defective, Type S will repair
such defect, or replace the product, without charge for parts or labor subject to the following
conditions:
17

1. All repairs must be performed by Type S.
2. All warranty claims must be accompanied by a copy of the sales receipt or bill of sale.
3. The equipment must not have been altered or damaged through negligence, accident,
improper operation, or failure to follow the product instructions for installation, use, or
care.
4. The replacement of parts is excluded from the warranty when replacement is necessary
due to normal wear and tear.
5. Repair or replacement parts supplied by Type S under this warranty are protected only
for the unexpired portion of the original warranty.
6. This is a “repair or replace” warranty only, and does not cover the costs incurred for the
installation, removal or reinstallation of the product, or damage to any mobile phone
device or vehicle.
OWNER’S RESPONSIBILITIES:
Type S will make every eort to provide warranty service within a reasonable period of time.
SHOULD YOU HAVE ANY QUESTIONS ABOUT SERVICE RECEIVED OR IF YOU WOULD LIKE
ASSISTANCE IN OBTAINING SERVICE, PLEASE CALL TOLL FREE 1.866.294.9244 DURING REGULAR
BUSINESS HOURS MONDAY THROUGH FRIDAY 8:00 AM TO 5:00PM.
NOTE: Toll Free # is for North America Customers ONLY. See Customer service section for
customer contact numbers for other regions/oces.
For customer service and technical support, please call us at 1.866.294.9244. If at that time it is
determined that a replacement unit is needed, the support representative will issue a Return
Authorization and instruct on how to get a new unit.
Type S makes no other warranty of any kind aside from the limited express warranty stated
herein.
DISCLAIMER OF WARRANTIES, INCLUDING WARRANTY OF MERCHANTABILITY AND WARRANT Y
OF FITNESS FOR PARTICULAR PURPOSE: EXCEPT AS SPECIFICALLY SET FORTH HEREIN, NO
18

WARRANTY OR REPRESENTATION, EXPRESS OR IMPLIES, IS MADE AS TO THE SOLAR WIRELESS
BACKUP CAMERA. EXCEPT AS EXPRESSLY SET FORTH HEREIN, TYPE S AND/OR ITS AFFILIATES
EXPRESSLY DISCLAIMS, WITHOUT LIMITATION, ANY STATUTORY WARRANTIES AND ALL IMPLIED
WARRANTIES, INCLUDING ANY IMPLIED WARRANTY OF MERCHANTABILITY OR FITNESS FOR A
PARTICULAR PURPOSE.
Type S and/or its aliates do not guarantee or promise that the user of Solar Wireless Backup
Camera will not be in an accident or otherwise not collide with an object and/or person. Our
Solar Wireless Backup Camera is not intended in any way to be a substitute for careful and
cautious driving or for the consistent adherence to all applicable trac laws and motor vehicle
safety regulations.
The Solar Wireless Backup Camera is not intended to be a substitute for rearview mirrors or for
any other motor vehicle equipment mandated by law. Even when properly installed, our Solar
Wireless Backup Camera has a limited eld of vision and does not provide a comprehensive view
of the rear area of the vehicle. You should always look around outside your vehicle and use your
mirrors to conrm rearward clearance and that your vehicle can back up safely.
Type S and/or its aliates are not responsible for a user’s intended or actual use of the Solar
Wireless Backup Camera. In no event shall Type S and/or its aliates have any liability for any
losses (whether direct or indirect, in contract, tort or otherwise) incurred in connection with the
Solar Wireless Backup Camera, including but not limited to damaged property, personal injur y
and/or loss of life. Neither shall Type S and/or its aliates have any liability for any decision,
action or inaction taken by any person in reliance on the Solar Wireless Backup Camera, or for
any delays, inaccuracies and /or errors in connection with the Solar Wireless Backup Camera and
its functioning.
Type S and/or its aliates shall have no responsibility or liability for damage and/or injury
resulting from accidents occurring with vehicles having the installed, and Type S and/or its
aliates, the manufacturer, distributor and seller shall not be liable for any injury, loss or
damage, incidental or consequential, arising out of the use or intended use of the product.
19

9. GENERAL INFORMATION
CUSTOMER SERVICE/CONTACT
IF YOU ARE EXPERIENCING ANY ISSUES WITH THE PRODUCT DURING OPERATION, DO NOT RETURN
THE PRODUCT TO THE STORE. CONTACT TYPE S DIRECTLY FOR INSTRUCTIONS ON HOW TO RETURN/
EXCHANGE THE PRODUCT.
FCC / IC Compliance Statement:
This device complies with Part 15 of the FCC rules and Industry Canada license-exempt RSS
standard(s). Operation is subject to the following two conditions: (1) This device may not cause
harmful interference, and (2) this device must accept any interference received, including
interference that may cause undesired operation.
Warning: Changes or modications to this unit not expressly approved by the party responsible
for compliance could void the user’s authority to operate the equipment. The manufacturer is not
responsible for any radio or TV interference caused by unauthorized modications or change to this
equipment. Such modications or change could void the user’s authority to operate the equipment.
NOTE: This equipment has been tested and found to comply with the limits for Class B digital device,
pursuant to part 15 of the FCC Rules. These limits are designed to provide reasonable protection
against harmful interference in a residential installation. This equipment generates, uses and can
radiate radio frequency energy and, if not installed and used in accordance with the instructions,
may cause harmful interference to radio or television reception, which can be determined by turning
the equipment o and on, the user is encouraged to try to correct the interference by one or more of
the following measures:
- Reorient or relocate the receiving antenna.
- Increase the separation between the equipment and the receiver.
- Connect the equipment into an outlet on a circuit dierent from that to
which the receiver is connected.
- Consult the dealer or an experienced radio/TV technician for help.
20

The device has been evaluated to meet general RF exposure requirement.
To maintain compliance with FCC/IC’s RF exposure guidelines, this equipment should be installed
and operated with a minimum distance of 20cm between the radiator and your body.
CAN ICES-3 (B)/NMB-3(B)
Wireless Backup Camera
Solar Powered With 6.8” Widescreen HD Monitor
BT 57132
Responsible Party:
Typ e S
2975 Red Hill Ave., Ste. 100,
Costa Mesa, CA 92626
Tel: 866-294-9244
21

A Horizon Brands Company
2975 Red Hill Ave., Ste. 100, Costa Mesa, CA 92626
1.866.294.9244 | info@typesauto.com
©2019 Type S. All rights reserved.
www.typesauto.com
ML-57132_V1
 Loading...