

Ty Pennington Style PG-TTH003 Use And Care Manual
Use and Care Guide
TY PENNINGTON WICKER PATIO HEATER
Product code:46371/0-08432438-3
Item: 146.46371610
UPC code: 182995001726
Date of purchase: / /

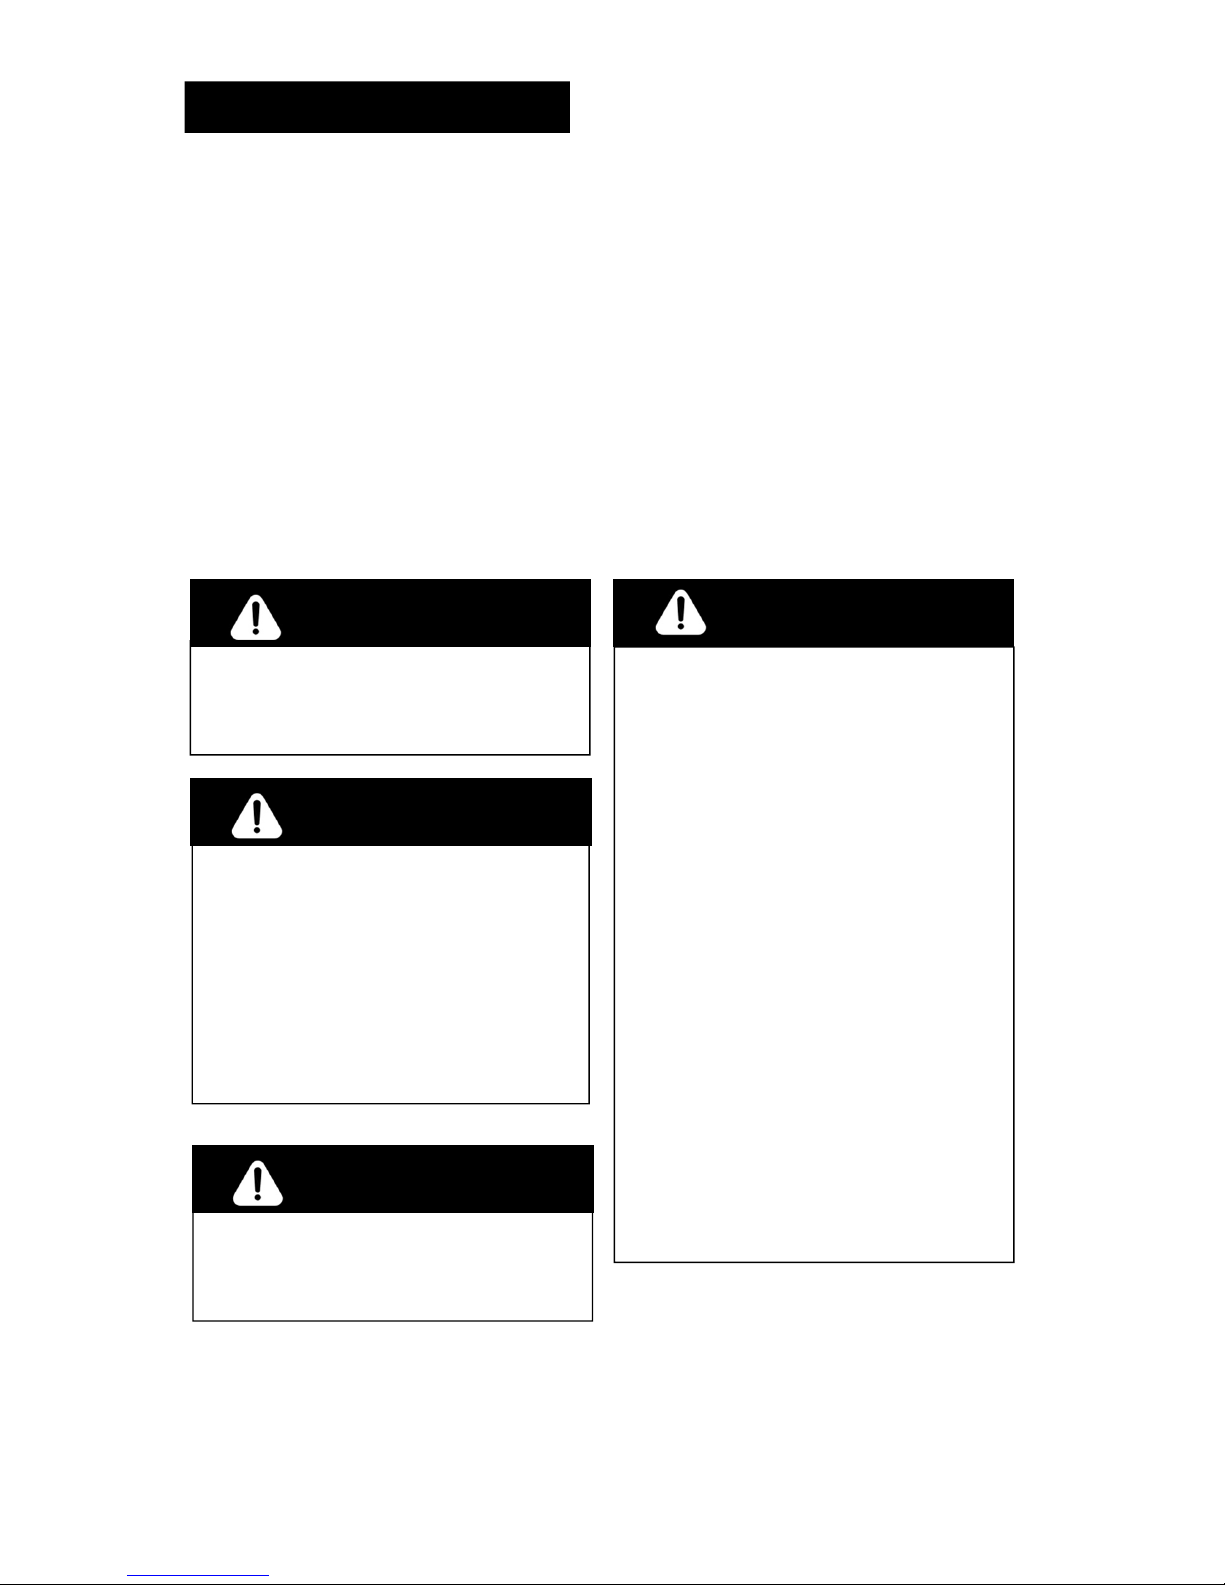
DANGER
If you smell gas:
1.Shut off gas to the appliance.
2.Extinguish any open flame.
3.If odor continues, keep away from the
appliance and immediately call you gas
supplier or fire department.
WARNING
For outdoor use only.
WARNING
Do not store or use gasoline or other
flammable vapors and liquids in the vicinity
of this or any other appliance.
An LP-cylinder not connected for use shall
not be stored in the vicinity of this or any
other appliance.
WARNING
Improper installation, adjustment, alteration,
service or maintenance can cause property
damage, injury or
death. Read the installation, operation and
maintenance instructions thoroughly before
installing or servicing this equipment.
TABLE OF CONTENTS
Product specifications …2
Safely information… …3
Preparation …5
Package contents … …6
Replacement parts list… …7
Replacement parts Diagram… …8
Assembly… …9
Operating instruction …20
Care and maintenance …22
Warranty …25
PRODUCT SPECIFICATIONS
Certification CSA
Height Overall 90.6 inches
Reflector Diameter 32 inches
Rated Heat Input 42,000BTU/HR
Fuel Propane-LP
Gas Supply 20-LB LP-Gas cylinder
Manifold Pressure 11 inches W.C
Injector Size(diameter) 1.99mm
Safety Features Thermocouple & Tilt Switch
If you experience any problems with your heater,
Do NOT RETURN THE PRODUCT TO THE STORE,
please call 1-888-287-0735 for assistances.8 am
to 5 pm, Monday to Friday.
2
Please read and understand this entire manual before attempting to assemble, operate or
install the product.
This manual contains important information about the assembly, operation and maintenance
of this patio heater. General safety information is presented in these first few pages and is
also located throughout the manual. Keep this manual for future reference and to educate
new users of this product. This manual should be read in conjunction with the labeling on the
product. Safety precautions are essential when any mechanical or propane fueled equipment
is involved. These precautions are necessary when using, storing, and servicing. Using this
equipment with the respect and caution demanded will reduce the possibilities of personal
injury or property damage. The following symbols shown below are used extensively
throughout this manual. Always heed these precautions, as they are essential when using any
mechanical or fueled equipment.
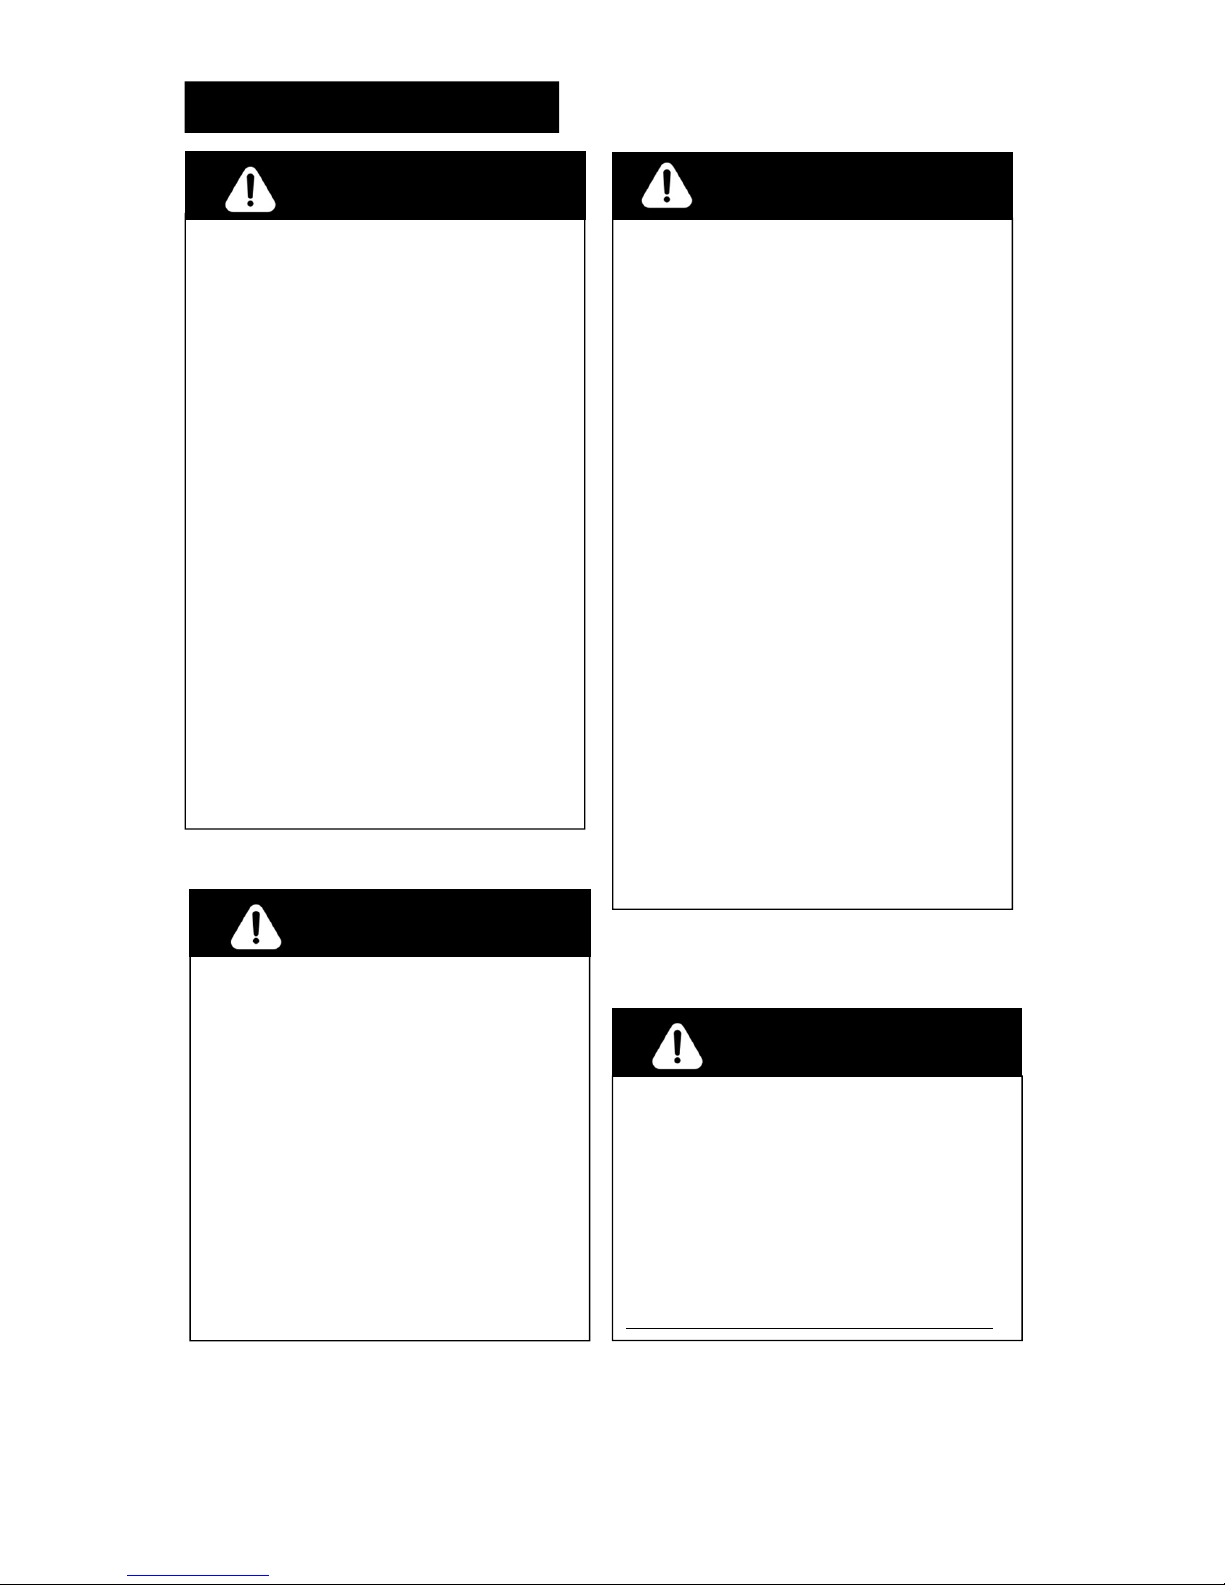
SAFETY INFORMATION
DANGER
DANGER indicates an imminently hazardous
situation which, if not avoided, will result in
death or serious injury.
DANGER
• CARBON MONOXIDE HAZARD
• This heater is a combustion appliance. All
combustion appliances produce carbon
monoxide (CO) during the combustion
process. This product is designed to produce
extremely minute, non-hazardous amounts of
CO if used and maintained in accordance
with all warnings and instructions. Do not
block air flow into or out of the heater.
• Carbon Monoxide (CO) poisoning produces
flu-like symptoms, watery eyes, headaches,
dizziness, fatigue and possibly death. You
can't see it and you can't smell it. It's an
invisible killer. If these symptoms are present
during operation of this product get fresh air
immediately!
• For outdoor use only.
• Never use inside house, or other
unventilated or enclosed areas.
• This heater consumes air (oxygen). Do not
use in unventilated or enclosed areas to
avoid endangering your life.
3
DANGER
Failure to comply with the precautions and
instructions provided with this heater can
result in death, serious bodily injury and
property loss or damage from hazards of
fire, explosion, burn, asphyxiation, and/or
carbon monoxide poisoning. Only persons
who can understand and follow the
instructions should use or service this heater.
WARNING
WARNING indicates an imminently
hazardous situation which, if not avoided,
will result in death or serious injury.
SAFETY INFORMATION
DANGER
• EXPLOSION - FIRE HAZARD
• Keep solid combustibles, such as building
materials, paper or cardboard, a safe
distance away from the heater as
recommended by the instructions.
• Provide adequate clearances around air
openings into the combustion chamber.
• Never use the heater in spaces which do or
may contain volatile or airborne
combustibles, or products
such as gasoline, solvents, paint thinner, dust
particles or unknown chemicals.
• During operation, this product can be a
source of ignition. Keep heater area clear
and free from
combustible materials, gasoline, paint thinner,
cleaning solvents and other flammable
vapors and liquids. Do not use heater in
areas with high dust content. Minimum heater
clearances from combustible materials: three
(3) feet from the sides & two (2) feet from
the top.
DANGER
• EXPLOSION - FIRE HAZARD
• Never store propane near high heat, open
flames, pilot lights, direct sunlight, other
ignition sources or where temperatures
exceed 120 degrees F (49°C).
• Propane vapors are heavier than air and
can accumulate in low places. If you smell
gas, leave the area immediately.
• Never install or remove propane cylinder
while heater is lighted, near flame, pilot
lights, other ignition sources
or while heater is hot to touch.
• This heater is red hot during use and can
ignite flammables too close to the burner.
Keep flammables at least 3 feet from sides &
2 feet from top. Keep gasoline and other
flammable liquids and vapors well away
from heater.
• Store the propane cylinder outdoors in a
well ventilated space out of reach of children.
Never store the propane
cylinder in an enclosed area (house, garage,
etc.). If heater is to be stored indoors,
disconnect the propane
cylinder for outdoor storage.
4
WARNING
We cannot foresee every use which may be
made of our heaters.
Check with your local fire safety authority if
you have questions about heater use.
Other standards govern the use of fuel gases
and heat producing products for specific
uses. Your local authorities can advise you
about these.
If no local codes exist, follow National Fuel
Gas Code, ANSI Z223.1. In Canada,
installation must conform to
local codes. If no local codes exist, follow the
current National standards of CANADA
CAN/CGA-B 149.2.
WARNING
CALIFORNIA PROPOSITION 65
1. Combustion by-produced when using this
product contain chemicals known to the State
of California to cause cancer, birth defects,
and other reproductive harm.
2.This product contains chemicals, including
lead and lead compounds, known to the State
of California to cause cancer, birth defects or
other reproductive harm.
Wash your hands after handling this product.

SAFETY INFORMATION
WARNING
BURN HAZARD
• Never leave heater unattended when hot
or in use.
• Keep out of reach of children.
WARNING
Certain materials or items, when stored
under the heater, will be subjected to radiant
heat and could be seriously damaged.
WARNING
• Keep all connections and fittings clean.
Make sure propane cylinder valve outlet
is clean.
• During set up, check all connections and
fittings for leaks using soapy water. Never
use a flame.
• Use as a heating appliance only. Never
alter in any way or use with any device.
WARNING
• This product is fueled by propane gas.
Propane gas is invisible, odorless, and
flammable. An odorant is normally added
to help detect leaks and can be described
as a “rotten egg” smell. The odorant can
fade over time so leaking gas is not
always detectable by smell alone.
• Propane gas is heavier than air and
leaking propane will sink to the lowest
level possible. It can ignite by ignition
sources including matches, lighters, sparks
or open flames of any kind many feet
away from the original leak. Use only
propane gas set up for vapor withdrawal.
• Store or use propane gas in compliance
with local ordinances and codes or with
ANSI/NFPA 58. Turn off propane when
not in use.
WARNING
• Alert children and adults to the hazards
of high surface temperatures. Stay away
from these surfaces to avoid burning skin
or igniting clothing.
• Carefully supervise young children when
in the vicinity of the heater.
• Do not hang clothing or any other
flammable materials from the heater, or
place on or near the heater.
• Replace any guard or protective device
removed for servicing the appliance prior
to placing back in service.
• Installation and repair should be done by
a qualified service person. The heater
should be inspected before use and
annually by a qualified service person.
More frequent cleaning may be required
as necessary. It is imperative that the
control compartment, burners , and
circulating air passageway of the
appliance be kept clean.
PREPARATION
Before beginning assembly of product, make
sure all parts are present. Compare parts with
package contents list and hardware contents
above. If any parts missing or damaged , do
not attempt to assemble the product. Contact
customer service for replacement parts,
please call 1-888-287-0735 for
assistances.9 am to 5 pm, Monday to
Friday.
Estimated Assembly Time:30 minutes-60
minutes
Tools Required:
Screwdriver( not provided)
Wrench (provided)
5
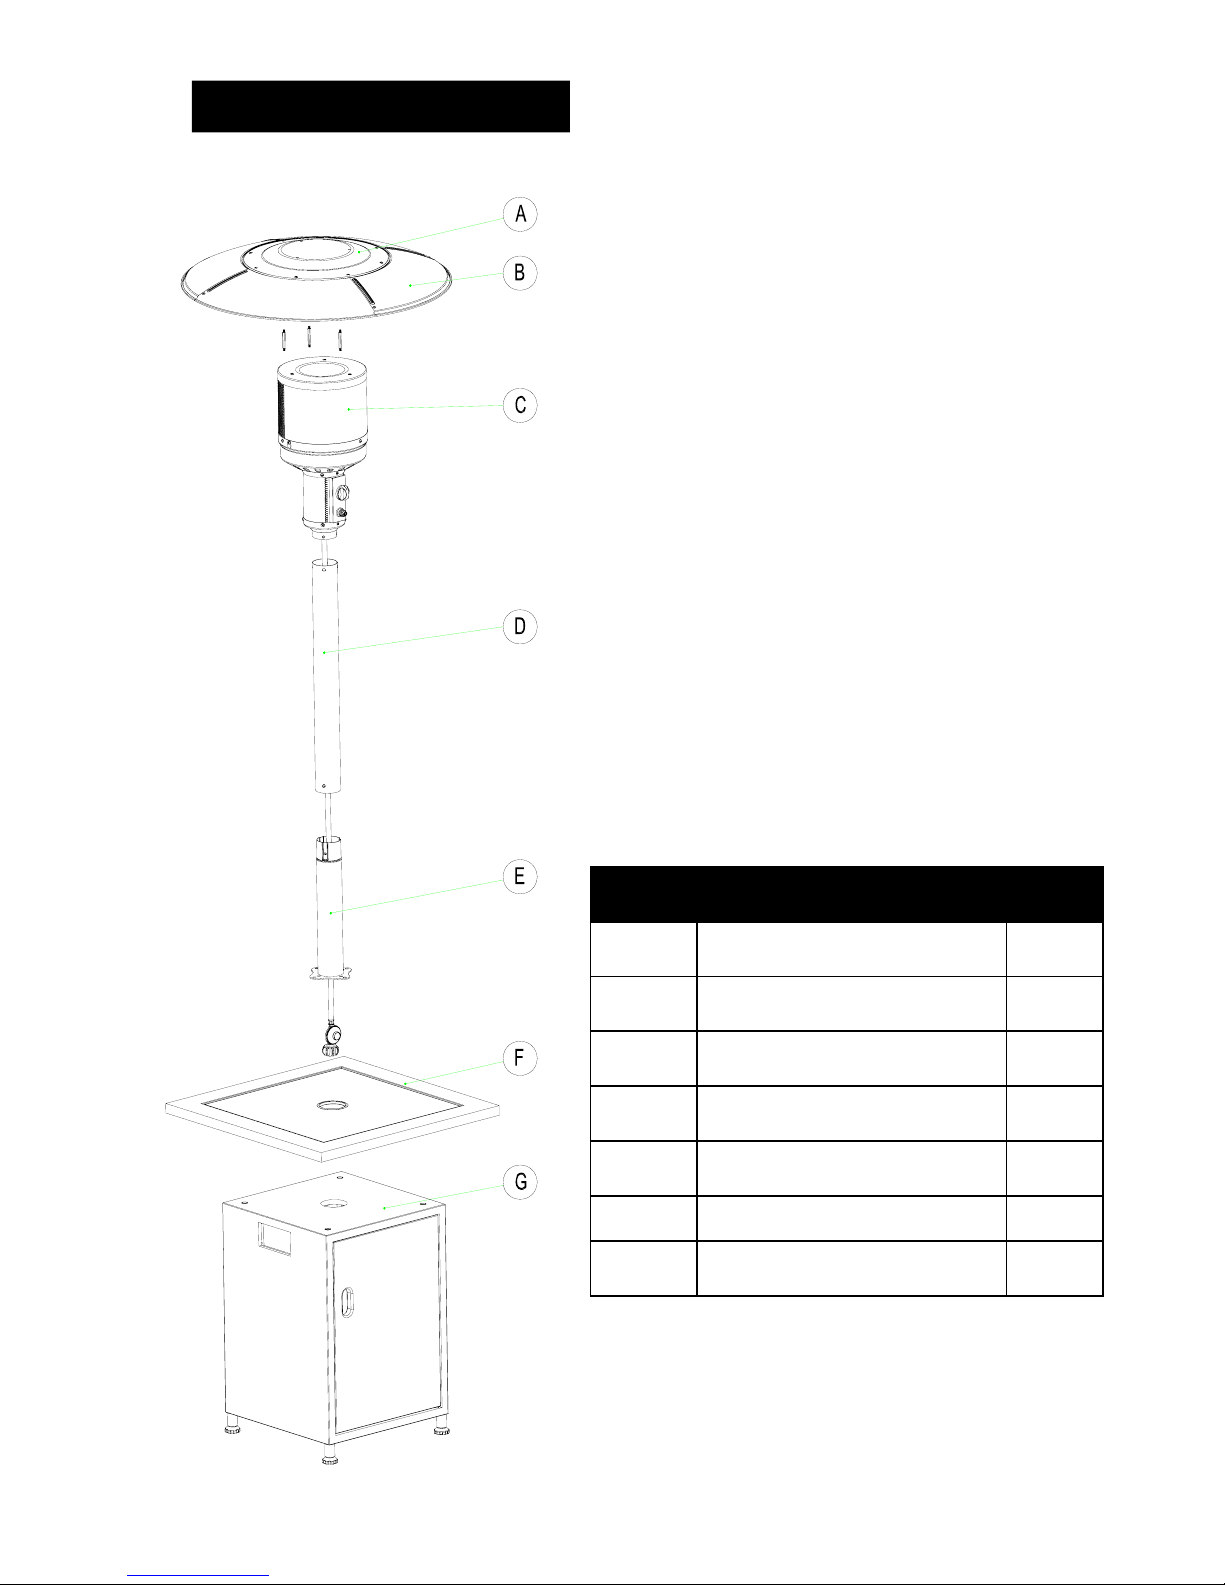
PACKAGE CONTENTS
PART DESCRIPTION QTY
AReflectorplate 1
BReflector panel 4
C Head assembly 1
DMain-post 1
E King-post 1
F Table 1
G Cylinder housing 1
6

REPLACEMENT PARTS LIST
Key
Description
Qty Part Number Key Description Qty Part Number
1
Reflector plate
1 H00300003 18 Control panel 1 H00300019
2
M5 Reflector spacer(placed in
hardware)
3 110368 19
Base of control
housing
1 H00300015
3
Reflector panel
4 H00300004 20 Door 1 H00300068
4
Head assembly
1 H00300009 21 Magnetic plate 2 H00300069
5
Wind shield
1 H00300027 22 Regulator 1 H00300208
6
Main burner
1 H00300201 23 Magnet 2 40200094
7
Bracket of thermal baffle
1 H00300081 24 Gas tank holder 1 40800130
8
Igniter system assembly
1 H00300024 25 Cotter pin 2 110050
9
Thermal baffle
2 H00300080 26 Clump weight 1 H00300215
10
Safety switch 1
1 H00300204 27 Foot extension 4 H00300211
11
Control panel support bracket
1 H00300020 28 Cylinder housing 1 H00300047
12
Burner base
1 H00300007 29
Table brackets
4 H00300040
13
Flame observation hatch
1 H00300008 30 Table shelf 1 H00300029
14
Control knob
1 H00300206 31 Glass tabletop 1 H00300209
15
Tilt switch
1 H00300205 32 Rubber bumper 1 H00300210
16
Air inlet screen
1 H00300016 33 Main post 1 H00300044
17
Electronic ignition module
1 H00300207 34 King post 1 H00300041
Not Pictured
Hardware Pack
1 H00300311
Manual
1 H00300310
If you are missing hardware or have
damaged parts after unpacking grill, call 1888-287-0735 for replacement.
To order replacement parts after using grill,
call 1-888-287-0735
7
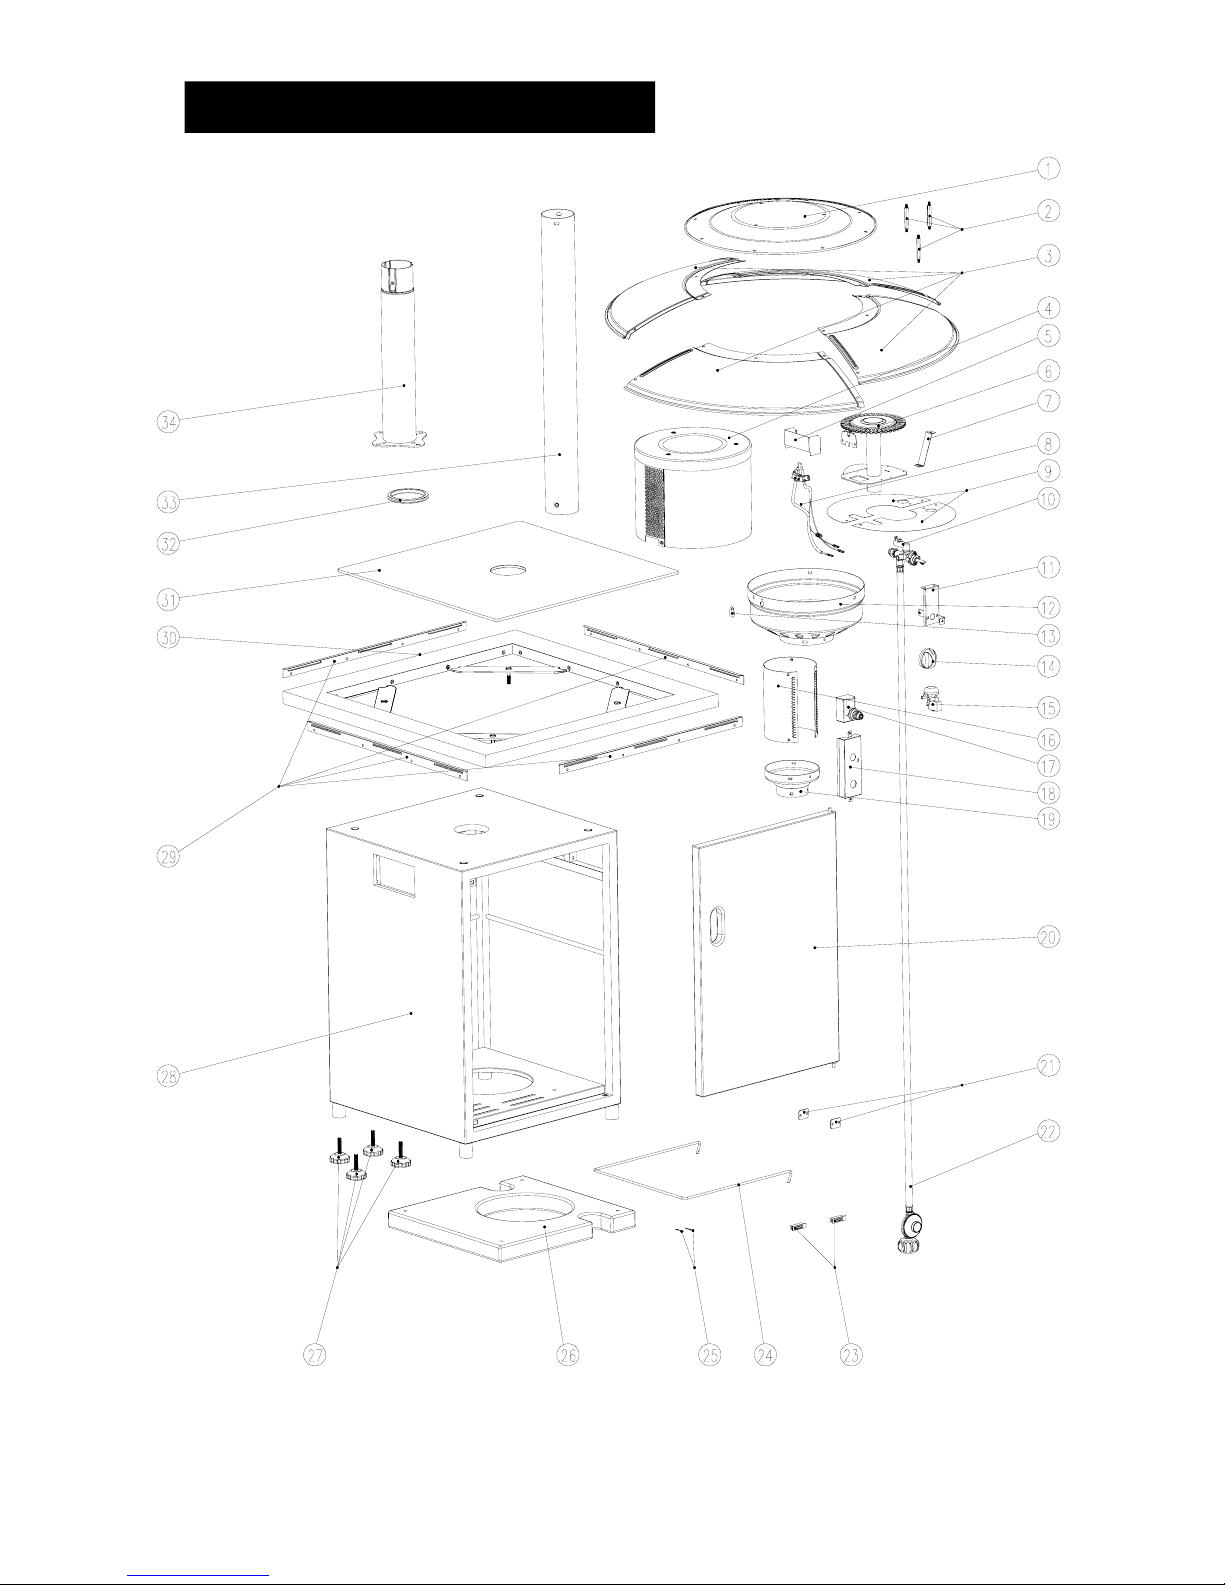
REPLACEMENT DIAGRAM
8
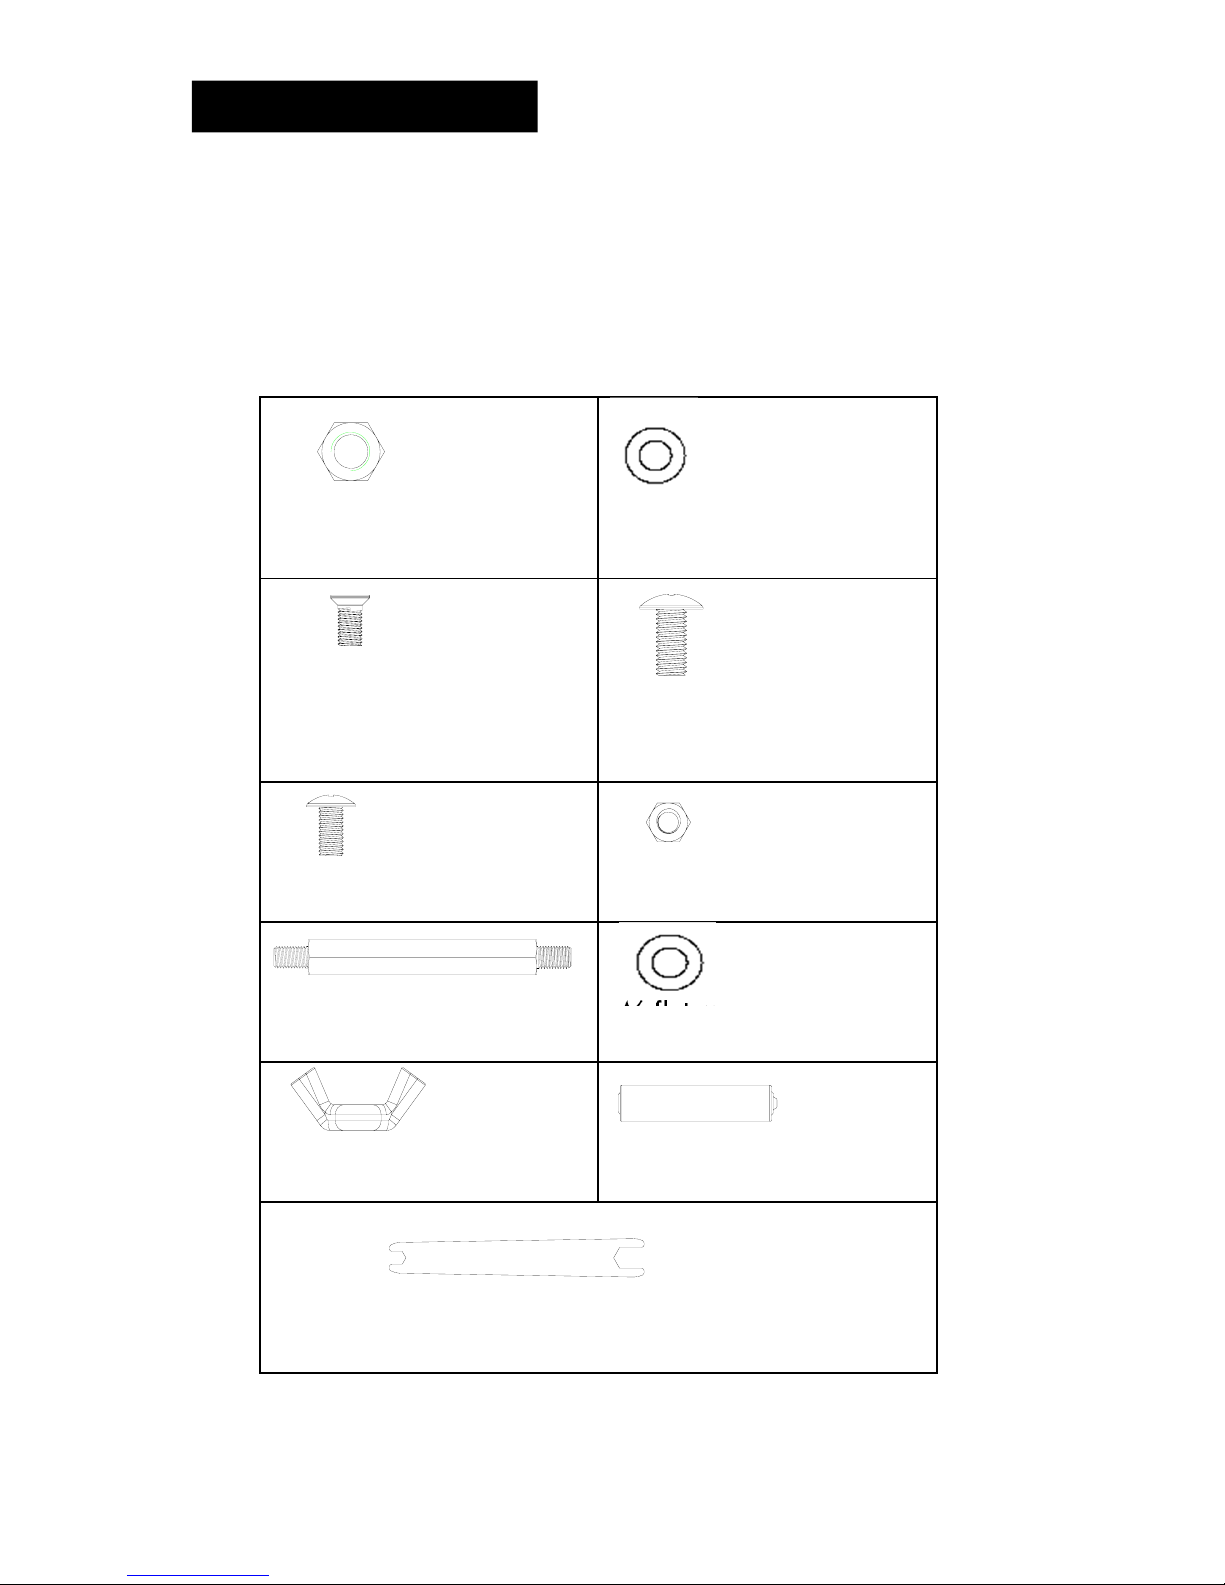
The following hardware is provided in blister pack:
M6 nut
Qty:8 pcs
M5 flat washer
Qty: 12 pcs
M5x8 countersunk head
screw
Qty:3 pcs
M6x13 screw
Qty:4 pcs
M5x8 screw
Qty:12 pcs
M5 nut
Qty:12 pcs
M5 Reflector spacer
Qty:3 pcs
M6 flat washer
Qty: 8 pcs
M5 Wing nut
Qty:3 pcs
Battery
Qty:1 pc
Wrench
Qty:1 pc
ASSEMBLY
9
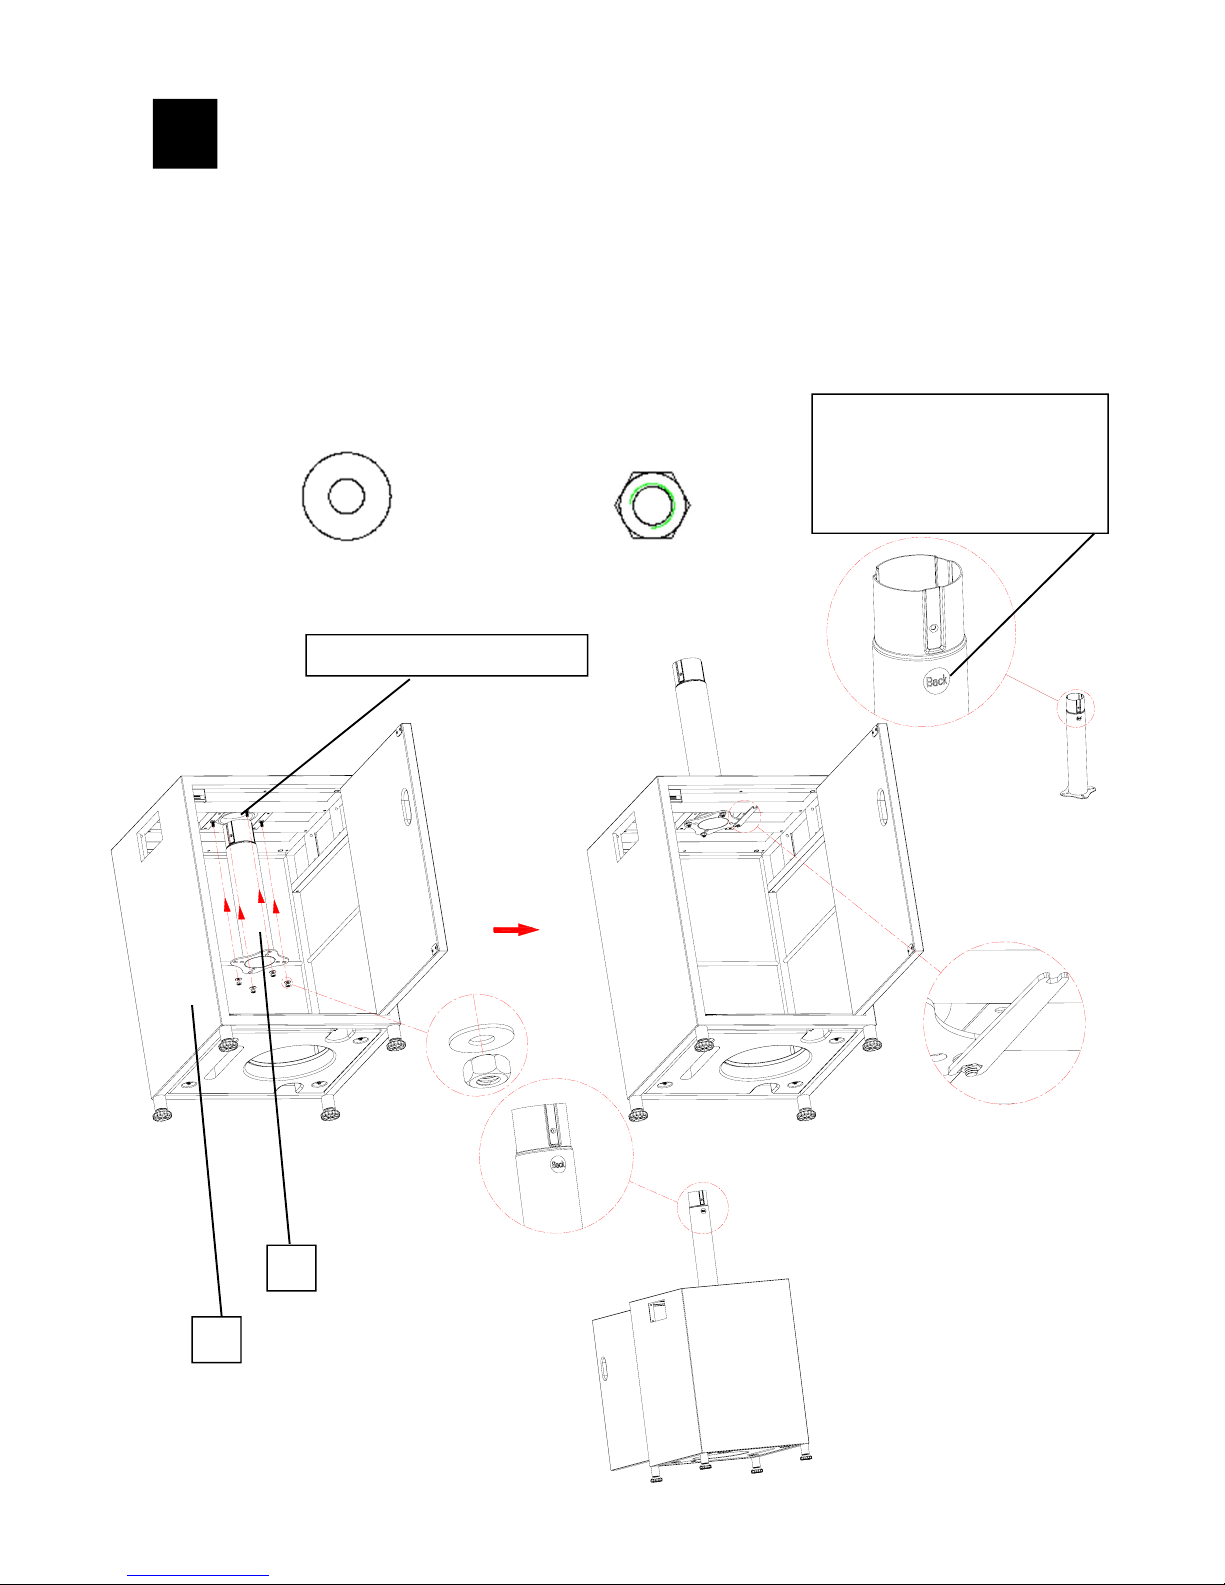
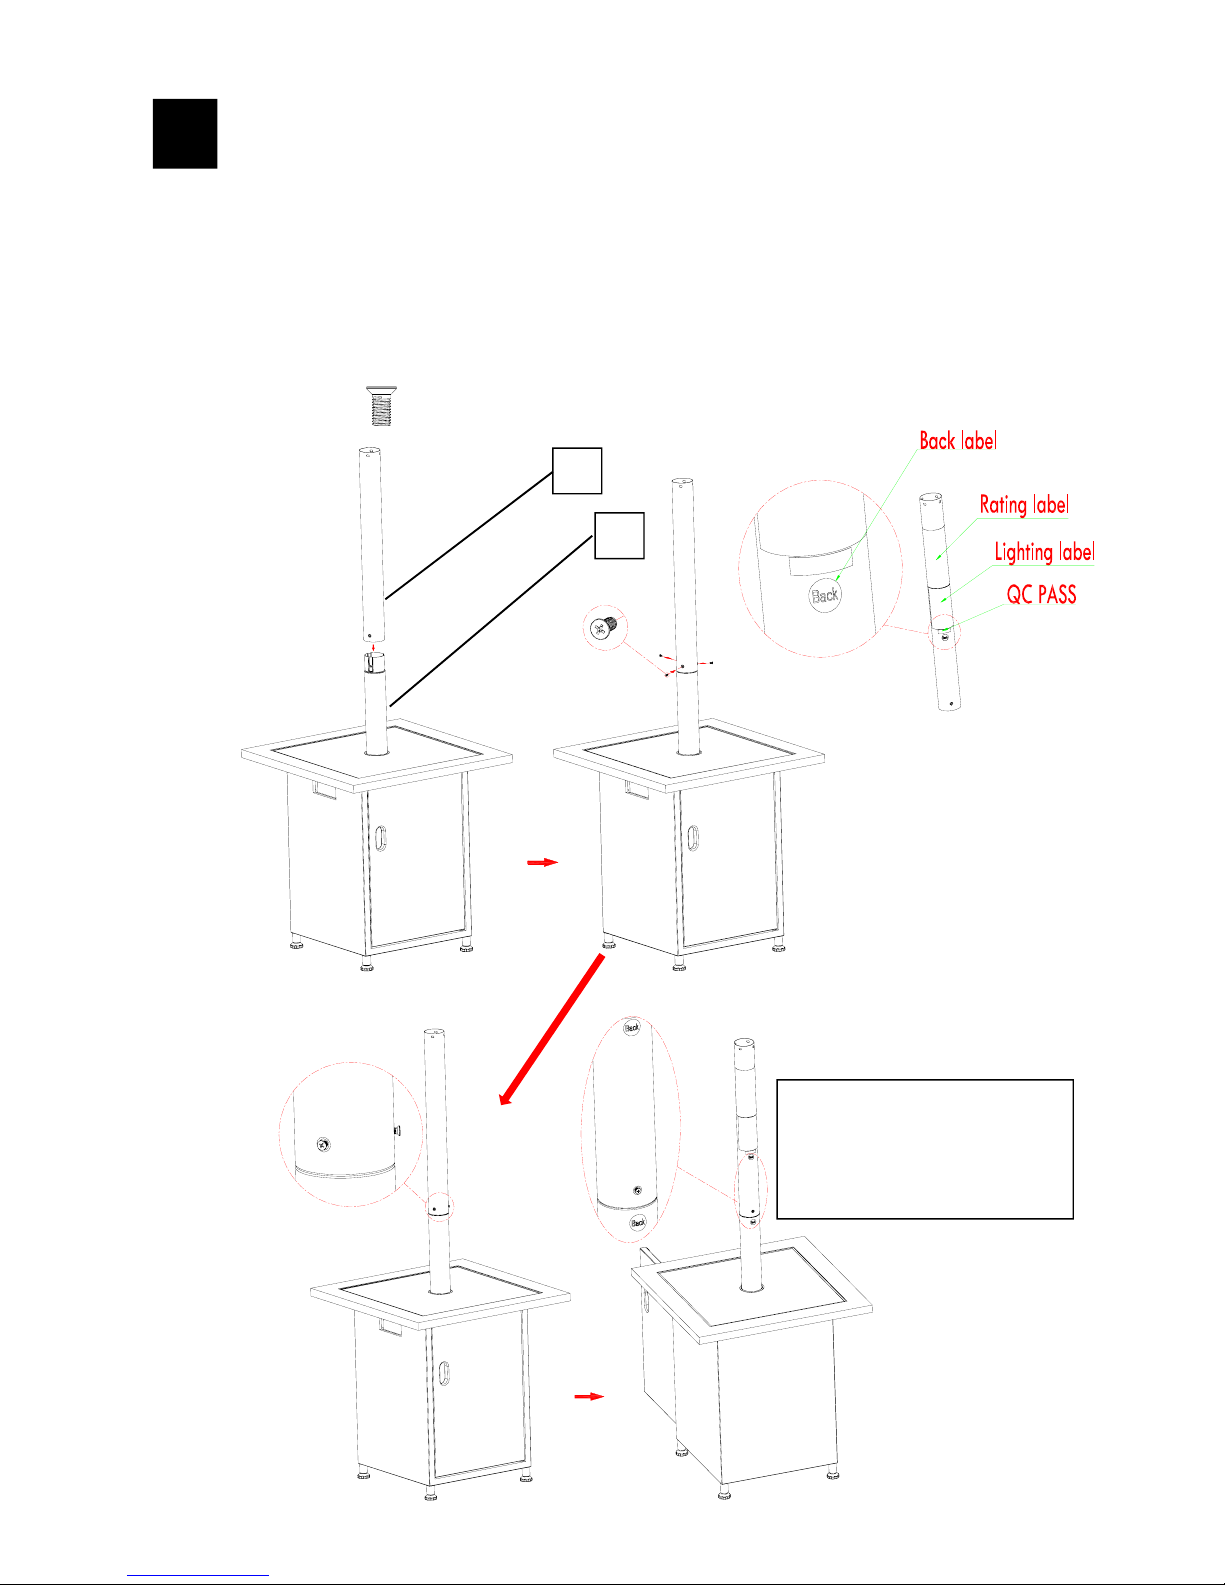
1
Step 1:
Note: Please make sure to attach king post (E) in correct direction
as shown in bellow fig. otherwise the heater control panel will not
be facing in the direction of the front of the heater which is where
the door of cylinder housing is located .
z Attach king-post (E) to cylinder housing (G) top. Open the door,
place king-post through the hole on the top of cylinder housing.
z Attach king-post to cylinder housing top as shown with (4) bolts
pre-attached, (4) M6 flat washers and (4) M6 nuts , fully tighten
the nuts with provided wrench.
M6 flat washer, Qty: 4 pcs M6 nut, Qty: 4 pcs
E
G
pre-attached bolt
10
King-post assembly: Please
attach the king post as shown
with sticker marked (Back)
facing the rear of cylinder
housing.
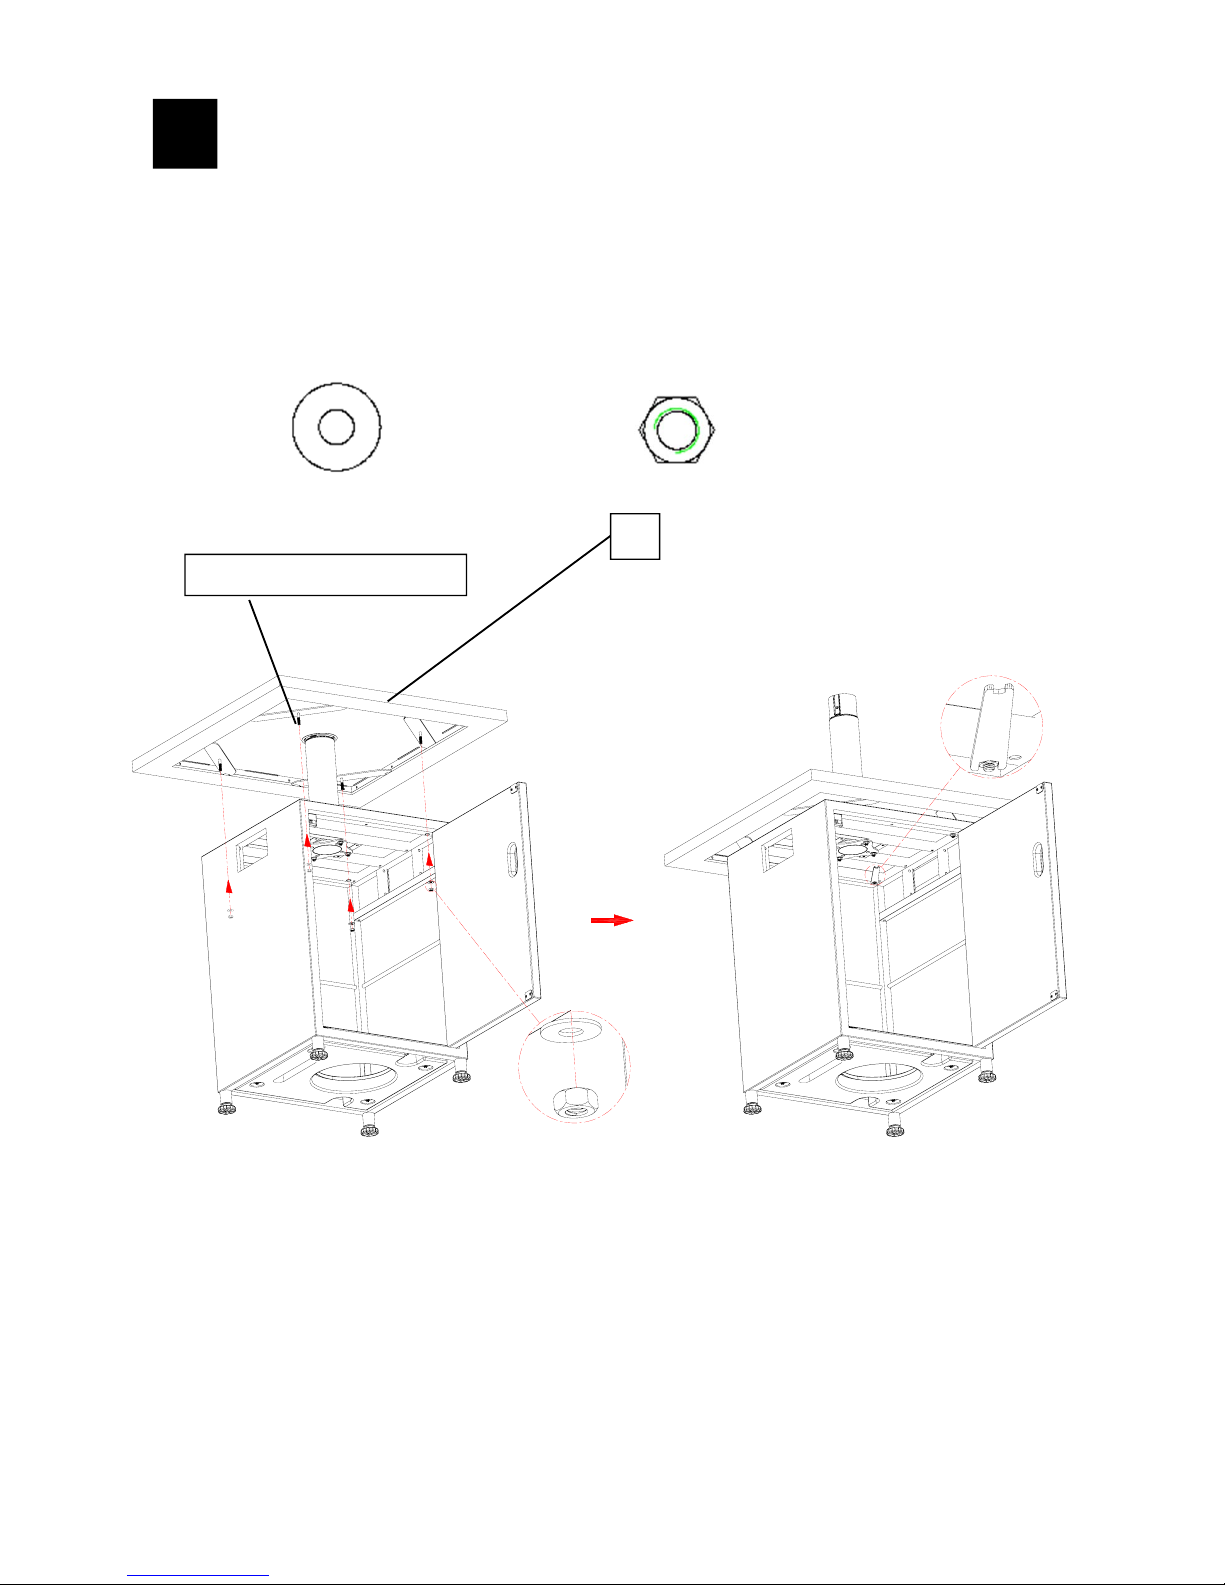
2
Step 2:
z Insert table (F) onto the king-post.
z Put (4) table bolts through the (4) mounting holes of the cylinder
housing.
z Attach table to the cylinder housing as shown with (4) table
bolts pre-assembled, (4) M6 flat washers and (4) M6 nuts, and
fully tighten the nuts using provided wrench.
M6 flat washer, Qty: 4 pcs M6 nut, Qty: 4 pcs
F
Table bolt
11
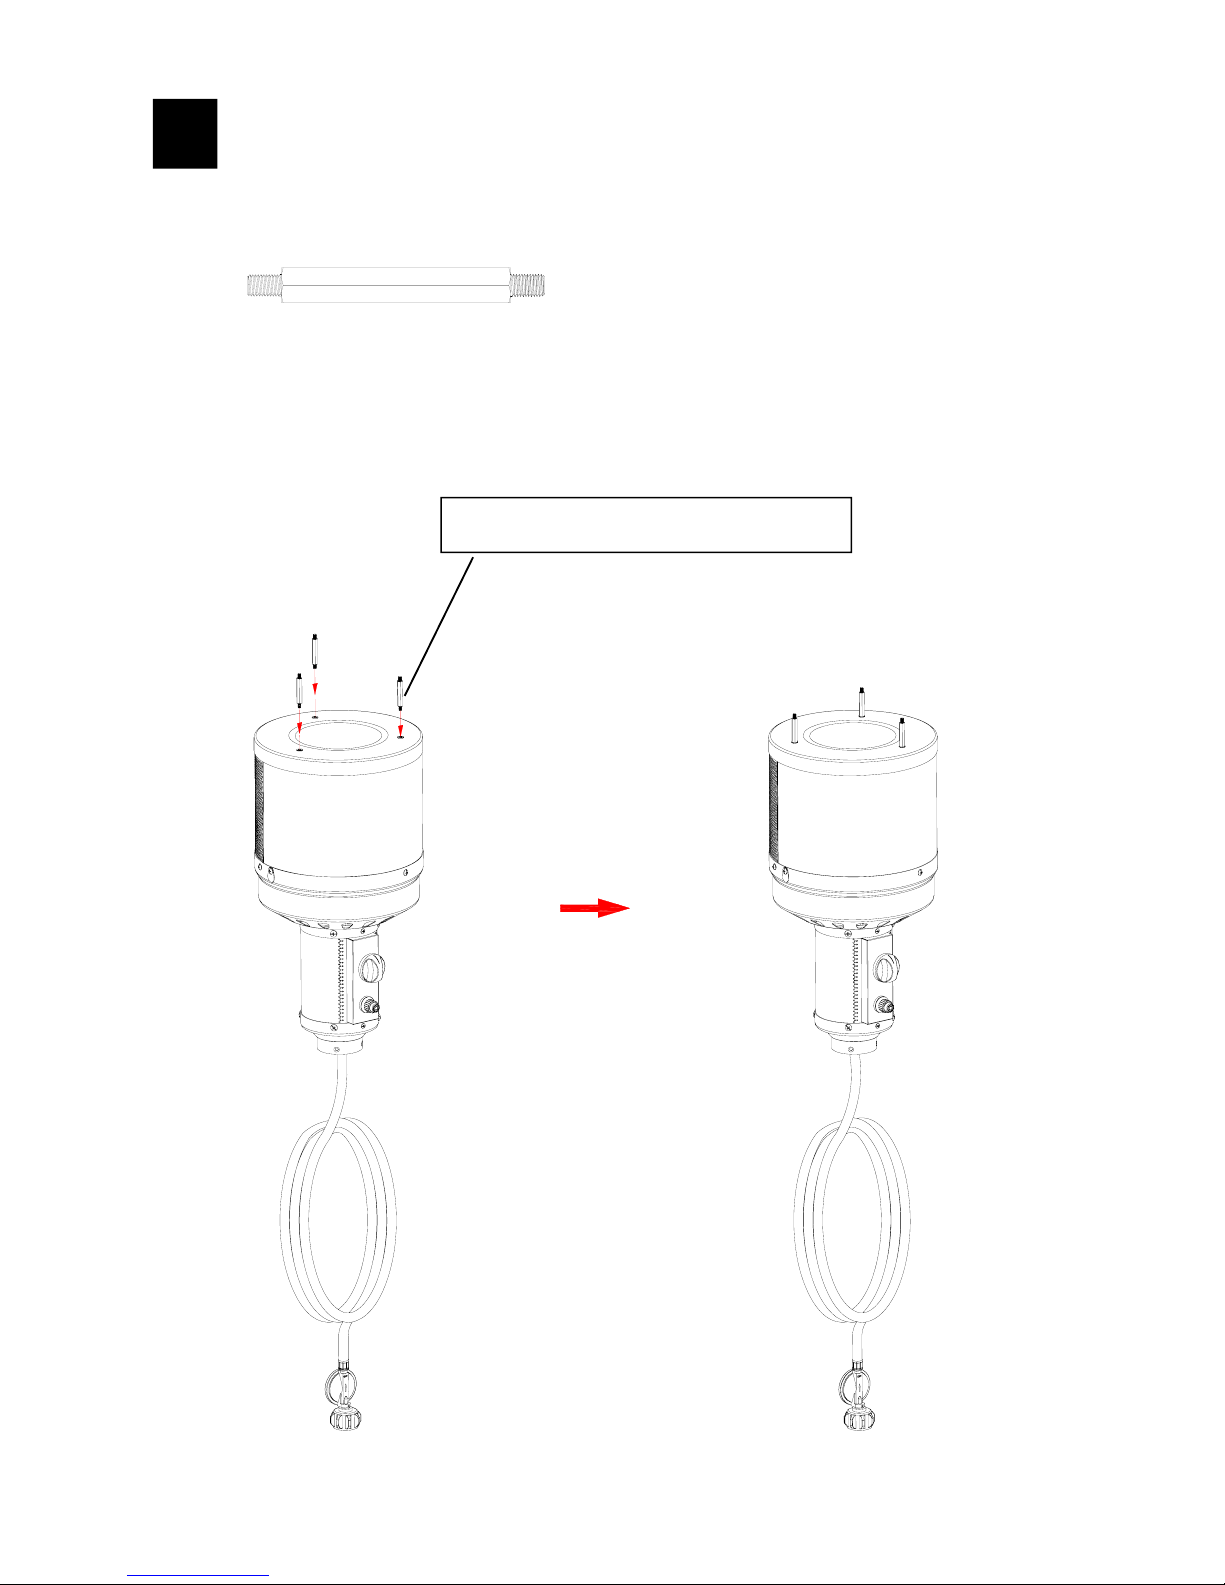
3
Step 3:
Note: Please make sure to attach Main Post (D) as shown in bellow
fig. otherwise heater control panel will not be facing in the direction
of the front of the heater which is where the door of cylinder
housing is located.
z Insert main post (D) onto top of king post (E) as shown attach
using (3) M5*8 countersunk head screws. Do not fully tighten
screws at this time, and leave 2-3mm screw head in outside to
allow pass through of regulator in step 5.
M5*8 countersunk head screw, Qty: 3 pcs
D
E
12
Main-post assembly: Please
attach the main post as shown
with sticker marked (Back)
facing the rear of cylinder
housing.
4
Step 4:
z Insert (3) M5 reflector spacers into top of head assembly.
Tighten the M5 reflector spacers.
M5 reflector spacer, Qty: 3 pcs
M5 reflector spacer
13
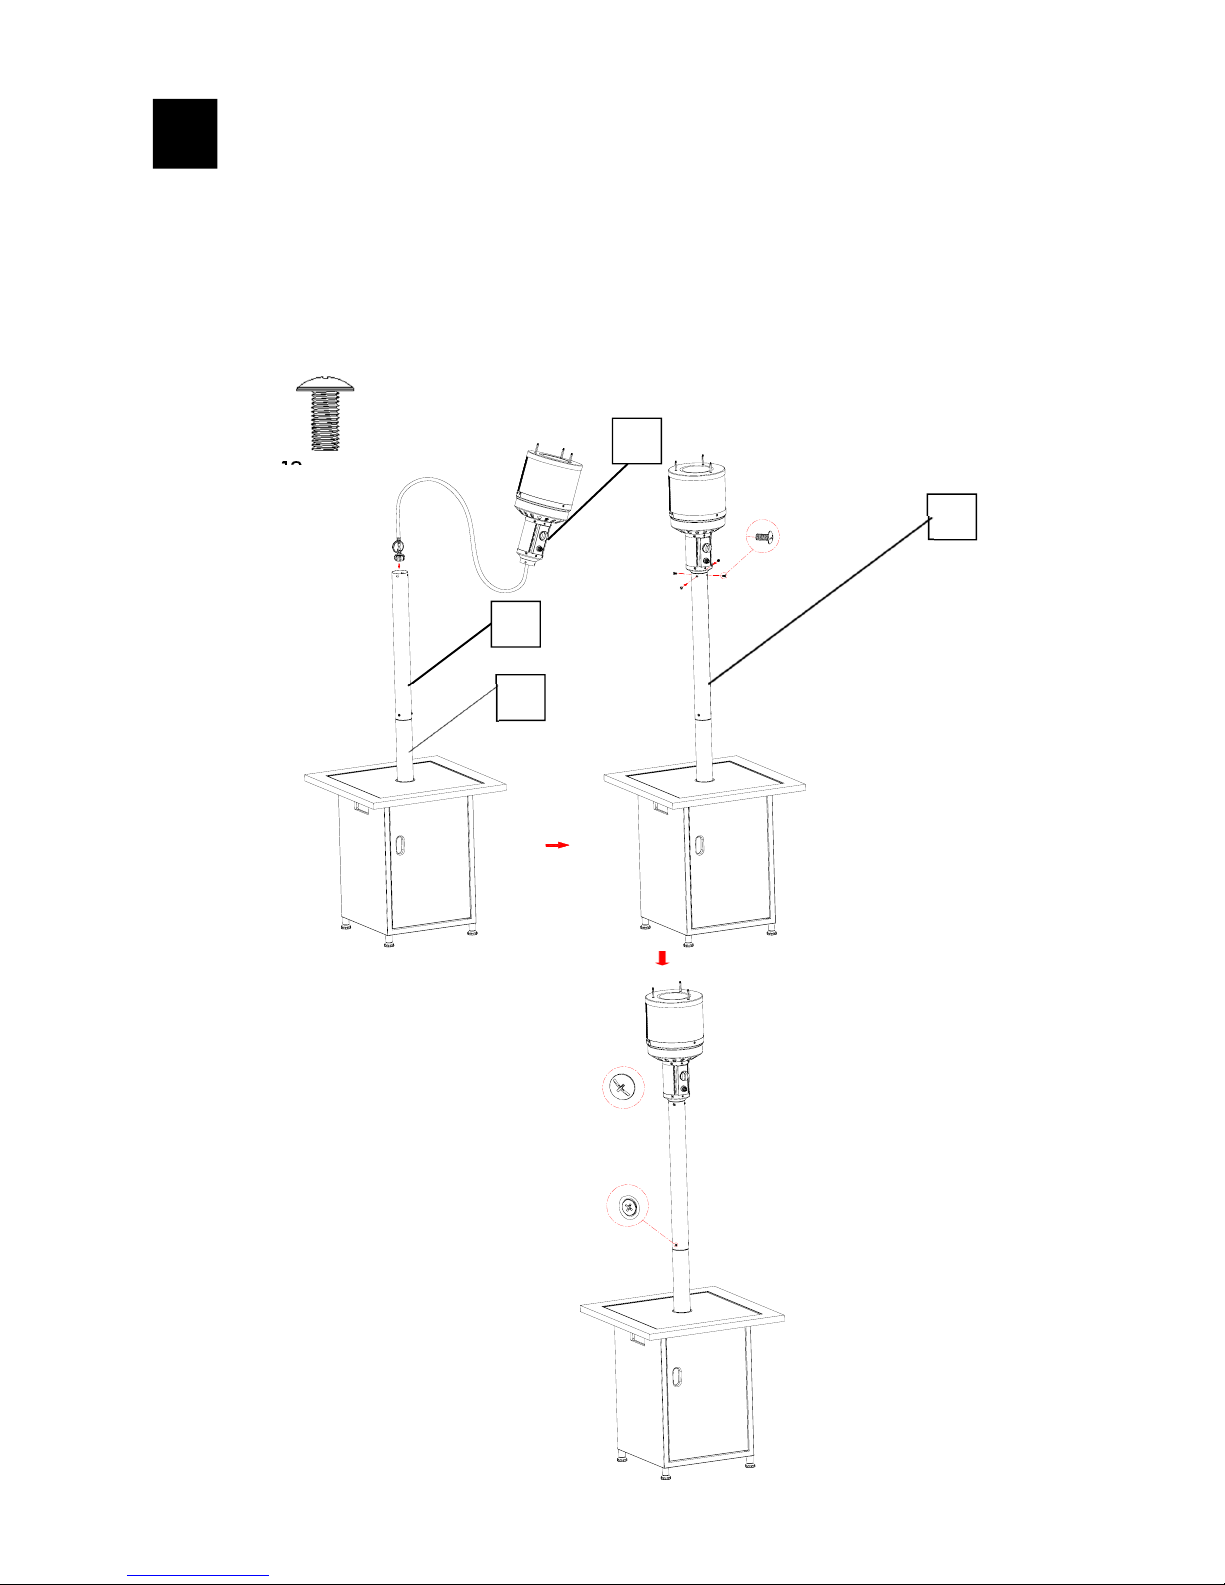
5
Step 5:
Note: This step must be done by two adults.
z Thread the regulator assembly preassembled to head assembly
(C) through the main post (D) and king post (E). Once the head
assembly rests on main post (D), tighten securely with (4)
M6*13 screws as shown.
z Back to step 3, fully tighten (3) M5*8 countersunk head screws
to secure king post and main post at this time.
M6*13screw,Qty:4pcs
E
D
D
C
14
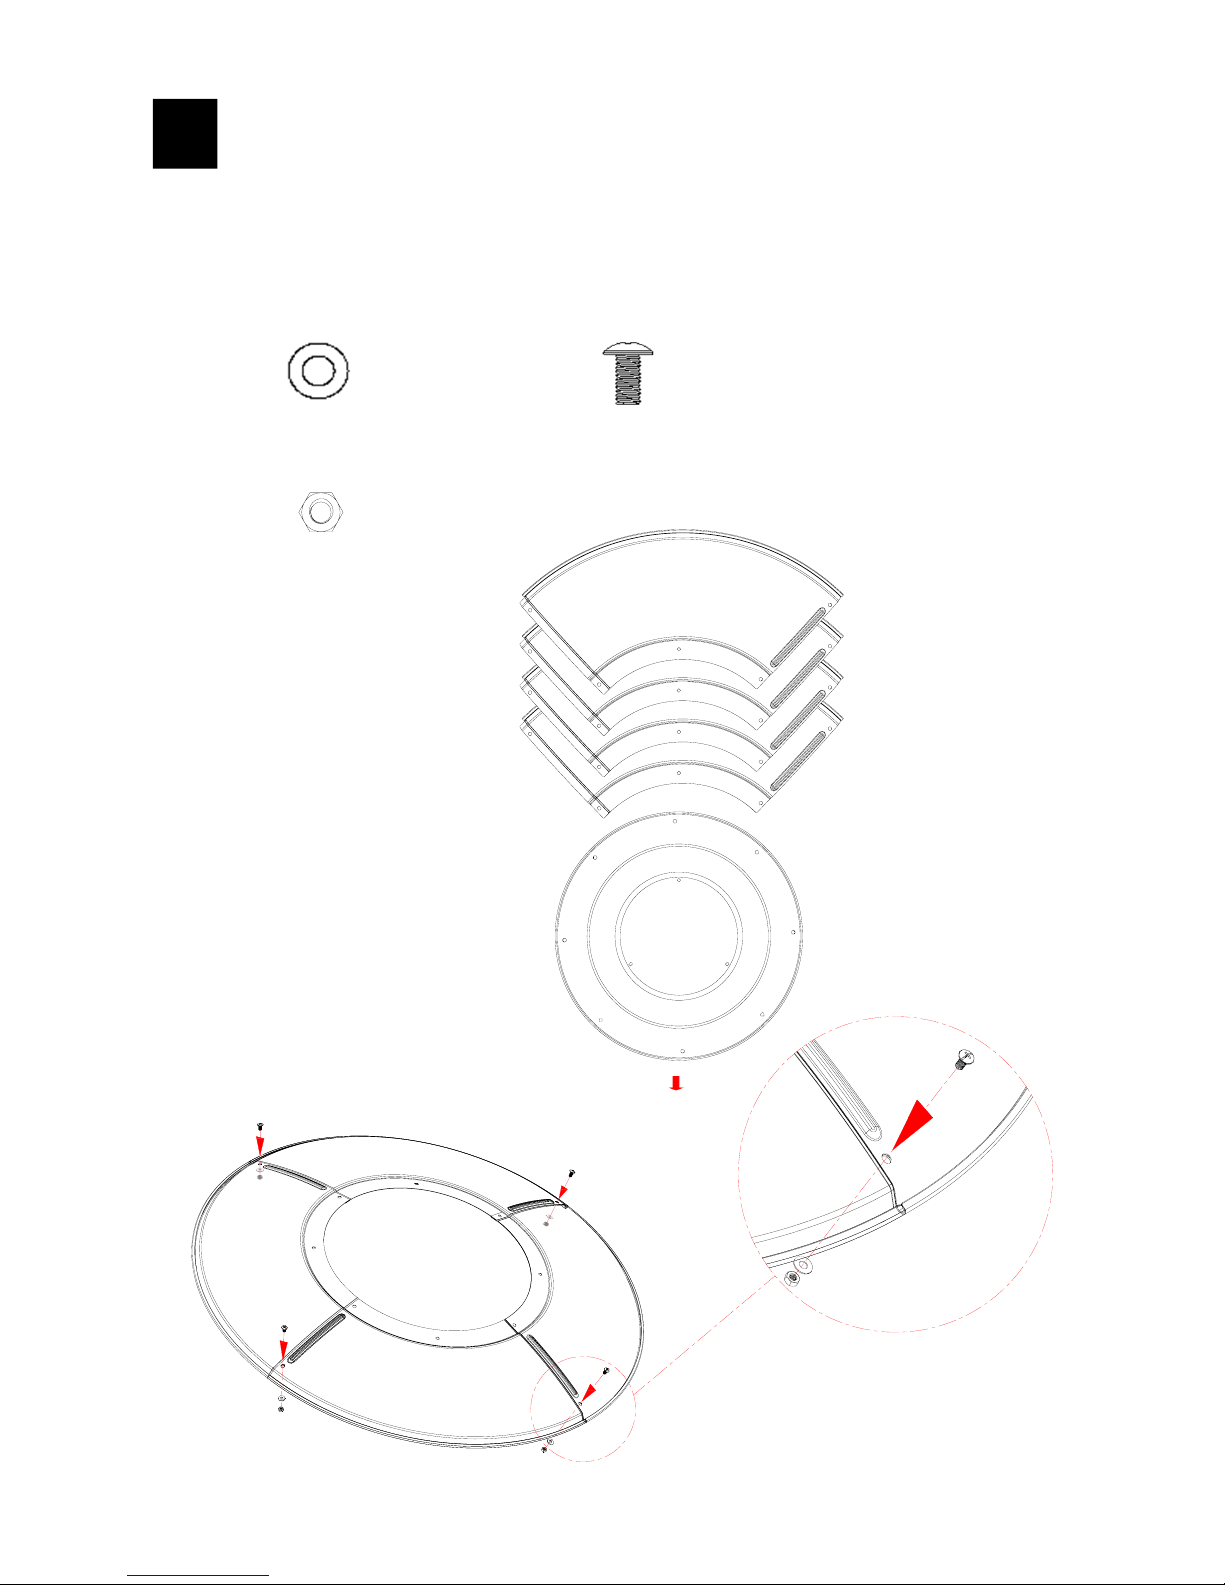
6
Step 6:
Note: Remove protective plastic cover of reflector panels before
assemble.
z Attach reflector panels using (4) M5*8 screws and (4) M5 flat
washers and (4) M5 nuts as shown. Don’t fully tighten down
screws at this time.
M5 flat washer, Qty: 4 pcs M5*8 screw, Qty: 4 pcs
M5 nut, Qty: 4 pcs
15
 Loading...