

Page 1
TYLÖ SAUNA
HARMONY GC ROUND
2017-12-04
Art.nr 2900 4714
Page 2
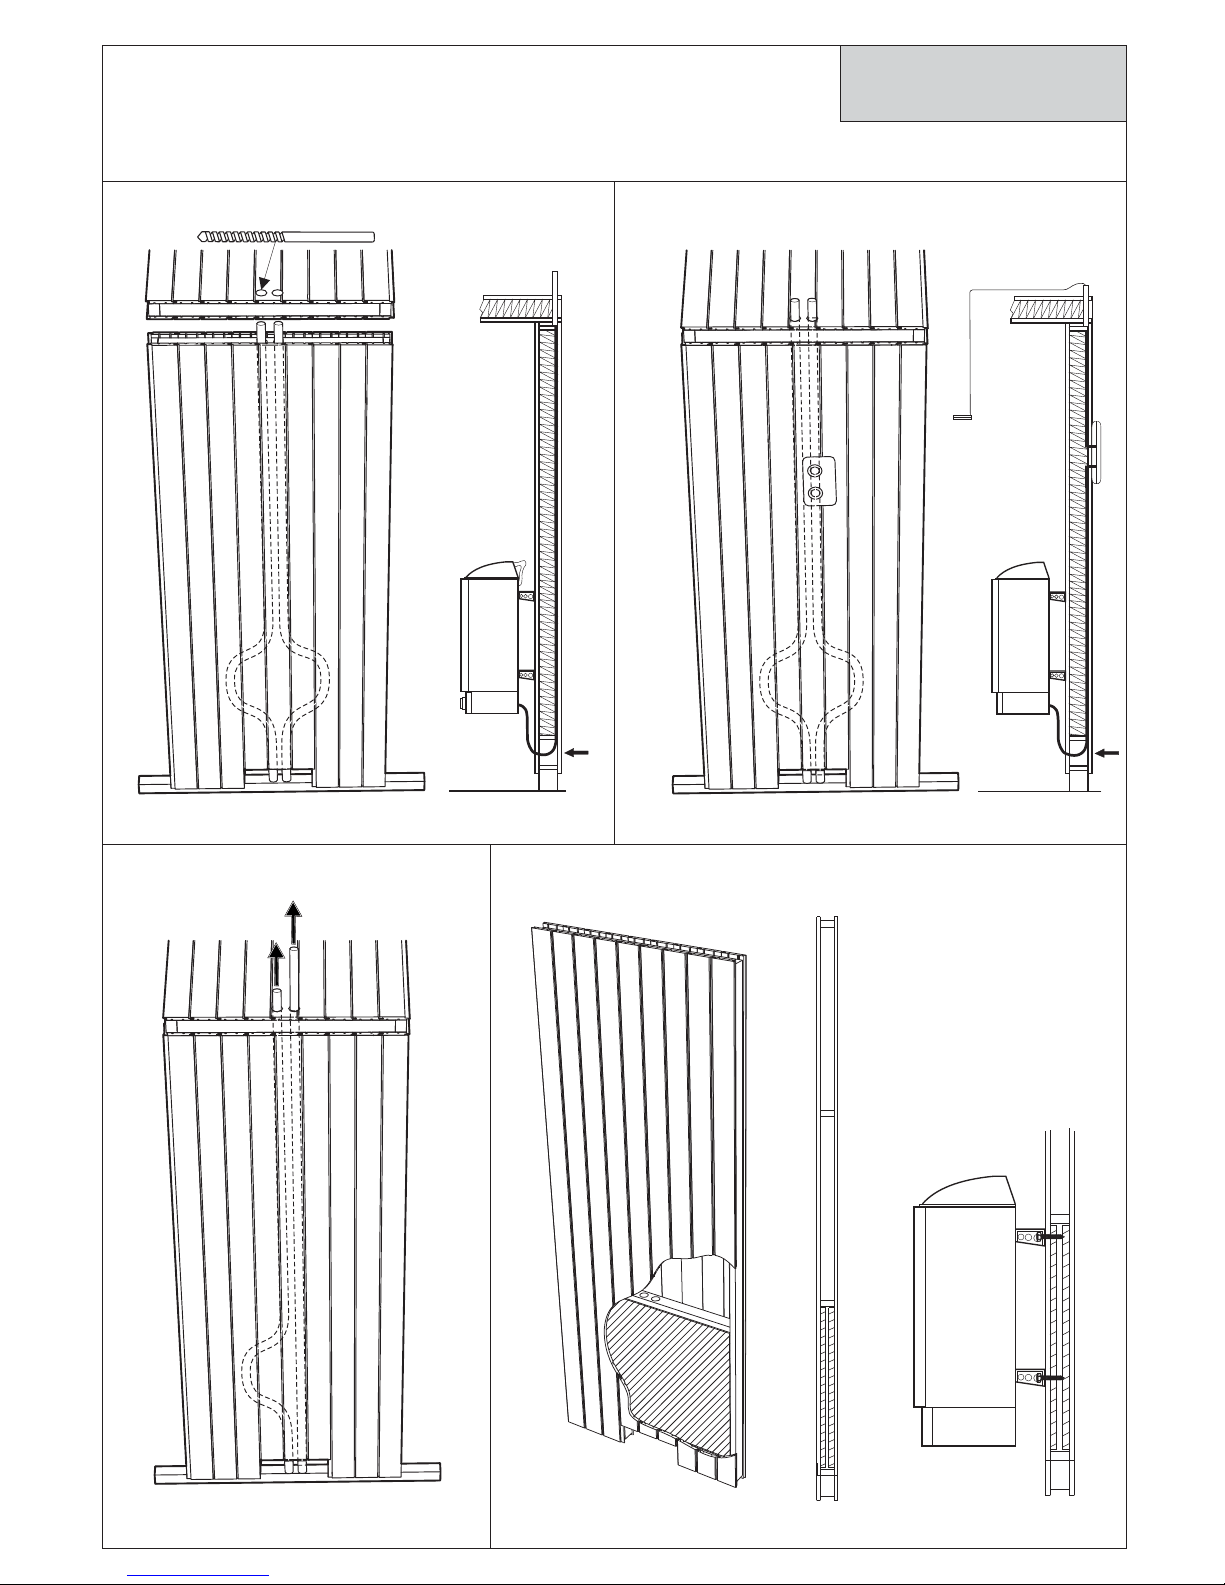
Väggsektion för aggregat
Wall section for heater
Moduł ścianki do montażu pieca do sauny
Ø 30
Information
Page 3
Tips!
Tip!
Porada!
Information
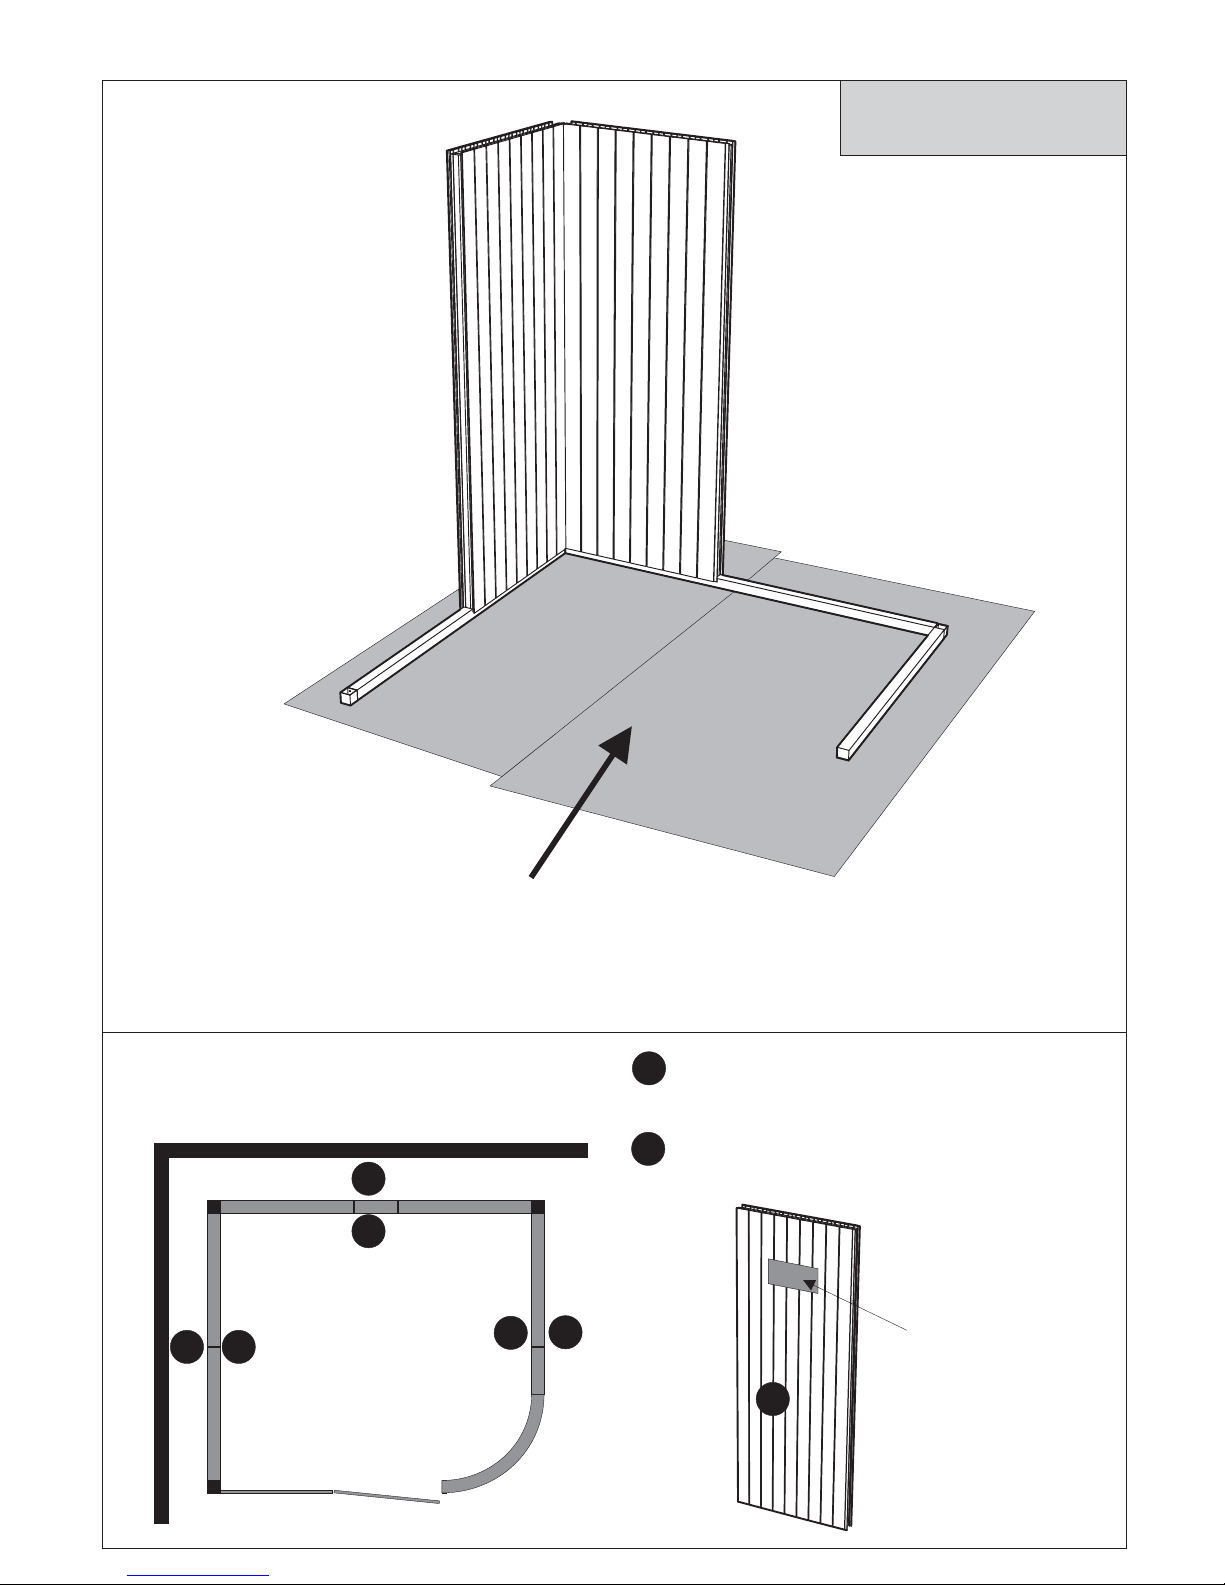
Använd som skydd på
golvet vid montering av
rummet.
Rumsemballage Room packaging
Use as a protection on
the floor during assembly
of the room.
Opakowanie sauny
Można wykorzystać jako
ochronę podłogi podczas
montażu sauny.
1
1
1
1
2
2
Väggpanel - kvalité
Wall panel - quality
Invändigt och en synlig utsida - kvalité A
Inside and one visible outside - quality A
1
Två ej synliga utsidor - kvalité C
Two invisible outsides - quality C
2
2
Se etikett
See lable
Page 4
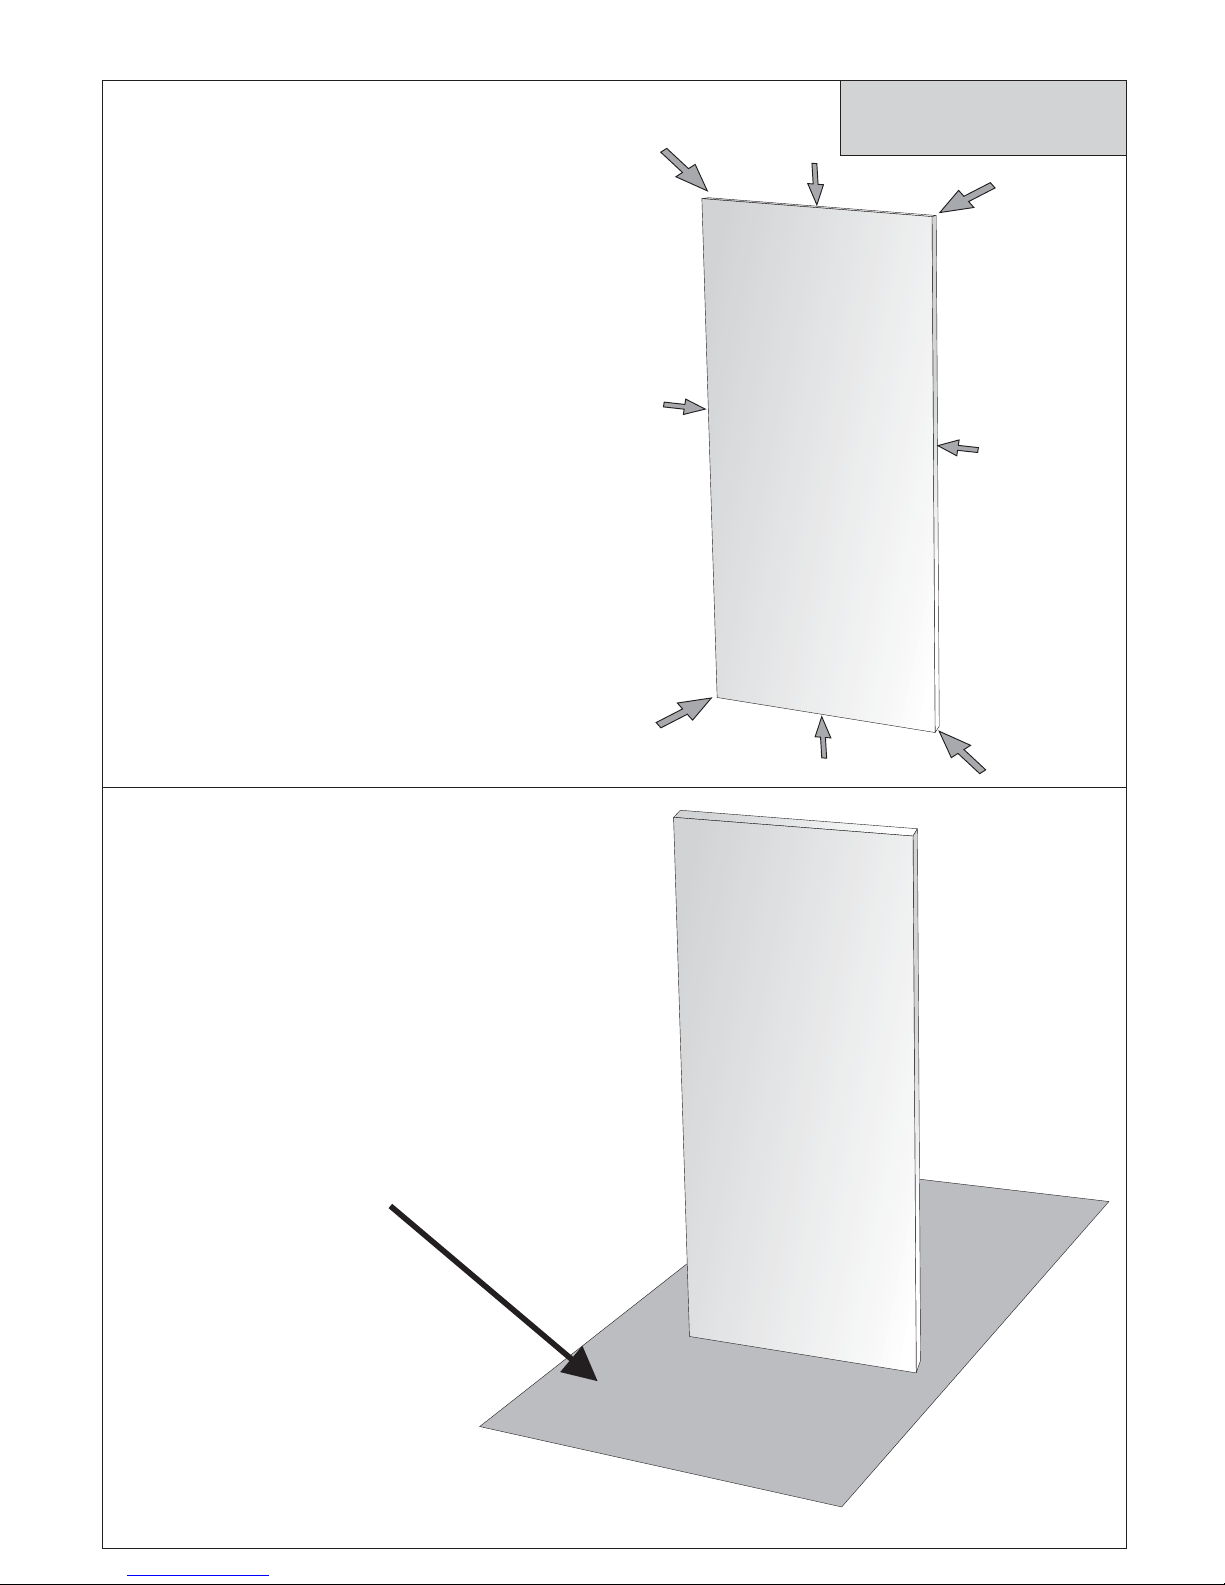
Använd som skydd vid
hantering av glasväggen.
Use as a protection when
handling the glass wall.
Rumsemballage Room packaging
Glasets kanter aktas för slag och
stötar.
The edges of the glass should be
protected from knocks and impacts.
Krawędzie szyby powinny być
chronione przed uderzeniami i
wstrząsami.
Varning! Glas - hanteras varsamt!
Warning! Glass - handle with care!
Uwaga! Ostrożnie- szkło!
Tips!
Tip!
Porada!
Można wykorzystać jako
ochronę podłogi podczas
montażu sauny.
Opakowanie sauny
Information
Page 5
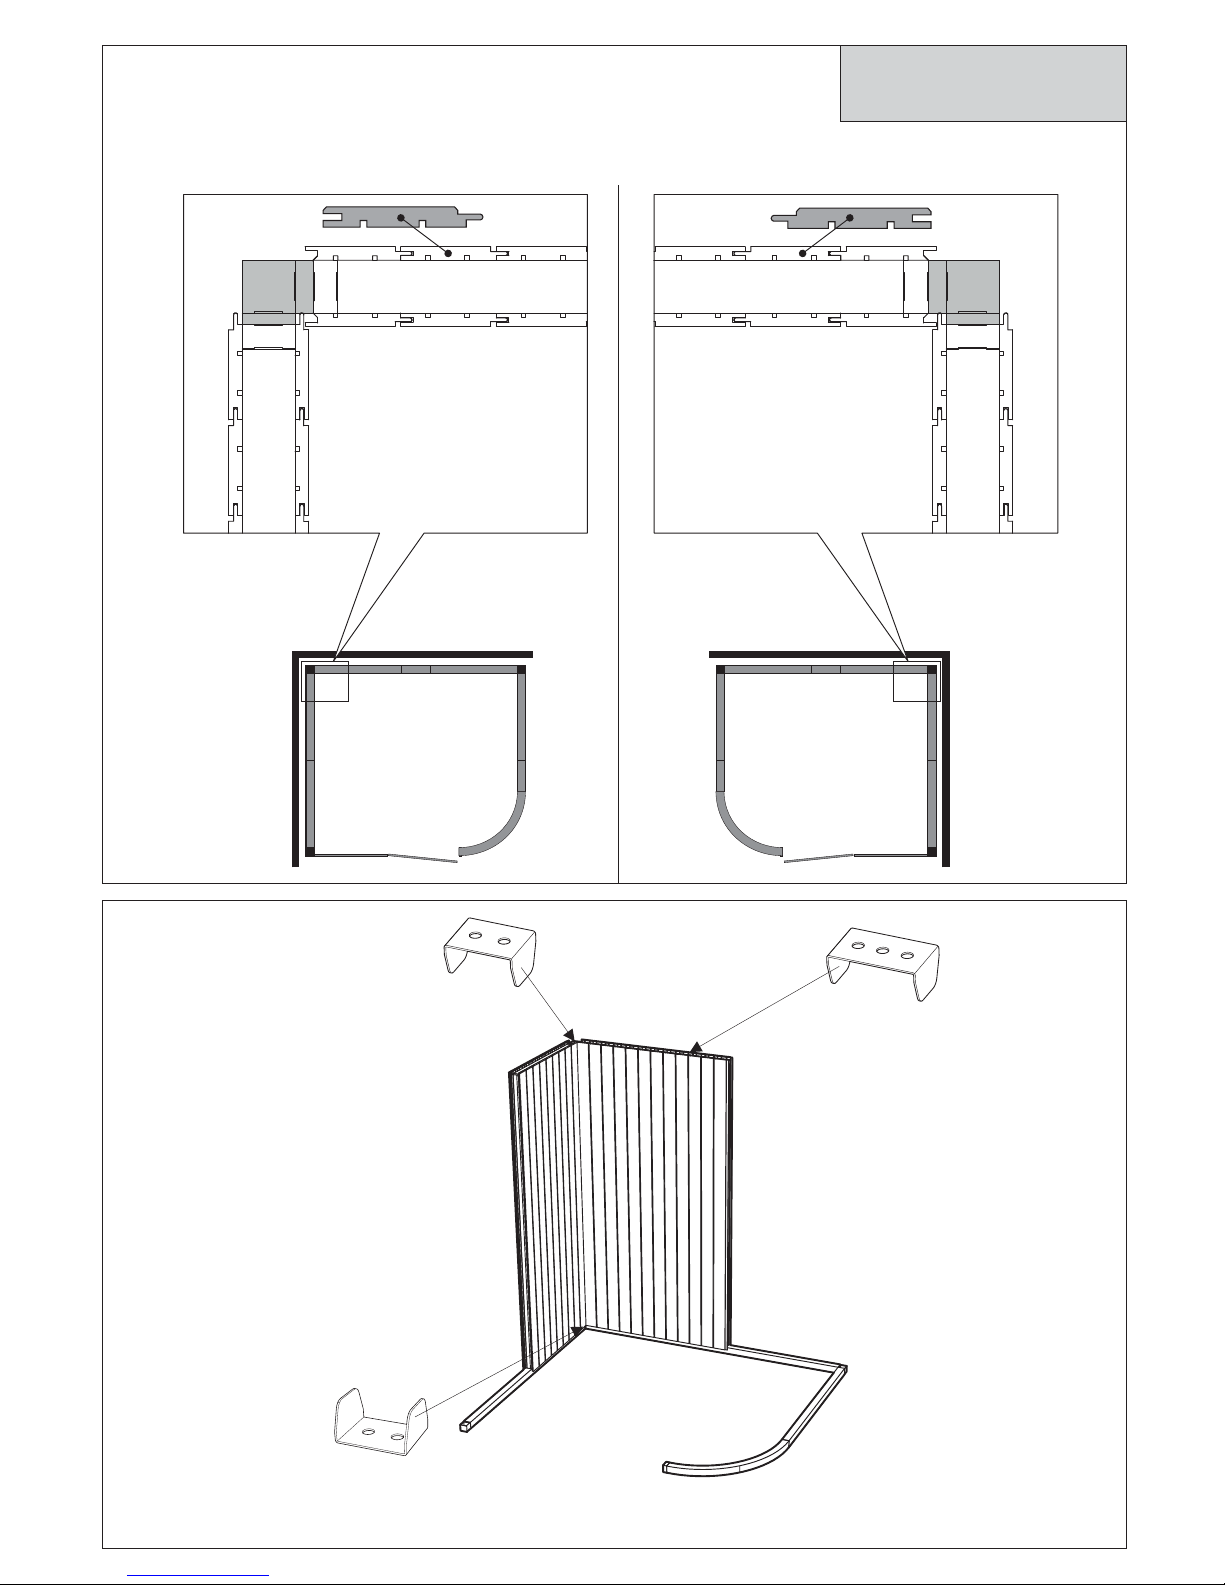
Monteringsbleck - hörn
Mounting plate - corner
Monteringsbleck - mellan väggar
Mounting plate - between walls
Monteringsbleck - hörn
Används bara om rummet skall monteras inifrån vid brist på utrymme.
Mounting plate - corner
Only to be used if the room has to be mounted from the inside when lack of space.
Panelriktning för vänster/höger placering av rummet.
Se även layouten som medföljer rummet.
Panel direction for left/right location of the room.
Also see the layout that comes with the sauna room.
Panelriktning
Panel direction
Monteringsbleck
Mounting plate
Information
Page 6
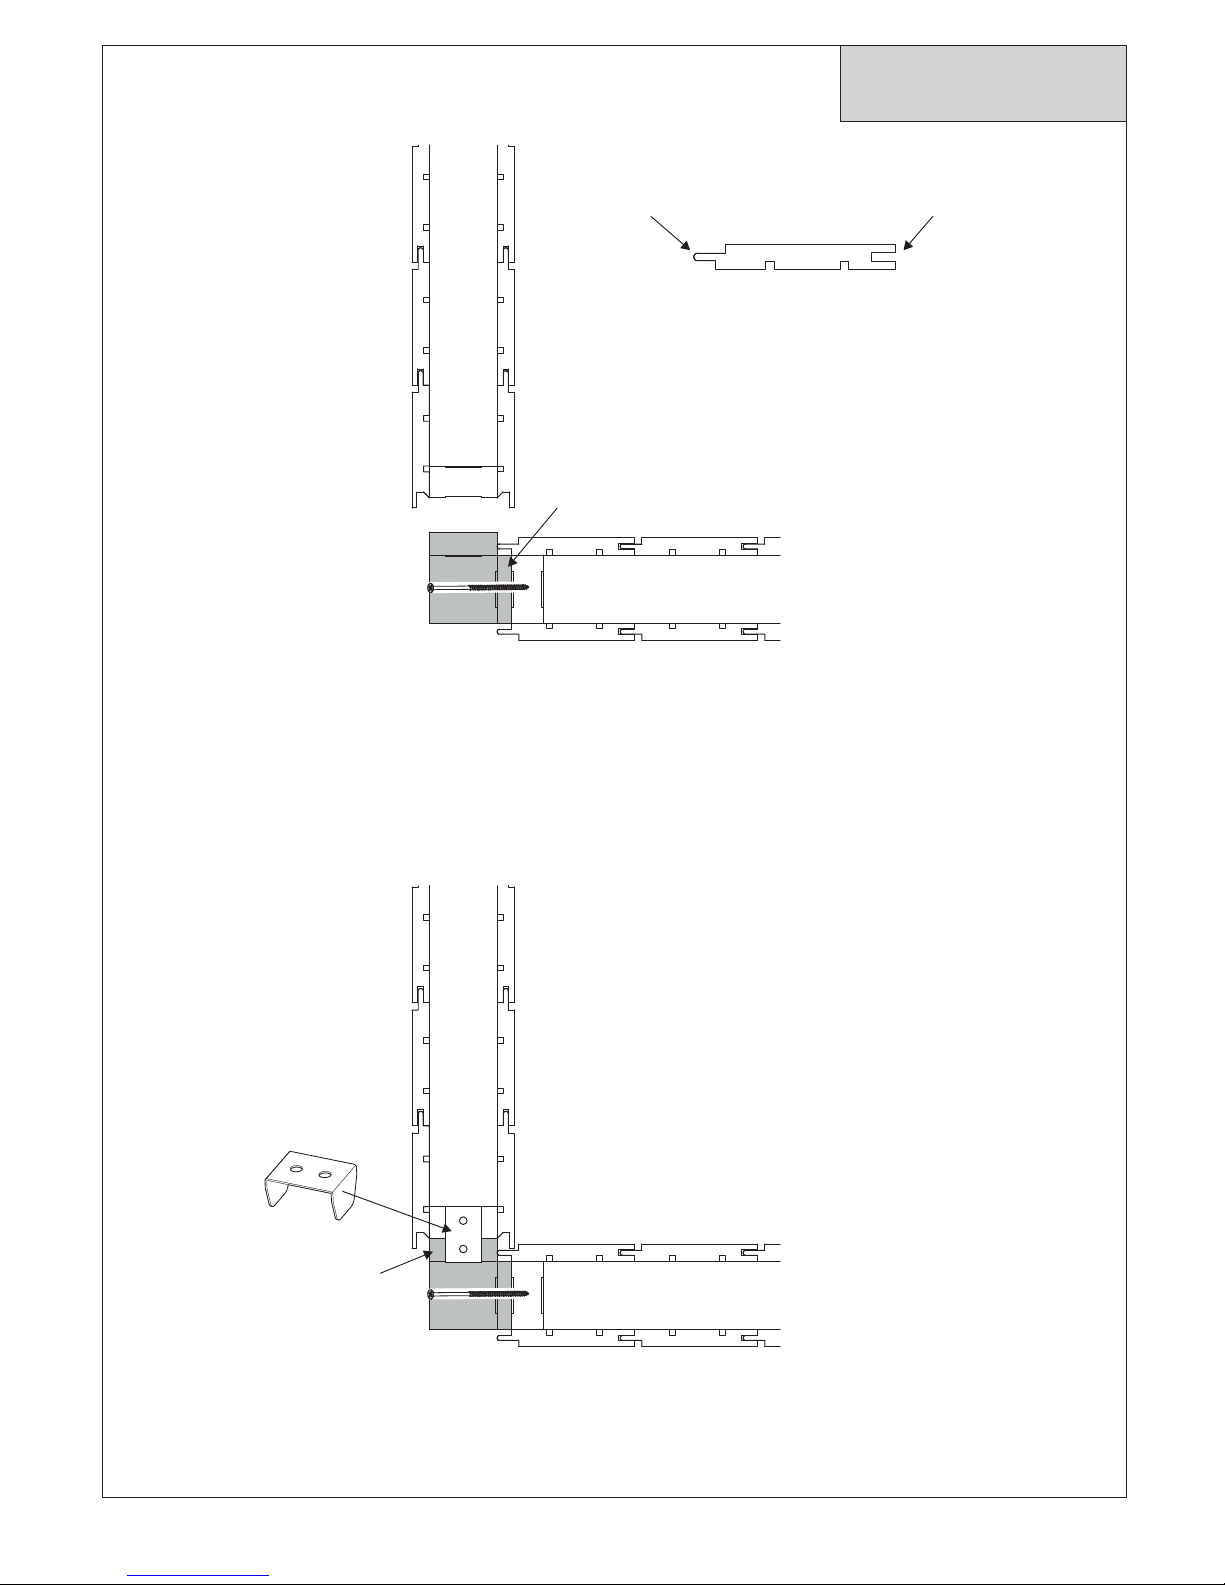
47x10 mm
47x16 mm
Spont
Tounge
Not
Groove
OBS! Hörnstolpen monteras på
väggen med spont.
NOTE! The corner post is to be
mounted on the wall with the tounge.
OBS! Monteringsblecket monteras
mellan vägg med not och 47x16 regel
NOTE! The mounting plate is to be
mounted between the wall with
groove and the 47x16 stud
Information
Page 7

P1-2
16mm
35mm
25mm
TX20
TX25
1/4"
30mm
Ø 3.5
100mm
Ø 2
120mm
80mm
Lim
Glue
12x8mm
P1
P5
P6
47x10x1944mm
47x47x1944mm
47x16x1944mm
P2
P3
P4
77.5x12x1970mm
56.5x12x1970mm
P7
P11
45x12x1750mm
P9
P10
90x8mm
20x20mm
20x11mm
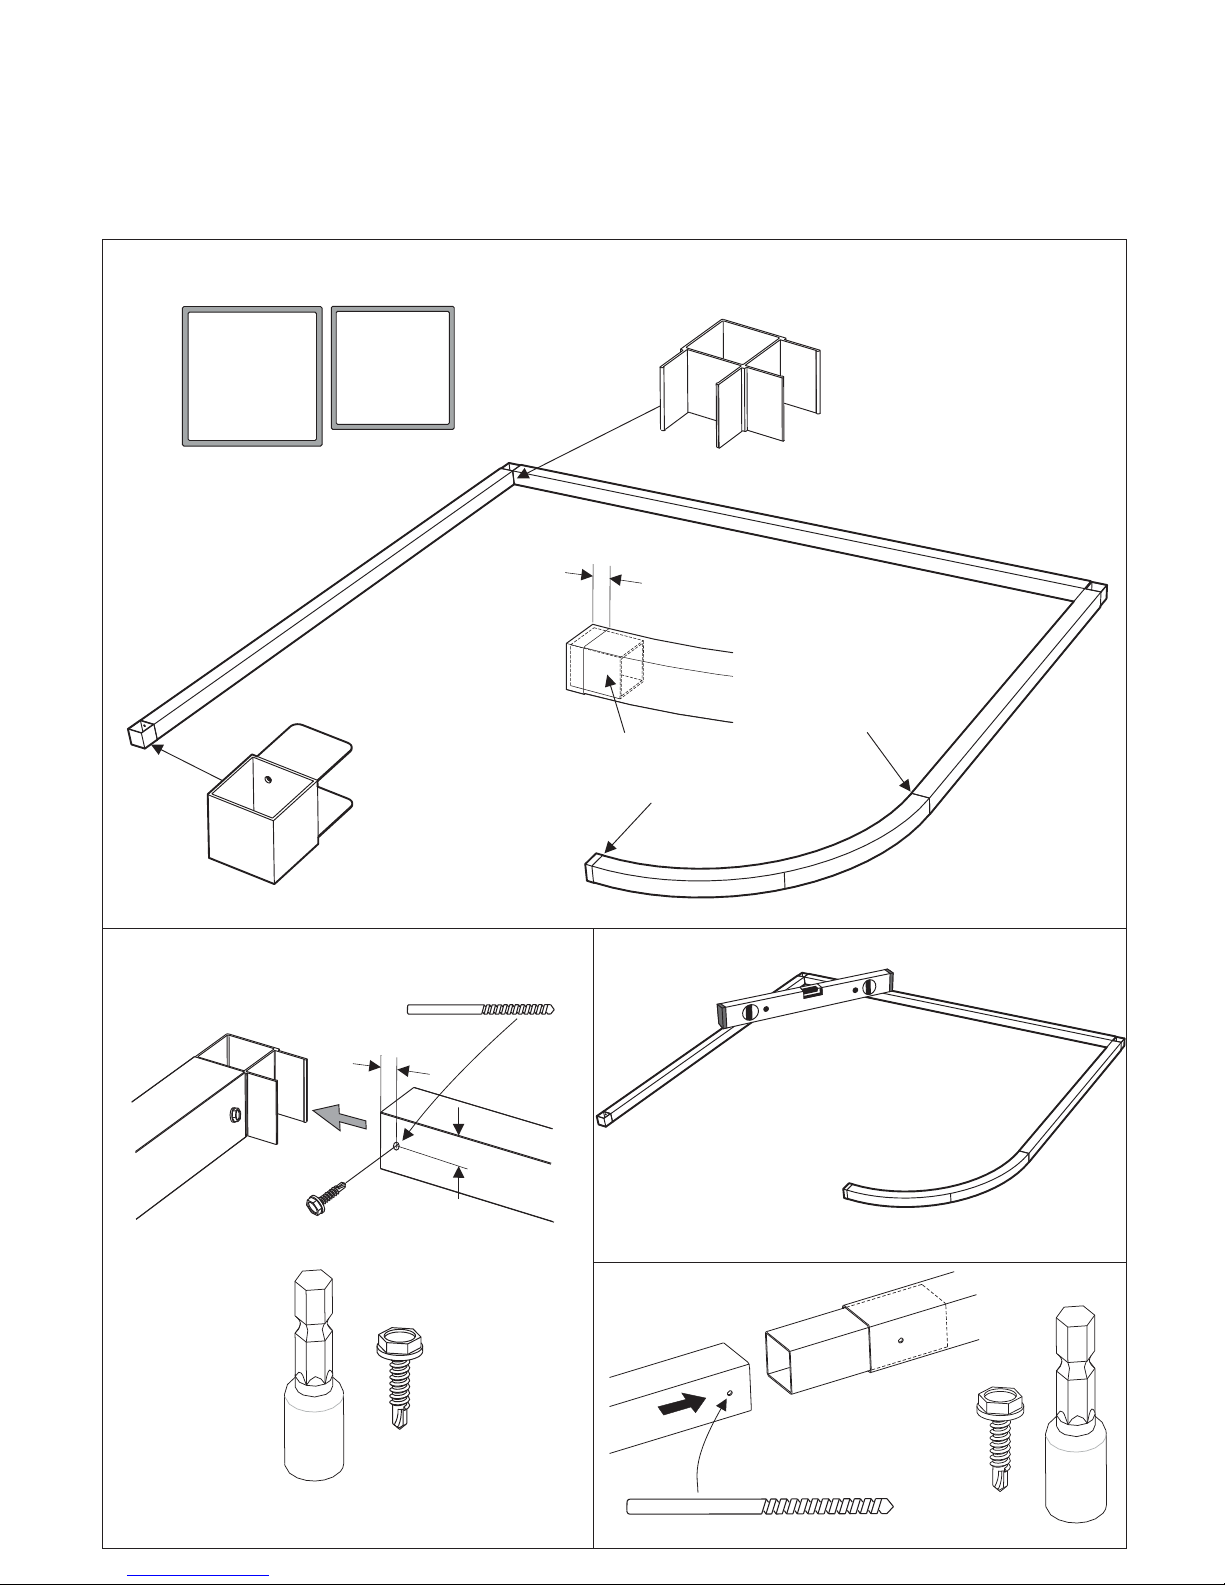
Golvram
Floor frame
Information
Detaljer och profiler som medföljer rummet
Details and profiles included with the room
32mm
SILICON
Glas list
Glass strip
13x5mm
P12
P13
P15
14x71mm
30x71mm
15x15mm
35x47x1972mm
P8
47x7x1944mm
Trafo
1000 1719
6-18W
(5-15 spots)
32mm
1000 1800
2800 0092
1.2W
P14
30x71mm
P16
80x8x2050mm
P17
32x5x1910mm
9.5mm
13x6x1
Page 8
1
x3
10mm
Ø3.5
x8
16mm
Note! This instruction can differ from the room
that is delivered.
The room that is mounted in this manual is a
Sauna 1925X1670 Harmony.
See the layout that comes with the sauna room
for details.
OBS! Denna instruktionen kan skilja sig jämfört
med bastun som är levererad.
Rummet som monteras i denna manual är ett
Sauna 1925X1670 Harmony.
Se layouten som medföljer rummet för mer
detaljer.
23mm
Ø 3.5
16mm
Skarvning av golvram
Joining of floor frame
P1 P1-2
P1-2
50mm
P1-2
150mm
Trycks in i golvramen - ska ej skruvas fast
To be pressed into the floor frame - will not be screwed
18mm
Page 9
35mm
47x47 mm
47x10 mm
47x16 mm
x2
P4
P2
P3
2
47x47 mm
47x16 mm
x1
P4
P3
P3
47x16 mm
A
B
AAAA
BB
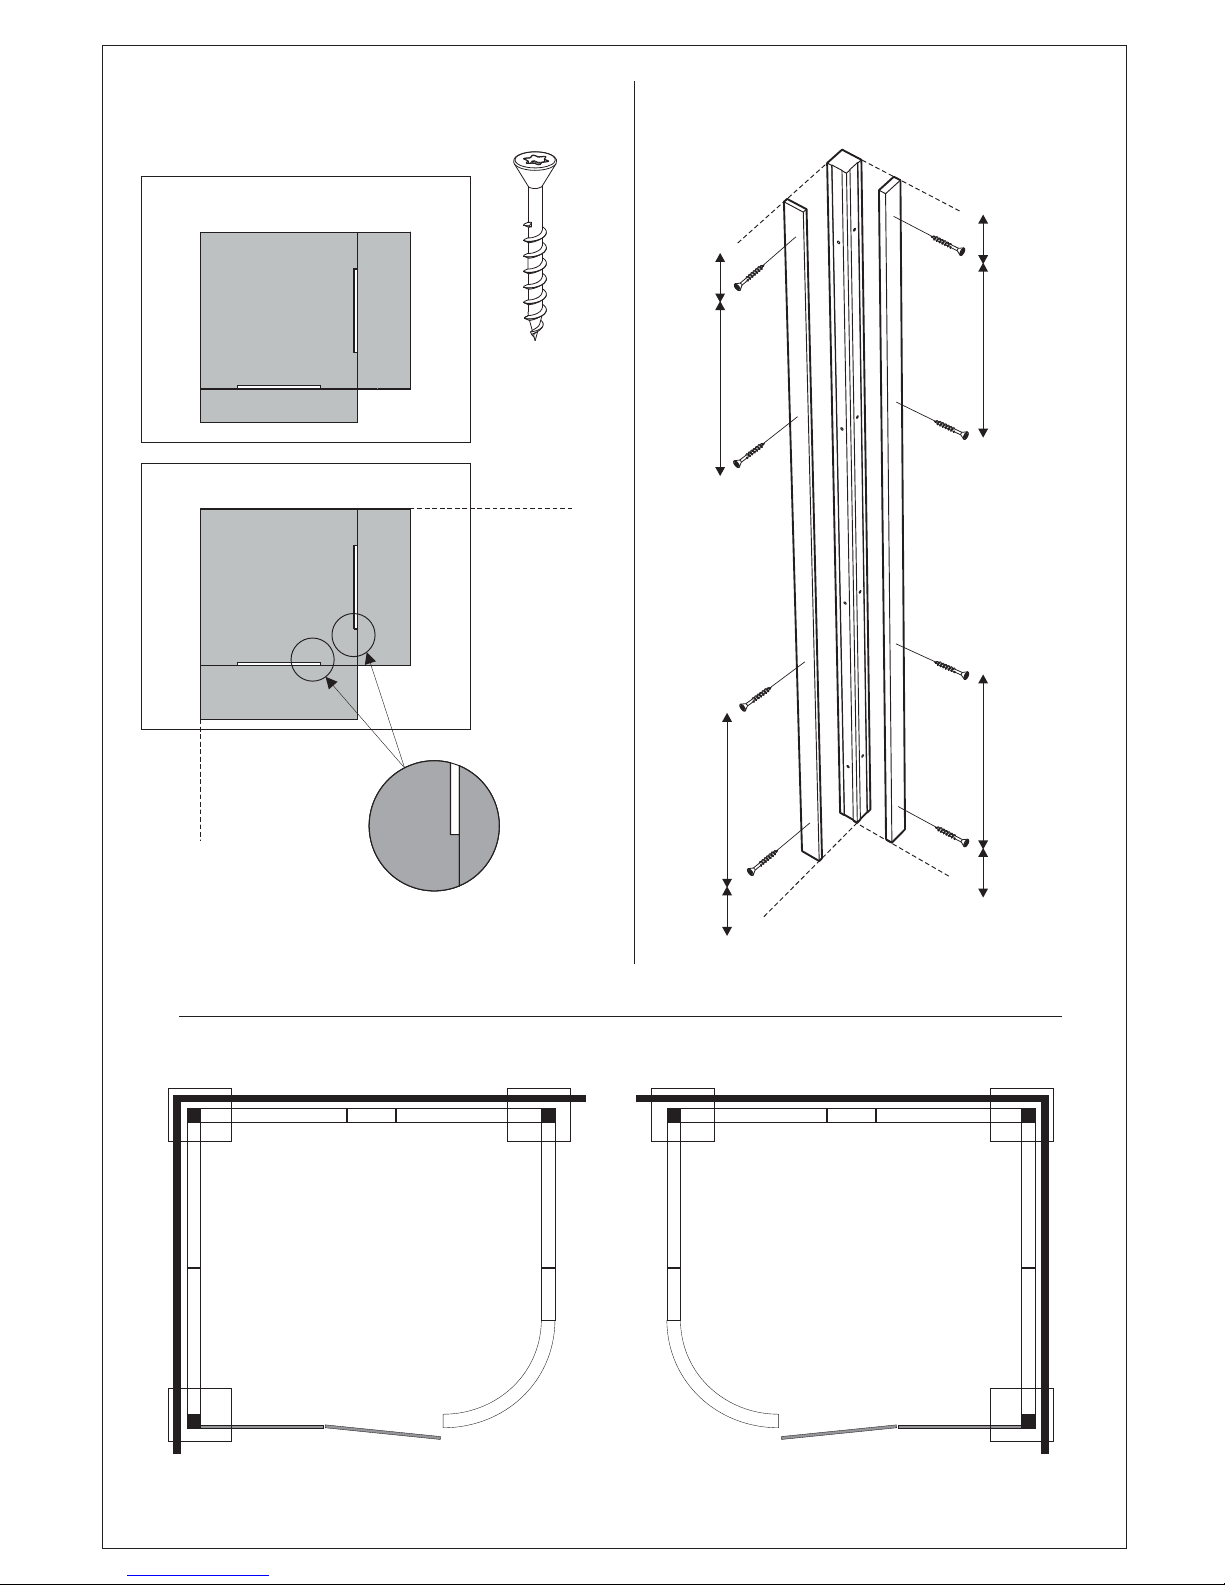
Kant i kant
Flush fitting
Kantenbündig
Bord à bord
Dokładnie wyrównać
Spår
Track
~50mm
~600mm
~50mm
~600mm
~600mm
~50mm
~600mm
~50mm
Kant i kant
Flush fitting
Kantenbündig
Bord à bord
Dokładnie wyrównać
Kant i kant
Flush fitting
Kantenbündig
Bord à bord
Dokładnie wyrównać
Hörnstolpar
Corner posts
Page 10
100mm
47x10 mm47x16 mm
25mm
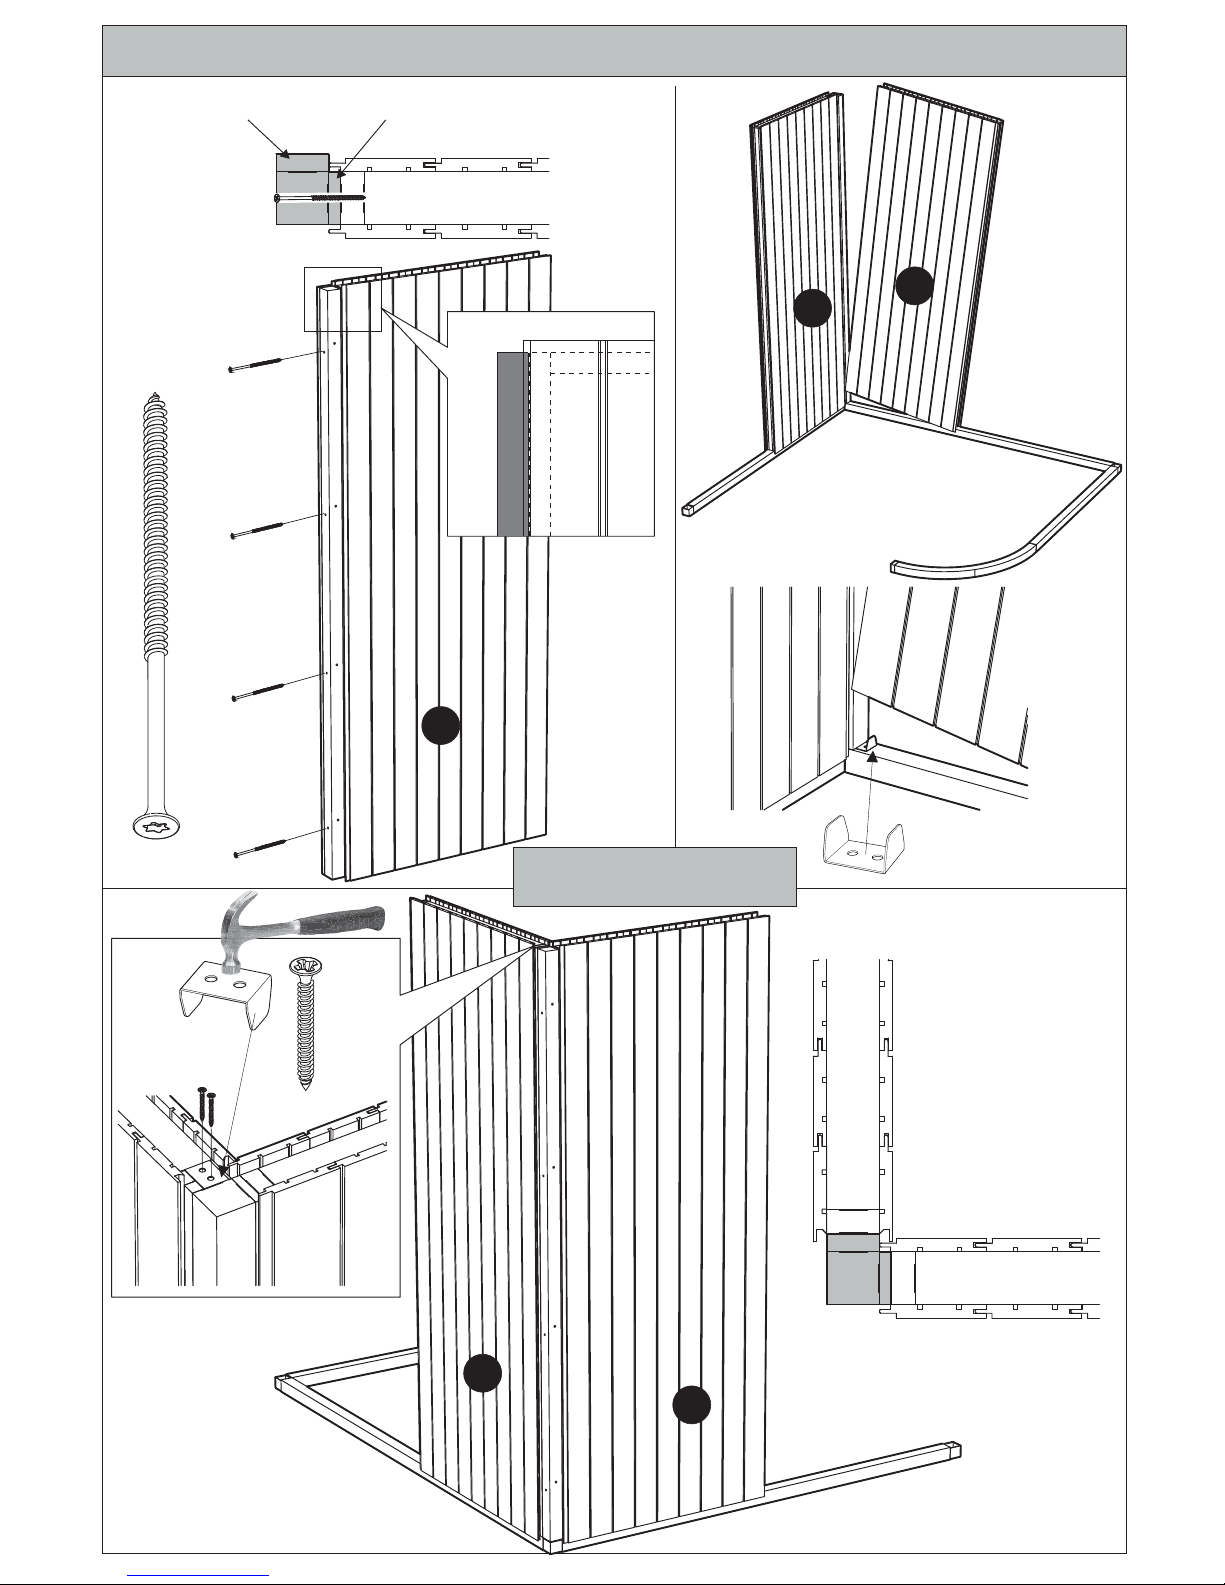
Montering hörn - om rummet skall vid brist på utrymme.monteras inifrån
Mounting corner - if the room has to be when lack of space.mounted from the inside
3
1
1
2
1
2
Montering inifrån
Mounting from the inside
Page 11
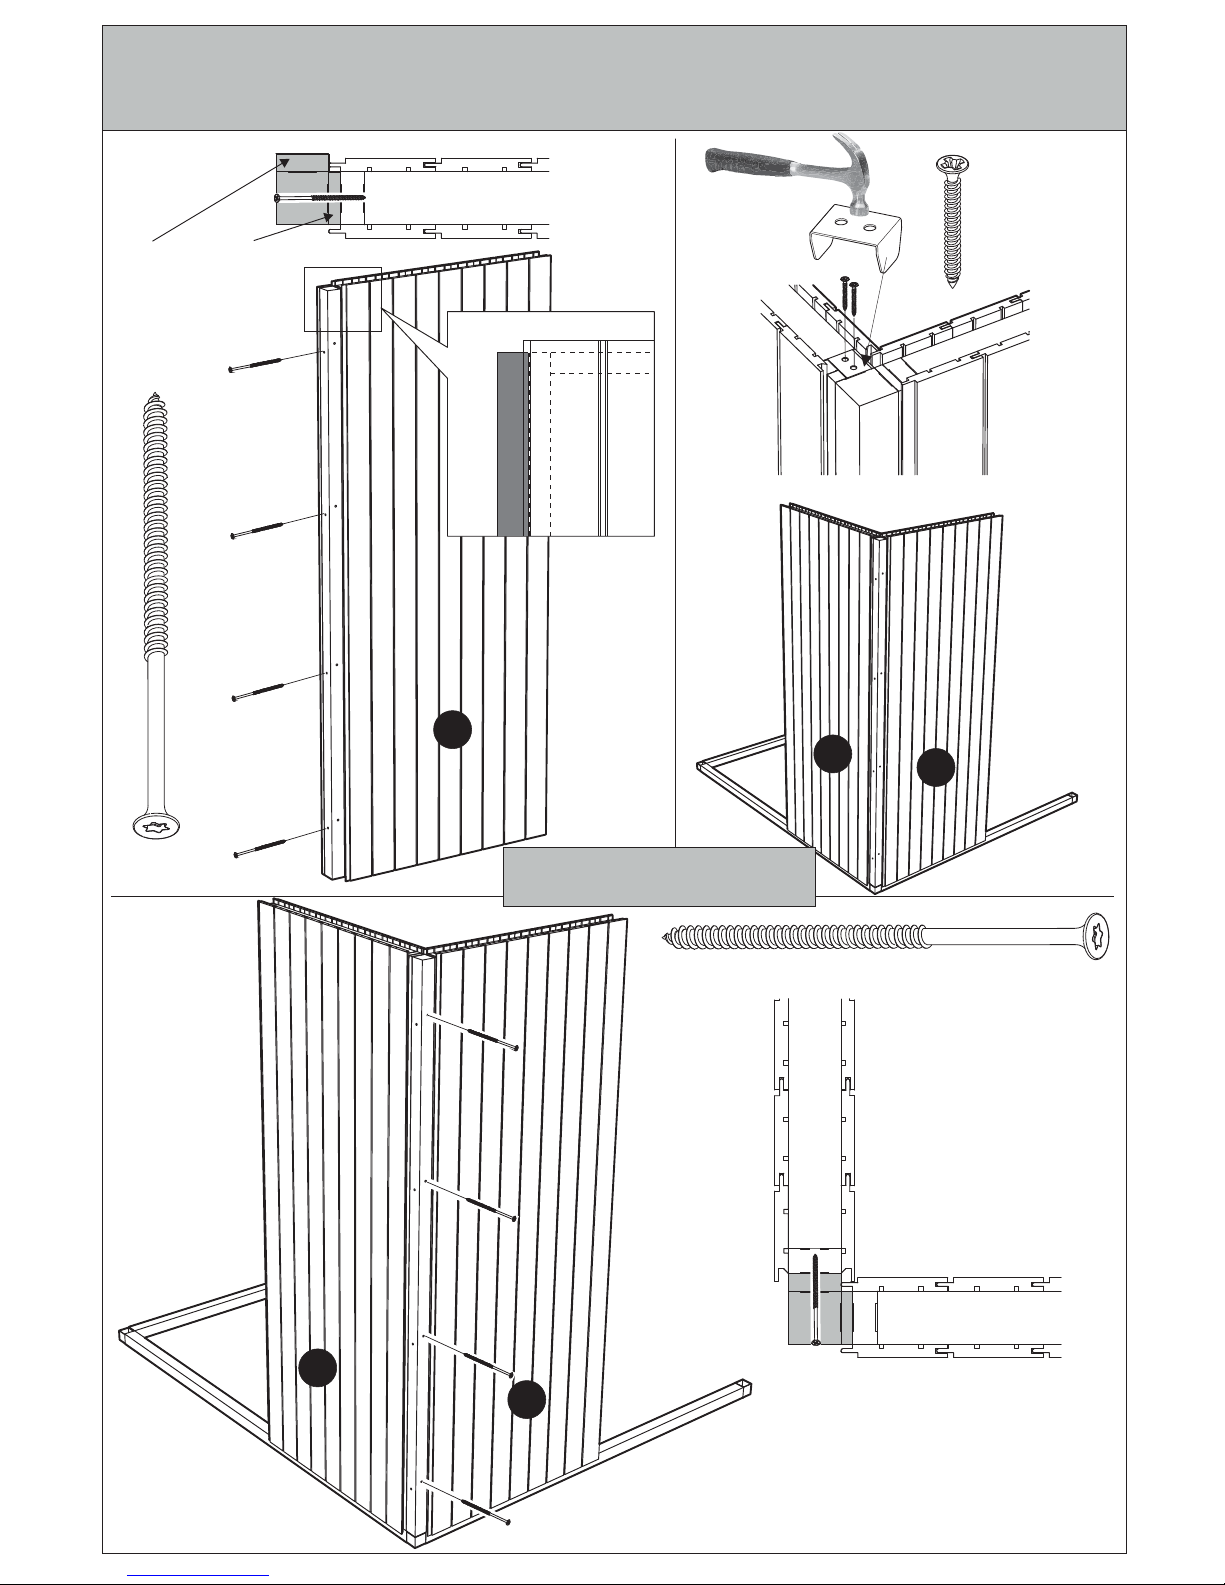
100mm
47x10 mm47x16 mm
100mm
25mm
4
1
1
2
1
2
Montering hörn - om rummet (Finns det utrymme rekommenderas att hörnstolparmonteras utifrån
och väggar skruvas ihop).
Mounting corner - if the room is (If there is space it’s recommended thatmounted from the outside
the corner posts and walls are screwed together).
Montering utifrån
Mounting from the outnside
Page 12
25mm
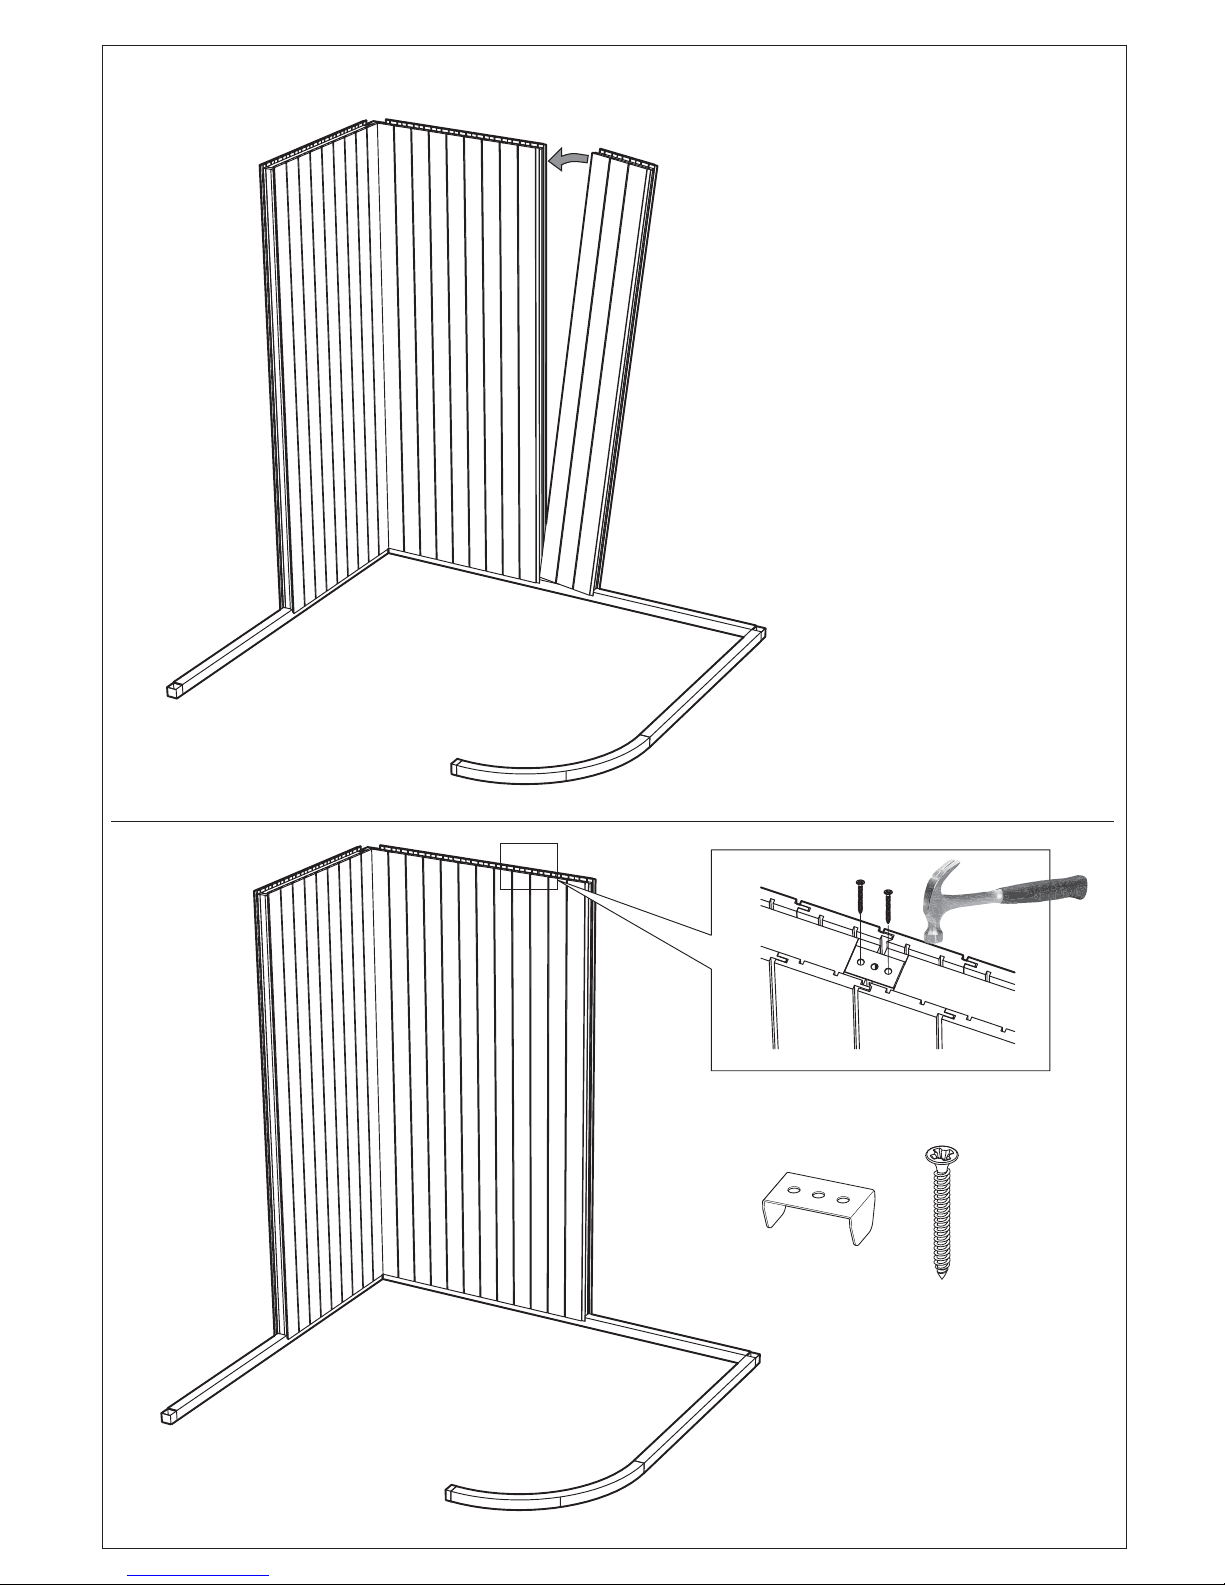
5
6
Page 13

100mm
47x10 mm 47x16 mm
7
8
Page 14

9
10
47x10 mm
47x16 mm
47x16 mm
47x16 mm
Page 15

P8
47x7x1944mm
11
35mm
47x10x1944mm
P2
30mm
13x6x1
Page 16

Kant i kant
Flush fitting
Kantenbündig
Bord à bord
Dokładnie wyrównać
Kant i kant
Flush fitting
Kantenbündig
Bord à bord
Dokładnie wyrównać
x8
Ø 2
x1
12
P12
9.5mm
Page 17

13
P14
25mm
Ø 2
=
=
P14
SILICON
Page 18

Vägg/Wall
1
Glassektion
Glass section
2
P13
1
2
35mm
80mm
14
13x6x1
Page 19

1
2
4
15
Styrlister - se nästa sida
Guide bars - see next page
1
2
4
Mot bastuvägg
Against sauna wall
Do ściany
OBS!
N.B.!
UWAGA!
Mot bastuvägg
Against sauna wall
Do ściany
X:
Mått och antal tak varierar
beroende på rummets storlek
Size and number of ceilings
vary depending on room size
Tak
Ceilings
333mm 333mm839mm 839mm
1 14 4
X X
3
3
Page 20

P7
35mm
13mm
120mm
13mm
13mm
98mm
13mm
1
3
4
~15mm ~15mm ~15mm~15mm
45x12mm
16
Vägg
Wall
Wand
Cloison
Wand
Ta k
Ceiling
Dach
Toit
Dak
13mm
700mm
Styrlist
Guide bar
Fürungsleiste
Barre conductrice
35mm
35x47x1972mm
13mm
2
~15mm
~15mm
Page 21

12x8mm
Vägg
Wall
Wand
Cloison
Wand
Ta k
Ceiling
Dach
Toit
Dak
Styrlist
Guide bar
Fürungsleiste
Barre conductrice
12x8mm
1
2
17
Tätningen placeras längs styrlisterna
(Mellan tak och trävägg)
The seal is placed along the guide bars
(Between ceiling and wooden wall)
3
Vänta med att lägga på det rundade taket
Wait to put on the rounded ceiling
85mm
85mm
Ta k
Ceiling
Page 22

Glas
Glass
Se till att skruvens skalle ej sticker
utanför aluminiumprofilen.
Ensure that the screw head does not
protrude from the aluminum profile.
Ovanför dörrglaset
Above the door glass
OBS! Ingen aluminiumprofil
ovanför dörrglaset.
NOTE! No aluminium profile
above the door glass.
Tak/Ceiling
P13
1
2
25mm
18
Page 23

Om sidoglaset/glasen är bredare än
dörröppningen kan det vara
nödvändigt att lyfta på
taket för att få dit glaset.
Vänta i så fall med att lägga på det rundade
taket tills glasen är på plats.
If the side glass/glasses is wider than
the door opening it can be
necessary to lift the ceiling to
get the glass in place.
In that case, wait for the rounded ceiling
until the glasses are in place.
OBS!
NOTE!
Mät sidoglaset/glasen och öppningen för
dörrglaset.
Measure the side glass/glasses and the
opening for the door glass.
19
Page 24

Montera inredningen (lavar, ryggstöd etc).
Det är lättare att göra det innan
glasen sätts på plats.
Mount the interior (benches, backrest etc).
It’s easier to do that before the
glasses are put in place.
Kanterna på glaset bör skyddas från
slag och stötar.
The edges of the glass should be
protected from knocks and impacts.
Varning! Glas - behandlas varsamt!
Glass - handle with care!
Warning!
Gångjärn-höger
Hinges-right
Gångjärn-vänster
Hinges-left
Exempel på placering av glas - front
Examples of glass placement - front
20
21
Page 25

Lägg glaslisten i glasspåret.
(Minst två under varje glas)
Add the strip in the glass slot.
(At least two under each glass)
Vid behov, lägg i flera så att
glaset står rakt.
If needed, add several so
the glass is in line.
Glas list
Glass strip
22
Sidoglas
Side glass
Golvram
Floor frame
Kant i kant
Flush fitting
Klipp av 5cm-bitar av glaslisten
för att tillfälligt stabilisera glaset
under monteringen av resten
av rummet.
Cut pieces of 5cm of the glass
bar to temporarily stabilize the
glass during the assembly of
rest of the room.
~5cm
(x4)
Użyj kawałków uszczelki o dług.
5 cm do tymczasowej stabilizacji
szyby podczas montażu pozostałej
części kabiny sauny.
Insida
Inside
Wewnątrz
Glas
Glass
Tips!
Tip!
Lägg bitar av kartong under glaset
Put slices of cardboard under the glass
Lägg glaslister ovanför glaset för att fylla ut
eventuella tomrum.
Add strips above the glass to fill any gaps.
Glid försiktigt in glaset i golvramen.
Slide the glass carefully into the floor frame.
Ta bort takstöttorna.
Remove the ceiling supports.
1
2
3
4
1
2
Om rummet har två sidoglas mät glas 2 och dess plats
när glas 1 monteras.
Se nästa sida för sammanfogning
av glasen.
If the room has two side glasses measure glass 2 and its location
when mounting glass 1.
See next page for joining
of the glasses.
1
2
Page 26

Montera gångjärnen
på sidoglaset.
Mount the hinges
on the side glass
Lägg till fler packningar vid behov för att
säkerställa att skruvarna drar fast tillräckligt.
Add more gaskets if necessary
to make sure that the screws tighten enough.
Sidoglas
Side glass
Kant i kant
Flush fitting
GÅNGJÄRN
HINGES
Insida
Inside
Utsida
Outside
Packning - grön
Gasket - green
Packning
Gasket
2mm
Packning
Gasket
1mm
Packning - grön
Gasket - green
Packning
Gasket
2mm
Packning
Gasket
1mm
Glas
Glass
23
24
1
1
2
Vid två sidoglas:
Kontrollera att glas 2 får plats i golvramen.
Lägg en tunn sträng silicon på kanten av glas 1 och sätt sedan glas 2 på plats.
When there are two side glasses:
Make sure that glass 2 has the right space in the floor frame.
Put a thin strand of silicon on the edge of glass 1 and then put glass 2 in place.
1
2
SILICON
Gör rent kanterna på glasen innan siliconen
appliceras med exempelvis t-röd.
Clean the edges of the glass before applying
the silicone with, for example, ethanol.
Page 27

Dörrglas
Door glass
Tips!
Distanser
Höjd ca: 18mm
Tip!
Distance block
Height ca: 18mm
Lägg till packningar på gångjärnet och lyft
glasdörren på plats i gångjärnen.
Lägg sedan packningarna till rätta.
Add gaskets on the hinge and put the door
glass on the hinges.
Then put the plastic gasket into place.
Plastpackning
Plastic gasket
VIKTIGT!!
Stäng dörren sakta och säkerställ att glaset
inte slår i golvramen.
Lägg fler glaslister under sidoglaset vid behov.
Dörrglas
Door glass
Sidoglas
Side glass
Golvram
Floor frame
Ca: 4mm
(Min. 2mm)
IMPORTANT!!
Close the door slowly and make sure it
doesn´t hit the floor frame.
Put glass strips under the side glass if
necessary.
14mm
25
Använd U-profilen som skall sitta
ovanför dörrglaset som mall vid
injustering av glasen.
Use the U-profile to be placed
above the door glass as a template
when adjusting the glasses.
Gångjärnen efterspännes efter
cirka en månad.
Tighten hinge after approx. one
month.
Das Scharnier wird nach etwa
einem Monat nachgezogen.
Resserrez les charnieres apres
un mois environ.
Петли необходимо подтягивать
примерно через месяц.
Po upływie około miesiąca
należy dokręcić zawiasy.
P13
Page 28

2x1970mm
2x1970mm
P5
P6
26
27
U-profil ovanför dörrglas
U-profile above the door glass
Tak/Ceiling
Dörrglas
Glass door
~13mm
30mm
P13
SILICON
77.5x12mm
56.5x12mm
Page 29
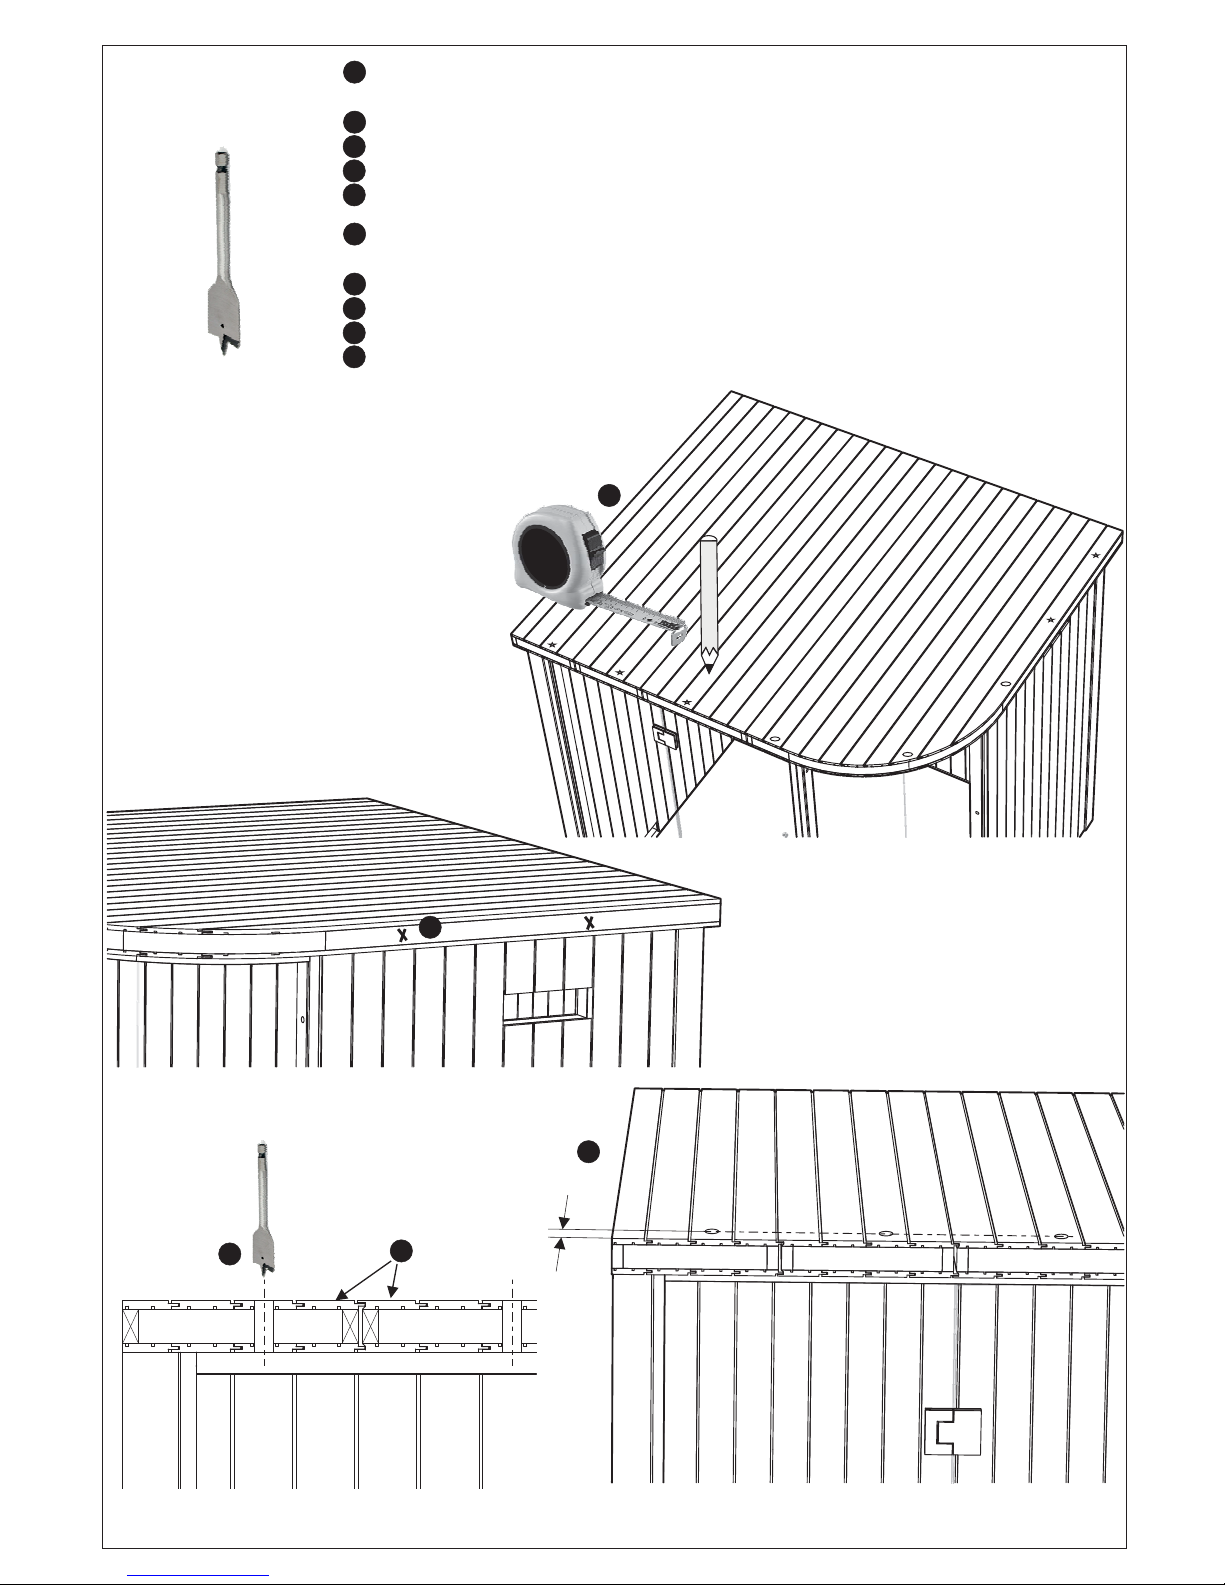
3
1
2
32mm
43mm
Bestäm lämpligt avstånd mellan spotlighten och markera
för borrhål på taket. 3 hål är förborrade i den runda delen.
Borra hål genom hela taket 43mm in från kanten.
Borra helst i mitten av en panelbräda.
Borra ej vid kryssmarkeringarna, där finns tvärsgående reglar.
Undvik att borra i panelen närmast en regel, lampans fjädrar behöver plats.
Determine the appropriate distance between the spotlight and mark
for drill holes on the ceiling. 3 holes are predrilled in the round section.
Drill holes through the entire ceiling 43mm in from the edge.
Drill preferably in the middle of a panel board.
Do not drill at the crossmarks, there are transverse rules.
Avoid drilling in the panel closest to a rule, the lamp's feathers need space.
28
4
5
3
1
2
4
5
1
2
3
4
5
Page 30

29
30mm
P16
80x8x2050mm
Page 31

30
30mm
Alt. 1
Alt. 2
P11
90x8mm
TRÄLIM
WOOD
GLUE
1h
Lim
Glue
Page 32
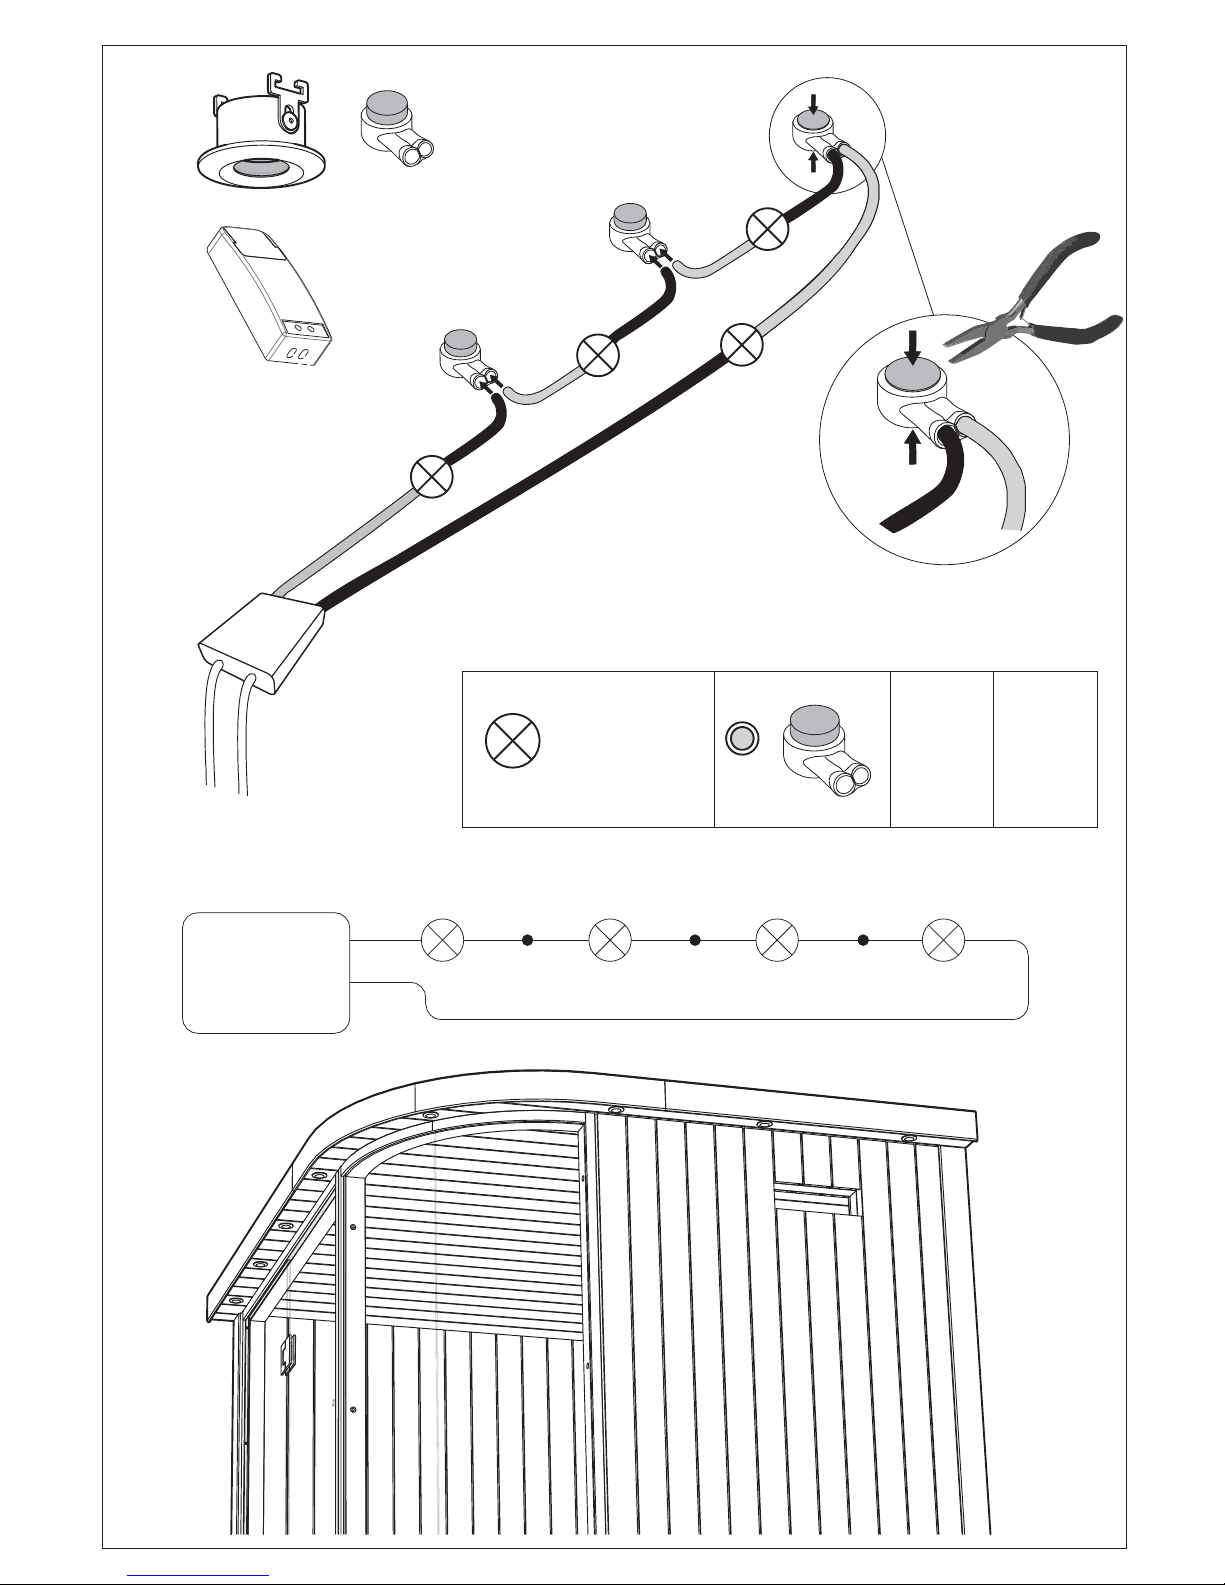
+
-
Röd
Red
Röd
Red
Röd
Red
Röd
Red
Svart
Black
Svart
Black
Svart
Black
Svart
Black
LED, TRAFO
SPOT LIGHTS
++++
----
+
-
+
-
+
-
+
-
LED Trafo
LED transformer
Spotlights
Spots
Röd
Red
Svart
Black
-
+
+
-
200-240V~
31
Trafo
1000 1719
6-18W
(5-15 spots)
1000 1800
2800 0092
1.2W
Page 33

Tips!
Tip!
Porada!
Lave
Bench
Alt. 1
P9 P10
P10
P10
P9
P9
P10
P10
P9
P10
Alt. 2
P10
32
30mm
Page 34

x8
Lim
Glue
Insida
Inside
Innenseite
Interieur
.Внутр
Wewnątrz
Utsida
Outside
Ausenseite
Exterieur
.Наруж
Na zewnątrz
Insida
Inside
Innenseite
Interieur
.Внутр
Wewnątrz
Utsida
Outside
Ausenseite
Exterieur
.Наруж
Na zewnątrz
Lim
Glue
Lim
Glue
33
Page 35

P17
32x5x1910mm
34
30mm
Vinkla spiken något.
OBS! Var försiktig med glaset.
Angle the nail a little bit.
NOTE! Be careful with the glass.
Page 36

Glaspackning
Glass gasket
35
13x5mm
Tips! Använd tvålvatten eller
någonting liknande.
Tip! Use soap water or
something similar.
Insida
Inside
Flytta eventuellt rummet på plats
innan glaslisten monteras.
Move eventually the room into
place before the glass gasket is mounted.
Alternativ
Option
120mm
30mm
P10
Dörrglas
Door glass
36
37
Page 37

Ändpluggar - golvram
End plugs - floor frame
Dörrhandtag
Door handle
SILICON
38
39
SILICON
Insida
Inside
Utsida
Outside
60mm
60mm
Page 38

90°
90°
90°
40
SILICON
SILICON
SILICON
 Loading...