

Page 1
h1
1109
Art. Nr 2900 4139
Page 2

Page 3

Contents
Installation instructions 12
Wiring diagram 12
Operating instructions for h1 13
Explanation of symbols 13
Initial set-up process 14
Start 14
Setting the desired bathing temperature 14
Setting the desired level of humidity (Combi Compact only) 15
Drying mode (Combi Compact only) 15
Setting the desired start time 15
Settings menu 16
Locking the Panel 16
Status 16
Time 16
Language 16
Display 17
Automatic key-lock 17
Vibration 17
English
Service 17
Cleaning 17
11
Page 4

Installation instructions for h1
Steam roomSauna room
The h1 can be placed inside or outside the
sauna room and outside the steam room. If
the h1 is placed inside a sauna room, the
top edge must not be more than 90 cm
above the floor (figure 1).
Begin by fitting the rubber seal if this is
necessary (figure 2).
English
Figure 1
This seal should be fitted if the h1 is to be used in a steam room or a humid environment. Screw
the mounting plate into place at a suitable location, making sure that the electric cables pass
through the opening. Note that the plate must be oriented so that the hole for the retainer screw
is on the underside. Screw the electrical connections into place on the terminal block as shown
in the wiring diagram (figures 3, 6 and 7). To facilitate this process, the terminal block can
be removed from the circuit
board. Slide the glass and
circuit board of the control
panel upwards into place on
the mounting plate and
press the bottom edge into
place (figure 4). Screw the
retainer screw into place
(figure 5).
Figure 2
Figure 3
Figure 4 Figure 5
Wiring diagram
1.Sauna heater/steam generator
2.Thermistor (sensor)
3.h1
Figure 6
4.External switch
Figure 7
It is possible to connect an optional external switch to the h1 panel via terminals 19 and 20 on the
circuit board (also via 21 if you wish to have an indicator signal). See Wiring diagram (figure 6).
Momentary connection: switches on and off respectively each time it is pressed.
Constant connection: the panel is activated for as long as the connection is maintained, up to the
maximum running time that has been set.
When the heater is on, the indicator lamp on the external switch lights up. If the panel has been
programmed to start at a later time, the indicator lamp flashes.
An external switch can not be used with Combi Compact.
1.Combi Compact RC
2.Thermistor (sensor)
3.h1
12
Page 5

Operating instructions for h1
11
10
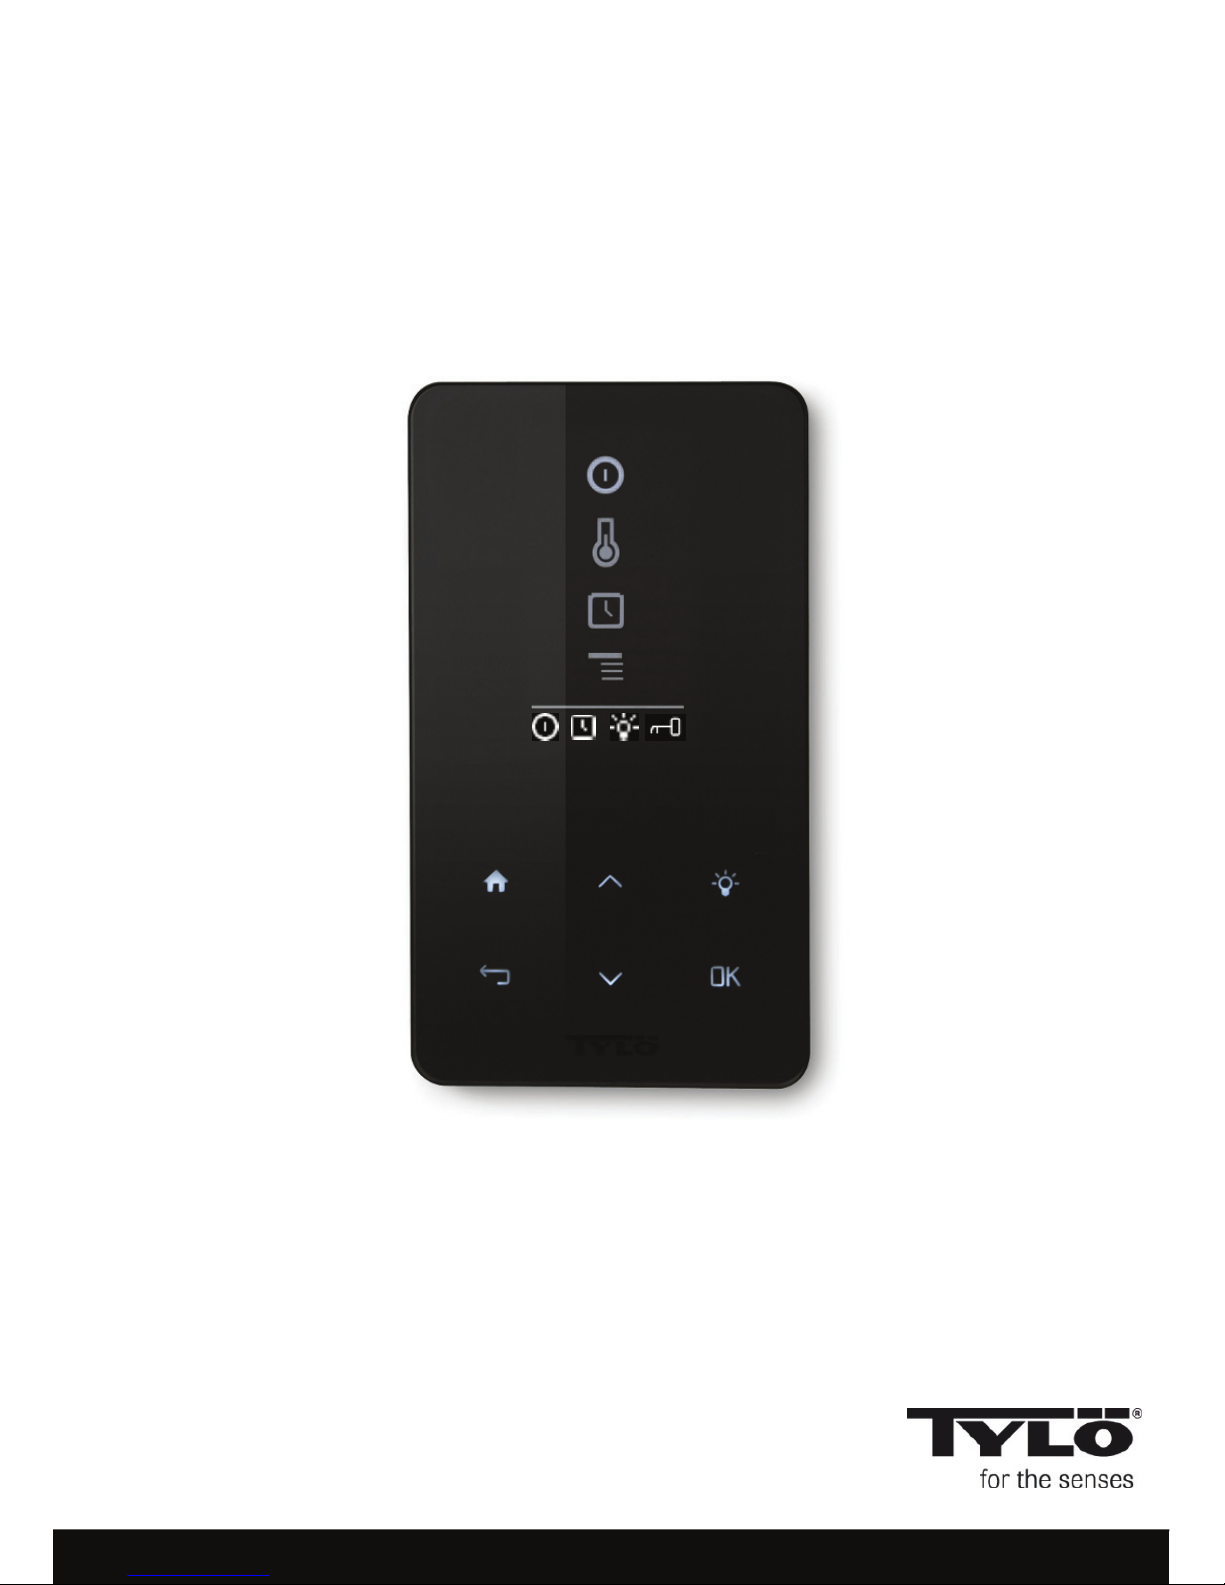
Figure 8. Basic menu h1
1
1
2
2
17
3
4
5
5
6
7
8
11
10
3
4
English
6
7
8
9
9
Figure 9. Basic menu Combi Compact h1
Explanation of symbols:
1. On/Off
2. Temperature
3. Program start time
12 13 14
15
Figure 10.
16
4. Settings menu
5. Status display (figure 10)– Indicates the status of certain functions (see 12, 13, 14, 15
and 16)
6. Up - One step up in the menu or one step up in the value entered
7. Lighting – Switches lighting on/off in the sauna/steam room
8. OK – Confirms selection
9. Down - One step down in the menu or one step down in the value entered
10. Back - One step back in the menu tree or one step back when entering values
11. Home – Returns you to the basic menu (figure 8 or 9)
12. Indicates that the sauna/steam generator is on
13. Indicates that h1 is programmed to start at some later point in time
14. Indicates that the lighting is on
15. Indicates that the panel is locked
16. Humidity (Combi Compact only) – Indicates approximate water level in tank. Symbol
filled = full tank. Symbol half-filled = half tank. Flashing symbol (unfilled) = tank empty.
17. Humidity (Combi Compact only)
13
Page 6

Initital set-up process
When activating h1 for the very first time, it is necessary to program a number of basic settings:
1. Set the region (Europe, USA, Other). Use the Up and Down arrows and press OK to confirm
your selection.
2. Select language. Use the Up and Down arrows and press OK to confirm your selection.
3. Select the relevant product (sauna, steam bath, Combi Compact). Use the Up and Down
arrows and press OK to confirm your selection.
English
4. Set the desired running time (1–23 hours for steam room; 1–12 hours for sauna) and press
OK to confirm
5. Set the current time and press OK to confirm.
Start
To start the sauna heater/steam generator, move your hand in front of the screen. The screen
will then light up. The On/Off symbol will be highlighted. Press OK. The small On/Off icon will
then light up in the status display (5) to indicate that the sauna heater/steam generator has
been switched on. If the On/Off button (1) is not illuminated, press the Up arrow to step to the
right position. To switch off, step to (1) and press OK.
While the sauna heater/steam generator is in operation, the current temperature and time will
be displayed unless any alterations are made to the settings.
When the sauna heater/steam generator is switched off, the illumination in the control panel
will fade. It can be automatically reactivated by moving your hand in front of the panel.
Setting the desired bathing temperature
Press the Up or Down arrow to highlight the temperature symbol (2) and press OK. Set the
desired temperature using the Up/Down arrows and then confirm this by pressing OK.
When using h1 with a Combi Compact heater, remember that when the temperature set is
higher than 70°C, priority is given to heating up the sauna room. When the temperature set is
lower than 70°C, priority is given to producing steam. It is possible to alter these priorities in the
settings menu.
14
Page 7

Setting the desired level of humidity (Combi Compact only)
Press the Up or Down arrow to highlight the humidity symbol (16) and press OK. Set the
desired level of humidity on the scale that runs from 0–10: 0 = a dry sauna, 10 =
maximum humidity.
The water level in the tank is indicated by the water droplet icon in the status display. An
illuminated, fully filled water droplet indicates a full tank. An illuminated, half-filled icon
indicates that the tank is half full. A flashing, empty icon indicates that the tank is empty.
When starting a bathing cycle, an empty tank is also indicated by a repeated audible
signal. If the water runs out during the bathing cycle, this is indicated by a flashing icon
and a repeated audible signal. As the tank is gradually refilled with water, the icon
changes from half-filled to full and a single audible signal sounds to indicate that the tank
is full once again.
Drying mode (Combi Compact only)
When the preset running time has elapsed or the heater is switched off by pressing the
OFF button, the sauna heater switches automatically to drying mode (provided that the
water tank has been in use and the humidity level has been set at a value from 1 to 10).
The drying cycle runs for 20 minutes and then the heater switches off. The drying cycle
can also be terminated manually by pressing the OFF button.
English
To show that the drying mode is in operation, the ON icon is replaced by the drying
mode icon.
Setting the desired start time
You can set a start time for the sauna heater or steam generator up to 24 hours in
advance.
To preset a start time, use the Up and Down arrows to mark the clock symbol (3) and
press OK. Select Start time, then preset the desired time by using the Up and Down
arrows. Confirm each individual figure by pressing OK. A clock icon will light up in the
status display to indicate that a start time has been programmed.
A time that has already been programmed can be activated by stepping to Activate
under the clock symbol and confirming with OK.
To deactivate a programmed value, step to (3), use the Down arrow to step to Activate
and confirm with OK.
15
Page 8

Settings menu
Under the Settings menu are a number of extra functions. These are designed to make
troubleshooting easier and can be used to set certain parameters. It is also possible to use
this menu to reset the h1 panel to the factory default setting. There are the following submenus:
Status- shows current temperature and time
English
Time – Sets clock
Language – Changes language setting
Display – Sets brightness of display and delay before illumination switches off
Service – Other parameter settings
Locking the panel
To prevent any unauthorised changes to programmed values, the control panel’s keypad
can be locked by simultaneously pressing the Home (11) and Back (10) buttons for
approximately 2 seconds. A key icon will appear in the status display. To unlock the
keypad, press the Home and Back buttons once again for approximately 2 seconds.
Status
Shows time and temperature in the same way as in the basic menu (figure 8) even when
the heater is switched off.
Set clock
Enter the correct time by using the arrow keys (6, 9) to adjust the figures up and down.
Confirm with OK.
Language
Select the desired language by using the arrow keys. Confirm with OK.
16
Page 9

Display
Sleep – Enter the length of time (in seconds) the control panel remains inactive before the
display switches off.
Automatic key-lock – Enter whether or not the automatic key-lock is to be
activated (current status is displayed) and the length of time before the key-lock is
activated.
Vibration
Here you can choose whether or not you wish the panel to vibrate slightly when a button is
pressed.
Service
Under the service menu you can, for example, change the parameters that were set during
the initial installation process. The code 124 must be entered to access the service menu.
The following sub-menus are available:
Max. running time – Enter desired running time.
English
Max. temp. – Enter maximum temperature limit. (Default values are 110°C for sauna
bathing and 55°C for steam baths.)
°C or °F – Display temperature in Celsius or Fahrenheit.
24h or 12-hour – Display time according to the 24-hour or 12-hour clock.
Priority temp/humidity (Combi Compact only)
Select the desired priority for the heater:
Auto – Priority determined according to the temperature set (default setting).
Temperature – Heating up sauna is prioritised.
Humidity – Production of steam is prioritised.
Factory reset – All previously set parameters are cancelled and an initial start-up is required.
See “Initial set-up process” on page 14. You must enter code 421 to do this.
Test – Used by Tylö engineers for functional testing and trouble-shooting.
Cleaning - Clean the glass with a proprietary window/glass cleaner and a soft cloth.
17
 Loading...