

Page 1

Elite Cloud
2103
SV
EN
DE
FR
NL
PL
RU
Art. nr 2900 5208
IPX5
Page 2

SV
Monteringsanvisning och Quickstart guide Svenska sid 3
Installation Guide and Quickstart guide English page 10
Installationsanleitung und Schnellstartanleitung Deutsch Seite 17
Notice d’installation et Guide de démarrage rapide Français page 24
Installatiehandleiding en Snelstartgids Nederlands, pag. 31
Instrukcja instalacji i Pierwsze kroki Polski, stron 38
Руководство по монтажу Краткое руководство поначалу работы Русский язык стр. 45
2
Page 3
Monteringsanvisning
Manöverpanelen skall monteras i en frostfri omgivning.
Manöverpanelen kan installeras inne i eller utanför basturum/ångrum. Vid montering inne i basturum får den övre
kanten placeras högst 80 cm från golv och minst 30 cm från aggregatet. Omgivningstemperatur för manöverpanel
Elite Cloud får aldrig överstiga 80°C.
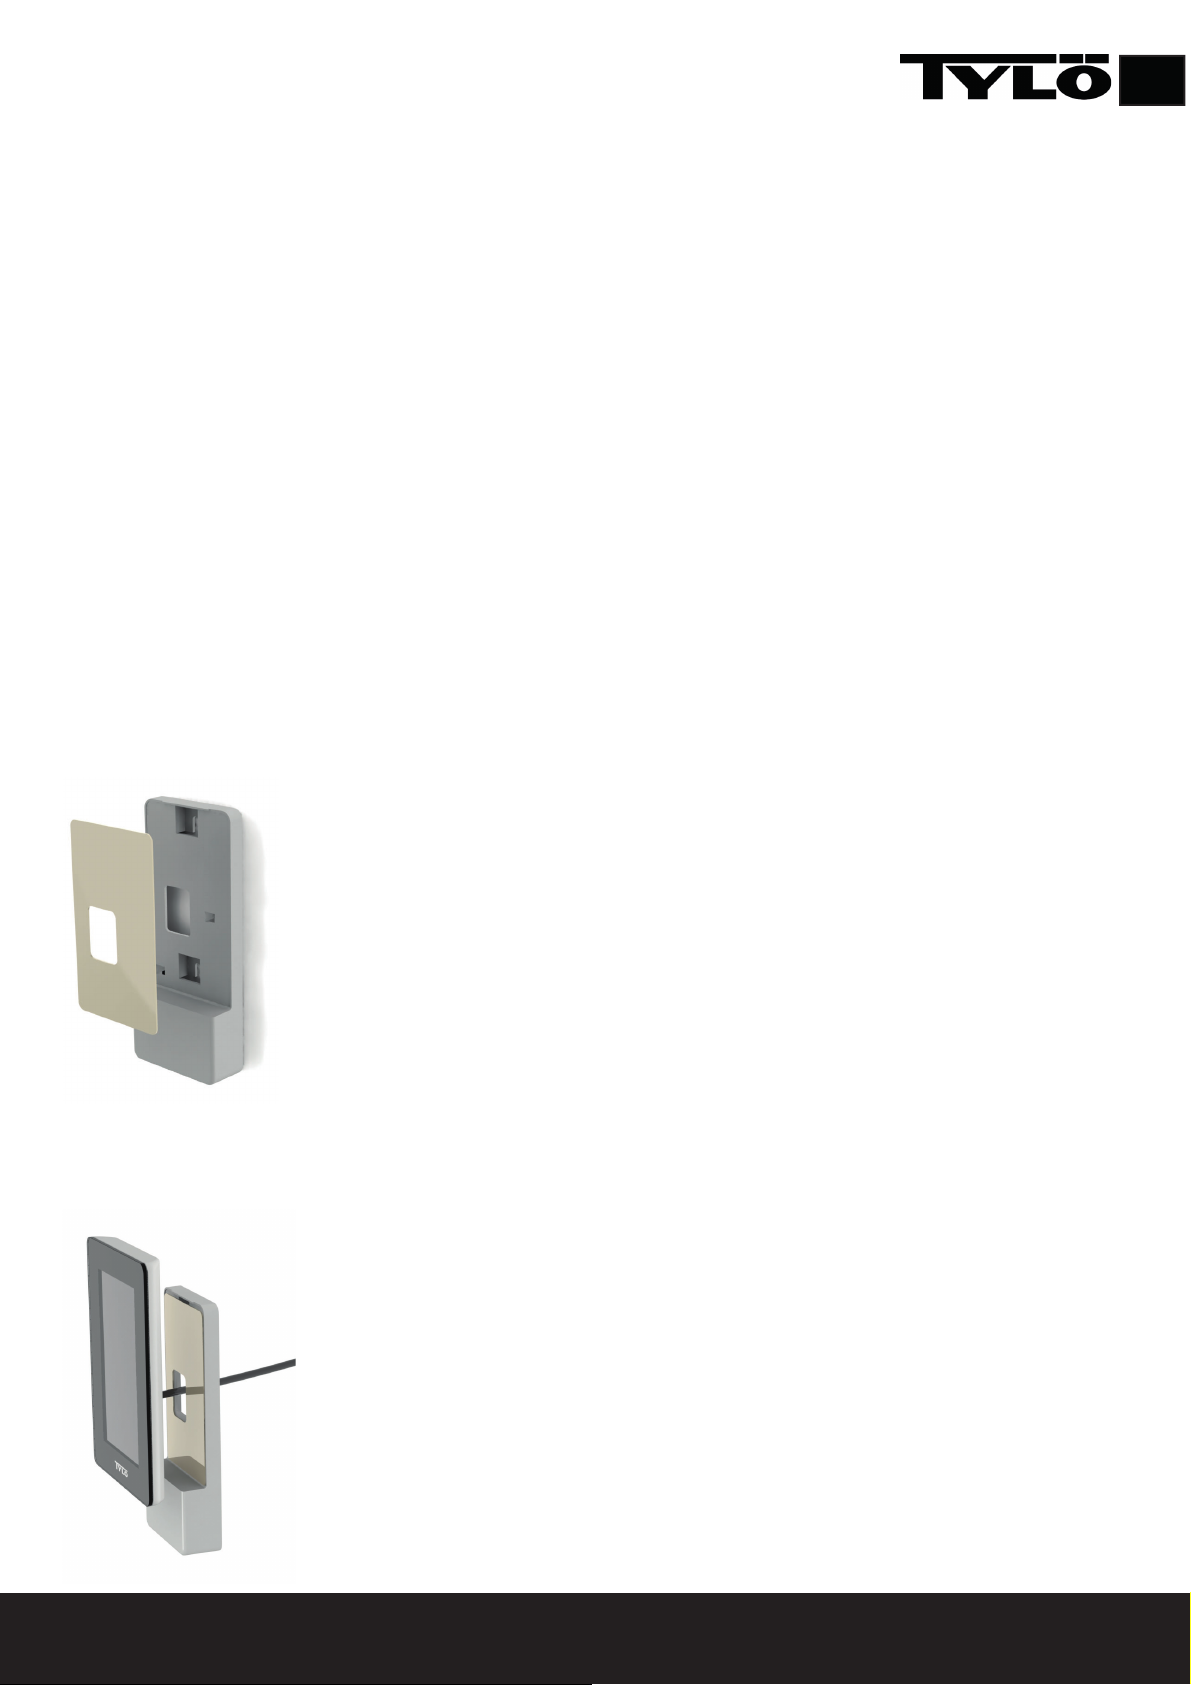
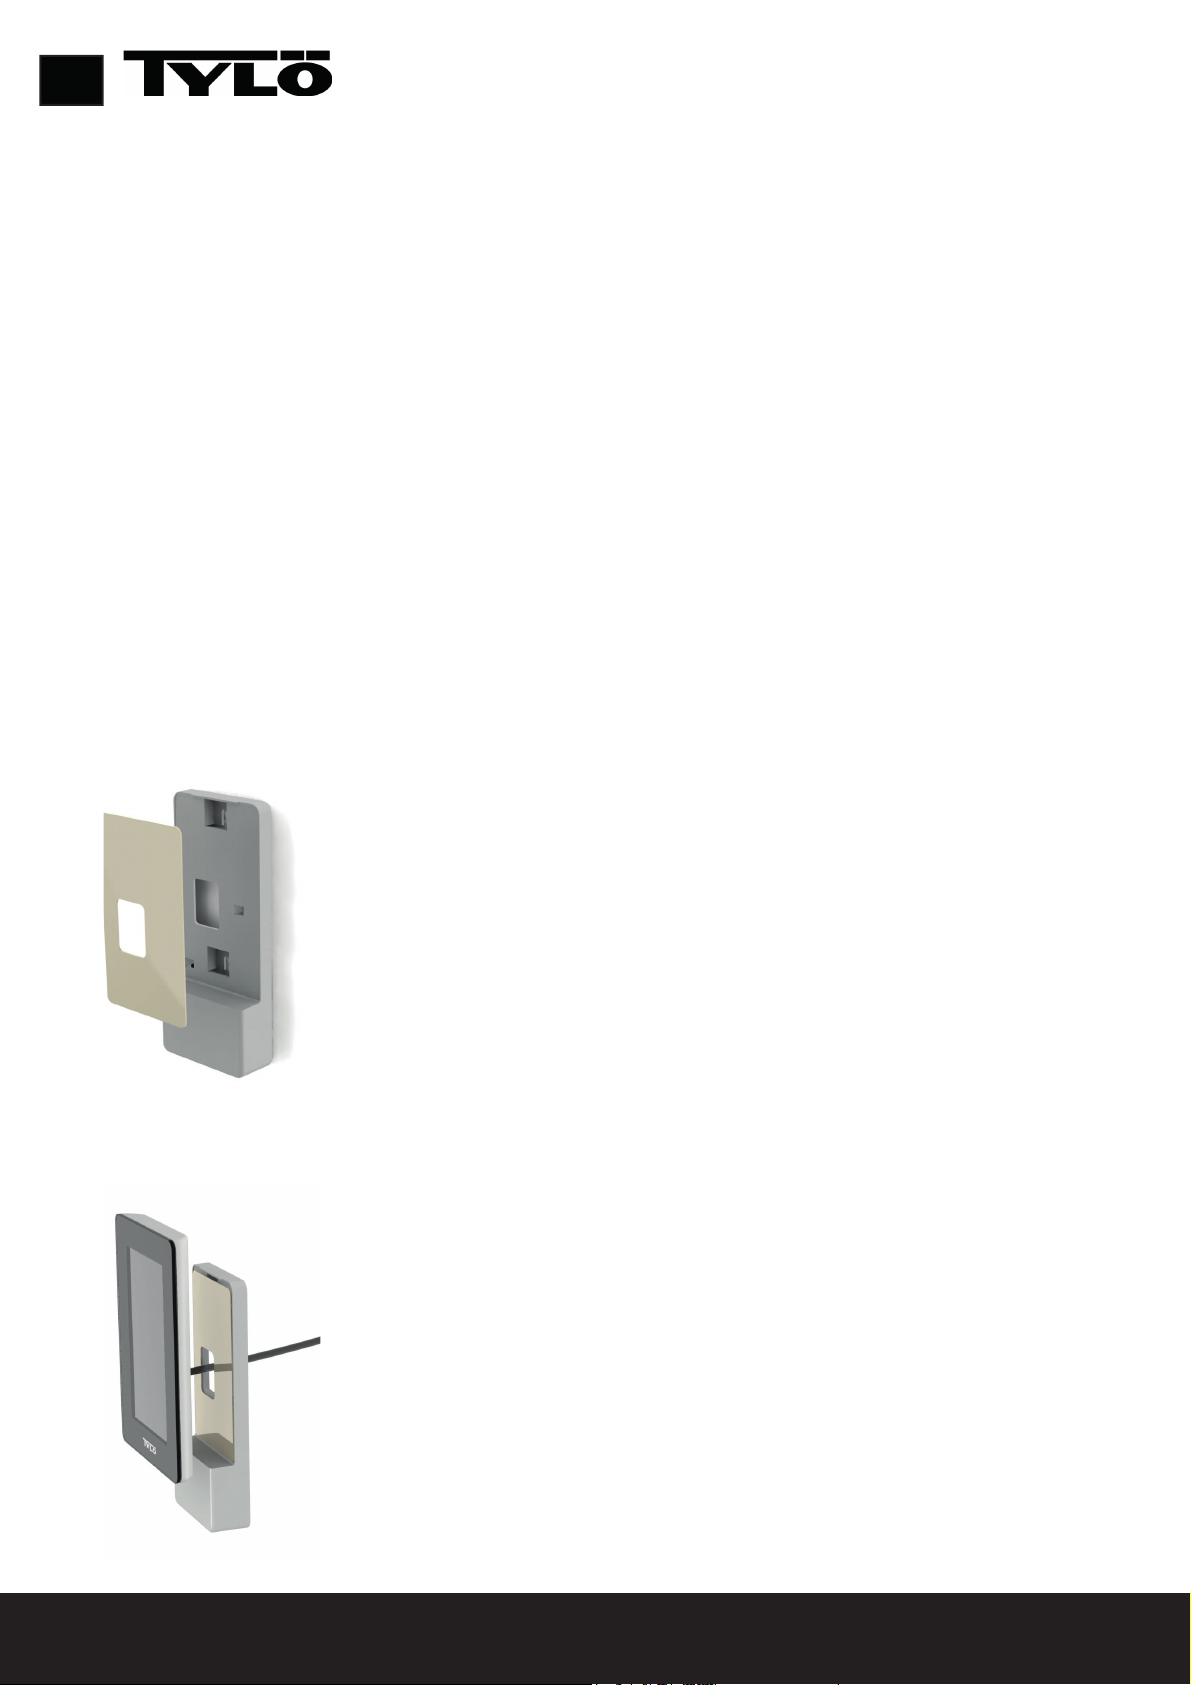
Montering på vägg kan göras med den medföljande konsolen eller med hjälp av medföljande dubbelsidiga
adhesiv. Om konsolen skall användas fästs manöverpanelen på konsolen med adhesiv.
För montering av manöverpanel direkt på vägg krävs ett genomgående hål på 30 mm.
Vid montering av panelen inne i ångrum skall montering ske direkt på vägg med medföljande adhesiv eller med
Tylös infällningsram (art. Nr 90001056). Väggen skall vara slät och väl rengjord efter håltagning (30 mm) innan
montering. Konsolen får inte användas.
Har du köpt Elite så kontrollera täckningen av ditt trådlösa nätverk innan du monterar fast manöverpanelen (se
även Konfi gurera: Systeminställningar i denna guide).
Montering med konsol
Använd konsolen för att markera skruvhålen på väggen. Skruva i skruvarna så att konsolen sitter stadigt men
fortfarande går att lossa.
SV
Fäst adhesivet mot konsolen (se bild 1).
Bild 1
Ta bort skyddet på adhesivet och fäst panelen mot konsolen (se bild 2).
Bild 2
3
Page 4
SV
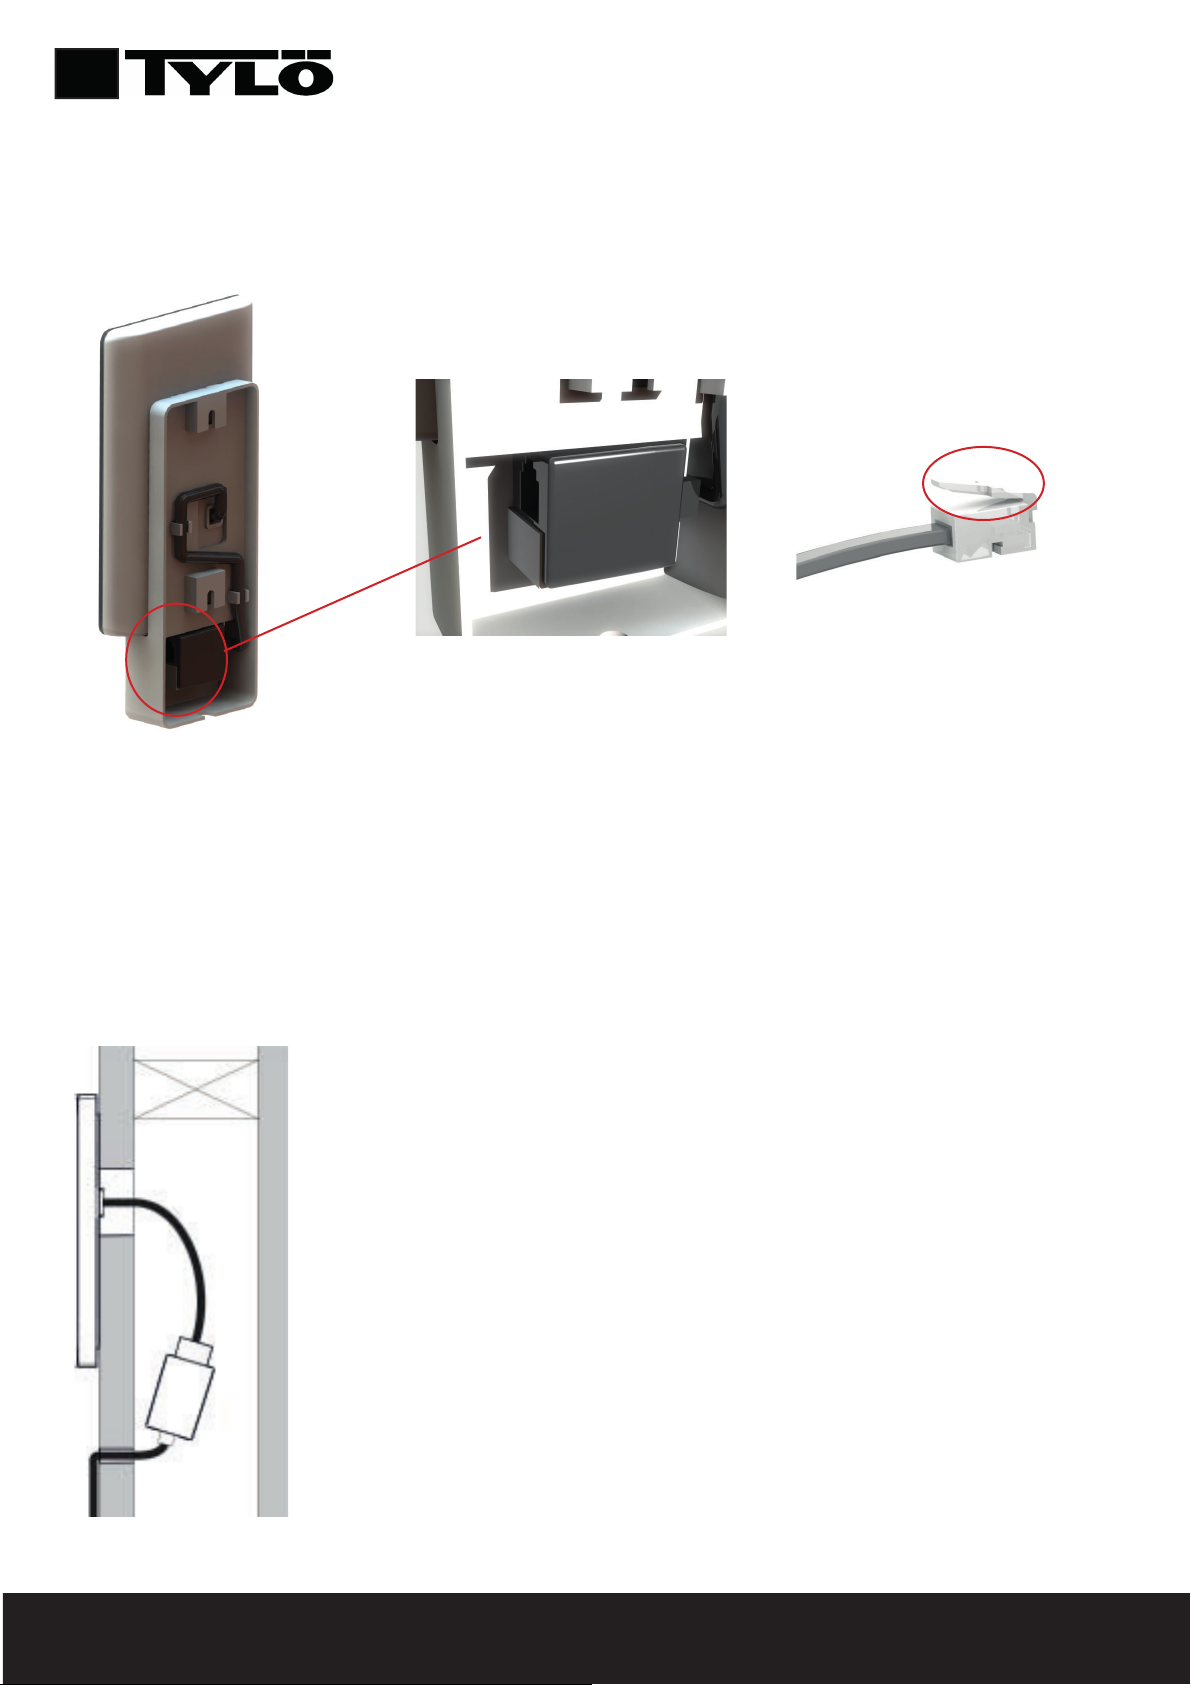
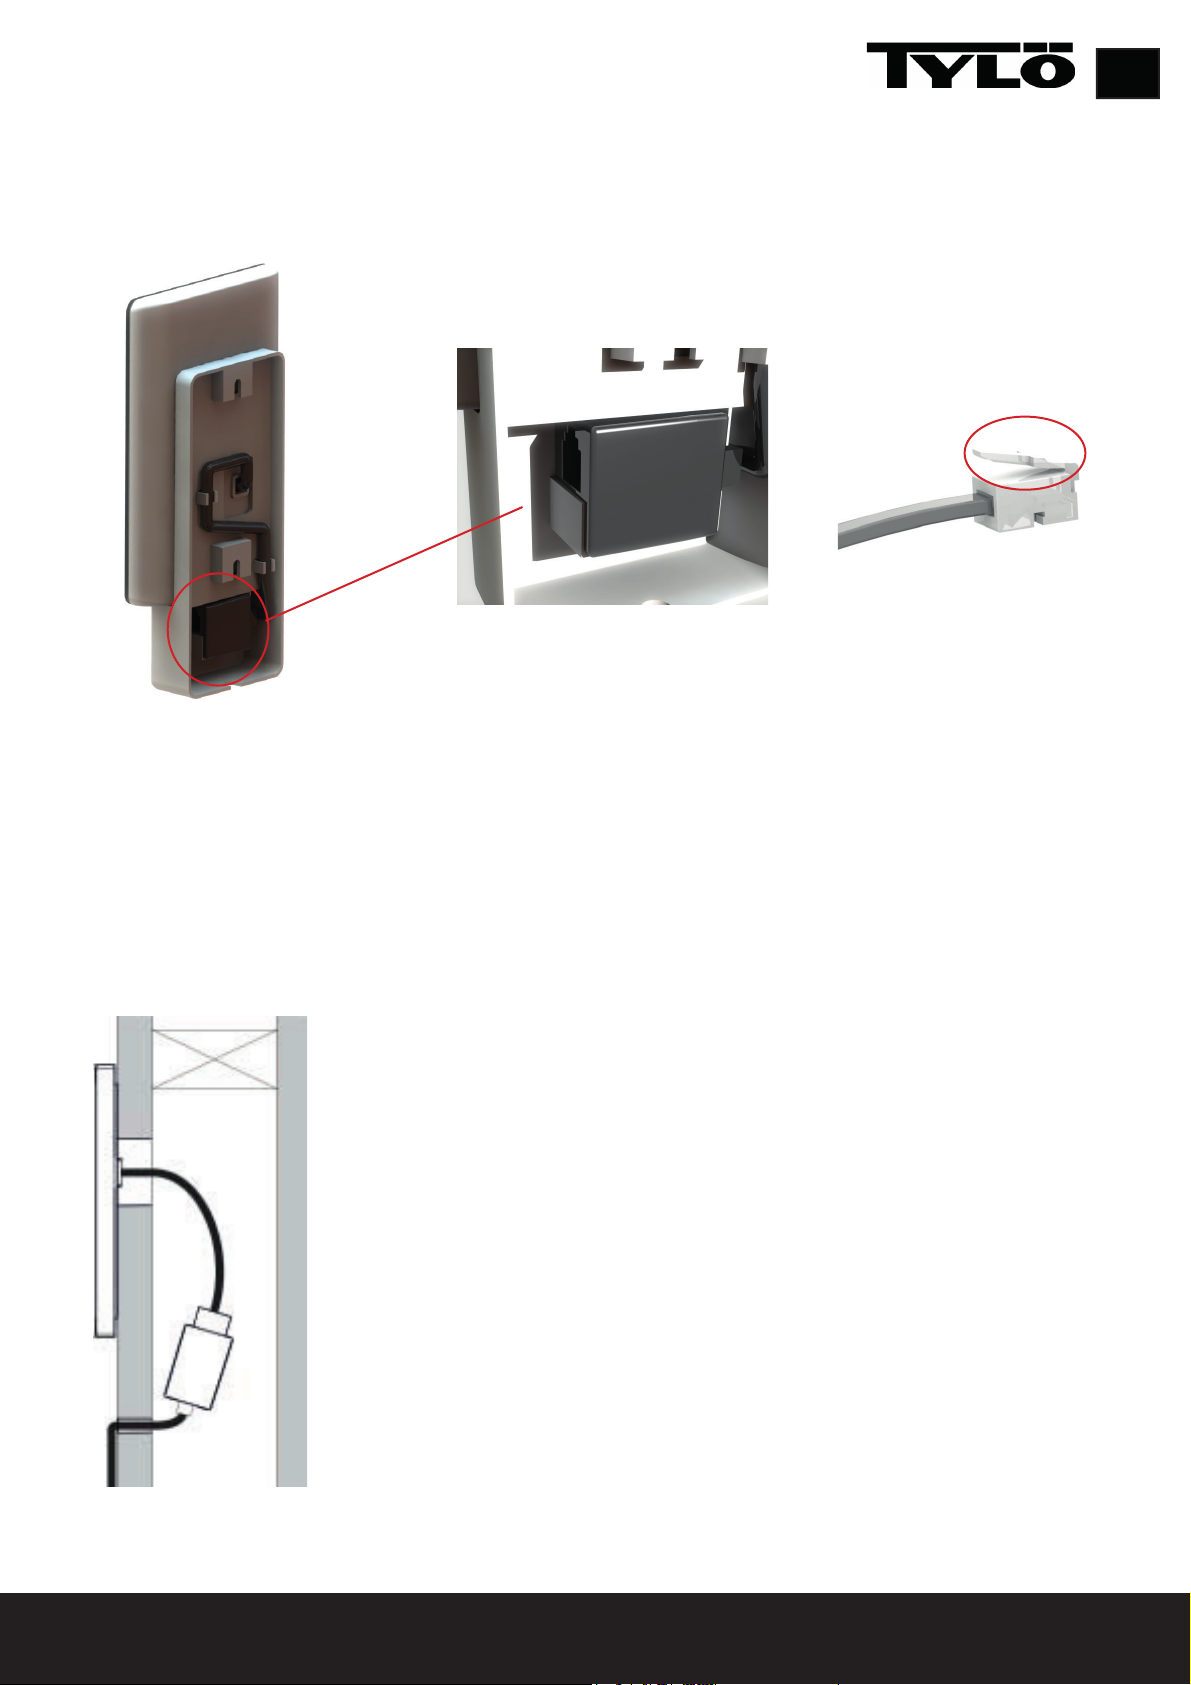
Fixera sladd och kontakt i konsolen (se bild 3 och 4). Tänk på att positionera kontakten enligt bild 5 så
att låstungan på RJ10 kommer uppåt (se bild 5). Montera upp panelen på väggen. Använd medföljande
manöverpanelsledning för att ansluta panelen till aggregatet. Ledningen går att korta om den är för lång och
använda medföljande extrakontakt. OBS det krävs specialtång för detta (crimptång för RJ10).
Bild 3
Montering utan konsol
Fäst det dubbelhäftande adhesivet på manöverpanelen. Innan panelen fästs mot vägg skall manöverpanelen
kopplas samman med aggregatet för kontroll att allt fungerar innan manöverpanelen permanent fästs mot
väggen. Därefter tas skyddet på adhesivet bort. Koppla därefter ihop manöverpanelen med ledningen, trä
genom kontakten genom hålet i väggen och tryck fast manöverpanelen mot väggen.
Vill man montera manöverpanelen utan konsol men behöver dra ledningen utanpå väggen kan följande
principlösning användas (Se bild 6). Detta gäller enbart för montering inne i bastu. Tänk på att hålet i väggen
där kontakten skall gå igenom måste vara minst 30 mm.
Bild 4 Bild 5
Bild 6
4
Page 5

Quickstart guide
För att du snabbt skall kunna komma igång och använda din nya bastu eller ditt nya ångrum så läs igenom
denna guide. Här beskrivs de grundläggande funktionerna som du behöver veta. Fullständig manual kan laddas
ned från https://www.tylohelo.com/sv/control-panel-tylo-elite.
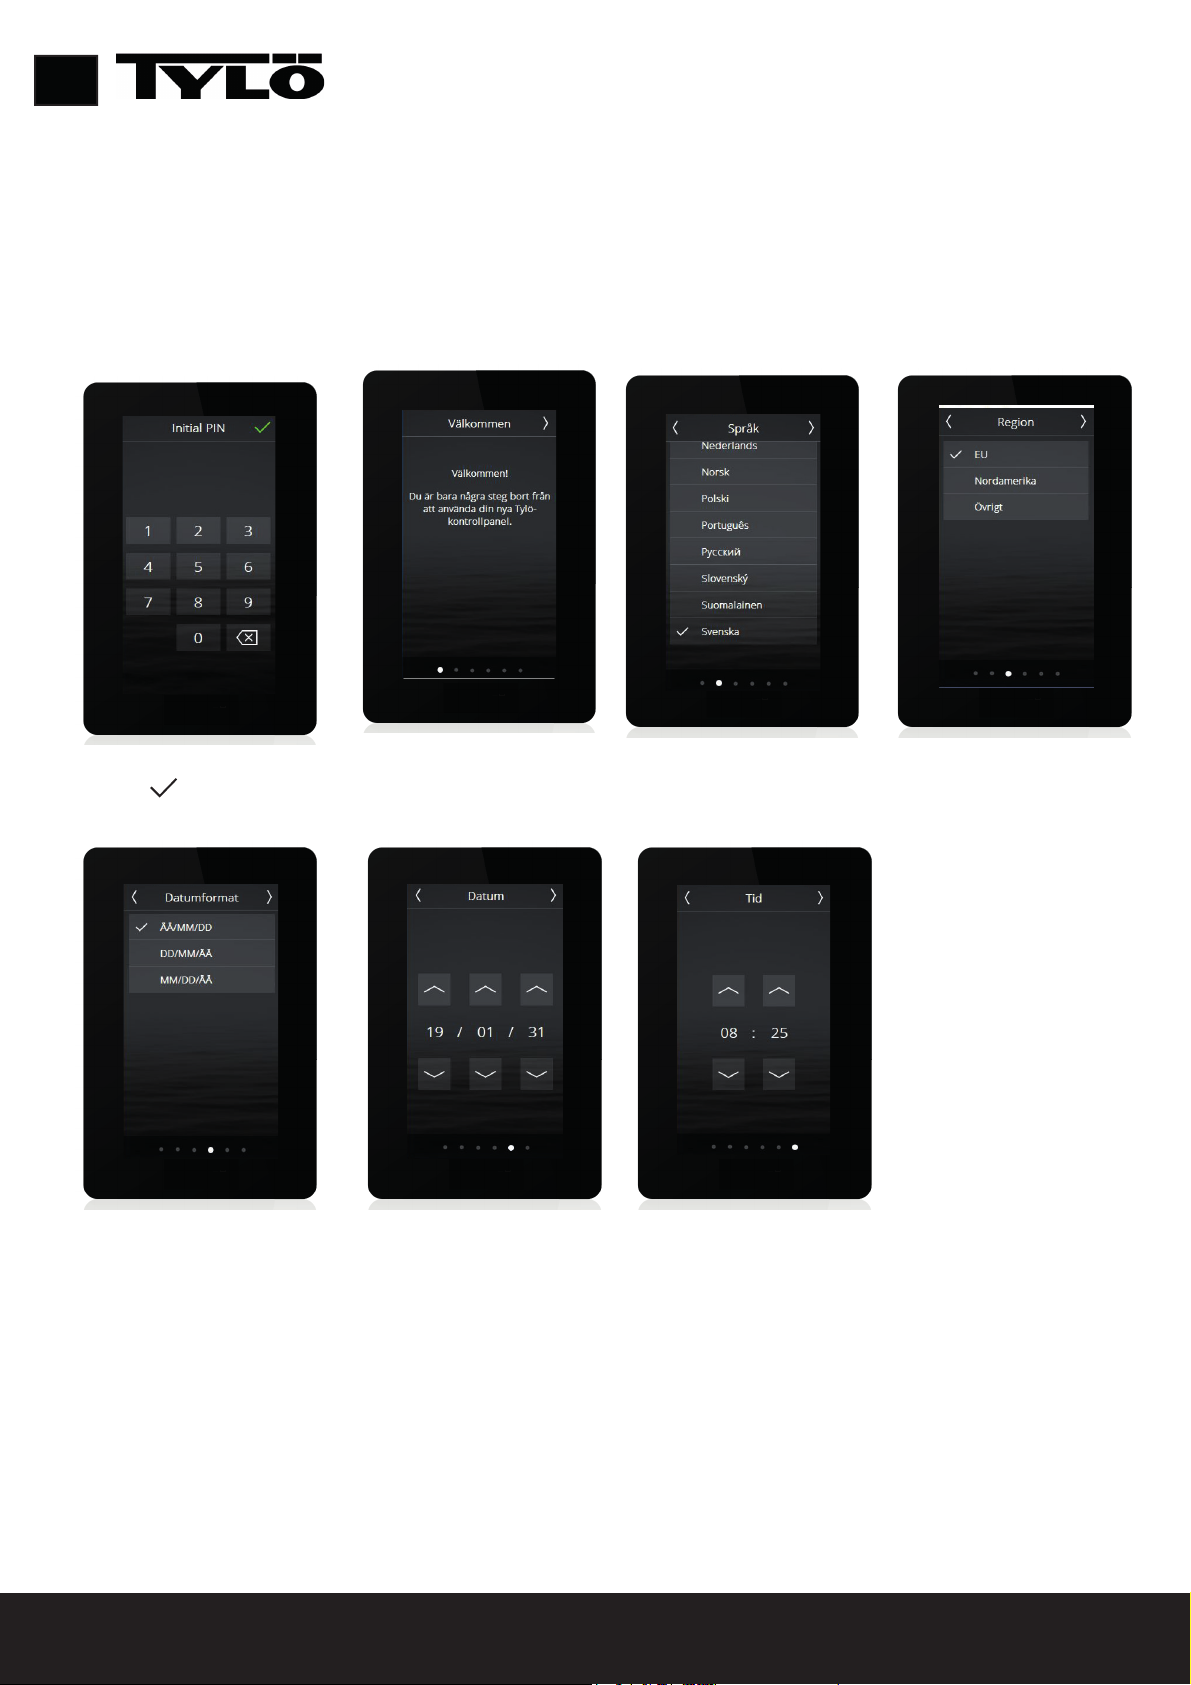
Initial setup
Vid första start ställs vissa grundläggande parametrar in. Tryck på skärmen för att ange ditt val och därefter >
(eller <).
SV
Ange PIN kod: 8956
(tryck på )
Välj datumformat
Välkomstskärm
(tryck på >)
Ställ in datum
Välj språk Välj region
Ställ in tid
Flera andra parametrar ställs in automatiskt utifrån inställningarna ovan samt vilken typ av aggregat det är.
Samtliga parametrar kan ändras senare. De beskrivs i manualen.
5
Page 6
SV
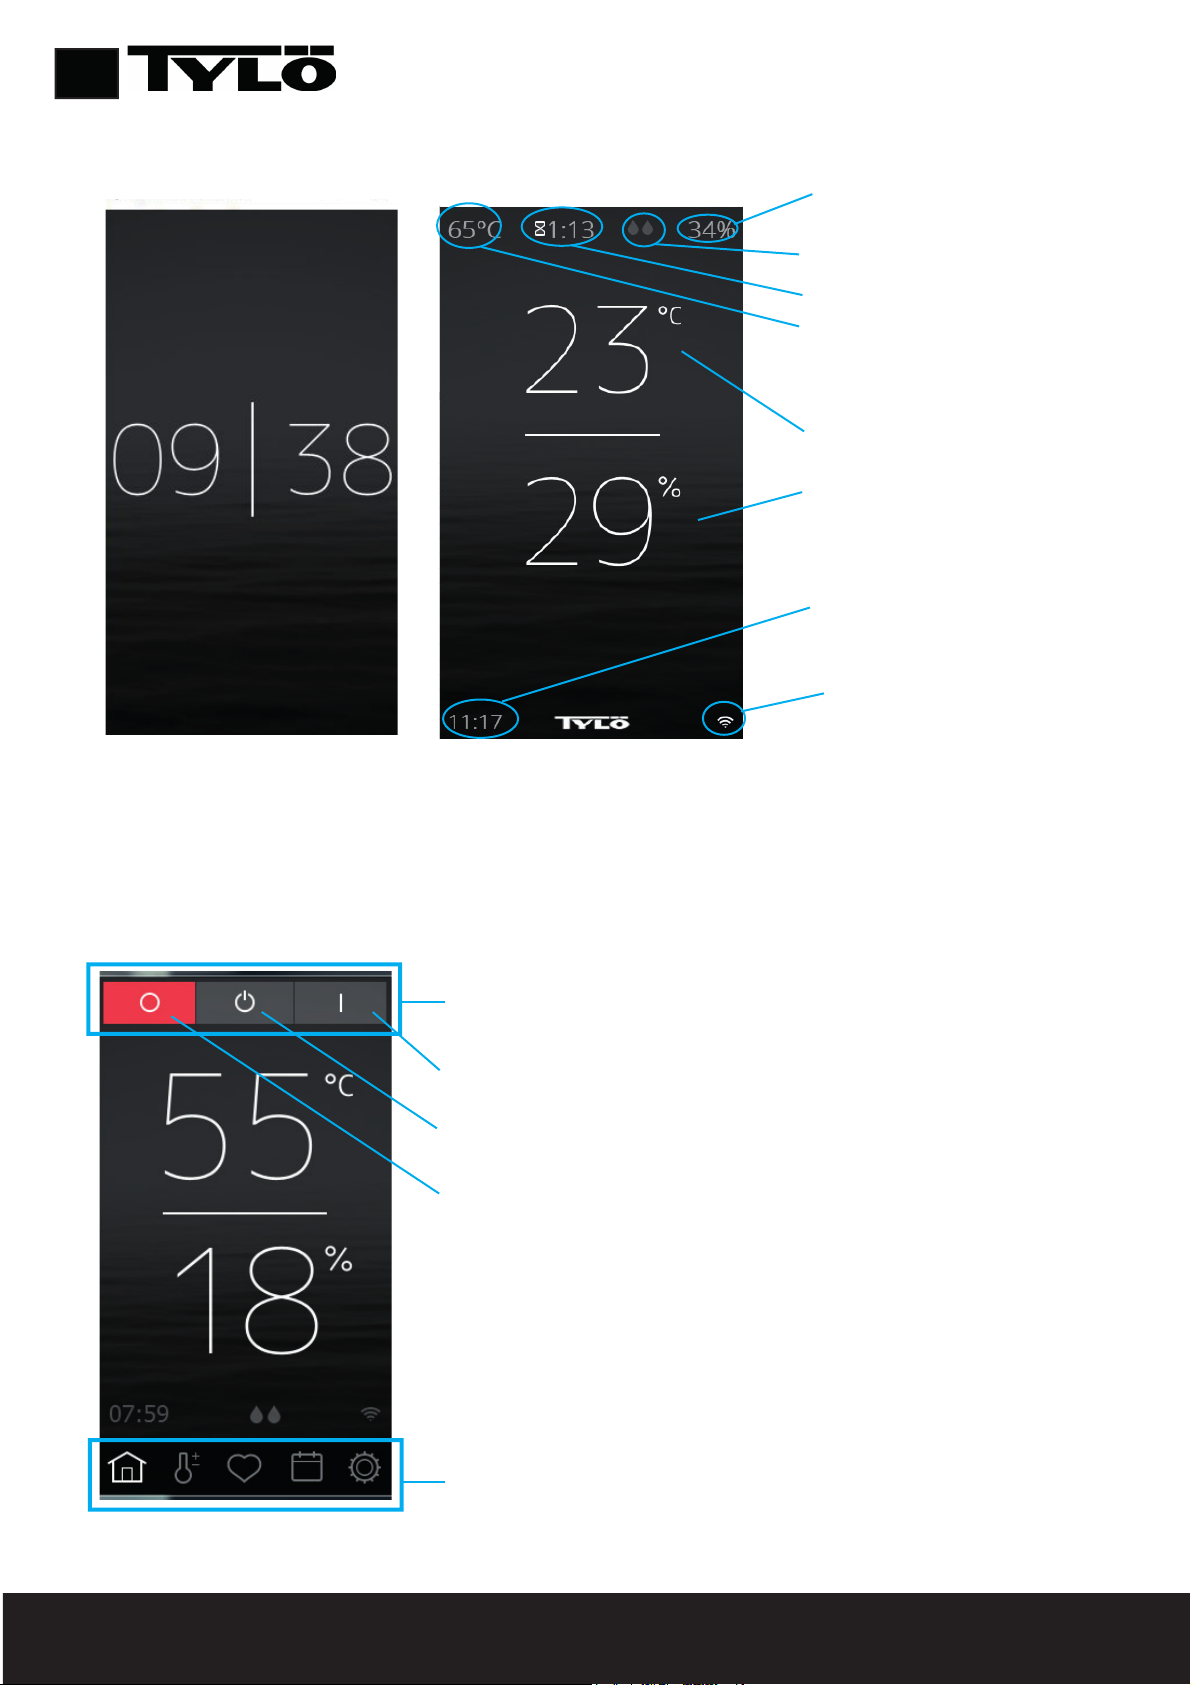
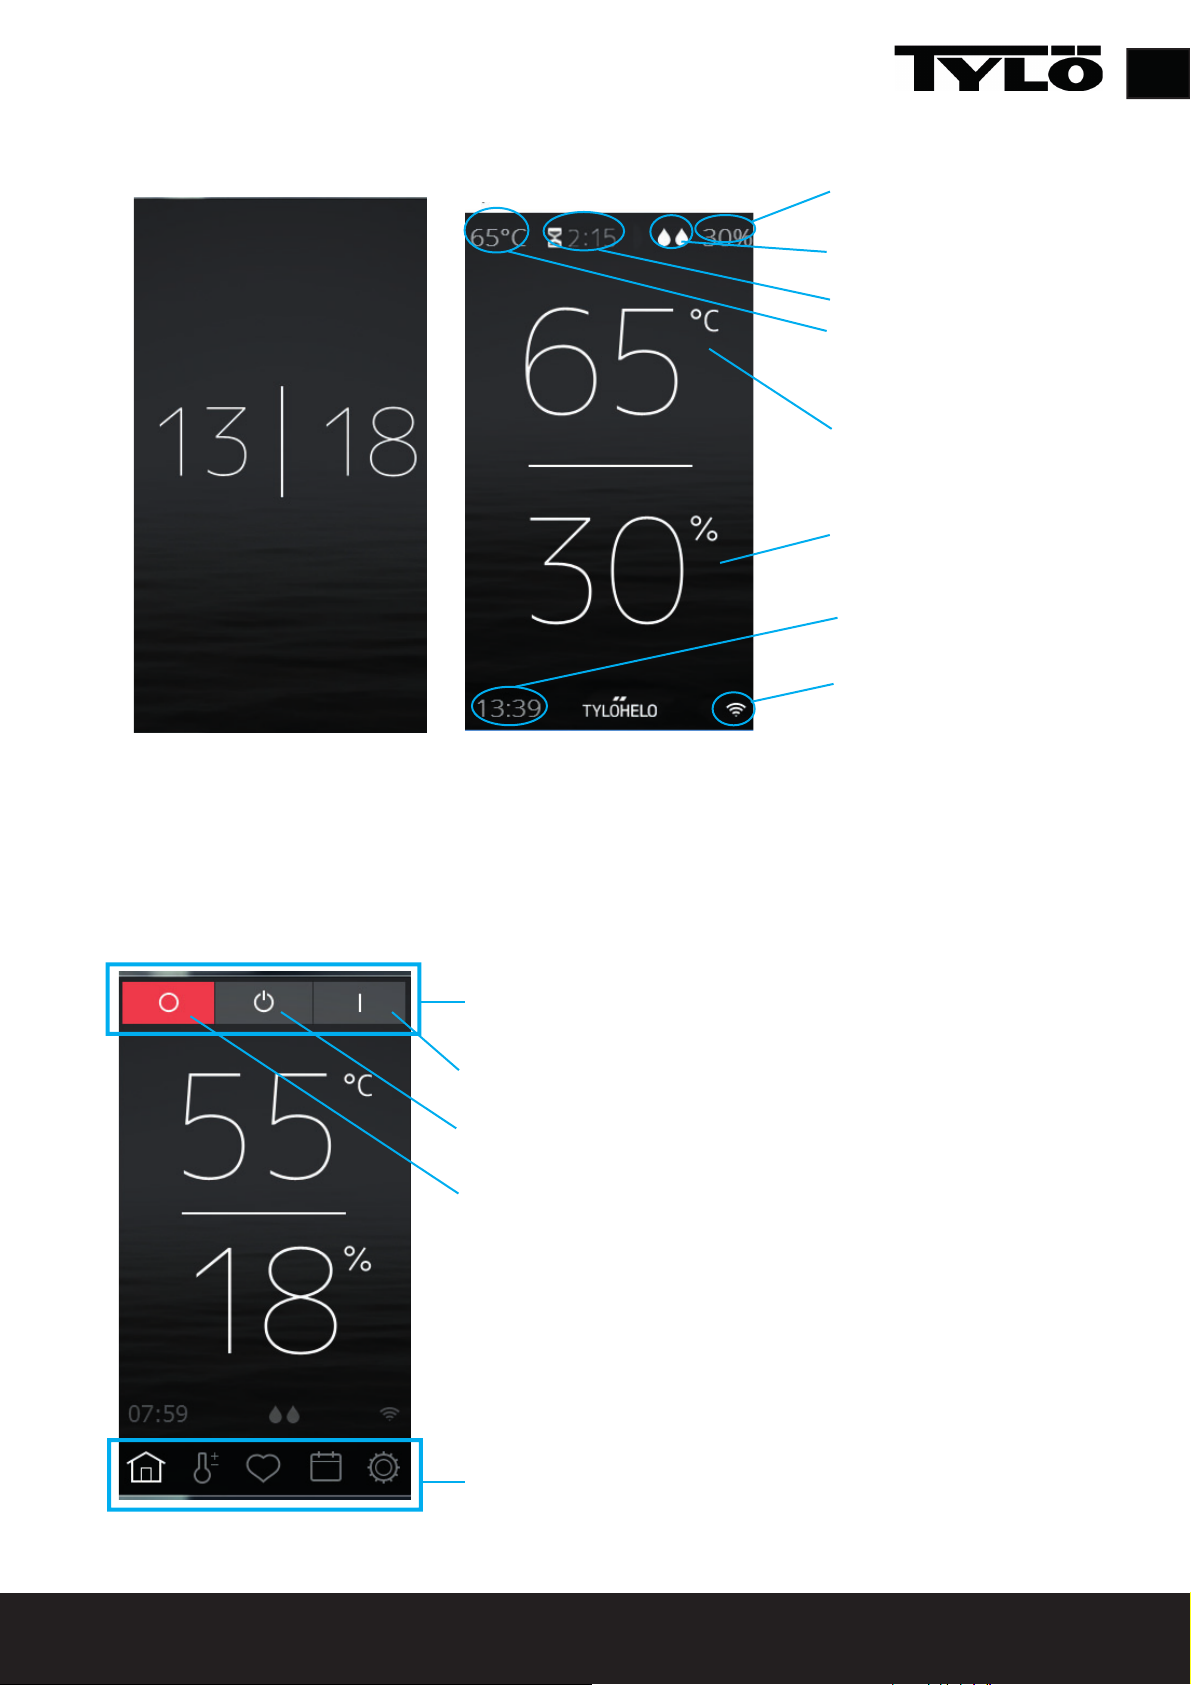
Overview
Overviewskärmen vissas både när aggregatet är avstängt (bild 7) och när det är igång (bild 8).
Inställd luftfuktighet
Vattennivå i tanken (gäller Combi)
Återstående badtid
Inställd temperatur
Aktuell temperatur
Aktuell relativ luftfuktighet (visas
endast om temperatur/fuktsensor
är inkopplad på Combi och
Tylarium)
Aktuell tid
Visar att panelen är ansluten till Wifi
Bild 7 Bild 8
Home
Man kommer till Home skärmen (bild 9) genom att trycka på skärmen i Overview läge eller genom att trycka på
Home knappen. Aktivitetsknappar används för att starta och stänga av aggregatet. Även en Standby knapp visas.
När man trycker på aktivitetsknapparna ändrar de färg så att de visar aktuell status.
Aktivitets- / Statusknappar
På
Standby
Av
Bild 9
Funktions- / Inställningsknappar
6
Page 7
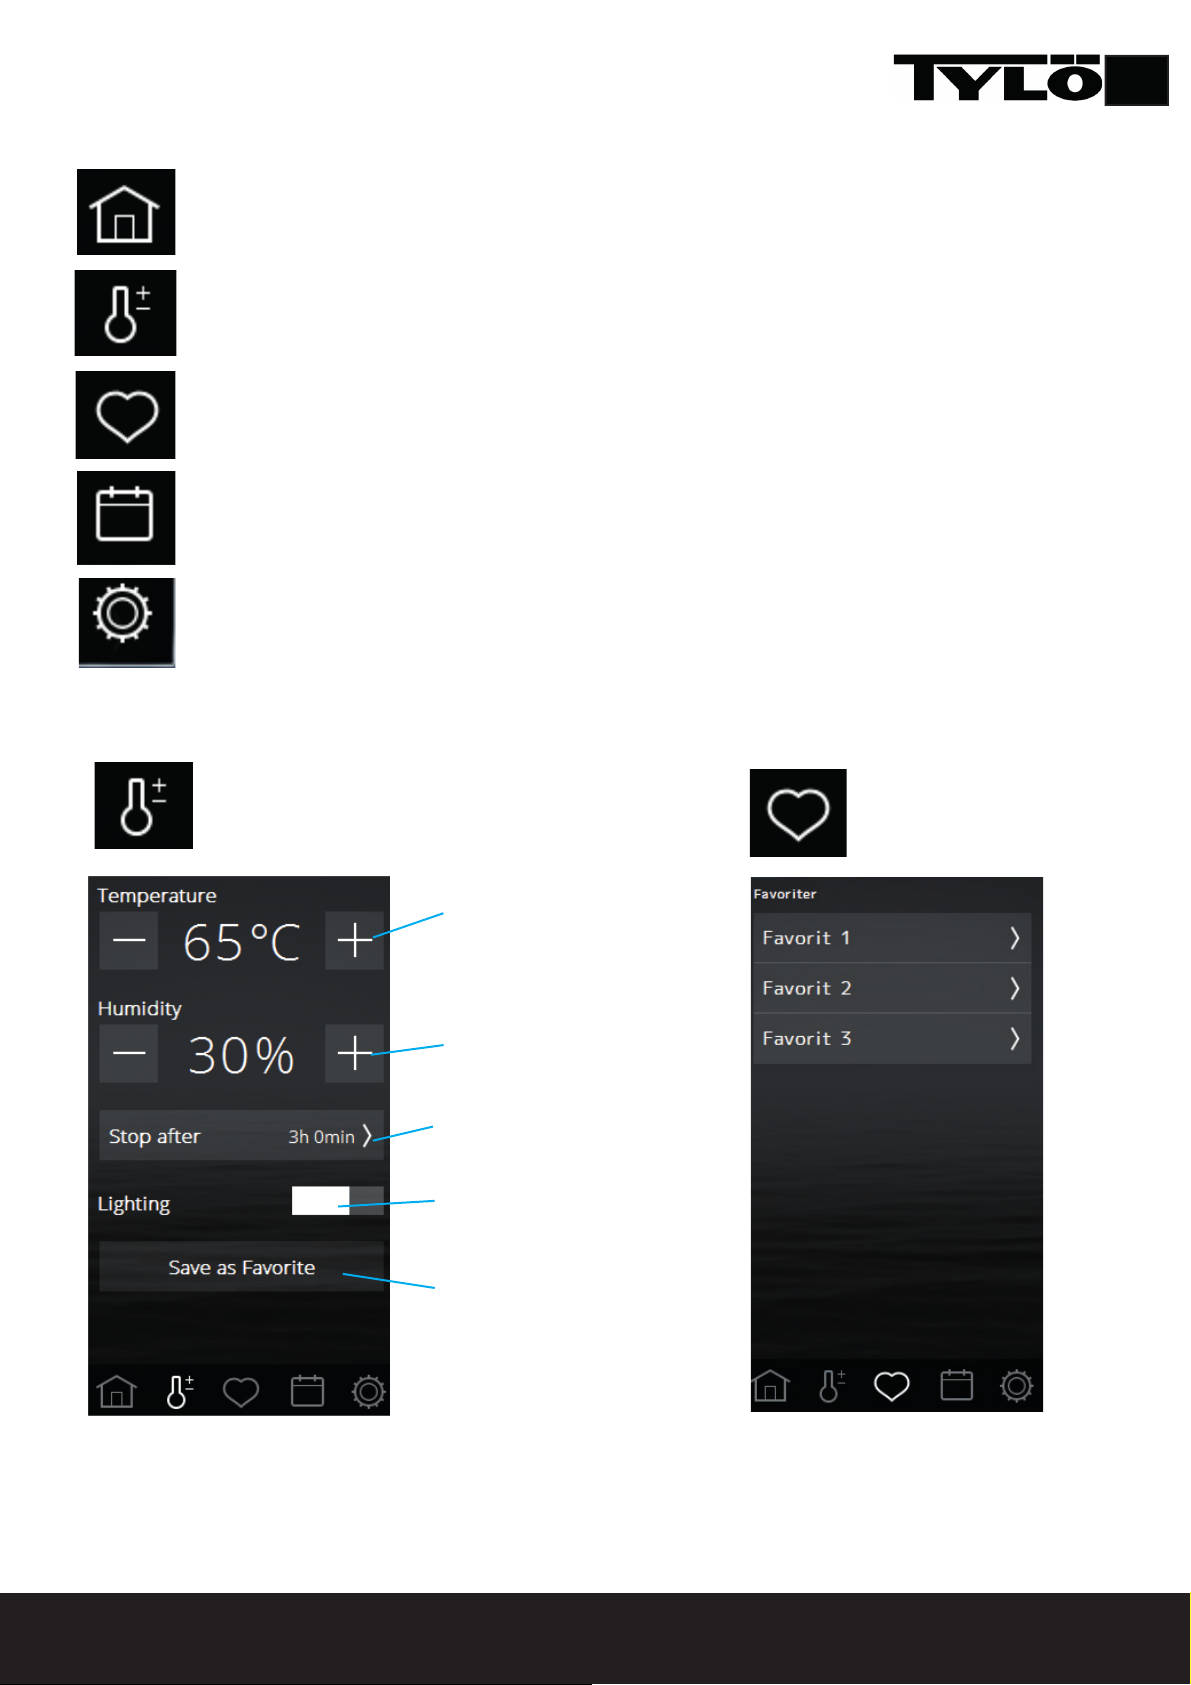
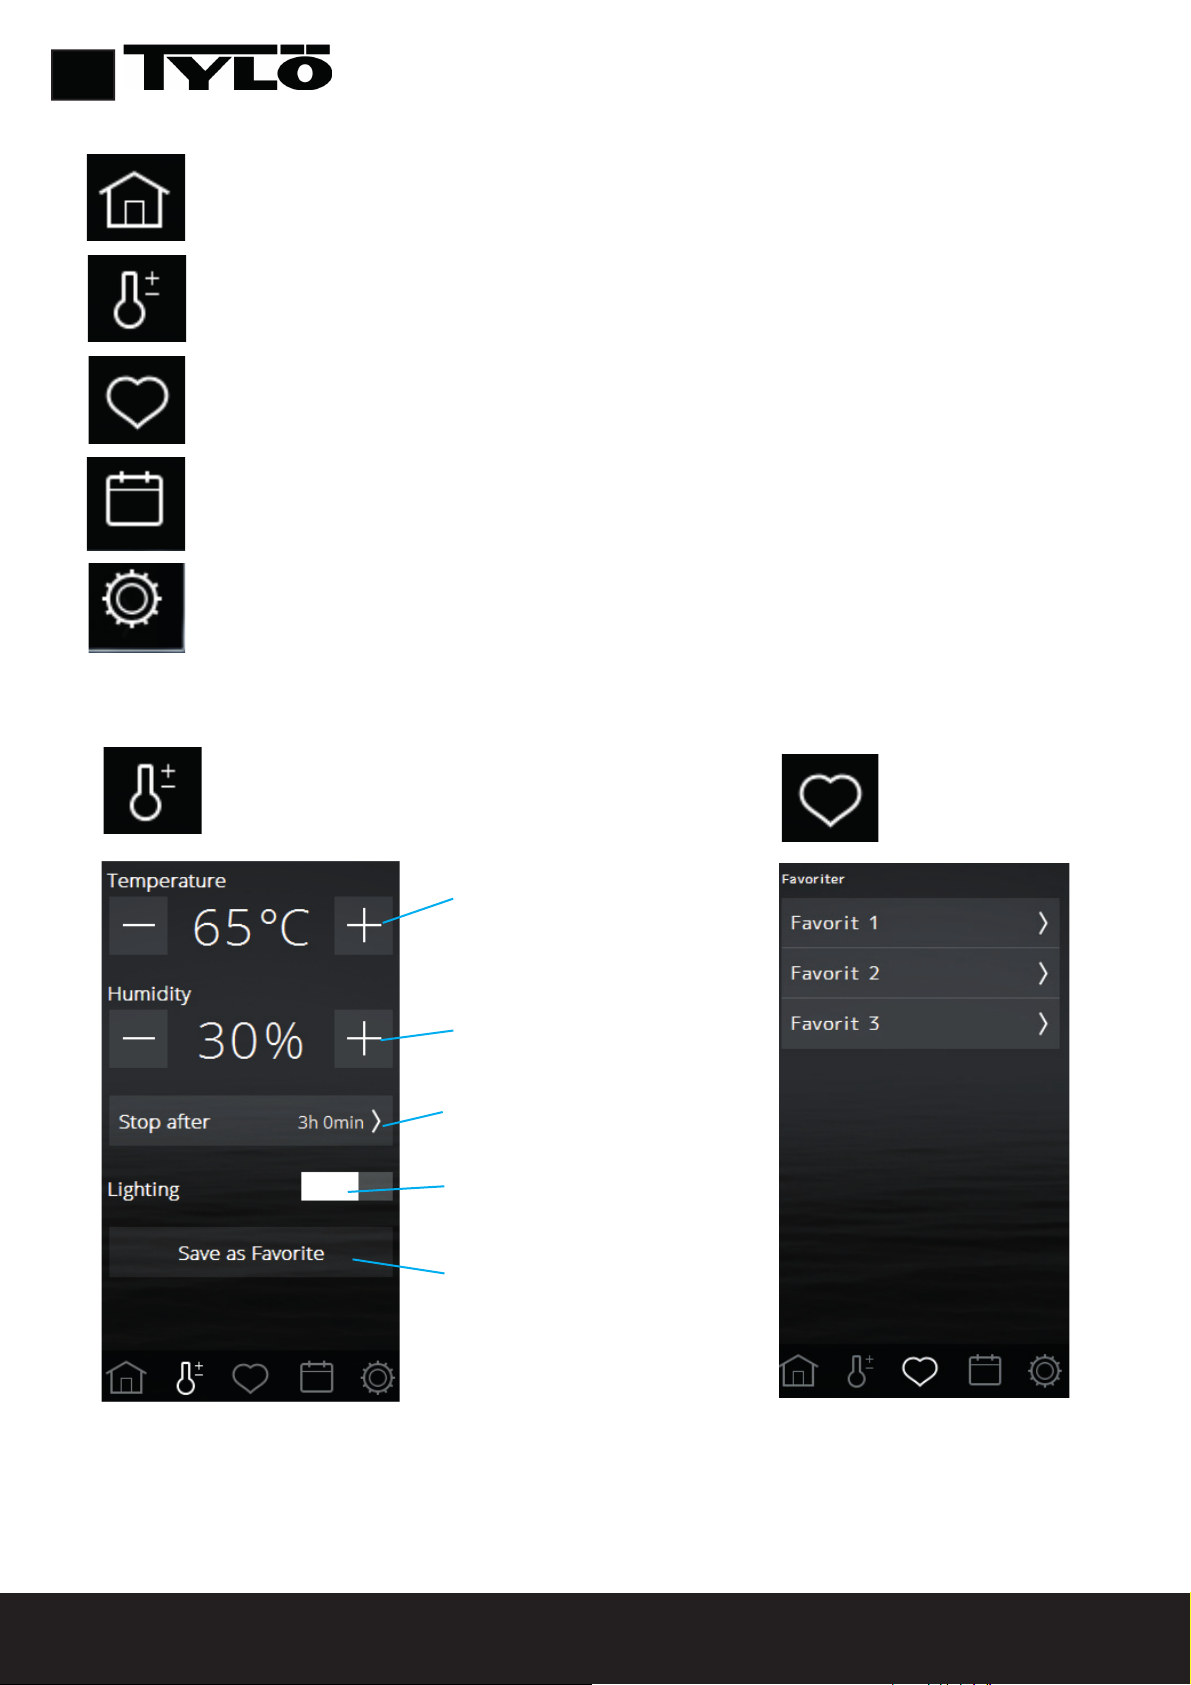
Funktions- / inställningsknappar
Home: Visar information om temperatur och fukt samt aktivitets-/statusknappar och Funktions-/
inställningsknappar.
Inställning: Inställning av temperatur, badtid, fukt mm.
Favoriter: Sparade favoritinställningar.
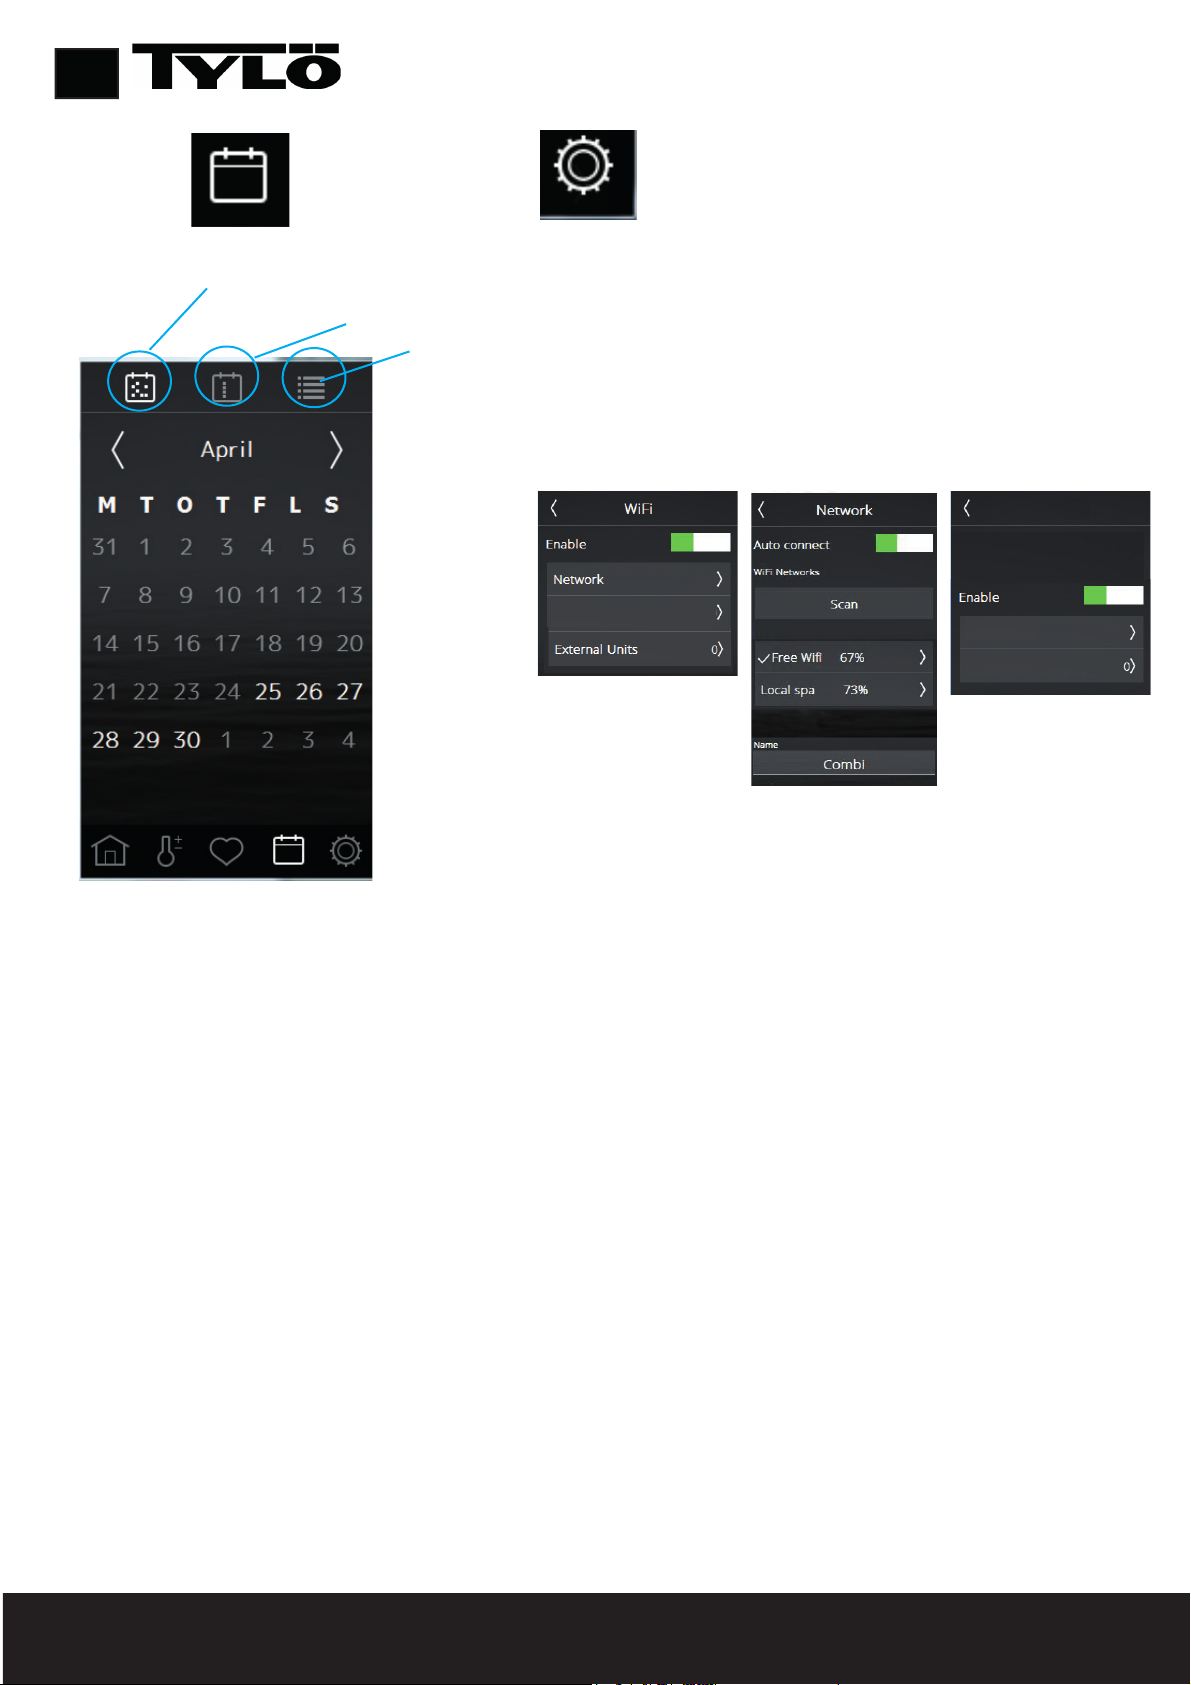
Kalender: Skapa kalender- och/eller veckoprogram.
Konfi gurera: Systeminställningar.
SV
Inställningar
Favoriter
Inställning av önskad
badtemperatur
Inställning av önskad
luftfuktighet. Endast på Combi
och Tylarium.
Inställning av önskad
badtid.
Belysning Av/På
Spara inställningarna som
en favorit.
Under inställningar ställs allt in för
badet. Dessa inställningar kan även
sparas till Favoriter.
Under denna symbol fi nns de Favoriter som
sparats under inställningar. För att starta,
radera eller redigera, tryck på fältet med
namnet på favoriten.
7
Page 8
SV
Cloud
Cloud
Cloud functional ity
Pair your iOS/android device
Cloud C onnection Status
Connected
Connect Dev ice
Trusted Remote Devices
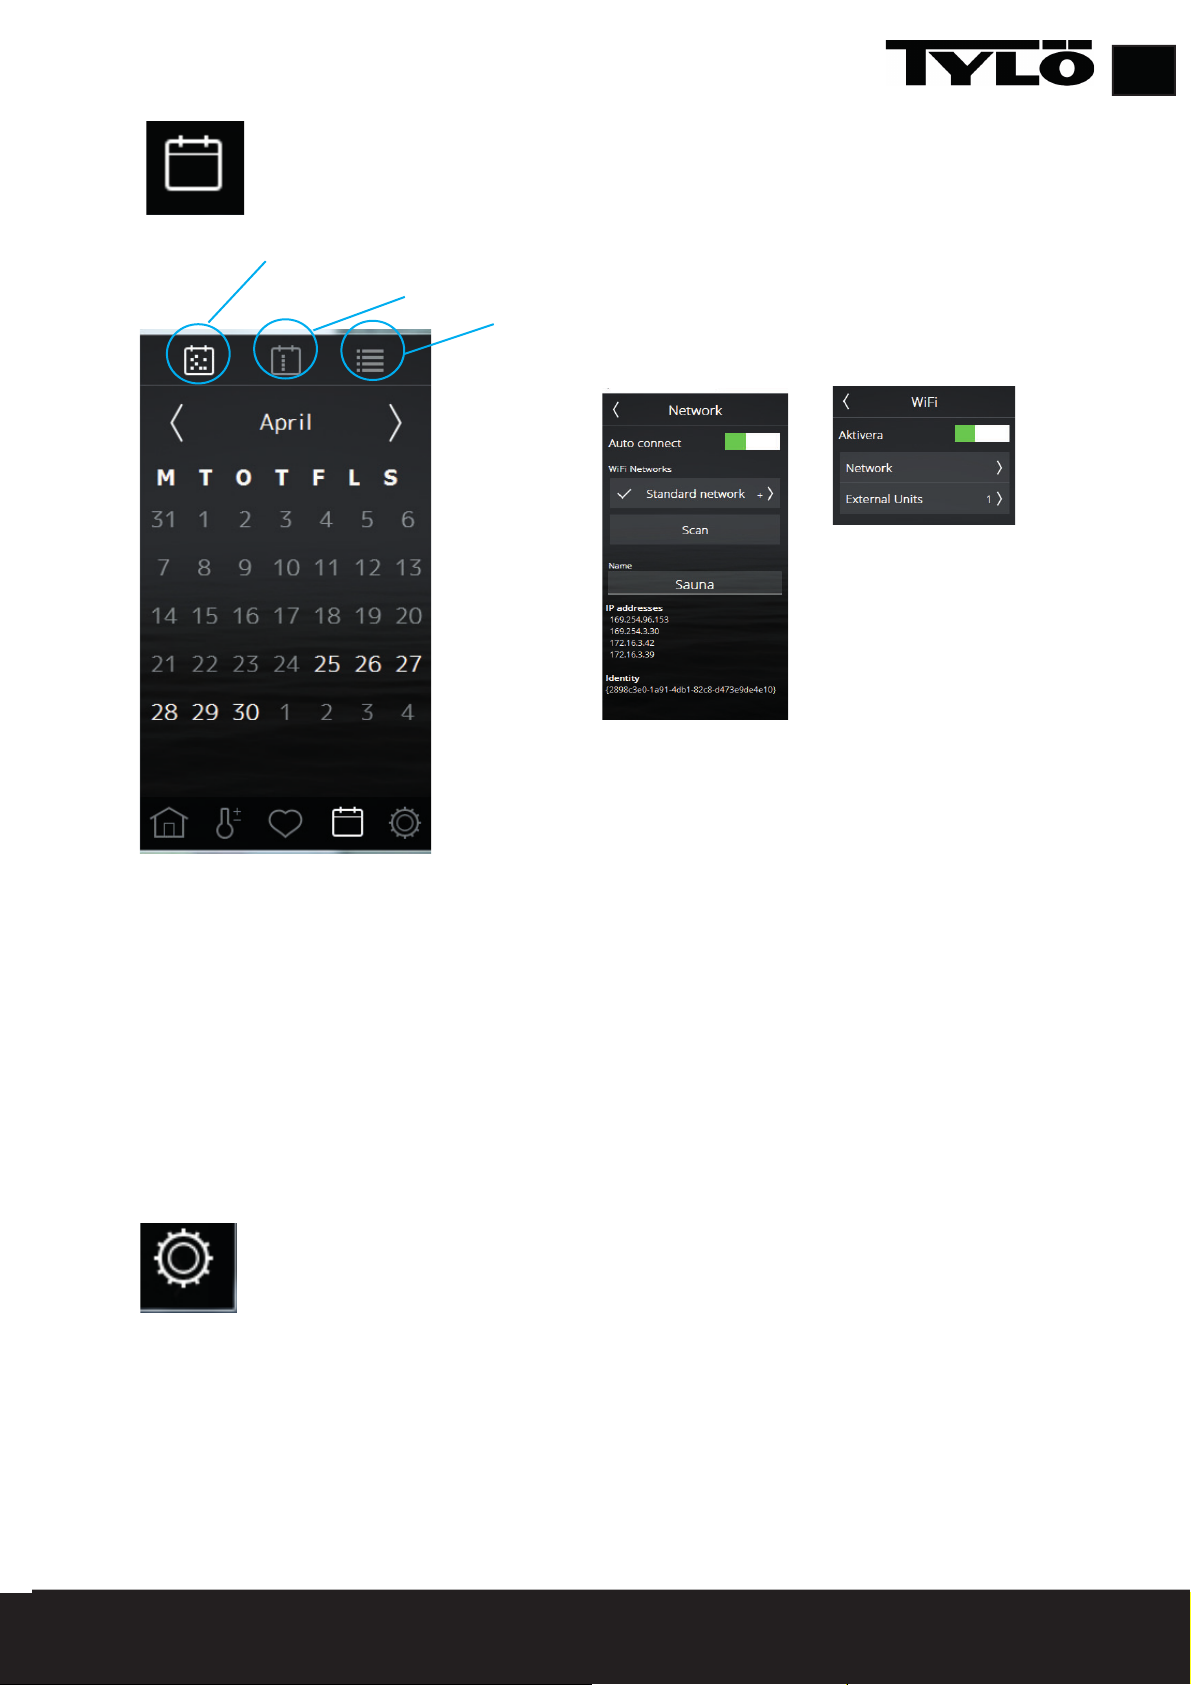
Kalender
Datumkalenderprogram
Dagprogram
Översikt program
Konfi gurera: Systeminställningar.
Under Konfi gurera fi nns både information om systemet och möj-
lighet att anpassa och ställa in olika funktioner och parametrar.
Man kan även konfi gurera eventuell tilläggsutrustning (som t ex
doftpumpar eller extra belysning).
När man trycker på Konfi gurera visar skärmen en meny med
olika indelningar. För att se fl er rader sätt fi ngret mot skärmen
och dra upp/ned.
I denna quickstart guide beskrivs endast menyn Wifi , Network
och Cloud.
För att man skall kunna använda Kalenderfunktionerna för Bastu- och Combi
aggregat samt även vid Tylarium anläggning krävs att en dörrkontakt kopplas till
dörren (Artikelnummer 90908035). Den
behövs även för att använda Wifi till bas-
tu- och Combiaggregat.
Under kalender kan du skapa program för
enskilda datum eller program som återkommer varje vecka.
Under Network ansluter du till ditt befi ntliga WLAN. Tänk på att
platsen där manöverpanelen placeras påverkar hur bra den kan
nå trådlösa nätverk. Undersök signalstyrkan genom att, före
fast installation av manöverpanelen, starta systemet och gå in i
Network. Tillgängliga nätverk visas, och efter namnet visas en relativ signalstyrka i %. Signalstyrkan måste vara minst 60% annars
måste en ny accesspunkt eller repeater sättas i närheten av Elite
panelen. Det lokala nätverket skall vara inställt på 2,4 GHz bandet
och Elite kan endast använda kanal 1-11.
Systemet stöder WPA/WPA2 personal SSID+Passord (max 20
tecken). För att ansluta mobilapplikation eller PC applikation se
instruktion för appar på TylöHelos hemsida (https://www.tylohelo.
com/sv/control-panel-tylo-elite).
Under Name kan du namnge ditt system. För att byta eller ändra
på namnet, tryck på namnet så kommer tangentbordet fram för
editering.
Elite Cloud ansluter automatiskt till valt nätverk om kontakten
förloras. Anslutningen visas genom att Wifi symbolen tänds på
Home skärmen.
Anslutningen visas genom att Wifi symbolen tänds på Home
skärmen.
8
Page 9
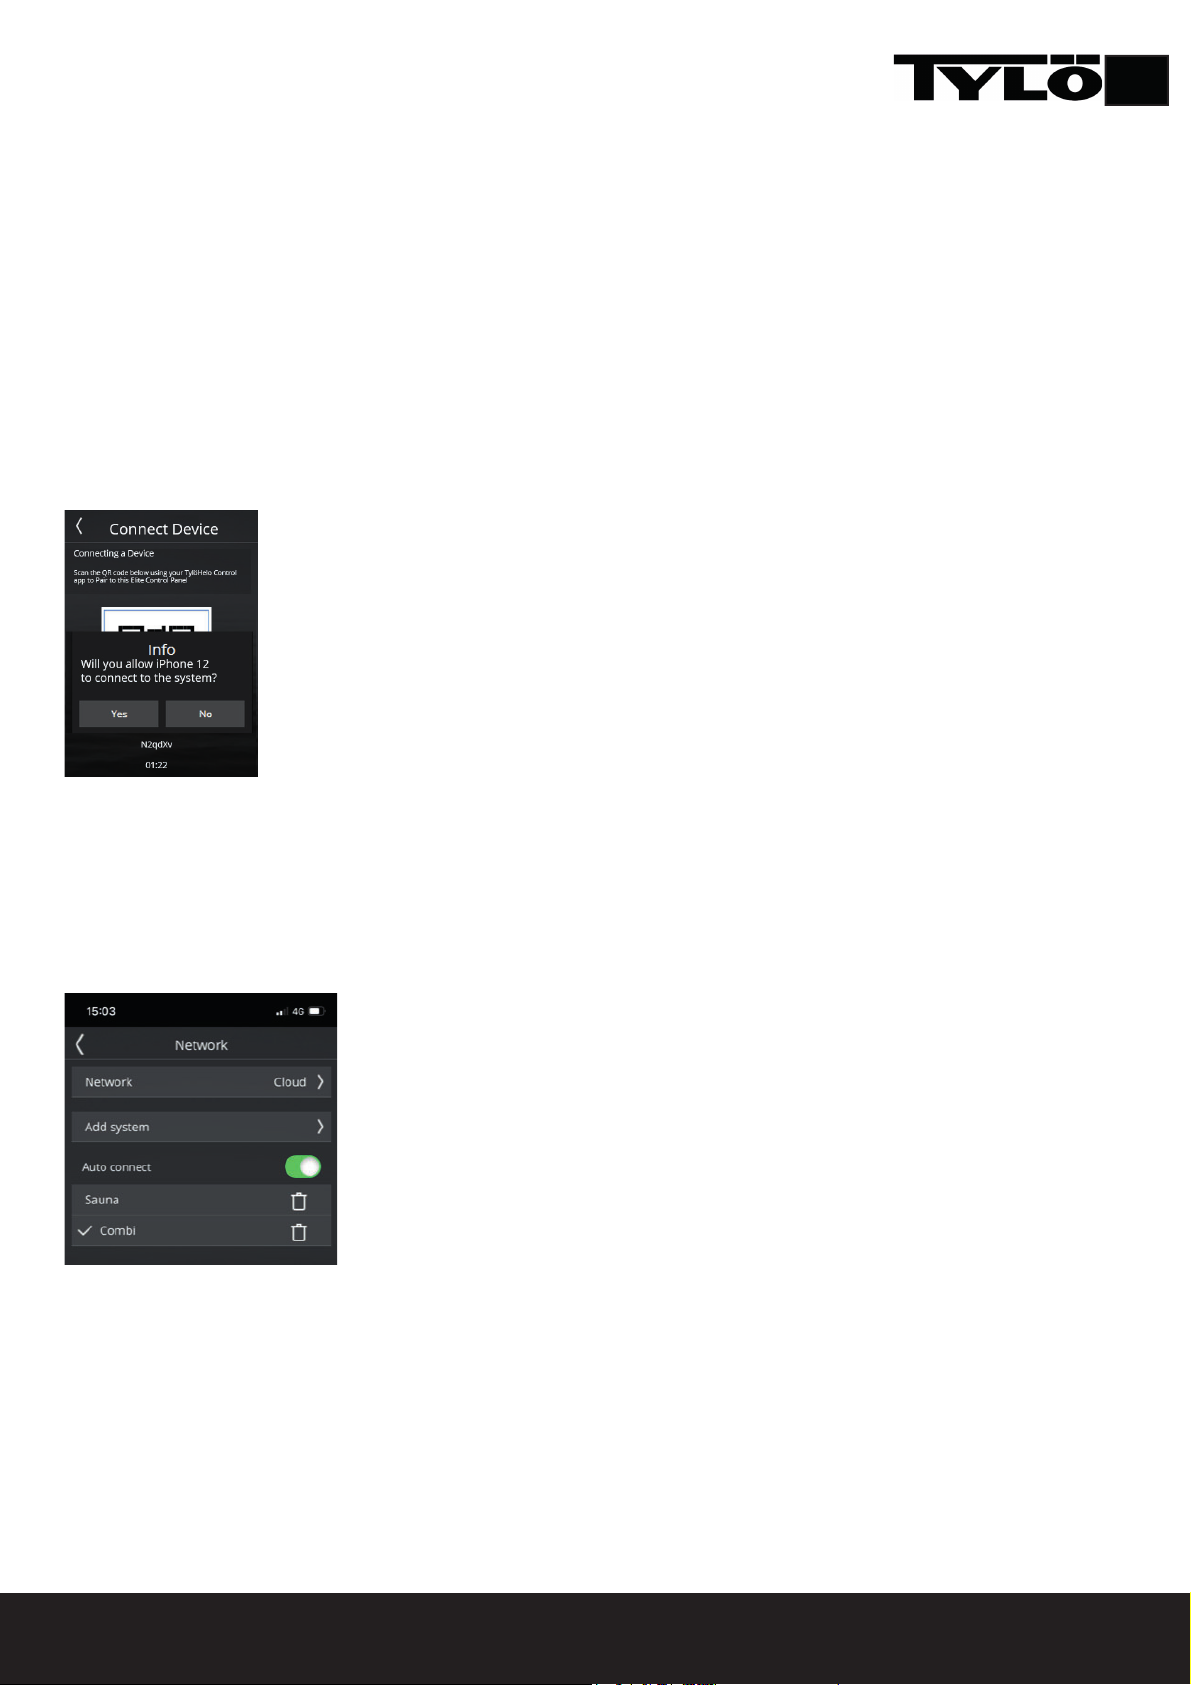
Cloud
Din Elite Cloud manöverpanel har blivit förregistrerad för
molnanslutning. Ladda ned appen från Apple Appstore eller
Google Play butiken. Aktivera Cloud anslutning genom att
trycka på Enable på Cloud skärmen (du måste först ansluta till
ditt Wifi ).
För att ansluta Elite Cloud till din enhet (iPhone, android),
öppna appen, gå till System/Network, tryck på Network och
välj Cloud. Gå tillbaka ett steg (<) och välj Add System. Tryck
därefter på Scan QR Code. Appen kommer be om tillgång till
kameran, acceptera detta. Gå därefter till Elite Cloud och tryck
på Connect device. En QR kod visas på panelen, scanna den
med appen. I manöverpanelen bekräftar du parkopplingen.
SV
Du kan parkoppla fl er enheter till manöverpanelen samt även
radera tidigare parkopplade enheter.
För att radera en enhet, gå in på Trusted Remote Devices, välj
den som skall raderas och tryck på soptunnan.
Det är också möjligt att koppla din enhet till fl er system (bastu,
combi, ånga mm). Det är bara att repetera processen beskriven ovan vid det nya systemet.
9
Page 10
EN
Installation Guide
The operating panel must be installed in a frost-free environment.
The control panel can be installed inside or outside the sauna/steam room. If installing inside the sauna
cabin, the upper edge must not be more than 80 cm above the fl oor, and must be at least 30 cm from the
heater. The ambient temperature around the Pure control panel should never exceed 80 °C.
The unit can be mounted on the wall using the bracket or double-sided adhesive supplied. If using the
bracket, mount the control panel on the bracket using adhesive.
A 30 mm hole through the wall is required if mounting the control panel directly on the wall.
When installing the panel inside the steam room/sauna, installation must be directly to the wall, using the
accompanying adhesive or a Tylö embedding frame (item no. 90001056). The wall must be smooth and
perfectly clean after hole drilling (30 mm) before installation. The bracket must not be used.
If you have purchased an Elite check the coverage of your wireless network before you fi nally install the
control panel (see also Confi guring: System settings in this guide).
Installation with bracket
Use the bracket as a template to mark up screw holes on the wall. Tighten the screws a little until the
bracket is loosely secured.
Secure the adhesive to the bracket (see Figure 1).
Fig. 1
Remove the protection from the adhesive and secure the panel to the bracket (see Figure 2).
Fig. 2
10
Page 11
Attach the cable and switch to the bracket (see Figures 3 and 4). Remember to position the switch in
accordance with the illustration (the locking tongue should be at the left side when seen from below). Install
the panel on the wall. Use the supplied control panel cable to connect the panel to the heater. If the cable is
too long, it can be shortened, then use the extra switch supplied. NB: special pliers are required (crimp pliers
for RJ10).
EN
Fig. 3
Installation without bracket
Attach the double-sided adhesive to the control panel. Before attaching the panel to the wall, connect it to the
heater to check that everything works. Remove the protective backing from the adhesive. Connect the panel
wire, pass the contact through the hole in the wall and press the panel fi rmly against the wall.
If fi tting the panel without the bracket but it is necessary to run the cable outside the wall, the following solution
can be used (see Figure 6). This only applies to installation inside the sauna cabin. Remember that the hole
through which the contact will pass must be min. 30 mm.
Fig. 4 Fig. 5
Fig. 6
11
Page 12
EN
Quickstart guide
In order to quickly get started and use your new sauna or steam room, read the whole of this guide. It describes
the basic operations that you need to know. The complete manual can be downloaded from https://www.tylohelo.
com/en/control-panel-tylo-elite.
.
Initial set-up
At the fi rst start, certain basic parameters are set. Touch the screen to indicate your choice and then > (or <).
Enter PIN: 8956
(touch
Select the date format Set the date: Set the time:
)
Welcome screen
(touch >)
Select language Select region
Several other parameters are set automatically on the basis of the above settings, and the type of heater. Any of
the parameters can be altered later. They are described in the manual.
12
Page 13
EN
Overview
The overview screen is shown both when the heater is switched off (Figure 7) and when it is on
Air humidity setting
Water level in the tank (applies to
the Combi model)
Remaining sauna time
Temperature setting
Current temperature
Current relative air humidity
(only shown if the temperature/
humidity sensor is connected on
the Combi and Tylarium models)
Current time
Shows that the panel is
connected to Wifi .
Fig. 7 Fig. 8
Home
Get to the Home screen (fi g. 9) by touching the screen in the Overview mode or by pressing the Home button. The
Activity buttons are used to start and stop the heater. A Standby button is also shown. When one of the activity
buttons is pressed, the colour changes to indicate the current status.
Activity/Status buttons
On
Standby:
Off
Fig. 9
Functions/Settings buttons
13
Page 14
EN
Functions/Settings buttons
Home: Show information concerning temperature and humidity, along with activity/status buttons and
Functions/settings buttons.
Setting up: Setting the temperature, sauna time, humidity, etc.
Favourites: Saved favourite settings.
Calendar: Creating a calendar and/or weekly program.
Confi guration: System settings.
Settings
Favourites
Setting temperature
Setting the desired air humidity. Only
on the Combi and Tylarium models.
Setting the desired sauna time.
Lighting Off/On
Save the settings as a favourite.
In settings, everything is set for the
sauna. These settings can also be
saved to Favourites.
The Favourites that were saved
during setting up are saved with
this symbol. In order to start,
delete or edit, press on the fi eld
with the name of the favourite.
14
Page 15
Calender
Date and calendar program
Day program
Overview program
EN
When Confi guration is touched, the screen shows a menu
with a number of separate sections. IN order to see more
rows, put your fi nger on the screen and draw it up or down.
Only the Wifi menu is described in this quickstart guide.
In order to be able to use the Calendar
functions for the Sauna and Combi
heaters, and also the Tylarium installation,
a door switch is required for EU region,
connected to the door (Tylö part no.
90908035). It is also needed in order to
use WiFi with a sauna heater and Combi
heater.
While setting the calendar function you
can create programs for individual dates
or programs that repeat every week.
Confi guration: System settings.
In order to be able to use Wifi for the sauna and Combi
installation, a door switch must be connected.
You connect to your WLAN under the Network menu. Bear
in mind that the position where the control panel is located
affects how well it can communicate with the wireless
network. Many kinds of material disturb the wifi signal. Before
fi xed installation of the control panel, check the signal strength.
To do this, start the system and go into Network. Available
networks will be displayed with a relative signal strength
indicated in % after each name. The signal strength must be at
least 60%. Otherwise a new access point or repeater must be
installed near the Elite panel. The local network must be set on
the 2.4 GHz band and only on channel 1-11.
The system supports WPA/WPA2 personal SSID+password
(max. 20 characters). In order to connect to your local network,
fi rst activate Wifi and press Network. Then press Scan which
searches for the accessible networks. In order to connect,
press on the desired network; if a password is required press
on Password, enter the password and then press Connect. In
order to connect mobile applications or PC applications refer
to the app instructions on the Tylö web site (https://www.
tylohelo.com/en/control-panel-tylo-elite).
During Confi guration there is both information
about the system and the possibility to adapt
and set various functions and parameters. It is
also possible to confi gure additional equipment
(such as for example fragrance pumps or extra
lighting).
Under Name you can name your system. A default name is
present to begin with, and this depends on the system you
have. In order to change or alter the name, press it and a
keyboard will appear for editing.
Elite Cloud automatically re-connects to the selected WLAN
if connection is lost. When the system is connected, the WiFi
symbol lights up on the Home screen.
15
Page 16
Cloud
Cloud functional ity
Pair your iOS/android device
Cloud C onnection Status
Connected
Connect Dev ice
Trusted Remote Devices
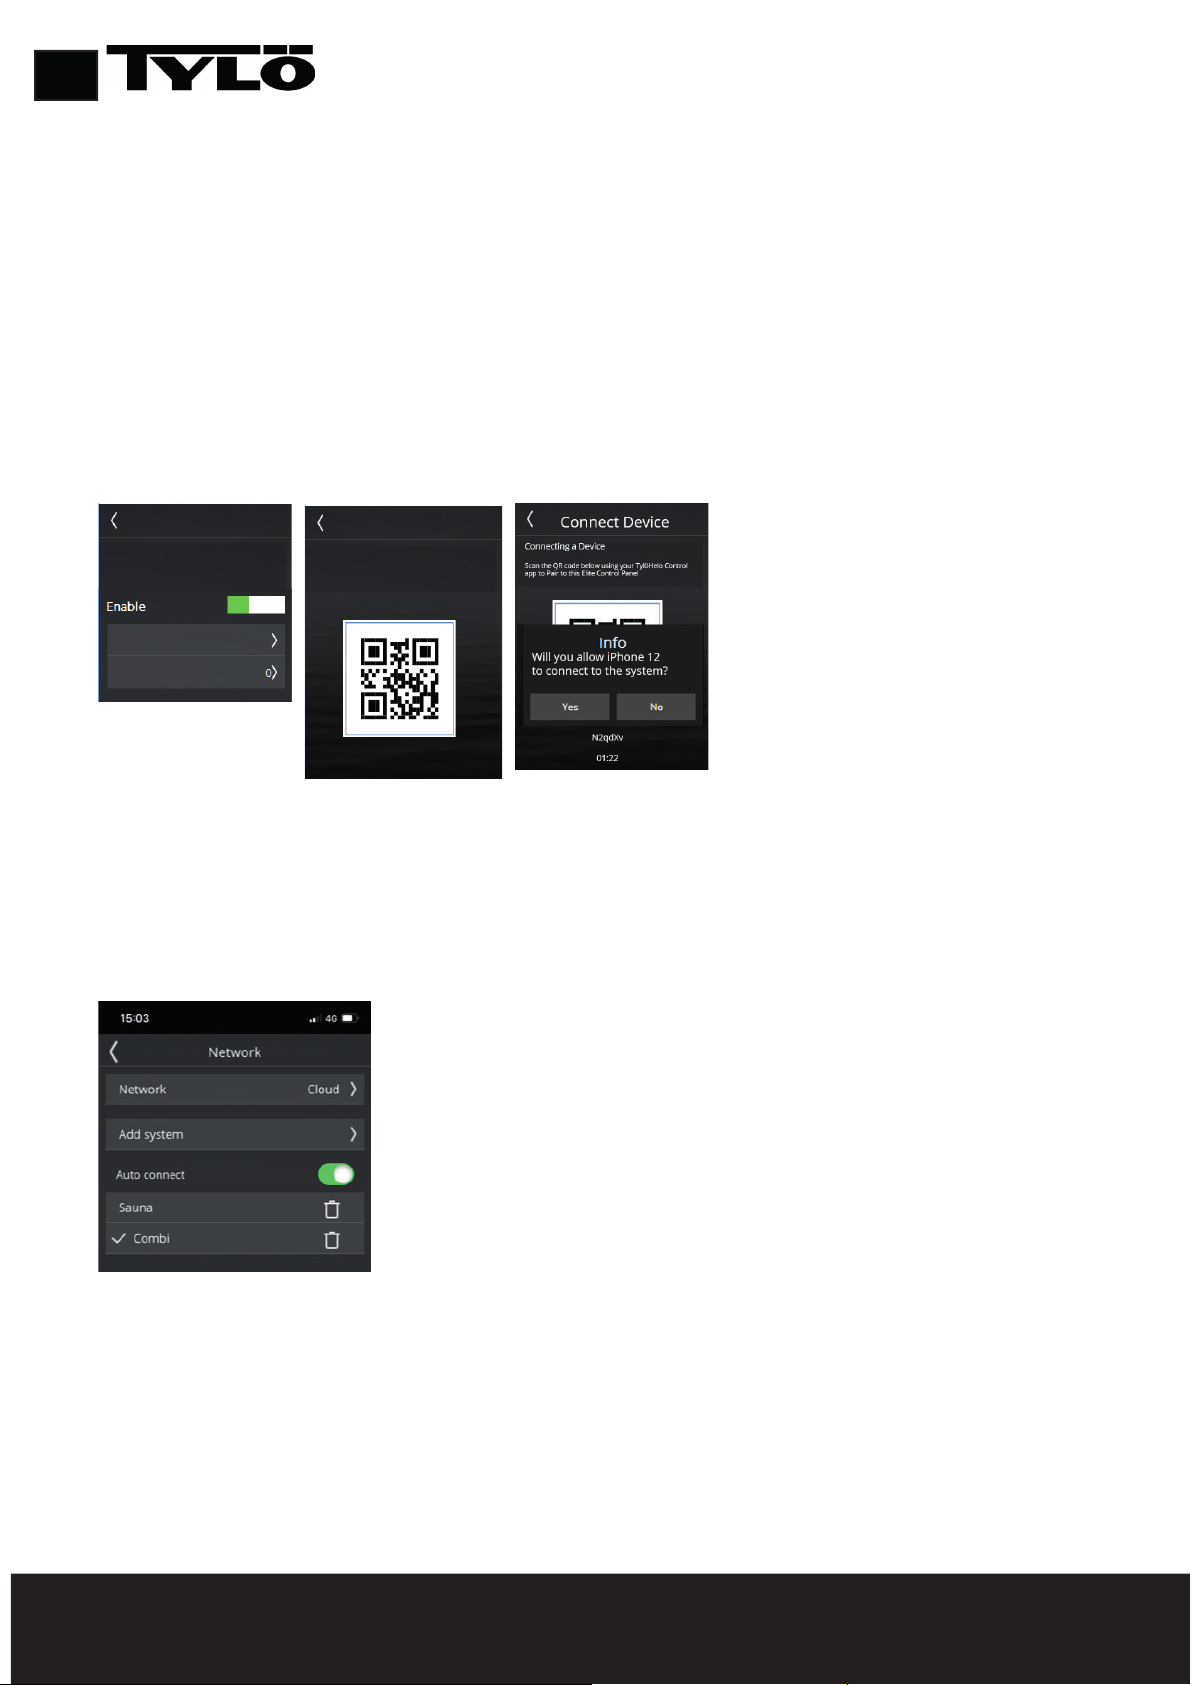
Connect Device
Connecting a Device
Scan th e QR code b elow using y our TylöHe lo Control
app to Pair to this Elite Control Panel
N2qdXv
01:22
EN
Cloud
Your Elite Cloud control panel has been pre-registred for cloud
connection. Download the app from Apple Appstore or the Google
Play shop. After connecting to your WLAN press Enable on the Cloud
menu.
To pair your device (iPhone or android device)open the app and go to
System/Network and select Cloud. Press < and select Add System.
Press Scan QR code. On Elite Cloude Control Panel press Connect
device. A QR code will be displayed. Scan the code and accept the
the pairing in the Elite Cloud.
You can pair many devices to your Elite Cloud and also delete old paired devices. To delete a paired device press Trusted Remote Devices
and select the device to be deleted, then press the trash bin symbol.
It is also possible to connect your device to multiple systems (e.g.
Sauna, Combi heater, steam etc.). Just repeat the process described
above.
16
Page 17

Installationsanleitung
Die Steuertafel muss im frostfreien Innenbereich installiert werden. Das Bedienpanel kann entweder innerhalb
oder außerhalb der Saunakabine installiert werden. Wenn es innen installiert wird, sollte sich die obere Kante
nicht mehr als 80 Zentimeter über dem Boden befi nden und mindestens einen 30-cm-Abstand zur Heizung
haben.
Das Gerät kann an der Wand mittels einer Halterung oder eines doppelseitigen Klebebands befestigt werden.
Bei Verwendung der Halterung befestigen Sie das Bedienpanel an der Halterung mit dem Klebeband.
Soll das Bedienpanel direkt an der Wand montiert werden, ist dazu ein 30mm breites Loch notwendig, das
durch die Wand gebohrt wird.
Falls das Bedienpanel in der Schwitzkabine/Sauna angebracht wird, sollte es direkt an der Wand mit dem
mitgelieferten Klebeband oder dem speziellen Tylö Rahmen zur Einbettung (Artikelnummer 90001056)
fi xiert werden. Die Wand sollte nach Bohrung des 30mm großen Loches und vor der Installation des Geräts
vollkommen glatt und sauber sein. Die Halterung darf dabei nicht verwendet werden.
Wenn Sie ein Elite erworben haben, überprüfen Sie vor der letztendlichen Installation des Bedienpanels die
Reichweite Ihres drahtlosen Netzwerks (siehe auch Konfi guration: Systemeinstellungen in dieser Anleitung).
Die Umgebungstemperatur der Pure-Steuertafel zu keiner Zeit den Wert von 80 °C überschreiten.
DE
Installation mit Halterung
Verwenden Sie die Halterung, um die Bohrlöcher an der Wand zu markieren. Drehen Sie die Schrauben erst nur
ein wenig ein, sodass die Halterung locker gesichert ist.
Bringen Sie das Klebeband an der Halterung an (siehe Abbildung 1).
Abbildung 1
Entfernen Sie den Klebschutz und befestigen Sie das Panel an der Halterung (siehe Abbildung 2).
Abbildung 2
17
Page 18

DE
Befestigen Sie das Kabel und den Schalter an der Halterung (siehe Abbildung 3 und 4). Vergewissern Sie sich, den
Schalter genau in Übereinstimmung mit der Abbildung zu positionieren (die Rastzunge sollte sich von unten her
gesehen links befi nden). Installieren Sie das Panel an der Wand. Verwenden Sie dazu das mitgelieferte Kabel und
verbinden Sie das Panel mit der Heizung. Falls das Kabel zu lang ist, kann es gekürzt werden. Verwenden Sie dann
den zusätzlich mitgelieferten Schalter. Anmerkung: Spezielle Zangen sind dazu notwendig (Crimp-Zangen für RJ10).
Abbildung 3
Installation ohne Halterung
Bringen Sie das doppelseitige Klebeband am Bedienpanel an. Bevor Sie dann das Panel an der Wand befestigen,
verbinden Sie es mit der Heizung, um zu überprüfen, ob alles funktioniert. Entfernen Sie die Schutzschicht vom
Klebeband. Verbinden Sie das Panelkabel, stecken Sie es durch das Loch in der Wand und pressen dann das Panel
fest gegen die Wand.
Wenn das Panel ohne Halterung montiert wird, es aber notwendig ist, dass das Kabel an der Außenseite der Wand
verlaufen soll, kann folgende Lösung verwendet werden (siehe Abbildung 6). Das trifft nur auf eine Installation im
Inneren der Saunakabine zu. Vergewissern Sie sich, dass das Loch, durch welches das Kabel durchgesteckt wird,
mindestens 30mm breit sein muss.
Abbildung 4 Abbildung 5
Abbildung 6
18
Page 19

Schnellstartanleitung
Um rasch mit der Inbetriebnahme Ihrer Sauna oder Schwitzkabine starten zu können, lesen Sie diese Anleitung
komplett durch. Sie beschreibt die grundlegenden Vorgangsweisen, die Sie wissen sollten. Die vollständige
Anleitung kann unter https://www.tylohelo.com/de/control-panel-tylo-elite heruntergeladen werden.
Erstinbetriebnahme
Beim ersten Einschalten werden bestimmte Grundparameter eingestellt. Berühren Sie den
Bildschirm, um sich Ihre Auswahl anzeigen zu lassen,und verwenden dann die Symbole >
(oder <).
DE
PIN eingeben: 8956
( berühren)
Auswahl des
Datumformats
Einige andere Parameter werden automatisch anhand der oben genannten Einstellungen und an den Typ der
Heizung angepasst. Jeder dieser Parameter kann später noch geändert werden. Sie werden in der Anleitung
beschrieben.
Startseite
(drücken Sie auf >)
Datum einstellen Uhrzeit einstellen
Sprachauswahl Länderauswahl
19
Page 20

DE
Übersicht
Die Übersichtsseite wird sowohl angezeigt, wenn die Heizung ausgeschaltet (Abbildung 7) als auch eingeschaltet
ist (Abbildung 8).
Einstellung der
Luftfeuchtigkeit
Wasserstand im Tank (gilt
für das Combi-Modell)
Verbleibende Sitzungsdauer
Temperatureinstellung
Aktuelle Temperatur
Aktuelle relative
Luftfeuchtigkeit (wird
nur angezeigt, wenn
der Temperatur-/
Feuchtigkeitssensor mit
den Combi- und TylariumModellen verbunden ist)
WLAN-Verbindung
Abbildung 7
Startseite
Sie gelangen zur Startseite (Abbildung 9), indem Sie den Bildschirm im Übersichtsmodus berühren, oder
wenn Sie auf den Home Button drücken. Die Aktivitäts-Buttons werden verwendet, um die Heizung ein- oder
auszuschalten. Auch ein Standby-Button wird angezeigt. Wenn einer der Aktivitäts-Buttons gedrückt wird,
ändert sich die Farbe, um den aktuellen Status anzuzeigen.
Abbildung 8
Aktuelle Uhrzeit
Aktivitäts-/Status-Buttons
Ein
Standby:
Aus
Abbildung 9
Funktions- und Einstellungs-Buttons
20
Page 21

Funktions- und Einstellungs-Buttons
Startseite: Zeigt Informationen betreffend Temperatur und Luftfeuchtigkeit zusammen mit Aktivitäts-/
Status-Buttons und Funktions- und Einstellungs-Buttons an.
Einstellungen Einstellung der Temperatur, der Saunazeit, der Luftfeuchtigkeit etc.
Favoriten: Gespeicherte favorisierte Einstellungen
Kalender Erstellt einen Kalender und/oder ein wöchentliches Programm.
Konfi guration: Systemeinstellungen.
DE
Einstellungen
Favoriten
Einstellen der Temperatur
Einstellen der gewünschten
Luftfeuchtigkeit. Nur auf Combiund Tylarium-Modellen.
Einstellen der gewünschten
Saunazeit.
Licht an/aus
Einstellungen als Favoriten
abspeichern.
In den Einstellungen wird alles
für die Sauna eingestellt. Diese
Einstellungen können auch als
Favoriten abgespeichert werden.
Die Favoriten, die während den
Einstellungen gespeichert wurden,
werden mit diesem Symbol
gespeichert. Um die Favoriten
anzulegen, zu löschen oder zu
ändern, drücken Sie auf das Feld mit
dem Namen des Favoriten.
21
Page 22

DE
Kalender
Datums- und Kalenderprogramm
Tagesprogramm
Übersichtsprogramm
Wenn die Konfi guration berührt wird, zeigt der Bildschirm ein
Menü mit einer Reihe an separaten Abschnitten. Um mehr
Zeilen zu sehen, berühren Sie den Bildschirm mit dem Finger
und fahren Sie ihn rauf oder runter.
Nur das Wifi Menü wird in dieser Schnellstartanleitung
beschrieben.
Um die Kalenderfunktionen für die Bastu und
Combi Heizungen wie auch für die TylariumInstallation nutzen zu können, wird ein
Türschalter benötigt in der EU Regionen, der
mit der Tür verbunden ist (Tylö Artikelnummer
90908035). Dies ist auch erforderlich, um
WLAN für die Saunabeheizung und die CombiBeheizung nutzen zu können.
Wenn Sie die Kalenderfunktionen einstellen,
können Sie Programme für individuelle
Termine oder wöchentlich wiederholende
Konfi guration: Systemeinstellungen.
Während der Konfi guration gibt es sowohl
Informationen über das System, als auch
die Möglichkeit, verschiedene Funktionen
und Parameter anzupassen. Es ist
ebenso möglich, zusätzliches Equipment
zu konfi gurieren (wie zum Beispiel
Duftkonzentratpumpen oder extra Licht).
Um das Wifi für die Sauna und die Combi Installation nutzen
zu können, muss ein Türschalter verbunden werden.
Die Verbindung zum WLAN im Menü Netzwerk herstellen.
Vergewissern Sie sich, dass die Position, in der sich das
Bedienpanel befi ndet darüber entscheidet, wie gut es mit
dem drahtlosen Netzwerk kommunizieren kann. Vor der
endgültigen Festmontage der Steuertafel die Signalstärke
prüfen. Dazu das System starten und die Option Netzwerk
aufrufen. Die relative Signalstärke der verfügbaren
Netzwerke wird prozentual hinter der Netzwerksbezeichnung
angezeigt. Die Signalstärke muss mindestens 60 % betragen.
Andernfalls muss in der Nähe der Elite-Tafel ein neuer
Zugangspunkt oder ein Repeater eingerichtet werden. Das
lokale Netzwerk muss auf dem 2,4-GHz-Band arbeiten und
nur auf die Kanäle 1 bis 11.
Das System unterstützt WPA/WPA2, individuelles SSID und
Kennwortschutz (max. 20 Zeichen).
Um sich mit Ihrem lokalen Netzwerk zu verbinden, aktivieren
Sie zuerst das Wifi und drücken auf Netzwerk. Dann drücken
Sie auf Scannen, womit nach verfügbaren Netzwerken
gesucht wird. Um eine Verbindung herzustellen, drücken Sie
auf das gewünschte Netzwerk; falls ein Passwort benötigt
wird, drücken Sie auf Passwort, geben das Passwort ein
und drücken dann auf „Verbinden“. Um sich mit mobilen
Anwendungen oder PC-Anwendungen verbinden zu können,
sehen Sie sich die App Anweisungen auf der Tylö Webseite
an (https://www.tylohelo.com/de/control-panel-tylo-elite).
Unter „Name“ können Sie Ihr System benennen. Es existiert
ein Standardname, um damit zu beginnen. Dieser hängt
vom System ab, das Sie verwenden. Um den Namen
zu verändern, drücken Sie ihn, worauf eine Tastatur zur
Bearbeitung erscheint.
22
Page 23

Elite Cloud stellt automatisch die Verbindung zum
Cloud
Cloud functional ity
Pair your iOS/android device
Cloud C onnection Status
Connected
Connect Dev ice
Trusted Remote Devices
Connect Device
Connecting a Device
Scan th e QR code b elow using y our TylöHe lo Control
app to Pair to this Elite Control Panel
N2qdXv
01:22
gewählten WLAN her, falls diese unterbrochen wurde. Bei
Systemverbindung leuchtet auf der Startseite das WLANSymbol auf.
Cloud
Das Steuerfeld für Elite Cloud wurde für die CloudVerbindung vorregistriert. Die App vom Apple Appstore oder
von Google Play herunterladen. Nach Verbindungsaufbau
zum WLAN im Menü Cloud die Option Aktivieren wählen.
Um das Gerät zu koppeln (iPhone oder Android ), die App
öffnen , System/Netzwerk aufrufen und die Option Cloud
wählen. Die Option < (Rückwärtspfeil) wählen und dann die
Option für das Hinzufügen zum System wählen. Die Option
zum Scannen des QR-Codes aktivieren. Auf dem Steuerfeld
von Elite Cloud die Option zum Verbinden des Geräts
wählen. Es wird ein QR-Code angezeigt. Den Code scannen
und das Koppeln in der Elite Cloud akzeptieren
DE
Es können mehrere Geräte mit der Elite Cloud gekoppelt werden und auch
alte gekoppelte Geräte gelöscht werden. Um ein gekoppeltes Gerät zu
löschen, die Option Vertrauenswürdige Remote-Geräte wählen und das zu
löschende Gerät wählen und dann das Symbol Papierkorb wählen.
Es können auch mehrere Systeme an das Gerät angeschlossen werden (zum
Beispiel (e.g. Sauna, Kombiheizung, Dampfbad und andere). Dazu einfach
das oben beschriebene Verfahren wiederholen.
23
Page 24

FR
Notice d'installation
Le panneau de commande doit être installé à l’abri du gel.
Le panneau de commande peut être monté à l'intérieur ou à l'extérieur de la cabine de sauna. S'il est installé
à l'intérieur de la cabine, le bord supérieur ne doit pas être à plus de 80 cm du sol et doit être éloigné du poêle
d'au moins 30 cm. La température ambiante autour du panneau de commande Pure ne doit jamais dépasser 80°C.
Le panneau peut être monté sur la cloison à l'aide du support mural ou de l'adhésif double-face fourni. Si vous
utilisez le support mural, utilisez également l'adhésif pour fi xer l'appareil sur le support.
Le montage du panneau de commande directement sur la cloison nécessite le percement d'un trou de 30 mm
de diamètre.
Si le panneau est installé à l'intérieur de la cabine de sauna, il devra être fi xé directement sur la cloison, à l'aide
de l'adhésif fourni ou d'un boîtier encastré Tylö (pièce no. 90001056). Après percement du trou de 30 mm,
la cloison doit être parfaitement lisse et propre avant l'installation du panneau. Dans ce cas, n'utilisez pas le
support mural.
Si vous avez choisi le modèle Elite, vérifi ez la portée de votre réseau wifi avant de fi xer défi nitivement le
panneau de commande (voir aussi Confi guration: réglages du système, dans le présent guide.
Installation sur le support mural :
Utilisez le support comme gabarit pour marquer l'emplacement des trous de vis à percer dans le mur. Visser le
support sans serrer.
Appliquer l'adhésif sur le support (voir Figure 1).
Fig. 1
Retirez la bande de protection de l'adhésif et fi xez le panneau sur le support (voir Fig. 2).
Fig. 2
24
Page 25

Fixer le câble et l'interrupteur sur le support (voir Figures 3 et 4). Positionnez l'interrupteur comme indiqué dans
l'illustration ci-contre (la languette de verrouillage doit être à gauche, vue par en-dessous). Installez le panneau sur le
mur. Connectez le panneau de commande au poêle à l'aide du câble fourni. Si le câble est trop long, raccourcissez-le,
puis utilisez l'interrupteur supplémentaire fourni. NOTE: utilisez les pinces appropriées (pince à sertir pour RJ10).
FR
Fig. 4
Fig. 3
Installation sans le support mural :
Fixez l'adhésif double-face sur le panneau de commande. Avant de fi xer le panneau au mur, connectez-le
au poêle pour vérifi er son fonctionnement. Retirez la bande de protection de l'adhésif. Connectez le câble
d'alimentation du panneau, passez le contact à travers la cloison et pressez le panneau fermement contre la
cloison.
Si vous montez le panneau sans le support, mais que le câble doit être à l'extérieur de la cloison, vous pouvez
utiliser la solution suivante (voir Figure 6). Ceci n'est valable que pour une installation à l'intérieur de la cabine.
Important: le diamètre du trou percé pour le passage du contact doit être au minimum de 30 mm.
Fig. 5
Fig. 6
25
Page 26

FR
Guide de démarrage rapide
Lisez attentivement ce guide de démarrage rapide avant d'utiliser votre cabine de sauna. Le guide décrit les
opérations de base que vous devez connaître. Vous pouvez télécharger le manuel complet à l'adresse suivante:
www.tylo.se.
Confi guration initiale
Vous devez d'abord sélectionner certains réglages de base. Appuyez sur les options choisies, puis appuyez sur > (or
<).
Entrez le PIN: 8956
(appuyez sur )
Sélection du format de
date
Plusieurs autres réglages sont confi gurés automatiquement en fonction des réglages ci-dessus et du type de
poêle. Vous pouvez modifi er tous les réglages à tout moment. Ils sont décrits dans le manuel.
Écran d'accueil
(appuyez sur >)
Réglage de la date: Réglage de l'heure:
Choisir la langue Choisir la région
26
Page 27

Aperçu
L'écran d'aperçu est illustré poêle éteint (Figure 7) et poêle allumé (Figure 8).
Réglage de l'humidité
Niveau d'eau dans le réservoir
(modèle Combi seulement)
Durée de session restante
Réglage de la température
Température en cours
Humidité relative en cours (ne
s'a che que si le capteur de
température/humidité est connecté sur les modèles Combi et
Tylarium)
FR
Connexion Wi-Fi
Fig. 7 Fig. 8
Heure actuelle
Accueil
Revenir à l'écran d'accueil (fi g. 9) en touchant l'écran en mode Aperçu ou bien en appuyant sur
le bouton Accueil. Les boutons d'état permettent de démarrer et d'arrêter le poêle. Le panneau
comporte également un bouton de mise en veille. Lorsque vous appuyez sur l'un des boutons
d'état, la couleur change et indique l'état en cours.
Boutons d'état
Activé
Veille:
Désactivé
Fig. 9
Boutons de fonctions et de réglage
27
Page 28

FR
Boutons de fonctions et de réglage
Accueil: Affi che les informations relatives à la température et à l'hygrométrie, ainsi que les boutons
d'état et les boutons de fonctions et de réglage.
Réglages initiaux: Réglage de la température, de la durée du sauna, de l'hygrométrie, etc.
Favoris: Sauvegarde des réglages favoris.
Calendrier: Créer un calendrier et/ou une programmation hebdomadaire.
Confi guration: Réglages du système.
Réglages
Favoris
Réglage de la température
Réglage de l'hygrométrie. Sur
les modèles Combi et Tylarium
seulement.
Réglage de la durée du sauna.
Éclairage Marche/Arrêt
Sauvegarde des réglages favoris.
L'écran de Confi guration affi che
tous les réglages pour votre sauna.
Vous pouvez sauvegarder ces
réglages dans les favoris.
Les réglages sauvegardés dans les favoris
s'affi chent avec le symbole ci-dessus. Pour
utiliser, supprimer ou modifi er le réglage,
appuyez sur le nom du favori.
28
Page 29

FR
Calendrier
Programmation date et calendrier
Programmation jour de la semaine
Aperçu
Confi guration : Réglages du système
En mode Confi guration, l'écran affi che des informations
sur le système et vous permet de sélectionner et d'adapter
diff érents réglages et fonctions. Vous pouvez également
confi gurer des équipements (par exemple : diff useurs de
senteurs ou éclairages supplémentaires).
Lorsque vous appuyez sur le bouton Confi guration, l'écran
affi che un menu séparé en sections. Pour affi cher des
rangées supplémentaires, faites défi ler l'écran avec votre
doigt.
Seul le menu Wifi est décrit dans le guide de démarrage
rapide.
Avec les modèles de poêle Bastu et
Combi, et avec l'installation Tylarium, la
fonction Calendrier nécessite l'installation
d'un interrupteur spécial connecté à la
porte (pièce Tylö no. 90908035). Il est
également nécessaire pour utiliser le Wi-Fi
avec un poêle de sauna et un poêle Combi
La fonction Calendrier vous permet
de également prévoir simultanément
une programmation à la journée, ou
hebdomadaire.
L'utilisation de la Wifi pour le sauna et pour l'installation
Combi nécessite la connexion d'un interrupteur sur la porte.
Vous vous connectez à votre WLAN dans le menu Réseau.
Notez que le positionnement du panneau de commande
peut affecter sa capacité de communication avec le réseau
Wifi . Avant l’installation fi xe du panneau de commande,
vérifi ez l’intensité du signal. Démarrez le système et
accédez à Réseau. Les réseaux disponibles sont affi chés
avec une intensité relative du signal indiquée en% après
chaque nom. L’intensité du signal doit être supérieure
ou égale à60%. Dans le cas contraire, un nouveau point
d’accès ou répéteur doit être installé près du panneau Elite.
Le réseau local doit être réglé sur la bande de 2,4GHz et
uniquement sur les canaux 1 à 11.
Le système prend en charge les mots de passe personnels
WPA/WPA2 SSID+ (20caractères max.).
Pour établir la communication avec le réseau local, activez
d'abord le Wifi puis appuyez sur Réseau (Network). Puis
appuyez sur Scan pour chercher les réseaux accessibles.
Pour connecter l'appareil, appuyez sur le réseau souhaité;
s'il demande un mot de passe, appuyez sur Password
(Mot de passe), entrez le mot de passe, puis appuyez sur
Connect (connexion). Pour connecter des applications
mobiles ou PC, consultez les instructions sur les applis
sur le site web Tylö (https://www.tylohelo.com/fr/controlpanel-tylo-elite).
29
Page 30

FR
Cloud
Cloud functional ity
Pair your iOS/android device
Cloud C onnection Status
Connected
Connect Dev ice
Trusted Remote Devices
Connect Device
Connecting a Device
Scan th e QR code b elow using y our TylöHe lo Control
app to Pair to this Elite Control Panel
N2qdXv
01:22
La rubrique Name (nom) vous permet d’attribuer un nom à
votre système. Un nom est fourni par défaut, en fonction du
système dont vous disposez. Pour modifi er ou changer le
nom, appuyez sur le nom et utilisez le clavier qui s’affi che.
Elite Cloud se reconnecte automatiquement au réseau WLAN
sélectionné si la connexion est perdue. Lorsque le système
est connecté, le symbole Wi-Fi s’allume sur l’écran d’accueil.
Cloud
Votre panneau de contrôle Elite Cloud a été pré-enregistré
pour une connexion sur le cloud. Téléchargez l'application
depuis les boutiques Apple Appstore ou Google Play. Après
vous être connecté à votre réseau WLAN, appuyez sur le menu
Activer sur le Cloud.
Pour appairer votre appareil (iPhone ou Android ) ouvrez
l'application et accédez à Système / Réseau, puis sélectionnez
Cloud. Appuyez sur< puis sélectionnez Ajouter un système.
Appuyez sur Scanner le code QR. Sur le panneau de contrôle
Elite Cloud, appuyez sur Connecter un appareil. Un code QR
s'affi che. Scannez le code et acceptez l'appairage dans l'Elite
Cloud.
Vous pouvez appairer de nombreux appareils à votre Elite
Cloud et également supprimer d'anciens appareils appairés.
Pour supprimer un appareil appairé, appuyez sur Appareils
distants approuvés puis sélectionnez l'appareil à supprimer.
Ensuite, appuyez sur l'icône de corbeille.
Il est également possible de connecter votre appareil à plusieurs systèmes (par ex. Sauna, poêle Combi, hammam etc.). Il
vous suffi t de répéter le processus décrit ci-dessus.
30
Page 31

Installatiehandleiding
Het bedieningspaneel moet in een vorstvrije omgeving worden geïnstalleerd.
Het bedieningspaneel kan binnen of buiten de sauna/stoomcabine worden geïnstalleerd. Als het
bedieningspaneel binnen de saunacabine wordt geïnstalleerd, mag de bovenste rand van het paneel zich
maximaal 80 cm boven de vloer bevinden en de afstand tot het verwarmingselement moet ten minste 30 cm
zijn.
De omgevingstemperatuur rond het Pure-bedieningspaneel mag nooit meer dan 80 °C bedragen.
De unit kan met de meegeleverde beugel of dubbelzijdige tape aan de wand worden bevestigd. Als u de beugel
gebruikt, bevestigt u het bedieningspaneel met de tape aan de beugel.
Als u het bedieningspaneel direct aan de wand bevestigt, moet u een gat van 30 mm boren.
Wanneer u het bedieningspaneel binnen de sauna/stoomcabine installeert, moet het paneel direct aan de wand
worden bevestigd met behulp van de meegeleverde tape of een frame van Tylö (artikelnr. 90001056). Voor
installatie moet de wand glad en schoon zijn en moet een gat van 30 mm worden geboord. U hoeft hiervoor
niet de beugel te gebruiken.
Als u een Elite hebt gekocht, controleert u de dekking van uw draadloze netwerk voordat u het
bedieningspaneel installeert (zie ook Confi guratie: systeeminstellingen in deze handleiding).
Installatie met beugel
Gebruik de beugel als een sjabloon om de schroefgaten voor de wand te markeren. Draai de schroeven los-vast
aan.
Plak de tape op de beugel (zie afbeelding 1).
NL
Afb. 1
Verwijder de bescherming van de kleefstrook en plak het paneel op de beugel (zie afbeelding 2).
Afb. 2
31
Page 32

NL
Bevestig de kabel en schakelaar aan de beugel (zie afbeelding 3 en 4). Raadpleeg de illustratie voor de positie van de
schakelaar (van onderaf gezien moet het vergrendelingslipje zich aan de linkerzijde bevinden). Installeer het paneel aan
de wand. Gebruik de meegeleverde kabel om het paneel op het verwarmingselement aan te sluiten. Als de kabel te lang
is, kunt u deze inkorten. Gebruik dan de extra schakelaar die is meegeleverd. Let op: hiervoor is een speciale tang vereist
(krimptang voor RJ10).
Afb. 3
Installatie zonder beugel
Plak de dubbelzijdige tape op het bedieningspaneel. Voordat u het paneel aan de wand bevestigt, controleert
u of alles werkt door het paneel aan te sluiten op het verwarmingselement. Verwijder de bescherming van de
kleefstrook. Sluit de draad van het paneel aan, steek het contact door het gat in de wand en druk het paneel
stevig tegen de wand.
Als het paneel zonder beugel wordt bevestigd maar de kabel langs de wand moet worden geleid, kunt u de
volgende oplossing gebruiken (zie afbeelding 6). Dit geldt alleen voor installatie binnen de saunacabine. Het gat
voor het contact moet minimaal 30 mm zijn.
Afb. 4 Afb. 5
Afb. 6
32
Page 33

Snelstartgids
Neem deze gids goed door om snel aan de slag te gaan en uw nieuwe sauna of stoomcabine in gebruik te nemen.
In deze gids worden alle basisbewerkingen beschreven die u moet kennen. De volledige handleiding kunt u
downloaden via www.tylo.se.
Eerste confi guratie
Wanneer u het bedieningspaneel voor het eerst start, worden bepaalde basisparameters ingesteld. Tik op het
scherm om uw keus te selecteren en tik vervolgens op > (of <).
NL
Voer pincode in: 8956
(tik op
Selecteer de
datumnotatie
Op basis van de bovenstaande instellingen en het type verwarmingselement worden enkele andere parameters
automatisch ingesteld. Deze parameters kunnen later worden gewijzigd en worden beschreven in de handleiding.
)
Welkomstscherm
(tik op >)
Stel de datum in
Selecteer de taal
Stel de tijd in
Selecteer de regio
33
Page 34

NL
Overzicht
Het overzichtsscherm wordt weergegeven wanneer het verwarmingselement wordt
uitgeschakeld (afbeelding 7) en wanneer het aan staat (afbeelding 8).
Luchtvochtigheidsinstelling
Waterniveau in de tank (van toepassing op het Combi-model)
Resterende sessietijd
Temperatuurinstelling
Huidige temperatuur
Huidige relatieve luchtvochtigheid (wordt alleen weergegeven als de sensor voor de
temperatuur/luchtvochtigheid
is aangesloten op de modellen
Combi en Tylarium)
WiFi-verbinding
Afb. 7 Afb. 8
Beginscherm
Ga naar het beginscherm (afbeelding 9) door in de overzichtsmodus op het scherm te tikken of door op de knop
Home te drukken. Met de activiteitsknoppen kan het verwarmingselement worden in- en uitgeschakeld. De knop
Stand-by wordt ook weergegeven. Wanneer u op een van de activiteitsknoppen drukt, verandert de kleur om de
huidige status aan te geven.
Activiteits-/statusknoppen
Aan
Stand-by:
Uit
Huidige tijd
Afb. 9
Functie-/instellingsknoppen
34
Page 35

Functie-/instellingsknoppen
Beginscherm: hier wordt informatie weergegeven over de temperatuur en luchtvochtigheid. Dit scherm
bevat activiteits- en statusknoppen en knoppen voor functies en instellingen.
Instellen: hier kunt u onder andere de temperatuur, saunatijd en luchtvochtigheid instellen.
Favorieten: hier ziet u uw opgeslagen favoriete instellingen.
Kalender: hier kunt u een kalender- en/of weekprogramma maken.
Confi guratie: systeeminstellingen
NL
Instellingen
Favorieten
Stel de temperatuur in
Stel de gewenste
luchtvochtigheid in (alleen
voor de modellen Combi en
Tylarium)
Stel de gewenste saunatijd in
Schakel de verlichting in
of uit
Sla de instellingen op als een
favoriet
In de instellingen kunt u alles
instellen voor de sauna. U kunt
deze instellingen ook opslaan als
favorieten.
Druk op dit pictogram om de favorieten
weer te geven die tijdens het instellen zijn
opgeslagen. Als u een favoriet wilt starten,
verwijderen of bewerken, drukt u op het veld
met de naam van deze favoriet.
35
Page 36

NL
Kalender
Datum- en kalenderprogramma
Dagprogramma
Overzichtsprogramma
Confi guratie: systeeminstellingen
Tijdens de confi guratie wordt informatie weergegeven over
het systeem en kunnen verschillende functies en parameters
worden aangepast en ingesteld. Het is ook mogelijk om
aanvullende apparatuur te confi gureren (zoals geurpompen
of extra verlichting).
Wanneer u op de Confi guratie-knop tikt, wordt op het scherm
een menu weergegeven met een aantal afzonderlijke
secties. Als u meer rijen wilt zien, plaatst u uw vinger op het
scherm en veegt u omhoog of omlaag.
In deze snelstartgids wordt alleen het menu Wifi beschreven.
Voor het gebruik van de kalenderfuncties
voor het Bastu- en Combiverwarmingselement, evenals de Tylariuminstallatie, is een deurschakelaar vereist
die moet worden aangesloten op de deur
(Tylö-onderdeelnr. 90908035). Dit is ook
nodig om WiFi met een saunaverwarming
en Combi-verwarming te gebruiken.
Tijdens het instellen van de
kalenderfunctie kunt u programma´s
maken voor afzonderlijke datums of
programma´s die elke week worden
herhaald.
Voor het gebruik van wifi voor de sauna en het model Combi,
moet een deurschakelaar worden aangesloten.
U maakt verbinding met uw WLAN via het menu Netwerk.
De locatie van het bedieningspaneel kan invloed hebbe.
Controleer de signaalsterkte voordat u het bedieningspaneel
vastmaakt. Start hiervoor het systeem op en ga naar
Netwerk. Achter de naam van de beschikbare netwerken
wordt een relatieve signaalsterkte in % aangegeven.
De signaalsterkte moet ten minste 60% bedragen. Als
dat niet het geval is, moet er een nieuw access point
of een repeater in de buurt van het Elite-paneel worden
geïnstalleerd. Het lokale netwerk moet op de 2,4 GHz banden
alleenopkanaal1-11
Het systeem ondersteunt WPA/WPA2 personal
SSID+wachtwoord (max. 20 tekens).
Om verbinding te maken met uw lokale netwerk, moet
u eerst wifi activeren en op Network (Netwerk) drukken.
Druk vervolgens op Scan om de beschikbare netwerken te
zoeken. Druk op het gewenste netwerk, druk op Password
(Wachtwoord) en voer indien nodig het wachtwoord in. Druk
vervolgens op Connect (Verbinding maken). Als u verbinding
wilt maken met apps op een smartphone, tablet of pc,
raadpleegt u de instructies op de website van Tylö (www.
tylohelo.com/en/control-panel-tylo-elite).
36
Page 37

Geef onder Name (Naam) een naam op voor uw systeem. De
Cloud
Cloud functional ity
Pair your iOS/android device
Cloud C onnection Status
Connected
Connect Dev ice
Trusted Remote Devices
Connect Device
Connecting a Device
Scan th e QR code b elow using y our TylöHe lo Control
app to Pair to this Elite Control Panel
N2qdXv
01:22
standaardnaam die wordt weergegeven, is afhankelijk van het
systeem dat u gebruikt. Als u de naam wilt wijzigen, drukt u op
hierop om een toetsenbord weer te geven.
De elite Cloud maakt automatisch opnieuw verbinding met de
geselecteerde WLAN als de verbinding is verbroken. Op het
startscherm licht het WiFi-symbool op wanneer het systeem
verbonden is.
Cloud
Uw Elite Cloud-confi guratiescherm is vooraf geregistreerd voor
cloud verbindingen. Download de app via de Apple Appstore
of Google Play shop. Nadat u verbinding hebt gemaakt met uw
WLAN, drukt u op Inschakelen in het Cloud menu.
Om te pairen met uw apparaat (iPhone of android apparaat)
open de app en ga naar Systeem/Netwerk en selecteer Cloud.
Druk op < en selecteer Systeem toevoegen. Druk op QR-code
scannen. Druk op het Elite Cloud-confi guratiescherm op
Verbinden met apparaat. Er wordt een QR-code weergegeven.
Scan de code en accepteer het koppelen in de Elite Cloud.
NL
U kan veel apparaten koppelen met uw Elite Cloud en ook
kunnen oude apparaten worden verwijderd. Om een gekoppeld
apparaat te verwijderen, drukt u op Trusted Remote Devices en
selecteert u het apparaat dat moet worden verwijderd, vervolgens drukt u op het prullenbak icoontje.
Het is ook mogelijk om uw apparaat aan te sluiten op meerdere
systemen (bijv. Sauna, Combi verwarming, stoom enz.). Her-
haal de werkwijze zoals hierboven beschreven.
37
Page 38

PL
Instrukcja instalacji
Panel sterujący musi być zamontowany w miejscu nienarażonym na działanie mrozu.
Panel sterujący można zamontować wewnątrz lub na zewnątrz sauny/łaźni parowej. W przypadku montażu w
kabinie górna krawędź nie może sięgać więcej niż 80 cm nad podłogę i musi znajdować się w odległości co
najmniej 30 cm od pieca.
Temperatura otoczenia w pobliżu panelu sterującego Pure nie może nigdy przekroczyć 80°C.
Panel można przymocować do ściany za pomocą dołączonego wspornika lub taśmy dwustronnej. W
przypadku wykorzystania wspornika, należy przymocować panel sterujący do wspornika za pomocą taśmy.
W przypadku montażu bezpośrednio na ścianie, wywierć w ścianie otwór 30 mm.
Montaż panelu wewnątrz łaźni parowej/sauny wymaga zamontowania go bezpośrednio na ścianie, za pomocą
dołączonej taśmy lub ramki montażowej Tylö (nr produktu 90001056). Przed montażem, po wywierceniu
otworu (30 mm), ściana musi być gładka i idealnie czysta. W takiej sytuacji nie należy stosować wspornika.
W przypadku modelu Elite sprawdź zasięg sieci bezprzewodowej przed ostatecznym montażem panelu
sterującego (patrz też Konfi guracja: Ustawienia systemowe w niniejszej instrukcji).
Instalacja z użyciem wspornika
Użyj wspornika jako szablonu do zaznaczenia miejsc, w których należy wywiercić otwory na śruby w ścianie.
Dokr
ęć delikatnie śruby aż wspornik będzie w miarę unieruchomiony.
Przyklej taśmę do wspornika (patrz Rysunek 1).
Rys. 1
Usuń folię zabezpieczającą z taśmy i przyklej panel do wspornika (patrz Rysunek 2).
Rys. 2
38
Page 39

PL
Przymocuj kabel i przełącznik do wspornika (patrz Rysunek 3 i 4). Przełącznik należy umiejscowić zgodnie z ilustracją
(patrząc z dołu, element blokujący powinien znaleźć się z lewej strony). Zamontuj panel na ścianie. Do podłączenia
panelu do pieca należy użyć dołączonego kabla. Jeżeli kabel jest za długi, można go skrócić i zastosować dołączony
dodatkowy przełącznik. Uwaga: wymagane specjalne szczypce (szczypce do zagniatania RJ10).
Rys. 3
Instalacja bez użycia wspornika
Przymocuj taśmę dwustronną do panelu sterującego. Zanim panel zostanie przymocowany do ściany podłącz
go do pieca, aby sprawdzić, czy wszystko działa prawidłowo. Usuń folię zabezpieczającą z taśmy. Podłącz
przewód, przeciągnąć styk przez otwór w ścianie i dociśnij panel mocno do ściany.
W przypadku montażu bez wspornika, gdy konieczne jest pociągnięcie kabla po ścianie, można zastosować
następujące rozwiązanie (patrz Rysunek 6). Dotyczy wyłącznie montażu wewnątrz kabiny sauny. Otwór, przez
który przechodzi styk, musi mieć min. 30 mm.
Rys. 4 Rys. 5
Rys. 6
39
Page 40

PL
Pierwsze kroki
Aby szybko rozpocząć korzystanie z nowej sauny lub łaźni parowej, należy zapoznać się z niniejszą instrukcją.
Zawiera ona opis podstawowych operacji. Pełną instrukcję można pobrać ze strony www.tylo.se.
Wstępna konfi guracja
Przy pierwszym włączeniu, niektóre parametry są już ustawione. Dotknij ekran, aby zaznaczyć wybraną opcję, a
następnie > (lub <).
Wprowadź PIN: 8956
(dotknij )
Wybierz format daty Ustaw datę: Ustaw godzinę:
Kilka innych parametrów ustawianych jest automatycznie na podstawie powyższych ustawień oraz rodzaju pieca.
Każdy z parametrów można później zmienić. Zostały one opisane w instrukcji.
Ekran powitalny
(dotknij >)
Wybierz język Wybierz region
40
Page 41

PL
Informacje ogólne
Ekran informacji ogólnych widoczny jest zarówno, gdy piec jest wyłączony (Rysunek 7), jak i gdy jest włączony (Rysunek 8).
Ustawienie wilgotności powietrza
Poziom wody w zbiorniku (dotyczy
modelu Combi)
Pozostały czas sesji
Ustawienie temperatury
Aktualna temperatura
Aktualna wilgotność względna
powietrza (widoczna tylko, gdy
podłączony jest czujnik temperatury/
wilgotności, dotyczy modeli Combi i
Tylarium)
Połączenie Wi-Fi
Rys. 7 Rys. 8
Menu główne
Otwórz menu główne (Rys. 9), dotykając ekran w trybie Informacji ogólnych lub naciskając przycisk Menu główne.
Przyciski Aktywności służą do uruchamiania i wyłączania pieca. Widoczny jest także przycisk Gotowość. Po
naciśnięciu jednego z przycisków aktywności, kolor ulegnie zmianie, odzwierciedlając aktualny stan.
Aktualna godzina
Przyciski Aktywność/Stan
Wł.
Gotowość
Wył.
Rys. 9
Przyciski Funkcje/Ustawienia
41
Page 42

PL
Przyciski Funkcje/Ustawienia
Menu główne: Pokaż informacje dotyczące temperatury i wilgotności, przyciski aktywności/stanu
oraz przyciski funkcji/ustawień.
Ustawienia: Ustawienia temperatury, czasu pracy sauny, wilgotności itp.
Ulubione: Zapisane ulubione ustawienia.
Kalendarz: Tworzenie programu kalendarza i/lub programu tygodniowego.
Konfi guracja: Ustawienia systemowe
Ustawienia
Ulubione:
Ustawianie temperatury
Ustawianie żądanej wilgotności
powietrza. Tylko modele Combi i
Tylarium.
Ustawianie żądanego czasu
pracy sauny.
Wł/wył. oświetlenia
Zapisz ustawienia jako ulubione.
Ustawienia pozwalają
skonfi gurować wszystkie
parametry sauny. Można je również
zapisać jako ulubione.
Ulubione ustawienia zapisywane
podczas konfi guracji będą posiadać
ten symbol. Aby rozpocząć, usunąć
lub edytować, naciśnij pole z nazwą
ulubionych ustawień.
42
Page 43

Kalendarz
Program daty i kalendarza
Program dzienny
PL
Po dotknięciu przycisku konfi guracji, na ekranie wyświetlone
zostanie menu podzielone na sekcje. Aby zobaczyć więcej
wierszy, przeciągnij palcem po ekranie w górę lub w dół.
Niniejsza instrukcja zawiera wyłącznie opis menu Wi-Fi.
Program ogólny
Aby możliwe było korzystanie z Wi-Fi w przypadku instalacji
sauny oraz Combi, konieczne jest podłączenie wyłącznika
drzwiowego.
Aby możliwe było korzystanie z funkcji
kalendarza z piecami Bastu i Combi oraz
instalacją Tylarium, konieczne jest podłączenie
wyłącznika drzwiowego (nr części Tylö
90908035). Jest to również wymagane w celu
używania Wi-Fi z piecem saunowym lub Combi.
Konfi gurując funkcję kalendarza, można
utworzyć programy dla konkretnych dat lub
programy powtarzające się co tydzień.
Konfi guracja: Ustawienia systemowe
Podczas konfi guracji widoczne będą informacje
o systemie oraz możliwa będzie zmiana
różnych funkcji i ustawień. Można będzie także
skonfi gurować dodatkowe urządzenia (jak np.
pompy zapachowe czy dodatkowe oświetlenie).
Łączysz się z siecią WLAN w menu sieci. Należy pamiętać,
że lokalizacja panelu sterującego ma wpływ na komunikację
z siecią bezprzewodową. Przed trwałym montażem panelu
sterującego sprawdź siłę sygnału. Aby to zrobić, uruchom
system i przejdź do sekcji Sieć. Będą tam wyświetlone dostępne
sieci wraz z względną siłą sygnału wyrażoną w % przy każdej
nazwie. Siła sygnału musi wynosić co najmniej 60%. W
przeciwnym wypadku wymagany będzie montaż nowego punktu
dostępowego lub wzmacniacza sygnału w pobliżu panelu Elite.
Lokalna sieć musi korzysta
kanale 1-11.
System obsługuje hasło WPA/WPA2 personal SSID+ (maks. 20
znaków).
Aby połączyć się z siecią lokalną, aktywuj Wi-Fi i naciśnij
Network (Sieć). Następnie naciśnij Scan (Skanuj), aby wyszukać
dostępne sieci. Aby połączyć się z wybraną siecią, naciśnij ją;
jeżeli wymagane jest hasło, naciśnij Password (Hasło), wpisz
hasło i naciśnij Connect (Połącz). Aby skorzystać z aplikacji
mobilnych lub na komputer, przeczytaj instrukcje aplikacji, do
pobrania z witryny Tylö (https://www.tylohelo.com/en/controlpanel-tylo-elite).
W polu Name (Nazwa) możesz wpisać nazwę dla systemu.
W zależności od systemu, domyślna nazwa będzie już
przypisana. Aby ją zmienić, naciśnij ją. Wyświetli się klawiatura,
umo
żliwiająca jej edycję.
Elite Cloud automatycznie nawiąże ponownie połączenie z
wybraną siecią WLAN, jeśli zostanie utracone. Gdy system jest
połączony, na ekranie Menu główne świeci się symbol Wi-Fi.
ć z pasma 2,4 GHzi wyłącznie na
43
Page 44

PL
Cloud
Cloud functional ity
Pair your iOS/android device
Cloud C onnection Status
Connected
Connect Dev ice
Trusted Remote Devices
Connect Device
Connecting a Device
Scan th e QR code b elow using y our TylöHe lo Control
app to Pair to this Elite Control Panel
N2qdXv
01:22
Chmura
Panel sterowania Elite Cloud został wstępnie zarejestrowany do połączenia z
chmurą. Pobierz aplikację ze sklepu Apple Appstore lub Google Play. Po połączeniu
się z siecią WLAN wciśnij opcję Włącz w menu chmury.
Aby sparować swoje urządzenie (iPhone'a lub urządzenie z systemem Android),
otwórz aplikację i przejdź do sekcji System/sieć oraz wybierz opcję Chmura. Naciśnij klawisz < i wybierz opcję Dodaj system. Wciśnij opcję Skanuj kod QR. W panelu
sterowania Elite Cloud wciśnij opcję Połącz urządzenie. Zostanie wyświetlony kod
QR. Zeskanuj kod i zaakceptuj operację parowania w Elite Cloud.
Możesz sparować wiele urządzeń ze swoją chmurą Elite Cloud oraz usuwać stare,
uprzednio sparowane urządzenia. Aby usunąć sparowane urządzenie, naciśnij
opcję Zaufane urządzenia zdalne i wybierz urządzenie, które ma zostać usunięte, a
nast
ępnie wciśnij symbol kosza.
Możliwe jest również podłączenie urządzenia do wielu systemów (np. sauny, pieca
Combi, pary itp.). Po prostu powtórz cały proces opisany powyżej.
44
Page 45

Руководство по монтажу
Рабочая панель устанавливается в условиях безморозной среды.
Панель управления можно устанавливать как снаружи, так и внутри сауны/парной. При установке
внутри сауны верхний край устройства должен находиться не выше 80см над полом и на расстоянии
не менее 30см от нагревателя. Окружающая температура для среды установки панели управления Pure
недолжна превышать 80°C.
Панель можно монтировать на стену с помощью кронштейна или двусторонней клейкой ленты,
входящей в комплект поставки. При использовании кронштейна прикрепите к нему панель
управления с помощью клейкой ленты.
Для монтажа панели управления непосредственно на стене необходимо просверлить в стене
отверстие глубиной 30мм.
RU
Внутри парной или сауны панель следует монтировать непосредственно на
ленты, входящей в комплект поставки, или встраивающей рамы Tylö (№изделия: 90001056). Для
монтажа стена должна быть гладкой, после сверления отверстия (30мм) ее необходимо тщательно
очистить. Не используйте кронштейн.
Если вы приобрели устройство Elite, перед окончательным монтажом панели управления проверьте
покрытие беспроводной сети (см.также раздел «Конфигурация: системные настройки» настоящего
руководства).
Монтаж с помощью кронштейна
Используя кронштейн как шаблон, отметьте на стене места отверстий для винтов. Слегка закрутите
винты, чтобы свободно прикрепить кронштейн.
Наклейте клейкую ленту на кронштейн (см.рис.1).
стене с помощью клейкой
Рис. 1
Снимите защитный слой с клейкой ленты и приклейте панель к кронштейну (см.рис.2)
Рис. 2
45
Page 46

RU
Прикрепите к кронштейну кабель и выключатель (см.рис.3 и4). Расположите выключатель в
соответствии с рисунком (если смотреть снизу, запорный язычок должен находиться слева).
Установите панель на стене. С помощью кабеля панели управления, входящего в комплект поставки,
подключите панель к нагревателю. Если кабель слишком длинный, его можно укоротить и использовать
дополнительный
(обжимные клещи для RJ10).
выключатель из комплекта поставки. Примечание: требуются специальные клещи
Рис. 3
Установка без кронштейна
Наклейте двустороннюю клейкую ленту на панель управления. Прежде чем прикрепить панель к стене,
подключите ее к нагревателю и проверьте, все ли работает. Снимите защитную пленку с клейкой
ленты. Подключите кабель панели, проведите контакт через отверстие в стене и крепко прижмите
панель к стене.
Если при монтаже без кронштейна
следующим решением (см.рис.6). Это решение применимо только к установке внутри сауны. Глубина
отверстия, через которое проходит контакт, должна составлять не менее 30мм.
Рис. 4 Рис. 5
необходимо вывести кабель через стену, можно воспользоваться
Рис. 6
46
Page 47

Краткое руководство поначалу работы
Чтобы быстро приступить к эксплуатации новой сауны или парной, прочитайте данное руководство. В нем
описаны основные операции, о которых вам необходимо знать. Полное руководство можно загрузить с
веб-сайта www.tylo.se.
Начальная настройка
При первом запуске необходимо задать некоторые основные параметры. Коснитесь экрана, чтобы
выбрать нужное значение, а затем нажмите
> (или <).
RU
Введите PIN-код: 8956
(нажмите
Выбор формата даты
Некоторые другие параметры устанавливаются автоматически в зависимости от выбранных вами
настроек и типа нагревателя. Параметры можно изменить в любое время. Они описаны в руководстве.
)
Экран приветствия
(коснитесь >)
Установка даты Установка времени
Выбор языка
Выбор региона
47
Page 48

RU
Обзор
Экран обзора отображается как при выключенном (рис.7), так и при включенном нагревателе (рис.8).
Настройка влажности воздуха
Уровень воды в баке (для
модели Combi)
Оставшееся время сеанса
Настройка температуры
Текущая температура
Текущая относительная
влажность воздуха
(отображается на моделях
Combi и Tylarium, только если
подключен датчик температуры/
влажности)
Соединение Wi-Fi
Рис. 7 Рис. 8
Текущее время
Главный экран
Чтобы перейти на главный экран (рис.9), коснитесь экрана в режиме обзора или нажмите кнопку
главного экрана. Кнопки действий используются для запуска и остановки нагревателя. Также
отображается кнопка режима ожидания. При нажатии кнопки действия ее цвет изменяется, указывая на
текущее состояние.
Кнопки действий/состояния
Вкл.
Режим ожидания
Выкл.
Рис. 9
Кнопки функций/настроек
48
Page 49

Кнопки функций/настроек
Главный экран: сведения о температуре и влажности, а также кнопки действий/состояния и
функций/настроек.
Настройка: настройка температуры, времени работы сауны, влажности и т.д.
Избранное: сохранение избранных настроек.
Календарь: создание календарной и/или еженедельной программы.
Конфигурация: системные настройки.
RU
Настройки
Избранное
Настройка температуры
Настройка требуемой
влажности воздуха.
Только для моделей
Настройка требуемого
времени работы сауны.
Включение и отключение
освещения
Сохранение избранных
настроек.
В настройках установлены
все необходимые параметры
для сауны. Их также можно
сохранить в избранном.
Параметры, сохраненные в
избранном, отображаются с этим
символом. Чтобы запустить,
удалить или изменить избранный
параметр, нажмите на поле
с именем соответствующего
параметра.
49
Page 50

RU
Календарь
Программа даты и календаря
Программа обзора
Чтобы иметь возможность использовать
функции календаря для нагревателей Bastu
и Combi, а также для установки Tylarium,
к двери должен быть подключен дверной
выключатель (№детали Tylö: 90908035). Это
также необходимо, чтобы использовать Wi-Fi
для нагревателя сауны и нагревателя Combi.
При настройке функции календаря можно
создать программы на отдельные даты или
программы, повторяющиеся каждую неделю.
Конфигурация: системные
настройки.
В меню конфигурации можно просмотреть
сведения о системе, а также задать и
отрегулировать различные функции и
параметры. Кроме того, здесь можно настроить
дополнительное оборудование (например,
дозаторы ароматизатора и дополнительное
освещение).
сли коснуться значка конфигурации, на экране
отобразится меню с несколькими разделами.
Чтобы увидеть дополнительные строки,
проведите пальцем вверх или вниз по
экрану.
В данном кратком руководстве по началу работы описано
только меню Wi-Fi.
Чтобы иметь возможность использовать Wi-Fi для сауны
и установки Combi, необходимо подключить дверной
выключатель.
Подключение к WLAN выполняется в меню «Сеть».
Помните, что расположение панели управления
влияет на качество связи с беспроводной сетью.
До окончательного монтажа панели управления
проверьте уровень сигнала. Для этого необходимо
запустить систему и перейти в раздел Network (Сеть).
Здесь отображаются названия
относительная мощность сигнала(в%). Уровень сигнала
должен быть не менее 60%. Впротивном случае вблизи
панели Elite необходимо установить новую точку
доступа или ретранслятор. Локальную сеть необходимо
настроить на частоту 2,4ГГц только с каналами 1-11.
Система поддерживает аутентификацию WPA/WPA2
Personal по имени сети SSID и паролю (не более
20символов).
Чтобы подключиться к
и нажмите Network (Сеть). Затем нажмите Scan (Поиск)
для поиска доступных сетей. Чтобы подключиться,
нажмите нужную сеть. Если требуется пароль, нажмите
Password (Пароль), введите пароль и нажмите Connect
(Подключиться). Информацию о подключении
приложений для мобильных устройств или ПК см. в
инструкциях к соответствующему приложению на вебсайте Tylö (https://www.tylohelo.com/en/control-panel-tylo-
elite).
В поле Name (Имя)
поле изначально указано имя по умолчанию, которое
зависит от системы. Чтобы изменить имя, нажмите на
него. Отобразится клавиатура для ввода.
Elite Cloud автоматически повторно подключается к
выбранной WLAN, если соединение теряется. Если
система подключена, на главном экране загорается
значок Wi-Fi.
локальной сети, активируйте Wi-Fi
можно задать имя системы. В этом
доступных сетей и
50
Page 51

Облако
Cloud
Cloud functional ity
Pair your iOS/android device
Cloud C onnection Status
Connected
Connect Dev ice
Trusted Remote Devices
Connect Device
Connecting a Device
Scan th e QR code b elow using y our TylöHe lo Control
app to Pair to this Elite Control Panel
N2qdXv
01:22
Панель управления Elite Cloud предварительно зарегистрирована для
подключения к облаку. Скачайте приложение из магазина Apple App-
store или Google Play. После подключения к WLAN нажмите на меню
«Включить в облаке».
Чтобы установить сопряжение с устройством (iPhone или Android),
откройте приложение, перейдите в меню «Система/Сеть» и выберите
«Облако». Нажмите < и выберите «Добавить систему». Нажмите
«Сканировать QR-код». На панели
управления Elite Cloude нажмите
«Подключить устройство». Отобразится QR-код. Отсканируйте код и
примите сопряжение с Elite Cloud.
RU
Можно настроить сопряжение многих устройств с Elite Cloud. Также
можно удалять старые сопряженные устройства. Чтобы удалить
сопряженное устройство, нажмите «Надежные удаленные устройства»
и выберите устройство, которое требуется удалить, а затем нажмите на
значок корзины.
Также можно подключить устройство к нескольким
системам
(например, к сауне, нагревателю Combi, парогенератору и др.). Просто
повторите описанные выше действия.
 Loading...