

Steam shower Twin i130
1503
Art.nr 2901 2590
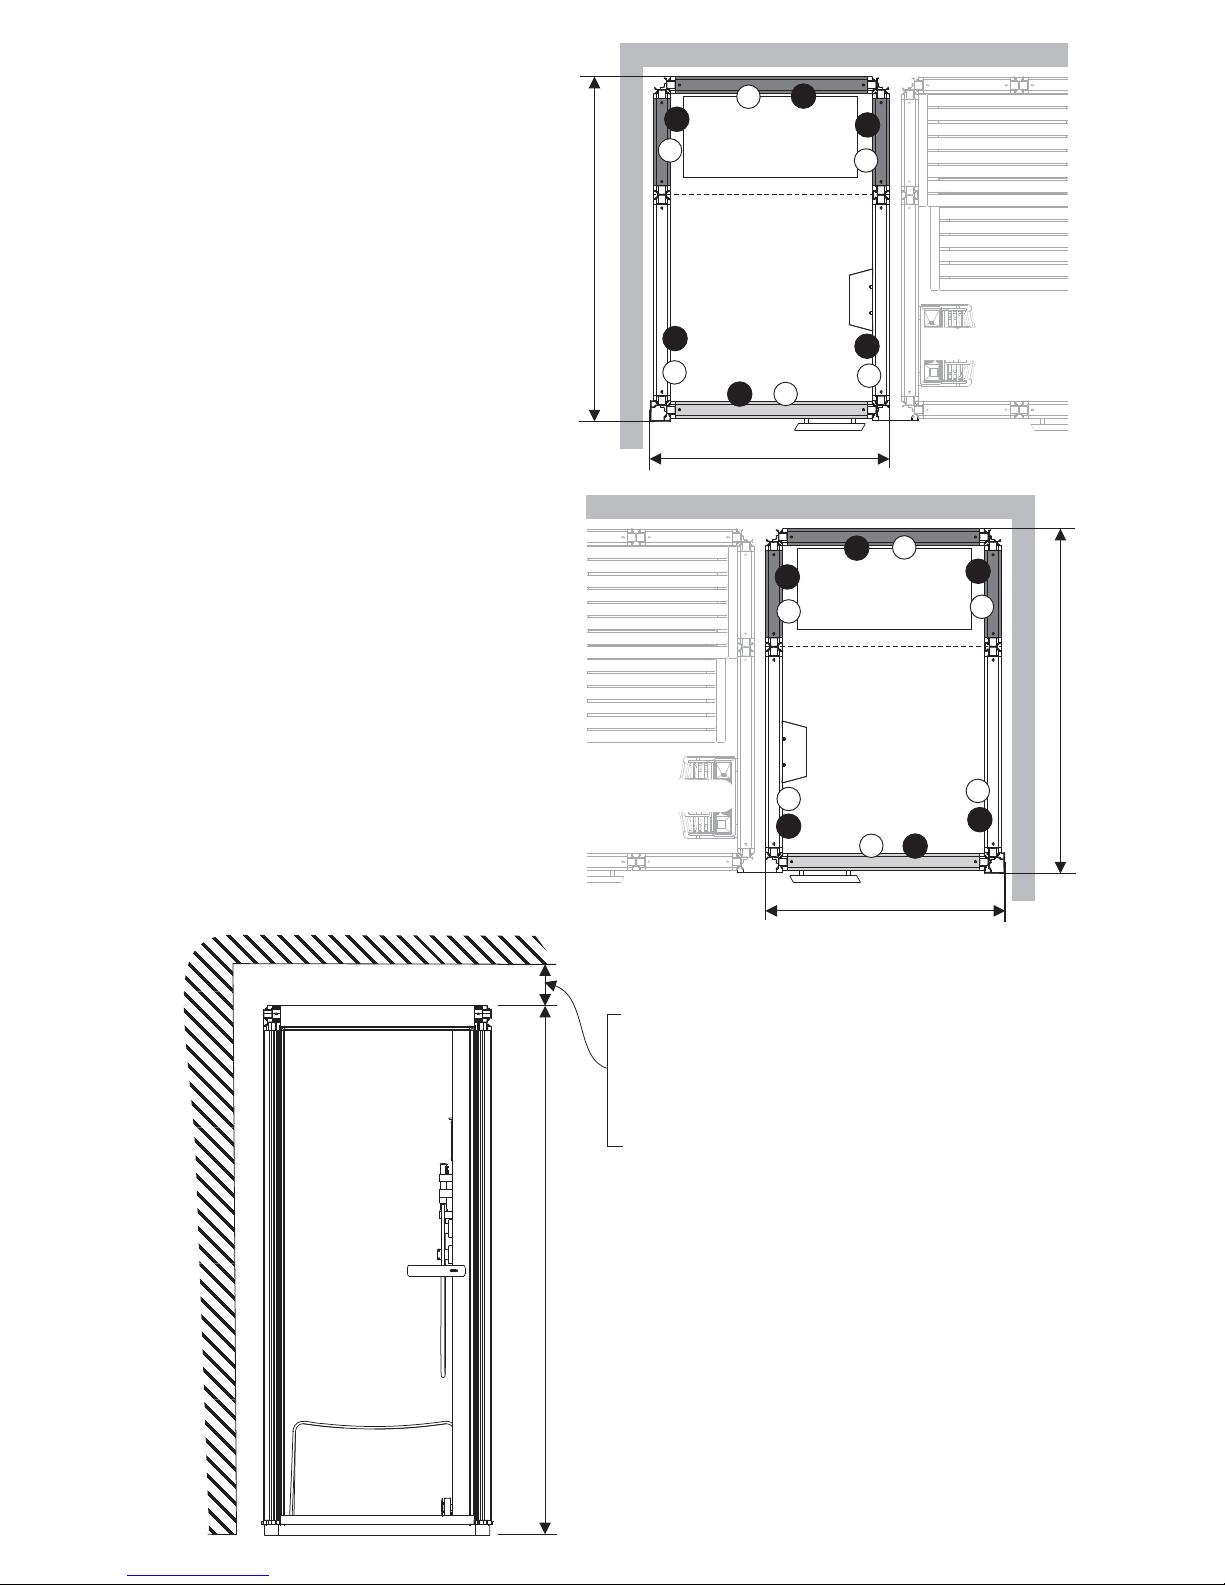
2090 mm
920 mm
1320 mm
B
B
B
P
P
D
i1309/i1313/i1713
920 mm
1320 mm
B
B
B
P
P
D
i1309/i1313/i1713
1
2
3
4
5
6
1
2
3
4
5
6
Det här är två exempel på montering av rummet. Det är
layout 1 som visas i monteringsanvisningen. Siffrorna
visar i vilken ordning väggarna skall monteras.
Väggarna på layouten är även märkta med materialet.
P= plast, B= svart glas, D= Glasdörr.
Shown here are two examples of how to assemble the
room. These assembly and installation instructions
describe the procedure for assembling Layout 1. The
numbers indicate the order in which the walls are to be
assembled. The layout diagrams use the following
codes to indicate materials/components: P= plastic, B=
black glass, D= glass door.
Dies sind zwei Beispiele für die Montage der Kabine.
Die Montageanleitung bezieht sich auf Layout 1. Die
Ziffern beziehen sich auf die Reihenfolge, in der die
Wände zu montieren sind. Die Buchstaben bezeichnen
das jeweilige Wandmaterial P= Kunststoff, B=
schwarzes Glas, D= Glastür.
Voici deux exemples de montage de la cabine. C'est la
configuration 1 qui est illustrée par les instructions de
montage. Les chiffres indiquent l'ordre de montage des
cloisons. Sur l'illustration, les cloisons portent
également une lettre désignant le matériau. P =
plastique, B = verre fumé, D = porte vitrée.
Два примера монтажа комнаты. Это монтажная
схема 1, показанная в инструкции по монтажу.
Цифрами показан порядок монтажа стен. Стенки на
монтажной схеме отмечены вместе с материалом.
P= пластмасса, B= чёрное стекло D= стеклянная,
дверь.
Są tu pokazane dwa przykłady aranżacji kabiny.
Poniższa instrukcja montażu i instalacji opisuje
procedurę dla schematu nr 1. Cyfry wskazują kolejność
w jakiej ścianki mają być montowane. Na schematach
są zastosowane następujące kody wskazujące
materiały/moduły: P= plastik, B= czarna szyba, D= drzwi
szklane.
Layout 1
Configuration 1
Монтажная схема 1
Układ nr 1
Layout 2
Configuration 2
Монтажная схема 2
Układ nr 2
Min. 100 mm - Vid montering
Min. 100 mm - During assembly/installation
Mind. 100 mm - Bei Montage
Mini. 100 mm - Lors du montage
-Мин. 100 мм При монтаже
Min. 0 mm Podczas montażu/instalacji10 -
7-20 mm/m (0.7-2 %)
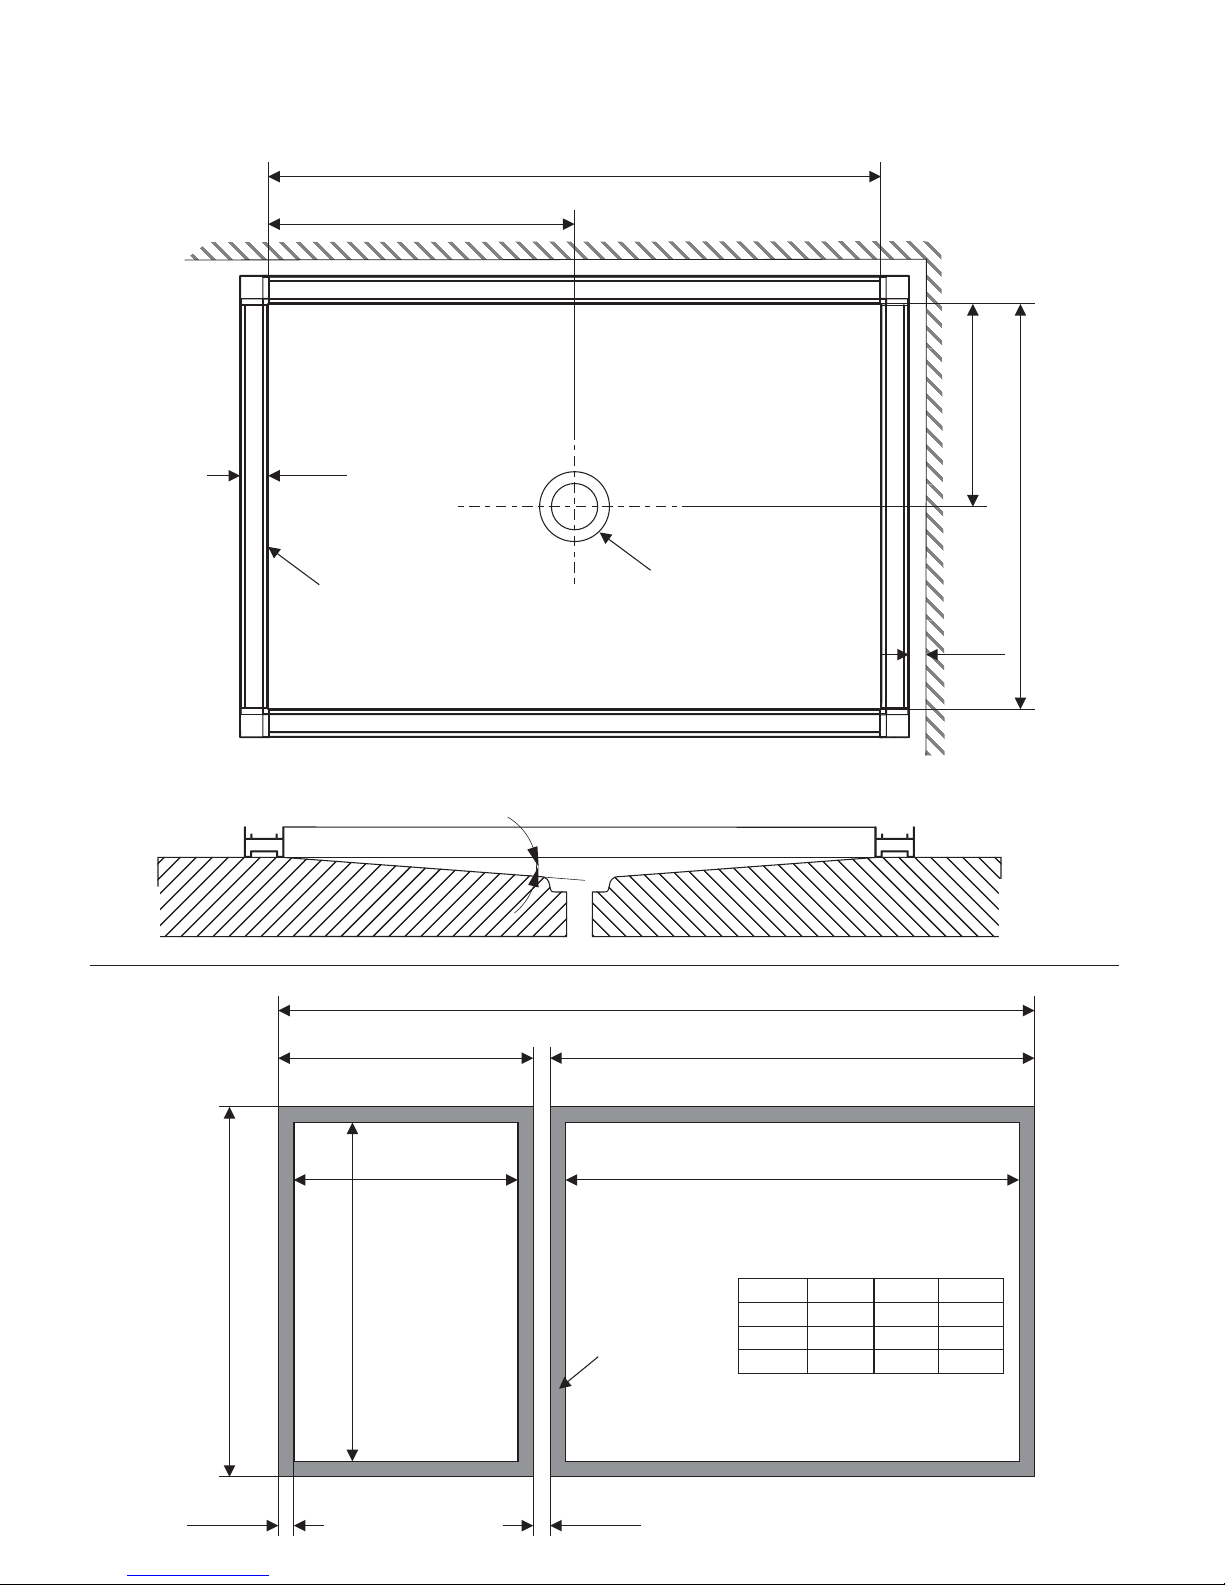
1181mm
590.5mm
781mm
390.5mm
Rekommenderad avloppsplacering
Recommended drainage placement
golvram
floor frame
Bodenrahm
cadre de sol
рамы пола
ramy podłogowej
avlopp
drainage
Abfluss
bouche d'évacuation
канализация
odpływ wody
54 mm
Min. 20 mm
Xmm
889mm
Ymm
Zmm781mm
1181mm
1289mm
i1309/i1313/i1713
Twin 130
59mm54mm
golvram
floor frame
Bodenrahm
cadre de sol
рамы пола
ramy podłogowej
X Y Z
i1309 1837 889 781
i1313 2237 1289 1181
i1713 2637 1689 1581
800x2000 (x1)
800x2000 (x2)
400x2000 (x2)
800x2000 (x1)
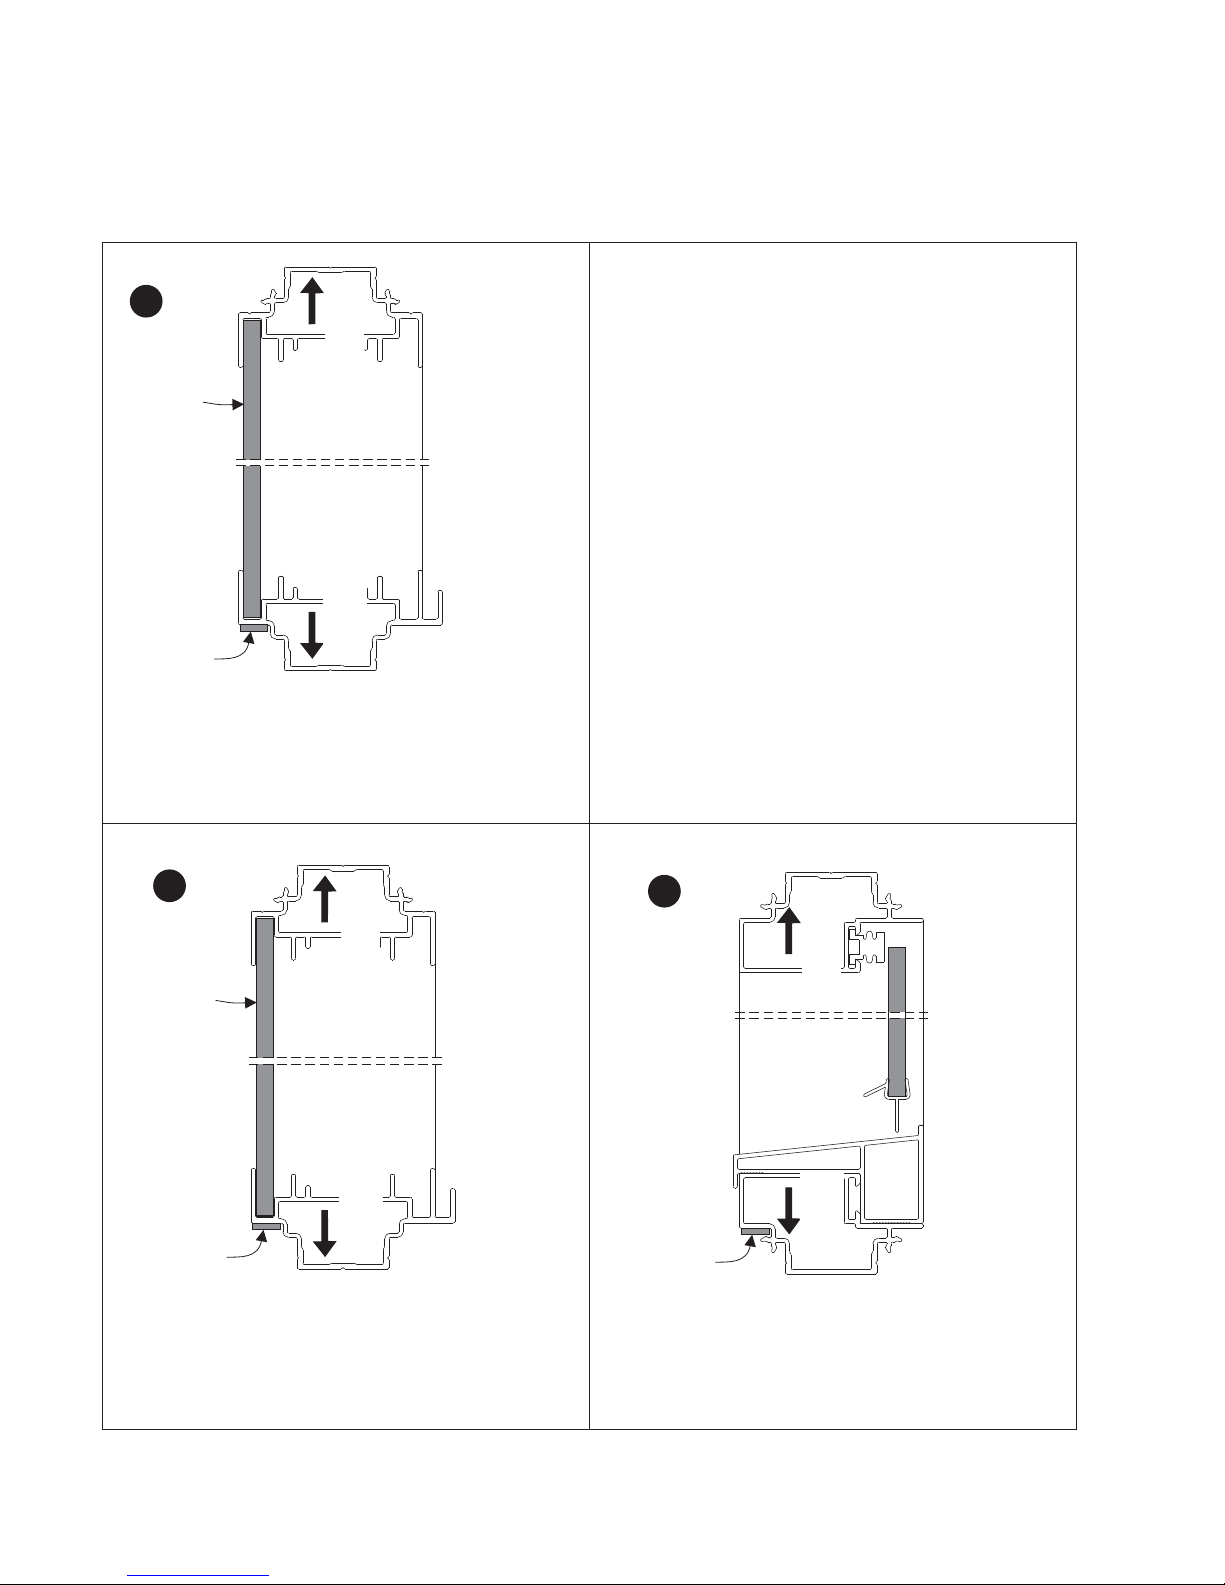
Beskrivning av de olika väggtyperna
Description of different types of wall construction
Beschreibung der einzelnen Wandtypen
Description des différents types de cloison
Описание различных типов стенок
Opis różnych modułów ścianek
P
Insida
Inside
Innenseite
Intérieur
Внутр.
Wewnątrz
Utsida
Outside
Außenseite
Extérieur
Наруж.
Na zewnątrz
Packning
Packing
Dichtung
Joint
Прокладка
Uszczelka
Upp
Up
Oben
Haut
Верх
Do góry
Ner
Down
Unten
Bas
Низ
Na dół
Plast
Plastic
Kunststoff
Plastique
Пластмасса
Plastki
B
D
Svart glas
Black glass
Schwarzes Glas
Verre fumé
Чёрное стекло
Szkło czarne
Upp
Up
Oben
Haut
Верх
Do góry
Ner
Down
Unten
Bas
Низ
Na dół
Upp
Up
Oben
Haut
Верх
Do góry
Ner
Down
Unten
Bas
Низ
Na dół
Insida
Inside
Innenseite
Intérieur
Внутр.
Wewnątrz
Utsida
Outside
Außenseite
Extérieur
Наруж.
Na zewnątrz
Packning
Packing
Dichtung
Joint
Прокладка
Uszczelka
Packning
Packing
Dichtung
Joint
Прокладка
Uszczelka
Insida
Inside
Innenseite
Intérieur
Внутр.
Wewnątrz
Utsida
Outside
Außenseite
Extérieur
Наруж.
Na zewnątrz
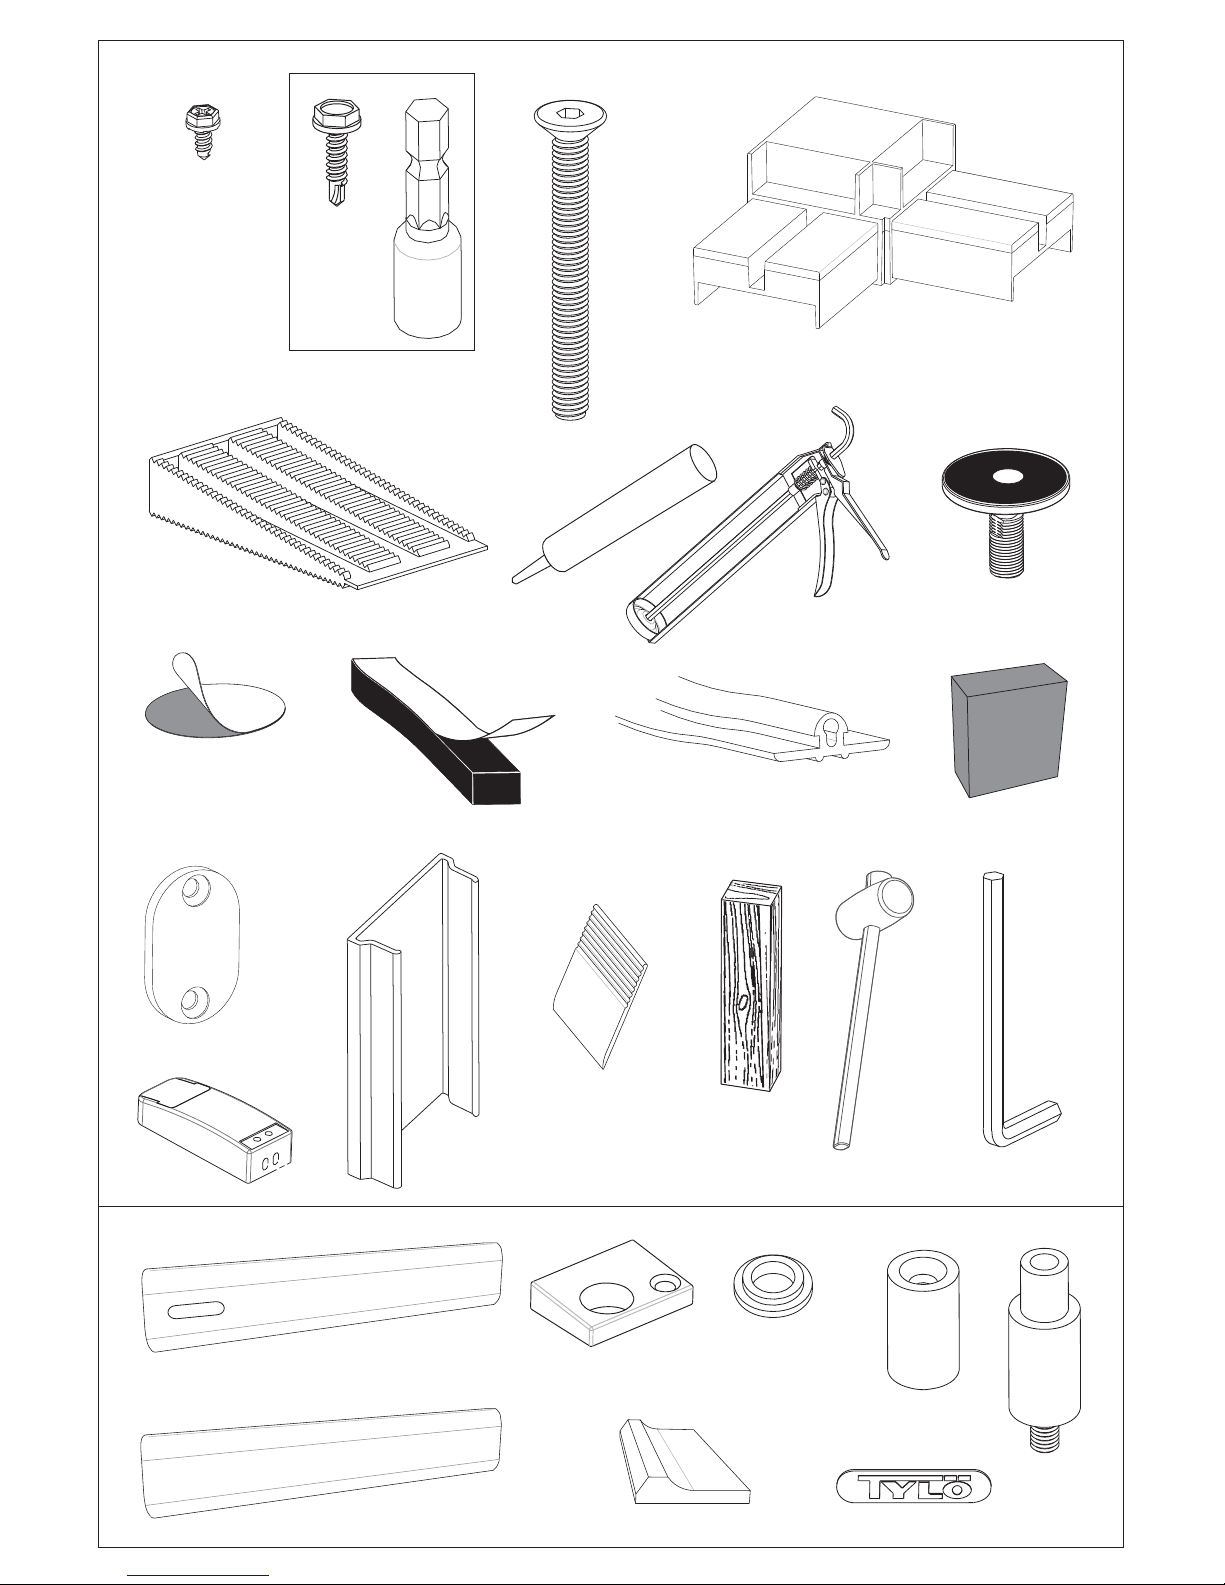
x4
x8
B8x9.5mm
x1
SILICONE
x1
x10
M8x25x30mm
x10
x4
x32
B6x16mm
x2
M6x60mm
x1
9x6mm
x4.5m
14.5x5mm
2100mmx4
x12
x4
26x29x12.5mm
33x21x3mm
Ø20mm
70mm
x16
x1
x1
22x46.5x210mm
4mm
x1
x1
x4
60x21x5mm
18x10x4mm
x1
x2 x2
25x18x7mm
x1
230x43x25mm LOGO
230x43x25mm
x1
x1
28x7mm
x1
Trafo
x1
1/4
2x777mm
2x1177mm
4x1930mm 1x768mm (white)
1x768mm (black)
1x768mm
2x1168mm
4x1968mm
2x792mm
2x1170mm
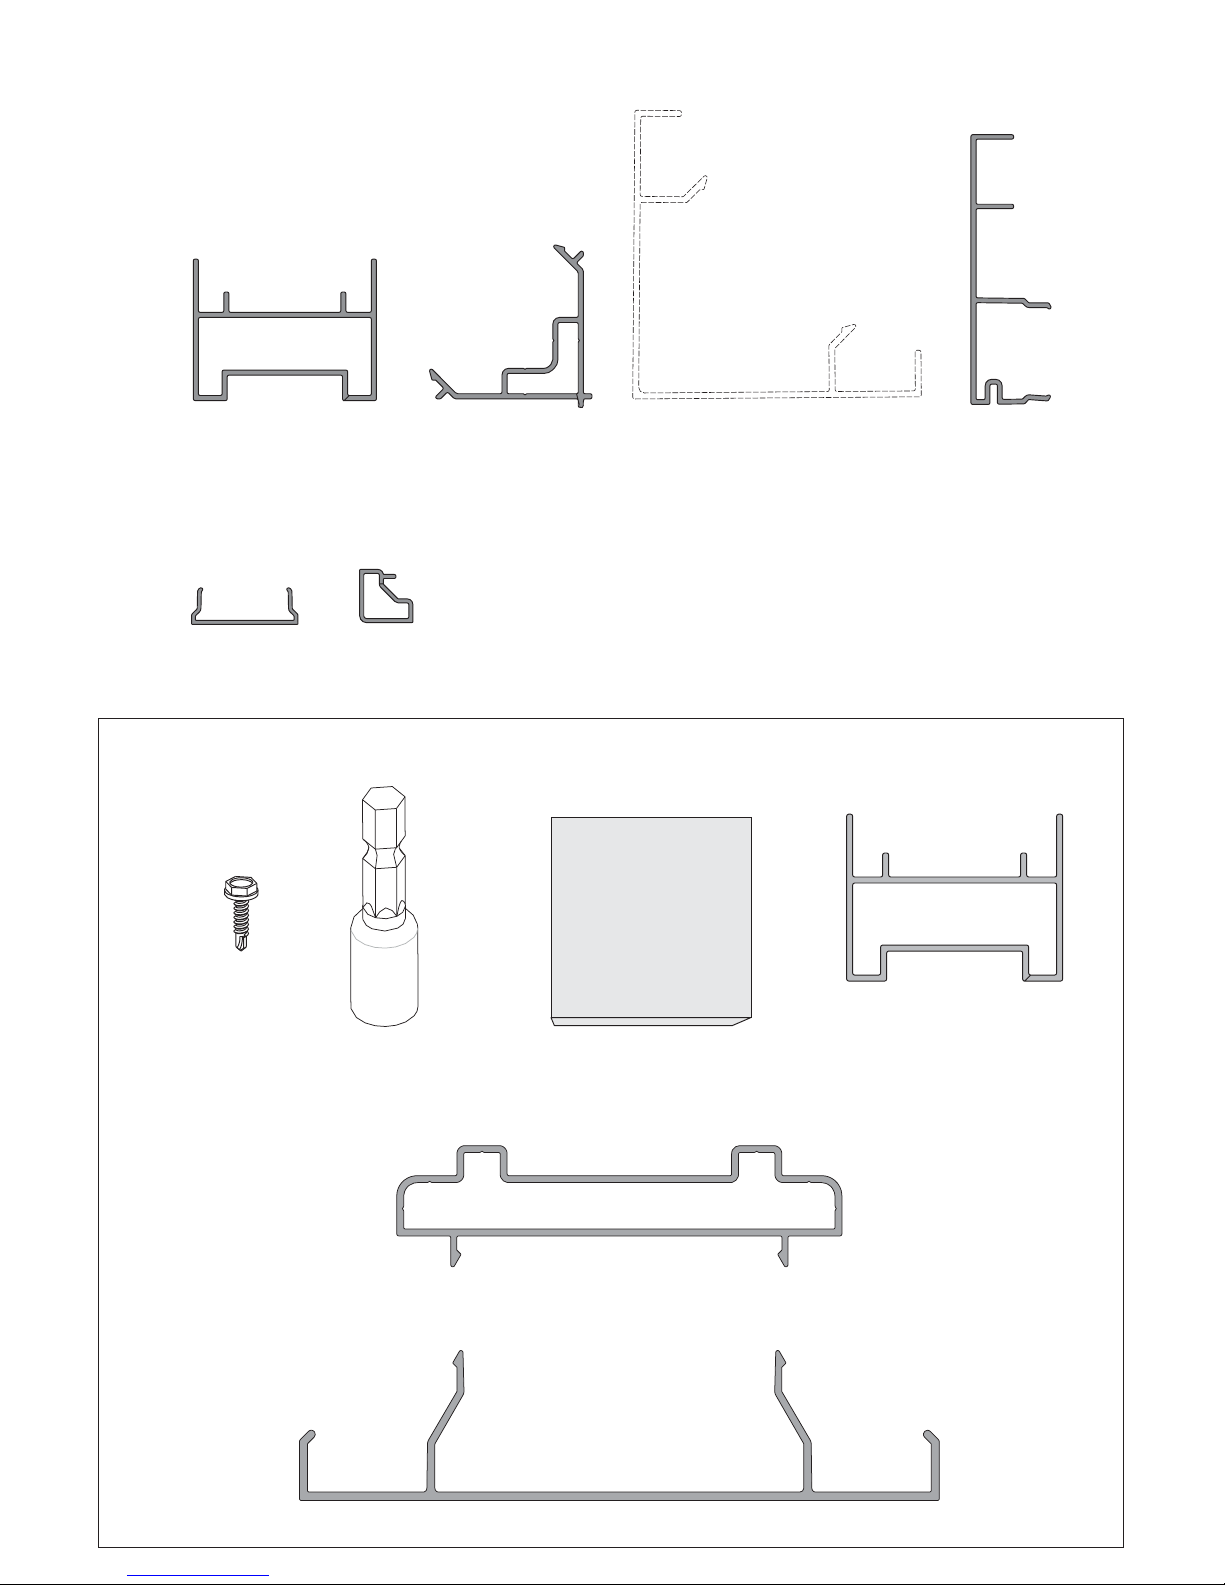
P1 P2 P4
P5 P6
x24
B6x9.5mm
x1
5.5
39mm
P1
x1
50x50x15.5mm
x4
510mm
x1
2048mm
x1
P7
P8
P3
Medföljer saunarummet
Included with the sauna room
W komplecie z kabiną sauny
Profilsats Twin / Profile kit Twin / Zestaw profili do kabiny TWIN
Profiler
Profiles
Profile
Profilés
Рейки
Profile
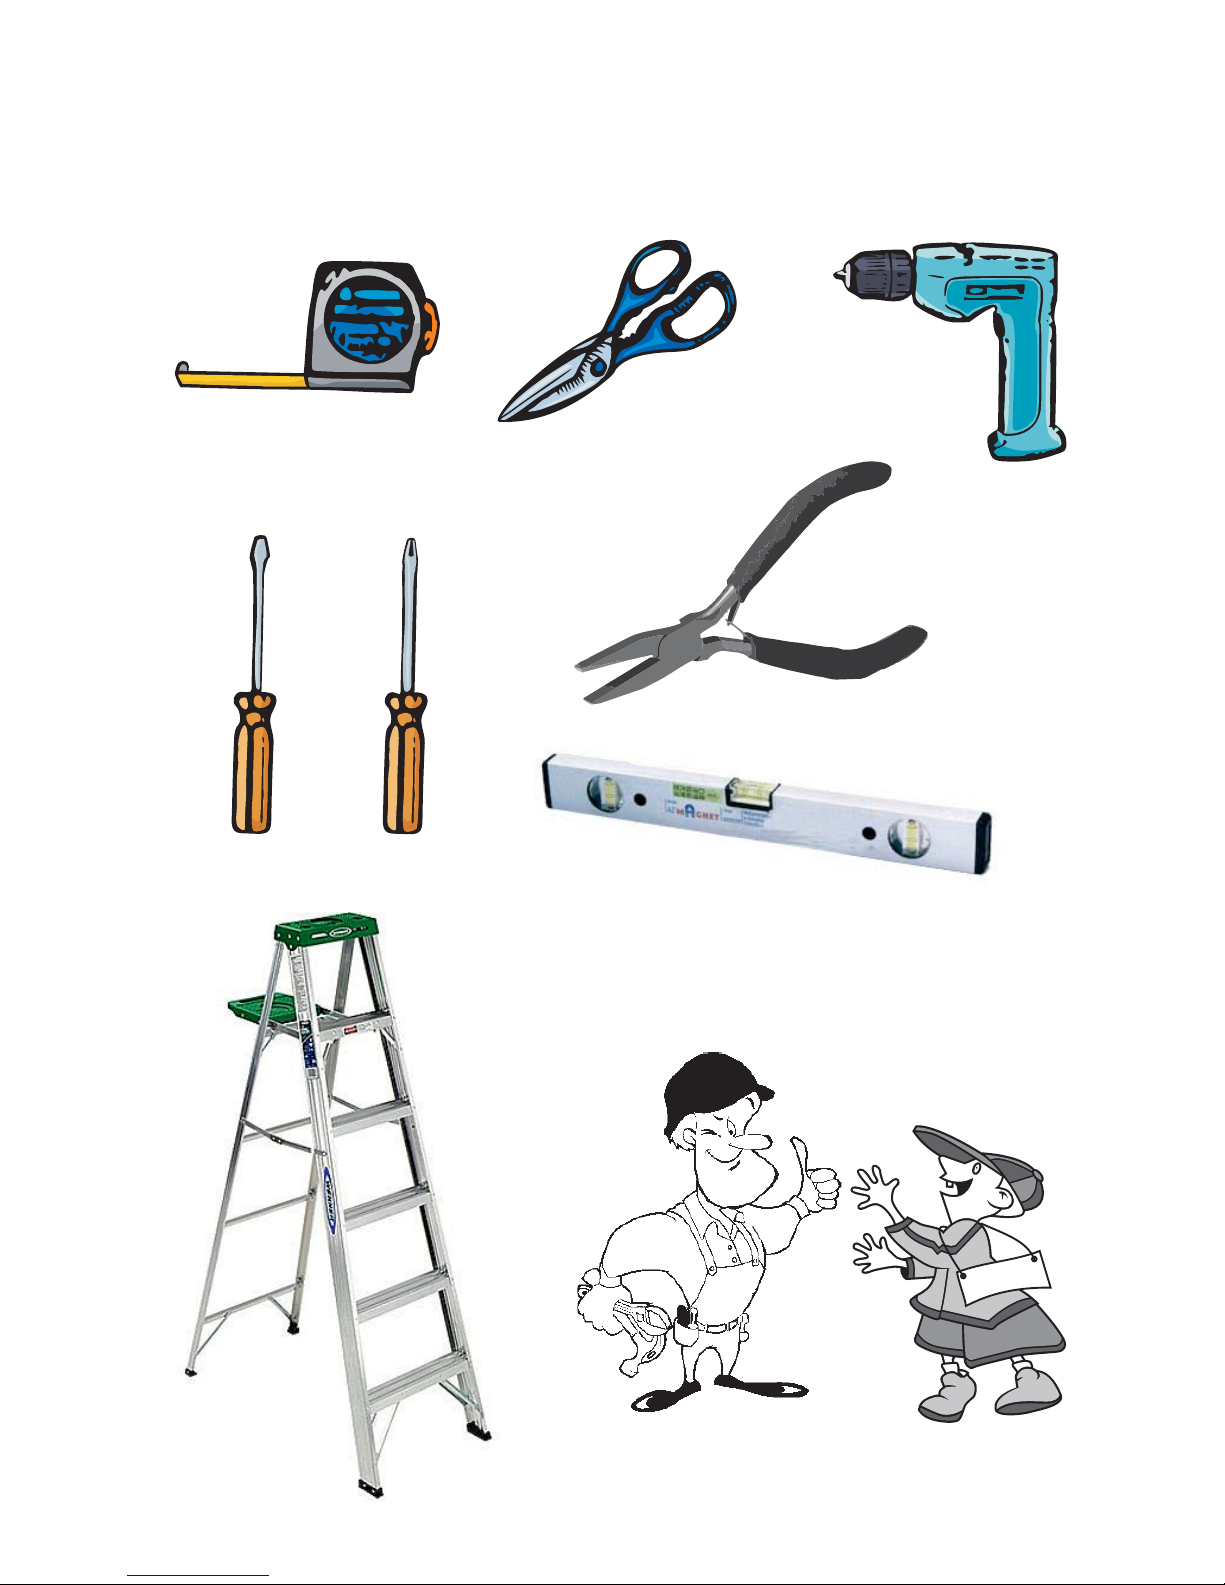
ASSISTANT
Grejer bra att ha
Useful tools, etc.
Praktische Hilfsmittel
Matériel utile
Что может пригодиться
Przydatne narzędzia, itp.
1177mm
777mm
777mm
1177mm
~3mm
SILICONE
SILICONE
1
P1
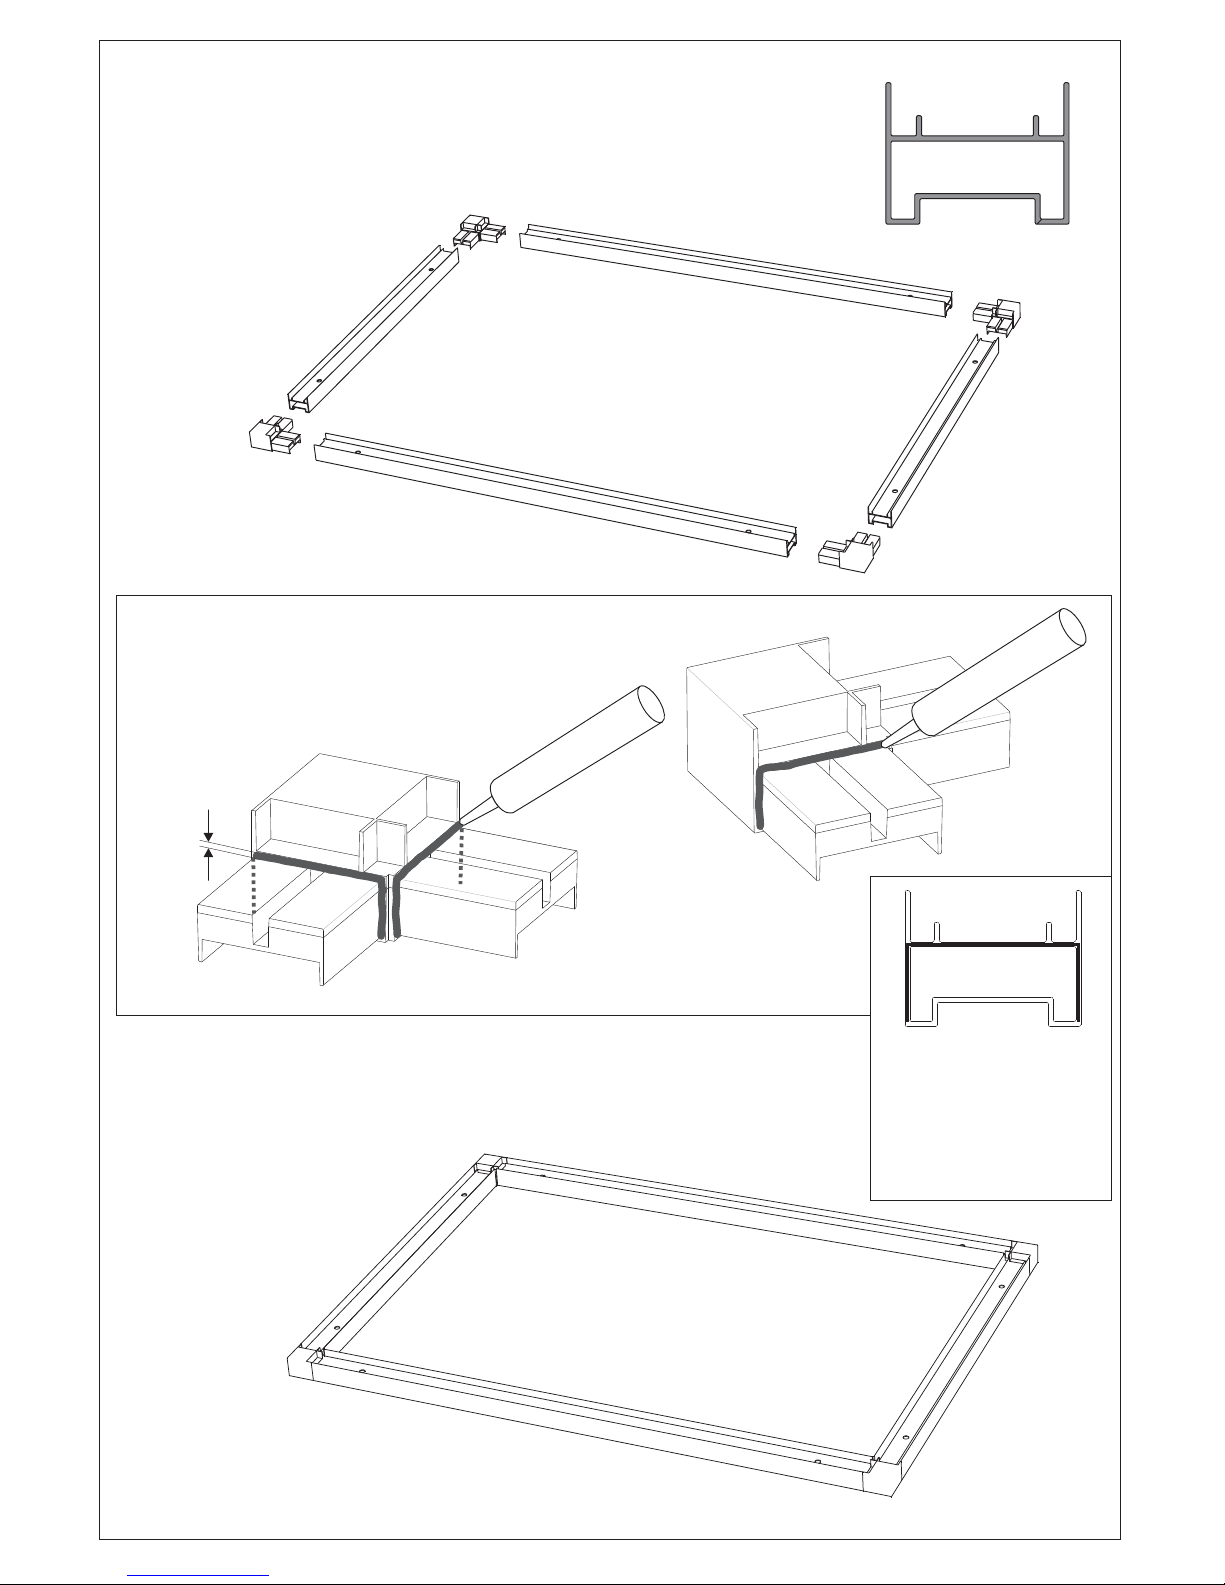
Montering av golvram
Assembling the floor frame
Montage des Bodenrahmens
Montage du cadre de sol
Монтаж рамы пола
Montaż ramy podłogowej
Lägg en sträng med silicon på hörnknutarna enligt bilderna.
Apply a string of silicone on the corner joints as shown.
An den Eck- und T-Verbindungen einen Siliconstrang wie abgebildet auftragen.
Appliquer un cordon de silicone aux angles selon les images.
Нанесите полосу силиконового клея на углах как показано на рисунке.
Nałożyć silikon na połączeniach narożnych jak pokazano na rysunkach.
Skjut in hörnknutarna I
golvramsprofilerna
Push the corner joints into place in
the profiles for the floor frame.
Eck- und T-Verbindungen in die
Bodenrahmenprofile einstecken
Engager les éléments d'angle dans
les profilés du cadre de sol
Задвиньте внутрь угловые связки
в рейки рамы пола
Wcisnąć złącza narożne na
miejsce w profilach ramy
podłogowej.
Motsvarande kontaktytor på golvram
Corresponding contact surfaces on
floor frame
Entsprechende Kontaktflächen am
Bodenrahmen
Plans de contact correspondants sur
cadre de sol
Соответствующие поверхности
соприкосновения на раме пола
Odpowiadające powierzchnie styku
na ramie podłogowej
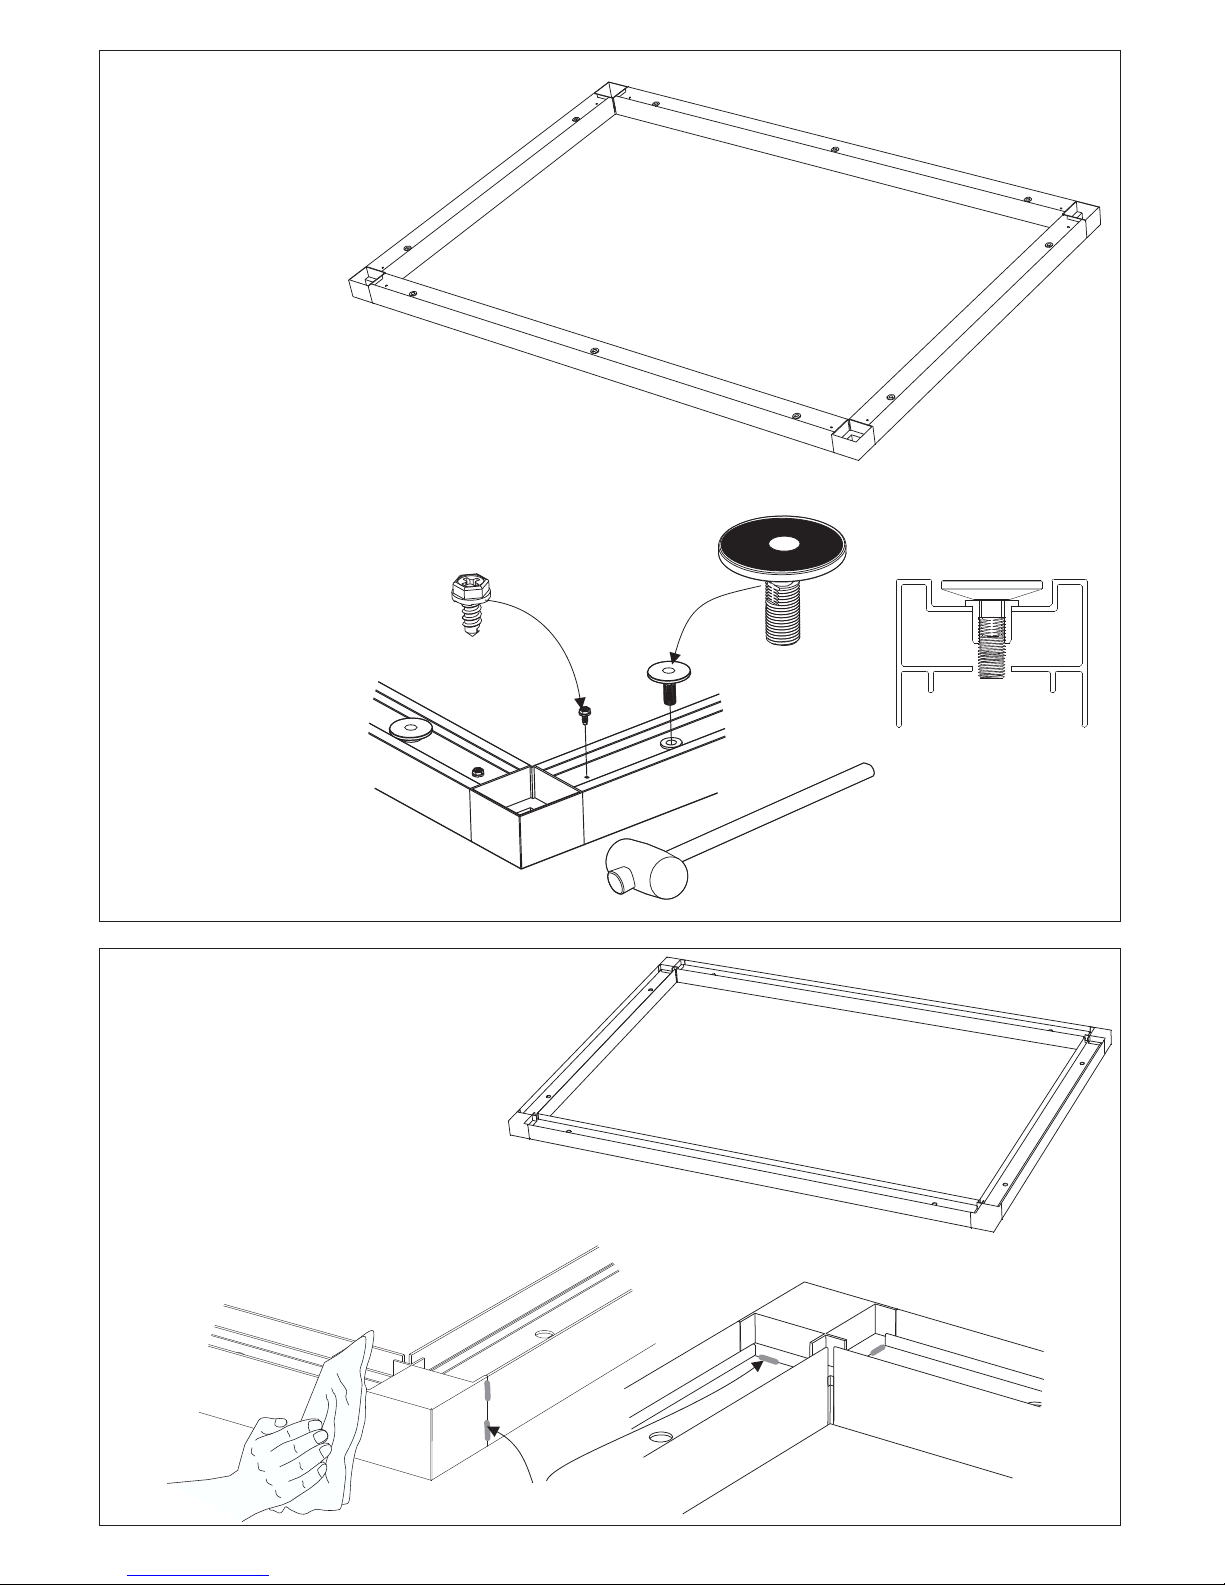
B8x9.5mm
x8
x10
Silicone
2
3
M8x25x30mm
Vänd golvramen upp och ned. Banka
in hörnknutarna i golvramsprofilerna
så att de säkert går i botten.
Skruva fast hörnknutarna och sätt dit
ställfötterna. Ställfötterna skruvas i
botten.
Turn the floor frame upside down.
Tap the corner joints carefully into
the floor frame profiles to make sure
that they sit all the way in. Secure
the corner joints with screws and fit
the adjustable feet. Screw the
adjustable feet in as far as they will
go.
Bodenrahmen wenden. Eck- und TVerbindungen bis zum Anschlag in
die Bodenrahmenprofile einschlagen.
Verbindungen festschrauben und
Einstellfüße anbringen. Einstellfüße
bis zum Anschlag einschrauben.
Retourner à l'envers le cadre de sol.
Frapper sur les éléments d'angle
pour les faire entrer entièrement
dans les profilés du cadre de sol.
Visser les éléments d'angle et placer
les pieds réglables. Visser à fond les
pieds réglables.
Переверните раму пола верхом
вниз. Вбейте угловые связки в
рейки рамы пола так, чтобы они
хорошо вошли в днище. Закрепите
угловые связки винтами и
установите в них стальные лапки.
Регулируемые лапки ввинчиваются
в днище.
Odwrócić ramę podłogową do góry
nogami. Zamontować złącza
narożne w profilach ramy
podłogowej, delikatnie je wbijając aż
do końca. Przymocować złącza
narożne wkętami i zamocować
regulowane stopki. Wkręcić
regulowane stopki do oporu.
Vänd tillbaka golvramen. Torka bort eventuellt
överflödigt silicon runt hörnknutarna.
Turn the floor frame over so it is once again the right
way up. Wipe off any silicone residue around the corner
joints.
Bodenrahmen wieder wenden. Eventuell
überschüssiges Silicon an den Eck- und TVerbindungen abwischen.
Retourner à l'endroit le cadre de sol. Essuyer l'éventuel
excédent de silicone autour des éléments d'angle.
Поверните опять раму пола в правильное
положение. Протрите возможный избыток силикона
вокруг угловых связок.
Odwrócić ramę podłogową, aby ponownie była
skierowana prawidłową stroną do góry. Usunąć nadmiar
silikonu wokół złącz narożnych.
4
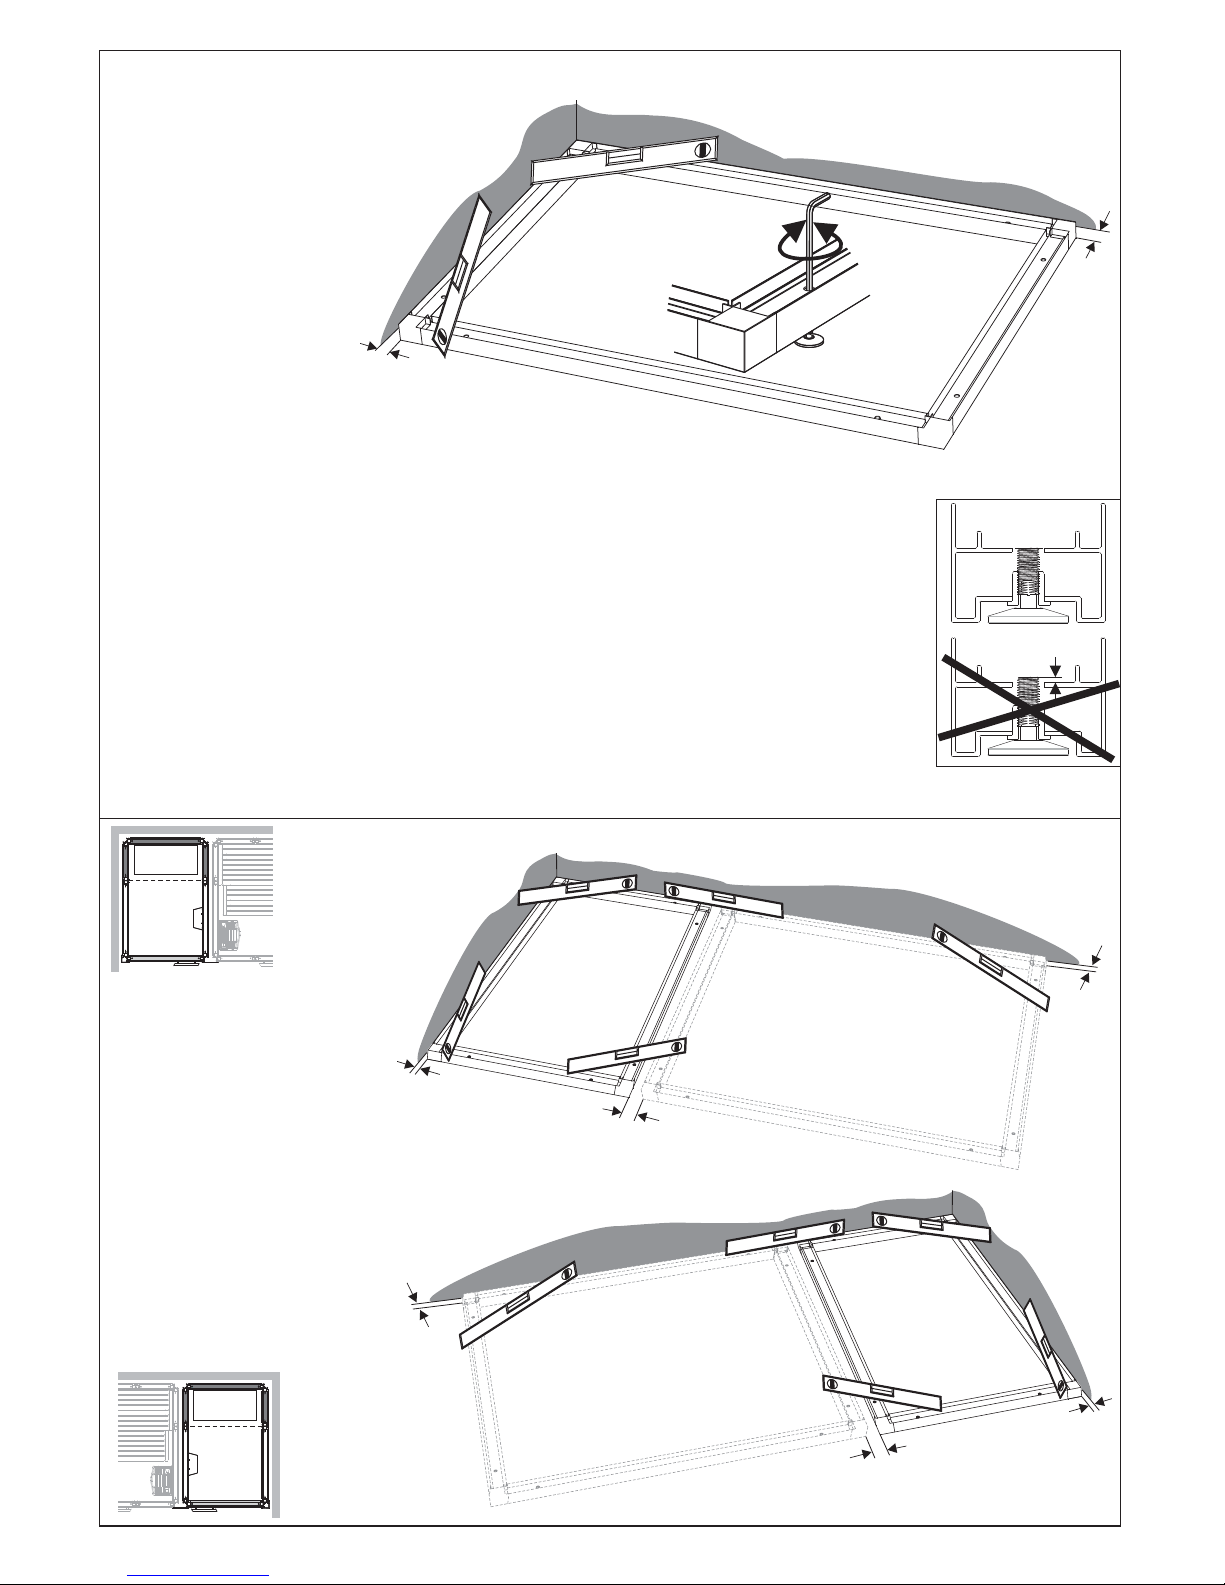
Placera golvramen där rummet
ska stå. Kontrollera att ramen
ligger plant, använd vattenpass.
OBS! Det är ett absolut krav att
golvramen ligger plant “i våg” för
att slutresultatet ska bli perfekt.
Justera ställfötterna med
insexnyckeln. Det är viktigt att
ställfoten hamnar under ytan där
väggarna ska stå.
Move the floor frame to the exact
location where the cabinet will
stand. Use a spirit level to make
sure that the floor frame is
completely level on the floor.
IMPORTANT! For a perfect end
result, it is essential that the floor
frame is absolutely level. Use the
hex key to adjust the adjustable
feet. It is important that the top of
the thread on the adjustable feet
is below the level of the bottom
edge of the walls. (See the
drawings.)
Bodenrahmen an der
gewünschten Stelle
positionieren. Auf ebene Lage
des Rahmens achten,
Wasserwaage verwenden.
ACHTUNG! Damit ein perfektes
Endergebnis gewährleistet ist,
muss der Bodenrahmen
unbedingt waagerecht liegen.
Einstellfüße mit
Innensechskantschlüssel
einstellen. Die Einstellfüße
dürfen nicht über die
Auflagefläche für die Wände
hinausragen (siehe Abb.).
Установите раму пола
там, где будет
расположена комната.
Проверьте, чтобы рама
лежала плоско,
пользуйтесь нивелиром.
Внимание! Для
достижения оптимального
результата, рама пола
должна лежать
полностью
горизонтально.
Отрегулируйте
регулируемые лапки
шестигранником. Важно,
чтобы регулируемые
лапки опустились под
поверхности, на которых
будут стоять стенки.
Placer le cadre de sol à
l'emplacement choisi pour
la cabine. Vérifier que le
cadre est posé à plat,
utiliser un niveau à bulle.
ATTENTION ! Il est
absolument indispensable
que le cadre de sol soit
bien horizontal pour que le
résultat final soit parfait.
Ajuster les pieds réglables
à l'aide d'une clé six pans
creux. Il est important que
le pied réglable soit placé
comme indiqué par la
figure.
OK!
i1309/i1313/i1317
130
min. 2 cm.
min. 2 cm.
40 mm.
min. 2 cm.
min. 2 cm.
i1309/i1313/i1317
130
min. 2 cm.
min. 2 cm.
40 mm.
Umieścić ramę podłogową w
miejscu, gdzie kabina ma być
finalnie zamontowana. Użyć
poziomicy do dokładnego
wypoziomowania ramy
podłogowej względem podłogi.
WAŻNE! W celu prawidłowego
zamontowania kabiny ważne
jest, aby rama podłogowa była
dokładnie wypoziomowana. Do
wyregulowania regulowanych
stopek użyć klucza
imbusowego. Bardzo ważne
jest, aby gorna część gwintu na
regulowanej stopce była
poniżej poziomu dolnej
krawędzi ścianek (patrz
rysunki).
x10
Ø20mm
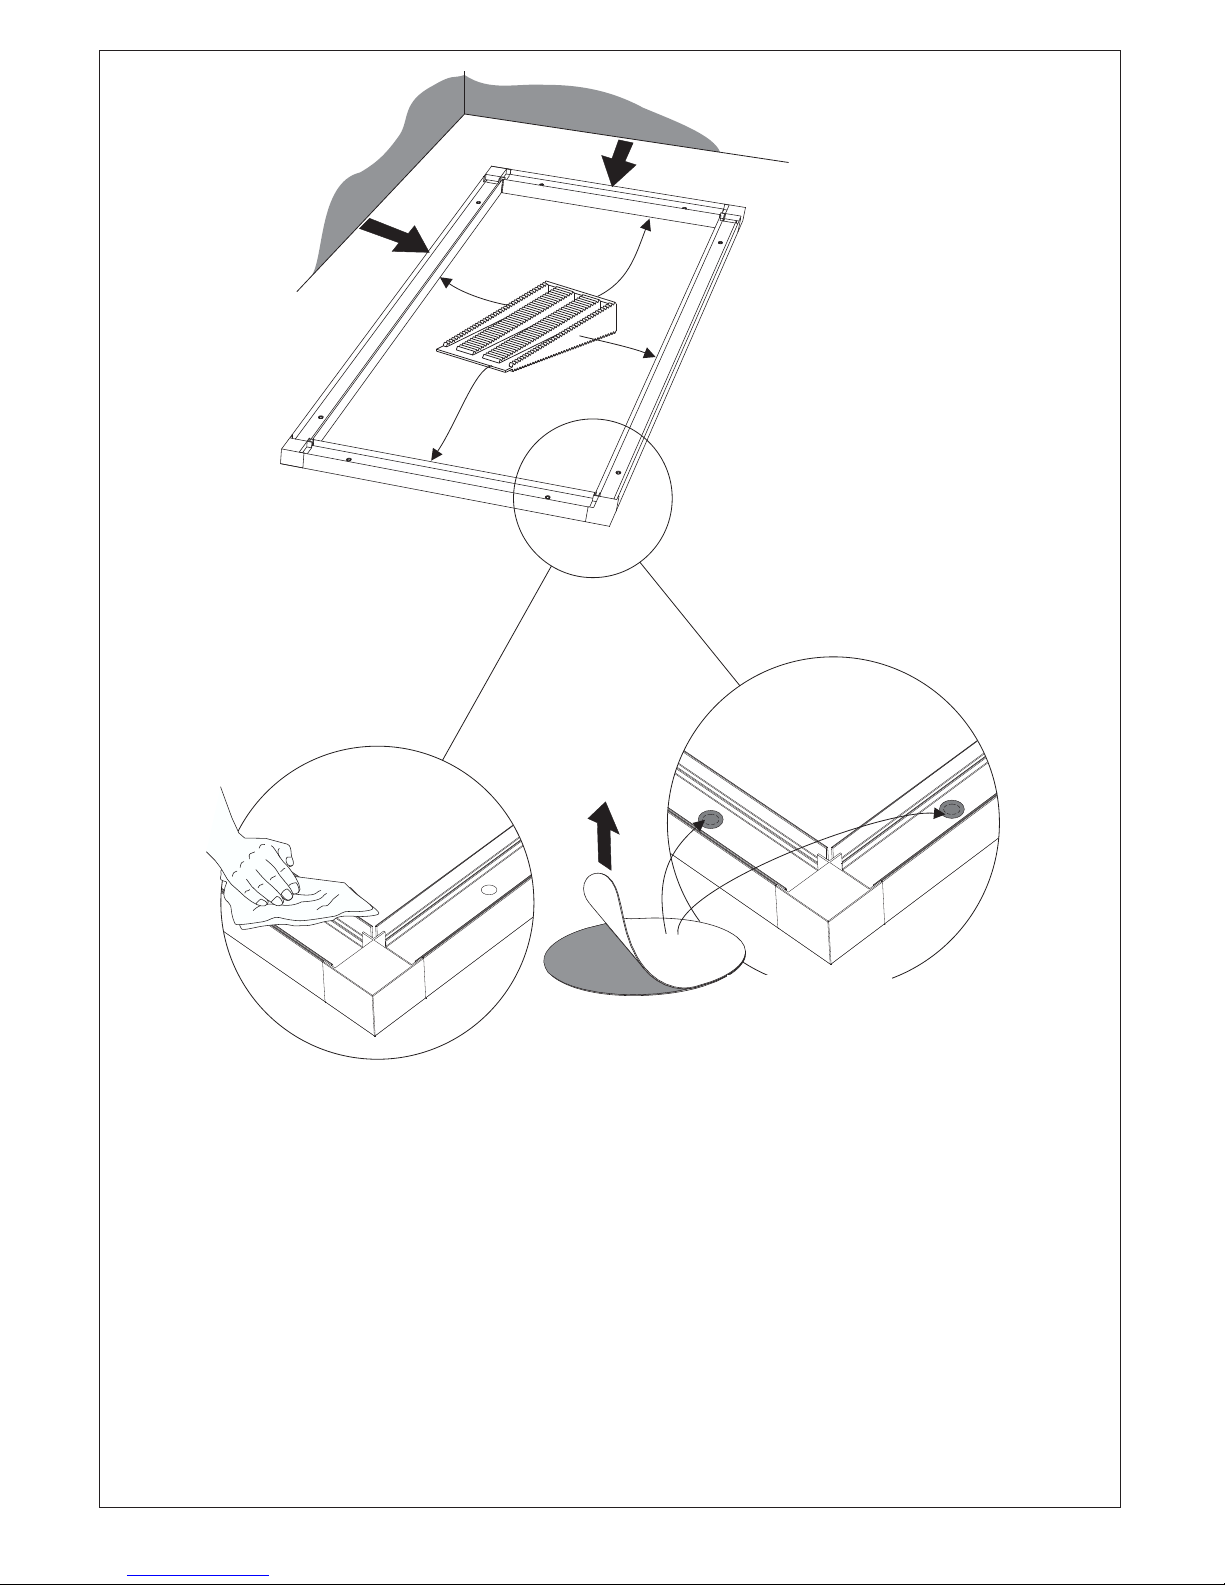
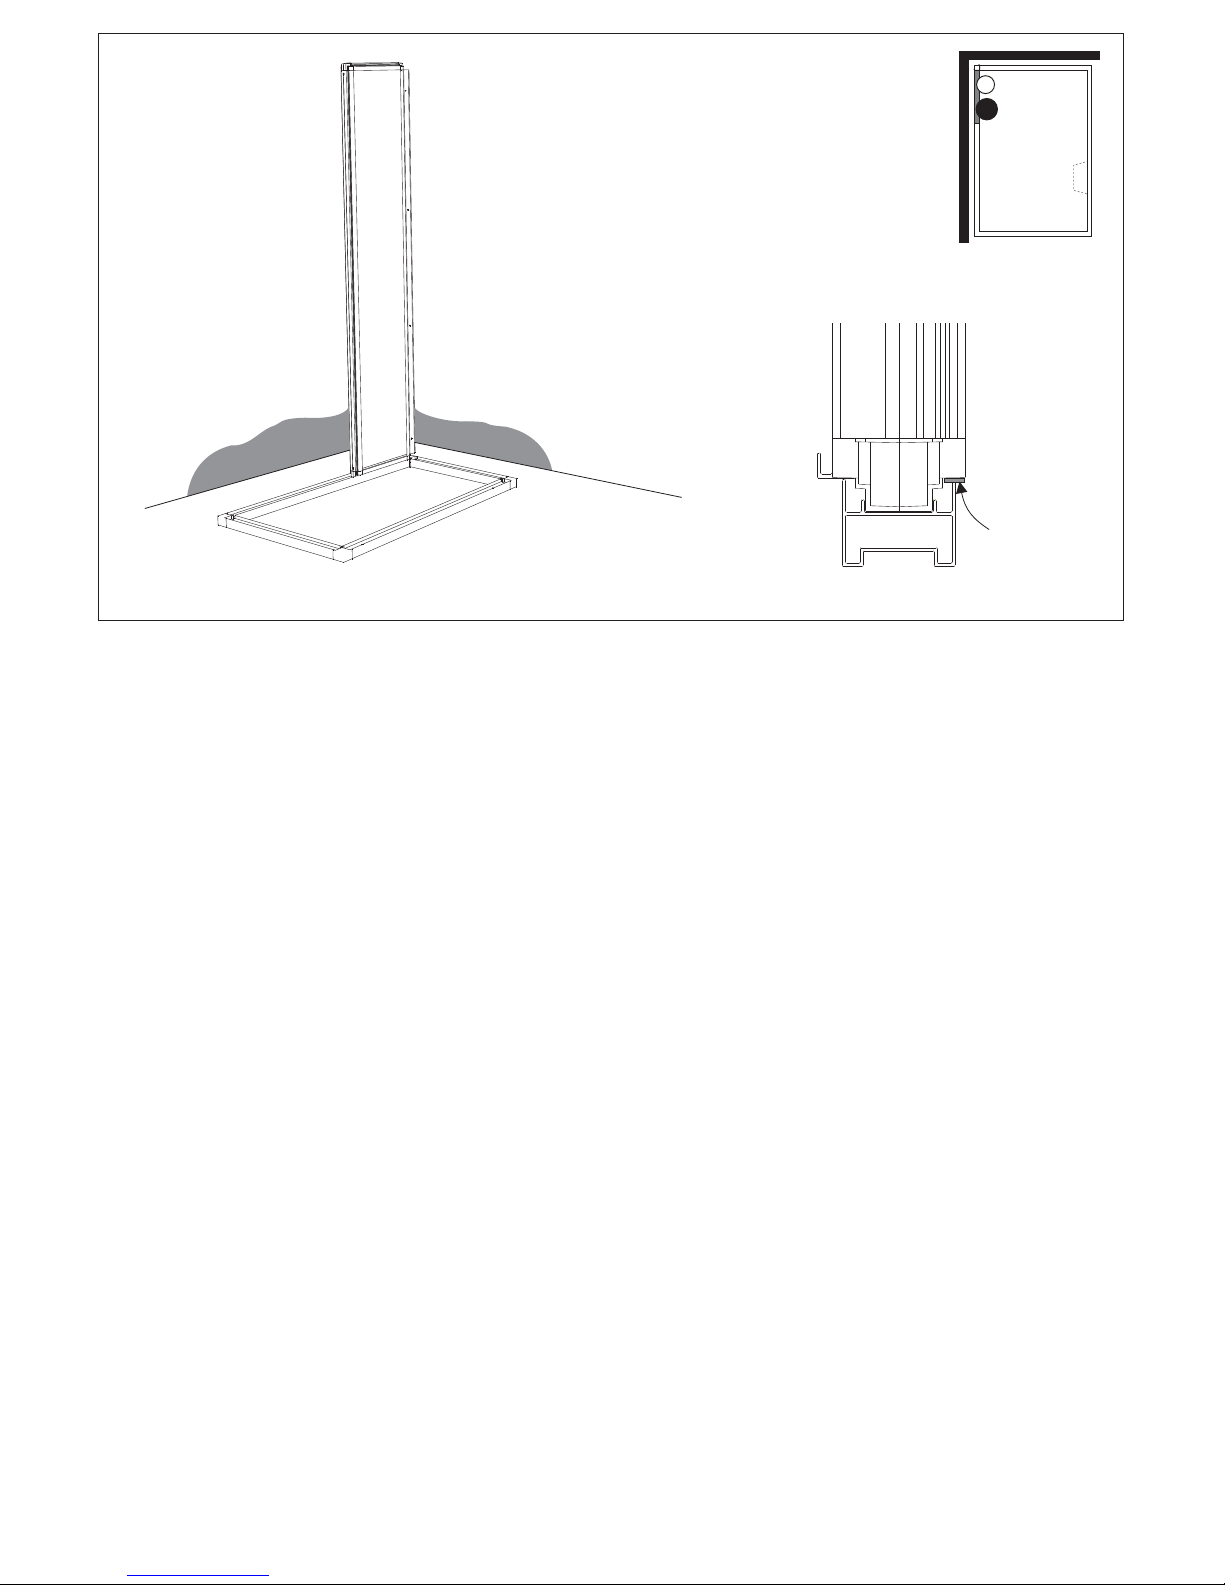
Flytta ut golvramen om den står nära en vägg för
att lätt kunna montera väggarna. Om golvramen
inte är plan när den flyttats, lägg under kilar på de
ställen som behöver. Torka rent runt hålen ovanför
ställfötterna och sätt dit tätningscirklarna.
For easier assembly, pull the floor frame out into
the room if it is close to a wall. If this results in the
floor frame no longer being level, use wedges
where needed to level it up. Wipe clean around the
holes above the adjustable feet and then cover the
holes with the self-adhesive circular sealing pads.
Den Bodenrahmen gegebenenfalls von der Wand
abrücken, um die Montage der Wände zu
erleichtern. Bei eventuell auftretenden
Unebenheiten Keile unterlegen. Den Bereich um
die Löcher über den Einstellfüßen abwischen und
die runden Abdeckungen aufkleben.
5
?
Självhäftande
Self-adhesive
Selbstklebend
Autocollant
Самоприклеивающиеся
Samoprzylepne
Si le cadre de sol est proche d'un mur, le déplacer afin de
pouvoir monter les cloisons. Si le cadre de sol n'est plus
d'aplomb après avoir été déplacé, poser des cales aux
endroits où c'est nécessaire. Nettoyer autour des trous audessus des pieds réglables et coller les caches autocollants.
Выдвиньте раму пола, если она стоит рядом со стенкой,
чтобы было легче монтировать стенки. Если рама пола
не расположена горизонтально при перемещении,
подложите клинья там, где это необходимо. Протрите
начисто вокруг отверстия над регулируемыми лапками и
наложите круглые прокладки.
W celu łatwiejszego montażu można ramę podłogową
przesunąć na środek pomieszczenia. Jeśli po przesunięciu
rama podłogowa nie jest w poziomie należy użyć klinów do
wypoziomowania jej na czas montażu. Wytrzeć otwory nad
regulowanymi stopkami, a następnie przykryć otwory
samoprzylepnymi, okrągłymi podkładkami uszczelniającymi.
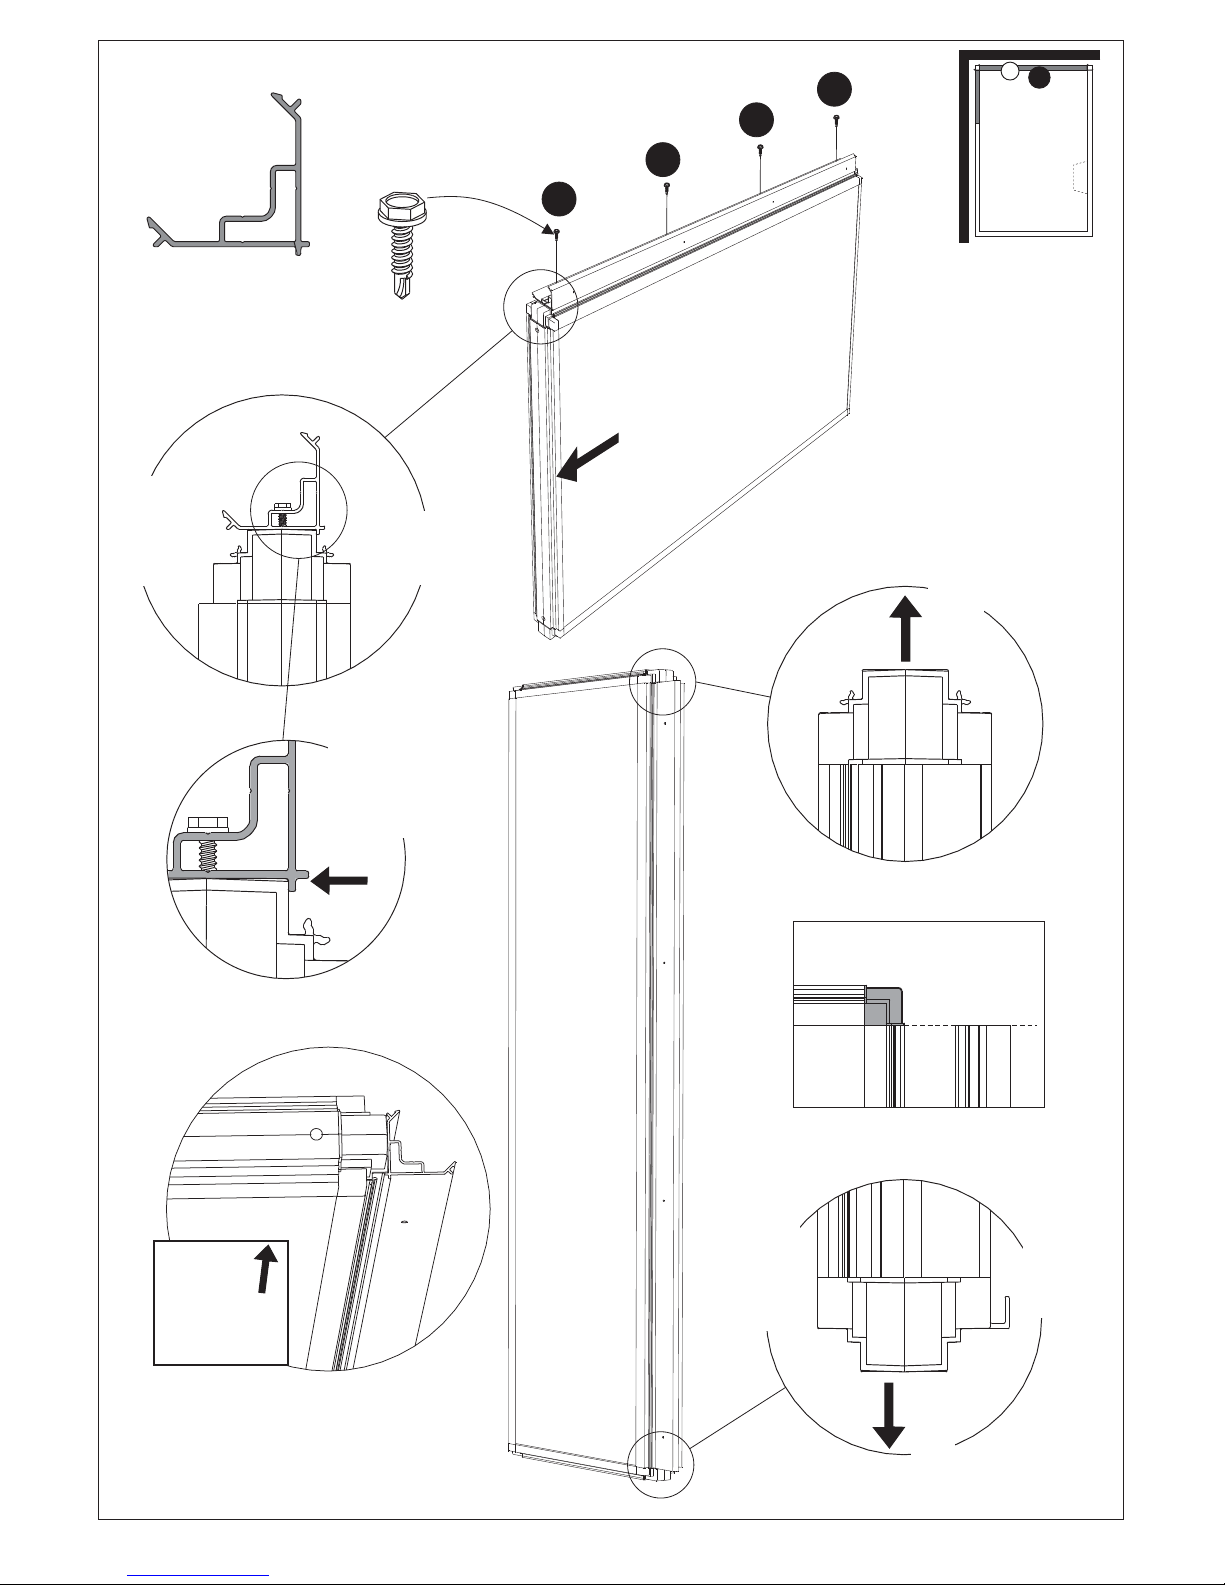
6
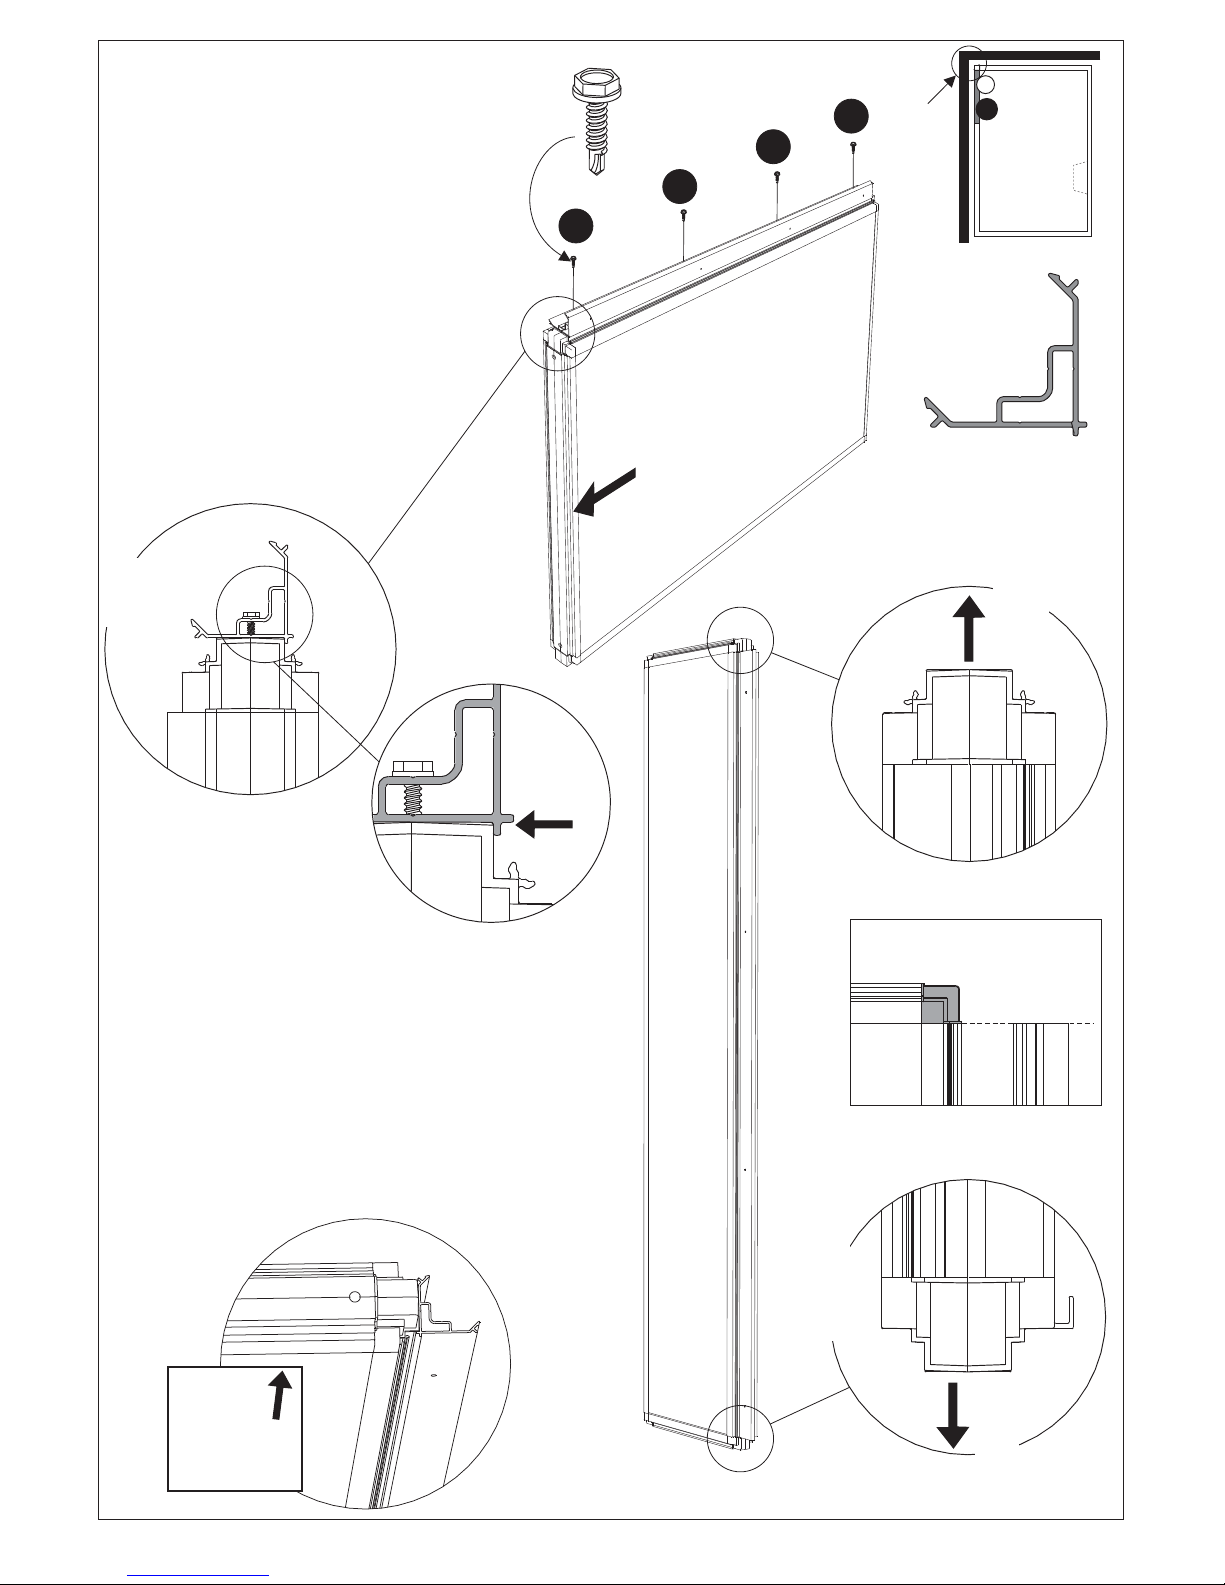
Skruva alltid dit den översta skruven först, sedan
den nedersta och till sist de båda skruvarna I
mitten.
Always start with the top screw, then the bottom
screw and finally the two middle screws.
Zuerst die obere Schraube, dann die untere und
abschließend die beiden mittleren Schrauben
anbringen.
Toujours commencer à visser la vis du haut, puis
celle du bas, et enfin les deux vis du milieu.
Начинайте ввинчивать всегда с первого винта,
потом ввинтите нижний винтивконцеоба
винта посредине.
Przykręcanie należy zawsze zaczynać od śrub
górnych, następnie dolne, a na końcu śruby
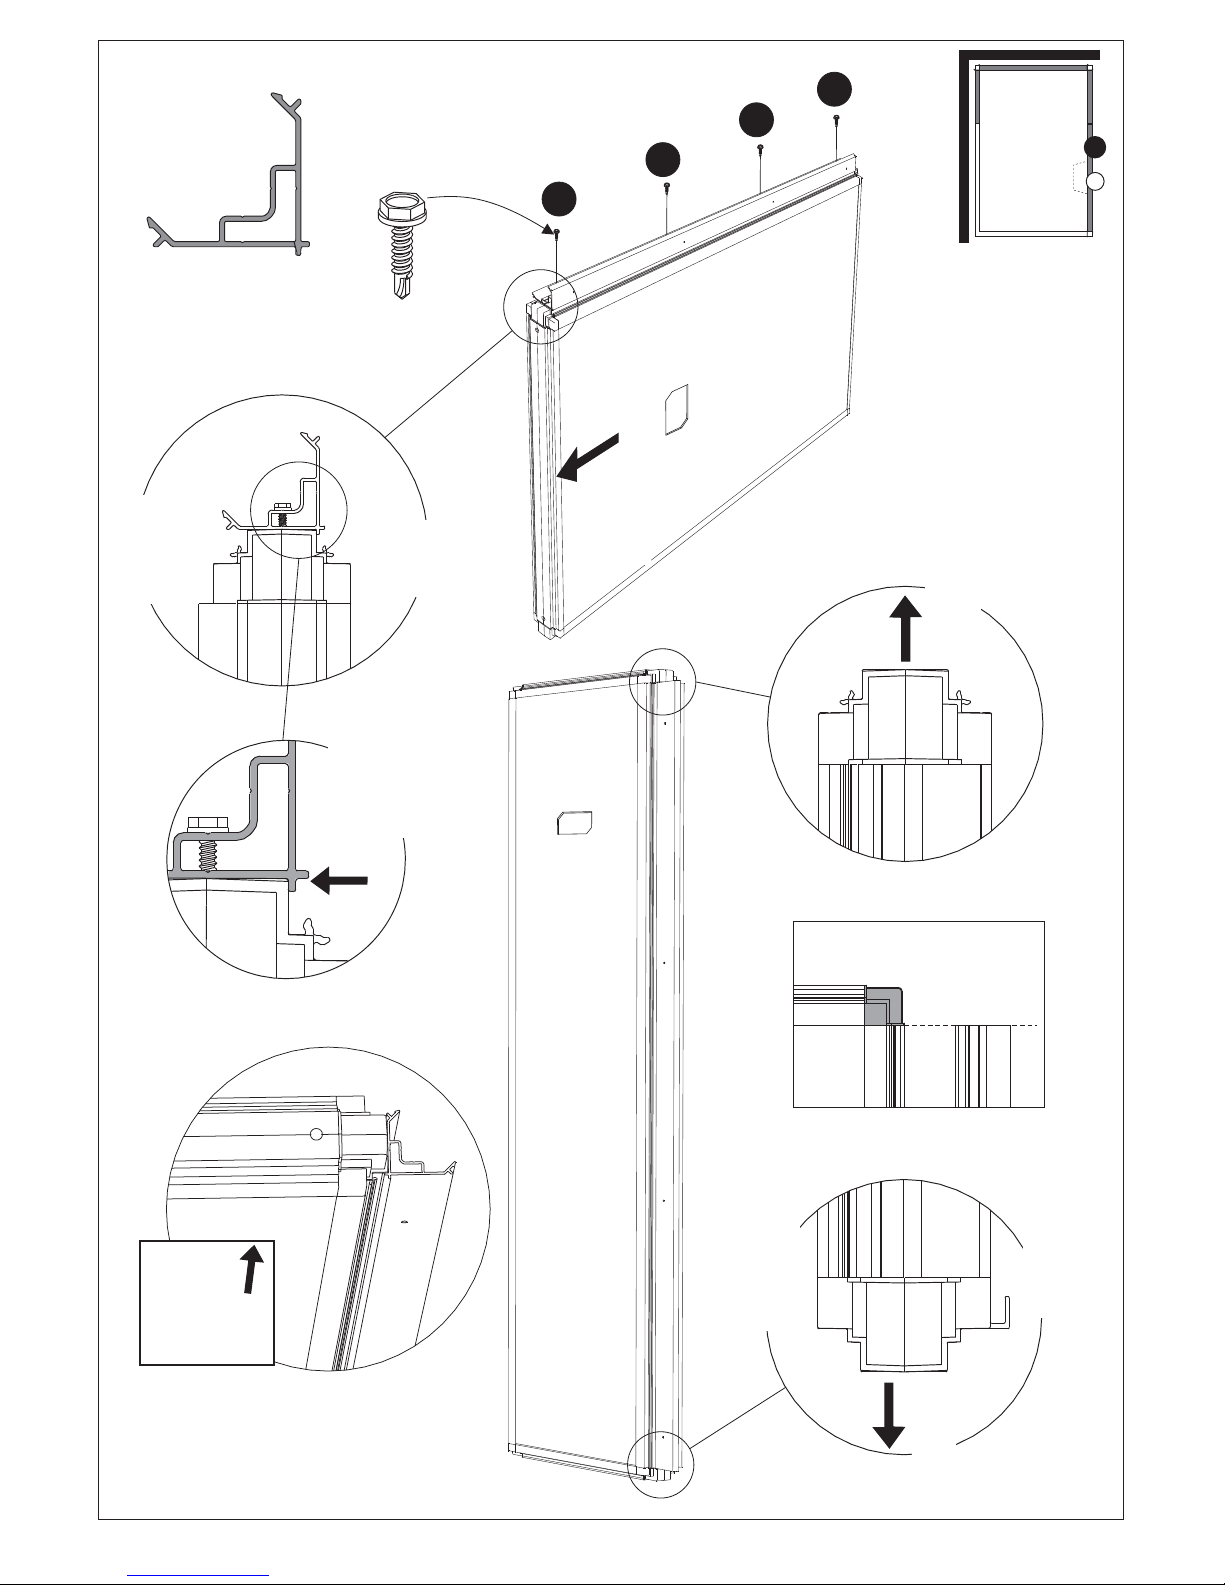
środkowe.
x4
1
3
4
2
B6x16mm
P2
400x2000
Upp/insida
Up/inside
Oben/innen
Haut/intérieur
Верх внутренняя/
сторона
Do góry Wewnątrz/
1
B
Upp
Up
Oben
Haut
Верх
Do góry
Insida
Inside
Innenseite
Intérieur
Внутр.
Wewnątrz
Upp
Up
Oben
Haut
Верх
Do góry
Kant i kant
Flush fit
Kantenbündig
Bord à bord
Край к краю.
Wyrównać
Ner
Down
Unten
Bas
Низ
Na dół
OBS! Det är viktigt att hörnprofilen ligger dikt an mot väggen. Tryck profilen mot
väggen när den skruvas I.
IMPORTANT! Make sure the corner profile fits perfectly flush against the wall.
Press the profile against the wall while screwing it into place.
ACHTUNG! Die Eck- und T-Verbindungen müssen dicht an der Wand anliegen.
Das Profil beim Festschrauben an der Wand andrücken.
ATTENTION ! Il est important que le profilé d'angle soit bien plaqué contre la
cloison. Pendant l'assemblage, presser le profilé contre la cloison.
Внимание! Важно, чтобы угловые рейки плотно прилегали к стенке.
Прижимайте рейку к стенке, когда будете её привинчивать.
WAŻNE! Należy upewnić się czy profile narożne są idealnie dopasowane do
elementu ścianki. Podczas dokręcania profil należy docisnąć do ścianki.
Utsida
Outside
Außenseite
Extérieur
Наруж.
Na zewnątrz
Insida
Inside
Innenseite
Intérieur
Внутр.
Wewnątrz
7
1
B
Utsida
Outside
Außenseite
Extérieur
Наруж.
Na zewnątrz
Insida
Inside
Innenseite
Intérieur
Внутр.
Wewnątrz
Packning
Packing
Dichtung
Joint
Прокладка
Uszczelka
x4
1
3
4
2
B6x16mm
P2
8
800x2000
2
B
Upp
Up
Oben
Haut
Верх
Do góry
Utsida
Outside
Außenseite
Extérieur
Наруж.
Na zewnątrz
Insida
Inside
Innenseite
Intérieur
Внутр.
Wewnątrz
Upp
Up
Oben
Haut
Верх
Do góry
OBS!
NOTE!
ACHTUNG!
ATTENTION !
Внимание!
UWAGA!
Kant i kant
Flush fit
Kantenbündig
Bord à bord
Край к краю.
Wyrównać
Upp/insida
Up/inside
Oben/innen
Haut/intérieur
Верх внутренняя/
сторона
Do góry Wewnątrz/
Ner
Down
Unten
Bas
Низ
Na dół
Insida
Inside
Innenseite
Intérieur
Внутр.
Wewnątrz
Utsida
Outside
Außenseite
Extérieur
Наруж.
Na zewnątrz
1
4
3
2
800x2000
x4
B6x16mm
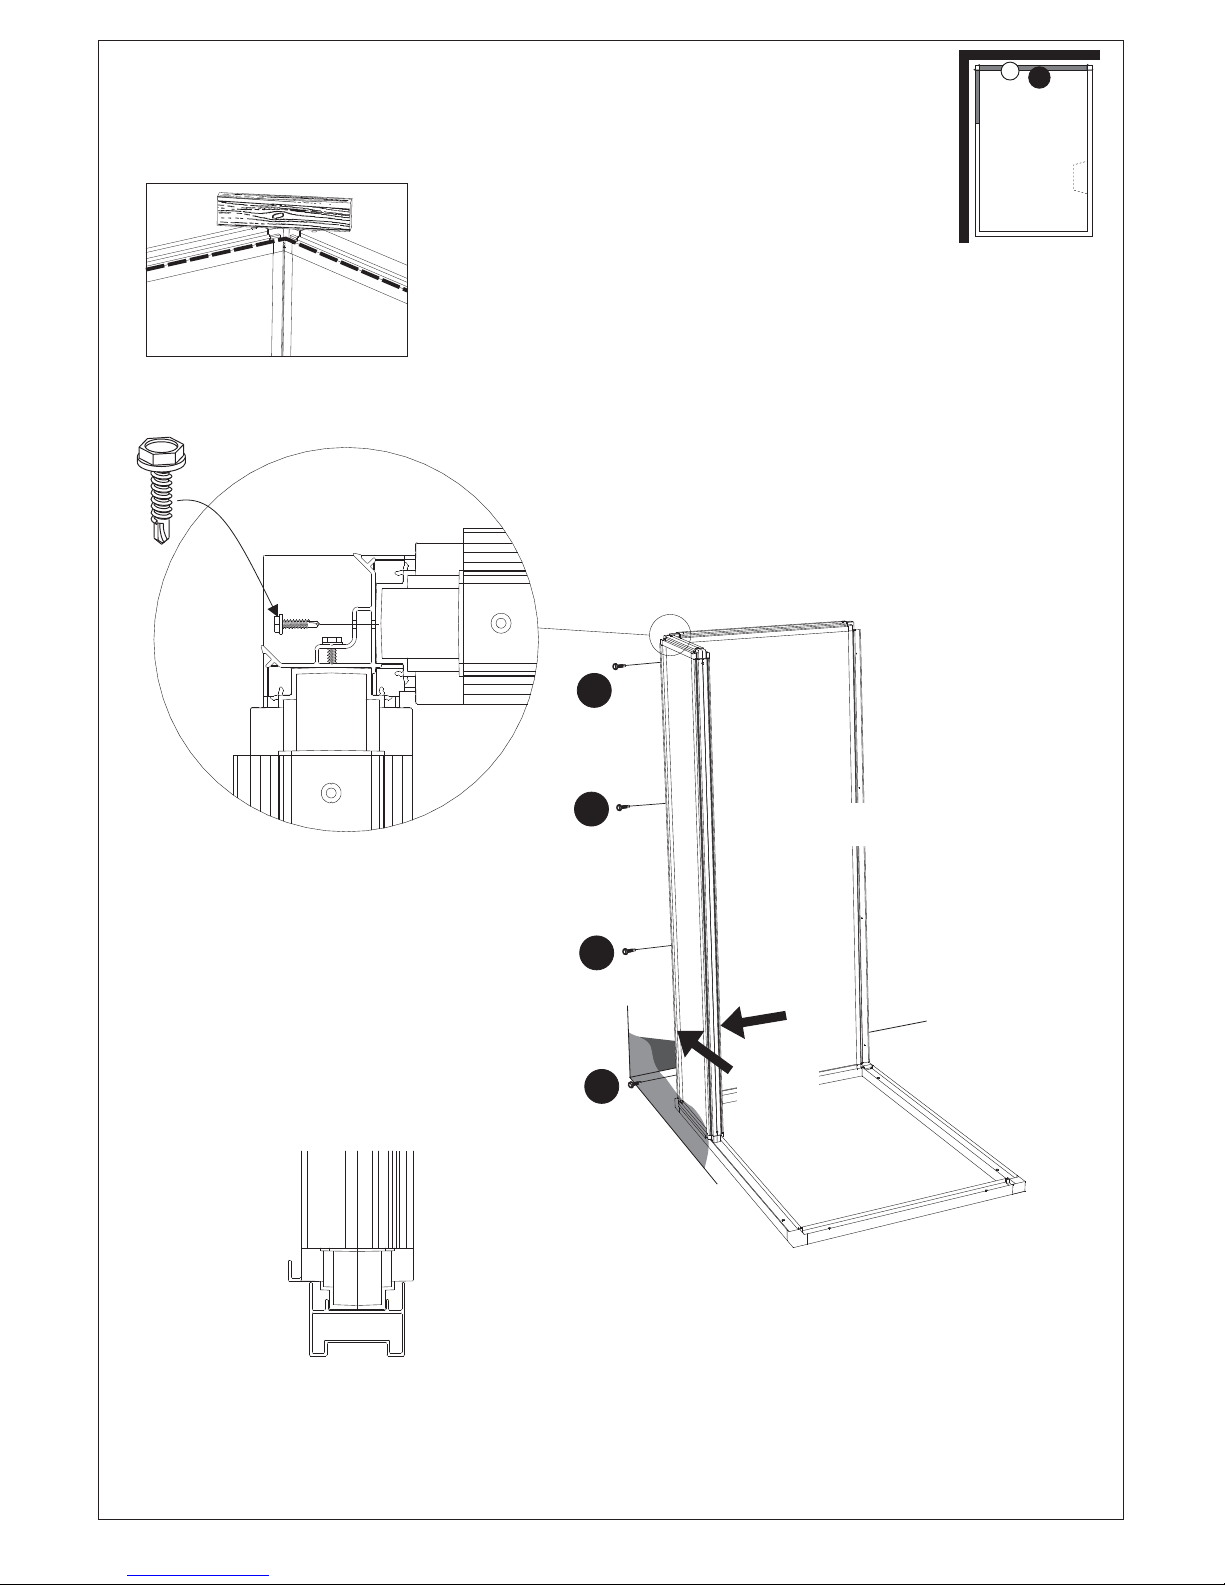
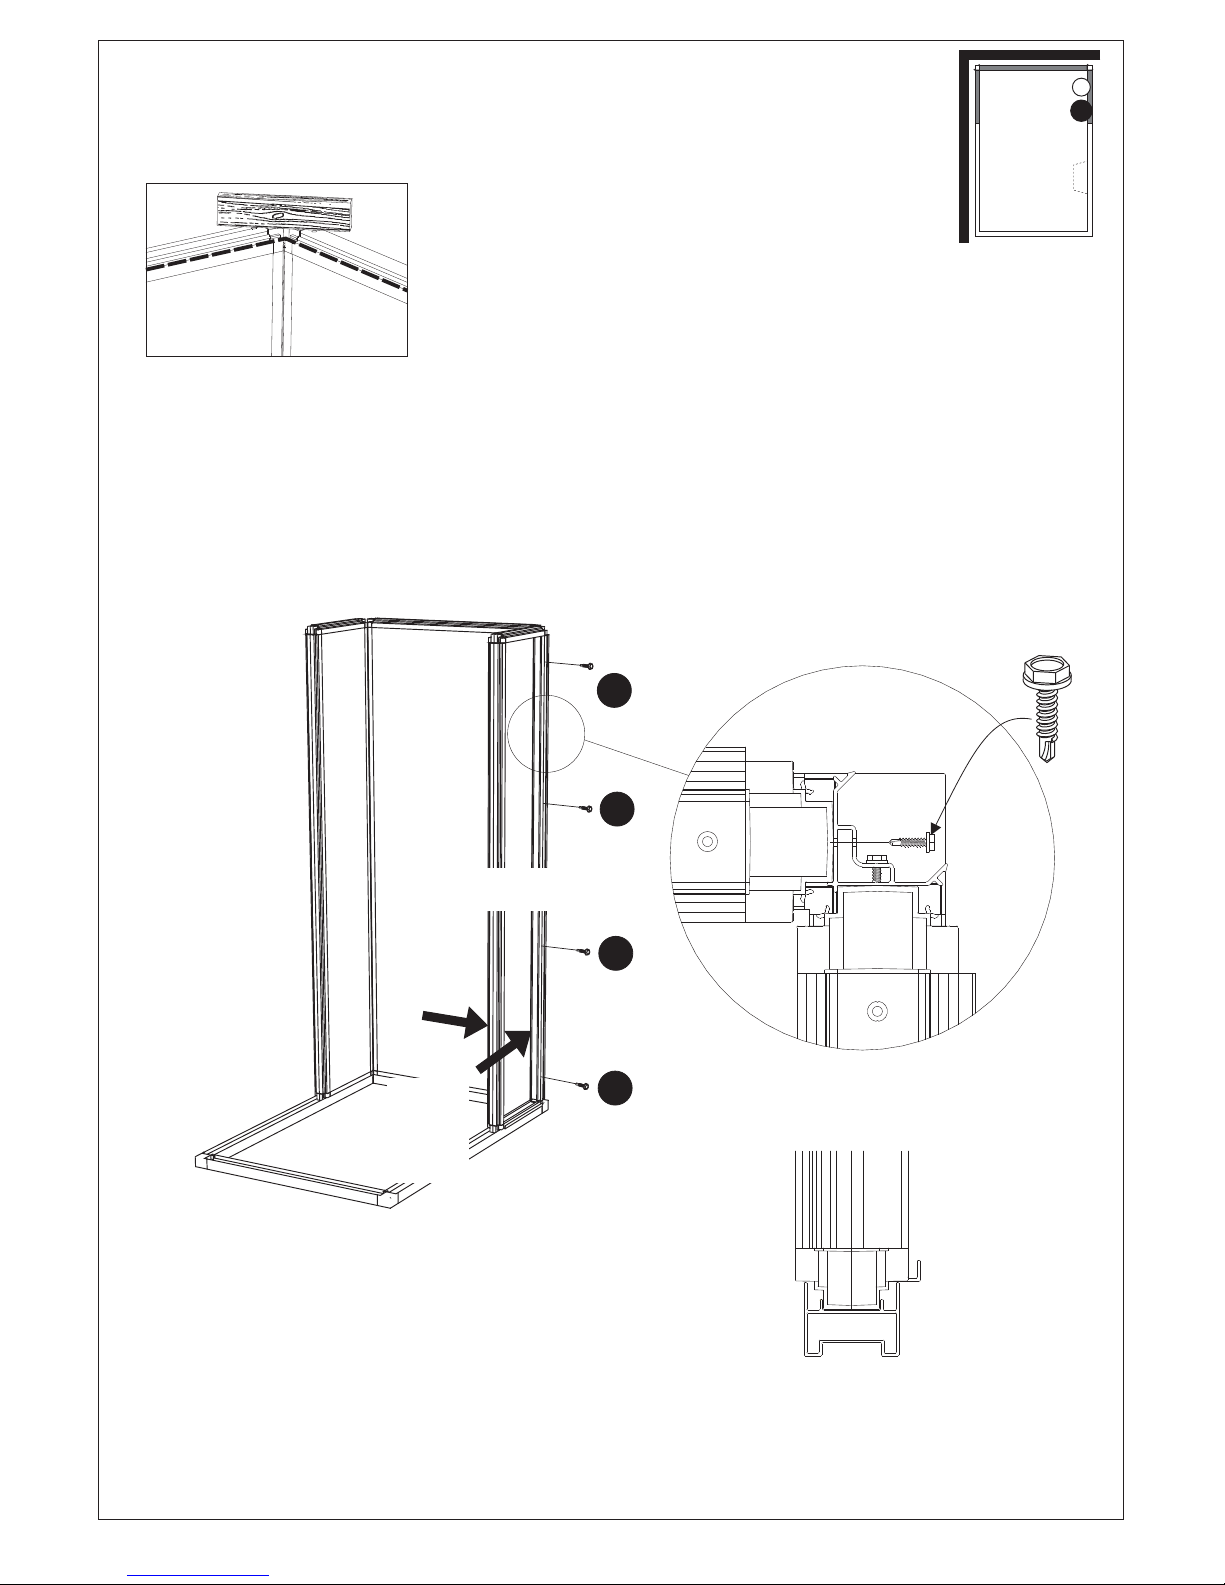
Tryck ihop väggarna när
de skruvas samman.
Push the walls together
while they are being
screwed together.
Wände beim
Zusammenschrauben
zusammendrücken.
Pour visser les cloisons, les
maintenir fermement
assemblées.
Прижимайте стенки одну
кдругой,когдабудете
соединять их винтами.
Podczas skręcania ścianek
należy je ze sobą trzymać
dokładnie połączone.
9
2
B
OBS! Det är viktigt att väggarna är i jämnhöjd I hörnen.
IMPORTANT! The walls must be perfectly level where they meet at the
corners.
ACHTUNG! Die Wände müssen an den Ecken auf gleicher Höhe liegen.
ATTENTION ! Il est important que les cloisons soient au même niveau dans
les angles.
Внимание! Важно, чтобы стенки были на одинаковой высоте в углу.
WAŻNE! Ścianki w narożniku musza być dokładnie na tym samym
poziomie.
Utsida
Outside
Außenseite
Extérieur
Наруж.
Na zewnątrz
Insida
Inside
Innenseite
Intérieur
Внутр.
Wewnątrz
Tryck
Press
Drücken
Presser
Прижмите
Docisnąć
1
4
3
2
400x2000
x4
B6x16mm
10
B
3
OBS! Det är viktigt att väggarna är i jämnhöjd I hörnen.
IMPORTANT! The walls must be perfectly level where they meet at the
corners.
ACHTUNG! Die Wände müssen an den Ecken auf gleicher Höhe liegen.
ATTENTION ! Il est important que les cloisons soient au même niveau dans
les angles.
Внимание! Важно, чтобы стенки были на одинаковой высоте в углу.
WAŻNE! Ścianki w narożniku musza być dokładnie na tym samym
poziomie.
Tryck ihop väggarna när
de skruvas samman.
Push the walls together
while they are being
screwed together.
Wände beim
Zusammenschrauben
zusammendrücken.
Pour visser les cloisons, les
maintenir fermement
assemblées.
Прижимайте стенки одну
кдругой,когдабудете
соединять их винтами.
Podczas skręcania ścianek
należy je ze sobą trzymać
dokładnie połączone.
Tryck
Press
Drücken
Presser
Прижмите
Docisnąć
Utsida
Outside
Außenseite
Extérieur
Наруж.
Na zewnątrz
Insida
Inside
Innenseite
Intérieur
Внутр.
Wewnątrz
x4
1
3
4
2
B6x16mm
P2
11
800x2000
P
4
Upp
Up
Oben
Haut
Верх
Do góry
Insida
Inside
Innenseite
Intérieur
Внутр.
Wewnątrz
Utsida
Outside
Außenseite
Extérieur
Наруж.
Na zewnątrz
OBS!
NOTE!
ACHTUNG!
ATTENTION !
Внимание!
UWAGA!
Upp
Up
Oben
Haut
Верх
Do góry
Ner
Down
Unten
Bas
Низ
Na dół
Kant I kant
Flush fit
Kantenbündig
Bord à bord
Край к краю.
Wyrównać
Upp/insida
Up/inside
Oben/innen
Haut/intérieur
Верх внутренняя/
сторона
Do góry Wewnątrz/
Insida
Inside
Innenseite
Intérieur
Внутр.
Wewnątrz
Utsida
Outside
Außenseite
Extérieur
Наруж.
Na zewnątrz
12
x1
33x21x3mm
P
4
Styrning
Locking plate
Sicherungsscheibe
Rondelle de blocage
Направление
Płytka blokująca
Utsida
Outside
Außenseite
Extérieur
Наруж.
Na zewnątrz
Insida
Inside
Innenseite
Intérieur
Внутр.
Wewnątrz
x4
13
70mm
P
4
Insida
Inside
Innenseite
Intérieur
Внутр.
Wewnątrz
Utsida
Outside
Außenseite
Extérieur
Наруж.
Na zewnątrz

x4
1
3
4
2
B6x16mm
P2
14
800x2000
P
5
Ner
Down
Unten
Bas
Низ
Na dół
Utsida
Outside
Außenseite
Extérieur
Наруж.
Na zewnątrz
Insida
Inside
Innenseite
Intérieur
Внутр.
Wewnątrz
OBS!
NOTE!
ACHTUNG!
ATTENTION !
Внимание!
UWAGA!
Upp
Up
Oben
Haut
Верх
Do góry
Kant I kant
Flush fit
Kantenbündig
Bord à bord
Край к краю.
Wyrównać
Upp/insida
Up/inside
Oben/innen
Haut/intérieur
Верх внутренняя/
сторона
Do góry Wewnątrz/
Insida
Inside
Innenseite
Intérieur
Внутр.
Wewnątrz
Utsida
Outside
Außenseite
Extérieur
Наруж.
Na zewnątrz
Ner
Down
Unten
Bas
Низ
Na dół

15
x1
33x21x3mm
P
5
Styrning
Locking plate
Sicherungsscheibe
Rondelle de blocage
Направление
Płytka blokująca
Utsida
Outside
Außenseite
Extérieur
Наруж.
Na zewnątrz
Insida
Inside
Innenseite
Intérieur
Внутр.
Wewnątrz

x4
16
70mm
P
5
Insida
Inside
Innenseite
Intérieur
Внутр.
Wewnątrz
Utsida
Outside
Außenseite
Extérieur
Наруж.
Na zewnątrz

17
Dörren levereras högerhängd. För att göra om
dörren till vänsterhängd gör enligt bilderna på
följande två sidor. Ska dörren vara högerhängd gå
direkt till bild 1 .9
The door is supplied with hinges on the right-hand
side. To move the hinges to the left-hand side,
follow the pictograph instructions on the next two
pages. If you are fitting a door with hinges on the
right-hand side, go directly to figure 1 .9
Tür bei Lieferung mit Rechtsanschlag. Für Umbau
der Tür auf Linksanschlag siehe Abbildungen auf
den nachfolgenden Seiten. Wird Rechtsanschlag
gewünscht, weiter mit Abb. 1 .9
1
2
A
C
C
3
C
Ø 2.8
4
5
La porte est livrée suspendue à droite. Pour modifier la porte et
la rendre suspendue à gauche, procéder comme indiqué sur les
images des deux pages suivantes. Si la porte doit être
suspendue à droite, passer directement à l'image 19.
Дверь поставляется с петлями с правой стороны. Чтобы
дверь открывалась на петлях с левой стороны, выполните
действия на следующих двух страницах. Если дверь
открывается на петлях с правой стороны, перейдите к
иллюстрации .19
Drzwi dostarczane są z zawiasami z prawej strony. Aby
przesunąć zawiasy na lewą stroną należy postępować zgodnie z
rysunkami na następnej stronie. Jeśli montowane są drzwi z
zawiasami z prawej strony to należy przejść do rysunku .19

18
9
10
B
C
7
8
B
B
A
25x18x7mm
C
6
11
Glas
Glass
Glas
Verre
Стекло
Szkło
Insida
Inside
Innenseite
Intérieur
Внутр.
Wewnątrz

x4
B6x16mm
19
1
4
3
2
6
D
OBS! Det är viktigt att väggarna är i jämnhöjd I hörnen.
IMPORTANT! The walls must be perfectly level where they meet at the
corners.
ACHTUNG! Die Wände müssen an den Ecken auf gleicher Höhe liegen.
ATTENTION ! Il est important que les cloisons soient au même niveau
dans les angles.
Внимание! Важно, чтобы стенки были на одинаковой высоте в углу.
WAŻNE! Ścianki w narożniku musza być dokładnie na tym samym
poziomie.
OBS!
NOTE!
ACHTUNG!
ATTENTION !
Внимание!
UWAGA!
Tryck
Press
Drücken
Presser
Прижмите
Docisnąć
Tryck ihop väggarna när de skruvas samman.
Push the walls together while they are being
screwed together.
Wände beim Zusammenschrauben
zusammendrücken.
Pour visser les cloisons, les maintenir
fermement assemblées.
Прижимайте стенки одну к другой, когда
будете соединять их винтами.
Podczas skręcania ścianek należy je ze sobą
trzymać dokładnie połączone.

x4
B6x16mm
20
1
4
3
2
6
D
OBS! Det är viktigt att väggarna är i jämnhöjd I hörnen.
IMPORTANT! The walls must be perfectly level where they meet at the
corners.
ACHTUNG! Die Wände müssen an den Ecken auf gleicher Höhe liegen.
ATTENTION ! Il est important que les cloisons soient au même niveau
dans les angles.
Внимание! Важно, чтобы стенки были на одинаковой высоте в углу.
WAŻNE! Ścianki w narożniku musza być dokładnie na tym samym
poziomie.
Tryck
Press
Drücken
Presser
Прижмите
Docisnąć
OBS!
NOTE!
ACHTUNG!
ATTENTION !
Внимание!
UWAGA!
Tryck ihop väggarna när de skruvas samman.
Push the walls together while they are being
screwed together.
Wände beim Zusammenschrauben
zusammendrücken.
Pour visser les cloisons, les maintenir
fermement assemblées.
Прижимайте стенки одну к другой, когда
будете соединять их винтами.
Podczas skręcania ścianek należy je ze sobą
trzymać dokładnie połączone.

21
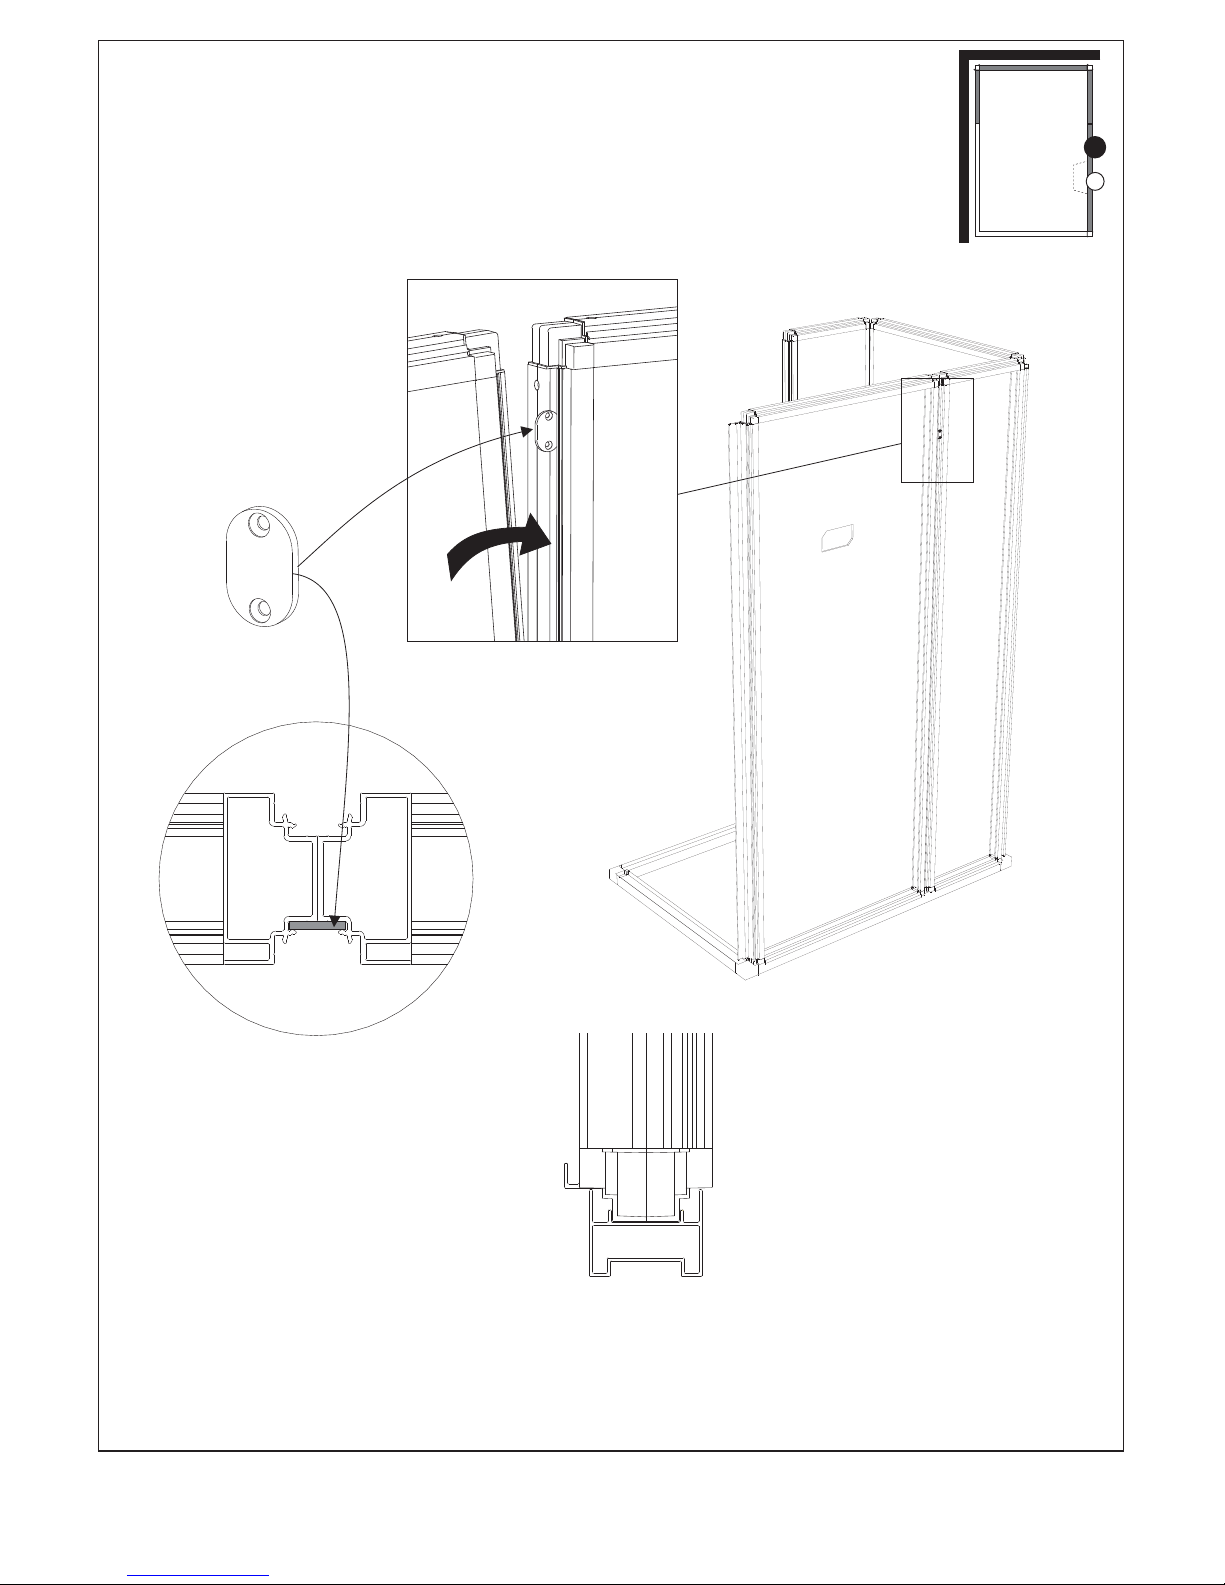
2x792mm
2x1170mm
9x6mm
P6
Självhäftande
Self-adhesive
Selbstklebend
Autocollant
Самоприклеивающиеся
Samoprzylepne
Insida
Inside
Innenseite
Intérieur
Внутр.
Wewnątrz
Utsida
Outside
Außenseite
Extérieur
Наруж.
Na zewnątrz

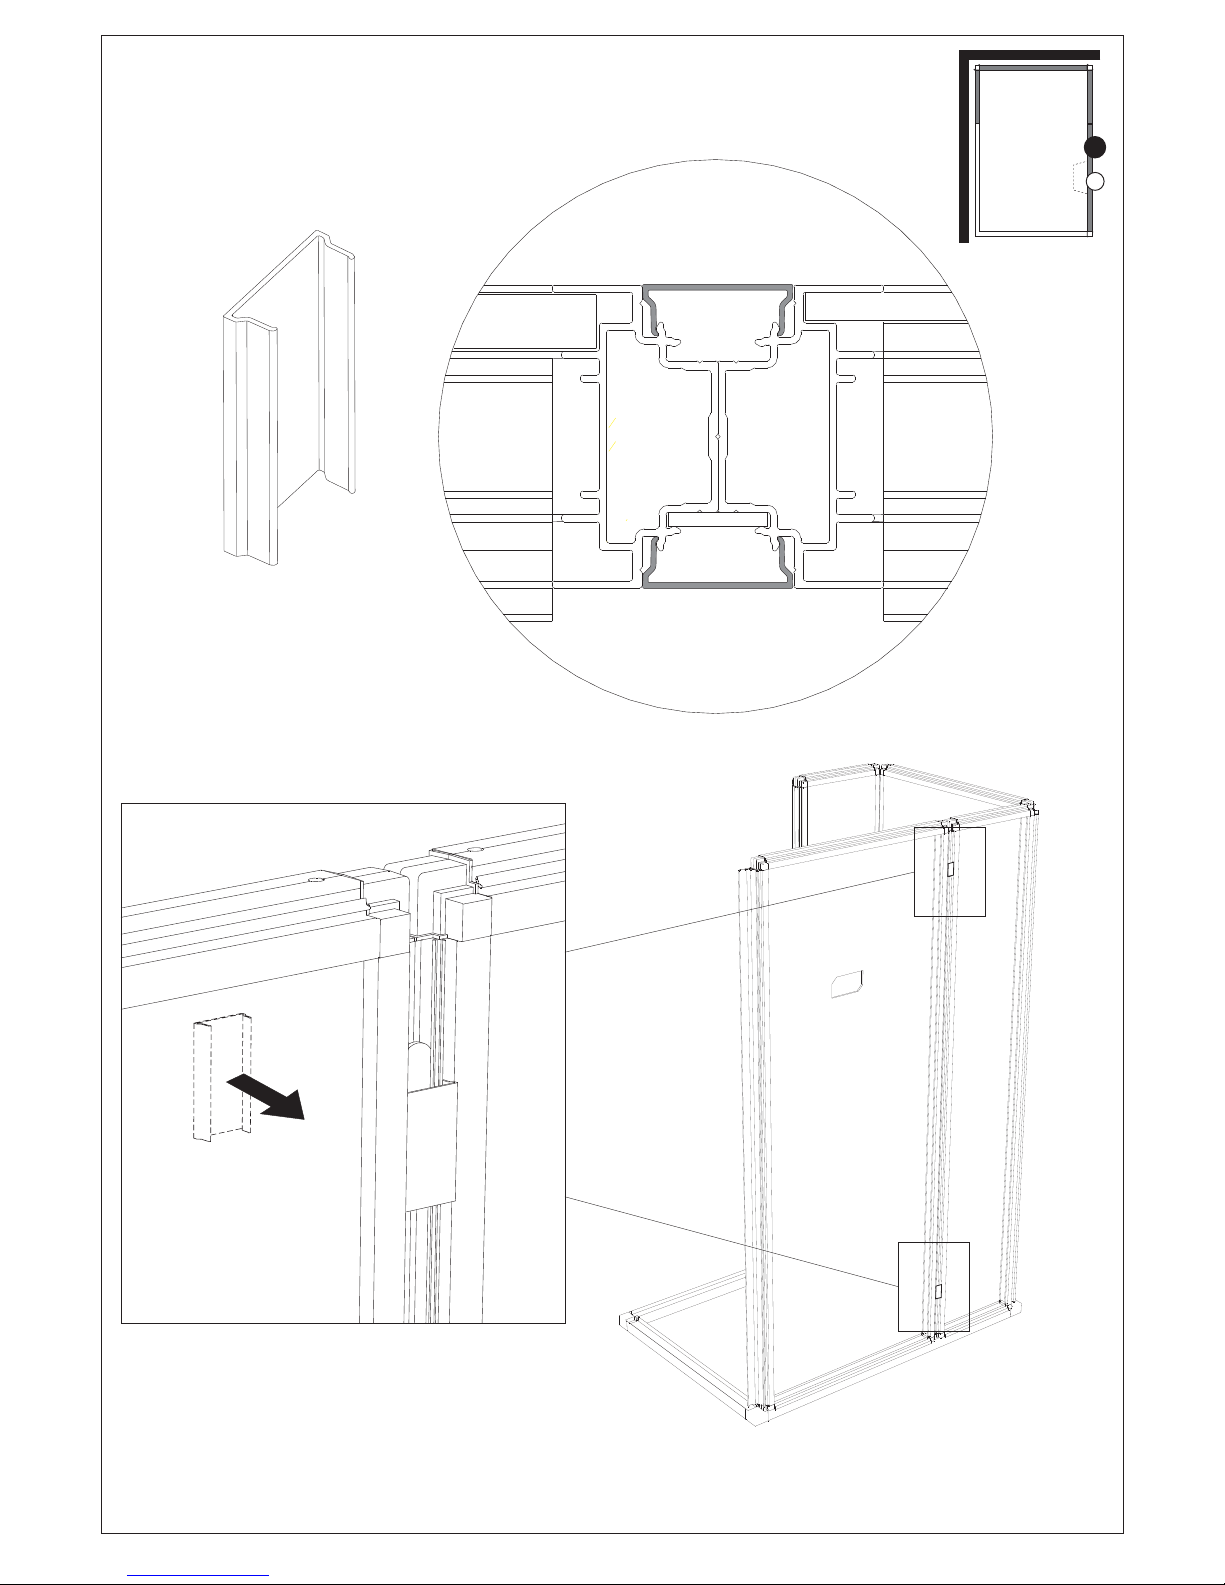
22
x10
33x21x3mm
Styrning
Locking plate
Sicherungsscheibe
Rondelle de blocage
Направление
Płytka blokująca
Insida
Inside
Innenseite
Intérieur
Внутр.
Wewnątrz
Utsida
Outside
Außenseite
Extérieur
Наруж.
Na zewnątrz

23
Duschpelare
Shower column
Duschsäule
Colonne de douche
Стойка душа
Kolumna prysznica
Takdusch
Ceiling shower
Deckendusche
Douche de plafond
Душвпотолке
Deszczownica
Ta k
Ceiling
Decke
Plafond
Потолок
Sufit

24
x8
70mm
Ta k
Ceiling
Decke
Plafond
Потолок
Sufit
Vägg
Wall
Wand
Cloison
Стенка
Ścianka

25
1968mm
P5
Baksidan av rummet
Back of the room
Rückseite der Kabine
Face arrière de la cabine
Задняя часть комнаты
Tył kabiny

768mm
1168mm
26
27
P5
P5
Baksidan av rummet
Back of the room
Rückseite der Kabine
Face arrière de la cabine
Задняя часть комнаты
Tył kabiny
Baksidan av rummet
Back of the room
Rückseite der Kabine
Face arrière de la cabine
Задняя часть комнаты
Tył kabiny

28
1968mm
P5

1168mm
29
P5

30
~10mm
SILICONE
x4
29mm
26mm
Insida
Inside
Innenseite
Intérieur
Внутр.
Wewnątrz
Insida
Inside
Innenseite
Intérieur
Внутр.
Wewnątrz

1968mmx2
31
P5
W

W
32
14.5x5mm
SILICONE
~15mm
Sätt i listen upp mot taket och klipp av den nertill
enligt bild längst ned på sidan. Punkttryck på
listen för att fästa den i spåret. Listen får inte
tänjas ut.
Press the sealing strip into place against the
ceiling and cut it to length at the bottom as
shown at the foot of this page. Press the full
length of the strip into place in the groove. Take
care not to stretch the strip.
Leiste an der Decke ansetzen und wie unten
abgebildet an der Unterseite abschneiden.
Leiste schrittweise in die Nut eindrücken. Die
Leiste darf nicht gedehnt werden.
Poser le profilé de joint contre le plafond et le
couper en bas conformément à l'image tout en
bas de la page. Presser sur le joint avec le
pouce pour le mettre en place dans la gorge.
S'assurer que le joint ne s'allonge pas.
Установите рейку к потолку и срежьте её
внизу, как это показано на рисунке внизу
страницы. Прижмите рейку в нескольких
местах, чтобы она была зафиксирована в
пазе. Рейка не должна выгибаться наружу.
Wcisnąć listwę uszczelniającą na miejsce
opierając o sufit i dociąć na dole jak pokazano
na rysunku poniżej. Wcisnąć całą długość listwy
na miejsce. Uważać, aby nie rozciągnąć listwy.
Décoller un morceau de joint en haut et en bas. Si le
joint n'entre pas dans la gorge tout en haut, en couper
un petit morceau selon l'illustration. Poser un petit
cordon de silicone et remettre en place le joint.
Снимите рейку немного вверху и внизу. Если рейка
не входит в паз вверху к потолку, срежьте немного,
как показано на рисунке. Нанесите полоску
силиконового клея и прижмите рейку опять.
Unieść listwę uszczelniającą na małej na małej
długości na dole i na górze. Jeśli górna część listwy
nie pasuje do szczeliny należy odciąć mały kawałek
wg wskazówek na rysunku. W szczelinę nałożyć
silikon i wcisnąć listwę uszczelniającą na miejsce.
Ta bort listen en liten bit både uppe och nere. Om
listen ej går in i spåret längst upp mot taket så klipp
bort lite av listen enligt bild. Sätt dit en liten
siliconsträng och tryck dit listen igen.
Lift away a small section of the sealing strip at the
top and bottom. If the top of the strip does not fit
exactly in the groove, cut off a small piece as shown.
Apply a string of silicone in the groove and press the
sealing strip back into position.
Leiste am oberen und unteren Ende aus der Nut
lösen. Falls sich die Leiste am oberen Ende nicht in
die Nut eindrücken lässt, schneiden Sie ein Stück ab
(siehe Abb.). Einen kleinen Strang Silikon auftragen
und Leiste wieder andrücken.
~3-5mm
SILICONE

33
28x7mm
x1
Insida
Inside
Innenseite
Intérieur
Внутр.
Wewnątrz
Utsida
Outside
Außenseite
Extérieur
Наруж.
Na zewnątrz

x2
B8x16mm
1
2
5mm
34
Ø 3.3
Skruva först in de båda skruvarna så att
de bottnar. Skruva sedan ut dem 5 mm.
First screw the two screws all the way in.
Then unscrew them 5 mm.
Beide Schrauben bis zum Anschlag
einschrauben. Anschließend wieder 5 mm
herausschrauben.
Visser d'abord à fond les deux vis. Les
dévisser ensuite de 5 mm.
Ввинтите вначале оба винта до упора.
Затем вывинтите их на 5 мм.
Wkręcić do końca dwie śruby. Następnie
wykręcić je 5 mm.
Borra genom plastskivan (x3)
Drill through the plastic sheet (x3)
Loch in Kunststoffscheibe bohren (x3)
Percer le panneau en plastique (x3)
Просверлите через пластмассовую пластину (х3)
Przewiercić przez płytę wykonaną z tworzywa (x3)

35
Vrid skruven medsols för att lossa
på locket.
Turn the screw clockwise to
release the cover.
Zum Lösen der Abdeckung
Schraube im Uhrzeigersinn drehen.
Visser la vis dans le sens horaire
pour débloquer le couvercle.
Поверните винт по часовой
стрелке, чтобы освободить
крышку.
Obrócić śrubę w lewo w celu
demontażu pokrywy.
Hur man lossar på locket.
How to remove the cover
Lösen der Abdeckung.
Comment démonter le couvercle.
Как снимать крышку.
Sposób demontażu pokrywy

36
1
2
3
4
5
1
2
3
4
5
Koppla loss elkopplingen och de fem
snabbkopplingarna för vatten, (2xblå, röd, grön och
svart). Lägg sedan locket åt sidan.
Disconnect the power supply and the five quickconnect fittings for water (2xblue, red, green and
black). Now the cover can be removed.
Elektroanschluss und die fünf Schnellverschlüsse
für Wasser (2 x blau, rot, grün und schwarz) lösen.
Abdeckung beiseitelegen.
Débrancher le raccordement électrique et les cinq
raccords rapides du branchement d'eau, (2 x bleu,
rouge, vert et noir). Mettre ensuite de côté le
couvercle.
Отсоедините электрический контакт, и пять
штуцеров подключения воды (2 синих, красный,
зелёный и чёрный). Положите крышку в сторону.
Odłączyć kostkę zasilnia elektrycznego i pięć
szybkozłączek hydraulicznych (2 niebieskie, 1
czerwoną, 1 zieloną i 1 brązową). Teraz można
zdjąć pokrywę.

1
2
x1
B6x16mm
37
38
För in en skruvmejsel under pelaren så att den
ligger tryckt mot taket. Skruva sedan fast
pelaren nedtill.
Insert a screwdriver under the shower column
to leverage it up towards the ceiling of the
cabinet. Then secure the column with a screw
at the base.
Einen Schraubenziehen unter die Säule
einstecken, so dass sie an der Decke anliegt.
Anschließend Säule im unteren Bereich
festschrauben.
Coincer un tournevis sous la colonne pour que
celle-ci soit plaquée contre le plafond. Fixer
ensuite la vis en bas de la colonne.
Введите отвёртку под стойку, чтобы она
прижимала к потолку. Привинтите затем
стойку внизу.
Umieścić śrubokręt pod kolumną prysznicową,
aby podnieść ją do sufitu kabiny. Następnie
przymocować kolumnę wkrętem w dolnej
części kolumny.

~1700mm
~500mm
39
Koppla in el och vatten, anlita behöriga fackmän.
Use a qualified professional to connect to power and water supplies.
Elektro- und Wasseranschluss wieder herstellen (Fachmann beauftragen).
Raccorder l'électricité et l'eau, faire appel à un professionnel agréé.
Подсоедините электричество и воду, работы должен выполнять специалист электрик.
Podłączenie zasilania elektrycznego oraz instalacja hydrauliczna powinny być
wykonywane przez wykwalifikowanych specjalistów.
Belysning
Lighting
Beleuchtung
Éclairage
Освещение
Oświetlenie
Elanslutning
Power supply
Elektroanschluss
Raccordement électrique
Электрическое подключение
Zasilanie elektryczne
Vattenanslutning (kallt/varmt)
Water connection (cold/hot)
Wasseranschluss (kalt/warm)
Raccordement de l'eau
(froid/chaud)
Подключение воды
(холодная/горячая)
Przyłącze wody (zimna/ciepła)
Varmvatten – röd
Hot water – red
Warmwasser – rot
Eau chaude – rouge
Горячая вода - красный
Ciepła woda - czerwony
Kallvatten – blå
Cold water – blue
Kaltwasser – blau
Eau froide – bleu
Холодная вода - синий
Zimna woda - niebieski
Takdusch – svart
Ceiling shower – black
Deckendusche – schwarz
Douche de plafond – noir
Душ в потолке - чёрный
Deszczownica – czarny

40
+
-
NB B
200-240V~
+
-
+
-
+
-
+
-
Spotlights
Spots
Прожекторы
Punkty oświetleniowe
LED Trafo
LED transformer
LED, transformateur
Светодиод
Transformator LED
Duschpelare
Shower column
Duschsäule
Colonne de douche
Стойка душа
Kolumna prysznica
Belysning
Lighting
Beleuchtung
Éclairage
Освещение
Oświetlenie
+
-
LED Trafo
LED transformer
LED, transformateur
Светодиод
Transformator LED
Spotlights
Spots
Прожекторы
Punkty oświetleniowe
Röd
Red
Rot
Rouge
Красный
Czerwony
Svart
Black
Schwarz
Noir
Чёрный
Czarny
+
-
-
+
-
+
-
+
-
+

Ø 4
1
2
3
41
Vänster
Left
Links
Gauche
Левый
Lewy
Höger
Right
Rechts
Droite
Правый
Prawy
Borrfixtur för hyllplanen
Template for drilling holes for shelves
Bohrschablone für Ablagen
Gabarit de perçage pour la fixation des
étagères
Крепление сверла для полок
Szablon do wiercenia otworów do
zamocowania uchwytów półek
Hyllorna kan monteras på
varsin sida av pelaren eller
på samma sida.
The shelves can either be
fitted on the same or
opposite sides of the
column.
Die Ablagen können an
beiden Seiten oder an
einer Seite der Säule
angebracht werden.
Les étagères peuvent être
montées de part et d'autre
de la colonne ou du même
côté.
Полки должны
монтироваться с каждой
стороны стойки или с
одной и той же стороны.
Półki można zamontować
po jednej lub po
przeciwległych stronach
kolumny.

Montera impression sauna-rummet
Build the impresson sauna room
Teraz należy zmontować kabinę sauny Impression
i1309/i1313/i1317
Assembly
Instruction
Impression
Sauna
42

x24
B6x9.5mm
x4
510mm
P7
43
OBS! NOTE! ACHTUNG! ATTENTION ! Внимание! UWAGA!
5.5
Kant i kant
Flush fit
Kantenbündig
Bord à bord
Край к краю.
Wyrównać

Flytta rumme på plats där de ska stå.n
Move the cabinet into place.s
Przesunąć kabiny w docelowe miejsce
montażu.
Tänk på el och vatten!
Don’t forget electricity and water!
Należy pamiętać o podłączeniu do prądu i
instalacji wodnej!
i1309/i1313/i1317
44
h1 - exempel på placeringar
h1 - example of positions
Panel h1 – przykładowe miejsca montażu
Tänk på var
manöverpanelen h1
ska placeras innan
resten av rummen
monteras ihop.
Think of where panel
h1 should be placed
before the rest of the
rooms are assembled.
Przed zakończeniem
montażu kabin należy
ustalić miejsce
montażu panelu
sterującego h1.
Max 900mm

45
P3
3
1
2
i1309/i1313/i1317
Medföljer saunarummet
Included with the sauna room
W komplecie z kabiną sauny
Upp
Up
Oben
Haut
Верх
Do góry
Banka med handen i hörnet på hörnprofilerna för att fästa dem.
Tap the corner of the corner profiles with your hand to fix them securely in place.
Eckprofile durch Schlagen mit der Handfläche auf die Profilecke befestigen.
Frapper de la main dans l'angle des profilés d'angle pour les mettre en place.
Прибейте угловые рейки в углу рукой, чтобы они были зафиксированы.
Uderzając dłonią w róg profilu zamontować dekoracyjny profil narożny zgodnie z
rysunkiem.

46
i1309/i1313/i1317

x1
2048mm
P8
47
Upp
Up
Oben
Haut
Верх
Do góry

768mm
P4
i1309/i1313/i1317
i1309 - 768mm
i1313 - 1168mm
i1317 - 1568mm
48

1168mm
P4
49
TIPS! För bästa resultat polera
frontprofilerna med bilvax.
NOTE! For a superior result
polish the front profiles with car
wax.
Tipp! Für optimales Ergebnis die
Frontprofile mit Autowachs
polieren.
CONSEIL ! Pour obtenir le
meilleur résultat, polir les profilés
frontaux avec du polish pour
automobile.
Совет! Для достижения
оптимального результата,
отшлифуйте передние рейки
автомобильным воском.
UWAGA! W celu uzyskania
najlepszego efektu wizualnego
profile dekoracyjne można
wypolerować woskiem do
polerowania samochodów.

50
Lossa skruven längst ned på pelaren.
Dra ut pelaren nedtill för att komma åt
bakom längs med golvet.
Release the screw at the base of the
column. Carefully ease the base of
the column away from the wall to gain
access to the area behind the column
along the floor.
Schraube unten an der Säule lösen.
Säule unten etwas herausziehen, um
an die Bodenkante hinter der Säule
heranzukommen.
Dévisser la vis tout en bas de la
colonne. Tirer sur le bas de la
colonne pour accéder à la face
derrière, le long du sol.
Освободите винты внизу на стойке.
Вытяните стойку вниз, чтобы
открылся доступ к пространству
сзади на уровне пола.
Odkręcić śrubę w dolnej części
kolumny. Ostrożnie zdemontować
kolumnę ze ściany, aby uzyskać
dostęp za kolumną, przy podłodze.

51
52
SILICONE
SILICONE
SILICONE
Lägg en sträng silicon runt om på golvet I duschrummet.
Apply a string of silicone all the way around the floor frame on the inside of the shower area.
Entlang des Bodenrahmens rundum einen Strang Silikon auftragen.
Poser un cordon de silicone autour du sol de la cabine de douche.
Нанесите полоску силиконового клея вокруг на полу душевой кабины.
Nałożyć silikon wokół całej ramy podłogowej w kabinie prysznicowej.
Skruva fast pelaren.
Screw the column back into place.
Säule wieder festschrauben.
Visser en place la colonne.
Закрепите стойку винтами.
Przykręcić kolumnę z powrotem na
miejsce.
För in en skruvmejsel under pelaren så att den ligger
tryckt mot taket. Skruva sedan fast pelaren nedtill.
Insert a screwdriver under the shower column to leverage
it up towards the ceiling of the cabinet. Then secure the
column with a screw at the base.
Einen Schraubenziehen unter die Säule einstecken, so
dass sie an der Decke anliegt. Anschließend Säule im
unteren Bereich festschrauben.
Coincer un tournevis sous la colonne pour que celle-ci
soit plaquée contre le plafond. Fixer ensuite la vis en bas
de la colonne.
Введите отвёртку под стойку, чтобы она прижимала к
потолку. Привинтите затем стойку внизу.
Umieścić śrubokręt pod kolumną prysznicową, aby
podnieść ją do sufitu kabiny. Następnie przymocować
kolumnę wkrętem w dolnej części kolumny.

53
Ø 3.3 (x3)
Ø 9.5 (x2)
Hål för ventilation.
Holes for ventilation.
Öffnung für Ventilation.
Trous de ventilation.
Проделайте отверстие
для вентиляции.
Otwory wentylacyjne.

54
x3
B6x16mm
SILICONE
Sätt en siliconklick i hålet
innan skruvarna sätts dit.
Squeeze a small bead of
silicone into the holes before
screwing in the screws.
Vor dem Einsetzen der
Schrauben einen Klick Silikon
in die Schraubenlöcher
eindrücken.
Poser un point de silicone
dans le trou avant de mettre
en place les vis.
Капните каплю
силиконового клея в
отверстие перед тем, как
ввинчивать винт.
Przed wkręceniem wkrętów
wcisnąć trochę silikonu w
otwory.
Dra åt de båda övre
skruvarna.
Tighten the two
upper screws.
Die beiden oberen
Schrauben anziehen.
Serrer les deux vis
du haut.
Затяните оба
верхних винта.
Dokręcić dwa górne
wkręty.

55
1
2
3
4
5
1
2
3
4
5
Koppla samman elkopplingen och de fem snabbkopplingarna för
vatten, (2xblå, röd, grön och svart).
Connect the power supply and the five quick-connect fittings for water
(2xblue, red, green and black).
Elektroanschluss und die fünf Schnellverschlüsse für Wasser (2 x
blau, rot, grün und schwarz) herstellen.
Rebrancher le raccordement électrique et les cinq raccords rapides du
branchement d'eau, (2 x bleu, rouge, vert et noir).
Соедините электрический контакт, и пять штуцеров подключения
воды (2 синих, красный, зелёный и чёрный).
Podłączyć kostkę zasilania elektrycznego i pięć szybkozłączek
hydraulicznych (2 niebieskie, 1 czerwona, 1 zielona i 1 zarny).c
Svart
Black
Schwarz
Noir
Чёрный
Czarny
Röd
Red
Rot
Rouge
Красный
Czerwony
Blå
Blue
Blau
Bleu
Синий
Niebieski
Blå
Blue
Blau
Bleu
Синий
Niebieski
Grön
Green
Grün
Vert
Зелёный
Zielony

56
Kontrollera eventuella läckage innan lock sätts på. Ställ
vred enligt bild och tillför vattentryck.
Check for any leaks before fitting the cover. Set the knob as
shown and open up the water supply.
Vor Anbringen der Abdeckung auf eventuelle Leckage
prüfen. Drehknopf wie abgebildet einstellen und
Wasserdruck herstellen.
Avant de poser le couvercle, s'assurer qu'il n'y a pas de
fuite. Placer la manette selon l'image et mettre la pression
d'eau.
Перед тем, как установить на место крышку, проверьте,
чтобы не было течи. Поверните рукоятку как показано
на рисунке, чтобы открыть подачу воды.
Przed zamontowaniem pokrywy sprawdzić czy nie ma
wycieków. Ustawić pokrętło jak pokazano i odkręcić dopływ
wody.
Se till att skruven längst ned på pelaren är utskruvad. Tryck
sedan fast locket på pelaren. Skruva dit kupolmuttern längst
upp.
Make sure that the screw at the base of the column has
been removed. Then press the cover in place on the
column. Screw the domed nut at the top into place as
shown below.
Achten Sie darauf, dass die Schrauben unten an der Säule
herausgeschraubt sind. Anschließend Abdeckung an der
Säule andrücken. Hutmutter im oberen Bereich anbringen.
S'assurer que la vis tout en bas de la colonne est dévissée.
Poser ensuite le couvercle sur la colonne. Mettre en place
l'écrou à chapeau tout en haut.
Убедитесь в том, что винт внизу на стойке вывинчен.
Прижмите затем крышку на стойку. Ввинтите
куполообразную гайку вверху.
Upewnić się, że śruba w dolnej części kolumny kolumny
została wykręcona. Następnie zamontować pokrywę
kolumny. Wkręcić nakrętkę kulistą na górze kolumny na
miejsce, jak pokazano na rysunku poniżej.
Av
Off
Aus
Wyłącz

E
S
S
E
N
C
E
57
Montera slang, handstril och hyllor.
Fit the hose, hand shower and shelves.
Schlauch, Brause und Ablagen montieren.
Monter le tuyau, la pomme de douche et les étagères.
Смонтируйте шланг, распылитель и полки.
Zamontować wąż prysznicowy, słuchawkę prysznica
ręcznego i półki.

58
+
+
+
=
=
=
+=
Monteringsexempel / Examples of steam head settings
Montagebeispiel / Exemples de montage / Пример монтажа
Przykłady ustawień dyszy parowej
Doftskål
Steam fragrance reservoir
Duftschale
Coupelle pour parfum
Чашечка для эссенций
Zagłębienie na esencje zapachowe
1-3 st.
1-3 pcs.
1-3 St.
1-3 pces
1-3 шт.
1-3 szt.

Stang dorren efter avslutat bad, ventilera vid behov.
Close the door when you have finished bathing.
Ventilate if necessary.
Nach beendetem Bad Tur schliesen, bei Bedarf
luften.
Fermer la porte une fois le bain termine, aerez en
cas de besoin.
Zamknąć drzwi po zakończonej kąpieli. W razie
potrzeby wentylować.
 Loading...