

Page 1

090605
CC300, CC300T
sauna&steam
Bruksanvisning för manöverpanel CC 300/CC 300T................................... Svenska sid 2.
Läs anvisningen tillsammans med instruktionerna för bastuaggregat resp ånggenerator. Inkoppling skall utföras
av behörig el-installatör. SPARA ANVISNINGEN! Efter installation överlämnas denna till bastun/steambadets ägare
eller till den som sköter anläggningen.
Operating instructions for control panel CC 300/CC 300T....................... English page 8.
Please read this information together with the instructions supplied with the sauna heater or steam generator.
Installation work must be carried out by an authorised electrician. KEEP THIS INFORMATION IN A SAFE PLACE.
On completion of the installation work, please give these instructions to the owner or operator of the sauna/steam bath.
Gebrauchsanleitung für Kontrollgerät CC 300/CC 300T........................ Deutsch Seite 15.
Benutzen Sie diese Anleitung zusammen mit den Instruktionen für Saunaöfen und Dampfgeneratoren.
Der elektrische Anschluß ist von einem Fachmann auszuführen. ANLEITUNG AUFBEWAHREN! Nach der
Installation ist diese Anleitung dem Sauna-/Dampfbadbesitzer oder Bedienungspersonal auszuhändigen.
Instr. mode d'emploi du tableau de commande CC 300/CC 300T.........Français page 22.
Bien lire ce document ainsi que les instructions du poêle de sauna ou du générateur de vapeur. Les branchements
doivent être effectués par un électricien agréé. CONSERVER CE DOCUMENT! Après installation, le remettre au
propriétaire du sauna/hammam ou au responsable de l'entretien.
Bruksanvisning for manøversentral CC 300/CC 300T................................. Norsk side 29.
Les instruksjons- og bruksanvisningen for badstuovn og dampgenerator. Tilkobling skal utføres av autorisert
installatør. NB! TA VARE PÅ BRUKSANVISNINGEN! Etter installasjonen skal den leveres til eier av badstu/dampbad
eller til den som skal ha ansvar for driften av anlegget.
Brugsanvisning for manøvrepanel CC 300/CC 300T.................................. Dansk side 35.
Læs brugsanvisningen sammen med instruktionerne for saunaovn resp. dampbad-generator. Installation
skal foretages af autoriseret el-installatør. GEM BRUGSANVISNINGEN! Efter installation afleveres brugsanvisningen til saunaens/dampbadets ejer eller til den ansvarlige for anlægget.
Asennus- ja käyttöohjeet, käyttötaulu CC 300/CC 300T............................. Suomi sivu 41.
Lue nämä ohjeet samalla kuin saunakiukaan tai höyrygeneraattorinkin ohjeet. Asennuksen saa tehdä
vain pätevä sähköasentaja. SÄILYTÄ OHJEITA HYVIN! Anna ne asennuksen jälkeen saunan/höyrykylvyn
omistajalle tai laitteiston hoitajalle.
Art nr 29004135
1
Page 2
BRUKSANVISNING
CC 300
O
R
4 1 2 5 3
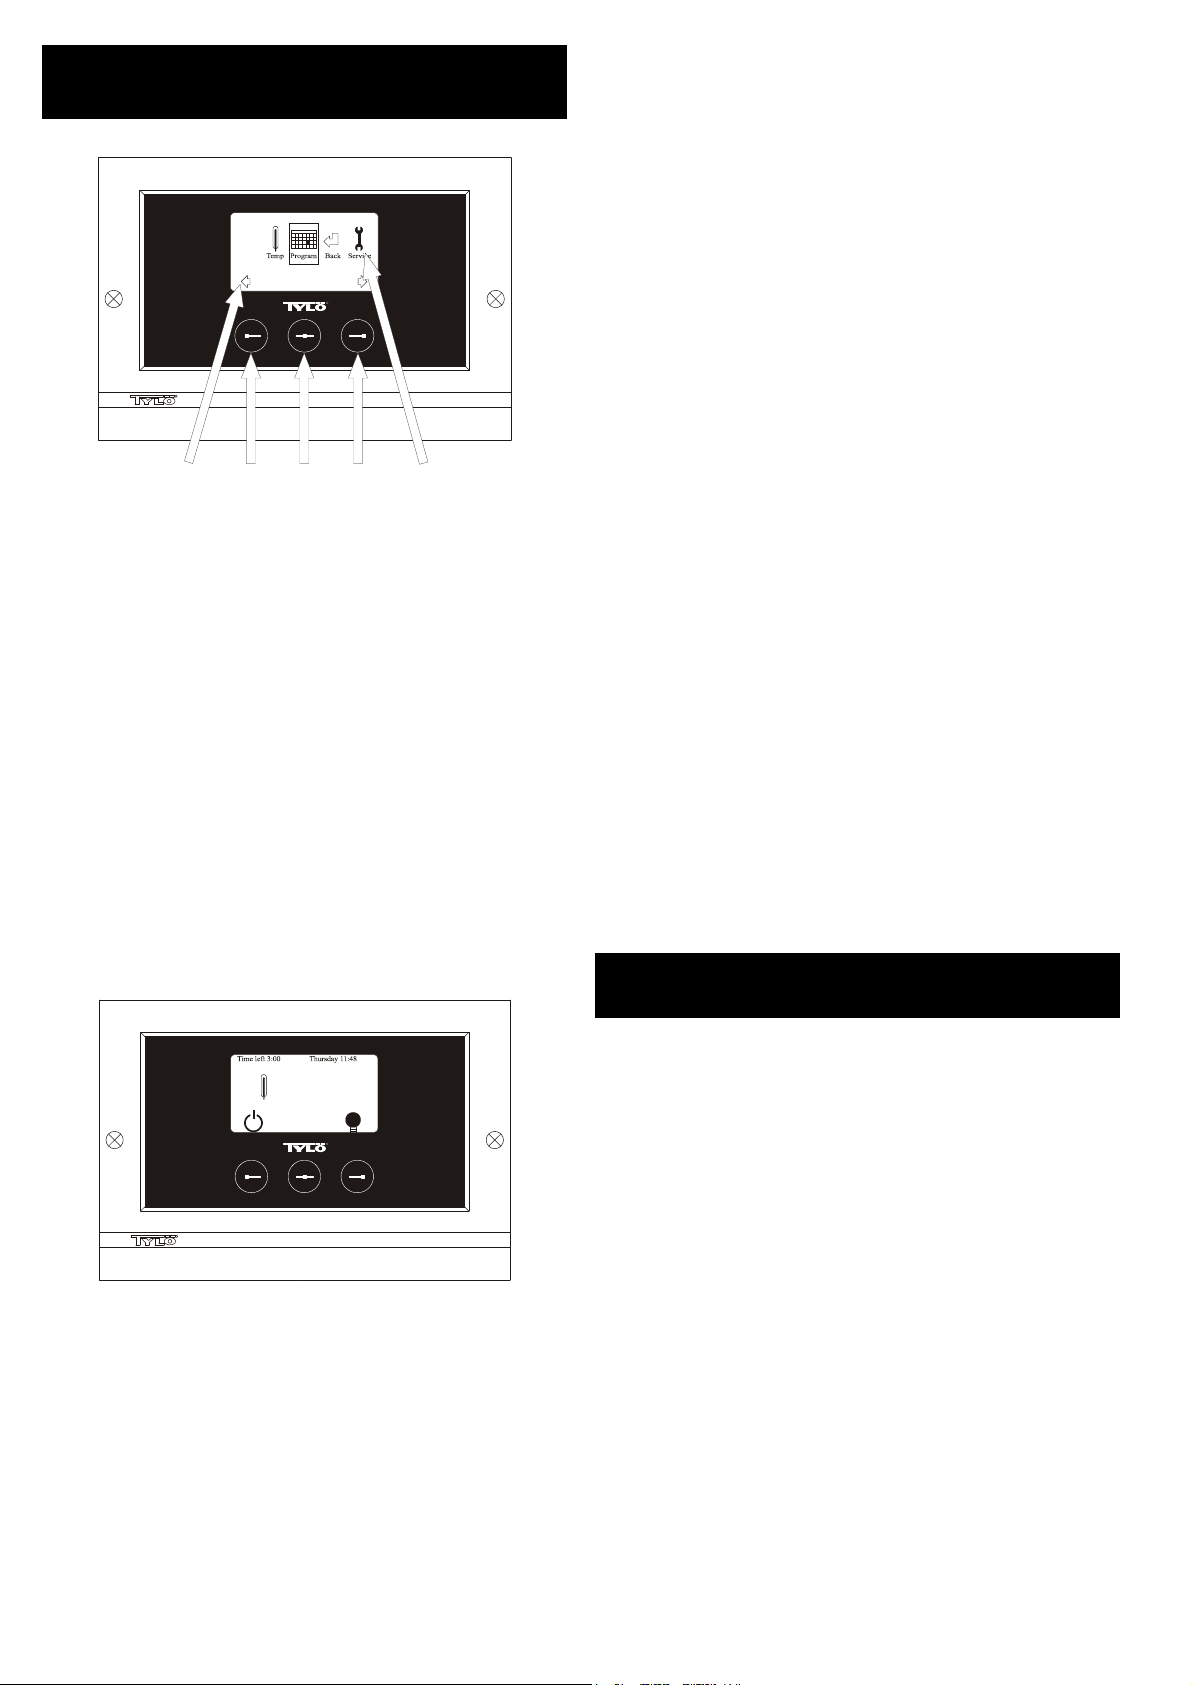
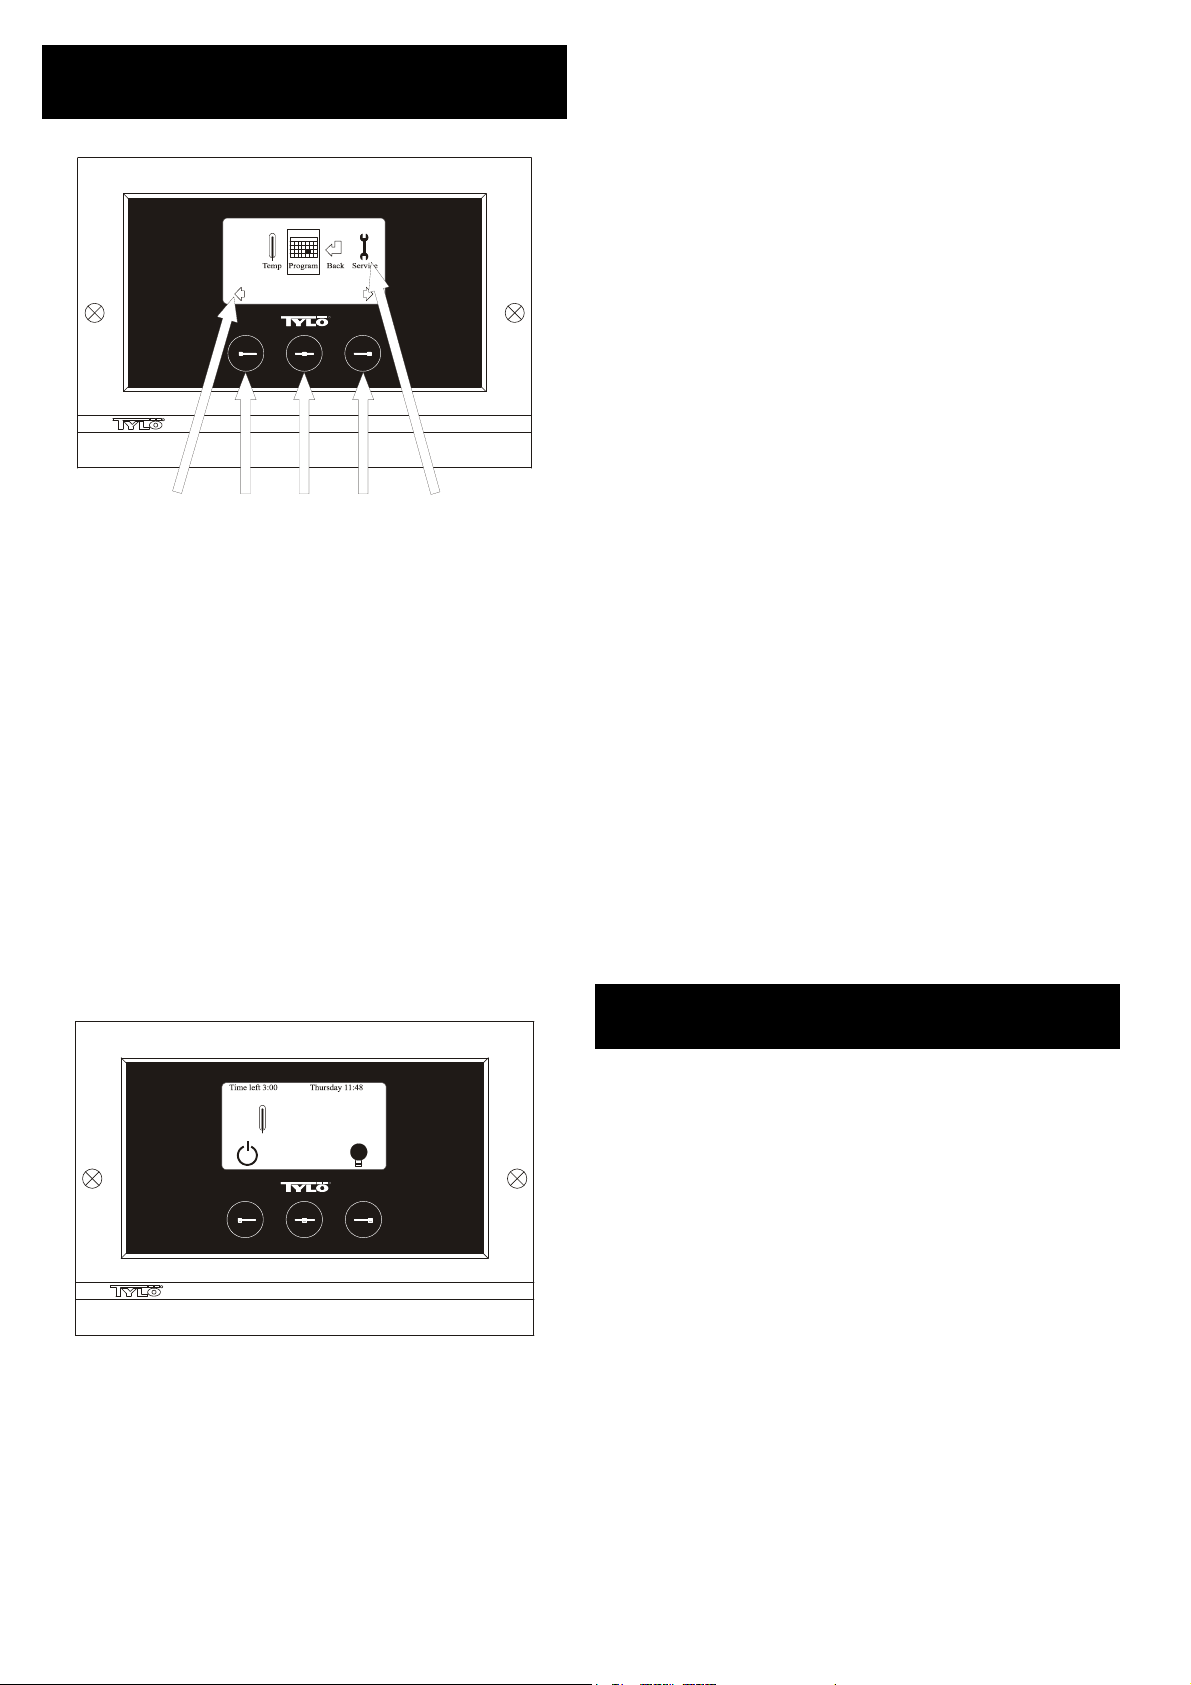
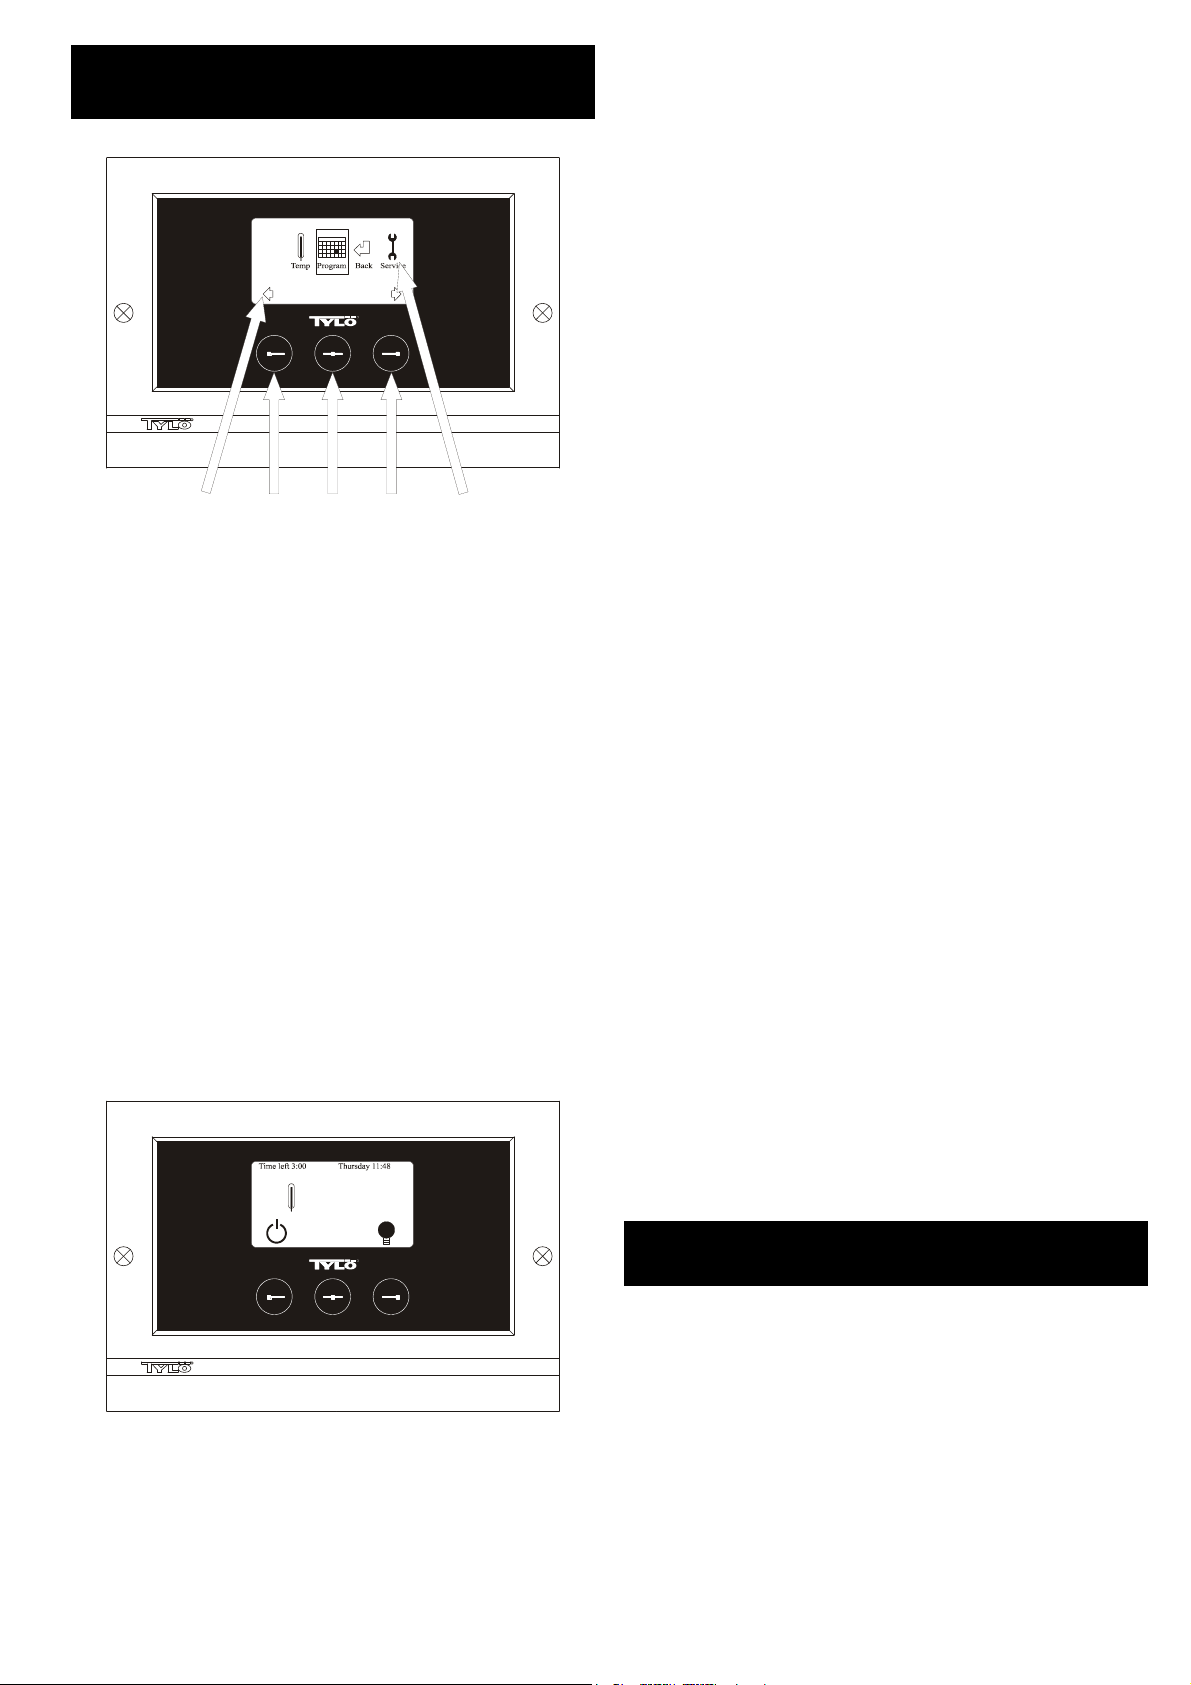
Bild 1. Menydisplay
1 = Vänsterknapp, 2 = Mittknapp, 3 = Högerknapp. 4 = Symboler/text
som motsvarar respektive knapp. 5 = Symboler/text för inställning och
visning av aktuella värden.
Knappar och display.
På manöverpanelen finns det tre knappar. Ovanför knapparna i
nederkanten på displayen visas symboler som motsvarar respektive
knapp. De ser olika ut beroende på i vilket läge panelen befinner sig i.
När pilarna syns i Menydisplayen (Bild 1) används vänster- och
högerknapp för att stega till önskad symbol. För att välja symbolen
bekräfta med mittknappen.
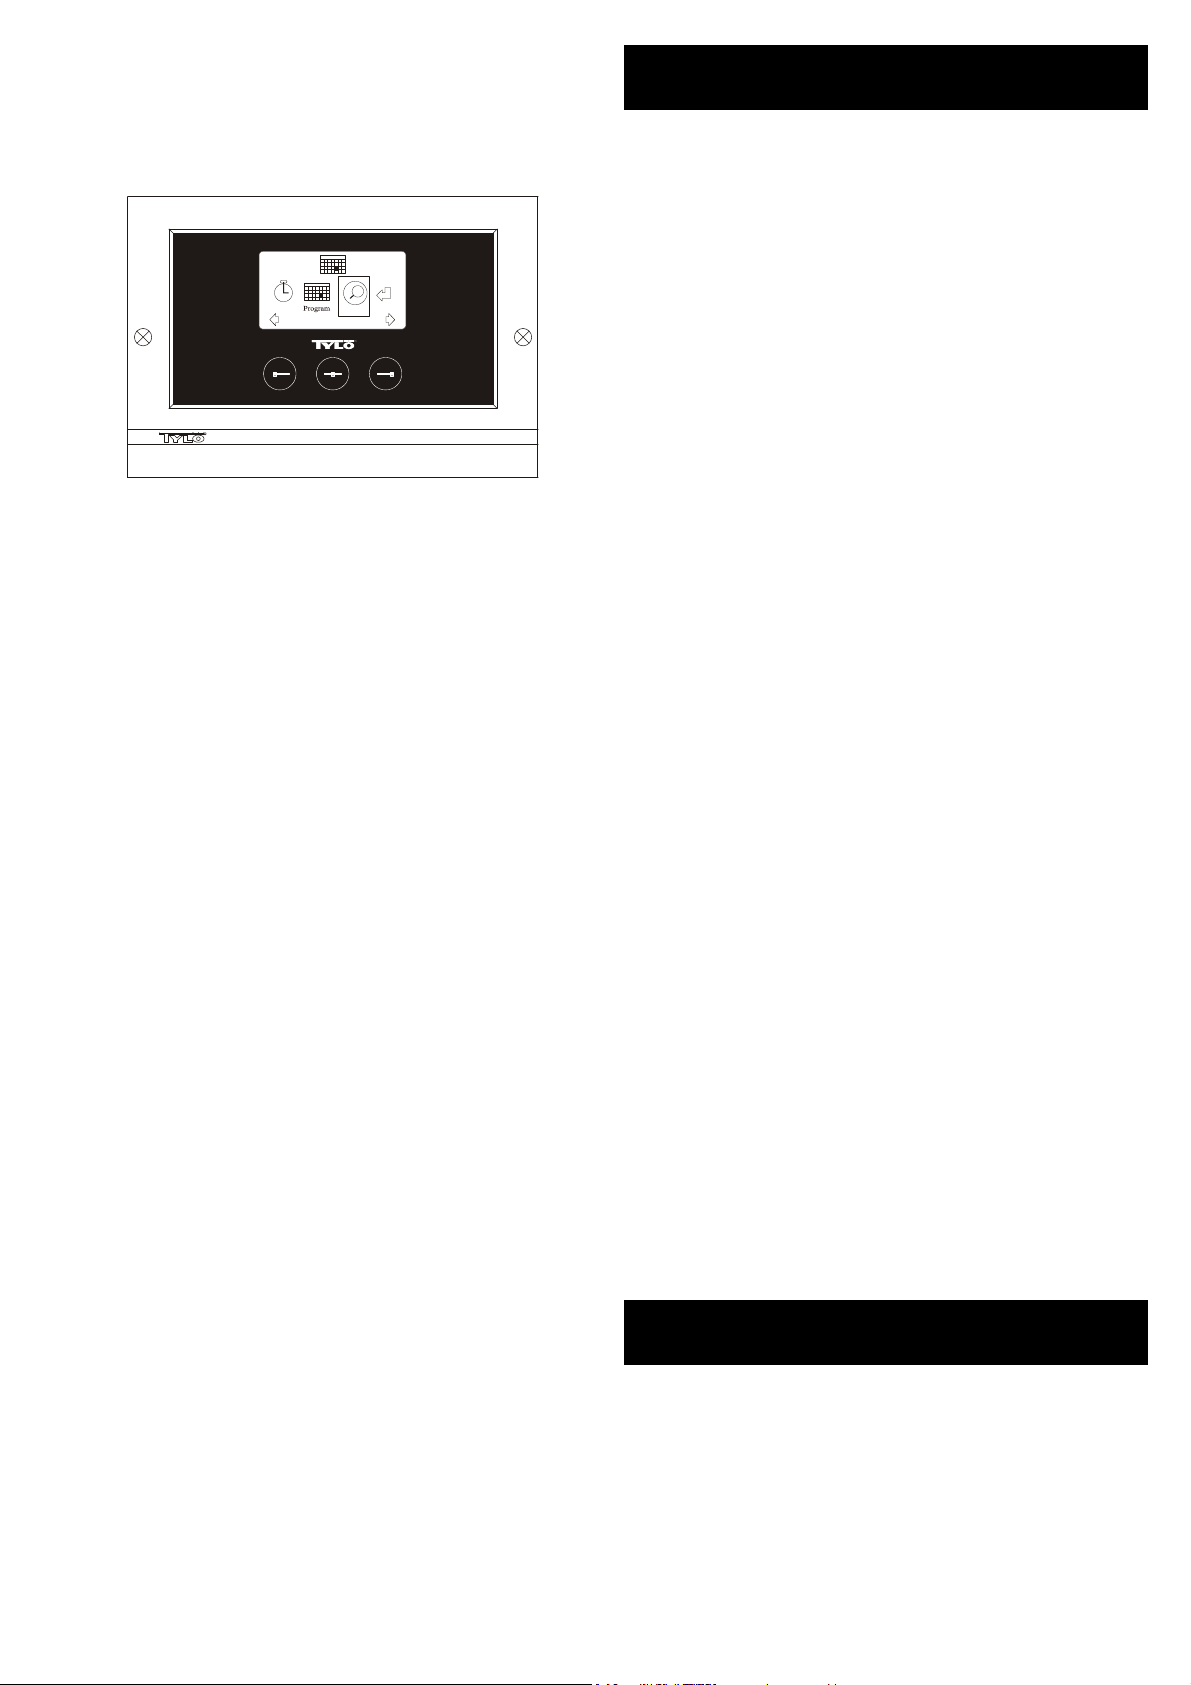
I Normaldisplayen (Bild 2) är vänsterknappens funktion ON/OFF och
dess symbol syns ovanför i displayens nederkant. När anläggningen är
igång är symbolen grön, när anläggningen är avstängd blir symbolen röd
och i standby-läge orange. Högerknappens funktion är belysning.
Lampsymbolen är gul när belysningen är på och vit när belysningen är
avstängd. Displayen visar även aktuell temperatur.
Genom att hålla in mittknappen en längre stund återgår panelen till
Normaldisplay om man befinner sig i annat läge.
När ett program är aktivt tryck vänsterknapp 2 sek för att stänga av aktivt
program.
Belysning.
Tänds automatiskt när anläggningen startar och släcks automatiskt när
anläggningen stänger av. Belysningen kan också tändas eller släckas
manuellt med tryck på högerknapp när lampsymbolen syns längst ned i
högra hörnet. Symbolen är vit när belysningen är släckt och gul när
belysningen är på.
Kodlås.
Förhindrar obehörig ändring av inställda värden.
Huvudströmbrytare.
På reläboxens, SE aggregatets och de mindre ånggeneratorernas
undersida finns en huvudströmbrytare som endast behöver användas då
anläggningen skall vara frånkopplad under längre tid.
Tips! Termometern i bastun placeras på sådan höjd, att visade värden
överensstämmer med de exakta siffror CC 300 visar.
Stand by.
Stand by är av stort värde för tylarier i hotell, badhus etc, där
besöksfrekvensen växlar. Under lågfrekventa perioder står anläggningen
inställd på energisnål "beredskapsvärme", som snabbt accelereras till
önskad badtemperatur vid tryck på ON alternativt extern brytare. Här
sparar Stand by funktionen stora belopp årligen.
Som framgår av nedanstående exempel finns många möjligheter att
enkelt programmera ett passande badprogram.
Exempel Stand by.
Tre olika badanläggningar som har öppet mellan klockan 800 och 2000
och med växlande besökfrekvens enligt nedanstående alternativ.
Alt. 1) Ett litet antal badgäster som kommer sporadiskt under hela öppettiden. Programmera Stand by mellan 8
badvaktmästaren) aktiverar badprogrammet genom ett tryck på CCpanelens ”ON” knapp.
Alt. 2) Ett litet antal badgäster kommer sporadiskt mellan 8
Efter klockan 14
ningsdags. Programmera Stand by mellan 8
fast ”ON” tid mellan 14
badprogrammet med ett tryck på CC-panelens ”ON” knapp.
Alt. 3) Ett stort antal badande mellan klockan 8
mellan 18
badgäster. Programmera Stand by mellan 8
fasta ”ON” tider för de välbesökta badtiderna enligt ovan. De sporadiska
badgästerna aktiverar badprogrammet med ett tryck på CC-panelens
”ON” knapp.
00
brukar anläggningen vara välbesökt fram till stäng-
00
- 2000. De sporadiska badgästerna aktiverar
00
- 2000. Resten av dagen besöks endast sporadiskt av
00
och 2000. Badgästerna (eller
00
00
och 1400 och programmera
00
- 1000, 1300- 1400 och
00
och 2000, programmera
och 1400.
INSTÄLLNINGAR
CC 300
º
22
R
Bild 2. Normaldisplay
M
EN
Initial uppstart.
Första gången manöverpanelen sätts på måste man göra vissa
inställningar. Välj först region, bekräfta med mittknapp. Därefter väljs
önskat språk, bekräfta med mittknapp. Ange sedan datum och tid.
Använd vänster- och högerknapp för att stega till önskade värden.
Bekräfta med mittknapp. Sist ställs önskad driftstid vid manuell uppstart
in. Grundinställning är 3 timmar men kan väljas mellan 1 till 24 timmar.
Stega uppåt med högerknapp (nedåt med vänsterknapp) tills önskad tid
visas i displayen. Varje knapptryck ökar eller minskar tiden med 15
minuter. För snabbare stegning håll knappen intryckt. Bekräfta med
mittknapp. Därmed är grundinställningen färdig.
2
MANUELLT TILL/FRÅNSLAG.
Inställning av badtemperatur.
Välj [Meny] i Normaldisplay och sedan temperaturmätaren. Stega uppåt
till önskad temperatur, bekräfta med [OK].
Starta anläggningen
Välj sedan retursymbolen, bekräfta med mittknapp och välj ON/OFFsymbolen för att starta ”badet”. Tryck en gång till på ON/OFF för frånslag.
Symbolen är röd när anläggningen är avstängd och grön när
anläggningen är igång.
AUTOMATISKT TILL/FRÅNSLAG.
Inställning av badtemperatur.
Välj [Meny] i Normaldisplay och sedan temperaturmätare. Stega till
önskad temperatur, bekräfta med [OK].
Starta timerfunktion
Välj [Meny] i Normaldisplay. Välj därefter [Program] och sedan [Timer].
Ställ in förvalstid (tid till start av anläggningen), bekräfta med OK.
Tillslagstid är nu aktiverad och badet startar automatiskt efter inställd tid.
Tid till start visas uppe i vänstra hörnet. Du kan när som helst stänga av
förvalstiden medan timern räknar ned genom att trycka två gånger på
ON/OFF-symbolen. Om badet har startat stänger man av genom att
trycka en gång på ON/OFF-knapp.
Page 3
VECKOURSPROGRAMMERING
med olika inställningar på olika veckodagar eller med samma
inställning alla veckodagar.
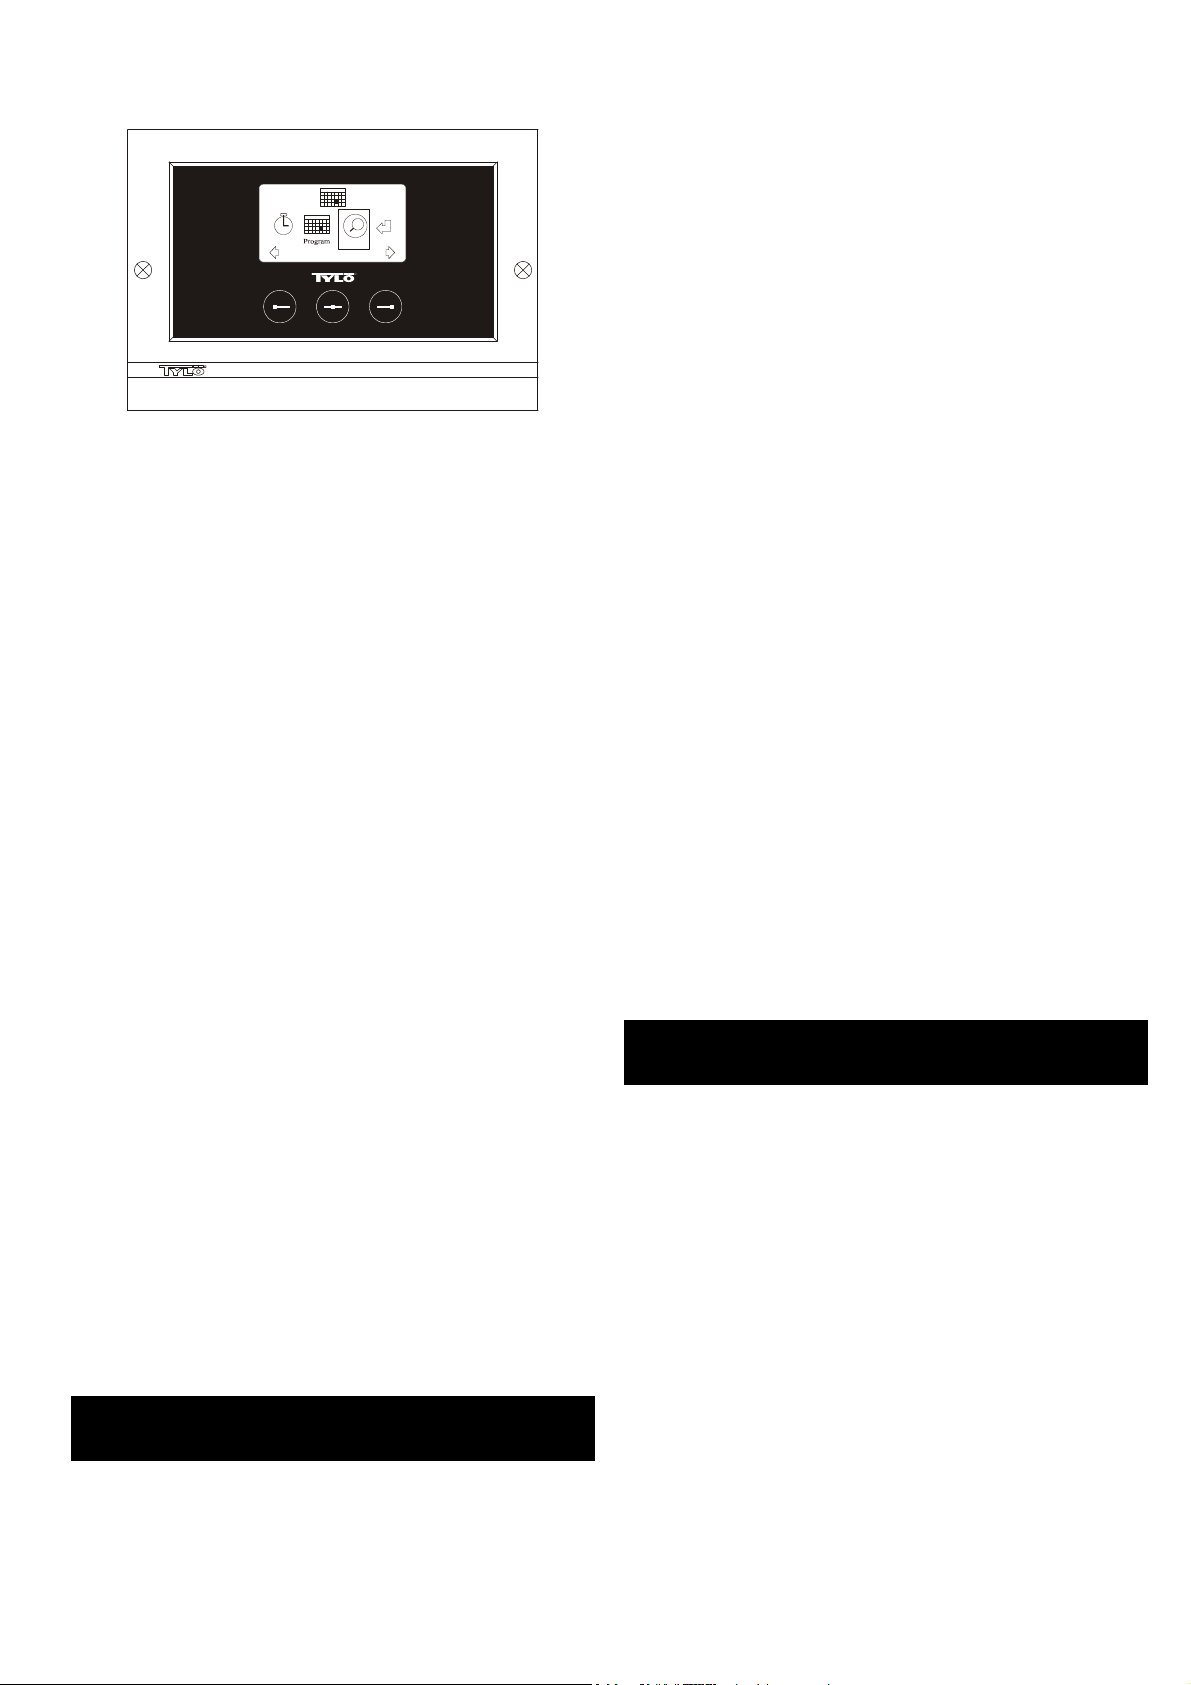
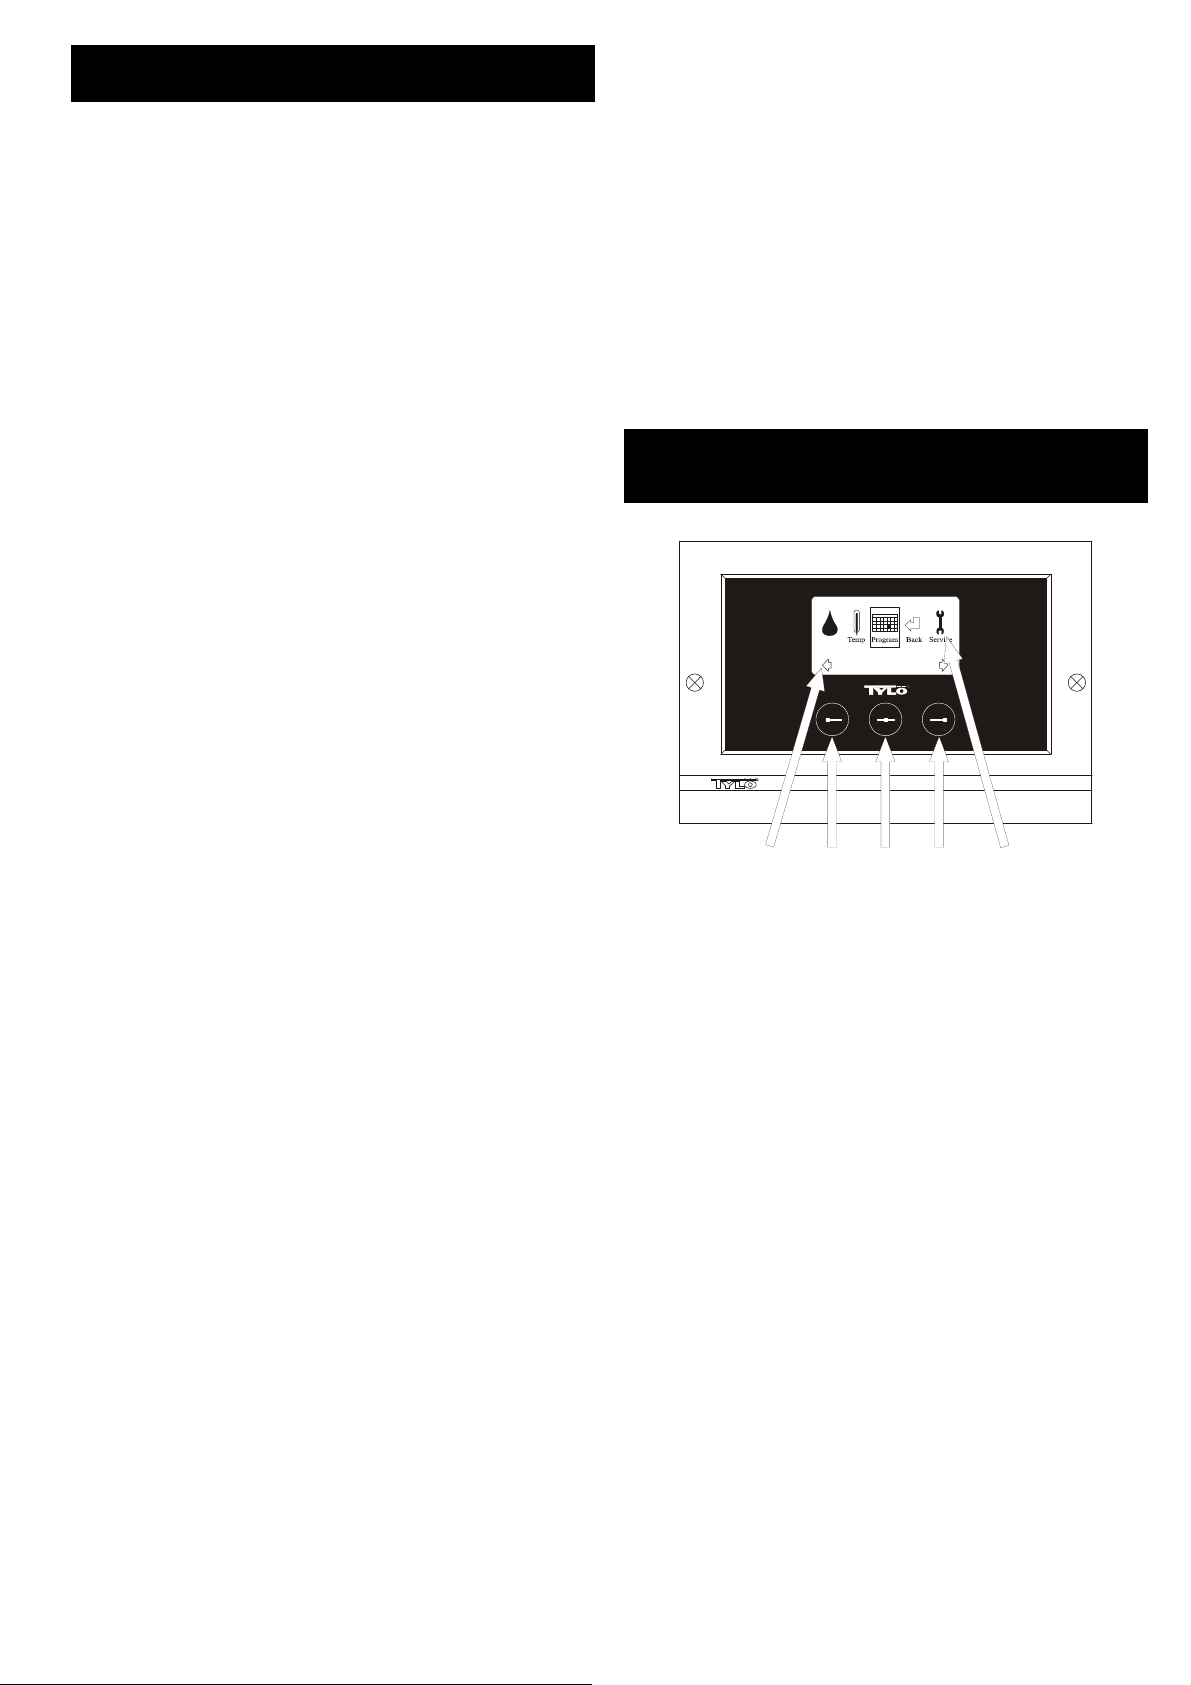
Timer
Bild 3. Programdisplay
Översikt Åter
OK
R
Inställning av till/frånslag/standby, temperatur.
Välj [Meny] i Normaldisplay och sedan Program. Välj Program en gång
till i Programdisplay (se bild 3). Vid tryck på [OK] ändras markeringen
[Lägg till] till mörkblå. Man är då inne i program mode. Välj först önskad
dag (aktuell text är rödmarkerad) genom att använda piltangenterna. Det
går att välja varje enskild veckodag för sig men man kan även direkt välja
måndag-söndag (för att få samma inställning alla veckodagar), måndagfredag eller lördag-söndag. Bekräfta med [OK]. Ställ sedan in vilket
klockslag anläggningen ska starta. Varje tryck på piltangenterna stegar
tiden upp eller ned 15 minuter, tryck på [OK] när önskad starttid syns i
displayen. Välj sedan önskad stopptid och tryck [OK]. Ange om
anläggningen ska vara på, av eller standby den tid som valts. ON/OFFsymbolen väljs grön om anläggningen ska vara på, röd om anläggningen
ska vara av och orange vid standby. Vid val att anläggningen ska vara på
görs även inställning för önskad temperatur, stega med piltangenterna
och bekräfta med [OK]. För att göra en ny programmering tryck på
högerknapp en gång för att markera [Lägg till] och sedan på [OK].
Upprepa sedan ovanstående procedur. För att återgå till Normaldisplay
välj [Åter], bekräfta med [OK]. Välj [Åter] en gång till och sedan [OK]. Om
inga knapptryckningar görs återgår manöverpanelen automatiskt till
Normaldisplay efter ca: 30 sekunder. Vill man ta bort alla
förprogrammerade tider väljer man [Rensa kalender]. Man kan även
avaktivera all program tillfälligt genom att välja [Kalender AV].
För att få en enkel översikt över de program som är förprogrammerade
välj [Översikt] i Programdisplay. Där visas schemaläggningen i form av
staplar som visar rött när anläggningen är avstängd, grönt när
anläggningen är igång och gult vid standby.
Så snart man trycker på ON när anläggningen är i stand by-läge, stiger
temperaturen till den inställda badtemperaturen. Efter 1 timme återgår
anläggningen automatiskt till fortsatt stand by-temperatur. Varje nytt tryck
på ON startar 1 timmes badperiod.
Är anläggningen i OFF-läge så gäller de inställningar som gjordes vid
initial uppstart.
Om anläggningen är igång kan man manuellt stänga av med tryck på
OFF. (Stänger endast av pågående bad).
Man kan även avaktivera hela kalenderfunktionen tillfälligt vid exempelvis
någon serviceåtgärd och sedan enkelt aktivera den igen.
BAD UTANFÖR PROGRAMMERAD TID
om panelen är kodspärrad.
Tylariet kan användas vid annan tid än inprogrammerad. Med ett tryck på
ON startar 1 timmes badtid. Önskas förlängning av badperioden, trycker
man åter på ON. Anläggningen stänger automatiskt av 1 timme efter
sista knapptryckningen.
OBS! Glöm ej att kodspärra panelen.
PANELINSTÄLLNINGAR
CC 300
Display.
LCD ljusstyrka.
Välj [Meny] i Normaldisplay, [Service] och sedan [Display]. Markera
[Ljusstyrka (%)] och tryck mittknapp. Markeringen blir mörkblå och värdet
för ljusstyrkan i displayen kan ändras. Tryck [OK] för att bekräfta.
LCD Ljusstyrka vid viloläge.
Välj [Meny] i Normaldisplay, [Service] och sedan [Display]. Markera
[Ljusstyrka vid viloläge (%)] och tryck mittknapp. Markeringen blir
mörkblå och värdet för ljusstyrkan i displayen när panelen är i Stand byläge kan ändras. Tryck [OK] för att bekräfta. Fabriksinställning är 30%.
Tid till LCD viloläge.
Välj [Meny] i Normaldisplay, [Service] och sedan [Display]. Markera [Tid
till viloläge] och tryck mittknapp. Markeringen blir mörkblå och värdet går
att ställas för när ljusstyrkan i displayen ska ändras efter det att panelen
gått in i Stand by-läge. Tryck OK för att bekräfta.
Service.
Se SERVICEINSTÄLLNINGAR
Kodlås.
Välj [Meny] i Normaldisplay och sedan [Service]. Stega till [Kodlås] och
tryck på [OK]. Ange önskad kod. Stega med piltangenterna till rätt siffra
och bekräfta med [OK]. Kodlåset aktiveras automatiskt vid
programmering och går till Normaldisplay.
För att återgå till ospärrat läge, upprepa ovanstående och sätt kod till
0000.
Det går ej att ändra några inställningar när kodlåset är aktiverat. Det går
att starta och stänga av anläggningen samt tända och släcka
belysningen. Badet är igång den tid man angett i Servicemenyn under
[Bad utanför prog tid] (fabriksinställning 1 timme).
Allmän kod som alltid fungerar är 1995.
OBS! Alla inställningar skall göras innan eventuell kodspärr.
Språk.
Välj [Meny] i Normaldisplay och sedan [Service]. Välj språk och stega
med piltangenterna till önskat språk och tryck sedan [OK].
Klocka.
Välj [Meny] i Normaldisplay och sedan [Service]. Välj [Inställning klocka].
Ange först rätt dag, stega med piltangenterna och bekräfta med [OK].
Ställ sedan in aktuellt klockslag, först timmar och sedan minuter.
Fabriksinställning.
Välj [Meny] i Normaldisplay och sedan [Service]. Välj [Fabriksinställning].
Välj [Ja] eller [Nej] med piltangenterna tryck sedan [OK]. Genom att välja
[Ja] försvinner alla programmeringar och egna inställningar som gjorts
och panelen får de fabriksinställningar som den hade från början.
SERVICEINSTÄLLNINGAR
CC 300
Service.
I Servicemenyn kan den som sköter anläggningen göra diverse
inställningar såsom maximal badtemperatur. Det rekommenderas dock
att behålla de fabriksinställningar som finns. Servicemenyn är belagd
med en kod för att inte obehöriga ska kunna ändra på dessa
inställningar. I Normaldisplay tryck [Meny] och sedan [Service]. Välj
[Service] och tryck koden 124.
Systeminställningar.
Maximal driftstid
[Max driftstid (h)] – Detta är den driftstid som ställdes in vid initial
uppstart. Denna tid gäller ej då anläggningen är programmerad. Går att
ställa mellan 1 till 24 timmar, fabriksinställning är 3 timmar.
Temperaturenhet
[Temperatur (C°/F)] – Denna parameter ställer in om temperaturen ska
visas i grader Celsius eller Fahrenheit.
Testmeny
Testmenyn används endast för felsökning och teknisk support via Tylö.
Max temperatur.
[Max temp (C°/F)] – Här ställer man in den maximala temperaturen som
anläggningen kan programmeras till. Vid bad i Tylarium är
maxtemperaturen 55°C.
3
Page 4

Temperaturreducering vid stand by.
[Tempreducering stand by (C°/F)] – Hur mycket temperaturen skall
sjunka när anläggningen är i stand by-läge jämfört med programmerad
badtemperatur. Fabriksinsställning är 30°C.
Max gångtid vid stand by.
[Max tid stand by (min)] – När anläggningen är programmerad i stand by-
läge och man trycker på ON-knapp är badet igång så länge som den tid
man angett här. Fabriksinställning 60 minuter.
Max gångtid utanför programmerad tid.
[Bad utanför prog tid (min)] – Detta är den tid som anläggningen är igång
vid kodspårr utanför programmerad tid.
Avkalkning.
[Avkalkning (h)] – Denna parameter är en timer som räknar ned när
anläggningen är igång. Den talar om att det är dags att avkalka.
Fabriksinställning är 40 timmar.
Vid eventuella problem kontakta inköpsstället.
© Eftertryck, helt eller delvis, är förbjudet utan Tylös skriftliga tillstånd.
Rätt till ändringar i material, konstruktion och design förbehålls.
4
Page 5
345
INSTALLATION CC 300T
Denna anvisning läses tillsammans med monteringsanvisning som
medföljer bastuaggregat resp. ånggenerator.
Bild A – TYLARIUM.
(Bastuaggregat typ SK, SDK, och ånggenerator typ VA/VB).
1 = bastuaggregat. 2 = fukt och temperatursensor. 3 = manöverpanel
CC 300T. 4 = eventuell extern on/off-brytare. 5 = el-central.
6 = reläbox RB30/60. 7 = ånggenerator. 8 = förstärkare (amplifier).
Bild B – TYLARIUM.
(Bastuaggregat typ SE och ånggenerator typ VA/VB).
1 = bastuaggregat. 2 = fukt och temperatursensor. 3 = manöverpanel
CC 300T. 4 = eventuell extern on/off-brytare. 5 = el-central.
7 = ånggenerator. 8 = förstärkare (amplifier).
Reläbox (RB).
(Reläbox används ej till SE aggregat).
Monteras utanför och på obegränsat avstånd från tylariet i ett svalt och
ventilerat utrymme. Reläboxen får inte placeras närmare än 1 meter från
CC 300T.
Skärmad svagströmsledning (LiYCY 6-ledare).
Manöverledning mellan CC 300T till reläbox, SE aggregat eller
ånggenerator skall vara skärmad svagströmsledning (LiYCY, 6-ledare).
Skärmningen anslutes till plint 12 i CC panelen.
Placering av termistor, fukt och temperatursensor.
Monteras 1500 mm från golvet (ej ovanför bastuaggregatet).
Placera sensorn så, att den varken direkt eller indirekt kan träffas av
ångstrålen.
7 = ånggenerator. 8 = förstärkare (amplifier).
Kontrollera på bastuaggregatets och på ånggeneratorns dataskylt att
anslutning sker till rätt spänning.
Glöm inte att jorda!
Bild D – kopplingsschema.
(Bastuaggregat typ SE och ånggenerator typ VA/VB med manöverpanel typ CC 300T).
1 = bastuaggregat. 2 = fukt och temperatursensor.3 = manöverpanel
CC 300T. 4 = eventuell extern on/off-brytare. 7 = ånggenerator.
8 = förstärkare (amplifier).
Kontrollera på bastuaggregatets och på ånggeneratorns dataskylt att
anslutning sker till rätt spänning.
Glöm inte att jorda!
BRUKSANVISNING
CC 300T
RH%
OK
R
Förstärkare (amplifier).
Monteras utanför tylariet max 2 meter från sensorn och på obegränsat
avstånd från CC 300T. Manöverledning mellan förstärkare och CC 300T
skall vara skärmad svagströmsledning (4-ledare). Skärmningen ansluts
till plint 25 i förstärkaren.
Belysning.
Anslut belysningen enligt kopplingschema.
Tillval: extern on/off-brytare (momentan).
Placeras på valfritt avstånd från tylariet. Anslutes med
svagströmsledning till CC 300T – se kopplingsschema. Vid användande
av flera externa on/off-brytare skall dess parallellkopplas. Ett tryck på
externbrytaren startar CC300T och går så länge som önskad driftstid är
satt (Se Initial uppstart). Ett tryck till på externbrytaren stänger av
CC300T om den ej är programmerad/kodspärrad. Om CC300T är
programmerad/kodspärrad måste man stänga av med ON/OFF-knappen
på CC300T.
Tylö rekommenderar denna typ av extern brytare.
Tillval: extern on/off-brytare (konstant slutning).
Placeras på valfritt avstånd från Tylariet. Anslutes med
svagströmsledning till CC 300T – se kopplingsschema. Vid användande
av flera externa on/off-brytare skall dessa parallellkopplas. Vid konstant
slutning går anläggningen så länge slutning finns mellan plint 19 och 20,
dock maximalt inställd driftstid.
Anslutning till centraldator.
Anslutning kan också göras till centraldator som antingen gör en kort
slutning eller konstant slutning mellan plintarna 19 och 20 i CC 300T.
Tillåten kontinuerlig inkopplingstid är max 24 timmar.
Viktigt! För att ånggeneratorns automatiska tömningsfunktion skall
fungera måste manöverpanelen vara avstängd minst 1,5 tim/dygn.
Styrning av andra Tylöprodukter.
CC300T kan med fördel styra andra Tylöprodukter. Exempel på detta är
sammankoppling med Tylö Fresh som då aktiveras när panelen är i drift.
Vid styrning av t.ex. Tylö Fresh eller annan CC-panel ska dessa kopplas
mellan plint 40 och 41 i CC 300T och plint 19 och 20 på den andra
Tylöprodukten. Se bild J för exempel.
12
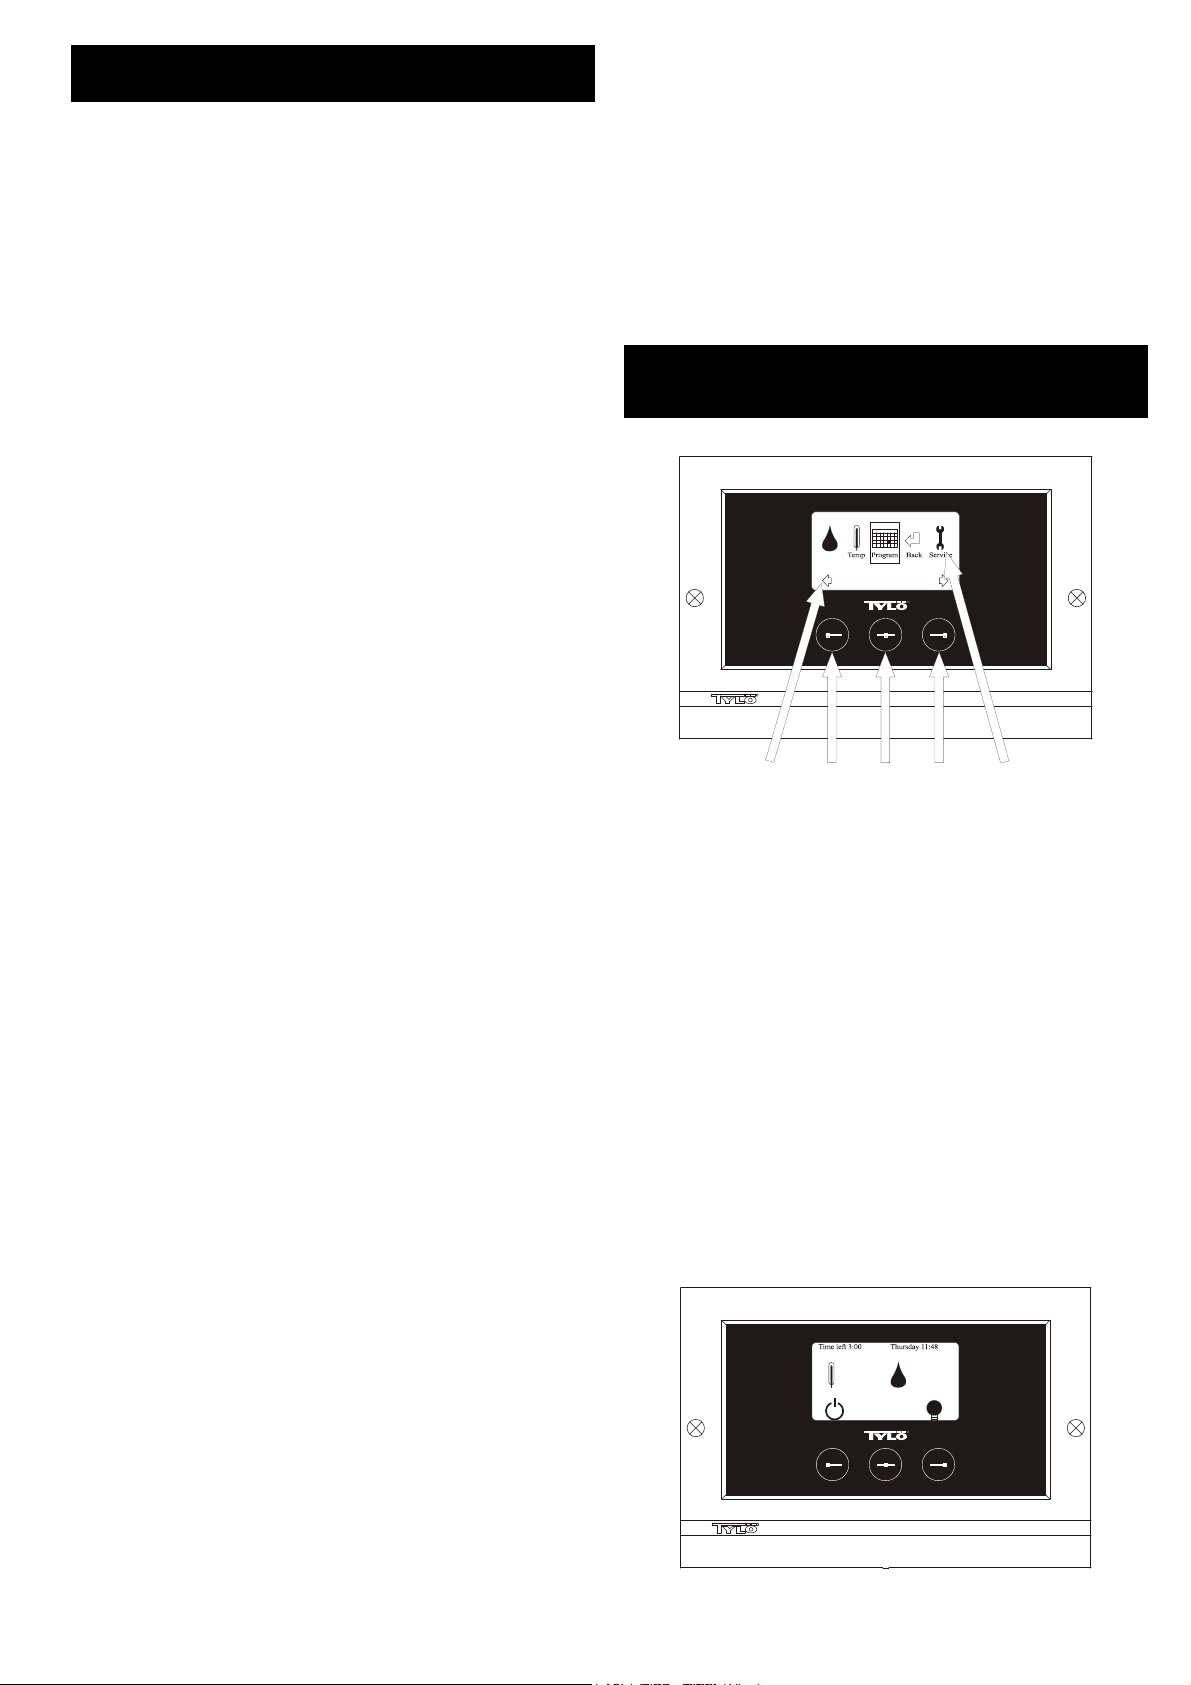
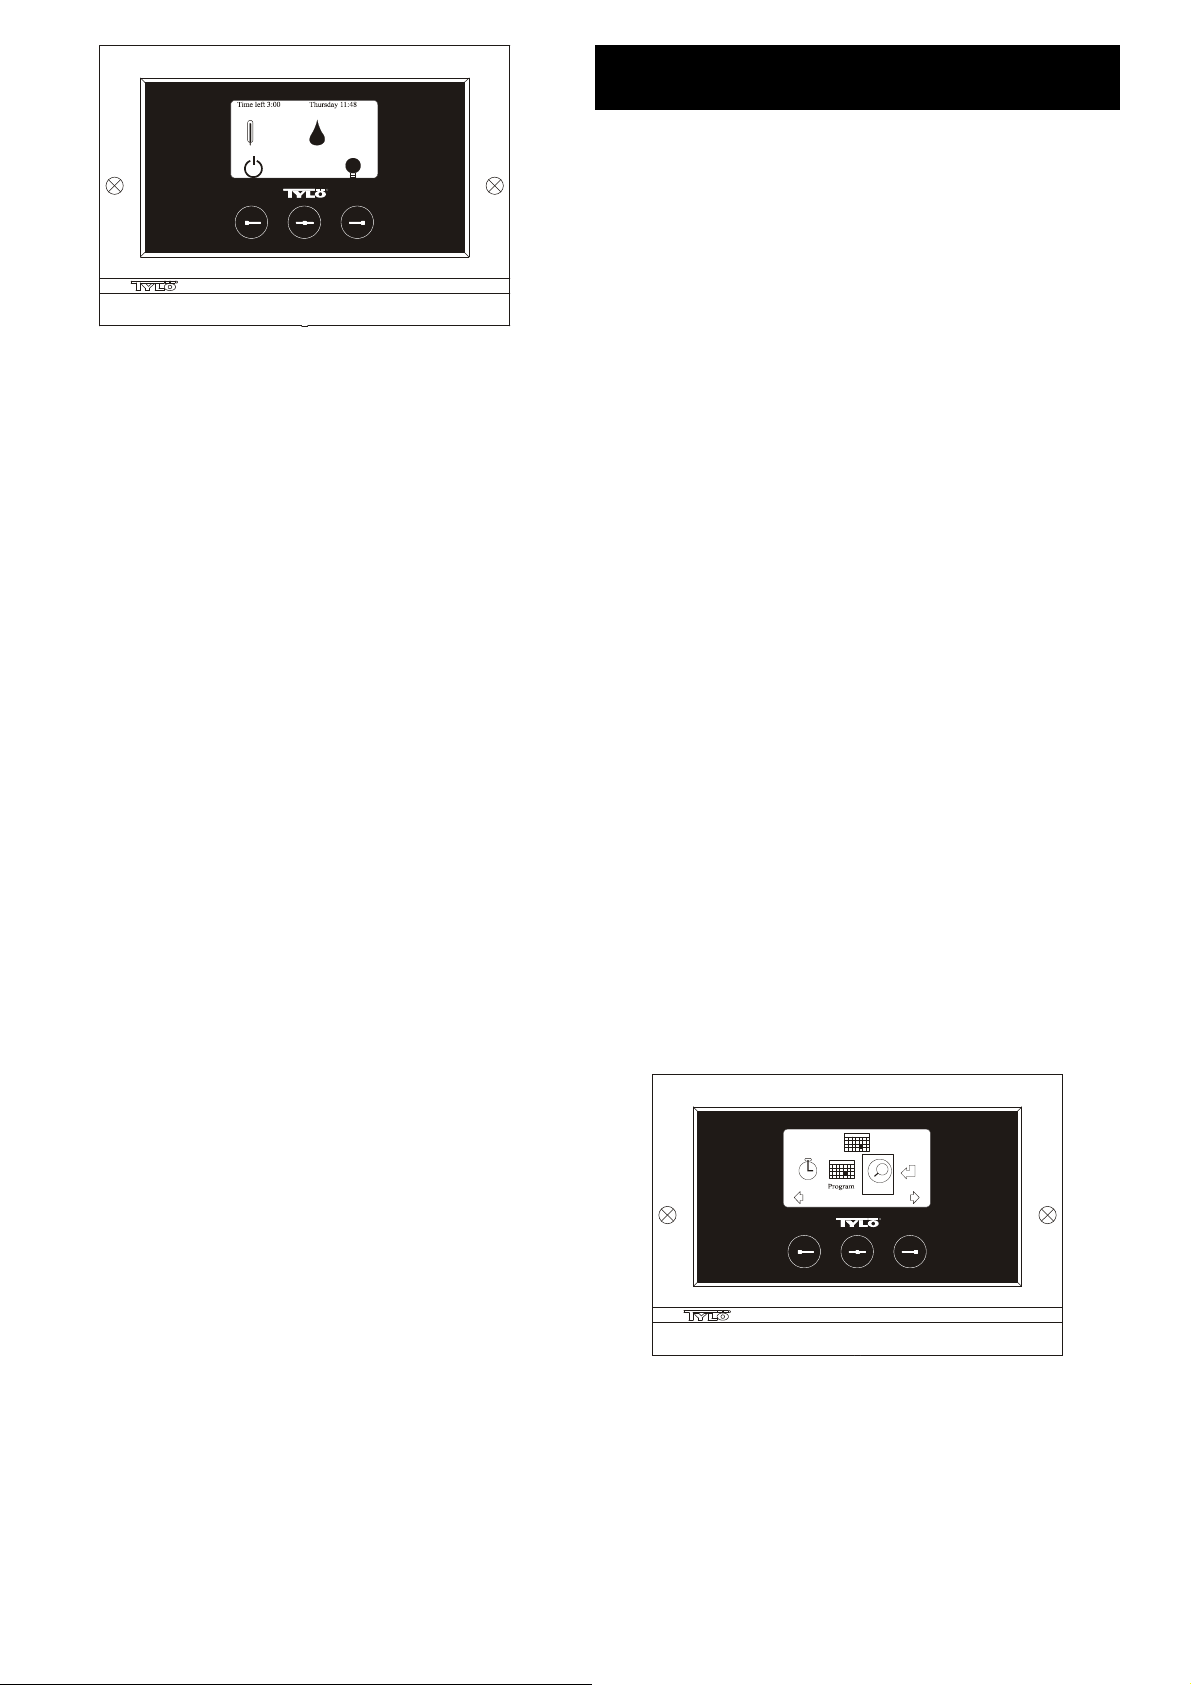
Bild 1. Menydisplay
1 = Vänsterknapp, 2 = Mittknapp, 3 = Högerknapp. 4 = Symboler/text
som motsvarar respektive knapp. 5 = Symboler/text för inställning och
visning av aktuella värden.
Knappar och display.
På manöverpanelen finns det tre knappar. Ovanför knapparna i
nederkanten på displayen visas symboler som motsvarar respektive
knapp. De ser olika ut beroende på i vilket läge panelen befinner sig i.
När pilarna syns i Menydisplayen (Bild 1) används vänster- och
högerknapp för att stega till önskad symbol. För att välja symbolen
bekräfta med mittknappen.
I Normaldisplayen (Bild 2) är vänsterknappens funktion ON/OFF och
dess symbol syns ovanför i displayens nederkant. När anläggningen är
igång är symbolen grön, när anläggningen är avstängd blir symbolen röd
och i standby-läge orange. Högerknappens funktion är belysning.
Lampsymbolen är gul när belysningen är på och vit när belysningen är
avstängd. Displayen visar även aktuell temperatur och luftfuktighet.
Genom att hålla in mittknappen en längre stund återgår panelen till
Normaldisplay om man befinner sig i annat läge.
När ett program är aktivt tryck vänsterknapp 2 sek för att stänga av aktivt
program.
22
ºc
MENU
%
33
R
Bild C, E – kopplingsschema.
(Bastuaggregat typ SK, SDK och ånggenerator typ VA/VB med
manöverpanel typ CC 300T).
1 = bastuaggregat. 2 = fukt och temperatursensor. 3 = manöverpanel
CC 300T. 4 = eventuell extern on/off-brytare. 6 = reläbox RB30/60.
Bild 2. Normaldisplay
5
Page 6
Initial uppstart.
Första gången manöverpanelen sätts på måste man göra vissa
inställningar. Välj först region, bekräfta med mittknapp. Därefter väljs
önskat språk, bekräfta med mittknapp. Ange sedan datum och tid.
Använd vänster- och högerknapp för att stega till önskade värden.
Bekräfta med mittknapp. Sist ställs önskad driftstid vid manuell uppstart
in. Grundinställning är 3 timmar men kan väljas mellan 1 till 24 timmar.
Stega uppåt med högerknapp (nedåt med vänsterknapp) tills önskad tid
visas i displayen. Varje knapptryck ökar eller minskar tiden med 15
minuter. För snabbare stegning håll knappen intryckt. Bekräfta med
mittknapp. Därmed är grundinställningen färdig.
Belysning.
Tänds automatiskt när anläggningen startar och släcks automatiskt när
anläggningen stänger av. Belysningen kan också tändas eller släckas
manuellt med tryck på högerknapp när lampsymbolen syns längst ned i
högra hörnet. Symbolen är vit när belysningen är släckt och gul när
belysningen är på.
Kodlås.
Förhindrar obehörig ändring av inställda värden.
Huvudströmbrytare.
På reläboxens, SE aggregatets och de mindre ånggeneratorernas
undersida finns en huvudströmbrytare som endast behöver användas då
anläggningen skall vara frånkopplad under längre tid.
Tips! Termometern (hygrometern) i tylariet placeras på sådan höjd, att
visade värden överensstämmer med de exakta siffror CC 300T visar.
Stand by.
Stand by är av stort värde för tylarier i hotell, badhus etc, där
besöksfrekvensen växlar. Under lågfrekventa perioder står anläggningen
inställd på energisnål "beredskapsvärme", som snabbt accelereras till
önskad badtemperatur vid tryck på ON alternativt extern brytare. Här
sparar Stand by funktionen stora belopp årligen.
Som framgår av nedanstående exempel finns många möjligheter att
enkelt programmera ett passande badprogram.
Exempel Stand by.
Tre olika badanläggningar som har öppet mellan klockan 800 och 2000
och med växlande besökfrekvens enligt nedanstående alternativ.
Alt. 1) Ett litet antal badgäster som kommer sporadiskt under hela öppettiden. Programmera Stand by mellan 8
badvaktmästaren) aktiverar badprogrammet genom ett tryck på CCpanelens ”ON” knapp.
Alt. 2) Ett litet antal badgäster kommer sporadiskt mellan 8
Efter klockan 14
ningsdags. Programmera Stand by mellan 8
fast ”ON” tid mellan 14
badprogrammet med ett tryck på CC-panelens ”ON” knapp.
Alt. 3) Ett stort antal badande mellan klockan 8
mellan 18
badgäster. Programmera Stand by mellan 8
fasta ”ON” tider för de välbesökta badtiderna enligt ovan. De sporadiska
badgästerna aktiverar badprogrammet med ett tryck på CC-panelens
”ON” knapp.
00
brukar anläggningen vara välbesökt fram till stäng-
00
- 2000. De sporadiska badgästerna aktiverar
00
- 2000. Resten av dagen besöks endast sporadiskt av
00
och 2000. Badgästerna (eller
00
00
och 1400 och programmera
00
- 1000, 1300- 1400 och
00
och 2000, programmera
och 1400.
INSTÄLLNINGAR
CC 300T
MANUELLT TILL/FRÅNSLAG.
Inställning av badtemperatur.
Välj [Meny] i Normaldisplay och sedan temperaturmätaren. Stega uppåt
till önskad temperatur, bekräfta med [OK].
Inställning av fuktighet.
Välj droppsymbolen. Stega sedan till önskad fuktighet [(RH%)], bekräfta
med [OK]. Gränsen för hur högt man kan ställa värdet är beroende på
temperaturen.
Starta anläggningen
Välj sedan retursymbolen, bekräfta med mittknapp och välj ON/OFFsymbolen för att starta ”badet”. Tryck en gång till på ON/OFF för frånslag.
Symbolen är röd när anläggningen är avstängd och grön när
anläggningen är igång.
6
AUTOMATISKT TILL/FRÅNSLAG.
Inställning av badtemperatur.
Välj [Meny] i Normaldisplay och sedan temperaturmätare. Stega till
önskad temperatur, bekräfta med [OK].
Inställning av fuktighet.
Välj droppsymbolen. Stega sedan till önskad fuktighet [(RH%)] bekräfta
med [OK]. Gränsen för hur högt man kan ställa värdet är beroende på
temperaturen.
Starta timerfunktion
Välj [Meny] i Normaldisplay. Välj därefter [Program] och sedan [Timer].
Ställ in förvalstid (tid till start av anläggningen), bekräfta med OK.
Tillslagstid är nu aktiverad och badet startar automatiskt efter inställd tid.
Tid till start visas uppe i vänstra hörnet. Du kan när som helst stänga av
förvalstiden medan timern räknar ned genom att trycka två gånger på
ON/OFF-knappen. Om badet har startat stänger man av genom att
trycka en gång på ON/OFF-knapp.
Om fuktigheten överstiger 30% vid frånslag startar automatiskt en
”upptorkning” på ca. 20 minuter (fabriksinställning).
VECKOURSPROGRAMMERING
med olika inställningar på olika veckodagar eller med samma
inställning alla veckodagar.
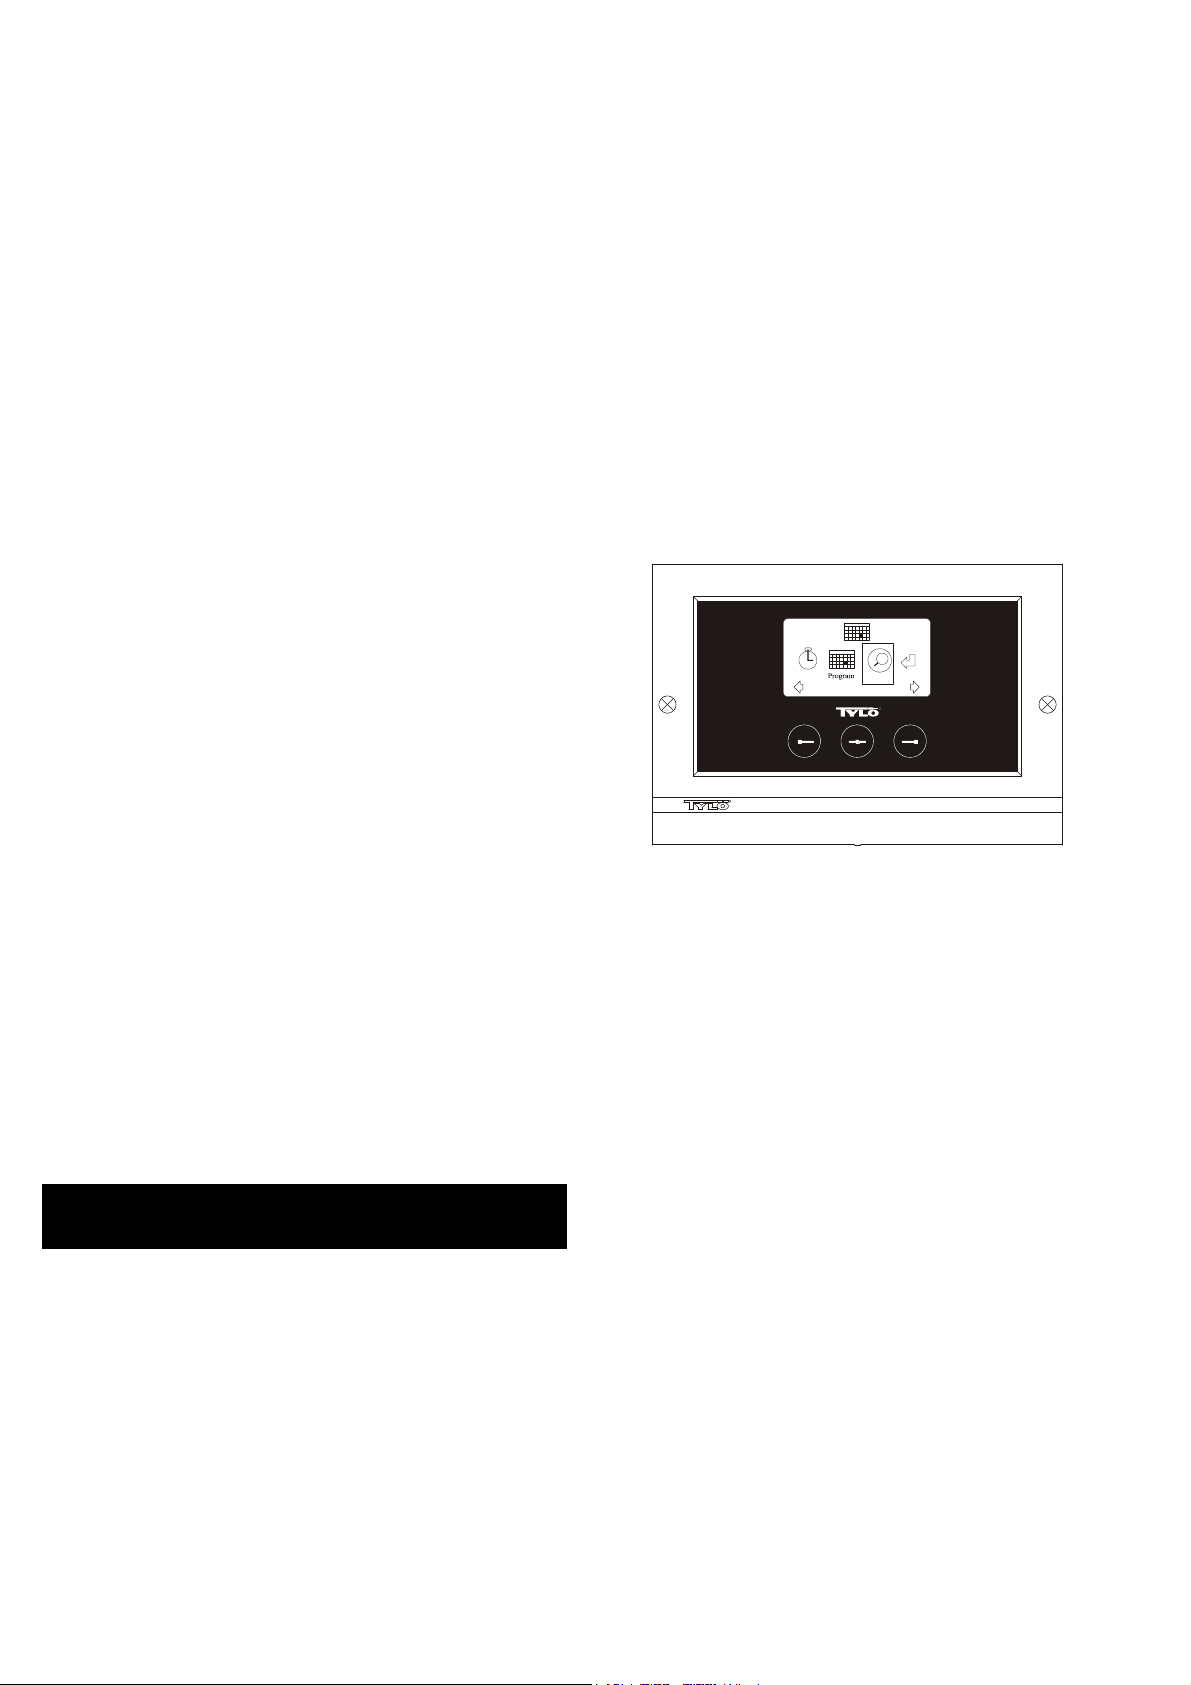
Timer
Bild 3. Programdisplay
Inställning av till/frånslag/standby, temperatur/fukt.
Välj [Meny] i Normaldisplay och sedan Program. Välj Program en gång
till i Programdisplay (se bild 3). Vid tryck på [OK] ändras markeringen
[Lägg till] till mörkblå. Man är då inne i program mode. Välj först önskad
dag (aktuell text är rödmarkerad) genom att använda piltangenterna. Det
går att välja varje enskild veckodag för sig men man kan även direkt välja
måndag-söndag (för att få samma inställning alla veckodagar), måndagfredag eller lördag-söndag. Bekräfta med [OK]. Ställ sedan in vilket
klockslag anläggningen ska starta. Varje tryck på piltangenterna stegar
tiden upp eller ned 15 minuter, tryck på [OK] när önskad starttid syns i
displayen. Välj sedan önskad stopptid och tryck [OK]. Ange om
anläggningen ska vara på, av eller standby den tid som valts. ON/OFFsymbolen väljs grön om anläggningen ska vara på, röd om anläggningen
ska vara av och orange vid standby. Vid val att anläggningen ska vara på
görs även inställning för önskad temperatur och fuktighetsgrad, stega
med piltangenterna och bekräfta med [OK]. För att göra en ny
programmering tryck på högerknapp en gång för att markera [Lägg till]
och sedan på [OK]. Upprepa sedan ovanstående procedur. För att återgå
till Normaldisplay välj [Åter], bekräfta med [OK]. Välj [Åter] en gång till
och sedan [OK]. Om inga knapptryckningar görs återgår
manöverpanelen automatiskt till Normaldisplay efter ca: 30 sekunder. Vill
man ta bort alla förprogrammerade tider väljer man [Rensa kalender].
Man kan även avaktivera all program tillfälligt genom att välja [Kalender
AV].
För att få en enkel översikt över de program som är förprogrammerade
välj [Översikt] i Programdisplay. Där visas schemaläggningen i form av
staplar som visar rött när anläggningen är avstängd, grönt när
anläggningen är igång och gult vid standby.
Så snart man trycker på ON när anläggningen är i stand by-läge, stiger
temperaturen till den inställda badtemperaturen. Efter 1 timme återgår
anläggningen automatiskt till fortsatt stand by-temperatur. Varje nytt tryck
på ON startar 1 timmes badperiod.
Är anläggningen i OFF-läge så gäller de inställningar som gjordes vid
initial uppstart.
Om anläggningen är igång kan man manuellt stänga av med tryck på
OFF. (Stänger endast av pågående bad).
Översikt Åter
OK
R
Page 7

Om fuktigheten överstiger 30% vid frånslag startar automatiskt en
”upptorkning” på ca. 20 minuter (fabriksinställning).
Man kan även avaktivera hela kalenderfunktionen tillfälligt vid exempelvis
någon serviceåtgärd och sedan enkelt aktivera den igen.
BAD UTANFÖR PROGRAMMERAD TID
om panelen är kodspärrad.
Tylariet kan användas vid annan tid än inprogrammerad. Med ett tryck på
ON startar 1 timmes badtid. Önskas förlängning av badperioden, trycker
man åter på ON. Anläggningen stänger automatiskt av 1 timme efter
sista knapptryckningen.
OBS! Glöm ej att kodspärra panelen.
PANELINSTÄLLNINGAR
CC 300T
Display.
LCD ljusstyrka.
Välj [Meny] i Normaldisplay, [Service] och sedan [Display]. Markera
[Ljusstyrka (%)] och tryck mittknapp. Markeringen blir mörkblå och värdet
för ljusstyrkan i displayen kan ändras. Tryck [OK] för att bekräfta.
LCD Ljusstyrka vid viloläge.
Välj [Meny] i Normaldisplay, [Service] och sedan [Display]. Markera
[Ljusstyrka vid viloläge (%)] och tryck mittknapp. Markeringen blir
mörkblå och värdet för ljusstyrkan i displayen när panelen är i Stand byläge kan ändras. Tryck [OK] för att bekräfta. Fabriksinställning är 30%.
Tid till LCD viloläge.
Välj [Meny] i Normaldisplay, [Service] och sedan [Display]. Markera [Tid
till viloläge] och tryck mittknapp. Markeringen blir mörkblå och värdet går
att ställas för när ljusstyrkan i displayen ska ändras efter det att panelen
gått in i Stand by-läge. Tryck [OK] för att bekräfta.
Service.
Se SERVICEINSTÄLLNINGAR
Kodlås.
Välj [Meny] i Normaldisplay och sedan [Service]. Stega till [Kodlås] och
tryck på [OK]. Ange önskad kod. Stega med piltangenterna till rätt siffra
och bekräfta med [OK]. Kodlåset aktiveras automatiskt vid
programmering och går till Normaldisplay.
För att återgå till ospärrat läge, upprepa ovanstående och sätt kod till
0000.
Det går ej att ändra några inställningar när kodlåset är aktiverat. Det går
att starta och stänga av anläggningen samt tända och släcka
belysningen. Badet är igång den tid man angett i Servicemenyn under
[Bad utanför prog tid] (fabriksinställning 1 timme).
Allmän kod som alltid fungerar är 1995.
OBS! Alla inställningar skall göras innan eventuell kodspärr.
Språk.
Välj [Meny] i Normaldisplay och sedan [Service]. Välj språk och stega
med piltangenterna till önskat språk och tryck sedan [OK].
Klocka.
Välj [Meny] i Normaldisplay och sedan [Service]. Välj [Inställning klocka].
Ange först rätt dag, stega med piltangenterna och bekräfta med [OK].
Ställ sedan in aktuellt klockslag, först timmar och sedan minuter.
Fabriksinställning.
Välj [Meny] i Normaldisplay och sedan [Service]. Välj [Fabriksinställning].
Välj [Ja] eller [Nej] med piltangenterna tryck sedan [OK]. Genom att välja
[Ja] försvinner alla programmeringar och egna inställningar som gjorts
och panelen får de fabriksinställningar som den hade från början.
I Servicemenyn kan den som sköter anläggningen göra diverse
inställningar såsom maximal badtemperatur. Det rekommenderas dock
att behålla de fabriksinställningar som finns. Servicemenyn är belagd
med en kod för att inte obehöriga ska kunna ändra på dessa
inställningar. I Normaldisplay tryck [Meny] och sedan [Service]. Välj
[Service] och tryck koden 124.
Systeminställningar.
Gräns för torkning av anläggning
[Torkgräns (%)] – När anläggningen stannar känner den av
luftfuktigheten i rummet. Om det är över 30% luftfuktighet
(fabriksinställning) så går anläggningen in i upptorkningsläge.
Torktemperatur
[Torkningstemperatur (°C)] – Det är den temperatur som anläggningen
har vid upptorkningsläge. Fabriksinställning är 80°C.
Torktid
[Tork tid (min)] – Det är den tid som anläggningen är igång vid
upptorkningsläge. Fabriksinställning är 20 minuter.
Minsta temperatur vid ånga
[Min temperatur ångbad (°C)]– Det är den minsta temperatur som
anläggningen måste ha för att ånggeneratorn ska starta.
Fabriksinställning är 40°C.
Maximal driftstid
[Max driftstid (h)] – Detta är den driftstid som ställdes in vid initial
uppstart. Denna tid gäller ej då anläggningen är programmerad. Går att
ställa mellan 1 till 24 timmar, fabriksinställning är 3 timmar.
Temperaturenhet
[Temperatur (C°/F)] – Denna parameter ställer in om temperaturen ska
visas i grader Celsius eller Fahrenheit.
Testmeny
Testmenyn används endast för felsökning och teknisk support via Tylö.
Max temperatur.
[Max temp (C°/F)] – Här ställer man in den maximala temperaturen som
anläggningen kan programmeras till. Vid bad i Tylarium är
maxtemperaturen 55°C.
Temperaturreducering vid stand by.
[Tempreducering stand by (C°/F)] – Hur mycket temperaturen skall
sjunka när anläggningen är i stand by-läge jämfört med programmerad
badtemperatur. Fabriksinsställning är 30°C.
Max gångtid vid stand by.
[Max tid stand by (min)] – När anläggningen är programmerad i stand by-
läge och man trycker på ON-knapp är badet igång så länge som den tid
man angett här. Fabriksinställning 60 minuter.
Max gångtid utanför programmerad tid.
[Bad utanför prog tid (min)] – Detta är den tid som anläggningen är igång
vid kodspårr utanför programmerad tid.
Avkalkning.
[Avkalkning (h)] – Denna parameter är en timer som räknar ned när
anläggningen är igång. Den talar om att det är dags att avkalka.
Fabriksinställning är 40 timmar.
TYLARIUM
Tylarium erbjuder bastubad i alla dess former. Torrbastu, Våtbastu och
Ångbastu. Eftersom den relativa luftfuktigheten ibland är högre än vid
traditionella bastubad bör nedanstående punkter beaktas.
• Har bastun fönster i dörr eller vägg, skall dörr- resp fönsterfodrets hela
nedre list strykas med båtfernissa och skarven mellan glas och list
tätas med våtrumssilikon. På så sätt förhindras eventuell kondens på
glasytorna att tränga ner i skarven.
• Lackera tröskeln och dörrhandtagen ett par gånger med båtfernissa,
så behålls träets finish och rengöringen av bastun blir mycket enklare.
Bastulavar dekorraster och ryggstöd inoljas på båda sidor med Tylö
bastuolja.
OBS! Allt övrigt trä inne i bastun skall vara obehandlat.
SERVICEINSTÄLLNINGAR
CC 300T
Service.
Vid eventuella problem kontakta inköpsstället.
© Eftertryck, helt eller delvis, är förbjudet utan Tylös skriftliga tillstånd.
Rätt till ändringar i material, konstruktion och design förbehålls.
7
Page 8
OPERATING INSTRUCTIONS
CC 300
OK
R
1234 5
Fig. 1. Menu display
1 = Left button, 2 = Middle button, 3 = Right button. 4 = Symbols/text that
correspond to the respective button. 5 = Symbols/text for setting and
displaying current values.
Buttons and display.
There are three buttons on the control panel. Symbols shown above the
buttons at the bottom of the display correspond to the respective button.
These symbols differ depending on the panel’s current mode. When the
arrows are shown in the Menu display (fig. 1), use the left and right
buttons to move to the desired symbol. To select a symbol, confirm with
the middle button.
In the Normal display (fig. 2) the left button has an ON/OFF function. The
symbol for this appears at the bottom of the display above the left button.
When the facility is operational, this symbol shows green; when it is
switched off, the symbol is red; and when it is on stand-by, the symbol is
orange. The right button controls the lighting function. The lighting
symbol shows yellow when the lighting is on and white when the lighting
is off. The display also shows the current temperature.
To return to the Normal display from another mode, press the middle
button until the Normal display shows.
When a program is active, press the left button for 2 seconds to switch
off the active program.
decreases the running time by 15 minutes. To move more quickly, keep
the button depressed. Confirm the time with middle button. The basic
settings are now stored in the control panel’s memory.
Lighting.
The lighting comes on/goes off automatically when the facility starts/
shuts down. The lighting can also be controlled manually by pressing the
right button when the lighting symbol shows at the bottom right of the
display. The symbol shows white when the lighting is off and yellow when
the lighting is on.
Code lock.
Prevents unauthorised users from changing the programmed settings.
Main power switch.
This switch, on the underside of the relay box, SE sauna heater and
small steam generators, should be used only when the facility is to
remain switched off for a prolonged period of time.
Note! Place the thermometer in the sauna room at a height where the
values shown correspond exactly with the figures displayed on the CC
300T panel.
Stand-by.
The stand-by function is invaluable for Tylarium facilities in hotels, public
baths, etc., where visitor frequency varies. During off-peak hours the
equipment is set at stand-by heat, which can rapidly be raised to the
desired temperature by pressing the ON button or using an external
switch. This stand-by feature can yield substantial savings every year.
The examples below show how easy it is to program a suitable bathing
schedule.
Examples of Stand-by operation.
Here are examples of three different options for public facilities open
between 8 am to 8 pm, with varying numbers of visitors:
Option 1) A limited number of visitors use the facility sporadically
throughout the day. Program “stand-by” between 8 am and 8 pm. Bathers
(or the attendant responsible) activate the bathing cycle by pressing the
control panel’s ON button.
Option 2) A limited number of visitors use the facility sporadically
between 8 am and 2 pm. From 2 pm to 8 pm there is a steady flow of
bathers. Program “stand-by” between 8 am and 2 pm, and program a
permanent “ON” time from 2 pm to 8 pm. Visitors during the morning
activate the bathing cycle by pressing the control panel’s ON button.
Option 3) Large numbers of bathers 8–10 am, 1–2 pm and 6–8 pm. The
rest of the day, the facility is used only sporadically. Program “stand-by”
between 8 am and 8 pm and program permanent “ON” times for the peak
periods above. Visitors during off-peak times activate the bathing cycle
by pressing the control panel’s ON button.
SETTINGS
CC 300
ºc
22
MENU
R
Fig. 2. Normal display
Initial start-up.
When you switch on the control panel for the first time, you must
configure certain basic settings. First select the relevant region and
confirm your choice by pressing the middle button. Then select the
desired language and confirm with the middle button. Next, use the left
and right buttons to set the correct date and time, and confirm with the
middle button. Finally, set the running time for a manually activated
bathing cycle. (The standard setting is for 3 hours, but you can choose
1–24 hours.) Move up/down with the right/left button respectively until the
desired running time is displayed. Each button press increases/
8
MANUAL ON/OFF.
Setting the bathing temperature.
Select [MENU] in the Normal display and then select the thermometer
symbol. Use the arrow keys to enter the desired temperature and then
confirm with [OK].
Starting the bathing cycle.
Then select the Return symbol, confirm with the middle button and select
the ON/OFF symbol to start the bathing cycle. To switch the unit off,
press once more on ON/OFF. The symbol shows red when the facility is
switched off, and green when the facility is in operation.
AUTOMATIC ON/OFF.
Setting the bathing temperature.
Select [MENU] in the Normal display and then select the thermometer
symbol. Use the arrow keys to enter the desired temperature and then
confirm with [OK].
Starting the timer function.
Select [MENU] in the Normal display. Select [Program] and then [Timer].
Enter the countdown time (= time remaining before the facility is
automatically switched on) and confirm with OK.
The switch-on time has now been set and the bathing cycle will begin
automatically at the pre-set time. The countdown to the switch-on time is
shown at the top left of the display. You can switch off the countdown
Page 9
function at any time by pressing twice on the button under the ON/OFF
symbol. To switch off the equipment after the bathing cycle has begun,
press just once on the ON/OFF button.
PROGRAMMING THE WEEKLY TIMER
with different settings for different days of the week, or with the
same setting for every day of the week.
Timer
Fig. 3. Program display
Översikt Åter
OK
R
Setting on/off/stand-by times and temperature.
Select [MENU] in the Normal display and then select [Program]. Select
[Program] one more time in the Program display (see fig. 3). When you
press [OK] the highlighted text [Add] changes colour to dark blue. You
are now in the Programming mode. First use the arrow keys to select the
desired weekday (current choice is shown in red). You can select each
weekday separately or choose Monday–Sunday (for the same setting on
all days), Monday–Friday or Saturday–Sunday. Confirm with [OK]. Then
set the start time. Each key press increases/decreases the time shown
by 15 minutes. Press [OK] when the desired start time is displayed. Then
set the desired switch-off time and press [OK]. Indicate whether the
facility is to be on, off or on stand-by for the time chosen The ON/OFF
symbol shows green if the facility is to be on, red if it is to be off and
orange for stand-by. When selecting the ON mode, you must also set the
desired temperature. Use the arrow keys and confirm with [OK]. To
program a new value, press the right button once to highlight [Add] and
then press [OK]. Then repeat the procedure described above. To return
to the Normal display, select [Back] and confirm with [OK]. Select [Back]
once more and then [OK]. If no buttons are pressed, the control panel
automatically reverts to the Normal display after approx. 30 seconds. To
delete all pre-programmed times, select [Clear calendar]. You can also
temporarily deactivate all programmed values by selecting [Calendar
OFF].
For a simple overview of the pre-programmed schedule select [Overview]
in the Program display. A schematic bar chart diagram shows red for
times when the facility is switched off, green when it is in operation and
yellow when it is on stand-by.
When ON is pressed while the bathing facility is in stand-by mode, the
temperature immediately begins to rise to the pre-set value for bathing.
After 1 hour, the temperature automatically reverts to the stand-by
temperature. Each time the ON button is pressed, a new 1-hour
operating cycle is started.
When the facility is in the OFF mode, the settings are those that were
entered as part of the initial start-up process.
At any time while the facility is operational, you can switch it off manually
by pressing OFF. (This switches off only the current bathing cycle.)
You can also deactivate the entire calendar function temporarily, for
example, to carry out service or maintenance, and then reactivate it.
BATHING OUTSIDE PROGRAMMED TIMES
if the control panel’s security code function has been activated.
The Tylarium can also be used at times other than those that have been
programmed. Pressing ON starts a 1-hour bathing cycle. To prolong the
bathing period, simply press ON again. The bathing cycle is terminated
automatically 1 hour after the ON button has last been pressed.
IMPORTANT! Don’t forget to use the security code to lock the panel.
PANEL SETTINGS
CC 300
Display.
LCD brightness.
Select [MENU] in the Normal display, [Service] and then [Display].
Highlight [(Brightness (%)] and press the middle button. The highlighted
text then turns dark blue and the value for the brightness of the LCD
display can be changed. Press [OK] to confirm.
LCD brightness in sleep mode.
Select [MENU] in the Normal display, [Service] and then [Display].
Highlight [Stand by] and press the middle button. The highlighted text
then turns dark blue and the value for the brightness of the LCD display
when the panel is on stand-by can be changed. Press [OK] to confirm.
(The factory setting is 30%.)
Countdown to LCD sleep mode.
Select [MENU] in the Normal display, [Service] and then [Display].
Highlight [Stand by time] and press the middle button. The highlighted
text then turns dark blue, and you can reduce or extend the length of time
it takes before the LCD display dims after the panel has switched to
stand-by. Press [OK] to confirm.
Service.
See SERVICE SETTINGS
Code lock.
Select [MENU] in the Normal display and then [Service]. Use the arrow
keys to move to [Code lock] and press [OK]. Enter the desired code. Use
the arrow keys to display the correct combination and confirm with [OK].
The security code function is automatically activated during programming
and the panel shows Normal display.
To return to unlocked mode, repeat the above procedure and set the
code to 0000.
It is not possible to change any settings when the security function has
been activated. It is possible, however, to switch both the facility and the
lighting on and off. The bathing cycle runs for the time indicated in the
Service menu under [Time outside timer]. (Factory setting: 1 hour).
A general code that always works is 1995.
IMPORTANT! Program all settings before activating security code.
Language.
Select [MENU] in the Normal display and then [Service]. Select
language. Use the arrow keys to select the required language and then
press [OK].
Clock.
Select [MENU] in the Normal display and then [Service]. Select [Set
clock). First use the arrow keys to set the right day and confirm with [OK].
Then set the correct time; first the hour and then the minutes.
Factory settings.
Select [MENU] in the Normal display and then [Service]. Select [Factory
settings]. Use the arrow keys to select [Yes] or [No] and then press [OK].
Selecting [Yes] deletes all your own programmed settings and the panel
reverts to the original factory settings.
SERVICE SETTINGS
CC 300
Service.
The Service menu enables the bathing facility attendant to change
certain settings such as the maximum bathing temperature. However, we
recommend that the original factory settings are always retained. The
Service menu is protected by a code to prevent unauthorised users from
changing factory settings. In the Normal display press [MENU] and then
[Service]. Select [Service] and enter the code 124.
System settings.
Maximum running time
9
Page 10

[Max running time (hrs)] – The running time that was set at the initial
start-up. This setting does not apply when the equipment has been
programmed. Adjustable from 1–24 hrs. Factory setting: 3 hrs.
Temperature unit
[Temperature (°C/°F)] – This feature enables you to display temperatures
in Celsius or Fahrenheit.
Test menu
The Test menu is used only for trouble-shooting and technical support
via Tylö.
Max temperature.
[Max temp (°C/°F)] – Used to set the maximum temperature to which the
facility can be programmed. For Tylarium bathing, the maximum
temperature is 55°C.
Temperature reduction during stand-by.
[Temp reduction Stand by (°C/°F)] – This is where you indicate the
reduction in temperature from the programmed bathing temperature to
the stand-by temperature. Factory setting: 30°C.
Max. running time during stand-by.
[On time Stand by (mins)) – The duration of the bathing cycle that is
initiated when the ON button is pressed while the facility is on stand-by.
Factory setting: 60 minutes.
Max running time outside programmed time.
[Time outside timer (mins)] – The duration of the bathing cycle outside
code-locked, programmed time.
Removing limescale
[De-scaling (hrs)] – Timer function that records total operating time and
counts down to signal when it is time to clean the equipment from any
limescale deposits. Factory setting: 40 hours.
In the event of a problem, please contact your Tylö
retailer.
© This content may not be reproduced in part or in whole without written permission from Tylö.
Tylö reserves the right to amend specifications of materials, construction and design.
10
Page 11
345
INSTALLATION CC 300T
Please read these instructions together with the installation
instructions supplied with the sauna heater or steam generator.
Fig. A – TYLARIUM.
(Sauna heater type SK, SDK, and steam generator type VA/VB).
1 = sauna heater. 2 = humidity/temperature sensor. 3 = control panel CC
300T. 4 = external on/off switch (where applicable). 5 = main electrical
distribution box. 6 = relay box RB30/60. 7 = steam generator. 8 =
amplifier.
Fig. B – TYLARIUM.
(Sauna heater type SE and steam generator type VA/VB).
1 = sauna heater. 2 = humidity/temperature sensor. 3 = control panel CC
300T. 4 = external on/off switch (where applicable). 5 = main electrical
distribution box. 7 = steam generator. 8 = amplifier.
Relay box (RB).
(No relay box is needed with Tylö SE sauna heaters).
Install outside the Tylarium and at any distance from the Tylarium in a
cool, well-ventilated room. Important! Always ensure a minimum distance
of at least 1 metre between the relay box and the CC 300T.
(Sauna heater type SK, SDK and steam generator type VA/VB with
control panel type CC 300T).
1 = sauna heater. 2 = humidity/temperature sensor. 3 = control panel
CC 300T. 4 = external on/off switch (where applicable). 6 = relay box
RB30/60. 7 = steam generator. 8 = amplifier.
Check the type plate on the sauna heater/steam generator to ensure that
the equipment is connected to the right supply voltage.
Do not forget to earth/ground the equipment!
Fig. D – wiring diagram.
(Sauna heater type SE and steam generator type VA/VB with control
panel type CC 300T).
1 = sauna heater. 2 = humidity/temperature sensor.3 = control panel CC
300T. 4 = external on/off switch (where applicable). 7 = steam generator.
8 = amplifier.
Check the type plate on the sauna heater/steam generator to ensure that
the equipment is connected to the right supply voltage.
Do not forget to earth/ground the equipment!
OPERATING INSTRUCTIONS
CC 300T
Shielded low-current cable (LiYCY 6-core).
Use only a shielded low-current cable (LiYCY, 6-core) between the CC
300T and the relay box, SE sauna heater or steam generator. Connect
the shielding to terminal 12 on the CC panel.
Location of thermistor, humidity/temperature sensor.
Install 1500 mm above floor level (but not directly above a sauna heater).
Place the sensor so that it does not risk being affected directly or
indirectly by a jet of steam.
Amplifier.
Install outside the Tylarium, no more than 2 metres from the sensor, but
at any distance from the CC 300T panel. Use only a shielded low-current
cable (4-core) between the amplifier and the CC 300T. Connect the
shielding to terminal 25 on the amplifier.
Lighting.
Connect the lighting as indicated in the wiring diagram.
Optional external on/off-switch (quick-break).
May be placed at any distance from the Tylarium. Connect to the CC
300T using a low-current cable – see wiring diagram. If more than one
external on/off switch is used, the switches must be connected in
parallel. Press once on the external switch to start the CC300T, which
then remains in operation for as long as the running time has been set.
(See ‘Initial start-up’.) The next time you press the external switch, this
will turn off the CC300T – unless it has been pre-programmed or is
protected by a security code. If the CC300T has been pre-programmed
or is protected by a security code, it must be switched off by pressing the
ON/OFF button on the control panel.
Optional external on/off-switch (maintained contact).
May be placed at any distance from the Tylarium. Connect to the CC
300T using a low-current cable – see wiring diagram. If more than one
external on/off switch is used, the switches must be connected in
parallel. When connected to receive a constant signal, the facility
remains operational for as long as contact closure is maintained between
terminals 19 and 20, but only up to the maximum running time that has
been set.
Connection to a central computer.
The unit can also be connected to a central computer that transmits a
momentary contact closure (short impulse) or constant signal between
terminals 19 and 20 in the CC 300T. The maximum permissible running
time is 24 hours.
Important! In order for the steam generator’s automatic emptying
function to work, the control panel must be switched off for at least 1.5
hours each day.
RH%
OK
R
12
Fig. 1. Menu display
1 = Left button, 2 = Middle button, 3 = Right button. 4 = Symbols/text that
correspond to the respective button. 5 = Symbols/text for setting and
displaying current values.
Buttons and display.
There are three buttons on the control panel. Symbols shown above the
buttons at the bottom of the display correspond to the respective button.
These symbols differ depending on the panel’s current mode. When the
arrows are shown in the Menu display (fig. 1), use the left and right
buttons to move to the desired symbol. To select a symbol, confirm with
the middle button.
In the Normal display (fig. 2) the left button has an ON/OFF function. The
symbol for this appears at the bottom of the display above the left button.
When the facility is operational, this symbol shows green; when it is
switched off, the symbol is red; and when it is on stand-by, the symbol is
orange. The right button controls the lighting function. The lighting
symbol shows yellow when the lighting is on and white when the lighting
is off. The display also shows the current temperature/humidity.
To return to the Normal display from another mode, press the middle
button until the Normal display shows.
When a program is active, press the left button for 2 seconds to switch
off the active program.
Controlling other Tylö products.
The CC300T can also be used to control other Tylö products, such as a
Tylö Fresh fragrance dispenser, which can be activated while the panel is
in operation. Wiring for Tylö Fresh or other CC-panels must be
connected between terminals 40 and 41 on the CC 300T and terminals
19 and 20 on the other Tylö product. See Fig. J for an example of this.
Fig. C, E – wiring diagram.
11
Page 12
%
33
R
Fig. 2. Normal display
22
ºc
MENU
Initial start-up.
When you switch on the control panel for the first time, you must
configure certain basic settings. First select the relevant region and
confirm your choice by pressing the middle button. Then select the
desired language and confirm with the middle button. Next, use the left
and right buttons to set the correct date and time, and confirm with the
middle button. Finally, set the running time for a manually activated
bathing cycle. (The standard setting is for 3 hours, but you can choose
1–24 hours.) Move up/down with the right/left button respectively until the
desired running time is displayed. Each button press increases/
decreases the running time by 15 minutes. To move more quickly, keep
the button depressed. Confirm the time with middle button. The basic
settings are now stored in the control panel’s memory.
Lighting.
The lighting comes on/goes off automatically when the facility starts/
shuts down. The lighting can also be controlled manually by pressing the
right button when the lighting symbol shows at the bottom right of the
display. The symbol shows white when the lighting is off and yellow when
the lighting is on.
Code lock.
Prevents unauthorised users from changing the programmed settings.
Main power switch.
This switch, on the underside of the relay box, SE sauna heater and
small steam generators, should be used only when the facility is to
remain switched off for a prolonged period of time.
Note! Place the thermometer (hygrometer) in the Tylarium at a height
where the values shown correspond exactly with the figures displayed on
the CC 300T panel.
Stand-by.
The stand-by function is invaluable for Tylarium facilities in hotels, public
baths, etc., where visitor frequency varies. During off-peak hours the
equipment is set at stand-by heat, which can rapidly be raised to the
desired temperature by pressing the ON button or using an external
switch. This stand-by feature can yield substantial savings every year.
The examples below show how easy it is to program a suitable bathing
schedule.
Examples of Stand-by operation.
Here are examples of three different options for public facilities open
between 8 am to 8 pm, with varying numbers of visitors:
Option 1) A limited number of visitors use the facility sporadically
throughout the day. Program “stand-by” between 8 am and 8 pm. Bathers
(or the attendant responsible) activate the bathing cycle by pressing the
control panel’s ON button.
Option 2) A limited number of visitors use the facility sporadically
between 8 am and 2 pm. From 2 pm to 8 pm there is a steady flow of
bathers. Program “stand-by” between 8 am and 2 pm, and program a
permanent “ON” time from 2 pm to 8 pm. Visitors during the morning
activate the bathing cycle by pressing the control panel’s ON button.
Option 3) Large numbers of bathers 8–10 am, 1–2 pm and 6–8 pm. The
rest of the day, the facility is used only sporadically. Program “stand-by”
between 8 am and 8 pm and program permanent “ON” times for the peak
periods above. Visitors during off-peak times activate the bathing cycle
by pressing the control panel’s ON button.
SETTINGS
CC 300T
MANUAL ON/OFF.
Setting the bathing temperature.
Select [MENU] in the Normal display and then select the thermometer
symbol. Use the arrow keys to enter the desired temperature and then
confirm with [OK].
Setting the humidity level.
Select the water droplet symbol. Use the arrow keys to enter the desired
humidity (RH%). Confirm with [OK]. Note! The value for the maximum
humidity varies according to the bathing temperature selected.
Starting the bathing cycle.
Then select the Return symbol, confirm with the middle button and select
the ON/OFF symbol to start the bathing cycle. To switch the unit off,
press once more on ON/OFF. The symbol shows red when the facility is
switched off, and green when the facility is in operation.
AUTOMATIC ON/OFF.
Setting the bathing temperature.
Select [MENU] in the Normal display and then select the thermometer
symbol. Use the arrow keys to enter the desired temperature and then
confirm with [OK].
Setting the humidity level.
Select the water droplet symbol. Use the arrow keys to enter the desired
humidity [(RH%)]. Confirm with [OK]. Note! The value for the maximum
humidity varies according to the bathing temperature selected.
Starting the timer function.
Select [MENU] in the Normal display. Select [Program] and then [Timer].
Enter the countdown time (= time remaining before the facility is
automatically switched on) and confirm with OK.
The switch-on time has now been set and the bathing cycle will begin
automatically at the pre-set time. The countdown to the switch-on time is
shown at the top left of the display. You can switch off the countdown
function at any time by pressing twice on the button under the ON/OFF
symbol. To switch off the equipment after the bathing cycle has begun,
press just once on the ON/OFF button.
If the humidity level exceeds 30% when the equipment is switched off, an
automatic drying cycle will be activated. This takes about 20 minutes
(factory setting).
PROGRAMMING THE WEEKLY TIMER
with different settings for different days of the week, or with the
same setting for every day of the week.
Fig. 3. Program display
Setting on/off/stand-by times, temperature/humidity.
Select [MENU] in the Normal display and then select [Program]. Select
[Program] one more time in the Program display (see fig. 3). When you
press [OK] the highlighted text [Add] changes colour to dark blue. You
are now in the Programming mode. First use the arrow keys to select the
desired weekday (current choice is shown in red). You can select each
weekday separately or choose Monday–Sunday (for the same setting on
all days), Monday–Friday or Saturday–Sunday. Confirm with [OK]. Then
set the start time. Each key press increases/decreases the time shown
Timer
Översikt Åter
OK
R
12
Page 13

by 15 minutes. Press [OK] when the desired start time is displayed. Then
set the desired switch-off time and press [OK]. Indicate whether the
facility is to be on, off or on stand-by for the time chosen The ON/OFF
symbol shows green if the facility is to be on, red if it is to be off and
orange for stand-by. When selecting the ON mode, you must also set the
desired temperature and humidity. Use the arrow keys and confirm with
[OK]. To program a new value, press the right button once to highlight
[Add] and then press [OK]. Then repeat the procedure described above.
To return to the Normal display, select [Back] and confirm with [OK].
Select [Back] once more and then [OK]. If no buttons are pressed, the
control panel automatically reverts to the Normal display after approx. 30
seconds. To delete all pre-programmed times, select [Clear calendar].
You can also temporarily deactivate all programmed values by selecting
[Calendar OFF].
For a simple overview of the pre-programmed schedule select [Overview]
in the Program display. A schematic bar chart diagram shows red for
times when the facility is switched off, green when it is in operation and
yellow when it is on stand-by.
When ON is pressed while the bathing facility is in stand-by mode, the
temperature immediately begins to rise to the pre-set value for bathing.
After 1 hour, the temperature automatically reverts to the stand-by
temperature. Each time the ON button is pressed, a new 1-hour
operating cycle is started.
When the facility is in the OFF mode, the settings are those that were
entered as part of the initial start-up process.
At any time while the facility is operational, you can switch it off manually
by pressing OFF. (This switches off only the current bathing cycle.)
If the humidity level exceeds 30% when the equipment is switched off, an
automatic drying cycle will be activated. This takes about 20 minutes
(factory setting).
You can also deactivate the entire calendar function temporarily, for
example, to carry out service or maintenance, and then reactivate it.
BATHING OUTSIDE PROGRAMMED TIMES
if the control panel’s security code function has been activated.
The Tylarium can also be used at times other than those that have been
programmed. Pressing ON starts a 1-hour bathing cycle. To prolong the
bathing period, simply press ON again. The bathing cycle is terminated
automatically 1 hour after the ON button has last been pressed.
IMPORTANT! Don’t forget to use the security code to lock the panel.
PANEL SETTINGS
CC 300T
Display.
LCD brightness.
Select [MENU] in the Normal display, [Service] and then [Display].
Highlight [(Brightness (%)] and press the middle button. The highlighted
text then turns dark blue and the value for the brightness of the LCD
display can be changed. Press [OK] to confirm.
LCD brightness in sleep mode.
Select [MENU] in the Normal display, [Service] and then [Display].
Highlight [Stand by] and press the middle button. The highlighted text
then turns dark blue and the value for the brightness of the LCD display
when the panel is on stand-by can be changed. Press [OK] to confirm.
(The factory setting is 30%.)
Countdown to LCD sleep mode.
Select [MENU] in the Normal display, [Service] and then [Display].
Highlight [Stand by time] and press the middle button. The highlighted
text then turns dark blue, and you can reduce or extend the length of time
it takes before the LCD display dims after the panel has switched to
stand-by. Press [OK] to confirm.
Service.
See SERVICE SETTINGS
Code lock.
Select [MENU] in the Normal display and then [Service]. Use the arrow
keys to move to [Code lock] and press [OK]. Enter the desired code. Use
the arrow keys to display the correct combination and confirm with [OK].
The security code function is automatically activated during programming
and the panel shows Normal display.
To return to unlocked mode, repeat the above procedure and set the
code to 0000.
It is not possible to change any settings when the security function has
been activated. It is possible, however, to switch both the facility and the
lighting on and off. The bathing cycle runs for the time indicated in the
Service menu under [Time outside timer]. (Factory setting: 1 hour).
A general code that always works is 1995.
IMPORTANT! Program all settings before activating security code.
Language.
Select [MENU] in the Normal display and then [Service]. Select
language. Use the arrow keys to select the required language and then
press [OK].
Clock.
Select [MENU] in the Normal display and then [Service]. Select [Set
clock). First use the arrow keys to set the right day and confirm with [OK].
Then set the correct time; first the hour and then the minutes.
Factory settings.
Select [MENU] in the Normal display and then [Service]. Select [Factory
settings]. Use the arrow keys to select [Yes] or [No] and then press [OK].
Selecting [Yes] deletes all your own programmed settings and the panel
reverts to the original factory settings.
SERVICE SETTINGS
CC 300T
Service.
The Service menu enables the bathing facility attendant to change
certain settings such as the maximum bathing temperature. However, we
recommend that the original factory settings are always retained. The
Service menu is protected by a code to prevent unauthorised users from
changing factory settings. In the Normal display press [MENU] and then
[Service]. Select [Service] and enter the code 124.
System settings.
Limit for automatic drying cycle
[Dryup limit (%)] – When the facility switches off, it measures the relative
humidity in the room. If this exceeds 30% (factory setting), the equipment
initiates a drying cycle.
Drying temperature
[Dryiup temperature (°C)] – The ambient temperature in the facility during
the drying cycle. Factory setting: 80°C.
Drying time
[Dryiup time (mins.)] – The duration of the drying cycle. Factory setting:
20 minutes.
Minimum temperature for steam generation
[Min. temp. steam (°C)] – The lowest temperature at which the steam
generator starts. Factory setting: 40°C.
Maximum running time
[Max running time (hrs)] – The running time that was set at the initial
start-up. This setting does not apply when the equipment has been
programmed. Adjustable from 1–24 hrs. Factory setting: 3 hrs.
Temperature unit
[Temperature (°C/°F)] – This feature enables you to display temperatures
in Celsius or Fahrenheit.
Test menu
The Test menu is used only for trouble-shooting and technical support
via Tylö.
Max temperature.
[Max temp (°C/°F)] – Used to set the maximum temperature to which the
facility can be programmed. For Tylarium bathing, the maximum
temperature is 55°C.
Temperature reduction during stand-by.
[Temp reduction Stand by (°C/°F)] – This is where you indicate the
reduction in temperature from the programmed bathing temperature to
the stand-by temperature. Factory setting: 30°C.
Max. running time during stand-by.
[On time Stand by (mins)) – The duration of the bathing cycle that is
initiated when the ON button is pressed while the facility is on stand-by.
Factory setting: 60 minutes.
13
Page 14

Max running time outside programmed time.
[Time outside timer (mins)] – The duration of the bathing cycle outside
code-locked, programmed time.
Removing limescale
[De-scaling (hrs)] – Timer function that records total operating time and
counts down to signal when it is time to clean the equipment from any
limescale deposits. Factory setting: 40 hours.
TYLARIUM
A Tylarium gives you full freedom to enjoy all types of sauna bathing –
dry saunas, wet saunas and steam saunas, too. As the relative humidity
in a Tylarium tends to be higher than in traditional sauna bathing, you are
kindly requested to take note of the following advice.
• Treat the lower mouldings of any windows in sauna room doors or
walls with boat varnish, and seal the gap between the pane of glass
and the moulding with bathroom silicone. This prevents any
condensation on the glass from seeping into the gap.
• Treat threshold and door handles with a couple of coats of boat
varnish. This preserves the finish of the wood and makes cleaning the
sauna much simpler. Oil sauna benches, skirting panels and backrests
on both sides with Tylö sauna oil.
IMPORTANT! Leave all other wood in the sauna room untreated.
In the event of a problem, please contact your Tylö
retailer.
© This content may not be reproduced in part or in whole without written permission from Tylö.
Tylö reserves the right to amend specifications of materials, construction and design.
14
Page 15
GEBRAUCHSANLEITUNG
CC 300
OK
R
1234 5
Bild 1. Menüdisplay
1 = Linker Knopf, 2 = Mittelknopf, 3 = Rechter Knopf. 4 = Symbole/Text,
die dem jeweiligen Knopf entsprechen. 5 = Symbole/Text für Einstellung
und Anzeige aktueller Werte.
Knöpfe und Display.
Auf dem Kontrollgerät sitzen drei Knöpfe. Über den Knöpfen sind am
unteren Rand des Displays Symbole zu sehen, die dem jeweiligen Knopf
entsprechen. Diese Symbole sehen je nach Betriebslage des
Kontrollgeräts unterschiedlich aus. Wenn die Pfeile im Menüdisplay zu
sehen sind (Abb. 1) kann man mit dem linken und rechten Knopf zum
gewünschten Symbol gelangen. Zur Auswahl eines Symbols ist dieses
mit dem Mittelknopf zu bestätigen.
Im Normaldisplay (Abb. 2) ist die Funktion des linken Knopfes ON/OFF,
und dessen Symbol ist am unteren Displayrand zu sehen. Wenn die
Anlage eingeschaltet ist, ist dieses Symbol grün, bei ausgeschalteter
Anlage wird das Symbol rot und die Standby-Anzeige leuchtet orange.
Der rechte Knopf dient dem Ein- und Ausschalten der Beleuchtung. Das
Lampensymbol ist bei eingeschalteter Beleuchtung gelb, bei
ausgeschalteter Beleuchtung weiss. Das Display zeigt auch die aktuelle
Temperatur an.
Bleibt der Mittelknopf längere Zeit eingedrückt, wird das Kontrollgerät
wieder in Normaldisplay-Lage zurückversetzt, falls es sich in einer
anderen Displaylage befunden hat.
Wenn ein Programm aktiv ist, 2 Sekunden lang den linken Knopf
drücken, um das Programm auszuschalten.
ºc
22
MENU
R
manuellem Start einstellen. Die Betriebszeit ist ab Werk auf drei Stunden
eingestellt, lässt sich aber auf 1 bis 24 Stunden einstellen. Der Wert lässt
sich mit dem rechten Knopf erhöhen (bzw. mit dem linken Knopf
senken), bis die gewünschte Betriebszeit im Display angezeigt wird. Mit
jedem Knopfdruck erhöht bzw. verringert sich die Betriebszeit um 15
Minuten. Zur schnelleren Wertumstellung, den Knopf eingedrückt halten.
Betriebszeit mit dem Mittelknopf bestätigen. Damit ist die
Grundeinstellung abgeschlossen.
Beleuchtung.
Leuchtet automatisch bei Einschalten der Anlage und erlischt
automatisch bei Ausschalten der Anlage. Die Beleuchtung lässt sich
auch manuell ein- bzw. ausschalten. Hierzu den rechten Knopf drücken,
wenn unten rechts im Display das Lampensymbol zu sehen ist. Das
Symbol ist bei ausgeschalteter Beleuchtung weiß, bei eingeschalteter
Beleuchtung gelb.
Codesperre.
Verhindert unbefugtes Ändern der eingestellten Werte.
Hauptsromschalter.
Auf der Unterseite der Relaisbox, des SE-Saunaofens und der kleineren
Dampfgeneratoren sitzt ein Hauptschalter, der nur auszuschalten ist,
wenn die Anlage längere Zeit außer Funktion gesetzt werden soll.
Tipp! Die Höhe, in der das Thermometer in der Saunakabine angebracht
wird, ist so zu wählen, dass die angezeigten Werte exakt mit den auf
dem Display des CC 300 angezeigten Zahlen übereinstimmen.
Standby.
Die Standby-Funktion ist wichtig für Tylariums in Hotels, Hallenbädern
usw. mit wechselnder Besucherfrequenz. Während besucherschwachen
Zeiten ist die Anlage auf die energiesparende „Bereitschaftswärme“
eingestellt. Durch Drücken der ON-Taste bzw. des externen Schalters
erhöht sich die Temperatur schnell auf die eingestellte Badetemperatur.
Diese Standby-Funktion spart im Laufe eines Jahres große
Energiekosten.
Wie aus den folgenden Beispielen hervorgeht, gibt es zahlreiche
Möglichkeiten zur Programmierung eines passenden Badeprogramms.
Beispiele Standby.
Unsere Beispiele beziehen sich auf drei verschiedene Saunaanlagen, die
im Laufe ihrer Öffnungszeit von 800 bis 2000 unterschiedliche
Besucherfrequenzen haben.
Alt. 1) Kleinere Gruppen von Saunabesuchern kommen sporadisch
während der gesamten Öffnungszeit. Standby-Funktion von 800 bis 2000
programmieren. Die Saunabesucher (oder ein Bademeister) aktivieren
das Badeprogramm durch Drücken der ON-Taste am Kontrollgerät.
Alt. 2) Kleinere Gruppen von Saunabesuchern kommen sporadisch von
800 bis 1400. Nach 1400 Uhr ist die Sauna bis zu ihrer Schließung stark
besucht. Standby-Funktion von 800 bis 1400 programmieren und die
Sauna danach von1400 bis 2000 Uhr in Betriebsstatus ON betreiben.
Saunabesucher, die bis 14 Uhr kommen, aktivieren das Badeprogramm
durch Drücken der ON-Taste am Kontrollgerät.
Alt. 3) In den Zeiten von 800 bis 1000, 1300- 1400 und 1800- 2000 Uhr
ist die Sauna gut besucht. Zu den übrigen Zeiten kommen nur
sporadische Besucher. Standby-Funktion von 800 bis 2000
programmieren und Betriebsstatus ON für die oben genannten Zeiten mit
hoher Besucherfrequenz programmieren. Die sporadischen
Saunabesucher aktivieren das Badeprogramm durch Drücken der ONTaste am Kontrollgerät.
EINSTELLUNGEN
CC 300
Abb. 2. Normaldisplay
Erste Inbetriebnahme.
Beim ersten Einschalten des Kontrollgeräts sind gewisse Einstellungen
vorzunehmen. Zunächst die Region wählen und mit dem Mittelknopf
bestätigen. Danach gewünschte Sprache wählen und mit dem
Mittelknopf bestätigen. Als nächstes Datum und Zeit einstellen. Mit dem
linken und rechten Knopf die gewünschten Werte wählen und mit dem
Mittelknopf bestätigen. Zuletzt die gewünschte Betriebszeit bei
MANUELLES EIN-/AUSSCHALTEN.
Einstellen der Badetemperatur.
Im Normaldisplay [Menü] und danach Thermometer-Symbol wählen.
Gewünschte Temperatur einstellen und mit [OK] bestätigen.
Anlage einschalten
Danach das ENTER-Symbol wählen, mit dem Mittelknopf bestätigen und
das ON/OFF-Symbol drücken, um die Anlage einzuschalten. Zum
Ausschalten der Anlage erneut auf ON/OFF drücken. Das Symbol
leuchtet rot, wenn die Anlage ausgeschaltet ist, und grün, wenn sie
eingeschaltet ist.
15
Page 16
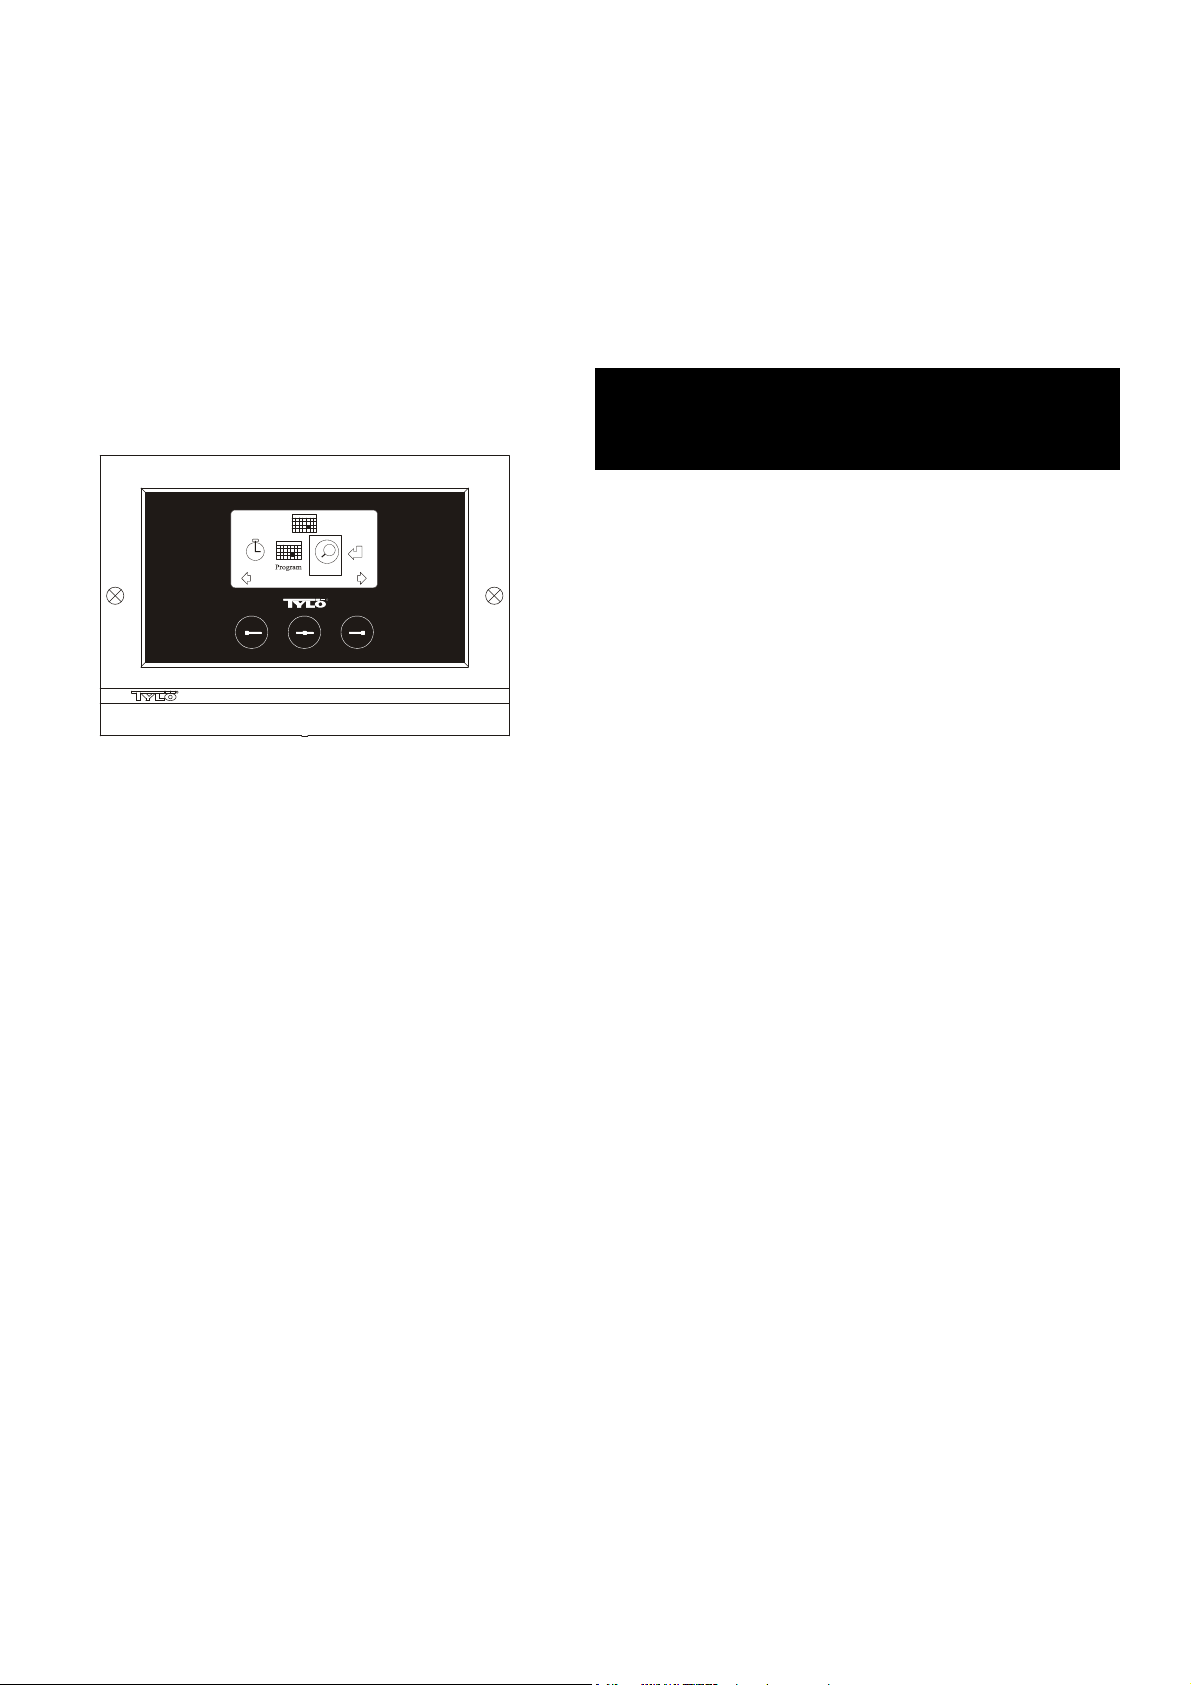
AUTOMATISCHES EIN-/AUSSCHALTEN.
Einstellen der Badetemperatur.
Im Normaldisplay [Menü] und danach das Thermometer-Symbol wählen.
Gewünschte Temperatur einstellen und mit [OK] bestätigen.
Timerfunktion starten
Im Normaldisplay [Menü] wählen. Danach [Programm] und schließlich
[Zeitschalt] wählen. Einschaltzeit (Zeit bis zum Einschalten der Anlage)
einstellen und mit OK bestätigen.
Jetzt ist der Zeitpunkt eingestellt, zu dem sich die Anlage automatisch
einschaltet. Die verbleibende Zeit bis zum Einschaltzeitpunkt wird oben
links im Display angezeigt. Die Timerfunktion lässt sich jederzeit durch
zweimaliges Drücken der Taste unter der ON/OFF-Symbole ausschalten.
Hat sich die Anlage bereits eingeschaltet, lässt sie sich durch einmaliges
Drücken der ON/OFF-Taste ausschalten.
WOCHENPROGRAMMIERUNG
erlaubt unterschiedliche Einstellungen für unterschiedliche
Wochentage oder dieselbe Einstellung für alle Wochentage.
Timer
Översikt Åter
OK
R
Die gesamte Kalenderfunktion lässt sich auch vorübergehend
desaktivieren (z.B. für eine Servicemaßnahme) und danach wieder
aktivieren.
BADEN AUSSERHALB PROGRAMMIERTER
ZEITEN
wenn das Kontrollgerät durch einen Code gesichert ist.
Das Tylarium lässt sich auch außerhalb der programmierten Zeiten
anwenden. Bei einmaliger Betätigung der ON-Taste startet eine
einstündige Badeperiode. Zur Verlängerung der Badeperiode, erneut auf
ON drücken. Eine Stunde nach dem letzten Betätigen der ON-Taste
schaltet sich die Anlage automatisch ab.
HINWEIS! Nicht vergessen, das Kontrollgerät durch die Codesperre zu
sichern.
EINSTELLUNGEN DES
KONTROLLGERÄTS
CC 300
Display.
LCD-LEUCHTSTÄRKE.
Im Normaldisplay [Menü], danach [Service] und schließlich [Display]
wählen. [Lichtstärke (%)] wählen und auf den Mittelknopf drücken. Das
Symbol wird dunkelblau und der Wert der Display-Leuchtstärke lässt sich
ändern. Einstellung mit [OK] bestätigen.
Abb. 3. Programmdisplay
Einstellung von Ein/Aus/Standby, Temperatur.
Im Normaldisplay [Menü] und danach Programm wählen. Im
Programmdisplay erneut Programm wählen (siehe Abb. 3). Auf [OK]
drücken. Das Symbol [Add] wird dunkelblau. Jetzt befinden Sie sich im
Programm-Modus. Mit den Pfeiltasten den ersten gewünschten Tag
wählen (der aktuelle Text ist rot gekennzeichnet). Man kann jeden
Wochentag einzeln wählen, oder aber direkt Montag-Sonntag wählen
(um dieselbe Einstellung für alle Wochentage zu programmieren),
Montag–Freitag oder Samstag–Sonntag wählen. Mit [OK] bestätigen.
Danach die Uhrzeit einstellen, zu der sich die Anlage einschalten soll. Mit
jedem Drücken der Pfeiltaste erhöht sich die Zeit um 15 Minuten. Wenn
die gewünschte Zeit im Display erscheint, diese mit [OK] bestätigten.
Danach gewünschte Ausschaltzeit wählen und mit [OK] bestätigen.
Wählen Sie, ob die Anlage zu dem angegebenen Startzeitpunkt
eingeschaltet oder auf Standby sein soll. Das ON/OFF-Symbol ist grün,
wenn die Anlage eingeschaltet sein soll, rot, wenn die Anlage
ausgeschaltet sein soll, und orange, wenn die Anlage auf Standby
stehen soll. Bei Einschalten der Anlage ist auch die gewünschte
Temperatur einzustellen. Mit den Pfeiltasten den gewünschten Wert
wählen und mit [OK] bestätigen. Um eine neue Programmierung
vorzunehmen, erneut auf den rechten Knopf drücken, um [Add] zu
kennzeichnen und danach mit [OK] bestätigen. Danach die oben
beschriebene Vorgehensweise wiederholen. Um wieder ins
Normaldisplay zu gelangen, [Zurück] wählen und mit [OK] bestätigen.
Erneut [Zurück] wählen und mit [OK] bestätigen. Wenn keine Tasten
bestätigt werden, stellt sich die Kontrolleinheit nach etwa 30 Sekunden
automatisch auf Normaldisplay um. Um alle programmierten Zeiten zu
löschen, wählen Sie [Kalender löschen]. Man kann auch alle Programme
vorübergehend desaktivieren, indem man [Kalender AUS] wählt.
Um eine einfache Übersicht über die vorprogrammierten Programme zu
aufzurufen, im Programmdisplay [Übersicht] wählen. Daraufhin wird in
Form von Stapeln angezeigt, wann die Anlage ausgeschaltet (rot),
eingeschaltet (grün) oder auf Standby ist (orange).
Sobald man im Standby-Modus auf ON drückt, steigt die Temperaturen
auf die voreingestellte Temperatur. Nach einer Stunde sinkt die
Temperatur automatisch wieder auf die Standby-Temperatur. Jede
Betätigung der ON-Taste startet eine neue, einstündige Badeperiode.
Wenn die Anlage in OFF-Stellung ist, gelten die bei der ersten
Inbetriebnahme gemachten Einstellungen.
Wenn die Anlage eingeschaltet ist, kann man sie durch Drücken der
OFF-Taste manuell ausschalten. (Dadurch wird nur die laufende
Badeperiode ausgeschaltet).
LCD-Leuchtstärke in Standby
Im Normaldisplay [Menü], danach [Service] und schließlich [Display]
wählen. [Standby (%)] wählen und auf den Mittelknopf drücken. Die
Kennzeichnung wird dunkelblau und der Wert für die DisplayLeuchtstärke im Standby lässt sich ändern. Einstellung mit [OK]
bestätigen. Ab Werk ist dieser Wert auf 30 % eingestellt.
Zeit bis Standby-LCD.
Im Normaldisplay [Menü], danach [Service] und schließlich [Display]
wählen. [Stand by zeit] wählen und auf den Mittelknopf drücken. Die
Markierung wird dunkelblau. Jetzt kann man einstellen, nach welcher
Zeit sich die Leuchtstärke des Displays verringern soll, nachdem das
Kontrollgerät in Standby-Modus gegangen ist. Einstellung mit [OK]
bestätigen.
Service.
Siehe SERVICEEINSTELLUNGEN
Codesperre.
Im Normaldisplay [Menü] und danach [Service] wählen. [Codesperre]
wählen und auf OK drücken. Gewünschten Code eingeben. Mit den
Pfeiltasten die entsprechenden Zahlen eingeben und mit [OK]
bestätigen. Die Codesperre wird bei Programmierung automatisch
aktiviert und das Normaldisplay erscheint wieder.
Um die Codesperre zu desaktivieren, den Code auf 0000 stellen.
Bei aktivierter Codesperre ist die Anlage gegen unbefugtes Ändern der
Einstellungen gesichert. Man kann lediglich die Anlage und die
Beleuchtung ein bzw. ausschalten. Die Anlage bleibt für die im
Servicemenü unter [Bad nicht progr. Zeit] angegebene Dauer
eingeschaltet (Werkseinstellung = 1 Stunde).
Ein allgemeiner Code, der immer funktioniert, ist 1995.
HINWEIS! Vor Programmierung der Codesperre sind alle
Einstellungen zu programmieren.
Sprache.
Im Normaldisplay [Menü] und danach [Service] wählen. Sprache wählen.
Mit den Pfeiltasten gewünschte Sprache auswählen und mit [OK]
bestätigen.
Uhr.
Im Normaldisplay [Menü] und danach [Service] wählen. [Einstellung Uhr]
wählen. Zuerst mit den Pfeiltasten den aktuellen Tag einstellen und mit
[OK] bestätigen. Danach die aktuelle Uhrzeit einstellen – erst Stunden
und dann Minuten.
16
Page 17

Werkseinstellung.
Im Normaldisplay [Menü] und danach [Service] wählen.
[Werkseinstellungen] wählen. Mit den Pfeiltasten [Ja] oder [Nein] wählen
und mit OK bestätigen. Wenn Sie [Ja] wählen, werden alle
vorgenommenen Einstellungen durch die ab Werk vorgegebenen
Einstellungen ersetzt.
SERVICEEINSTELLUNGEN
CC 300
Service.
Im Servicemenü kann der Anlagenbetrieber diverse Einstellungen
vornehmen, wie z.B. die maximale Badetemperatur. Wir empfehlen
jedoch, die Werkseinstellungen beizubehalten. Das Servicemenü ist
durch eine Codesperre gesichert, die unbefugtes Ändern der
Einstellungen verhindert. Im Normaldisplay [Menü] und danach [Service]
wählen. [Service] wählen und den Code 124 eingeben.
Systemeinstellungen.
Maximale Betriebszeit
[Max. Zeit (Std.)] – Die bei der ersten Inbetriebnahme eingestellte
Betriebszeit. Dieser Wert wird nicht berücksichtigt, wenn die Anlage nach
einem Programm betrieben wird. Der Wert lässt sich auf 1 bis 24
Stunden einstellen. Die Werkseinstellung ist 3 Stunden.
Temperatureinheit
[Temperatur (°C/F)] – Hier lässt sich wählen, ob die Temperatur in Grad
Celsius oder Fahrenheit angezeigt werden soll.
Testmenü
Das Testmenü wird nur für die Fehlersuche und den technischen
Kundendienst durch Tylö verwendet.
Max. Temperatur.
[Max. Temp. (°C/F)] – Hier lässt sich die höchste programmierbare
Temperatur für die Anlage einstellen. Für das Bad im Tylarium beträgt
die Höchsttemperatur 55°C.
Temperatursenkung bei Standby.
[Stand by Offset(°C/F)] – Temperaturdifferenz zwischen programmierter
Badetemperatur und Standby-Temperatur. Ab Werk ist dieser Wert auf
30°C eingestellt.
Max. Betriebszeit bei Standby
[Max. Zeit Stand by (Min.)] – Betriebszeit der Anlage, wenn Sie aus dem
Standby manuell mit der ON-Taste eingeschaltet wird. Ab Werk ist dieser
Wert auf 60 Minuten eingestellt.
Max. Betriebszeit außerhalb der programmierten Zeit.
[Bad nicht progr. Zeit (Min.)] – Betriebszeit der Anlage bei Codesperre
außerhalb der programmierten Zeit.
Entkalkung.
[Entkalkung (Std.)] – Dieser Parameter ist eine Timerfunktion, die angibt,
nach welcher Gesamtbetriebszeit die Anlage zu entkalken ist. Ab Werk
ist dieser Wert auf 40 Stunden eingestellt.
Wenden Sie sich bei eventuellen Problemen bitte an Ihren
Händler.
© Der Nachdruck, ganz oder teilweise, ohne schriftliche Genehmigung von Tylö, ist verboten.
Werkstoff-, Konstruktions- und Designänderungen vorbehalten.
17
Page 18

345
INSTALLATION CC 300T
Diese Anleitung ist zusammen mit der Montageanleitung des
Saunaofens bzw. des Dampfgenerators zu lesen.
Abb. A – TYLARIUM.
(Saunaofen Typ SK, SDK und Dampfgenerator Typ VA/VB).
1 = Saunaofen. 2 = Feuchte- und Temperaturfühler. 3 = Kontrollgerät CC
300T. 4 = eventueller externer Schalter Ein/Aus. 5 = Stromzentrale.
6 = Relaisbox RB30/60. 7 = Dampfgenerator. 8 = Verstärker (Amplifier).
Abb. B – TYLARIUM.
(Saunaofen Typ SE und Dampfgenerator Typ VA/VB).
1 = Saunaofen. 2 = Feuchte- und Temperaturfühler. 3 = Kontrollgerät
CC 300T. 4 = eventueller externer Schalter Ein/Aus. 5 = Stromzentrale.
7 =Dampfgenerator. 8 = Verstärker (Amplifier).
Relaisbox (RB).
(Für den SE-Ofen wird keine Relaisbox verwendet).
Wird in beliebigem Abstand außerhalb des Tylariums in einem kühlen
und belüfteten Platz installiert. Die Relaisbox darf nicht näher als einen
Meter vom CC 300T installiert werden.
Geschirmtes Schwachstromkabel (6-adriges LiYCYKabel).
Die Steuerleitung vom CC 300T zu Relaisbox, SE-Ofen oder
Dampfgenerator muss ein geschirmtes Schwachstromkabel sein (6adriges LiYCY-Kabel). Die Schirmung wird an Klemme 12 des
Kontrollgeräts angeschlossen.
Installation von Thermistor, Feuchte- und
Temperaturfühler.
Ist 1500 mm über dem Fußboden anzubringen (nicht über dem
Saunaofen).
Fühler so anbringen, dass er weder direkt noch indirekt vom Dampfstrahl
getroffen werden kann.
Verstärker (Amplifier).
Wird außerhalb des Tylariums, höchstens zwei Meter vom Fühler und in
unbegrenztem Abstand zum CC 300T installiert. Die Steuerleitung
zwischen Verstärker und CC 300T muss ein geschirmtes, 4-adriges
Schwachstromkabel sein. Die Schirmung wird an Klemme 25 des
Verstärkers angeschlossen.
von z.B. Tylö Fresh oder eines anderen Kontrollgeräts sind diese
zwischen Klemme 40 und 41 des CC 300T und zwischen Klemme 19
und 20 des anderen Tylö-Produkts anzuschließen. Siehe Beispiel Abb. J.
Abb. C, E – Schaltplan.
(Saunaofen Typ SK, SDK und Dampfgenerator Typ VA/VB mit
Kontrollgerät Typ CC 300T).
1 = Saunaofen. 2 = Feuchte- und Temperaturfühler. 3 = Kontrollgerät
CC 300T. 4 = eventueller externer Schalter Ein/Aus. 6 = Relaisbox
RB30/60.
7 =Dampfgenerator. 8 = Verstärker (Amplifier).
Richtige Anschlussspannung kontrollieren – siehe Typenschild des
Saunaofens bzw. Dampfgenerators.
Erdung nicht vergessen!
Abb. D – Schaltplan.
(Saunaofen Typ SE und Dampfgenerator Typ VA/VB mit
Kontrollgerät Typ CC 300T)
1 = Saunaofen. 2 = Feuchte- und Temperaturfühler. 3 = Kontrollgerät
CC 300T. 4 = eventueller externer Schalter Ein/Aus. 7 =Dampfgenerator.
8 = Verstärker (Amplifier).
Richtige Anschlussspannung kontrollieren – siehe Typenschild des
Saunaofens bzw. Dampfgenerators.
Erdung nicht vergessen!
GEBRAUCHSANLEITUNG
CC 300T
RH%
OK
R
Beleuchtung.
Beleuchtungsarmaturen gemäß Schaltplan anschließen.
Zubehör: Externer Schalter Ein/Aus
(Momentanschalter).
Der Schalter lässt sich in beliebigem Abstand vom Tylarium installieren
und wird mit einem Schwachstromkabel an das CC 300T angeschlossen
(siehe Schaltplan). Bei Installation mehrerer externer Ein-/Aus-Schalter
müssen diese parallelgeschaltet werden. Durch einmaliges Drücken des
externen Schalters wird CC300T eingeschaltet. Die Anlage ist dann für
die Dauer der voreingestellten Betriebszeit in Betrieb (siehe erste
Inbetriebnahme). Ein weiteres Drücken des externen Schalters schaltet
CC300T ab, sofern das Kontrollgerät nicht programmiert oder durch eine
Codesperre gesichert ist. Wenn CC300T programmiert oder durch eine
Codesperre gesichert ist, muss die Anlage mit dem ON/OFF-Knopf am
Kontrollgerät ausgeschaltet werden.
Zubehör: Externer Schalter Ein/Aus (Dauerschalter).
Der Schalter lässt sich in beliebigem Abstand vom Tylarium installieren
und wird mit einem Schwachstromkabel an das CC 300T angeschlossen
(siehe Schaltplan). Bei Gebrauch eines Dauerschalters bleibt die Anlage
in Betrieb, solange die Klemmen 19 und 20 miteinander verbunden sind,
jedoch höchstens für die Dauer der eingestellten Betriebszeit.
Anschluss an Zentralrechner.
Es ist auch der Anschluss an einen Zentralrechner möglich, der die
Klemmen 19 und 20 des CC 300T entweder kurzzeitig oder konstant
miteinander verbindet. Die zulässige Einschaltzeit ist auf max. 24 Std.
begrenzt.
Wichtiger Hinweis! Für die einwandfreie Funktion der automatischen
Entleerung des Dampfgenerators muss das Kontrollgerät mindestens 1,5
Std. pro Tag ausgeschaltet sein.
Steuerung anderer Tylö-Produkte.
CC300T kann auch andere Tylö-Produkte steuern. So lässt sich das
Kontrollgerät beispielsweise an Tylö Fresh anschließen. Der Duftautomat
wird dann aktiviert, sobald das Kontrollgerät in Betrieb ist. Bei Steuerung
18
12
Bild 1. Menüdisplay
1 = Linker Knopf, 2 = Mittelknopf, 3 = Rechter Knopf. 4 = Symbole/Text,
die dem jeweiligen Knopf entsprechen. 5 = Symbole/Text für Einstellung
und Anzeige aktueller Werte.
Knöpfe und Display.
Auf dem Kontrollgerät sitzen drei Knöpfe. Über den Knöpfen sind am
unteren Rand des Displays Symbole zu sehen, die dem jeweiligen Knopf
entsprechen. Diese Symbole sehen je nach Betriebslage des
Kontrollgeräts unterschiedlich aus. Wenn die Pfeile im Menüdisplay zu
sehen sind (Abb. 1) kann man mit dem linken und rechten Knopf zum
gewünschten Symbol gelangen. Zur Auswahl eines Symbols ist dieses
mit dem Mittelknopf zu bestätigen.
Im Normaldisplay (Abb. 2) ist die Funktion des linken Knopfes ON/OFF,
und dessen Symbol ist am unteren Displayrand zu sehen. Wenn die
Anlage eingeschaltet ist, ist dieses Symbol grün, bei ausgeschalteter
Anlage wird das Symbol rot und die Standby-Anzeige leuchtet orange.
Der rechte Knopf dient dem Ein- und Ausschalten der Beleuchtung. Das
Lampensymbol ist bei eingeschalteter Beleuchtung gelb, bei
ausgeschalteter Beleuchtung weiss. Das Display zeigt auch die aktuelle
Temperatur und Luftfeuchtigkeit an.
Bleibt der Mittelknopf längere Zeit eingedrückt, wird das Kontrollgerät
wieder in Normaldisplay-Lage zurückversetzt, falls es sich in einer
anderen Displaylage befunden hat.
Wenn ein Programm aktiv ist, 2 Sekunden lang den linken Knopf
drücken, um das Programm auszuschalten.
Page 19

%
33
R
Abb. 2. Normaldisplay
22
ºc
MENU
Erste Inbetriebnahme.
Beim ersten Einschalten des Kontrollgeräts sind gewisse Einstellungen
vorzunehmen. Zunächst die Region wählen und mit dem Mittelknopf
bestätigen. Danach gewünschte Sprache wählen und mit dem
Mittelknopf bestätigen. Als nächstes Datum und Zeit einstellen. Mit dem
linken und rechten Knopf die gewünschten Werte wählen und mit dem
Mittelknopf bestätigen. Zuletzt die gewünschte Betriebszeit bei
manuellem Start einstellen. Die Betriebszeit ist ab Werk auf drei Stunden
eingestellt, lässt sich aber auf 1 bis 24 Stunden einstellen. Der Wert lässt
sich mit dem rechten Knopf erhöhen (bzw. mit dem linken Knopf
senken), bis die gewünschte Betriebszeit im Display angezeigt wird. Mit
jedem Knopfdruck erhöht bzw. verringert sich die Betriebszeit um 15
Minuten. Zur schnelleren Wertumstellung, den Knopf eingedrückt halten.
Betriebszeit mit dem Mittelknopf bestätigen. Damit ist die
Grundeinstellung abgeschlossen.
Beleuchtung.
Leuchtet automatisch bei Einschalten der Anlage und erlischt
automatisch bei Ausschalten der Anlage. Die Beleuchtung lässt sich
auch manuell ein- bzw. ausschalten. Hierzu den rechten Knopf drücken,
wenn unten rechts im Display das Lampensymbol zu sehen ist. Das
Symbol ist bei ausgeschalteter Beleuchtung weiß, bei eingeschalteter
Beleuchtung gelb.
Codesperre.
Verhindert unbefugtes Ändern der eingestellten Werte.
Hauptsromschalter.
Auf der Unterseite der Relaisbox, des SE-Saunaofens und der kleineren
Dampfgeneratoren sitzt ein Hauptschalter, der nur auszuschalten ist,
wenn die Anlage längere Zeit außer Funktion gesetzt werden soll.
Tipp! Die Höhe, in der das Thermometer (Hygrometer) in der
Saunakabine angebracht wird, ist so zu wählen, dass die angezeigten
Werte exakt mit den auf dem Display des CC 300T angezeigten Zahlen
übereinstimmen.
Standby.
Die Standby-Funktion ist wichtig für Tylariums in Hotels, Hallenbädern
usw. mit wechselnder Besucherfrequenz. Während besucherschwachen
Zeiten ist die Anlage auf die energiesparende „Bereitschaftswärme“
eingestellt. Durch Drücken der ON-Taste bzw. des externen Schalters
erhöht sich die Temperatur schnell auf die eingestellte Badetemperatur.
Diese Standby-Funktion spart im Laufe eines Jahres große
Energiekosten.
Wie aus den folgenden Beispielen hervorgeht, gibt es zahlreiche
Möglichkeiten zur Programmierung eines passenden Badeprogramms.
Beispiele Standby.
Unsere Beispiele beziehen sich auf drei verschiedene Saunaanlagen, die
im Laufe ihrer Öffnungszeit von 800 bis 2000 unterschiedliche
Besucherfrequenzen haben.
Alt. 1) Kleinere Gruppen von Saunabesuchern kommen sporadisch
während der gesamten Öffnungszeit. Standby-Funktion von 800 bis 2000
programmieren. Die Saunabesucher (oder ein Bademeister) aktivieren
das Badeprogramm durch Drücken der ON-Taste am Kontrollgerät.
Alt. 2) Kleinere Gruppen von Saunabesuchern kommen sporadisch von
800 bis 1400. Nach 1400 Uhr ist die Sauna bis zu ihrer Schließung stark
besucht. Standby-Funktion von 800 bis 1400 programmieren und die
Sauna danach von1400 bis 2000 Uhr in Betriebsstatus ON betreiben.
Saunabesucher, die bis 14 Uhr kommen, aktivieren das Badeprogramm
durch Drücken der ON-Taste am Kontrollgerät.
Alt. 3) In den Zeiten von 800 bis 1000, 1300- 1400 und 1800- 2000 Uhr
ist die Sauna gut besucht. Zu den übrigen Zeiten kommen nur
sporadische Besucher. Standby-Funktion von 800 bis 2000
programmieren und Betriebsstatus ON für die oben genannten Zeiten mit
hoher Besucherfrequenz programmieren. Die sporadischen
Saunabesucher aktivieren das Badeprogramm durch Drücken der ONTaste am Kontrollgerät.
EINSTELLUNGEN
CC 300T
MANUELLES EIN-/AUSSCHALTEN.
Einstellen der Badetemperatur.
Im Normaldisplay [Menü] und danach Thermometer-Symbol wählen.
Gewünschte Temperatur einstellen und mit [OK] bestätigen.
Einstellen der Luftfeuchtigkeit.
Das Tropfen-Symbol wählen. Gewünschte Luftfeuchtigkeit (RH%)
einstellen und mit [OK] bestätigen. Der höchste Wert ist von der
eingestellten Temperatur abhängig.
Anlage einschalten
Danach das ENTER-Symbol wählen, mit dem Mittelknopf bestätigen und
das ON/OFF-Symbol drücken, um die Anlage einzuschalten. Zum
Ausschalten der Anlage erneut auf ON/OFF drücken. Das Symbol
leuchtet rot, wenn die Anlage ausgeschaltet ist, und grün, wenn sie
eingeschaltet ist.
AUTOMATISCHES EIN-/AUSSCHALTEN.
Einstellen der Badetemperatur.
Im Normaldisplay [Menü] und danach das Thermometer-Symbol wählen.
Gewünschte Temperatur einstellen und mit [OK] bestätigen.
Einstellen der Feuchtigkeit.
Das Tropfen-Symbol wählen. Gewünschte Luftfeuchtigkeit (RH %)
einstellen und mit [OK] bestätigen. Der höchste Wert ist von der
eingestellten Temperatur abhängig.
Timerfunktion starten
Im Normaldisplay [Menü] wählen. Danach [Programm] und schließlich
[Zeitschalt] wählen. Einschaltzeit (Zeit bis zum Einschalten der Anlage)
einstellen und mit OK bestätigen.
Jetzt ist der Zeitpunkt eingestellt, zu dem sich die Anlage automatisch
einschaltet. Die verbleibende Zeit bis zum Einschaltzeitpunkt wird oben
links im Display angezeigt. Die Timerfunktion lässt sich jederzeit durch
zweimaliges Drücken der Taste unter der ON/OFF-Symbole ausschalten.
Hat sich die Anlage bereits eingeschaltet, lässt sie sich durch einmaliges
Drücken der ON/OFF-Taste ausschalten.
Liegt die Luftfeuchtigkeit in der Kabine beim Ausschalten über 30 %,
startet automatisch die „Trocknungsfunktion“, die ab Werk auf eine
Laufzeit von ca. 20 Minuten eingestellt ist.
WOCHENPROGRAMMIERUNG
erlaubt unterschiedliche Einstellungen für unterschiedliche
Wochentage oder dieselbe Einstellung für alle Wochentage.
Timer
Abb. 3. Programmdisplay
Einstellung von Ein/Aus/Standby,
Temperatur/Feuchtigkeit.
Im Normaldisplay [Menü] und danach Programm wählen. Im
Programmdisplay erneut Programm wählen (siehe Abb. 3). Auf [OK]
Översikt Åter
OK
R
19
Page 20

drücken. Das Symbol [Add] wird dunkelblau. Jetzt befinden Sie sich im
Programm-Modus. Mit den Pfeiltasten den ersten gewünschten Tag
wählen (der aktuelle Text ist rot gekennzeichnet). Man kann jeden
Wochentag einzeln wählen, oder aber direkt Montag-Sonntag wählen
(um dieselbe Einstellung für alle Wochentage zu programmieren),
Montag–Freitag oder Samstag–Sonntag wählen. Mit [OK] bestätigen.
Danach die Uhrzeit einstellen, zu der sich die Anlage einschalten soll. Mit
jedem Drücken der Pfeiltaste erhöht sich die Zeit um 15 Minuten. Wenn
die gewünschte Zeit im Display erscheint, diese mit [OK] bestätigten.
Danach gewünschte Ausschaltzeit wählen und mit [OK] bestätigen.
Wählen Sie, ob die Anlage zu dem angegebenen Startzeitpunkt
eingeschaltet oder auf Standby sein soll. Das ON/OFF-Symbol ist grün,
wenn die Anlage eingeschaltet sein soll, rot, wenn die Anlage
ausgeschaltet sein soll, und orange, wenn die Anlage auf Standby
stehen soll. Wenn die Anlage eingeschaltet sein soll, ist auch die
gewünschte Temperatur und Luftfeuchtigkeit einzustellen. Mit den
Pfeiltasten den gewünschten Wert wählen und mit [OK] bestätigen. Um
eine neue Programmierung vorzunehmen, erneut auf den rechten Knopf
drücken, um [Add] zu kennzeichnen und danach mit [OK] bestätigen.
Danach die oben beschriebene Vorgehensweise wiederholen. Um
wieder ins Normaldisplay zu gelangen, [Zurück] wählen und mit [OK]
bestätigen. Erneut [Zurück] wählen und mit [OK] bestätigen. Wenn keine
Tasten bestätigt werden, stellt sich die Kontrolleinheit nach etwa 30
Sekunden automatisch auf Normaldisplay um. Um alle programmierten
Zeiten zu löschen, wählen Sie [Kalender löschen]. Man kann auch alle
Programme vorübergehend desaktivieren, indem man [Kalender AUS]
wählt.
Um eine einfache Übersicht über die vorprogrammierten Programme zu
aufzurufen, im Programmdisplay [Übersicht] wählen. Daraufhin wird in
Form von Stapeln angezeigt, wann die Anlage ausgeschaltet (rot),
eingeschaltet (grün) oder auf Standby ist (orange).
Sobald man im Standby-Modus auf ON drückt, steigt die Temperaturen
auf die voreingestellte Temperatur. Nach einer Stunde sinkt die
Temperatur automatisch wieder auf die Standby-Temperatur. Jede
Betätigung der ON-Taste startet eine neue, einstündige Badeperiode.
Wenn die Anlage in OFF-Stellung ist, gelten die bei der ersten
Inbetriebnahme gemachten Einstellungen.
Wenn die Anlage eingeschaltet ist, kann man sie durch Drücken der
OFF-Taste manuell ausschalten. (Dadurch wird nur die laufende
Badeperiode ausgeschaltet).
Liegt die Luftfeuchtigkeit in der Kabine beim Ausschalten über 30 %,
startet automatisch die „Trocknungsfunktion“, die ab Werk auf eine
Laufzeit von ca. 20 Minuten eingestellt ist.
Die gesamte Kalenderfunktion lässt sich auch vorübergehend
desaktivieren (z.B. für eine Servicemaßnahme) und danach wieder
aktivieren.
BADEN AUSSERHALB PROGRAMMIERTER
ZEITEN
wenn das Kontrollgerät durch einen Code gesichert ist.
Das Tylarium lässt sich auch außerhalb der programmierten Zeiten
anwenden. Bei einmaliger Betätigung der ON-Taste startet eine
einstündige Badeperiode. Zur Verlängerung der Badeperiode, erneut auf
ON drücken. Eine Stunde nach dem letzten Betätigen der ON-Taste
schaltet sich die Anlage automatisch ab.
HINWEIS! Nicht vergessen, das Kontrollgerät durch die Codesperre zu
sichern.
EINSTELLUNGEN DES
KONTROLLGERÄTS
CC 300T
Display.
LCD-LEUCHTSTÄRKE.
Im Normaldisplay [Menü], danach [Service] und schließlich [Display]
wählen. [Lichtstärke (%)] wählen und auf den Mittelknopf drücken. Das
Symbol wird dunkelblau und der Wert der Display-Leuchtstärke lässt sich
ändern. Einstellung mit [OK] bestätigen.
LCD-Leuchtstärke in Standby
Im Normaldisplay [Menü], danach [Service] und schließlich [Display]
wählen. [Standby (%)] wählen und auf den Mittelknopf drücken. Die
Kennzeichnung wird dunkelblau und der Wert für die DisplayLeuchtstärke im Standby lässt sich ändern. Einstellung mit [OK]
bestätigen. Ab Werk ist dieser Wert auf 30 % eingestellt.
Zeit bis Standby-LCD.
Im Normaldisplay [Menü], danach [Service] und schließlich [Display]
wählen. [Stand by zeit] wählen und auf den Mittelknopf drücken. Die
Markierung wird dunkelblau. Jetzt kann man einstellen, nach welcher
Zeit sich die Leuchtstärke des Displays verringern soll, nachdem das
Kontrollgerät in Standby-Modus gegangen ist. Einstellung mit [OK]
bestätigen.
Service.
Siehe SERVICEEINSTELLUNGEN
Codesperre.
Im Normaldisplay [Menü] und danach [Service] wählen. [Codesperre]
wählen und auf OK drücken. Gewünschten Code eingeben. Mit den
Pfeiltasten die entsprechenden Zahlen eingeben und mit [OK]
bestätigen. Die Codesperre wird bei Programmierung automatisch
aktiviert und das Normaldisplay erscheint wieder.
Um die Codesperre zu desaktivieren, den Code auf 0000 stellen.
Bei aktivierter Codesperre ist die Anlage gegen unbefugtes Ändern der
Einstellungen gesichert. Man kann lediglich die Anlage und die
Beleuchtung ein bzw. ausschalten. Die Anlage bleibt für die im
Servicemenü unter [Bad nicht progr. Zeit] angegebene Dauer
eingeschaltet (Werkseinstellung = 1 Stunde).
Ein allgemeiner Code, der immer funktioniert, ist 1995.
HINWEIS! Vor Programmierung der Codesperre sind alle
Einstellungen zu programmieren.
Sprache.
Im Normaldisplay [Menü] und danach [Service] wählen. Sprache wählen.
Mit den Pfeiltasten gewünschte Sprache auswählen und mit [OK]
bestätigen.
Uhr.
Im Normaldisplay [Menü] und danach [Service] wählen. [Einstellung Uhr]
wählen. Zuerst mit den Pfeiltasten den aktuellen Tag einstellen und mit
[OK] bestätigen. Danach die aktuelle Uhrzeit einstellen – erst Stunden
und dann Minuten.
Werkseinstellung.
Im Normaldisplay [Menü] und danach [Service] wählen.
[Werkseinstellungen] wählen. Mit den Pfeiltasten [Ja] oder [Nein] wählen
und mit OK bestätigen. Wenn Sie [Ja] wählen, werden alle
vorgenommenen Einstellungen durch die ab Werk vorgegebenen
Einstellungen ersetzt.
SERVICEEINSTELLUNGEN
CC 300T
Service.
Im Servicemenü kann der Anlagenbetrieber diverse Einstellungen
vornehmen, wie z.B. die maximale Badetemperatur. Wir empfehlen
jedoch, die Werkseinstellungen beizubehalten. Das Servicemenü ist
durch eine Codesperre gesichert, die unbefugtes Ändern der
Einstellungen verhindert. Im Normaldisplay [Menü] und danach [Service]
wählen. [Service] wählen und den Code 124 eingeben.
Systemeinstellungen.
Grenzwert für das Trocknen der Anlage
[Trockenzeit (%)] – Bei Ausschalten der Anlage fühlt diese die
Luftfeuchtigkeit in der Kabine ab. Überschreitet dieser Wert 30 %
(Werkseinstellung) startet automatisch die Trocknungsfunktion.
Trockentemperatur
[Trockentemperatur (°C)] – Dies ist die Temperatur, die die Anlage
während der Trocknungsfunktion beibehält. Ab Werk ist dieser Wert auf
80 °C eingestellt.
Trockenzeit
[Trockenzeit (Min.)] – Gibt die Laufzeit der Trocknungsfunktion an. Ab
Werk ist dieser Wert auf 20 Minuten eingestellt.
Geringste Temperatur bei Dampfsauna
[Min. Temperatur Dampfbad (°C)] – Mindesttemperatur in der Kabine, bei
der sich der Dampfgenerator einschalten soll. Ab Werk ist dieser Wert
auf 40°C eingestellt.
Maximale Betriebszeit
[Max. Zeit (Std.)] – Die bei der ersten Inbetriebnahme eingestellte
Betriebszeit. Dieser Wert wird nicht berücksichtigt, wenn die Anlage nach
20
Page 21

einem Programm betrieben wird. Der Wert lässt sich auf 1 bis 24
Stunden einstellen. Die Werkseinstellung ist 3 Stunden.
Temperatureinheit
[Temperatur (°C/F)] – Hier lässt sich wählen, ob die Temperatur in Grad
Celsius oder Fahrenheit angezeigt werden soll.
Testmenü
Das Testmenü wird nur für die Fehlersuche und den technischen
Kundendienst durch Tylö verwendet.
Max. Temperatur.
[Max. Temp. (°C/F)] – Hier lässt sich die höchste programmierbare
Temperatur für die Anlage einstellen. Für das Bad im Tylarium beträgt
die Höchsttemperatur 55°C.
Temperatursenkung bei Standby.
[Stand by Offset(°C/F)] – Temperaturdifferenz zwischen programmierter
Badetemperatur und Standby-Temperatur. Ab Werk ist dieser Wert auf
30°C eingestellt.
Max. Betriebszeit bei Standby
[Max. Zeit Stand by (Min.)] – Betriebszeit der Anlage, wenn Sie aus dem
Standby manuell mit der ON-Taste eingeschaltet wird. Ab Werk ist dieser
Wert auf 60 Minuten eingestellt.
Max. Betriebszeit außerhalb der programmierten Zeit.
[Bad nicht progr. Zeit (Min.)] – Betriebszeit der Anlage bei Codesperre
außerhalb der programmierten Zeit.
Entkalkung.
[Entkalkung (Std.)] – Dieser Parameter ist eine Timerfunktion, die angibt,
nach welcher Gesamtbetriebszeit die Anlage zu entkalken ist. Ab Werk
ist dieser Wert auf 40 Stunden eingestellt.
TYLARIUM
Das Tylarium erlaubt alle Formen des Saunabads – Trockensauna,
Feuchtsauna und Dampfsauna. Da die relative Luftfeuchtigkeit im
Tylarium zeitweilig deutlich höher ist als in der traditionellen Sauna, sind
folgende Hinweise besonders zu beachten:
• Wenn Kabine ein Fenster in der Tür oder einer Wandsektion hat, ist
die untere Leiste des Tür- bzw. Fensterfutters mit Firnis zu streichen
und der Zwischenraum zwischen Glas und Leiste mit FeuchtzellenSilikon abzudichten. Auf diese Weise wird verhindert, dass eventuelles
Kondenswasser auf vom Fensterglas in die Fuge eindringt.
• Türschwelle und Türgriff mehrmals mit Firnis streichen, sodass das
Holz geschützt wird und sich die Sauna leichter reinigen lässt.
Saunaliegen, Zwischenbankverkleidungen und Rückenlehnen
beidseitig mit Tylö Saunaöl behandeln.
HINWEIS! Alle übrigen Holzteile in der Saunakabine unbehandelt lassen.
Wenden Sie sich bei eventuellen Problemen bitte an Ihren
Händler.
© Der Nachdruck, ganz oder teilweise, ohne schriftliche Genehmigung von Tylö, ist verboten.
Werkstoff-, Konstruktions- und Designänderungen vorbehalten.
21
Page 22

MODE D’EMPLOI
CC 300
OK
R
Image 1. Écran du menu
1 = Touche gauche. 2 = Touche centre. 3 = Touche droite. 4 =
Symboles/texte qui correspondent aux touches respectives. 5 =
Symboles/texte pour programmation et affichage des valeurs actuelles.
1234 5
Touches et écran.
Il y a trois touches sur le tableau de commande. Les symboles qui
correspondent aux touches respectives apparaissent au-dessus des
touches, en bas de l’écran. Ils sont différents suivant le mode où se
trouve le tableau. Quand les flèches sont visibles sur l’écran du menu
(Image 1), les touches gauche et droite servent à passer au symbole
voulu. Confirmer avec la touche centre pour choisir le symbole.
Sur l’écran normal (image 2), la touche gauche sert à la fonction
ON/OFF, dont le symbole est visible juste au-dessus, en bas de l’écran.
Quand l’installation est en service, le symbole est vert, quand elle est
arrêtée, le symbole passe au rouge tandis qu’il est orange en position
d’attente (stand-by). Le symbole du voyant est jaune quand l’éclairage
est allumé et blanc quand il est éteint.
température actuelle.
Si l’on se trouve sur un autre mode, en maintenant enfoncée la touche
centre de manière prolongée, le tableau revient à l’écran normal.
Quand un programme est actif, presser sur la touche gauche pendant 2
secondes pour interrompre le programme actif.
Image 2. Écran normal
L’écran indique également la
ºc
22
MENU
R
Mise en service initiale.
La première fois que le tableau de commande est allumé, il faut procéder
à certains réglages. Choisir d’abord la région, puis confirmer avec la
touche centre. Choisir ensuite la langue souhaitée, puis confirmer avec
la touche centre. Indiquer ensuite la date et l’heure. Utiliser les touches
gauche et droite pour passer aux valeurs voulues. Confirmer avec la
touche centre. Programmer enfin le temps de fonctionnement voulu
pendant la mise en service manuelle. Le paramètre de base est de 3
heures, mais il peut être choisi entre 1 et 24 heures. Faire avancer les
valeurs avec la touche droite (et les faire diminuer avec la touche
gauche), jusqu’à ce que l’heure voulue apparaisse à l’écran. Chaque fois
que l’on presse sur la touche, l’heure avance de 15 minutes. Pour
avancer plus vite, maintenir la touche enfoncée. Confirmer avec la
touche centre. Le réglage de base est maintenant terminé.
Éclairage.
S’allume automatiquement quand l’installation démarre et s’éteint
automatiquement quand on l’arrête. L’éclairage peut également être
22
allumé ou éteint manuellement en pressant sur la touche droite quand le
symbole de la lampe apparaît tout en bas, dans l’angle de droite. Le
symbole est blanc quand l’éclairage est éteint et jaune quand il est
allumé.
Verrouillage à code.
Empêche toute modification illicite des valeurs programmées.
Interrupteur principal.
Sur la face inférieure du boîtier de relais, du poêle SE et des petits
générateurs de vapeur, se trouve un interrupteur principal qui n’a besoin
d’être utilisé que si l’installation doit être déconnectée pendant une
période prolongée.
Un conseil ! Placer le thermomètre du sauna à une hauteur telle que les
valeurs indiquées correspondent aux chiffres exacts indiqués par CC
300.
Mode d’attente.
Le mode d’attente est très important pour les Tylarium installés dans les
hôtels, piscines, etc., où la fréquence d’utilisation est variable. Pendant
les périodes de basse fréquentation, l’installation se met sur un « mode
d’attente à économie d’énergie », pouvant être augmenté rapidement
jusqu’à la température de bain souhaitée dès que l’on presse sur ON ou
sur l’interrupteur extérieur. Le mode d’attente permet ainsi d’économiser
chaque année des sommes considérables.
Comme l’indique l’exemple ci-dessous, les possibilités sont nombreuses
pour programmer simplement une séance de bain adaptée.
Exemples Mode d’attente.
Trois établissements de bains différents, ouverts entre huit et vingt
heures, avec des fréquences de visite différentes, selon les alternatives
ci-dessous.
Alt. 1) Un petit nombre de visiteurs vient de manière sporadique, sur
toute la durée d’ouverture. Programmer le mode d’attente entre huit et
vingt heures. Les visiteurs (ou le maître-nageur) activent le programme
de bain en pressant sur la touche « ON » du tableau CC.
Alt. 2) Un petit nombre de visiteurs vient de manière sporadique, entre
huit et quatorze heures. Après quatorze heures, l’établissement a en
général une fréquentation élevée jusqu’à l’heure de fermeture.
Programmer le mode d’attente entre huit et quatorze heures, puis
programmer une durée fixe sur « ON » entre quatorze et vingt heures.
Les visiteurs qui viennent de manière sporadique activent le programme
de bain en pressant sur la touche « ON » du tableau CC.
Alt. 3) Un grand nombre de visiteurs entre huit et dix heures, entre treize
et quatorze heures, ainsi qu’entre dix-huit et vingt heures. Le reste de la
journée, l’établissement est uniquement fréquenté de manière
sporadique. Programmer le mode d’attente entre huit et vingt heures,
puis programmer des durées fixes « ON » pour les horaires de forte
fréquentation indiqués ci-dessus. Les visiteurs qui viennent de manière
sporadique activent le programme de bain en pressant sur la touche
« ON » du tableau CC.
RÉGLAGES
CC 300
MARCHE/ARRÊT MANUEL.
Programmation de la température de bain.
Choisir [Menu] à l’écran normal, puis le thermomètre. Monter ensuite
jusqu’à la température voulue, puis valider par [OK].
Démarrer l’installation
Choisir ensuite le symbole de retour, valider avec la touche centre, puis
choisir le symbole ON/OFF pour commencer la séance de bain. Presser
une fois sur ON/OFF pour arrêter. Le symbole est rouge quand
l’installation est arrêtée et vert quand elle est en service.
MARCHE/ARRÊT AUTOMATIQUE.
Programmation de la température de bain.
Choisir [Menu] à l’écran normal, puis le thermomètre. Monter ensuite
jusqu’à la température voulue, puis valider par [OK].
Démarrer la fonction de minuteur
Choisir [Menu] à l’écran normal. Choisir ensuite [Program] puis
[Minuterie]. Choisir ensuite le temps de présélection (le temps jusqu’au
démarrage de l’installation), puis valider par OK.
L’heure de mise en service est maintenant activée et le bain démarre
automatiquement au bout du temps programmé. Le temps qui reste
jusqu’au démarrage de l’installation s’affiche en haut, dans l’angle
gauche. Vous pouvez à tout moment interrompre le décompte du temps
pendant que le minuteur tourne, en pressant deux fois sur le bouton sous
le symbole ON/OFF.
en pressant une fois sur la touche ON/OFF.
Si la séance de bain a démarré, on arrête l’appareil
PROGRAMMATION DU MINUTEUR
HEBDOMADAIRE
avec des programmations différentes suivant les jours de la
semaine, ou avec le même réglage pour tous les jours.
Page 23

Timer
Image 3. Écran du programme.
Översikt Åter
OK
R
Programmation de marche/arrêt/mode d’attente,
température.
Choisir [Menu] à l’écran normal, puis Programme. Choisir Programme
une fois de plus à l’écran Programme (voir image 3). En pressant sur
[OK] l’indication [Add] passe au bleu foncé. On est alors en mode
programme. Choisir d’abord le jour voulu (le texte actuel est marqué de
rouge) en utilisant les touches fléchées. Il est possible de sélectionner
séparément chaque jour de la semaine, mais on peut aussi choisir
directement lundi-dimanche (pour obtenir le même réglage pour tous les
jours de la semaine), lundi-vendredi ou samedi-dimanche. Valider par
[OK]. Programmer ensuite l’heure à laquelle l’installation devra démarrer.
À chaque fois que l’on presse sur les touches fléchées, l’heure monte ou
descend de 15 minutes, presser sur [OK] une fois que l’heure de
démarrage voulue apparaît à l’écran. Choisir ensuite l’heure d’arrêt
voulue puis presser sur [OK]. Indiquer si l’installation doit être
enclenchée, arrêtée ou mise en mode d’attente, pendant le temps choisi.
Le symbole ON/OFF est mis en vert si l’installation doit être enclenchée,
rouge si elle doit être arrêtée et orange en mode d’attente. Si l’on choisit
que l’installation doit être enclenchée, programmer également la
température voulue, faire avancer les valeurs à l’aide des touches
fléchées, puis valider par [OK]. Pour faire une nouvelle programmation,
presser sur la touche droite une fois pour marquer [Add], puis sur [OK].
Répéter ensuite la procédure ci-dessus. Pour revenir à l’écran normal,
choisir [Retour], valider par [OK]. Choisir [Retour] une fois de plus, puis
[OK]. Si l’on ne presse sur aucune touche, le tableau de commande
revient automatiquement à l’écran normal au bout d’environ 30
secondes. Si l’on veut supprimer toutes les périodes préprogrammées,
choisir [Effacer calendrier]. On peut également désactiver provisoirement
tous les programmes en choisissant [Calendrier Non].
Pour obtenir simplement un aperçu des programmes qui sont
préprogrammés, choisir [Aperçu] à l’écran Programme. Le calendrier
apparaît sous la forme de bâtons qui sont en rouge quand l’installation
est arrêtée, en vert quand elle est en service, et en jaune en mode
d’attente.
Dès que l’on presse sur ON quand l’installation est en mode d’attente, la
température monte jusqu’à la température de bain programmée. Au bout
d’une heure, elle reprend automatiquement la température de mode
d’attente. Chaque fois que l’on presse de nouveau sur ON, une période
de bain d’une heure démarre.
Si l’installation est en mode OFF, les paramètres valables sont ceux qui
ont été programmés lors de la mise en service initiale.
Si l’installation est en service, on peut l’arrêter manuellement en pressant
sur OFF. (Arrête uniquement la séance de bain en cours).
On peut également désactiver provisoirement l’ensemble de la fonction
calendrier, par exemple pour procéder à un entretien, puis la réactiver
plus tard.
SÉANCE DE BAIN EN DEHORS DES
HORAIRES PROGRAMMÉS
si le tableau est verrouillé par un code.
Tylarium peut être utilisé à une période autre que celle qui est
programmée. En pressant une fois sur ON, une période de bain d’une
heure démarre. Pour prolonger la séance de bain, presser de nouveau
sur ON. L’installation s’arrête automatiquement une heure après avoir
pressé pour la dernière fois sur une touche.
ATTENTION ! Ne pas oublier de verrouiller le tableau par un code.
PROGRAMMATION DU TABLEAU
CC 300
Écran.
Intensité lumineuse LCD.
Choisir [Menu] à l’écran normal, [Service] puis [Display]. Marquer
[l’intensité lumineuse (%)] puis presser sur la touche centre. Le
marquage devient bleu foncé et la valeur de l’intensité lumineuse de
l’écran peut être modifiée. Presser sur [OK] pour valider.
Intensité lumineuse LCD en mode d’attente.
Choisir [Menu] à l’écran normal, [Service] puis [Display]. Marquer [Stand
by (%)] puis presser sur la touche centre. Le marquage devient bleu
foncé et la valeur de l’intensité lumineuse de l’écran en mode d’attente
peut être modifiée. Presser sur [OK] pour valider. Le réglage d’usine est
de 30%.
Intensité lumineuse LCD en mode d’attente.
Choisir [Menu] à l’écran normal, [Service] puis [Display]. Marquer [Temps
Stand by] puis presser sur la touche centre. Le marquage devient bleu
foncé et le moment où l’intensité lumineuse de l’écran peut être modifié
après que le tableau est passé en mode d’attente. Presser sur [OK] pour
valider.
Maintenance.
Voir RÉGLAGES MAINTENANCE
Verrouillage à code.
Choisir [Menu] à l’écran normal, puis [Service]. Passer à [Blocage code]
puis presser sur [OK]. Indiquer le code voulu. À l’aide des touches
fléchées, passer au chiffre correct, puis valider avec [OK]. Le verrouillage
à code s’active automatiquement lors de la programmation, puis revient
à l’écran normal.
Pour revenir en mode non verrouillé, répéter la procédure ci-dessus et
programmer le code 0000.
Il n’est pas possible de changer les réglages quand le verrouillage à
code est activé. Il est possible de démarrer et d’arrêter l’installation, ainsi
que d’allumer et d’éteindre l’éclairage. La séance est enclenchée
pendant le temps indiqué au Menu de maintenance, sous [Séance non
prog. Temps] (réglage d’usine une heure).
Le code général qui fonctionne toujours est le 1995.
ATTENTION ! Tous les réglages doivent être faits avant d’activer un
éventuel verrouillage à code.
Langue.
Choisir [Menu] à l’écran normal, puis [Service]. Choisir la langue et
atteindre la langue voulue à l’aide des touches fléchées, puis presser sur
[OK].
Horloge.
Choisir [Menu] à l’écran normal, puis [Service]. Choisir [Réglage
horloge]. À l’aide des touches fléchées, indiquer d’abord le jour correct,
puis valider avec [OK]. Programmer ensuite l’heure actuelle, d’abord les
heures puis les minutes.
Réglage d’usine.
Choisir [Menu] à l’écran normal, puis [Service]. Choisir [Réglage d’usine].
Choisir [Oui] ou [Non] à l’aide des touches fléchées, puis presser sur
[OK]. Si l’on choisit [Oui], toutes les programmations et les propres
réglages disparaissent, puis le tableau reprend les réglages d’usine qu’il
avait au début.
PARAMÈTRES DE
MAINTENANCE
CC 300
Maintenance.
Le menu de maintenance permet à la personne chargée de l’entretien de
l’installation de faire différents réglages tels que la température de bain
maximale. Il est cependant recommandé de conserver les réglages
d’usine programmés. Le menu de maintenance est protégé par un code
pour éviter que les personnes non habilitées ne puissent modifier ces
réglages. Presser sur [Menu] à l’écran normal, puis [Service]. Choisir
[Service] puis frapper le code 124.
Paramètres système.
Temps de fonctionnement maximal
[Temps maxi. (h)] – C’est le temps de fonctionnement qui a été
programmé lors de la mise en service initiale. Ce temps n’est pas valable
quand l’installation est programmée. Peut être réglé entre 1 et 24 heures,
le réglage d’usine étant de 3 heures.
Unité de température
[Température (C°/F)] – Ce paramètre détermine si la température doit
s’afficher en degrés Celsius ou Fahrenheit.
Menu de test
Le menu de test est utilisé uniquement pour la recherche des pannes et
l’assistance technique via Tylö.
Température maxi.
[Temp. maxi (C°/F)] – On programme ici la température maximale sur
laquelle l’installation peut être programmée. Lors d’une séance dans
Tylarium, la température maximale est de 55°C.
Réduction de température en mode d’attente.
[Décalage stand by (C°/F)] – De combien la température doit baisser
quand l’installation est en mode d’attente, par rapport à la température
de bain programmée. Le réglage d’usine est de 30°C.
Durée de fonctionnement maxi. en mode d’attente.
23
Page 24

[Temps maxi. Stand by (min) – Quand l’installation est programmée en
mode d’attente et que l’on presse sur la touche ON, la séance de bain
est enclenchée pendant le temps indiqué ici. Le réglage d’usine est de
60 minutes.
Durée de fonctionnement maxi. en dehors du temps
programmé.
[Séance non prog. Temps (min)] – C’est le temps pendant lequel
l’installation est en service avec un verrouillage à code en dehors du
temps programmé.
Détartrage.
[Détartrage (h)] – Ce paramètre est un minuteur qui décompte le temps
pendant que l’installation est en service. Il indique le moment de
procéder à un détartrage. Le réglage d’usine est de 40 heures.
En cas d’éventuels problèmes, prière de s’adresser au
point de vente.
© Toute impression ultérieure, complète ou partielle, est interdite sans l’autorisation écrite de
Tylö.
Tous droits à modifications des matériaux, de la construction et de la conception réservés.
24
Page 25

345
INSTALLATION CC 300T
Prière de lire ces instructions en même temps que les instructions de
montage qui accompagnent le poêle de sauna ou le générateur de
vapeur.
Image A – TYLARIUM.
(Poêle de sauna type SK, SDK, et générateur de vapeur type VA/VB).
1 = poêle de sauna. 2 = capteur d’humidité et de température. 3 =
tableau de commande CC 300T. 4 = éventuel interrupteur marche/arrêt
externe. 5 = centrale électrique.
6 = boîtier de relais RB30/60. 7 = générateur de vapeur. 8 = amplificateur
(amplifier).
Image B – TYLARIUM.
(Poêle de sauna type SE, et générateur de vapeur type VA/VB).
1 = poêle de sauna. 2 = capteur d’humidité et de température. 3 =
tableau de commande
CC 300T. 4 = éventuel interrupteur marche/arrêt externe. 5 = centrale
électrique.
7 = générateur de vapeur. 8 = amplificateur (amplifier).
Boîtier de relais (RB).
(Un boîtier de relais n’est pas utilisé avec un poêle SE).
Se monte à l’extérieur et à une distance non limitée de Tylarium, dans un
local frais et ventilé. Le boîtier de relais ne doit pas être placé à moins
d’un mètre de CC300T.
Canalisation basse tension blindée (6-conducteurs
LiYCY).
La canalisation de commande entre CC 300T et le boîtier de relais, le
poêle SE ou le générateur de vapeur doit être une canalisation basse
tension blindée (6-conducteurs LiYCY). Le blindage se raccorde à la
borne 12 du tableau CC.
Mise en place du thermistor, capteur d’humidité et de
température.
Montage à 1500 mm du sol (pas au-dessus du poêle de sauna).
Placer le capteur de sorte qu’il ne puisse pas être atteint, ni directement
ni indirectement, par le jet de vapeur.
Amplificateur (amplifier).
Se monte à l’extérieur de Tylarium, à 2 mètres au maximum du capteur,
et à une distance illimitée de CC 300T. La canalisation de commande
entre l’amplificateur et CC 300T doit être une canalisation basse tension
blindée (4-conducteurs). Le blindage se raccorde à la borne 25 de
l’amplificateur.
Éclairage.
Raccorder l’éclairage selon le schéma de branchement.
Options : interrupteur marche/arrêt externe
(instantané).
Montage à une distance au choix de Tylarium. Raccordement à CC 300T
par un câble basse tension – voir le schéma de branchement. Si
plusieurs interrupteurs marche/arrêt externes sont utilisés, ceux-ci
doivent être branchés en parallèle. En pressant une fois sur l’interrupteur
extérieur, CC300T démarre et fonctionne aussi longtemps que le temps
de service est programmé (voir Mise en service initiale). En pressant une
fois de plus sur l’interrupteur extérieur, CC300T s’arrête s’il n’est pas
programmé/verrouillé par un code. Si CC300T est programmé/verrouillé
par un code, il faut l’arrêter à l’aide du bouton ON/OFF de CC300T.
Options : interrupteur marche/arrêt externe (fermeture
constante).
Montage à une distance au choix de Tylarium. Raccordement à CC 300T
par un câble basse tension – voir le schéma de branchement. Si
plusieurs interrupteurs marche/arrêt externes sont utilisés, ceux-ci
doivent être branchés en parallèle. En cas de fermeture constante,
l’installation fonctionne aussi longtemps que le contact est fermé entre
les bornes 19 et 20, mais au maximum pendant le temps de
fonctionnement maximum programmé.
Raccordement à l’ordinateur central.
Il est également possible de raccorder l’appareil à un ordinateur central
qui, soit provoque une impulsion brève, soit provoque une fermeture
constante entre les bornes 19 et 20 de CC-300T.
Important ! Pour que la fonction de vidange automatique du générateur
de vapeur fonctionne, le tableau de commande doit être arrêté pendant
au moins 1,5 heure/jour.
Image C, E – schéma de branchement.
(Poêle de sauna type SK, SDK, et générateur de vapeur type VA/VB
avec tableau de commande type CC 300T).
1 = poêle de sauna. 2 = capteur d’humidité et de température. 3 =
tableau de commande
CC 300T. 4 = éventuel interrupteur marche/arrêt externe. 6 = boîtier de
relais RB30/60.
7 = générateur de vapeur. 8 = amplificateur (amplifier).
Vérifier sur la plaquette d’identification du poêle de sauna et du
générateur de vapeur que la tension de raccordement est correcte.
Ne pas oublier de mettre à la terre !
Image D – schéma de branchement.
(Poêle de sauna type SE, et générateur de vapeur type VA/VB avec
tableau de commande type CC 300T).
1 = poêle de sauna. 2 = capteur d’humidité et de température. 3 =
tableau de commande CC 300T. 4 = éventuel interrupteur marche/arrêt
externe. 7 = générateur de vapeur.
8 = amplificateur (amplifier).
Vérifier sur la plaquette d’identification du poêle de sauna et du
générateur de vapeur que la tension de raccordement est correcte.
Ne pas oublier de mettre à la terre !
MODE D’EMPLOI
CC 300T
RH%
OK
R
Image 1. Écran du menu
1 = Touche gauche. 2 = Touche centre. 3 = Touche droite. 4 =
Symboles/texte qui correspondent aux touches respectives. 5 =
Symboles/texte pour programmation et affichage des valeurs actuelles.
12
Touches et écran.
Il y a trois touches sur le tableau de commande. Les symboles qui
correspondent aux touches respectives apparaissent au-dessus des
touches, en bas de l’écran. Ils sont différents suivant le mode où se
trouve le tableau. Quand les flèches sont visibles sur l’écran du menu
(Image 1), les touches gauche et droite servent à passer au symbole
voulu. Confirmer avec la touche centre pour choisir le symbole.
Sur l’écran normal (image 2), la touche gauche sert à la fonction
ON/OFF, dont le symbole est visible juste au-dessus, en bas de l’écran.
Quand l’installation est en service, le symbole est vert, quand elle est
arrêtée, le symbole passe au rouge tandis qu’il est orange en position
d’attente (stand-by). Le symbole du voyant est jaune quand l’éclairage
est allumé et blanc quand il est éteint.
température et l’humidité de l’air actuelles.
Si l’on se trouve sur un autre mode, en maintenant enfoncée la touche
centre de manière prolongée, le tableau revient à l’écran normal.
Quand un programme est actif, presser sur la touche gauche pendant 2
secondes pour interrompre le programme actif.
L’écran indique également la
Commande d’autres produits Tylö.
CC300T peut avantageusement commander d’autres produits Tylö. Il est
ainsi possible de le raccorder à Tylö Fresh, qui est activé quand le
tableau est en service. Quand l’appareil est utilisé pour commander Tylö
Fresh ou un autre tableau CC, ceux –ci doivent être raccordés entre les
bornes 40 et 41 de CC 300T et les bornes 19 et 20 de l’autre produit
Tylö. Voir l’exemple de l’image J.
25
Page 26

%
33
R
Image 2. Écran normal
22
ºc
MENU
Mise en service initiale.
La première fois que le tableau de commande est allumé, il faut procéder
à certains réglages. Choisir d’abord la région, puis confirmer avec la
touche centre. Choisir ensuite la langue souhaitée, puis confirmer avec
la touche centre. Indiquer ensuite la date et l’heure. Utiliser les touches
gauche et droite pour passer aux valeurs voulues. Confirmer avec la
touche centre. Programmer enfin le temps de fonctionnement voulu
pendant la mise en service manuelle. Le paramètre de base est de 3
heures, mais il peut être choisi entre 1 et 24 heures. Faire avancer les
valeurs avec la touche droite (et les faire diminuer avec la touche
gauche), jusqu’à ce que l’heure voulue apparaisse à l’écran. Chaque fois
que l’on presse sur la touche, l’heure avance de 15 minutes. Pour
avancer plus vite, maintenir la touche enfoncée. Confirmer avec la
touche centre. Le réglage de base est maintenant terminé.
Éclairage.
S’allume automatiquement quand l’installation démarre et s’éteint
automatiquement quand on l’arrête. L’éclairage peut également être
allumé ou éteint manuellement en pressant sur la touche droite quand le
symbole de la lampe apparaît tout en bas, dans l’angle de droite. Le
symbole est blanc quand l’éclairage est éteint et jaune quand il est
allumé.
Verrouillage à code.
Empêche toute modification illicite des valeurs programmées.
Interrupteur principal.
Sur la face inférieure du boîtier de relais, du poêle SE et des petits
générateurs de vapeur, se trouve un interrupteur principal qui n’a besoin
d’être utilisé que si l’installation doit être déconnectée pendant une
période prolongée.
Un conseil ! Placer le thermomètre (hygromètre) de Tylarium à une
hauteur telle que les valeurs indiquées correspondent aux chiffres exacts
indiqués par CC 300T.
Mode d’attente.
Le mode d’attente est très important pour les Tylarium installés dans les
hôtels, piscines, etc., où la fréquence d’utilisation est variable. Pendant
les périodes de basse fréquentation, l’installation se met sur un « mode
d’attente à économie d’énergie », pouvant être augmenté rapidement
jusqu’à la température de bain souhaitée dès que l’on presse sur ON ou
sur l’interrupteur extérieur. Le mode d’attente permet ainsi d’économiser
chaque année des sommes considérables.
Comme l’indique l’exemple ci-dessous, les possibilités sont nombreuses
pour programmer simplement une séance de bain adaptée.
Exemples Mode d’attente.
Trois établissements de bains différents, ouverts entre huit et vingt
heures, avec des fréquences de visite différentes, selon les alternatives
ci-dessous.
Alt. 1) Un petit nombre de visiteurs vient de manière sporadique, sur
toute la durée d’ouverture. Programmer le mode d’attente entre huit et
vingt heures. Les visiteurs (ou le maître-nageur) activent le programme
de bain en pressant sur la touche « ON » du tableau CC.
Alt. 2) Un petit nombre de visiteurs vient de manière sporadique, entre
huit et quatorze heures. Après quatorze heures, l’établissement a en
général une fréquentation élevée jusqu’à l’heure de fermeture.
Programmer le mode d’attente entre huit et quatorze heures, puis
programmer une durée fixe sur « ON » entre quatorze et vingt heures.
Les visiteurs qui viennent de manière sporadique activent le programme
de bain en pressant sur la touche « ON » du tableau CC.
Alt. 3) Un grand nombre de visiteurs entre huit et dix heures, entre treize
et quatorze heures, ainsi qu’entre dix-huit et vingt heures. Le reste de la
journée, l’établissement est uniquement fréquenté de manière
sporadique. Programmer le mode d’attente entre huit et vingt heures,
puis programmer des durées fixes « ON » pour les horaires de forte
fréquentation indiqués ci-dessus. Les visiteurs qui viennent de manière
sporadique activent le programme de bain en pressant sur la touche
« ON » du tableau CC.
26
RÉGLAGES
CC 300T
MARCHE/ARRÊT MANUEL.
Programmation de la température de bain.
Choisir [Menu] à l’écran normal, puis le thermomètre. Monter ensuite
jusqu’à la température voulue, puis valider par [OK].
Programmation de l’humidité.
Choisir le symbole de goutte. Monter ensuite jusqu’à l’humidité voulue
(RH%), puis valider par [OK]. La limite supérieure de la valeur
programmable dépend de la température.
Démarrer l’installation
Choisir ensuite le symbole de retour, valider avec la touche centre, puis
choisir le symbole ON/OFF pour commencer la séance de bain. Presser
une fois sur ON/OFF pour arrêter. Le symbole est rouge quand
l’installation est arrêtée et vert quand elle est en service.
MARCHE/ARRÊT AUTOMATIQUE.
Programmation de la température de bain.
Choisir [Menu] à l’écran normal, puis le thermomètre. Monter ensuite
jusqu’à la température voulue, puis valider par [OK].
Programmation de l’humidité.
Choisir le symbole de goutte. Monter ensuite jusqu’à l’humidité voulue
[RH%], puis valider par [OK]. La limite supérieure de la valeur
programmable dépend de la température.
Démarrer la fonction de minuteur
Choisir [Menu] à l’écran normal. Choisir ensuite [Program] puis
[Minuterie]. Choisir ensuite le temps de présélection (le temps jusqu’au
démarrage de l’installation), puis valider par OK.
L’heure de mise en service est maintenant activée et le bain démarre
automatiquement au bout du temps programmé. Le temps qui reste
jusqu’au démarrage de l’installation s’affiche en haut, dans l’angle
gauche. Vous pouvez à tout moment interrompre le décompte du temps
pendant que le minuteur tourne, en pressant deux fois sur le bouton sous
le symbole ON/OFF.
en pressant une fois sur la touche ON/OFF.
Si l’humidité est supérieure à 30% quand on arrête l’installation, un
« séchage » d’environ 20 minutes démarre automatiquement (réglage
d’usine).
Si la séance de bain a démarré, on arrête l’appareil
PROGRAMMATION DU MINUTEUR
HEBDOMADAIRE
avec des programmations différentes suivant les jours de la
semaine, ou avec le même réglage pour tous les jours.
Timer
Image 3. Écran du programme.
Programmation de marche/arrêt/mode d’attente,
température/humidité.
Choisir [Menu] à l’écran normal, puis Programme. Choisir Programme
une fois de plus à l’écran Programme (voir image 3). En pressant sur
[OK] l’indication [Add] passe au bleu foncé. On est alors en mode
programme. Choisir d’abord le jour voulu (le texte actuel est marqué de
rouge) en utilisant les touches fléchées. Il est possible de sélectionner
séparément chaque jour de la semaine, mais on peut aussi choisir
directement lundi-dimanche (pour obtenir le même réglage pour tous les
jours de la semaine), lundi-vendredi ou samedi-dimanche. Valider par
[OK]. Programmer ensuite l’heure à laquelle l’installation devra démarrer.
À chaque fois que l’on presse sur les touches fléchées, l’heure monte ou
descend de 15 minutes, presser sur [OK] une fois que l’heure de
démarrage voulue apparaît à l’écran. Choisir ensuite l’heure d’arrêt
voulue puis presser sur [OK]. Indiquer si l’installation doit être
enclenchée, arrêtée ou mise en mode d’attente, pendant le temps choisi.
Le symbole ON/OFF est mis en vert si l’installation doit être enclenchée,
rouge si elle doit être arrêtée et orange en mode d’attente. Si l’on choisit
que l’installation doit être enclenchée, programmer également la
Översikt Åter
OK
R
Page 27

température et le taux d’humidité voulus, faire avancer les valeurs à
l’aide des touches fléchées, puis valider par [OK]. Pour faire une
nouvelle programmation, presser sur la touche droite une fois pour
marquer [Add], puis sur [OK]. Répéter ensuite la procédure ci-dessus.
Pour revenir à l’écran normal, choisir [Retour], valider par [OK]. Choisir
[Retour] une fois de plus, puis [OK]. Si l’on ne presse sur aucune touche,
le tableau de commande revient automatiquement à l’écran normal au
bout d’environ 30 secondes. Si l’on veut supprimer toutes les périodes
préprogrammées, choisir [Effacer calendrier]. On peut également
désactiver provisoirement tous les programmes en choisissant
[Calendrier Non].
Pour obtenir simplement un aperçu des programmes qui sont
préprogrammés, choisir [Aperçu] à l’écran Programme. Le calendrier
apparaît sous la forme de bâtons qui sont en rouge quand l’installation
est arrêtée, en vert quand elle est en service, et en jaune en mode
d’attente.
Dès que l’on presse sur ON quand l’installation est en mode d’attente, la
température monte jusqu’à la température de bain programmée. Au bout
d’une heure, elle reprend automatiquement la température de mode
d’attente. Chaque fois que l’on presse de nouveau sur ON, une période
de bain d’une heure démarre.
Si l’installation est en mode OFF, les paramètres valables sont ceux qui
ont été programmés lors de la mise en service initiale.
Si l’installation est en service, on peut l’arrêter manuellement en pressant
sur OFF. (Arrête uniquement la séance de bain en cours).
Si l’humidité est supérieure à 30% quand on arrête l’installation, un
« séchage » d’environ 20 minutes démarre automatiquement (réglage
d’usine).
On peut également désactiver provisoirement l’ensemble de la fonction
calendrier, par exemple pour procéder à un entretien, puis la réactiver
plus tard.
SÉANCE DE BAIN EN DEHORS DES
HORAIRES PROGRAMMÉS
si le tableau est verrouillé par un code.
Tylarium peut être utilisé à une période autre que celle qui est
programmée. En pressant une fois sur ON, une période de bain d’une
heure démarre. Pour prolonger la séance de bain, presser de nouveau
sur ON. L’installation s’arrête automatiquement une heure après avoir
pressé pour la dernière fois sur une touche.
ATTENTION ! Ne pas oublier de verrouiller le tableau par un code.
PROGRAMMATION DU TABLEAU
CC 300T
Écran.
Intensité lumineuse LCD.
Choisir [Menu] à l’écran normal, [Service] puis [Display]. Marquer
[l’intensité lumineuse (%)] puis presser sur la touche centre. Le
marquage devient bleu foncé et la valeur de l’intensité lumineuse de
l’écran peut être modifiée. Presser sur [OK] pour valider.
Intensité lumineuse LCD en mode d’attente.
Choisir [Menu] à l’écran normal, [Service] puis [Display]. Marquer [Stand
by (%)] puis presser sur la touche centre. Le marquage devient bleu
foncé et la valeur de l’intensité lumineuse de l’écran en mode d’attente
peut être modifiée. Presser sur [OK] pour valider. Le réglage d’usine est
de 30%.
Intensité lumineuse LCD en mode d’attente.
Choisir [Menu] à l’écran normal, [Service] puis [Display]. Marquer [Temps
Stand by] puis presser sur la touche centre. Le marquage devient bleu
foncé et le moment où l’intensité lumineuse de l’écran peut être modifié
après que le tableau est passé en mode d’attente. Presser sur [OK] pour
valider.
Maintenance.
Voir RÉGLAGES MAINTENANCE
Verrouillage à code.
Choisir [Menu] à l’écran normal, puis [Service]. Passer à [Blocage code]
puis presser sur [OK]. Indiquer le code voulu. À l’aide des touches
fléchées, passer au chiffre correct, puis valider avec [OK]. Le verrouillage
à code s’active automatiquement lors de la programmation, puis revient
à l’écran normal.
Pour revenir en mode non verrouillé, répéter la procédure ci-dessus et
programmer le code 0000.
Il n’est pas possible de changer les réglages quand le verrouillage à
code est activé. Il est possible de démarrer et d’arrêter l’installation, ainsi
que d’allumer et d’éteindre l’éclairage. La séance est enclenchée
pendant le temps indiqué au Menu de maintenance, sous [Séance non
prog. Temps] (réglage d’usine une heure).
Le code général qui fonctionne toujours est le 1995.
ATTENTION ! Tous les réglages doivent être faits avant d’activer un
éventuel verrouillage à code.
Langue.
Choisir [Menu] à l’écran normal, puis [Service]. Choisir la langue et
atteindre la langue voulue à l’aide des touches fléchées, puis presser sur
[OK].
Horloge.
Choisir [Menu] à l’écran normal, puis [Service]. Choisir [Réglage
horloge]. À l’aide des touches fléchées, indiquer d’abord le jour correct,
puis valider avec [OK]. Programmer ensuite l’heure actuelle, d’abord les
heures puis les minutes.
Réglage d’usine.
Choisir [Menu] à l’écran normal, puis [Service]. Choisir [Réglage d’usine].
Choisir [Oui] ou [Non] à l’aide des touches fléchées, puis presser sur
[OK]. Si l’on choisit [Oui], toutes les programmations et les propres
réglages disparaissent, puis le tableau reprend les réglages d’usine qu’il
avait au début.
PARAMÈTRES DE
MAINTENANCE
CC 300T
Maintenance.
Le menu de maintenance permet à la personne chargée de l’entretien de
l’installation de faire différents réglages tels que la température de bain
maximale. Il est cependant recommandé de conserver les réglages
d’usine programmés. Le menu de maintenance est protégé par un code
pour éviter que les personnes non habilitées ne puissent modifier ces
réglages. Presser sur [Menu] à l’écran normal, puis [Service]. Choisir
[Service] puis frapper le code 124.
Paramètres système.
Limite pour le séchage de l’installation
[Temps séchage (%)] – Quand l’installation s’arrête, le système détecte
l’humidité de l’air dans la pièce. Si l’humidité de l’air est supérieure à
30% (réglage d’usine), l’installation passe en mode de séchage.
Température de séchage
[Température séchage (°C)] – C’est la température de l’installation en
mode de séchage. Le réglage d’usine est de 80°C.
Temps de séchage
[Temps séchage (min)] – C’est le temps pendant lequel l’installation est
en service en mode de séchage. Le réglage d’usine est de 20 minutes.
Température minimale pour vapeur
[Température mini. Hammam (°C)] – C’est la température la plus basse
que doit avoir l’installation pour que le générateur de vapeur démarre. Le
réglage d’usine est de 40°C.
Temps de fonctionnement maximal
[Temps maxi. (h)] – C’est le temps de fonctionnement qui a été
programmé lors de la mise en service initiale. Ce temps n’est pas valable
quand l’installation est programmée. Peut être réglé entre 1 et 24 heures,
le réglage d’usine étant de 3 heures.
Unité de température
[Température (C°/F)] – Ce paramètre détermine si la température doit
s’afficher en degrés Celsius ou Fahrenheit.
Menu de test
Le menu de test est utilisé uniquement pour la recherche des pannes et
l’assistance technique via Tylö.
Température maxi.
[Temp. maxi (C°/F)] – On programme ici la température maximale sur
laquelle l’installation peut être programmée. Lors d’une séance dans
Tylarium, la température maximale est de 55°C.
Réduction de température en mode d’attente.
[Décalage stand by (C°/F)] – De combien la température doit baisser
quand l’installation est en mode d’attente, par rapport à la température
de bain programmée. Le réglage d’usine est de 30°C.
Durée de fonctionnement maxi. en mode d’attente.
[Temps maxi. Stand by (min) – Quand l’installation est programmée en
mode d’attente et que l’on presse sur la touche ON, la séance de bain
est enclenchée pendant le temps indiqué ici. Le réglage d’usine est de
60 minutes.
Durée de fonctionnement maxi. en dehors du temps
programmé.
[Séance non prog. Temps (min)] – C’est le temps pendant lequel
l’installation est en service avec un verrouillage à code en dehors du
temps programmé.
Détartrage.
[Détartrage (h)] – Ce paramètre est un minuteur qui décompte le temps
pendant que l’installation est en service. Il indique le moment de
procéder à un détartrage. Le réglage d’usine est de 40 heures.
27
Page 28

TYLARIUM
Tylarium permet de prendre des séances de sauna sous toutes ses
formes. Sauna sec, sauna humide et hammam. Puisque l’humidité
relative de l’air est parfois supérieure à celle d’une séance traditionnelle
de sauna, les éléments ci-dessous doivent être pris en compte.
• Si la cabine de sauna a des vitres, dans la porte ou les cloisons,
appliquer du vernis marine sur tout le profilé inférieur de l’huisserie de
porte ou de fenêtre et du silicone pour salles d’eau dans le joint entre
vitre et baguette. On empêche ainsi l’éventuelle eau de condensation
qui recouvre la vitre de s’infiltrer dans le joint.
• Passer deux couches de vernis marine sur le seuil et les poignées de
porte, afin de préserver le bel aspect du bois et de simplifier le
nettoyage du sauna. Banquettes de sauna, dossiers et panneaux
décoratifs doivent être huilés des deux côtés avec de l’huile Tylö pour
sauna.
ATTENTION ! Toutes les autres surfaces de bois à l’intérieur du sauna
ne doivent pas être traitées.
En cas d’éventuels problèmes, prière de s’adresser au
point de vente.
© Toute impression ultérieure, complète ou partielle, est interdite sans l’autorisation écrite de
Tylö.
Tous droits à modifications des matériaux, de la construction et de la conception réservés.
28
Page 29

BRUKSANVISNING
345
CC 300
OK
R
12
Bild 1. Menydisplay
1 = Venstre knapp, 2 = Midtre knapp, 3 = Høyre knapp. 4 =
Symboler/tekst som tilsvarer respektive knapp. 5 = Symboler/tekst for
innstilling og visning av aktuelle verdier.
Knapper og display.
På betjeningspanelet står det tre knapper. Ovenfor knappene nederst på
displayet vises symboler som tilsvarer respektive knapp. De ser
forskjellig ut avhengig av hvilken funksjon panelet har. Når pilene viser
seg på betjeningsdisplayet (Bilde 1) brukes venstre- og høyre knapp for å
komme til ønsket symbol. Velg symbol ved å bekrefte med knappen i
midten.
I normaldisplayet (Bilde 2) er venstre knapps funksjon ON/OFF og dens
symboler vises ovenfor i nedkanten av displayet. Symbolet lyser grønt
når anlegget er i drift. Symbolet lyser rødt når anlegget er slått av.
Symbolet lyser oransje når anlegget står i standby. Høyre knapps
funksjon er belysning. Symbolet til lampen er gult når belysningen er på
og hvit når belysningen er slått av. Displayet viser også aktuell
temperatur.
Ved å holde den midtre knappen inne en stund, endres innstillingen på
displayet til normalfunksjon, hvis det står i en annen innstilling.
Trykk på venstre knapp i 2 sek. for å slå av et aktivt program.
Belysning.
Tennes automatisk når anlegget starter og slukker automatisks når
anlegget slås av. Belysningen kan også tennes eller slukkes manuelt ved
å trykke på høyre knapp når lampesymbolet vises lengst nede i høyre
hjørnet. Symbolet lyser hvitt når belysningen er slukket og gult når
belysningen slått på.
Kodelås.
Hindrer uvedkommende i å endre innstilte tider.
Hovedstrømbryter.
På undersiden av reléboksen, SE aggregatet og de mindre
dampgeneratorene finnes en hovedstrømbryter som kun trenger å bli
brukt når anlegget skal være utkoblet over lengre tid.
Tips! Termometeret i badstuen plasseres i en slik høyde at viste verdier
stemmer overens med de samme siffre som CC 300 viser.
Standby.
Standby er av stor betydning for Tylariumet i hoteller, badeanlegg osv,
der besøksfrekvensen varierer. Under lavfrekvente perioder står anlegget
innstilt på energisparing "beredskapsvarme", som hurtig kan akselereres
til ønsket badetemperatur ved å trykke på ON, alternativt ekstern bryter.
Funksjonen Standby sparer derved store beløp per år.
Som det framgår av nedenstående eksempel er det flere muligheter for
lett å programmere et passende badstuprogram.
Eksempel på Standby.
Tre ulike badstuanlegg som er åpne mellom klokken 800 og 2000 og med
varierende besøkfrekvens ifølge nedenstående alternativer.
Alt. 1) Et lite antall badegjester som kommer sporadisk under hele
åpningstiden. Programmer Standby mellom 8
(eller badevakten) aktiverer badstuprogrammet ved å trykke på CCpanelets ”ON” knapp.
Alt. 2) Et lite antall badegjester kommer sporadisk mellom 8
Etter klokken 14
Programmer Stand by mellom 8
mellom 14
bastuprogrammet ved et trykk på CC-panelets ”ON” knapp.
Alt. 3) Et stort antall badende mellom klokken 8
mellom 18
badegjester. Programmer Standby mellom 8
”ON” tider for de velbesøkte badstutidene som ovenfor. De sporadiske
badegjestene aktiverer badstuprogrammet med et trykk på CC-panelets
”ON” knapp.
00
pleier anlegget å være godt besøkt fram til stengetid.
00
- 2000. De sporadiske badegjestene aktiverer
00
- 2000. Resten av dagen besøkes kun sporadisk av
00
og 1400 og programmer fast ”ON” tid
00
og 2000. Badegjestene
00
og 1400.
00
- 1000, 1300- 1400 og
00
og 2000, programmer faste
INNSTILLINGER
CC 300
ºc
22
MENU
R
Bilde 2. Normaldisplay
Første gangs oppstart.
Første gang betjeningspanelet slås på må man foreta visse innstillinger.
Velg først region og bekreft med midtre knapp. Velg deretter ønsket
språk, bekreft med midtre knapp. Angi så dato og tid. Bruk venstre- og
høyre knapp for stille inn ønsket tid. Bekreft med midtre knapp. Ved
manuell oppstart stilles til slutt inn ønsket driftstid. Grunninnstilling er 3
timer, men kan velges fra 1 til 24 timer. Trykk trinnvis oppover med høyre
knapp/nedover med venstre knapp til ønsket tid vises i displayet. Hvert
knappetrykk øker eller minsker tiden med 15 minutter. Hold knappene
trykt inn hvis det skal gå raskere. Bekreft med midtre knapp. Nå er
grunninnstillingen klar.
SLÅ PÅ ON/OFF MANUELT.
Innstilling av badstutemperatur.
Velg [MENU] i Normaldisplay og deretter temperaturmåleren. Trykk
oppover til ønsket temperatur, bekreft med [OK].
Starting av anlegget
Velg deretter retursymbolet, bekreft med midtre knapp og velg ON/OFFsymbolet for å starte badstuen. Trykk en gang til på ON/OFF for å slå av.
Symbolet lyser rødt når anlegget er slått av og grønt når anlegget er i
drift.
AUTOMATISK AV/PÅ.
Innstilling av badstutemperatur.
Velg [Meny] i Normaldisplay og deretter temperaturmåler. Trykk frem til
ønsket temperatur, bekreft med [OK].
Start av timerfunksjon
Velg [MENU] i Normaldisplay. Velg deretter [Program] og så [Timer]. Still
inn forvalgstid (tid før start av anlegget), bekreft med OK.
Timertiden er nå aktivert og badet starter automatisk etter innstilt tid.
Starttid vises øverst i venstre hjørne. Du kan slå av timertiden når som
helst mens timeren teller ned ved å trykke to ganger på knappen under
ON/OFF-symbolet. Har anlegget startet slår man av ved å trykke én gang
på ON/OFF-knappen.
29
Page 30

UKEPROGRAMMERING
Med forskjellige innstillinger på ulike ukedager eller med samme
innstilling alle dager i uken.
Timer
Bild 3. Programdisplay
Översikt Åter
OK
R
Innstilling av på/av/standby, temperatur.
Velg [MENU] i Normaldisplay og deretter Program. Velg Program en
gang til i Programdisplay (se bilde 3). Ved å trykke på [OK] endres
markeringen [Add] til mørkeblå. Man er nå inne i programmeringsmodus.
Velg først ønsket dag (aktuell tekst er rødmarkert) ved å bruke piltastene.
Det går an å velge hver ukedag for seg, men man kan også velge direkte
mandag-søndag (for å få samme innstilling alle ukedager), mandagfredag eller lørdag-søndag. Bekreft med [OK]. Still deretter inn hvilken tid
anlegget skal starte. For hvert trykk på piltastene går tiden opp eller ned
15 minutter. Trykk på [OK] når ønsket starttid vises i displayet. Velg
deretter ønsket stopptid og trykk på [OK]. Angi om anlegget skal være
på, av eller standby den tiden som er valgt. ON/OFF-symbolet viser grønt
hvis anlegget skal være på, rødt om anlegget skal være slått av og
oransje ved standby. Velges det at anlegget skal være på må også
innstilling av ønsket temperatur foretas. Trykk frem med piltastene og
bekreft med [OK]. Ny programmering foretas ved å trykke på høyre
knapp én gang, for å markere [Add] og deretter på [OK]. Gjenta deretter
ovenstående prosedyre. Velg [Back], for å gå tilbake til Normaldisplay,
bekreft med OK. Velg [Back] en gang til og deretter OK. Foretas ingen
knappetrykkinger går betjeningspanelet automatisk tilbake til
Normaldisplay etter ca. 30 sekunder. Ønsker man å fjerne all
forhåndsprogrammeringen velger [Clear Calender]. Man kan også
deaktivere alle programmene midlertidig ved å velge [Calender OFF].
Velg [Overview] i Programdisplay, for å få en enkel oversikt over de
programmene som er forhåndsprogrammerte. Der er det et søylediagram
som viser rødt når anlegget er slått av, grønt når anlegget er i drift og gult
ved standby.
Så snart man trykker på ON når anlegget er i standby, stiger
temperaturen til innstilt badetemperatur. Etter 1 time går anlegget
automatisk tilbake til fortsatt standby-temperatur. Hvert nytt trykk på ON
starter 1 times badstuperiode.
Står anlegget i OFF gjelder de innstillingene som ble foretatt ved første
oppstart.
Hvis anlegget er idrift kan man slå av manuelt ved å trykke på OFF. (Slår
kun av pågående badstue.)
Man kan også deaktivere hele kalenderfunksjonen midlertidig, for
eksempel ved service, og ganske enkelt aktivere den igjen etterpå.
BADSTUE UTENOM PROGRAMMERT TID
hvis panelet er sperret med kode.
Tylariumet kan brukes til en annen tid enn programmert. Ved å trykke på
ON starter 1 times badstutid. Ønskes forlenget badstuperiode trykker
man en gang til på ON. Anlegget slår seg automatisk av 1 time etter siste
knappetrykking.
OBS! Glem ikke å kodesperre panelet.
PANELINNSTILLINGER
CC 300
Display.
LCD lysstyrke.
Velg [MENU] i Normaldisplay, [Service] og deretter [Display]. Marker
[Brightness (%)] og trykk på midtre knapp. Markeringen blir mørkeblå og
verdien på lysstyrken i displayet kan endres. Trykk på [OK] for å bekrefte.
30
LCD lysstyrke ved Standby.
Velg [MENU] i Normaldisplay, [Service] og deretter [Display]. Marker
[Stand by (%)] og trykk på midtre knapp. Markeringen blir mørkeblå og
verdien for lysstyrken i displayet når panelet er i Standby kan endres.
Trykk på [OK] for å bekrefte. Fabrikkinnstilling er 30 %.
Tid frem til LCD Standby.
Velg [MENU] i Normaldisplay, [Service] og deretter [Display]. Marker
[Stand by time] og trykk på midtre knapp. Markeringen blir mørkeblå og
tiden kan endres for når lysstyrken i displayet skal endres etter at panelet
er gått over til Standby. Trykk på OK for å bekrefte.
Service.
Se SERVICEINNSTILLINGER
Kodelås.
Velg [MENU] i Normaldisplay og deretter [Service]. Trykk frem til [Code
lock] og trykk på [OK]. Angi ønsket kode. Trykk med piltastene til riktig
siffer og bekreft med [OK]. Kodelåsen aktiveres automatisk ved
programmering og går til Normaldisplay.
Gjenta ovenstående og sett koden til 0000, for å gå tilbake til innstilling
uten sperre.
Det går ikke an å endre innstillinger når kodelåsen er aktivert. Det går an
å starte og slå av anlegget, samt tenne og slukke belysningen.
Badstutiden starter den tiden man har angitt i Servicemenyn under [Time
outside timer] (fabrikkinnstilling 1 time).
Allmenn kode som alltid virker er 1995.
OBS! Alle innstillinger må foretas før eventuell kodelåsing.
Språk.
Velg [MENU] i Normaldisplay og deretter [Service]. Velg språk og trykk
frem med piltastene til ønsket språk. Trykk deretter på [OK].
Klokke.
Velg [MENU] i Normaldisplay og deretter [Service]. Velg [Set clock]. Angi
først riktig dag, trykk frem med piltastene og bekreft med [OK]. Still
deretter inn aktuell tid, først timer og deretter minutter.
Fabrikkinnstilling.
Velg [MENU] i Normaldisplay og deretter [Service]. Velg [Factory
settings]. Velg [Yes] eller [No] med piltastene og trykk deretter på [OK].
Ved å velge [Yes] slettes alle programmeringer og egne innstillinger som
er gjort og panelet får de fabrikkinnstillingene som den hadde fra
begynnelsen.
SERVICEINNSTILLINGER
CC 300
Service.
I menyen Service kan den som tar seg av anlegget foreta diverse
innstillinger som maksimal badetemperatur. Det anbefales likevel å
beholde de fabrikkinnstillingene som finnes. Menyen Service har en
kode, slik at uvedkommende ikke skal kunne endre på disse
innstillingene. I Normaldisplay trykkes på [MENU] og deretter på
[Service]. Velg [Service] og trykk koden 124.
Systeminnstillinger.
Maximal driftstid
[Max running time (h)] – Dette er den driftstid som stilles inn ved første
oppstart. Denne tiden gjelder ikke hvis anlegget er programmert. Kan
stilles mellom 1 til 24 timer. Fabrikkinnstilling er 3 timer.
Temperaturenhet
[Temperature (°C/F)] – Denne parameter stiller inn om temperaturen skal
vises i grader Celsius eller Fahrenheit.
Testmeny
Testmenyen brukes kun til feilsøking og teknisk support via Tylö.
Max temperatur.
[Max temp (°C/F)] – Her stiller man inn maksimumtemperatur som
anlegget kan programmeres med. Ved badstue i Tylarium er
maksimumtemperaturen 55 °C.
Page 31

Senking av temperatur ved standby.
[Temp reduction stand by (°C/F)] – Hvor mye temperaturen skal synkr
når anlegget er i stand by, sammenlignet med programmert
badetemperatur. Fabrikkinnstilling er 30 °C.
Maksimal driftstid ved standby.
[On time stand by (min)] – Når anlegget er programmert i standby og
man trykker på ON-knappen, er badet idrift så lenge som den tid man
angitt her. Fabrikkinnstilling er 60 minutter.
Maksimal driftstid utenom programmert tid.
[Time outside timer (min)] – Dette er den tiden anlegget er i drift ved
kodesperre utenom programmert tid.
Avkalking.
[De-scaling (h)] – Denne parameter er en timer som teller ned når
anlegget er i drift. Den sier fra at det er på tide å avkalke.
Fabrikkinnstilling er 40 timer.
Ta kontakt med innkjøpsstedet ved eventuelle problemer.
© Kopiering, helt eller delvis, er forbudt uten skriftlig tillatelse fra Tylö.
Rett til endringer i materiale, konstruksjon og design forbeholdes.
31
Page 32

345
INSTALLASJON CC 300T
Denne anvisningen leses sammen med monteringsanvisningen som
følger med badstuaggregat eller dampgenerator.
Bilde A – TYLARIUM.
(Badstuaggregat type SK, SDK og dampgenerator type VA/VB).
1 = badstuaggregat. 2 = fukt- og temperatursensor. 3 = betjeningspanel
CC 300T. 4 = eventuell ekstern on/off-bryter. 5 = el-sentral.
6 = reléboks RB30/60. 7 = dampgenerator. 8 = forsterker (amplifier).
Bilde B – TYLARIUM.
(Badstuaggregat type SE og dampgenerator type VA/VB).
1 = badstuaggregat. 2 = fukt- og temperatursensor. 3 = betjeningspanel
CC 300T. 4 = eventuell ekstern on/off-bryter. 5 = el-sentral.
7 = dampgenerator. 8 = forsterker (amplifier).
Reléboks (RB).
(Det brukes ikke reléboks til SE aggregat).
Monteres utenfor og valgfri avstand fra Tylariumet på en kjølig og
ventilert plass. Reléboksen må ikke plasseres nærmere enn 1 meter fra
CC 300T.
Skjermet svakstrømsledning (LiYCY 6-leder).
Betjeningsledning mellom CC 300T til reléboks, SE aggregat eller
dampgenerator må være en skjermet svakstrømsledning (LiYCY, 6leder). Skjemingen kobles til plint 12 på CC panelet.
Plassering av termistor, fukt- og temperatursensor.
Monteres 1500 mm fra gulvet (ikke ovenfor badstuaggregatet).
Plasser sensoren slik at den verken direkte eller indirekte ikke kan treffes
av dampstrålen.
Glem ikke å jorde!
Bilde D – koblingsskjema.
(Badstuaggregat type SE og dampgenerator type VA/VB med
betjeningspanel type CC 300T).
1 = badstuaggregat. 2 = fukt- og temperatursensor. 3 = betjeningspanel
CC 300T. 4 = eventuell ekstern on/off-bryter. 7 = dampgenerator.
8 = forsterker (amplifier).
Kontroller at tilkobling skjer med riktig spenning i henhold til
badstuaggregatets og dampgeneratorens merkeskilt.
Glem ikke å jorde!
BRUKSANVISNING
CC 300T
RH%
OK
R
Forsterker (amplifier).
Monteres utenfor Tylariumet maks. 2 meter fra sensoren og valgfri
avstand fra CC 300T. Betjeningsledning mellom forsterker og CC 300T
må være skjermet svakstrømsledning (4-leder). Skjemingen kobles til
plint 25 på forsterkeren.
Belysning.
Belysningen kobles ifølge koblingskjema.
Ekstrautstyr: ekstern on/off-bryter (momentan).
Plasseres i valgfri avstand fra Tylariumet. Kobles til CC 300T med
svakstrømsledning – se koblingsskjema. Ved bruk av flere eksterne
on/off-brytere skal disse parallellkobles. Ett trykk på ekstern bryter starter
CC300T og lar det stå på innstilt tid (se Første oppstart). Ett trykk til på
ekstern bryter slår av CC300T hvis det ikke er programmert/kodesperret.
Hvis CC300T er programmert/kodesperret må man slå av med ON/OFFknappen på CC300T.
Ekstrautstyr: ekstern on/off-bryter (konstant slutning).
Plasseres i valgfri avstand fra Tylariumet. Kobles til CC 300T med
svakstrømsledning till CC 300T – se koblingsskjema. Ved bruk av flere
eksterne on/off-bryter skal disse parallellkobles. Ved kontinuerlig
innkobling går anlegget så lenge det er sluttet kobling mellomn plint 19
og 20, men ikke over maksimalt innstilt tid.
Tilkobling til sentral datamaskin.
Innkobling kan også gjøres via en sentral datamaskin som enten gir et
impulssignal eller vedvarende, sluttet kobling mellom plintene 19 og 20 i
CC 300T.Maksimal tillatt kontinuerlig innkoblingstid er 24 timer.
Viktig! For at dampgeneratorens automatiske tømmefunksjon skal
fungere må betjeningspanelet være slått av minst 1,5 time/døgn.
Styring av andre Tylö-produkter.
CC300T kan med fordel styre andre Tylö-produkter. Eksempel på dette
er sammenkobling med Tylö Fresh, som blir aktivert når panelet er slått
på. Ved styring av f.eks. Tylö Fresh eller annet CC-panel må disse
kobles mellom plint 40 og 41 på CC 300T og plint 19 og 20 på andre
Tylö-produkter. Som eksempel, se bilde J.
12
Bild 1. Menydisplay
1 = Venstre knapp, 2 = Midtre knapp, 3 = Høyre knapp. 4 =
Symboler/tekst som tilsvarer respektive knapp. 5 = Symboler/tekst for
innstilling og visning av aktuelle verdier.
Knapper og display.
På betjeningspanelet står det tre knapper. Ovenfor knappene nederst på
displayet vises symboler som tilsvarer respektive knapp. De ser
forskjellig ut avhengig av hvilken funksjon panelet har. Når pilene viser
seg på betjeningsdisplayet (Bilde 1) brukes venstre- og høyre knapp for å
komme til ønsket symbol. Velg symbol ved å bekrefte med knappen i
midten.
I normaldisplayet (Bilde 2) er venstre knapps funksjon ON/OFF og dens
symboler vises ovenfor i nedkanten av displayet. Symbolet lyser grønt
når anlegget er i drift. Symbolet lyser rødt når anlegget er slått av.
Symbolet lyser oransje når anlegget står i standby. Høyre knapps
funksjon er belysning. Symbolet til lampen er gult når belysningen er på
og hvit når belysningen er slått av. Displayet viser også aktuell
temperatur og luftfuktighet.
Ved å holde den midtre knappen inne en stund, endres innstillingen på
displayet til normalfunksjon, hvis det står i en annen innstilling.
Trykk på venstre knapp i 2 sek. for å slå av et aktivt program.
22
ºc
MENU
%
33
R
Bilde C, E – koblingsskjema.
(Badstuaggregat type SK, SDK og dampgenerator type VA/VB med
betjeningspanel type CC 300T).
1 = badstuaggregat. 2 = fukt- og temperatursensor. 3 = betjeningspanel
CC 300T. 4 = eventuell ekstern on/off-bryter. 6 = reléboks RB30/60.
7 = dampgenerator. 8 = forsterker (amplifier).
Kontroller at tilkobling skjer med riktig spenning i henhold til
badstuaggregatets og dampgeneratoren merkeskilt.
32
Bilde 2. Normaldisplay
Page 33

Første gangs oppstart.
Første gang betjeningspanelet slås på må man foreta visse innstillinger.
Velg først region og bekreft med midtre knapp. Velg deretter ønsket
språk, bekreft med midtre knapp. Angi så dato og tid. Bruk venstre- og
høyre knapp for stille inn ønsket tid. Bekreft med midtre knapp. Ved
manuell oppstart stilles til slutt inn ønsket driftstid. Grunninnstilling er 3
timer, men kan velges fra 1 til 24 timer. Trykk trinnvis oppover med høyre
knapp/nedover med venstre knapp til ønsket tid vises i displayet. Hvert
knappetrykk øker eller minsker tiden med 15 minutter. Hold knappene
trykt inn hvis det skal gå raskere. Bekreft med midtre knapp. Nå er
grunninnstillingen klar.
Belysning.
Tennes automatisk når anlegget starter og slukker automatisks når
anlegget slås av. Belysningen kan også tennes eller slukkes manuelt ved
å trykke på høyre knapp når lampesymbolet vises lengst nede i høyre
hjørnet. Symbolet lyser hvitt når belysningen er slukket og gult når
belysningen slått på.
Kodelås.
Hindrer uvedkommende i å endre innstilte tider.
Hovedstrømbryter.
På undersiden av reléboksen, SE aggregatet og de mindre
dampgeneratorene finnes en hovedstrømbryter som kun trenger å bli
brukt når anlegget skal være utkoblet over lengre tid.
Tips! Termometeret (hygrometeret) i Tylariumet plasseres i en slik høyde
at viste verdier stemmer overens med de eksakte tallene CC 300T viser.
Standby.
Standby er av stor betydning for Tylariumet i hoteller, badeanlegg osv,
der besøksfrekvensen varierer. Under lavfrekvente perioder står anlegget
innstilt på energisparing "beredskapsvarme", som hurtig kan akselereres
til ønsket badetemperatur ved å trykke på ON, alternativt ekstern bryter.
Funksjonen Standby sparer derved store beløp per år.
Som det framgår av nedenstående eksempel er det flere muligheter for
lett å programmere et passende badstuprogram.
Eksempel på Standby.
Tre ulike badstuanlegg som er åpne mellom klokken 800 og 2000 og med
varierende besøkfrekvens ifølge nedenstående alternativer.
Alt. 1) Et lite antall badegjester som kommer sporadisk under hele
åpningstiden. Programmer Standby mellom 8
(eller badevakten) aktiverer badstuprogrammet ved å trykke på CCpanelets ”ON” knapp.
Alt. 2) Et lite antall badegjester kommer sporadisk mellom 8
Etter klokken 14
Programmer Stand by mellom 8
mellom 14
bastuprogrammet ved et trykk på CC-panelets ”ON” knapp.
Alt. 3) Et stort antall badende mellom klokken 8
mellom 18
badegjester. Programmer Standby mellom 8
”ON” tider for de velbesøkte badstutidene som ovenfor. De sporadiske
badegjestene aktiverer badstuprogrammet med et trykk på CC-panelets
”ON” knapp.
00
pleier anlegget å være godt besøkt fram til stengetid.
00
- 2000. De sporadiske badegjestene aktiverer
00
- 2000. Resten av dagen besøkes kun sporadisk av
00
og 1400 og programmer fast ”ON” tid
00
og 2000. Badegjestene
00
og 1400.
00
- 1000, 1300- 1400 og
00
og 2000, programmer faste
INNSTILLINGER
CC 300T
SLÅ PÅ ON/OFF MANUELT.
Innstilling av badstutemperatur.
Velg [MENU] i Normaldisplay og deretter temperaturmåleren. Trykk
oppover til ønsket temperatur, bekreft med [OK].
Innstilling av fuktighet.
Velg dråpesymbol. Trykk fram til ønsket fuktighet (RH %), bekreft med
[OK]. Grensen for hvor høyt man kan stille inn er avhengig av
temperaturen.
Starting av anlegget
Velg deretter retursymbolet, bekreft med midtre knapp og velg ON/OFFsymbolet for å starte badstuen. Trykk en gang til på ON/OFF for å slå av.
Symbolet lyser rødt når anlegget er slått av og grønt når anlegget er i
drift.
AUTOMATISK AV/PÅ.
Innstilling av badstutemperatur.
Velg [Meny] i Normaldisplay og deretter temperaturmåler. Trykk frem til
ønsket temperatur, bekreft med [OK].
Innstilling av fuktighet.
Velg dråpesymbolet. Trykk deretter frem til ønsket fuktighet [(RH %)],
bekreft med [OK]. Grensen for hvor høyt man kan stille inn verdien er
avhengig av temperaturen.
Start av timerfunksjon
Velg [MENU] i Normaldisplay. Velg deretter [Program] og så [Timer]. Still
inn forvalgstid (tid før start av anlegget), bekreft med OK.
Timertiden er nå aktivert og badet starter automatisk etter innstilt tid.
Starttid vises øverst i venstre hjørne. Du kan slå av timertiden når som
helst mens timeren teller ned ved å trykke to ganger på knappen under
ON/OFF-symbolet. Har anlegget startet slår man av ved å trykke én gang
på ON/OFF-knappen.
Hvis fuktigheten overstiger 30 % når anlegget slås av, starter en
”opptørking” på ca. 20 minutter automatisk (fabrikkinnstilt).
UKEPROGRAMMERING
Med forskjellige innstillinger på ulike ukedager eller med samme
innstilling alle dager i uken.
Timer
Bild 3. Programdisplay
Innstilling av på/av/standby, temperatur/fuktighet.
Velg [MENU] i Normaldisplay og deretter Program. Velg Program en
gang til i Programdisplay (se bilde 3). Ved å trykke på [OK] endres
markeringen [Add] til mørkeblå. Man er nå inne i programmeringsmodus.
Velg først ønsket dag (aktuell tekst er rødmarkert) ved å bruke piltastene.
Det går an å velge hver ukedag for seg, men man kan også velge direkte
mandag-søndag (for å få samme innstilling alle ukedager), mandagfredag eller lørdag-søndag. Bekreft med [OK]. Still deretter inn hvilken tid
anlegget skal starte. For hvert trykk på piltastene går tiden opp eller ned
15 minutter. Trykk på [OK] når ønsket starttid vises i displayet. Velg
deretter ønsket stopptid og trykk på [OK]. Angi om anlegget skal være
på, av eller standby den tiden som er valgt. ON/OFF-symbolet viser grønt
hvis anlegget skal være på, rødt om anlegget skal være slått av og
oransje ved standby. Velges det at anlegget skal være på må også
innstilling av ønsket temperatur og fuktighetsgrad foretas. Trykk frem
med piltastene og bekreft med [OK]. Ny programmering foretas ved å
trykke på høyre knapp én gang, for å markere [Add] og deretter på [OK].
Gjenta deretter ovenstående prosedyre. Velg [Back], for å gå tilbake til
Normaldisplay, bekreft med OK. Velg [Back] en gang til og deretter OK.
Foretas ingen knappetrykkinger går betjeningspanelet automatisk tilbake
til Normaldisplay etter ca. 30 sekunder. Ønsker man å fjerne all
forhåndsprogrammeringen velger [Clear Calender]. Man kan også
deaktivere alle programmene midlertidig ved å velge [Calender OFF].
Velg [Overview] i Programdisplay, for å få en enkel oversikt over de
programmene som er forhåndsprogrammerte. Der er det et søylediagram
som viser rødt når anlegget er slått av, grønt når anlegget er i drift og gult
ved standby.
Så snart man trykker på ON når anlegget er i standby, stiger
temperaturen til innstilt badetemperatur. Etter 1 time går anlegget
automatisk tilbake til fortsatt standby-temperatur. Hvert nytt trykk på ON
starter 1 times badstuperiode.
Står anlegget i OFF gjelder de innstillingene som ble foretatt ved første
oppstart.
Hvis anlegget er idrift kan man slå av manuelt ved å trykke på OFF. (Slår
kun av pågående badstue.)
Översikt Åter
OK
R
33
Page 34

Hvis fuktigheten overstiger 30 % når anlegget slås av, starter automatisk
en ”opptørking” på ca. 20 minutter (fabrikkinnstilling).
Man kan også deaktivere hele kalenderfunksjonen midlertidig, for
eksempel ved service, og ganske enkelt aktivere den igjen etterpå.
BADSTUE UTENOM PROGRAMMERT TID
hvis panelet er sperret med kode.
Tylariumet kan brukes til en annen tid enn programmert. Ved å trykke på
ON starter 1 times badstutid. Ønskes forlenget badstuperiode trykker
man en gang til på ON. Anlegget slår seg automatisk av 1 time etter siste
knappetrykking.
OBS! Glem ikke å kodesperre panelet.
PANELINNSTILLINGER
CC 300T
Display.
LCD lysstyrke.
Velg [MENU] i Normaldisplay, [Service] og deretter [Display]. Marker
[Brightness (%)] og trykk på midtre knapp. Markeringen blir mørkeblå og
verdien på lysstyrken i displayet kan endres. Trykk på [OK] for å bekrefte.
LCD lysstyrke ved Standby.
Velg [MENU] i Normaldisplay, [Service] og deretter [Display]. Marker
[Stand by (%)] og trykk på midtre knapp. Markeringen blir mørkeblå og
verdien for lysstyrken i displayet når panelet er i Standby kan endres.
Trykk på [OK] for å bekrefte. Fabrikkinnstilling er 30 %.
Tid frem til LCD Standby.
Velg [MENU] i Normaldisplay, [Service] og deretter [Display]. Marker
[Stand by time] og trykk på midtre knapp. Markeringen blir mørkeblå og
tiden kan endres for når lysstyrken i displayet skal endres etter at panelet
er gått over til Standby. Trykk på OK for å bekrefte.
Service.
Se SERVICEINNSTILLINGER
Kodelås.
Velg [MENU] i Normaldisplay og deretter [Service]. Trykk frem til [Code
lock] og trykk på [OK]. Angi ønsket kode. Trykk med piltastene til riktig
siffer og bekreft med [OK]. Kodelåsen aktiveres automatisk ved
programmering og går til Normaldisplay.
Gjenta ovenstående og sett koden til 0000, for å gå tilbake til innstilling
uten sperre.
Det går ikke an å endre innstillinger når kodelåsen er aktivert. Det går an
å starte og slå av anlegget, samt tenne og slukke belysningen.
Badstutiden starter den tiden man har angitt i Servicemenyn under [Time
outside timer] (fabrikkinnstilling 1 time).
Allmenn kode som alltid virker er 1995.
OBS! Alle innstillinger må foretas før eventuell kodelåsing.
Språk.
Velg [MENU] i Normaldisplay og deretter [Service]. Velg språk og trykk
frem med piltastene til ønsket språk. Trykk deretter på [OK].
Klokke.
Velg [MENU] i Normaldisplay og deretter [Service]. Velg [Set clock]. Angi
først riktig dag, trykk frem med piltastene og bekreft med [OK]. Still
deretter inn aktuell tid, først timer og deretter minutter.
Fabrikkinnstilling.
Velg [MENU] i Normaldisplay og deretter [Service]. Velg [Factory
settings]. Velg [Yes] eller [No] med piltastene og trykk deretter på [OK].
Ved å velge [Yes] slettes alle programmeringer og egne innstillinger som
er gjort og panelet får de fabrikkinnstillingene som den hadde fra
begynnelsen.
SERVICEINNSTILLINGER
CC 300T
beholde de fabrikkinnstillingene som finnes. Menyen Service har en
kode, slik at uvedkommende ikke skal kunne endre på disse
innstillingene. I Normaldisplay trykkes på [MENU] og deretter på
[Service]. Velg [Service] og trykk koden 124.
Systeminnstillinger.
Grense for tørking av anlegget
[Dryup limit (%)] – Når anlegget slås av, registrerer den luftfuktigheten i
rommet. Hvis det er over 30 % luftfuktighet (fabrikkinnstilt) går anlegget
over i en opptørkingsfase.
Tørketemperatur
[Dryup temperature (°C)] – Dette er den temperaturen som anlegget har i
opptørringsfasen. Fabrikkinnstillingen er 80 °C.
Tørketid
[Dryup time (min)] – Dette er den tiden som anlegget er i
opptørkingsfasen. Fabrikkinnstilling er 20 minutter.
Minste temperatur med damp
[Min temp steam (°C)]– Dette er den minstetemperaturen anlegget må ha
for at dampgeneratoren skal starte. Fabrikkinnstilling er 40 °C.
Maximal driftstid
[Max running time (h)] – Dette er den driftstid som stilles inn ved første
oppstart. Denne tiden gjelder ikke hvis anlegget er programmert. Kan
stilles mellom 1 til 24 timer. Fabrikkinnstilling er 3 timer.
Temperaturenhet
[Temperature (°C/F)] – Denne parameter stiller inn om temperaturen skal
vises i grader Celsius eller Fahrenheit.
Testmeny
Testmenyen brukes kun til feilsøking og teknisk support via Tylö.
Max temperatur.
[Max temp (°C/F)] – Her stiller man inn maksimumtemperatur som
anlegget kan programmeres med. Ved badstue i Tylarium er
maksimumtemperaturen 55 °C.
Senking av temperatur ved standby.
[Temp reduction stand by (°C/F)] – Hvor mye temperaturen skal synkr
når anlegget er i stand by, sammenlignet med programmert
badetemperatur. Fabrikkinnstilling er 30 °C.
Maksimal driftstid ved standby.
[On time stand by (min)] – Når anlegget er programmert i standby og
man trykker på ON-knappen, er badet idrift så lenge som den tid man
angitt her. Fabrikkinnstilling er 60 minutter.
Maksimal driftstid utenom programmert tid.
[Time outside timer (min)] – Dette er den tiden anlegget er i drift ved
kodesperre utenom programmert tid.
Avkalking.
[De-scaling (h)] – Denne parameter er en timer som teller ned når
anlegget er i drift. Den sier fra at det er på tide å avkalke.
Fabrikkinnstilling er 40 timer.
TYLARIUM
Tylarium tilbyr badstubad i alle former. Tørrbadstue, Våtbadstue og
Dampbadstue. Fordi relativ luftfuktighet iblant er høyere enn ved
tradisjonelle badstubad bør det tas hensyn til nedenstående punkter.
• Har badstuen vindu i dør eller vegg, må hele nedre list på
vindusrammen strykes med båtferniss og skjøten mellom glass og list
tettes med våtrumssilikon. På den måten hindres eventuell kondens på
glassflatene å trenge inn i skjøten.
• Lakker treskel og dørhåndtak et par ganger med båtferniss, så holder
trefinishen seg og rengjøringen av badstuen blir mye lettere.
Badstulava, dekorraster og ryggstø smøres inn med olje på begge
sider med Tylö badstuolje.
OBS! Alt annet tre inne i badstuen skal være ubehandlet.
Ta kontakt med innkjøpsstedet ved eventuelle problemer.
© Kopiering, helt eller delvis, er forbudt uten skriftlig tillatelse fra Tylö.
Rett til endringer i materiale, konstruksjon og design forbeholdes.
Service.
I menyen Service kan den som tar seg av anlegget foreta diverse
innstillinger som maksimal badetemperatur. Det anbefales likevel å
34
Page 35

BRUGSANVISNING
CC 300
OK
R
1234 5
Billede 1. Menudisplay
1 = Venstreknap, 2 = Midterknap, 3 = Højreknap. 4 = Symboler/tekst som
svarer til de nævnte knapper. 5 = Symboler/tekst for indstilling og visning
af de aktuelle værdier.
Knapper og display
Der er placeret tre knapper på kontrolpanelet. Over knapperne, nederst
på displayet, vises de symboler, som svarer til knapperne. Disse ser
forskellige ud, afhængigt af den aktuelle panel-funktion. Når pilene vises
på Menudisplayet (Billede 1), anvendes venstre- og højreknapperne til at
gå til det ønskede symbol. For at vælge symbolet bekræftes med
midterknappen.
På Normaldisplayet (Billede 2) er venstreknappens funktion ON/OFF, og
dette symbol vises oven for, nederst på displayet. Når anlægget kører, er
symbolet grønt, når anlægget er slukket, er symbolet rødt, og i standby
er symbolet orange. Højreknappens funktion er belysning. Pæresymbolet er gult, når belysningen er tændt, og hvidt, når belysningen er
slukket. Displayet viser også den aktuelle temperatur.
Ved at trykke på midterknappen og holde den inde går panelet tilbage til
Normaldisplay, hvis det befinder sig i en anden funktion.
Når et program er aktivt, trykkes på venstreknappen i 2 sek. for at slukke
det aktive program.
ºc
22
MENU
R
Belysning
Lyset tændes automatisk, når anlægget starter, og slukkes automatisk,
når anlægget lukker ned. Belysningen kan også tændes eller slukkes
manuelt med et tryk på højreknappen, når pære-symbolet vises længst
nede i højre hjørne. Symbolet er hvidt, når belysningen er slukket, og
gult, når belysningen er tændt.
Kodelås
Forhindrer ikke-autoriseret ændring af de indstillede værdier.
Hovedafbryder
På relæboksens, SE-aggregatets og de mindre dampgeneratorers
underside sidder en hovedafbryder, som kun bør anvendes, hvis
anlægget skal være frakoblet i en længere periode.
Tip! Termometeret i saunaen skal placeres i en sådan højde, at de viste
værdier er i overensstemmelse med de værdier, som CC 300 viser.
Standby
Standby er vigtig for Tylarier på hoteller, badeanstalter etc., hvor
besøgsfrekvensen varierer. I lavfrekvente perioder er anlægget indstillet
på sparefunktion, "beredskabsvarme", som hurtigt accelereres op på den
ønskede temperatur ved et tryk på ON, alternativt på den eksterne
afbryder. Her sparer Standby-funktionen store beløb årligt.
Som det fremgår af nedenstående eksempel, er der mange muligheder
for enkel programmering af et passende program.
Eksempel på Standby
Tre forskellige anlæg, som alle har åbent mellem klokken 800 og 2000,
med varierende besøgsfrekvens iht. nedenstående alternativer.
Alt. 1) Et lille antal gæster, der kommer og går sporadisk i hele
åbningstiden. Programmér Standby mellem 8
bademesteren) aktiverer programmet ved at trykke på CC-panelets ”ON”knap.
Alt. 2) Et lille antal gæster kommer og går sporadisk mellem 800 og 1400.
Efter klokken 14
Programmér Standby mellem 8
mellem klokken 14
aktiverer programmet ved at trykke på CC-panelets ”ON”-knap.
Alt. 3) Et stort antal badende mellem klokken 800 og 1000, 1300 og 1400 og
00
18
og 2000. Resten af dagen kommer der kun enkelte badende.
Programmér Standby mellem 8
for de velbesøgte perioder iht. ovenstående. De sporadisk ankommende
gæster aktiverer programmet ved at trykke på CC-panelets ”ON”-knap.
00
er anlægget normalt velbesøgt frem til lukketid.
00
og 2000. De sporadisk ankommende gæster
00
og 1400 og programmér fast ”ON”-tid
00
og 2000, programmér faste ”ON”-tider
00
og 2000. Gæsterne (eller
INDSTILLINGER
CC 300
MANUEL TIL- OG FRAKOBLING
Indstilling af temperaturen
Vælg [MENU] på Normaldisplayet og derefter temperaturmåleren. Øg til
den ønskede temperatur, bekræft med [OK].
Start anlægget
Vælg retur-symbolet, bekræft med midterknappen og vælg derefter
ON/OFF-symbolet for at starte ”badet”. Tryk en gang til på ON/OFF for at
slå anlægget fra. Symbolet er rødt, når anlægget er slukket, og grønt, når
anlægget er tændt.
Billede 2. Normaldisplay
Initial opstart
Første gang kontrolpanelet aktiveres, skal der foretages visse
indstillinger. Vælg først region, bekræft med midterknappen. Vælg
derefter ønsket sprog, bekræft med midterknappen. Indlæs derefter dato
og klokkeslæt. Brug venstre- og højreknapperne til at indstille de
ønskede værdier. Bekræft med midterknappen. Til sidst indstilles den
ønskede driftstid for manuel opstart. Grundindstillingen er 3 timer, men
der kan vælges indstilling fra 1 til 24 timer. Øg med højreknappen eller
mindsk med venstreknappen, indtil den ønskede tid vises på displayet.
Hvert knaptryk øger eller mindsker tiden med 15 minutter. For hurtigere
indstilling holdes knappen inde. Bekræft med midterknappen. Hermed er
grundindstillingerne klar.
AUTOMATISK TIL- OG FRAKOBLING
Indstilling af temperaturen
Vælg [MENU] på Normaldisplayet og derefter temperaturmåleren. Øg til
den ønskede temperatur, bekræft med [OK].
Start af timerfunktionen
Vælg [MENU] på Normaldisplayet. Vælg derefter [Program] og herefter
[Timer]. Indstil forvalgstid (tiden til anlægget starter), bekræft med OK.
Tilkoblingstiden er nu aktivere, og badet starter automatisk efter den
indstillede tid. Tiden til start vises oppe i det venstre hjørne. Man kan når
som helst afslutte forvalgstiden, mens timeren tæller ned, ved at trykke to
gange på knappen under ON/OFF-symbolet. Hvis badet er startet,
slukker man for dette ved at trykke en gang på ON/OFF-knappen.
Hvis luftfugtigheden overstiger 30 % på det tidspunkt, hvor der slukkes
for badet, starter en ”tørreperiode” på ca. 20 minutter automatisk
(fabriksindstilling).
UGEPROGRAMMERING
med forskellige indstillinger på forskellige ugedage eller med
samme indstilling for alle ugedage.
35
Page 36

Timer
Översikt Åter
OK
R
LCD-lysstyrke i hvilefunktion
Vælg [MENU] på Normaldisplayet, derefter [Service] og sluttelig
[Display]. Markér [Stand by (%)] og tryk på midterknappen. Markeringen
bliver mørkeblå, og lysstyrkeværdien på displayet, når panelet står på
Standby, kan ændres. Tryk på [OK] for at bekræfte. Fabriksindstilling er
30 %.
Tid til LCD-hvilefunktion
Vælg [MENU] på Normaldisplayet, derefter [Service] og sluttelig
[Display]. Markér [Stand by time] og tryk på midterknappen. Markeringen
bliver mørkeblå, og værdien for, hvornår lysstyrken på displayet skal
ændres, efter at panelet er gået over på Standby, kan indstilles. Tryk på
[OK] for at bekræfte.
Billede 3. Programdisplay
Indstilling af til/fra/standby, temperatur
Vælg [MENU] på Normaldisplayet og derefter Program. Vælg Program
en gang til på Program-displayet (se billede 3). Ved tryk på [OK] ændres
markeringen [Add] til mørkeblå. Program-funktionen vises nu. Vælg først
den ønskede dag (den aktuelle tekst er rødmarkeret) ved at anvende
piltasterne. Det er muligt at vælge hver enkelt ugedag hver for sig, men
man kan også direkte vælge mandag-søndag (for at få den samme
indstilling for alle ugens dage), mandag-fredag eller lørdag-søndag.
Bekræft med [OK]. Indstil derefter det klokkeslæt, hvor anlægget skal
starte. Hvert tryk på pilknapperne øger eller mindsker tiden med 15
minutter, tryk på [OK], når den ønskede starttid vises på displayet. Vælg
derefter den ønskede sluttid og tryk på [OK]. Angiv om anlægget skal
være tændt, slukket eller på standby i den periode, der er valgt. ON/OFFsymbolet vælges grønt, hvis anlægget skal være tændt, rødt hvis
anlægget skal være slukket og orange ved standby. Ønsker man, at
anlægget skal være tændt, indstilles endvidere den ønskede temperatur
(øg eller mindsk med pilknapperne) og bekræft med [OK]. For at
omprogrammere trykkes en gang på højreknappen for at markere [Add]
og derefter trykkes på [OK]. Gentag derefter ovenstående procedure. For
at gå tilbage til Normaldisplayet vælges [Back], bekræft med [OK]. Vælg
[Back] en gang til, bekræft med [OK]. Hvis der ikke aktiveres nogen
knapper, vender styrepanelet automatisk tilbage til Normaldisplayet efter
ca. 30 sekunder. Ønsker man at slette alle forprogrammerede tider,
vælges [Clear Calender]. Det er også muligt at deaktivere alle
programmer midlertidigt ved at vælge [Calender OFF].
For at få en letoverskuelig oversigt over de programer, der er
forprogrammerede, vælges [Overview] på Program-displayet. Her vises
skemalægningen i form af søjler, der er røde, når anlægget er slukket,
grønne, når anlægget er tændt, og gule ved standby.
Så snart der er trykket på ON, når anlægget står på standby, stiger
temperaturen til den indstillede temperatur. Efter 1 time vender anlægget
automatisk tilbage til standby-temperatur. Hvert nyt tryk på ON starter en
ny 1-timesperiode.
Står anlægget i OFF-funktion, gælder de indstillinger, der blev indlagt
ved initial opstart.
Hvis anlægget er tændt, er det muligt at foretage manuel slukning ved at
trykke på OFF. (Slukker kun den igangværende proces).
Man kan også deaktivere hele kalenderfunktionen midlertidigt i
forbindelse med f.eks. serviceeftersyn, og derefter nemt aktivere den
igen.
BAD UDEN FOR PROGRAMMERET TID
hvis panelet er kodespærret.
Tylariet kan anvendes på andre tidspunkter end den/de
indprogrammerede. Ved at trykke på ON starter en 1-timesperiode.
Ønskes en forlængelse af perioden, trykker man igen på ON. Anlægget
slukker automatisk 1 time efter sidste tryk på ON-knappen.
Bemærk! Husk at kodespærre panelet.
PANELINDSTILLINGER
CC 300
Display
LCD-lysstyrke
Vælg [MENU] på Normaldisplayet, derefter [Service] og sluttelig
[Display]. Markér [Brightness (%)] og tryk på midterknappen.
Markeringen bliver mørkeblå, og lysstyrkeværdien på displayet kan
ændres. Tryk på [OK] for at bekræfte.
36
Service
Se SERVICEINDSTILLINGER
Kodelås
Vælg [MENU] på Normaldisplayet og derefter [Service]. Gå til [Code lock]
og tryk derefter på [OK]. Angiv den ønskede kode. Brug piltasterne til at
gå til det ønskede tal og bekræft med [OK]. Kodelåsen aktiveres
automatisk ved programmering og går til Normaldisplayet.
For at vende tilbage til uspærret funktion gentages ovenstående, og
koden sættes til 0000.
Det er ikke muligt at ændre indlæste indstillinger, når kodelåsen er
aktiveret. Det er muligt at starte og slukke for anlægget samt tænde og
slukke for belysningen. Badet er startet til den tid, der er angivet i
Servicemenuen under [Time outside timer] (fabriksindstilling 1 time).
Generel kode, som altid fungerer, er 1995.
Bemærk! Alle indstillinger skal foretages, inden evt. kodespærre
aktiveres.
Sprog
Vælg [MENU] på Normaldisplayet og derefter [Service]. Vælg sprog og
gå til det ønskede sprog med piltasterne, bekræft derefter med [OK].
Ur
Vælg [MENU] på Normaldisplayet og derefter [Service]. Vælg [Set clock].
Angiv først korrekt dato ved hjælp af piltasterne, bekræft med [OK].
Indstil derefter det aktuelle klokkeslæt, først timer, dernæst minutter.
Fabriksindstilling
Vælg [MENU] på Normaldisplayet og derefter [Service]. Vælg [Factory
settings]. Vælg [Yes] eller [No] med piltasterne, tryk derefter på [OK].
Vælges [Yes] forsvinder alle de programmeringer og egenindstillinger,
der er foretaget, og panelet går tilbage til de oprindelige indstillinger,
fabriksindstillingerne.
SERVICEINDSTILLINGER
CC 300
Service
I Servicemenuen kan den, der varetager anlægget, indstille forskellige
parametre, som f.eks. maksimal temperatur. Det anbefales imidlertid at
beholde de fabriksindstillinger, der findes. Servicemenuen er sikret med
en kode, for at tilfældige personer ikke umiddelbart kan ændre på disse
indstillinger. På Normaldisplayet trykkes på [MENU] og derefter på
[Service]. Vælg [Service] og tryk koden 124.
Systemindstillinger
Maksimal driftstid
[Max running time (h)] – Den driftstid, der indstilles ved initial opstart.
Denne tidsindstilling gælder ikke, hvis anlægget er programmeret. Kan
indstilles på 1 til 24 timer, fabriksindstillingen er 3 timer.
Temperaturenhed
[Temperature (C°/F)] – Denne parameter angiver, om temperaturen skal
vises i grader Celsius eller Fahrenheit.
Testmenu
Testmenuen anvendes kun til fejlsøgning og teknisk support via Tylö.
Maks.-temperatur
[Max temperature (C°/F)] – Her indstilles den maksimale temperatur, som
anlægget kan programmeres til. Ved bad i Tylarium er maks.temperaturen 55 °C.
Page 37

Temperaturnedsættelse ved standby
[Temperature reduction stand by (C°/F)] – Hvor meget temperaturen skal
sænkes, når anlægget står på standby, i forhold til den programmerede
temperatur. Fabriksindstillingen er 30 °C.
Maks. driftstid under standby
[On time stand by (min)] – Når anlægget er programmeret til standby, og
der trykkes på ON-knappen, er badet aktivt i den tidsperiode, der er
indlæst her. Fabriksindstilling 60 minutter.
Maks. driftstid uden for programmeret tid
[Time outside timer (min)] – Dette er den tid ved kodespærre, som
anlægget kører uden for programmeret tid.
Afkalkning
[De-scaling (h)] – Denne parameter er en timer, der tæller ned, når
anlægget er i gang. Den meddeler, når det er tid til afkalkning.
Fabriksindstillingen er 40 timer.
Ved eventuelle problemer kontaktes forhandleren.
© Eftertryk, helt eller delvis, er forbudt uden Tylös skriftlige tilladelse.
Ret til ændringer i materialer, konstruktion og design forbeholdes.
37
Page 38

345
INSTALLATION CC 300T
Denne vejledning skal læses sammen med den monteringsvejledning,
der medfølger saunaaggregatet hhv. dampgeneratoren.
Billede A – TYLARIUM
(Saunaaggregat type SK, SDK og dampgenerator type VA/VB).
1 = saunaaggregat. 2 = fugt- og temperatursensor. 3 = kontrolpanel CC
300T. 4 = eventuel ekstern on/off-afbryder. 5 = el-central.
6 = relæboks RB30/60. 7 = dampgenerator. 8 = forstærker (amplifier).
Billede B – TYLARIUM
(Saunaaggregat type SE og dampgenerator type VA/VB).
1 = saunaaggregat. 2 = fugt- og temperatursensor. 3 = kontrolpanel CC
300T. 4 = eventuel ekstern on/off-afbryder. 5 =
7 = dampgenerator. 8 = forstærker (amplifier).
el-central.
Relæboks (RB)
(Relæboks anvendes ikke til SE-aggregat).
Monteres uden for Tylariet – i valgfri afstand af dette – i et svalt og
ventileret rum. Relæboksen må ikke placeres nærmere end 1 meter fra
CC 300T.
Afskærmet svagstrømsledning (LiYCY 6-leders kabel).
Styreledningen mellem CC 300T og relæboks, SE-aggregat eller
dampgenerator skal være en afskærmet svagstrømsledning (LiYCY, 6leders kabel). Afskærmningen tilsluttes til klemme 12 på CC-panelet.
Placering af termistor, fugt- og temperatursensor.
Monteres 1500 mm over gulv (ikke over saunaaggregatet).
Sensoren skal placeres, så den hverken direkte eller indirekte kan
rammes af dampstrålen.
Kontrollér på hhv. saunaaggregatets og dampgeneratorens dataplader,
at disse har den korrekte spænding for tilslutning.
Husk at føre til jord!
Billede D – ledningsdiagram
(Saunaaggregat type SE og dampgenerator type VA/VB med
kontrolpanel type CC 300T).
1 = saunaaggregat. 2 = fugt- og temperatursensor. 3 = kontrolpanel CC
300T. 4 = eventuel ekstern on/off-afbryder. 7 = dampgenerator. 8 =
forstærker (amplifier).
Kontrollér på hhv. saunaaggregatets og dampgeneratorens dataplader,
at disse har den korrekte spænding for tilslutning.
Husk at føre til jord!
BRUGSANVISNING
CC 300T
RH%
OK
R
Forstærker (amplifier)
Forstærkeren skal monteres uden for Tylariet, maks. 2 meter fra
sensoren og i valgfri afstand fra CC 300T. Styreledningen mellem
forstærkeren og CC 300T skal være en afskærmet svagstrømsledning
(4-leders kabel). Afskærmningen tilsluttes til klemme 25 i forstærkeren.
Belysning
Tilslut belysningen iht. ledningsdiagrammet.
Tilvalg: Ekstern on/off-afbryder (momentan-afbryder).
Placeres i valgfri afstand fra Tylariet. Tilsluttes med svagstrømsledning til
CC 300T – se ledningsdiagrammet. Ved anvendelse af flere eksterne
on/off-afbrydere skal disse parallelkobles. Et tryk på den eksterne
afbryder starter C300T, og anlægget kører så længe, som den ønskede
driftstid er indstillet til (Se Initial-opstart). Ved et tryk til på en eksterne
afbryder afbrydes CC300T, hvis den ikke er programmeret/kodespærret.
Hvis CC300T er programmeret/kodespærret, skal man abryde med
ON/OFF-knappen på CC300T.
Tilvalg: Ekstern on/off-afbryder (konstant tilslutning).
Placeres i valgfri afstand fra Tylariet. Tilsluttes med svagstrømsledning til
CC 300T – se ledningsdiagrammet. Ved anvendelse af flere eksterne
on/off-afbrydere skal disse parallelkobles. Ved konstant tilkobling kører
anlægget, så længe der er tilkobling mellem klemme 19 og 20, dog
maksimalt i den indstillede driftsperiode.
Tilslutning til central computer
Tilslutning kan også ske over en central computer, som enten foretager
en kort tilkobling eller konstant tilkobling mellem klemme 19 og 20 i
CC300T. Tilladt kontinuerlig tilkoblingstid er maks. 24 timer.
Vigtigt! For at dampgeneratorens automatiske tømningsfunktion skal
fungere, skal kontrolpanelet være slukket mindst 1,5 tim./døgn.
Styring af andre Tylö-produkter
CC300T kan med fordel anvendes til styre andre Tylö-produkter. Et
eksempel på dette er sammenkobling med Tylö Fresh, som så aktiveres,
når panelet er i drift. Ved styring af f.eks. Tylö Fresh eller andet CC-panel
skal disse kobles mellem klemme 40 og 41 i CC 300T og klemme 19 og
20 på det andet Tylö-produkt. Se billede J for eksempel.
12
.
Billede 1. Menudisplay
1 = Venstreknap, 2 = Midterknap, 3 = Højreknap. 4 = Symboler/tekst som
svarer til de nævnte knapper. 5 = Symboler/tekst for indstilling og visning
af de aktuelle værdier.
Knapper og display
Der er placeret tre knapper på kontrolpanelet. Over knapperne, nederst
på displayet, vises de symboler, som svarer til knapperne. Disse ser
forskellige ud, afhængigt af den aktuelle panel-funktion. Når pilene vises
på Menudisplayet (Billede 1), anvendes venstre- og højreknapperne til at
gå til det ønskede symbol. For at vælge symbolet bekræftes med
midterknappen.
På Normaldisplayet (Billede 2) er venstreknappens funktion ON/OFF, og
dette symbol vises oven for, nederst på displayet. Når anlægget kører, er
symbolet grønt, når anlægget er slukket, er symbolet rødt, og i standby
er symbolet orange. Højreknappens funktion er belysning. Pæresymbolet er gult, når belysningen er tændt, og hvidt, når belysningen er
slukket. Displayet viser også den aktuelle temperatur og luftfugtighed.
Ved at trykke på midterknappen og holde den inde går panelet tilbage til
Normaldisplay, hvis det befinder sig i en anden funktion.
Når et program er aktivt, trykkes på venstreknappen i 2 sek. for at slukke
det aktive program.
22
ºc
MENU
%
33
R
Billede C, E – ledningsdiagram
(Saunaaggregat type SK, SDK og dampgenerator type VA/VB med
kontrolpanel type CC 300T).
1 = saunaaggregat. 2 = fugt- og temperatursensor. 3 = kontrolpanel
CC 300T. 4 = eventuel ekstern on/off-afbryder 6 = relæboks RB30/60. .
7 = dampgenerator. 8 = forstærker (amplifier).
38
Billede 2. Normaldisplay
Page 39

Initial opstart
Første gang kontrolpanelet aktiveres, skal der foretages visse
indstillinger. Vælg først region, bekræft med midterknappen. Vælg
derefter ønsket sprog, bekræft med midterknappen. Indlæs derefter dato
og klokkeslæt. Brug venstre- og højreknapperne til at indstille de
ønskede værdier. Bekræft med midterknappen. Til sidst indstilles den
ønskede driftstid for manuel opstart. Grundindstillingen er 3 timer, men
der kan vælges indstilling fra 1 til 24 timer. Øg med højreknappen eller
mindsk med venstreknappen, indtil den ønskede tid vises på displayet.
Hvert knaptryk øger eller mindsker tiden med 15 minutter. For hurtigere
indstilling holdes knappen inde. Bekræft med midterknappen. Hermed er
grundindstillingerne klar.
Belysning
Lyset tændes automatisk, når anlægget starter, og slukkes automatisk,
når anlægget lukker ned. Belysningen kan også tændes eller slukkes
manuelt med et tryk på højreknappen, når pære-symbolet vises længst
nede i højre hjørne. Symbolet er hvidt, når belysningen er slukket, og
gult, når belysningen er tændt.
Kodelås
Forhindrer ikke-autoriseret ændring af de indstillede værdier.
Hovedafbryder
På relæboksens, SE-aggregatets og de mindre dampgeneratorers
underside sidder en hovedafbryder, som kun bør anvendes, hvis
anlægget skal være frakoblet i en længere periode.
Tip! Termometeret (hygrometeret) i Tylariet skal placeres i en sådan
højde, at de viste værdier er i overensstemmelse med de værdier, som
CC 300T viser.
Standby
Standby er vigtig for Tylarier på hoteller, badeanstalter etc., hvor
besøgsfrekvensen varierer. I lavfrekvente perioder er anlægget indstillet
på sparefunktion, "beredskabsvarme", som hurtigt accelereres op på den
ønskede temperatur ved et tryk på ON, alternativt på den eksterne
afbryder. Her sparer Standby-funktionen store beløb årligt.
Som det fremgår af nedenstående eksempel, er der mange muligheder
for enkel programmering af et passende program.
Eksempel på Standby
Tre forskellige anlæg, som alle har åbent mellem klokken 800 og 2000,
med varierende besøgsfrekvens iht. nedenstående alternativer.
Alt. 1) Et lille antal gæster, der kommer og går sporadisk i hele
åbningstiden. Programmér Standby mellem 8
bademesteren) aktiverer programmet ved at trykke på CC-panelets ”ON”knap.
Alt. 2) Et lille antal gæster kommer og går sporadisk mellem 800 og 1400.
Efter klokken 14
Programmér Standby mellem 8
mellem klokken 14
aktiverer programmet ved at trykke på CC-panelets ”ON”-knap.
Alt. 3) Et stort antal badende mellem klokken 800 og 1000, 1300 og 1400 og
00
18
og 2000. Resten af dagen kommer der kun enkelte badende.
Programmér Standby mellem 8
for de velbesøgte perioder iht. ovenstående. De sporadisk ankommende
gæster aktiverer programmet ved at trykke på CC-panelets ”ON”-knap.
00
er anlægget normalt velbesøgt frem til lukketid.
00
og 2000. De sporadisk ankommende gæster
00
og 1400 og programmér fast ”ON”-tid
00
og 2000, programmér faste ”ON”-tider
00
og 2000. Gæsterne (eller
INDSTILLINGER
CC 300T
MANUEL TIL- OG FRAKOBLING
Indstilling af temperaturen
Vælg [MENU] på Normaldisplayet og derefter temperaturmåleren. Øg til
den ønskede temperatur, bekræft med [OK].
Indstilling af fugtigheden
Vælg dråbe-symbolet. Øg derefter til den ønskede luftfugtighed (RH%),
bekræft med [OK]. Grænsen for, hvor højt man kan indstille denne værdi,
afhænger af temperaturen.
Start anlægget
Vælg retur-symbolet, bekræft med midterknappen og vælg derefter
ON/OFF-symbolet for at starte ”badet”. Tryk en gang til på ON/OFF for at
slå anlægget fra. Symbolet er rødt, når anlægget er slukket, og grønt, når
anlægget er tændt.
AUTOMATISK TIL- OG FRAKOBLING
Indstilling af temperaturen
Vælg [MENU] på Normaldisplayet og derefter temperaturmåleren. Øg til
den ønskede temperatur, bekræft med [OK].
Indstilling af fugtigheden
Vælg dråbe-symbolet. Øg derefter til den ønskede luftfugtighed [(RH%)],
bekræft med [OK]. Grænsen for, hvor højt man kan indstille denne værdi,
afhænger af temperaturen.
Start af timerfunktionen
Vælg [MENU] på Normaldisplayet. Vælg derefter [Program] og herefter
[Timer]. Indstil forvalgstid (tiden til anlægget starter), bekræft med OK.
Tilkoblingstiden er nu aktivere, og badet starter automatisk efter den
indstillede tid. Tiden til start vises oppe i det venstre hjørne. Man kan når
som helst afslutte forvalgstiden, mens timeren tæller ned, ved at trykke to
gange på knappen under ON/OFF-symbolet. Hvis badet er startet,
slukker man for dette ved at trykke en gang på ON/OFF-knappen.
Hvis luftfugtigheden overstiger 30 % på det tidspunkt, hvor der slukkes
for badet, starter en ”tørreperiode” på ca. 20 minutter automatisk
(fabriksindstilling).
UGEPROGRAMMERING
med forskellige indstillinger på forskellige ugedage eller med
samme indstilling for alle ugedage.
Timer
Billede 3. Programdisplay
Indstilling af til/fra/standby, temperatur/fugtighed
Vælg [MENU] på Normaldisplayet og derefter Program. Vælg Program
en gang til på Program-displayet (se billede 3). Ved tryk på [OK] ændres
markeringen [Add] til mørkeblå. Program-funktionen vises nu. Vælg først
den ønskede dag (den aktuelle tekst er rødmarkeret) ved at anvende
piltasterne. Det er muligt at vælge hver enkelt ugedag hver for sig, men
man kan også direkte vælge mandag-søndag (for at få den samme
indstilling for alle ugens dage), mandag-fredag eller lørdag-søndag.
Bekræft med [OK]. Indstil derefter det klokkeslæt, hvor anlægget skal
starte. Hvert tryk på pilknapperne øger eller mindsker tiden med 15
minutter, tryk på [OK], når den ønskede starttid vises på displayet. Vælg
derefter den ønskede sluttid og tryk på [OK]. Angiv om anlægget skal
være tændt, slukket eller på standby i den periode, der er valgt. ON/OFFsymbolet vælges grønt, hvis anlægget skal være tændt, rødt hvis
anlægget skal være slukket og orange ved standby. Ønsker man, at
anlægget skal være tændt, indstilles endvidere den ønskede temperatur
og luftfugtighed (øg eller mindsk med pilknapperne) og bekræft med
[OK]. For at omprogrammere trykkes en gang på højreknappen for at
markere [Add] og derefter trykkes på [OK]. Gentag derefter ovenstående
procedure. For at gå tilbage til Normaldisplayet vælges [Back], bekræft
med [OK]. Vælg [Back] en gang til, bekræft med [OK]. Hvis der ikke
aktiveres nogen knapper, vender styrepanelet automatisk tilbage til
Normaldisplayet efter ca. 30 sekunder. Ønsker man at slette alle
forprogrammerede tider, vælges [Clear Calender]. Det er også muligt at
deaktivere alle programmer midlertidigt ved at vælge [Calender OFF].
For at få en letoverskuelig oversigt over de programer, der er
forprogrammerede, vælges [Overview] på Program-displayet. Her vises
skemalægningen i form af søjler, der er røde, når anlægget er slukket,
grønne, når anlægget er tændt, og gule ved standby.
Så snart der er trykket på ON, når anlægget står på standby, stiger
temperaturen til den indstillede temperatur. Efter 1 time vender anlægget
automatisk tilbage til standby-temperatur. Hvert nyt tryk på ON starter en
ny 1-timesperiode.
Står anlægget i OFF-funktion, gælder de indstillinger, der blev indlagt
ved initial opstart.
Hvis anlægget er tændt, er det muligt at foretage manuel slukning ved at
trykke på OFF. (Slukker kun den igangværende proces).
Översikt Åter
OK
R
39
Page 40

Hvis luftfugtigheden overstiger 30 % på det tidspunkt, hvor der slukkes
for badet, starter en ”tørreperiode” på ca. 20 minutter automatisk
(fabriksindstilling).
Man kan også deaktivere hele kalenderfunktionen midlertidigt i
forbindelse med f.eks. serviceeftersyn, og derefter nemt aktivere den
igen.
BAD UDEN FOR PROGRAMMERET TID
hvis panelet er kodespærret.
Tylariet kan anvendes på andre tidspunkter end den/de
indprogrammerede. Ved at trykke på ON starter en 1-timesperiode.
Ønskes en forlængelse af perioden, trykker man igen på ON. Anlægget
slukker automatisk 1 time efter sidste tryk på ON-knappen.
Bemærk! Husk at kodespærre panelet.
PANELINDSTILLINGER
CC 300T
Display
LCD-lysstyrke
Vælg [MENU] på Normaldisplayet, derefter [Service] og sluttelig
[Display]. Markér [Brightness (%)] og tryk på midterknappen.
Markeringen bliver mørkeblå, og lysstyrkeværdien på displayet kan
ændres. Tryk på [OK] for at bekræfte.
LCD-lysstyrke i hvilefunktion
Vælg [MENU] på Normaldisplayet, derefter [Service] og sluttelig
[Display]. Markér [Stand by (%)] og tryk på midterknappen. Markeringen
bliver mørkeblå, og lysstyrkeværdien på displayet, når panelet står på
Standby, kan ændres. Tryk på [OK] for at bekræfte. Fabriksindstilling er
30 %.
Tid til LCD-hvilefunktion
Vælg [MENU] på Normaldisplayet, derefter [Service] og sluttelig
[Display]. Markér [Stand by time] og tryk på midterknappen. Markeringen
bliver mørkeblå, og værdien for, hvornår lysstyrken på displayet skal
ændres, efter at panelet er gået over på Standby, kan indstilles. Tryk på
[OK] for at bekræfte.
Service
Se SERVICEINDSTILLINGER
Kodelås
Vælg [MENU] på Normaldisplayet og derefter [Service]. Gå til [Code lock]
og tryk derefter på [OK]. Angiv den ønskede kode. Brug piltasterne til at
gå til det ønskede tal og bekræft med [OK]. Kodelåsen aktiveres
automatisk ved programmering og går til Normaldisplayet.
For at vende tilbage til uspærret funktion gentages ovenstående, og
koden sættes til 0000.
Det er ikke muligt at ændre indlæste indstillinger, når kodelåsen er
aktiveret. Det er muligt at starte og slukke for anlægget samt tænde og
slukke for belysningen. Badet er startet til den tid, der er angivet i
Servicemenuen under [Time outside timer] (fabriksindstilling 1 time).
Generel kode, som altid fungerer, er 1995.
Bemærk! Alle indstillinger skal foretages, inden evt. kodespærre
aktiveres.
Sprog
Vælg [MENU] på Normaldisplayet og derefter [Service]. Vælg sprog og
gå til det ønskede sprog med piltasterne, bekræft derefter med [OK].
Ur
Vælg [MENU] på Normaldisplayet og derefter [Service]. Vælg [Set clock].
Angiv først korrekt dato ved hjælp af piltasterne, bekræft med [OK].
Indstil derefter det aktuelle klokkeslæt, først timer, dernæst minutter.
Fabriksindstilling
Vælg [MENU] på Normaldisplayet og derefter [Service]. Vælg [Factory
settings]. Vælg [Yes] eller [No] med piltasterne, tryk derefter på [OK].
Vælges [Yes] forsvinder alle de programmeringer og egenindstillinger,
der er foretaget, og panelet går tilbage til de oprindelige indstillinger,
fabriksindstillingerne.
SERVICEINDSTILLINGER
CC 300T
Service
I Servicemenuen kan den, der varetager anlægget, indstille forskellige
parametre, som f.eks. maksimal temperatur. Det anbefales imidlertid at
beholde de fabriksindstillinger, der findes. Servicemenuen er sikret med
en kode, for at tilfældige personer ikke umiddelbart kan ændre på disse
indstillinger. På Normaldisplayet trykkes på [MENU] og derefter på
[Service]. Vælg [Service] og tryk koden 124.
Systemindstillinger
Grænse for tørring af anlægget
[Dryup limit (%)] – Når anlægget stopper, detekterer det luftfugtigheden i
rummet. Hvis luftfugtigheden ligger over 30 % (fabriksinställning), går
anlægget over i tørrefunktion.
Tørretemperatur
[Dryup temperature (°C)] – Den temperatur, anlægget har i tørrefunktion.
Fabriksindstillingen er 80 °C.
Tørretid
[Dryup Time (min)] – Den tid, anlægget kører i tørrefunktion.
Fabriksindstillingen er 20 minutter.
Mindste temperatur ved damp
[Min temp steam (°C)] – Den mindste temperatur, som anlægget skal
køre med, for at dampgeneratoren kan starte. Fabriksindstillingen er 40
°C.
Maksimal driftstid
[Max running time (h)] – Den driftstid, der indstilles ved initial opstart.
Denne tidsindstilling gælder ikke, hvis anlægget er programmeret. Kan
indstilles på 1 til 24 timer, fabriksindstillingen er 3 timer.
Temperaturenhed
[Temperature (C°/F)] – Denne parameter angiver, om temperaturen skal
vises i grader Celsius eller Fahrenheit.
Testmenu
Testmenuen anvendes kun til fejlsøgning og teknisk support via Tylö.
Maks.-temperatur
[Max temperature (C°/F)] – Her indstilles den maksimale temperatur, som
anlægget kan programmeres til. Ved bad i Tylarium er maks.temperaturen 55 °C.
Temperaturnedsættelse ved standby
[Temperature reduction stand by (C°/F)] – Hvor meget temperaturen skal
sænkes, når anlægget står på standby, i forhold til den programmerede
temperatur. Fabriksindstillingen er 30 °C.
Maks. driftstid under standby
[On time stand by (min)] – Når anlægget er programmeret til standby, og
der trykkes på ON-knappen, er badet aktivt i den tidsperiode, der er
indlæst her. Fabriksindstilling 60 minutter.
Maks. driftstid uden for programmeret tid
[Time outside timer (min)] – Dette er den tid ved kodespærre, som
anlægget kører uden for programmeret tid.
Afkalkning
[De-scaling (h)] – Denne parameter er en timer, der tæller ned, når
anlægget er i gang. Den meddeler, når det er tid til afkalkning.
Fabriksindstillingen er 40 timer.
TYLARIUM
Tylarium tilbyder alle former for saunabade Tørsauna, Vådsauna og
Dampbad. Eftersom den relative luftfugtighed undertiden er højere end
ved traditionelle saunaer, bør nedenstående punkter iagttages.
• Har saunaen vindue i døren eller væggen, skal dørens hhv. vinduets
underste liste stryges med bådfernis, og overgangen mellem glas og
liste tætnes med vådrumssilikone. På denne måde hindres eventuel
kondens på glasfladerne i at trænge ned mellem vinduet og træet.
• Dørtærsklen og dørhåndtagene skal også lakeres et par gange med
bådfernis, så beholder træet sin finish, og rengøringen af saunaen
bliver meget lettere. Bænke, dekorationer og ryglæn olieres på begge
sider med Tylö bastuolja.
Bemærk! Alt andet træ inde i saunaen skal være ubehandlet.
Ved eventuelle problemer kontaktes forhandleren.
© Eftertryk, helt eller delvis, er forbudt uden Tylös skriftlige tilladelse.
Ret til ændringer i materialer, konstruktion og design forbeholdes.
40
Page 41

345
KÄYTTÖOHJE
CC 300
OK
R
12
Kuva 1. Valikkonäyttö
1 = Vasen painike, 2 = Keskipainike, 3 = Oikea painike. 4 = Painikkeita
vastaavat symbolit/tekstit. 5 = Ajankohtaisten arvojen säätämiseen ja
näyttämiseen tarkoitetut symbolit/tekstit.
Painikkeet ja näyttö.
Ohjauskeskus sisältää kolme painiketta. Näytön alareunassa olevien
painikkeiden yläpuolella näkyvät kutakin painiketta vastaavat symbolit.
Näytössä näkyy eri symboleita riippuen ohjauskeskuksen tilasta. Nuolien
ollessa näkyvissä Valikkonäytössä (kuva 1) haluttu symboli voidaan
saada esiin selaamalla vasemmalla ja oikealla painikkeella. Symboli
valitaan keskipainikkeella.
Normaalinäytössä (kuva 2) vasemman painikkeen toiminto on ON/OFF ja
toiminnon symboli näkyy painikkeen yläpuolella näytön alareunassa. Kun
laite on käynnissä, symboli on vihreä; kun se on sammutettuna, symboli
on punainen; ja kun laite on valmiustilassa, symboli on oranssi. Oikea
painike säätelee valaistusta. Lampun symboli on keltainen valaistuksen
ollessa päällä ja valkoinen, kun valaistus on sammutettu. Näytössä
näkyy myös ajankohtainen lämpötila.
Pitämällä keskipainiketta alhaalla jonkin aikaa voidaan palata
Normaalinäyttöön muusta tilasta.
Aktiivisena oleva ohjelma voidaan keskeyttää painamalla vasenta
painiketta 2 sekunnin ajan.
22
MENU
ºc
R
alhaalla lukemat vaihtuvat nopeammin. Vahvista keskipainikkeella.
Tämän jälkeen perusasetukset on tehty.
Valaistus.
Syttyy automaattisesti laitteiston käynnistyessä ja sammuu
automaattisesti laitteiston sammuessa. Valaistus voidaan sytyttää ja
sammuttaa myös manuaalisesti painamalla oikeaa painiketta, kun
lampun symboli näkyy näytön oikeassa alakulmassa. Symboli on
valkoinen valaistuksen ollessa sammutettuna ja keltainen sen ollessa
päällä.
Koodilukko.
Estää asiattomia henkilöitä muuttamasta asetettuja arvoja.
Päävirtakytkin.
Relelaatikon, SE-kiukaan ja pienten höyrynkehittimien alaosassa olevaa
pääkytkintä käytetään vain, jos laitetta ei ole tarkoitus käyttää pitkään
aikaan.
Vinkki! Saunan lämpömittari asennetaan sellaiselle korkeudelle, että
näytetyt arvot vastaavat tarkasti CC 300:ssä näkyviä arvoja.
Valmiustila.
Valmiustila on hyvä ominaisuus hotelleissa, uimahalleissa ym.
käytettävissä Tylarium-laitteissa, koska käyttäjämäärä vaihtelee
tällaisissa paikoissa päivän aikana. Laitteen ollessa käyttämättömänä
sen lämpötilaksi on säädetty energiaa säästävä ”valmiuslämpö”, joka
voidaan nopeasti kohottaa halutuksi käyttölämpötilaksi painamalla ONpainiketta tai ulkoista kytkintä. Valmiustila-toiminnon avulla voidaan
saavuttaa vuosittain suuria säästöjä.
Sopiva kylpyohjelma voidaan ohjelmoida laitteistoon kätevästi monin eri
tavoin, kuten seuraavista esimerkeistä näkyy.
Esimerkki: valmiustila.
Kolme eri uimahallia, joiden aukioloajat ovat 800–2000 ja joiden
kävijämäärä vaihtelee seuraavasti.
Vaihtoehto 1) Uimahallissa käy satunnaisia kävijöitä koko päivän ajan.
Ohjelmoi laitteistoon valmiustila 8
vahtimestari) aktivoivat ohjelman CC-ohjauskeskuksen ”ON”painikkeella.
Vaihtoehto 2) Uimahallissa käy satunnaisia kävijöitä 800–1400. Kello 1400
jälkeen uimahallissa on yleensä paljon kävijöitä sen sulkemiseen saakka.
Ohjelmoi laitteistoon valmiustila 8
Satunnaiset uimarit aktivoivat ohjelman CC-ohjauskeskuksen ”ON”painikkeella.
Vaihtoehto 3) Uimahallissa käy paljon uimareita 800–1000, 1300–1400 ja
00
18
–2000. Muina aikoina kävijöitä on vain satunnaisesti. Ohjelmoi
laitteistoon valmiustila 8
aikoina, jolloin kävijöitä on paljon. Satunnaiset uimarit aktivoivat
ohjelman CC-ohjauskeskuksen ”ON”-painikkeella.
00
00
–2000. Uimarit (tai uimahallin
00
–1400 ja jatkuva ”ON”-tila 1400–2000.
–2000 ja jatkuva ”ON”-tila yllä mainittuina
ASETUKSET
CC 300
MANUAALINEN KÄYNNISTYS/SAMMUTUS.
Kylpylämpötilan säätäminen.
Valitse Normaalinäytöstä [MENU] ja sen jälkeen lämpömittari. Valitse
painikkeilla haluttu lämpötila ja vahvista painamalla [OK].
Laitteiston käynnistäminen.
Valitse palautussymboli, vahvista keskipainikkeella ja käynnistä laitteisto
ON/OFF-painikkeella. Sammuta laitteisto painamalla kerran ON/OFFpainiketta. Symboli on punainen laitteiston ollessa sammutettuna ja
Kuva 2. Normaalinäyttö
Ensimmäinen käynnistys.
Käynnistettäessä ohjauskeskus ensimmäisen kerran on tehtävä tiettyjä
asetuksia. Valitse ensin alue ja vahvista valinta keskipainikkeella. Valitse
sen jälkeen kieli ja vahvista valinta keskipainikkeella. Ilmoita sen jälkeen
päivämäärä ja aika. Selaa esiin haluamasi arvot vasemman ja oikean
painikkeen avulla. Vahvista keskipainikkeella. Aseta lopuksi manuaalisen
käynnistyksen käyttöaika. Perusasetus on 3 tuntia, mutta arvoksi voidaan
valita 1–24 tuntia. Selaa oikealla painikkeella ylöspäin tai vasemmalla
painikkeella alaspäin, kunnes näytössä näkyy haluttu aika. Jokainen
painallus lisää tai vähentää aikaa 15 minuuttia. Pitämällä painikkeita
vihreä sen ollessa päällä.
AUTOMAATTINEN KÄYNNISTYS/SAMMUTUS.
Kylpylämpötilan säätäminen.
Valitse Normaalinäytöstä [MENU] ja sen jälkeen lämpömittari. Valitse
painikkeilla haluttu lämpötila ja vahvista painamalla [OK].
Ajastintoiminnon käynnistäminen
Valitse Normaalinäytöstä [MENU]. Valitse [Program] ja sen jälkeen
[Timer]. Aseta laitteiston käynnistysaika ja vahvista painamalla OK.
Laitteisto käynnistyy tämän jälkeen automaattisesti asetettuna aikana.
Aika käynnistykseen näkyy vasemmassa kulmassa. Voit milloin tahansa
poistaa valitun käynnistysajan painamalla kahdesti ON/OFF-symbolin
alla olevaa painiketta.. Jos laitteisto on ehtinyt käynnistyä, se
sammutetaan painamalla kerran ON/OFF-painiketta.
41
Page 42

VIIKKO-OHJELMOINTI
samat tai eri asetukset kaikille viikonpäiville.
Näyttö.
LCD:n kirkkaus.
Valitse Normaalinäytöstä [MENU], [Service] ja lopuksi [Display]. Valitse
[Brightness (%)] ja vahvista keskipainikkeella. Näytön kirkkauden symboli
näkyy tummansinisenä ja näytön kirkkautta voidaan muuttaa. Vahvista
painamalla [OK].
Timer
Kuva 3. Ohjelmanäyttö
Översikt Åter
OK
R
Käynnistyksen/sammutuksen/valmiustilan ja
lämpötilan säätäminen.
Valitse Normaalinäytöstä [MENU] ja sen jälkeen [Program]. Valitse
[Program] vielä kerran Ohjelmanäytössä (ks. kuva 3). Painamalla [OK]
merkintä [Add] (lisää) muuttuu tummansiniseksi. Olet tällöin
ohjelmatilassa. Valitse ensin haluttu päivä (ajankohtainen teksti on
merkitty punaisella) nuolipainikkeiden avulla. Voit valita jokaisen
viikonpäivän erikseen tai valita kerralla maanantai–sunnuntai (jolloin
asetukset ovat samat kaikkina viikonpäivinä) tai esimerkiksi maanantai–
perjantai ja lauantai–sunnuntai. Vahvista painamalla [OK]. Valitse sen
jälkeen laitteiston käynnistysaika. Jokainen nuolipainikkeiden painallus
lisää tai vähentää aikaa 15 minuuttia. Valitse [OK], kun näytössä näkyy
haluttu aika. Valitse sen jälkeen pysäytysaika ja paina [OK]. Valitse,
haluatko laitteiston olevan valittuna aikana käynnissä, sammutettuna vai
valmiustilassa. Valitse ON/OFF-symbolin väriksi vihreä, jos laitteiston
tulee olla käynnissä; punainen, jos laitteiston tulee olla sammutettuna; ja
oranssi, jos sen tulee olla valmiustilassa. Jos laitteiston on tarkoitus olla
käynnissä, valitse myös haluttu lämpötila nuolipainikkeiden avulla ja
vahvista painamalla [OK]. Tee uusi ohjelmointi painamalla kerran oikeaa
painiketta valitaksesi [Add] (lisää) ja paina sen jälkeen [OK]. Toimi sen
jälkeen samoin kuin edellä. Palaa Normaalinäyttöön valitsemalla [Back]
(takaisin), vahvista painamalla [OK]. Valitse uudelleen [Back] ja sen
jälkeen [OK]. Jos mitään painikkeita ei paineta, ohjauskeskus palaa
automaattisesti Normaalinäyttöön noin 30 sekunnin kuluttua. Kaikki
esiohjelmoidut ajat voidaan poistaa valitsemalla [Clear calender]
(tyhjennä kalenteri). Ohjelmat voidaan myös poistaa käytöstä tilapäisesti
valitsemalla [Calender OFF].
Näet kaikki esiohjelmoidut ohjelmat kätevästi valitsemalla
Ohjelmanäytöstä [Overview] (yleiskatsaus). Katsauksessa näkyvät
pylväät ovat punaisia laitteiston ollessa sammutettuna, vihreitä sen
ollessa käynnissä ja keltaisia sen ollessa valmiustilassa.
Painettaessa ON-painiketta laitteiston ollessa valmiustilassa lämpötila
kohoaa heti säädettyyn kylpylämpötilaan. Tunnin kuluttua laitteisto palaa
automaattisesti valmiuslämpötilaan. Painettaessa ON-painiketta
uudelleen käynnistetään uusi 1 tunnin kylpyjakso.
Laitteiston ollessa OFF-tilassa pätevät ensimmäisen käynnistyksen
yhteydessä tehdyt asetukset.
Käynnissä oleva laitteisto voidaan sammuttaa manuaalisesti painamalla
OFF-painiketta. (Sammuttaa vain käynnissä olevan ohjelman.)
Koko kalenteritoiminto voidaan poistaa käytöstä tilapäisesti esimerkiksi
huollon yhteydessä ja käynnistää sen jälkeen kätevästi uudelleen.
LAITTEISTON KÄYTTÖ MUINA KUIN
OHJELMOITUINA AIKOINA
jos ohjauskeskuksessa on koodilukitus.
Tylarium-laitteistoa voidaan käyttää myös muina kuin ohjelmoituina
aikoina. Laitteisto käynnistyy 1 tunniksi painettaessa ON-painiketta.
Käyttöaikaa voidaan jatkaa painamalla uudelleen ON-painiketta.
Laitteisto sammuu automaattisesti tunnin kuluttua viimeisestä
painalluksesta.
HUOM! Muista käynnistää ohjauskeskuksen koodilukitus.
OHJAUSKESKUKSEN
ASETUKSET
CC 300
LCD:n kirkkaus lepotilassa.
Valitse Normaalinäytöstä [MENU], [Service] ja lopuksi [Display]. Valitse
[Stand by (%)] ja vahvista keskipainikkeella. Näytön kirkkauden symboli
näkyy tummansinisenä ja näytön kirkkautta valmiustilassa voidaan
muuttaa. Vahvista painamalla [OK]. Tehdasasetus on 30 %.
Aika LCD:n lepotilaan.
Valitse Normaalinäytöstä [MENU], [Service] ja lopuksi [Display]. Valitse
[Stand by time] ja vahvista keskipainikkeella. Symboli näkyy
tummansinisenä ja voit valita ajan, minkä jälkeen näytön kirkkaus
muuttuu ohjauskeskuksen siirryttyä valmiustilaan. Vahvista painamalla
[OK].
Huolto.
Katso HUOLTOASETUKSET
Koodilukitus.
Valitse Normaalinäytöstä [MENU] ja sen jälkeen [Service]. Selaa
painikkeilla kohtaan [Code lock] ja paina [OK]. Ilmoita haluttu koodi.
Valitse nuolipainikkeilla haluttu numero ja vahvista painamalla [OK].
Koodilukitus aktivoituu automaattisesti ohjelmoinnin jälkeen ja
ohjauskeskus palautuu Normaalinäyttöön.
Voit palata lukitsemattomaan tilaan toimimalla samoin kuin edellä ja
valitsemalla koodiksi 0000.
Laitteiston asetuksia ei voi muuttaa koodilukon ollessa aktiivisena.
Laitteisto ja sen valaistus voidaan kuitenkin käynnistää ja sammuttaa.
Kylpyohjelma on käynnissä Huoltovalikossa kohdassa [Time outside
timer] ilmoitetun ajan (tehdasasetus 1 tunti).
Yleinen aina toimiva koodi on 1995.
HUOM! Kaikki asetukset on tehtävä ennen mahdollisen
koodilukituksen käynnistämistä.
Kieli.
Valitse Normaalinäytöstä [MENU] ja sen jälkeen [Service]. Valitse haluttu
kieli nuolipainikkeilla ja paina sen jälkeen [OK].
Kello.
Valitse Normaalinäytöstä [MENU] ja sen jälkeen [Service]. Valitse [Set
clock] (kellon asetukset). Valitse nuolipainikkeilla oikea päivämäärä ja
vahvista painamalla [OK]. Aseta sen jälkeen kellonaika, ensin tunnit ja
sitten minuutit.
Tehdasasetukset.
Valitse Normaalinäytöstä [MENU] ja sen jälkeen [Service]. Valitse
[Factory settings]. Valitse [Yes] (kyllä) tai [No] (ei) nuolipainikkeilla ja
paina sen jälkeen [OK]. Valitsemalla [Yes] poistat keskuksen kaikki
ohjelmoinnit ja itse tekemäsi asetukset ja palautat järjestelmän
tehdasasetukset.
HUOLTOASETUKSET
CC 300
Huolto.
Huoltovalikossa laitteistoa hoitava henkilö voi tehdä erilaisia asetuksia,
esim. säätää laitteiston maksimilämpötilan. Suosittelemme kuitenkin
käyttämään valmiita tehdasasetuksia. Huoltovalikko on varustettu
koodilla, jotta asiattomat henkilöt eivät pääse muuttamaan näitä
asetuksia. Valitse Normaalinäytöstä [MENU] ja sen jälkeen [Service].
Valitse [Service] ja näppäile koodi 124.
Järjestelmäasetukset.
Maksimikäyttöaika
[Max running time (h)] – Tämä aika asetettiin ensimmäisen
käynnistyksen yhteydessä. Aika ei ole käytössä, jos laitteistoon on tehty
ohjelmointeja. Ajaksi voidaan asettaa 1–24 tuntia, tehdasasetus on 3
tuntia.
42
Page 43

Lämpötilayksikkö
[Temperature (C°/F)] – Tässä valitaan lämpötilan yksiköksi joko Celsius
tai Fahrenheit.
Testivalikko
Testivalikkoa käytetään vain vianetsintään ja Tylön tekniseen
tukipalveluun.
Maksimilämpötila.
[Max temp (C°/F)] – Tässä valitaan maksimilämpötila laitteistoon
ohjelmoitaville ohjelmille. Käytettäessä Tylariumia kylpemiseen
maksimilämpötila on 55 °C.
Lämpötilan aleneminen valmiustilassa.
[Temp reducition Stand by (C°/F)] – Ilmoittaa, kuinka paljon lämpötila
alenee valmiustilassa verrattuna ohjelmoituun kylpylämpötilaan.
Tehdasasetus on 30 °C.
Maksimikäyttöaika valmiustilassa.
[On time Stand by (min)] – Kun laitteisto on valmiustilassa ja painetaan
ON-painiketta, kylpyohjelma on käynnissä tässä kohdassa ilmoitetun
ajan. Tehdasasetus on 60 minuuttia.
Maksimikäyttöaika muuna kuin ohjelmoituina aikoina.
[Time outside timer (min)] – Aika, jonka laitteisto on käynnissä
koodilukituksen ollessa päällä muuna kuin ohjelmoituina aikoina.
Kalkinpoisto.
[De-scaling (h)] – Tämä ajastin laskee laitteiston kokonaiskäyttöajan ja
ilmoittaa kalkinpoiston tarpeen. Tehdasasetus on 40 tuntia.
Mahdollisissa ongelmatapauksissa ota yhteys
ostopaikkaan.
© Materiaalin monistaminen kokonaan tai osittain on kielletty ilman Tylön kirjallista suostumusta.
Tylö pidättää itselleen oikeuden muuttaa tuotteiden materiaaleja, rakenteita ja muotoilua.
43
Page 44

345
ASENNUS CC 300T
Lue tämä ohje yhdessä kiukaan ja höyrynkehittimen mukana
toimitettavien asennusohjeiden kanssa.
Kuva A – TYLARIUM.
(Kiuas, tyyppi SK, SDK, ja höyrynkehitin, tyyppi VA/VB).
1 = kiuas. 2 = kosteus- ja lämpötila-anturi. 3 = ohjauskeskus CC 300T. 4
= mahdollinen erillinen ON/OFF-kytkin. 5 = sähkökeskus.
RB30/60. 7 = höyrynkehitin. 8 = vahvistin (amplifier).
6 = relelaatikko
Kuva B – TYLARIUM.
(Kiuas, tyyppi SE, ja höyrynkehitin, tyyppi VA/VB).
1 = kiuas. 2 = kosteus- ja lämpötila-anturi. 3 = ohjauskeskus CC 300T. 4
= mahdollinen erillinen ON/OFF-kytkin. 5 = sähkökeskus. 7 =
höyrynkehitin. 8 = vahvistin (amplifier).
Relelaatikko (RB).
(Relelaatikkoa ei käytetä SE-kiukaassa).
Asennetaan rajoittamattomalle etäisyydelle Tylariumin ulkopuolelle
viileään ja ilmastoituun tilaan. Relelaatikko tulee sijoittaa vähintään 1
metrin päähän CC 300T:stä.
Suojattu heikkovirtajohto (LiYCY 6-johtiminen).
CC 300T:n ja relelaatikon, SE-kiukaan ja höyrynkehittimen välisenä
ohjauskaapelina tulee käyttää suojattua heikkovirtajohtoa (LiYCY, 6johtiminen). Suojaus kytketään CC-paneelin liittimeen 12.
Termistorin sekä kosteus- ja lämpötila-anturin
sijoitus.
Asennetaan 1500 mm:n korkeudelle lattiasta (ei kiukaan yläpuolelle).
Sijoita anturi siten, ettei höyrysuihku osu siihen suoraan tai epäsuorasti.
Vahvistin (amplifier).
Asennetaan Tylariumin ulkopuolelle, enintään 2 metrin päähän anturista
ja rajoittamattomalle etäisyydelle CC 300T:stä. Vahvistimen ja CC
300T:n välisenä ohjauskaapelina tulee käyttää suojattua
heikkovirtajohtoa (4-johtiminen). Suojaus kytketään vahvistimen liittimeen
25.
Valaistus.
Kytke valaistus kytkentäkaavion mukaisesti.
Lisävaruste: erillinen ON/OFF-kytkin (hipaisukytkin).
Sijoitetaan halutulle etäisyydelle Tylariumista. Kytketään CC 300T:hen
heikkovirtajohdolla – katso kytkentäkaavio. Käytettäessä useita ulkoisia
ON/OFF-kytkimiä ne on kytkettävä rinnakkain. Painettaessa ulkoista
kytkintä CC300T toimii asetetun käyttöajan (ks. Ensimmäinen
käynnistys). Painettaessa ulkoista kytkintä vielä kerran CC300T
sammuu, jos sitä ei ole ohjelmoitu/koodilukittu. Jos CC300T on
ohjelmoitu/koodilukittu, se pitää sammuttaa ON/OFF-painikkeella.
Lisävaruste: erillinen ON/OFF-kytkin (jatkuva
kosketus).
Sijoitetaan halutulle etäisyydelle Tylariumista. Kytketään CC 300T:hen
heikkovirtajohdolla – katso kytkentäkaavio. Käytettäessä useita ulkoisia
ON/OFF-kytkimiä ne on kytkettävä rinnakkain
laite toimii niin kauan kuin liittimien 19 ja 20 välillä on kosketus, kuitenkin
enintään asetetun maksimikäyttöajan.
. Jatkuvalla kosketuksella
Liittäminen ohjaustietokoneeseen.
Ohjauskeskus voidaan kytkeä myös ohjaustietokoneeseen, jonka antaa
joko lyhyen tai jatkuvan kosketuksen CC 300T:n liittimien 19 ja 20 välille.
Laitetta saa pitää käynnissä yhtäjaksoisesti korkeintaan 24 tuntia.
Tärkeää! Höyrynkehittimen automaattisen tyhjennyksen toimimiseksi
ohjauskeskuksen virran on oltava katkaistuna vähintään 1,5 h/vrk.
Muiden Tylö-tuotteiden ohjaus.
CC 300T voi ohjata myös muita Tylö-tuotteita. Siihen voidaan kytkeä
esimerkiksi Tylö Fresh, joka käynnistyy siinä tapauksessa
ohjauskeskuksen ollessa käynnissä. Jos halutaan ohjata esim. Tylö
Freshiä tai toista CC-ohjauskeskusta, kytkentä on tehtävä CC 300T:n
liittimien 40 ja 41 sekä toisen Tylö-tuotteen liittimien 19 ja 20 välille.
Katso esimerkki kuvassa J.
Kuvat C, E – kytkentäkaavio.
(Kiuas, tyyppi SK, SDK, ja CC 300T -ohjauskeskuksella varustettu
höyrynkehitin, tyyppi VA/VB).
1 = kiuas. 2 = kosteus- ja lämpötila-anturi. 3 = ohjauskeskus CC 300T. 4
= mahdollinen erillinen ON/OFF-kytkin. 6 = relelaatikko RB30/60. 7 =
höyrynkehitin. 8 = vahvistin (amplifier).
Tarkasta oikea liitäntäjännite kiukaan ja höyrynkehittimen arvokilvestä.
Muista maadoitus!
Kuva D – kytkentäkaavio.
(Kiuas, tyyppi SE, ja CC 300T -ohjauskeskuksella varustettu
höyrynkehitin, tyyppi VA/VB).
1 = kiuas. 2 = kosteus- ja lämpötila-anturi. 3 = ohjauskeskus CC 300T. 4
= mahdollinen erillinen ON/OFF-kytkin. 7 = höyrynkehitin. 8 = vahvistin
(amplifier).
Tarkasta oikea liitäntäjännite kiukaan ja höyrynkehittimen arvokilvestä.
Muista maadoitus!
KÄYTTÖOHJE
CC 300T
RH%
OK
R
Kuva 1. Valikkonäyttö
12
1 = Vasen painike, 2 = Keskipainike, 3 = Oikea painike. 4 = Painikkeita
vastaavat symbolit/tekstit. 5 = Ajankohtaisten arvojen säätämiseen ja
näyttämiseen tarkoitetut symbolit/tekstit.
Painikkeet ja näyttö.
Ohjauskeskus sisältää kolme painiketta. Näytön alareunassa olevien
painikkeiden yläpuolella näkyvät kutakin painiketta vastaavat symbolit.
Näytössä näkyy eri symboleita riippuen ohjauskeskuksen tilasta. Nuolien
ollessa näkyvissä Valikkonäytössä (kuva 1) haluttu symboli voidaan
saada esiin selaamalla vasemmalla ja oikealla painikkeella. Symboli
valitaan keskipainikkeella.
Normaalinäytössä (kuva 2) vasemman painikkeen toiminto on ON/OFF ja
toiminnon symboli näkyy painikkeen yläpuolella näytön alareunassa. Kun
laite on käynnissä, symboli on vihreä; kun se on sammutettuna, symboli
on punainen; ja kun laite on valmiustilassa, symboli on oranssi. Oikea
painike säätelee valaistusta. Lampun symboli on keltainen valaistuksen
ollessa päällä ja valkoinen, kun valaistus on sammutettu. Näytössä
näkyvät myös ajankohtainen lämpötila ja ilmankosteus.
Pitämällä keskipainiketta alhaalla jonkin aikaa voidaan palata
Normaalinäyttöön muusta tilasta.
Aktiivisena oleva ohjelma voidaan keskeyttää painamalla vasenta
painiketta 2 sekunnin ajan.
22
Kuva 2. Normaalinäyttö
Ensimmäinen käynnistys.
Käynnistettäessä ohjauskeskus ensimmäisen kerran on tehtävä tiettyjä
asetuksia. Valitse ensin alue ja vahvista valinta keskipainikkeella. Valitse
ºc
MENU
%
33
R
44
Page 45

sen jälkeen kieli ja vahvista valinta keskipainikkeella. Ilmoita sen jälkeen
päivämäärä ja aika. Selaa esiin haluamasi arvot vasemman ja oikean
painikkeen avulla. Vahvista keskipainikkeella. Aseta lopuksi manuaalisen
käynnistyksen käyttöaika. Perusasetus on 3 tuntia, mutta arvoksi voidaan
valita 1–24 tuntia. Selaa oikealla painikkeella ylöspäin tai vasemmalla
painikkeella alaspäin, kunnes näytössä näkyy haluttu aika. Jokainen
painallus lisää tai vähentää aikaa 15 minuuttia. Pitämällä painikkeita
alhaalla lukemat vaihtuvat nopeammin. Vahvista keskipainikkeella.
Tämän jälkeen perusasetukset on tehty.
Valaistus.
Syttyy automaattisesti laitteiston käynnistyessä ja sammuu
automaattisesti laitteiston sammuessa. Valaistus voidaan sytyttää ja
sammuttaa myös manuaalisesti painamalla oikeaa painiketta, kun
lampun symboli näkyy näytön oikeassa alakulmassa. Symboli on
valkoinen valaistuksen ollessa sammutettuna ja keltainen sen ollessa
päällä.
Koodilukko.
Estää asiattomia henkilöitä muuttamasta asetettuja arvoja.
Päävirtakytkin.
Relelaatikon, SE-kiukaan ja pienten höyrynkehittimien alaosassa olevaa
pääkytkintä käytetään vain, jos laitetta ei ole tarkoitus käyttää pitkään
aikaan.
Vinkki! Tylariumin lämpömittari (kosteusmittari) asennetaan sellaiselle
korkeudelle, että näytetyt arvot vastaavat tarkasti CC 300T:ssä näkyviä
arvoja.
Valmiustila.
Valmiustila on hyvä ominaisuus hotelleissa, uimahalleissa ym.
käytettävissä Tylarium-laitteissa, koska käyttäjämäärä vaihtelee
tällaisissa paikoissa päivän aikana. Laitteen ollessa käyttämättömänä
sen lämpötilaksi on säädetty energiaa säästävä ”valmiuslämpö”, joka
voidaan nopeasti kohottaa halutuksi käyttölämpötilaksi painamalla ONpainiketta tai ulkoista kytkintä. Valmiustila-toiminnon avulla voidaan
saavuttaa vuosittain suuria säästöjä.
Sopiva kylpyohjelma voidaan ohjelmoida laitteistoon kätevästi monin eri
tavoin, kuten seuraavista esimerkeistä näkyy.
Esimerkki: valmiustila.
Kolme eri uimahallia, joiden aukioloajat ovat 800–2000 ja joiden
kävijämäärä vaihtelee seuraavasti.
Vaihtoehto 1) Uimahallissa käy satunnaisia kävijöitä koko päivän ajan.
Ohjelmoi laitteistoon valmiustila 8
vahtimestari) aktivoivat ohjelman CC-ohjauskeskuksen ”ON”painikkeella.
Vaihtoehto 2) Uimahallissa käy satunnaisia kävijöitä 800–1400. Kello 1400
jälkeen uimahallissa on yleensä paljon kävijöitä sen sulkemiseen saakka.
Ohjelmoi laitteistoon valmiustila 8
Satunnaiset uimarit aktivoivat ohjelman CC-ohjauskeskuksen ”ON”painikkeella.
Vaihtoehto 3) Uimahallissa käy paljon uimareita 800–1000, 1300–1400 ja
00
18
–2000. Muina aikoina kävijöitä on vain satunnaisesti. Ohjelmoi
laitteistoon valmiustila 8
aikoina, jolloin kävijöitä on paljon. Satunnaiset uimarit aktivoivat
ohjelman CC-ohjauskeskuksen ”ON”-painikkeella.
00
00
–2000. Uimarit (tai uimahallin
00
–1400 ja jatkuva ”ON”-tila 1400–2000.
–2000 ja jatkuva ”ON”-tila yllä mainittuina
ASETUKSET
CC 300T
MANUAALINEN KÄYNNISTYS/SAMMUTUS.
Kylpylämpötilan säätäminen.
Valitse Normaalinäytöstä [MENU] ja sen jälkeen lämpömittari. Valitse
painikkeilla haluttu lämpötila ja vahvista painamalla [OK].
Kosteuden säätäminen.
Valitse tipan symboli. Valitse painikkeilla haluttu kosteus [(RH%)] ja
vahvista painamalla [OK]. Valittavana olevat kosteusarvot riippuvat
säädetystä lämpötilasta.
Laitteiston käynnistäminen.
Valitse palautussymboli, vahvista keskipainikkeella ja käynnistä laitteisto
ON/OFF-painikkeella. Sammuta laitteisto painamalla kerran ON/OFFpainiketta. Symboli on punainen laitteiston ollessa sammutettuna ja
vihreä sen ollessa päällä.
AUTOMAATTINEN KÄYNNISTYS/SAMMUTUS.
Kylpylämpötilan säätäminen.
Valitse Normaalinäytöstä [MENU] ja sen jälkeen lämpömittari. Valitse
painikkeilla haluttu lämpötila ja vahvista painamalla [OK].
Kosteuden säätäminen.
Valitse tipan symboli. Valitse painikkeilla haluttu kosteus [(RH%)] ja
vahvista painamalla [OK]. Valittavana olevat kosteusarvot riippuvat
säädetystä lämpötilasta.
Ajastintoiminnon käynnistäminen
Valitse Normaalinäytöstä [MENU]. Valitse [Program] ja sen jälkeen
[Timer]. Aseta laitteiston käynnistysaika ja vahvista painamalla OK.
Laitteisto käynnistyy tämän jälkeen automaattisesti asetettuna aikana.
Aika käynnistykseen näkyy vasemmassa kulmassa. Voit milloin tahansa
poistaa valitun käynnistysajan painamalla kahdesti ON/OFF-symbolin
alla olevaa painiketta.. Jos laitteisto on ehtinyt käynnistyä, se
sammutetaan painamalla kerran ON/OFF-painiketta.
Jos kosteus on sammutettaessa yli 30 %, laitteisto käynnistää
automaattisesti noin 20 minuuttia kestävän kuivauksen (tehdasasetus).
VIIKKO-OHJELMOINTI
samat tai eri asetukset kaikille viikonpäiville.
Timer
Kuva 3. Ohjelmanäyttö
Käynnistyksen/sammutuksen/valmiustilan ja
lämpötilan/kosteuden säätäminen.
Valitse Normaalinäytöstä [MENU] ja sen jälkeen [Program]. Valitse
[Program] vielä kerran Ohjelmanäytössä (ks. kuva 3). Painamalla [OK]
merkintä [Add] (lisää) muuttuu tummansiniseksi. Olet tällöin
ohjelmatilassa. Valitse ensin haluttu päivä (ajankohtainen teksti on
merkitty punaisella) nuolipainikkeiden avulla. Voit valita jokaisen
viikonpäivän erikseen tai valita kerralla maanantai–sunnuntai (jolloin
asetukset ovat samat kaikkina viikonpäivinä) tai esimerkiksi maanantai–
perjantai ja lauantai–sunnuntai. Vahvista painamalla [OK]. Valitse sen
jälkeen laitteiston käynnistysaika. Jokainen nuolipainikkeiden painallus
lisää tai vähentää aikaa 15 minuuttia. Valitse [OK], kun näytössä näkyy
haluttu aika. Valitse sen jälkeen pysäytysaika ja paina [OK]. Valitse,
haluatko laitteiston olevan valittuna aikana käynnissä, sammutettuna vai
valmiustilassa. Valitse ON/OFF-symbolin väriksi vihreä, jos laitteiston
tulee olla käynnissä; punainen, jos laitteiston tulee olla sammutettuna; ja
oranssi, jos sen tulee olla valmiustilassa. Jos laitteiston on tarkoitus olla
käynnissä, valitse myös haluttu lämpötila ja ilmankosteus
nuolipainikkeiden avulla ja vahvista painamalla [OK]. Tee uusi ohjelmointi
painamalla kerran oikeaa painiketta valitaksesi [Add] (lisää) ja paina sen
jälkeen [OK]. Toimi sen jälkeen samoin kuin edellä. Palaa
Normaalinäyttöön valitsemalla [Back] (takaisin), vahvista painamalla
[OK]. Valitse uudelleen [Back] ja sen jälkeen [OK]. Jos mitään painikkeita
ei paineta, ohjauskeskus palaa automaattisesti Normaalinäyttöön noin 30
sekunnin kuluttua. Kaikki esiohjelmoidut ajat voidaan poistaa valitsemalla
[Clear calender] (tyhjennä kalenteri). Ohjelmat voidaan myös poistaa
käytöstä tilapäisesti valitsemalla [Calender OFF].
Näet kaikki esiohjelmoidut ohjelmat kätevästi valitsemalla
Ohjelmanäytöstä [Overview] (yleiskatsaus). Katsauksessa näkyvät
pylväät ovat punaisia laitteiston ollessa sammutettuna, vihreitä sen
ollessa käynnissä ja keltaisia sen ollessa valmiustilassa.
Painettaessa ON-painiketta laitteiston ollessa valmiustilassa lämpötila
kohoaa heti säädettyyn kylpylämpötilaan. Tunnin kuluttua laitteisto palaa
automaattisesti valmiuslämpötilaan. Painettaessa ON-painiketta
uudelleen käynnistetään uusi 1 tunnin kylpyjakso.
Laitteiston ollessa OFF-tilassa pätevät ensimmäisen käynnistyksen
yhteydessä tehdyt asetukset.
Käynnissä oleva laitteisto voidaan sammuttaa manuaalisesti painamalla
OFF-painiketta. (Sammuttaa vain käynnissä olevan ohjelman.)
Jos kosteus on sammutettaessa yli 30 %, laitteisto käynnistää
automaattisesti noin 20 minuuttia kestävän kuivauksen (tehdasasetus).
Koko kalenteritoiminto voidaan poistaa käytöstä tilapäisesti esimerkiksi
huollon yhteydessä ja käynnistää sen jälkeen kätevästi uudelleen.
Översikt Åter
OK
R
45
Page 46

LAITTEISTON KÄYTTÖ MUINA KUIN
OHJELMOITUINA AIKOINA
jos ohjauskeskuksessa on koodilukitus.
Tylarium-laitteistoa voidaan käyttää myös muina kuin ohjelmoituina
aikoina. Laitteisto käynnistyy 1 tunniksi painettaessa ON-painiketta.
Käyttöaikaa voidaan jatkaa painamalla uudelleen ON-painiketta.
Laitteisto sammuu automaattisesti tunnin kuluttua viimeisestä
painalluksesta.
HUOM! Muista käynnistää ohjauskeskuksen koodilukitus.
OHJAUSKESKUKSEN
ASETUKSET
CC 300T
Näyttö.
LCD:n kirkkaus.
Valitse Normaalinäytöstä [MENU], [Service] ja lopuksi [Display]. Valitse
[Brightness (%)] ja vahvista keskipainikkeella. Näytön kirkkauden symboli
näkyy tummansinisenä ja näytön kirkkautta voidaan muuttaa. Vahvista
painamalla [OK].
LCD:n kirkkaus lepotilassa.
Valitse Normaalinäytöstä [MENU], [Service] ja lopuksi [Display]. Valitse
[Stand by (%)] ja vahvista keskipainikkeella. Näytön kirkkauden symboli
näkyy tummansinisenä ja näytön kirkkautta valmiustilassa voidaan
muuttaa. Vahvista painamalla [OK]. Tehdasasetus on 30 %.
Aika LCD:n lepotilaan.
Valitse Normaalinäytöstä [MENU], [Service] ja lopuksi [Display]. Valitse
[Stand by time] ja vahvista keskipainikkeella. Symboli näkyy
tummansinisenä ja voit valita ajan, minkä jälkeen näytön kirkkaus
muuttuu ohjauskeskuksen siirryttyä valmiustilaan. Vahvista painamalla
[OK].
Huolto.
Katso HUOLTOASETUKSET
Koodilukitus.
Valitse Normaalinäytöstä [MENU] ja sen jälkeen [Service]. Selaa
painikkeilla kohtaan [Code lock] ja paina [OK]. Ilmoita haluttu koodi.
Valitse nuolipainikkeilla haluttu numero ja vahvista painamalla [OK].
Koodilukitus aktivoituu automaattisesti ohjelmoinnin jälkeen ja
ohjauskeskus palautuu Normaalinäyttöön.
Voit palata lukitsemattomaan tilaan toimimalla samoin kuin edellä ja
valitsemalla koodiksi 0000.
Laitteiston asetuksia ei voi muuttaa koodilukon ollessa aktiivisena.
Laitteisto ja sen valaistus voidaan kuitenkin käynnistää ja sammuttaa.
Kylpyohjelma on käynnissä Huoltovalikossa kohdassa [Time outside
timer] ilmoitetun ajan (tehdasasetus 1 tunti).
Yleinen aina toimiva koodi on 1995.
HUOM! Kaikki asetukset on tehtävä ennen mahdollisen
koodilukituksen käynnistämistä.
Kieli.
Valitse Normaalinäytöstä [MENU] ja sen jälkeen [Service]. Valitse haluttu
kieli nuolipainikkeilla ja paina sen jälkeen [OK].
Kello.
Valitse Normaalinäytöstä [MENU] ja sen jälkeen [Service]. Valitse [Set
clock] (kellon asetukset). Valitse nuolipainikkeilla oikea päivämäärä ja
vahvista painamalla [OK]. Aseta sen jälkeen kellonaika, ensin tunnit ja
sitten minuutit.
Tehdasasetukset.
Valitse Normaalinäytöstä [MENU] ja sen jälkeen [Service]. Valitse
[Factory settings]. Valitse [Yes] (kyllä) tai [No] (ei) nuolipainikkeilla ja
paina sen jälkeen [OK]. Valitsemalla [Yes] poistat keskuksen kaikki
ohjelmoinnit ja itse tekemäsi asetukset ja palautat järjestelmän
tehdasasetukset.
HUOLTOASETUKSET
CC 300T
Huolto.
Huoltovalikossa laitteistoa hoitava henkilö voi tehdä erilaisia asetuksia,
esim. säätää laitteiston maksimilämpötilan. Suosittelemme kuitenkin
käyttämään valmiita tehdasasetuksia. Huoltovalikko on varustettu
koodilla, jotta asiattomat henkilöt eivät pääse muuttamaan näitä
asetuksia. Valitse Normaalinäytöstä [MENU] ja sen jälkeen [Service].
Valitse [Service] ja näppäile koodi 124.
Järjestelmäasetukset.
Laitteiston kuivauksen raja
[Dryup limit (%)] – Kun laitteisto sammuu, se tunnistaa ympäröivän tilan
ilmankosteuden. Jos ilmankosteus on yli 30 % (tehdasasetus), laitteisto
siirtyy kuivaustilaan.
Kuivauslämpötila
[Dryup temperature (°C)] – Lämpötila, joka laitteistolla on kuivaustilassa.
Tehdasasetus on 80 °C.
Kuivausaika
[Dryup time (min)] – Aika, jonka laitteisto on käynnissä kuivaustilassa.
Tehdasasetus on 20 minuuttia.
Alin höyrynmuodostuslämpötila
[Min temp. steam (°C)] – Laitteiston alin lämpötila, jossa höyrynkehitin
käynnistyy. Tehdasasetus on 40 °C.
Maksimikäyttöaika
[Max running time (h)] – Tämä aika asetettiin ensimmäisen
käynnistyksen yhteydessä. Aika ei ole käytössä, jos laitteistoon on tehty
ohjelmointeja. Ajaksi voidaan asettaa 1–24 tuntia, tehdasasetus on 3
tuntia.
Lämpötilayksikkö
[Temperature (C°/F)] – Tässä valitaan lämpötilan yksiköksi joko Celsius
tai Fahrenheit.
Testivalikko
Testivalikkoa käytetään vain vianetsintään ja Tylön tekniseen
tukipalveluun.
Maksimilämpötila.
[Max temp (C°/F)] – Tässä valitaan maksimilämpötila laitteistoon
ohjelmoitaville ohjelmille. Käytettäessä Tylariumia kylpemiseen
maksimilämpötila on 55 °C.
Lämpötilan aleneminen valmiustilassa.
[Temp reducition Stand by (C°/F)] – Ilmoittaa, kuinka paljon lämpötila
alenee valmiustilassa verrattuna ohjelmoituun kylpylämpötilaan.
Tehdasasetus on 30 °C.
Maksimikäyttöaika valmiustilassa.
[On time Stand by (min)] – Kun laitteisto on valmiustilassa ja painetaan
ON-painiketta, kylpyohjelma on käynnissä tässä kohdassa ilmoitetun
ajan. Tehdasasetus on 60 minuuttia.
Maksimikäyttöaika muuna kuin ohjelmoituina aikoina.
[Time outside timer (min)] – Aika, jonka laitteisto on käynnissä
koodilukituksen ollessa päällä muuna kuin ohjelmoituina aikoina.
Kalkinpoisto.
[De-scaling (h)] – Tämä ajastin laskee laitteiston kokonaiskäyttöajan ja
ilmoittaa kalkinpoiston tarpeen. Tehdasasetus on 40 tuntia.
TYLARIUM
Tylarium-laitteistoja voidaan käyttää eri tavoin: kuivasaunana,
perinteisenä saunana ja höyrysaunana. Koska suhteellinen ilmankosteus
voi olla korkeampi kuin muissa saunoissa, Tylariumia käytettäessä on
syytä ottaa huomioon seuraavat seikat.
• Jos saunan ovessa tai seinässä on ikkuna, oven- ja ikkunankarmin
koko alalista on siveltävä venevernissalla ja lasin ja listan välinen
sauma on tiivistettävä saniteettisilikonilla. Näin lasipintojen välille
mahdollisesti muodostuva kondenssi ei pääse tunkeutumaan
saumaan.
Sivele kynnys ja ovenkahvat pariin kertaan venevernissalla, jotta
•
niiden puumateriaali pysyy hyväkuntoisena ja sauna on helpompi
siivota. Saunan lauteet, koristeristikot ja selkänojat öljytään molemmin
puolin Tylön saunaöljyllä.
HUOM! Saunan kaikkien muiden puupintojen tulee olla
käsittelemättömiä.
Mahdollisissa ongelmatapauksissa ota yhteys ostopaikkaan.
© Materiaalin monistaminen kokonaan tai osittain on kielletty ilman Tylön kirjallista suostumusta.
Tylö pidättää itselleen oikeuden muuttaa tuotteiden materiaaleja, rakenteita ja muotoilua.
46
Page 47

A
B
2
1500
mm
SAUNA: Type SK, SDK
C
TAB
Room volume
min/max
3
m (cu.m)
6-12
10-18
1 = 8 SK, 10 SDK
2 = sensor
3 = CC300T
4 = external switch
6 = RB30
7 = VA6, VB6
8 = amplifier
STEAM: Type VA, VB
400 - 415 V 3N~
Type Type
8SK
10 SDK
1
SAUNA HEATER
kWkWRB-type
RB 30
8
RB 30
10.7
GG
8
AB
6
Amp
12102.5
16
7
L1
400-415 V 3N~
4
3
STEAM GENERATOR
mm²
VA 6, VB 6
VA 6, VB 6
2.5
E
F
S
40 41C42D43
L2
L3
N
8
5
5
2
4
3
5
5
1500
mm
1
7
23 31
24 32 34
25 33 35
1816 19
8
22 23 24 4025 41
3
21
Amp
mm²
6 - 6.6
6 - 6.6
7
P
G
BB
5
6
1.5
1.5
10
7
11 12 13 14 16 17
15
3
11 12 13 14 15
112212
13
14
15 17 20
3
7
GREEN
WHITE
ORANGE
2
BLACK
BLUE
8
3
4
3A 4B5B 6B
11 12 13 14
6
16
15
7163
5xTAB
SAUNA: Type SE
D
TAB
Room volume
min/max
3
m (cu.m)
6-12
1 = 8SE
2 = sensor
3 = CC300T
4 = external switch
7=VA6,VB6
8 = amplifier
STEAM: Type VA, VB
400 - 415 V 3N~
SAUNA HEATER
Type
8SE VA6,VB6
4xTAB
5 x 0.2 mm²
6 x 0.2 mm²
5xTAB
3 x 0.2 mm²
4 x 0.2 mm²
3 x 2.5 mm²
STEAM GENERATOR
kW
8
Amp
12102.5
Type
mm²
7
GG
AB
E
F
S
L1
L2
L3
N
400-415 V 3N~
kW
6 - 6.6
40 41C42D43
Amp
7
P
5
mm²
1.5
G
BB
6
7
11 12 13 14 16 17
15
713
3 x 2.5 mm²
6 x 0.2 mm² 3 x 0.2 mm²
4 x 0.2 mm²
5xTAB
5 x 0.2 mm²
5xTAB
42
8
42
8
3
11 12 13 14 15
112212
13
14
15 17 20
LLGL
123
L1 L2 L3 N
400-415 V 3N~
23 31
8
3
1816 19
22 23 24 4025 41
3
21
6
NA
24 32 34
25 33 35
UZVXWY
BCD
UV
8
3
142536
G
W
123
1
GREEN
WHITE
ORANGE
2
BLACK
BLUE
4
3A 4B5B 6B
1
G
LL
L
NBB
123
L1 L2 L3 N
400-415 V 3N~
6
GG
B40
B41
200-240 V~
1
11 12 13 14
16
15
G
Page 48

SAUNA: Type SD
E
STEAM: Type VA
400 - 415 V 3N~
1 = 16SD, 20SD
2 = sensor
3 = CC300T
4 = external switch
6 = RB 30, RB 60
7=VA9,VA12
8 = amplifier
71 36
3 x 1.5 mm²
3 x 1.5 mm²
6 x 0.2 mm²
11 12 13 14 15
3
7xTAB
5 x 0.2 mm²
5xTAB
7
GG
AB
E
F
L1
L2
L3
400-415 V 3N~
S
N
40 41C42D43
7
P
G
BB
5
6
5xTAB
7
11 12 13 14 16 17
15
112212
3 x 0.2 mm²
4 x 0.2 mm²
13
14
15 17 20
42
3
1816 19
8
8
22 23 24 4025 41
3
21
23 31
24 32 34
25 33 35
8
3
GREEN
WHITE
ORANGE
BLACK
BLUE
4
3A 4B5B 6B
2
11 12 13 14
6
16
15
TAB
Room volume
min/max
3
m (cu.m)
15-35
22-43
SAUNA HEATER
Type Type
16 SD
20 SD
kWkWRB-type
16
RB 30
RB 60
Amp
23136
29
SAUNA: Type SK, SDK, SD, Deluxe
F
STEAM: Type VA, VB
200-208-230-240V3~
1 = 8 SK, 10 SDK, 16 SD, 20 SD,
8 Deluxe, 10 Deluxe, 16 Deluxe
2 = sensor
3 = CC300T
4 = external switch
6 = RB 30, RB 60
7=VB6,VA6,VA9,VA12
8 = amplifier
TAB
Room
volume
min/max
3
m (cu.m)
6-12
10-18
15-35
22-43
For USA only:
Use copper wire for at least 90° C (194°F).
* Min. copper wire size, supply power - RB box.
** Min. copper wire size, RB box - heater.
Type Type
8 SK, 8 Deluxe
10 SDK, 10 Deluxe
16 SD, 16 Deluxe VA 9
20 SD
SAUNA HEATER
kWkWRB-type
10.7
16
20
GG
L1
200-240 V 3~
Amp
8
RB 30
RB 60
RB 60
mm²
10
7
AB
L2
L3
200-208V 3~
mm²
23
6
31
10
46
16
58
25
STEAM GENERATOR
Amp
9
VA 9
VA 122012
E
F
S
AWG
10*12**
8*10**
6*8**
-
40 41C42D43
Amp
17
7
P
G
5
6
230-240V 3~
mm²
10*12**
20
44
27
10 4
10*12**
40
16
50
16
mm²
2.5
4
71 36
5 x 0.2 mm²
4xTAB
7
11 12 13 14 16 17
BB
AWG
VA 6, VB 6
VA 6, VB 6
6*8**
VA 1 2
-
7xTAB
4xTAB
15
3x1.5mm²
6 x 0.2 mm²
3 x 1.5 mm²
11 12 13 14 15
STEAM GENERATOR
200-208V 3~
Amp
mm²
19
6 - 6.6RB 30
6 - 6.6
9
12
4
19
4
26
10
35
10
3
AWG
12*
12*
8*
-
112212
13
230-240V 3~
Amp
mm²
17
17
23
6
30
10
3 x 0.2 mm²
4 x 0.2 mm²
3
14
15 17 20
AWG
12*
12*
10*
-
G
LL
123
L1 L2 L3 N
400-415 V 3N~
42
8
1816 19
G
L
NA
8
22 23 24 4025 41
3
21
LL
L
123
L1 L2 L3
200-240 V 3~
6
UZVXWY
BCD
142536
UV
123
23 31
24 32 34
25 33 35
8
3
6
UZVXWY
BCD
NA
142536
UV
123
GG
200-240 V~
G
ZXY
W
456
1
GREEN
WHITE
ORANGE
2
BLACK
BLUE
4
3A 4B5B 6B
G
200-240 V~
110 V~ (For USAonly)
G
ZXY
W
456
1
6
B40
B41
11 12 13 14
6
B40 B41
6
16
15
G
SAUNA: Type SE
G
STEAM: Type VA, VB
200-208-230-240V3~
TAB
Room
volume
min/max
m (cu.m)
1 = 8SE
2 = sensor
3 = CC300T
4 = external switch
7=VA6,VB6
8 = amplifier
Type Type
3
6-12
8SE
SAUNA HEATER
200-208V 3~
kW
8
Amp
mm²
6
230-240V 3~
mm²
Amp
4
20
GG
AB
L1
L2
L3
200-240 V 3~
VA 6, VB 6
7
E
F
S
40 41C42D43
STEAM GENERATOR
200-208V 3~
kW
Amp
6 - 6.623
19
7
P
G
5
6
BB
11 12 13 14 16 17
mm²
4
7
230-240V 3~
15
713
3 x 1.5 mm²
6 x 0.2 mm² 3 x 0.2 mm²
4 x 0.2 mm²
3 x 1.5 mm²
4xTAB
5 x 0.2 mm²
4xTAB
mm²
Amp
17
42
8
4
11 12 13 14 15
GREEN
WHITE
ORANGE
2
BLACK
BLUE
23 31
24 32 34
25 33 35
8
3
112212
13
14
15 17 20
3
1816 19
22 23 24 4025 41
3
21
8
L
11 12 13 14
G
200-240 V~
1
16
15
1
G
B40 B41
3
4
3A 4B5B 6B
G
LL
123
L1 L2 L3
200-240 V 3~
1
Page 49

SAUNA: Type SK, SDK, Deluxe
H
STEAM: Type VA, VB
200 - 208 - 230 - 240 V~
1 = 8 SK, 10 SDK, 8 Deluxe, 10 Deluxe
2 = sensor
3 = CC300T
4 = external switch
6 = RB 30, RB 60
7=VA6,VB6
8 = amplifier
TAB
Room
volume
min/max
3
m (cu.m)
6-12
10-18
For USA only:
Use copper wire for at least 90° C (194°F).
* Min. copper wire size, supply power - RB box.
** Min. copper wire size, RB box - heater.
Type Type
kWkWRB-type
8 SK, 8 Deluxe VA 6, VB 6
10 SDK, 10 Deluxe 10.7
GG
AB
SAUNA HEATER
RB 30
8
RB 30
SAUNA: Type SE
I
STEAM: Type VA, VB
200 - 208 - 230 - 240 V~
TAB
Room
volume
min/max
3
m (cu.m)
6-12
1 = 8SE
2 = sensor
3 = CC300T
4 = external switch
7=VA6,VB6
8 = amplifier
SAUNA HEATER
Type Type
8SE
200-208V 3~
kW
8
Amp
mm²
16
G
230-240V 3~
Amp
35
AB
200-240 V~
200-208V~
Amp
40
mm²
10
7
E
7
E
200-240 V~
mm²
16
-
VA 6, VB 6
F
S
F
S
40 41C42D43
AWG
6*8**
-
40 41C42D43
71 36
3xTAB
7
P
G
BB
5
6
230-240V~
Amp
mm²
AWG
8*10**
35
10
47
8*
16
STEAM GENERATOR
200-208V 3~
kW
Amp
6 - 6.640
33
7
G
P
G
5
6
BB
11 12 13 14 16 17
7xTAB
5 x 0.2 mm²
7
11 12 13 14 16 17
15
VA 6, VB 6
230-240V 3~
mm²
Amp
29
10
7
15
3x1.5mm²
6 x 0.2 mm²
3 x 1.5 mm²
3xTAB
3
11 12 13 14 15
STEAM GENERATOR
200-208V~
Amp
mm²
33
10
6
6--
-
mm²
10
3
11 12 13 14 15
AWG
8*
-
112212
112212
13
230-240V~
Amp
29
29
13
14
15 17 20
3 x 0.2 mm²
4 x 0.2 mm²
3
14
15 17 20
mm²
AWG
8*
10
10
8*
3
1816 19
42
8
1816 19
G
8
3
21
23 31
24 32 34
8
22 23 24 4025 41
3
21
LL
L
NA
123
200-240 V~
23 31
24 32 34
25 33 35
8
22 23 24 4025 41
GREEN
WHITE
ORANGE
BLACK
25 33 35
8
3
3A 4B5B 6B
6
UZVXWY
142536
ZXY
W
UV
123
1
GREEN
WHITE
ORANGE
BLACK
BLUE
3
4
3A 4B5B 6B
BLUE
4
456
2
2
11 12 13 14
G
200-240 V~
G
11 12 13 14
6
16
15
6
G
B40 B41BCD
1
16
15
J
3 = CC300T
9 = Tylö Fresh
713
3 x 1.5 mm²
6 x 0.2 mm² 3 x 0.2 mm²
4 x 0.2 mm²
3 x 1.5 mm²
3xTAB
5 x 0.2 mm²
3xTAB
Example
CC300T and Tylö Fresh
3
11 12 13 14 15
42
8
11 12 13 14 15 17 2031816 19
21
22 23 24 4025 41
1
GG G
AB
200-240 V~
3
3
2111 12 13 14 15 17 2091816 19
1
40 41
200-240 V~
BB
Page 50

6-8kW
40mm
Ångrör Ø15mm
Steam pipe Ø15mm
Tubo de vapor Ø15mm
Dampfrohr Ø15mm
conduit de vapeur Ø15mm
Steamrør Ø15mm
Höyryputki Ø15mm
Stoompijp Ø15mm
Damprør Ø15mm
tubo del vapore Ø15mm
tubería de vapor Ø15mm
Tubo de vapor Ø15mm
Ø15mmПаровая труба
Ångmunstycke Tylarium™
Steam head Tylarium™
Dampfdüse
L'embout de vapeur
Dampmunnstykket
Tylarium™
Tylarium™
Tylarium™
Höyrysuutin asennetaan
Stoominlaat
Dampmundstykket
Bocchettone di vapore
Boquilla de vapor
Cabeça de vapor
Tylarium™
Tylarium™
Tylarium™
Tylarium™
Tylarium™
Tylarium™Паровое сопло
Ca 100mm
Tylarium™
Page 51

Available spare parts
9600 0104
2009-04-30TYLÖ CC300/CC300T
CC300: 9600 0101
CC300T: 9600 0102
CC300:
9600 0071
9600 0103
CC300T:
9600 0074
 Loading...