

Page 1
BLACK
www.tyentusa.com
The user is responsible for improper use of the
products such as use in any manner for which the
product was not originally intended and any
damage that may occur from such improper use.
This product is subject to changes that enhance
its performance without prior notification.
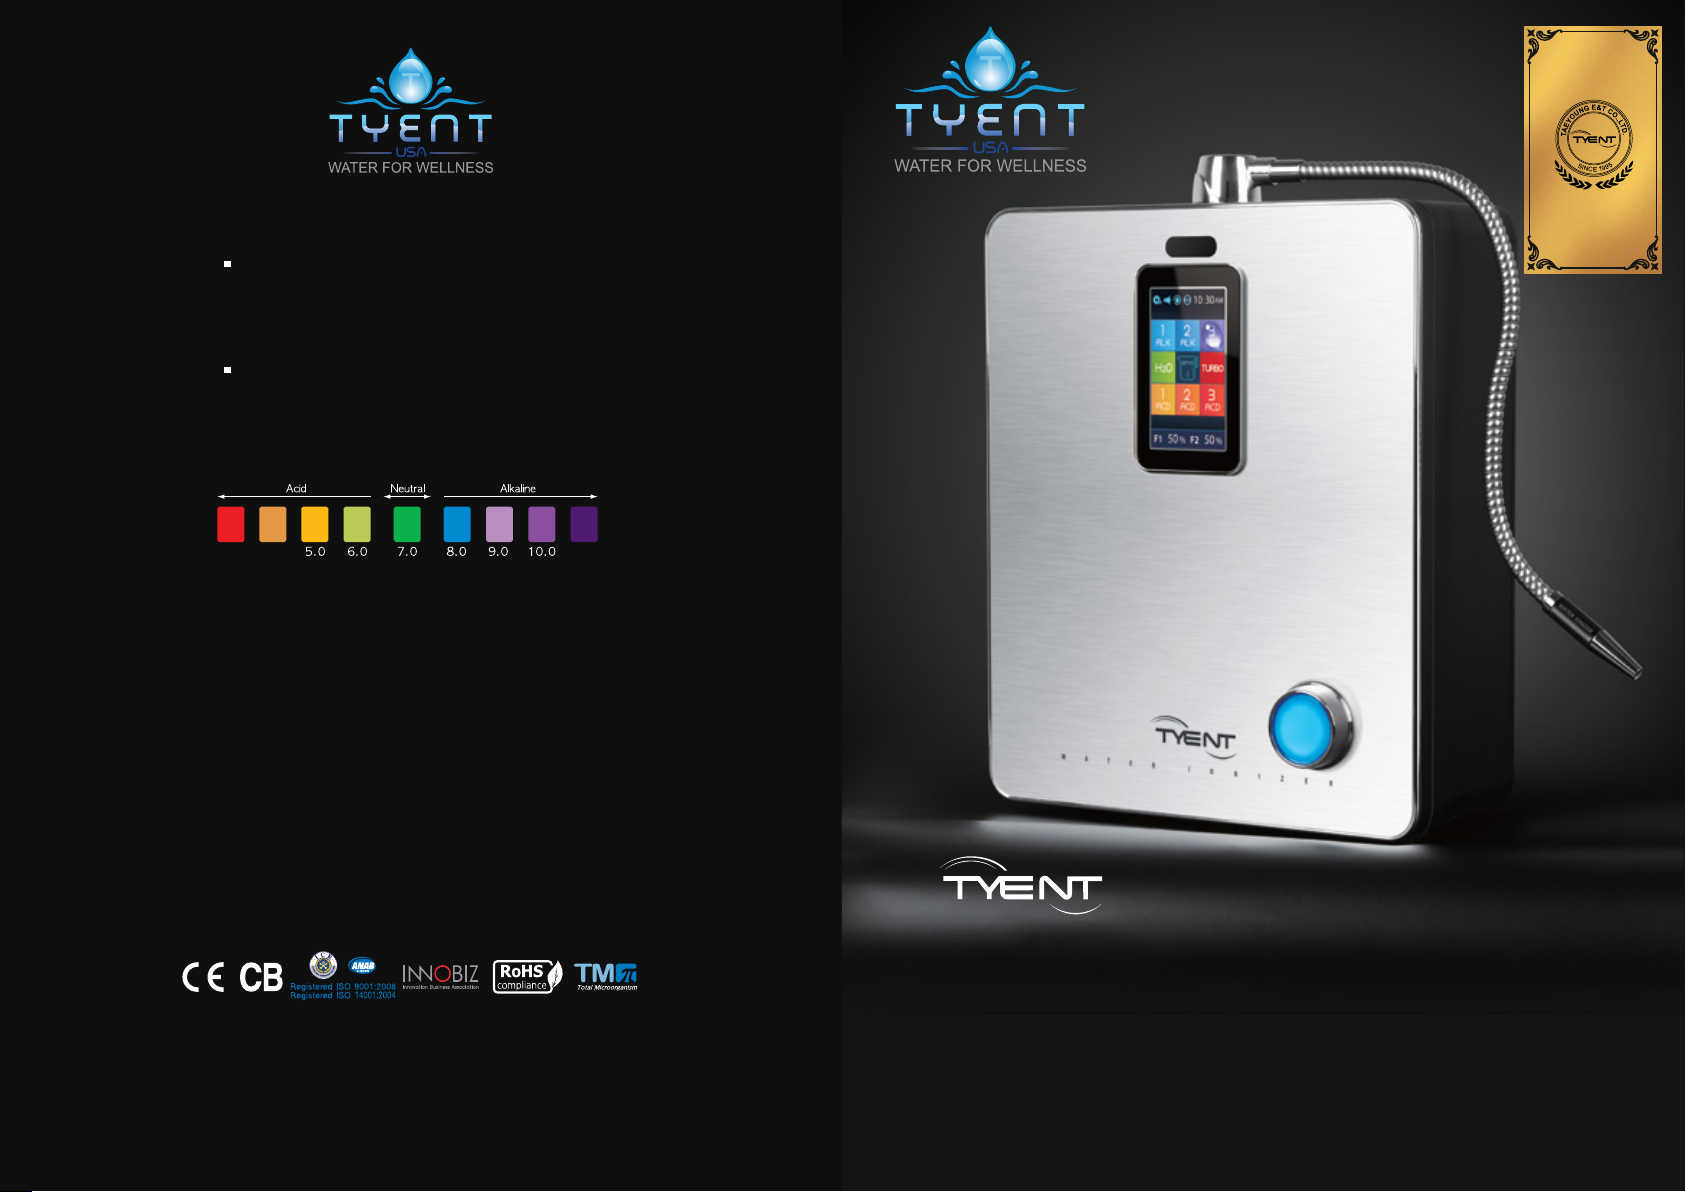
pH Chart
4.02.5 11.5
How to Measure pH: Place approximately 2 tablespoons
(30mL) of test water in a container and add 4 drops of pH
reagent. Then, mix well and check the color of the water
with the pH chart above (The color of the water will change
according to its pH.)
·
If the power cord is damaged, it must be replaced by the
manufacturer, or a similarly qualified Tyent repair person in
order to avoid a hazard.
·
This appliance is not intended for use by persons (including
children) with reduced physical sensory or mental capabilities
or lack of experience and knowledge, unless they have been
given supervision or instruction concerning use of the appliance
by a person responsible for their safety.
·
Children should be supervised to ensure that they do not
play with the appliance.
LABEL
WATER IONIZER
MADE IN KOREA
User Manual
�
This product is intended for domestic use only.
�
Keep this User Manual handy for easy reference.
�
Carefully read this User Manual, particularly “all safety warnings.”
WATER FOR WELLNESS
Page 2
To Our Valued Customers Table of contents
o Our Valued Customers
T
Thank you for purchasing the ACE-13 (YT22-4TL) Water Ionizer. Please read all
safety warnings and this User Manual carefully before using this product to ensure
proper product usage. (Keep the manual handy for easy reference.)
We are not responsible for any accidents and/or malfunctions due to the
improper use of this machine.
Please keep the manual, warranty card and a copy of your receipt in a safe
place, so that it’s easily accessible when you need it.
Please refer to this manual when you have questions about how to use or
how to troubleshoot this unit.
ntended UseI
This device creates
of regular tap water through the use of electrolysis and enables the following changes
to occur:
An increase or decrease in pH level
Creation of negatively charged hydrogen ions (antioxidants)
Purification through filtration
An increase in molecular hydrogen
functional alkaline ionized water
To Our Valued Customers
. It changes the properties
able of ContentsT
To Our Valued Customers
Table of Contents
Before Usage
Safety Precautions and Warnings
Product Features
Package Contents
Unit Overview
How to Install the Unit
Water Hose Installation
Customer Serviceable Parts
How to Change the Filters
How to Reset the Filters
Operation of the Touch Screen
Directions for Product Use
pH Level Adjustment
System Setup Method
Selecting Voice On/Off
ECO Mode
Cleaning Function
TURBO Function
Temperature Sensor
Unit Specifications
Troubleshooting
Product Warranty
2
3
4
5
10
14
15
16
18
20
21
22
23
27
30
31
40
41
42
43
44
45
46
47
Table of Contents
2
3
Page 3
Before Usage Safety Precautions and Warnings
efore UsageB
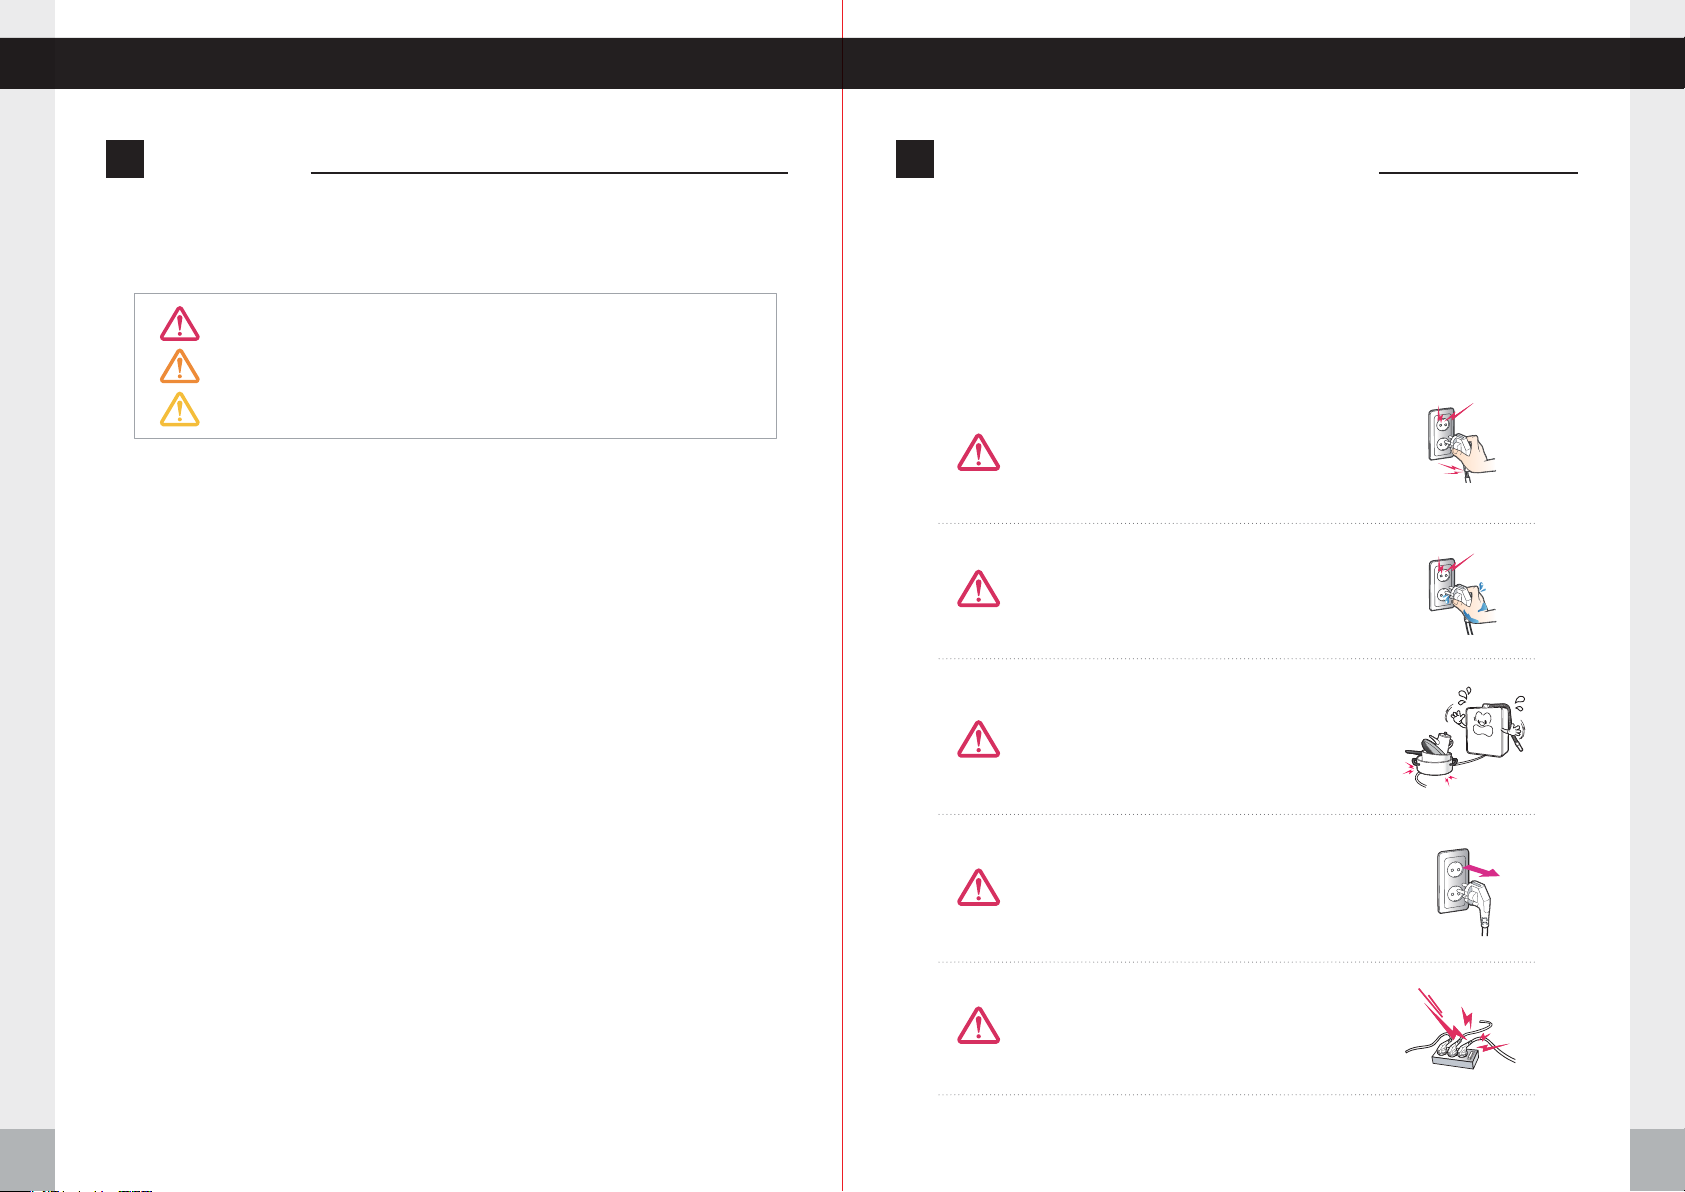
Safety precautions are provided for the safe and proper use of this unit and can prevent
danger, bodily harm and/or possible damage due to misuse. Please make sure you are
familiar with all the safety precautions and warnings associated with this unit.
DANGER (Red Warning Sign)
or death. If you see this sign, stop using this unit immediately.
WARNING (Orange Warning Sign)
bodily harm or damage to the unit. If you see this sign, stop the use of this unit.
ATTENTION (Yellow Warning Sign)
bodily harm or damage to the unit.
1.
Do not drink functional water with medication. When taking medication, use “clean H2O”
indicates an imminent hazard that could result in serious injury
indicates a potential hazard that could result in significant
indicates a potential hazard that could result in minor
afety Precautions and WarningsS
This appliance is not intended for use by persons (including children) with
reduced physical, sensory or mental capabilities, or lack of experience and
knowledge, unless they have been given supervision or instruction concerning
use of the appliance by a person responsible for their safety. Children should
be supervised to ensure that they do not play with the appliance.
Regarding the Power Supply
Do not use if the power cord is damaged or in a
loose power outlet.
filtered water thirty minutes prior to taking medication as well as with medication.
You may resume drinking functional water thirty minutes after taking medication.
2.
Always consult your primary care physician before drinking functional water. Only
drink a small amount near a neutral pH level for the first week. This will give the body
time to adjust to functional water during the detoxification period. See Welcome
Do not pull the power cord. Never touch the power
cord or the power outlet with wet hands.
Guide for full details on getting started.
3.
If you notice any negative effects from drinking functional water, stop drinking the
functional water immediately and consult your primary care physician about changes in your body’s pH level.
4.
If you are currently under the care of a primary care physician for an existing condition, consult your primary care physician about how changes in pH and other
characteristics of functional water could affect your medical condition.
5.
If you suffer from gastric anacidity, kidney failure or potassium excretion, you should
Do not forcibly bend, squeeze, damage or crush
the power cord under heavy objects.
not drink functional water.
6.
Verify the pH levels of the functional water dispensed from this unit on a monthly
basis to ensure proper function. This can be done with the supplied reagent drops
and a pH color chart.
7.
When switching from one pH to another, it is good practice to let the water run for
several seconds before using.
8.
It is common to drink half your body weight in ounces. For example, if you weigh 180
Unplug the power cord during general maintenance,
repair and inspection and while replacing parts.
pounds, it may be wise to drink 90 ounces every day of water per day. This especially
applies after you have given your body some time to adjust to the new pH level.
9.
The recommended drinking level for functional water is 9.5 pH (+-0.3). It is not
recommended to drink functional water above a pH of 10.
10.
IIf you wish to store functional water, use a glass or other nonleaching material with
Do not use power surge protectors with this unit.
Use unit with its own dedicated power source.
an airtight lid and store it in the refrigerator. Functional water will begin to weaken
Before Usage
immediately and will lose most of its benefits after 3 days.
11.
Never run hot water through this unit.
12.
Never drink acidic or turbo water.
Safety Precautions and Warnings
4
5
Page 4
Safety Precautions and Warnings Safety Precautions and Warnings
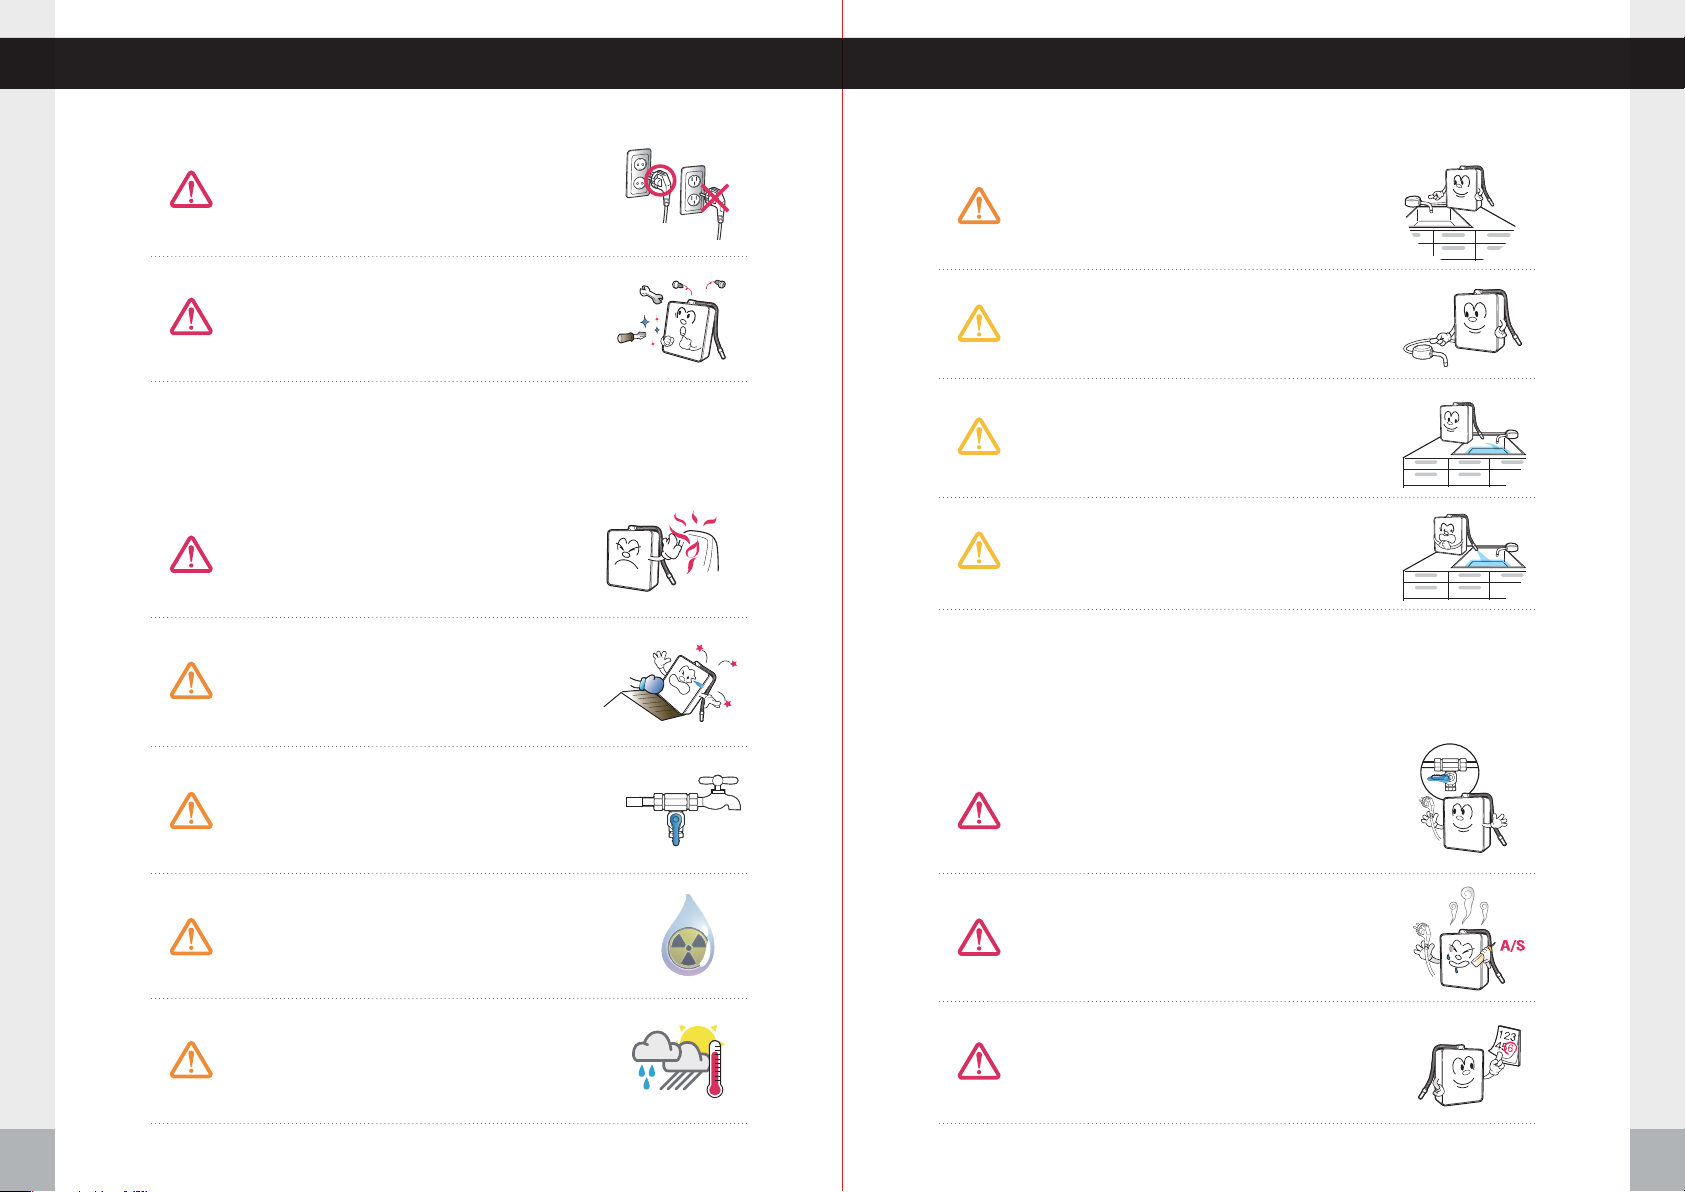
Only use the unit with the correct voltage. Units sold
in the USA and Canada are designed to be used with
between 110 and 120 volts AC. Plugging your ionizer
into an outlet with a higher voltage than this will cause
serious damage to the ionizer.
To reduce the risk of electric shock, do not remove
the cover; there are no user-serviceable parts
inside. Refer servicing to qualified service
personnel. Removing the cover will void the
warranty.
Install the drain faucet with suction cup near your
sink and adjust the position of the drain faucet’s
metal spout to drain into the sink.
Make sure the drain faucet is positioned lower than
the unit.
If the unit is not used for a few days, let the water run
for 1-2 minutes before drinking functional water.
Installation
Do not place this unit near heat sources.
Do not place this unit on an uneven surface.
Do not drop or use excessive force on this unit.
Do not connect the water line to a hot water supply.
Please use a new hose to connect with water line. (Do
not reuse old hose as it can cause leakage.)
Do not use unfit raw water in accordance with the
standards of the water service act.
Do not use in areas of high humidity and/or high
temperature.
Safety Precautions and Warnings
new hose
Usage
Do not run the water for longer than 1 hour.
If the unit won't be used for a long time, shut off the
valve and unplug the power cord.
If you hear strange noises, smell a burning odor or
see smoke, unplug the power cord immediately
and call qualified personnel for service.
Replace filters every 6 months to optimize the purification performance of this unit even if the replacement
indicator light isn’t turned on.
Safety Precautions and Warnings
6
7
Page 5
Safety Precautions and Warnings Safety Precautions and Warnings
Cleaning
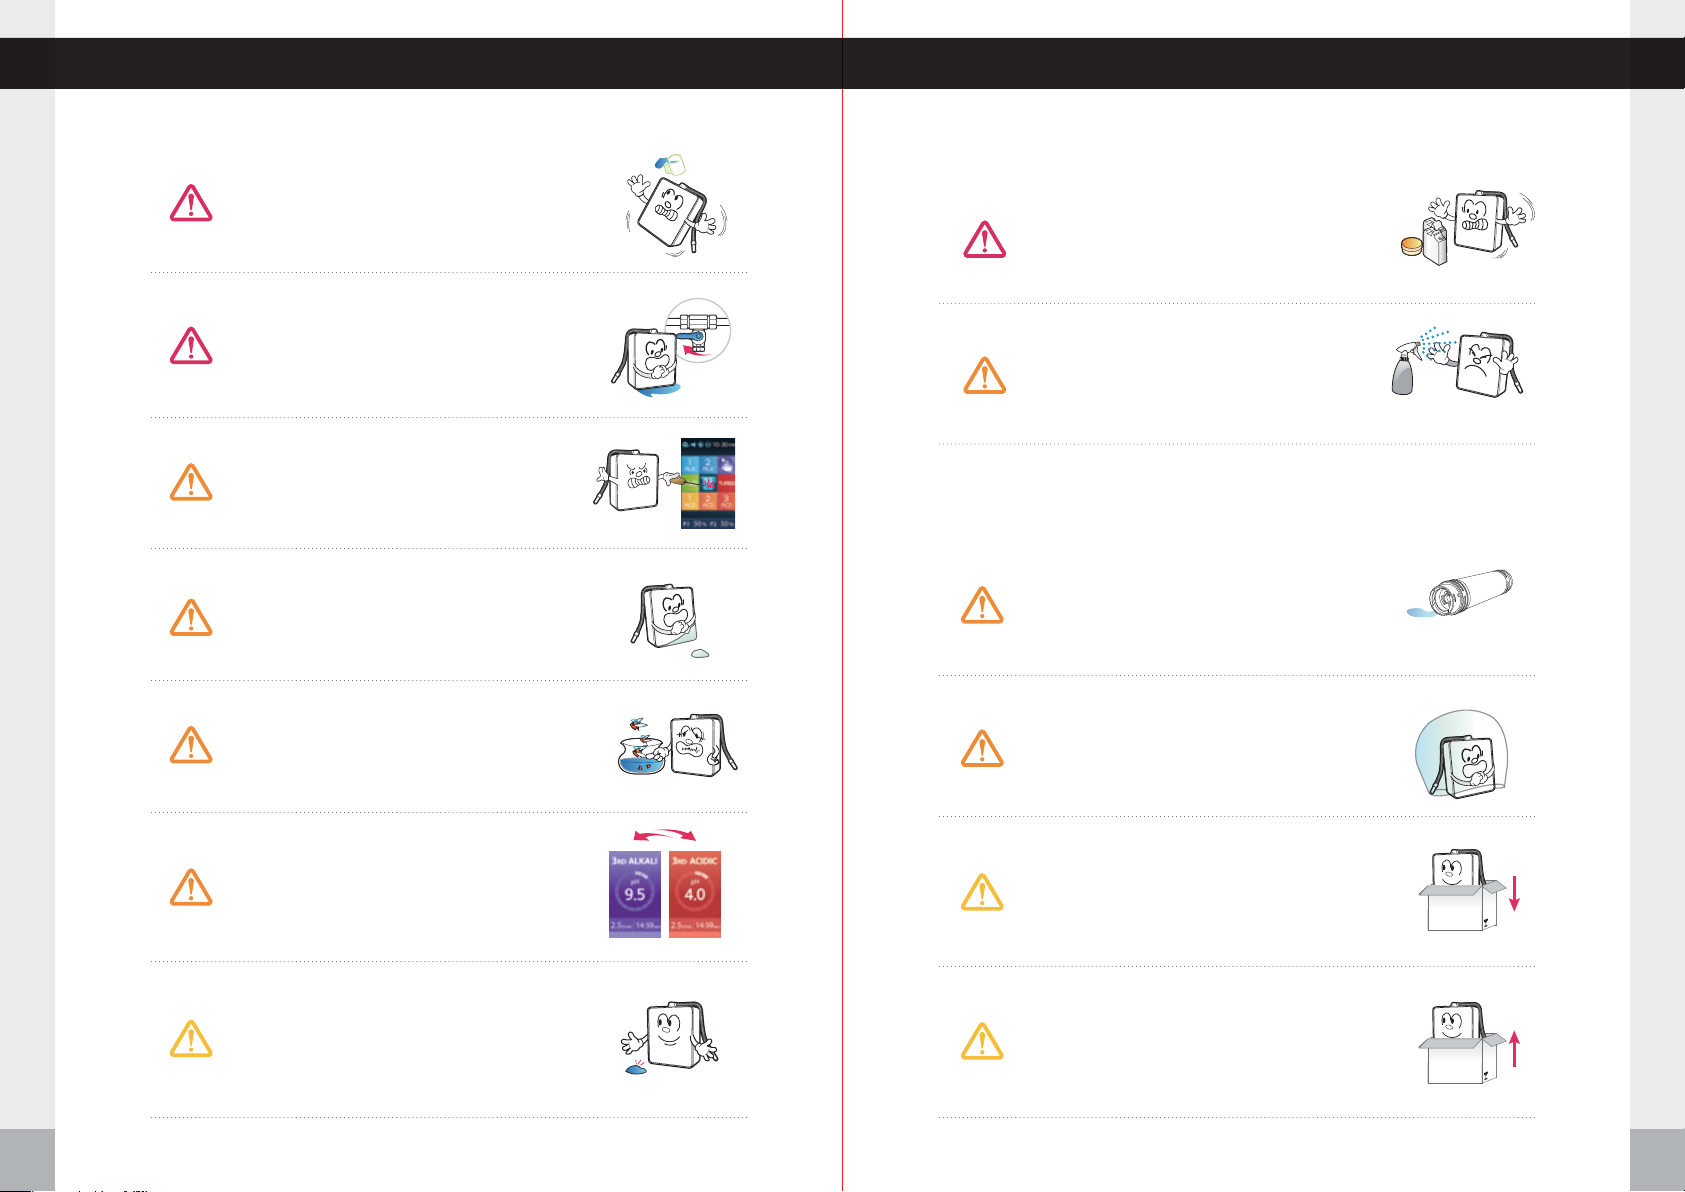
Do not place any objects on top of this unit no
matter how small they are.
Do not store the unit near chemicals, food,
metals or medication
If water leaks out of the unit (other than the
hoses) or if the unit is standing in a puddle of
water, shut off the water supply, unplug the
power cord and contact qualified service personnel
for service.
Do not poke or scratch the touch pad or LCD
display with sharp objects.
In areas of hard water (calcium scaling present
on faucets), notify your service provider and
install a cell safe antiscale prefilter to protect the
ionizer from scaling.
Do not use alkaline or acidic water in fish bowls
or aquariums. The sudden change in pH could
be harmful or fatal to some marine life.
It is beneficial for the maintenance of the
machine to run a strong acidic level for 5-minute
cycles twice weekly. This will help to maintain a
clean chamber.
Storage
Do not spray water on the main unit. Do not
clean the unit with benzene or other chemicals,
which may leak into the unit. If using a damp
cloth, be very careful not to get electronic display
wet.
Remove the filters and turn them upside down to
remove excess water before storing.
If the original packaging is not available, cover
the unit in plastic to avoid scratching the surface.
Store the unit in its original packaging in a cool,
dry place when not in use.
Danger: Do not use
benzene or thinner!
It is normal for condensation to be present on the
unit during humid summer months. If condensation persists despite weather conditions, unplug
the power cord and refer servicing to qualified
Safety Precautions and Warnings
service personnel.
8
Carefully remove this unit from its packaging.
Keep the original packaging for future storage
and unit transportation.
Safety Precautions and Warnings
9
Page 6
Product Features Product Features
roduct FeaturesP
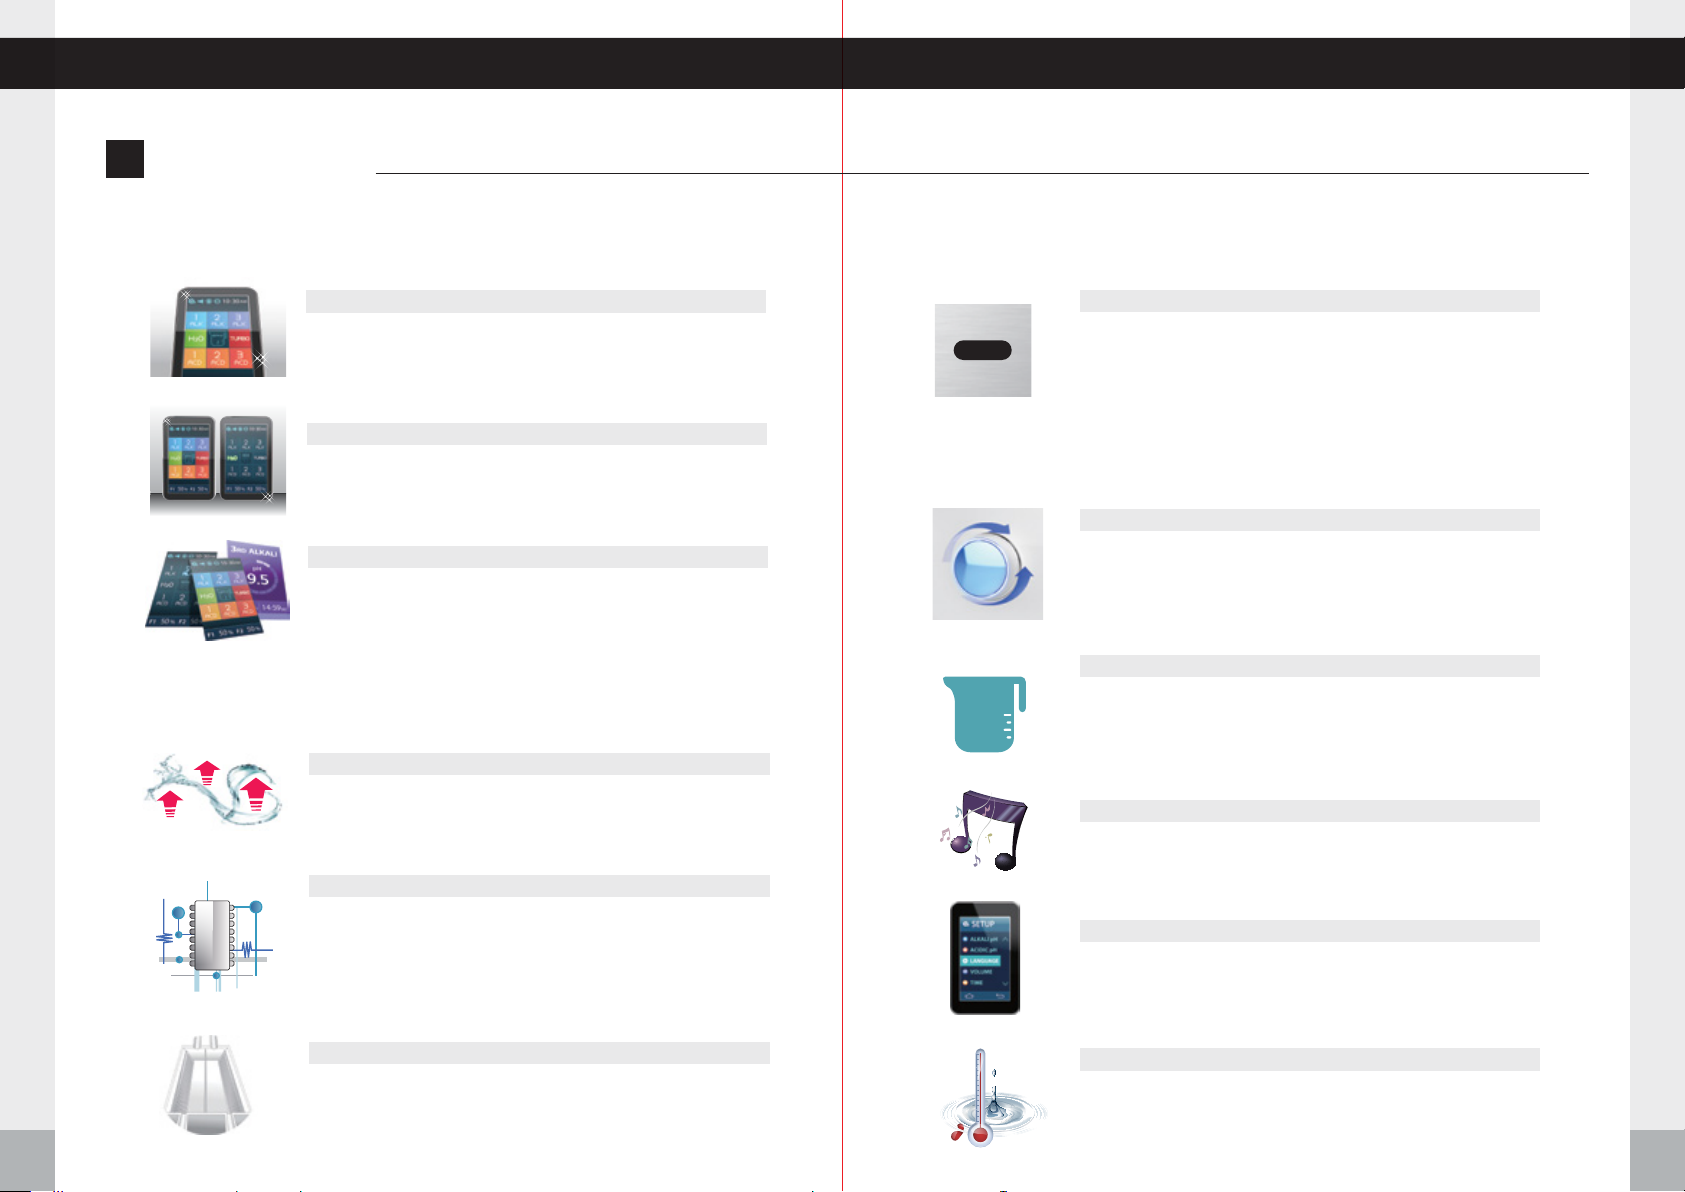
FULL TOUCH LCD – TRANSFORMATION AT YOUR FINGERTIPS
The Industry’s First Full Touch Screen Panel
A new capacitive touch screen offers a marked improvement in
responsiveness to touch over older resistive touch screens.
Touch LCD Screen with a Clear Picture Tone
A 262,000 color touch and LCD display provides a range of
information in true vivid colors for user convenience.
GUI [Graphical User Interface]
The graphical user interface is designed specifically for ease of
use and operation. The communication between the user and
ionizer has never been this simple!
A MORE POWERFUL SYSTEM ENGINE!
Upgraded Power Turbo System
The Turbo feature has been upgraded within the SMPS Plus® power
system. This upgrade will produce both stronger acidic turbo water
and stronger alkaline turbo water.
Powered by SMPS Plus Power Supply System
®
IMPORTANT CONSIDERATIONS FOR THE USER
Proximity sensor function for automatic water outflow
For hygienic purposes, water is automatically dispensed
when you move your hand close to the proximity sensor and
it stops when you move your hand close to the sensor again,
allowing you to get water while cooking or when your hands
are wet without actually touching the ionizer. You can choose
the type of water that you want to be dispensed in advance by
activating the proximity sensor.
Convenient Jog Dial Operation
For your convenience, you can also perform the most basic
operations with the front jog dial. Select any pH level of water
that you would like to dispense. You can also start and stop the
flow of water using the jog dial. The jog dial changes color with
the type of water selected.
Fixed quantity discharge function
1.0
ℓ
For your convenience, the ionizer has the ability to dispense a
predetermined amount of water and then stop. Presets
include 0.5L, 1.0L & 1.5L. These presets can be further
adjusted with the jog dial.
Excellent Sound Quality with Guided Support
Top-quality voice guidance system ensures that you are
always informed about what your ionizer is doing.
Product Features
10
SMPS Plus® Power Supply System provides the maximum output
needed to produce highly stable electric power required for each
phase of electrolysis. SMPS Plus is engineered specifically for
adjustability and variable voltage, which allows the unit to be
customized for your unique source water.
Electrodes with Solid/Mesh Hybrid Technology
These platinum-coated titanium plates are made with highly
stable, durable Solid/Mesh Hybrid Technology that enhances
the instantaneous electrolysis effect.
Multiple Languages Supported
The graphical user interface and voice guidance supports
multiple languages from around the world.
Temperature Sensor Function for Safe Operation
If the temperature of the source water exceeds 95℉(35℃),
the water will stop flowing and a warning message will appear
on the screen.
Product Features
11
Page 7
Product Features Product Features
roduct FeaturesP
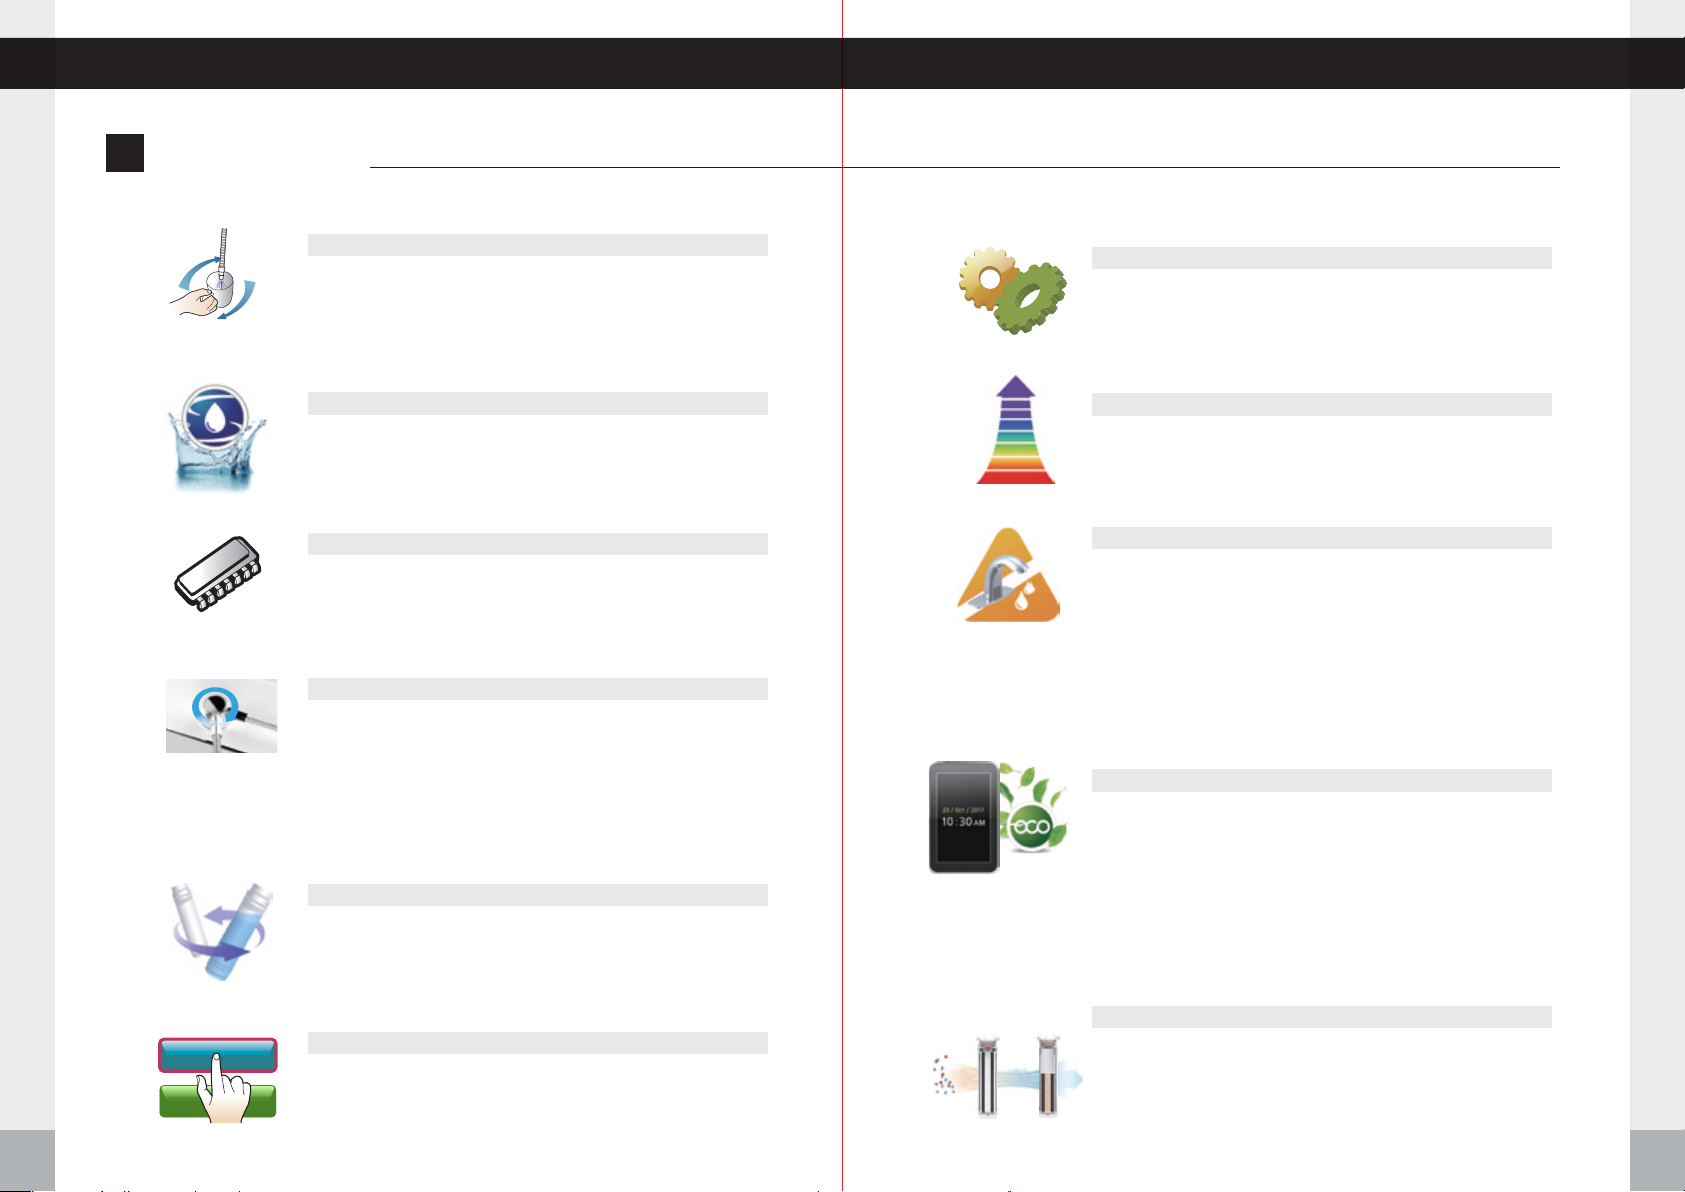
Automatic Water Discharge Interruption Function
In order to prevent the overflow of water due to user
negligence, the water discharge is automatically stopped after
15 minutes
360˚
15 minutes of use.
※TURBO: 5 minutes
Automatic Electrolysis Tank Cleaning Function
The interior of the electrolysis tank is automatically cleaned on
a regular basis, ensuring stable electrolysis operating conditions.
Automatic Memory Function
The last function used by the user is automatically memorized
and displayed on the standby screen for fast and convenient
operation.
Water Discharge Nozzle with Directional Control
The water discharge direction may be adjusted to many
diverse angles based on user preference.
SELF-MAINTENANCE MADE EASY – FROM INSTALLATION TO SERVICE
Intuitive Touch Screen Operated System Settings
The unit features an easy to understand setting system,
allowing users to conveniently customize water power
settings, time, date, the appearance of the interface and
pH Control Function
Individual alkali, acid and turbo presets can be easily adjusted
by the user to suit their source water.
Self-Diagnosis Function
When the condition of the source water is not suitable, the
water discharge is automatically suspended, displaying a
warning sign on the screen.
CARE FOR THE ENVIRONMENT
Earth-Friendly Technology When in ECO Mode
When setting the eco-mode, the LCD backlight will be turned
off automatically during periods of nonuse and the Time
function is displayed.
F1 RESET
Product Features
H2O
F2 RESET
12
On Screen Filter Usage Indication
The level of filter usage can be identified through the LCD
screen on a real-time basis. New filters start at 00% used and
count up to 100% used.
Super Simple Filter Replacement System
A simple filter replacement system along with a touch screen
filter reset feature makes filter management easy for anyone.
FRESH, PURIFIED WATER IS A MUST ALONG WITH HEALTHY MINERALS!
Water Purification through a Filtration Process
Perfect, seamless elimination of foreign substances including
residual chlorine, organic & inorganic compounds through a
filtering process using Activated Carbon and UF
micro-Ceramic materials, enhancing the alkali water quality.
Product Features
13
Page 8
Package Contents Unit Overview
ackage ContentsP nit OverviewU
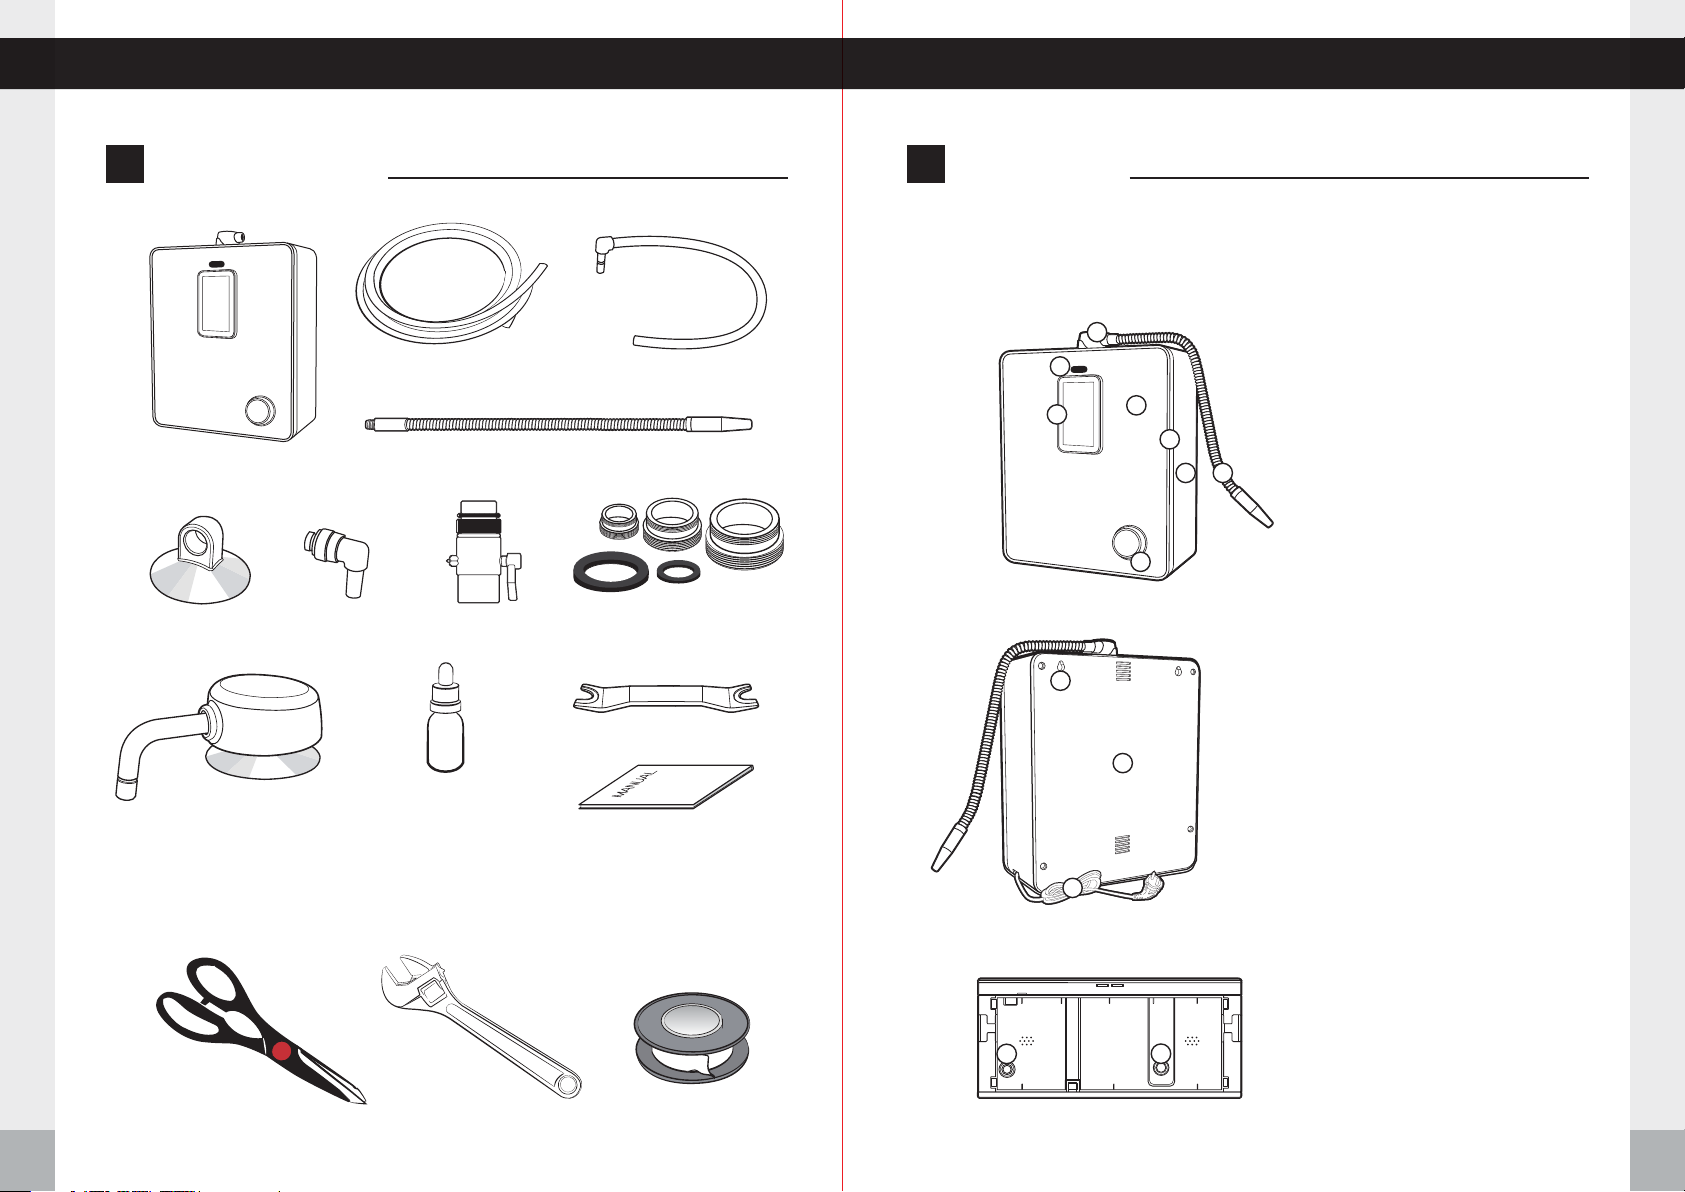
Make sure you are familiar with the parts and features of this unit, and carefully read the
User Manual and other important information.
Water Ionizer
8.2 ft (2.5 m)
of Hose
Water Outlet Tube
2 ft (0.61 m)
of Gray Hose with
Attached Tube Elbow
1
2
3
4
5
6
7
8
Front View
1.
Water Outlet Unit
2.
Proximity Sensor
3.
LCD Display
4.
Front Cover
5.
Door Case
6.
Front Case
7.
Water Outlet Tube
8.
Jog Dial
Tube Suction Cup
Drain Faucet
and Tube Suction Cup
Tools You Will Need
Package Contents
14
Stem Elbow
Faucet Diverter
pH Testing
Solution Bottle
Adjustable WrenchUtility Scissors Plumber’s Tape
Assortment of Connectors
and Rubber Washers
Wrench
User Manual
1
Rear View
1.
2
3
Hanging Groove
2.
Rear Case
3.
Power Cord
Bottom View
Water Inflow
1
3
1.
Water Outflow
2.
Unit Overview
15
Page 9
How to Install the Unit How to Install the Unit
ow to Install the UnitH
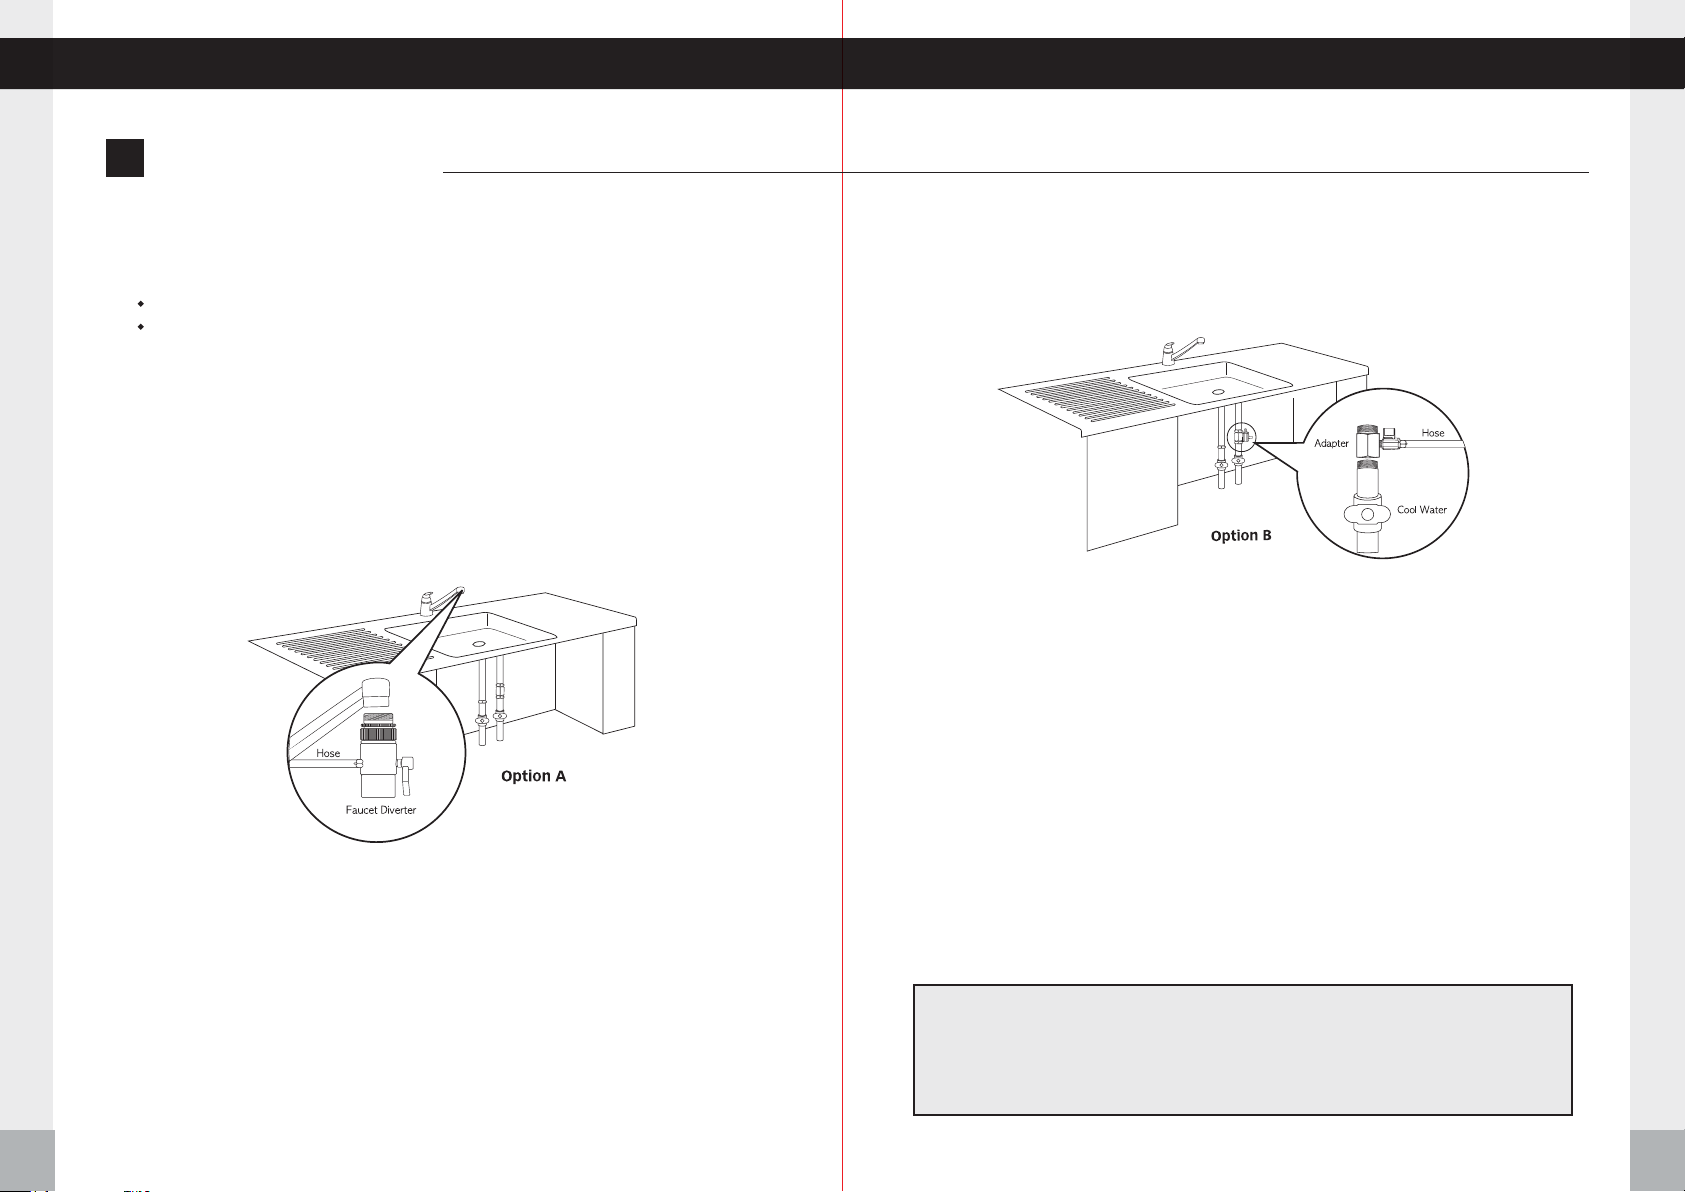
Determine whether you will connect the unit directly to the cold water supply line (under
sink) or to the faucet (see image).
Option A l Faucet: A faucet connection requires a faucet diverter (included).
Option B l Under-Sink: An under sink connection requires an under-sink adapter kit
(not included) or a compatible t-valve (available from most hardware stores). For more
information see Welcome Guide or call support.
Option A – Faucet Installation
Many faucets vary in design, and your faucet may require different setup instructions than those featured in this manual. Please consult a qualified service professional if you are unable to correctly complete the installation.
1.
Shut off both the hot and cold water main supply at the pipe under the sink.
2.
If your faucet features a screw-on style aerator, remove it by unscrewing it from
the tip of the faucet.
3.
If the included faucet diverter does not fit directly to the tip of the faucet, select an
appropriate size connector and rubber washer (included).
4.
When connecting the diverter or adapter to the faucet, be sure to use plumbing
pipe thread seal tape also known as plumbers tape or teflon tape (not included)
How to Install the Unit
to prevent leaks.
5.
If necessary, connect the faucet diverter with the appropriate connector to the faucet.
6.
Be sure all connections are secure but do not overtighten them.
16
Faucet Installation
(fittings included)
Option B – Under-Sink Installation
Under-Sink Installation
(fittings not included)
1.
Purchase either an under-sink installation kit (not included) or purchase a
T-connection (with shut-off valve) from a hardware or plumbing supply store.
2.
Shut off both the hot and the cold water main supply at the pipe under the sink.
3.
Locate the cold water supply line valve.
4.
Disconnect the faucet cold water supply line from the main cold water pipe. Use a
towel to catch the small amount of water that may come from the faucet supply line.
5.
When connecting the T-connection to the cold water pipe, be sure to use
plumber’s tape or teflon tape (not included) to prevent leaks.
6.
Reconnect the faucet’s cold water supply line to the T-connection (now secured
to the main cold water pipe).
7.
Be sure all connections are secure but do not overtighten them.
Both Options
Do not turn on the main water supply until all hoses are properly installed to the unit.
The unit and components are subject to change without prior notification in
order to enhance performance.
How to Install the Unit
17
Page 10
Water Hose Installation Water Hose Installation
Inflow
ater Hose InstallationW
4.
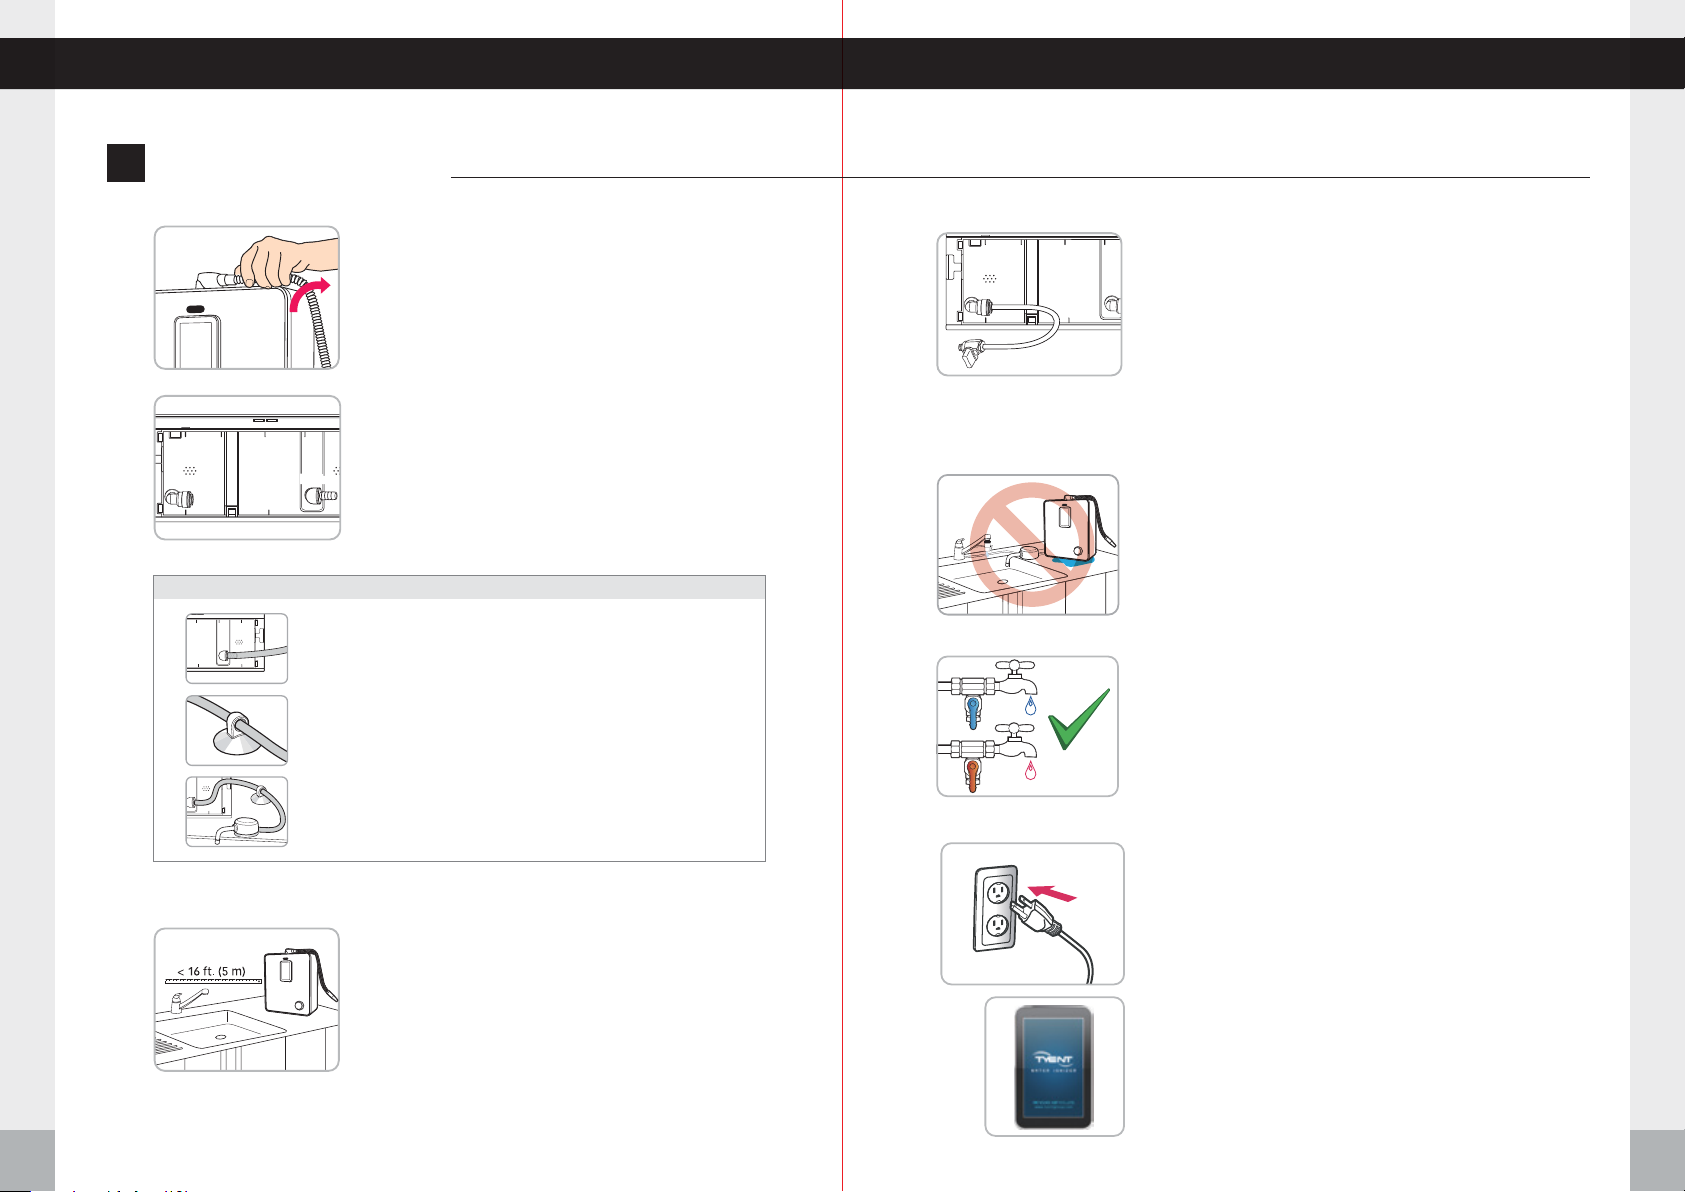
Place the unit on the planned installation location and
1.
screw the flexible tube clockwise into the water outlet
hole positioned at the top of the unit. Do not over
tighten.
Press the stem elbows into the water inflow and
2.
outflow holes on the bottom of the unit until you hear
Inflow
Drain
a click and feel the hose sit firmly in place.
How to Install the Drain Faucet
①
Connect the drain hose tube elbow to the outflow hole
located at the bottom of the unit.
②
Connect the drain hose to the tube suction cup and
secure it so that it does not move.
③
Connect the drain hose to the faucet and secure it to
the proper position on the sink.
hose to faucet
Connect the hose from the inflow hole to the cold
water supply either at the faucet diverter using Option
A, or the under-sink T-connection using Option B.
Option A: Remove the nut from the diverter, slide the
nut onto the hose, then firmly seat the hose on the faucet
diverter and screw the nut over the hose and back onto
the faucet diverter.
Option B: Route the hose through the countertop to the
T-connection, then firmly seat the hose on the T-connection
and make sure the connection is sealed completely.
Make sure all hose connections are firmly seated in
5.
the correct holes, both on the unit and at the water
supply
Turn on both the cold and hot water supply. Make
6.
sure there are no leaks at any of the connections.
Make sure the faucet is working with both hot and
cold water. Make sure there are no leaks from the
hose connections on the bottom of the unit. Make
sure the hoses are firmly seated in the unit holes.
Water Hose Installation
18
Measure between the unit’s location (on the counter)
3.
and the water faucet (or under-sink T-connection)
where the diverter (or T-connection) will be installed.
Cut enough hose to allow an easy connection from
the rear of the unit to the water supply (either using
the faucet diverter or the under-sink T-connection).
Note: Keep the length from the unit to the faucet
under 16 feet (5 meters). You may need a pressure
pump or a larger size hose if the pressure is too low.
Be sure to leave a few extra inches (centimeters) of
length so the faucet can still be rotated.
Plug in the power cord. You should hear a series of
7.
tones when you power up the unit.
※ INTRO Screen appears in about 10 seconds
when initial power is supplied.
Water Hose Installation
19
Page 11
Customer Serviceable Parts How to Change the Filters
ustomer Serviceable PartsC
ATTENTION:
replacement filters and/or purchased parts are not manufacturer specific. This unit
contains high-performance purifying filters and an advanced control system.
The consumer accepts any and all responsibility and/or liability if
Primary Filter: YT20 1st Filter
Recommended filter replacement cycle:
(Every 6 months )
Removes harmful chemicals like chlorine,
1st Filter
2nd Filter
compounds such as agrichemicals and detergents, large suspended matters like rust and
sediments as well as other volatile organic
compounds through an efficient activated
absorption method. It also eliminates bad
smells and any remaining dissolved chlorine.
Secondary Filter:
Recommended filter replacement cycle:
(Every 6 months )
0.01 micrometer filtering film filters
contaminated materials including ordinary
bacteria, etc. and maintains the minerals
in the water.
YT20 2nd Filter
ow to Change the FiltersH
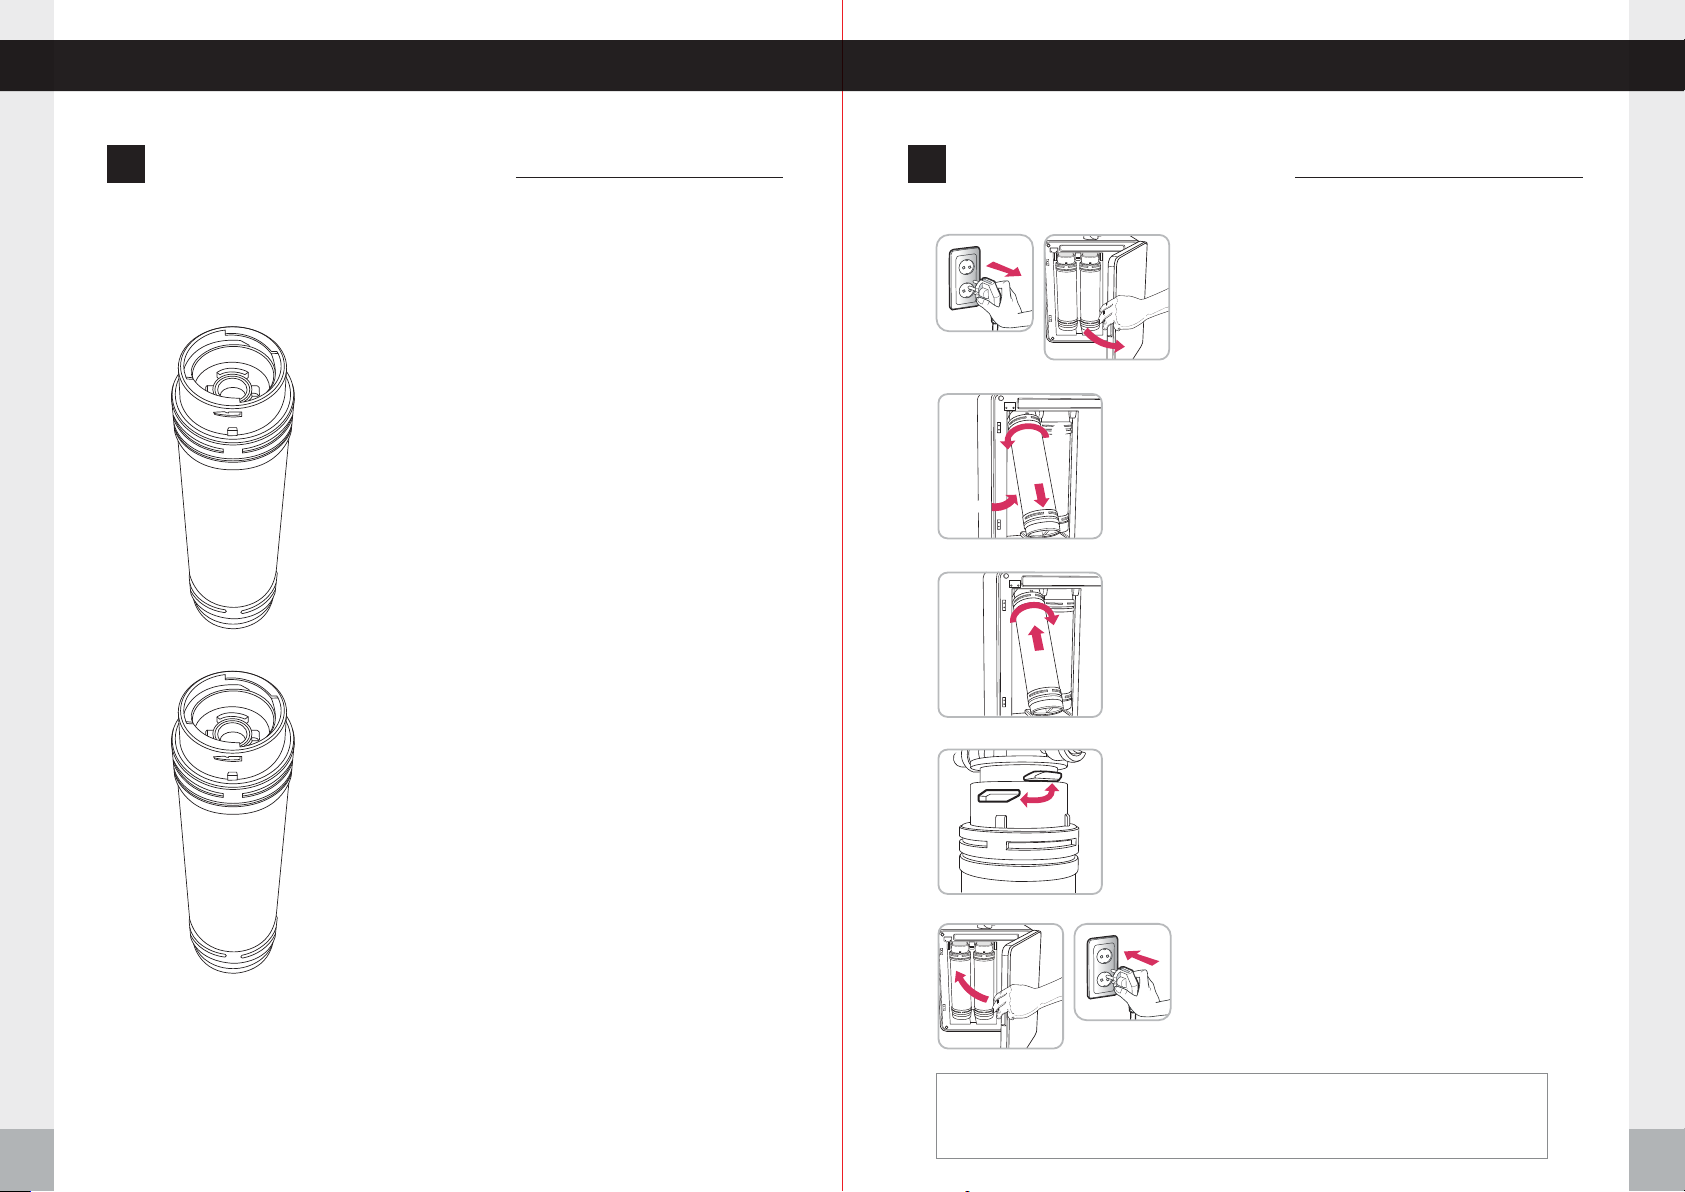
1.
Shut off the water supply to the unit and
unplug the power cord. Open the door in
front of the product.
ⓑ
ⓒ
ⓐ
2.
Remove old filter:
(a) Lift the filter that needs to be replaced.
(b) Turn the filter counterclockwise until it loosens.
(c) Pull the filter down and remove it.
3.
Put the new filter into the right position
by turning it clockwise.
4.
When installing the filter, the connection
bump of the head and the connection
groove on the top of the filter should be
completely combined.
5.
Close the door, plug the power cord
back in and reengage the water supply.
The life of the filter can vary greatly due to use, water pressure, water quality and the
changing of the seasons. Filters may need to be replaced sooner than the scheduled
Customer Serviceable Parts
time due to these reasons, you may notice reduced water quality or declining water taste.
20
After initializing the filter, press the H2O button and run purified water for 3 minutes.
It is highly recommended that you follow this process in order to ensure that your
machine functions properly.
How to Change the Filters
21
Page 12
How to Reset the Filters Operation of the Touch Screen
ow to Reset the FiltersH peration of the Touch ScreenO
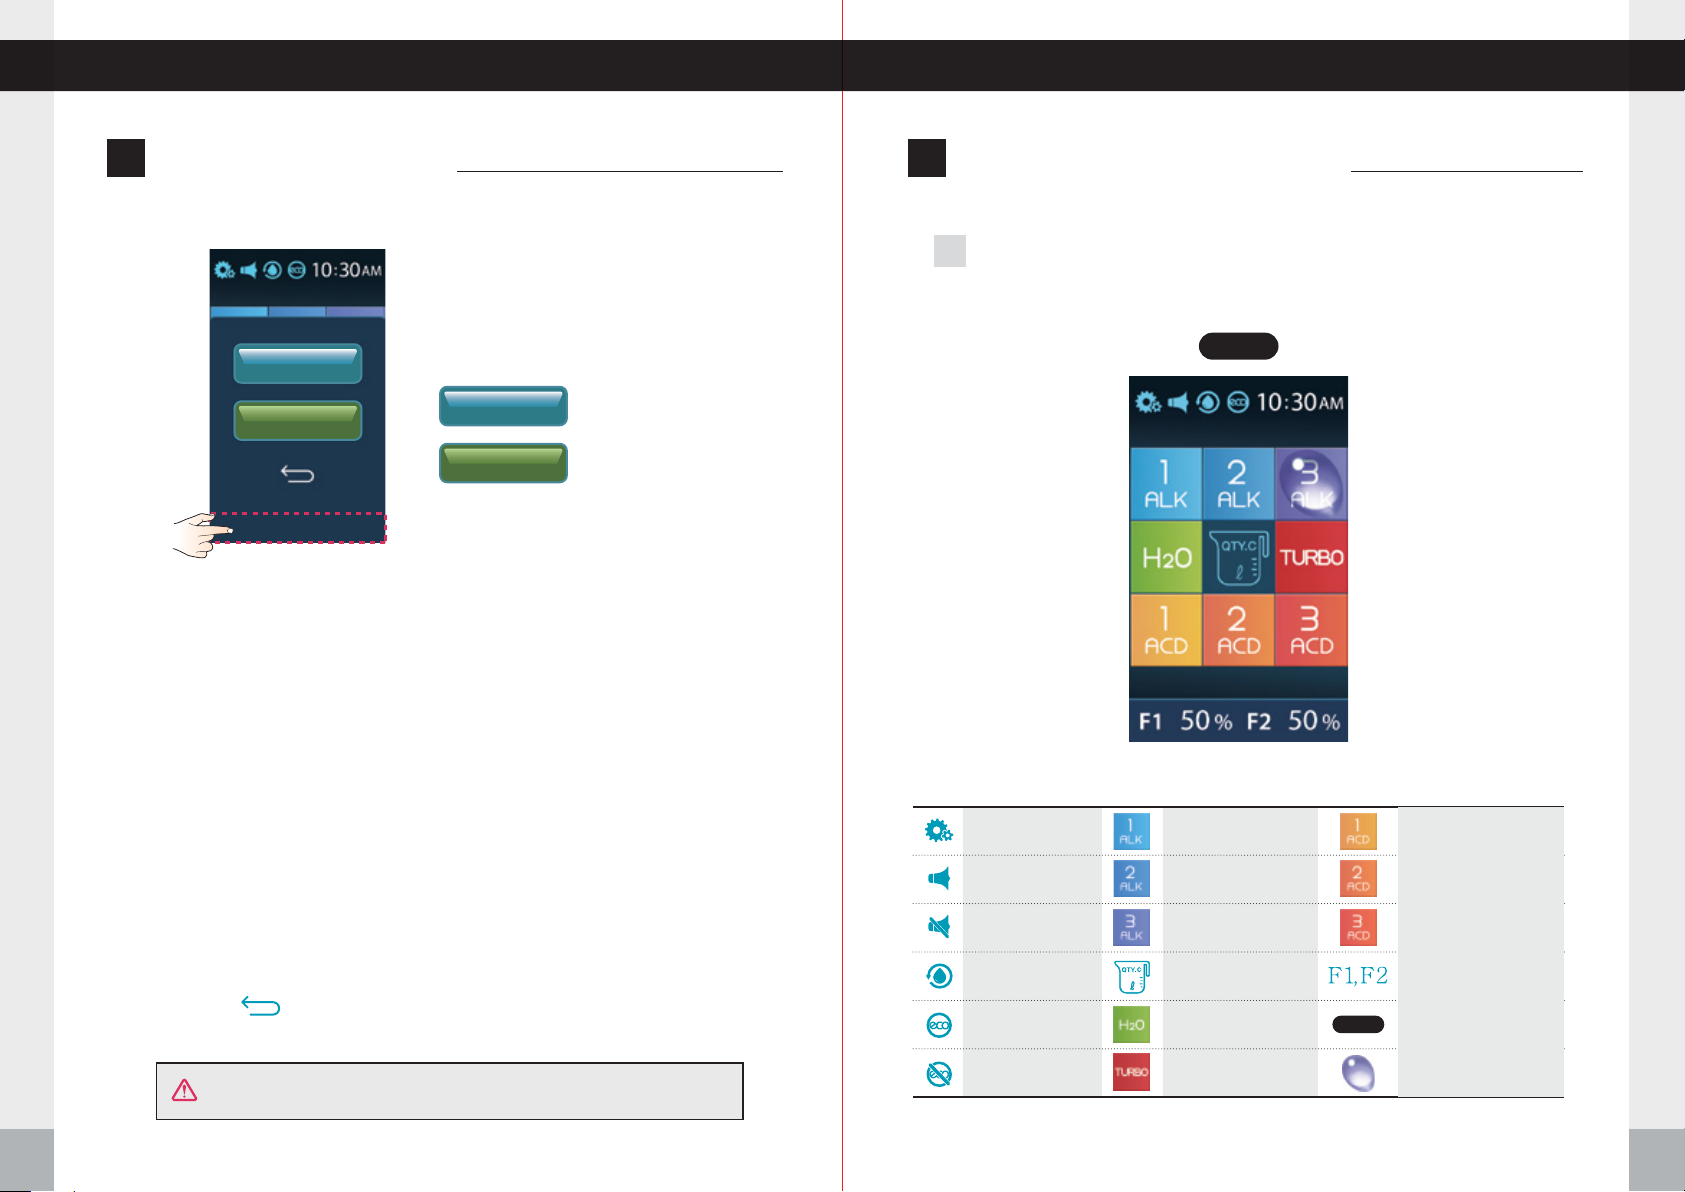
Standby Mode 1
F1 RESET
F2 RESET
F1
100
% F2
100
F1 RESET
F2 RESET
%
: Filter 1 reset
: Filter 2 reset
1. First Filter Reset
① Press the bottom part of the LCD screen.
A menu will appear on the LCD screen.
② To initialize, press the F1 RESET icon 2 times.
The Ionizer with speak and say “First Filter” then
“Initializing was performed” and F1 percentage
will go back to 00%.
2. Second Filter Reset
① Press the bottom part of the LCD screen.
A menu will appear on the LCD screen.
② To initialize, press the F2 RESET icon 2 times.
The Ionizer with speak and say “Second Filter”
then “Initializing was performed” and F2 percentage
will go back to 00%.
Press the RETURN button to return to the home screen
System setup
Voice on
Voice off
Cleaning
Eco mode on
Alkaline level 1
Alkaline level 2
Alkaline level 3
Fixed qty discharge
Purified water
Acidic level 1
Acidic level 2
Acidic level 3
Filter usage
Proximity sensor
How to Reset the Filters
CAUTION!
Only reset the filters after they have been changed.
22
Eco mode off
Turbo water
Proximity sensor
select
Operation of the Touch Screen
23
Page 13
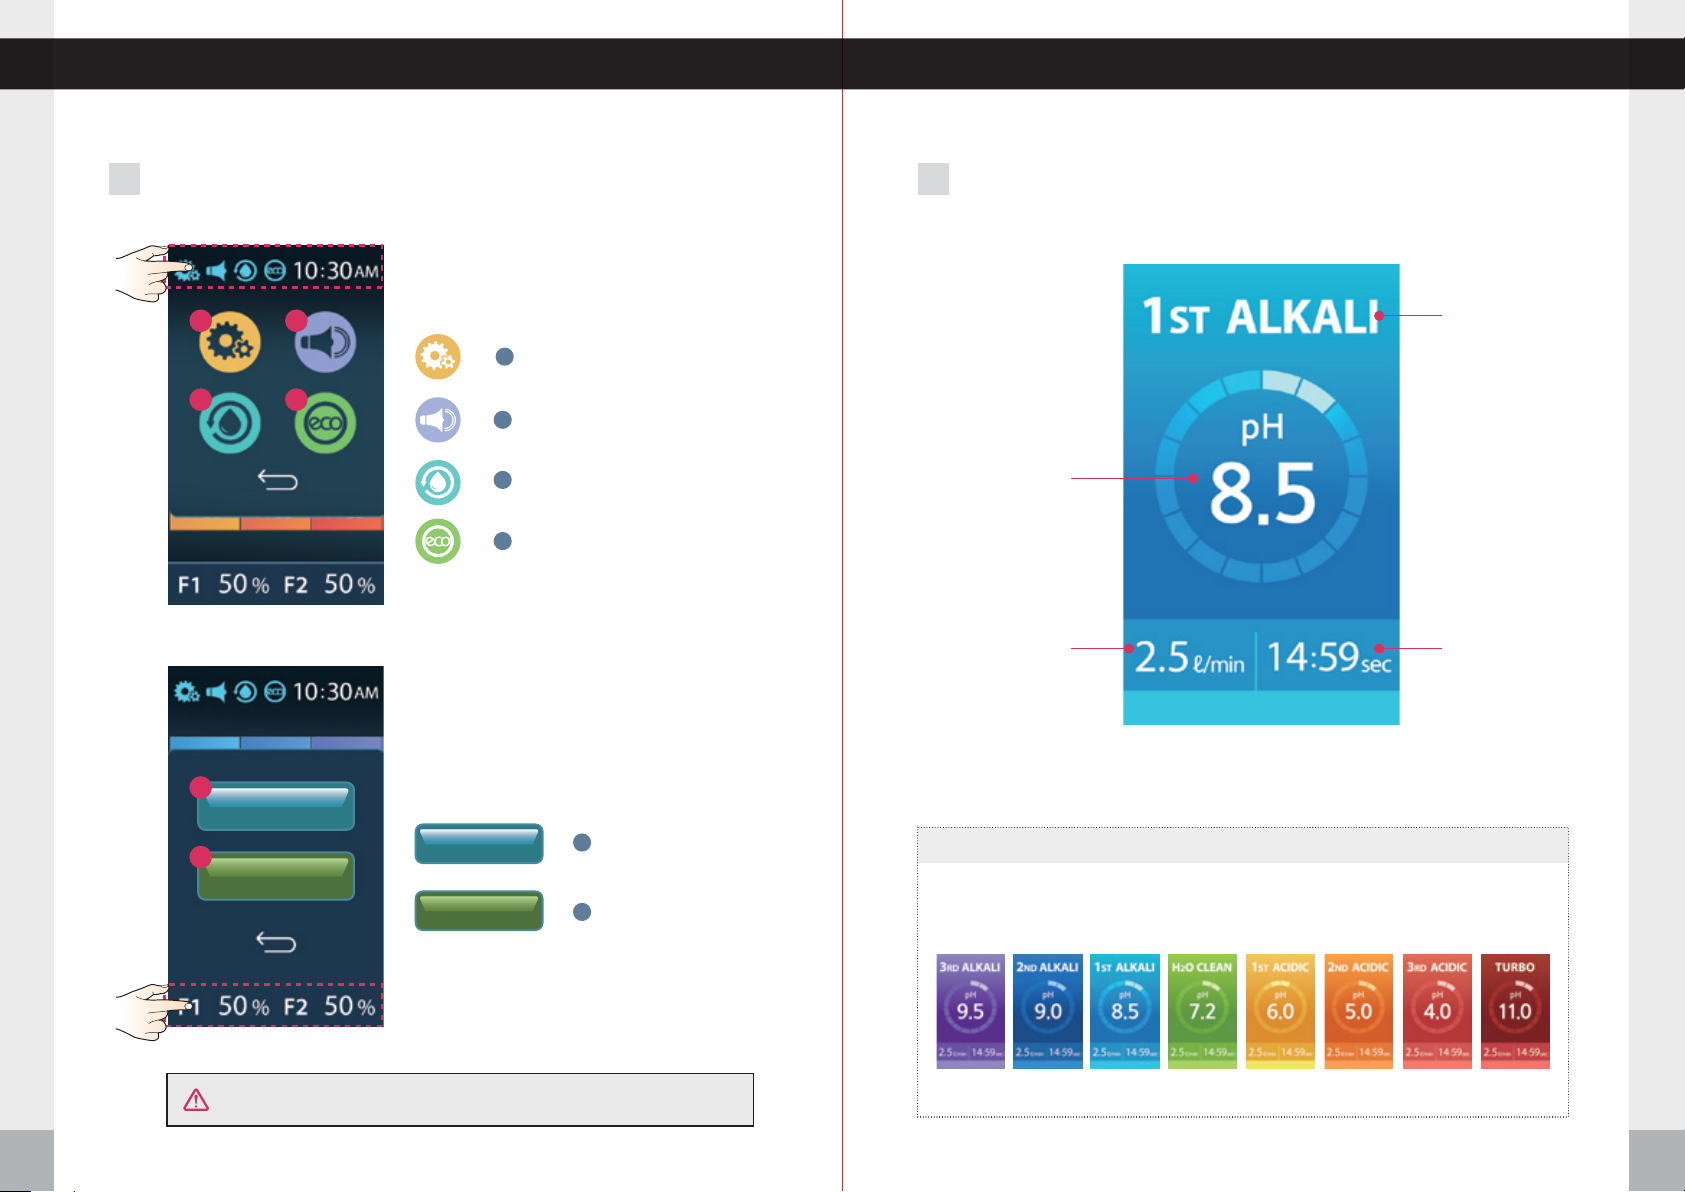
Operation of the Touch Screen Operation of the Touch Screen
Menu Window2 LCD Display3
Push the upper part of the LCD screen.
The menu window will appear on the LCD screen.
1
2
1
Setup
Selected mode
3
1
F1 RESET
2
F2 RESET
4
2
Voice on/off
3
Cleaning
4
ECO Mode on/off
Press F1 or F2 at the bottom of the LCD screen
to bring up the filter reset menu.
Filter 1 reset
F1 RESET
F1 RESET
H2O
F2 RESET
F2 RESET
1
Filter 2 reset
2
DISPLAY CHANGES
LCD display will match the pH level color according to water pH level being used
after icon is pressed.
pH level
Rate of
water inflow
Remaining
discharge time
Operation of the Touch Screen
CAUTION!
Only reset the filters after they have been changed.
24
Alkaline Water 3
Violet Color
Alkaline Water 2
Blue Color
Alkaline Water 1
light Blue Color
Clean Water
Green Color
Acidic Water 1
Light Yellow Color
Acidic Water 2
Light Orange Color
Acidic Water 3
Red Color
Turbo Water
Dark Red Color
Operation of the Touch Screen
25
Page 14
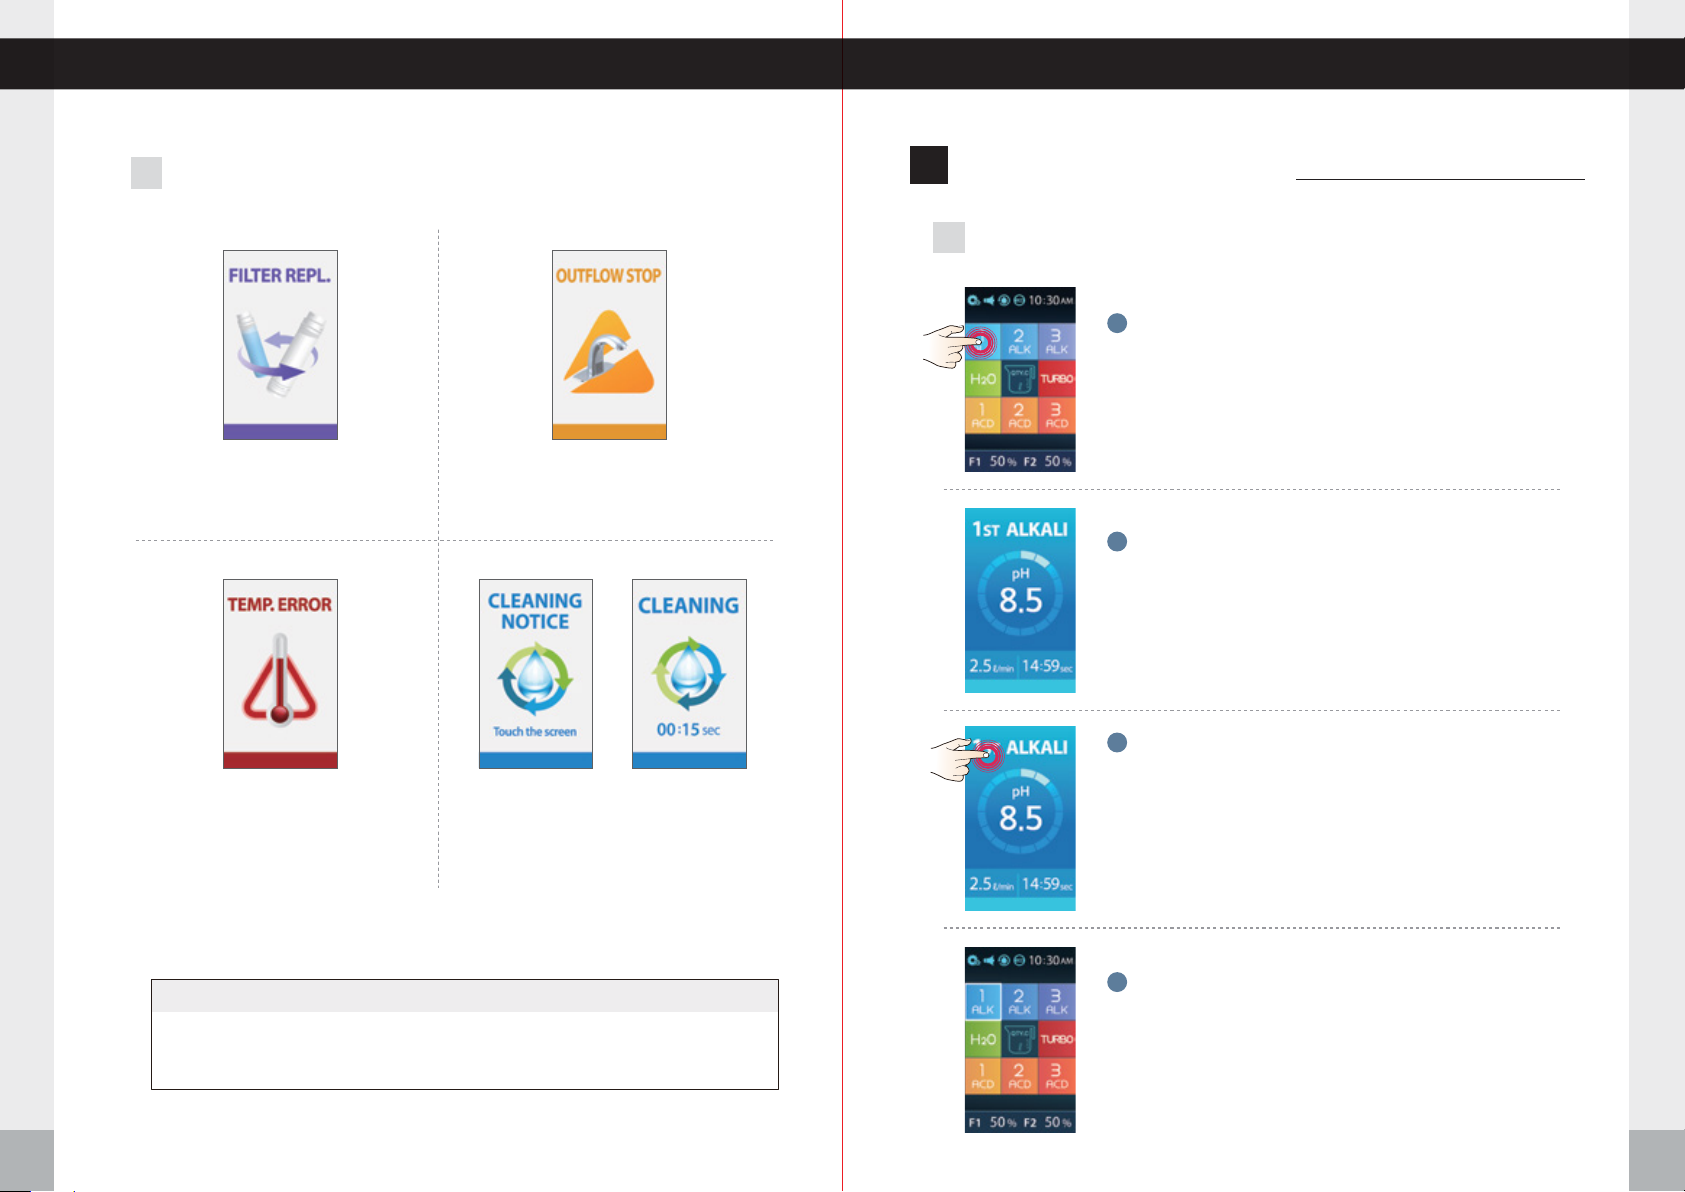
Operation of the Touch Screen Directions for Product Use
Message Display4
When this image is displayed, it is
time to replace the filters (p. 21~22)
After you suspend the water supply to
the unit, this message will appear before
the water outflow stops.
irections for Product UseD
When using the Touch Screen 1
1
Press the desired icon on the LCD screen.
2
Water outflow starts. Screen will display the rate
of water inflow and stop time.
3
Press the screen to stop the flow of water.
When this is displayed, water inside
the unit is hotter than 95℉(35℃). The
water supply will then be shut off and
the unit will stop operating temporarily.
(p. 44)
When the automatic
cleaning time comes,
this warning will be
displayed.
Touch Screen Safety Precautions
1.
It may be difficult to see the screen in direct sunlight.
2.
Do not use sharp or pointy objects to press the screen.
Operation of the Touch Screen
26
When this image is
displayed, the unit is
being cleaned, which
can be done automatically and/or manually.
4
When done, the screen moves to the last icon that was
used, and then goes into standby mode.
When using the Touch Screen
27
Page 15
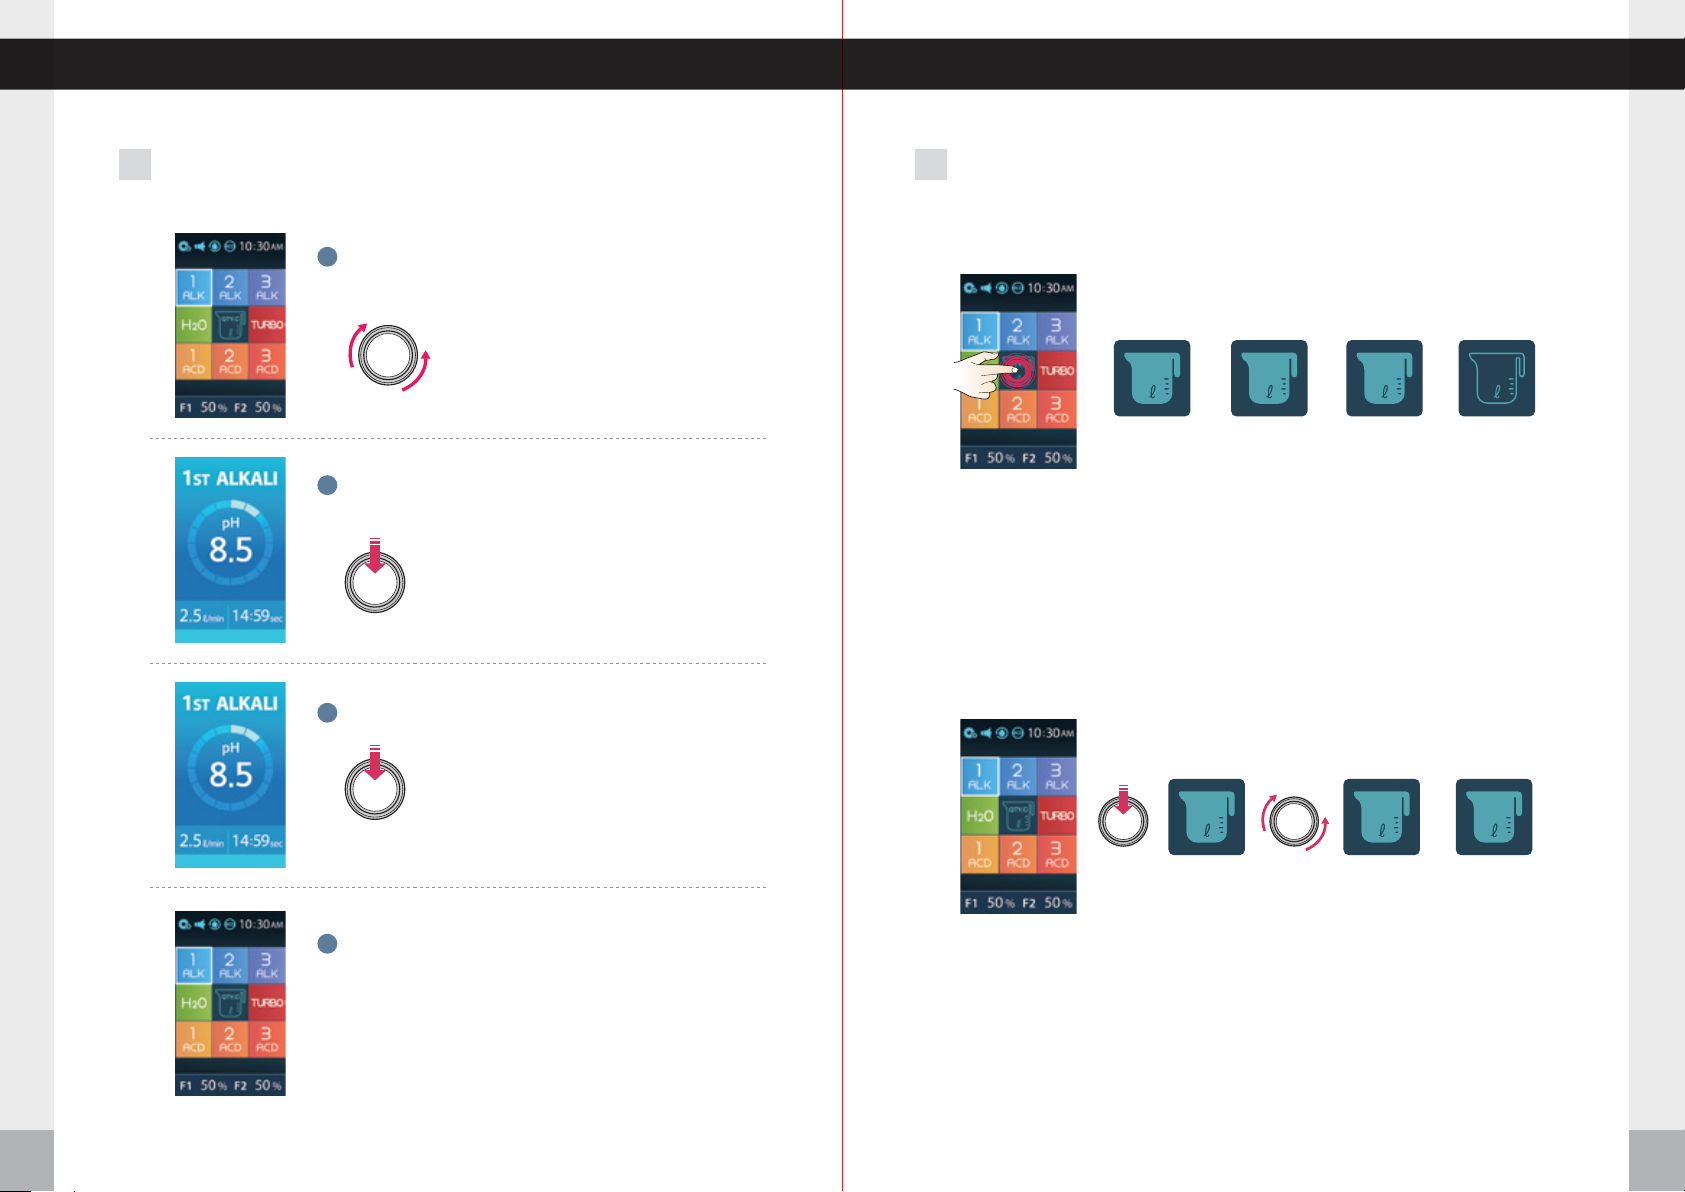
Directions for Product Use Directions for Product Use
When using the JOG DIAL2 3 When using xed quantity discharge function
1
Turn the dial either direction to select function.
The white outline means it's selected.
2
Push the center of the Dial to start the water outflow.
The screen changes to selected level.
3
Press the Jog dial to stop the flow of water.
When using the Touch Screen
0.5 1.0 1.5
①
Touch the QTY,C icon and choose the fixed amount of water. (0.5ℓ, 1.0ℓ,1.5ℓ)
( 0.5 》1.0 》1.5 》 release )
②
Select a desired water mode.
③
Water outflow stops automatically.
(Fixed quantity discharge function is released after water comes out)
≤ ≤ ≤
When using the JOG DIAL
0.5 0.2 5.0
~
QTY.C
4
When done, the screen will move to last icon that was
selected and go into standby mode.
Directions for Product Use
28
①
Touch the QTY.C button.
②
Select the fixed amount of water that you need by turning the jog dial.
- Clockwise: Increasing by 100ml (Max.5L)
- Counterclockwise: Decreasing by 100ml (Min.200ml)
③
Push the discharge level that you need.
④
Automatic stop after discharging the fixed amount of water that you selected.
(Discharge of water will stop if you press the button again during water discharge.)
⑤
After the water discharge completes, the fixed quantity function is released.
Directions for Product Use
29
Page 16
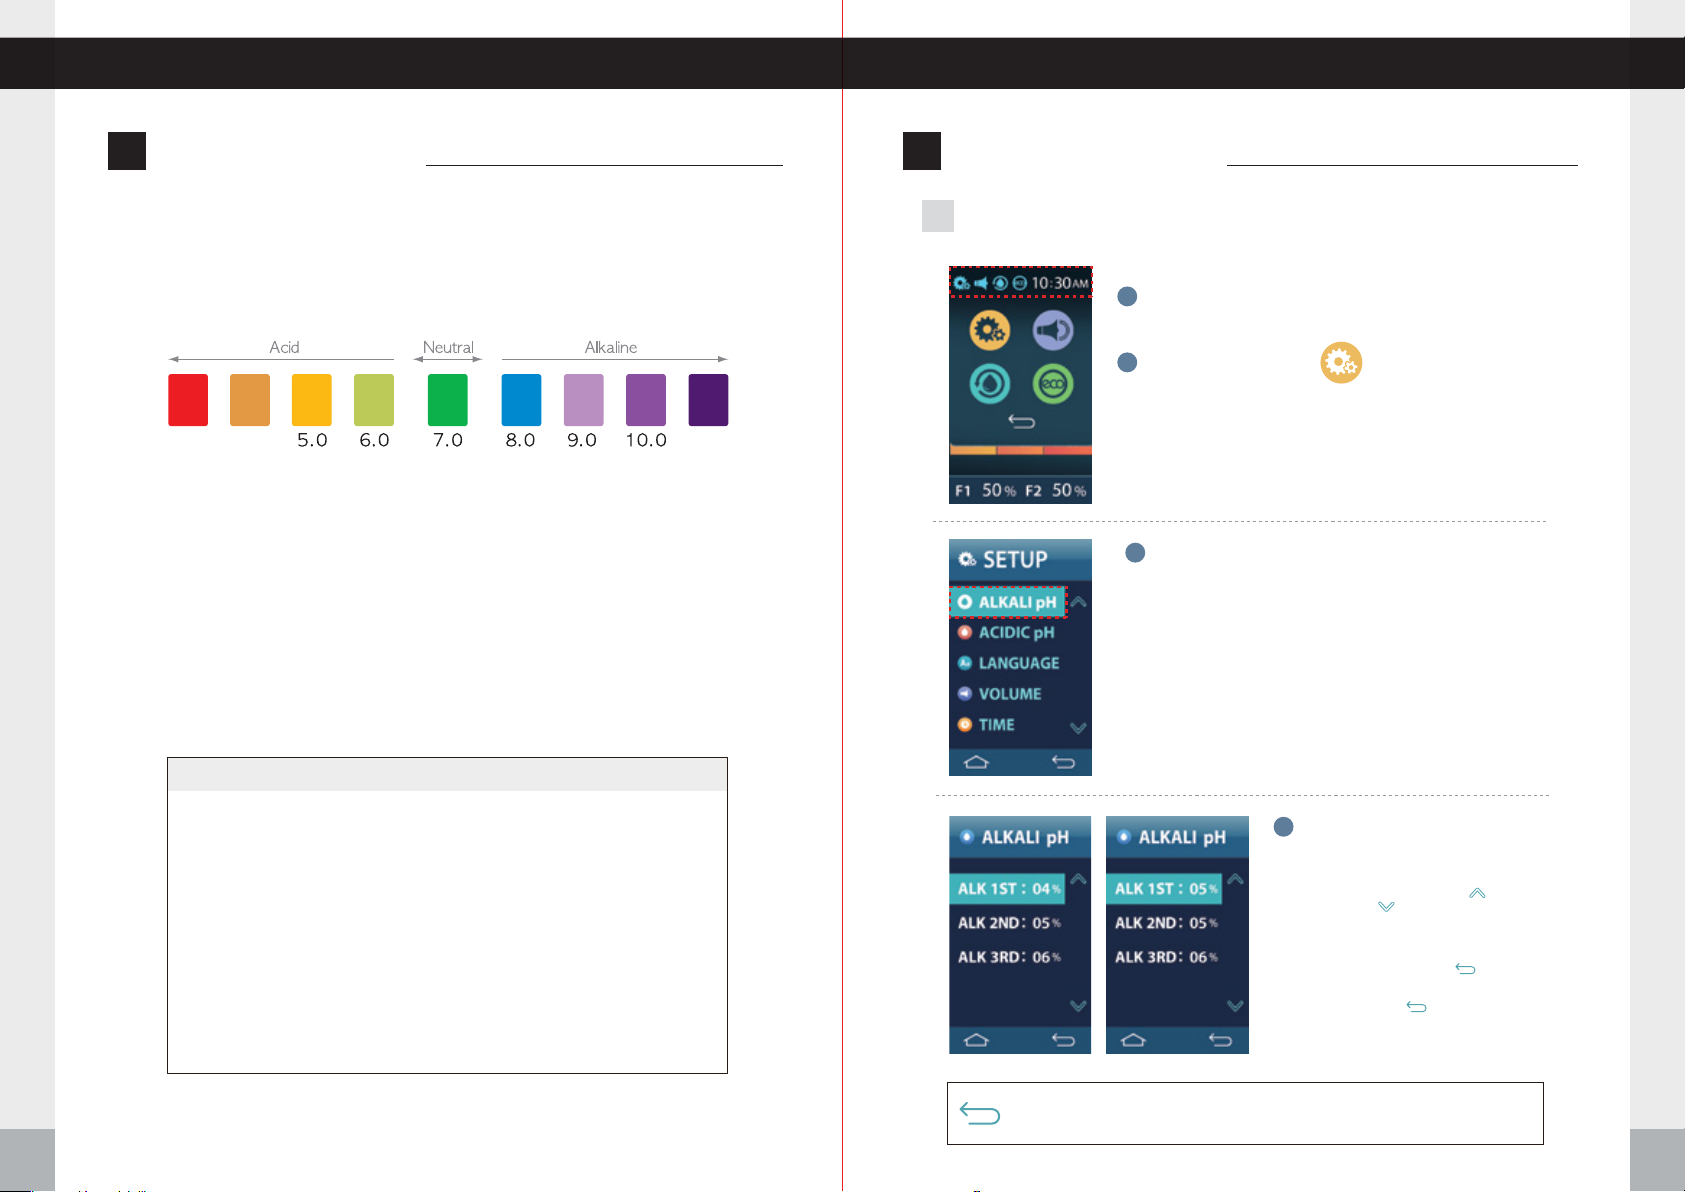
p
H Level Adjustment
p
H Level Adjustment
4.02.5 11.5
When testing the pH, be sure to allow the unit to run for 1 minute (60
seconds) before taking a sample of the water. If you have to adjust the
percentage, after adjusting, run an additional 1 minute before taking a new
sample. When testing pH values, we like to use 2 tablespoons (30mL) of
the water being produced and 4 drops of the reagent in a clear glass. The
minimum and maximum Turbo waters produced will depend on the water
source quality. Set Turbo at 99% for maximum pH levels. These levels can
range normally as follows:
pH Chart
ystem Setup MethodS
1
ALKALI pH Level Adjustment
Press the top left corner of the screen. The menu
1
options will fall below the upper part of the screen.
Press the setup icon.
2
3
Press
ALKALI pH.
System Setup Method
Color of pH testing of each level:
Alkaline Turbo (dark purple)
Acidic Turbo (red)
Alkaline Level 1 Approx. 8.0-8.5 pH (light blue)
Alkaline Level 2 Approx. 9.0 pH (light purple)
Alkaline Level 3 Approx. 9.5 pH (purple)
H2O = Approx. 7.0 pH (green) Purified Water
Acid Level 1 Approx. 6.5~5.5 pH (light greenish yellow)
Acid Level 2 Approx. 5.5~4.0 pH (light orange)
Acid Level 3 Approx. 4.5~3.5 pH (dark orange)
H Level Adjustment
p
※The pH value indicated for each level is based on standardized test results which have used average tap water.
30
Press the desired level that you
4
would like to adjust. (level will
highlight in blue)
With the desired level highlighted press to raise the percentage
of power or press to lower the percentage of power for that level.
Pressing either arrow once will change the value by 1% in that
direction. Holding the arrow will cause the percentage to change
continuously until the arrow is released.
When done push the RETURN icon for the previous menu
screen. Voice says: “Applied”
Then push the RETURN icon again to leave System Setup.
Voice says: “Setup was completed”
*VALUES SHOWN ARE EXAMPLES ONLY AND
ARE NOT TO BE TAKEN LITERALLY*
If you push the UP/DOWN icon, the digital number will increase or decrease by one level.
Push the RETURN icon for the previous menu screen. Voice says: “
Push the RETURN icon again to complete setup. Voice says: “
Applied
Setup was completed
”
”
System Setup Method
31
Page 17
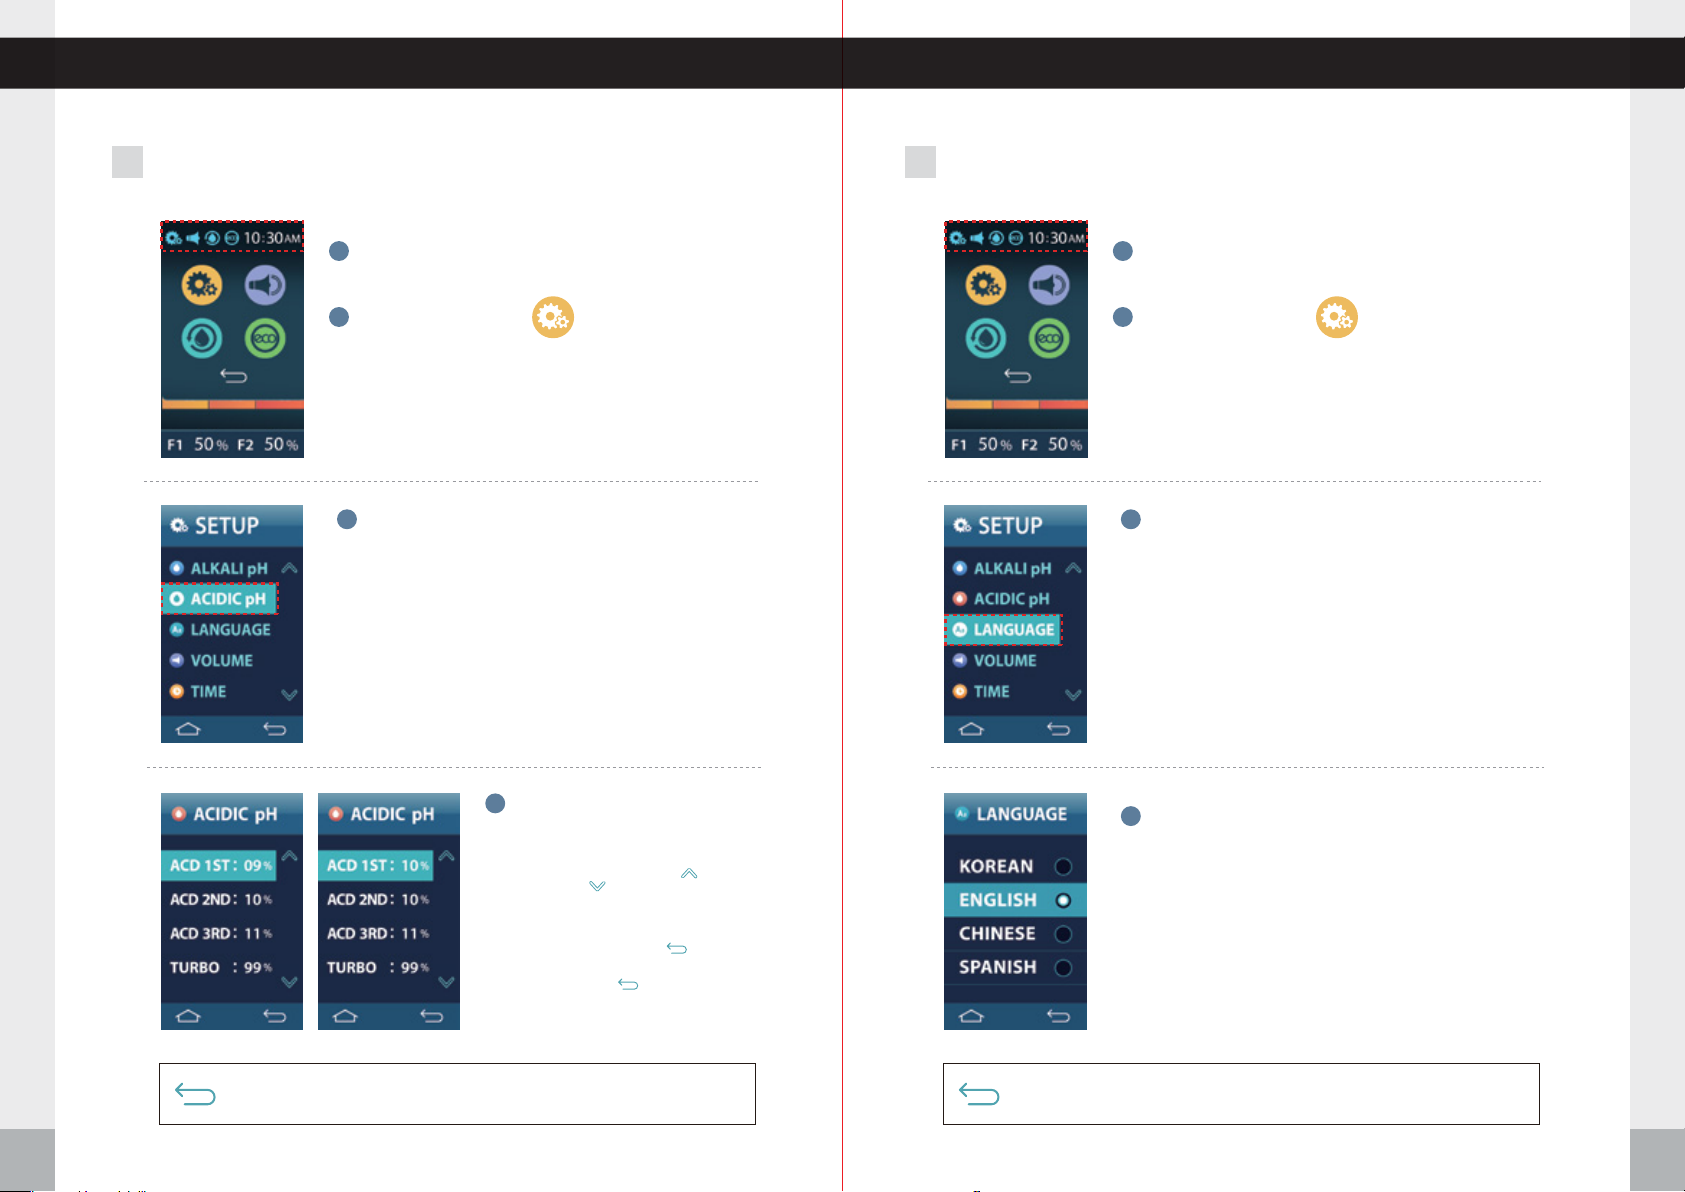
System Setup Method System Setup Method
2
ACIDIC H Level Adjustment
p
Press the top left corner of the screen. The menu
1
options will fall below the upper part of the screen.
Press the setup icon.
2
3
Press
ACIDIC pH.
3
LANGUAGE Mode
Press the top left corner of the screen. The menu
1
options will fall below the upper part of the screen.
Press the setup icon.
2
3
Press
LANGUAGE.
System Setup Method
Push the RETURN icon for the previous menu screen. Voice says: “
Push the RETURN icon again to complete setup. Voice says: “
32
Press the desired level that you
4
would like to adjust. (level will
highlight in blue)
With the desired level highlighted press to raise the percentage
of power or press to lower the percentage of power for that level.
Pressing either arrow once will change the value by 1% in that
direction. Holding the arrow will cause the percentage to change
continuously until the arrow is released.
When done push the RETURN icon for the previous menu
screen. Voice says: “Applied”
Then push the RETURN icon again to leave System Setup.
Voice says: “Setup was completed”
*VALUES SHOWN ARE EXAMPLES ONLY AND
ARE NOT TO BE TAKEN LITERALLY*
Applied
Setup was completed
”
”
Press the desired language.
4
Push the RETURN icon for the previous menu screen. Voice says: “
Push the RETURN icon again to complete setup. Voice says: “
Setup was completed
Applied
”
”
System Setup Method
33
Page 18
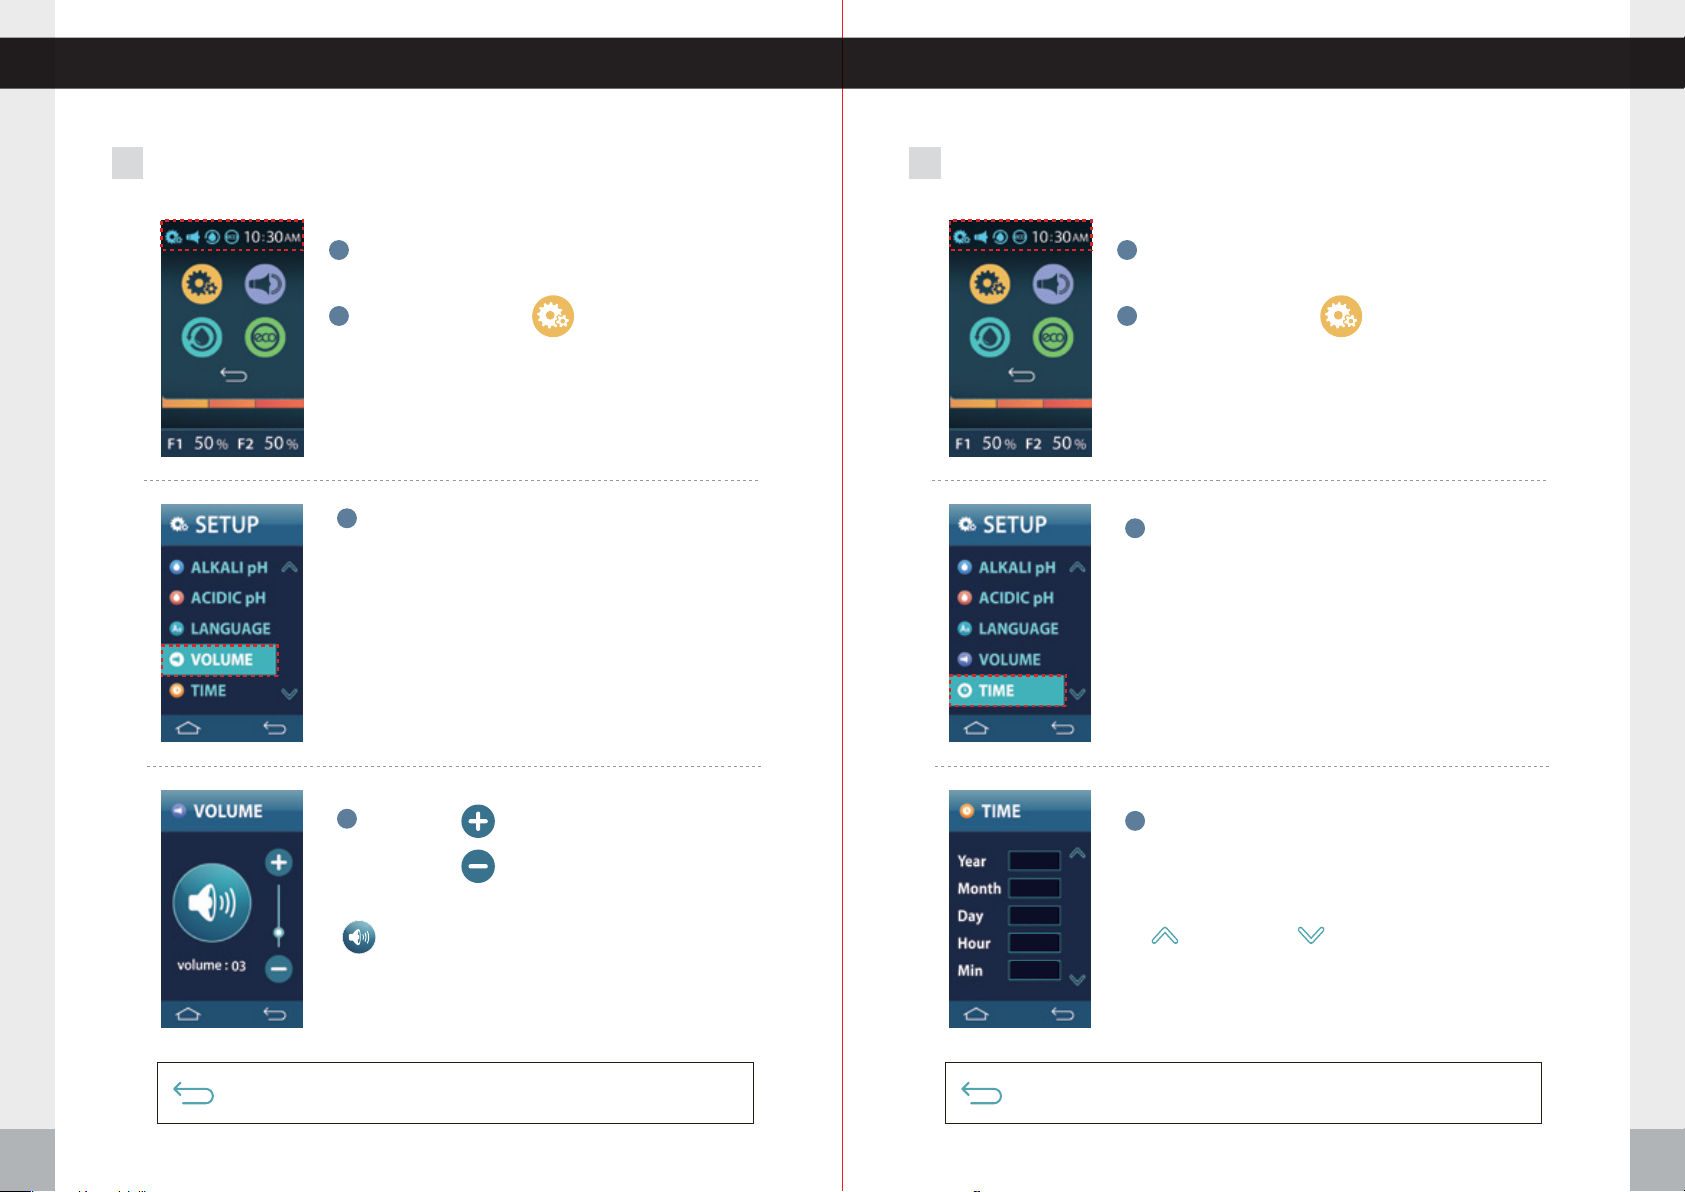
System Setup Method System Setup Method
4
VOLUME Level Adjustment
Press the top left corner of the screen. The menu
1 1
options will fall below the upper part of the screen.
Press the setup icon.
2
3
Press
VOLUME.
5
Setting the TIME
Press the top left corner of the screen. The menu
options will fall below the upper part of the screen.
Press the setup icon.
2
3
Press
TIME.
System Setup Method
If you push the UP/DOWN icon, the digital number will increase or decrease by one level.
Push the RETURN icon for the previous menu screen. Voice says: “
Push the RETURN icon again to complete setup. Voice says: “
34
4
Press the button to increase the volume.
Press the button to decrease the volume.
Pressing this icon will let you hear a sample of the voice at the
current volume.
Applied
Setup was completed
”
”
Adjust the time and date with the arrows:
4
ⓐ
2021
10
23
10
30
Year
ⓓ
Hour
: for up : for down
Time is set here using a 24 hour clock (military time).
ⓑ
ⓔ
Month
Minute
Day
ⓒ
Outside of this menu the time is displayed with a standard
12 hour clock.
If you push the UP/DOWN icon, the digital number will increase or decrease by one level.
Push the RETURN icon for the previous menu screen. Voice says: “
Push the RETURN icon again to complete setup. Voice says: “
Applied
Setup was completed
”
”
System Setup Method
35
Page 19
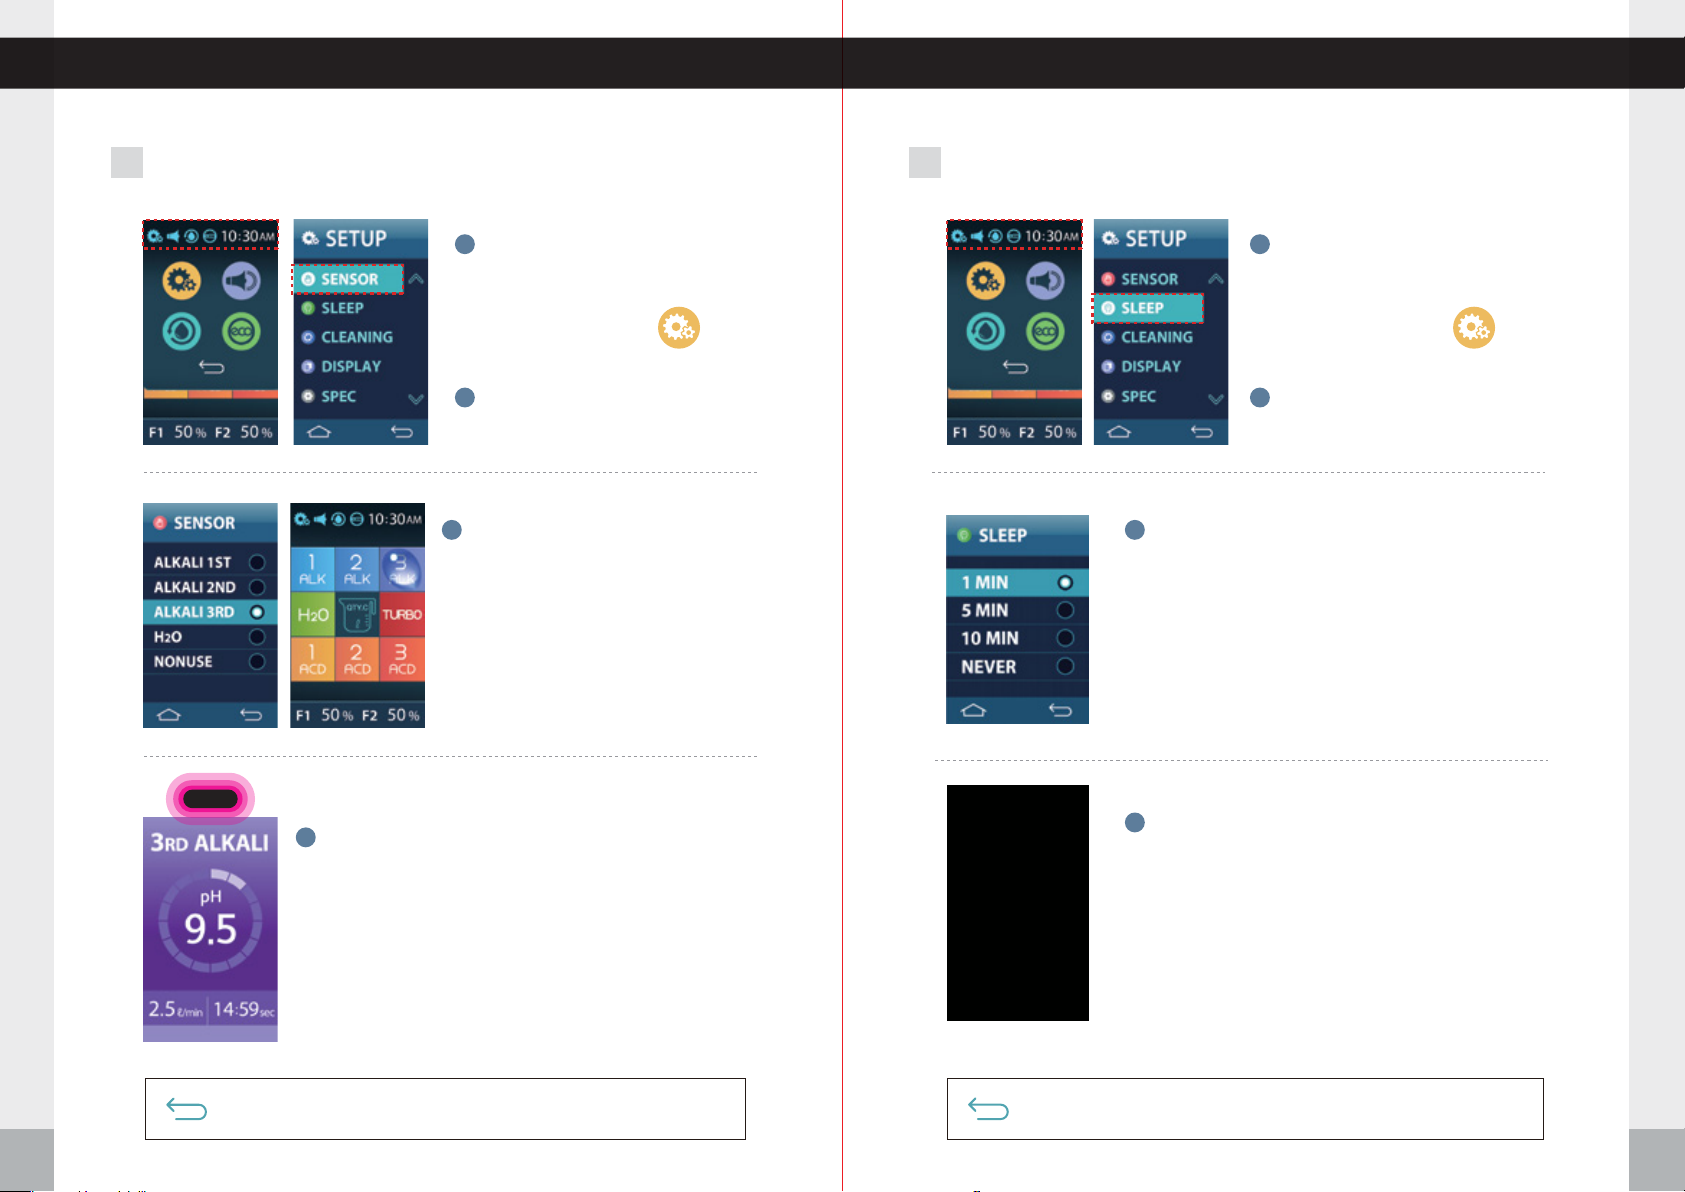
System Setup Method System Setup Method
6 PROXIMITY Sensor Setting 7
Press the top left corner of the
1
screen. The menu options will fall
below the upper part of the screen.
Press the setup icon.
2
Press
SENSOR.
Touch the level that you would like
3
to be triggered with the proximity sensor.
The selected level will be highlighted
with a water droplet when you leave
System Setup.
SLEEP Mode Setting
3
1 MIN
Press the top left corner of the
1
screen. The menu options will fall
below the upper part of the screen.
Press the setup icon.
2
Press
SLEEP.
Set the Sleep mode timer to your
preferred time.
System Setup Method
Push the RETURN icon for the previous menu screen. Voice says: “
Push the RETURN icon again to complete setup. Voice says: “
36
When you move your hand close to the proximity sensor
4
the previously selected level (the one with the water droplet
on the homescreen) will begin to pour. Move your hand
close to the proximity sensor again to stop the flow of water.
Applied
Setup was completed
”
”
23 / Oct / 2021
10:30
AM
Push the RETURN icon for the previous menu screen. Voice says: “
Push the RETURN icon again to complete setup. Voice says: “
Power save mode is enabled when not in use
4
during the set amount of time.
Applied
Setup was completed
”
”
System Setup Method
37
Page 20
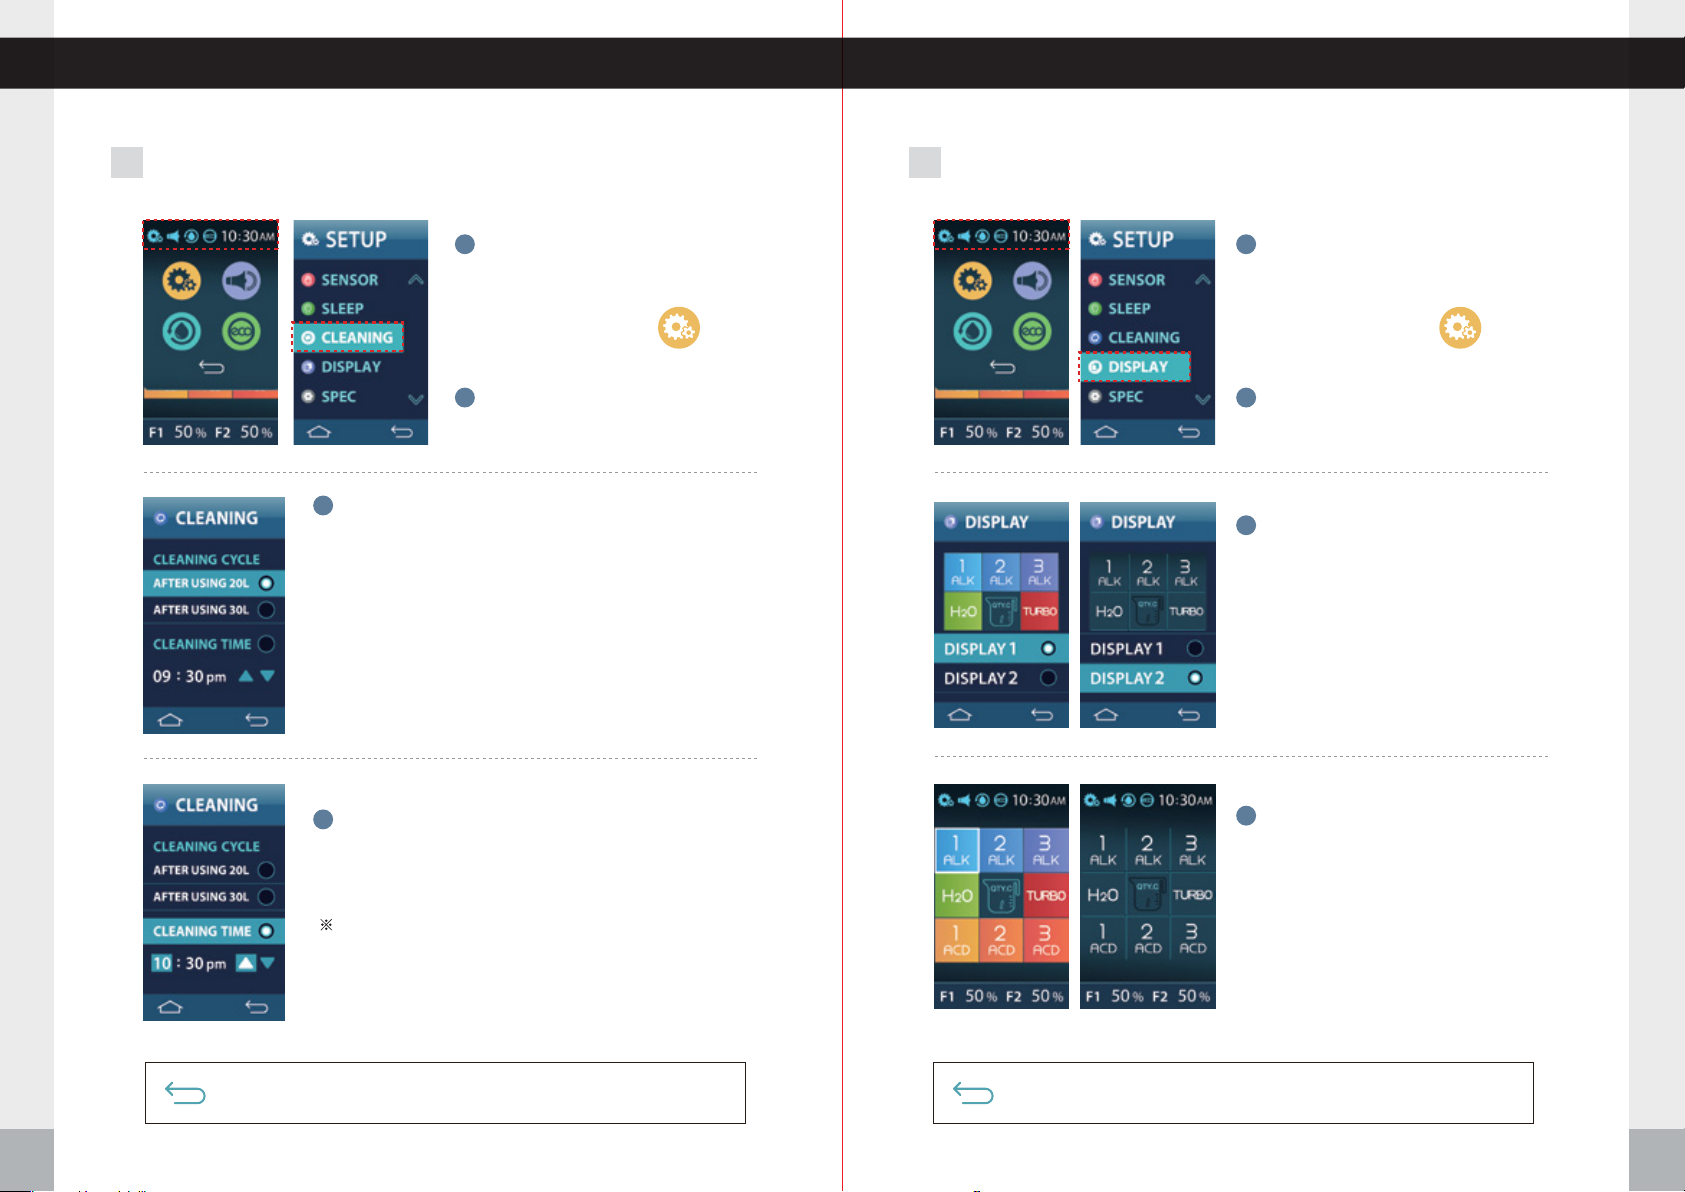
System Setup Method System Setup Method
CLEANING Mode Setting
8
Select
3
You can choose to have the automatic cleaning occur after a
predetermined volume of water is poured, or you can choose to
have the cleaning cycle run at a certain time of the day.
Note: The actual cleaning cycle will not start on its own. Instead,
the unit will wait until the next time that you use the machine,
and it will begin then.
To set a time for cleaning, touch the current set time and use
the up and down arrows to make adjustments.
Press the top left corner of the
1
screen. The menu options will fall
below the upper part of the screen.
Press the setup icon.
2
Press
CLEANING.
CLEANING CYCLE.
MAIN Display Setting
9
Press the top left corner of the
1
screen. The menu options will fall
below the upper part of the screen.
Press the setup icon.
2
Press
DISPLAY.
3
One of the two main display designs
can be set as a main.
System Setup Method
Push the RETURN icon for the previous menu screen. Voice says: “
Push the RETURN icon again to complete setup. Voice says: “
38
Select
4
※You can set up the cleaning cycle as a time.
※You can automatically start cleaning at the set time every day.
To set a time for cleaning touch the hour or minutes and use
the up and down arrows to make adjustments.
CLEANING TIME.
Setup was completed
Applied
”
”
The display appearance you select will
4
be reflected when you return to the
home screen.
Push the RETURN icon for the previous menu screen. Voice says: “
Push the RETURN icon again to complete setup. Voice says: “
Setup was completed
Applied
”
”
System Setup Method
39
Page 21
Selecting Voice ON/OFF ECO Mode
electing Voice ON/OFFS
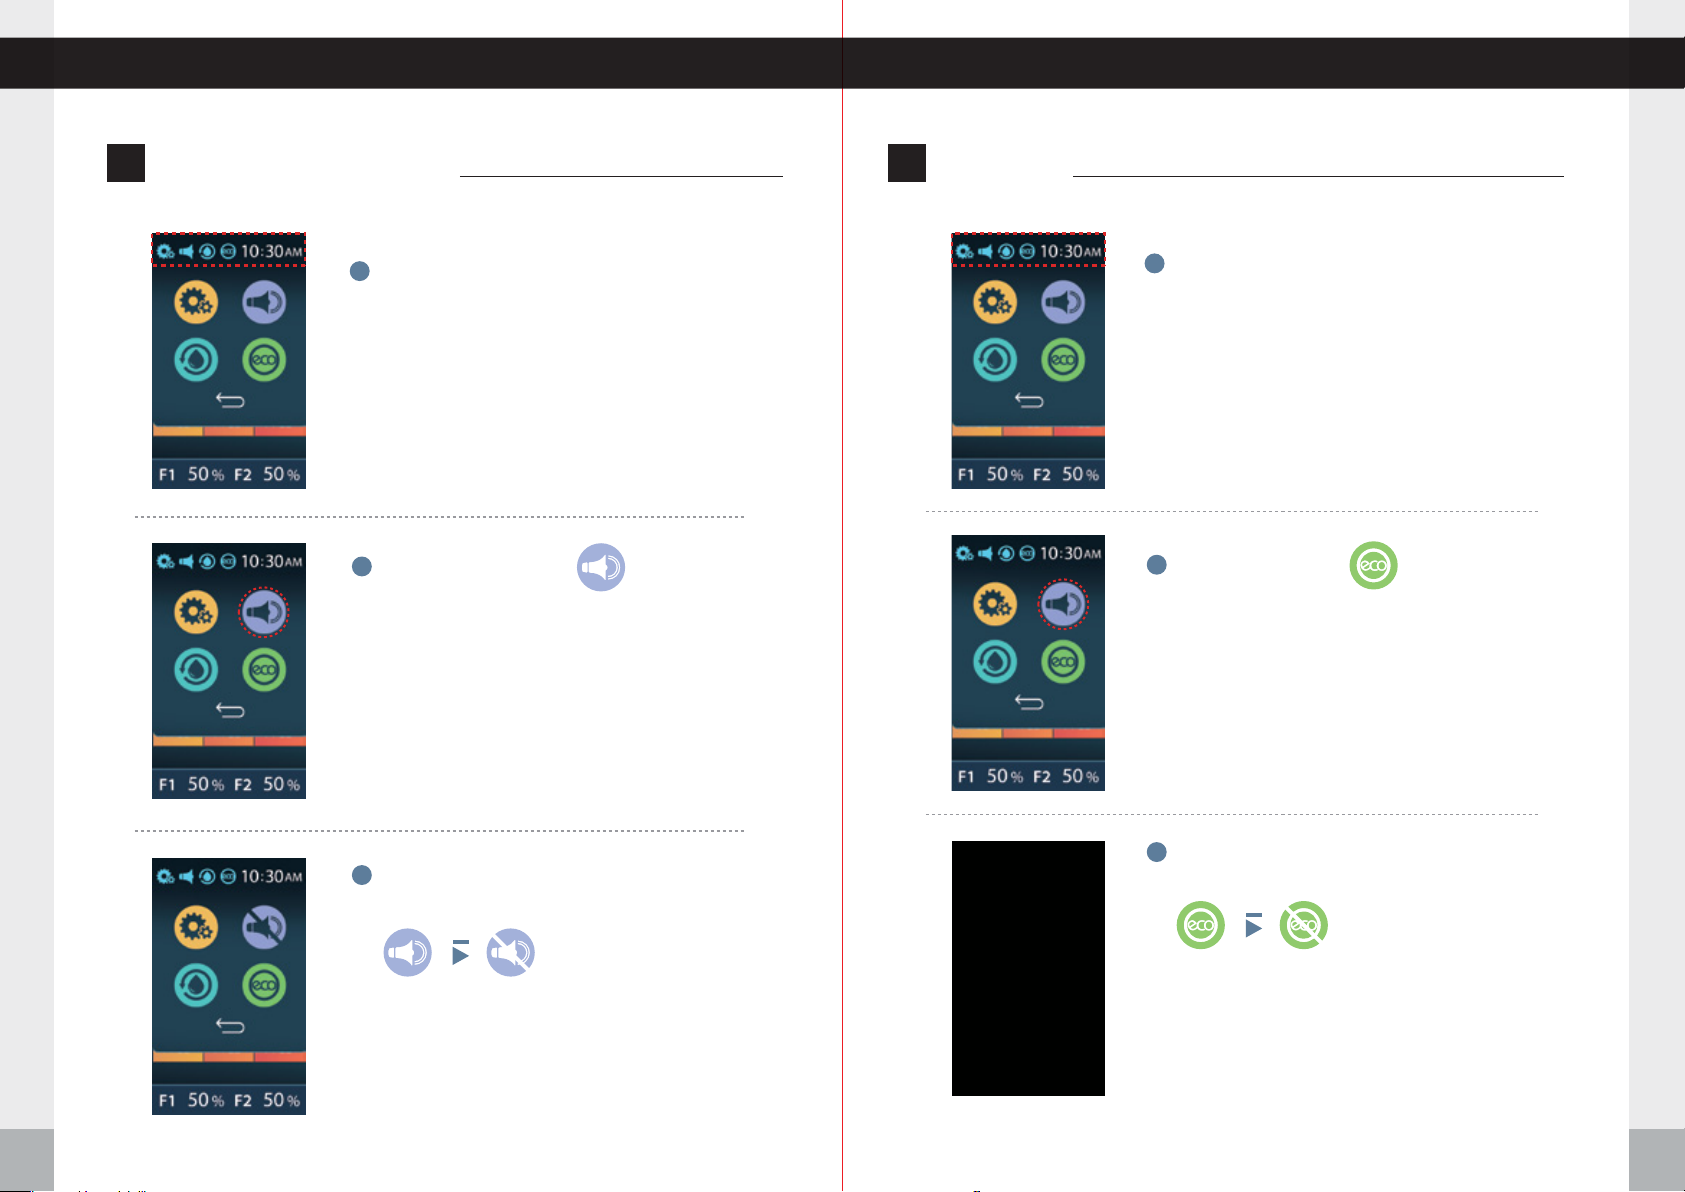
Press the top left corner of the screen. The
1
menu options will fall below the upper part of
the screen.
Select the
2
Even if the volume is turned off, warning notifica-
※
tions will still play through the speaker if necessary.
(filter replacement, water not supplied, TEMP,
cleaning, setup mode).
VOICE
icon.
CO ModeE
Press the top left corner of the screen. The
1
menu options will fall below the upper part of
the screen.
Select the
2
ECO
icon.
Selecting Voice ON/OFF
40
The voice will be turned on/off by selecting
3
the voice icon in this sequence.
If voice function is already on, then pressing the
voice icon will turn it off.
If voice function is already off, then pressing the
voice icon will turn it on.
23 / Oct / 2017
10 : 30
AM
Turn on/off ECO Mode by selecting the ECO
3
icon in this sequence.
If ECO function is already on, then pressing the
voice icon will turn it off.
If ECO function is already off, then pressing the
voice icon will turn it on.
When ECO Mode is active, the unit consumes less power by going to
sleep when not in use and displaying the time. The period before the unit
goes to sleep if ECO is active is set under SLEEP in System Settings
Eco mode
41
Page 22
Cleaning Function TURBO Function
LEANING Function C
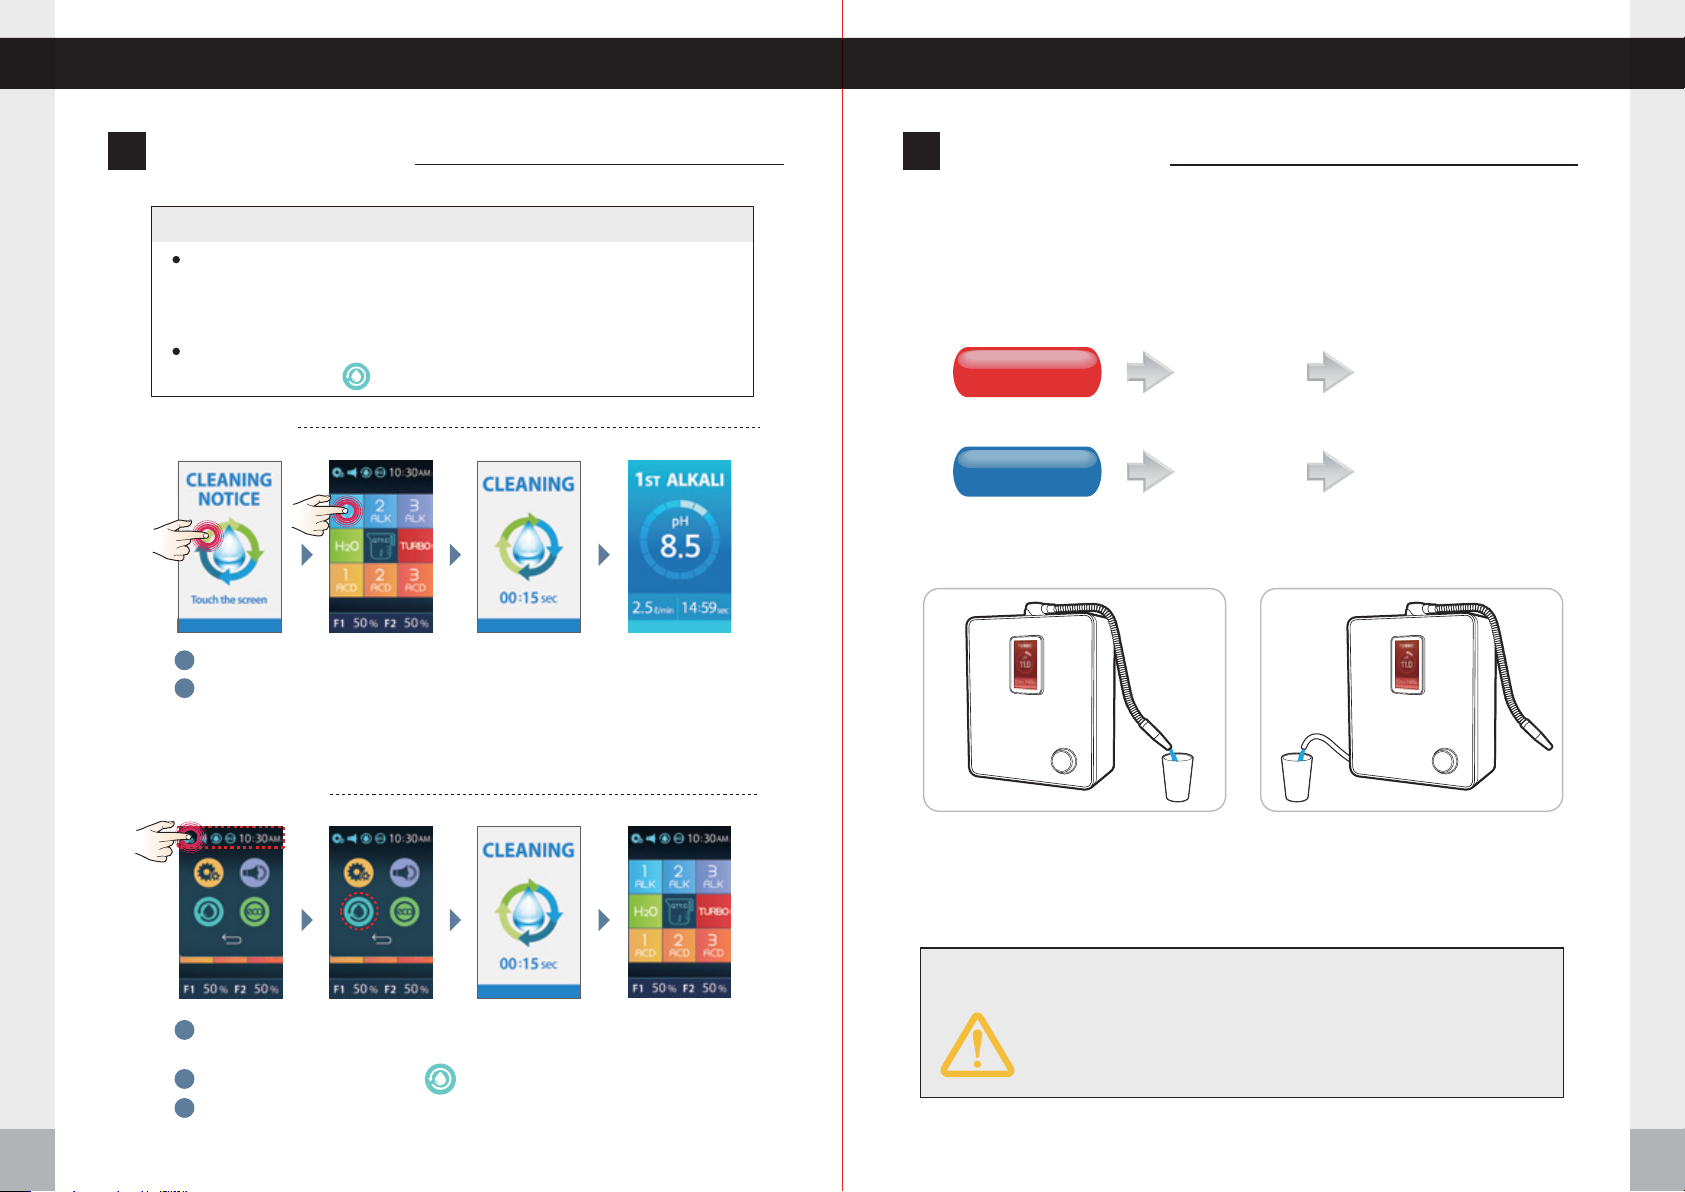
Cleaning can take place automatically and/or manually.
Auto Cleaning (15 Seconds). Auto cleaning can be set to happen after
a set amount of water, 20L or 30L or every 24 hours at a time of your
choosing. For more information, see Cleaning Mode Settings on Page
38.
Manual Cleaning (15 seconds) is performed whenever desired by
simply touching the icon.
Auto Cleaning
If the screen is touched, it changes to the previously used screen.
1
When functional water is selected on standby mode, it goes into auto-
2
matic cleaning for 15 seconds, and the selected functional water will
be dispensed.
15:00
URBO Function T
The TURBO function allows you to create strong alkaline and acidic water. These types
of water are ONLY to be used for cleaning, sanitizing and disinfecting purposes. The
minimum and maximum pH of turbo will vary depending on the quality of your
source water.
TURBO
Strong Acidic Water
TURBO
Strong Alkaline Water
pH 2.5
~ pH 3.8
pH 10.0
~ pH 11.8
Used to disinfect
and sterilize
To remove stains from
fabrics/carpet/upholstery
Manual Cleaning
Press the top left corner of the screen. The menu options will fall below
1
the upper part of the screen.
Press the CLEANING icon.
Cleaning Function
2
Cleaning mode stops after 15 seconds and the screen changes to the
3
home screen.
42
Alkaline Turbo Water Outflow Acidic Turbo Water Outflow
Caution
The waters produced in
DO NOT DRINK
DO NOT USE
the
TURBO
these types of waters.
TURBO
mode are not intended for drinking.
function in a manner other than directed.
Turbo Function
43
Page 23
Temperature Sensor Unit Specifications
%
a
10:30
50
%
50
emperature SensorT
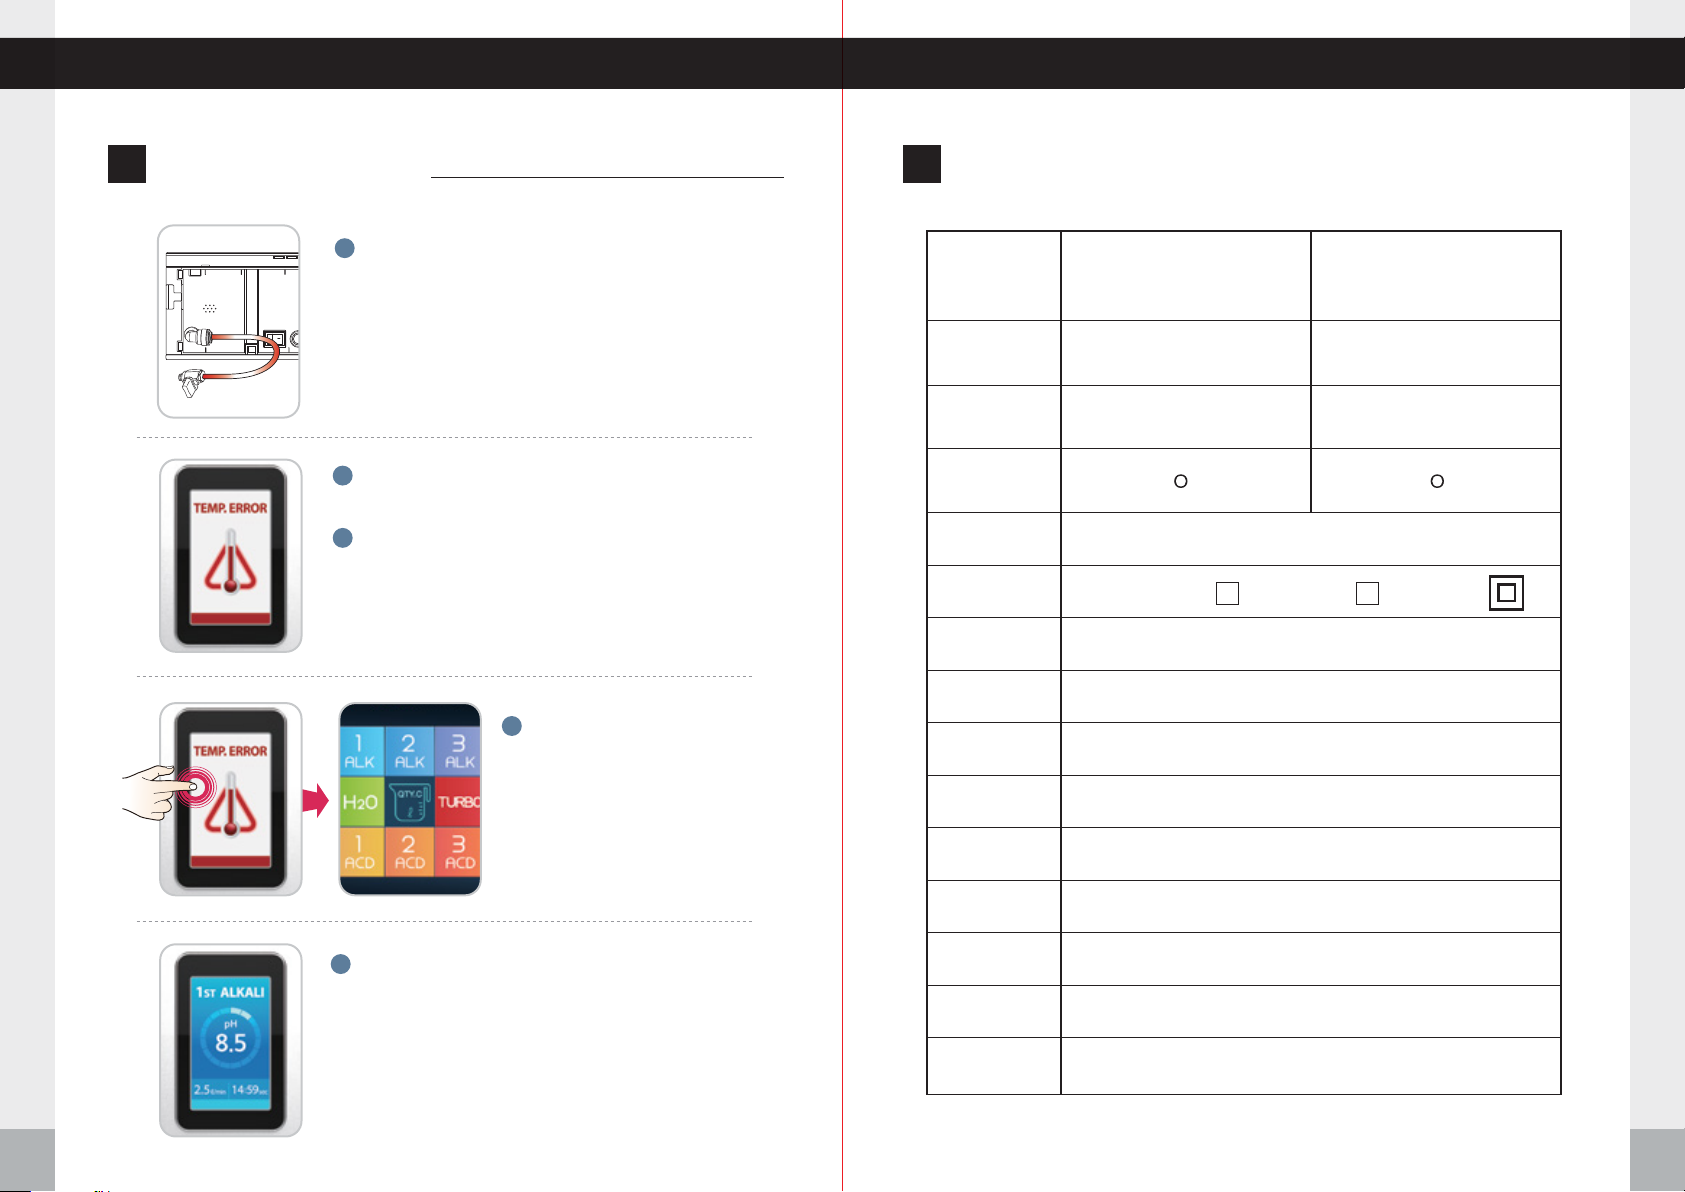
1
Should water with a temperature higher than 35�
(95�) get into the unit, the water supply will
nit SpecificationsU
Model Number
YT22-4TL13D YT22-4TL11D
automatically be shut off, and the unit will stop
Inflow
Hot water
operating temporarily.
LCD:
2
3
TEMP ERROR
Bring the source water temperature within
Electrolytic Cell
Quantity of Plates
Power Consumption
TURBO Function
Product Name
13
Max 220W
11
Max 220W
Water Ionizer
the proper range.
If you press the error icon,
4
the display will switch to
the previously used screen.
Rated Voltage
Available
Temperature
Operating
Pressure Range
pH Levels
100 -130 V~ , 200 -240 V~ / 50-60 Hz
4 -35º C ( 39 - 95ºF )
0.1- 0.5 MPa
3 Alkaline, 1 Neutral, 3 Acidic, Turbo
Temperature Sensor
44
When the source water is within the proper range,
5
the ionizer will resume proper function and water
will flow.
Adjustable pH
Filter Configuration
Filter Life Display
Water Cell Plate
Materials
Product Size
Product Weight
※To ensure the best functionality, there may be some minor changes without notice.
W300 x D135 x H355 mm (11.8 x 5.3 x 13.9 inches)
User adjustable pH levels control
Dual .01 Micron Filtration System
LCD filter replacement and announcement
Platinum and Titanium
approx 5.0kg (11.1 Lbs )
Unit Specifications
45
Page 24
Troubleshooting Product Warranty
roubleshootingT
Symptoms
Abnormal Taste
Water Outow Change
Incorrect pH levels
Filter replacement icon remains
“on” even after lter has been
replaced
Unit stops during use
Unit leaks
Settlement in extracted water
Checkpoints Measures to be Taken
Check period of use
Check the last time the lter was replaced
Check that pH is not higher than 10pH Calibrate pH
Check whether the valve on the water
supply is closed
Check whether the hose is bent or folded
Check whether the ow rates are low
(less than 1ℓ/ min)
Check whether the water supply is cut o
or whether the water supply line is frozen
Check whether the lter is clogged
Check TDS of water Water quality varies by region
Check ow rates for higher levels
Check whether the amount of drained
water is small
Check whether the lter usage has
been reset
Check whether the operating time exceeds
15 minutes (*Turbo function: 5 minutes)
Check the lter for proper mounting
Check other areas of the unit
Check for excessive calcium in the
source water
Run the unit for one minute, draining
stagnant water
Replace the lter
Open the Valve
Stretch out the hose
Contact us to install a water pump
Wait until water comes out of the water
supply pipe
Change the lter
Reduce the amount of raw water
Contact us. Request after-sales service
Reset lter usage
Unit stops automatically after 15 minutes
(*Turbo function: 5 minutes)
Unplug unit Contact us
Contact us for an additional lter
Product Warranty
1. This product features a lifetime warranty. If any manufacturing defects or
spontaneous failures occur during the warranty period, the unit will be
repaired or replaced at no charge.
2. If any failure occurs, please call the service center. Note: The answers to
many service questions can be found online at
3. In case of a failure resulting from the customer’s negligence or intentional
damage of the product, the customer shall be responsible for repair or
replacement costs.
4. This warranty is non-transferable and valid only for the original owner.
Product Name
Tyent Water Ionizer
Customer’s Name/Phone
Water Ionizer Warranty Period
ACE-11
□
ACE-13
□
Date of Purchase
tyentusa.com/support.
Lifetime
(Above conditions apply)
Only puried water is extracted
The Unit doesn’t operate
in cleaning mode
The screen turns o
Troubleshooting
46
Check whether the ow rate is high
(5 kgf/㎠ or faster)
Check whether the operating time
exceeds 24 hours
Check whether the cleaning icon is pressed
Check the Sleep settings in System
Setup
* Check the set time
Contact us to install a pressure
-reducing valve
The unit returns to normal after performing
auto cleaning for 15 seconds
Unit automatically switches to power
saving mode when not in use for a
period of time If you do not want this
turn o ECO mode.
Customer’s Address
Tyent USA, LLC
www.tyentusa.com
Installation Date/Name
Toll Free: 855-TYENT-US
Product Warranty
47
 Loading...