


TYCO® R/C
XFO™
CAUTION – ELECTRIC TOY: NOT RECOMMENDED FOR CHILDREN UNDER 10 YEARS OF
AGE. AS WITH ALL ELECTRIC PRODUCTS, PRECAUTIONS SHOULD BE OBSERVED
DURING HANDLING AND USE TO PREVENT ELECTRIC SHOCK.
INPUT: 120VAC, 60Hz, 18W. OUTPUT: 15.6VDC, 0.6A, 9.36VA.
l CAUTION: Stay clear of the rotor at all times when operating this vehicle. Contact with
spinning rotor may cause injury or damage, or may damage the rotor.
Keep these instructions for future reference: they contain important information.
SAFETY INFORMATION
Adults, this toy is recommended for children 10 years of age and older. To ensure that the child’s
play is both safe and fun, please review the operating instructions and these general safety rules
with the child.
Keep fingers, hair and loose clothing away from the rotor while the vehicle is switched ON.
Maintain a minimum 10’/3m distance between yourself and the vehicle during operation.
DO NOT operate the vehicle indoors.
NEVER hold the vehicle while operating. ALWAYS launch the vehicle from level ground.
NEVER stand under the vehicle during flight.
During operation, maintain a minimum 10’/3m distance between the vehicle and other people or
animals.
Keep small children away from the vehicle at all times.
In the event that the vehicle comes too close to a person, animal or obstacle during flight, push
the control stick all the way down to activate the stop feature.
Adult supervision is recommended AT ALL TIMES during operation of this toy.
To avoid accidental operation, remove the transmitter battery when not in use.
If the vehicle and/or charger get wet, discontinue use until they are completely dry. Thoroughly
wipe off all moisture and allow them to air-dry completely before use.
DO NOT fly in or near the street! Make sure you have plenty of open space in all directions
(please read Section VI carefully before operating).
DO NOT stand (or allow others to stand) downwind of the vehicle while flying.
NEVER operate the vehicle if the rotor blades are broken or damaged. ALWAYS make sure the
rotor blades are properly attached and the screws holding them are fully tightened.
NEVER operate the vehicle unless it is fully assembled.
NEVER throw foreign objects into the path of the rotor.

INTRODUCTION
Please read this manual thoroughly for detailed operating instructions and important safety
information.
• The XFO™ vehicle is an advanced-technology vertical-takeoff flying machine with cool features.
It’s easy to fly, challenging to master…and lots of fun!
• You will need to assemble your vehicle before use. This is a simple, one-time process (please
see Section II for assembly instructions). This is an advanced flying machine! Assembly is a fun
“science project” you get to play with after it’s done.
• This vehicle is powered by a NiMH battery that is permanently installed. The vehicle must be
fully charged before using.
• The vehicle is recharged with a handy Field Charger that can be used at your selected flight
location.
• The Field Charger must be charged at a wall outlet before it can be used to recharge the
vehicle. You will need to charge the Field Charger for at least 16 hours before use (please see
Section III for details). Once the Field Charger is fully charged, it will be able to recharge the
vehicle many times. NOTE: you must disconnect the Field Charger from the vehicle before
operating the vehicle.
I. CONTENTS/FEATURES
1. XFO™ vehicle
(shown fully assembled; please see Section II for assembly instructions)
q Rotor
w Lightweight body
e ON/OFF switch
r Recharging connector (Field Charger plugs in here)
t Landing legs (x4)
2. Field Charger
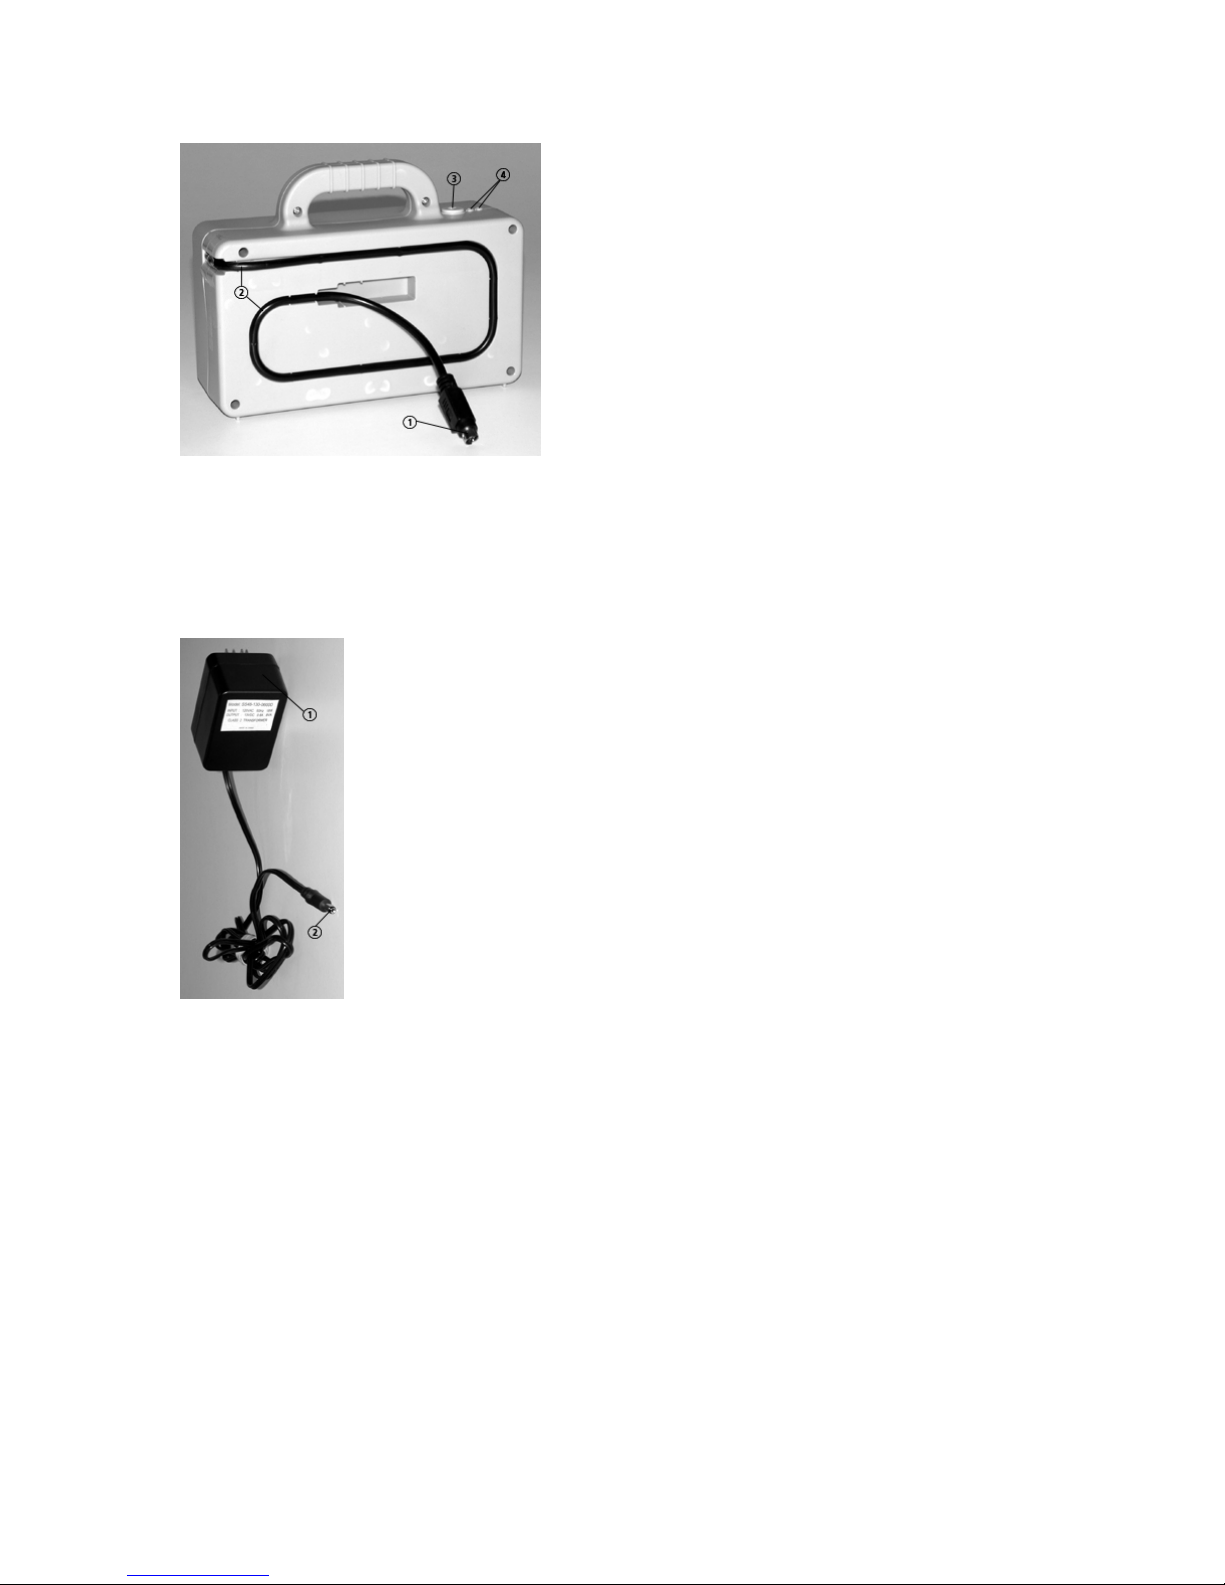
q Vehicle recharge cord (plugs into vehicle)
w Vehicle recharge cord storage (insert cord into groove as shown)
e CHARGE button
r LED charge indicators (2): red and green
3. Wall Charger
q This end plugs into wall outlet
w This end plugs into Field Charger
l CAUTION: Use only the charger supplied with this toy. Do not use any other charging
source.
4. Transmitter
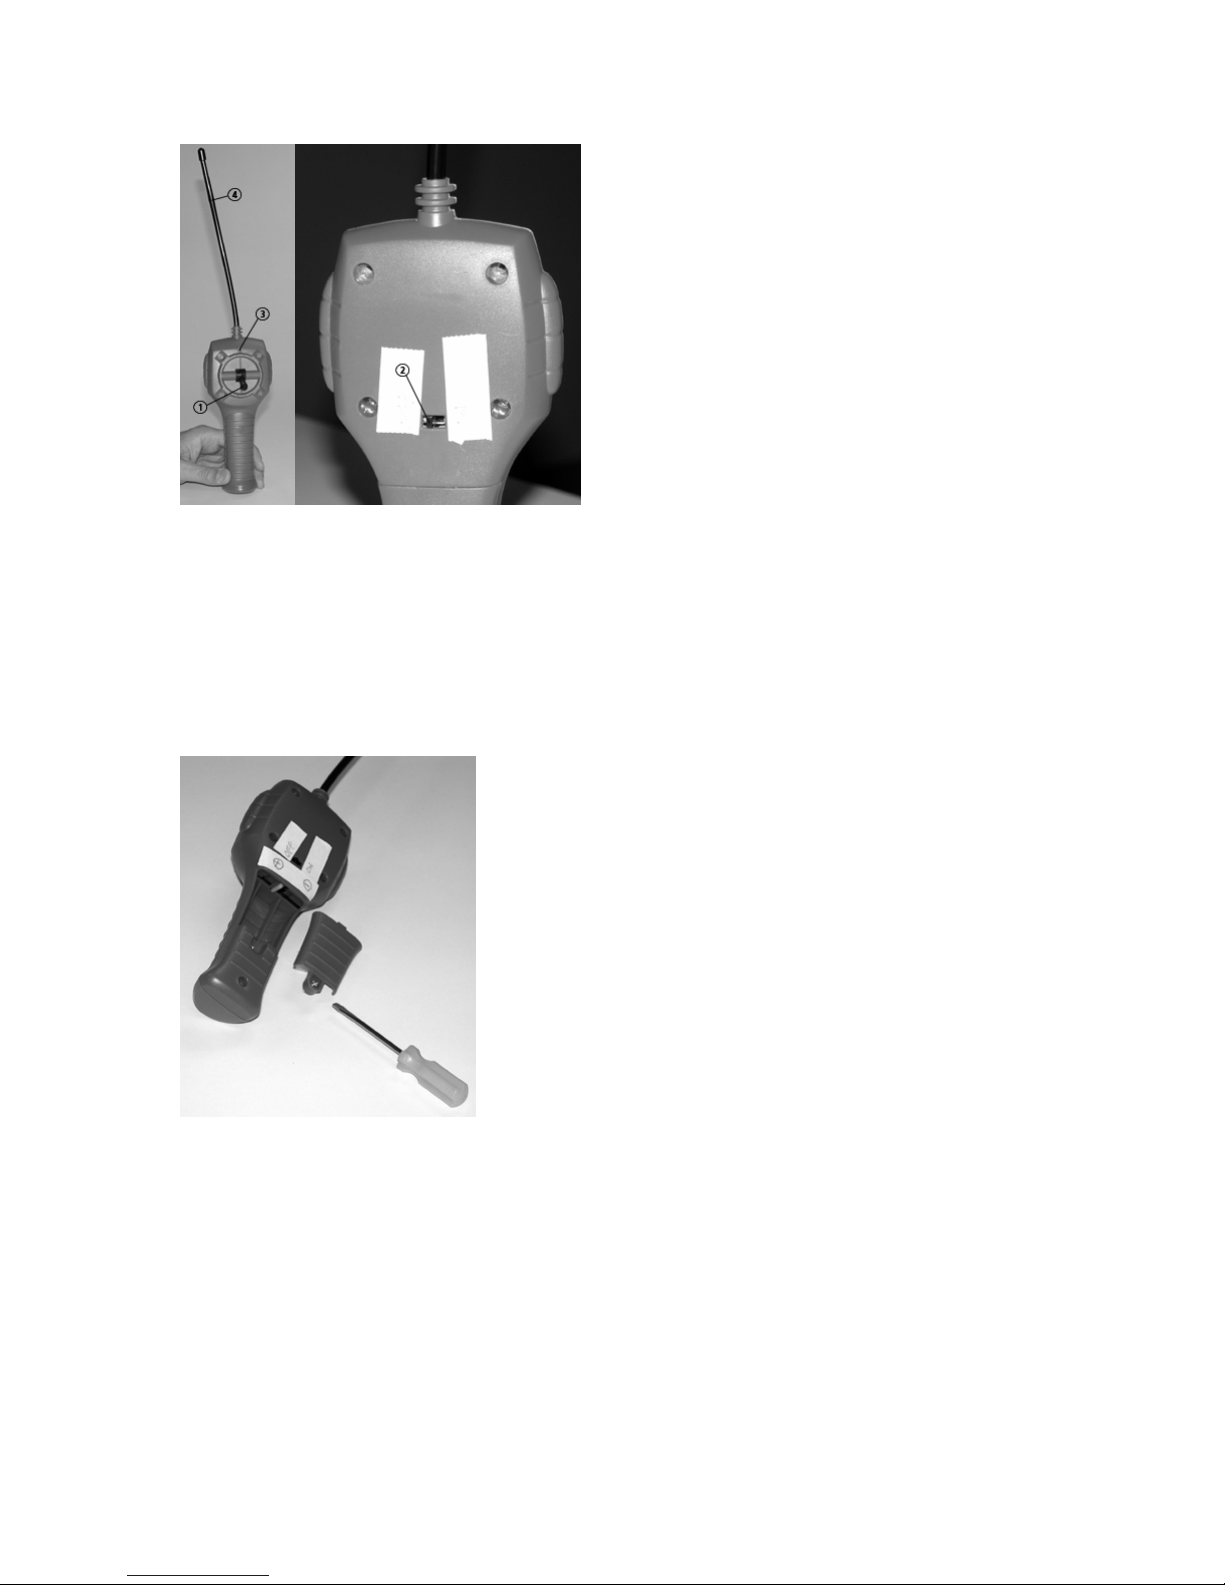
q Joystick flight control (please see Section V for detailed operation)
w ON/OFF switch
e LED indicator
r Antenna
5. Battery installation – Transmitter
(1) To install transmitter battery, unscrew and open battery cover as shown. (Screwdriver not
included.)
(2) Install one 9V battery with polarity (+/-) as shown inside battery compartment.
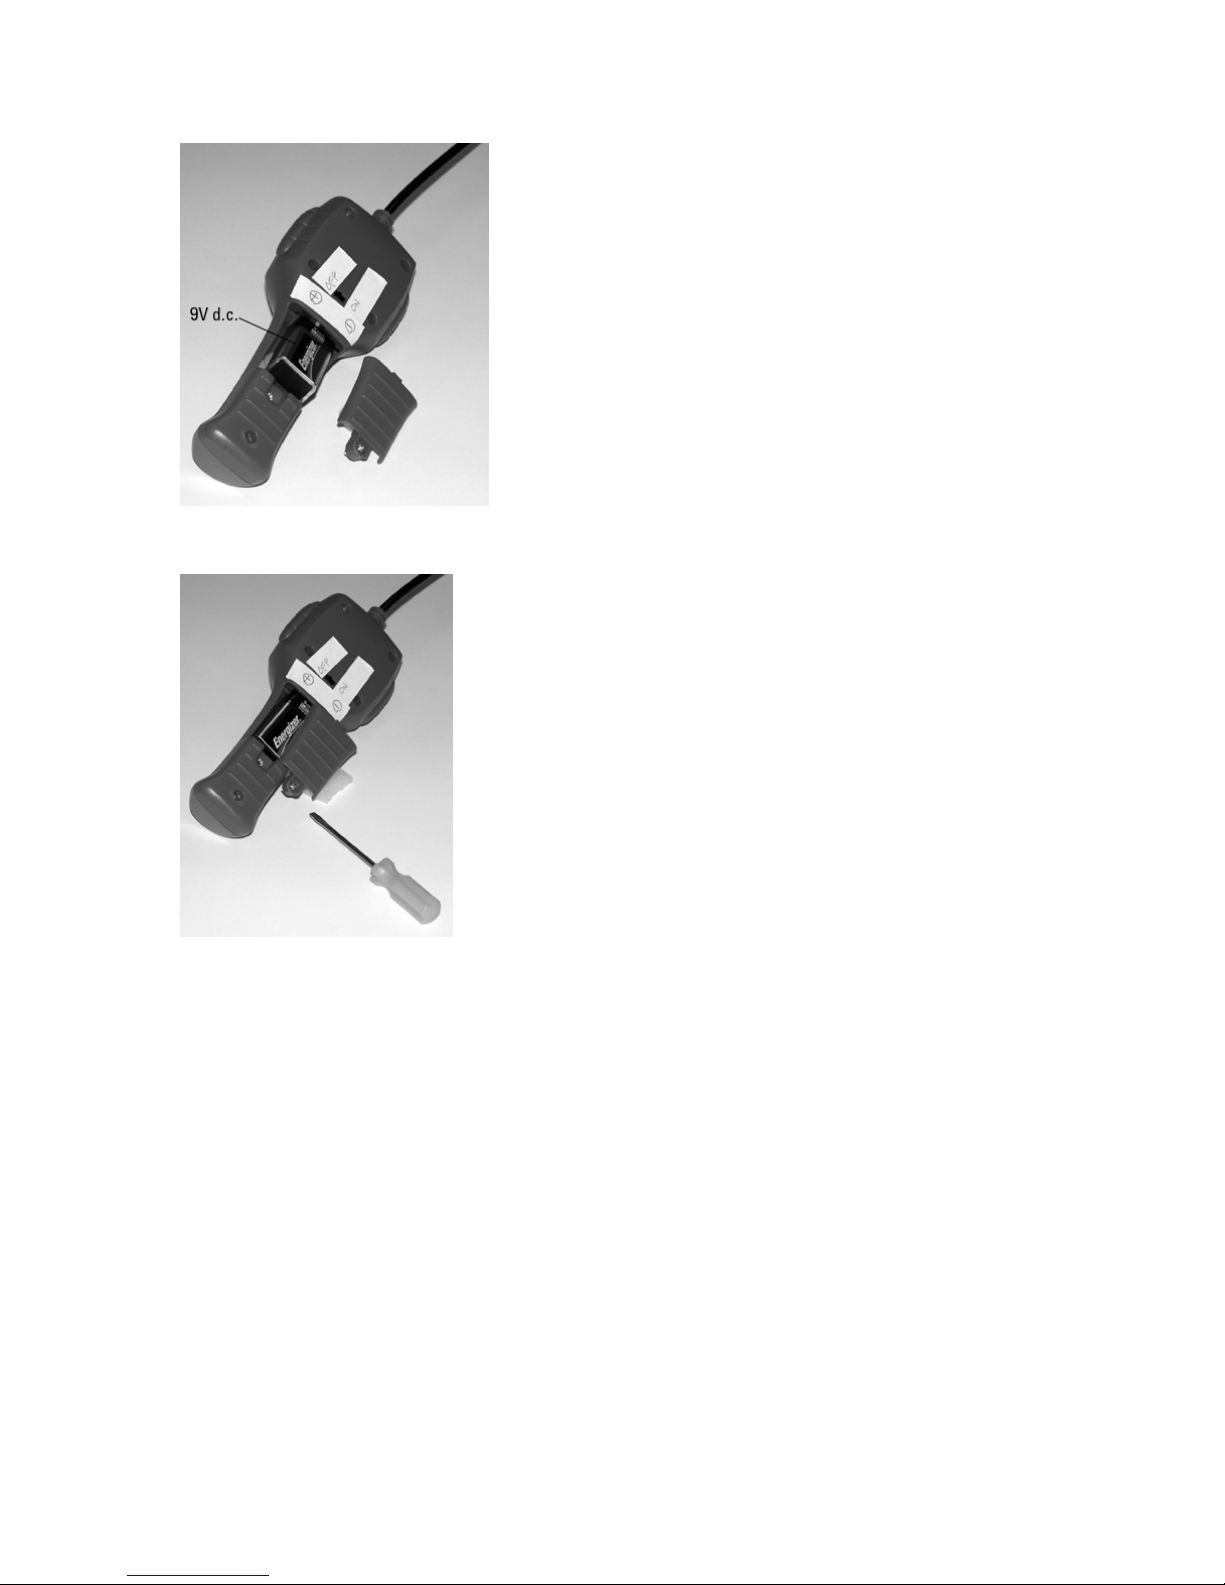
(3) Replace battery cover and tighten screw.
II. VEHICLE ASSEMBLY
Vehicle assembly is a one-time process. It’s easy and fun…just follow the easy steps below.
Before you begin: remove all vehicle components from the package and check them against this
list:
(1) Motor/power module
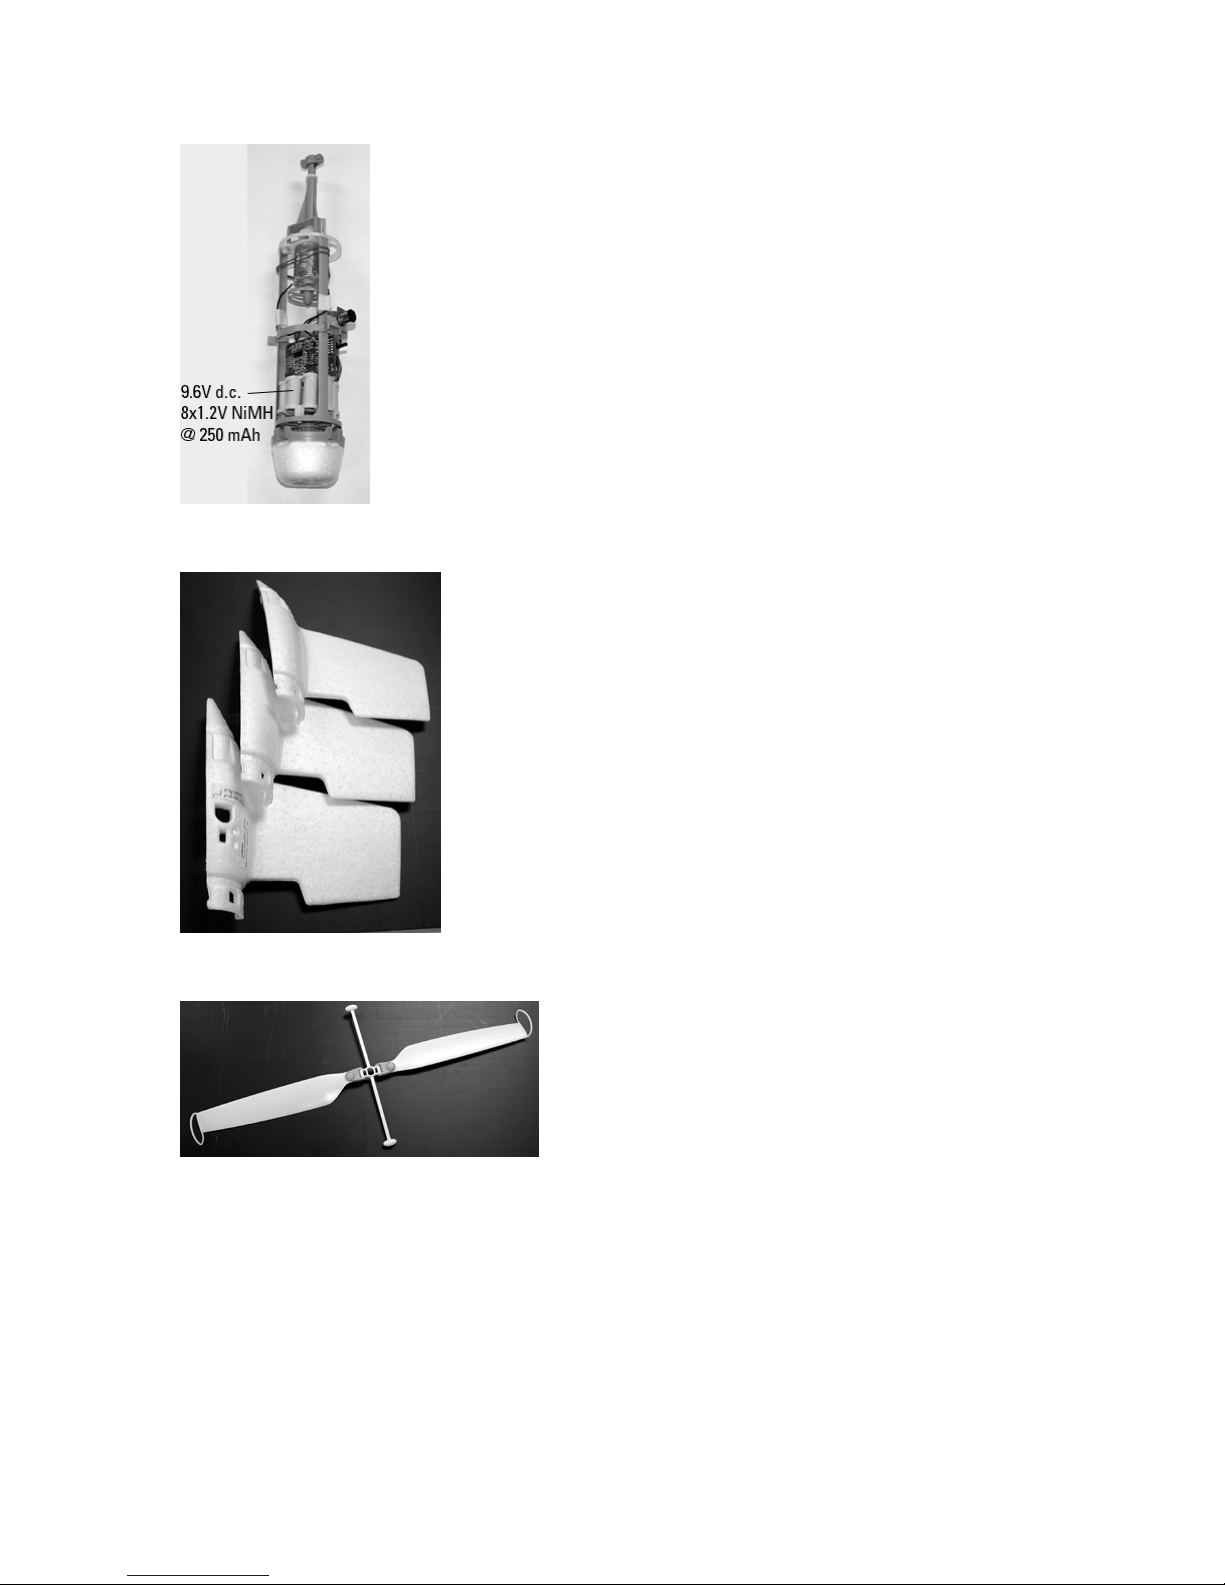
(2) Lightweight body panels (x3)
(3) Rotor
(4) Landing legs (x4)
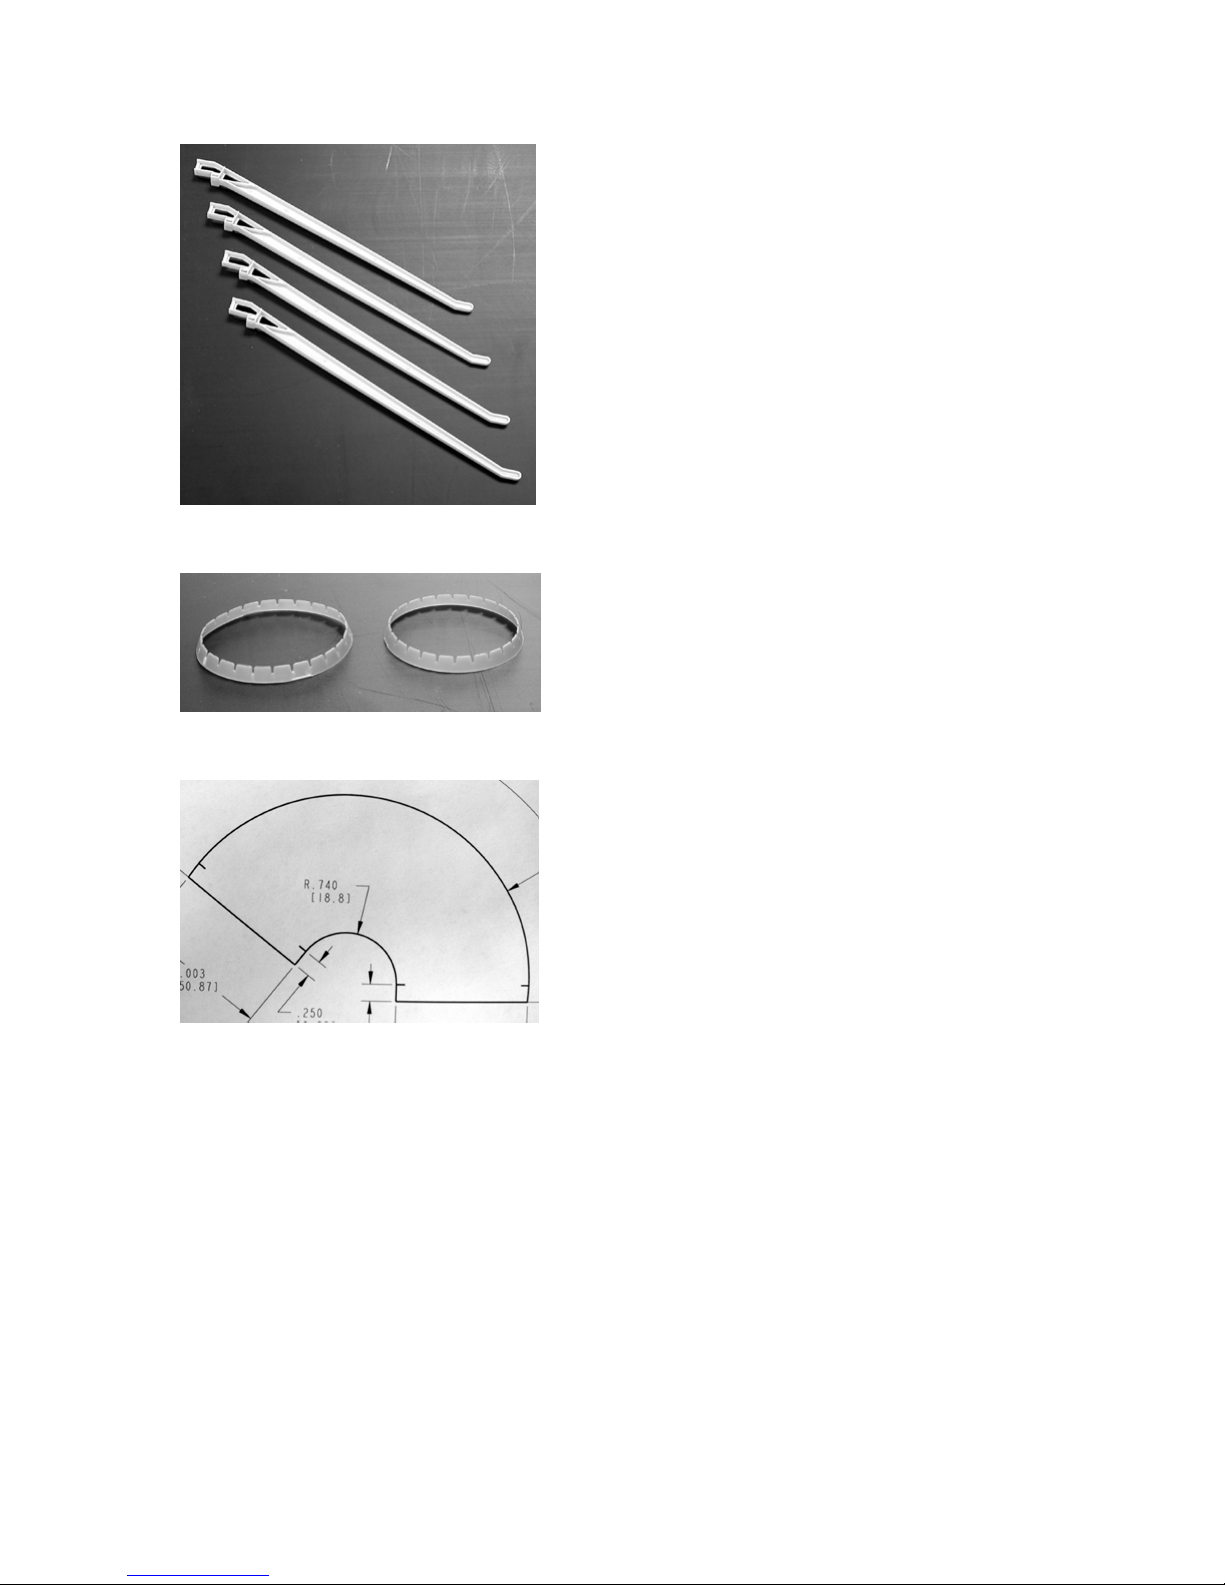
(5) Retaining rings (x2)
(6) Self-adhesive nosecone label
STEP-BY-STEP ASSEMBLY
1. The first step is to assemble the vehicle body panels over the motor/power module. Begin by
locating the body panel with holes in it (these are for the switch and the recharging jack).

2. Fit this body panel over the motor/power module, making sure that the switch and the
recharging connector are accessible through the body panel holes.
3. Add the remaining 2 body panels as shown.
4. The body panels are secured by 2 retaining rings.
NOTE: the two retaining rings are different sizes: one has a larger diameter than the other. Slide
the smaller retaining ring over the nosecone (top) of the vehicle as shown, fitting it securely into
the groove. Slide the larger retaining ring over the bottom of the vehicle as shown, fitting it
securely into the groove.

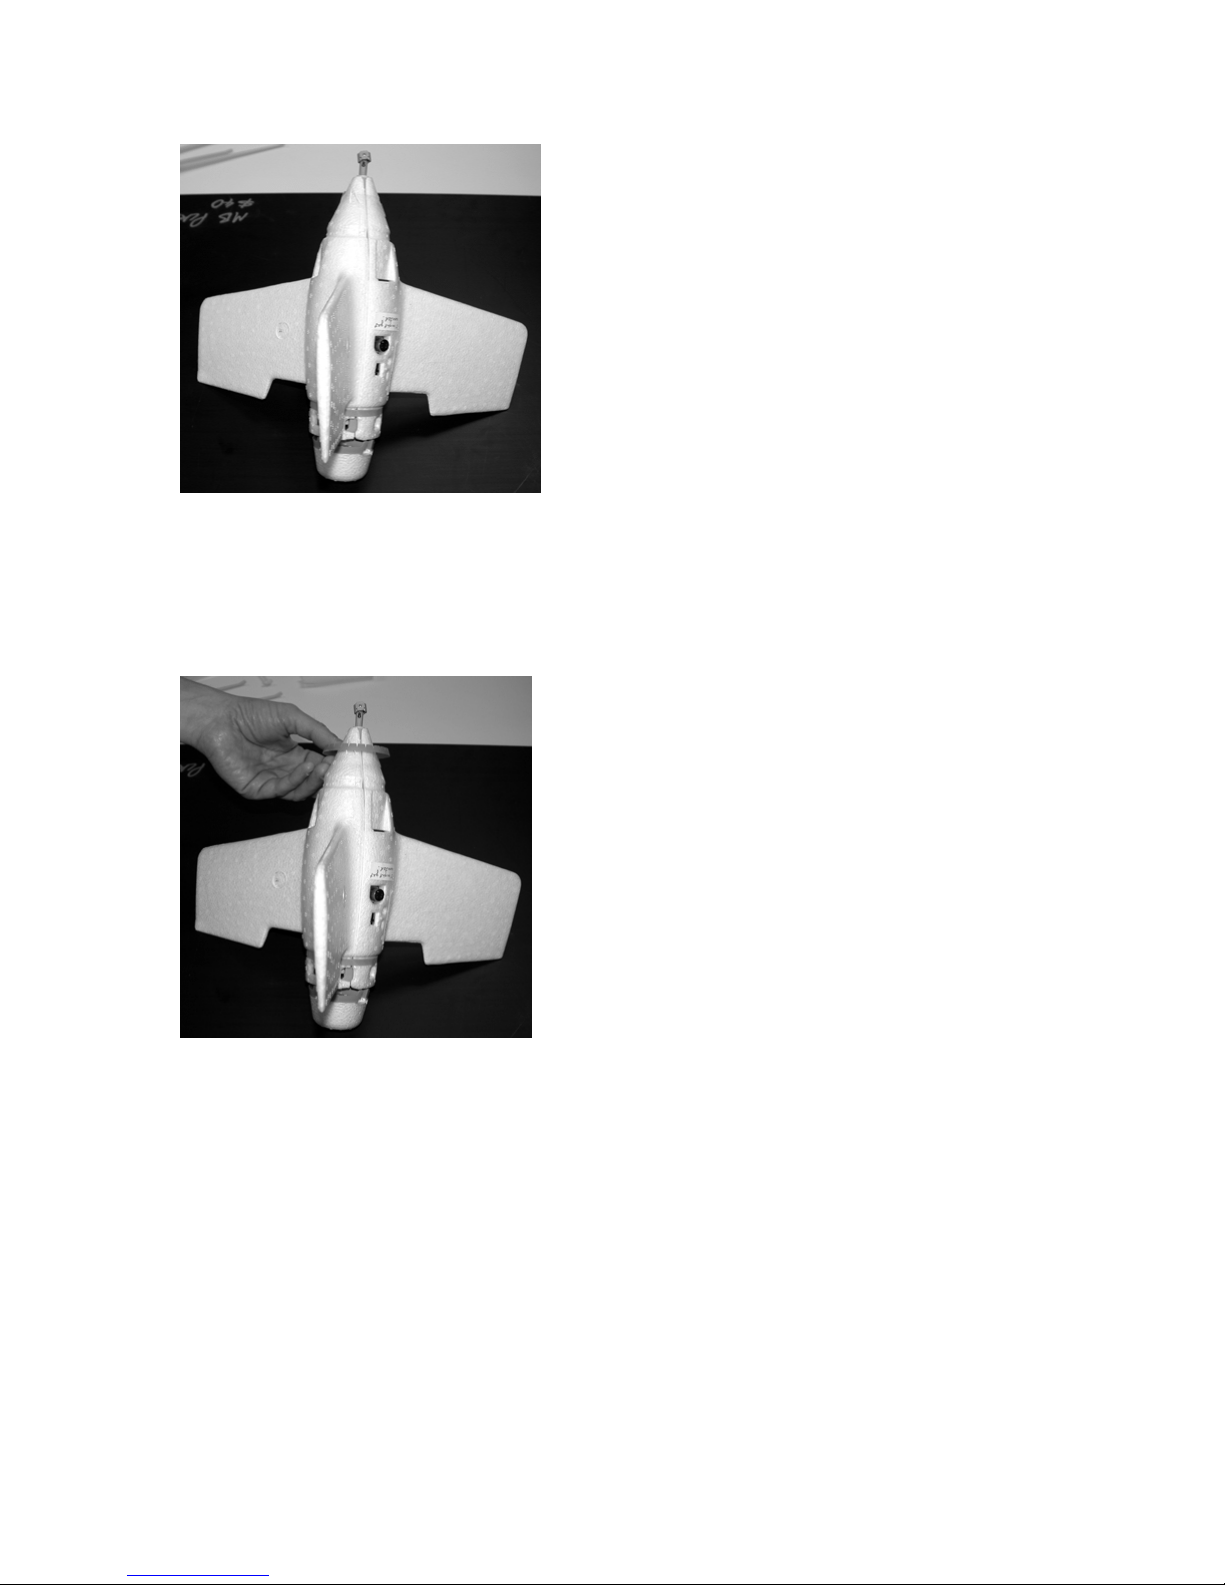
5. Attach the self-adhesive nosecone label to the top of the vehicle as shown. Be sure to overlap
the edges as shown.
NOTE: the nosecone label adds strength to the vehicle!

6. Attach the 4 landing legs to the vehicle as shown. Make sure the legs slide in and click
securely in place.

7. Snap the rotor onto the vehicle as shown. Make sure the rotor clicks securely in place.
NOTE: If the rotor detaches after a landing, simply reattach it as described in this step.
NOTE: If the rotor blades become permanently bent or deformed, your vehicle won’t operate
properly. Be careful not to store your vehicle with the rotor blades bent, or with any weight or
pressure on them.
III. FIELD CHARGER USE & CARE
1. Charge the Field Charger only in a well-ventilated area. To charge the Field Charger, first
attach the Wall Charger to the Field Charger as shown. Then plug the Wall Charger into a
standard wall outlet.

2. If you are charging the Field Charger for the first time, you will need to charge it for at least 16
hours. Subsequent charges will take 14-16 hours. Never charge the Field Charger longer than 24
hours. Be sure to keep the Field Charger upright during charging, as shown.
3. After charging, unplug the Wall Charger from the wall outlet. Detach the Wall Charger from the
Field Charger. You must unplug and detach the Wall Charger in order to use the Field Charger to
recharge the vehicle.
4. The Field Charger is now fully charged, and ready to recharge your vehicle. Please see
Section IV for vehicle recharging instructions.
FIELD CHARGER SAFETY INFORMATION
• It is recommended that the Field Charger be charged, handled and operated by adults only.
Adult supervision is recommended AT ALL TIMES during operation of this toy.
• The Field Charger contains a sealed lead-acid battery. It contains sulfuric acid (electrolyte).
Dropping the battery could result in serious injury.
• Never lift or carry the Field Charger by wires, cords, plugs or connectors. This can damage the
Field Charger and possibly cause a fire resulting in injury. Lift and carry the Field Charger by the
handle only.
• Read the cautions on the back panel of the Field Charger.
• Charge the Field Charger only in a well-ventilated area.
• Regularly examine for damage to the plug, enclosure and other parts. In the event of any
damage, the toy must not be used with the charger until the damage has been repaired.
• This toy is not intended for children under 10 years old. The charger is not a toy.
• If a battery leak develops, avoid contact with the leaking acid and place the damaged Field
Charger in a plastic bag. See information below for proper disposal.
• If acid comes in contact with skin or eyes, flush with cool water for at least 15 minutes and
call a physician,
• If acid is internally ingested, give water, milk of magnesia or egg whites immediately. Never
give emetics or induce vomiting. Call a physician.
• Charge a new Field Charger for at least 16 hours before first use. Never charge the Field
Charger longer than 24 hours. Overcharging or undercharging the Field Charger may shorten its
life and decrease vehicle operating time.
• After the first charge, recharge the Field Charger for at least 14 hours after each use. Never
charge the Field Charger longer than 24 hours. If you do not plan to use the Field Charger for a
long period, be sure to charge the Field Charger before putting it away.

• The Field Charger must be upright during charging.
• Be sure to make all connections properly, and always follow all instructions for use and care of
the Field Charger.
• Do not allow the Field Charger to run down completely before charging.
• Storing the Field Charger in a partially discharged condition may decrease its useful life.
Always fully recharge the Field Charger before storing it.
• Charge the Field Charger at least once per month, even if the vehicle has not been used.
• Do not store the Field Charger in temperatures above 100°F/37°C or below 30ºF/-1°C.
l WARNING: PREVENT FIRE!
• Never modify the electrical system. Alterations could cause a fire.
• Use of the wrong type of battery or charger could cause a fire or explosion.
DISPOSAL
• The Field Charger contains a sealed lead-acid battery. It must be recycled or disposed of in an
environmentally sound manner.
• Do not dispose of a lead-acid battery in your regular, household trash. The incineration,
landfilling or mixing of sealed lead-acid batteries with household trash is prohibited by law in most
areas.
• Return the battery to a federal or state approved lead-acid battery recycler or a local seller of
automotive batteries. In Minnesota, call 1-800-348-0751 if further disposal information is required.
Contact your local waste management officials for other information regarding the
environmentally sound collection, recycling and disposal of lead-acid batteries.
IV. RECHARGING THE VEHICLE
Your vehicle is powered by a NiMH battery that is permanently installed. The vehicle must be
recharged with the Field Charger before using. To recharge, first make sure you have fully
charged the Field Charger as shown in Section III. Then follow these easy steps:
1. Make sure the vehicle’s power switch is in the OFF position.

2. Plug the Field Charger’s vehicle recharge cord into the vehicle’s power connector as shown.
The plug is designed to fit one way only.
3. Press and hold the CHARGE button on the Field Charger until the green LED charge indicator
lights up, showing that the battery is being charged.
NOTE: if the RED indicator comes on or flashes (or if both the green and red indicators flash,
refer to “LED Functions” below.
4. The green LED charge indicator will glow steadily, showing that the battery is being charged.
5. The charging process takes about 4 minutes. When the green LED charge indicator flashes,
the charging cycle is complete. The Field Charger will shut off automatically after charging.
7. Disconnect the vehicle recharge cord from the vehicle. The vehicle cannot be operated while
connected to the Field Charger.

8. Replace the vehicle recharge cord in the Field Charger’s storage groove.
LED Functions
When the CHARGE button is pressed, the Field Charger’s two LED charge indicators will provide
information about the status of the Field Charger and the charging process:
• Green LED glowing steadily: charging normally.
• Green LED flashing: charging is complete.
• Red LED glowing steadily: Field Charger must be recharged (not enough power to recharge
vehicle).
• Red LED flashing: Vehicle’s NiMH battery temperature is too high (allow vehicle to cool down
before attempting to recharge).
• Red AND green LEDs flashing: The charger is not properly connected to the vehicle. First make
sure that the vehicle switch is in the OFF position. If the red and green indicators still flash, then
the vehicle’s NiMH battery temperature is too low for charging (allow vehicle to warm up to
normal operating temperature).
NOTE: the NiMH battery inside your vehicle must be conditioned in order to deliver
maximum flight time. Your first few flights may be shorter, but flight time will increase with
use.
[!] Do not attempt to recharge the vehicle until it’s fully discharged. Additional charging will not
increase running time, and may permanently damage the vehicle’s NiMH battery.

[!] Always hold the connectors when disconnecting the vehicle recharge cord. NEVER pull the
cord to disconnect; this may cause it to break.
[!] Your vehicle and Field Charger may not work their best in overly cold or overly hot conditions.
The suggested temperature range for operation is between 40°F/4°C and 95°F/35°C.
NOTE: DO NOT charge the vehicle until just before flying. If the vehicle is left in a charged
condition for a time before operating, it may not be able to fly (the rotor will turn, but the vehicle
will not lift off). If this happens, you will need to discharge the vehicle battery and then recharge it.
It’s a quick and simple process.
a. Make sure to follow all the safety information in this manual during the discharge/recharge
process. In particular, make sure to maintain the minimum 10’/3m distance from the vehicle, and
make sure weather conditions are calm and clear.
b. With the transmitter OFF, turn the vehicle ON. Set the vehicle upright on the ground. Make
sure the rotor blades are approximately 180° apart.
c. Turn the transmitter ON. Slowly push the transmitter control stick up, just until the rotor begins
to spin. Adjust the control stick until the rotor is spinning slowly and steadily. Keep the rotor
spinning (you may need to adjust the control stick position to maintain rotor speed) until it slows
down noticeably. At that point the vehicle battery will be discharged. Push the control stick all the
way down to activate the stop feature.
[!] If the vehicle starts to lift off during the discharge process, IMMEDIATELY push the control
stick all the way down to activate the stop feature.
d. Turn the transmitter OFF, then turn the vehicle OFF.
e. Recharge the vehicle battery as described in Section IV. You should now be able to fly your
vehicle normally (please see Sections VI and VII).
V. TRANSMITTER CONTROL
Your transmitter features a joystick flight control system that’s easy to use – and challenging to
master.
[!] Before operating your vehicle for the first time, familiarize yourself with the “feel” of the control
stick (with the transmitter turned OFF). Move it through its range of motion, up and down. That
way you’ll know how far to push down to activate the stop feature (see Number 3 below).
1. Normal position

This is the normal position of the control stick when released. This position has 2 functions:
• When you first turn on the transmitter, this position is standby mode. The transmitter must be in
standby mode to begin operation.
• When you’re flying (please see Section VII for details), this position activates the vehicle’s
automatic-descent feature. If you release the stick during flight, the vehicle’s motor will
automatically switch to a controlled-descent speed to bring the vehicle down easily.
2. Operation zone
This range of the control stick’s travel is used for takeoff, ascent and descent. The control stick’s
travel is roughly proportional to the speed of the vehicle’s motor: push up for faster rotor speeds,
and ease off for slower rotor speeds.
• When the transmitter is in standby mode, slowly push the control stick up to take off.
• During flight, push the control stick up to ascend. Ease off on the control stick to descend,
allowing it to move back toward the normal position. DON’T push the control stick down to
descend – you might trigger the stop feature. For best results, adjust the control stick slowly
during flight.
3. Stop feature

This control stick position stops rotor motion. Use it to stop the rotors upon landing. It also acts as
a safety feature, enabling you to cut off all vehicle power instantly in an emergency!
• Push the control stick all the way down (past the normal position) to activate the stop feature.
VI. PRE-FLIGHT CHECK
A. Choose the Right Location.
DO NOT operate the vehicle indoors. Give yourself plenty of flying room. For best results, you
should have at least 150’/50m of clear space in all directions. The best flying location is an open
field. ALWAYS launch the vehicle from level ground. Avoid tall buildings, trees and power lines.
They may obstruct your flight path, and they may create air currents that make it difficult to
operate your vehicle. DO NOT fly near water (pool, pond, lake, river, etc.). DO NOT fly in or near
the street!
B. Check the Conditions.
Your vehicle is very sensitive to air conditions. DO NOT attempt to operate your vehicle in windy
conditions; operate in calm, clear weather only. Windy conditions will make it difficult to fly safely,
and will reduce battery life and flying time. Remember that the wind may be stronger at higher
altitudes than at ground level. Your vehicle’s performance may also vary depending on
temperature and humidity.

C. Be Careful!
Be a safe pilot…use common sense and care when flying. Watch out for people, animals and
obstacles.
VII. READY TO FLY!
Your vehicle is easy to fly, but you’ll need to put in some flight time to become an expert. Practice
these steps to sharpen your skills.
NOTE: to become familiar with the controls and the vehicle’s operation, you may want to practice
taking off and landing at low altitudes: take off, ascend a few feet, and then land. Repeat this
process until you are comfortable with the vehicle’s operation. Gradually fly higher and hover
longer. Be sure to practice the controlled descent and soft landing.
1. Recharge the vehicle (see Section IV). With the transmitter OFF, turn the vehicle ON. Make
sure the transmitter is OFF when you turn the vehicle ON: the vehicle will not power up if the
transmitter is transmitting.
2. Set the vehicle upright on level ground. Make sure the rotor blades are approximately 180°
apart, as shown. Step away until there’s AT LEAST 10’/3m DISTANCE between you and the
vehicle.
3. Make sure the transmitter control stick is in normal position (standby mode). Turn the
transmitter ON. The transmitter will not transmit unless the control stick is in the normal position
when the transmitter is turned ON.

4. To take off, slowly push the transmitter control stick up. To ascend, keep the control stick up.
5. Moving the control stick up or down, within the operation zone, will enable to you vary the
altitude of your vehicle, or to hover at one altitude. Avoid large abrupt changes in control stick
position during flight. It will take practice to achieve maximum flight time.
6. After about 90 seconds of continuous flight, the rotors will begin to slow down. It’s time to ease
off on the control stick, to bring your vehicle in for a controlled descent and landing. Depending on
conditions and flying style, your own flying time may be shorter.

7. To land, ease off on the control stick to descend. When the control stick is in the normal
position, the vehicle will automatically switch to a controlled-descent speed that will bring the
vehicle down easily. Once your vehicle has landed, push the control stick all the way down to the
stop position to stop the rotors.
NOTE: If vehicle does not land on its landing gear, ALWAYS push the control stick all the
way down IMMEDIATELY to activate the stop feature and avoid damage to the blades.
8. Turn the transmitter OFF, then turn the vehicle OFF. Recharge the vehicle for more flying
action.

NOTE: DO NOT activate the stop feature during flight, except in a real emergency! Activating this
feature when the vehicle is in the air will cause it to come down in an uncontrolled descent. A
hard landing may damage the vehicle.
VIII. QUICK TIPS
1. Radio interference can make your vehicle fly badly. Interference can be caused by other R/C
vehicles running on the same frequency; electrical wires; large buildings; or CB radios. Try to stay
away from these!
2. Your flying time may change depending on air conditions and on your flying style. When the
vehicle fails to respond, slows down, or loses range, recharge the vehicle. If performance does
not improve following a recharge, it may be time to charge the Field Charger.
3. The vehicle is designed with advanced protection circuitry that will switch automatically to a
controlled-descent speed, to bring the vehicle down easily, under the following conditions:
(a) If the vehicle gets out of range of the transmitter while flying;
(b) If the remaining charge in the vehicle’s permanent battery drops too low while flying;
(c) If the control stick is released while flying; or
(d) If the vehicle gets too hot during operation.
4. Because your vehicle is sensitive to extra weight, dirt or mud on the vehicle’s body can affect
its operation. Use a clean dry cloth to remove any dirt or mud immediately. If your vehicle gets
wet, it’s important not to operate it until it’s completely dry, inside and outside. Wipe surfaces with
a towel and allow the vehicle to air-dry until it’s dry…overnight at least.
5. Don’t store your vehicle near heat or in direct sunlight. Always turn switches OFF before
storing your vehicle and transmitter.
BATTERY SAFETY INFORMATION
NOTE: This section contains general information about battery safety. For specific information
relating to the use and care of the Field Charger, please see Section III.
Batteries may leak fluids that can cause a chemical burn injury or ruin your toy (product). To

avoid battery leakage:
Do not mix old and new batteries or batteries of different types: alkaline, standard (carbon-zinc) or
rechargeable (nickel-cadmium).
Insert batteries as indicated inside the battery compartment.
Remove batteries during long periods of non-use. Always remove exhausted batteries from the
toy (product). Dispose of batteries safely. Do not dispose of batteries in a fire. The batteries may
explode or leak.
Never short-circuit the battery terminals.
Use only batteries of the same or equivalent type, as recommended.
Do not charge non-rechargeable batteries.
If removable, rechargeable batteries are used in the transmitter, they are only to be charged
under adult supervision.
Do not dispose of the vehicle in a fire. The permanently-installed battery inside may explode or
leak.
Battery Performance Note:
For best performance use alkaline batteries (where disposable batteries are called for). If your
vehicle is supplied with standard (carbon-zinc) batteries for initial use and/or demonstration
purposes, we recommend replacing them with alkaline batteries when necessary. Battery life may
vary depending on battery brand.
IMPORTANT INFORMATION
DO NOT RECHARGE THE VEHICLE IF IT FEELS HOT. ALLOW IT TO COOL BEFORE
RECHARGING.
DO NOT ATTEMPT TO USE OR CHARGE THE VEHICLE IF IT SHOWS SIGNS OF LEAKAGE
OR CORROSION.
DO NOT HANDLE OR DISASSEMBLE THE VEHICLE’S PERMANENTLY-INSTALLED NiMH
BATTERY. THE NiMH BATTERY IS A SEALED NiMH (NICKEL-METAL HYDRIDE) BATTERY.
IF THE VEHICLE AND/OR FIELD CHARGER ARE WET, THOROUGHLY DRY BEFORE USING
OR CHARGING.
REGULARLY EXAMINE ALL WIRES AND CONNECTORS. IN THE EVENT OF DAMAGE, DO
NOT USE.
The vehicle is powered by Nickel-Metal Hydride technology, and requires no special procedures
or precautions for disposal. However, as with all products, you should dispose of your NiMH
battery in an environmentally responsible and considerate manner. For information regarding
disposal of the Field Charger, please see Section III.
IX. SAFETY INFORMATION

Adults, this toy is recommended for children 10 years of age and older. To ensure that the child’s
play is both safe and fun, please review the operating instructions and these general safety rules
with the child.
Keep fingers, hair and loose clothing away from the rotor while the vehicle is switched ON.
Maintain a minimum 10’/3m distance between yourself and the vehicle during operation.
DO NOT operate the vehicle indoors.
NEVER hold the vehicle while operating. ALWAYS launch the vehicle from level ground.
NEVER stand under the vehicle during flight.
During operation, maintain a minimum 10’/3m distance between the vehicle and other people or
animals.
Keep small children away from the vehicle at all times.
In the event that the vehicle comes too close to a person, animal or obstacle during flight, push
the control stick all the way down to activate the stop feature.
Adult supervision is recommended AT ALL TIMES during operation of this toy.
To avoid accidental operation, remove the transmitter battery when not in use.
If the vehicle and/or charger get wet, discontinue use until they are completely dry. Thoroughly
wipe off all moisture and allow them to air-dry completely before use.
DO NOT fly in or near the street! Make sure you have plenty of open space in all directions
(please read Section VI carefully before operating).
DO NOT stand (or allow others to stand) downwind of the vehicle while flying.
NEVER operate the vehicle if the rotor blades are broken or damaged. ALWAYS make sure the
rotor blades are properly attached and the screws holding them are fully tightened.
NEVER operate the vehicle unless it is fully assembled.
NEVER throw foreign objects into the path of the rotor.
TROUBLESHOOTING GUIDE
It takes a little flying time and practice to become an expert. If you still have difficulty operating
your vehicle, please check this troubleshooting guide. Usually the problem’s a simple one…with a
quick solution.
IF THE VEHICLE WILL NOT FLY:
• The vehicle may need to be recharged. Follow the instructions in Section IV.
• The Field Charger may need to be charged (red Field Charger LED glows steadily when you
attempt to recharge the vehicle). Follow the instructions in Section III.
• You may need to replace the transmitter battery with a fresh alkaline battery. Follow the
instructions in Section I.

• The vehicle’s NiMH battery temperature may be too high (red Field Charger LED flashes when
you attempt to recharge the vehicle). Let the vehicle cool down before attempting to fly again.
• If the rotor spins but the vehicle will not fly, you may need to discharge and recharge the
vehicle. Follow the instructions in Section IV.
• The vehicle may still be connected to the Field Charger. You must disconnect the Field Charger
from the vehicle before operating the vehicle. Follow the instructions in Section IV.
IF YOU HAVE DIFFICULTY OPERATING OR CONTROLLING THE VEHICLE:
• Check air conditions. Operate your vehicle in calm, clear weather only. DO NOT attempt to
operate your vehicle in windy conditions. Please refer to Section VI.
• Check for obstacles that may create air currents, like tall buildings and trees. You may need to
choose an alternative place to fly. Please refer to Section VI.
• Check the area for sources of radio interference, like other radio control vehicles, electrical
wires, large buildings or CB radios. You may need to choose an alternative place to fly. Please
refer to Section VIII.
• Check your vehicle for dirt or mud. Clean if necessary. Please refer to Section VIII.
• Make sure the rotor blades are not bent or deformed. Please refer to Section II.
• Make sure it is not too hot or too cold outside. Please refer to Section IV.
ROTOR REPLACEMENT
We’ve included two “spare” rotor blades…just in case a rotor blade gets damaged. Follow these
instructions to replace a damaged rotor blade.
The rotor blade is held in place by a pin and a Philips head screw. The pin is inserted through the
blade holder from the top; the screw is inserted through the blade holder from the bottom.
q Rotor Blade
w Pin
e Blade Holder (inserted from top)
r Philips head screw (inserted from bottom)

1. Hold the blade holder, and the top of the pin, as shown. Use a Philips screwdriver (not
included) to remove the screw from the underside of the blade holder. Remove the pin (be sure to
keep the screw and the pin).
2. Remove the damaged rotor blade. Insert the new rotor blade into the blade holder, making
sure that the tip hoops are facing upward as shown (refer to the other rotor blade as a guide).
3. Reinsert the pin through the blade holder and rotor blade from the top, as shown, matching the
flat sides of the pin to the flat sides of the slot.
4. Reinsert the screw through the blade holder from the bottom, as shown. Tighten the screw
COMPLETELY.
NEVER operate the vehicle if the rotor blades are broken or damaged. ALWAYS make sure the
rotor blades are properly attached and the screws holding them are fully tightened.
l CAUTION! Only allow children at least 10 years old to use the battery charger. The
battery charger is not a toy and should be used only under adult supervision.
COMPLIANCE WITH FCC REGULATIONS (VALID IN U.S. ONLY - VALABLE AUX É.-U.
SEULEMENT)
This device complies with part 15 of the FCC Rules. Operation is subject to the following two
conditions: (1) This device may not cause harmful interference, and (2) this device must accept
any interference received, including interference that may cause undesired operation.
This device generates and uses radio frequency energy and if not used properly may cause
interference to radio and television reception. It has been tested and found to comply with the
limits set by the FCC which are designed to provide reasonable protection against such
interference.
NOTE: Changes or modifications not expressively approved by the manufacturer responsible for
compliance could void the user’s authority to operate the equipment.
 Loading...