

Tyco R/C Batcycle, H6954 Owner's Manual
H6954-0720
H6954-S1
CANADA
h
Keep these instructions for future reference: they contain important information.
i
Guardar estas instrucciones para futura referencia, ya que contienen información de importancia acerca de
este producto. LEA LAS INSTRUCCIONES ANTES DE USAR ESTE PRODUCTO.
j
Conserver ces instructions pour s'y référer en cas de besoin; elle contiennent des renseignements importants.
X
CAUTION:
Surfaces may become hot and cause burns if
electronics get wet. Do not operate vehicle through water or snow.
X
PRECAUCIÓN:
Si las piezas electrónicas se mojan, es
posible que las superficies se calienten y causen quemaduras. No usar
el vehículo en agua ni nieve.
X
MISE EN GARDE:
Les surfaces peuvent devenir chaudes
et causer des brûlures si les composantes électroniques sont mouillées.
Ne pas faire rouler ce véhicule sur des surfaces mouillées ou enneigées.
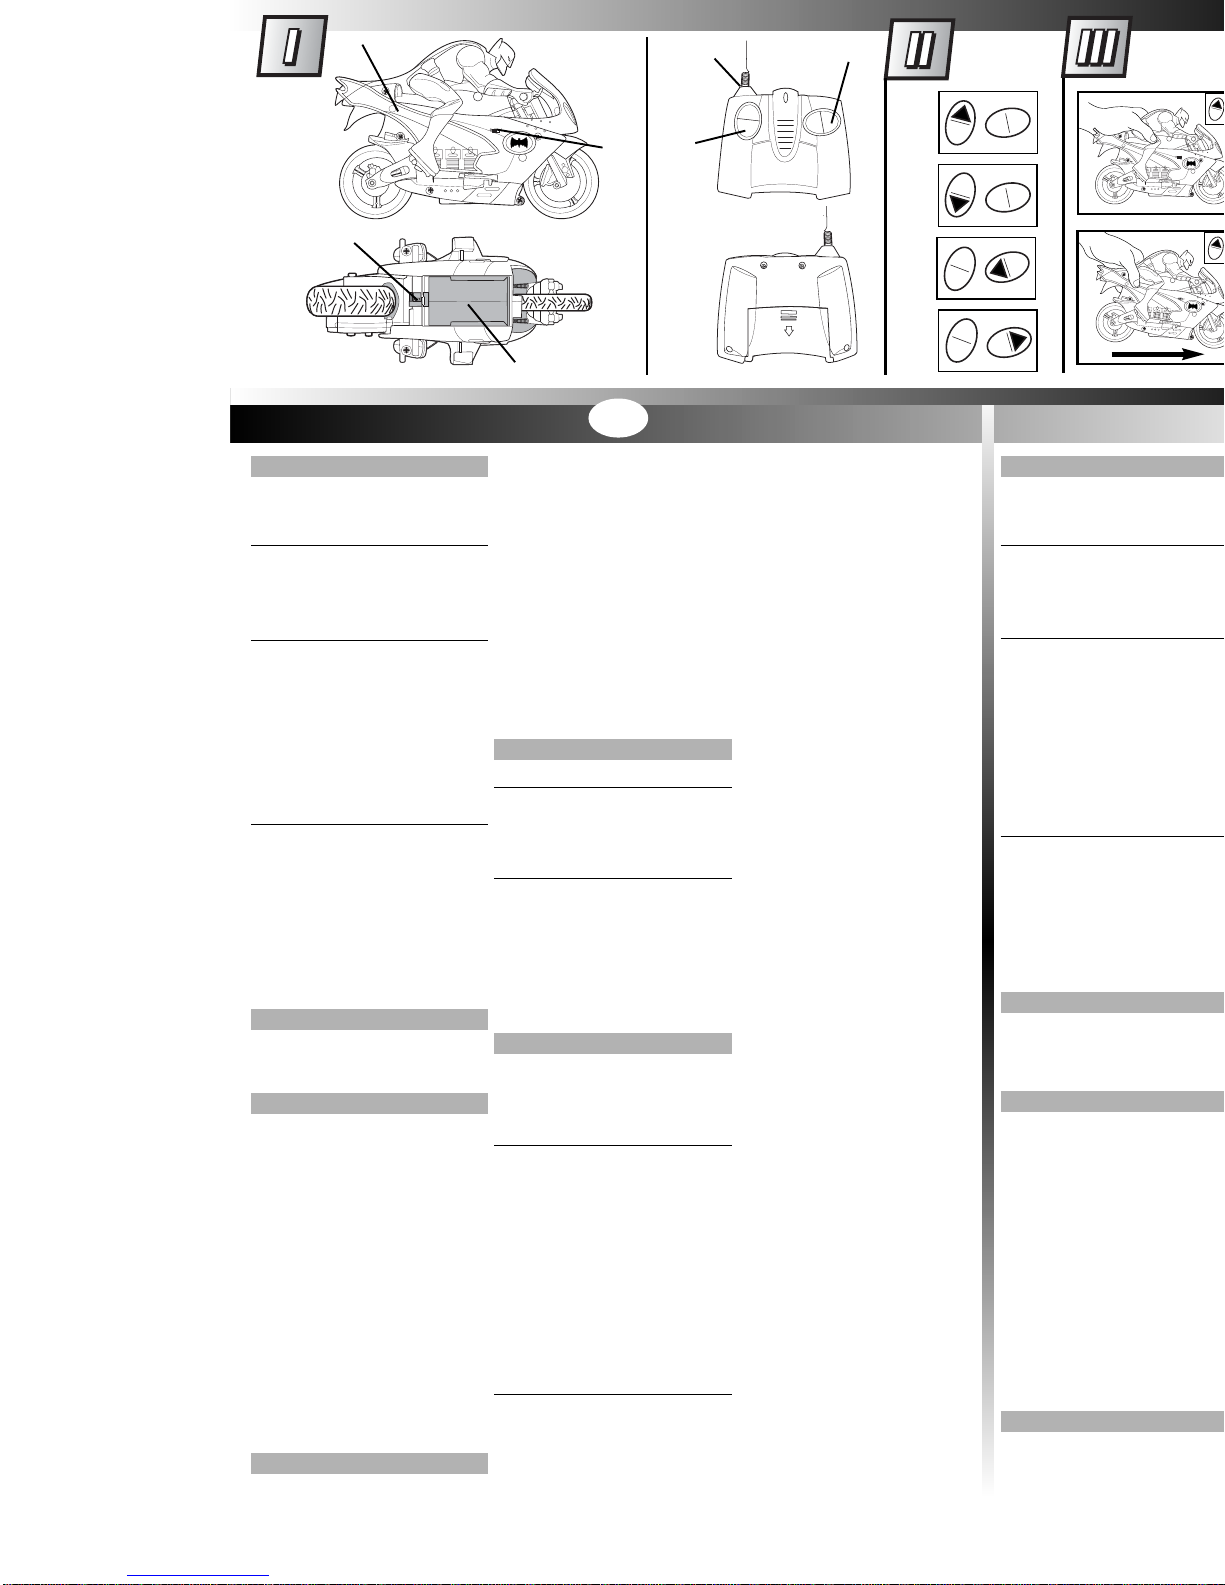
I. CONTENTS
• Full function
• Range up to 9m/30’
q VEHICLE
q Powerful motor
w ON/OFF switch
e Battery latch
r Battery compartment
w TRANSMITTER
q Antenna
w Left button controls forward & braking
e Right button controls turning
Your transmitter is equipped with a special
automatic ON battery-saving feature. Just
turn your vehicle ON. Then push either
transmitter stick and you’ll be able to run
and control your vehicle.
QUICK START
Please read this Owner’s Manual
thoroughly.
1. Start with a fresh set of batteries.
2. Turn the vehicle switch ON. Press the
transmitter controls to run and control
your vehicle.
3. When you're finished driving, turn the
vehicle switch OFF. Remove all the
batteries for storage.
II. OPERATING YOUR VEHICLE
q FORWARD w BRAKING
e LEFT TURN r RIGHT TURN
III. DRIVING TIPS
1. To start driving, gently hand-launch your
vehicle. Set it on the ground and give it a
gentle push while pushing the left button
forward.
Ä Be sure to hold the vehicle by the driver
figure, keeping your fingers clear of the
wheels.
2. You can also start with your vehicle
resting on its side skid plate: push the left
stick forward and steer with the right
stick (into and then out of the turn).
Your vehicle will get up and go!
3. Your vehicle is designed to run on
smooth, hard surfaces only.
4. When you want to stop, it’s best to turn
into a skid while braking, instead of
hitting the brakes suddenly while going
straight.
;
IV. QUICK TIPS
q When your vehicle starts to lose power,
it may lose functions or performance.
It's time for fresh batteries.
w Your vehicle's running time may change
depending on your driving style.
e Radio interference can make your
vehicle run badly. Interference can be
caused by other R/C vehicles running on
the same frequency, electrical wires,
large buildings, or other wireless gear.
Try to stay away from these!
r Point your transmitter antenna up – not
down toward your vehicle. If your vehicle
gets too far away, it won't work properly.
t Don't drive your vehicle in sand or
through water or snow. If your vehicle
does get wet, dry it with a clean cloth
and allow it to air-dry thoroughly
overnight before operating again.
y Don’t store your vehicle near heat or in
direct sunlight. Always turn switches OFF
and remove all batteries for storage.
V. BATTERY INSTALLATION
q TRANSMITTER
1. Slide the battery door open.
2. Install two AA batteries with polarity (+/-)
as shown inside the battery
compartment.
3. Replace the battery door.
w VEHICLE
1. Turn your vehicle over. Rotate the battery
latch to release the battery holder.
2. Slide the battery holder toward the latch.
3. Lift the battery holder out of the vehicle.
4. Insert 4 AA batteries into the battery
holder, with polarity (+/-) as shown on the
battery holder.
5. Replace the battery holder in the vehicle
and rotate the latch until it clicks shut,
locking the battery holder in place.
VI. SAFETY INFORMATION
NOTE TO ADULTS: To ensure that the child’s
play is both safe and fun, please review all
operating instructions and safety rules with
your child.
SAFETY TIPS
• NEVER drive your vehicle on streets!
They’re for real cars!
• DO NOT pick up the vehicle while in
motion.
• Keep fingers, hair and loose clothing away
from the tires and the wheel hubs while
the vehicle is switched ON.
X
CAUTION: To prevent entanglement,
keep hair away from the wheels.
• Adult supervision is recommended when
this vehicle is being operated.
• To avoid accidental operation, remove all
batteries when not in use. Always turn the
vehicle OFF before removing the batteries.
ì
IMPORTANT BATTERY INFORMATION
BATTERY SAFETY INFORMATION
In exceptional circumstances batteries may
leak fluids that can cause a chemical burn
injury or ruin your toy (product). To avoid
battery leakage:
• Non-rechargeable batteries are not to be
recharged.
• Rechargeable batteries are to be removed
from the toy before being charged
(if designed to be removable).
• Rechargeable batteries are only to be
charged under adult supervision
(if designed to be removable).
• Do not mix alkaline, standard
(carbon-zinc), or rechargeable
(nickel-cadmium) batteries.
• Do not mix old and new batteries.
• Only batteries of the same or equivalent
type as recommended are to be used.
• Batteries are to be inserted with the
correct polarity.
• Exhausted batteries are to be removed
from the toy.
• The supply terminals are not to be
short-circuited.
• Dispose of battery(ies) safely.
• Do not dispose of this toy in a fire.
The batteries inside may explode or leak.
Battery Performance Note:
• Your vehicle is a high-performance vehicle
that uses lots of power. For best
performance and battery life, let your
vehicle "rest" for about five minutes after
every fifteen minutes of driving. This will
often let the batteries "recover." Your
batteries will last longer too!
• If your vehicle suddenly stops running
after several minutes of constant driving,
install fresh batteries. You can reinstall
regular alkaline batteries…or for longer
battery life, we STRONGLY RECOMMEND
that you use extra-high-performance
alkaline, rechargeable Nickel-Cadmium or
rechargeable Nickel-Metal Hydride
batteries.
I. CONTENIDO
• Multifuncional
• Alcance de hasta 9 metros
q VEHICLE
q Motor poderoso
w Interruptor de ENCENDIDO/APAGADO
e Seguro de las pilas
r Compartimento de pilas
w TRANSMISOR
q Antena
w Palanca izquierda controla marcha
adelante y frenar
e Palanca derecha controla virar
El transmisor incluye una característica
especial de auto-apagado para ahorrar pila.
Simplemente ACTIVAR el vehículo. Luego,
empujar cualquiera de los controles del
transmisor para echar a andar y controlar el
vehículo. LEA LAS INSTRUCCIONES ANTES
DE USAR ESTE PRODUCTO.
PASOS RÁPIDOS
Leer cuidadosamente este manual del
usuario.
1. Empezar con un juego de pilas nuevas.
2. ACTIVAR el vehículo. Presionar los
controles del transmisor para echar a
andar y controlar el vehículo.
3. Después de acabar de jugar,
DESACTIVAR el vehículo. Sacar todas las
pilas y guardarlas.
II. USO DEL VEHÍCULO
q MARCHA ADELANTE
w FRENAR
e VUELTA A LA IZQUIERDA
r VUELTA A LA DERECHA
III. CONSEJOS PARA MANEJAR
1. Para empezar a andar, lanza suavemente
el vehículo con la mano. Ponlo en el piso
y empújalo ligeramente mientras empujas
el control izquierdo para adelante.
Ä Asegúrate de sujetar el vehículo de la
figura del conductor, manteniendo tus
dedos alejados de las ruedas.
2. También puedes empezar con el vehículo
descansando sobre su chapa lateral:
empuja el control izquierdo para adelante
y vira con el control derecho (entrando y
saliendo de la curva). ¡El vehículo se
echará a andar!
3. El vehículo está diseñado para andar
únicamente en superficies duras, suaves.
4. Cuando quieras hacer alto, lo mejor es
virar derrapándote mientras frenas, en
lugar de frenar en seco mientras avanzas
en línea recta.
;
IV. CONSEJOS RÁPIDOS
q Cuando el vehículo empiece a perder
fuerza, puede perder funciones o
rendimiento. Es hora de sustituir las pilas
por pilas nuevas.
w El rendimiento del vehículo puede variar
según tu estilo de manejar.
e La radiointerferencia puede hacer que tu
vehículo no funcione correctamente.
La interferencia puede ser causada por
otros vehículos R/C que estén operando
bajo la misma frecuencia; cables
eléctricos; edificios altos;
radiotransmisores; o demás equipo
inalámbrico. ¡Procura alejarte de estos!
r Apuntar la antena del transmisor para
arriba, no hacia el vehículo. Si el vehículo
se aparta demasiado, no funcionará
correctamente.
t No manejar el vehículo en arena ni en
agua o nieve. Si se llega a mojar, secarlo
con un paño limpio y dejar que se seque
al aire por completo, de un día al otro,
antes de volver a usarlo.
y No guardar el vehículo cerca de fuentes
de calor o en contacto directo con el sol.
Siempre apagarlo y sacar las pilas antes
de guardarlo.
V. COLOCACIÓN DE LAS PILAS
q TRANSMISOR
1. Abrir la tapa del compartimento de pilas.
2. Introducir dos pilas tipo 2 x AA x 1,5V con la
polaridad (+/-) como se muestra dentro
del compartimento.
3. Cerrar la tapa del compartimento.
w VEHÍCULO
1. Voltear el vehículo. Girar el seguro de las
pilas para soltar el sujetador de las pilas.
2. Ajustar el sujetador de las pilas hacia el
seguro.
3. Sacar el sujetador de las pilas del
vehículo.
4. Introducir cuatro pilas tipo 4 x AA
x 1,5V en el sujetador de pilas, con la
polaridad (+/-) tal como se muestra en el
sujetador.
5. Meter el sujetador de pilas en el vehículo
y girar el seguro hasta que se ajuste,
asegurando el sujetador en su lugar.
VI. INFORMACIÓN DE SEGURIDAD
ATENCIÓN PADRES: para asegurar que el
juego sea seguro y divertido para los niños,
revisar todas las instrucciones y reglas de
seguridad con su hijo.
INFORMACIÓN DE SEGURIDAD
• ¡NO usar el vehículo en la calle! ¡La calle
es para autos de verdad!
• NO levantar el vehículo cuando esté en
movimiento.
• Mantener los dedos, cabello y ropa suelta
alejados de las ruedas y los tapones de las
ruedas mientras el vehículo esté
encendido.
X
PRECAUCIÓN: para evitar accidentes,
mantener el cabello alejado de las
ruedas.
• Se recomienda que un adulto supervise
mientras el vehículo esté en operación.
• Para evitar la operación accidental, sacar
las pilas cuando el vehículo no esté en
uso. Siempre apagar el vehículo antes de
sacar las pilas.
h
i
1
2
3
4
5
6
q
e
r
w
q
w
q
w
e
w
q
e
r
 Loading...