


CONTENTS/FEATURES
Vehicle
Transmitter
7.2V Battery Pack
7.2V Wall Charger
Vehicle
q Steering Adjuster
*
Turn with a screwdriver (not included)
to keep vehicle running straight.
w Battery Door
e Battery Latch
r ON/OFF/SOUND Switch
*
This switch has 3 positions:
= Vehicle ON (cool engine sounds). In
this position, your vehicle will run
with cool “revving” engine sound
effects as you drive.
= Vehicle OFF
= Vehicle ON (no sounds). In this
position, your vehicle will run with
engine sound effects off.
t MultiBand™ Selector Switch
*
Please see the “MultiBand™ Feature”
Section for more information.
Transmitter
q Vehicle Controls
w Antenna
e MultiBand™ Selector Switch
*
Please see the “MultiBand™ Feature”
Section for more information.
TYCO R/C SUPPORT
Questions or problems with your product?
DON’T RETURN IT TO THE STORE!
Just call us for help.
U.S. consumers may also register their products at this number.
1 888 557-TYCO (8926)
®
tycorc.com
Keep these instructions for future reference: they contain important information.
IMPORTANT: Please read all “Consumer Information” (last page) before operating your vehicle.
7.2V R/C
7.2V R/C
CAUTION:
Surfaces may become hot and cause burns if
electronics get wet. Do not operate vehicle through water or snow.
FORWARD REVERSE LEFT
RIGHT
VEHICLE OPERATION
NOT RECOMMENDED
FOR CHILDREN UNDER
8 YEARS OF AGE. AS WITH ALL ELECTRIC PRODUCTS,PRECAUTIONS SHOULD BE
OBSERVED DURING HANDLING AND USE TO PREVENT ELECTRIC SHOCK.
CAUTION-ELECTRIC TOY:
C4639-0920
INPUT: 120VAC,60Hz, 12VA. OUTPUT: 8.5VDC, 420mA, 3.6W.
q
w
e
123
r
t
3 2 1
321
q
w
e
MULTIBAND™ FEATURE
• Your vehicle features the advanced Tyco® R/C MultiBand™
system. This system lets you race your vehicle head-to-head
– against up to two of your friends (up to 3 drivers total) –
without any radio interference from your friends’ transmiters
or vehicles. You must be racing against another Tyco® R/C
MultiBand™-equipped vehicle for this feature to work.
• There’s one MultiBand™ Selector Switch on your vehicle
chassis, and another one on your transmitter. The vehicle
switch has 3 positions: one for each MultiBand™ setting.
The transmitter switch has 3 positions: one for each
MultiBand™ setting.
• For successful operation, the vehicle switch and the
transmitter switch must be set to the same MultiBand™
setting. When you’re driving by yourself, you can set the
switches to any of the 3 MultiBand™ settings (as long as
they match).
• When you want to race head-to-head, just make sure that
each driver (up to 3 drivers total) has a vehicle and
transmitter set to a different MultiBand™ setting.
*
The transmitter’s MultiBand™ Selector Switch also serves
as the transmitter’s power switch. To operate your
vehicle, just turn the vehicle ON; then set the transmitter
switch to the desired MultiBand™ setting. Push any
transmitter control and you will be able to run and control
your vehicle.
*
You must be racing against another Tyco® R/C
MultiBand™-equipped vehicle for this feature to work. A
non-MultiBand™ vehicle, running on the same frequency
as your vehicle, may interfere with operation of your
vehicle. If you are racing against a non-MultiBand™
vehicle, make sure that vehicle operates on a frequency
different from yours.
*
If you need to change the MultiBand™ setting, first make
sure that your vehicle is turned OFF. Change the switch
position as desired, making sure to change both the
transmitter AND the vehicle switches. Then turn your
vehicle back ON for more racing action. NOTE: Make
certain you’re not pressing a transmitter control while
changing selector switch position.
123
3 2 1
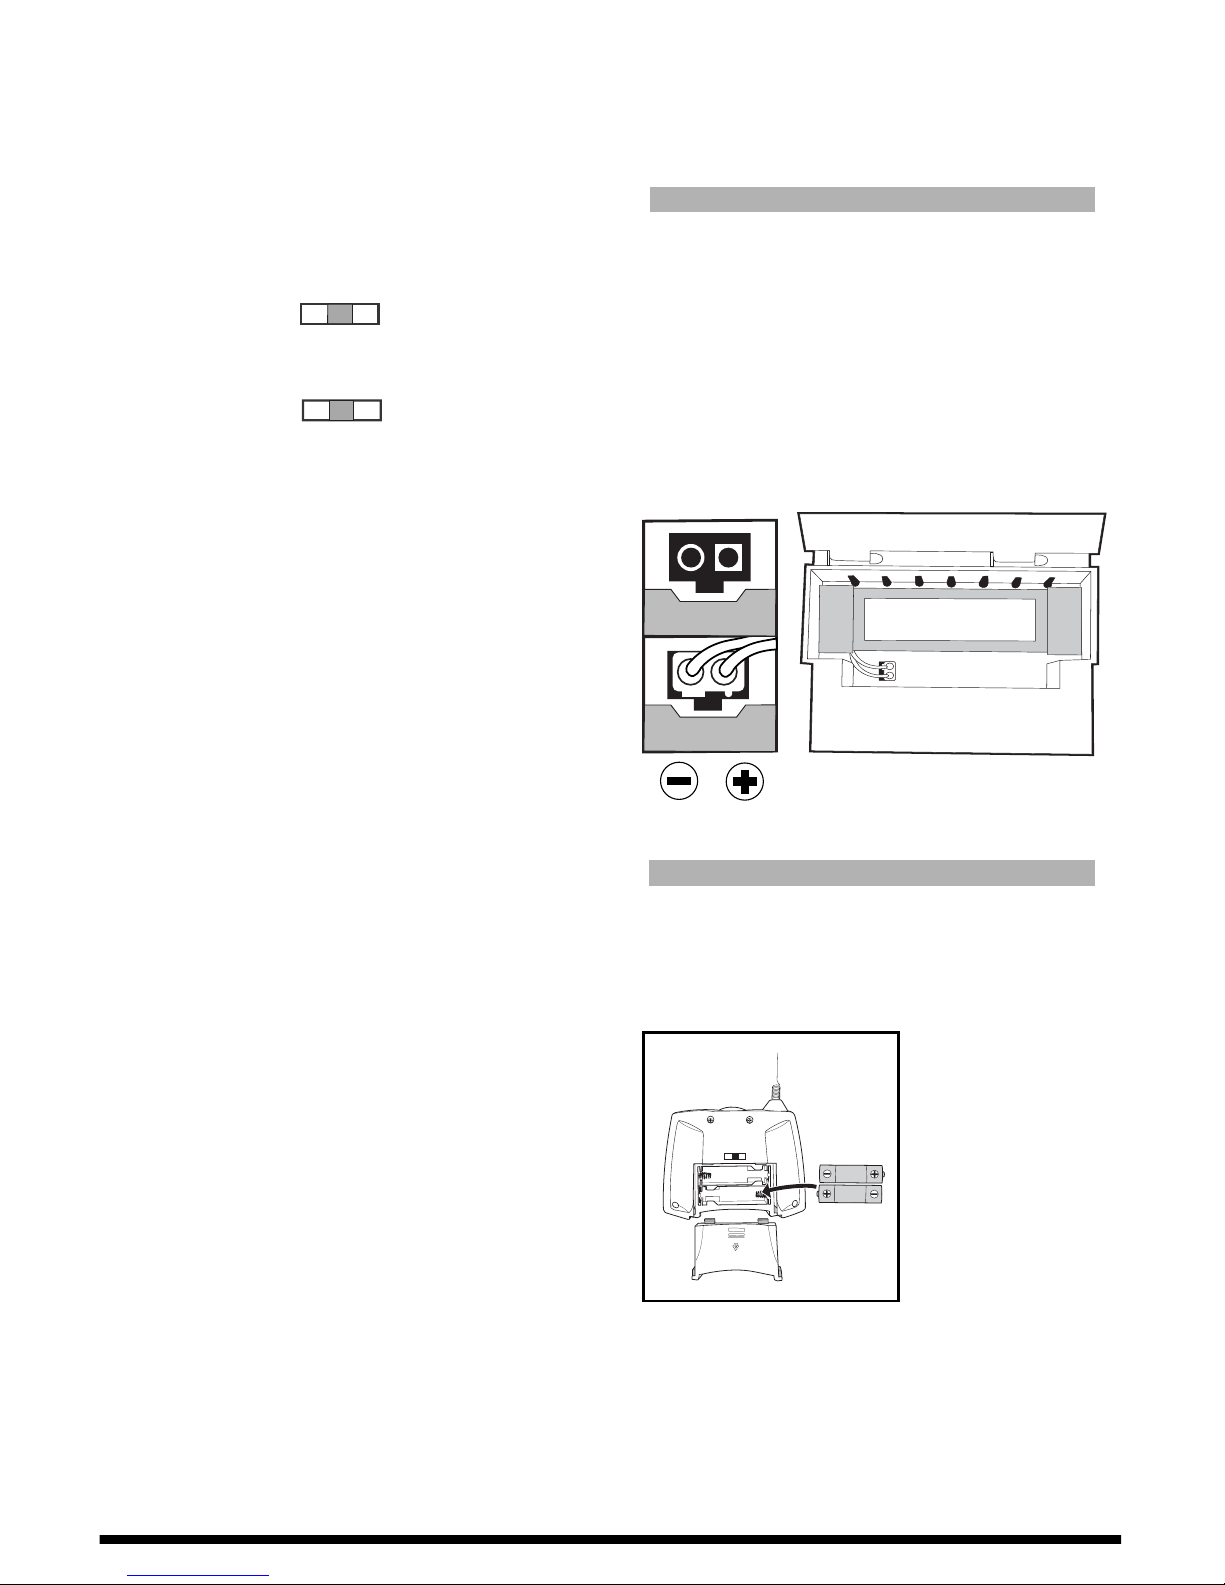
Transmitter
1. To install transmitter battery, open battery cover as shown.
2. Install 2 AA alkaline batteries with polarity (-/+) as shown
inside battery compartment.
3. Replace battery cover.
7.2V d.c.
For detailed information regarding rechargeable battery
charging and safety, please refer to the “Battery
Charging/Care” Section.
Vehicle
1. Rotate the battery door latch to unlocked position and
open the battery door.
2. Insert the charged battery pack into the battery
compartment as shown.
3. Connect the battery pack’s wire connector to the vehicle’s
charging jack as shown. Make certain the connector is
securely connected.
4. Close the battery door and rotate the battery door latch to
locked position.
BATTERY INSTALLATION
321

Use only Tyco® R/C 7.2V NiCd battery
packs. Other batteries may leak or
rupture, causing personal injury and
damage.
1. Plug wall pack charger into standard
wall outlet.
2. Connect the battery pack’s wire
connector to the wall pack charger
connector. Make certain the two
connectors are tightly snapped
together.
3. To disconnect wires, push down on the
connector clip and pull apart.
4. After charging, the battery will feel
warm. This condition is normal for fully
charged batteries.
5. New battery packs must be charged for
5 1/2 hours the first two times charged.
Subsequent charges will require 4
hours. Charging the battery pack for
more than 5 1/2 hours will not give you a
longer running time. 5 1/2 hours is all
that is required for a fully charged
battery pack.
6. Unlike alkaline batteries, which lose
power gradually, a NiCd (NickelCadmium) battery will run for its normal
running time and then lose most of its
power at once. It is time to recharge the
battery pack.
7. After use, the battery pack will be hot!
Wait at least 20 minutes until the battery
pack cools before recharging.
Recharging a warm or hot battery pack
will greatly reduce the number of times
your battery pack can be recharged.
RECHARGEABLE BATTERY INFORMATION:
DO NOT RECHARGE BATTERY PACK IF
IT’S HOT. ALLOW IT TO COOL BEFORE
RECHARGING.
DO NOT RECHARGE A BATTERY PACK
THAT SHOWS LEAKAGE OR
CORROSION.
DO NOT DISASSEMBLE THE BATTERY
PACK. THE BATTERY PACK IS A
SEALED RECHARGEABLE NICKELCADMIUM BATTERY.
EXERCISE CAUTION IN HANDLING A
HOT BATTERY PACK.
IF BATTERY PACK AND/OR CHARGER
ARE WET, THOROUGHLY DRY BEFORE
CHARGING.
DO NOT RECHARGE NON-
RECHARGEABLE BATTERIES.
Note to Adults:
• Remove rechargeable batteries before
recharging. Recharge batteries only
under adult supervision.
• Regularly examine for damage to the
cord, plug, enclosure and other parts.
In the event of any damage, the toy must
not be used with the battery charger
until the damage has been repaired.
• This toy is not intended for children
under 3 years old. The battery charger
is not a toy.
THIS PRODUCT USES A NICKELCADMIUM RECHARGEABLE BATTERY
PACK. BATTERY MUST BE RECYCLED OR
DISPOSED OF PROPERLY. FOR FURTHER
INFORMATION REGARDING BATTERIES
OR THEIR DISPOSAL PLEASE CALL
1-888-557-TYCO.
BATTERY CHARGING/CARE
THIS PRODUCT USES A NICKEL-CADMIUM RECHARGEABLE BATTERY PACK. BATTERY MUST BE RECYCLED OR DISPOSED OF PROPERLY.
FOR FURTHER INFORMATION REGARDING BATTERIES OR THEIR DISPOSAL PLEASE CALL 1-888-557-TYCO.
X
CAUTION: Use only the charger
supplied with this toy. Do not use
any other charging source.

Note to Adults: To ensure that the child’s play is
both safe and fun, please review all operating
instructions and safety rules with your child..
Safety Tips
• NEVER drive your vehicle on streets! They’re for
real cars!
• DO NOT pick up vehicle while in motion.
• Keep fingers, hair and loose clothing away from
the tires and the wheel hubs while the vehicle is
switched ON.
X
CAUTION: To prevent entanglement, keep
hair away from wheels.
• Adult supervision is recommended when this
vehicle is being operated.
• To avoid accidental operation, remove all
batteries when not in use. Always turn all
switches OFF before removing batteries.
BATTERY SAFETY INFORMATION
In exceptional circumstances batteries may leak
fluids that can cause a chemical burn injury or ruin
your toy (product). To avoid battery leakage:
• Non-rechargeable batteries are not to be
recharged.
• Rechargeable batteries are to be removed from
the toy before being charged (if designed to be
removable).
• Rechargeable batteries are only to be charged
under adult supervision (if designed to be
removable).
• Do not mix alkaline, standard (carbon-zinc),
or rechargeable (nickel-cadmium) batteries.
• Do not mix old and new batteries.
• Only batteries of the same or equivalent type as
recommended are to be used.
• Batteries are to be inserted with the correct
polarity.
• Exhausted batteries are to be removed from the
toy.
•
The supply terminals are not to be short-circuited.
• Dispose of battery(ies) safely.
• Do not dispose of this toy in a fire. The batteries
inside may explode or leak.
Battery Performance Note:
For best performance use regular or high-performance alkaline batteries (where disposable batteries
are called for). If your vehicle is supplied with
standard (carbon-zinc) batteries for initial use and/or
demonstration purposes, we recommend replacing
them with alkaline batteries when necessary. Battery
life may vary depending on battery brand.
QUICK TIPS
SYMPTOM
Vehicle runs slowly or will not run.
Erratic operation or only short range possible.
Short rechargeable battery life.
Vehicle doesn’t work after going through water or snow.
• PROBABLE CAUSE
• Loose battery connection or vehicle switch not ON.
• Weak or uncharged rechargeable battery.
• Weak transmitter battery.
• Transmitter and vehicle MultiBand™ Selector Switches
set to different MultiBand™ settings.
• Radio interference likely.
• Battery not fully charged.
• Water in the electronics area.
• CORRECTION
• Check battery connector and vehicle switch.
• Charge battery or replace.
• Replace with fresh alkaline battery.
• Check MultiBand™ Selector Switches and change switch
positions if necessary (MultiBand™ settings must match).
• Check for possible interference, and change driving
location if necessary (see point 2 – Quick Tips).
• Recharge vehicle battery.
• Vehicle will take several hours to dry. Allow to dry
thoroughly overnight before trying again. Avoid driving in
water or snow.
TROUBLESHOOTING - PROBLEM? - SOLUTIONS
CONSUMER INFORMATION:
yt
q
er
© 2004 Mattel, Inc., 333 Continental Blvd., El Segundo, CA 90245 U.S.A.
Consumer Affairs: 1 (800) 524-TOYS. PRINTED IN CHINA. All Rights
Reserved. MATTEL, TYCO and associated trademarks and trade dress
are owned by Mattel, Inc. Retain this address for future reference:
Mattel U.K. Ltd., V
anwall Business Park, Maidenhead SL6 4UB. Helpline
01628 500303. Mattel Australia Pty Ltd., Richmond, Victoria 3121 Consumer Advisory Service: 1300 135 312. Mattel East Asia Ltd, Room
1106, South Tower, World Finance Centre, Harbour City, Tsimshatsui, HK,
China. Diimport & Diedarkan Oleh: Mattel SEA Ptd Ltd. (993532-P) Lot
13.5, Menara Lien Hoe, Persiaran Tropicana Golf Country Resort, 47410
PJ. Tel: 03-78803817, Fax: 03-78803867.
COMPLIANCE WITH FCC REGULATIONS (VALID IN U.S. ONLY)
)
This device complies with part 15 of the FCC Rules. Operation is
subject to the following two conditions: (1) This device may not
cause harmful interference, and (2) this device must accept any
interference received, including interference that may cause
undesired operation.
This device generates and uses radio frequency energy and if not
used properly may cause interference to radio and
television reception. It has been tested and found to comply with
the limits set by the FCC which are designed to provide reasonable protection against such interference.
NOTE: Changes or modifications not expressively approved by the
manufacturer responsible for compliance could void the user’s
authority to operate the equipment.
Mattel, Inc. warrants to the original consumer purchaser that this product will be free of defects in
material and workmanship for ninety (90) days (unless specified in alternate warranties) from the date of
purchase. Mattel will replace the product in the event of such a defect within the warranty period.
In the event of a defect covered under this warranty, first call the toll-free number listed below.
Many problems can be solved in this manner. If necessary, you will be instructed to return the product,
postage prepaid and insured, to the address below. Enclose your name, address, dated sales receipt,
and a brief explanation of the defect. Replacement and return shipment will be free of charge.
This warranty does not cover damage resulting from unauthorized modification, accident, misuse or
abuse. If the product is returned without a dated sales receipt the product may be excluded from
coverage under this warranty.
Mattel’s liability for defects in material and workmanship under this warranty shall be limited to repair or
replacement, at our sole option, and in no event shall we be responsible for incidental, consequential, or
contingent damages (except in those states that do not allow this exclusion or limitation). This warranty
is exclusive, and is made in lieu of any express or implied warranty. Valid only in U.S.A. This warranty
gives you specific legal rights and you may have other rights, which vary from state to state. Some states
do not allow the exclusion of incidental or consequential damages, so the above exclusions or limitations
may not apply to you.
TOLL-FREE NUMBER: 1-888-557-TYCO (8926) (valid only in U.S.A.)
Hours: 8:00 A.M. - 5:00 P.M. Eastern Time; Monday - Friday. Expect some delay in January following the
holiday season. Please be patient and keep trying the toll-free number.
ADDRESS FOR RETURNS:
CONSUMER RELATIONS
636 GIRARD AVENUE
EAST AURORA, NY 14052
90 DAY LIMITED WARRANTY – TYCO® R/C PRODUCTS
q When your vehicle starts to
lose power, it may lose
functions or performance.
It's time for a recharge. For best
performance, always start with
a fully-charged battery.
w Your vehicle's running time may
change depending on your
driving style.
e Radio interference can make
your vehicle run badly.
Interference can be caused by
other non-MultiBand™ R/C
vehicles running on the same
frequency; electrical wires;
large buildings; CB radios; or
other wireless gear. Try to stay
away from these!
r Point your transmitter antenna
up - not down toward your
vehicle. If your vehicle gets too
far away, it won't work properly.
t Don’t drive your vehicle in sand
or through water or snow. If
your vehicle does get wet, wipe
with a towel and allow to dry
completely.
y Don’t store your vehicle near
heat or in direct sunlight.
Always turn switches OFF and
remove all batteries for storage.
w
 Loading...