

Tyco Healthcare KANGAROO JOEY User manual
kENDALL
0123
™
KANGAROO JOEY
Enteral Feeding Pump
Operation and Service Manual
Enteral Feeding Pump — Operation and Service Manual
Nutripompe — Manuel d’utilisation et d’entretien
Pumpe für die enterale Ernährung — Betriebs- und Serviceanleitung
Pompa di alimentazione enterale — Manuale operativo e di manutenzione
Bomba para alimentación enteral — Manual de operación y servicio
Enteral matningspump — Användar- och servicemanual
Enterale voedingspomp — Handleiding voor bediening en onderhoud
Bomba de alimentação entérica — Manual de funcionamento e assistência
Enteraalinen ravitsemuspumppu — Käyttö- ja huolto-opas
Pumpe til enteral ernæring — Betjenings- og servicehåndbog
Αντλία εντερικής σίτισης — Εγχειρίδιο λειτουργίας και σέρβις
Pumpa pro enterální výživu — Provozní a servisní příručka
Enterális táplálópumpa — Kezelési és karbantartási kézikönyv
Насос для энтерального питания — Руководство по эксплуатации и техническому обслуживанию
Pompa żywienia dojelitowego — Instrukcja obsługi i serwisowania
Enteral Besleme Pompası — Operasyon ve Servis Kılavuzu
Enteral ernæringspumpe — Bruker- og vedlikeholdshåndbok
Rx
ONLY
™ Trademark of Tyco Healthcare Group LP or its aliate.
™*SPRAY-NINE is a trademark of Spray-Nine Corporation.
™*PHISOPHEX is a trademark of Smith Kline Beecham Corp.
™*HIBICLENS is a trademark of Tubifoam Ltd.
™*VESTA-SYDE is a trademark of Steris, Inc.
TYCO HEALTHCARE GROUP LP • MANSFIELD, MA 02048 • MADE IN U.S.A. • © 2006 TYCO HEALTHCARE GROUP LP
ALL RIGHTS RESERVED • 061005 • PRODUCT INFORMATION IN U.S. 1-800-962-9888 • www.tycohealthcare.com
EC REP TYCO HEALTHCARE U.K. LTD • GOSPORT PO13 0AS, U.K.
182404

English
Thank you for purchasing the KANGAROO JOEY™ Enteral Feeding Pump.
With proper care, this device will provide you with years of precision service.
TABLE OF CONTENTS
Page
Section I — General Information . . . . . . . . . . . . . . . . . . . . . . . . . . . . . . . . . . . . . . . . . . . . . . . . . . . . . . . . . . . . . . . . . . . . . . . . . . . . . 1
Section II — Safety and Warnings . . . . . . . . . . . . . . . . . . . . . . . . . . . . . . . . . . . . . . . . . . . . . . . . . . . . . . . . . . . . . . . . . . . . . . . . . . . . 3
Section III — Icon Identification. . . . . . . . . . . . . . . . . . . . . . . . . . . . . . . . . . . . . . . . . . . . . . . . . . . . . . . . . . . . . . . . . . . . . . . . . . . . . . 4
Section IV — Initial Setup
Attaching the A/C Adapter Power Cord. . . . . . . . . . . . . . . . . . . . . . . . . . . . . . . . . . . . . . . . . . . . . . . . . . . . . . . . . . . . . . . . . . . . . . . . . . . . . 5
Battery Setup. . . . . . . . . . . . . . . . . . . . . . . . . . . . . . . . . . . . . . . . . . . . . . . . . . . . . . . . . . . . . . . . . . . . . . . . . . . . . . . . . . . . . . . . . . . . . . . . . . . 6
Attaching Pole Clamp . . . . . . . . . . . . . . . . . . . . . . . . . . . . . . . . . . . . . . . . . . . . . . . . . . . . . . . . . . . . . . . . . . . . . . . . . . . . . . . . . . . . . . . . . . . . 6
Section V — Instructions for Use
Quick Start . . . . . . . . . . . . . . . . . . . . . . . . . . . . . . . . . . . . . . . . . . . . . . . . . . . . . . . . . . . . . . . . . . . . . . . . . . . . . . . . . . . . . . . . . . . . . . . . . . . . . 7
General Startup . . . . . . . . . . . . . . . . . . . . . . . . . . . . . . . . . . . . . . . . . . . . . . . . . . . . . . . . . . . . . . . . . . . . . . . . . . . . . . . . . . . . . . . . . . . . . . . . . 8
Placement/Mounting. . . . . . . . . . . . . . . . . . . . . . . . . . . . . . . . . . . . . . . . . . . . . . . . . . . . . . . . . . . . . . . . . . . . . . . . . . . . . . . . . . . . . . 8
A/C Power Operation . . . . . . . . . . . . . . . . . . . . . . . . . . . . . . . . . . . . . . . . . . . . . . . . . . . . . . . . . . . . . . . . . . . . . . . . . . . . . . . . . . . . . . 8
Battery Power Operation. . . . . . . . . . . . . . . . . . . . . . . . . . . . . . . . . . . . . . . . . . . . . . . . . . . . . . . . . . . . . . . . . . . . . . . . . . . . . . . . . . . 9
Power On/Off. . . . . . . . . . . . . . . . . . . . . . . . . . . . . . . . . . . . . . . . . . . . . . . . . . . . . . . . . . . . . . . . . . . . . . . . . . . . . . . . . . . . . . . . . . . . . 9
Language Selection, First Power Up. . . . . . . . . . . . . . . . . . . . . . . . . . . . . . . . . . . . . . . . . . . . . . . . . . . . . . . . . . . . . . . . . . . . . . . . . . 9
Keep or Clear Prior Pump Settings . . . . . . . . . . . . . . . . . . . . . . . . . . . . . . . . . . . . . . . . . . . . . . . . . . . . . . . . . . . . . . . . . . . . . . . . . . . 9
Loading Pump Sets . . . . . . . . . . . . . . . . . . . . . . . . . . . . . . . . . . . . . . . . . . . . . . . . . . . . . . . . . . . . . . . . . . . . . . . . . . . . . . . . . . . . . . . . . . . . . 10
Prime Pump . . . . . . . . . . . . . . . . . . . . . . . . . . . . . . . . . . . . . . . . . . . . . . . . . . . . . . . . . . . . . . . . . . . . . . . . . . . . . . . . . . . . . . . . . . . . . . . . . . . 11
Auto Priming. . . . . . . . . . . . . . . . . . . . . . . . . . . . . . . . . . . . . . . . . . . . . . . . . . . . . . . . . . . . . . . . . . . . . . . . . . . . . . . . . . . . . . . . . . . . 11
Hold-To-Prime. . . . . . . . . . . . . . . . . . . . . . . . . . . . . . . . . . . . . . . . . . . . . . . . . . . . . . . . . . . . . . . . . . . . . . . . . . . . . . . . . . . . . . . . . . . 12
Re-priming after Bag Empty . . . . . . . . . . . . . . . . . . . . . . . . . . . . . . . . . . . . . . . . . . . . . . . . . . . . . . . . . . . . . . . . . . . . . . . . . . . . . . .12
Selecting Feed Mode. . . . . . . . . . . . . . . . . . . . . . . . . . . . . . . . . . . . . . . . . . . . . . . . . . . . . . . . . . . . . . . . . . . . . . . . . . . . . . . . . . . . . . . . . . . . 12
Selecting EZMODE . . . . . . . . . . . . . . . . . . . . . . . . . . . . . . . . . . . . . . . . . . . . . . . . . . . . . . . . . . . . . . . . . . . . . . . . . . . . . . . . . . . . . . . . . . . . . . 13
KANGAROO JOEY™
Enteral Feeding Pump

TABLE OF CONTENTS
Selecting Continuous or Intermittent Mode . . . . . . . . . . . . . . . . . . . . . . . . . . . . . . . . . . . . . . . . . . . . . . . . . . . . . . . . . . . . . . . . . . . . . . . . 13
Continuous Mode (Adjust Feed) . . . . . . . . . . . . . . . . . . . . . . . . . . . . . . . . . . . . . . . . . . . . . . . . . . . . . . . . . . . . . . . . . . . . . . . . . . . . 14
Continuous Mode Feeding . . . . . . . . . . . . . . . . . . . . . . . . . . . . . . . . . . . . . . . . . . . . . . . . . . . . . . . . . . . . . . . . . . . . . . . . . . . 14
Continuous Mode Flushing. . . . . . . . . . . . . . . . . . . . . . . . . . . . . . . . . . . . . . . . . . . . . . . . . . . . . . . . . . . . . . . . . . . . . . . . . . . 14
Intermittent Mode (Adjust Bolus) . . . . . . . . . . . . . . . . . . . . . . . . . . . . . . . . . . . . . . . . . . . . . . . . . . . . . . . . . . . . . . . . . . . . . . . . . . 15
Intermittent Mode Feeding . . . . . . . . . . . . . . . . . . . . . . . . . . . . . . . . . . . . . . . . . . . . . . . . . . . . . . . . . . . . . . . . . . . . . . . . . . 15
Intermittent Mode Feeding – Bolus Max . . . . . . . . . . . . . . . . . . . . . . . . . . . . . . . . . . . . . . . . . . . . . . . . . . . . . . . . . . . . . . .16
Intermittent Mode Flushing. . . . . . . . . . . . . . . . . . . . . . . . . . . . . . . . . . . . . . . . . . . . . . . . . . . . . . . . . . . . . . . . . . . . . . . . . . 16
Run . . . . . . . . . . . . . . . . . . . . . . . . . . . . . . . . . . . . . . . . . . . . . . . . . . . . . . . . . . . . . . . . . . . . . . . . . . . . . . . . . . . . . . . . . . . . . . . . . . . . . . . . . . 17
KTO . . . . . . . . . . . . . . . . . . . . . . . . . . . . . . . . . . . . . . . . . . . . . . . . . . . . . . . . . . . . . . . . . . . . . . . . . . . . . . . . . . . . . . . . . . . . . . . . . . . .18
Lock Screen Feature . . . . . . . . . . . . . . . . . . . . . . . . . . . . . . . . . . . . . . . . . . . . . . . . . . . . . . . . . . . . . . . . . . . . . . . . . . . . . . . . . . . . . . 18
Hold. . . . . . . . . . . . . . . . . . . . . . . . . . . . . . . . . . . . . . . . . . . . . . . . . . . . . . . . . . . . . . . . . . . . . . . . . . . . . . . . . . . . . . . . . . . . . . . . . . . . . . . . . . 19
Flush Now. . . . . . . . . . . . . . . . . . . . . . . . . . . . . . . . . . . . . . . . . . . . . . . . . . . . . . . . . . . . . . . . . . . . . . . . . . . . . . . . . . . . . . . . . . . . . . . . . . . . . 20
More Options . . . . . . . . . . . . . . . . . . . . . . . . . . . . . . . . . . . . . . . . . . . . . . . . . . . . . . . . . . . . . . . . . . . . . . . . . . . . . . . . . . . . . . . . . . . . . . . . . . 20
Buzzer Alarm Volume . . . . . . . . . . . . . . . . . . . . . . . . . . . . . . . . . . . . . . . . . . . . . . . . . . . . . . . . . . . . . . . . . . . . . . . . . . . . . . . . . . . .20
History . . . . . . . . . . . . . . . . . . . . . . . . . . . . . . . . . . . . . . . . . . . . . . . . . . . . . . . . . . . . . . . . . . . . . . . . . . . . . . . . . . . . . . . . . . . . . . . . . 20
Language Selection . . . . . . . . . . . . . . . . . . . . . . . . . . . . . . . . . . . . . . . . . . . . . . . . . . . . . . . . . . . . . . . . . . . . . . . . . . . . . . . . . . . . . . 21
Continuous/Intermittent Mode . . . . . . . . . . . . . . . . . . . . . . . . . . . . . . . . . . . . . . . . . . . . . . . . . . . . . . . . . . . . . . . . . . . . . . . . . . . . 21
BioTech Menu. . . . . . . . . . . . . . . . . . . . . . . . . . . . . . . . . . . . . . . . . . . . . . . . . . . . . . . . . . . . . . . . . . . . . . . . . . . . . . . . . . . . . . . . . . . . . . . . . . 21
Accessing the BioTech Screen . . . . . . . . . . . . . . . . . . . . . . . . . . . . . . . . . . . . . . . . . . . . . . . . . . . . . . . . . . . . . . . . . . . . . . . . . . . . . . 21
BioTech Screen Data . . . . . . . . . . . . . . . . . . . . . . . . . . . . . . . . . . . . . . . . . . . . . . . . . . . . . . . . . . . . . . . . . . . . . . . . . . . . . . . . . . . . . . 21
BioTech Options. . . . . . . . . . . . . . . . . . . . . . . . . . . . . . . . . . . . . . . . . . . . . . . . . . . . . . . . . . . . . . . . . . . . . . . . . . . . . . . . . . . . . . . . . . 22
Lock Settings Feature (Program Locked) . . . . . . . . . . . . . . . . . . . . . . . . . . . . . . . . . . . . . . . . . . . . . . . . . . . . . . . . . . . . . . . 22
EZMode . . . . . . . . . . . . . . . . . . . . . . . . . . . . . . . . . . . . . . . . . . . . . . . . . . . . . . . . . . . . . . . . . . . . . . . . . . . . . . . . . . . . . . . . . . .22
Communications . . . . . . . . . . . . . . . . . . . . . . . . . . . . . . . . . . . . . . . . . . . . . . . . . . . . . . . . . . . . . . . . . . . . . . . . . . . . . . . . . . . 22
Section VI — Re-Certification of Performance
System Performance Re-Certification. . . . . . . . . . . . . . . . . . . . . . . . . . . . . . . . . . . . . . . . . . . . . . . . . . . . . . . . . . . . . . . . . . . . . . . . . . . . . . 23
Certifying the Accuracy of Pump Flow Rate. . . . . . . . . . . . . . . . . . . . . . . . . . . . . . . . . . . . . . . . . . . . . . . . . . . . . . . . . . . . . . . . . . . . . . . . . 23
Section VII — Cleaning . . . . . . . . . . . . . . . . . . . . . . . . . . . . . . . . . . . . . . . . . . . . . . . . . . . . . . . . . . . . . . . . . . . . . . . . . . . . . . . . . . . . . . .24
Section VIII — Battery Replacement . . . . . . . . . . . . . . . . . . . . . . . . . . . . . . . . . . . . . . . . . . . . . . . . . . . . . . . . . . . . . . . . . . . . . . . . 25
KANGAROO JOEY™
Enteral Feeding Pump

TABLE OF CONTENTS
Section IX — Error/Warning/Informational Screens and Troubleshooting
System Error. . . . . . . . . . . . . . . . . . . . . . . . . . . . . . . . . . . . . . . . . . . . . . . . . . . . . . . . . . . . . . . . . . . . . . . . . . . . . . . . . . . . . . . . . . . . . . . . . . . 27
Hold Error . . . . . . . . . . . . . . . . . . . . . . . . . . . . . . . . . . . . . . . . . . . . . . . . . . . . . . . . . . . . . . . . . . . . . . . . . . . . . . . . . . . . . . . . . . . . . . . . . . . . . 28
Rotor Error . . . . . . . . . . . . . . . . . . . . . . . . . . . . . . . . . . . . . . . . . . . . . . . . . . . . . . . . . . . . . . . . . . . . . . . . . . . . . . . . . . . . . . . . . . . . . . . . . . . . 28
Feed Error . . . . . . . . . . . . . . . . . . . . . . . . . . . . . . . . . . . . . . . . . . . . . . . . . . . . . . . . . . . . . . . . . . . . . . . . . . . . . . . . . . . . . . . . . . . . . . . . . . . . .28
Flush Error . . . . . . . . . . . . . . . . . . . . . . . . . . . . . . . . . . . . . . . . . . . . . . . . . . . . . . . . . . . . . . . . . . . . . . . . . . . . . . . . . . . . . . . . . . . . . . . . . . . . 29
Flow Error. . . . . . . . . . . . . . . . . . . . . . . . . . . . . . . . . . . . . . . . . . . . . . . . . . . . . . . . . . . . . . . . . . . . . . . . . . . . . . . . . . . . . . . . . . . . . . . . . . . . . 29
Pump Set Dislodged Error. . . . . . . . . . . . . . . . . . . . . . . . . . . . . . . . . . . . . . . . . . . . . . . . . . . . . . . . . . . . . . . . . . . . . . . . . . . . . . . . . . . . . . . . 29
Battery Low . . . . . . . . . . . . . . . . . . . . . . . . . . . . . . . . . . . . . . . . . . . . . . . . . . . . . . . . . . . . . . . . . . . . . . . . . . . . . . . . . . . . . . . . . . . . . . . . . . . 30
Feeding Complete . . . . . . . . . . . . . . . . . . . . . . . . . . . . . . . . . . . . . . . . . . . . . . . . . . . . . . . . . . . . . . . . . . . . . . . . . . . . . . . . . . . . . . . . . . . . . .30
Pump Set Use >24 Hours Warning . . . . . . . . . . . . . . . . . . . . . . . . . . . . . . . . . . . . . . . . . . . . . . . . . . . . . . . . . . . . . . . . . . . . . . . . . . . . . . . . 30
LED Array . . . . . . . . . . . . . . . . . . . . . . . . . . . . . . . . . . . . . . . . . . . . . . . . . . . . . . . . . . . . . . . . . . . . . . . . . . . . . . . . . . . . . . . . . . . . . . . . . . . . .31
Section X — Specifications and Symbols
Specifications. . . . . . . . . . . . . . . . . . . . . . . . . . . . . . . . . . . . . . . . . . . . . . . . . . . . . . . . . . . . . . . . . . . . . . . . . . . . . . . . . . . . . . . . . . . . . . . . . . 32
Symbols on Pump and Accessories . . . . . . . . . . . . . . . . . . . . . . . . . . . . . . . . . . . . . . . . . . . . . . . . . . . . . . . . . . . . . . . . . . . . . . . . . . . . . . . . 35
Section XI — Customer Service . . . . . . . . . . . . . . . . . . . . . . . . . . . . . . . . . . . . . . . . . . . . . . . . . . . . . . . . . . . . . . . . . . . . . . . . . . . . . . 36
Section XII — Maintenance
Top Door Enclosing Pump Set Loading Area. . . . . . . . . . . . . . . . . . . . . . . . . . . . . . . . . . . . . . . . . . . . . . . . . . . . . . . . . . . . . . . . . . . . . . . . . 36
Battery Pack. . . . . . . . . . . . . . . . . . . . . . . . . . . . . . . . . . . . . . . . . . . . . . . . . . . . . . . . . . . . . . . . . . . . . . . . . . . . . . . . . . . . . . . . . . . . . . . . . . . 37
Battery Door. . . . . . . . . . . . . . . . . . . . . . . . . . . . . . . . . . . . . . . . . . . . . . . . . . . . . . . . . . . . . . . . . . . . . . . . . . . . . . . . . . . . . . . . . . . . . . . . . . . 37
Power Cord . . . . . . . . . . . . . . . . . . . . . . . . . . . . . . . . . . . . . . . . . . . . . . . . . . . . . . . . . . . . . . . . . . . . . . . . . . . . . . . . . . . . . . . . . . . . . . . . . . . . 37
Pole Clamp . . . . . . . . . . . . . . . . . . . . . . . . . . . . . . . . . . . . . . . . . . . . . . . . . . . . . . . . . . . . . . . . . . . . . . . . . . . . . . . . . . . . . . . . . . . . . . . . . . . . 37
Section XIII — Service Part Numbers
Accessory Items . . . . . . . . . . . . . . . . . . . . . . . . . . . . . . . . . . . . . . . . . . . . . . . . . . . . . . . . . . . . . . . . . . . . . . . . . . . . . . . . . . . . . . . . . . . . . . . . 38
Section XIV — Warranty . . . . . . . . . . . . . . . . . . . . . . . . . . . . . . . . . . . . . . . . . . . . . . . . . . . . . . . . . . . . . . . . . . . . . . . . . . . . . . . . . . . . . . 39
Section XV — Electromagnetic Conformity Declaration . . . . . . . . . . . . . . . . . . . . . . . . . . . . . . . . . . . . . . . . . . . . . . . . . . . 40
Section XVI — AccuSystem√ . . . . . . . . . . . . . . . . . . . . . . . . . . . . . . . . . . . . . . . . . . . . . . . . . . . . . . . . . . . . . . . . . . . . . . . . . . . . . . . . . 41
This product contains software solely owned by Tyco. Tyco grants the user a non-exclusive, limited license
to use the software according to the operating instructions. A copy of the license can be obtained from Tyco.
KANGAROO JOEY™
Enteral Feeding Pump

Section I – General Information
The KANGAROO JOEY enteral feeding pump is a simple-to-use, precision enteral feeding pump. It is easily programmed to provide
patients with either continuous or intermittent feeding, and can provide automatic flushing capability when used with KANGAROO
ePump™ Feed & Flush Sets.
User Interface:
• Intuitive user interface
• Large, backlit LCD display
• Step-by-step prompts to guide programming and operation
• “Stoplight” LED array visually indicates pump status in a bright or darkened room
Ergonomics:
• Quiet operation
• Compact, portable aesthetic design
• Tabletop usage or IV pole mounting
• Simple loading of pump sets
• Transparent top door to protect pump set
• Water-resistant
• “Soft Touch” rubberized casing for easy grip and drop protection
• “Quick Release” pole clamp for easy detachment of pump
Features:
• MISTIC (Magnetic Intelligent Set Type Identification Connector) Feed-Only vs. Feed & Flush Set identification system to ensure
match between the pump’s user interface and pump set type
• Automatic Anti-Free-Flow (AFF) System
• Audible alarm to indicate errors or pump set loading conditions
• Orientation-independent delivery design eliminates need for drip chamber on pump set
• Sensor technology detects both upstream and downstream flow conditions
• Continuous feed, intermittent feed, and flush capability
• Auto-prime feature reduces the need for time-consuming manual priming
• Hold feature with restart
• “Keep Tube Open” (KTO) feature
• Stores previous 72 hours of feeding and flushing history
• 15 Languages
• All sets operating on the KANGAROO ePump will also operate on the KANGAROO JOEY
KANGAROO JOEY™
1
Enteral Feeding Pump
.FOV
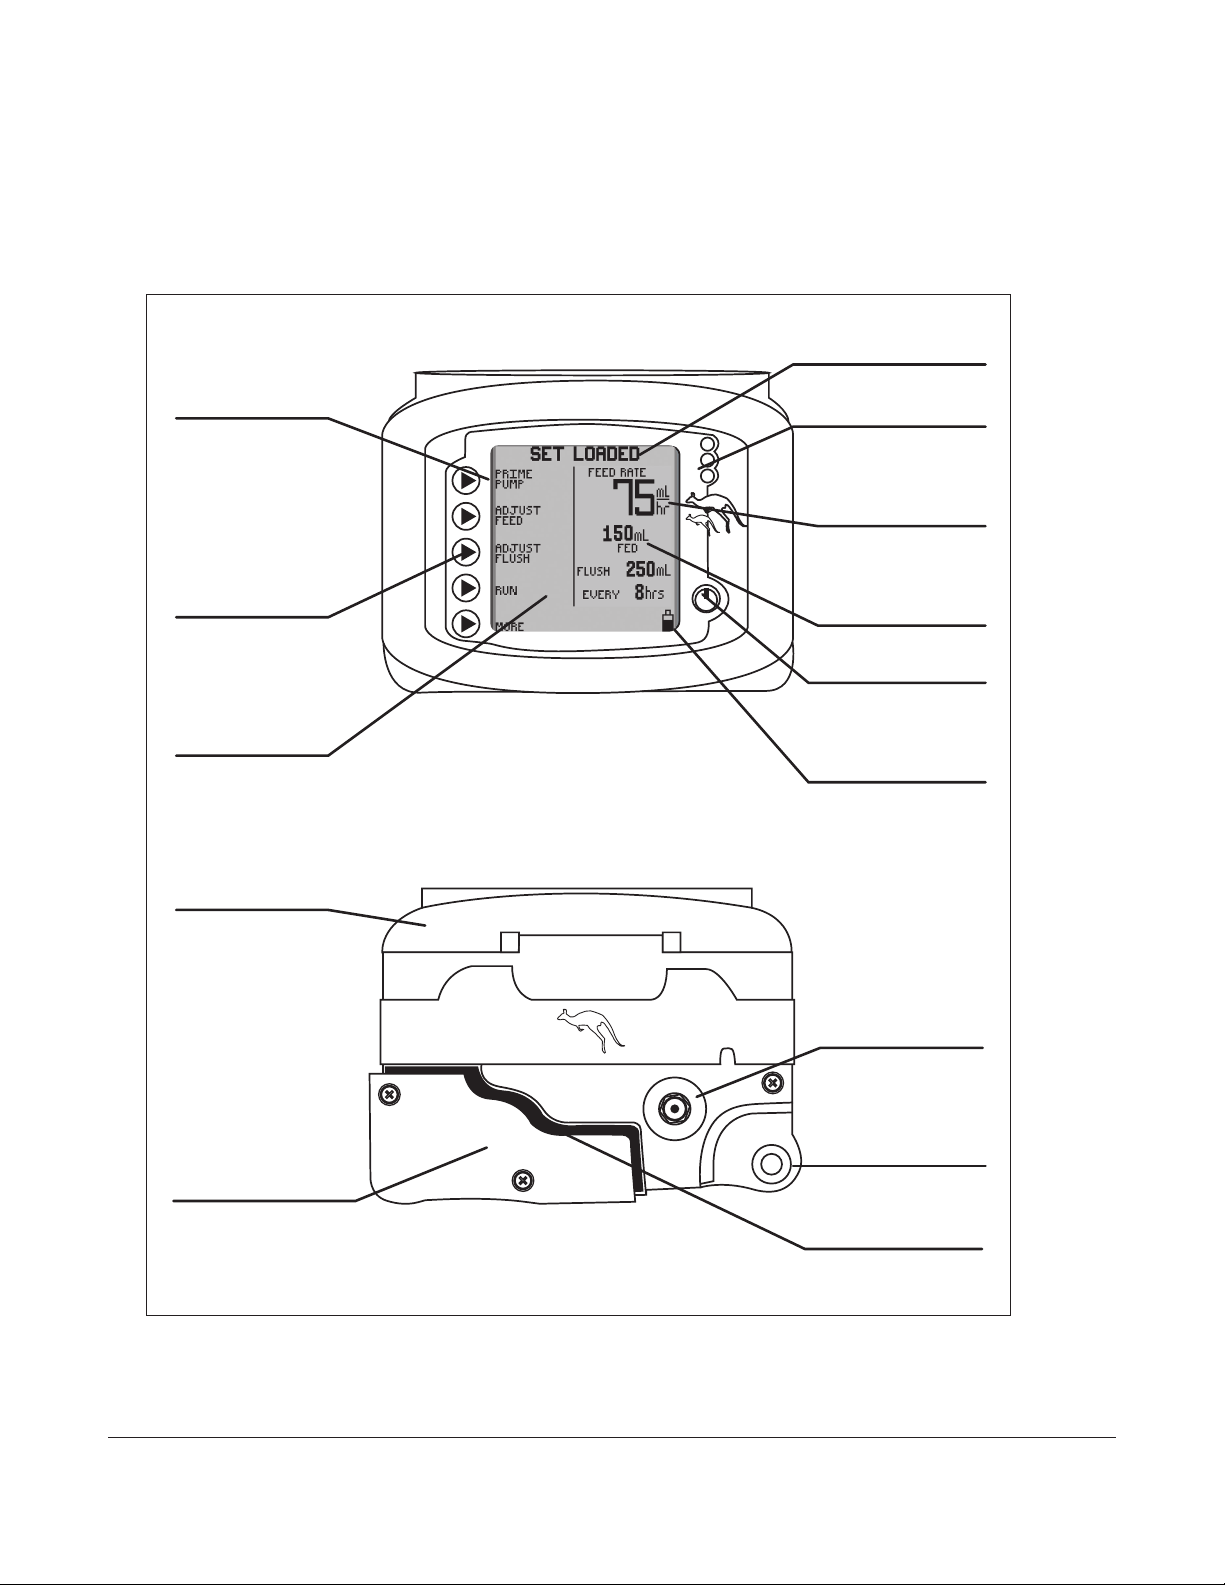
4FMFDUJPOT
.FOV
4FMFDUJPO
#VUUPOT
(SBQIJD
%JTQMBZ
'SPOU
%PPS
#BDL
#BUUFSZ%PPS
4FSJBM*01PSUJT
#&)*/%#BUUFSZ%PPS
"$"EBQUFS1PSU
1PMF$MBNQ
"UUBDINFOU1PJOU
#BUUFSZ4UBUVT
1PXFS#VUUPO
0VUQVU5PUBMT
*OQVU4FUUJOHT
4UBUVT-&%T
4UBUVT-JOF
Service:
• Serial I/O port for data retrieval and software updates
• Uses replaceable, rechargeable Lithium-Ion Battery Pack for 18 hours of backup power
• Easily removable power cord
Figure 1A. KANGAROO JOEY features, front and rear views.
KANGAROO JOEY™
2
Enteral Feeding Pump
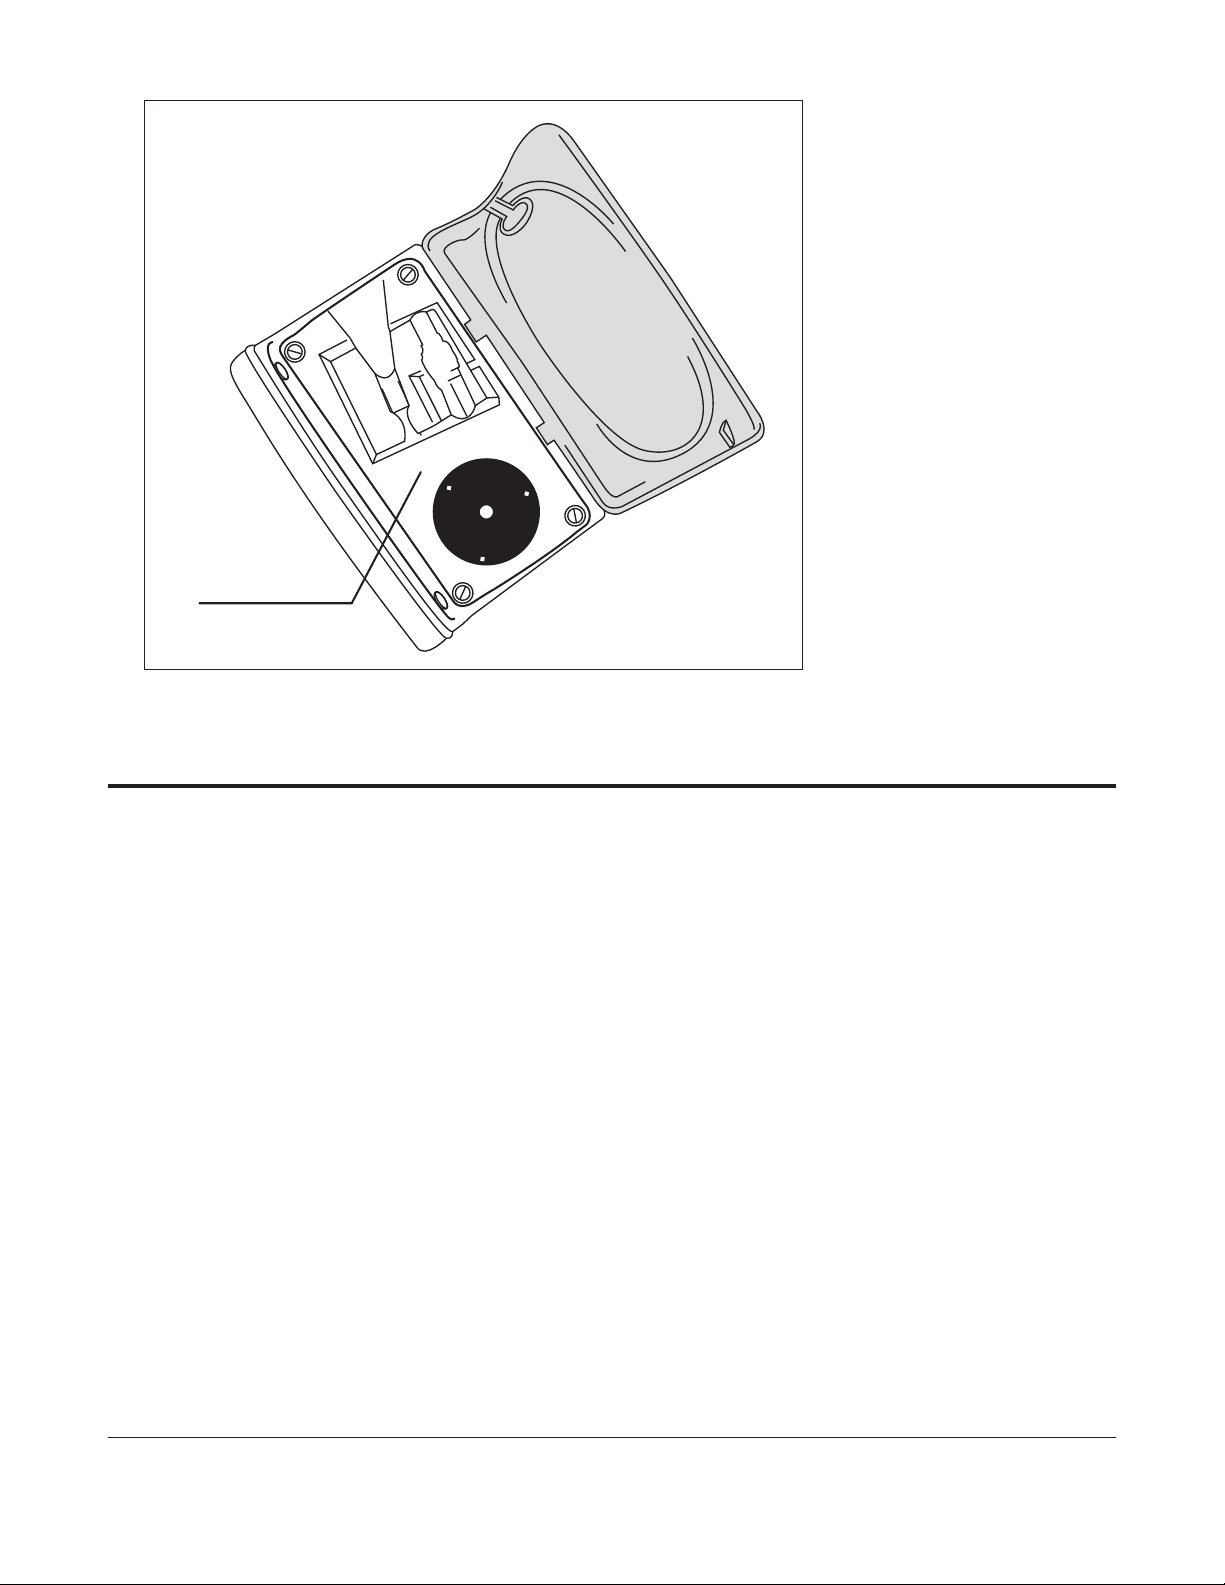
Figure 1B. KANGAROO JOEY pump set loading area.
'FFEJOH4FU
-PBEJOH"SFB
Section II — Safety and Warnings
CAUTION: U.S. federal law restricts the sale of this device to physicians or to their direct representatives.
1. Read this booklet thoroughly before using the KANGAROO JOEY enteral feeding pump.
2. Do not use this device near flammable anesthetics.
3. Disconnect power supply before cleaning or servicing.
4. Use only KANGAROO JOEY enteral feeding pump power cord (with built-in A/C adapter) with pump. See Section XIII - Service
Part Numbers for replacement of power cord.
5. Use only KANGAROO ePump enteral feeding pump sets with this device. Pump is not compatible with other pump sets.
6. For re-certification, see Section VI - Re-certification of Performance. For other integrity checks, consult with a qualified
Biomedical Technician or contact the manufacturer (Section XI - Customer Service).
7. For service or for technical information, please contact Customer Service (Section XI).
8. Do not open the main housing, as there are no user-serviceable parts inside. Opening may affect function of device and voids
the warranty. To replace battery, see Section VIII.
9. Dispose of old battery-powered electronic equipment in a manner consistent with institutional policy for expired equipment
disposal.
10. Cleaning frequency and practices must be consistent with institutional policy for cleaning of non-sterile devices. See Section VII
- Cleaning, for instructions on cleaning the KANGAROO JOEY enteral feeding pump.
11. See icon descriptions in Section III - Icon Identification and Section X - Specifications and Symbols for additional safety
information.
KANGAROO JOEY™
3
Enteral Feeding Pump

12. This device is designed to minimize the effects of uncontrolled electromagnetic interference and other types of interference
from external sources. Avoid use of other equipment that may cause erratic operation or degradation in the performance of this
device.
13. WARNING: The serial I/O port (see Figure 1A) is intended only for use by the manufacturer.
Any accessory equipment that can be connected to the serial I/O port, and which does not comply with the equivalent safety
requirements of this equipment, may lead to a reduced level of safety of the pump. While use of the pump’s serial port is not
recommended for customers, the following should be considered in the event that the customer decides to connect to this port:
• The accessory is specifically certified as complying with the safety requirements for accessories used with the pump, whereas
the safety certification of the accessory has been performed in accordance to the appropriate IEC 60601-1 and/or IEC 60601-1-1
harmonized standard.
14. CAUTION: This enteral feeding pump should only be used for patients who can tolerate the flow rates and accuracy levels
delivered by the pump. Premature infants may require higher accuracy rates than specified for this enteral feeding pump.
Section III – Icon Identification
Run Mode
Vertically-moving droplet in
RUNNING screen indicates Run
mode.
Battery Symbols
• Full charge
• 2/3 or less charge
• 1/3 or less charge
• Very low battery (15 minutes max.)
Auto Priming Indicator
When auto priming, the bar will progress
to show auto prime feature is active.
Volume Setting
Indicates alarm volume setting.
Error Indicator
Pump operations are stopped
until the error is resolved.
Information Indicator
This indicates information only, and
does not require any immediate action.
KANGAROO JOEY™
4
Enteral Feeding Pump
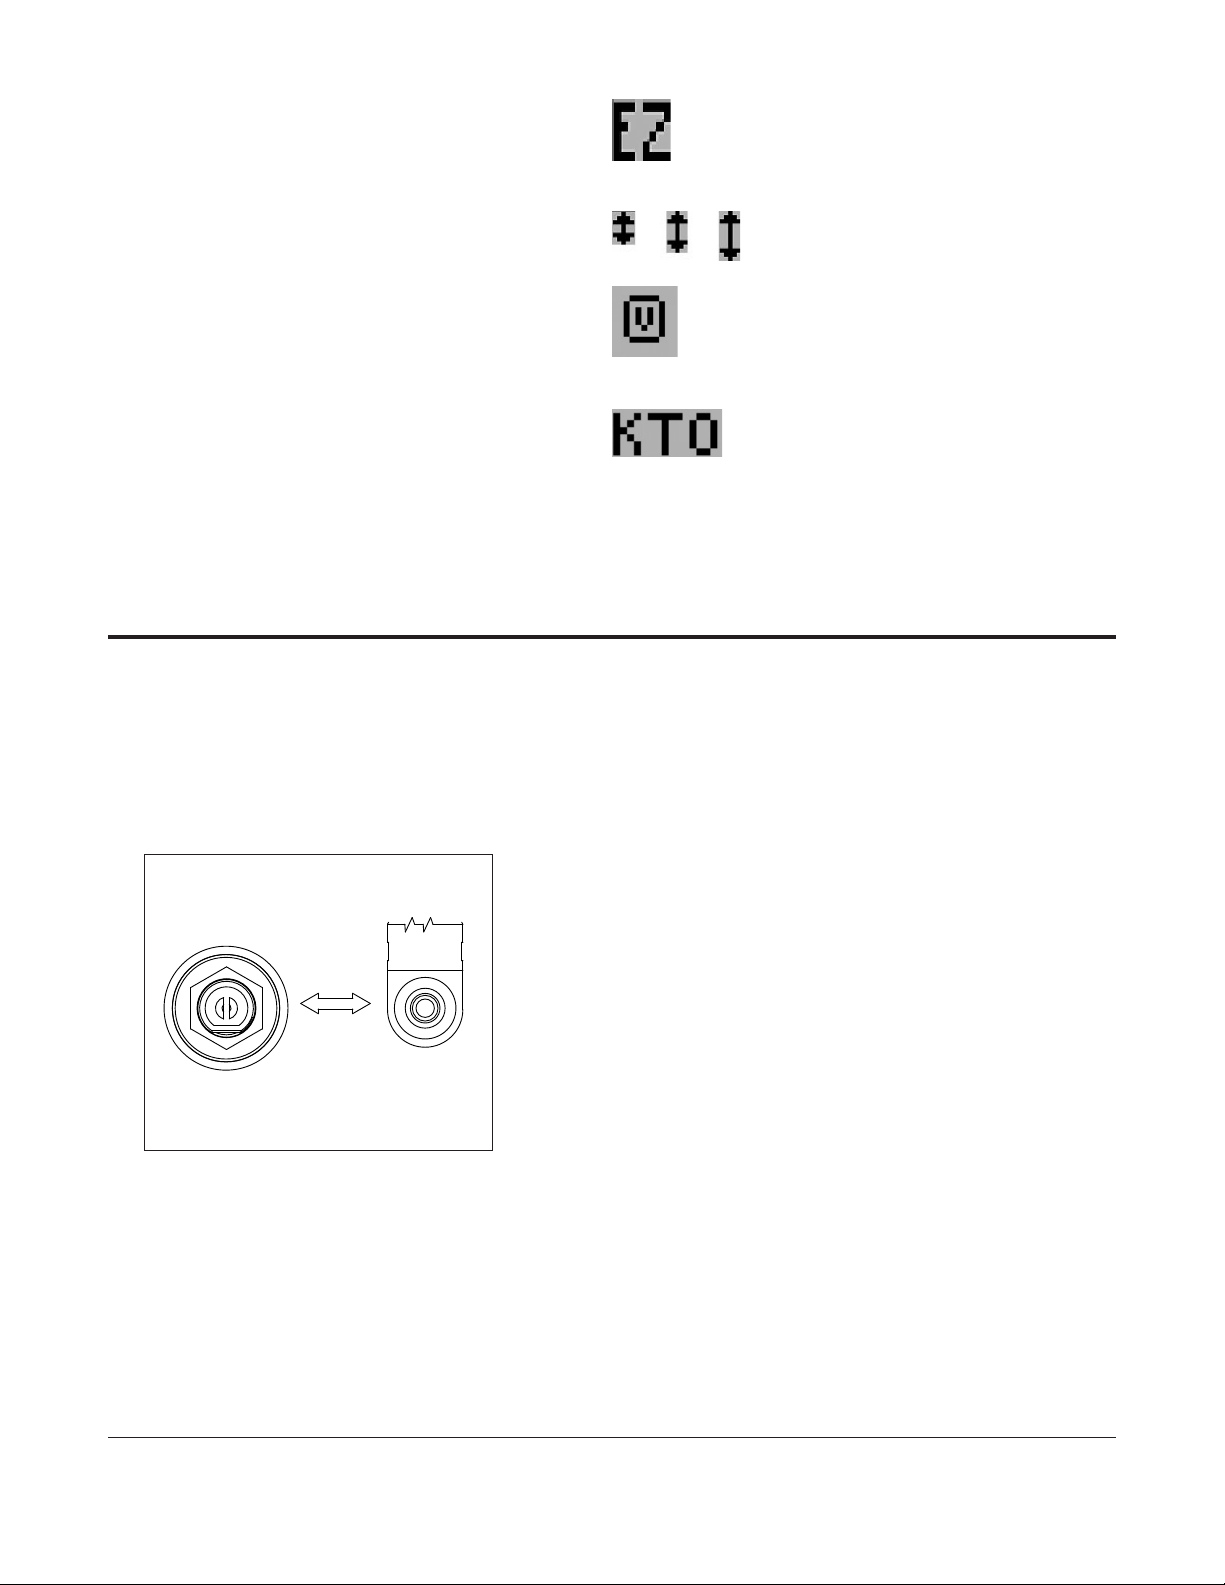
EZMODE Indicator
"$"EBQUFS
1PSU
"$"EBQUFS
1MVH
6TFDBSFBMJHOJOHBEBQUFS
XJUIQVNQDPOOFDUPS
AC Adapter
Plug
AC Adapter
Port
Indicates that EZMODE feature is activated.
Communication Indicator
Indicates that communication feature is activated.
Volume to be Delivered Indicator
Indicates that a VTBD has been programmed.
Keep Tube Open
Indicates that Keep Tube Open feature is in operation.
Section IV — Initial Setup
Attaching the A/C Adapter Power Cord
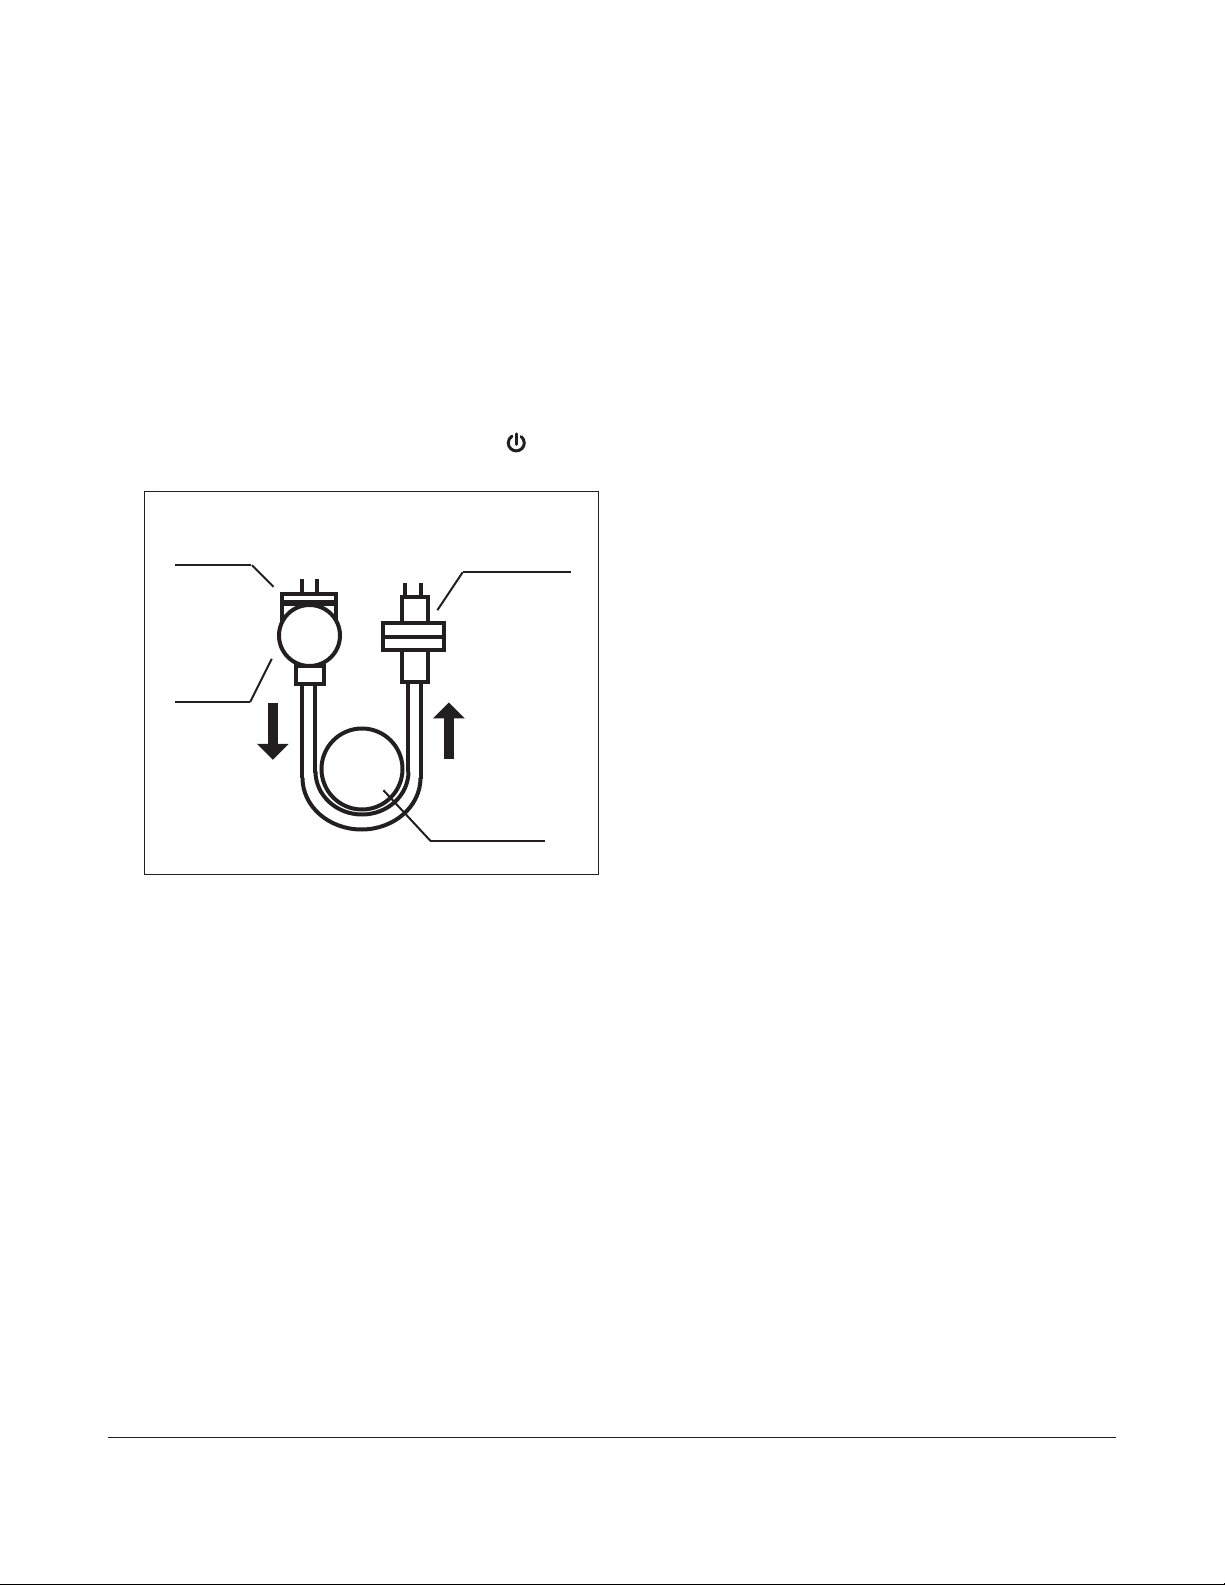
Plug the Power Cord into the A/C Adapter Port on the back of the pump. See Figure 1A to locate port on pump.
NOTE: It is important to make sure the power plug is pushed all the way into the pump for proper operation. If the display screen
shows the pump is running on battery power after plugging in the A/C Adaptor, check to make sure the A/C Adaptor plug is flush
with the back of the pump.
Figure 2A. Alignment of
A/C Adapter plug with
pump’s adapter port.
Do not detach the connector by pulling on the cord only.
(A cord extension accessory is available that will allow the wall plug to be separated from the power transformer, see Fig. 2B. The
cord extension order number is located on page 38.)
KANGAROO JOEY™
5
Enteral Feeding Pump
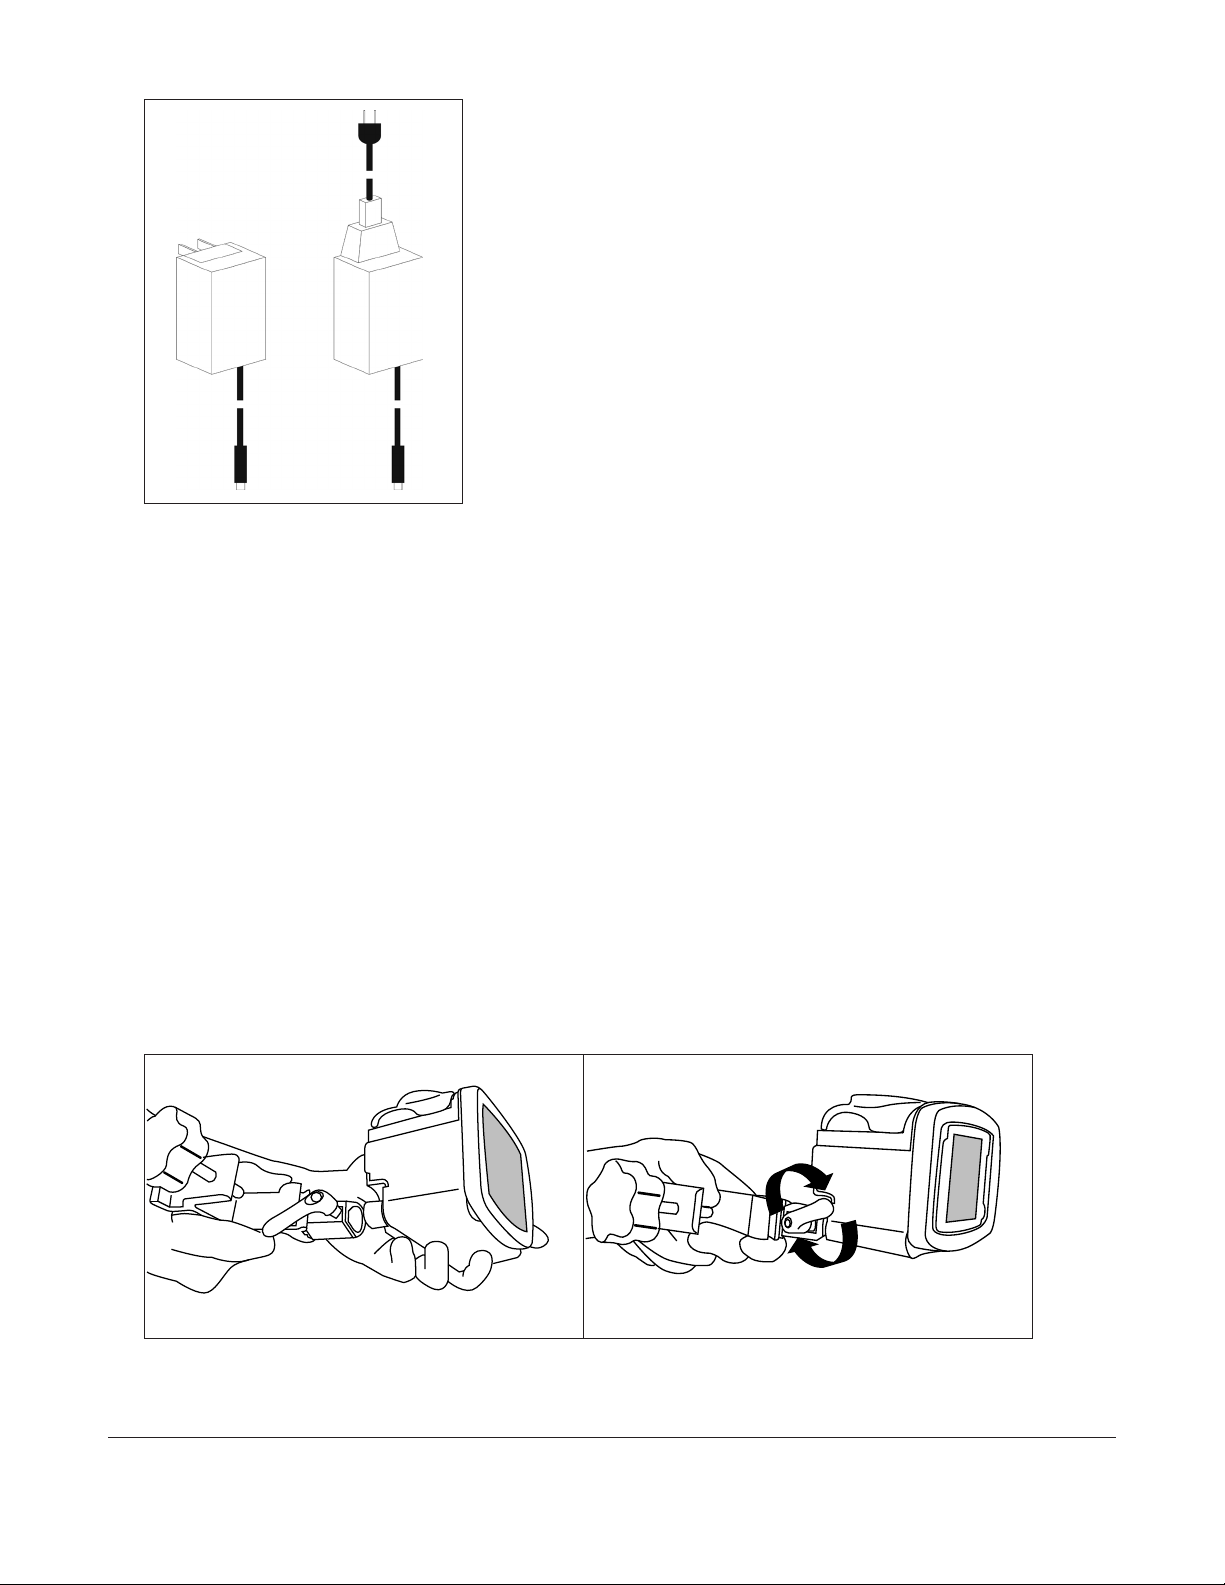
Figure 2B.
Battery Setup
The battery pack is fully charged before shipping.
It is also recommended that the battery charge be “topped off” before battery-only operation is utilized. The battery pack will charge
continuously whenever the pump is plugged into a wall outlet, including during normal use of the pump with A/C power. 6 hours of
charging is required to fully recharge the battery pack.
A new battery pack will provide approximately 18 hours of service before needing to be recharged.
Attaching Pole Clamp
The KANGAROO JOEY enteral feeding pump can be attached to a vertical pole using the pole clamp which is included with the pump
(a flexible arm pole clamp may also be purchased and attached to the vertical pole – Figure 3B). The pole clamp provides the ability
to retain the power cord to prevent accidental cord removal or cord loss. Simply wrap the cord around the cord wrap posts to ensure
that the cord stays with the pump.
To attach the pole clamp to the pump, simply slide the clamp onto the mounting stud on the back of the pump (Figure 3A). When
engaged, turn the lever to secure attachment.
Figure 3A.
KANGAROO JOEY™
6
Enteral Feeding Pump

Figure 3B. Attaching and using the Pole Clamps.
Section V — Instructions For Use
Quick Start
1. Press POWER on lower, right-hand corner of control panel.
2. Open blue door enclosing pump set loading area.
3. To load pump set (refer to Figure 4):
• Grasp finger tab on valve and insert into left pocket (1).
• Grasp black ring retainer and gently stretch tubing around rotor (2). Pull up on retainer and insert into right pocket (3).
• Press down on finger tab to ensure that valve is fully seated.
KANGAROO JOEY™
7
Enteral Feeding Pump
• Close blue door.
(Note: display status line should read SET LOADED).
4. To automatically prime the pump, press4PRIME PUMP and4AUTO PRIME. For Feed & Flush sets, auto priming will prime
both lines.
5. To directly control pump priming, press4PRIME PUMP and then press and hold the HOLD TO PRIME button(s)4. If a Feed
& Flush Set is used, remember to first press4HOLD TO PRIME FLUSH until the flushing fluid has reached the valve, and then
press4HOLD TO PRIME FEED until the feeding fluid has reached past the valve and down to the distal end connector.
6. Use buttons4on left side of LCD to set the feeding parameters. Set flushing parameters if a Feed & Flush Set is loaded. The
continuous or intermittent feed mode selection is made under the MORE options menu.
7. Press4RUN when ready to start. The screen will display RUNNING.
8. To stop, press4HOLD or press and hold the POWER button.
3
Black Ring
Retainer
(MISTIC)
Figure 4.
Installation of
Pump Set.
Finger
Tab
1
Valve
2
Rotor
General Startup
Placement/Mounting
There are two recommended placement methods for the KANGAROO JOEY enteral feeding pump.
• Attached to a vertical IV pole via the pole clamp peripheral device, included with the pump.
• Placed on any stable surface.
A/C Power Operation
Plug the KANGAROO JOEY enteral feeding pump into an A/C power outlet for normal operation. When the pump is not plugged in, or
if A/C power is interrupted, a built-in rechargeable battery will run the pump.
Battery Power Operation
If A/C power is not available to the pump, or if A/C power is interrupted, the pump will automatically operate on backup battery
power. The built-in battery recharges any time the pump is plugged into an outlet.
KANGAROO JOEY™
8
Enteral Feeding Pump

A fully-charged, new battery will supply 18 hours of backup power at 125 mL/hr before requiring recharging. Contact Customer
Service, Section XI, to replace the battery pack if battery life degrades.
Power On/Off
To power up the pump, press the POWER button on the lower right of the front panel. To power down the pump, press and hold
the POWER button until the pump display turns off.
Language Selection, First Power Up
Immediately after powering up the pump for the first time, the language option screen will appear. Select the language using
the ( È ) or ( Í ) buttons. When the language is selected, push the fifth button ( Ë ) to enter the language selection. After the
language is selected the first time the pump is powered up, the language selection screen will not appear during future power up
operations. Should the language need to be changed after the initial power up, it can be changed through the “MORE OPTIONS”
menu (see Figure 10A).
Keep or Clear Prior Pump Settings
Immediately after powering up the pump, if the prior feed or flush settings were not cleared and the settings are not locked in the
BioTech Screen, the pump will give the following two options:
KEEP SETTINGS - Select this option to start with the same settings that were most recently programmed into the pump. Any of
the previously-programmed settings can be modified, if needed. The feed volume totals, “mL FED” (Continuous Feed Mode) or
“BOLUSES FED” (Intermittent Feed Mode) and “mL FLUSH” are also maintained.
CLEAR SETTINGS - Select this option to reset all input feeding settings and the output feed totals to zero. It will then be necessary
to program all settings before running the pump. The BioTech options settings will not change.
Note: The output feed totals (“mL FED,” “BOLUSES FED,” “mL FLUSH”) can be cleared at any time, and without clearing the input
settings, by doing the following:
• Start the pump RUNNING
• Press4HOLD
• Press4CLEAR VOLUME
The status line of the pump will then show LOAD A SET (Figures 5A-5B), or, if the pump set is already loaded, it will show SET
LOADED (Figures 7A-7D).
KANGAROO JOEY™
9
Enteral Feeding Pump
Loading Pump Sets
4FU-PBEJOH%PPS
1VNQ4FU 7BMWF
1PXFS
#VUUPO
'JOHFS5BC
.*45*$
3FUBJOFS
&OE
7BMWF4MPU 3FUBJOFS4MPU
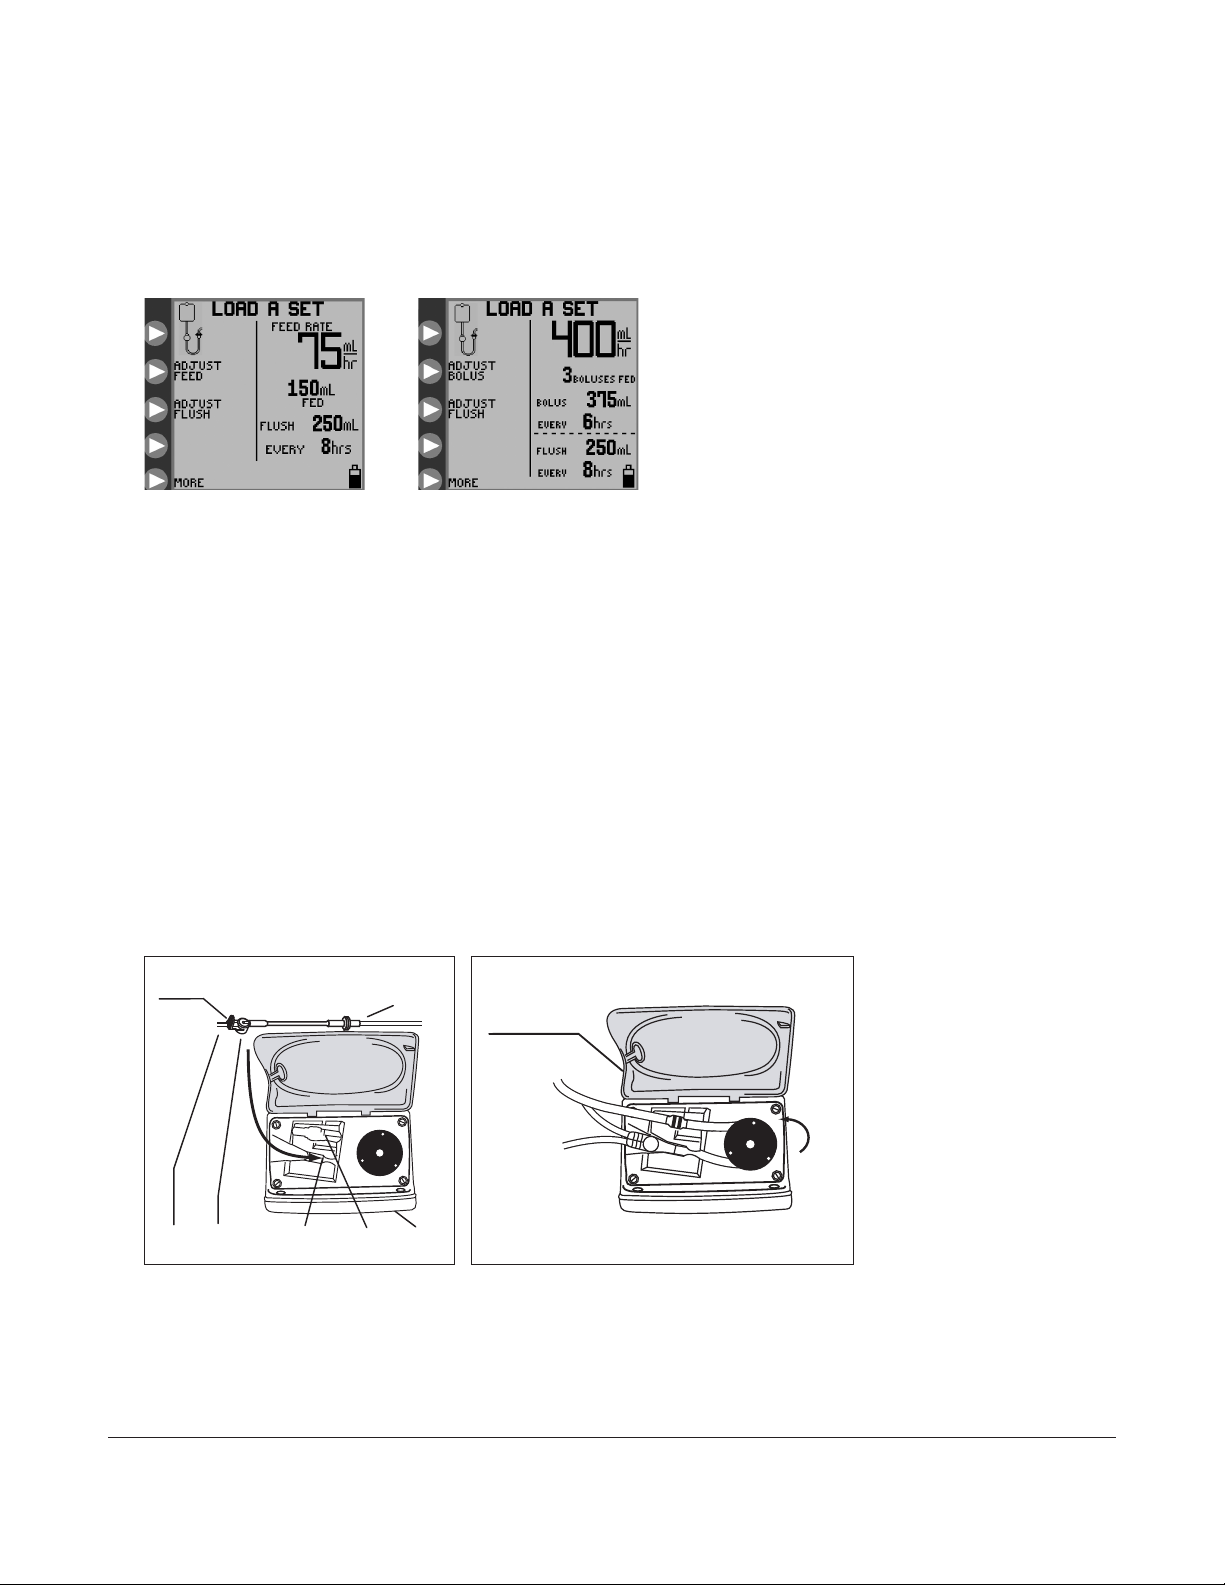
The KANGAROO JOEY enteral feeding pump will indicate LOAD A SET in the screen’s status line if a pump set is not installed. A
blinking icon of a pump set will also appear in the upper left corner of the screen. Figure 5A shows the screen for continuous feeding
mode and Figure 5B shows the screen for intermittent feeding mode (intermittent feeding mode not available in EZMODE).
Figure 5A. LOAD A SET opening menu
screen for Continuous Feeding mode
(EZMODE not activated).
Figure 5B. LOAD A SET opening menu
screen for Intermittent Feeding mode
(EZMODE not activated).
To load a Pump Set, follow the steps below:
1. With the pump display facing you, open the blue transparent door that encloses the rotor and pump set loading area.
2. Load the pump set by holding the finger tab on the valve, then inserting the valve into the valve slot on the left. (Figure 6A)
3. Grasp the MISTIC retainer end (black ring retainer) and wrap the tubing counterclockwise around the rotor. (Figure 6B)
4. Carefully pull the MISTIC retainer end left and upwards to position it over the slot on the left, and then lower the retainer into
the slot. Push down on the retainer then release to ensure proper engagement. (Figure 6B)
5. Push the valve’s finger tab to the right to ensure proper seating.
6. Close the blue transparent door, checking to make sure the valve finger tab is captured by the slot in the blue door.
NOTE: To avoid nuisance alarms, make sure the pump set exterior is free from droplets of water or formula.
Figure 6A.
The display should read SET LOADED and will show one of the following opening menus, depending on the type of pump set
detected, and whether continuous or intermittent feeding mode has been selected.
KANGAROO JOEY™
10
Figure 6B.
Enteral Feeding Pump
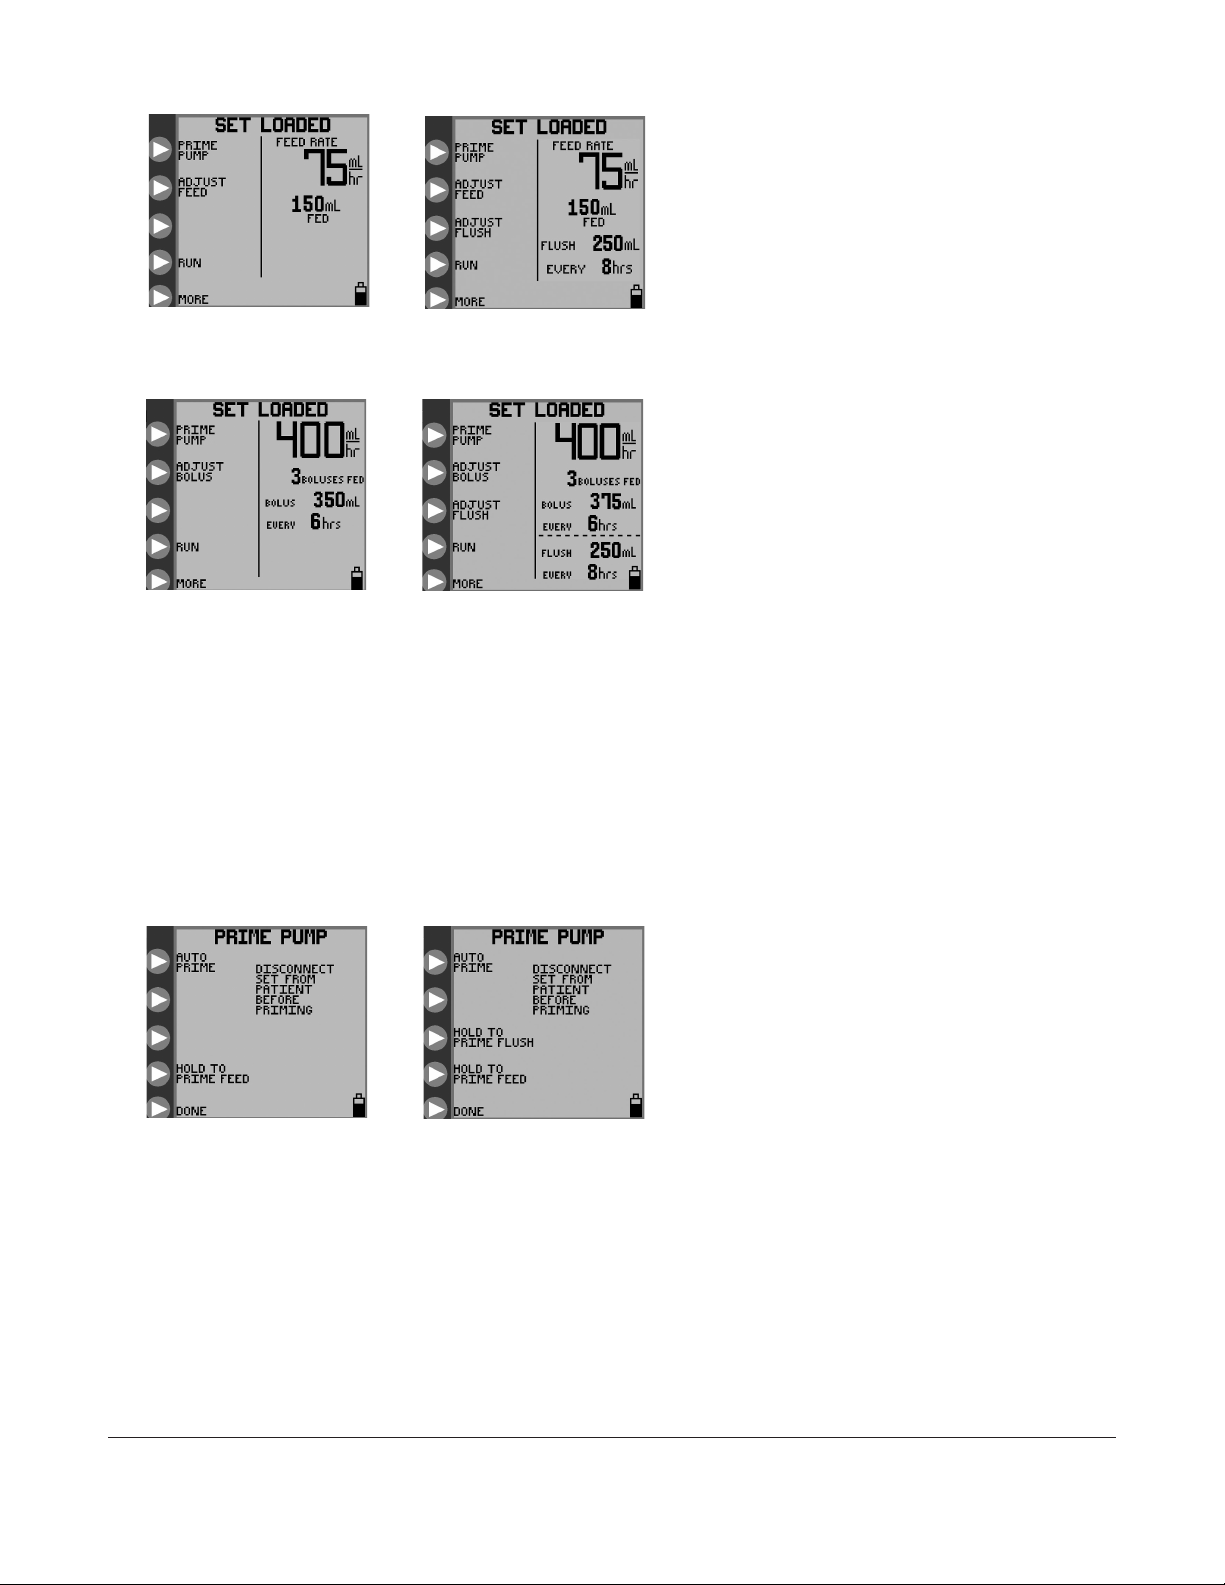
Figure 7A. Opening menu
for Continuous Feed mode
with a Feed-Only set.
Figure 7B. Opening menu
for Continuous Feed mode
with a Feed & Flush set.
Figure 7C. Opening menu
for Intermittent Feed mode with a
Feed-Only set.
Figure 7D. Opening menu
for Intermittent Feed mode
with a Feed & Flush set.
Prime Pump
The KANGAROO JOEY enteral feeding pump may be primed automatically with a single button push, including the flushing line if a
Feed & Flush Set is loaded. The pump can also be primed in a more interactive method using the hold-to-prime feature.
After a pump set has been loaded and the status line shows SET LOADED, press4PRIME PUMP in the opening menu (Figures 7A-
7D) to get one of the PRIME PUMP menus shown in Figures 8A and 8B.
Figure 8A. PRIME PUMP
menu for Feed-Only set.
Figure 8B. PRIME PUMP
menu for Feed & Flush set.
Auto Priming
The AUTO PRIME option will be available if the pump senses that the currently installed pump set was not previously primed, and
that there is no fluid in the line near the rotor. If auto-priming is desired, press and release4AUTO PRIME to automatically prime
the line(s). For Feed & Flush Pump Sets, the auto prime feature will automatically prime both lines, starting with the flush line.
Press4STOP to cancel AUTO PRIME.
KANGAROO JOEY™
11
Enteral Feeding Pump
 Loading...