

Page 1

FOMS-FPS-O-XXXX-XX
INSTALLATION INSTRUCTION
19” 1HU Splicing and Front Patching Shelf
1 Introduction
2 General
2.1 Characteristics
2.2 Kit contents
2.3 Tools
3 Installation
3.1 Preparation of the shelf for patch-patch
3.2 Routing of the pigtails (patch-patch)
3.3 Preparation of the shelf for splice-patch
3.4 Termination of loose tube
3.5 Termination of IFC
3.6 Termination of ribbon and microgain
3.7 Routing and splicing
3.8 Closing the shelf
Contents
1 Introduction
The FOMS-FPS-O shelf is a mechanical enclosure for a physical fiber management system.
It is used for splicing and connector patching: depending on type up to 24 fibers can be
connected (in case of SFF up to 48 connections can be made).
Follow all local safety regulations related to optical fiber plant elements.
For cleaning components, the use of isopropylalcohol is recommended.
2 General
2.1 Characteristics
Compatible with standard 19” rack, back or front mounting or in FIST-GR2 racks
Dimensions: width = 481 mm
height = 44 mm (fits in 1 HU 19”)
depth = 210 mm, 270 mm including plastic frontcover (optional)
Page 2
2
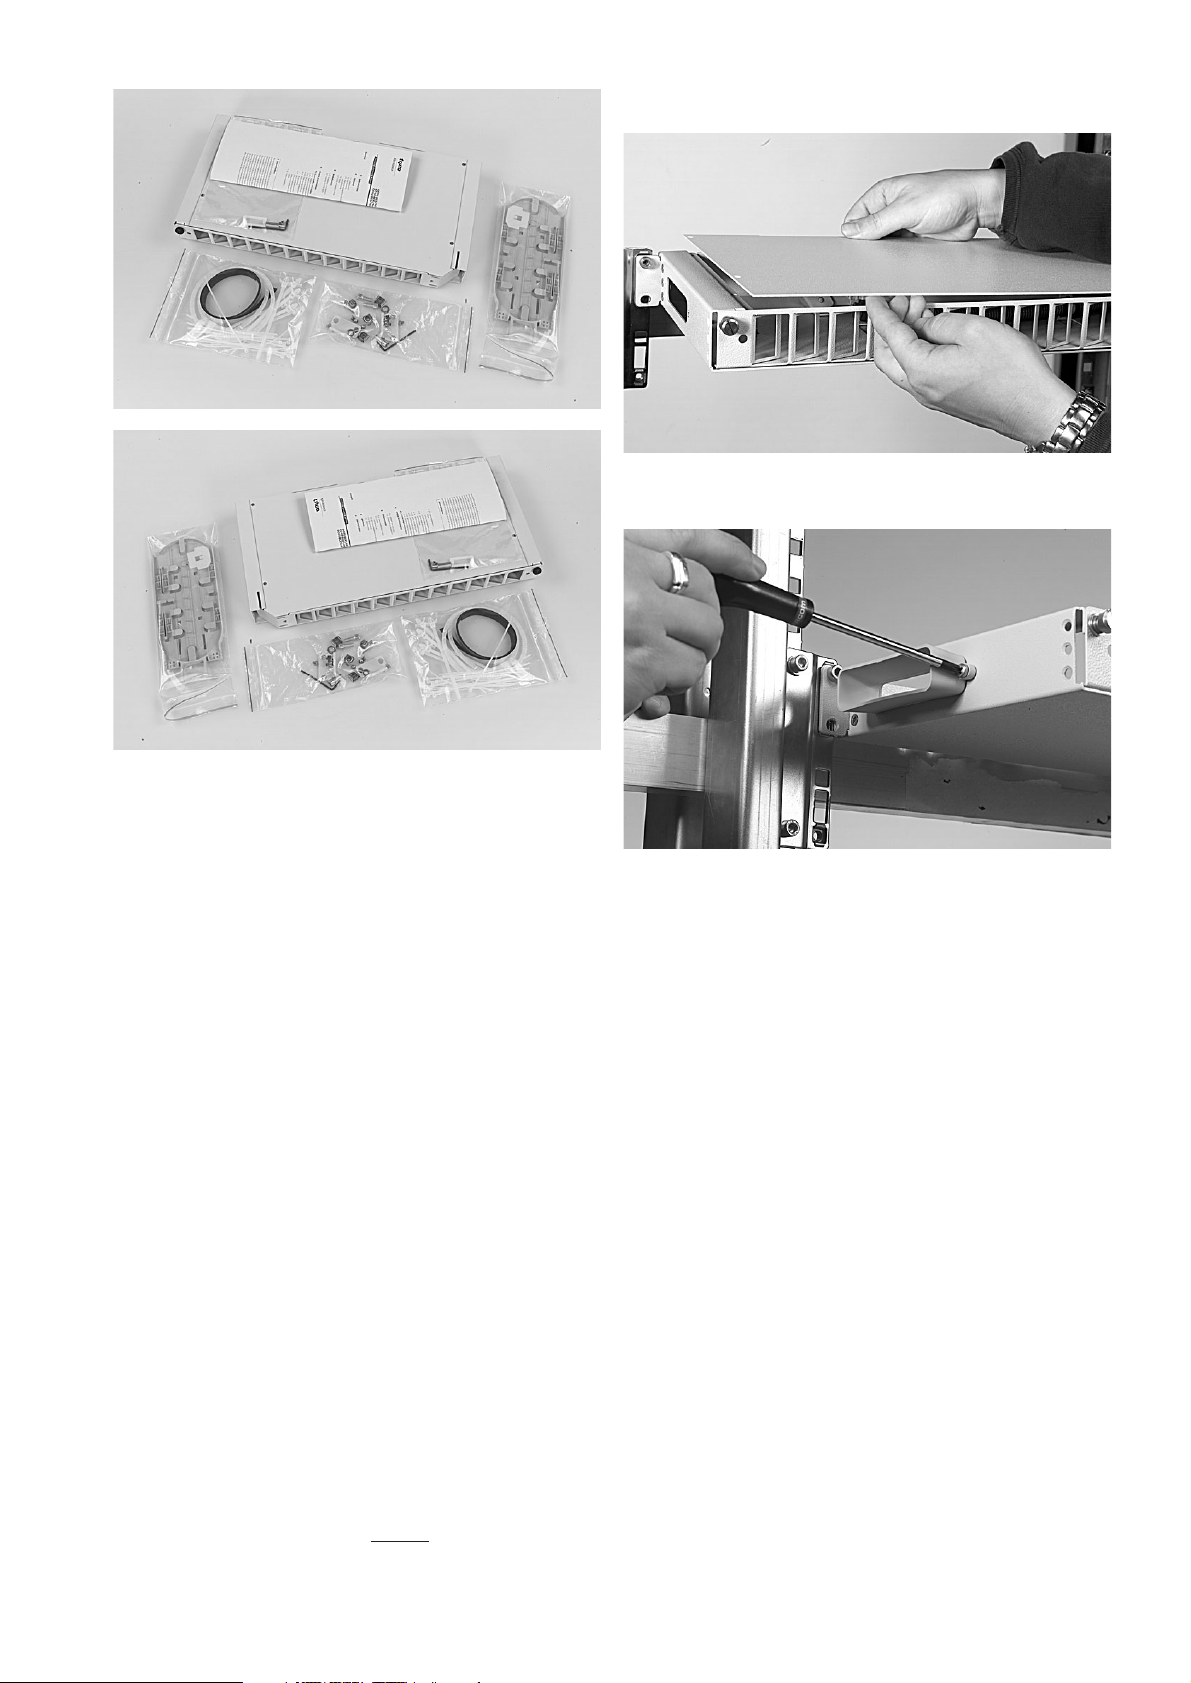
2.2 Kit contents
Splice-Patch configuration
- 1 metal shelf incorporating:
- front patch panel with max 24 adapters
(48 in case of SFF (small form factor)-connectors)
- FOSC-400-A splice trays
- Cage nuts and bolts
- Tie-wraps
- Back cable termination kit
Patch-Patch configuration
- 1 metal shelf incorporating:
- Frontpatch panel with max 24 adapters
(48 in case of SFF-connectors)
- Patch island
- Velcro
- Cage nuts and bolts for mounting
- Back cable termination kit
2.3 Tools
FACC-ALLEN-KEY-5-350 to mount shelf in rack marker pen
Philips screwdriver
FACC-CAGE-NUT-TOOL for easy installation of cage nuts in
the rack
FACC-TUBE-STRIPPER-02
Right version
Left version
3.1.1 Remove the cover of the shelf.
3 Installation
3.1 Preparation of the shelf in case of patch-patch
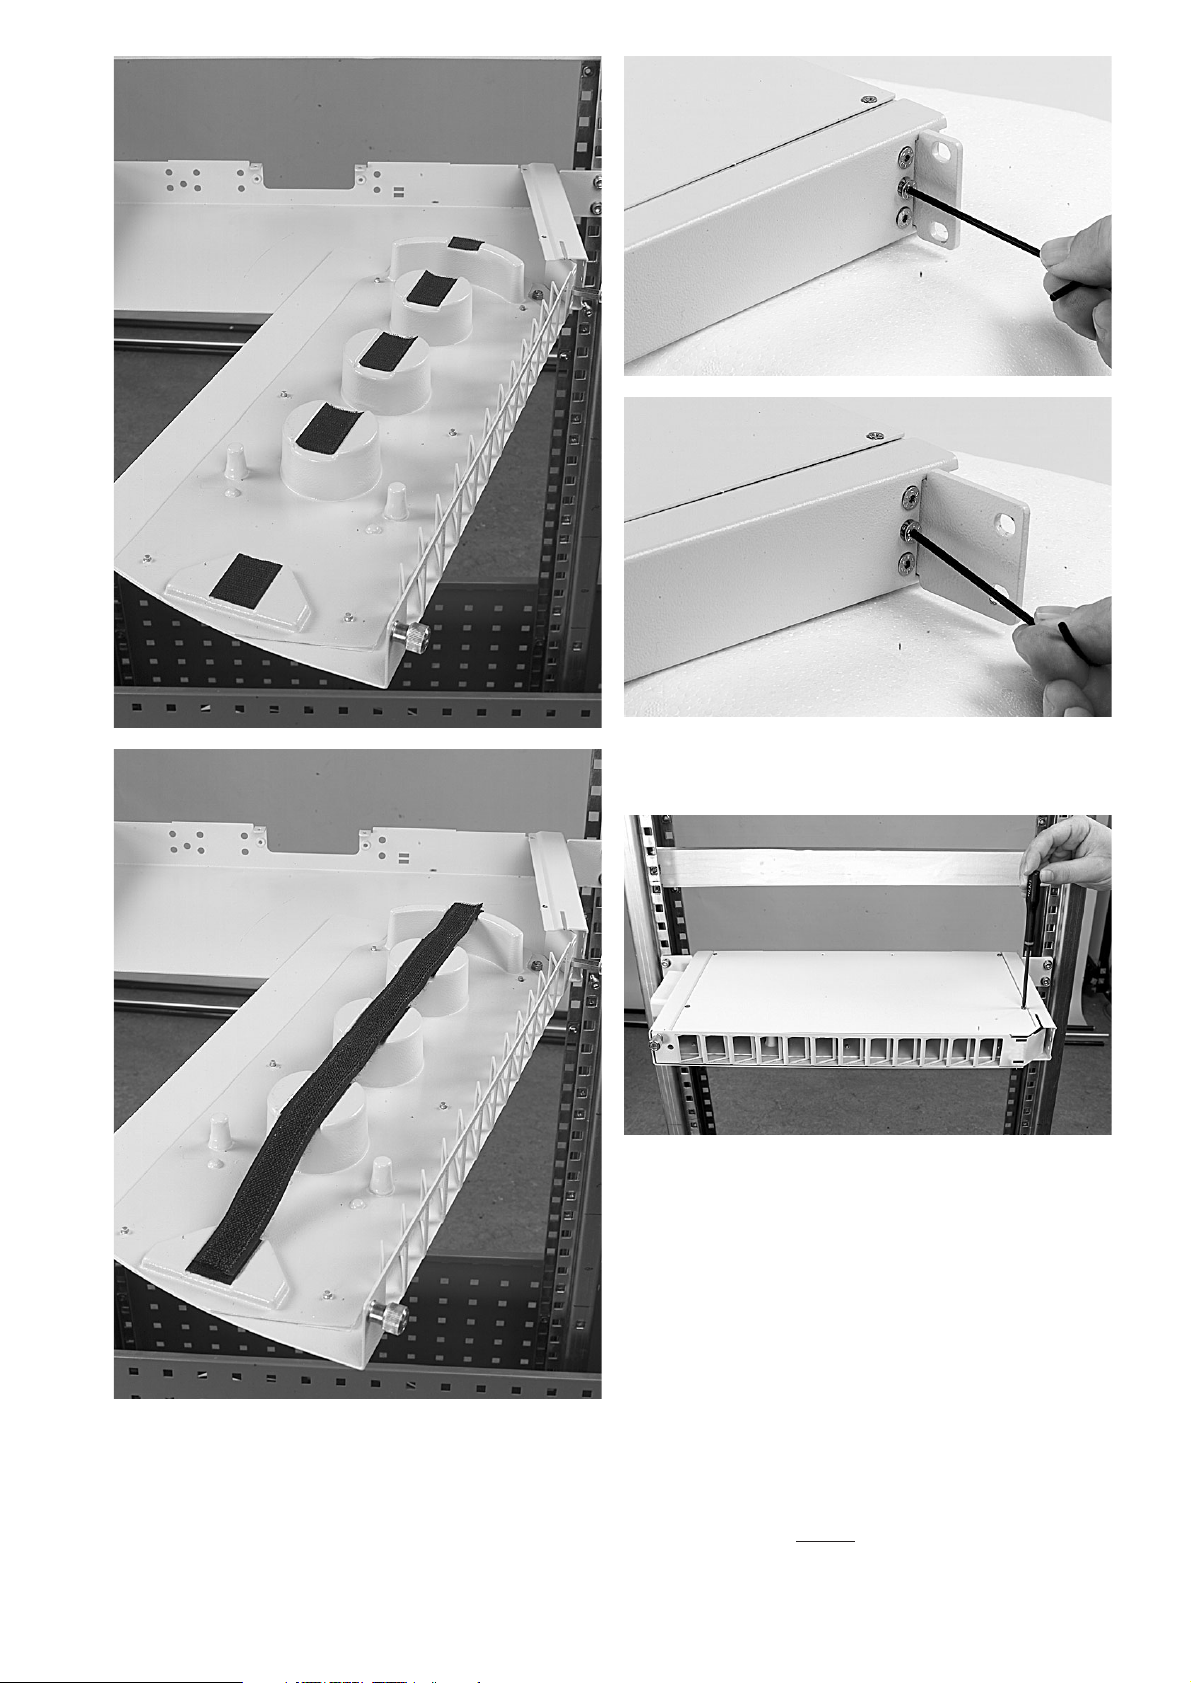
3.1.2 Trumpet is needed where the pigtails enter the shelf.
Depending on the rack configuration it is possible to install the trumpet
at the left (in case of right version) or at the back side of the shelf.
Page 3
3
3.1.2 Tape the velcro at the 5 spots and put the long strip of velcro
to secure the patch field.
3.1.3 Install the mounting brackets on the correct position. Respect
correct orientation.
3.1.4 Place the top cover back on the shelf.
3.1.5 Determine the position of the shelf (see rack installation
instruction). Fix the cage nuts into the rack. Mount the shelf using the
FACC-ALLEN key.
In case of 19 inch. (standard)
In case of ETSI
Page 4
4
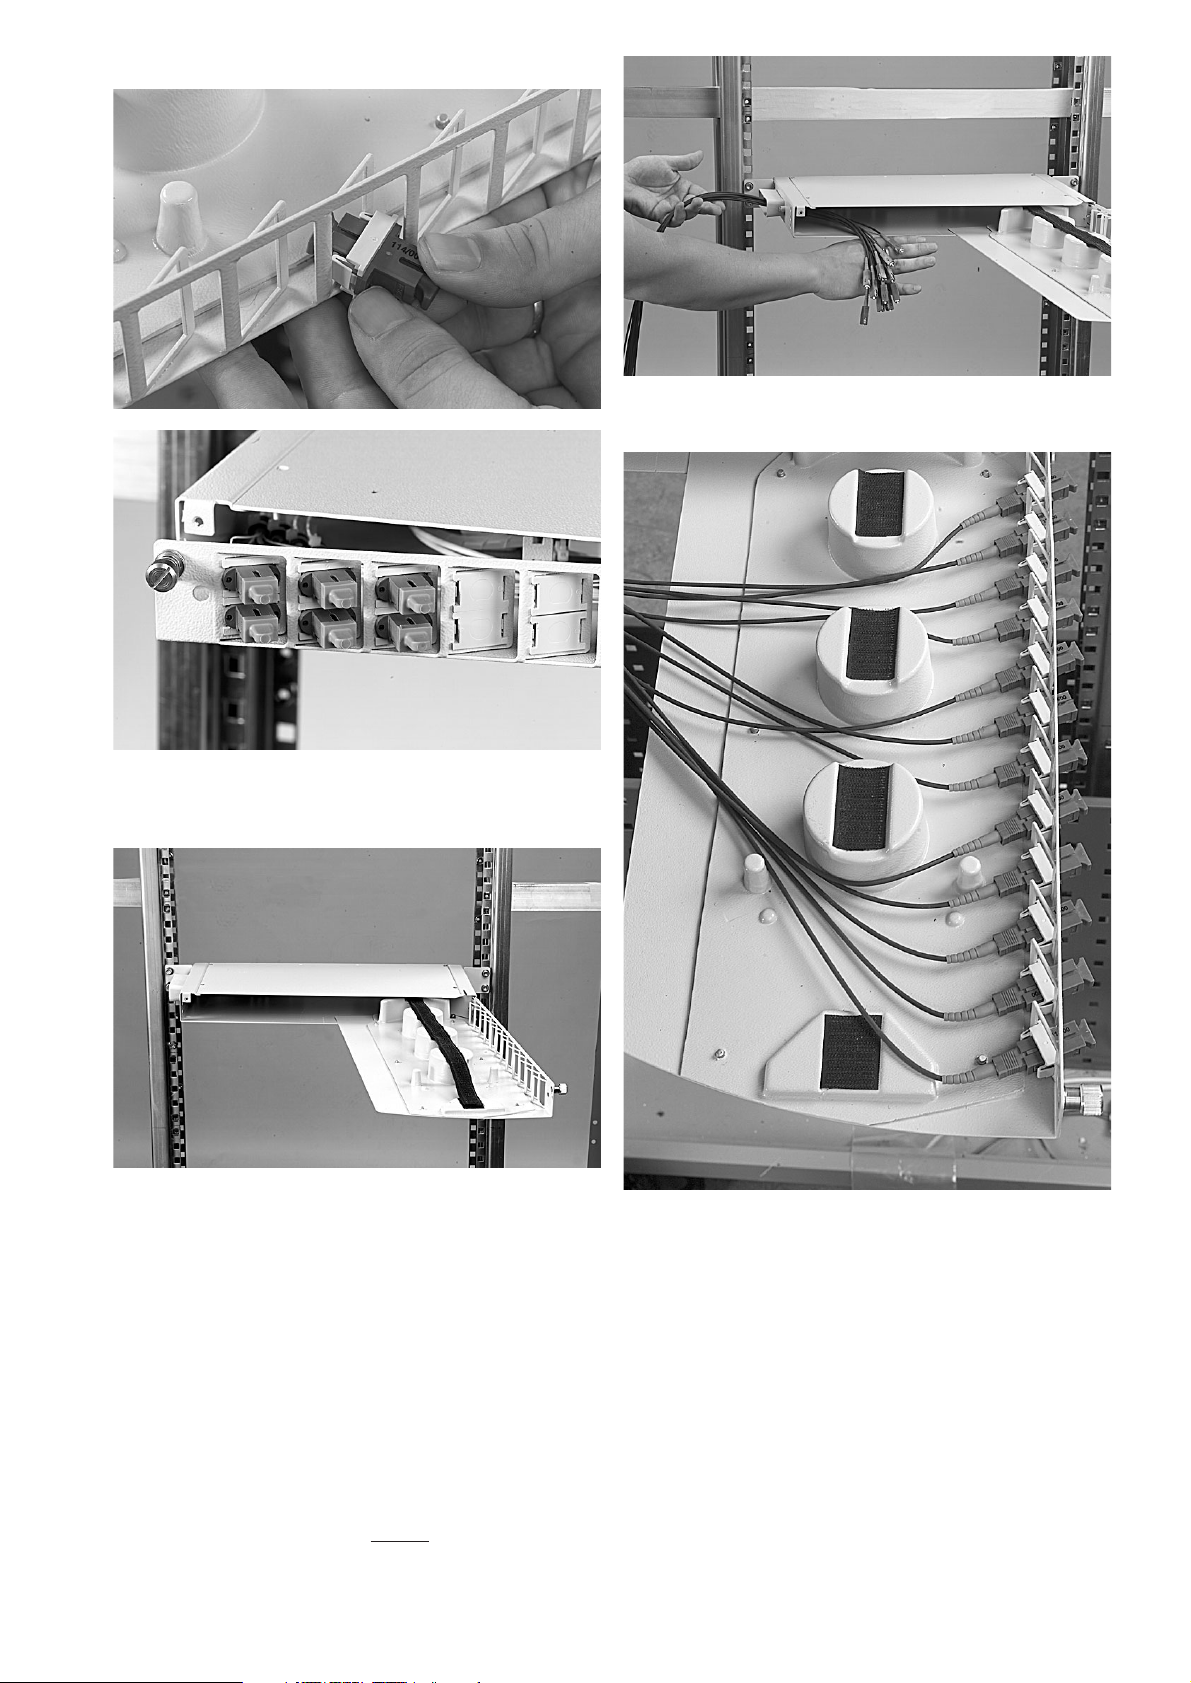
3.2 Routing of pigtails (patch-patch)
3.2.1 Place the connector-adaptors in the patchpanel. In the picture
you also can see the blind stops.
3.2.2 Slide the drawer to the fully open position.
3.2.3 Entering the shelf trough the trumpet.
3.2.4 Remove the velcro. Guide the jumpers to the patch field and
connect the jumpers.
Page 5

5
3.2.5 Recommend this routing for entering the shelf, and the
possibility for storage of pigtail.
3.2.6 Put the velcro back in place. (it is not recommended to remove
the velcro totally).
3.3 Preparation of the shelf in case of splice-patch/LT-cable
3.3.1 Remove top cover (place strength member connector in case
of loose tube).
3.3.2 Prepare flex tube (do not cut the flex-tube) with foam and fasten
with tie-wraps. Place the top cover back on the shelf (in case of loose
tube).
Page 6

6
3.3.3 Install the mounting brackets on the correct position. Respect
correct orientation.
3.3.4 Place the top cover back on the shelf.
3.3.5 Determine the position of the shelf (see rack installation
instruction). Fix the cage nuts into the
rack. Mount the shelf using the FACC-ALLEN key.
3.4 Termination of loose tube cable
3.4.1 Open the drawer to the fully open position. Strip the cable
approx 1.8m. Cut the strength member approx 100mm. Feed the cable
through the flex tube.
3.4.3 Put FOSC-400AA tray in place. Cut 4 pieces of spiral tube
200mm. Put foam at the ends of the spiral tubes.
3.4.4 Strip LT ( loose tube ) over 1.1meter starting at 170mm after
end of flex tube.
3.4.2 Fasten cable with push T-wraps and put strength member in
strength member connector. Use foam there where the cable is fixed.
3.4.5 Put foam at the end of the LT. Fasten the LT together with
spiral tube with two T-wraps. Always put the LT to the outside of the
FOSC tray. Route the primary coated fiber on the FOSC tray.
3.4.6 Fasten the second spiral tube to the FOSC-tray.
In case of 19 inch. (standard)
In case of ETSI
Termination at the back
Page 7

7
3.4.7 Place the connector adapters in the patchpanel.
3.4.10 In case of two trays : recommend to do it this way. Spirals
coming from the lowest tray, place in position 1 and 3and spiral from
tray on top place in position 2 and 4.
3.4.8 Feed the first 6 pigtails through the spiral tube and connect the
pigtails.
3.4.11 Termination of cable in the rack, entering the shelf from the
side, also possible entering at the back. Next step see 3.4.3.
3.5 Termination of IFC cable (trumpet : optional)
3.4.9 The next 6 pigtails can be fed through the spiral tube on the
right side of the FOSC-tray. In case of 1 tray, the routing of the spiral is
OK.
3.5.1 Entering with IFC from the side trough the trumpet up to the
tray, fixation the same as the flex tube, termination up to the tray.
4
3
2
1
Page 8

8
3.6.1 Entering the shelf from the side with the FOPT up to the tray.
3.6 Termination of ribbon cable and microgain cable
Entering with fopt trough the trumpet (back or side)
up to the tray
3.5.2 Termination up to the tray, fixation together with the spiral
tube. Check the positions of the spiral tubes.
3.5.3 Back termination of the IFC cable, routing inside the shelf is the
same as the previous one.
3.6.2 Fixation of the FOPT is the same as for the spiral tube. One
FOPT to the first tray the other to the second tray, look closely to the
routing of the spiral tubes.( see 3.4.10 ).
Page 9

9
3.7.1 Tray for up to 24 heat-shrinkable fusion splice protectors is
used (FOSC-A-TRAY-S24).
3.7.2 Remove front cover. Open tray 90°.
3.7 Routing and splicing
3.7.3 Rotate the FOSC-tray ± 45°.
• The tray organizer has 6 locations to store splice protectors. Each
location can hold maximum 4 fusion splice protectors of type SMOUV-
1120-02 (length 45 mm, installed outer diameter is 2,4 mm)or
equivalent.
• After each splice is made, the splice should be stored as indicated
on the drawing. First protector in position 1,the second in position 2.
Continue for other fibers. Fiber nr.5 will be in position 1 of next
location.
• If splice protectors are stored on the side with the 4 locations, the
fibers from the locations on the outside are first guided through the
passage between the locations and then coiled into the tray.
Page 10

10
3.7.4 Use the wedge to get access to the bottom tray for splicing.
3.8 Closing the shelf
3.8.1 Mount the guiding snap onto the shelf. Patch the outgoing
jumpers and guide them through the guiding snap.
3.8.2 Additionally a plastic cover with label can be placed to protect
the connectors.
3.8.3 Identify the shelf and connectors.
Page 11

11
Page 12

Tyco Electronics Raychem NV
Telecom Outside Plant
Diestsesteenweg 692
B-3010 Kessel-Lo, Belgium
Tel.: 32-16-351 011
Fax: 32-16-351 697
www.tycoelectronics.com
www.telecomosp.com
TC 656/IP/2 05/02
Tyco is a trademark. Velcro is a trademark of Velcro Industries B.V.
The information given herein, including drawings, illustrations and schematics which are intended for illustration purposes only, is
believed to be reliable. However, Tyco Electronics makes no warranties as to its accuracy or completeness and disclaims any liability
in connection with its use. Tyco Electronics’ obligations shall only be as set forth in Tyco Electronics’ Standard Terms and Conditions
of Sale for this product and in no case will Tyco Electronics be liable for any incidental, indirect or consequential damages arising out
of the sale, resale, use or misuse of the product. Users of Tyco Electronics products should make their own evaluation to determine
the suitability of each such product for the specific application.
 Loading...