

Page 1
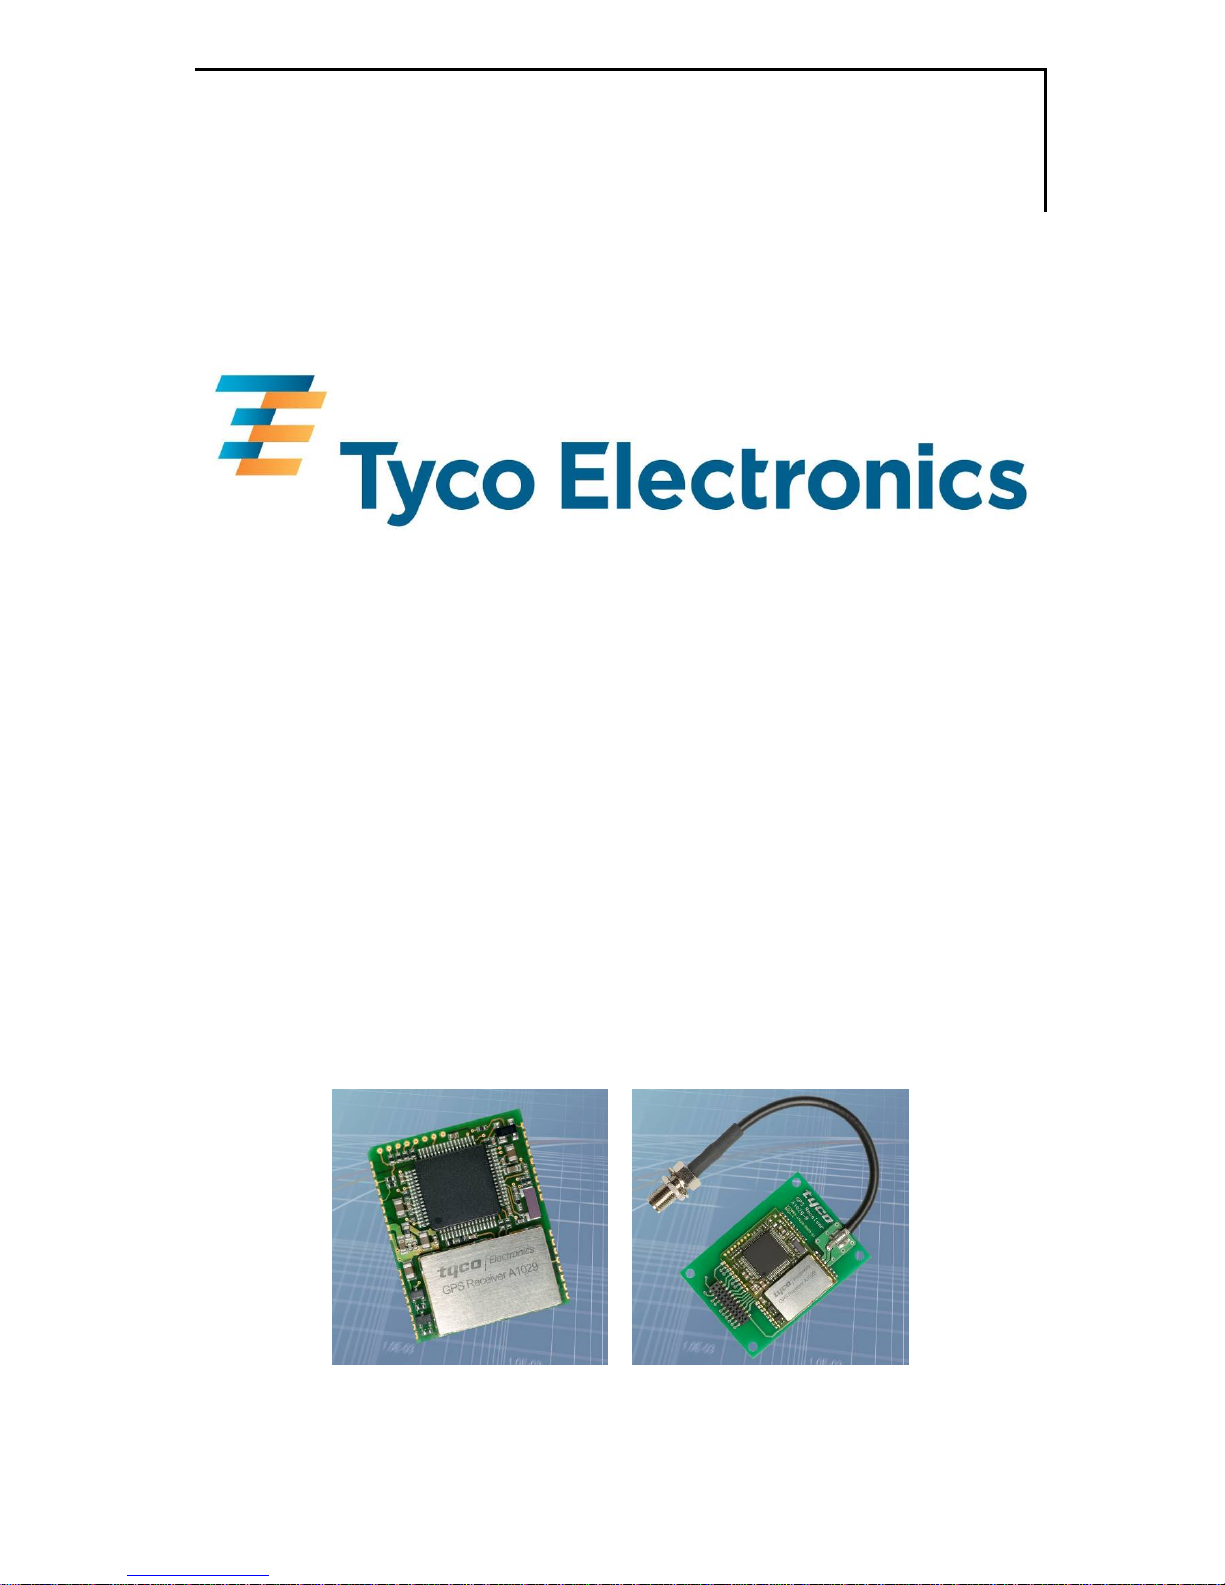
GPS Receivers A1029
A description of Tyco Electronics’
GPS modules A1029-A/-C and A1029-B/-D
including Dead Reckoning interface
User’s Manual
Version 4.0
Hardware Revision 04/05
Page 2

This page was intentionally left blank.
Page 3

Revision History
Revision History
Rev. Date Description
1.0 11-10-03 Initial Draft.
1.1 11-24-03 Second draft – not released.
1.2 12-02-03 Preliminary version.
1.3 12-22-03 Minor format changes.
1.4 01-09-04 Gain select clarified, LOCK pin described, Overview Mechanics
included.
1.5 01-15-04 Picture, description ENABLE pin.
1.6 02-16-04 Included picture minimum configuration.
1.7 03-01-04 Included antenna connection recommendations, tape drawings,
removed Glossary (on web site).
1.8 04-15-04 Included solder pad proposal.
1.9 06-18-04 Complete review, important changes on VANT and 1PPS.
2.0 06-23-04 Introduced A1029-B.
2.1 07-16-04 Minor corrections after R&D review.
2.2 10-06-04 Minor corrections.
2.3 10-11-04 Format changes, correct pin-out of A1029B, added tray description on A1029-B.
2.4 02-23-05 Introduced new contact details.
3.0 07-01-05 Description of additional Dead Reckoning signal interface (HW
version 02), added details for use of nRST signal.
3.1 11-10-05 Description of differences HW version 02 to old HW version 01
for A1029-A added.
3.2 02-17-06 More details added for signals.
3.2 03-03-06 Recommended minimum Configuration updated
3.3 04-25-06 New gyros for DR.
3.4 22-05-06 TCXO product versions –C and –D added.
3.5 11-28-06 Additional info “Connection of RF Signal”
3.6 12-08-06 Application note: Antenna current limiter
4.0 03-05-07 Application note nReset input, re-structuring, new design
mm-dd-yy
V4.0 – 03/07 User’s Manual Page 3 of 47
Page 4

Disclaimer
Disclaimer
THIS DOCUMENT CONTAINS PROPRIETARY INFORMATION OF TYCO ELECTRONICS CORPORATION/POWER SYSTEMS (TYCO ELECTRONICS). IT MAY
NOT BE COPIED OR TRANSMITTED BY ANY MEANS, PASSED TO OTHERS,
OR STORED IN ANY RETRIEVAL SYSTEM OR MEDIA, WITHOUT PRIOR
CONSENT OF TYCO ELECTRONICS OR ITS AUTHORIZED AGENTS.
THE INFORMATION IN THIS DOCUMENT IS, TO THE BEST OF OUR
KNOWLEDGE, ENTIRELY CORRECT. HOWEVER, TYCO ELECTRONICS CAN
NEITHER ACCEPT LIABILITY FOR ANY INACCURACIES, OR THE
CONSEQUENCES THEREOF, NOR FOR ANY LIABILITY ARISING FROM THE
USE OR APPLICATION OF ANY CIRCUIT, PRODUCT, OR EXAMPLE SHOWN IN
THE DOCUMENT.
THE PRODUCT (HARD- AND SOFTWARE) DESCRIBED IN THIS DOCUMENTATION IS NOT AUTHORIZED FOR USE IN LIFE SUPPORT DEVICES OR
SYSTEMS WITHOUT THE EXPRESS WRITTEN APPROVAL OF TYCO ELECTRONICS.
THIS DOCUMENT MAY PROVIDE LINKS TO OTHER WORLD WIDE WEB SITES
OR RESOURCES. BECAUSE TYCO ELECTRONICS HAS NO CONTROL OVER
SUCH SITES AND RESOURCES, TYCO ELECTRONICS SHALL NOT BE
RESPONSIBLE FOR THE AVAILABILITY OF SUCH EXTERNAL SITES OR
RESOURCES, AND DOES NOT ENDORSE AND IS NOT RESPONSIBLE OR
LIABLE FOR ANY CONTENT, ADVERTISING, PRODUCTS, OR OTHER
MATERIALS ON OR AVAILABLE FROM SUCH SITES OR RESOURCES. TYCO
ELECTRONICS SHALL NOT BE RESPONSIBLE OR LIABLE, DIRECTLY OR
INDIRECTLY, FOR ANY DAMAGE OR LOSS CAUSED OR ALLEGED TO BE
CAUSED BY OR IN CONNECTION WITH USE OF OR RELIANCE ON ANY SUCH
CONTENT, GOODS OR SERVICES AVAILABLE ON OR THROUGH ANY SUCH
SITE OR RESOURCE.
TYCO ELECTRONICS RESERVES THE RIGHT TO CHANGE, MODIFY, OR
IMPROVE THIS DOCUMENT OR THE PRODUCT DESCRIBED HEREIN, AS
SEEN FIT BY TYCO ELECTRONICS WITHOUT FURTHER NOTICE.
Page 4 of 47 User’s Manual V4.0 - 03/07
Page 5

Table of Contents
Table of Contents
1 Introduction........................................................................................................7
1.1 Label ................................................................................................................. 7
1.2 Dead Reckoning................................................................................................8
1.3 Characteristics ..................................................................................................8
1.4 Handling Precautions ........................................................................................9
2 Ordering Information.......................................................................................10
2.1 GPS Receiver A1029-A/-C and A1029-B/-D ................................................... 10
2.2 Packing ........................................................................................................... 10
2.2.1 Packaging of the A1029-A/-C ...................................................................................10
2.2.2 Packaging of the A1029-B/-D ...................................................................................11
2.3 Additional Equipment ...................................................................................... 12
3 Quick Start........................................................................................................13
3.1 Minimum Configuration ................................................................................... 13
3.2 Antenna........................................................................................................... 14
3.3 Serial Port Settings .........................................................................................14
3.4 Improved TTFF ...............................................................................................14
4 Mechanical Outline ..........................................................................................15
4.1 Overview A1029-A/-C .....................................................................................15
4.1.1 Overall module dimensions ...................................................................................... 15
4.1.2 Details Component Side A1029-A............................................................................ 16
4.1.3 Details Solder Side A1029-A/-C ............................................................................... 17
4.2 Overview A1029-B/-D .....................................................................................18
4.2.1 Overall module dimensions ...................................................................................... 18
4.2.2 Connector A1029-B/-D ............................................................................................. 18
5 Pin-out Information..........................................................................................19
5.1 Layout A1029-A/-C.......................................................................................... 19
5.2 Description A1029-A/-C Signals...................................................................... 20
5.3 Layout A1029-B/-D.......................................................................................... 22
5.4 Description A1029-B/-D Signals...................................................................... 23
5.5 General Comments.........................................................................................24
6 Dead Reckoning Interface...............................................................................25
6.1 Odometer and Reverse Signals ...................................................................... 25
6.2 Gyro and Gyro Signal...................................................................................... 26
6.3 Power Supply for Internal ADC ....................................................................... 28
6.4 Dead Reckoning Application ........................................................................... 28
7 Electrical Characteristics................................................................................30
7.1 Operating Conditions ......................................................................................30
7.2 Absolute Maximum Ratings ............................................................................30
8 Mounting...........................................................................................................31
V4.0 – 03/07 User’s Manual Page 5 of 47
Page 6

Table of Contents
8.1 Proposed Footprint for Soldering ....................................................................31
8.2 Recommended Profile for Reflow Soldering ...................................................32
9 Use of Antenna.................................................................................................33
9.1 Connection of RF Signal ................................................................................. 33
9.2 Active Antenna................................................................................................ 34
9.3 Passive Antenna ............................................................................................. 34
10 Quality and Reliability....................................................................................35
10.1 Environmental Conditions ............................................................................. 35
10.2 Product Qualification .....................................................................................35
10.3 Production Test............................................................................................. 35
11 Applications and Hints ..................................................................................36
11.1 Minimum Configuration ................................................................................. 36
11.2 Antenna Sensor Pin (ANTSTAT)................................................................... 36
11.2.1 Antenna Status Adaptation..................................................................................... 36
11.3 Gain select pin (GS)...................................................................................... 38
11.4 VANT Pin (antenna voltage input pin) ...........................................................39
11.5 LOCK Pin (position fix pin) ............................................................................ 40
11.6 ENABLE Pin (low-power mode) .................................................................... 40
11.7 1PPS pin (1 pulse per second pin)................................................................ 40
11.8 Reset Signal.................................................................................................. 41
11.9 Battery Back-up............................................................................................. 42
11.9.1 Simple Example...................................................................................................... 43
11.9.2 Integrated solution .................................................................................................. 44
12 Demonstration Kits........................................................................................45
12.1 USB Kit A1029-A/-C...................................................................................... 45
12.2 Evaluation Kit A1029-A/-C ............................................................................45
12.3 Demonstration Kit A1029-B/-D...................................................................... 45
13 Related Information .......................................................................................46
13.1 Contact.......................................................................................................... 46
13.2 Related Documents....................................................................................... 46
14 List of Tables..................................................................................................47
15 List of
Figures ................................................................................................47
Page 6 of 47 User’s Manual V4.0 - 03/07
Page 7
GPS Receivers
A1029-A/-C, A1029-B/-D
1 Introduction
Tyco Electronics’ GPS modules A1029-A and A1029-C (TCXO version) are highly
integrated GPS receiver modules and can be used as SMT components. They also
serve as the basis for the GPS modules A1029-B and A1029-D (TCXO version),
which are plug-in modules. All modules are capable of receiving signals from up to
12 GPS satellites and transferring them into position and timing information that can
be read over a serial port. The A1029-C (and therefore the A1029-D) is using a
TCXO (thermal compensated crystal oscillator) to improve TTFF by around 25%
instead of a standard crystal used by the A1029-A. Basic characteristics:
• Operable at 3.3V / 50mA (typ.) @ 1fix per second
• Antenna sensor pin with defined current sensing range (for antenna detec-
tion or antenna short circuit detection)
• LNA Gain select pin (for adjustment to various RF signal conditions)
A1029-A/-C features:
• Small form factor of 22 x 28 mm (0.87” x 1.10”)
• Cost-effective antenna input
• Single-sided SMD component, for reflow soldering
• Tape & reel packaging
A1029-B/-D features:
• Standard power and I/O connector
• Standard SMA bulk head antenna connector
• Mountable without solder process
• Field replaceable
Both GPS receiver are available as off-the-shelf components, 100% tested and
shipped in either standard tape-and-reel package (A1029-A/-C) or in trays (A1029B/-D).
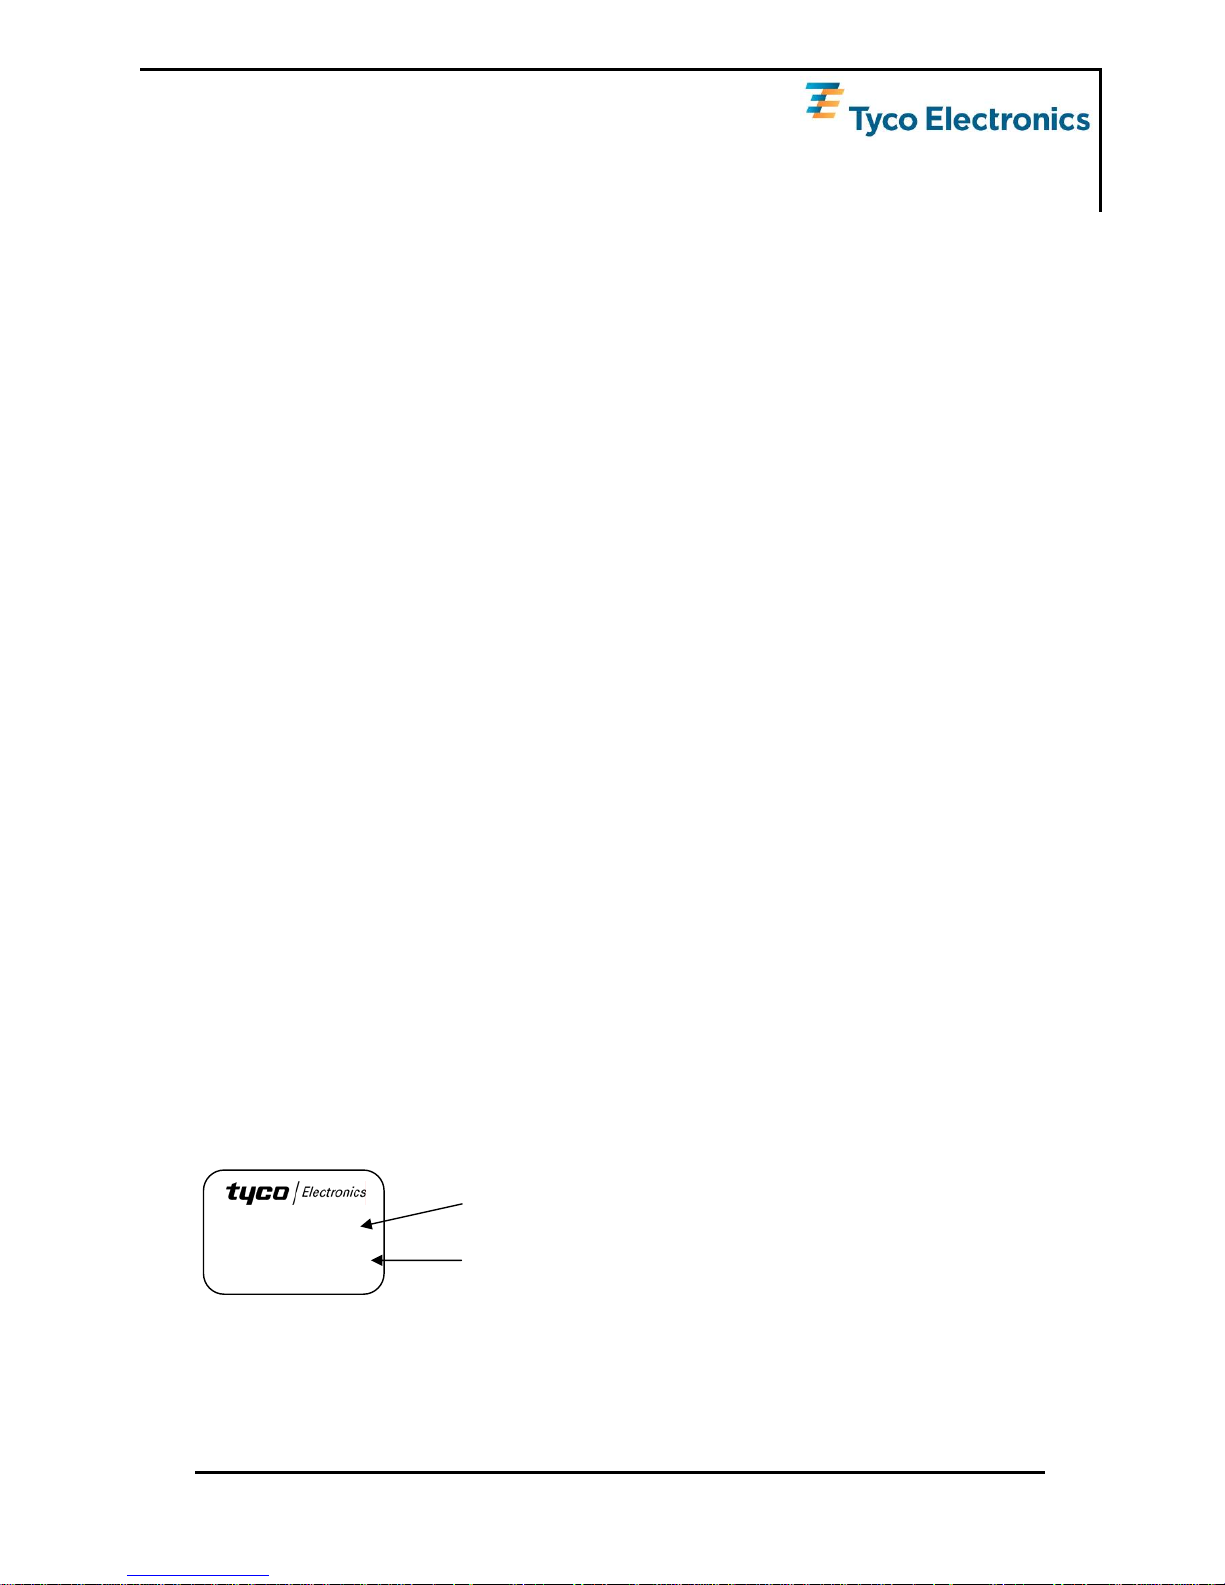
1.1 Label
The A1029’s labels hold the following information:
A1029-A-04
104-01 BZ/1207
Product code (A1029-A) with hardware version (04)
Firmware version (104-01), factory and date code
(week and year: 1207)
Figure 1: A1029 label
V4.0 – 03/07 User’s Manual Page 7 of 47
Page 8
GPS Receivers
A1029-A/-C, A1029-B/-D
1.2 Dead Reckoning
Dead Reckoning capability was introduced with hardware version 02, which can be
identified on the label. The extensions for the support of Dead Reckoning do not
affect any other characteristics of the module. 100% backward electrical and mechanical compatibility is assured with one exception: In order to be able to support
all necessary signals, the I/O connector of the A1029-B/-D was extended by two
pins on each side (total of 4 pins) keeping the center pins (signals and position)
identical. Therefore the connector plugs into existing designs based on the hardware version 01. Care must be taken that the real estate now covered by the additional pins is not populated on the carrier PCB.
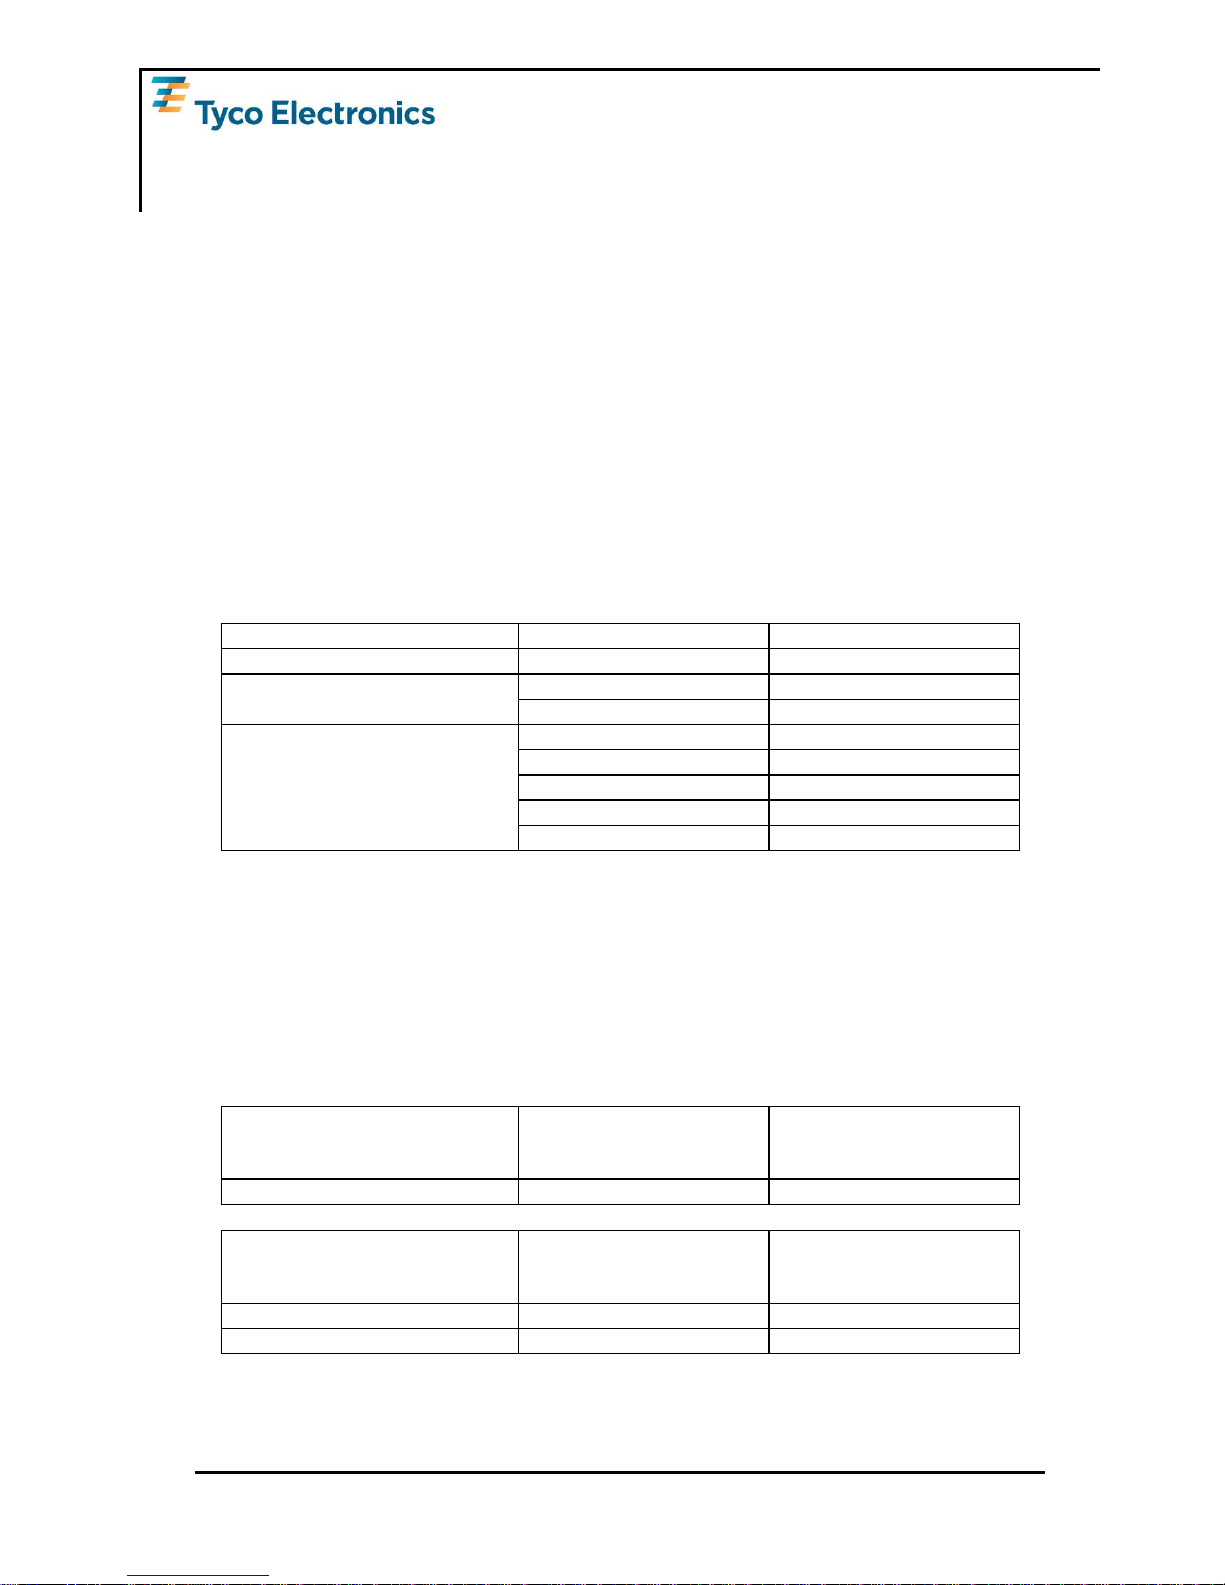
1.3 Characteristics
The modules are characterized by the following parameters.
Channels 12, parallel tracking
Frequency L1 (= 1575 MHz)
Stand alone 3m CEP (SA off) Position Accuracy
Differential < 2m CEP
Obscuration recovery
(1)
1s
Hot start
(2)
< 3s
Warm
(3)
< 32s
Autonomous / cold
(4) (6)
< 60s
Time To First Fix – TTFF
(theoretical minimum values;
values in real world may differ)
Power-off start
(5) (6)
Varying
Table 1: A1029 characteristics
(1) The calibrated clock of the receiver has not stopped, thus it knows precise time (to the µs level).
(2) The receiver has estimates of time/date/position and valid almanac and ephemeris data.
(3) The receiver has estimates of time/date/position and recent almanac.
(4) The receiver has no estimate of time/date/position, and no recent almanac.
(5) Receiver is powered off, clock stops. Start-up time depends on time passed since power-off and
power-on location.
(6) In order to improve TTFF, the receiver allows setting of time/date/position.
A1029-A/-C Mechanical dimensions
Length
Width
Height
28mm, 1.10”
22mm, 0.87”
3.2mm, 0.12”
A1029-A/-C Weight 2g, < 0.1oz
A1029-B/-D Mechanical dimensions
Length
Width
Height
33.0mm, 1.3”
45.7mm, 1.8”
4.5mm, 0.18”
A1029-B/-D Cable Length ~100mm, ~4.0”
A1029-B/-D Weight 11g, 0.5oz
Table 2 and 3: A1029-A/-C and A1029-B/-D dimensions and weight
Page 8 of 47 User’s Manual V4.0 - 03/07
Page 9

GPS Receivers
A1029-A/-C, A1029-B/-D
1.4 Handling Precautions
The GPS receiver modules A1029-A/-C and A1029-B/-D are modules that are sensitive to electrostatic discharge (ESD). Please handle with appropriate care.
V4.0 – 03/07 User’s Manual Page 9 of 47
Page 10
GPS Receivers
A1029-A/-C, A1029-B/-D
2 Ordering Information
2.1 GPS Receiver A1029-A/-C and A1029-B/-D
The order numbers are built as follows:
• V23993A1029Axxx
• V23993A1029Bxxx
• V23993A1029Cxxx
• V23993A1029Dxxx
V23993 stands for Tyco Electronics wireless and communication products, A1029A
for the A1029-A module, A1029B for the A1029-B module, A1029C for the A1029-C
module, A1029D for A1029-D module, respectively. The “xxx” stands for the according firmware version. Where
• “1xx” is standard GPS software
• “2xx” is GPS software with Dead Reckoning support
The functionality of both software versions is reflected in the according manuals.
2.2 Packing
2.2.1 Packaging of the A1029-A/-C
The A1029-A/-C GPS module comes in a tape and reel package suitable for pick
and place machines.
Figure 2: A1029-A/-C tape specifications (1)
Page 10 of 47 User’s Manual V4.0 - 03/07
Page 11
GPS Receivers
A1029-A/-C, A1029-B/-D
Figure 3: A1029-A/-C tape specifications (2)
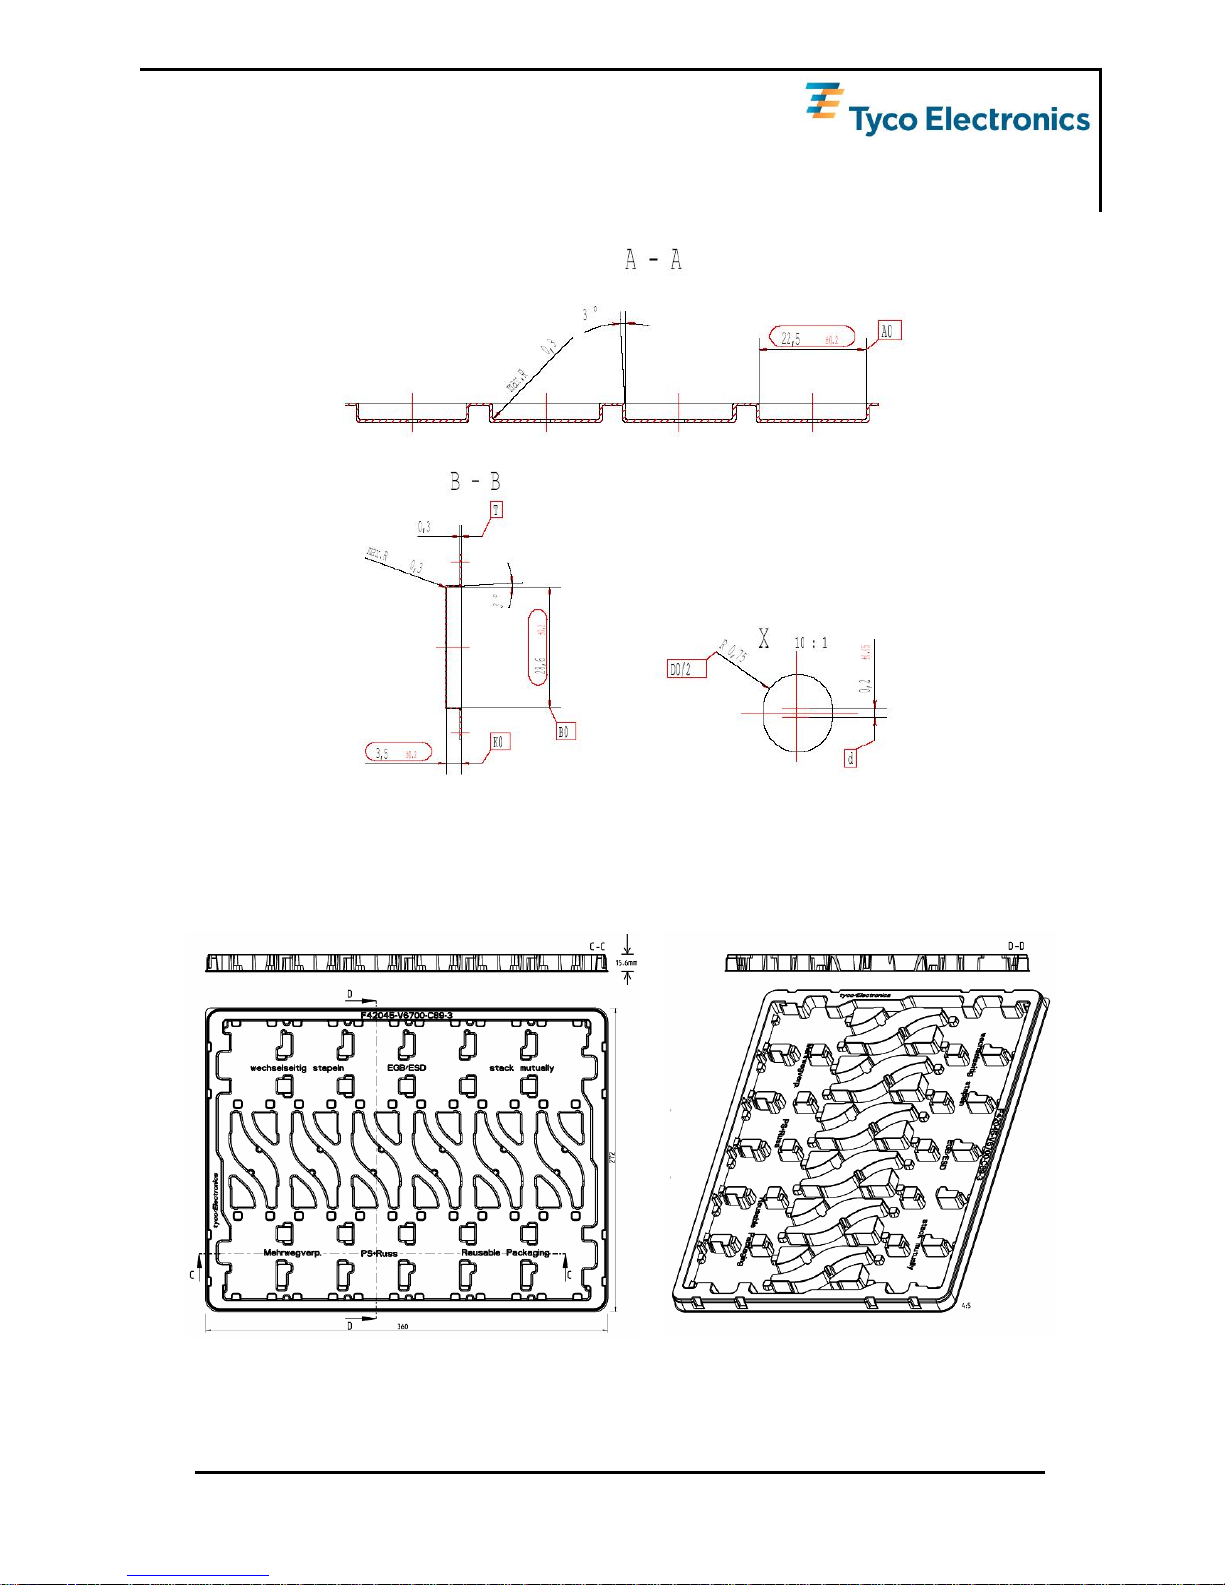
2.2.2 Packaging of the A1029-B/-D
The A1029-B/-D comes in trays, with 12 modules per tray.
Figure 4: A1029-B/-D tray specification
V4.0 – 03/07 User’s Manual Page 11 of 47
Page 12
GPS Receivers
A1029-A/-C, A1029-B/-D
2.3 Additional Equipment
V23993USB1029A Demonstration Kit (including one module V23993A1029A)
V23993USB1029C Demonstration Kit (including one module V23993A1029C)
V23993EVA1029A Evaluation Kit (including one module V23993A1029A)
V23993EVA1029C Evaluation Kit (including one module V23993A1029C)
V23993DKS1029B Demonstration Kit (including one module V23993A1029B)
V23993DKS1029D Demonstration Kit (including one module V23993A1029D)
V23993DR1030A Dead Reckoning Demonstration Kit (including one module
V23993A1030B) – functionality compatible to A1029A/B/C/D
Dead Reckoning solution.
Table 4: Additional equipment
Detailed descriptions of the additional kits can be found in the according manuals.
Page 12 of 47 User’s Manual V4.0 - 03/07
Page 13
GPS Receivers
A1029-A/-C, A1029-B/-D
3 Quick Start
In order to allow an easy and quick start with the modules A1029-A/-C or A1029-B/D, this chapter provides a short overview on the most important steps to receive
NMEA messages with position information on a serial port. For details please refer
to the according chapters.
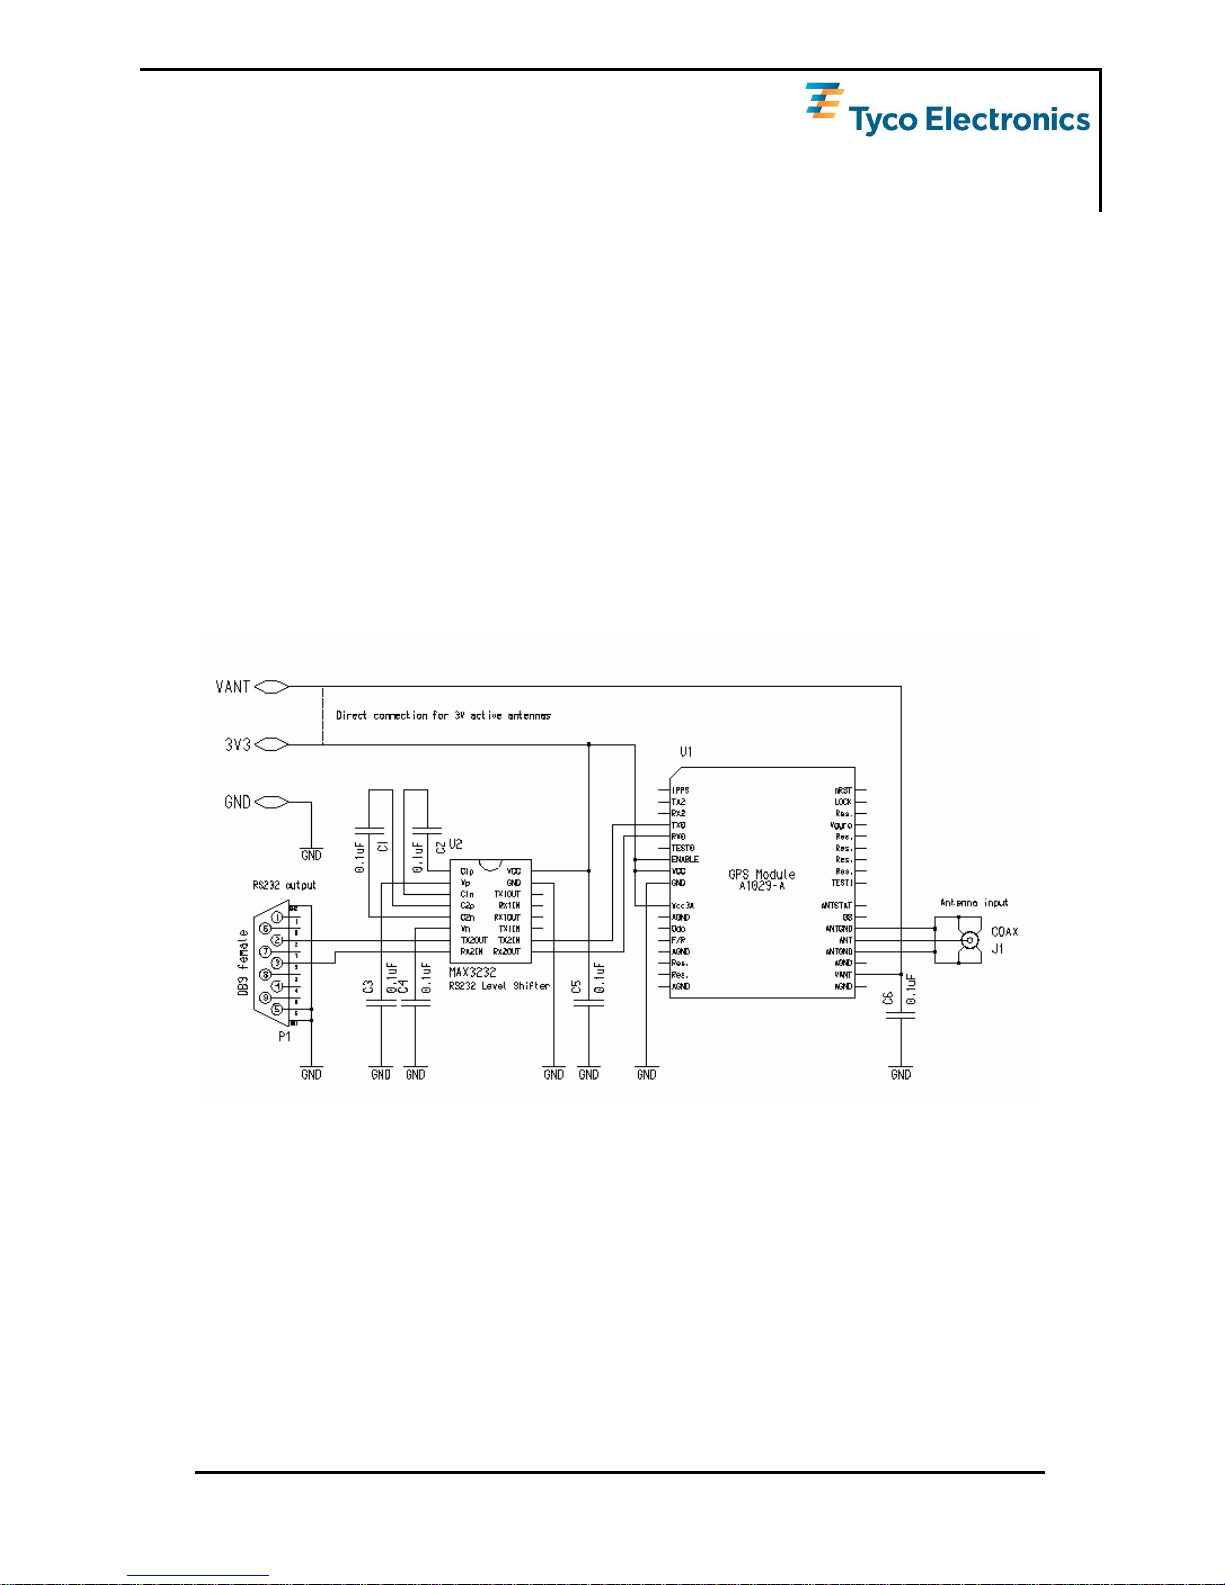
3.1 Minimum Configuration
The following picture shows a recommended minimum configuration for NMEA output and commands received and sent via an RS232 interface based on the A1029A/-C. The configuration for the A1029-B/-D has to be set up accordingly, using the
same pins on the module. Here it is not necessary to provide an antenna connection on the motherboard, as a cable and connector is already provided with the
module itself.
Figure 5: Recommended minimum configuration A1029-A/-C
Remarks:
• Place C1 to C5 close to MAX3232. For capacity values see datasheet of actual component used.
• Place C6 close to module pin.
• Use 3.3V level shifter (MAX3232 or equivalent).
• Use separate ground plane for antenna ground.
• Antenna input impedance is 50Ohm. Match as close as possible.
• Maximum allowed antenna current is 50mA. Consider a current limiter.
V4.0 – 03/07 User’s Manual Page 13 of 47
Page 14

GPS Receivers
A1029-A/-C, A1029-B/-D
• A battery back-up circuit for the RTC (Real Time Clock) should be considered (see 11.9 Battery Back-up)!
• In case of a long rise time of the external Vcc signal, a reset controller should
be considered (see 11.8 Reset Signal)!
3.2 Antenna
It is recommended to use an active GPS antenna with supply voltage of 3 to 5VDC
and a current draw of 50mA maximum. The quality of the GPS antenna chosen is of
paramount importance for the overall sensitivity of the GPS system. An active antenna should have a gain ≥ 20dB and a noise figure ≤ 1.5dB, which applies to more
than 95% of the active antennas available in the market.
3.3 Serial Port Settings
The default configuration within the standard GPS firmware is:
• Serial 0 (NMEA) 4800 baud, 8 data bits, no parity, 1 stop bit, no flow control
• Serial 2 (RTCM) 4800 baud, 8 data bits, no parity, 1 stop bit, no flow control
The default configuration within the Dead Reckoning GPS firmware is:
• Serial 0 (NMEA) 57600 baud, 8 data bits, no parity, 1 stop bit, no flow control
3.4 Improved TTFF
In order to improve the TTFF (Time To First Fix), it is recommended to support the
RTC with a back-up battery when no system power is available. Standard operation
mode is entered with the ENABLE pin on HIGH level. With the ENABLE pin on
LOW level, low power mode will be entered. If still power is being supplied to Vcc,
the RTC keeps on running while the internal processors will be stopped. The power
consumption will drop from typically 50mA to typically 30µA. Please see also paragraph 11.6 ENABLE Pin (low-power mode).
If the system or the GPS receiver alone should not be backed-up it is possible to
support the restart procedure by providing position and date/time information to the
module. This is described in the firmware manual. Please refer there to chapter
“Start-up Support” in the document T.E. GPS Firmware A1029.
Page 14 of 47 User’s Manual V4.0 - 03/07
Page 15
GPS Receivers
A1029-A/-C, A1029-B/-D
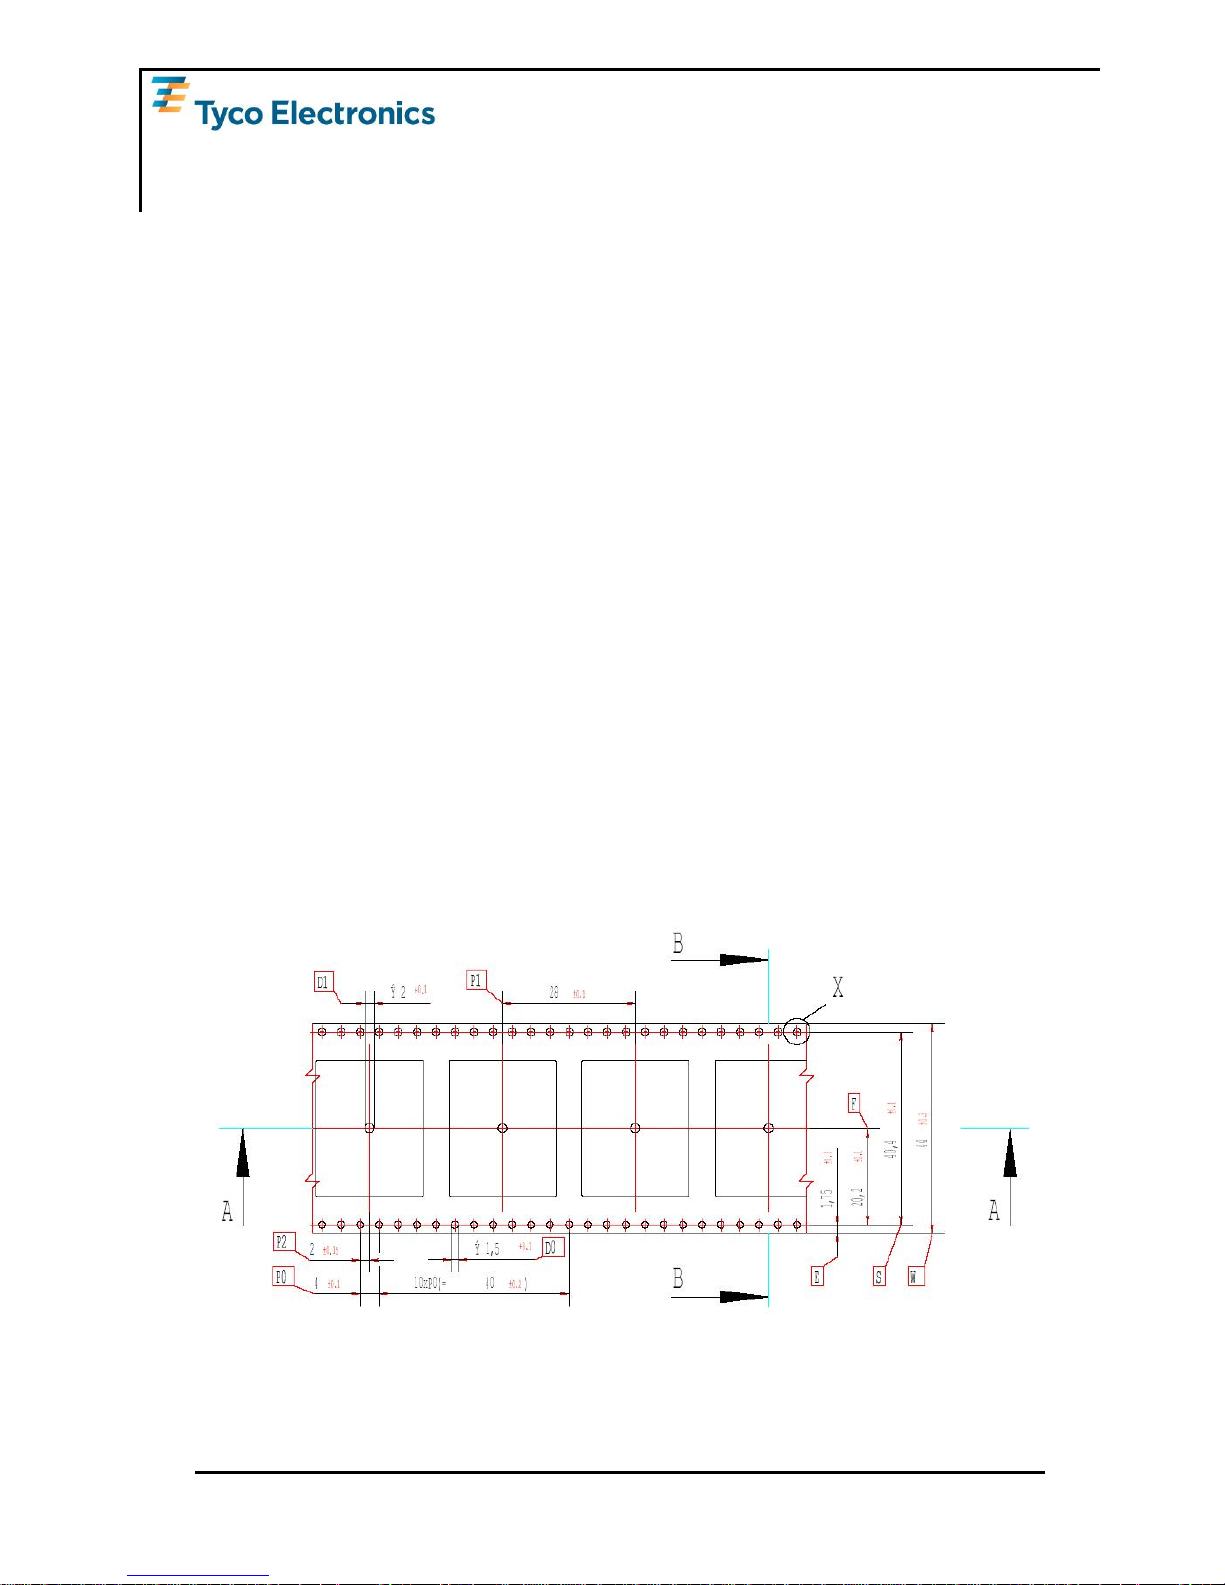
4 Mechanical Outline
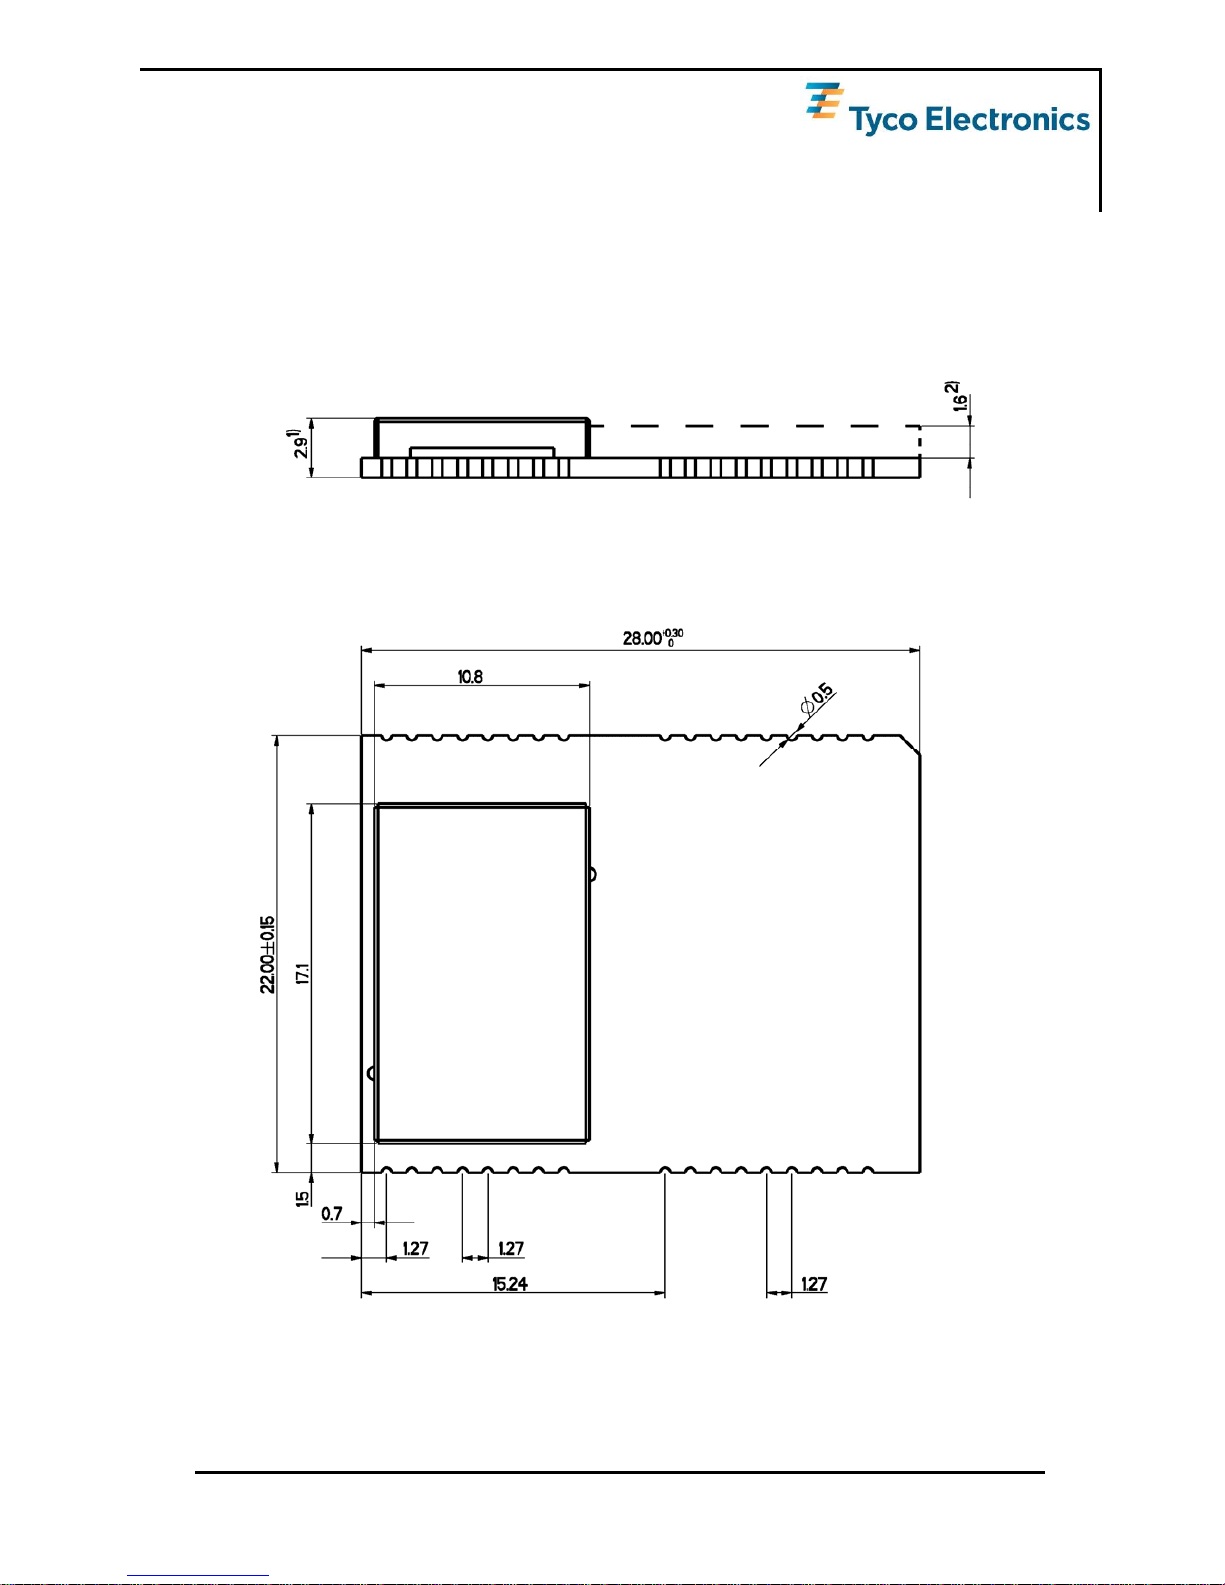
4.1 Overview A1029-A/-C
4.1.1 Overall module dimensions
All dimensions in [mm], 1) Minimum, 2) Maximum
Figure 6: Mechanical outline overview A1029-A/-C
V4.0 – 03/07 User’s Manual Page 15 of 47
Page 16

GPS Receivers
A1029-A/-C, A1029-B/-D
4.1.2 Details Component Side A1029-A
All dimensions in [mm]
Figure 7: Mechanical outline component side A1029-A/-C
Page 16 of 47 User’s Manual V4.0 - 03/07
Page 17

GPS Receivers
A1029-A/-C, A1029-B/-D
4.1.3 Details Solder Side A1029-A/-C
Solder pad size: 1.4 x 0.9
Width including solder pads: 22
Distance between solder pads within groups 1-9, 10-17, 18-25, 26-34: 1.27
Distance between groups (1-9 to 10-17 and 18-25 to 26-34): 5.08
All dimensions in [mm]
Figure 8: Mechanical outline solder side A1029-A/-C
V4.0 – 03/07 User’s Manual Page 17 of 47
Page 18

GPS Receivers
A1029-A/-C, A1029-B/-D
4.2 Overview A1029-B/-D
4.2.1 Overall module dimensions
All dimensions in [mm]
Figure 9: Mechanical outline overview A1029-B/-D
4.2.2 Connector A1029-B/-D
The power and I/O connector used on the A1029-B/-D is a 1.27mm (0.05”) low profile, double row socket with a height of 2.21mm (.087”) and a total of 26 contacts on
HW version 02 and higher (used to be 22 on HW version 01). Potential counterparts
on the motherboard are e.g. Samtec 1.27mm (0.05”) micro strips of the FTS series
(e.g. FTS-113-02-L-D).
Page 18 of 47 User’s Manual V4.0 - 03/07
Page 19

GPS Receivers
A1029-A/-C, A1029-B/-D
5 Pin-out Information
5.1 Layout A1029-A/-C
Figure 10: Pin-out information A1029-A/-C (top view)
V4.0 – 03/07 User’s Manual Page 19 of 47
Page 20

GPS Receivers
A1029-A/-C, A1029-B/-D
5.2 Description A1029-A/-C Signals
These tables describe the functionality of the pins and their associated symbols.
Signals required for Dead Reckoning (when according firmware is enabled) are
marked with .
Pin Symbol Description
1 1PPS 1PPS (pulse per second) output
2 TX2 Serial output 2
3 RX2 Serial input 2, RTCM input (DGPS)
4 TX0 Serial output 0, NMEA out
5 RX0 Serial input 0, NMEA in
6 TEST0 Reserved for test purposes – do not connect
7 ENABLE Enable pin – low power when low
8 Vcc +3.3V (power supply)
9 GND Ground (power supply)
10 Vcc3A
Analog voltage supply:
For standard GPS functionality connect to Vcc.
For DR < +3.3V (see below).
11 AGND
Analog ground
For standard GPS functionality leave open.
For DR connect to according analog GND.
12 Odo Odometer input (required for DR, otherwise leave open)
13 F/R
Reverse signal input (required for DR, otherwise leave
open)
14 AGND Analog ground - see above
15 Res. Reserved – do not connect
16 Res. Reserved – do not connect
17 AGND Analog ground - see above
Table 5: Pin description A1029-A/-C (part 1)
Page 20 of 47 User’s Manual V4.0 - 03/07
Page 21

GPS Receivers
A1029-A/-C, A1029-B/-D
Pin Symbol Description
34 nRST Reset input
33 LOCK Activated on LOCK (position fix)
32 Res. Reserved
31 Vgyro
Input pin for gyro output voltage
For standard GPS functionality leave open.
For DR connect to gyro output (see below).
30 Res. Reserved
29 Res. Reserved
28 Res. Reserved
27 Res. Reserved
26 TEST1 Reserved for test purposes
25 ANTSTAT Antenna sensor output
24 GS Gain Select for LNA – leave open
23 GNDANT
Antenna Ground, do not connect to GROUND, connect
to antenna shield (see below)
22 ANT Antenna signal / Z=50 Ohm
21 GNDANT
Antenna Ground, do not connect to GROUND, connect
to antenna shield (see below)
20 AGND Analog ground - see above
19 VANT Power supply antenna – provide according voltage.
18 AGND Analog ground - see above
Table 6: Pin description A1029-A/-C (part 2)
Pins 10 thru 17 used to be all AGND pins on HW version 01, pin 31 used to be a
“Res.” pin on HW version 01. For use without Dead Reckoning, no design modification is necessary.
V4.0 – 03/07 User’s Manual Page 21 of 47
Page 22

GPS Receivers
A1029-A/-C, A1029-B/-D
5.3 Layout A1029-B/-D
Figure 11: Pin out information A1029-B/-D (bottom and top view)
Bottom view is showing the side of the module that will face the carrier board.
Page 22 of 47 User’s Manual V4.0 - 03/07
Page 23

GPS Receivers
A1029-A/-C, A1029-B/-D
5.4 Description A1029-B/-D Signals
These tables describe the functionality of the pins and their associated symbols.
Signals required for Dead Reckoning (when according firmware is enabled) are
marked with .
Pin
(HW 02)
Pin
(HW 01)
Symbol Description
1 Res. Reserved – do not connect
3 1 1PPS 1PPS (pulse per second) output
5 3 TX0 Serial output 0, NMEA out
7 5 RX0 Serial input 0, NMEA in
9 7 Vcc +3.3V (power supply)
11 9 GND Ground (power supply)
13 11 Res. Reserved – do not connect
15 13 Res. Reserved – do not connect
17 15 Res. Reserved – do not connect
19 17 Res. Reserved – do not connect
21 19 TEST1 Reserved for test purposes – do not connect
23 21 VANT
Power supply antenna – provide according
voltage.
25 Odo
Odometer input (required for DR, otherwise leave
open)
Table 7: Pin description A1029-B/-D (part 1 – odd pin row)
Pin
(HW 02)
Pin
(HW 01)
Symbol Description
2 Res. Reserved – do not connect
4 2 nRST Reset input
6 4 TX2 Serial output 2
8 6 RX2 Serial input 2, RTCM input
10 8 ENABLE Enable pin – low power when low
12 10 Vcc3A
Analog voltage supply:
For standard GPS functionality connect to Vcc.
For DR < +3.3V (see below).
14 12 TEST0 Reserved for test purposes – do not connect
16 14 LOCK Activated on LOCK (position fix)
18 16 Res. Reserved – do not connect
20 18 Vgyro
Input pin for gyro output voltage
For standard GPS functionality leave open.
For DR connect to gyro output (see below).
22 20 ANTSTAT Antenna sensor output
24 22 GS Gain Select for LNA – leave open
26 F/R
Reverse signal input (required for DR, otherwise
leave open)
Table 8: Pin description A1029-B/-D (part 2 – even pin row)
V4.0 – 03/07 User’s Manual Page 23 of 47
Page 24

GPS Receivers
A1029-A/-C, A1029-B/-D
Pins 12 and 20 on HW version 02 and higher used to be “Res.” pins on HW version
01 (there numbered 10 and 18). For use without Dead Reckoning, no design modification is necessary.
5.5 General Comments
The following comments should be considered for a design with and use of the
module:
• Standard configuration of serial port (standard GPS software):
Serial 0 (NMEA) 4800 baud, 8 data bits, no parity, 1 stop bit, no flow control
Serial 2 (DGPS) 4800 baud, 8 data bits, no parity, 1 stop bit, no flow control
• Standard configuration of serial port (DR software):
Serial 0 (NMEA) 57600 baud, 8 data bits, no parity, 1 stop bit, no flow control
• Antenna (Antenna connected to Antenna Pin – A1029-A/-C only)
Use ground pins (pin 21, pin 23) close to the antenna input for RF ground.
• Gain Select
Default setting is “open” (identical to logical low), which results in a high gain
(14dB). This setting is recommended.
• nRST
Do not pull low when in low power mode (ENABLE = LOW)
• Vcc3A
Power supply of internal ADC. This feature is not used, but it is recommended to connect to Vcc.
Page 24 of 47 User’s Manual V4.0 - 03/07
Page 25

GPS Receivers
A1029-A/-C, A1029-B/-D
6 Dead Reckoning Interface
Dead Reckoning (DR) functionality requires the correct firmware (“2xx”) and the
correct hardware set-up on the main board. Two digital signals (odometer and reverse), a gyro and according power supply for the internal ADC are necessary to
support this feature. This chapter shall provide all necessary information for designing an according main board. The recommendations here assume the availability of
a 5V (V
CC5D
) and 3.3V (V
CC3D
) digital power supply on this main board.
6.1 Odometer and Reverse Signals
Both signals are provided by the vehicle. In order to connect the signals in the correct way to the module, they should be optically isolated. The following schematic is
an example on how an implementation could look like.
Figure 12: Connecting an odometer signal
The same configuration can be used for the reverse signal.
V4.0 – 03/07 User’s Manual Page 25 of 47
Page 26
GPS Receivers
A1029-A/-C, A1029-B/-D
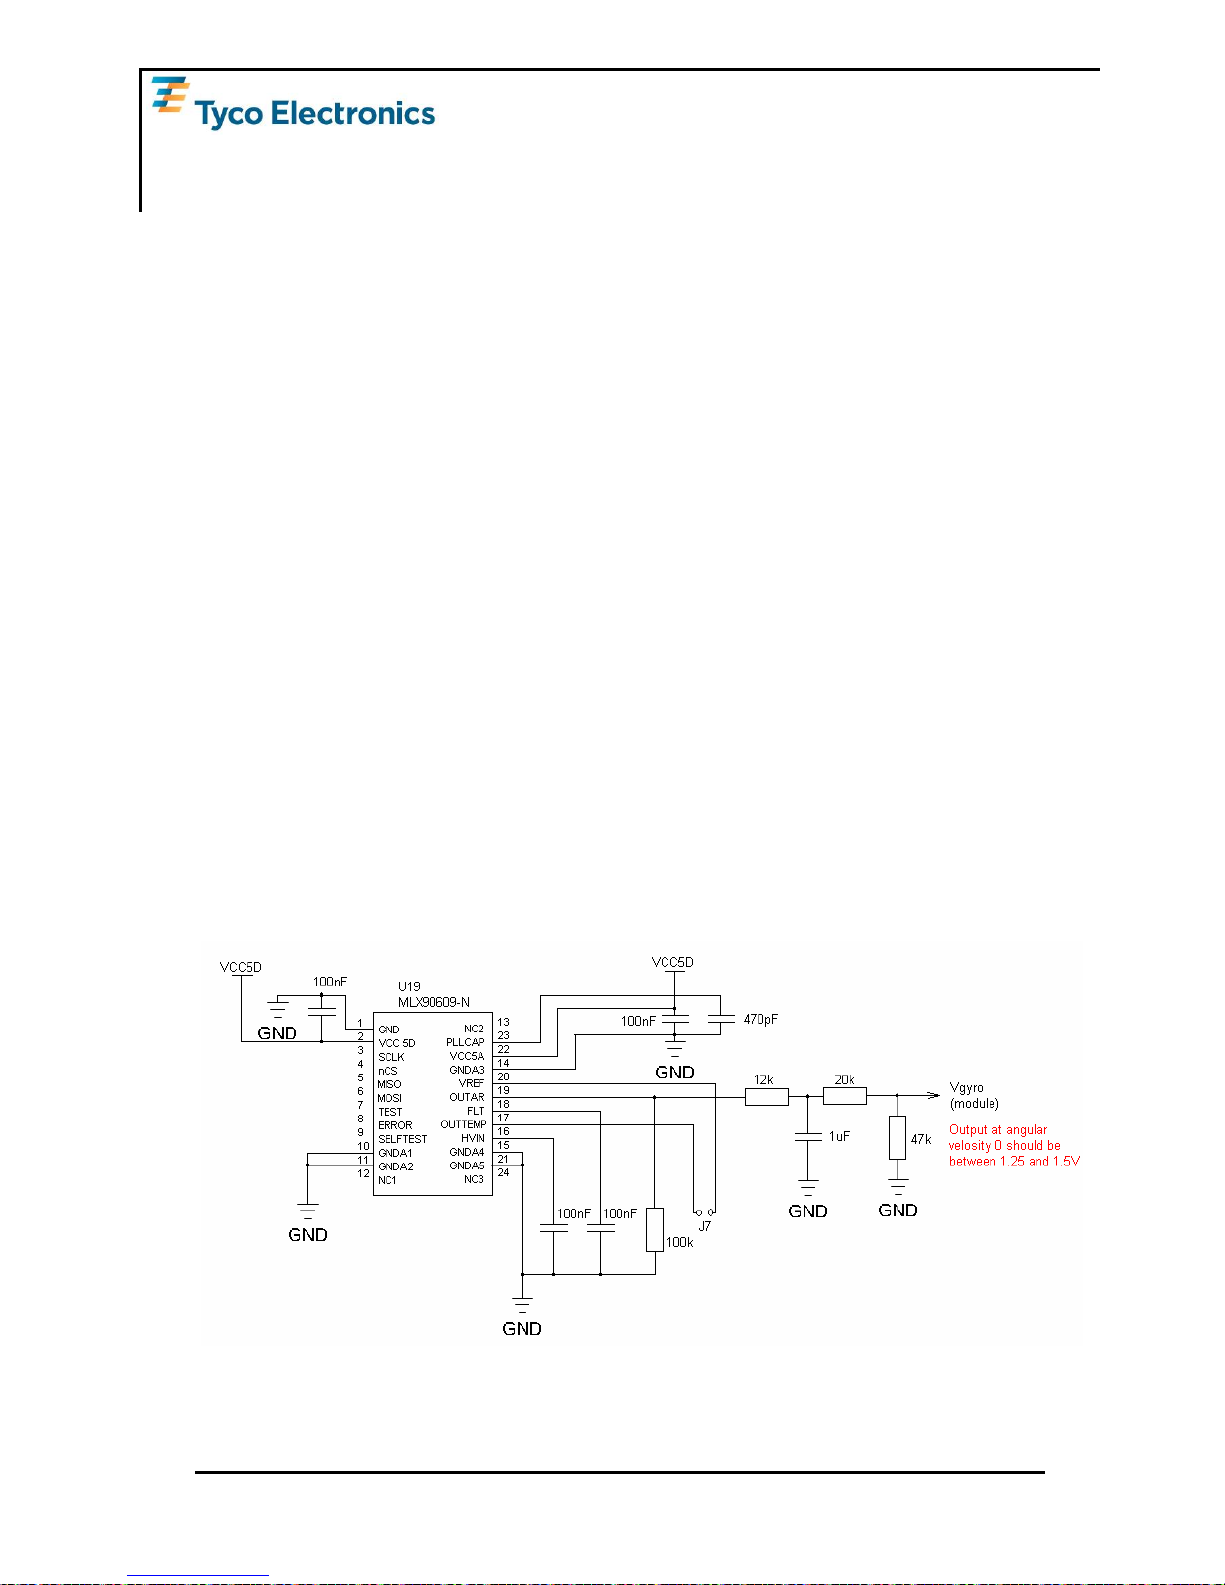
6.2 Gyro and Gyro Signal
The gyro is of utmost importance for the performance of the DR system. The following data shall provide a guideline for selecting the right gyro:
Basic gyro data
• Supply voltage: 5V (more gyros available, also used in the example) or 3V
• Current draw: < 20mA
• Max. angular velocity: ± 80 deg./ s
• Output at angular velocity 0: 1.5V (or 2.5V and according divider, as shown
in the example)
• Resolution: ~ 0.1 deg/sec
• Scale factor: ~ 25mV / deg / s (smaller values possible, e.g. 12.5mV / deg / s
at supply voltage 3V)
Important for system performance as well:
• Temperature coefficient of scale factor: max. ± 10% at -30° to +80°C
• Linearity: ± 0.5% full scale
• Offset drift: e.g. Melexis MLX90609-N +/- 2.5 % of Zero Rate Output at 25°
(smaller values desirable)
• Response: max. 10Hz
• Noise level; max. 10mVp-p
In the example (also on the DR1030A board), the Melexis MLX90609-N is used, a
5V gyro with an output of 2.5V at 0°/s angular velocity. To allow the complete output
range to fit into the input range of the internal ADC, a 2:1 divider is integrated.
Figure 13: Connecting the gyro Melexis MLX90609-N
(recommended solution)
Page 26 of 47 User’s Manual V4.0 - 03/07
Page 27

GPS Receivers
A1029-A/-C, A1029-B/-D
Other comparable gyros are Murata MEV50A or Analog ADXRS401.
Figure 8: Connecting the gyro Murata ENV-05G
(Attention: not recommended for new designs, but to illustrate the principle)
A one-to-one replacement that is available for new designs is the Panasonic
EWTS86NN21.
V4.0 – 03/07 User’s Manual Page 27 of 47
Page 28

GPS Receivers
A1029-A/-C, A1029-B/-D
6.3 Power Supply for Internal ADC
The internal ADC requires a separate power supply on pin Vcc3A. The power
should be derived from the same source that is used for the gyro. This way, oscillations of the power source affect the gyro and the ADC and therefore minimize the
negative effects. It is also recommended that Vcc3A is slightly below the power
supplied to module (Vcc).
The following circuit shows an example on how to generate the power for the internal ADC from a 5V source.
Figure 14: Power supply for internal ADC (Vcc3A)
6.4 Dead Reckoning Application
In comparison to the A1030-A the A1029-A/-C or A1029-B/-D do not offer external
SRAM that can be backed-up with a battery. Therefore the current calibration and
Kalman state data need to be stored using a command:
• $PTYCDRSAVE: Store the actual Kalman data
It is utterly important for the performance after start-up to issue this command right
before power is switched off. As a result the current calibration and Kalman state
data will be stored into flash memory. After restart, these data are immediately
available and as a consequence all Dead Reckoning calculations are very precise
from the beginning!
If this command was not issued before switching off the power or in case the vehicle was moved and the Dead Reckoning unit was switched off and is switched on
later on only (e.g. transport of car by train or ferry), send the following commands in
this order to the system:
Page 28 of 47 User’s Manual V4.0 - 03/07
Page 29

GPS Receivers
A1029-A/-C, A1029-B/-D
• $PTYCDRERASE : Erase calibration data in int. FLASH
Note: This will require a new calibration!
Otherwise for any details on the Dead Reckoning firmware implementation, please
refer to the “T.E. GPS Firmware DR A1030” document. All other aspects, especially
the integration and calibration process are identical. It has to be considered that the
A1029 Dead Reckoning firmware does not support SBAS or Data Logging.
V4.0 – 03/07 User’s Manual Page 29 of 47
Page 30
GPS Receivers
A1029-A/-C, A1029-B/-D
7 Electrical Characteristics
7.1 Operating Conditions
Pin Description Min Typical Max
AC BD
8 9 Vcc 3.0V 3.3V 3.6V
Current draw (without active Antenna) 50mA
Input current in standby mode 30µA
1 3
1PPS (1 pulse per second), reference GPS
time (active and passive antenna)
+120ns
+90ns
19 23
VANT (active antenna supply voltage)
Antenna current
Vcc-0.5V 5.2V
50mA
22 na ANT (antenna pin) Z0=50Ω
24 24
GS (gain select for LNA), input pin
GS high (Low gain – 4dB)
GS low (high gain – 14dB)
Vcc-0.6V
Vcc
0.6V
25 22
ANTSTAT (antenna sensor output) @ 1mA
current source (antenna current values are
typical values)
High at antenna current from 9 to 16mA
Low at antenna current <9mA or >16mA
Vcc-0.5V
0
Vcc
0.5V
Output pins
VOH
VOL
Vcc-0.8V
0.4V
Input pins
VIH
VIL
0.7Vcc
0.3Vcc
Table 9: Operating Conditions
7.2 Absolute Maximum Ratings
Pin Description Min Max
AC BD
8 9 Vcc -0.3V 3.6V
Current Antenna, external power supply 50mA
Applied voltage to all input pins excluding VCC, VANT -0.3V Vcc+0.3V
max. 3.6V
Table 10: Absolute maximum ratings
Stresses beyond those listed under “Absolute Maximum Ratings” may cause permanent damage to the device. This is a stress rating only. Functional operation of
the device at these or any other conditions beyond those indicated in the operational sections of this specification is not implied. Exposure to absolute maximum
rating conditions for extended periods may affect device reliability.
Page 30 of 47 User’s Manual V4.0 - 03/07
Page 31

GPS Receivers
A1029-A/-C, A1029-B/-D
8 Mounting
This chapter covers the mounting of the A1029-A/-C. The A1029-B/-D offer a power
and I/O connector with a 1.27mm (0.05”) low profile, double row socket with a total
of 26 contacts (on HW version 02 and higher or 22 contacts on HW version 01).
Potential counterparts on the motherboard are Samtec 1.27mm (0.05”) micro strips
of the FTS series. For fixing the A1029-B/-D on a motherboard appropriate screws
and bolts or clips (see also chapter 4.2 Overview A1029-B/-D) are recommended.
8.1 Proposed Footprint for Soldering
The following proposal of a footprint for soldering is assuming a stencil thickness of
150µm. ³ marks the center of the through holes.
Figure 15: Soldering footprint proposal A1029-A/-C
The final footprint has to be evaluated and qualified by the manufacturer according
to the specific processes.
V4.0 – 03/07 User’s Manual Page 31 of 47
Page 32

GPS Receivers
A1029-A/-C, A1029-B/-D
8.2 Recommended Profile for Reflow Soldering
Typical values for reflow soldering of the module in convection or IR/convection ovens are as follows:
Peak temperature (RoHS compliant process)
245°C
Average ramp up rate to Peak (183°C to Peak) 3°C / second max.
Preheat temperature 125 (±25°C)
120 seconds max.
Temperature maintained above 183°C
60 … 150 seconds
Time within 5°C of actual peak temperature
10 … 20 seconds
Ramp Down rate
6°C / second max.
Time 25°C to peak temperature
6 minutes max.
Table 11: Reflow soldering profile A1029-A/-C
As results of soldering may vary among different soldering systems and types of
solder and depend on additional factors like density and types of components on
board, the values above should be considered as a starting point for further optimization.
Page 32 of 47 User’s Manual V4.0 - 03/07
Page 33

GPS Receivers
A1029-A/-C, A1029-B/-D
9 Use of Antenna
9.1 Connection of RF Signal
This chapter affects the GPS receiver module A1029-A/-C only.
The ANT pin is used to connect the receiver with the GPS antenna. The design of
the antenna connection has to be done strictly according to RF design rules. A 50Ω
PCB strip line is required. The following drawings shall explain the guidelines. A
major rule is to keep the strip line as short as possible. Additionally, antenna ground
(GNDANT) should be routed to the ground plane of the PCB (the ground plane is
on a lower PCB layer) by vias as demonstrated in the drawing.
Figure 16: Antenna connector strip line A1029-A/-C
In order to gain the impedance of 50Ω, the width (W) of the strip line needs to be
calculated. It depends on the thickness or height (H) of the PCB layer (both parameters are shown in following drawing). For our calculation, we assume that the
PCB material is FR4 which typically has an ε
R
of 4.2 to 5.2.
Figure 17: Strip line parameters A1029-A/-C
As a rule of thumb, the width should be about 1.8 times the height of the PCB:
W = 1.8 x H
In our example, we would get a width of W = 1.8 x 0.8mm = 1.44mm.
V4.0 – 03/07 User’s Manual Page 33 of 47
Page 34

GPS Receivers
A1029-A/-C, A1029-B/-D
9.2 Active Antenna
General GPS active antenna specification:
Limitations:
• Supply voltage according to voltage fed into VANT pin (5V max.)
• Supply current 50mA (max.)
Recommendations:
• Gain ≥ 20dB (should not exceed 35dB)
• Noise figure ≤ 1.5dB
The recommendations apply to the majority of active antennas that can be found in
the market. Anyhow, the quality of the GPS antenna chosen is of paramount importance for the overall sensitivity of the GPS system.
The system design needs to reflect the supply voltage of the antenna. If the supply
voltage is equal to Vcc, Vcc can be connected to VANT. If the antenna requires a
different supply voltage, the antenna bias can be provided through the VANT pin.
9.3 Passive Antenna
Note: Different passive antenna set-ups have been tested with positive results on
the performance of the A1029 modules. Anyhow, it is the responsibility of the system integrator to qualify the final configuration.
Please consider that it is crucial to keep the connection from the antenna to the
ANT pin as short as possible. Each bit of attenuation between the passive antenna
and the ANT pin will degrade GPS performance.
Recommendations:
• Antenna gain: >2dBi
• Antenna gain: < 2dBi / LNA close to the antenna recommended!
Please make sure that the antenna is properly tuned to its dielectric environment.
Page 34 of 47 User’s Manual V4.0 - 03/07
Page 35

GPS Receivers
A1029-A/-C, A1029-B/-D
10 Quality and Reliability
10.1 Environmental Conditions
Operating temperature
-40 … +85°C
Operating humidity
Max. 85% r. H., non-condensing, at 85°C
MSL JEDEC
(Moisture Sensitivity Level)
3
Storage 6 months in original package.
Table 12: Environmental conditions
10.2 Product Qualification
Prior to product qualification the GPS receiver is preconditioned according to
EIA/JEDEC standard JESD22-A113-B / Level 3.
Basic qualification tests:
• Reflow simulation on test PCB (A1029-A/-C only)
• Temperature Cycling –40°C … +85°C
• Temperature Humidity Bias 85°C / 85% RH
• High / Low Temperature Operating –40° / +85°C
• High Temperature Operating Life +85°C
• Vibration Variable Frequency
• Mechanical Shock
Please contact Tyco Electronics for detailed information.
10.3 Production Test
Each module is electrically tested prior to packing and shipping to ensure state of
the art GPS receiver performance and accuracy.
V4.0 – 03/07 User’s Manual Page 35 of 47
Page 36

GPS Receivers
A1029-A/-C, A1029-B/-D
11 Applications and Hints
11.1 Minimum Configuration
Please refer to chapter 3.1 Minimum Configuration for details. In addition, for optimized start-up behavior it is strongly recommended to add a battery back-up circuit
(see chapter 3.4)!
11.2 Antenna Sensor Pin (ANTSTAT)
The Antenna Sensor pin is an output pin. It provides correct status information for
an active GPS antenna with current consumption in the defined range! For an active antenna with a current consumption outside this range, an external circuit could
detect the connection or a disconnection or a short circuit.
• Logic low when: Iant < 9mA
• Logic high when: 9mA > Iant < 16mA
• Logic low when: Iant > 16mA
The threshold values are typical values. Values in an application can defer towards
a wider range.
Iant = DC current of GPS antenna (DC current through sensing resistor on GPS
module)
The Antenna Sensor pin can detect when an active antenna is connected. It can
also detect when the antenna is short-circuited or disconnected for some reason.
Please consider that the Antenna Sensor can provide no useful output when the
GPS antenna is fed externally, i.e. the VANT pin is not used (the sensing resistor
on the GPS module can not sense any DC current).
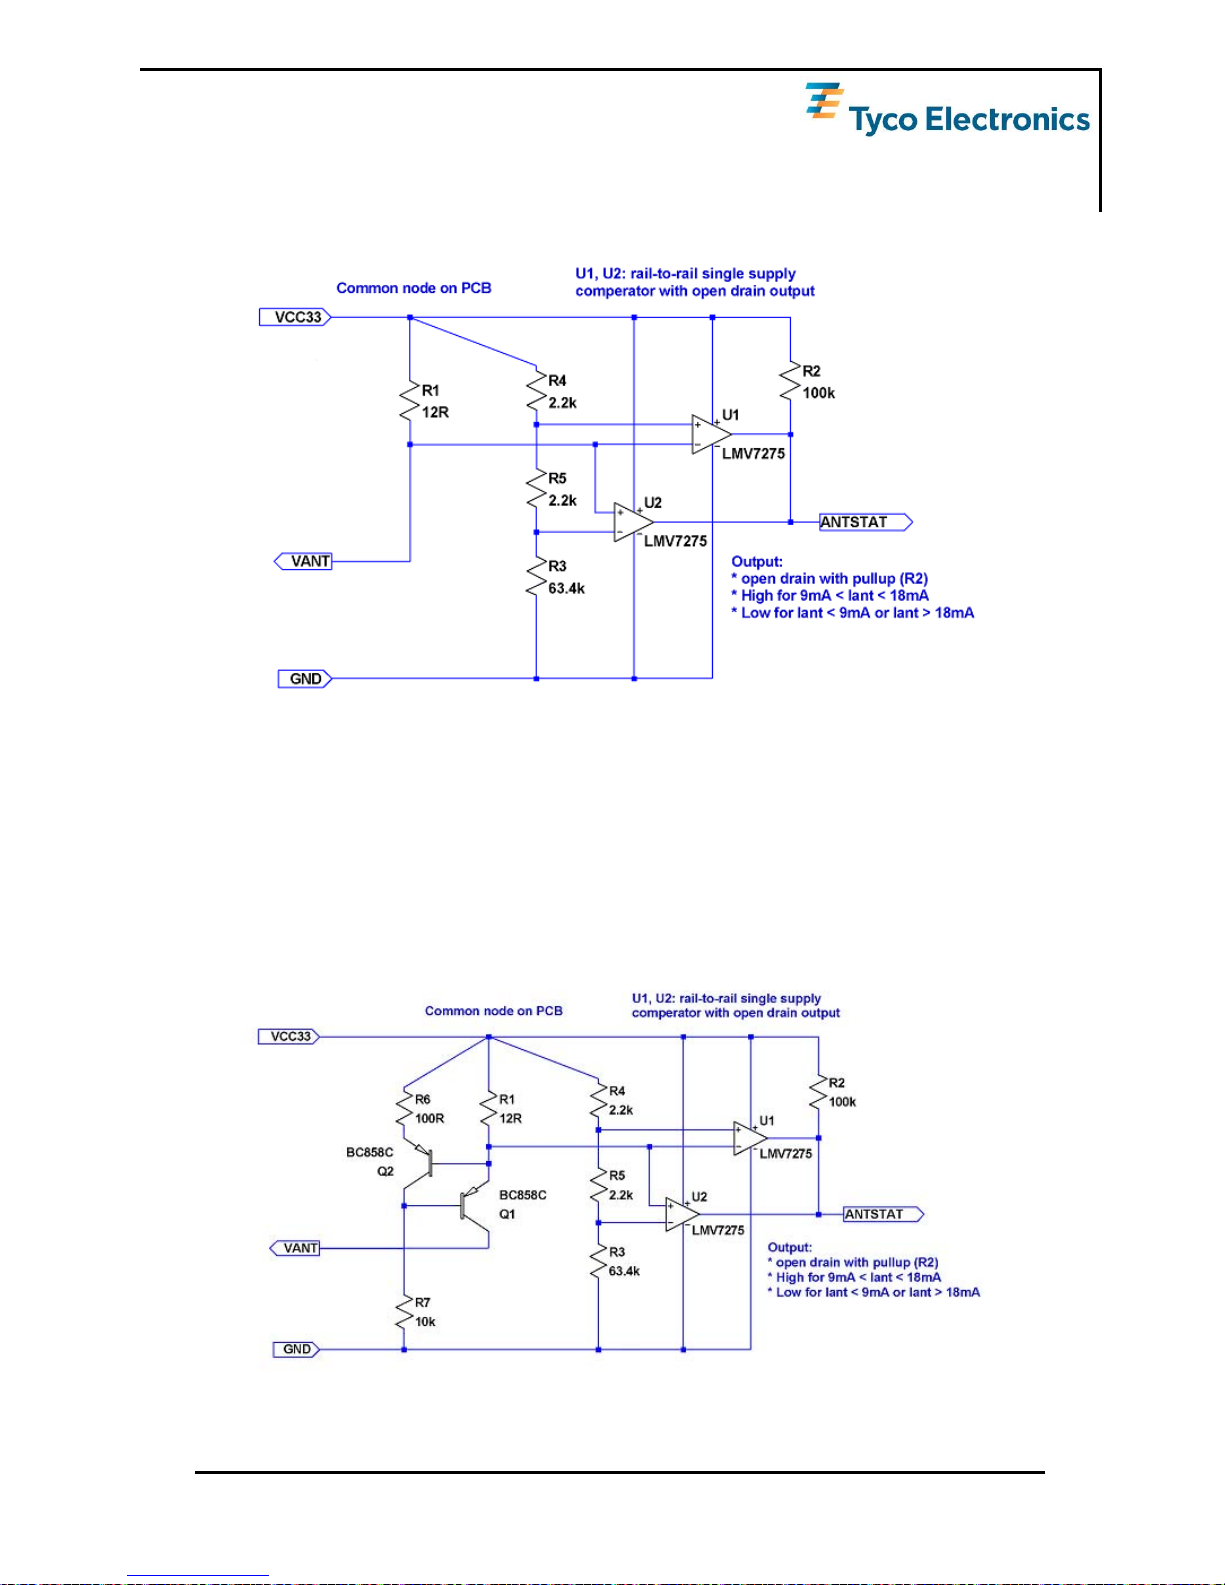
11.2.1 Antenna Status Adaptation
11.2.1.1 Antennas with Different Current Draw
The following circuit is a proposal on how you can feed an antenna with 3.3V and
provide an output for the ANTSTAT pin that is adapted to the range the ANTSTAT
pin detects as the valid one if and when the antenna is working properly. The value
of the components may need an adaptation in the final application. For example,
the input current of the chosen comperator goes into that equation. The thresholds
defined in this circuit are quite close to the ones of the ANTSTAT detection thresholds. Their value is determined by resistors R4, R5, and R3.
We strongly recommend simulating and testing your realized version before using
it. In any case, it is the responsibility of the designer to test and verify the implementation.
Page 36 of 47 User’s Manual V4.0 - 03/07
Page 37
GPS Receivers
A1029-A/-C, A1029-B/-D
Figure 18: Application note: Antenna sensor adaptation
11.2.1.2 Antennas with Different Current Draw incl. Current Limiter
This proposal is similar to the first one, but includes a current limiter. Comments
and notes as above apply.
We strongly recommend simulating and testing your realized version before use. In
any case it is the responsibility of the designer to test and verify the implementation.
Figure 19: Application note: Antenna sensor adaptation with current limiter
V4.0 – 03/07 User’s Manual Page 37 of 47
Page 38

GPS Receivers
A1029-A/-C, A1029-B/-D
11.3 Gain select pin (GS)
The LNA Gain Select pin is an input pin.
• Pin at GND (low) or open: LNA Gain 14dB (default)
• Pin at Vcc (high): LNA Gain 4dB
It is recommended to leave the pin unconnected. This allows for amplification of
weaker signals and a firmware implementation of an automatic gain control (AGC)
function.
Page 38 of 47 User’s Manual V4.0 - 03/07
Page 39

GPS Receivers
A1029-A/-C, A1029-B/-D
11.4 VANT Pin (antenna voltage input pin)
The VANT pin is an input pin.
The supply voltage for an active GPS antenna has to be fed into the Vant pin.
The easiest way to do that is to connect Vcc to VANT. The maximum current is
50mA.
Note: Shortcut between ANT and GND may damage the A1029 GPS receiver mod-
ule. This should be avoided by using an antenna current limiter.
Please find proposal for simple current limiter below. If other transistors are used,
other resistor values may be necessary as well. We strongly recommend simulating
and testing your realized version before using it.
The little schematics below work for Vcc from 3V to 5V. The antenna current will be
limited to around 50mA.
Figure 20: Application note: Antenna current limiter
V4.0 – 03/07 User’s Manual Page 39 of 47
Page 40

GPS Receivers
A1029-A/-C, A1029-B/-D
11.5 LOCK Pin (position fix pin)
The LOCK pin is an output pin.
When there is no valid position fix, the signal on the pin will be a continuous logic
low. During a valid position fix phase, the output signal will be a continuous logic
high.
11.6 ENABLE Pin (low-power mode)
The ENABLE pin is an input pin.
For enabling normal operation of the module, the pin has to be on HIGH level (e.g.
connected to Vcc). When the ENABLE pin is pulled down to GND, the module will
go to a low power mode where only the RTC will be supported (if a power source is
still connected to Vcc). I.e. date and time will be valid after wake-up. The current
draw will fall from typically 50mA to typically 30µA. Do not pull down low nRST at
the same time! This is not necessary and will result in additional current draw!
11.7 1PPS pin (1 pulse per second pin)
The 1PPS pin is an output pin.
In addition to precise positioning, GPS also allows for accurate timing due to the
synchronized atomic clocks in the GPS satellites. While the current date and time is
transmitted in NMEA sentences, an exact and accurate timing signal is provided via
the 1PPS pin of the A1029 modules.
The 1PPS signal is valid only, whenever the GPS modules provide a valid position
fix. Therefore it is recommended to monitor the LOCK signal in parallel (or logically
AND the 1PPS and LOCK signals).
The rising edge of the signal is synchronized to GPS time and therefore also to
UTC. The 1PPS signal is characterized (a) by the delay “d” between the start of a
GPS second and the rising edge of the 1PPS and (b) by standard deviation of this
delay providing a measure for the stability or jitter of this signal. Additionally, the
duration “l” of the signal is outlined.
Page 40 of 47 User’s Manual V4.0 - 03/07
Page 41

GPS Receivers
A1029-A/-C, A1029-B/-D
Figure 21: 1PPS signal description
Signal delay d (typical) 130ns
Standard deviation σd (typical) 20ns
Signal duration l (typical) 500ms
Table 13: 1PPS signal characterization with active antenna with filter at 22°C
Signal delay d (typical) 90ns
Standard deviation σd (typical) 20ns
Signal duration l (typical) 500ms
Table 14: 1PPS signal characterization with passive antenna at 22°C
The standard deviation is a probability measure for the occurrence of value within a
certain range. 68.3% of all new values will be within 1σ of the expected value,
95.5% within 2σ.
11.8 Reset Signal
The nRST pin is an input pin.
The nRST pin can be used to generate a reset on the A1029 modules. Resetting
the module will result in a restart of the complete firmware including the boot loader.
All information stored in flash memory will still be valid. The RTC will keep on running. The same result can be achieved using the ENABLE pin. Therefore connecting nRST is usually not necessary.
Note: In case of low power mode (ENABLE pin low) DO NOT pull nRST to low.
This will result in additional current draw.
V4.0 – 03/07 User’s Manual Page 41 of 47
Page 42
GPS Receivers
A1029-A/-C, A1029-B/-D
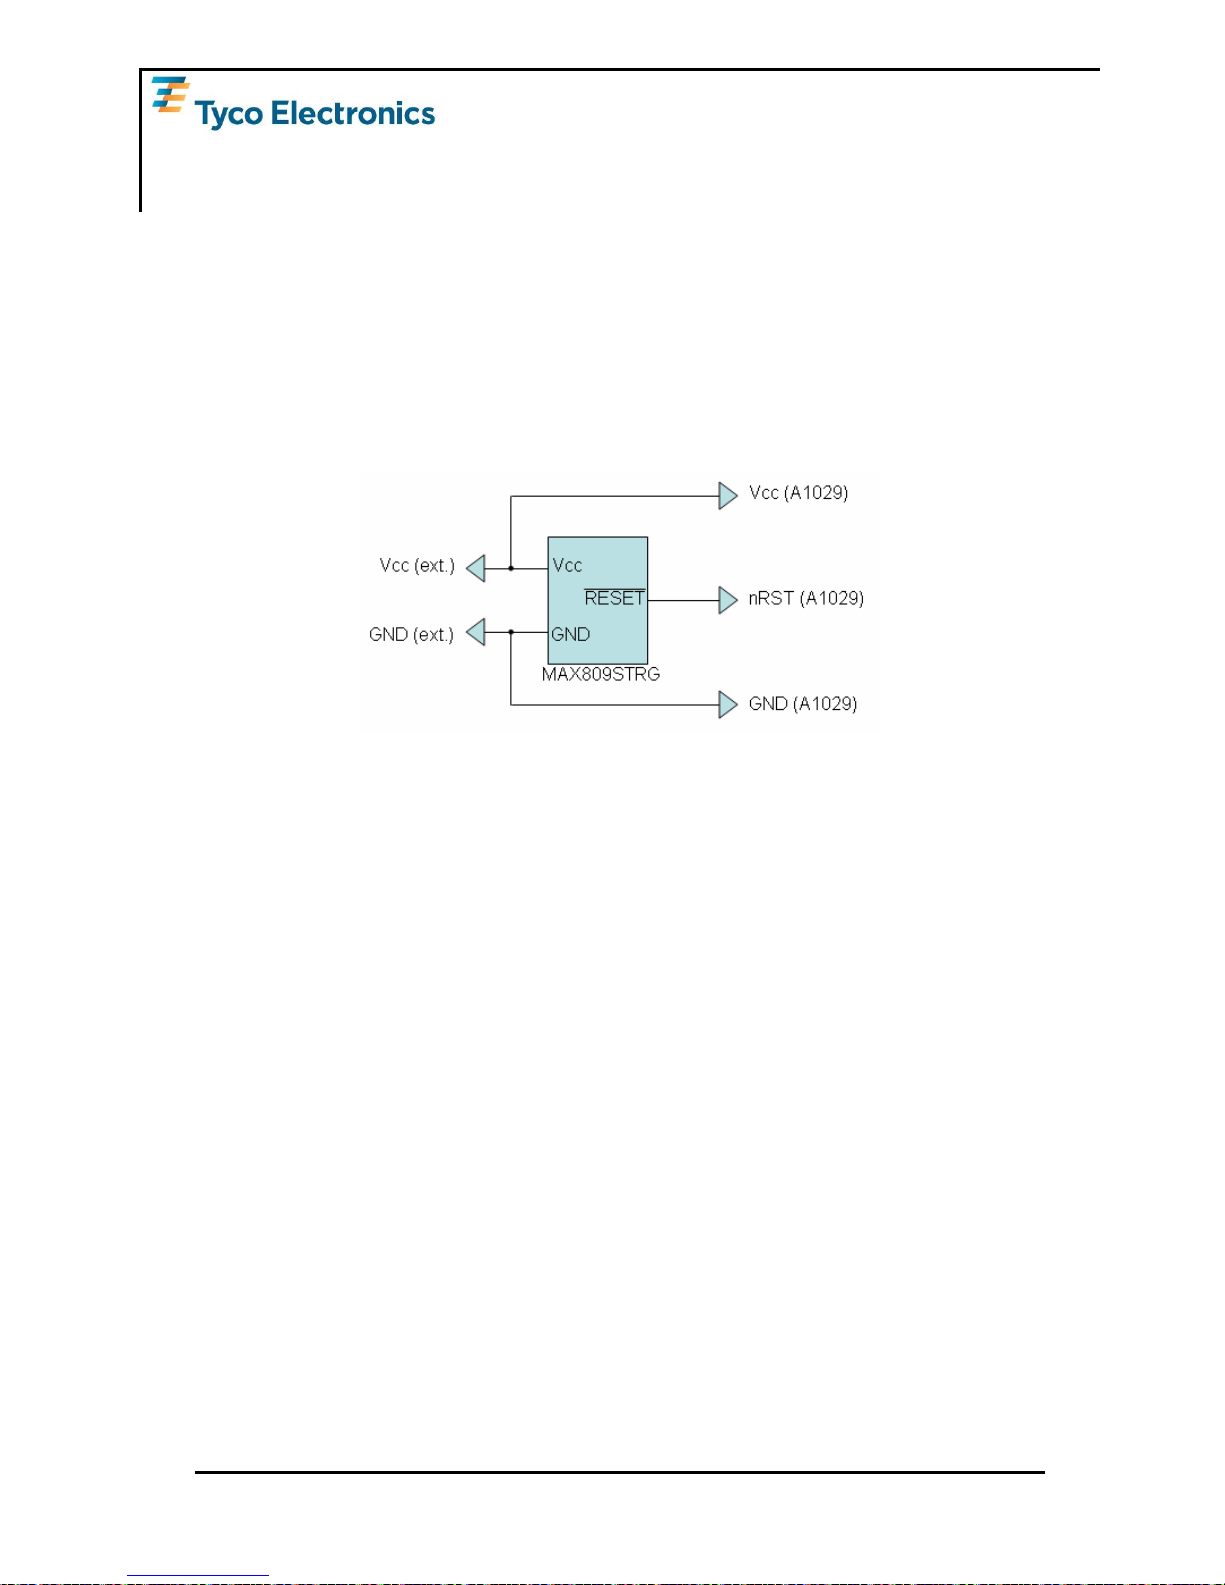
In case the rise time of the supply voltage signal from 0V to the minimum Vcc
threshold is longer than 10ms, it is recommended to implement an external reset
controller. This reset controller will keep the nRST at low level as long as the controller’s threshold is not reached.
The proposal below is based on the reset controller MAX809STRG from ON Semiconductor with a threshold of 2.93V. Other controllers could be used as well. Anyhow, it is the responsibility of the designer to test and verify the implementation.
Figure 22: Application note: External reset controller
11.9 Battery Back-up
This application note describes an example on how to back-up the RTC of the
GPS receiver modules. The note applies to the A1029-C and A1029-D in the
same way. V
MAIN
is considered to be 3.3V (3.0V to 3.6V) and V
BAT
in the range of
about 2.2V to 3.6V. 3.6V is the absolute maximum rating for the voltage supplied
to the module and must not be exceeded!
The circuits below are – although realized and tested – examples only. It is the responsibility of the designer to test and verify the implementation.
Page 42 of 47 User’s Manual V4.0 - 03/07
Page 43

GPS Receivers
A1029-A/-C, A1029-B/-D
11.9.1 Simple Example
Figure 23: Application note: Battery back-up semi-discrete solution
Note: The capacitor C1 is a switch over capacitor to protect the module.
The battery back-up circuit has to fulfill two tasks:
• Control the ENABLE input
• Provide power to VCC
The ENABLE control part is build up around the Maxim MAX837 voltage monitor.
The MAX837 will switch the ENABLE signal to low, whenever V
MAIN
falls below a
certain threshold (1.204V according to the MAX837 datasheet). V
MAIN
is divided by
R1 and R2 (3.3k and 2.2k, respectively). The input voltage will therefore be 2/5 *
V
MAIN
. This means that the threshold will be reached, whenever VMAIN falls below
3.01V! Above this threshold, ENABLE will be high and the module will work in normal operation mode.
The power for the module is provided via the two diodes D1 and D2. The module
will draw current from the source with the higher potential. E.g. if V
MAIN
is at 3.6V
and the battery voltage is at 3.0V, Vcc will be provided from V
MAIN
.
Obviously, this solution shows some weaknesses. First of all, the module will draw
current from V
BAT
whenever V
BAT
is higher than V
MAIN
– even if V
MAIN
would still be
sufficient. This will result in draining the battery until the potential of V
MAIN
is
reached. Secondly, the current draw on D1 will add to the power consumption of
the system.
V4.0 – 03/07 User’s Manual Page 43 of 47
Page 44

GPS Receivers
A1029-A/-C, A1029-B/-D
In order to overcome these weaknesses, a more sophisticated solution is described
in the following paragraph.
11.9.2 Integrated solution
Figure 24: Application note: Battery back-up integrated solution
This circuit uses the Texas Instruments battery back-up supervisor TPS3613-01. In
fact, only a part of the complete functionality of the IC is needed to fulfill the two
tasks described above.
The control of the ENABLE signal is done in the very same way than described
above – as long as V
MAIN
stays above a defined threshold. The provision of power
to the module (Vcc) is done by V
MAIN
– again as long as V
MAIN
stays above this
threshold. This way we avoid using V
BAT
even if V
MAIN
is still sufficient. In addition,
the additional power consumption can be neglected!
In our example we chose R1 to be 3.3k and R2 to be 2.2k resulting in a voltage at
the SENSE input at 2/5 * V
MAIN
. The threshold for the SENSE input is 1.15V, i.e.
nRESET will go to low, whenever V
MAIN
falls below 2.875V. This voltage should still
be above the battery voltage supplied in your application.
Page 44 of 47 User’s Manual V4.0 - 03/07
Page 45

GPS Receivers
A1029-A/-C, A1029-B/-D
12 Demonstration Kits
12.1 USB Kit A1029-A/-C
For demonstration and easy evaluation of GPS performance Tyco Electronics offers
a Demonstration Kit (including one GPS A1029-A/-C module). It contains a USB
interface with according drivers to connect easily to a PC. The USB interface is an
extension of the serial port 0, therefore sending NMEA sentences and accepting
commands. At the same time it provides power to the module. Accompanied by an
antenna it offers a ready-to-go set. For further information please contact Tyco
Electronics.
Figure 25: Demonstration kit USB1029-A/-C
12.2 Evaluation Kit A1029-A/-C
For the development of new software and applications an Evaluation Kit is available. It shows various connectors for easy access to the JTAG port, to the general
purpose I/Os, and the serial ports. It can be powered by battery or externally. For
further information please contact Tyco Electronics.
12.3 Demonstration Kit A1029-B/-D
For demonstration and easy evaluation of GPS performance Tyco Electronics offers
a Demonstration Kit (including one GPS A1029-B/-D module). It shows two serial
interfaces (NMEA and RTCM). The Demonstration Kit can be powered by an external 5 to 12V source. Accompanied by an antenna and serial cable it offers a readyto-go set. For further information please contact Tyco Electronics.
Figure 26: Demonstration kit DKS1029-B/-D
V4.0 – 03/07 User’s Manual Page 45 of 47
Page 46

GPS Receivers
A1029-A/-C, A1029-B/-D
13 Related Information
13.1 Contact
This manual was created with due diligence. We hope that it will be helpful to the
user to get the most out of the GPS module.
Anyway, inputs about errors or mistakable verbalizations and comments or proposals to TYCO Electronics, Power Systems in Munich, Germany, for further improvements are highly appreciated.
Tyco Electronics
Power Systems
Finsinger Feld 1
85521 Ottobrunn, Germany
Tel.: +49 89 6089 838
Fax: +49 89 6089 835
gps@tycoelectronics.com.
www.tycoelectronics.com/gps.
Further contact addresses:
Info.
gps@tycoelectronics.com.
support.
gps@tycoelectronics.com.
sales.
gps@tycoelectronics.com.
13.2 Related Documents
• Manual: T.E. GPS Firmware A1029 (TYCO)
• Manual: T.E. GPS Firmware DR A1029 (TYCO)
• Manual: T.E. GPS DemoKit USB1029 (TYCO)
• Manual: T.E. GPS EvaluationKit EVA1029 (TYCO)
• Manual: T.E. GPS DemoKit DKS1029 (TYCO)
Page 46 of 47 User’s Manual V4.0 - 03/07
Page 47

Lists of Tables
and Figures
14 List of Tables
Table 1: A1029 characteristics................................................................................. 8
Table 2 and 3: A1029-A/-C and A1029-B/-D dimensions and weight....................... 8
Table 4: Additional equipment................................................................................ 12
Table 5: Pin description A1029-A/-C (part 1) ......................................................... 20
Table 6: Pin description A1029-A/-C (part 2) ......................................................... 21
Table 7: Pin description A1029-B/-D (part 1 – odd pin row) ................................... 23
Table 8: Pin description A1029-B/-D (part 2 – even pin row) ................................. 23
Table 9: Operating Conditions ............................................................................... 30
Table 10: Absolute maximum ratings..................................................................... 30
Table 11: Reflow soldering profile A1029-A/-C ...................................................... 32
Table 12: Environmental conditions ....................................................................... 35
Table 13: 1PPS signal characterization with active antenna with filter at 22°C...... 41
Table 14: 1PPS signal characterization with passive antenna at 22°C .................. 41
15 List of Figures
Figure 1: A1029 label............................................................................................... 7
Figure 2: A1029-A/-C tape specifications (1) ......................................................... 10
Figure 3: A1029-A/-C tape specifications (2) ......................................................... 11
Figure 4: A1029-B/-D tray specification.................................................................. 11
Figure 5: Recommended minimum configuration A1029-A/-C ............................... 13
Figure 6: Mechanical outline overview A1029-A/-C ............................................... 15
Figure 7: Mechanical outline component side A1029-A/-C .................................... 16
Figure 8: Mechanical outline solder side A1029-A/-C ............................................ 17
Figure 9: Mechanical outline overview A1029-B/-D ............................................... 18
Figure 10: Pin-out information A1029-A/-C (top view)............................................ 19
Figure 11: Pin out information A1029-B/-D (bottom and top view) ......................... 22
Figure 12: Connecting an odometer signal ............................................................ 25
Figure 13: Connecting the gyro Melexis MLX90609-N........................................... 26
Figure 14: Power supply for internal ADC (Vcc3A) ................................................ 28
Figure 15: Soldering footprint proposal A1029-A/-C .............................................. 31
Figure 16: Antenna connector strip line A1029-A/-C.............................................. 33
Figure 17: Strip line parameters A1029-A/-C ......................................................... 33
Figure 18: Application note: Antenna sensor adaptation........................................ 37
Figure 19: Application note: Antenna sensor adaptation with current limiter.......... 37
Figure 20: Application note: Antenna current limiter .............................................. 39
Figure 21: 1PPS signal description ........................................................................ 41
Figure 22: Application note: External reset controller............................................. 42
Figure 23: Application note: Battery back-up semi-discrete solution...................... 43
Figure 24: Application note: Battery back-up integrated solution ........................... 44
Figure 25: Demonstration kit USB1029-A/-C ......................................................... 45
Figure 26: Demonstration kit DKS1029-B/-D ......................................................... 45
V4.0 – 03/07 User’s Manual Page 47 of 47
 Loading...