

Tyco INTEVO Compact LTE, INTEVO-CMP-2TB, INTEVO-LTE-2TB, INTEVO Compact, INTEVO-ADV-4TB Quick Setup Manual
...Page 1
Access Control and Video Software Management
INTEVO Compact LTE (Model INTEVO-LTE-2TB)
Not availablefor sale in North America
INTEVO Compact (Model INTEVO-CMP-2TB)
INTEVO Advanced (Model INTEVO-ADV-4TB)
KANTECH
Quick Setup Guide
LTE, Compact and Advanced Models
DN2055-1807 v2.0
Page 2

2
Contents
Copyright 3
Notice of use 3
Warranty 3
Important 3
Safety instructions 3
Technical support 5
Technical specifications 7
Quick setup guide 8
What is in the box? 8
Installation 8
Desktop installation 8
Wall Mount Installation 8
Rack Mount Installation (not included) 8
Connections 9
First start configuration 13
Usernames and passwords 13
Steps to follow for local access 13
Steps to follow for remote access: 14
How to activate IP camera channels on INTEVO using Illustra IP cameras 14
How to activate IP camera channels on INTEVO using an INTEVO-IPCAM01 license 15
Auto update 16
© 2018 Tyco Security Products. All rights reserved.
Page 3

Copyright
Under copyright laws, the contents of this manual may not be copied, photocopied,
reproduced, translated or reduced to any electronic medium or machine-readable form, in
whole or in part, without prior written consent of Tyco Security Products.© 2018 and its
respective companies. All rights reserved.
Notice of use
Read this manual carefully before use. All requirements should be followed before using
this product.
l We reserve the right to change the product and manuals without prior notice.
l Keep this document for future reference.
l The product is for indoor use only.
l Keep the product and other accessories in a dry environment.
l We are not responsible for any damage caused by inappropriate use.
l The Installer shall instruct the USER regarding ALL THE SAFETY INSTRUCTIONS
Warranty
l The Advanced and Compact models offers a warranty period of 3 years starting
l The Compact LTE model offers a warranty period of 12 months starting the date of
3
that shall be observed during the use of the equipment.
the date of installation.
installation.
Important
l This INTEVO device shall be used and installed within an environment that
provides the pollution degree max. 2 and overvoltages category II NON
HAZARDOUS LOCATIONS, indoor only. The equipment is FIXED or DESKTOP and
CORD CONNECTED and is recommended to be installed by service persons only.
l There is no ON/OFF SWITCH for the power supply. The AC power supply coupler
serves as a means of disconnection from the supply mains.
Safety instructions
l Select a place that is free from vibration and shock.
l Do not locate this product where persons can walk on the cables.
l Do not connect the product to electrical outlets on the same circuit as large
appliances.
© 2018 Tyco Security Products. All rights reserved.
Page 4

4
l Do not select a place that exposes the product to direct sunlight, excessive heat,
moisture, vapors, chemicals or dust.
l Do not install this equipment near water. For example, bathtub, wash bowl,
kitchen/laundry sink, wet basement, or near a swimming pool.
l Do not install this equipment and its accessories in areas where there is a risk of
explosion.
l Do not connect this product to electrical outlets controlled by switches or
automatic timers.
l AVOID sources of radio interference.
l AVOID setting up the equipment near heaters, air conditioners, ventilators, and/or
refrigerators.
l Ensure that cables are positioned so that accidents can not occur. Connected
cables must not be subject to excessive mechanical strain.
l Use the included AC power supply and cord only.
© 2018 Tyco Security Products. All rights reserved.
Page 5
Technical support
For technical assistance with this and other Kantech products, contact Technical
Support, Monday to Friday. See the following table for the Technical Support
phone numbers.
5
USA and Canada
North America Toll Free +1 888 222 1560
Latin America
Argentina, Buenos Aires Direct +54 11 5199 3104
Brazil, Sao Paolo Direct +55 11 3181 7377
Chile, Santiago Direct +56 2 3210 9662
Colombia, Bogota Direct +57 1 344 1422
Colombia, Cali Direct +57 2 891 2476
Colombia, Medellin Direct +57 4 204 0519
Costa Rica, National Direct +506 4 000 1655
Dominican Republic, Santo
Domingo
El Salvador, San Salvador Direct +503 2 136 8703
Guatemala, Guatemala City Direct +502 2 268 1206
Mexico, Mexico City Direct +52 55 8526 1801
Panama, Panama City Direct +507 836 6265
Peru, Lima Direct +51 1 642 9707
Venezuela, Caracas Direct +58 212 720 2340
Asia
GMT 05:00
Direct +1 450 444 2030
GMT 03:00
Direct +1 829 235 3047
GMT +
08:00
08:00 to 20:00
access-support
@jci.com
08:00 to 20:00
access-support
@jci.com
Toll free +800 CALL TYCO 09:00 to 17:00
+800 2255 8926
© 2018 Tyco Security Products. All rights reserved.
access-support
Page 6

6
Direct +86 21 6023 0650
China Direct +400 671 1528
India Direct +1 800 1082 008
Australia Direct +02 9684 3980
EMEA
United Kingdom Direct +44 330 777 1300
Israel Direct +972 772 201 350
Spain Direct +900 99 31 61
France Direct +0800 90 79 72
Germany Direct +0800 1806 757
Italy Direct +39 0230 510 112
Belgium Direct +0800 76 452
Ireland Direct +180 094 3570
Bahrain Direct +800 04127
Nordic countries Direct +45 4494 9001
Denmark Direct +45 4494 9001
Greece Direct +00800 3122 9453
Russia Direct +81 0800 2052 1031
Turkey Direct +00800 31923007
United Arab Emirates Direct +800 03107123
South Africa Direct +27 21100 3882
GMT +
01:00
Toll free +800 CALL TYCO
+800 2255 8926
Direct +31 475 352 722
@jci.com
08:00 TO 18:00
access-support
@jci.com
© 2018 Tyco Security Products. All rights reserved.
Page 7

Technical specifications
l Operating Temperatures: 0°C to 40°C (32°F to 104°F) for indoor use only.
l Humidity Level: 93% max. (relative humidity non-condensing).
l Cabinet Dimensions (Height-Width-Depth):
-
-
7
Advanced: 7cm (2.75 in) x 24 cm (9.45 in) x 19 cm (7.48 in).
Compact and Compact LTE: 6 cm (2.36 in) x 21cm (8.27 in)
x 19 cm (7.48 in).
PoE power ratings Input
Advanced
Compact
Compact
LTE
Max. 30W for each port, but with a system total
maximum of 120W.
Max. 30W for each port with a system total
maximum of 60W.
Max. 30W for each port with a system total
maximum of 60W.
100-240 Vac, 50-
60 Hz, 2.5A
100-240 Vac, 50-
60 Hz, 2.5A
100-240 Vac, 50-
60 Hz, 2.5A
WARNING: This product contains a lithium battery, which can be replaced
only by an authorized service person.
CAUTION: There is a risk of explosion if the battery is replaced by an
incorrect type. Dispose of used batteries according to the applicable local
legislation and instructions.
Output
24 Vdc, 6.66
A, LPS
19 Vdc, 6.31
A, LPS
12 Vdc, 3.33
A, LPS
© 2018 Tyco Security Products. All rights reserved.
Page 8

8
Quick setup guide
What is in the box?
l
INTEVO Integrated Security Platform
l
Power cords
l
Quick Setup Guide
l
2 wall mount brackets
l
Screws, 6 for Advanced; 4 for Compact and LTE
l
USB Key including: documentation, Detection Tool, EntraPass, and IP video
software
4 plastic footings
l
Installation
Desktop installation
Avoid storing anything near the device that could block air flow.
Wall Mount Installation
1. Fix the brackets on each side of the housing with the supplied screws.
2. Fix to the wall the INTEVO housing with the brackets provided using 4 screws (not
included). It is best practice to use stainless steel Phillips tapping screws M4.2 x
32mm (#8 x 1.25 in) (Spaenaur ST- 631P or equivalent). For drywall mounting use
four 4 plastic anchors (Spaenaur EX-S5 or equivalent; not included).
Rack Mount Installation (not included)
Precautions
l Elevated Operating Ambient - If you install the device in a closed or multi-unit rack
assembly, the operating ambient temperature of the rack assembly may be
greater than the room temperature. Give consideration to installing the
equipment in an environment compatible with the maximum ambient
temperature (Tma) specified by the manufacturer.
l Reduced Air Flow - Installation of the equipment in a rack must be such that the
amount of air flow required for safe operation of the equipment is not
compromised.
© 2018 Tyco Security Products. All rights reserved.
Page 9

l Mechanical Loading - If you are mounting the equipment in the rack, it must be
l Circuit Overloading - You must give consideration to the connection of the
l Reliable Earthing - Reliable earthing of rack-mounted equipment must be
Note: The maximum install height for the wall mounting installation is 2m.
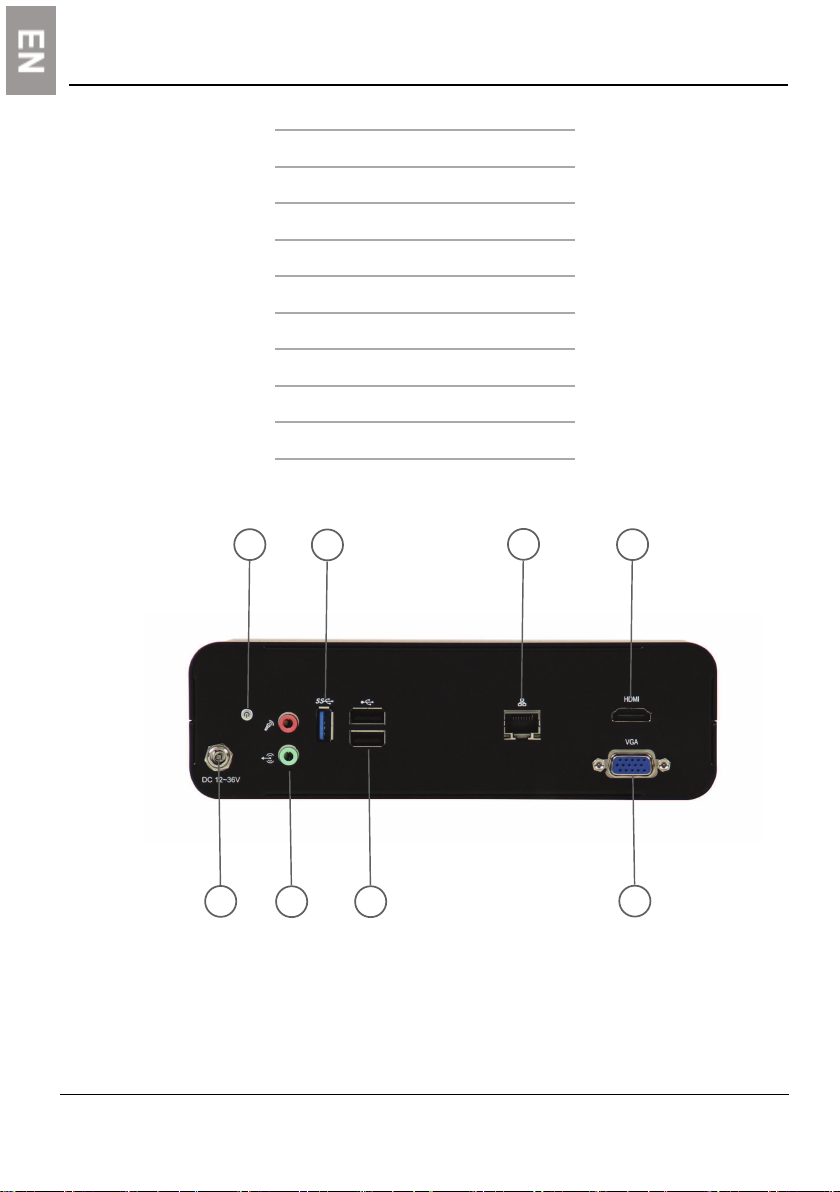
Connections
Proceed with the following connections:
1. Connect your network cable to ETH1/ETH2.
2. For the Compact, connect your camera network cable to PoE ports 3-6. For the
3. Connect a keyboard and a mouse to a USB port, on the back of the device, for local
9
such that an hazardous condition is not achieved due to uneven mechanical
loading.
equipment to the supply circuit and the effect that overloading of the circuits
might have on overcurrent protection and supply wiring. Appropriate consideration
of equipment nameplate ratings must be used when addressing this concern.
maintained. Particular attention must be given to supply connections other than
direct connections to the branch circuit. For example, use of power strips.
Advanced, connect your camera network cable to PoE ports 3-6 for cameras and
PoE ports 7-10 for cameras and controllers.
access.
Note: You can use INTEVO without a monitor or mouse with remote access.
© 2018 Tyco Security Products. All rights reserved.
Page 10
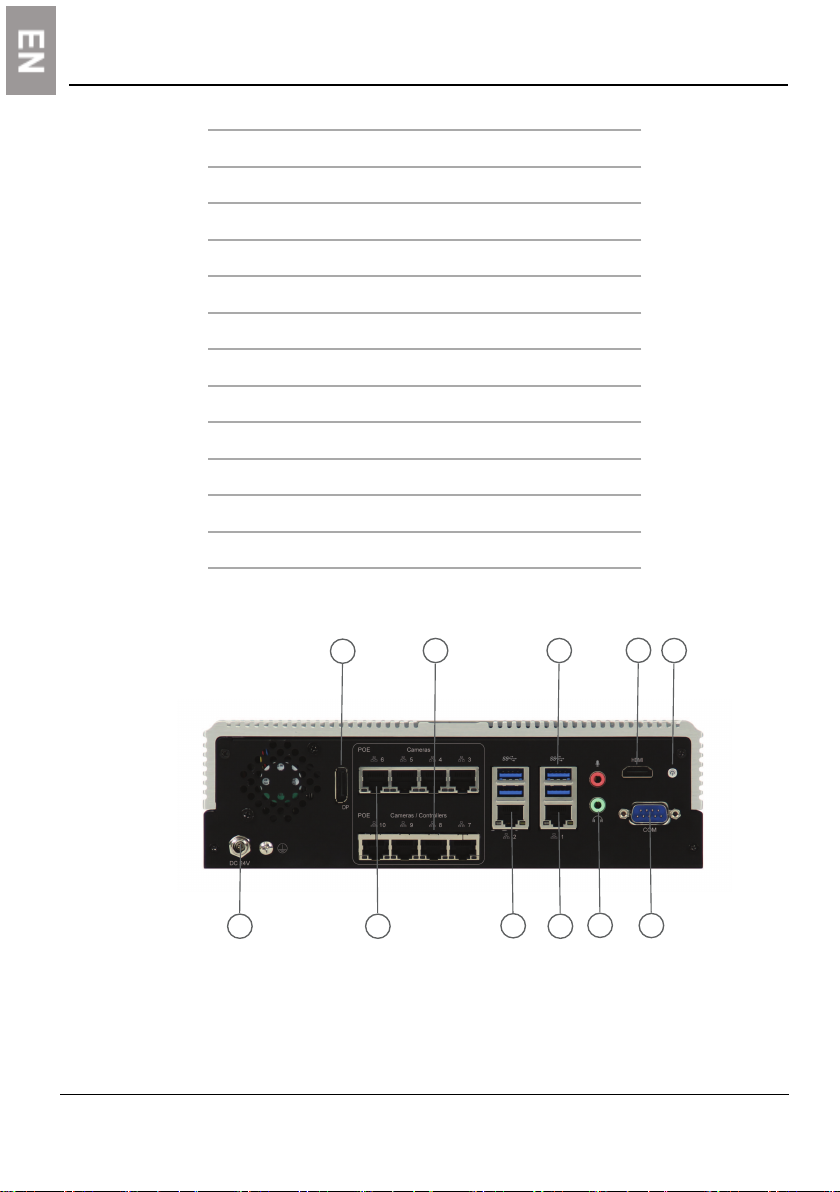
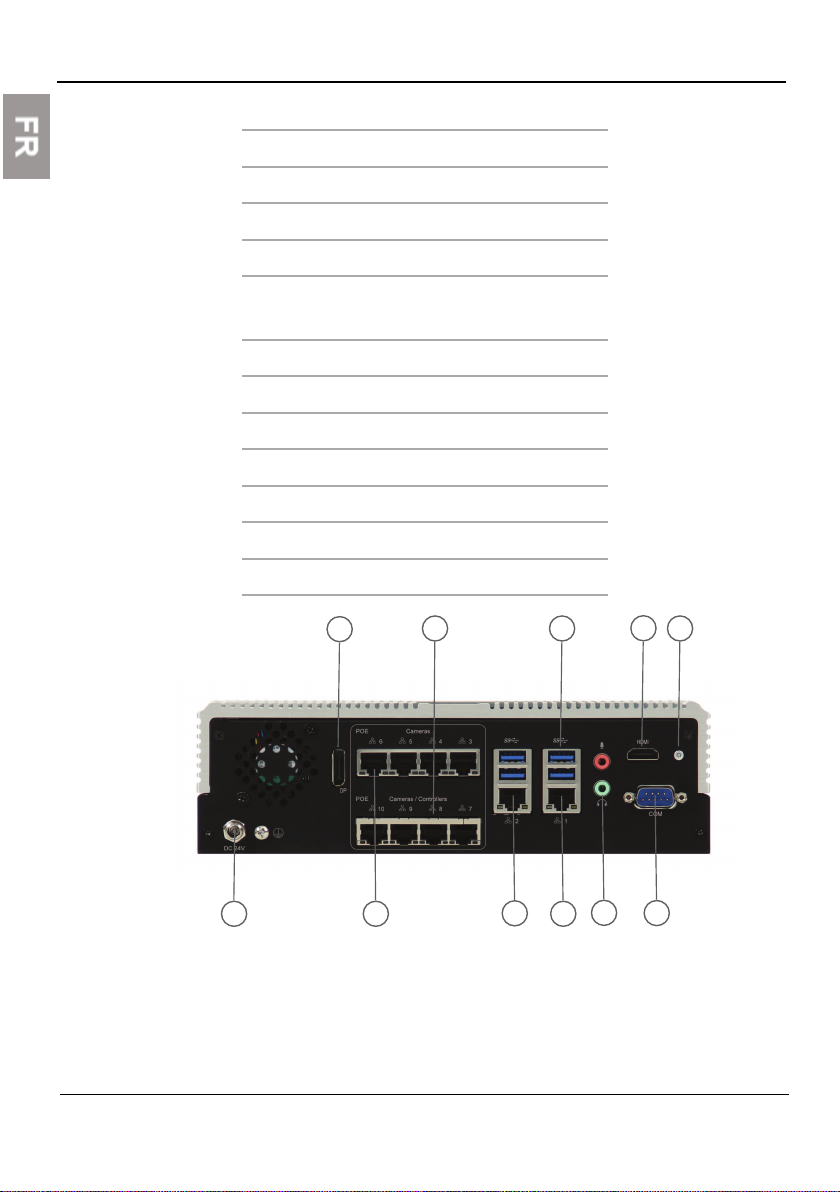
10
1
5
3 6
8
10
2
7
9
11
4
Advanced
Number Port
1 Power
2 Display port
3 PoE 3-6 cameras
4 PoE 7-10 cameras and controllers
5 Ethernet 2
6 Ethernet 1
7 USB 3.0
8 Audio ports
9 HDMI
10 Serial
11 Power button
Advanced back panel
© 2018 Tyco Security Products. All rights reserved.
Page 11
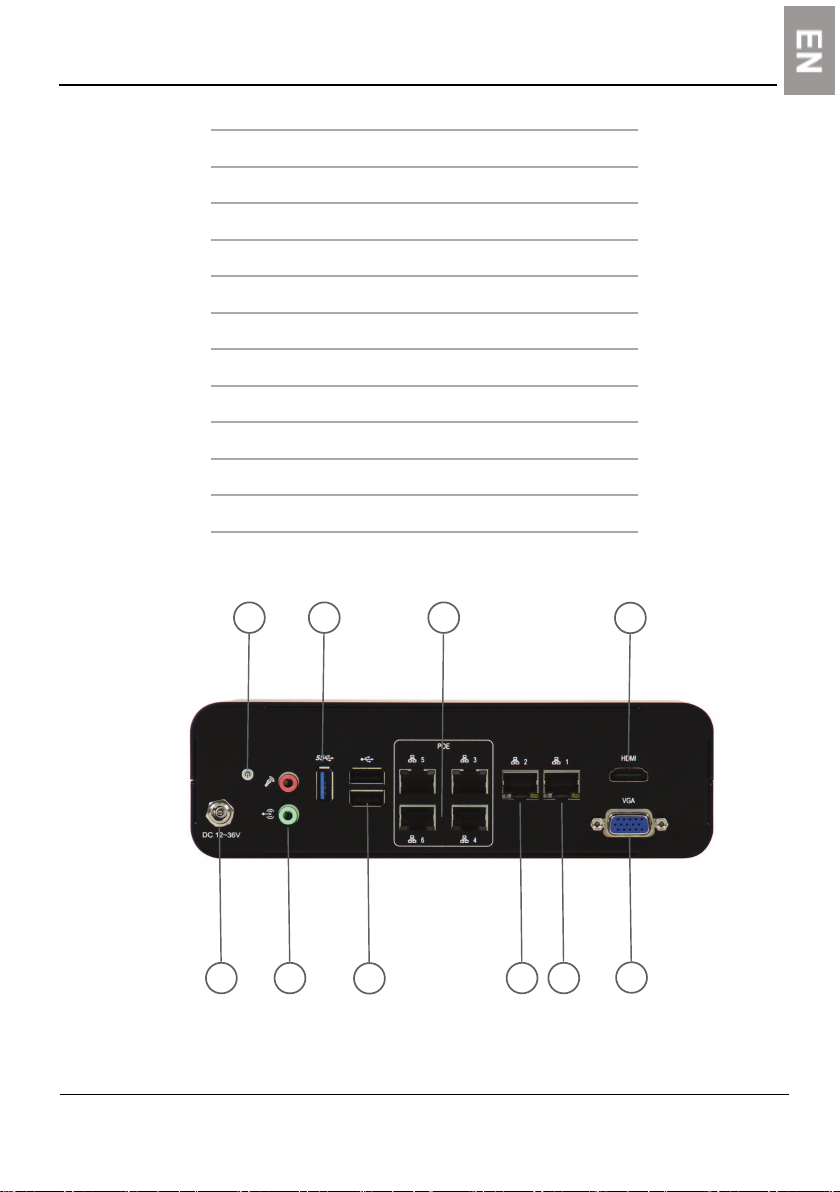
Compact
5
7 8
10
31
2 4 6
9
Number Port
1 Power
2 Power button
3 Audio ports
4 USB 3.0
5 USB
6 PoE 3-6 cameras and controllers
7 Ethernet 2
8 Ethernet 1
9 HDMI
10 VGA
11
Compact back panel
© 2018 Tyco Security Products. All rights reserved.
Page 12
12
2 7
6
4
3
1
5
8
Compact LTE
Number Port
1 Power
2 Power button
3 Audio ports
4 USB 3.0
5 USB
6 Ethernet
7 HDMI
8 VGA
Compact LTE back panel
© 2018 Tyco Security Products. All rights reserved.
Page 13

First start configuration
Usernames and passwords
1. To log on to the INTEVO unit, enter the following credentials:
Administrator
Username: admin Password: admin
Operator
Username: operator Password: (leave blank)
2. To log on to the EntraPass software, enter the following credentials:
Installer
Username: kantech Password: kantech
Administrator
Username: kantech1 Password: kantech
Guard
Username: kantech2 Password: kantech
Web Access
Username: intevo1 Password: intevo1
13
3. To log on to the IP Video software Exacqvision, enter the following credentials:
Administrator
Username: admin Password: admin256
WARNING: For your security protection, it is best practice that you change ALL
DEFAULT manufacturer passwords upon installation.
Steps to follow for local access
1. To power on the INTEVO, connect the AC power cable.
2. Follow the steps in the First Boot Wizard.
© 2018 Tyco Security Products. All rights reserved.
Page 14
14
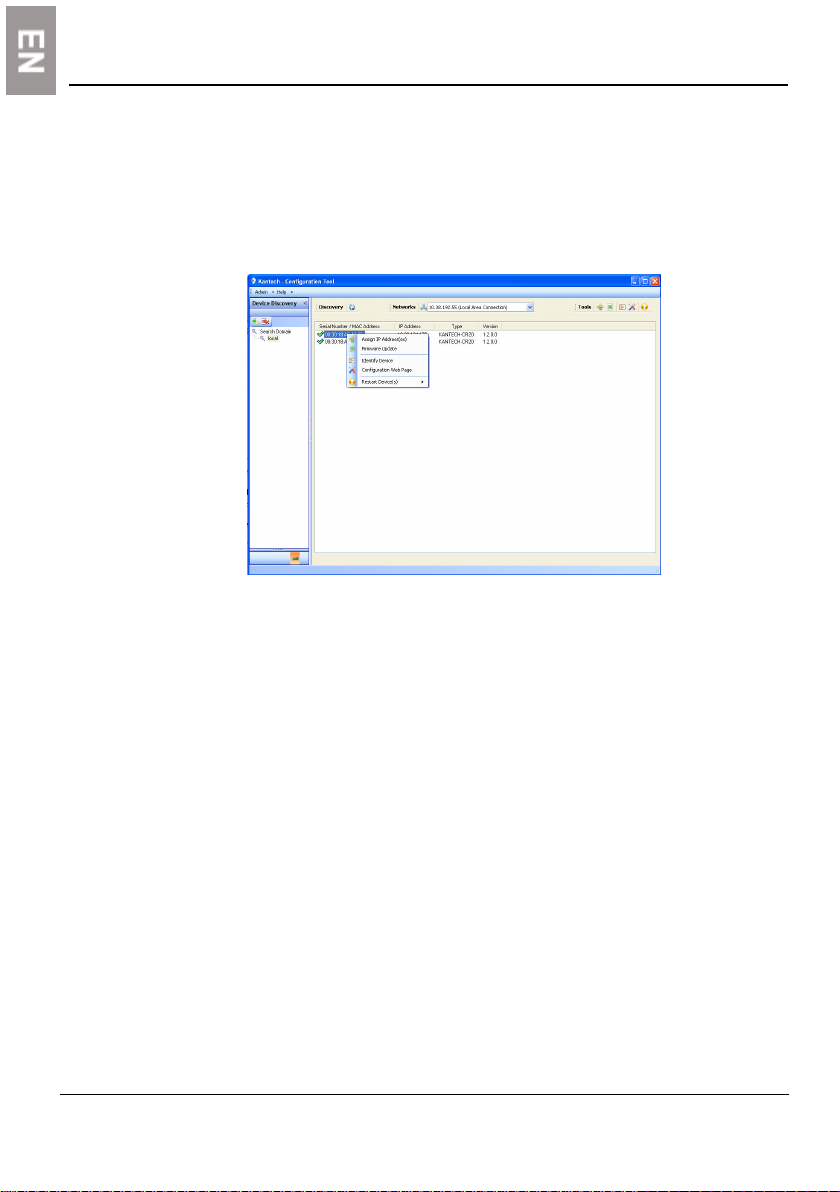
Steps to follow for remote access:
1. To power on the INTEVO, connect the AC power cable.
2. Insert the included USB key in the remote PC.
3. Locate the IntevoConfigTool.exe file on the USB key and launch the application.
4. To assign a new IP address, right-click on a MAC address and select assign IP
address.
5. Click the Launch Configuration Web Page button located on the upper right side of
the display.
6. Enter admin as an ID and password.
7. Follow the steps in the Language Wizard.
8. Launch the Remote Desktop Access application with the address entered in step 4.
Note: Refer to the User Manual for further information.
How to activate IP camera channels on INTEVO using Illustra IP cameras
1. Install and log on to your INTEVO unit.
2. Log on to the Exacq software.
3. Go to Configurations/Exacq server/System setup.
4. Take note of the MAC address of your INTEVO unit.
5. Go to the Kantech web registration page:
http://www.kantech.com/Support/KantechRegistration.aspx
© 2018 Tyco Security Products. All rights reserved.
Page 15

15
Note: Log on to the Kantech website in order to have access to the registration page. For
valid log on details for the Kantech website, go to
http://www.kantech.com/Register/Register.aspx and fill out the registration form.
6. Click INTEVO Camera registration
7. Enter your email address. A copy of the license key is sent to this address when
the process is completed.
8. Click would you like to register an Illustra IP camera?
9. Enter the following information:
• Camera MAC Address. See Illustra user manual for info.
• INTEVO MAC address. See step 4.
10. Click REGISTER.
11. To activate multiple camera channels, click Click here to create an additional key
and enter the other the additional information.
12. Take the KEY information and go to: Configurations/HDVR
server/System Setup in the Exacq software.
13. Enter the KEY information in the LICENSE field and click APPLY.
14. Your INTEVO camera channels are activated and ready to use.
How to activate IP camera channels on INTEVO using an INTEVO-IPCAM01 license
1. Install and log on to your INTEVO unit.
2. Log on to the IP Video Exacq software.
3. Go to Configurations/Exacq server/System setup.
4. Take note of the MAC address of your INTEVO unit.
5. To go to the Kantech web registration page, click the following link:
http://www.kantech.com/Support/KantechRegistration.aspx
Note:Log on to the Kantech website in order to have access to the registration page. For
valid log on details for the Kantech website, go to
http://www.kantech.com/Register/Register.aspx and fill out the registration form.
6. Click on INTEVO Camera registration
7. Enter your email address. A copy of the license key is sent to this address when
the process is completed.
8. Enter the following information:
• INTEVO-IPCAM01 serial number
© 2018 Tyco Security Products. All rights reserved.
Page 16
16
9. Click REGISTER.
10. To activate multiple camera channels, click Click here to create an additional key
11. Take the KEY information and go to: Configurations/Exacq
12. Enter the KEY information in the LICENSE field and click APPLY.
13. Your INTEVO camera channels are now activated and ready to use.
Note: To register the INTEVO IP channel open the web browser on the INTEVO or by any
other computer with a connection to the internet. If these options are not available,
contact Kantech Technical Support for assistance.
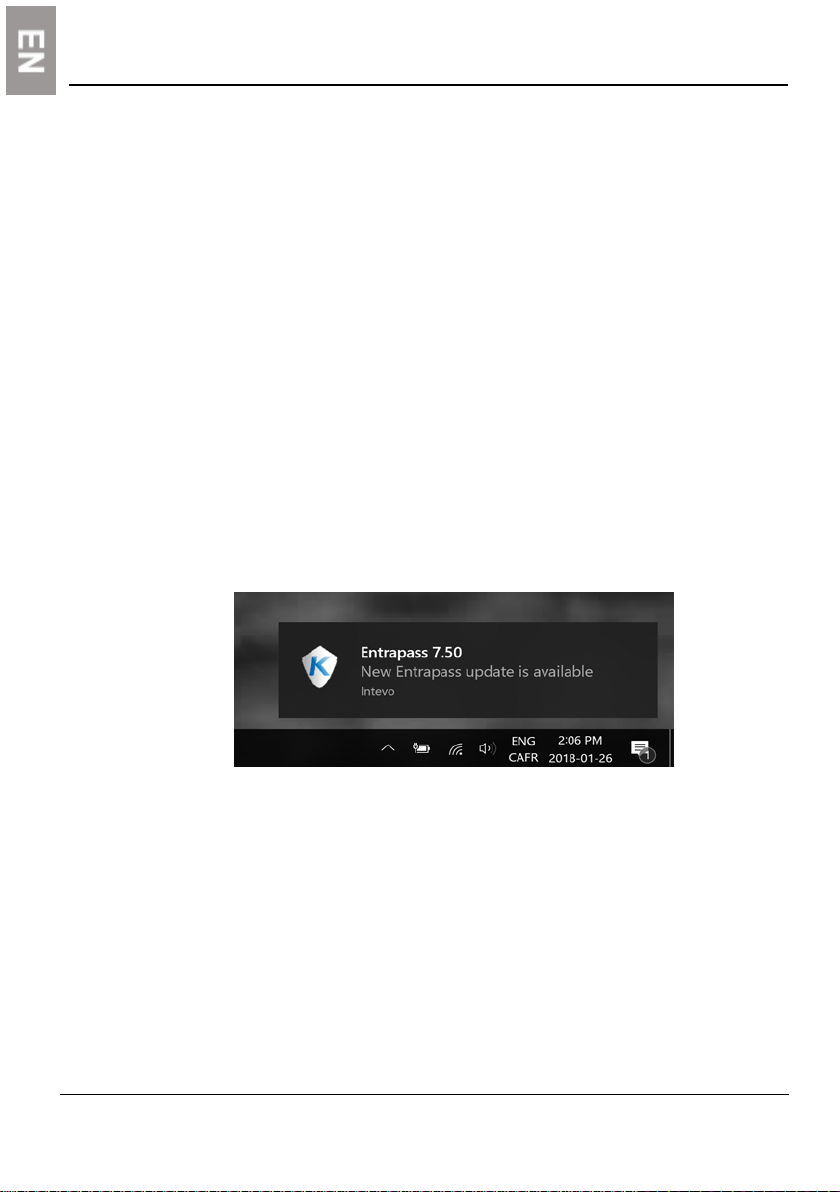
Auto update
After the setup wizard is complete, the auto-update feature for the INTEVO detects any
new version of EntraPass from the Internet once it is configured for the first time. The
INTEVO verifies the latest version for up to 5 days from the day of configuration and
advises the user using the Windows 10 notification center that a new version of EntraPass
is available. An internet connection is required for auto download.
• INTEVO MAC address. See step 4.
and enter the other the additional information.
server/System Setup in the Exacq software.
© 2018 Tyco Security Products. All rights reserved.
Page 17
Contrôle de l'accès et gestion vidéo
INTEVO Compact LTE (modèle INTEVO-LTE-2TB)
Non disponible à la vente en Amér ique du Nord
INTEVO Compact (modèle INTEVO-CMP-2TB)
INTEVO Avancé (modèle INTEVO-ADV-4TB)
KANTECH
Guide de configuration rapide
Modèles LTE, compact et avancé
DN2055-1807 v2.0
Page 18

2
Table des matières
Droit d'auteur 3
Notice d'utilisation 3
Garantie 3
Important 3
Instructions de sécurité 4
Assistance technique 5
Spécifications techniques 7
Guide de configuration rapide 8
Contenu de la boîte 8
Installation 8
Installation sur le bureau 8
Installation murale 8
Installation en armoire (non fournie) 8
Connexions 9
Configuration au premier démarrage 13
Noms d'utilisateur et mots de passe 13
Procédure à suivre pour un accès local 14
Procédure à suivre pour un accès à distance 14
Comment activer les canaux de caméras IP sur INTEVO avec des caméras IP Illustra 15
Comment activer les canaux de caméras IP sur INTEVO avec une licence INTEVOIPCAM01 16
Mise à jour automatique 17
© 2018 Tyco Security Products. All rights reserved.
Page 19

Droit d'auteur
En vertu des lois sur le droit d'auteur, le contenu de ce manuel ne peut pas être copié,
photocopié, reproduit, traduit ou transformé en un quelconque support électronique ou mis
sous forme lisible par machine, en tout ou en partie, sans le consentement préalable écrit
de Tyco Security Products.© 2018 et ses compagnies respectives. Tous droits réservés.
Notice d'utilisation
Veuillez lire ce manuel attentivement avant d'utiliser le produit. Vous devez satisfaire à
toutes les conditions avant de pouvoir utiliser ce produit.
l Nous nous réservons le droit de modifier ce produit et ses manuels sans avis
préalable.
l Veuillez conserver ce document aux fins de référence ultérieure.
l Ce produit est destiné à une utilisation à l'intérieur seulement.
l Gardez le produit et tous ses accessoires dans un environnement sec.
l Nous déclinons toute responsabilité pour les dommages causés par une utilisation
inappropriée.
l L'installateur doit informer l'UTILISATEUR de TOUTES LES INSTRUCTIONS DE
SÉCURITÉ relatives à l'utilisation de ce matériel.
Garantie
3
Important
l Les modèles avancé et compact offrent une période de garantie de 3ans à
compter de la date d'installation
l Le modèle compact LTE offre une période de garantie de 12mois à compter de la
date d'installation
l Ce matériel INTEVO ne doit être installé et utilisé que dans un environnement
dont le niveau de pollution est au maximum 2, en zone de protection contre les
surtensions II (ZONE NON DANGEREUSE), et en intérieur seulement. Cet
équipement est FIXE ou sur un BUREAU et RELIÉ PAR UN CORDON, et il est
devrait être installé uniquement par une personne du service de maintenance.
l L'alimentation électrique ne possède pas de COMMUTATEUR MARCHE/ARRÊT. La
connexion de l'alimentation CA permet de déconnecter l'appareil du secteur.
© 2018 Tyco Security Products. All rights reserved.
Page 20

4
Instructions de sécurité
l Choisissez un emplacement exempt de vibrations et de chocs.
l Ne placez pas cet appareil à un endroit où quelqu'un pourrait marcher sur les
câbles.
l Ne branchez pas le produit sur des prises de courant appartenant au même circuit
que de gros appareils.
l Évitez les endroits où le produit pourrait être exposé à la lumière directe du soleil,
à une chaleur excessive, à l'humidité, à des vapeurs, à des produits chimiques ou à
la poussière.
l N'installez pas cet équipement à proximité de l'eau. Par exemple baignoire,
lavabo, évier de cuisine ou de salle de bain, sous-sol humide ou piscine.
l N'installez pas ce matériel et ses accessoires dans un endroit présentant des
risques d'explosion.
l Ne branchez pas ce produit à une prise de courant contrôlée par un interrupteur ou
une minuterie automatique.
l ÉVITEZ toute source d'interférence radio.
l ÉVITEZ d'installer ce matériel à proximité d'un radiateur, d'un climatiseur, d'un
ventilateur et/ou d'un réfrigérateur.
l Assurez-vous que les câbles sont placés de façon à éviter tout accident. Les câbles
branchés ne doivent pas être soumis à des contraintes mécaniques excessives.
l N'utilisez que l'alimentation CA et le câble fournis.
© 2018 Tyco Security Products. All rights reserved.
Page 21
Assistance technique
Pour obtenir une assistance technique concernant ce produit et d'autres produits
Kantech, contactez l'assistance technique, du lundi au vendredi. Consultez le
tableau suivant pour connaître les numéros de téléphone de l'assistance
technique.
É.-U. et Canada GMT -5h00
5
Amérique du Nord
Amérique latine GMT -5h
Argentine, Buenos Aires Numéro direct +54 11 5199 3104 De 8h à 20h
Brésil, São Paulo Numéro direct +55 11 3181 7377
Chili, Santiago Numéro direct +56 2 3210 9662
Colombie, Bogota Numéro direct +57 1 344 1422
Colombie, Cali Numéro direct +57 2 891 2476
Colombie, Medellín Numéro direct +57 4 204 0519
Costa Rica, National Numéro direct +506 4 000 1655
République dominicaine,
Saint-Domingue
El Salvador, San Salvador Numéro direct +503 2 136 8703
Guatémala, Guatémala Numéro direct +502 2 268 1206
Mexique, Mexico Numéro direct +52 55 8526 1801
Panama, Panama Numéro direct +507, 836, 6265
Pérou, Lima Numéro direct +51 1 642 9707
Vénézuéla, Caracas Numéro direct +58 212 720 2340
Asie GMT +8h
Numéro sans
frais
Numéro direct +1 450 444 2030
Numéro direct +1 829 235 3047
+1 888 222 1560 De 8h à 20h
access-support
@jci.com
access-support
@jci.com
Numéro sans
frais
© 2018 Tyco Security Products. All rights reserved.
+800 CALL TYCO De 9h à 17h
+800, 2255, 8926
access-support
Page 22

6
Numéro direct +86 21 6023 0650
Chine Numéro direct +400, 671, 1528
Inde Numéro direct +1 800 1082 008
Australie Numéro direct +02, 9684, 3980
EMA GMT +1h
@jci.com
Numéro sans
frais
Numéro direct +31 475 352 722
Royaume-Uni Numéro direct +44 330 777 1300 De 8h à 18h
Israël Numéro direct +972 772 201350
Espagne Numéro direct +900 99 31 61
France Numéro direct +0800 90 79 72
Allemagne Numéro direct +0800, 1806, 757
Italie Numéro direct +39 0230 510 112
Belgique Numéro direct +0800, 76, 452
Irlande Numéro direct +180, 094, 3570
Bahreïn Numéro direct +800 04127
Pays nordiques Numéro direct +45, 4494, 9001
Danemark Numéro direct +45, 4494, 9001
Grèce Numéro direct +00800, 3122, 9453
Russie Numéro direct
Turquie Numéro direct +00800 31923007
Émirats arabes unis Numéro direct +800 03107123
Afrique du Sud Numéro direct +27, 21100, 3882
+800 CALL TYCO
+800, 2255, 8926
access-support
@jci.com
+81 0800 2052
1031
© 2018 Tyco Security Products. All rights reserved.
Page 23

Spécifications techniques
l Températures de fonctionnement: 0°C à 40°C (32°F à 104°F), à l'intérieur
uniquement.
l Seuil d'humidité: 93% maximum (humidité relative, sans condensation).
l Dimensions du boîtier (hauteur/largeur/profondeur):
-
-
7
Avancé: 7cm (2,75po) x 24cm (9,45po) x 19cm
(7,48po).
Compact et Compact LTE: 6cm (2,36po) x 21cm (8,27po)
x 19cm (7,48po).
Avancé
Compact
Compact
LTE
Puissances nominales PoE: Entrée
30W maximum pour chaque port, mais
avec un système total maximum de
120W.
30W maximum pour chaque port avec
un système total maximum de 60W.
30W maximum pour chaque port avec
un système total maximum de 60W.
100 à 240Vca,
50 à 60Hz,
2,5A
100 à 240Vca,
50 à 60Hz,
2,5A
100 à 240Vca,
50 à 60Hz,
2,5A
Sortie
24Vcc, 6,66A, source
d'alimentation limitée
(LPS)
19Vcc, 6,31A, LPS
12Vcc, 3,33A, LPS
AVERTISSEMENT: Ce produit contient une pile au lithium qui ne doit être
remplacée que par le personnel de maintenance autorisé.
ATTENTION: Risque d'explosion si la pile est remplacée par un modèle incorrect.
Les piles usagées doivent être mises au rebut en conformité avec la législation
locale et les instructions applicables.
© 2018 Tyco Security Products. All rights reserved.
Page 24

8
Guide de configuration rapide
Contenu de la boîte
l
Plate-forme de sécurité intégrée INTEVO
l
Cordons d'alimentation
l
Guide de configuration rapide
l
2support de fixation murale
l
Vis (6 pour le modèle Avancé; 4 pour les modèles Compact et LTE)
l
Clé USB contenant: documentation, outil de détection, EntraPass, et logiciel de
vidéo IP.
4socles en plastique
l
Installation
Installation sur le bureau
Évitez de stocker quoi que ce soit à proximité de l'appareil, afin de ne pas nuire à la
circulation d'air.
Installation murale
1. Fixez les pattes de chaque côté du boîtier à l'aide des vis fournies.
2. Fixez le boîtier INTEVO au mur à l'aide des pattes et de 4vis (non fournies). Nous
recommandons des vis taraudeuses Phillips en acier inoxydable de type M 4,2 x
32mm (#8 x 1,25po) (Spaenaur ST-631P ou équivalent). La fixation à une cloison
sèche nécessite 4chevilles en plastique (Spaenaur EX-S5 ou équivalent, non
fournies).
Installation en armoire (non fournie)
Précautions
l Température de fonctionnement élevée: si le produit est installé dans une
armoire close ou contenant plusieurs unités, la température de fonctionnement
ambiante de l'armoire peut être supérieure à la température de la pièce. Veillez à
installer le matériel dans un environnement compatible avec la température
ambiante maximale (Tma) indiquée par le fabricant.
© 2018 Tyco Security Products. All rights reserved.
Page 25

l Circulation d'air réduite: l'installation du matériel dans une armoire doit
l Charge mécanique: si vous montez le matériel dans l'armoire, cela ne doit
l Surcharge du circuit électrique: vous devez veiller à ce que la connexion du
l Mise à la terre fiable: une mise à la terre fiable du matériel installé en armoire
Remarque: La hauteur d'installation maximale pour l'installation murale est de 2m.
Connexions
Procédez aux connexions suivantes:
1. Connectez le câble du réseau local à ETH1/ETH2.
2. Pour le modèle Compact, connectez le câble du réseau vidéo aux ports PoE 3 à 6.
3. Connectez un clavier et une souris à un port USB, à l'arrière de l'appareil pour un
9
permettre la circulation d'air requise pour que le fonctionnement sécuritaire de
celui-ci ne soit pas compromis.
présenter aucun danger pour cause de charge mécanique inégale.
matériel ne surcharge pas le circuit d'alimentation et n'affecte pas la protection
contre les surtensions ni le câblage d'alimentation. À ce propos, vous devez
prendre en compte les indications apposées sur le matériel.
doit être assurée. Vous devez porter une attention particulière aux connexions
électriques autres que les connexions au secteur. Par exemple, l'utilisation de
barres d'alimentation.
Pour le modèle Avancé, connectez le câble du réseau vidéo aux ports PoE 3 à 6
pour les caméras et aux ports PoE 7 à 10 pour les caméras et les contrôleurs.
accès local.
Remarque: INTEVO peut être utilisé sans moniteur ni souris, à l'aide d'un accès à distance.
© 2018 Tyco Security Products. All rights reserved.
Page 26
10
1
5
3 6
8
10
2
7
9
11
4
Avancé
Numéro Port
1 Alimentation
2
3 Ports caméras PoE 3 à 6
4
5 Ethernet2
6 Ethernet1
7 USB3.0
8 Ports audio
9 HDMI
10 Série
11 Bouton Marche/Arrêt
Display Port
Ports caméras et
contrôleurs PoE 7 à 10
Panneau arrière avancé
© 2018 Tyco Security Products. All rights reserved.
Page 27

Compact
5
7 8
10
31
2 4 6
9
Numéro Port
1 Alimentation
2 Bouton Marche/Arrêt
3 Ports audio
4 USB3.0
5 USB
6 Ports caméras et contrôleurs PoE 3 à 6
7 Ethernet2
8 Ethernet1
9 HDMI
10 VGA
11
Panneau arrière compact
© 2018 Tyco Security Products. All rights reserved.
Page 28

12
2 7
6
4
3
1
5
8
Compact LTE
Numéro Port
1 Alimentation
2 Bouton Marche/Arrêt
3 Ports audio
4 USB3.0
5 USB
6 Ethernet
7 HDMI
8 VGA
Panneau arrière compact LTE
© 2018 Tyco Security Products. All rights reserved.
Page 29

Configuration au premier démarrage
Noms d'utilisateur et mots de passe
1. Pour vous connecter à l'appareil INTEVO, saisissez votre nom d'utilisateur
et mot de passe:
Administrateur
Nom d'utilisateur: admin Mot de passe: admin
Opérateur
Nom d'utilisateur: operator Mot de passe: (ne rien inscrire)
2. Pour vous connecter au logiciel EntraPass, saisissez votre nom d'utilisateur
et mot de passe:
Installateur
Nom d'utilisateur: kantech Mot de passe: kantech
Administrateur
Nom d'utilisateur: kantech1 Mot de passe: kantech
Guardien
Nom d'utilisateur: kantech2 Mot de passe: kantech
Accèss Web
Nom d'utilisateur: intevo1 Mot de passe: intevo1
13
3. Pour vous connecter au logiciel IP Video exacqVision, saisissez votre nom
d'utilisateur et mot de passe:
Administrateur
Nom d'utilisateur: admin Mot de passe: admin256
AVERTISSEMENT: Pour votre sécurité, il est recommandé de changer TOUS les
mots de passe du fabricant PAR DÉFAUT lors de l'installation.
© 2018 Tyco Security Products. All rights reserved.
Page 30

14
Procédure à suivre pour un accès local
1. Pour mettre l'appareil INTEVO sous tension, connectez le câble
d'alimentation CA.
2. Suivez les indications du First Boot Wizard.
Procédure à suivre pour un accès à distance
1. Pour mettre l'appareil INTEVO sous tension, connectez le câble
d'alimentation CA.
2. Insérez la clé USB fournie dans l'ordinateur distant.
3. Recherchez le programme IntevoConfigTool.exe sur la clé USB et lancez
l'application.
4. Pour affecter une nouvelle adresse IP, cliquez avec le bouton droit sur une
adresse MAC et choisissez Assign IP address (Affecter une adresse IP).
5. Cliquez sur le bouton Launch Configuration Web Page (Lancer la page Web
de configuration) situé dans le coin supérieur droit de l'écran.
6. Entrez admin comme ID utilisateur et comme mot de passe.
7. Suivez les indications du Language Wizard.
8. Lancez l'application Remote Desktop Access (Accès à distance au Bureau)
avec l'adresse entrée à l'étape4.
Remarque: Pour en savoir plus, reportez-vous au Manuel d'installation.
© 2018 Tyco Security Products. All rights reserved.
Page 31

Comment activer les canaux de caméras IP sur INTEVO avec des caméras IP Illustra
1. Installez votre appareil INTEVO et ouvrez une session.
2. Connectez-vous au logiciel Exacq.
3. Allez à Configurations/Exacq server/System setup.
4. Notez l'adresse MAC de votre appareil INTEVO.
5. Allez à la page web d'enregistrement de Kantech:
http://www.kantech.com/Support/KantechRegistration.aspx
Remarque: Connectez-vous au site web de Kantech pour avoir accès à la page
d'enregistrement. Pour obtenir des identifiants valides pour accéder au site web de
Kantech, allez à http://www.kantech.com/Register/Register.aspx et remplissez le
formulaire d'enregistrement.
6. Cliquez sur INTEVO Camera registration.
7. Entrez votre adresse de courriel. Une copie de la licence sera envoyée à
cette adresse à la fin du processus.
8. Cliquez sur would you like to register an Illustra IP camera?
9. Entrez les informations suivantes:
• Adresse MAC de la caméra. Reportez-vous au manuel de
l'utilisateur Illustra pour en savoir plus.
15
• Adresse MAC de l'appareil INTEVO. Voir l'étape4.
10. Cliquez sur REGISTER.
11. Pour activer plusieurs canaux de caméras, cliquez sur Click here to create
an additional key et entrez le reste des informations.
12. Notez les informations du champ KEY et allez à: Configurations /
Exacq server / System Setup dans le logiciel
Exacq.
13. Entrez les informations du KEY dans le champ LICENSE et cliquez sur
APPLY.
14. Vos canaux de caméras INTEVO sont maintenant activés et prêts à être
utilisés.
© 2018 Tyco Security Products. All rights reserved.
Page 32

16
Comment activer les canaux de caméras IP sur INTEVO avec une licence
INTEVO-IPCAM01
1. Installez votre appareil INTEVO et ouvrez une session.
2. Connectez-vous au logiciel IP Video Exacq.
3. Allez à Configurations/Exacq server/System setup.
4. Notez l'adresse MAC de votre appareil INTEVO.
5. Pour accéder à la page web d'enregistrement de Kantech, cliquez sur le
lien suivant:
http://www.kantech.com/Support/KantechRegistration.aspx
Remarque: Connectez-vous au site web de Kantech pour avoir accès à la page
d'enregistrement. Pour obtenir des identifiants valides pour accéder au site web de
Kantech, allez à http://www.kantech.com/Register/Register.aspx et remplissez le
formulaire d'enregistrement.
6. Cliquez sur INTEVO Camera registration.
7. Entrez votre adresse de courriel. Une copie de la licence sera envoyée à
cette adresse à la fin du processus.
8. Entrez les informations suivantes:
• Numéro de série INTEVO-IPCAM01
• Adresse MAC de l'appareil INTEVO. Voir l'étape4.
9. Cliquez sur REGISTER.
10. Pour activer plusieurs canaux de caméras, cliquez sur Click here to create
an additional key et entrez le reste des informations.
11. Notez les informations du champ KEY et allez à:
Configurations/Exacq server/System Setup dans le
logiciel Exacq.
12. Entrez les informations du KEY dans le champ LICENSE et cliquez sur
APPLY.
13. Vos canaux de caméras INTEVO sont maintenant activés et prêts à être
utilisés.
Remarque: Pour enregistrer les canaux IP INTEVO, ouvrez le navigateur web sur l'appareil
INTEVO ou sur n'importe quel autre ordinateur connecté à Internet. Si ces options ne sont
pas possibles, veuillez communiquer avec Kantech pour obtenir de l'aide.
© 2018 Tyco Security Products. All rights reserved.
Page 33

Mise à jour automatique
Une fois l'assistant de configuration terminé, la fonction de mise à jour automatique de
l'appareil INTEVO détectera toute nouvelle version du logiciel EntraPass à partir d'Internet
une fois configuré pour la première fois. L'appareil INTEVO vérifie la dernière version
jusqu'à 5jours à compter du jour de la configuration et informe l'utilisateur utilisant le
centre de notification Windows10 pour savoir qu'une nouvelle version d'EntraPass est
disponible. Une connexion Internet est requise pour le téléchargement automatique.
17
© 2018 Tyco Security Products. All rights reserved.
Page 34

© 2018 Tyco Security Products. All rights reserved.
Page 35

Administración de software de video y control de acceso
INTEVO Compacto LTE (Modelo INTEVO-LTE-2TB)
No disponiblepara su venta en América del Norte
INTEVO Compacto (Modelo INTEVO-CMP-2TB)
KANTECH
INTEVO Avanzado (Modelo INTEVO-ADV-4TB)
Guía rápida de utilización
Modelos LTE, Compacto y Avanzado
DN2055-1807 v2.0
Page 36

2
Contenido
Derechos de autor 3
Aviso de uso 3
Garantía 3
Importante 3
Instrucciones de seguridad 4
Servicio técnico 5
Especificaciones técnicas 7
Guía rápida de utilización 8
¿Qué hay en la caja? 8
Instalación 8
Instalación en escritorio 8
Instalación con montaje en la pared 8
Instalación con montaje en bastidor (no incluido) 8
Conexiones 9
Configuración para el primer encendido 13
Nombres de usuario y contraseñas 13
Pasos a seguir para el acceso local 14
Pasos a seguir para el acceso remoto: 14
Cómo activar los canales de la cámara IP en INTEVO con las cámaras IP Illustra 15
Cómo activar los canales de la cámara IP en INTEVO con una licencia INTEVOIPCAM01 16
Actualización automática 17
© 2018 Tyco Security Products. All rights reserved.
Page 37

Derechos de autor
De acuerdo con las leyes referentes a los derechos de autor, no está permitido
copiar, fotocopiar, reproducir, traducir o reducir a cualquier medio electrónico o
formato de lectura electrónica el contenido del presente manual, de manera
completa o parcial, sin el consentimiento previo por escrito de Tyco Security
Products.© 2018 y sus respectivas sociedades. Todos los derechos reservados.
Aviso de uso
Lea detenidamente este manual antes de utilizar el producto. Es necesario seguir todos los
requisitos antes de su uso.
l Nos reservamos el derecho de efectuar modificaciones en el producto y los
manuales sin previo aviso.
l Guarde este documento para futuras consultas.
l El producto solo es apto para su uso en espacios interiores.
l Mantenga el producto y demás accesorios en un ambiente seco.
l No nos hacemos responsables de los daños sufridos por el uso incorrecto.
l El Instalador informará al USUARIO acerca de TODAS LAS INSTRUCCIONES DE
SEGURIDAD que deben cumplirse al usar el equipo.
Garantía
3
Importante
l Los modelos Avanzado y Compacto ofrecen un período de garantía de 3 años a
partir de la fecha de instalación.
l El modelo Compacto LTE ofrece un período de garantía de 12 meses a partir de la
fecha de instalación.
l Este dispositivo INTEVO está diseñado para su uso e instalación en un ambiente
con un grado máximo de contaminación de2 y una categoría de sobretensión II
LUGARES NO PELIGROSOS, únicamente en interiores. El equipo es fijo o
CONECTADO CON CABLE o en ESCRITORIO y se recomienda que la instalación la
realicen únicamente personas de servicio técnico.
l No hay INTERRUPTOR DE ENCENDIDO Y APAGADO para la alimentación
eléctrica.El acoplador de la fuente de alimentación de corriente alterna sirve como
medio de desconexión de la alimentación de red.
© 2018 Tyco Security Products. All rights reserved.
Page 38

4
Instrucciones de seguridad
l Elija un lugar libre de golpes y vibraciones.
l No coloque el producto en un lugar en el que alguna persona pueda caminar sobre
los cables.
l No enchufe el producto a tomas eléctricas que estén en la misma fase que
electrodomésticos grandes.
l No elija un lugar donde el producto esté expuesto a luz solar directa, calor
excesivo, humedad, vapores, químicos o polvo.
l No instale el equipo cerca del agua. Por ejemplo, cerca de la tina del baño, el
lavadero, el fregadero de cocina o lavadero, en un sótano húmedo, o cerca de una
piscina.
l No instale el equipo ni sus accesorios en zonas en las que haya riesgo de
explosión.
l No enchufe el producto a tomas eléctricas controladas por interruptores o
temporizadores automáticos.
l EVITE fuentes de interferencia de radio.
l EVITE colocar el equipo cerca de calefactores, aires acondiciones, ventiladores o
refrigeradores.
l Asegúrese de que los cables estén en una posición tal que puedan producirse
accidentes. Los cables conectados no deben estar sometidos a una tensión
mecánica excesiva.
l Use solo el cable y la fuente de alimentación de corriente alterna que se incluyen
con el producto.
© 2018 Tyco Security Products. All rights reserved.
Page 39

Servicio técnico
Para obtener asistencia técnica por este y otros productos de Kantech,
comuníquese con el servicio técnico, de lunes a viernes.En la siguiente tabla se
indican los números de teléfono del servicio técnico.
EE.UU. y Canadá GMT - 05:00
5
América del Norte Número gratuito +1 888 222 1560
Número directo +1 450 444 2030
América Latina GMT - 03:00
Argentina, Buenos Aires Número directo +54 11 5199 3104
Brasil, San Pablo Número directo +55 11 3181 7377
Chile, Santiago Número directo +56 2 3210 9662
Colombia, Bogotá Número directo +57 1 344 1422
Colombia, Cali Número directo +57 2 891 2476
Colombia, Medellín Número directo +57 4 204 0519
Costa Rica, Nacional Número directo +506 4 000 1655
República Dominicana,
Santo Domingo
El Salvador, San
Salvador
Guatemala, Ciudad de
Guatemala
México, Ciudad de
México
Panamá, Ciudad de
Panamá
Perú, Lima Número directo +51 1 642 9707
Venezuela, Caracas Número directo +58 212 720 2340
Asia GMT + 08:00
Número directo +1 829 235 3047
Número directo +503 2 136 8703
Número directo +502 2 268 1206
Número directo +52 55 8526 1801
Número directo +507 836 6265
08:00 a 20:00
access-support
@jci.com
08:00 a 20:00
access-support
@jci.com
Número gratuito +800 CALL TYCO 09:00 a 17:00
© 2018 Tyco Security Products. All rights reserved.
Page 40

6
+800 2255 8926
Número directo +86 21 6023 0650
China Número directo +400 671 1528
India Número directo +1 800 1082 008
Australia Número directo +02 9684 3980
EMEA (Europa, Oriente
Medio y África)
Reino Unido Número directo +44 330 777 1300
Israel Número directo +972 772 201 350
España Número directo +900 99 31 61
Francia Número directo +0800 90 79 72
Alemania Número directo +0800 1806 757
Italia Número directo +39 0230 510 112
Bélgica Número directo +0800 76 452
Irlanda Número directo +180 094 3570
Baréin Número directo +800 04127
Países nórdicos Número directo +45 4494 9001
Dinamarca Número directo +45 4494 9001
Grecia Número directo +00800 3122 9453
Rusia Número directo +81 0800 2052 1031
Turquía Número directo +00800 31923007
Emiratos Árabes Unidos Número directo +800 03107123
Sudáfrica Número directo +27 21100 3882
GMT + 01:00
Número gratuito +800 CALL TYCO
+800 2255 8926
Número directo +31 475 352 722
access-support
@jci.com
08:00 a 18:00
access-support
@jci.com
© 2018 Tyco Security Products. All rights reserved.
Page 41

Especificaciones técnicas
l Temperaturas de funcionamiento: 0°C a 40°C (32°F a 104°F) para uso en
interiores solamente.
l Nivel de humedad: 93% máx. (humedad relativa sin condensación).
l Dimensiones del gabinete (altura-ancho-profundidad):
-
-
7
Avanzado: 7 x 24 x 19 cm (2,75 x 9,45 x 7,48 pulg.)
Compacto y Compacto LTE: 6 x 21 x 19 cm (2,36 x 8,27 x
7,48 pulg.)
Avanzado
Compacto
Compacto
LTE
Potencias nominales de PoE Entrada
Máx. 30W en cada puerto, pero con
un máximo total del sistema de
120W.
Máx. 30W en cada puerto con un
máximo total del sistema de 60W.
Máx. 30W en cada puerto con un
máximo total del sistema de 60W.
100-240 V de
CA, 50-60 Hz,
2.5A
100-240 V de
CA, 50-60 Hz,
2.5A
100-240 V de
CA, 50-60 Hz,
2.5A
Salida
24 V de CC, 6.66 A,
fuente de alimentación
limitada
19 V de CC, 6.31 A,
fuente de alimentación
limitada
12 V de CC, 3.33 A,
fuente de alimentación
limitada
ADVERTENCIA: Este producto incluye una batería de litio que solo puede
reemplazar una persona autorizada del servicio técnico. PRECAUCIÓN:Existe
riesgo de explosión si se sustituye la batería por un tipo inadecuado.La eliminación
de baterías usadas se debe efectuar acorde con la legislación local
correspondiente y las instrucciones.
© 2018 Tyco Security Products. All rights reserved.
Page 42

8
Guía rápida de utilización
¿Qué hay en la caja?
l Plataforma Integrada de Seguridad INTEVO
l Cables de electricidad
l Guía rápida de utilización
l 2 soportes de montaje para pared
l Tornillos, 6 para el modelo Avanzado; 4 para el Compacto y LTE
l Memoria USB con: documentación, herramienta de configuración,
EntraPass, y software de video IP
l 4 apoyos de plástico
Instalación
Instalación en escritorio
Evite guardar cosas cerca del dispositivo que puedan obstruir la entrada y salida
de aire.
Instalación con montaje en la pared
1. Coloque los soportes a cada lado de la carcasa con los tornillos provistos.
2. Fije en la pared la carcasa de INTEVO con los soportes provistos y 4
tornillos (no incluidos). Es recomendable utilizar tornillos roscados de
acero inoxidable Phillips M4,2 x 32mm (#8 x 1,25 pulg.) (Spaenaur ST631P o equivalente). Para montar el aparato sobre placa de yeso, use 4
anclajes de plástico (Spaenaur EX-S5 o equivalente; no incluidos).
Instalación con montaje en bastidor (no incluido)
Precauciones
l Temperatura ambiente de funcionamiento elevada: si instala el dispositivo
en un bastidor cerrado o en un bastidor múltiple con varios aparatos, la
temperatura ambiente de funcionamiento puede ser mayor que la
temperatura ambiente. Analice la posibilidad de instalar el equipo en un
© 2018 Tyco Security Products. All rights reserved.
Page 43

ambiente compatible con la temperatura de ambiente máxima (Tma)
especificada por el fabricante.
l Reducción del flujo de aire: la instalación del equipo en un bastidor debe
realizarse de tal manera que se no comprometa la cantidad de flujo de aire
que se necesita para el funcionamiento seguro del equipo.
l Carga mecánica: la instalación del equipo en un bastidor debe realizarse de
tal manera que no se produzca una situación peligrosa debido a una carga
mecánica despareja.
l Sobrecarga del circuito: debe tener en cuenta la conexión del equipo al
circuito de alimentación eléctrica y el efecto que pueda tener la
sobrecarga de los circuitos sobre la protección contra sobrecorriente y el
cableado eléctrico. Al abordar esta preocupación, deben considerarse
adecuadamente las especificaciones que figuran en el equipo.
l Conexión a tierra confiable: debe mantenerse una conexión a tierra
confiable de los equipos montados en bastidor. Debe prestarse especial
atención a las conexiones de alimentación que no sean conexiones
directas con el circuito derivado. Por ejemplo, el uso de alargues.
Nota: La altura de instalación máxima para el montaje en pared es de 2m.
9
Conexiones
Proceda con las siguientes conexiones:
1. Conecte el cable de red a ETH1/ETH2.
2. En el modelo Compacto, conecte el cable de red de la cámara a los
3. Conecte un teclado y un mouse a un puerto USB, en la parte trasera del
Nota: Puede usar INTEVO sin monitor ni mouse con un acceso remoto.
puertos PoE 3-6. En el modelo Avanzado conecte el cable de red de la
cámara a los puertos PoE 3-6 para cámaras y los puertos PoE 7-10 para
cámaras y controladores.
dispositivo, para acceso local.
© 2018 Tyco Security Products. All rights reserved.
Page 44

10
1
5
3 6
8
10
2
7
9
11
4
Avanzado
Número Puerto
1 Alimentación
2 Puerto de visualización
3 3-6 cámaras PoE
4
5 Ethernet 2
6 Ethernet 1
7 USB 3.0
8 Puertos de audio
9 HDMI
10 Serie
11 Botón de encendido
7-10 cámaras y
controladores PoE
Panel trasero del modelo Avanzado
© 2018 Tyco Security Products. All rights reserved.
Page 45

Compacto
5
7 8
10
31
2 4 6
9
Número Puerto
1 Alimentación
2 Botón de encendido
3 Puertos de audio
4 USB 3.0
5 USB
6 3-6 cámaras y controladores PoE
7 Ethernet 2
8 Ethernet 1
9 HDMI
10 VGA
11
Panel trasero del modelo Compacto
© 2018 Tyco Security Products. All rights reserved.
Page 46

12
2 7
6
4
3
1
5
8
Compacto LTE
Número Puerto
1 Alimentación
2 Botón de encendido
3 Puertos de audio
4 USB 3.0
5 USB
6 Ethernet
7 HDMI
8 VGA
Panel trasero del modelo Compacto LTE
© 2018 Tyco Security Products. All rights reserved.
Page 47

Configuración para el primer encendido
Nombres de usuario y contraseñas
1. Para iniciar sesión en la unidad de INTEVO, ingrese las siguientes
credenciales:
Administrador
Nombre de usuario: admin Contraseña: admin
Operador
Nombre de usuario: operator Contraseña:(dejar en blanco)
2. Para iniciar sesión en el software EntraPass, ingrese las siguientes
credenciales:
Instalador
Nombre de usuario: kantech Contraseña: kantech
Administrador
Nombre de usuario: kantech1 Contraseña: kantech
Guardia
Nombre de usuario: kantech2 Contraseña: kantech
Acceso Web
Nombre de usuario: intevo1 Contraseña: intevo1
13
3. Para iniciar sesión en el software de video IP Exacqvision, ingrese las
siguientes credenciales:
Administrador
Nombre de usuario: admin Contraseña: admin256
ADVERTENCIA: Para proteger su seguridad, es recomendable que modifique
TODAS las contraseñas PREDETERMINADAS asignadas por el fabricante al
momento de la instalación.
© 2018 Tyco Security Products. All rights reserved.
Page 48

14
Pasos a seguir para el acceso local
1. Para encender INTEVO, conecte el cable de alimentación de corriente
alterna.
2. Siga los pasos del asistente de encendido por primera vez.
Pasos a seguir para el acceso remoto:
1. Para encender INTEVO, conecte el cable de alimentación de corriente
alterna.
2. Inserte la memoria USB incluida en la computadora remota.
3. Ubique el archivo IntevoConfigTool.exe en la memoria USB e inicie la
aplicación.
4. Para asignar una nueva dirección IP, haga clic derecho sobre la dirección
MAC y asigne la dirección IP.
5. Haga clic en el botón “Launch Configuration Web Page” (página web de
configuración de inicio) en la esquina superior derecha de la pantalla.
6. Ingrese admin como nombre de usuario y contraseña.
7. Siga los pasos del asistente de idioma.
8. Inicie la aplicación Remote Desktop Access con la dirección ingresada en el
paso 4.
Nota: Para más información, consulte el manual del usuario.
© 2018 Tyco Security Products. All rights reserved.
Page 49

Cómo activar los canales de la cámara IP en INTEVO con las cámaras IP Illustra
1. Instale e inicie sesión en la unidad INTEVO.
2. Inicie sesión en el software de Exacq.
3. Vaya a Configuraciones / Servidor Exacq /
Configuración del sistema.
4. Anote la dirección MAC de la unidad INTEVO.
5. Vaya a la página de registro de Kantech:
http://www.kantech.com/Support/KantechRegistration.aspx
Nota: Inicie sesión en el sitio web de Kantech para acceder a la página de registro.
Puede consultar los detalles válidos de inicio de sesión en el sitio de Kantech en la
página http://www.kantech.com/Register/Register.aspx y llene el formulario de
registro.
6. Haga clic en Registro de cámara INTEVO.
7. Ingrese su dirección de correo electrónico.En esa dirección recibirá una
copia de la clave de la licencia una vez finalizado el proceso.
8. Haga clic en “¿Desea registrar una cámara IP Illustra?”.
9. Ingrese la siguiente información:
15
• Dirección MAC de la cámara.Consulte el manual del usuario de
Illustra para más información.
• Dirección MAC INTEVO.Consulte el paso 4.
10. Haga clic en REGISTRAR.
11. Para activar varios canales de cámara, haga clic en Haga clic aquí para
crear una clave adicional e ingrese la información adicional.
12. Tome la información de la CLAVE y vaya a: Configuraciones /
Servidor HDVR / Configuración del sistema en el
software de Exacq.
13. Ingrese la información de la CLAVE en el campo LICENCIA y haga clic en
APLICAR.
14. Los canales de cámara de INTEVO ya están activados y listos para usar.
© 2018 Tyco Security Products. All rights reserved.
Page 50

16
Cómo activar los canales de la cámara IP en INTEVO con una
licencia INTEVO-IPCAM01
1. Instale e inicie sesión en la unidad INTEVO.
2. Inicie sesión en el software de video IP de Exacq.
3. Vaya a Configuraciones / Servidor Exacq /
Configuración del sistema.
4. Anote la dirección MAC de la unidad INTEVO.
5. Vaya a la página de registro de Kantech con el siguiente enlace:
http://www.kantech.com/Support/KantechRegistration.aspx
Nota: Inicie sesión en el sitio web de Kantech para acceder a la página de registro.
Puede consultar los detalles válidos de inicio de sesión en el sitio de Kantech en la
página http://www.kantech.com/Register/Register.aspx y llene el formulario de
registro.
6. Haga clic en Registro de cámara INTEVO.
7. Ingrese su dirección de correo electrónico.En esa dirección recibirá una
copia de la clave de la licencia una vez finalizado el proceso.
8. Ingrese la siguiente información:
• Número de serie de INTEVO-IPCAM01
• Dirección MAC INTEVO.Consulte el paso 4.
9. Haga clic en REGISTRAR.
10. Para activar varios canales de cámara, haga clic en Haga clic aquí para
crear una clave adicional e ingrese la información adicional.
11. Tome la información de la CLAVE y vaya a: Configuraciones /
Servidor Exacq / Configuración del sistema en el
software de Exacq.
12. Ingrese la información de la CLAVE en el campo LICENCIA y haga clic en
APLICAR.
13. Los canales de cámara de INTEVO ya están activados y listos para usar.
Nota: Para registrar el canal IP de INTEVO, abra el navegador web desde INTEVO
o por medio de otra computadora con conexión a Internet. Si estas opciones no
© 2018 Tyco Security Products. All rights reserved.
Page 51

están disponibles, comuníquese con el servicio técnico de Kantech para recibir
asistencia.
Actualización automática
Una vez completado el asistente de configuración, la función de actualización
automática de INTEVO detecta si hay una versión nueva de EntraPass de Internet
una vez que se configura por primera vez. El dispositivo INTEVO verifica la última
versión durante un máximo de 5 días desde el día de la configuración y avisa al
usuario mediante el centro de notificaciones de Windows 10 que hay disponible
una nueva versión de EntraPass. Se necesita una conexión a Internet para la
descarga automática.
17
© 2018 Tyco Security Products. All rights reserved.
Page 52

© 2018 Tyco Security Products. All rights reserved.
Page 53

Software de Gerenciamento de Vídeo e Controle de Acesso
INTEVO Compact LTE (Modelo INTEVO-LTE-2TB)
Não disponível para venda na América do Norte
INTEVO Compact (Modelo INTEVO-CMP-2TB)
INTEVO Advanced (Modelo INTEVO-ADV-4TB)
KANTECH
Guia rápido de instalação
Modelos LTE, Compact e Advanced
DN2055- 1807 v2.0
Page 54

2
Conteúdo
Copyright 3
Aviso de uso 3
Garantia 3
Importante 3
Instruções de segurança 4
Suporte técnico 5
Especificações técnicas 7
Guia rápido de instalação 8
O que há na caixa? 8
Instalação 8
Instalação em mesa 8
Instalação do suporte de parede 8
Instalação em suporte de rack (não incluído) 8
Conexões 9
Configuração da primeira ligação 13
Nomes de usuário e senhas 13
Etapas a seguir para obter acesso local 13
Etapas a seguir para obter acesso remoto: 14
Como ativar os canais da câmera IP no INTEVO usando câmeras IP Illustra 14
Como ativar os canais da câmera IP no INTEVO usando uma licença INTEVO-IPCAM0115
Atualização automática 17
© 2018 Tyco Security Products. All rights reserved.
Page 55

Copyright
Segundo as leis de direitos autorais, o conteúdo deste manual não pode ser
copiado, fotocopiado, reproduzido, traduzido ou reduzido para qualquer meio
eletrônico ou forma passível de leitura por máquina, em toda a sua totalidade ou
por partes, sem o consentimento prévio por escrito da Tyco Security Products ©
2018 e suas respectivas empresas.Todos os direitos reservados.
Aviso de uso
Leia este manual com cuidado, antes do uso.Todos os requisitos devem ser seguidos,
antes de usar o produto.
l Nós nos reservamos o direito de alterar o produto e os manuais sem aviso prévio.
l Guarde este documento para futura referência.
l O produto destina-se somente ao uso em ambientes internos.
l Mantenha o produto e outros acessórios em ambiente seco.
l Não nos responsabilizamos por qualquer dano causado por uso inapropriado.
l O instalador deve informar ao USUÁRIO sobre TODAS AS INSTRUÇÕES DE
Garantia
l Os modelos Advanced e Compact oferecem uma garantia de 3 anos a partir da
l O modelo Compact LTE oferece um período de garantia de 12 meses a partir da
3
SEGURANÇA que devem ser seguidas durante o uso do equipamento.
data de instalação.
data de instalação.
Importante
l Esse dispositivo INTEVO deve ser instalado e usado em um ambiente que
proporcione um grau máximode poluição 2 e sobretensão de categoria II LOCAIS
NÃO PERIGOSOS, somente uso interno.O equipamento é FIXO ou CONECTADO
COM CABO E EM MESA e deve ser instalado e reparado apenas por pessoas
qualificadas.
l Não há nenhum botão LIGA/DESLIGA da fonte de alimentação.O acoplador da
fonte de alimentação CA serve como meio para desconectar a corrente elétrica.
© 2018 Tyco Security Products. All rights reserved.
Page 56

4
Instruções de segurança
l Selecione uma localização sem vibração ou impacto.
l Não coloque esse produto onde as pessoas possam pisar nos cabos.
l Não conecte o produto em tomadas elétricas do mesmo circuito de aparelhos
grandes.
l Não selecione um lugar que exponha o produto à luz solar direta, calor excessivo,
umidade, vapores, produtos químicos ou poeiras.
l NÃO instale este equipamento junto de água.Por exemplo, banheira, lavatórios,
pias de cozinha/lavanderia, porões úmidos ou próximo de uma piscina.
l Não instale este equipamento e seus acessórios em áreas em que haja risco de
explosão.
l Não conecte este produto a tomadas elétricas controladas por interruptores ou
temporizadores automáticos.
l EVITE fontes de interferência de rádio.
l EVITE colocar o equipamento junto a radiadores, ar condicionado, ventiladores
e/ou refrigeradores.
l Certifique-se de que os cabos estejam posicionados de modo a impedir
acidentes.Os cabos conectados não devem ser sujeitos a esforço mecânico
excessivo.
l Use apenas o cabo e a fonte de alimentação CA incluídos.
© 2018 Tyco Security Products. All rights reserved.
Page 57

Suporte técnico
Para obter assistência técnica para esses e outros produtos Kantech, entre em
contato com o suporte técnico de segunda a sexta-feira.Consulte a tabela a seguir
para obter os números de telefone do suporte técnico.
EUA e Canadá GMT - 05:00
América do Norte Ligação gratuita +1 888 222 1560 08:00 às 20:00
5
direto +1 450 444 2030
América Latina GMT - 03:00
Argentina, Buenos Aires direto +54 11 5199 3104 08:00 às 20:00
Brasil, São Paulo direto +55 11 3181 7377
Chile, Santiago direto +56 2 3210 9662
Colômbia, Bogotá direto +57 1 344 1422
Colômbia, Cali direto +57 2 891 2476
Colômbia, Medellim direto +57 4 204 0519
Costa Rica, Nacional direto +506 4 000 1655
República Dominicana,
Santo Domingo
El Salvador, San Salvador direto +503 2 136 8703
Guatemala, Cidade da
Guatemala
México, Cidade do México direto +52 55 8526 1801
Panamá, Cidade do Panamá direto +507 836 6265
Peru, Lima direto +51 1 642 9707
Venezuela, Caracas direto +58 212 720 2340
Ásia GMT + 08:00
direto +1 829 235 3047
direto +502 2 268 1206
access-support
@jci.com
access-support
@jci.com
Ligação gratuita +800 CALL TYCO 09:00 às 17:00
+800 2255 8926
© 2018 Tyco Security Products. All rights reserved.
access-support
@jci.com
Page 58

6
direto +86 21 6023 0650
CHINA direto +400 671 1528
ÍNDIA direto +1 800 1082 008
AUSTRÁLIA direto +02 9684 3980
EMEA GMT + 01:00
Ligação gratuita +800 CALL TYCO
+800 2255 8926
direto +31 475 352 722
REINO UNIDO direto +44 330 777 1300 08:00 às 18:00
Israel direto +972 772 201 350
Espanha direto +900 99 31 61
FRANÇA direto +0800 90 79 72
Alemanha direto +0800 1806 757
Itália direto +39 0230 510 112
Bélgica direto +0800 76 452
Irlanda direto +180 094 3570
BAHRAIN direto +800 04127
Países nórdicos direto +45 4494 9001
DINAMARCA direto +45 4494 9001
GRÉCIA direto
Rússia direto
TURQUIA direto +00800 31923007
EMIRADOS ÁRABES UNIDOS direto +800 03107123
ÁFRICA DO SUL direto +27 21100 3882
+00800 3122
9453
+81 0800 2052
1031
access-support
@jci.com
© 2018 Tyco Security Products. All rights reserved.
Page 59

Especificações técnicas
l Temperaturas operacionais:De 0°C a 40°C (de 32°F a 104°F) apenas em
ambiente interno.
l Nível de umidade:93% máx.(umidade relativa sem condensação)
l Dimensões do gabinete (altura-largura-profundidade):
-
Avançado:7 cm (2,75 pol.) x 24 cm (9,45 pol.) x 19 cm (7,48
pol.)
-
Compact e Compact LTE: 6 cm (2,36 pol.) x 21 cm (8,27
pol.) x 19 cm (7,48 pol.).
7
Níveis de energia PoE Entrada
Avançado
Compacto
Compact
LTE
Cobertura30W para cada porta, mas com um
máximo total do sistema de 120 W.
Cobertura30 W para cada porta com um máximo
total do sistema de 60 W.
Cobertura30 W para cada porta com um máximo
total do sistema de 60 W.
100-240 VCA, 5060 Hz, 2,5 A
100-240 VCA, 5060 Hz, 2,5 A
100-240 VCA, 5060 Hz, 2,5 A
AVISO: Este produto contém uma bateria de lítio que pode ser trocada apenas
por pessoal técnico.
CUIDADO:Há risco de explosão se a bateria for substituída por um tipo
incorreto.Descarte as baterias usadas de acordo com as instruções e a legislação
local aplicáveis.
Saída
24 VCC,
6,66 A, LPS
19 VCC,
6,31 A, LPS
12 VCC,
3,33 A, LPS
© 2018 Tyco Security Products. All rights reserved.
Page 60

8
Guia rápido de instalação
O que há na caixa?
l Plataforma de segurança integrada INTEVO
l Cabos de alimentação de energia
l Guia rápido de instalação
l 2 suportes para instalação na parede
l Parafusos, 6 para o Advanced; 4 para o Compact e LTE
l Pendrive incluindo: documentação, ferramenta de configuração,
EntraPass, e software de vídeo IP
l 4 pés de borracha
Instalação
Instalação em mesa
Evite armazenar qualquer coisa que possa bloquear o fluxo de ar perto do
dispositivo.
Instalação do suporte de parede
1. Fixe os suportes em cada lado do alojamento com os parafusos fornecidos.
2. Fixe o alojamento do INTEVO na parede com os suportes fornecidos
usando 4 parafusos (não incluídos).A melhor prática é usar parafusos
autoatarrachantes Phillips de aço inoxidável M4,2 x 32mm (nº 8 x 1,25'')
(Spaenaur ST- 631P ou equivalente).Para montagem em gesso use 4
buchas plásticas (Spaenaur EX-S5 ou equivalente; não incluídas).
Instalação em suporte de rack (não incluído)
Precauções
l Ambiente operacional elevado - Se o dispositivo for instalado em um
conjunto de racks de várias unidades ou fechado, a temperatura ambiente
operacional do conjunto de racks pode ser maior do que a temperatura
ambiente.Leve isso em consideração ao instalar o equipamento em um
© 2018 Tyco Security Products. All rights reserved.
Page 61

Obs.: A altura máxima de instalação do suporte de parede é de 2 m.
Conexões
9
ambiente compatível com a temperatura ambiente máxima (Tma)
especificada pelo fabricante.
l Fluxo de ar reduzido - A instalação do equipamento em um rack deve ser
realizada de modo a não comprometer a quantidade de fluxo de ar
necessária para a operação segura do equipamento.
l Carga mecânica - A montagem do equipamento no rack deve ser realizada
de modo que uma condição perigosa não seja alcançada por uma carga
mecânica desigual.
l Sobrecarga de circuito - Leve em consideração a conexão do equipamento
ao circuito de alimentação e o efeito que a sobrecarga dos circuitos pode
ter na proteção de sobrecorrente e fiação de alimentação.As classificações
da placa identificadora do equipamento devem ser usadas quando esse
problema for tratado.
l Aterramento confiável - O aterramento confiável do equipamento
montado em rack deve ser mantido.Tenha atenção especial às conexões
de alimentação, além das conexões diretas ao circuito secundário.Por
exemplo, uso de filtros de linha.
Prossiga com as seguintes conexões:
1. Conecte o cabo de rede à ETH1/ETH2.
2. Para o Compact, conecte o cabo de rede da câmera nas portas PoE 3-6.
Para o Advanced, conecte o cabo de rede da sua câmera nas portas PoE 36 para câmeras e portas PoE 7-10 para câmeras e controladores.
3. Conecte um teclado e um mouse a uma porta USB na traseira do
dispositivo para acesso local.
Obs.: É possível usar o INTEVO sem um monitor ou mouse com um acesso
remoto.
© 2018 Tyco Security Products. All rights reserved.
Page 62

10
1
5
3 6
8
10
2
7
9
11
4
Avançado
Número Porta
1 Power
2 Porta de exibição
3 PoE 3-6 câmeras
4
5 Ethernet 2
6 Ethernet 1
7 USB 3,0
8 Portas de áudio
9 HDMI
10 Serial
11 Botão de alimentação
PoE 7-10 câmeras e
controladores
Painel traseiro do Advanced
© 2018 Tyco Security Products. All rights reserved.
Page 63

Compacto
5
7 8
10
31
2 4 6
9
Número Porta
1 Power
2 Botão de alimentação
3 Portas de áudio
4 USB 3,0
5 USB
6 PoE 3-6 câmeras e controladores
7 Ethernet 2
8 Ethernet 1
9 HDMI
10 VGA
11
Painel traseiro do Compact
© 2018 Tyco Security Products. All rights reserved.
Page 64

12
2 7
6
4
3
1
5
8
Compact LTE
Número Porta
1 Power
2 Botão de alimentação
3 Portas de áudio
4 USB 3,0
5 USB
6 Ethernet
7 HDMI
8 VGA
Painel traseiro do Compact LTE
© 2018 Tyco Security Products. All rights reserved.
Page 65

Configuração da primeira ligação
Nomes de usuário e senhas
1. Para entrar na unidade INTEVO, digite as seguintes credenciais:
Administrador
Nome de usuário: admin Senha: admin
Operador
Nome de usuário: operador Senha:(Deixe em branco)
2. Para entrar no software EntraPass, digite as seguintes credenciais:
Instalador
Nome de usuário: kantech Senha: kantech
Administrador
Nome de usuário: kantech1 Senha: kantech
Guarda
Nome de usuário: kantech2 Senha: kantech
Acesso Web
Nome de usuário: intevo1 Senha: intevo1
13
3. Para entrar no software de vídeo IP Exacqvision, digite as seguintes
credenciais:
Administrador
Nome de usuário: admin Senha: admin256
AVISO: Para sua segurança, é uma melhor prática alterar TODAS as senhas
PADRÃO do fabricante após a instalação.
Etapas a seguir para obter acesso local
1. Para ligar o INTEVO, conecte o cabo de alimentação CA.
2. Siga as etapas do Assistente de primeira inicialização.
© 2018 Tyco Security Products. All rights reserved.
Page 66

14
Etapas a seguir para obter acesso remoto:
1. Para ligar o INTEVO, conecte o cabo de alimentação CA.
2. Insira o pendrive no PC remoto.
3. Localize o arquivo IntevoConfigTool.exe no pendrive e abra o aplicativo.
4. Para atribuir um novo endereço IP, clique com o botão direito sobre um
endereço MAC e selecione atribuir endereço IP.
5. Clique no botão Abrir página de configuração da Web localizado no lado
superior direito do monitor.
6. Digite admin como ID e a senha.
7. Siga as etapas do Assistente de idioma.
8. Abra o aplicativo Remote Desktop Access com o endereço digitado na
etapa 4.
Obs.: Consulte o manual do usuário para obter mais informações.
Como ativar os canais da câmera IP no INTEVO usando câmeras IP Illustra
1. Instale e entre em sua unidade INTEVO.
2. Entre no software Exacq.
3. Vá para Configurações/Servidor Exacq/Configuração do
sistema.
© 2018 Tyco Security Products. All rights reserved.
Page 67

4. Anote o endereço MAC da unidade INTEVO.
5. Vá para a página de registro da web da Kantech:
http://www.kantech.com/Support/KantechRegistration.aspx
Obs.: Entre no site da Kantech para ter acesso à página de registro.Para detalhes
válidos de entrada no site da Kantech, vá para
http://www.kantech.com/Register/Register.aspx e preencha o formulário de
registro.
6. Clique no registro da câmera INTEVO
7. Insira seu endereço de e-mail.Uma cópia da chave de licença é enviada
para esse endereço quando o processo é concluído.
8. Clique em deseja registrar uma câmera IP Illustra?
9. Insira as seguintes informações:
• Endereço MAC da câmera.Consulte o manual do usuário da
Illustra para obter informações.
• Endereço MAC INTEVO.Consulte a etapa 4.
10. Clique em REGISTRAR.
11. Para ativar vários canais de câmera, clique em Clique aqui para criar uma
chave adicional e digitar as outras informações.
12. Pegue a CHAVE e vá para: Configurações/servidor
HDVR/Configuração do sistema no software Exacq.
13. Digite a CHAVE no campo LICENÇA e clique em APLICAR.
14. Os canais de sua câmera INTEVO estarão ativados e prontos para usar.
15
Como ativar os canais da câmera IP no INTEVO usando uma licença INTEVO-IPCAM01
1. Instale e entre em sua unidade INTEVO.
2. Entre no software Exacq de vídeo IP.
3. Vá para Configurações/Servidor Exacq/Configuração do
sistema.
4. Anote o endereço MAC da unidade INTEVO.
5. Vá para a página de registro da web da Kantech e clique no seguinte link:
© 2018 Tyco Security Products. All rights reserved.
Page 68

16
http://www.kantech.com/Support/KantechRegistration.aspx
Obs.: Entre no site da Kantech para ter acesso à página de registro.Para detalhes
válidos de entrada no site da Kantech, vá para
http://www.kantech.com/Register/Register.aspx e preencha o formulário de
registro.
6. Clique no registro da câmera INTEVO
7. Insira seu endereço de e-mail.Uma cópia da chave de licença é enviada
para esse endereço quando o processo é concluído.
8. Insira as seguintes informações:
• Número de série do INTEVO-IPCAM01
• Endereço MAC INTEVO.Consulte a etapa 4.
9. Clique em REGISTRAR.
10. Para ativar vários canais de câmera, clique em Clique aqui para criar uma
chave adicional e digitar as outras informações.
11. Pegue a CHAVE e vá para: Configurações/servidor
Exacq/Configuração do sistema no software Exacq.
12. Digite a CHAVE no campo LICENÇA e clique em APLICAR.
13. Os canais de sua câmera INTEVO estarão ativados e prontos para usar.
Obs.: Para registrar o canal IP INTEVO abra o navegador de Internet no INTEVO ou
em outro computador com uma conexão com a Internet.Se essas opções não
estiverem disponíveis, entre em contato com a assistência técnica da Kantech
para obter assistência.
© 2018 Tyco Security Products. All rights reserved.
Page 69

Atualização automática
Após a conclusão do assistente de configuração, o recurso da atualização
automática do INTEVO detecta qualquer versão nova do EntraPass da Internet
quando ele é configurado pela primeira vez.O INTEVO verifica a versão mais
recente por até 5 dias a partir da data da configuração e informa o usuário, usando
a central de notificações do Windows 10, que há uma nova versão do EntraPass
disponível.É necessária uma conexão com a Internet para o download automático.
17
© 2018 Tyco Security Products. All rights reserved.
Page 70

© 2018 Tyco Security Products. All rights reserved.
Page 71

Management für Zugangskontrolle und Videosoftware
INTEVO Compact LTE (Modell INTEVO-LTE-2TB)
Kann in Nordamerika nicht käuflich erwor ben werden
INTEVO Compact (Modell INTEVO-CMP-2TB)
INTEVO Advanced (Modell INTEVO-ADV-4TB)
Kurzanleitung
Modelle LTE, Compact und Advanced
KANTECH
DN2055-1807 v2.0
Page 72

2
Inhalt
Copyright 3
Nutzungshinweis 3
Garantie 3
Wichtig 3
Sicherheitsanweisungen 4
Technische Unterstützung 5
Technische Daten 7
Kurzanleitung 8
Was ist im Lieferumfang enthalten? 8
Installation 8
Tischinstallation 8
Wandmontage 8
Rackmontagekit (nicht im Lieferumfang enthalten) 9
Anschlüsse 10
Basiskonfiguration 14
Benutzernamen und Kennwörter 14
Schritte für den lokalen Zugriff: 15
Schritte für den Fernzugriff: 15
So aktivieren Sie IP-Kamerakanäle auf INTEVO für Illustra IP-Kameras. 16
So aktivieren Sie IP-Kamerakanäle auf INTEVO für eine INTEVO-IPCAM01-Lizenz. 17
Automatische Aktualisierung 18
© 2018 Tyco Security Products. All rights reserved.
Page 73

Copyright
Gemäß den Gesetzen für Copyright darf der Inhalt dieses Handbuchs ohne
vorherige Genehmigung durch Tyco Security Products © 2018 und seinen
jeweiligen Gesellschaften weder ganz noch teilweise kopiert, reproduziert,
übersetzt oder für ein elektronisches Medium oder eine maschinell lesbare Form
verkleinert werden.Alle Rechte vorbehalten.
Nutzungshinweis
Bitte lesen Sie dieses Handbuch vor Gebrauch gründlich durch.Alle Voraussetzungen
müssen vor Gebrauch dieses Produktes gegeben sein.
l Wir behalten uns das Recht vor, das Produkt und Handbücher ohne vorherige
Ankündigung zu ändern.
l Bewahren Sie dieses Dokument auf, um in Zukunft darauf zurückgreifen zu
können.
l Das Produkt eignet sich ausschließlich für den Gebrauch in Innenräumen.
l Bewahren Sie das Produkt und sämtliches Zubehör in einer trockenen Umgebung
auf.
l Wir sind für keine Schäden verantwortlich, die durch eine unangemessene
Nutzung entstanden sind.
l Der Installateur muss den ANWENDER in Bezug auf ALLE
SICHERHEITSANWEISUNGEN instruieren, die während der Verwendung des
Gerätes berücksichtigt werden müssen.
3
Garantie
Wichtig
l Die Modelle Advanced und Compact haben ab dem Installationsdatum eine
Garantiefrist von drei (3) Jahren.
l Das Modell Compact LTE hat ab dem Installationsdatum eine Garantiefrist von
zwölf (12) Monaten.
l Dieses INTEVO-Gerät darf in einer Umgebung mit einem Verschmutzungsgrad von
maximal2 und einer Überspannungskategorie II für UNGEFÄHRLICHE ORTE nur im
Innenbereich eingesetzt und installiert werden.Das Gerät wird FEST oder AUF
EINEM TISCH INSTALLIERT und AN EIN KABEL ANGESCHLOSSEN und es wird
empfohlen, dass die Installation nur durch Servicemitarbeiter ausgeführt wird.
© 2018 Tyco Security Products. All rights reserved.
Page 74

4
l Es gibt keinen EIN-/AUS-Schalter für die Stromversorgung.Der
Netzanschlusskoppler dient zur Unterbrechung der Stromzufuhr.
Sicherheitsanweisungen
l Wählen Sie einen Standort ohne Vibrationen und Stöße.
l Stellen Sie dieses Produkt nicht dort auf, wo Menschen über die Kabel laufen
können.
l Schließen Sie das Produkt nicht an Steckdosen an demselben Stromkreis wie große
Geräte an.
l Wählen Sie keinen Standort, an dem das Produkt direktem Sonnenlicht,
übermäßiger Hitze, Feuchtigkeit, Dämpfen, Chemikalien oder Staub ausgesetzt ist.
l Installieren Sie dieses Gerät NICHT neben Nassbereichen.Zum Beispiel
Badewanne, Waschbecken, Spüle, feuchter Keller oder in Schwimmbadnähe.
l Installieren Sie das Gerät und das Zubehör nicht in Bereichen, in denen
Explosionsgefahr besteht.
l Schließen Sie dieses Produkt nicht an Steckdosen an, die von Schaltern oder
automatischen Zeitschaltuhren gesteuert werden.
l VERMEIDEN Sie Quellen von Funkstörungen.
l VERMEIDEN Sie es, das Gerät in der Nähe von Heizungen, Klimaanlagen,
Ventilatoren und/oder Kühlschränken aufzustellen.
l Stellen Sie sicher, dass die Kabel so positioniert sind, dass keine Unfälle
geschehen können.Angeschlossene Kabel dürfen keiner übermäßigen
mechanischen Beanspruchung ausgesetzt sein.
l Verwenden Sie ausschließlich die mitgelieferte Wechselspannungsquelle und das
Kabel.
© 2018 Tyco Security Products. All rights reserved.
Page 75

Technische Unterstützung
Technische Unterstützung mit diesem und anderen Kantech-Produkten erhalten
Sie von Montag bis Freitag vom Technischen Support.Die Telefonnummern des
Technischen Supports sind in der nachstehenden Tabelle zu finden.
USA und Kanada GMT - 05:00
5
Nordamerika Gebührenfrei +1 888 222 1560
Direkt +1 450 444 2030
Lateinamerika GMT - 03:00
Argentinien/Buenos Aires Direkt +54 11 5199 3104 08.00 bis 20.00 Uhr
Brasilien/Sao Paulo Direkt +55 11 3181 7377
Chile/Santiago Direkt +56 2 3210 9662
Kolumbien/Bogota Direkt +57 1 344 1422
Kolumbien/Cali Direkt +57 2 891 2476
Kolumbien/Cali Direkt +57 4 204 0519
Costa Rica/National Direkt +506 4 000 1655
Dominikanische
Republik/Santo Domingo
El Salvado /San Salvador Direkt +503 2 136 8703
Guatemala/Guatemala-
Stadt
Mexiko/Mexiko-Stadt Direkt +52 55 8526 1801
Panama/Panama-Stadt Direkt +507 836 6265
Peru/Lima Direkt +51 1 642 9707
Venezuela/Caracas Direkt +58 212 720 2340
Asien GMT - 08:00
Direkt +1 829 235 3047
Direkt +502 2 268 1206
08.00 bis 20.00 Uhr
access-support
@jci.com
access-support
@jci.com
Gebührenfrei +800 CALL TYCO
+800 2255 8926
© 2018 Tyco Security Products. All rights reserved.
09.00 bis 17.00 Uhr
access-support
@jci.com
Page 76

6
Direkt +86 21 6023 0650
China Direkt +400 671 1528
Indien Direkt +1 800 1082 008
Australien Direkt +02 9684 3980
EMEA GMT - 01:00
Gebührenfrei +800 CALL TYCO
+800 2255 8926
Direkt +31 475 352 722
Großbritannien Direkt +44 330 777 1300 08.00 bis 18.00 Uhr
Israel Direkt +972 772 201 350
Spanien Direkt +900 99 31 61
Frankreich Direkt +0800 90 79 72
Deutschland Direkt +0800 1806 757
Italien Direkt +39 0230 510 112
Belgien Direkt +0800 76 452
Irland Direkt +180 094 3570
Bahrain Direkt +800 04127
Nordische Länder Direkt +45 4494 9001
Dänemark Direkt +45 4494 9001
Griechenland Direkt +00800 3122 9453
Russland Direkt +81 0800 2052 1031
Türkei Direkt +00800 31923007
Vereinigte Arabische
Emirate
Südafrika Direkt +27 21100 3882
Direkt +800 03107123
access-support
@jci.com
© 2018 Tyco Security Products. All rights reserved.
Page 77

Technische Daten
l Betriebstemperaturen:0 °C bis 40 °C (32 °F bis 104 °F) - nur für den Einsatz
in Innenräumen.
l Luftfeuchtigkeit:Max. 93 %(relative Luftfeuchtigkeit, nicht kondensierend).
l Gehäuseabmessungen (H x B x T):
-
Advanced: 7 cm (2,75 in.) x 24 cm (9,45 in.) x 19 cm (7,48
in.).
-
Compact und Compact LTE: 6 cm (2,36 in.) x 21 cm (8,27
in.) x 19 cm (7,48 in.).
7
PoE-Leistungsstufen Eingang
Advanced
Compact
Compact
LTE
Max.30 W für jeden Anschluss, mit max. 120 W
für das gesamte System.
Max.30 W für jeden Anschluss, mit max. 60 W
für das gesamte System.
Max.30 W für jeden Anschluss, mit max. 60 W
für das gesamte System.
100-240 VAC, 5060 Hz, 2,5 A
100-240 VAC, 5060 Hz, 2,5 A
100-240 VAC, 5060 Hz, 2,5 A
WARNUNG: Dieses Produkt enthält eine Lithiumbatterie, die nur von
zugelassenem Servicepersonal ausgetauscht werden darf.
ACHTUNG: Wenn die Batterie durch eine Batterie der falschen Art ersetzt wird,
besteht Explosionsgefahr.Entsorgen Sie alle gebrauchten Batterien entsprechend
den geltenden örtlichen Gesetzen und Anweisungen.
Ausgang
24VDC, 6,66
A, LPS
19VDC, 6,31
A, LPS
12VDC, 3,33
A, LPS
© 2018 Tyco Security Products. All rights reserved.
Page 78

8
Kurzanleitung
Was ist im Lieferumfang enthalten?
l INTEVO Integrated Security Platform
l Netzkabel
l Kurzanleitung
l Zwei (2) Bügel für die Wandmontage
l Schrauben (sechs (6) für das Modell Advanced; vier (4) für die Modelle
Compact und LTE)
l USB-Stick mit Dokumentation, Konfigurationstool, EntraPass, DSC
PowerSeries und IP-Videosoftware
l Vier (4) Füße aus Kunststoff
Installation
Tischinstallation
Vermeiden Sie die Lagerung von jeglichen Gegenständen in der Nähe des
Gerätes, um dessen Luftdurchfluss nicht zu blockieren.
Wandmontage
1. Befestigen Sie die Bügel mit den mitgelieferten Schrauben an den beiden
Seiten des Gehäuses.
2. Befestigen Sie das INTEVO-Gehäuse mit den bereitgestellten Bügeln und
vier (4) Schrauben (nicht im Lieferumfang enthalten) an der Wand.Wir
empfehlen Edelstahl-Kreuzschlitzblechschrauben M4,2 x 32 mm (#8 x 1,25
in.) (Spaenaur ST- 631P oder gleichwertig). Für die Montage an
Trockenbauwänden vier (4) Kunststoffanker (Spaenaur EX-S5 oder
gleichwertig; nicht im Lieferumfang enthalten) verwenden.
© 2018 Tyco Security Products. All rights reserved.
Page 79

Rackmontagekit (nicht im Lieferumfang enthalten)
Vorsichtshinweise
l Erhöhte Betriebsumgebung ‒ Bei Montage auf einem geschlossenen oder
einem Rack mit mehreren Geräten kann die Umgebungstemperatur des
Aufbaus die Raumtemperatur überschreiten.Deshalb sollte berücksichtigt
werden, dass das Gerät in einer Umgebung installiert werden muss, die
mit der vom Hersteller angegebenen maximalen Umgebungstemperatur
(Tma) kompatibel ist.
l Verminderter Luftdurchfluss ‒ Das Gerät sollte so auf dem Gestell
montiert werden, dass der für den sicheren Betrieb des Gerätes benötigte
Luftdurchfluss nicht beeinträchtigt wird.
l Mechanische Belastung – Die Montage der Geräte in einem Rack sollte so
erfolgen, dass es nicht aufgrund von ungleichmäßiger mechanischer
Belastung zu gefährlichen Bedingungen kommt.
l Schaltkreisüberlastung – Es muss beachtet werden, dass die Geräte an den
Netzstromkreis angeschlossen sind und welche Auswirkung das Überladen
der Schaltkreise auf den Überstromschutz und die Stromkabel haben
könnte.Hierzu müssen die Typenschildangaben des Gerätes zu Rate
gezogen werden.
l Zuverlässige Erdung – Die zuverlässige Erdung der Rack-montierten Geräte
muss gewährleistet sein.Besondere Beachtung muss Netzanschlüssen
geschenkt werden, bei denen es sich nicht um direkte Anschlüsse an die
Abzweigschaltung handelt.Zum Beispiel die Verwendung von
Mehrfachsteckdosen.
9
Hinweis: Die maximale Installationshöhe für die Wandmontage beträgt 2 m.
© 2018 Tyco Security Products. All rights reserved.
Page 80

10
Anschlüsse
Beginnen Sie mit den folgenden Anschlüssen:
1. Schließen Sie Ihr Netzwerkkabel an ETH1/ETH2 an.
2. Schließen Sie für das Modell Compact Ihr Kameranetzwerkkabel an den
3. Schließen Sie für den lokalen Zugriff eine Tastatur und Maus am USB-
Hinweis: INTEVO kann bei Fernzugriff ohne Bildschirm oder Maus verwendet
werden.
PoE-Anschlüssen 3-6 an. Schließen Sie für das Modell Advanced Ihr
Kameranetzwerkkabel an den PoE-Anschlüssen 3-6 für Kameras und an
den PoE-Anschlüssen 7-10 für Kameras und Steuergeräte an.
Anschluss auf der Rückseite des Gerätes an.
© 2018 Tyco Security Products. All rights reserved.
Page 81

Advanced
1
5
3 6
8
10
2
7
9
11
4
Nummer Anschluss
1 Stromversorgung
2 Display-Anschluss
3 PoE 3-6 Kameras
11
4
5 Ethernet 2
6 Ethernet 1
7 USB 3.0
8 Audioanschlüsse
9 HDMI
10 Serieller Anschluss
11 Netzschalter
PoE 7-10 Kameras und
Steuergeräte
Modell Advanced - Rückseite
© 2018 Tyco Security Products. All rights reserved.
Page 82

12
5
7 8
10
31
2 4 6
9
Compact
Nummer Anschluss
1 Stromversorgung
2 Netzschalter
3 Audioanschlüsse
4 USB 3.0
5 USB
6 PoE 3-6 - Kameras und Steuergeräte
7 Ethernet 2
8 Ethernet 1
9 HDMI
10 VGA
Modell Compact - Rückseite
© 2018 Tyco Security Products. All rights reserved.
Page 83

Compact LTE
2 7
6
4
3
1
5
8
Nummer Anschluss
1 Stromversorgung
2 Netzschalter
3 Audioanschlüsse
4 USB 3.0
5 USB
6 Ethernet
7 HDMI
8 VGA
13
Modell Compact LTE - Rückseite
© 2018 Tyco Security Products. All rights reserved.
Page 84

14
Basiskonfiguration
Benutzernamen und Kennwörter
1. Geben Sie folgende Daten ein, um sich an der INTEVO-Einheit
anzumelden:
Administrator
Benutzername: admin Kennwort: admin
Anwender
Benutzername: operator Kennwort:(leer lassen)
2. Geben Sie folgende Daten ein, um sich bei der EntraPass-Software
anzumelden:
Installateur
Benutzername: kantech Kennwort: kantech
Administrator
Benutzername: kantech1 Kennwort: kantech
Wachpersonal
Benutzername: kantech2 Kennwort: kantech
Internetzugang
Benutzername: intevo1 Kennwort: intevo1
3. Geben Sie folgende Daten ein, um sich bei der IP-Videosoftware
Exacqvision anzumelden:
Administrator
Benutzername: admin Kennwort: admin256
WARNUNG: Zum Schutz Ihrer Sicherheit empfehlen wir, dass Sie ALLE
KENNWORT-VOREINSTELLUNGEN des Herstellers bei der Installation ändern.
© 2018 Tyco Security Products. All rights reserved.
Page 85

Schritte für den lokalen Zugriff:
1. Schalten Sie das INTEVO-Gerät durch Einstecken des Netzkabels ein.
2. Befolgen Sie die Schritte im First Boot-Assistenten.
Schritte für den Fernzugriff:
1. Schalten Sie das INTEVO-Gerät durch Einstecken des Netzkabels ein.
2. Stecken Sie den mitgelieferten USB-Stick am Remote-PC ein.
3. Suchen Sie auf dem USB-Stick die Datei IntevoConfigTool.exe und starten
Sie die Anwendung.
4. Um eine neue IP-Adresse zuzuordnen, müssen Sie mit der rechten
Maustaste auf eine MAC-Adresse klicken und „Assign IP Address(es)“(IPAdresse zuordnen) auswählen.
15
5. Klicken Sie auf die Schaltfläche „Launch Configuration Web Page“
(Konfigurationswebseite öffnen) oben rechts auf dem Bildschirm.
6. Geben Sie admin als ID und Kennwort ein.
7. Befolgen Sie die Schritte im Sprachassistenten.
8. Starten Sie die Anwendung Remote Desktop Access (Fernzugriff auf
Desktop) mit der in Schritt 4 eingegebenen Adresse.
Hinweis: Weitere Informationen finden Sie im Benutzerhandbuch.
© 2018 Tyco Security Products. All rights reserved.
Page 86

16
So aktivieren Sie IP-Kamerakanäle auf INTEVO für Illustra IP-Kameras.
1. Installieren Sie Ihre INTEVO-Einheit und melden Sie sich an.
2. Melden Sie sich in der Exacq-Software an.
3. Gehen Sie zu Configurations/Exacq Server/System Setup
(Konfiguration/Exaxq-Server/System-Setup).
4. Notieren Sie sich die MAC-Adresse Ihrer INTEVO-Einheit.
5. Gehen Sie zur Kantech-Website für die Registrierung:
http://www.kantech.com/Support/KantechRegistration.aspx
Hinweis: Um Zugang zur Registrierungsseite zu erhalten, müssen Sie auf der
Kantech-Website angemeldet sein.Wenn Sie keine gültigen Anmeldedaten für die
Kantech-Website haben, gehen Sie zu
http://www.kantech.com/Register/Register.aspx und füllen Sie das
Registrierungsformular aus.
6. Klicken Sie auf INTEVO Camera Registration (Kameraregistrierung)
7. Geben Sie Ihre E-Mail-Adresse ein.Wenn der Prozess abgeschlossen ist,
wird eine Kopie des Lizenzschlüssels an diese Adresse geschickt.
8. Klicken Sie auf Would you like to register an Illustra IP camera? (Möchten
Sie eine Illustra IP-Camera registrieren?).
9. Geben Sie die folgenden Daten ein:
• MAC-Adresse der KameraSiehe Illustra Benutzerhandbuch bzgl.
weiterer Informationen.
• MAC-Adresse der INTEVO-Einheit.Siehe Schritt 4.
10. Klicken Sie auf REGISTER (registrieren).
11. Wenn Sie mehrere Kamerakanäle aktivieren, klicken Sie auf Click here to
create an additional key (Hier klicken, um einen zusätzlichen Schlüssel zu
erzeugen) und geben Sie die zusätzlichen Informationen ein.
12. Nehmen Sie die KEY-Daten und gehen Sie zu: Configurations/HDVR
Server/System Setup (Konfiguration/HDVRServer/System-Setup) in der Exacq-Software.
13. Geben Sie die KEY-Daten in das Feld LICENSE (Lizenz) ein und klicken Sie
auf APPLY (Übernehmen).
14. Ihre INTEVO-Kamerakanäle sind jetzt aktiviert und einsatzbereit.
© 2018 Tyco Security Products. All rights reserved.
Page 87

So aktivieren Sie IP-Kamerakanäle auf INTEVO für eine INTEVOIPCAM01-Lizenz.
1. Installieren Sie Ihre INTEVO-Einheit und melden Sie sich an.
2. Melden Sie sich in der IP-Videosoftware Exacq an.
3. Gehen Sie zu Configurations/Exacq Server/System Setup
(Konfiguration/Exaxq-Server/System-Setup).
4. Notieren Sie sich die MAC-Adresse Ihrer INTEVO-Einheit.
5. Klicken Sie den folgenden Link, um für die Registrierung zur KantechWebsite zu gelangen:
http://www.kantech.com/Support/KantechRegistration.aspx
Hinweis: Um Zugang zur Registrierungsseite zu erhalten, müssen Sie auf der
Kantech-Website angemeldet sein.Wenn Sie keine gültigen Anmeldedaten für die
Kantech-Website haben, gehen Sie zu
http://www.kantech.com/Register/Register.aspx und füllen Sie das
Registrierungsformular aus.
6. Klicken Sie auf INTEVO Camera Registration (Kameraregistrierung)
7. Geben Sie Ihre E-Mail-Adresse ein.Wenn der Prozess abgeschlossen ist,
wird eine Kopie des Lizenzschlüssels an diese Adresse geschickt.
8. Geben Sie die folgenden Daten ein:
17
• Seriennummer der INTEVO-IPCAM01
• MAC-Adresse der INTEVO-Einheit.Siehe Schritt 4.
9. Klicken Sie auf REGISTER (registrieren).
10. Wenn Sie mehrere Kamerakanäle aktivieren, klicken Sie auf Click here to
create an additional key (Hier klicken, um einen zusätzlichen Schlüssel zu
erzeugen) und geben Sie die zusätzlichen Informationen ein.
11. Nehmen Sie die KEY-Daten und gehen Sie zu:
Configurations/Exacq Server/System Setup
(Konfiguration/Exacq-Server/System-Setup) in der
Exacq-Software.
12. Geben Sie die KEY-Daten in das Feld LICENSE (Lizenz) ein und klicken Sie
© 2018 Tyco Security Products. All rights reserved.
Page 88

18
auf APPLY (Übernehmen).
13. Ihre INTEVO-Kamerakanäle sind jetzt aktiviert und einsatzbereit.
Hinweis: Die Registrierung von INTEVO-IP-Kanälen kann über den Webbrowser
auf der INTEVO-Einheit oder über einen anderen Computer mit einer
Internetverbindung erfolgen.Wenn diese Optionen nicht zur Verfügung stehen,
wenden Sie sich bitte an den technischen Support von Kantech, um Unterstützung
zu erhalten.
Automatische Aktualisierung
Nach Abschluss der Einrichtung mit dem Assistenten erkennt die automatische
Aktualisierungsfunktion für die INTEVO-Einheit alle neuen Versionen von
EntraPass über das Internet, nachdem sie zum ersten Mal konfiguriert wurde.Die
INTEVO-Einheit verifiziert die aktuellste Version für bis zu fünf (5) Tage, nachdem
sie konfiguriert wurde und weist den Anwender über das Windows 10
Benachrichtigungszentrum darauf hin, dass eine neue Version von EntraPass
verfügbar ist.Für den automatischen Download ist eine Internetverbindung
erforderlich.
© 2018 Tyco Security Products. All rights reserved.
Page 89

Gestione del controllo accessi e del software video
INTEVO Compact LTE (Modello INTEVO-LTE-2TB)
Non disponibile in vendita in Nord America
INTEVO Compact (Modello INTEVO-CMP-2TB)
INTEVO Advanced (Modello INTEVO-ADV-4TB)
KANTECH
Guida rapida all'impostazione
Modelli LTE, Compact e Advanced
DN2055- 1807 v2.0
Page 90

2
Sommario
Copyright 3
Avviso per l'uso 3
GARANZIA 3
Importante 3
Istruzioni relative alla sicurezza 4
Assistenza tecnica 5
Specifiche tecniche 7
Guida rapida all'impostazione 8
Contenuto della confezione 8
Installazione 8
Installazione da tavolo 8
Installazione con montaggio a parete 8
Installazione con montaggio in rack (non incluso) 8
Connessioni 10
Configurazione al primo avvio 14
Nomi utente e password 14
Operazioni da eseguire per accedere in locale 14
Operazioni da eseguire per accedere da remoto 15
Attivazione dei canali della videocamera IP su INTEVO quando si utilizzano delle
videocamere IP Illustra 15
Attivazione dei canali della videocamera IP su INTEVO con una licenza INTEVOIPCAM01 16
Aggiornamento automatico 18
© 2018 Tyco Security Products. All rights reserved.
Page 91

Copyright
Ai sensi delle leggi sul copyright, è fatto divieto di copiare, fotocopiare, riprodurre,
tradurre o trasferire su supporto elettronico, o in qualsiasi altro formato leggibile
mediante computer, il contenuto del presente manuale, in tutto o in parte, senza
il previo consenso scritto di Tyco Security Products© 2018 e delle rispettive
società.Tutti i diritti riservati.
Avviso per l'uso
Leggere attentamente il presente manuale prima dell'uso.Occorre attenersi a tutti i
requisiti prima di usare il prodotto.
l Ci riserviamo il diritto di modificare il prodotto e il manuale senza preavviso.
l Conservare il presente documento per consultazione futura.
l Il prodotto è destinato unicamente all'utilizzo in interni.
l Tenere il prodotto e gli altri accessori in un ambiente asciutto.
l Si declina la responsabilità per eventuali danni dovuto all'utilizzo improprio.
l L'installatore dovrà istruire l'UTENTE in merito a tutte le ISTRUZIONI DI
SICUREZZA che dovranno essere seguite durante l'utilizzo del dispositivo.
GARANZIA
l Per i modelli Advanced e Compact viene offerta una garanzia di 3 anni, a partire
dalla data di installazione.
l Per il modello Compact LTE viene offerta una garanzia di 12 mesi, a partire dalla
data di installazione.
3
Importante
l Il dispositivo INTEVO sarà installato e usato in un ambiente con un grado di
inquinamento max.di 2 e una categoria di sovratensione II IN AREE NON
PERICOLOSE, solo in interni.Il dispositivo è FISSO o DESKTOP e CABLATO e deve
essere installato solo da personale qualificato.
l Non è presente alcun pulsante di ACCENSIONE/SPEGNIMENTO per
l'alimentazione.Il connettore dell'alimentatore c.a. ha funzione di mezzo di
disconnessione dall'alimentazione.
© 2018 Tyco Security Products. All rights reserved.
Page 92

4
Istruzioni relative alla sicurezza
l Selezionare una posizione priva di vibrazioni e scosse.
l Non posizionare il prodotto in posizioni in cui i cavi del circuito secondario
potrebbero essere calpestati.
l Non collegare il prodotto a uscite elettriche sullo stesso circuito di altre
apparecchiature grandi.
l Non scegliere un luogo che espone il prodotto a raggi solari diretti, calore
eccessivo, umidità, vapori, agenti chimici o polvere.
l NON installare il dispositivo in prossimità dell'acqua(ad esempio vasche da bagno,
lavelli cucina/lavanderia, in seminterrati umidi o vicino a piscine).
l Non installare questo dispositivo e i suoi accessori in aree in cui persiste il rischio
di esplosione.
l Non collegare il prodotto a uscite elettriche controllate da interruttori a parete o
timer automatici.
l EVITARE le sorgenti di interferenze radio.
l EVITARE di porre il dispositivo in prossimità di caloriferi, condizionatori d'aria,
ventilatori e/o frigoriferi.
l Assicurarsi che i cavi siano posizionati in modo tale che non si verifichino
incidenti.I cavi collegati non devono essere sottoposti a stress meccanico
eccessivo.
l Utilizzare esclusivamente l'alimentatore c.a. e il cavo forniti.
© 2018 Tyco Security Products. All rights reserved.
Page 93

Assistenza tecnica
Per assistenza tecnica su questo o su altri prodotti Kantech, rivolgersi a supporto
tecnico dal lunedì al venerdì.Nella tabella riportata di seguito sono indicati i
numeri di telefono del supporto tecnico.
USA e Canada GMT -05.00
Nord America Numero verde +1 888 222 1560 Dalle 08:00 alle 20:00
5
diretto +1 450 444 2030
America latina GMT -03.00
Argentina, Buenos Aires diretto
Brazil, Sao Paolo diretto
Chile, Santiago diretto +56 2 3210 9662
Colombia, Bogotá diretto +57 1 344 1422
Colombia, Cali diretto +57 2 891 2476
Colombia, Medellin diretto +57 4 204 0519
Costa Rica, National diretto +506 4 000 1655
Repubblica Dominicana,
Santo Domingo
El Salvador, San Salvador diretto +503 2 136 8703
Guatemala, Guatemala City diretto +502 2 268 1206
Messico, Città del Messico diretto
Panama, Panama City diretto +507 836 6265
Perù, Lima diretto +51 1 642 9707
Venezuela, Caracas diretto
Asia GMT +08.00
diretto +1 829 235 3047
+54 11 5199
3104
+55 11 3181
7377
+52 55 8526
1801
+58 212 720
2340
access-support
@jci.com
Dalle 08:00 alle 20:00
access-support
@jci.com
Numero verde +800 CALL TYCO Dalle 9.00 alle 17.00
+800 2255 8926
© 2018 Tyco Security Products. All rights reserved.
access-support
Page 94

6
diretto
CINA diretto +400 671 1528
India diretto +1 800 1082 008
Australia diretto +02 9684 3980
EMEA GMT +01.00
Numero verde +800 CALL TYCO
diretto +31 475 352 722
Regno Unito diretto
ISRAELE diretto
Spagna diretto +900 99 31 61
FRANCIA diretto +0800 90 79 72
Germania diretto +0800 1806 757
ITALIA diretto
Belgio diretto +0800 76 452
Irlanda diretto +180 094 3570
Bahrein diretto +800 04127
Paesi del nord diretto +45 4494 9001
DANIMARCA diretto +45 4494 9001
GRECIA diretto
Russia diretto
Turchia diretto
EMIRATI ARABI UNITI diretto +800 03107123
SUDAFRICA diretto +27 21100 3882
+86 21 6023
0650
+800 2255 8926
+44 330 777
1300
+972 772 201
350
+39 0230 510
112
+00800 3122
9453
+81 0800 2052
1031
+00800
31923007
@jci.com
Dalle 08.00 ALLE
18.00
access-support
@jci.com
© 2018 Tyco Security Products. All rights reserved.
Page 95

Specifiche tecniche
l Temperature operative:Da 0 °C a 40 °C (da 32 °F a 104 °F) solo in interni.
l Livelli di umidità:93% max.(umidità relativa senza condensa).
l Dimensioni custodia (altezza, larghezza, profondità):
-
Avanzate:7 cm (2,75 in) x 24 cm (9,45 in) x 19 cm (7,48 in).
-
Compact e Compact LTE: 6 cm (2,36 in) x 21 cm (8,27 in) x
19 cm (7,48 in).
7
Classificazione alimentazione PoE Ingresso
AVANZATE
Compatto
Compact
LTE
Max.30 W per ogni porta, ma con un totale
massimo per il sistema di 120 W.
Max.30 W per ogni porta, con un totale massimo
per il sistema di 60 W.
Max.30 W per ogni porta, con un totale massimo
per il sistema di 60 W.
100-240 V c.a., 5060 Hz, 2,5 A
100-240 V c.a., 5060 Hz, 2,5 A
100-240 V c.a., 5060 Hz, 2,5 A
AVVERTENZA: il prodotto contiene una batteria al litio, che può essere sostituita
esclusivamente da personale autorizzato.
ATTENZIONE: sussiste un rischio di esplosione se la batteria viene sostituita con
una di tipo non corretto.Smaltire le batterie usate in conformità alle normative e
ai regolamenti locali vigenti e alle istruzioni.
Output
24 V c.c.,
6,66 A, LPS
19 V c.c.,
6,31 A, LPS
12 V c.c.,
3,33 A, LPS
© 2018 Tyco Security Products. All rights reserved.
Page 96

8
Guida rapida all'impostazione
Contenuto della confezione
l Piattaforma di sicurezza integrata INTEVO
l Cavi di alimentazione
l Guida rapida all'impostazione
l 2 staffe per il montaggio a parete
l Viti, 6 per il modello Advanced; 4 per i modelli Compact e LTE
l Chiavetta USB che contiene: documentazione, strumento di
configurazione, EntraPass, e software video IP
l 4 piedini in plastica
Installazione
Installazione da tavolo
Evitare si bloccare la presa d'aria del dispositivo con altri oggetti.
Installazione con montaggio a parete
1. Fissare le staffe su ciascun lato della custodia con le viti fornite.
2. Fissare al muro l'alloggiamento dell'INTEVO con le staffe fornite utilizzando
4 viti (non incluse nella confezione). È consigliabile utilizzare viti Phillips in
acciaio inossidabile M4.2 x 32 mm (8 x 1,25'') (Spaenaur ST- 631P o
equivalenti). Per il montaggio su pareti in cartongesso, utilizzare 4
ancoraggi in plastica (Spaenaur EX-S5 o equivalenti; non inclusi nella
confezione).
Installazione con montaggio in rack (non incluso)
Precauzioni
l Ambiente operativo elevato: se il dispositivo viene installato in un
assemblaggio chiuso o rack multiunità, la temperatura ambiente operativa
dell'assemblaggio rack potrebbe essere superiore alla temperatura della
camera.Valutare la possibilità di installare gli apparecchi in un ambiente
© 2018 Tyco Security Products. All rights reserved.
Page 97

compatibile con i requisiti di temperatura ambiente massima (Tma)
specificati dal produttore.
l Flusso d'aria ridotto: l'installazione degli apparecchi su un rack deve essere
tale da non compromettere il flusso d'aria necessario per garantire il
corretto funzionamento degli apparecchi.
l Carico meccanico: se il dispositivo viene montato su rack, il montaggio
deve essere tale da non causare pericoli dovuti a un carico meccanico non
livellato.
l Sovraccarico del circuito: considerare con attenzione la connessione degli
apparecchi al circuito di alimentazione e l'effetto che il sovraccarico di tali
circuiti potrebbe avere sulla protezione da sovracorrente e sui cavi di
alimentazione.Nell'affrontare questo problema, prestare particolare
attenzione ai valori riportati sulle targhette presenti sugli apparecchi.
l Collegamento di messa a terra affidabile: mantenere un collegamento di
messa a terra affidabile per il sistema montato su rack.Prestare particolare
attenzione alle connessioni di alimentazione diverse dalle connessioni
dirette al circuito derivato.Ad esempio, quando si utilizzano prese multiple.
Nota: l'altezza massima per il montaggio a parete è di 2 m.
9
© 2018 Tyco Security Products. All rights reserved.
Page 98

10
Connessioni
Procedere con le seguenti connessioni:
1. Collegare il cavo di rete a ETH1/ETH2.
2. Per il modello Compact, collegare il cavo di rete della telecamera alle
3. Collegare una tastiera e un mouse USB a una porta USB sul pannello
Nota: non è possibile usare INTEVO senza un monitor o mouse per l'accesso
remoto.
porte PoE 3-6. Per il modello Advanced, collegare il cavo di rete della
telecamera alle porte PoE 3-6 per le telecamere e alle porte PoE 7-10 per
telecamere e controller.
posteriore del dispositivo, per accedere in locale.
© 2018 Tyco Security Products. All rights reserved.
Page 99

AVANZATE
1
5
3 6
8
10
2
7
9
11
4
Numero Porta
1 Power
2 Porta per la connessione del monitor
3 PoE 3-6 videocamere
4 PoE 7-10 videocamere e controllori
5 Ethernet 2
6 Ethernet 1
7 USB 3.0
8 Porte audio
9 HDMI
10 Serie
11 Pulsante di accensione
11
Pannello posteriore Advanced
© 2018 Tyco Security Products. All rights reserved.
Page 100

12
5
7 8
10
31
2 4 6
9
Compatto
Numero Porta
1 Power
2 Pulsante di accensione
3 Porte audio
4 USB 3.0
5 USB
6 PoE 3-6 videocamere e controllori
7 Ethernet 2
8 Ethernet 1
9 HDMI
10 VGA
Pannello posteriore Compact
© 2018 Tyco Security Products. All rights reserved.
 Loading...