

Page 1
Worldwide
Contacts
www.tyco-fire.com
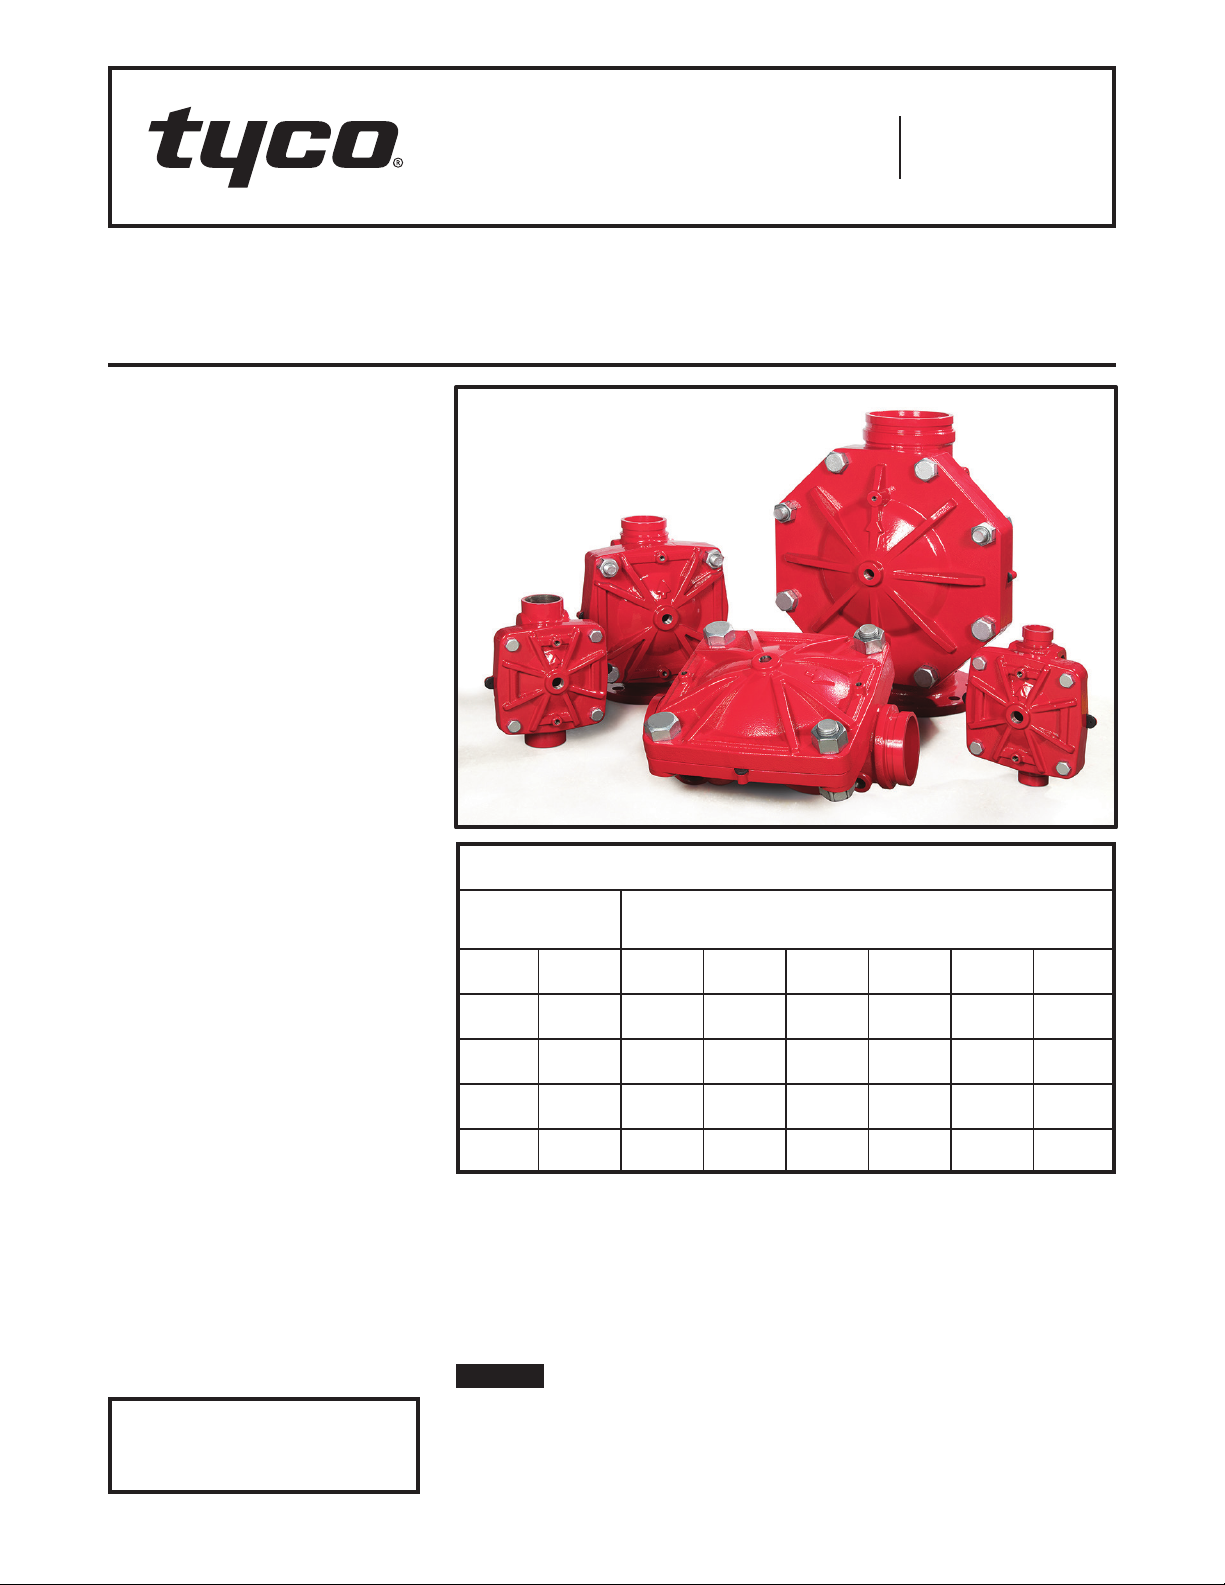
DV-5A Automatic Water Control Valve
Remote-Resetting Deluge Fire Protection Systems
1-1/2 Inch to 8 Inch (DN40 to DN200)
General
Description
The TYCO DV-5A Automatic Water
Control Valves are diaphragm type
valves that can be used in remoteresetting deluge fire protection
systems. When properly trimmed, the
DV-5A Valve with Remote-Resetting
Trim can be opened and closed during
a full-flow condition from a remote
location. Key features are as follows:
• Remote-resetting feature provides
the ability to reset the valve from one
or more locations.
• Compact, space-saving design
reduces valve room footprint and
construction costs.
• Electric actuation is compatible with
many types of automatic and manual
release options.
• Actuation of fire alarms upon system
operation is provided.
The DV-5a Valves are offered with the
DV-5a Valve and separately ordered
semi-assembled trim shown in Figure
6, or, for ease of installation, with the
DV-5a Valve completely trimmed with or
without a System Main Control Valve.
The diaphragm style design of the
DV-5A Valve allows external resetting,
providing for easy resetting of a deluge
system without having to open a valve
handhole cover to manually reposition
a clapper and/or latch mechanism.
Simply re-pressurizing the diaphragm
chamber resets the valve.
Operation of the DV-5A Valve with
Remote-Resetting Trim is provided by
an automatic electric detection system
or remote manual electric activation.
The easily installed trim configuration for the DV-5A Valve with RemoteResetting Trim provides for emergency
(manual) release of the valve at the
valve location.
IMPORTANT
Refer to Technical Data Sheet
TFP2300 for warnings pertaining to
regulatory and health information.
End Connection
Inlet Outlet
Thread Thread
Groove Groove
Flange Groove N/A N/A
Flange Flange N /A N/A
The DV-5A features internal and exter-
nal coating of the valve to provide
corrosion resistance. The external corrosion resistance of the epoxy coating
permits the use of the DV-5A in corrosive atmospheres associated with
many types of industrial processing
plants and outdoor installations.
NOTICE
The DV-5A Valves described herein
must be installed and maintained in
compliance with this document, as
well as with the applicable standards
Available End Connections and Weights — lb/(kg)
Nominal Valve Size
ANSI Inches
(DN)
1-1/2
(40)
26
(11,8 )
25
(11,3 )
2
(50)
25
(11,3 )
25
(11,3 )
3
(80)
N/A N/A N/A N/A
60
(27, 2)
66
(30,0)
72
(32,7 )
4
(100)
95
(4 3,1)
106
(4 8,1)
116
(52,6)
of the NATIONAL FIRE PROTECTION
ASSOCIATION (NFPA), in addition to
the standards of any other authorities
having jurisdiction. Failure to do so
may impair the performance of these
devices.
The owner is responsible for maintaining their fire protection system
and devices in proper operating condition. Contact the installing contractor or product manufacturer with any
questions.
6
(150 )
177
(80,3)
190
(86,2)
204
(92,5)
(200)
327
(148,3)
346
(1 57, 0 )
365
(165,6)
8
Page 1 of 20 DECEMBER 2018 TFP1325
Page 2
TFP1325
Dim. A
Number of
Bolt Holes
VALVES ONLY
3
4
1
Page 2 of 20
Nominal Valve Size ANSI Inch (DN)
Item Description Qty.
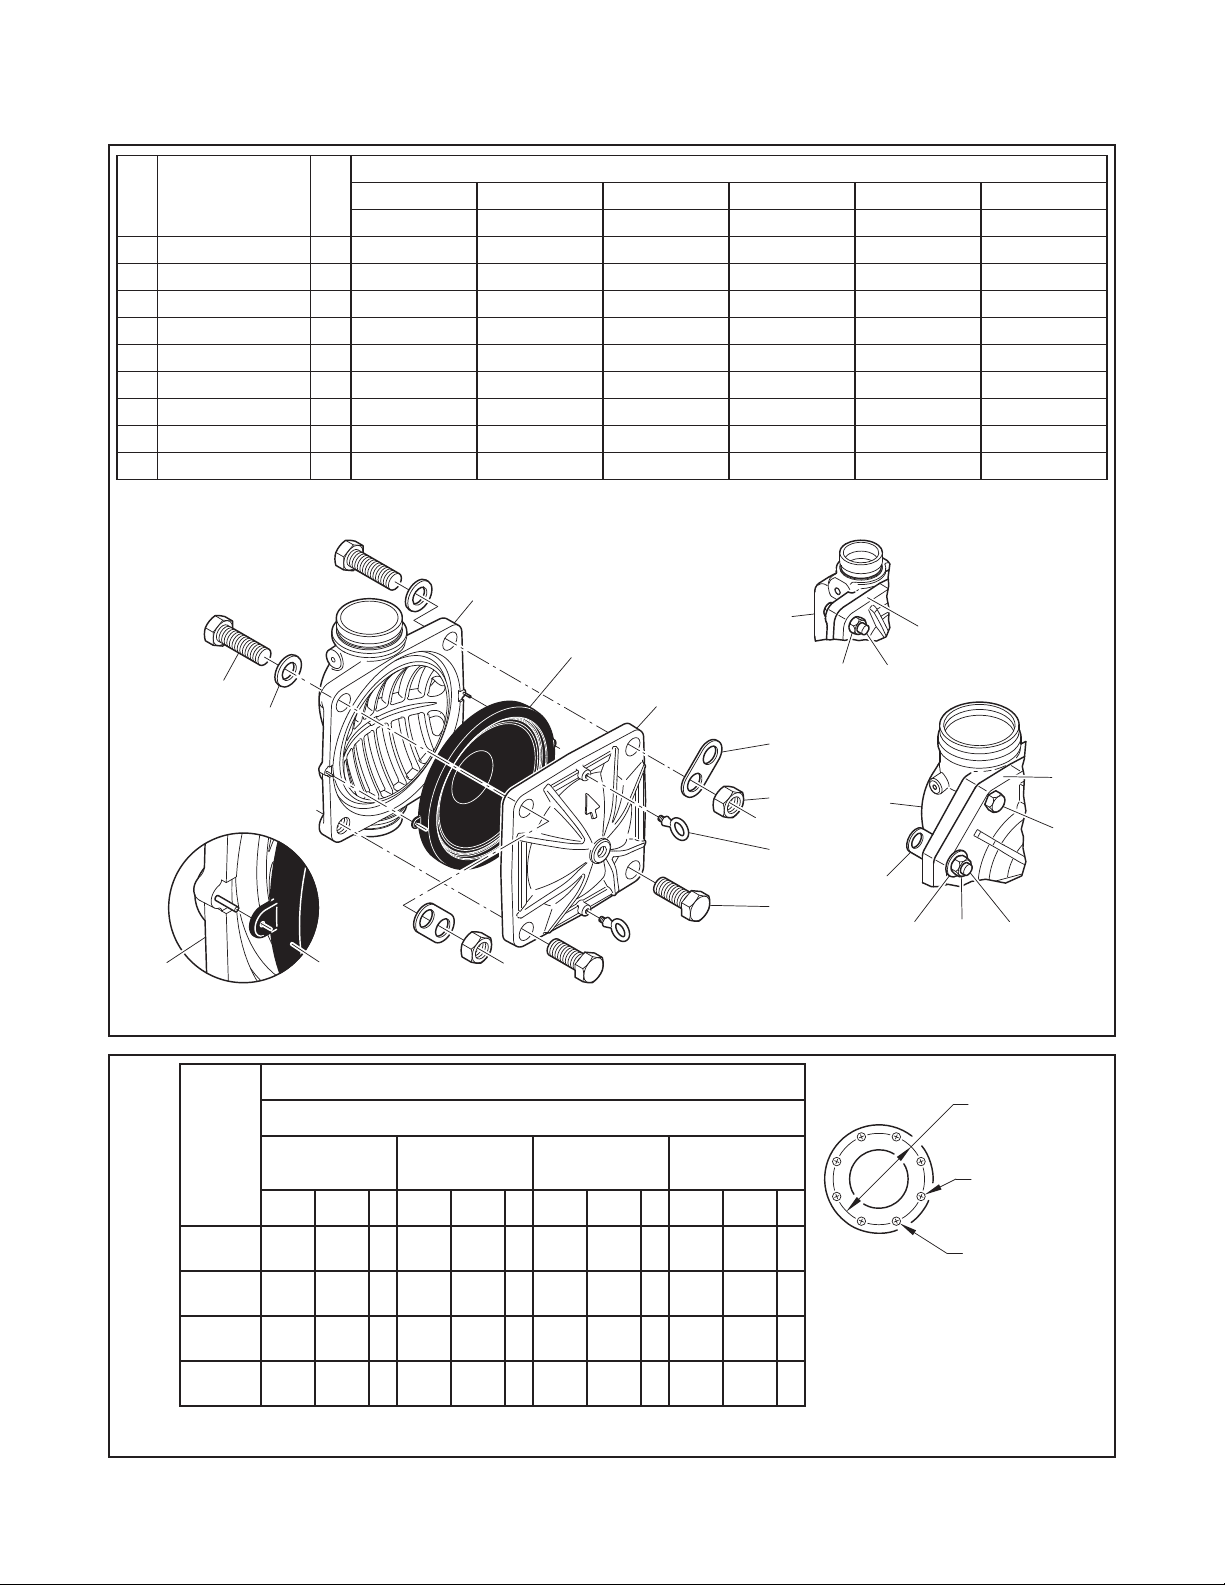
1 Valve Body 1 N/R N/R N/R N/R N/R N/R
2 Diaphragm 1 545000020 545000020 545000030 545000040 545000060 545000080
3 Diaphragm Cover 1 N/R N/R N/R N/R N/R N/R
4 Hex Bolt, Short 2
5 Hex Bolt, Long 2 545100011 545100011 545100012 545100013 545100014 545100015
6 Lift Washer 2
7 Hex Nut 2 545100031 545100031 545100032 545100033 545100034 545100033
8 Hoist Ring 2 545100041 545100041 545100041 545100041 545100041 545100041
9 Flat Washer 2 N/A N/A 545100024 545100025 545100026 545100025
NOTES:
a. Hex Bolt, Short, Qty. 6 in 6 and 8 inch (DN150 and DN200) assemblies
b. Lift Washer not used in 1-1/2 and 2 inch (DN40 and DN50) assemblies
5
9
1-1/2 (D N4 0) 2 (DN50) 3 (DN80) 4 (DN10 0) 6 (DN150) 8 (DN200)
P/N P/N P/N P/N P/N P/N
a
545100001 545100001 545100002 545100003 545100004 545100003
b
N/A N /A 545100021 545100022 545100023 545100022
c. N/R = Not Replaceable
d. Order replacements parts only via Part Numbers given, do not replace
Hex Bolt, Hex Nut, Lift Washer or Hoist Ring with common hardware parts
1
1
3
2
5
7
3
1-1/2 AND 2 INCH
VALVES ONLY
6
Nominal
Valve
Size
ANSI
Inches
(DN)
3
(80)
4
(100)
6
(150 )
8
(200)
2
FIGURE 1
DV-5a VALVE ASSEMBLY AND REPLACEMENT PARTS
Flange Drilling Specification
Nominal Dimensions in Inches and (mm)
ANSI B16.1a
(Class 125)
ISO 7005-2
(PN16)
b
JIS B 2210
(10K)
AS 2129
(Table E )
A B N A B N A B N A B N
6.00
(152,4)
7.50
(190,5)
9.50
(241,3)
11.75
(298,5)
0.75
(19,0)
0.75
(19,0)
0.88
(22,2)
0.88
(22,2)
4
8
8
8
6.30
(160,0)
7.09
(180 ,0)
9.45
(240,0)
11. 61
(295,0)
0.75
(19,0)
0.75
(19,0)
0.91
(23,0)
0.91
(23,0)
8
8
8
12
5.90
(150 ,0)
6.89
(175,0)
9.45
(240,0)
11. 42
(290,0)
0.59
(15,0)
0.60
(15,0)
0.75
(19,0)
0.75
(19,0)
8
8
8
12
5.75
(146,0 )
7.00
178 ,0 )
9.25
(235)
11. 50
(292,0)
0.71
(18,0)
0.71
(18,0)
0.87
(22,0)
0.87
(22,0)
TABLE A
FLANGE DRILLING SPECIFICATIONS
7
8
4
4
8
NOTES:
a. Same dr illing as for
ANSI B16.5 (Cl ass 150) and
8
ANSI B16.42 (Cl ass 150)
b. Sa me drilling as f or
BS 4504 Section 3.2 (PN16) a nd
8
DIN 2532 (PN16)
1
6
5
79
6 AND 8 INCH
Bolt Circle
Diameter
Dim. B
Bolt Hole
Diameter
Qty. N
Page 3
TFP1325
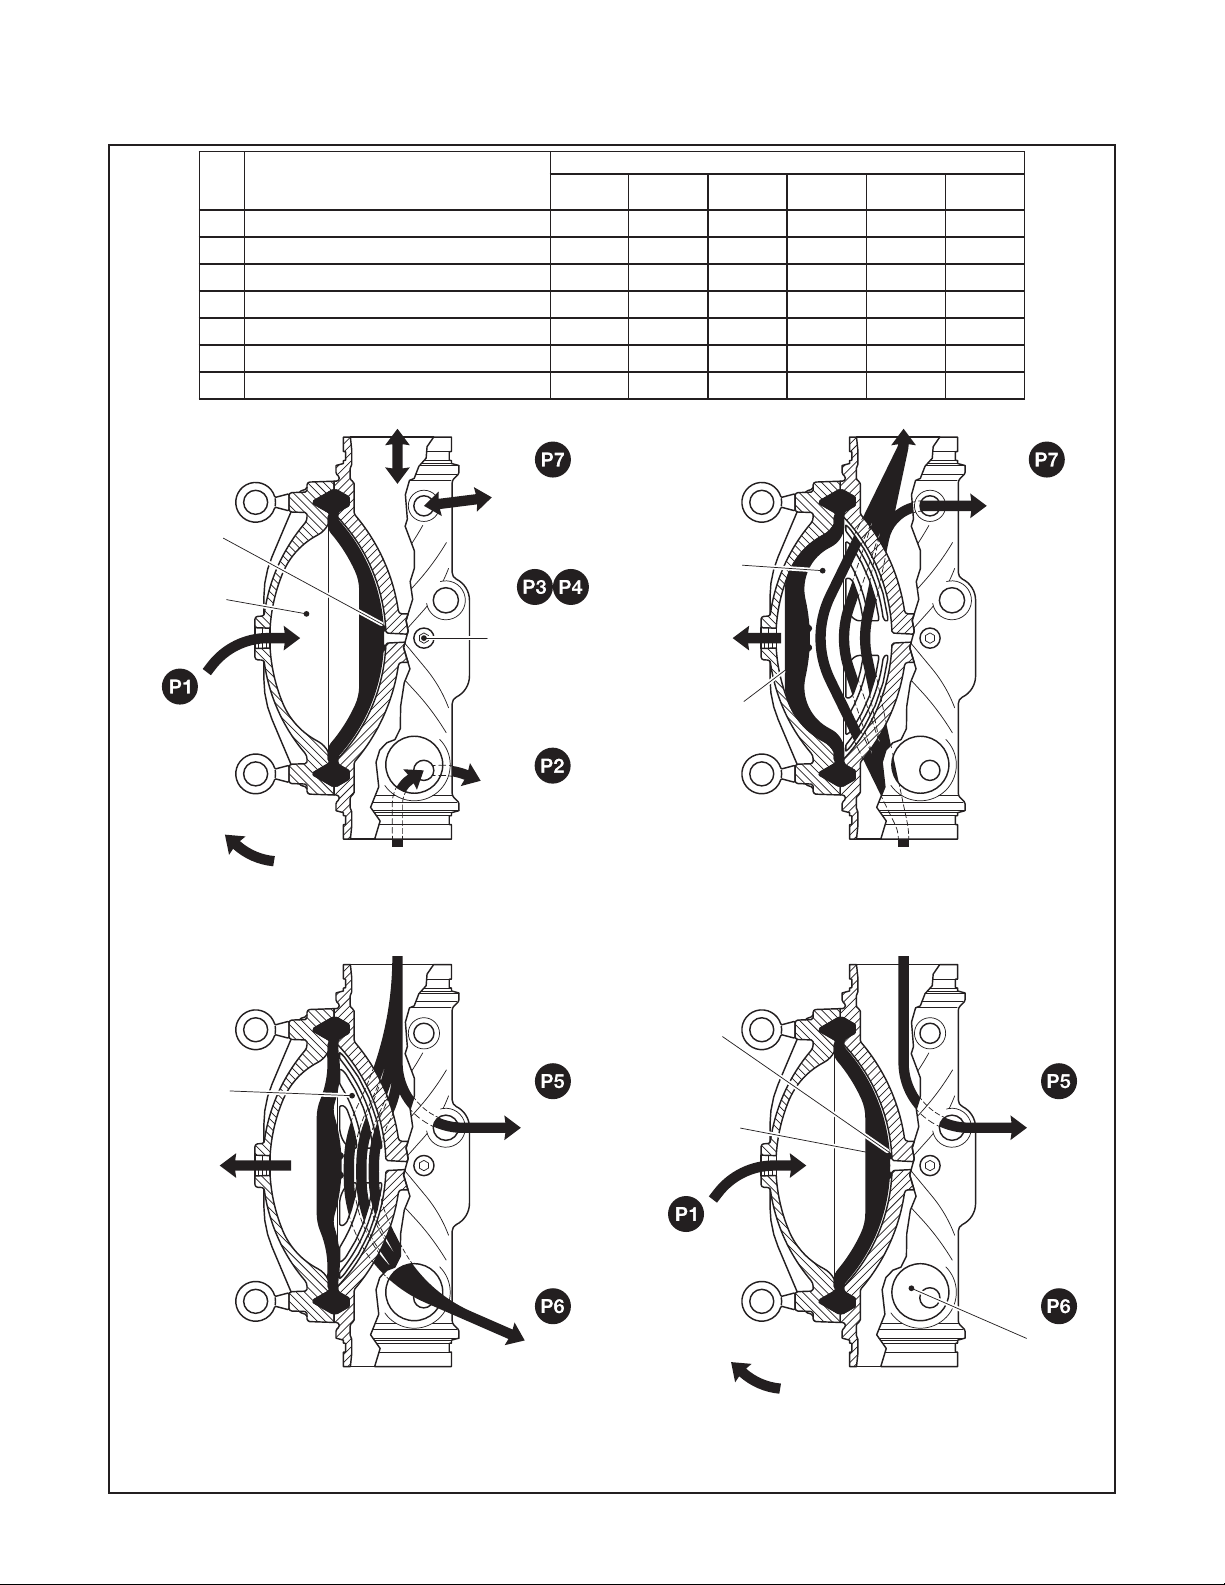
SYSTEM DRAIN CONDITION
SYSTEM OPEN TO ATMOSPHERE
ATMOSPHERE
RESIDUAL DRAIN CONDITION
WATERFLOW TO SYSTEM
DRAIN VALVE
CLOSED AND
WATERFLOW
Page 3 of 20
Port Port Description
P1 Diaphragm Chamber Supply 1/2 1/2 1/ 2 1/2 1/2 1/2
P2 Water Supply Pressure & Alarm Test 1/2 1/2 1/ 2 1/2 1/2 1/2
P3 Not Used 3/4 3/4 3/4 3/4 3/4 3 /4
P4 Not Used 1/2 1/2 1/2 1/2 1/2 1/2
P5 System Drain 3/4 3/4 3/4 3/4 3/4 3 /4
P6 Main Drain 3/4 3/4 1-1/4 2 2 2
P7 Alarm Actuation 1/2 1/2 1/ 2 1/2 1/2 1/2
VALVE
WATERWAY
DIAPHRAGM
SEAT
DIAPHRAGM
CHAMBER
DIAPHRAGM
CHAMBER
SUPPLY
FROM
UPSTREAM
SIDE OF
SHUT-OFF
VALVE
WATER SUPPLY
SET CONDITION
Port Sizes, NPT Inch per ANSI B1.20.1
1-1/2
(DN40)2 (DN50)3 (DN80)4 (DN10 0)6 (DN15 0)8 (DN200)
AUTOMATIC
DRAIN VALVE
OPEN TO
ATMOSPHERE
PLUGGED
FOR REMOTE
RESETTING
DELUGE
SYSTEMS
WATER SUPPLY
PRESSURE &
ALARM TEST
FIGURE 2A FIGURE 2B
VALVE
WATERWAY
DIAPHRAGM
CHAMBER
OPEN TO
ATMOSPHERE
DIAPHRAGM
RETRACTS
OPENING
VALVE
WATERWAY
WATERFLOW FROM WATER SUPPLY
OPERATED CONDITION
AUTOMATIC
TO ALARM
VALVE
WATERWAY
DIAPHRAGM
CHAMBER
OPEN TO
DRAIN FROM SYSTEM
WATER SUPPLY SHUT OFF
SYSTEM
DRAIN
OPEN
MAIN
DRAIN
OPEN
VALVE
WATERWAY
DIAPHRAGM
SEAT
DIAPHRAGM
AUTOMATICALLY
FLEXES TO
ITS SEATED
POSTION
DIAPHRAGM
CHAMBER
SUPPLY
FROM
UPSTREAM
SIDE OF
SHUT-OFF
VALVE
RESIDUAL DRAIN FROM SYSTEM
WATER SUPPLY SHUT OFF
FIGURE 2DFIGURE 2C
FIGURE 2
DV-5a VALVE OPERATION, DELUGE REMOTE-RESETTING SYSTEMS
SYSTEM
DRAIN
OPEN
MAIN
DRAIN
CLOSED
Page 4
TFP1325
DIMENSIONS SHOWN
Page 4 of 20
ARE APPLICABLE TO
ALL END CONNECTION
CONFIGURATIONS
AVAILABLE PER
1-1/2 Inch (DN40)
4 Inch (DN100)
6 Inch (DN150)
8 Inch (DN200)
DV-5a VALVE
TAKE-OUT DIMENSIONS
VALVE SIZE
10-3/16"
(260 mm)
10-3/16"
(260 mm)
2 Inch (DN50)
13-3/4"
(349 mm)
3 Inch (DN80)
16-3/4"
(425 mm)
22-3/8"
(569 mm)
27-7/16"
(697 mm)
FIGURE 3
Technical
Data
Approvals
UL/C-UL Listed
VdS A pproved
Listings and Approvals are based
on DV-5A Valves being trimmed as
described in this technical data sheet
and in conjunction with the use of the
Burkert Type 5282 Solenoid.
For local EMEA regional approvals,
consult with your local distributor.
DV-5A Valve
Components for the 1-1/2 in. to 8 in.
(DN40 to DN200) DV-5A Valves are
shown in Figure 1. The DV-5A Valves
are for vertical installations. They are
rated for use at a service pressures of
20 to 300 psi (1,4 to 20,7 bar).
The take-out dimensions are shown
in Figure 3, and flanged connections are available drilled per ANSI,
ISO, AS, and JIS specifications
(Ref. Table A). Threaded inlet and outlet
connections are available in NPT or
ISO 7/1. Threaded port connections
are NPT threaded.
NOTE: PN16 flanges are pressure rated
to 16 bar.
Valve Trim
The Maximum pressure rating is as
follows:
•
Deluge Remote-Resetting Trim is
232 psi (16 bar) dependent on separately ordered solenoid valve.
When the system pressure is greater
than 175 psi (12,1 bar), provision is to
be made to replace the standard order
300 psi (20,7 bar) Water Pressure
Gauges with separately ordered 600
psi (41,4 bar) Water Pressure Gauges.
If the addition of an Alarm Control
Valve is desired or required by the local
AHJ, the Alarm Control Valve noted as
Item H in Figure 9 is to be a separately
ordered electronically supervised normally open valve.
External trim connections are NPT
threaded. EMEA trim is provided with
NPT x ISO 7/1 thread adapters.
For 8 in. VdS approved Deluge RemoteResetting Trim, the maximum velocity
for this valve application is 7.5 m/s.
Pressure Loss
Refer to Graph A
Materials of
Construction
Body
Epoxy coated ductile iron per ASTM
A536-77, Grade 65-45-12
Handhole Cover
Epoxy coated ductile iron per ASTM
A536-77, Grade 65-45-12
Diaphragm
Polyester fabric reinforced, TEFLON
coated, EPDM rubber per ASTM D2000
Diaphragm Cover Fasteners
Aluminum zinc coated steel
Common Hardware Trim
•
Common hardware pipe ttings are
galvanized or black as required and
are malleable per ASME B16.3.
•
Common hardware pipe nipples are
galvanized or black as required and
are Schedule 40 per ASTM A53 or
A135.
•
Common hardware compression
ttings are brass per ASTM B16.
•
Common hardware tubing is Type L
copper per ASTM B88.
Design
Criteria
The following items must be considered and applied accordingly for T YCO
DV-5A Valve with Remote-Resetting
Trim installations.
NOTICE
The owner is responsible to design into
the system a releasing circuit such that
a Solenoid Valve is properly configured
to enable remote resetting.
The building owner must be informed
of the capabilities and limitations of
a remote-resetting system as it pertains to the possibility of an inadvertent remote closing of the DV-5A Valve
during a fire condition. Therefore, personnel responsible for the fire protection system must be fully trained
on system components and required
actions in the case of an alarm.
The Control Panel, Detectors, and Pull
Stations are to be installed in accordance with their laboratory listings and
approval.
System piping is to be installed so that
it is self-draining. TYCO Model AD-2
Automatic Drain Valves can be used
to drain low sections of pipe as necessary. For more information, refer to
Technical Data Sheet TFP1632.
Page 5

9.0
NOMINAL PRESSURE DROP IN BAR
(1 PSI = 0,06895 BAR)
FLOW RATE IN LITERS PER MINUTE (LPM)
NOMINAL PRESSURE DROP IN POUNDS PER SQUARE INCH (PSI)
FLOW RATE IN GALLONS PER MINUTE (GPM)
8.0
7.0
6.0
5.0
4.0
(1 GPM = 3,785 LPM)
TFP1325
Page 5 of 20
50002000 3000 1000070001000600400200
15000
0,600
0,500
0,400
0,300
3.0
2.0
1.0
0.9
0.8
0.7
0.6
0.5
0.4
0.3
1-1/2 INCH (DN40)
2 INCH (DN50)
3 INCH (DN80)
4 INCH (DN100)
200 400 1000 3000200060010050
GRAPH A
DV-5a VALVE
NOMINAL PRESSURE LOSS VERSUS FLOW
6 INCH (DN150)
8 INCH (DN200)
0,200
0,100
0,090
0,080
0,070
0,060
0,050
0,040
0,030
0,022
4000
Page 6
TFP1325
SYSTEM PIPING WITH OPEN NOZZLES OR SPRINKLERS - NORMALLY DRY
SUPPLY CONNECTION
SUPPLY
Page 6 of 20
DELUGE VALVE
RELEASING PANEL
(AUTOMATIC
CONTROL UNIT
WITH BATTERY
BACK-UP)
POWER
SUPPLY
(TYPICALLY
120 VOLTS AC)
ELECTRIC DETECTION SYSTEM
(TYPICALLY 24 VOLTS DC)
HEAT DETECTORS, SMOKE DETECTORS,
MANUAL PULL STATIONS, ETC.
WATERFLOW
PRESSURE
ALARM
SWITCH
DIAPHRAGM CHAMBER
PRESSURE GAUGE
DV-5A
VALVE
DRAIN
SOLENOID
VALVE
(TYPICALLY
24 VOLTS DC)
SYSTEM DRAIN VALVE
(NORMALLY CLOSED)
MAIN
DRAIN VALVE
DRAIN
(NORMALLY
CLOSED)
RESTRICTION
DIAPHRAGM
CHAMBER SUPPLY
CONTROL VALVE
(NORMALLY OPEN)
DIAPHRAGM CHAMBER
FIGURE 4
DV-5a VALVE
REMOTE-RESETTING SCHEMATIC DIAGRAM
Operation
The TYCO DV-5a Valve is a diaphragm
style valve that depends upon water
pressure in the Diaphragm Chamber
(Ref. Figure 2A) to hold the Diaphragm
closed against the water supply
pressure.
When the DV-5A Valve with RemoteResetting Trim is set for service, the
Diaphragm Chamber is pressurized
through the trim connections from the
inlet side of the system’s main control
valve.
With reference to Figure 4, initial activation of the Solenoid Valve due to
noid Valve. Opening of the Solenoid
Valve in the Remote-Resetting Trim
releases water from the Diaphragm
Chamber faster than it can be replenished through the Restriction in the
Diaphragm Chamber Supply Connection provided in the trim. This release
results in a rapid pressure drop in the
Diaphragm Chamber, and the force
differential applied through the Diaphragm that holds it in the set position
is reduced below the valve trip point.
The water supply pressure then forces
the Diaphragm open, permitting water
to flow into the system piping, as well
as through the Alarm Port to actuate
system alarms.
electrical detection or activation of the
electrical manual pull station results
in the latched opening of the Sole-
WATER SUPPLY
PRESSURE
GAUGE
LOCAL
MAIN
OPEN)
MANUAL
CONTROL
STATION
DRAIN
WATER
DRAIN
CONTROL VALVE
(NORMALLY
To remotely reset the DV-5a Valve,
the voltage to the Solenoid Valve
must be transferred to the appropriate terminals of the Solenoid Valve
(Ref. Figure 5) resulting in the latched
closure of the Solenoid Valve. Closing
of the Solenoid Valve in the RemoteResetting Trim permits the Diaphragm
Chamber to repressurize. This repressurizing results in a pressure increase
in the Diaphragm Chamber. The resulting force repressurizes the Diaphragm
Chamber, closing the valve and stopping the flow of water into the system
piping.
Page 7

DC CONNECTIONS:
1
2
4
3
TERMINAL 1 = CLOSED +
TERMINAL 2 = OPEN +
TERMINAL 3 = GND -
TERMINAL 4 = PROTECTIVE
CONDUCTOR CONNECTION
NOTICE
Note the voltage and current type as specified on the rating plate. The connection terminals in the device socket are identified with the numbers 1 to 3
according to the terminals on the valve.
FIGURE 5
BÜRKERT SOLENOID VALVE
CIRCUIT DIAGRAM
TFP1325
Page 7 of 20
Installation
The TYCO DV-5a Valve is to be installed
in accordance with this section.
NOTICE
Proper operation of the DV-5a Valves
depends upon their trim being installed
in accordance with the instructions
given in this technical data sheet.
Failure to follow the appropriate trim
diagram may prevent the DV-5a Valve
from functioning properly, as well as
void approvals and the manufacturer’s
warranties.
The DV-5a Valve must be installed in a
readily visible and accessible location.
The DV-5a Valve and associated trim
must be maintained at a minimum temperature of 40°F (4°C).
Heat tracing of the DV-5a Valve or its
associated trim is not permitted. Heat
tracing can result in the formation of
hardened mineral deposits that are
capable of preventing proper operation.
The DV-5a Valve is to be installed in
accordance with the following criteria:
Step 1. All nipples, fittings, and devices
must be clean and free of scale and
burrs before installation. Use pipe
thread sealant sparingly on male pipe
threads only.
Step 2. The DV-5a Valve must be
trimmed in accordance with Figure 6.
Note: If the addition of an Alarm Control
Valve is desired or required by the local
AHJ, the Alarm Control Valve noted as
Item H in Figure 9 is to be a separately
ordered electronically supervised normally open valve.
Step 3. Care must be taken to ensure
that check valves, strainers, globe
valves, etc. are installed with the flow
arrows in the proper direction.
Step 4. Drain tubing to the Drip Funnel
must be installed with smooth bends
that will not restrict flow.
Step 5. The Main Drain and Drip Funnel
Drain may be interconnected provided
a check valve is located at least 12 in.
(300 mm) below the Drip Funnel.
Step 6. Suitable provision must be
made for disposal of drain water. Drainage water must be directed such that
it will not cause accidental damage to
property or danger to persons.
Ste p 7. Connect the Diaphragm Supply
Valve to the inlet side of the System
Main Control Valve in order to facilitate setting of the DV-5a Valve. Refer
to Figure 9.
NOTICE
The connection to the Diaphragm
Supply Valve should be as short as
practical and from the same water
supply as the system.
Step 8. Unused Pressure Alarm Switch
connection must be plugged.
Step 9. Conduit and electrical connections are to be made in accordance
with the applicable standards of the
approval agency.
Step 10. Before a system hydrostatic
test is performed, the DV-5a Diaphragm
Chamber is to be depressurized, the
Automatic Drain Valve is to be temporarily replaced with a plug, and the
Diaphragm Cover Bolts must be uniformly and securely tightened using a
cross-draw sequence. After tightening, double-check to make certain that
all of the Diaphragm Cover Bolts are
securely tightened. Refer to Table B in
the Care and Maintenance section for
torque specifications.
Page 8

TFP1325
Page 8 of 20
A2
C3
C2
P7
P5
P4
A
C
E
A6
P6
A4
P1
43
A1
C4
B
42
C5
46
P3
P2
A3
D
F
G
Assemble in order
from A to G
A4
A5
A7
A8
NOTES:
1. Port Connections P1 through P7 are described in Figure 2.
2. External Trim Connections C1 through C5 are described in Figure 9.
3. When ordering pre-assembled "DV-5A Valve with Galvanized Valve Trim" or pre-assembled "DV-5A Valve with Galvanized Valve Trim and Buttery
Valve", Items A1 through A9 are provided, as applicably related to valve size, and Item A6 is provided as P/N 2460566 described in Technical Data Sheet
TFP2180.
4. When ordering DV-5A Trim separately from the DV-5A Valve, Items A1 through A9 are separately ordered, as applicably related to valve size. Water
Pressure Gauges for EMEA valve trim are also separately ordered.
NIPPLE 1-1/2 IN. (DN4 0) 2 IN. (DN50) 3 IN. ( DN80) 4 IN. (DN100) 6 IN. (DN15 0) 8 IN. (DN20 0)
44 1/2" x 2" 1/2" x 2" 1/2" x 2" 1/ 2" x 5" 1/2" x 6-1/2" 1/2" x 6-1/2"
45 1/2" x 3" 1/2" x 3" 1/2 " x 1-1/2" 1/2 " x 1-1/2" 1/2 " x 1-1/2" 1/2" x 2"
48 1/2 " x 3-1/2" 1/2 " x 3-1/2" 1/2 " x 4-1/2" 1/2 " x 5-1/2" 1/2 " x 5-1/2" 1/2" x 6-3/4"
1-1/2" (DN40) AND 2" (DN50)
VALVES ONLY
A9
NIPPLE S ELECTION PER VALVE SIZE
C1
FIGURE 6
DV-5A VALVES
REMOTE-RESETTING TRIM
SEMI-ASSEMBLED
Page 9

TFP1325
VALVES ONLY
Page 9 of 20
25
34
33
27
5
31
A7
16
46
23
21
26
A2
32
6
C3
44
15
29
37
P7
P5
P4
19
41
17
49
28
32
13
A6
9
P6
P3
P1
P2
A4
50
18
1
A3
43
A1
33
22
48
30
33
7
6
C4
17
36
8
32
32
27
40
33
50
22
52
42
26
4
51
14
32
25
A4
A5
C1
A8
33
5
A9
1-1/2" (DN40) AND 2" (DN50)
C2
20
25
32
47
24
45
39
26
3
10
35
26
2
C5
12
11
38
NOTES:
1. Port Connections P1 through P7 are described in Figure 2.
2. External Trim Connections C1 through C5 are
described in Figure 9.
3. When ordering pre-assembled "DV-5A Valve
with Galvanized Valve Trim" or pre-assembled "DV-5A Valve with Galvanized Valve Trim
and Buttery Valve", Items A1 through A9
are provided, as applicably related to valve
size, and Item A6 is provided as P/N 2460566
described in Technical Data Sheet TFP2180.
4. When ordering DV-5A Trim separately from
the DV-5A Valve, Items A1 through A9 are
separately ordered, as applicably related to
valve size. Wate r Pressure Gauges for EMEA
valve trim are also separately ordered.
ITEM QT Y DESCRIPTION CH 1-1/2 IN. (DN4 0) 2 IN. (DN50) 3 IN. (DN80) 4 IN. (DN10 0) 6 IN. (DN150) 8 IN. (DN200)
1 1 1/4” G AUGE TEST VALVE 460051003 460051003 460051003 460051003 460051003 460051003
2 1 MC-2 MANUAL CONTROL STATION 545002000 545002000 545002000 545002000 545002000 545002000
3 1 AD-3 AUTOMATI C DRAIN VALVE 547932004 547932004 547932004 547932004 547932004 547932004
4 1 PRIMING SUPPLY RESTRICTION 545100051 54 51000 51 5 45100 051 5 45100 051 54510 0051 54 51000 51
5 2 1/2” BALL VALVE 460 50100 4 460 501004 460501004 460 501004 460 501004 460 50100 4
6 2 1/2” SWING CHECK VALVE 460 491007 460 491007 460491007 460491007 460 491007 46 049100 7
7 1 1/2” Y-STRA INER 523531006 523 531006 523 531006 523 531006 523 531006 523 53100 6
8 1 3/4” ANGLE VALVE 460 481010 460 481010 460481010 460481010 46 0481010 46 0481010
9 1 ANGLE VALVE 460 481010 460 481010 460481011 460481012 460481012 460481012
10 1 DRIP FUNNEL BRACKET CONNECTOR 9 22111 00 5 9 22111 00 5 9 22111 00 5 9 22111 00 5 9 221110 05 9221110 05
11 1 DRIP FUNNEL BR ACKET 92 21110 03 92 21110 03 92 21110 03 9 2211100 3 9 22111 00 3 9 221110 03
12 1 DRIP FUNNEL 9 234310 07 92 343100 7 923431007 923431007 923 431007 92 343100 7
13 1 COMP. FIT TING 90° 1/2” MN PT x 1/2” OD TUBE
14 1 CO MP. FIT TING 90° 1/2” FNPT x 1/2” O D TUBE
15 1 FL ARE FITTI NG 1/2” NPT x 1/2” TUBE 545100061 545100061 545100061 5451000 61 5451000 61 54510 0061
16 1 FL ARE FITTIN G 90° 1/2" NPT x 1/2" TUBE 545100062 545100062 545100062 5451000 62 545100062 545100062
17 2 FLARE FITTING 3/4" NPT x 3/4" TUBE 545100063 545100063 545100063 545100 063 545100063 545100063
18 1 PIPE PLUG
19 1 SOC KET HEAD PIPE PLUG
✓
✓
✓
✓
— — — — — —
— — — — — —
1/4" 1/4" 1/4" 1/4" 1/4" 1/4"
1/2" 1/2" 1/ 2" 1/2 " 1/2" 1/2"
FIGURE 7 (1 OF 2)
DV-5A VALVES — REMOTE-RESETTING TRIM — EXPLODED VIEW
Page 10

TFP1325
Page 10 of 20
ITEM QT Y DESCRIPTION CH 1-1/2 IN. (DN4 0) 2 IN. (DN50) 3 IN. (DN80) 4 IN. (DN10 0) 6 IN. (DN150) 8 IN. (DN200)
20 1 PIPE PLUG
21 1 SOCKE T HEAD PIPE PLUG
22 2 UNION
23 1 STREET ELBOW
24 1 ELBOW
25 3 ELBOW
26 4 TEE
27 2 REDUCING TEE
28 1 REDUCING TEE
29 1 REDUCING TEE
30 1 REDUCING TEE
31 1 PIPE NIPPLE
32 6 PIPE NIPPLE
33 5 PIPE NIPPLE
34 1 PIPE NIPPLE
35 1 PIPE NIPPLE
36 1 PIPE NIPPLE
37 1 PIPE NIPPLE
38 1 TUBING, MC-2 DRAIN 535000720 535000720 535000730 535000740 535000760 535000780
39 1 TUBING, SOLENOID DRAIN 535000820 535000820 535000830 535000840 535000860 535000880
40 1 TUBING ASSY, AL ARM TEST INTE RCONNECT 535000920 535000920 535000930 535000940 535000960 535000980
41 1 TU BING ASSY, SYSTEM DRAI N 535000420 535000420 535000430 535000440 535000460 535000480
42 1 PIPE NIPPLE
43 1 PIPE NIPPLE
44 1 PIPE NIPPLE
45 1 PIPE NIPPLE
46 1 PIPE NIPPLE
47 1 PIPE NIPPLE
48 1 PIPE NIPPLE
49 1 PIPE NIPPLE
50
51 1 LABEL 545003002 5450030 02 545003002 545003002 545003002 545003002
52 1 LABEL W IRE — — — — — —
A1 1 DV-5A VALV E
A2
A3
A4
A5 1 GROOVE x THRE ADED OUTLE T WELDED TEE 54-500-4-000 54-500 -4-001 — — — —
A6 1 SOLENOID VALV E (SEPAR ATELY ORDERED) 2460566 2460566 2460566 2460566 2460566 2460566
A7 1 FLARE FIT TING 90° 545100062 545100062 545100054 5451000 62 545100062 545100062
A8 1 FLARE FIT TING 90° 1/2” NPT x 1/2” TUBE 545100062 545100062 545100062 5451000 62 545100062 545100062
A9 1 TUBING ASSY, DIAPHRAGM CHAMBER SUPPLY 535000115 535000120 535000130 535000140 535000160 535000180
WATER PRESSURE GAUGE, 300 PS I / 2000 kPa
2
(AMER/APAC)
WATER PRESSURE GAUGE, 20 bar / 20 00 kPa
2
(EMEA)
WATERFLOW PRESSURE ALARM SW ITCH,
1
PS10-2 (AMER/APAC)
WATERFLOW PRESSURE ALARM SW ITCH,
1
PS10-1 (EMEA)
1 BUTTERFLY VALVE, G x G 51024 A 510 21A — — — —
1 BFV-300 BU TTERFLY VALVE, G x G — — 59300G030WS 59300G040WS 59300G060WS 59300G080WS
2 FIGURE 577 RIGID GROOVED COUPLING 57715A CP 57720ACP — — — —
1 FIGURE 577 RIGID GROOVED COUPLING — — 5773 0ACP 5774 0AC P 57760ACP 57780ACP
NOTE:
CH - Common Hardware - Refer to Materials of Construction section for specications.
3/4" 3/4" 3/4" 3 /4" 3 /4" 3 /4"
✓
3/4" 3/4" 3/4" 3 /4" 3 /4" 3 /4"
✓
1/2" 1/2" 1/ 2" 1/2 " 1/2" 1/2"
✓
1/4" x 90° 1/4" x 90° 1/4" x 90° 1/4" x 90° 1/4" x 90° 1/4" x 90°
✓
1/2" x 45° 1/2" x 45° 1/2" x 45° 1/2" x 45° 1/2" x 4 5° 1/2" x 45°
✓
1/2" x 90° 1/2" x 90 ° 1/2" x 90° 1/2" x 90° 1/2" x 9 0° 1/2" x 90°
✓
1/2" 1/2" 1/ 2" 1/2 " 1/2" 1/2"
✓
1/2" x 1/2" x 1/4" 1/2" x 1/2" x 1/4" 1/2" x 1/2" x 1/4" 1/2" x 1/2" x 1/4" 1/2" x 1/2" x 1/4" 1/2" x 1/2" x 1/4"
✓
1/2" x 1/2" x 3/4" 1/2" x 1/2" x 3/4" 1/2" x 1/2" x 3/4" 1/2" x 1/2" x 3/4" 1/2" x 1/2" x 3 /4" 1/2" x 1/2" x 3/4"
✓
3/4" x 1/2" x 3/4" 3/4" x 1/2" x 3/4" 3/4" x 1/2" x 3/4" 3/4" x 1/2" x 3/4" 3 /4" x 1/2" x 3/4" 3/4" x 1/2" x 3/4"
✓
3/4" x 3/4" x 3/4" 3/4" x 3/4" x 3/4"
✓
1/4" x 1-1/2" 1/4" x 1-1/2" 1/4" x 1-1/2" 1/4" x 1-1/2" 1/4" x 1-1/2" 1/4" x 1-1/2"
✓
1/2" x CLOSE 1/2" x CLOSE 1/2" x CLOSE 1/2" x CLOSE 1/2" x CLOSE 1/2" x C LOSE
✓
1/2" x 1-1/2" 1/2" x 1-1/2" 1/2" x 1-1/2" 1/2" x 1-1/2" 1/2" x 1-1/2" 1/ 2" x 1-1/2"
✓
1/2" x 2" 1/2" x 2" 1/2" x 2" 1/2" x 2" 1/2" x 2" 1/2" x 2"
✓
1/2" x 2-1/2" 1/2" x 2-1/2" 1/2" x 2-1/2" 1/2" x 2-1/2" 1/2" x 2-1/2" 1/ 2" x 2-1/2"
✓
3/4" x 1-1/2 " 3/4" x 1-1/2" 3/4" x 1-1/ 2" 3/4" x 1-1/2" 3/4" x 1-1/2" 3 /4" x 1-1/2"
✓
3/4" x 2" 3/4" x 2" 3/4" x 2" 3/4" x 2" 3 /4" x 2" 3/4" x 2"
✓
1/2" x 2" 1/2" x 2" 1/2" x 2" 1/2" x 5" 1/ 2" x 6-1/2 " 1/2" x 6 -1/2"
✓
1/2" x 3" 1/2" x 3" 1/2" x 1-1/2" 1/2" x 1-1/2" 1/2" x 1-1/2" 1/2" x 2”
✓
1/2" x 3-1/4" 1/2" x 3-1/4" 1/2" x 3-1/4" 1/2" x 4-1/2" 1/2" x 4-1/2" 1/ 2" x 3-1/4"
✓
1/2" x 3-1/2" 1/2" x 3-1/2" 1/2" x 3-1/2" 1/2" x 4" 1/2" x 6-3/4" 1/2" x 6-3/4"
✓
1/2" x 3-1/2" 1/2" x 3-1/2" 1/2" x 4-1/2" 1/2" x 5-1/2" 1/2" x 5-1/2" 1/2" x 6- 3/4"
✓
1/2" x 6" 1/2" x 6" 1/2" x 6 -3/4" 1/ 2" x 9-1/2" 1/ 2" x 9-1/2 " 1/2" x 9 -1/2"
✓
3/4" x 4-1/2" 3/4" x 4-1/2" 1-1/4" x 3-1/4" 2" x 3" 2" x 3" 2" x 3"
✓
3/4" x 6-1/2" 3/4" x 6-1/ 2" 1-1/4" x 5-1/2" 2" x 5" 2" x 6" 2" x 8"
✓
923 431005 923 431005 923431005 923 431005 923 431005 923 43100 5
025500013 025500013 025500013 025500013 025500013 025500013
25710 25710 25710 25710 25710 25710
0260 0260 0260 0260 0260 0260
1-1/4" x 1-1/4" x 3/4"
REFER TO TABLE E FO R DV-5A VALVE PART NUMBERS.
2" x 2" x 3/4" 2" x 2" x 3/4" 2" x 2" x 3/4"
DV-5A VALVES — REMOTE-RESETTING TRIM — EXPLODED VIEW
FIGURE 7 (2 OF 2)
Page 11

Nominal
DCB
J
Valve
Size
ANSI
Inches
(DN)
1-1/2
(40)
2
(50)
3
(80)
4
(100)
6
(150 )
8
(200)
NOTES:
1. Dimensions based on drain valves being open.
2. Dimensions do not provide installation clearance.
A
A B C D E F G H J
2.8
(71)
2.8
(71)
3.0
(76)
3.0
(76)
4.5
(114)
5.3
(135 )
11. 0
(279)
11. 0
(279)
11. 0
(279)
12.7
(323)
13.5
(343)
16.7
(424)
10.4
(264)
10.4
(264)
12.0
(305)
13 .1
(333)
15.0
(381)
17. 2
(437)
14.7
(373)
14.7
(373)
15.3
(389)
16.7
(424)
18.6
(472)
19.4
(493)
Inches (mm)
16.8
(427)
16.8
(427)
19.9
(505)
22.3
(566)
26 .1
(663)
30.6
(777)
7.3
(185 )
7.3
(185 )
5.8
(147 )
5.1
(130 )
3.3
(84)
2.9
(74)
10.2
(259)
10.2
(259)
13.8
(351)
16.8
(427)
22.4
(569)
27.5
(699)
8.0
(203)
3.8
(97)
3.9
(99)
4.5
(114)
5.9
(150 )
5.2
(132)
TFP1325
Page 11 of 20
1.2
(30)
2.9
(74)
3.6
(91)
4.3
(109 )
5.7
(145)
6.7
(170)
E
G
H
F
FIGURE 8
DV-5A VALVE
REMOTE-RESETTING TRIM
NOMINAL DIMENSIONS
Page 12

TFP1325
Page 12 of 20
Valve Setting
Procedure
Perform Steps 1 through 13 when initially setting the TYCO DV-5A Valve with
Remote-Resetting Trim for service or
after an operational test of the fire protection system ( Ref. Figure 9).
Step 1. Close the System Main Control
Valve (B).
Step 2. Close the Diaphragm Supply
Valve (P).
Step 3. Open the Main Drain Valve
(D) and System Drain Valve (E). Close
the System Drain Valve (E) after water
ceases to discharge. Leave the Main
Drain Valve (D) open.
At this time make certain that the
Pressure Gauge Valves and the Alarm
Control Valve (H), as applicable, are
open.
Step 4. Depress the plunger of the
Automatic Drain Valve (F) to verify that
it is open.
Step 5. Clean the Diaphragm Supply
Strainer (Q) by removing the cleanout plug and strainer basket. The Diaphragm Supply Strainer (Q) may be
flushed out by momentarily opening
the Diaphragm Supply Valve (P).
Step 6. Reset the electric detection
system in accordance with the manufacturer’s instructions to de-energize
the solenoid valve.
Ste p 7. Operate (open) the Manual
Control Station (M) and then open
the Diaphragm Supply Valve (P). After
unaerated water ceases to discharge
from the Manual Control Station (M)
drain tube, slowly close the operating
lever by pushing it up. Do not close the
hinged cover at this time.
Step 8. Inspect drain connections from
the Manual Control Station and Solenoid Valve. Before proceeding to the
next step, correct any leaks.
Step 9. Verify the ability for the DV-5A
Diaphragm to hold pressure as follows:
• With the diaphragm chamber pressurized per Step 7, temporarily close
the Diaphragm Supply Valve (P), and
then observe the Diaphragm Gauge
(K) for a drop in pressure.
• If a drop in pressure is noted, the
DV-5A Diaphragm is to be replaced
and/or any leaks must be corrected
before proceeding to the next step.
• If the Diaphragm Gauge (K) indicates
no drop in pressure, re-open the Diaphragm Supply Valve (P) and proceed to the next step.
Step 10. Partially open the System
Main Control Valve (B). Slowly close the
Main Drain Valve (D) as soon as water
discharges from the Main Drain Valve
(D). Observe the Automatic Drain Valve
(F) for leaks. If there are leaks, determine/correct the cause of the leakage
problem before proceeding.
NOTICE
When the System Main Control Valve
(B) is partially opened, the pressure on
the DV-5A Diaphragm Chamber may
increase. This increase in pressure is
normal, and if the pressure is greater
than the valve trim maximum pressure
rating provided in the Technical Data
section, the pressure is to be relieved
to at least the valve trim pressure rating
by partially and temporarily opening the
Manual Control Station (M); however,
do not allow the pressure as indicated
on the Diaphragm Gauge (K) to drop
below the supply pressure shown on
the Water Supply Gauge (J), since
this action may result in tripping of the
DV-5A Valve.
Step 11. Close the hinged cover of the
Manual Control Station Valve (M) and
insert a new break rod in the small hole
through the top of the enclosing box.
Step 12. Fully open the System Main
Control Valve (B).
Step 13. After setting a fire protection system, notify the proper authorities and advise those responsible for
monitoring proprietary and/or central
station alarms.
Page 13

TFP1325
Page 13 of 20
Item Description
A
DV-5A Valve
B
System Main Control Valve
C
Waterow Pressure Switch
D
Main Drain Valve
E
System Drain Valve
F
Automatic Drain Valve
G
Alarm Test Valve
H
Alarm Control Valve (Optional)
P7
Item Description
J
Water Supply Gauge
K
Diaphragm Gauge
L
(Not Used)
M
Manual Control Station
N
Solenoid Valve
P
Diaphragm Supply Valve
Q
Diaphragm Supply Strainer
P4
P5
P6
External Trim Connections
C1
Diaphragm Supply Connection
C2
Water Motor Alarm Connection
C3
Waterow Pressure Alarm
Switch Connection
C4
Main Drain Connection
C5
Drip Funnel Drain Connection
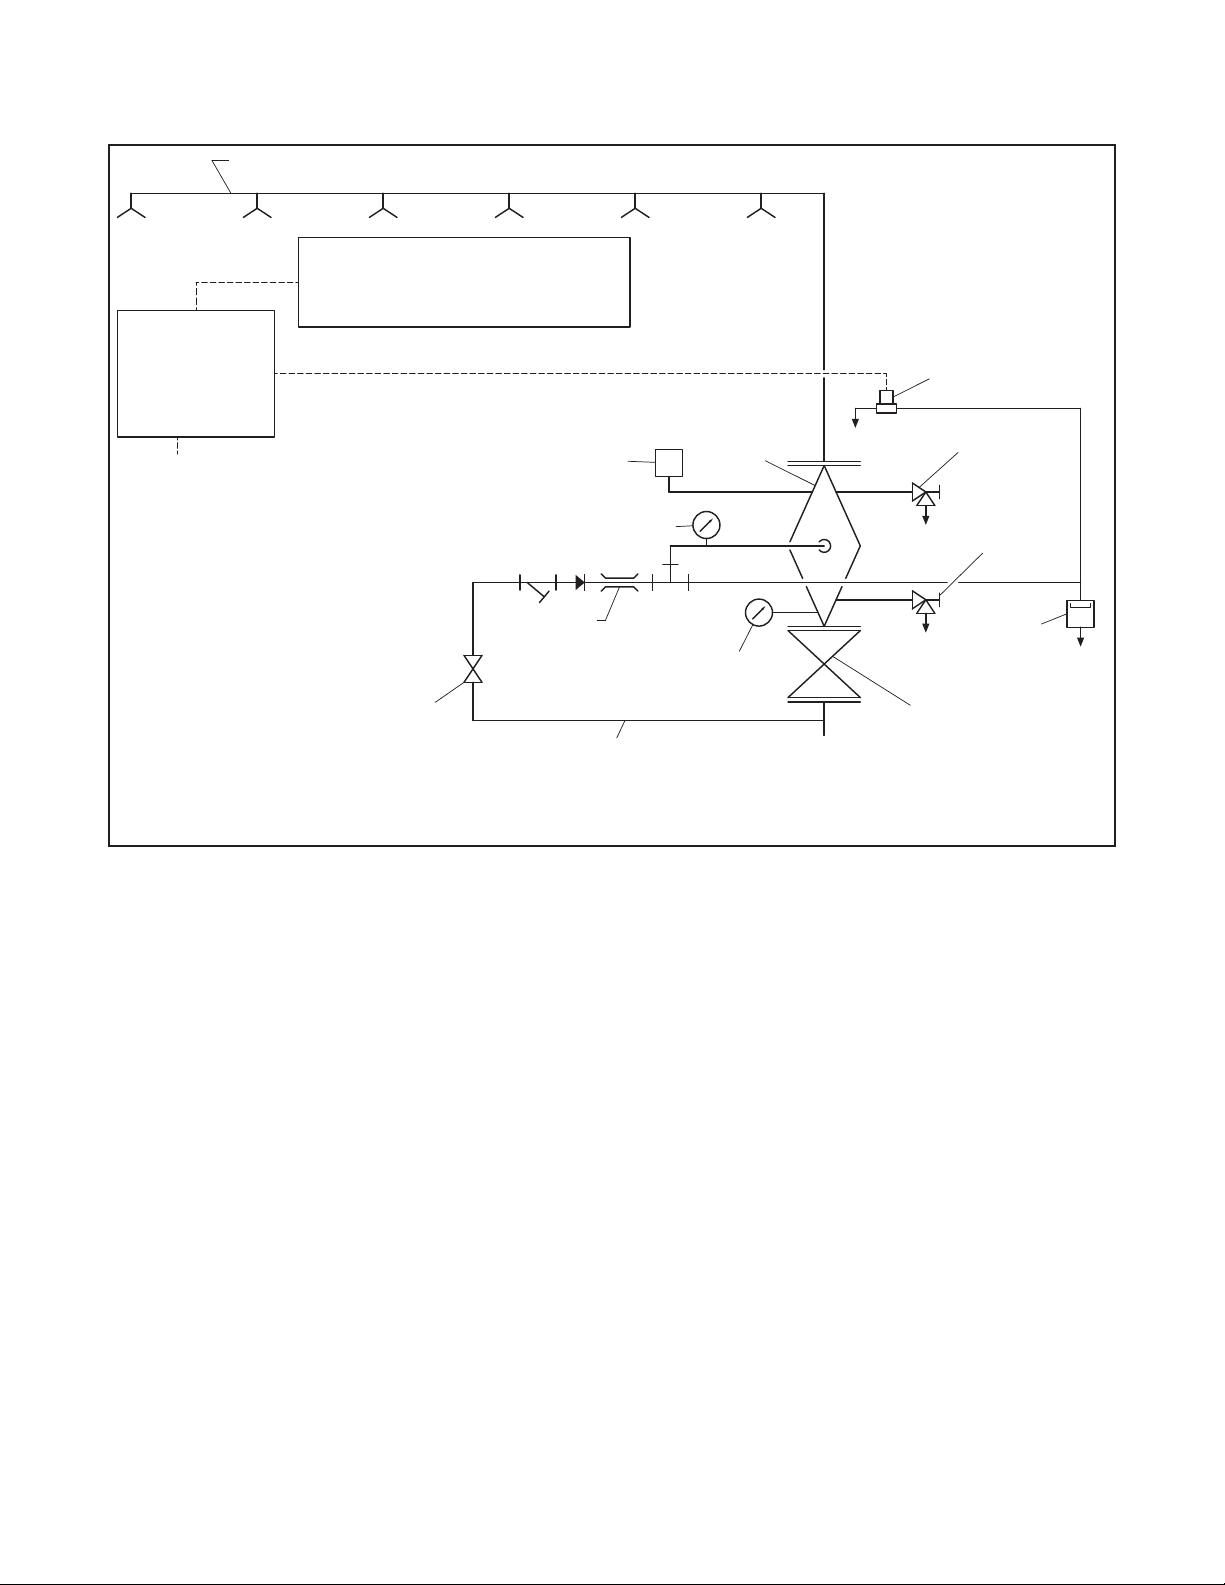
C
C3
C2
H
D
N
LOCATION
FOR OPTIONAL
ELECTRICALLY
SUPERVISED
N.O. ALARM
CONTROL
VALVE
F
P3
P2
J
G
NOTE:
Port Connections P1 through P7 are described in Figure 2.
A
P1
B
C1
DV-5a VALVE REMOTE-RESETTING TRIM
(Refer to Figure 6 for specific Bills of Materials)
P
C4
E
Q
FIGURE 9
K
C5
M
Page 14

TFP1325
Page 14 of 20
Care and
Maintenance
The following procedures and inspections must be performed as indicated,
in addition to any specific requirements of the NFPA and any applicable
standards recognized by the Approval
agency. Any impairment must be immediately corrected (Ref. Figure 9).
NOTICE
The frequency at which the following
procedures and inspections are to be
performed are to be in accordance with
the NFPA and any applicable specific
requirements of the standards recognized by the Approval agency.
Before closing a fire protection system
main control valve for maintenance
work on the fire protection system that
it controls, permission to shut down
the affected fire protection systems
must first be obtained from the proper
authorities and all personnel who may
be affected by this action must be
notified.
The owner is responsible for the
inspection, testing, and maintenance
of their fire protection system and
devices in compliance with this document, as well as with the NFPA and any
applicable standards recognized by the
Approval agency. Contact the installing contractor or product manufacturer
with any questions.
Some procedures in this section result
in the operation of the associated
alarms. Notify the owner and the fire
department, central station, or other
signal station to which the alarms are
connected before performing the tests.
It is recommended that automatic
sprinkler systems be inspected, tested,
and maintained by a qualified Inspection Service in accordance with the
NFPA and any applicable standards
recognized by the Approval agency.
Drop in Water Supply Pressure
Below Normal Range
NOTICE
If the water supply pressure is significantly reduced below the normally
expected static pressure range (as
could occur in the case of a water main
break or repair), and there is a subsequent drop in the diaphragm chamber
water pressure below its normal range
(for example, due to a leak in a piping
connection to or from the diaphragm
chamber or, a leak in the diaphragm
chamber check valve caused by dirt or
debris in the check valve seal area), a
deluge valve such as the DV-5A could
inadvertently trip, if its water supply
pressure is quickly restored.
A drop in the water supply pressure
to below its normal range (as in the
case of an interrupted water supply
condition) constitutes an emergency
impairment.
Should this condition occur, immediately close the main control valve and
use the following procedure to reset the
system:
Step 1. Prior to the water supply pressure being restored to the closed main
control valve, note the pressure indicated by the diaphragm chamber
pressure gauge and determine if
the pressure is within the normally
expected range.
Step 2. If the diaphragm chamber pressure is below the normal range, check
for and correct any source of leakage
from the diaphragm chamber prior to
resetting the system.
Step 3. After the water supply pressure is restored to the main control
valve, reset the DV-5A Valve in accordance with the Valve Setting Procedure
section.
NOTICE
For fire protection systems subject to
an emergency impairment caused by
an interrupted water supply condition,
it is recommended that consideration
be given to installing a low water supply
pressure switch with the appropriate
alarm/indications to monitor the water
supply pressure.
Waterflow Alarm Test Procedure
To test the waterflow alarm, open the
Alarm Test Valve (G), which will allow a
flow of water to the Waterflow Pressure
Switch (C) and/or Water Motor Alarm.
Upon satisfactory completion of the
test, close the Alarm Test Valve (G).
To ensure drainage of the alarm line,
depress the plunger on the Automatic
Drain Valve (F).
Electric Actuation
Operation Test Procedure
Proper operation of the DV-5A Valve
(i.e., opening of the DV-5A Valve as
during a fire condition) must be verified as follows:
Step 1. If water must be prevented
from flowing beyond the riser, perform
the following steps.
• Close System Main Control Valve (B).
Open Main Drain Valve (D).
• Open System Main Control Valve (B)
one turn beyond position at which
water just begins to flow from Main
Drain Valve (D).
• Slowly close the Main Drain Valve
(D).
Step 2. Test the deluge releasing panel
in accordance with the manufacturer’s
instructions to energize the solenoid
valve.
Note: Be prepared to quickly perform
Steps 3, 4, and 5 if water must be prevented from flowing beyond the riser.
Step 3. Verify that the DV-5A Valve has
tripped, as indicated by the flow of
water into the system.
Step 4. Close the System Main Control
Valve (B).
Step 5. Close the Diaphragm Supply
Valve (P).
Step 6. Reset the DV-5A Valve in accor-
dance with the Valve Setting Procedure.
Electric Actuation
Solenoid Valve (N) Test Procedure
Proper operation of the Solenoid Valve
(N) for electric actuation must be verified at as follows:
Step 1. Close the System Main Control
Valve (B).
Step 2. Open the Main Drain Valve (D).
Step 3. Test the deluge releasing panel
in accordance with the manufacturer’s
instructions to energize the Solenoid
Valve (N).
Step 4. Verify that there is a flow of
water from the Solenoid Valve (N) drain
connection.
Step 5. Verify that the Diaphragm
Chamber pressure has decreased
to below 25% of the water supply
pressure.
Step 6. Reset the electric detection
system in accordance with the manufacturer’s instructions to de-energize
the Solenoid Valve (N), and proceed
as follows:
• Water should cease draining from the
Solenoid Valve (N).
• Pressure will then build up in the
DV-5A Diaphragm Chamber.
• After system pressure is restored
in the DV-5A Diaphragm Chamber,
inspect the Solenoid Valve (N) for
leaks at the drain tube. Any leaks
must be corrected before proceeding to the next step.
Ste p 7. Partially open the System Main
Control Valve (B). Slowly close the Main
Drain Valve (D) as soon as water discharges from the Main Drain Valve (D ).
Observe the Automatic Drain Valve
(F) for leaks. If there are leaks, determine/correct the cause of the leakage
problem. If there are no leaks, the
DV-5A Valve is ready to be placed in
service and the System Main Control
Valve (B) must then be fully opened.
Page 15

TFP1325
Page 15 of 20
Internal Valve Inspection
Once every five years during the annual
operational test procedure and prior
to the DV-5a Valve being reset and
with the DV-5a Valve de-pressurized,
the interior of the DV-5a Valve must
be cleaned and inspected for wear
and damage. Damaged or worn parts
must be replaced. (Replacement of the
Diaphragm every ten years is recommended, or more frequently if inspections and/or wear and tear warrant
more frequent replacement.)
NOTICE
The Diaphragm Cover may be removed
between Steps 4 and 5 of the resetting instructions, since at that point the
DV-5a Valve should be de-pressurized
as evident by a zero gauge reading on
the Diaphragm Gauge (K) and Water
Supply Gauge (J), as well as no water
discharging from the Automatic Drain
Valve (F).
To perform internal valve inspection
between Steps 4 and 5 of the Valve
Setting Procedure, remove the diaphragm cover as follows:
Step 1. Remove the Copper Tube
Fitting between the Diaphragm Supply
(P) and the System Main Control Valve
(B).
Step 2. Loosen the union securing the
Solenoid Valve (N).
Step 3. Loosen and remove the union
between the Diaphragm Cover and the
trim and remove the trim.
Step 4. Remove the Diaphragm Valve
Cover hardware, then slowly remove
the Diaphragm Cover and perform
internal valve inspection. Clean the
valve interior and replace parts as
ne ce ssar y.
After cleaning and inspecting valve
interior, and replacing parts as necessary, reinstall the Diaphragm Cover
by completing the following steps to
assure the Diaphragm Cover Fasteners
are uniformly and securely tightened.
Step 1. With reference to Figure 1,
ensure that the Diaphragm is properly
oriented and that the proper hardware
arrangement is utilized when assembling the Diaphragm Covers. The hardware arrangements differ depending on
the size of the DV-5a Valve.
Step 2. By first using the Long Hex
Bolts, support of the Diaphragm Cover
will be provided before installing the
Short Hex Bolts. Align Diaphragm in
proper orientation with Valve Body, and
then align Diaphragm Cover in proper
orientation with Valve Body. Handtighten all fasteners.
Step 3. Using crossdraw sequence
to assure uniformity, wrench-tighten
Long Hex Bolts and Short Hex Bolts
to appropriate torque values. Repeat
crossdraw sequence two to three
times at incremental torque valves
until reaching the torque valves found
in Table B.
Step 4. Inspect to assure all Hex Bolts
are securely tightened.
Step 5. Using the union, the trim to the
Diaphragm Cover.
Step 6. Using the union, secure the
solenoid Valve (N).
Ste p 7. Replace the Copper Tube
Fitting between the Diaphragm Supply
Valve (P) and the System Main Control
Valve (B).
Step 8. Ensure that the unions and flare
fittings are securely tightened.
Step 9. Proceed to step 5 of the Valve
Setting Procedures section in this data
sheet.
NOTICE
If the water supply contains chemicals
which tend to attack a polyester fabricreinforced, EPDM rubber or the five
year inspection indicates a build-up of
debris within the DV-5A Valve that could
affect its proper operation, then the
frequency of the internal valve inspection procedure must be appropriately
increased.
With reference to Figure 1, make
certain that the Diaphragm is correctly
oriented; otherwise, the DV-5A Valve
cannot be properly set.
Under-tightening the Diaphragm Cover
Bolts can result in internal and external
leakage.
Use only TYCO replacement fasteners
as specified in Figure 1.
Do not apply adhesives, lubricants, or
other substances to the Diaphragm or
Valve Bod y.
Torque
Nuts
44
(59,7)
44
(59,7)
188
(254,9)
396
(536,9)
265
(359,3)
545
(738,9)
lb-ft
(N∙m)
Short
Hex
Bolts
35
(4 7,5)
35
(4 7,5)
150
(203,4)
316
(428,4)
212
(287,4)
436
(591,1)
Nominal
Valve Sizes
ANSI
Inches
(DN)
1-1/2
(40)
2
(50)
3
(80)
4
(100)
6
(150 )
8
(200)
TABLE B
DIAPHRAGM COVER BOLTS
MINIMUM TORQUE
Page 16

TFP1325
Page 16 of 20
Limited
Warranty
For warranty terms and conditions, visit
www.tyco-fire.com.
Ordering
Procedure
The TYCO DV-5a Valve Remote-Resetting Trim may be ordered as follows:
Pre-Assembled Ordering
DV-5A Valves with Galvanized Valve
Trim and Butterfly Valve
Specify: Size (specify), DV-5a Automatic Water Control Valve, G x G connections with assembled galvanized
Americas Remote-Resetting Valve
Trim, complete with assembled Model
BFV-300 Butterfly Valve, P/N (Ref.
Table C )
Note: This arrangement is available
for EMEA and APAC upon request.
Contact your local distributor.
DV-5A Valves with Galvanized Valve
Tri m
Specify: Size (specify), DV-5a Automatic Water Control Valve, (specify)
end connection with assembled galvanized (Americas, EMEA, or APAC)
Remote-Resetting Valve Trim, P/N (Ref.
Table D )
Separate Parts Ordering
DV-5A Valves
Refer to Table A for flange drilling
specifications.
Specify: Size (specify), DV-5a Automatic Water Control Valve, (specify)
end connection, P/N (Ref. Table E)
G x G Valve Size Americas
1-1/2 in. (DN40) 551010415
2 in. (DN50) 551010 420
3 in. (DN80) 551010 430
4 in. (DN100) 551010 440
6 in. (DN150) 551010460
8 in. (DN200) 551010 480
NOTES:
1. AMERICAS DV-5A Valve with Trim and Buttery Valve: A mericas pressure switches,
P/N 2460566 Solenoid Valve (as applicable), and psi/kPa water pressure gauges
are provided.
TABLE C
DV-5A VALVE WITH GALVANIZED VALVE TRIM AND BUTTERFLY VALVE
PART NUMBER SELECTION
— REMOTE-RESETTING DELUGE SYSTEM —
DV-5A Valve Trim
Specify: Size (specify), finish (specify),
(specify) Remote-Resetting Trim for
DV-5a Automatic Water Control Valves
used in Remote-Resetting Deluge Fire
Protection System, P/N (Ref. Table F)
DV-5A Valve Trim Accessories
(for separately ordered valve trim)
Refer to Table G for separately ordered
accessories not included with the Valve
Trim.
DV-5A Valve Remote-Resetting
Replacement Parts
Specify: (Description) for use with
(specify size) DV-5a Valve RemoteResetting Trim, P/N (Ref. Figure 1)
DV-5A Valve Remote-Resetting Trim
Replacement Parts
Specify: (Description) for use with
DV-5a Valve Remote-Resetting Trim,
P/N (Refer to Figure 7)
Page 17

TFP1325
Page 17 of 20
AMERICAS
1
EMEA
2
APAC
3
G x G Valve Size
1-1/2 in. (DN40) 5 50 010415 550110415 55 0010415
2 in. (DN50) 5 50010420 55011042 0 550010 420
3 in. (DN80) 550010430 550110430 550010430
4 in. (DN100) 5 50010440 5 50110 4 40 550010440
6 in. (DN150) 550010460 550110460 550010460
8 in. (DN200) 550010480 550110480 550010480
F x F ANSI Valve Size
3 in. (DN80) 550020430 550120430 550020430
4 in. (DN100) 550020440 55 0120440 550020440
6 in. (DN150) 550020460 550120460 550020460
8 in. (DN200) 550020480 550120480 550020480
F x G ANSI Valve Size
3 in. (DN80) 550030430 550130430 550030430
4 in. (DN100) 550030440 550130440 550030440
6 in. (DN150) 550030460 550130460 550030460
8 in. (DN200) 550030480 550130480 550030480
T x T NPT Valve Size
1-1/2 in. (DN40) 55 00 60 415 — 5500 60 415
2 in. (DN50) 550060420 — 550060420
F x F ISO Valve Size
3 in. (DN80) — 550140430 550040430
4 in. (DN100) — 550140440 550040440
6 in. (DN150) — 550140460 550040460
8 in. (DN200) — 550140480 550040480
F x G ISO Valve Size
3 in. (DN80) — 550150430 550050430
4 in. (DN100) — 550150440 550050440
6 in. (DN150) — 550150460 550050460
8 in. (DN200) — 550150480 550050480
T x T ISO Valve Size
1-1/2 in. (DN40) — 55 0170 415 —
2 in. (DN50) — 55 0170 42 0 —
NOTES:
1. AMERICAS DV-5A Valve with Trim: Americas pressure switches, P/N 2460566 solenoid valve (as applicable), and psi/kPa water pressure gauges are
provided.
2. EMEA DV-5A Valve with Trim: EMEA pressure switches, P/N 2460566 solenoid valve (as applicable), bar/psi water pressure gauges, and NPT to ISO
threaded trim adaptors for external connections are provided.
3. APAC DV-5A Valve with Trim: APAC pressure switches, P/N 2460566 solenoid valve (as applicable), and psi/kPa water pressure gauges are provided.
TABLE D
DV-5a VALVES WITH GALVANIZED VALVE TRIM
PART NUMBER SELECTION
— REMOTE-RESETTING DELUGE SYSTEM —
Page 18

TFP1325
Page 18 of 20
REGIONS OF TYPICAL AVAILABILITY (indicated by “✔”)
AMERICAS
EMEA
APAC
Valve Size
1-1/2 in. (DN40) 1.990 in. (50,5 mm) 530010015 — — 530060015 — — 530070015
2 in. (DN50) 2.375 in. (60,3 mm) 530010020 — — 530060020 — — 530070020
3 in. (DN80) 3.500 in. (88,9mm) 530010030 530020030 530030030 — 530040030 530050030 —
4 in. (DN100) 4.500 in. (114,3 mm) 530010040 530020040 530030040 — 530040040 530050040 —
6 in. (DN150) 6.625 in. (168,3mm) 530010060 530020060 530030060 — 530040060 530050060 —
8 in. (DN200) 8.625 in. (219,1 mm) 530010080 530020080 530030080 — 530040080 530050080 —
NOTES:
1. Valves are typically provided with ange drilling per ANSI B16.1 (Class 125) or ISO (7005-2 PN16).
2. Upon request, valves can be provided with ange drilling per JIS B 2210 or AS 2129. In which case part numbers are not assigned.
Nominal Groove
O.D.
✔ ✔ ✔ ✔
✔ ✔ ✔ ✔ ✔ ✔ ✔
✔ ✔ ✔ ✔ ✔ ✔ ✔
G x G F X F ANSI F x G ANSI T x T NPT F x F ISO F x G ISO T x T ISO
TABLE E
DV-5a VALVES PART NUMBER SELECTION
Valve Sizes Americas Galvanized Americas Black
1½ in. (DN40) 540000420 542000420
2 in. (DN50) 540000420 542000420
3 in. (DN80) 540000430 542000430
4 in. (DN100) 540000440 542000440
6 in. (DN150) 540000460 542000460
8 in. (DN200) 540000480 542000480
Valve Sizes EMEA Galvanized EMEA Black
1½ in. (DN40) 540100420 542100420
2 in. (DN50) 54010 0420 542100420
3 in. (DN80) 540100430 542100430
4 in. (DN100) 540100440 542100440
6 in. (DN150) 540100460 54210046 0
8 in. (DN200) 540100480 542100480
Valve Sizes APAC Galvanized A PAC Black
1½ in. (DN40) 540000420 542000420
2 in. (DN50) 540000420 542000420
3 in. (DN80) 540000430 542000430
4 in. (DN100) 540000440 542000440
6 in. (DN150) 540000460 542000460
8 in. (DN200) 540000480 542000480
NOTES:
1. Americas Valve Trim: Pressure switches and/or solenoid valves are separately ordered.
2. EMEA Valve Trim: Pressure switches, solenoid valves, water pressure gauges and BFV-300 Buttery Valve are separately ordered. NPT to ISO threaded
adaptor s are provided for External Trim Connections (drains, pressure switche s, water motor alarms, etc.).
3. APAC Valve Trim: Pressure switches and/or solenoid valves are separately ordered.
TABLE F
DV-5a VALVE E TRIM
PART NUMBER SELECTION
— REMOTE-RESETTING DELUGE SYSTEM —
— — —
Page 19

TFP1325
Page 19 of 20
ACCESSORIES, DELUGE FIRE PROTECTION SYSTEMS P/N
Waterow Pressure Alarm Switch, Potter PS10-2 (America/APAC) 25720 —
Waterow Pressure Alarm Switch PS10-1 (EMEA) 0260 —
Model WMA-1 Water Motor Alarm (America/APAC) 526301001P TFP921
Model WMA-1 Water Motor Alarm (EMEA) 526301021R TFP922
Water Gauges with bar/psi 025500013 —
Solenoid Valve for Releasing Service 2460566 TF2180
600 psi Water Gauge psi/kPa (service pressure over 300 psi) 9234310 04
Model AD-2 Automatic Drain Valve 52789100 4 TF P1632
Data
Sheet
TABLE G
DV-5a VALVE ACCESSORIES
PART NUMBER SELECTION
— REMOTE-RESETTING DELUGE SYSTEM —
Page 20

TFP1325
Page 20 of 20
1400 Pennbrook Parkway, Lansdale, PA 19446 | Telephone +1-215-362-0700
© 2019 John son Control s. All right s reserved. A ll specifica tions and ot her informa tion shown wer e current as o f document rev ision date an d are subject t o change wit hout notice.
NATIONAL FIRE P ROTECTION ASSOCIATIO N and NFPA are register ed trademarks of N ational Fire Protec tion Associati on;
TEFLON is a regi stered tradema rk of DuPont
 Loading...