

Page 1
22 INCH HD LCD TV Combo DVD
MODEL: Max22i
Page 2
Page 3
22 INCH HD LCD TV Combo DVD
MODEL : Max22 i
1
Page 4
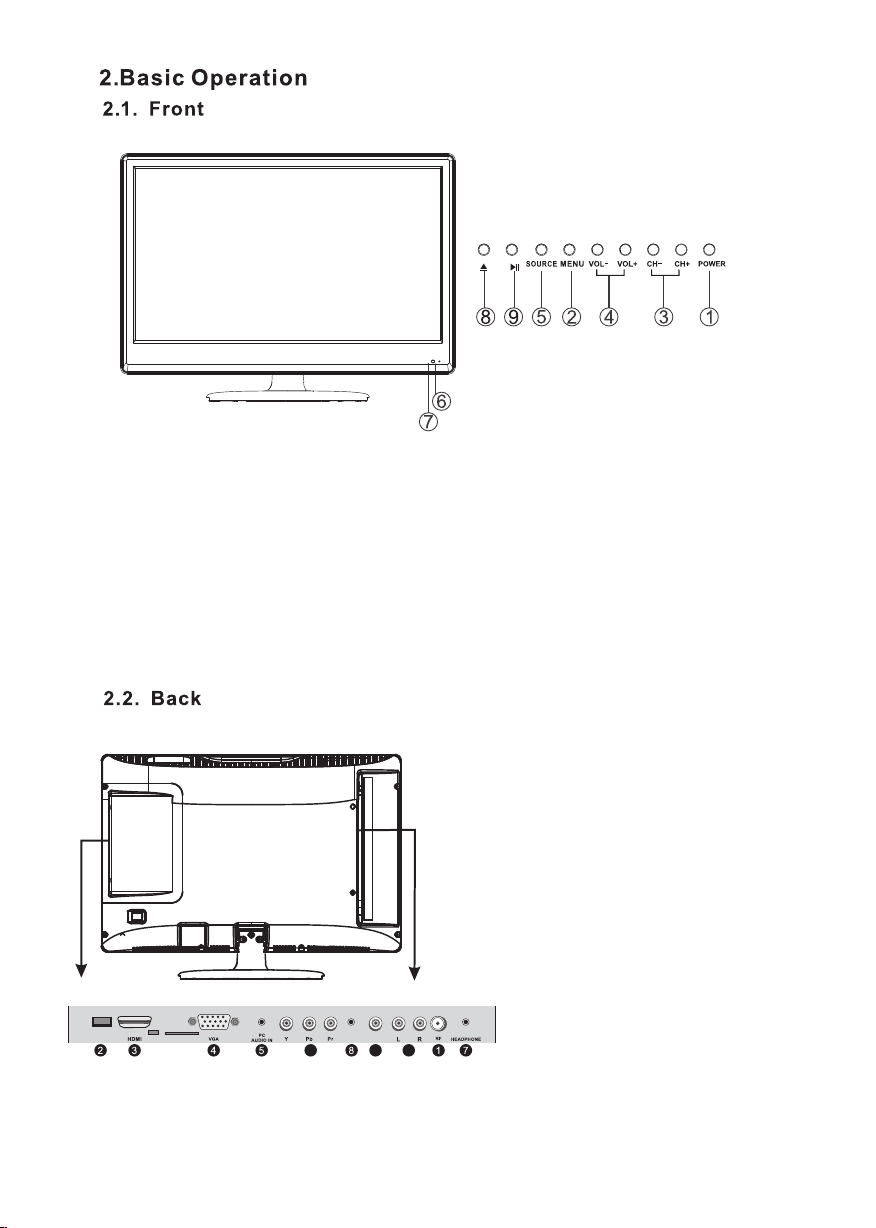
1. Power b utt on
Press to t urn TV on or tu rn to s tandby mode.
2. MENU
Press to d isp lay the set up men u on the TV
screen .
3. CH+/C HPress to s ele ct desired cha nne ls, or pres s to
select o r adj ust a menu item.
4. VOL+/ VOL Press to a dju st the volume le vel, or press to
select or ad just a menu item .
DVD Solt
USB
MEDIA
CARD READER
6 9 10
COAXIAL
5. SOURC E(T V/AV)
Press to s ele ct TV or all ot her mode like
MEDIA, a nd DV D.
6. Infra red R emote Sensor
Receiv es th e signals from t he remote cont rol .
7. POWER L ED
On stand by mo de, it turns red , while it turns
Green wh en un it is power on.
8. OPEN/ CLO SE
9. PLAY/PAUSE
1. RF:An ten na/close cir cuit TV or Di git al
TV termi nal .
2.Medi a(U SB2.0):For p lay ing media f ile .
3. HDMI: Hig h-definiti on mu ltimedi a int erface
Note: Acc ept able video sig nal
480P/5 76P /720P/1080 i/1 080P
4. VGA:T his c an be connecte d with the
D-sub 15 p in si gnal cable to yo ur PC .
5.PC AUDI O IN: PC audio input .
6.YPbP r:Y PbPr input.
7.HEAD PHO NE:Headpho ne to
headph one s.
8.COAX IAL :Digital aud io ou tput.
9.VIDE O:T his can be conne cted to the RCA
video ou t con nection of any v ide o
resour ce.
VIDEO
10.AUD IO: audio input
(RCA conn ect ion).
2
Page 5
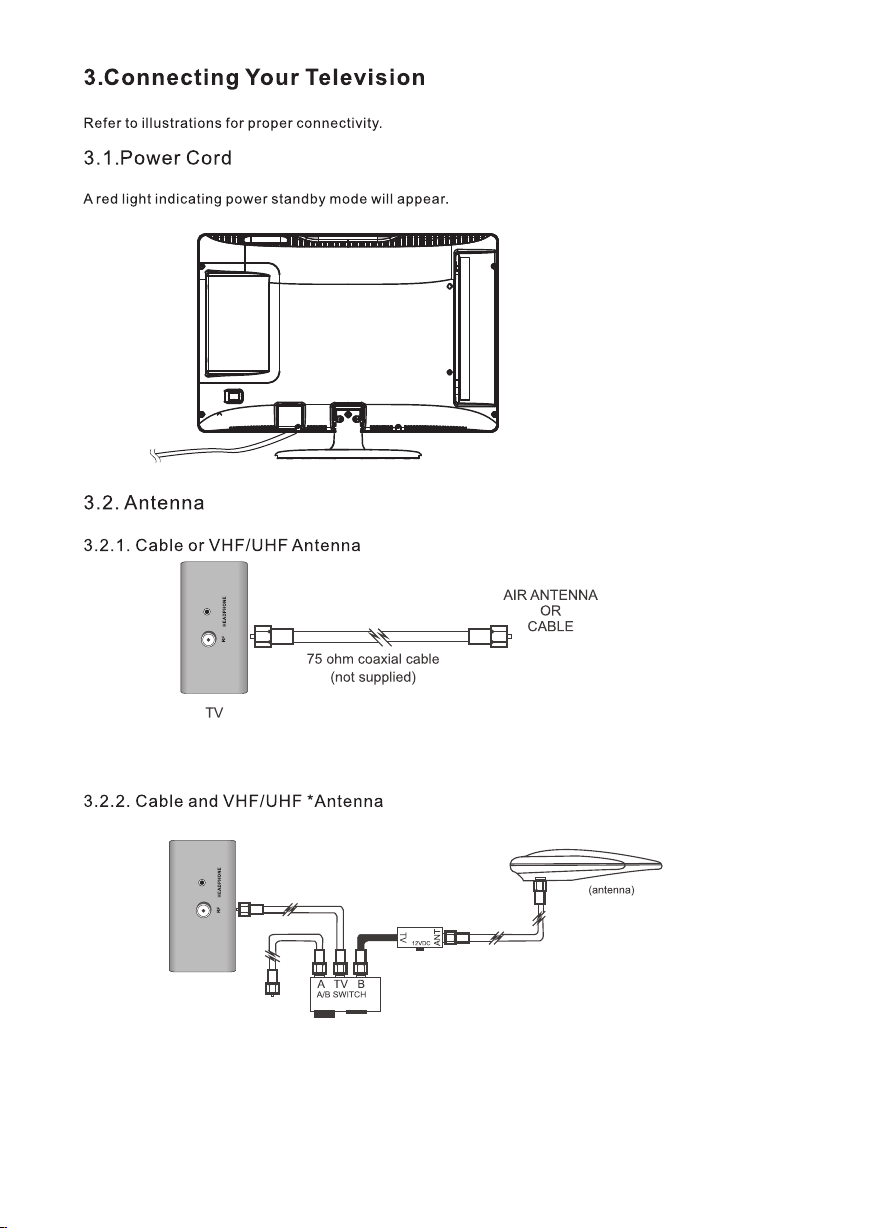
AC IN
3
Page 6
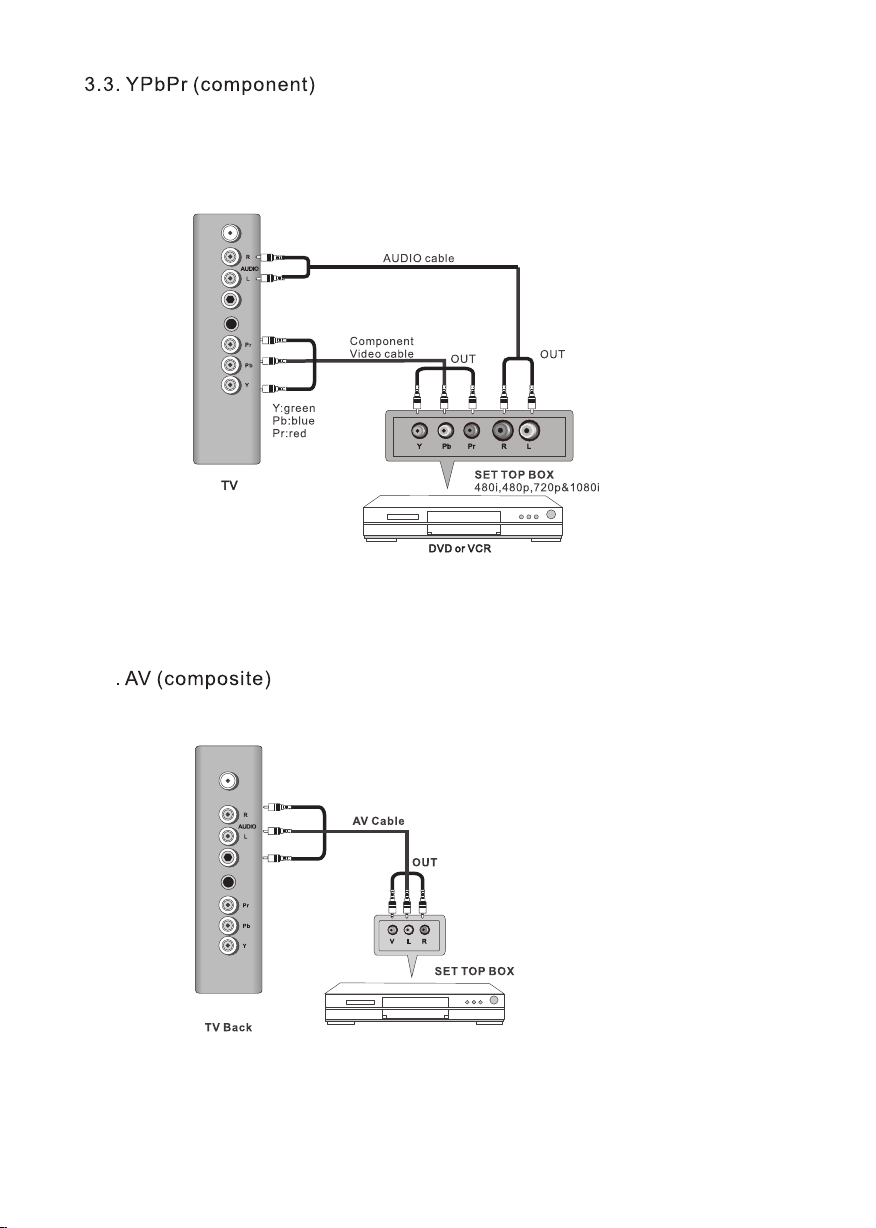
3.4
VIDEO
VIDEO
4
Page 7
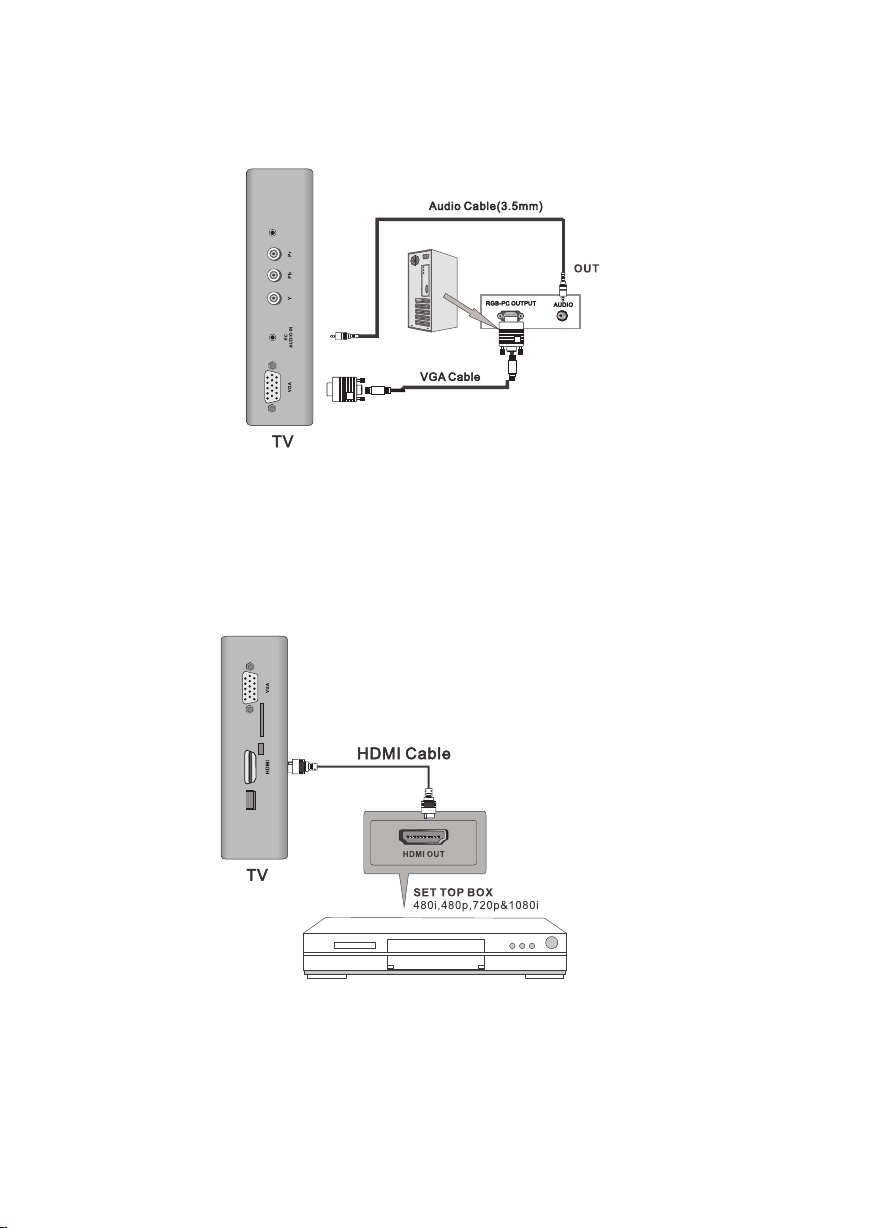
3.5.VGA(PC)
3.6.HDMI
COAXIAL
CARD READER
USB
MEDIA
5
Page 8
6
Page 9
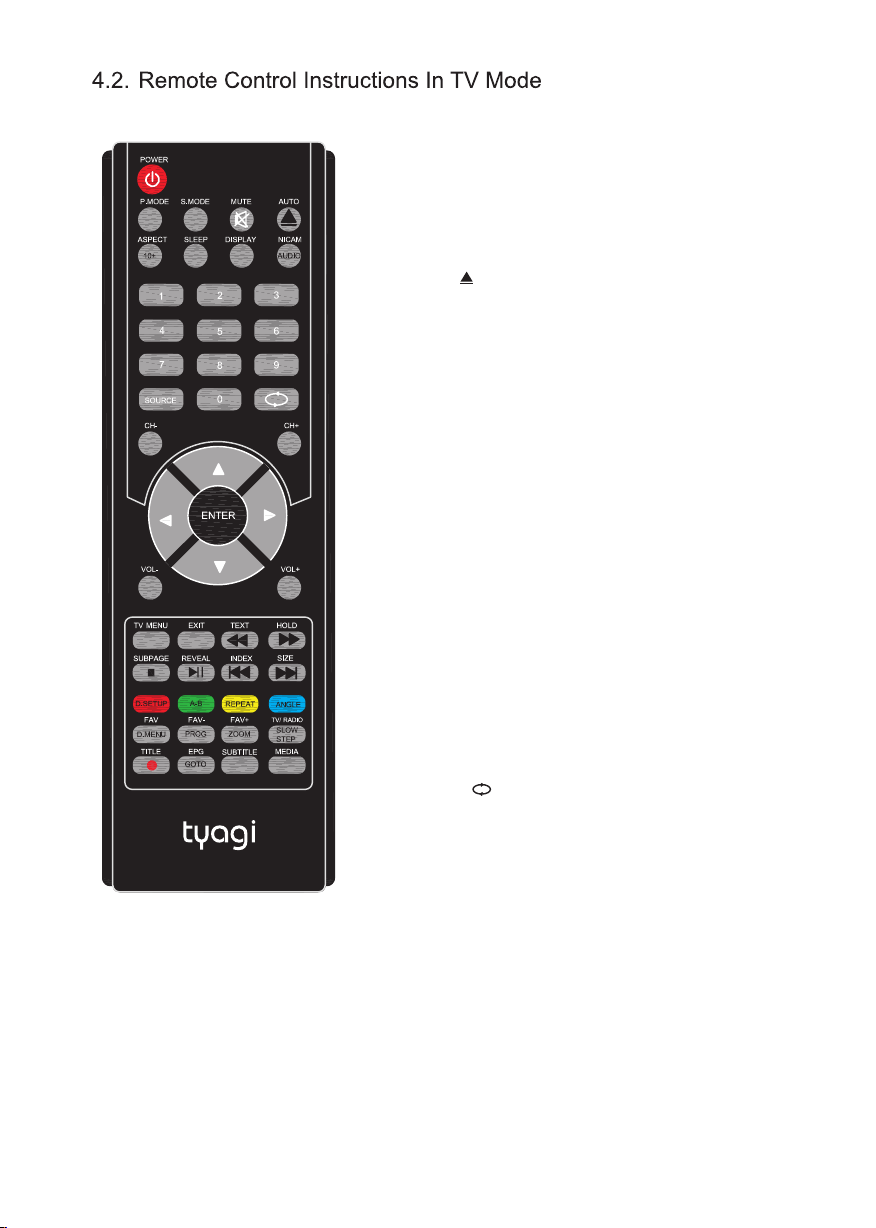
1. POWER
Press this b utt on to t urn o n/off TV.
2. P.MODE
Press to sel ect t he pi ctu re mode.
3. S.MODE
Press this b utt on to c han ge th e audio mode.
4. MUTE
Press to tur n on or o ff the audio ou tpu t.
5. AU TO
Press to do au to co nfi gur ati on directly
(PC-RGB MO DE)
:Ejeact bu tto n
6. AS PEC T:
10+:
To select the aspect of screen.
Press "10+ " to ch ang e DVD p rogram what
you want to se lec t.
7. SLEEP
This featu re al low s you t o set up sleeptime.
Press the bu tto n rep eat edl y to select the
desired ti me to s lee p or se lect Off t o clo se
the functi on.
8. DISPLAY
Press this b utt on to d isp lay i nformation about
the curren t mod e on th e scr een.
9. NICAM:
AUDIO:
Press to sel ect t he NI CAM m ode s.
Audio Sele ct Bu tto n
10. 0-9 butt on
Press any nu mbe r of 0~ 9 but tons to
select a TV channel , also can be us ed in
Teletext Pag e cho osi ng.
11. SOURCE
Press to sel ect e nte r the s our ce selecting
menu, pres s the ▲/▼ d ire cti on bu ttons or
press the SO URC E but ton r epeatedly to
select des ire d mod e and p ress the ENTER
button to en ter t he se lec ted m ode.
12. button
In the ATV/DTV mode, press to retu rn to t he
channel la st vi ewe d.
13. CH+/-
In ATV or DTV mode, press to select Ana log
channel or d igi tal c han nel.
14. VOL+/-
Press to inc rea se or d ecr ease the volume.
15. ENTER/ OK
Press to con fir m sel ect ion i n the setup Menu.
16. Direct ion b utt on
Press the di rec tio n but ton s to select menu
options or s ett ing s.
17. TV MENU
Press to ent er or e xit t he se tup m enu.
7
Page 10

18. EXIT
Press to exi t all t he OS D on th e screen.
19. TEXT/
Switch on or o ff the telete xt mo de (T V
mode) /pla yin g bac kward fast
20. HOLD/
Hold on or off for current pa ge di spl ay.
/Playing f orw ard f ast.
21. SUBPAGE/■
Sub coded pa ge ac ces s
Press ■ to sto p DVD p lay ing
22. REVEAL / II
Reveal or hi dde n the h idden words.
/Press to pa use t he pl ayb ack, Press
Again to res ume n orm al playback.
23. INDEX/
Request th e ind ex pa ge (Tele tex t mod e)
/Skip back war d but ton.
24. SIZE/
Change dis pla y siz e in teletext mode.
/Skip forw ard b utt on
25. Color bu tto n
D.SETUP: P res s DVD S ETU P to di spl ay
main menu fo r DVD s our ce.
Replay fro m A to B.
A-B:
REPEAT:
ANGLE:An gle
Play progr am re pea tedly.
.
button
26. FAV/D.MENU
Press to dis pla y FAV menu in TV mode.
Press to dis pla y DVD m ain menu under
/
DVD mode.
27. FAV-/PROG
Displays t he se lec ted favorite
downprog ram mer s. /
To select the DV D
program pl ayb ack .
28. FAV+/ZOOM
Displays t he se lec ted favorite
upprogra mme rs. /
ZOOM can cha nge
display si ze in D VD mo de.
29. TV/RAD IO/
SLOW STEP
Press to sel ect TV or RADIO m ode .
/
Slow step bu tto n.
30. TITLE/ Rec ord
Press TITLE to display DV D tit le. / Pre ss
to begin rec ord ing .
31.
EPG/GOTO
Press this b utt on to d isp lay Electronic
Program Gu ide m enu ./P ress GOTO to
select the f ilm g oto o net ime in DVD.
32.
SUBTITLE
In DVD mode, p res s to se lec t alternate
subtitle l ang uag es during view/playback
of a DVD progr am.
33. MEDIA
Press to dis pla y the M EDI A menu.
8
Page 11
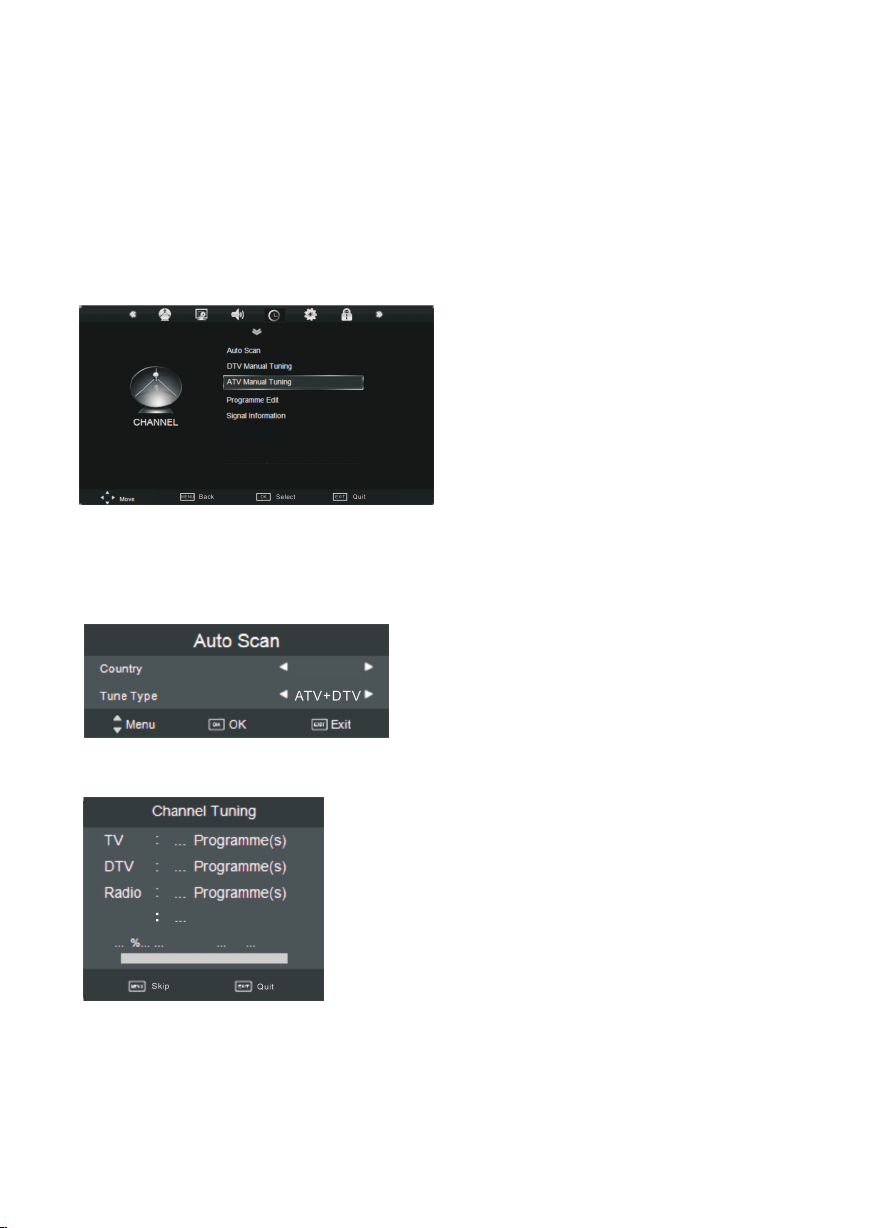
5. Setting Up Your Television
5.1. Main Me nu ou tlo ok and description
Main Men u ite ms (from right or der CHANNEL –> PICTU RE -> S OUND ->
TIME -> OP TIO N -> LOCK ) at DT V/ATV input sou rce,the first pa ge sh owed is
CHANNE L。At no n DTV/ATV in put source,the f irs t page is PIC TUR E as defaul t。
Curren tly p ress ENTER to ge t in sub menu,subm enu i s Highlig ht fi xed on,pres s
button k ey,th e subtopic tur ns up with full sc ree n.
5.1.1 CHANNEL:
Reco rd Star t
Note:
1) CHANN ELc an be only selec ted u nder ATV/DTV condi tio n,others ca n't b e used.
5.1.1.1 Aut o Sca n:
Enter Aut o Sca n,it shows the fra mes of 'countr y' an d 'tune typ e' op tional.
German y
Press mo ve to s elect up and dow n, press DONE to s tar t scannin g. Wh en scanni ng,
the firs t 50% p rocessing me ans ATV tunin g, th e last 50% pr oce ssing mea ns DT V tuning.
Data
When ATV tun ing, you can pre ss exit to skip ATV tu ning and st art D TV tuning .
Programme(s)
99
Page 12
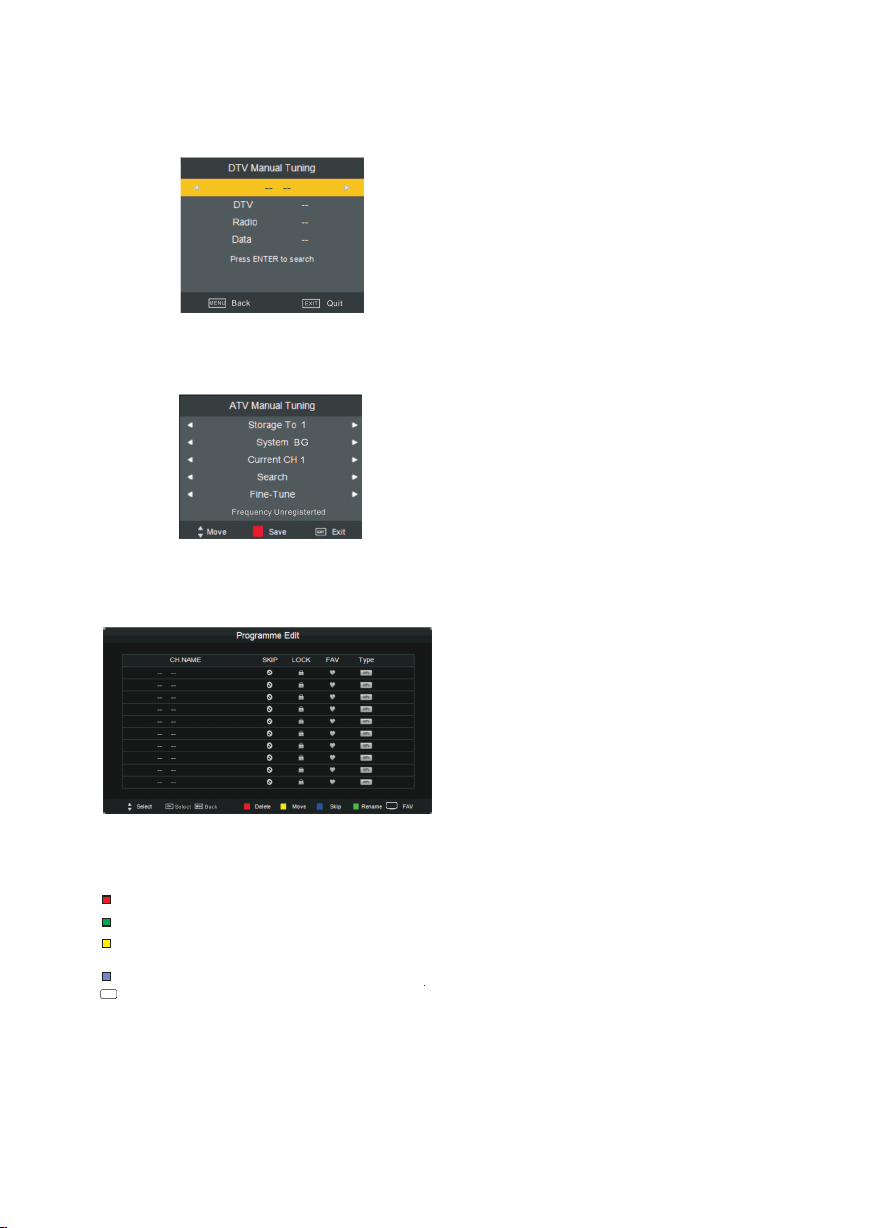
5.1.1.2 DT V man ual t uni ng:
Press en ter t o confirm tuni ng (only in DTV co ndi tion).
5.1.1.3 ATV ma nua l tun ing :
after tu nin g by hand, make su re to press red ke y for s torage, oth erwise al l cha nnels
search ed wo uld not be store d aft er switch ing c onditio n.
5.1.1.4 Programme Edi t:
FAV
the Cann el men u inc lude s“Delet e/Mo ve/ Rena me/Skip /Fav ”. “ Lo ck、Fav、S kip”
can be use d when c lie nts do s ome setti ngs to t he ch anne l. (Fav can n ot be fi xed
togeth er wit h Ski p).
(DELETE)
(RENAME)
(MOVE)
Delete current chan nel
Modify current channel name, only used in ATV mode.
Channe l swit chi ng fun ction, ATV availa ble as d efa ult,
DTV avai labl e at no n open L CN auto ord erin g con diti on.
FAV
(SKIP)
(FAV)
Choose i f skip t he cu rren t channel w hen CH +/- c hann el tuning .
Set your f avor abl e chan nel
5.1.1.5 Si gna l Inf orm ation:
It only ma ke us e at DTV conditi on, shows sign al in formati on.
10
Page 13
5.1.1.6 Re cor ded M ode
Enter Recorder menu, do reservation of recording, check PVR specification in details.
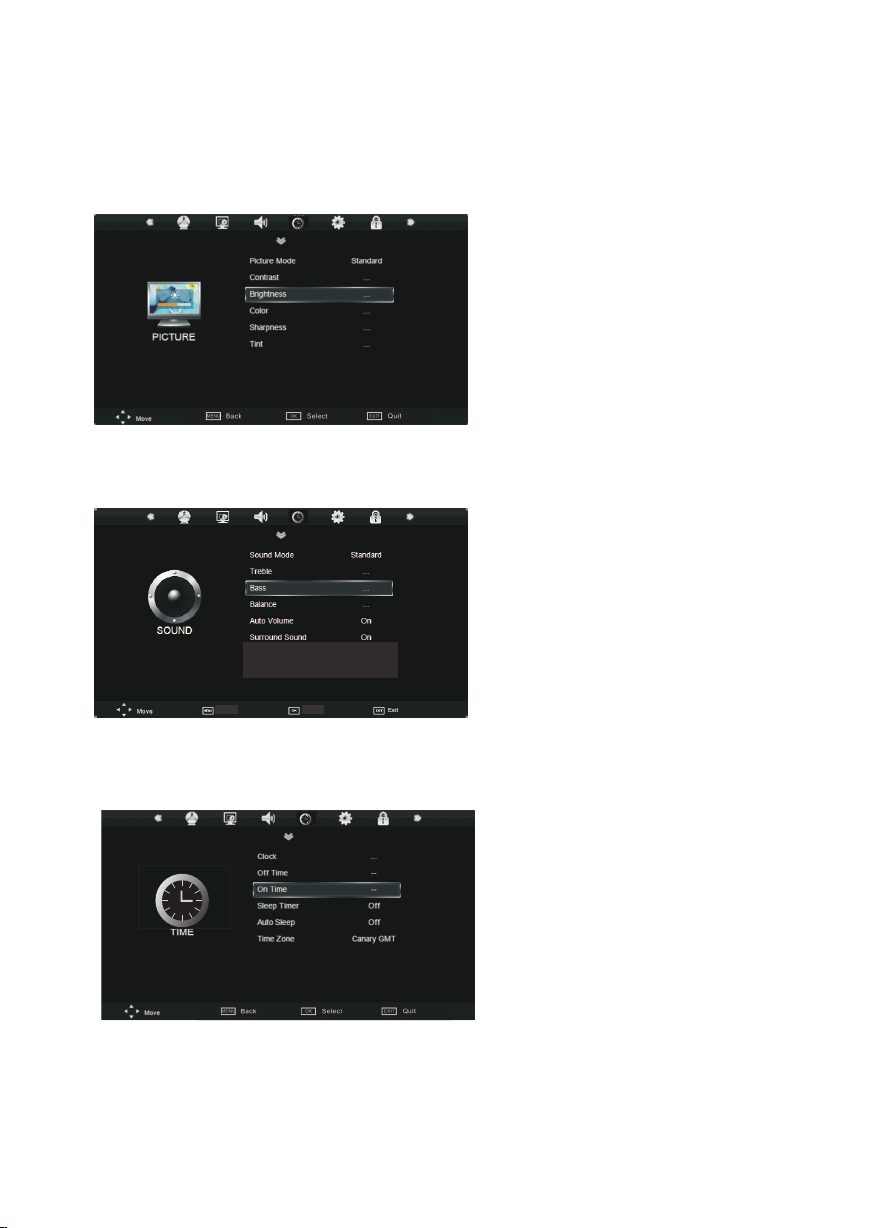
5.1.2 PICT URE
Press LE FT,RI GHT adjus table;Pres s MEN U to return p ict ure main me nu;
Press EX IT to exit me nu;
5.1.3 SOUN D
Back
Sele ct
Quit
Press LE FT,RI GHT adjus table;Pres s MEN U to return s oun d main menu ;
Press EX IT to exit me nu;
5.1.4 TIME
Press LE FT,RI GHT adjus table;Pres s MEN U to return Ti me ma in menu;
Press EX IT to exit me nu;
11
Page 14
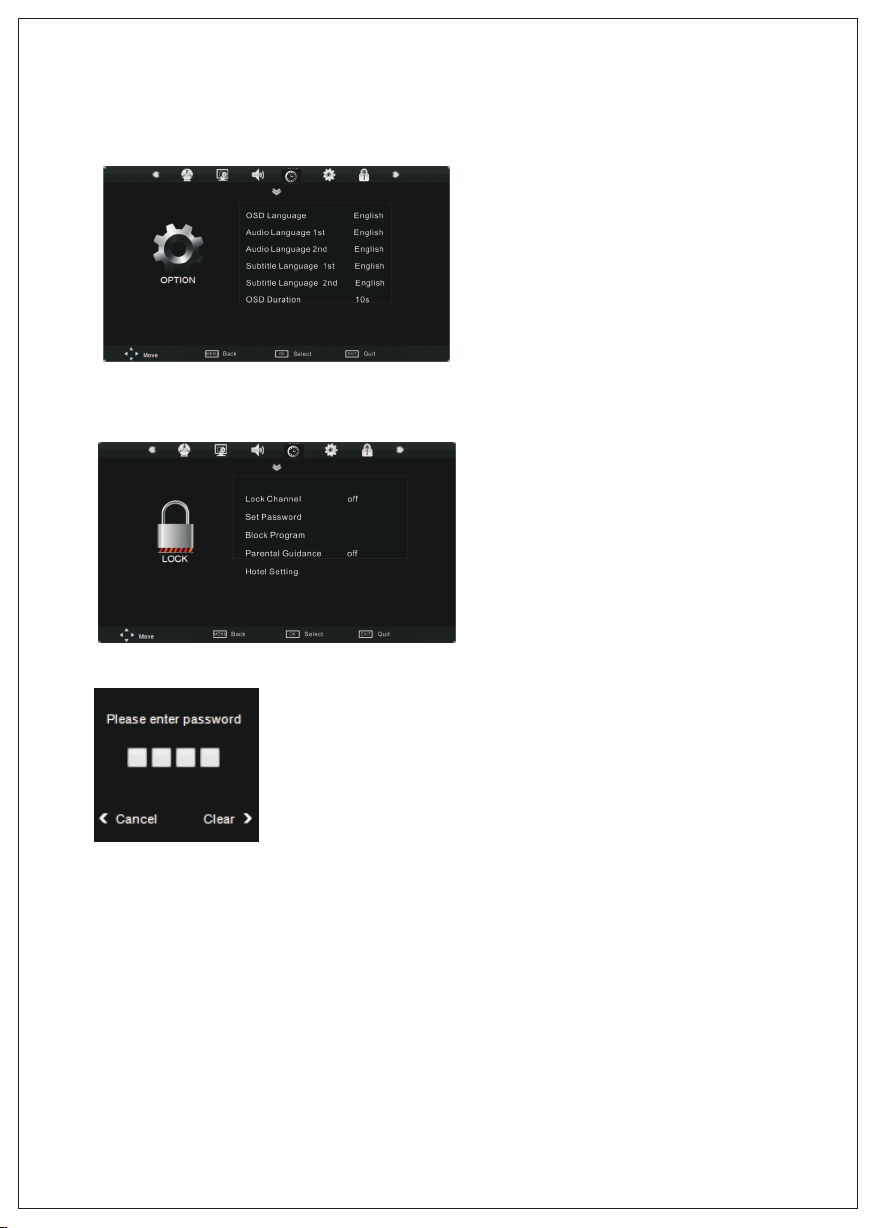
5.1.5 OPTI ON
Enter se con d menu, use UP, DOWN to se t lan guage
5.1.6 LOCK
5.1.6.1 Lo ck Sy ste m
LEFT to qu it passport, t urn back main me nu;
RIGHT to d elete passpo rt wrote and rew rit e correct o ne. I t need inpu t cor rect
passpo rt to e nter the LOCK su bmenu. It show s Wrong pas swo rd it uncor rec t
passpo rt;
MENU to ex it to L OCK menu;
Note:Def aul t pas sword is 0000,Administrator 's pa ssw ord is 8899.
12
Page 15
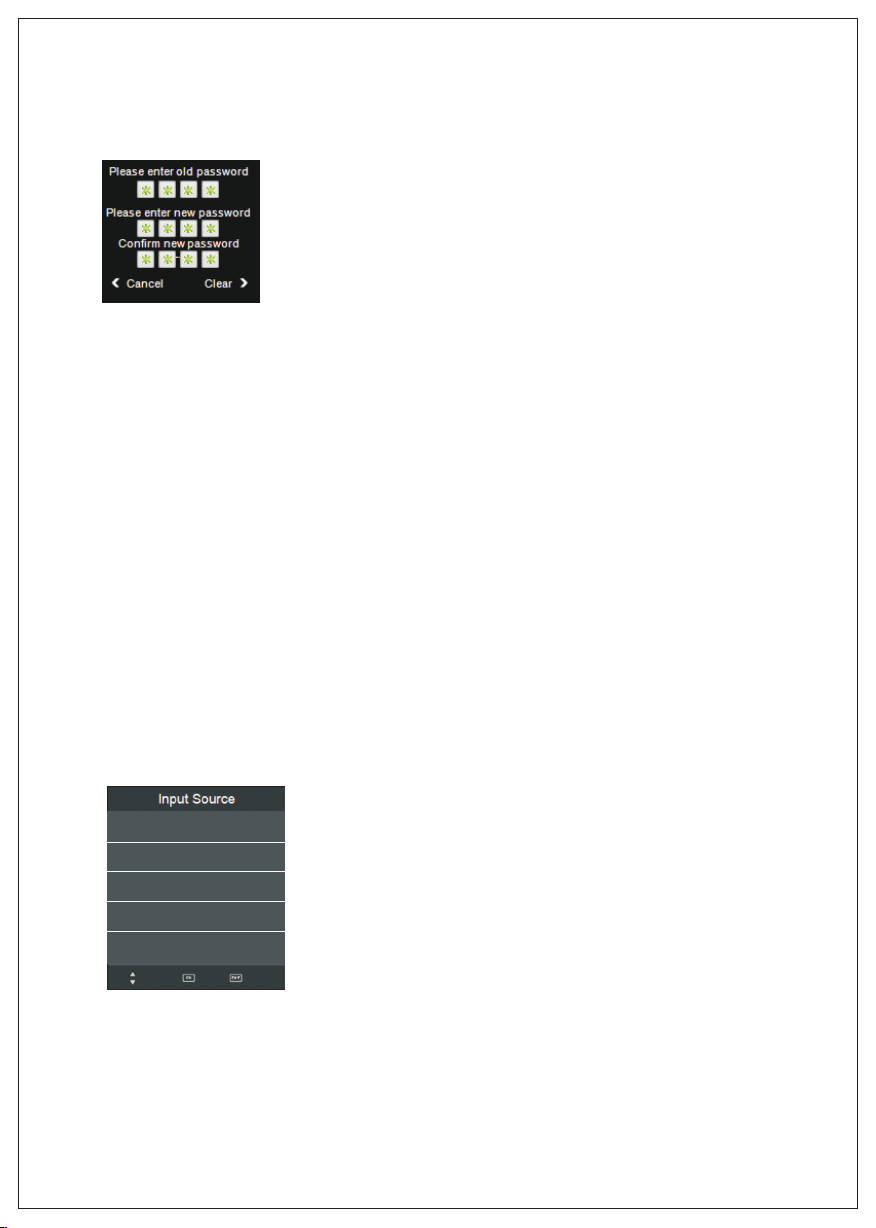
5.1.6.2 Se t Pas swo rd
LEFT to ex it reset passw ord, back to mai n men u;
RIGHT to c ancle the writ ten password , and t hen rewri te it . If the pass wor d get wrong t wic e, it
shows“ pas sword doesn' t mat ch”.
1.6.3 Bl ock P rogram
Check if l ock ed the current c han nle, if loc ked , it need pas swo rd before w atc hing.
1.6.4 Parental Guidance
when setted Parental Guidance is lower than programme true class, it need to lock the
channle and then input password to watch it.
Enter second menu, use UP, DOWN key to choose data, press ENTER to confirm it.
5.2. Other m enu
5.2.1 Inpu t Sou rce
DTV
ATV
SCA RT
YPB PR
DVD
PC
HDM I1
HDM I2
AV
MED IA
Mov e
Input So urc e format, main ly with UP/DOW N to ch oose obje ct. An d then choo se
relate d fun ction key to do th e other action .
Sel ect
Qui t
13
Page 16
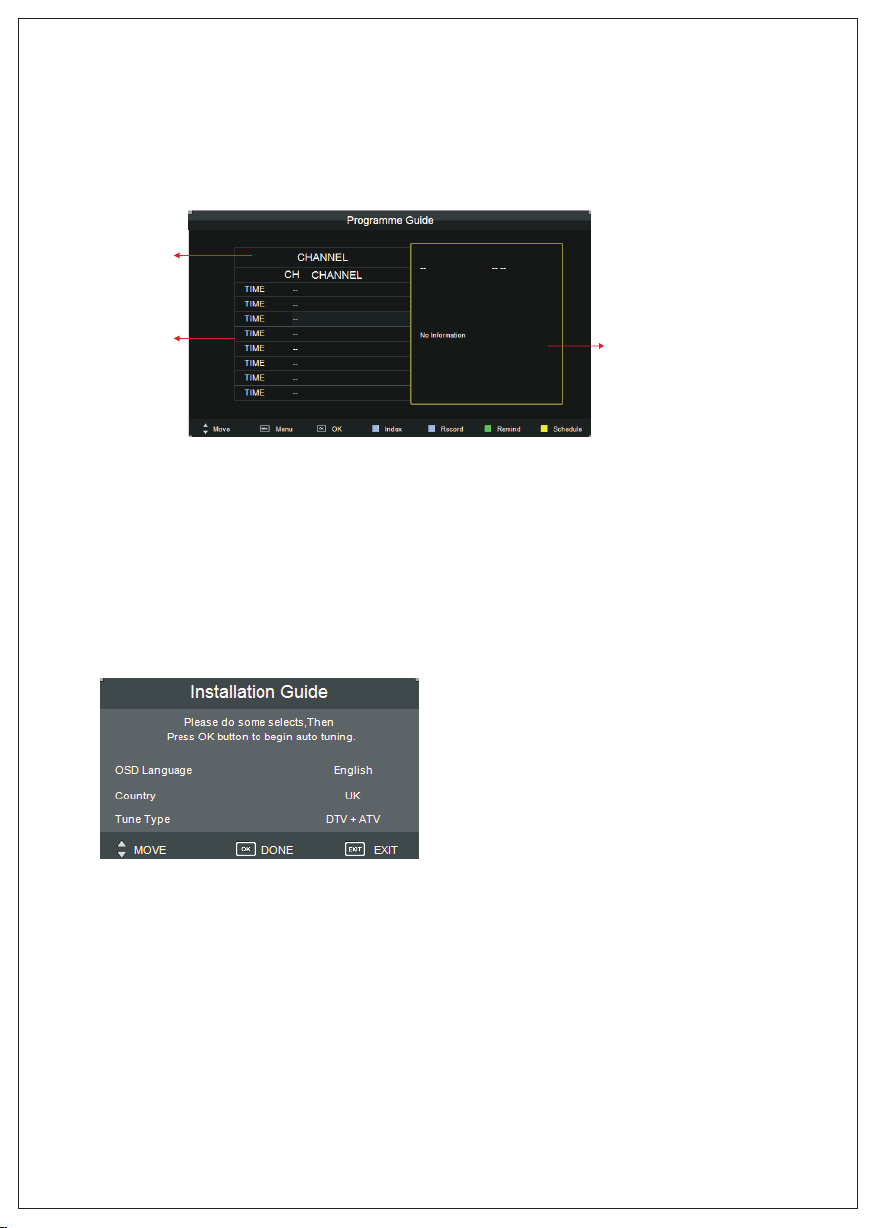
5.2.2 EP G
EPG is onl y ava ilable in DTV, channe l inf ormatio n cla ssfied by C HAN NLE
Can c hoose
up an d down:
Cha nnel
All p rogra mme
inf ormat ion;if
cla ssifi ed by
tim e, it sho ws
all p rogra mme
inf ormat iona at
cur rentl y time
Details
information
of selected
programme
Move: mo ve up a nd down.
Menu: ex it EP G.
OK; swit ch to c urrent selec ted programm e;
Index: s wit ch to type optio n.
Record : rec ord programm e. It show recor d mod e when sele cte d(check P VR ma nual deta ils );
Schedu le: r ecord inform ati on. Check d eta ils at PVR' s Sch edule Lis t int roducti on)
Remind : pro gramme reser ved . Choose Re min d to show the f oll owing set tin gs menu.
Use up and d own t o choose sette d pro gramme.
5.2.3 Insta lla tion Guid e
if not sto red c hannel infor mation, powe r on an d turn to
DTV/ATV c onditio n,it sh ows Installa tio n Guide men u.
Move: mo ve up a nd down.
Exit: ex it me nu.
OK: ente r set ted tuning mod e;
14
Page 17
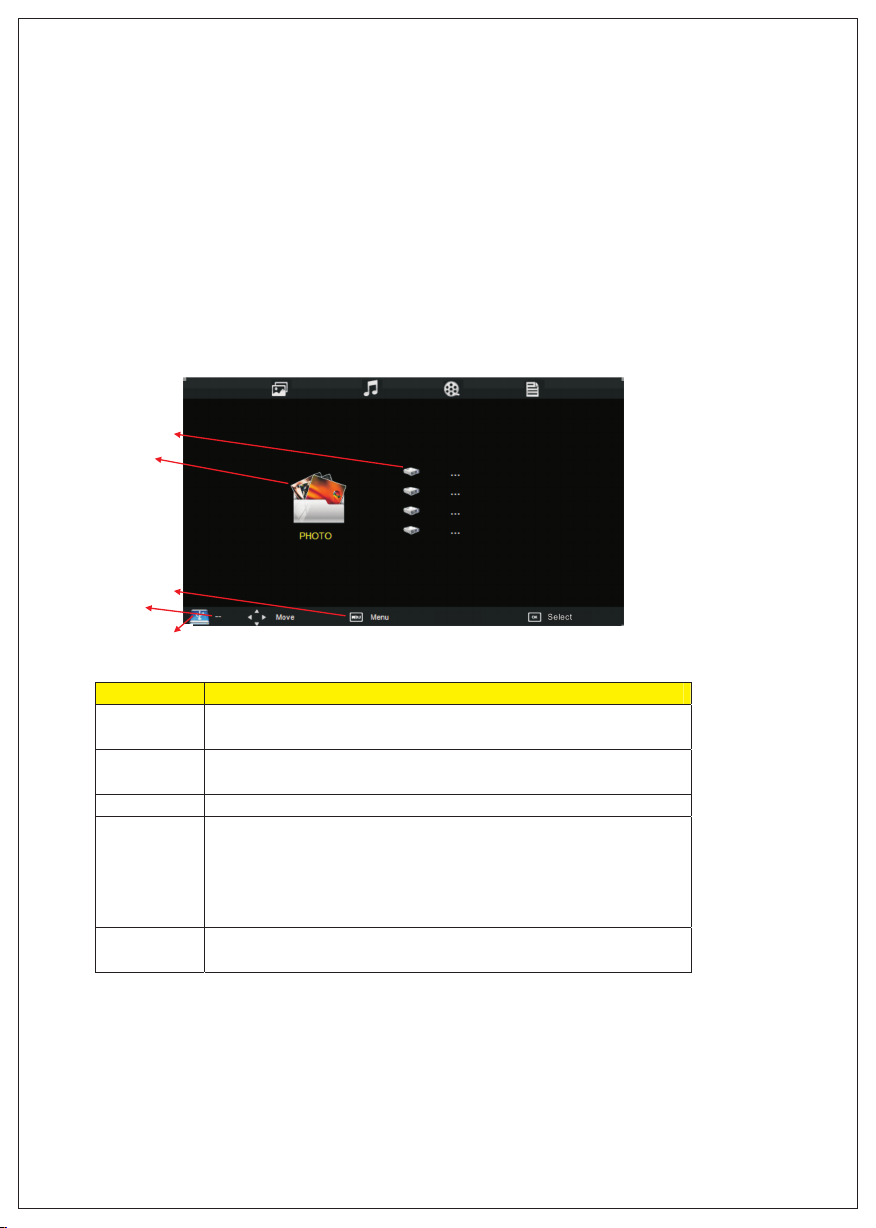
5.3. Multi med ia( MM)
5.3.1 br ief i ntroductio n
At Input S our ce menu, choos e USB port to ente r Mul timedia (MM ) conditi on.
At Multi med ia(MM)cond iti on, the sys ter m can do the fi les c lariufy, o rder, play ing
operat ion a nd other Brows er wo rk beside s mul timedia p lay ing.
5.3.2 mu lti media main men u pattern, spa re pa rt notes an d key board not es.
1) multi med ia main menu sty le:
Discs
multimedia
operation
USB information
Inserting HD info
2) multimedia main menu spare parts introduction
Equip Instruction
Equip inser tin g
messege
Multimedi a
style
Disc
USB info
Operation
guide
If inspect th e USB equip inse rte d, it turn br igh t; otherwise , it tu rn gray.
From left to ri ght PHOTO、M USI C、MOVIE; TE XT for w hat n eed play.
Shows the ins ert d iscs, and o rde r them as let ter s, from C on.
It sho ws curre nt USB equipment information. When no inserting USB,
it sho ws No Device; when inserti ng USB equipment, it shows USB equip,
such as USB 2.0、USB 1.1 and so on ;
If ins pect the re is USB ins ertin g, but with no correct inspeciton messege,
it sho ws as Reinsert Device;
Show the curr ent a vailabl e ope ration;
15
Page 18
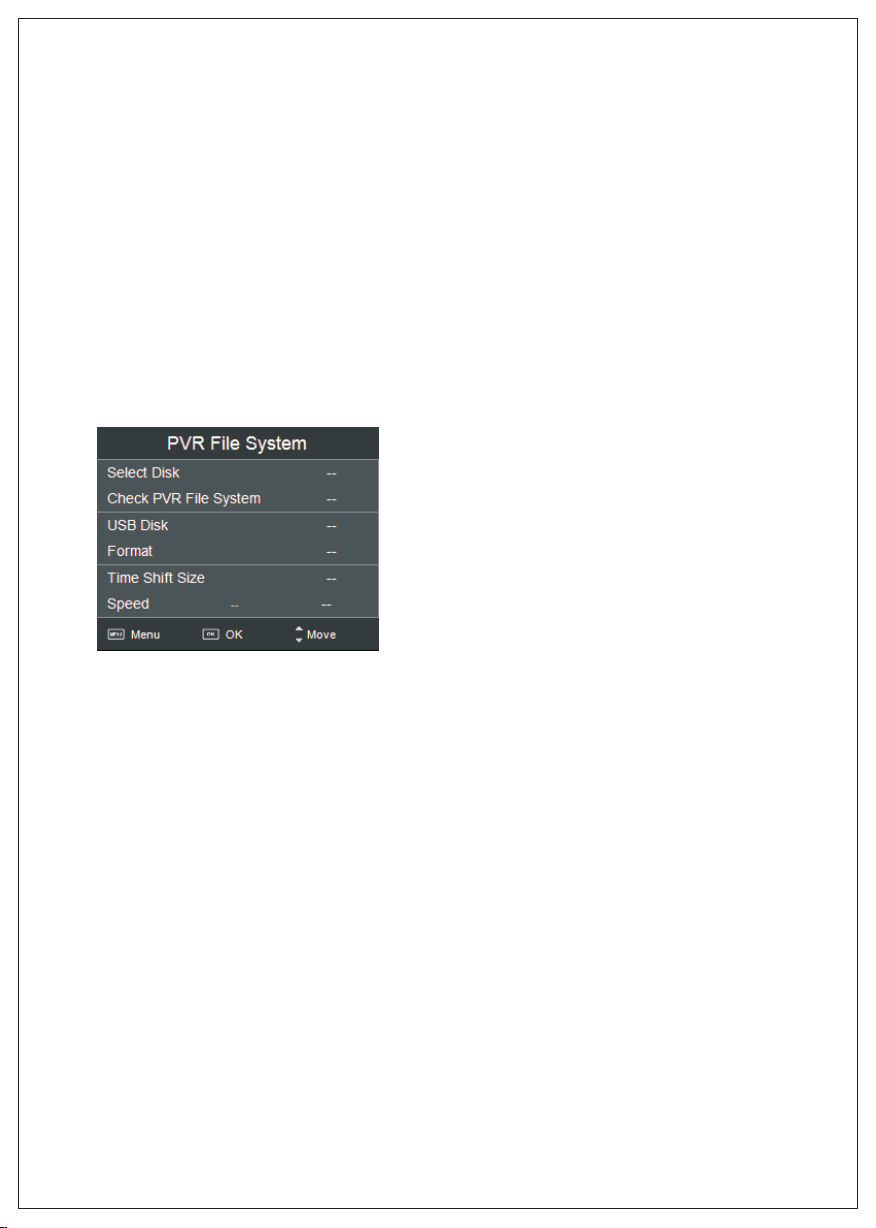
5.4. Personal Video Recorder (PVR)
5.4.1 brie f
PVR func iti on is only avail abl e for DTV, include s Rec ord, Tim esh ift and Pla yba ck
functi on. R ecording inc lud es in time re cor d and prese rve r ecord. In -ti me record c an
be worke d thr ough short-c ut key immedia tel y, and pr ese rve recor d nne d to preser ve
before . Rec ord and Playba ck ca n be done of th e sam e time, tha t mea ns record D TV
and play ing U SB equip at the sa me ti me. Time shi ft is a nother fu nct ion for bot h rec ord
and play ing t ogether. The foll ows i t would explai n in de tails.
5.4.2 PVR me nu fu nct ion d etails.
5.4.2.1 PV R Fil e Sys tem
Enter PV R fro m CHANNEL men u, as f ollows:
5.4.2.1. 1 Sel ect D isk :
Choose t he di sc to store what eve r content n eed r ecord, as f oll ows, defa ult a s C:
5.4.2.1. 2 Che ck PV R Fil e System:
Check st ora ge equipment P VR Fi le System i s wel l establi she d. Defaul t as St art,
OK/Ent er an d Right key to ins pect the USB fil es sy sterm and s pee d, the
proces sio ng shows Check ing …;
When no in ser ting USB, or ins pec tion fail ed, i t shows FAIL ;
When ins ert ing USB but didn 't pa ss MStar Fo rma t, enter Fo rma t menu;
When ins ert ing USB but insp ect ing unnor mal n o partiti on, i t shows No Pa rti tion Foun d.
If inspe cti on normal, it sh ows SUCCESS;
5.4.2.1. 3 For mat :
At Forma t, pr ess OK/En ter o r Right key to sta rt Ch ecking PV R Fil e System,
after co nfi rmed USB equip i nformation , it po p out Forma t Dis k menu as fol low s:
After Fo rma ting, the syst erm would esta bli sh PVR file s yst erm accor din g to previo us co nfirmed
PVR File S yst em Size
5.4.2.1. 4 Time shift si ze
When fin ish C reating PVR fi le sy stem, It po p out Ti me Shift Si ze se tting men u, an d
client s can s et the space siz e for time shift a s fol lows:
5.4.2.2 Ch ann el – Re cor der List
1) patte rn fo r reference, a s follows:
16
Page 19
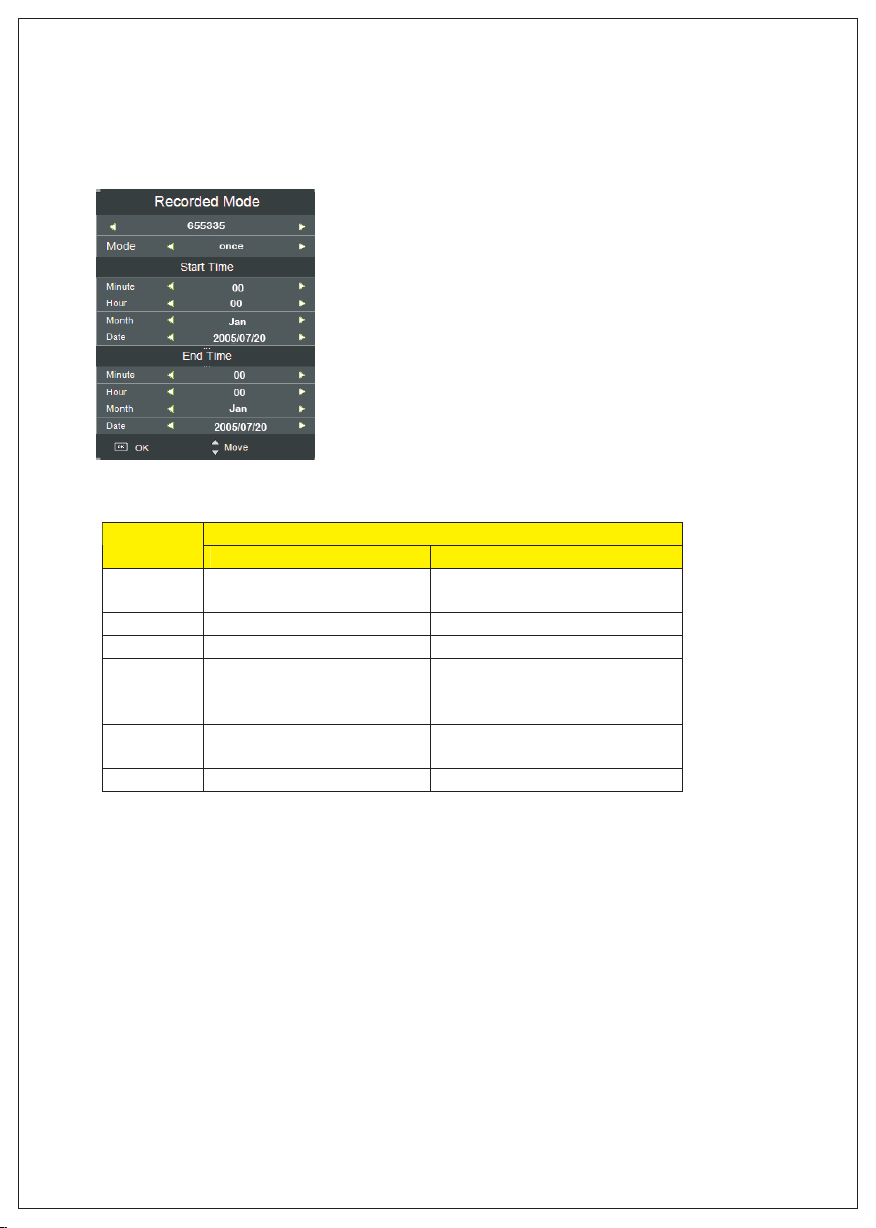
5.4.2.3 PV R - Rec ord M ode
1) recor ded m ode
Key
Menu Exit time setting
Up/Down
OK
●(Schedule)
Exit Not stored, exit menu Not stored, exit menu
Recorder menu Time set menu
Exit Rec ord er, enter PVR men u,
Focus Re cor d Mode;
Move Foc us up a nd down;
Adjust Mode, or enter time settings
Store cu rre nt recording a nd ex it
Record er to e nter Recorde r
Schedu le Li st;
Not stor ed, e xit Recorder t o
enter Re cor der Schedule L ist;
Function
Move Focus up and down;
Adjust d ata
Confir m cur rent setting s and e xit
timese tti ng
----
17
Page 20
7.DVD Operation
Basic operation
1. Turn ON and OFF the DVD function
- Turn on the LCD TV and then press SOURCErepeatedly to select DVD mode.
2. Swquential playback
- For S uper VCD & DVD discs, if PBC is “ON” stat us, press butto n will enter the disc men u.
Press button t o star t in sequent. For others, while it stopp ed, press butto n to sta rt in sequent.
3. Program playback
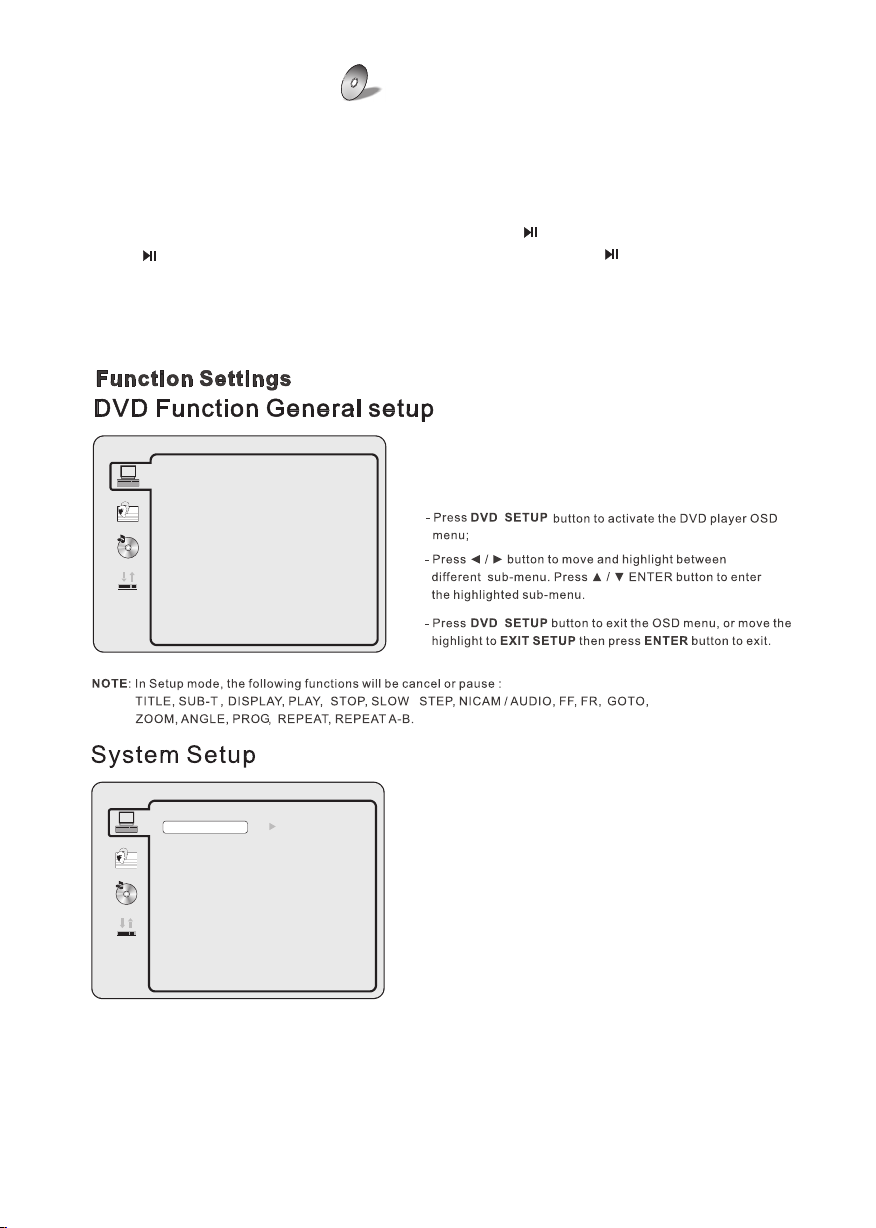
- Using Program playback, you can select max. 16 tracks from the disc to playback in programmed order.
- OSD for program playback as below.
SYSTEM S ETUP
TV SY STE M
TV TY PE
PASS WORD
RATI NG
POW ER RE SUME
SOU RCE
DEFAULT
SYSTEM S ETUP
TV SY STE M
TV TY PE
PASS WORD
RATI NG
POW ER RE SUME
SOU RCE
DEFAULT
NTSC
PAL
AUTO
18
Page 21
SYSTEM S ETUP
TV SY STE M
TV TY PE
PASS WORD
RATI NG
POW ER RE SUME
SOU RCE
DEFAULT
4:3PS
4:3LB
16:9
19
Page 22
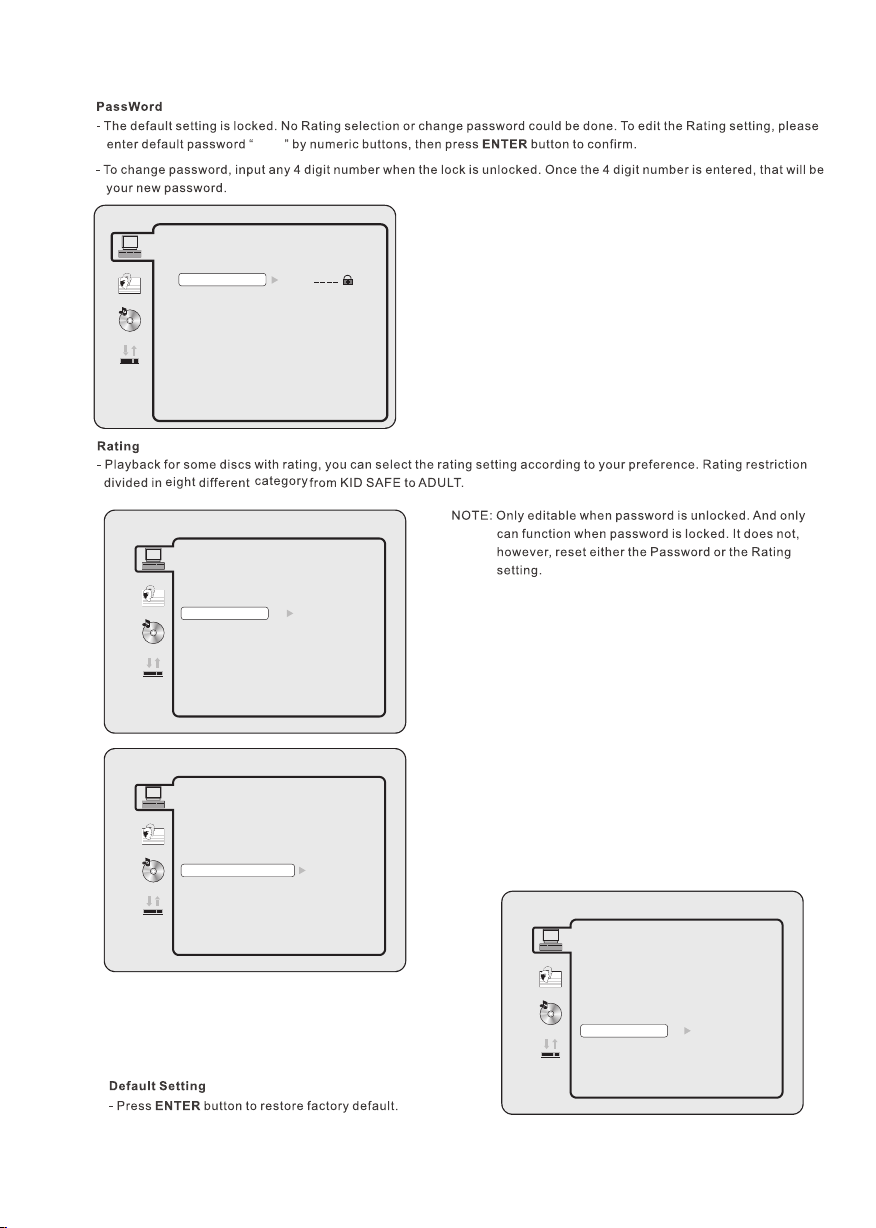
0000
SYSTEM S ETUP
TV SY STE M
TV TY PE
PASS WORD
RATI NG
POWER RE SUME
SOURCE
DEFAULT
SYSTEM S ETUP
TV SY STE M
TV TY PE
PASS WORD
RATI NG
POW ER RE SUME
SOU RCE
DEFAULT
1 KID SAFE
2 G
3 PG
4 PG13
5 PG-R
6 R
7 NC-17
8 ADULT
SYSTEM S ETUP
TV SY STE M
TV TY PE
PASS WORD
RATI NG
POW ER RE SUME
SOU RCE
DEFAULT
ON
OFF
SOURCE
Press en ter b utton to selec t AUTO/D ISC/USB/CA RD
20
POWER RE SUM E
ON:Cho ose t his setti ng to activ at th e power res ume.
OFF:Ch oos e this sett ing to canc el th e power res ume.
SYSTEM S ETUP
TV SYSTE M
TV TY PE
PASS WORD
RATI NG
RESUME
DEFAULT
RESTOR E
EXIT SET UP
Page 23
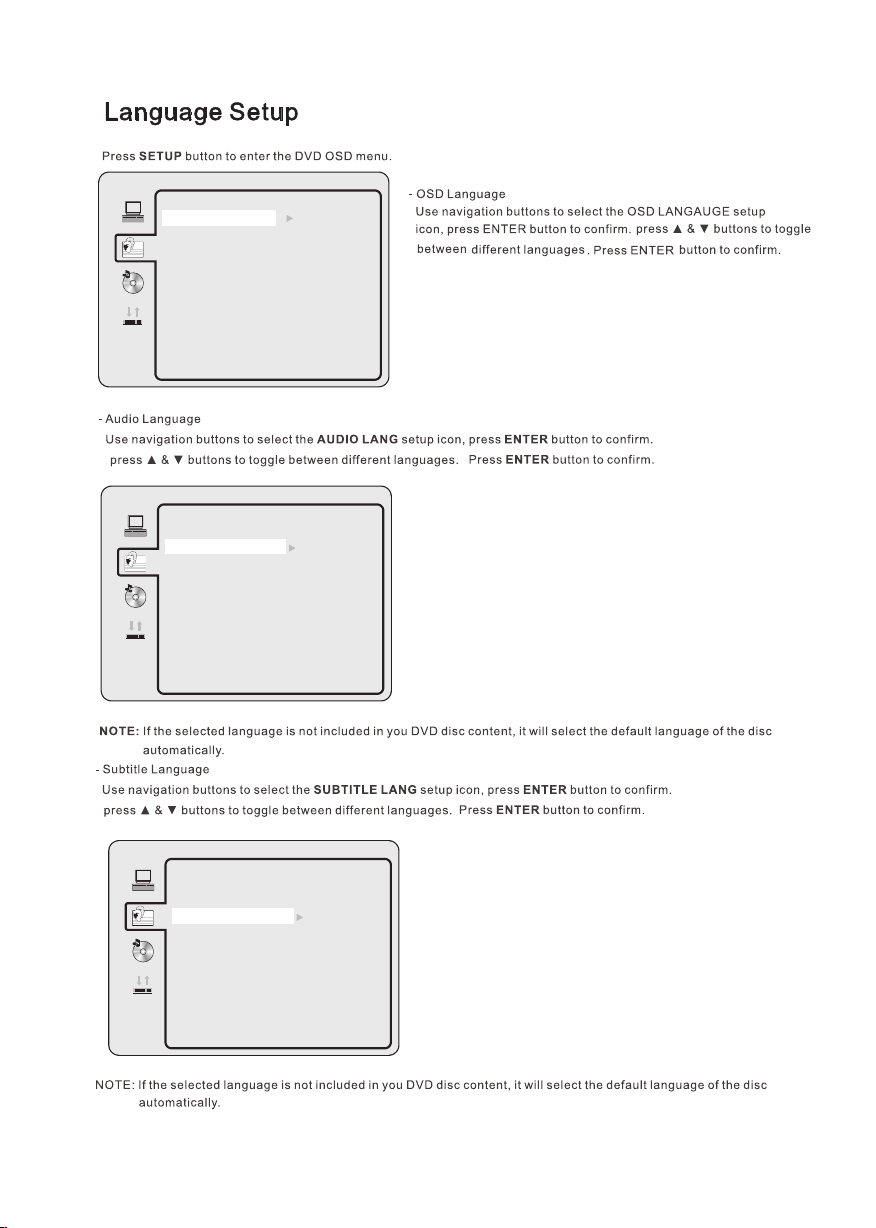
LAN GUAGE S ETUP
OSD L ANGUA GE
AUD IO LANG
SUB TITLE L ANG
MEN U LANG
EXI T SETUP
LAN GUAGE S ETUP
OSD L ANGUA GE
AUD IO LANG
SUB TITLE L ANG
MEN U LANG
EXI T SETUP
ENG LISH
GER MAN
SPAN ISH
FRE NCH
POR TUGU ESE
ITAL IAN
RUS SIAN
DUT CH
ENG LISH
GER MAN
SPAN ISH
FRE NCH
POR TUGU ESE
ITAL IAN
RUS SIAN
DUT CH
OSD L ANGUA GE
AUD IO LANG
SUB TITLE L ANG
MEN U LANG
EXI T SETUP
LAN GUAGE S ETUP
ENG LISH
GER MAN
SPAN ISH
FRE NCH
POR TUGU ESE
ITAL IAN
RUS SIAN
DUT CH
OFF
21
Page 24
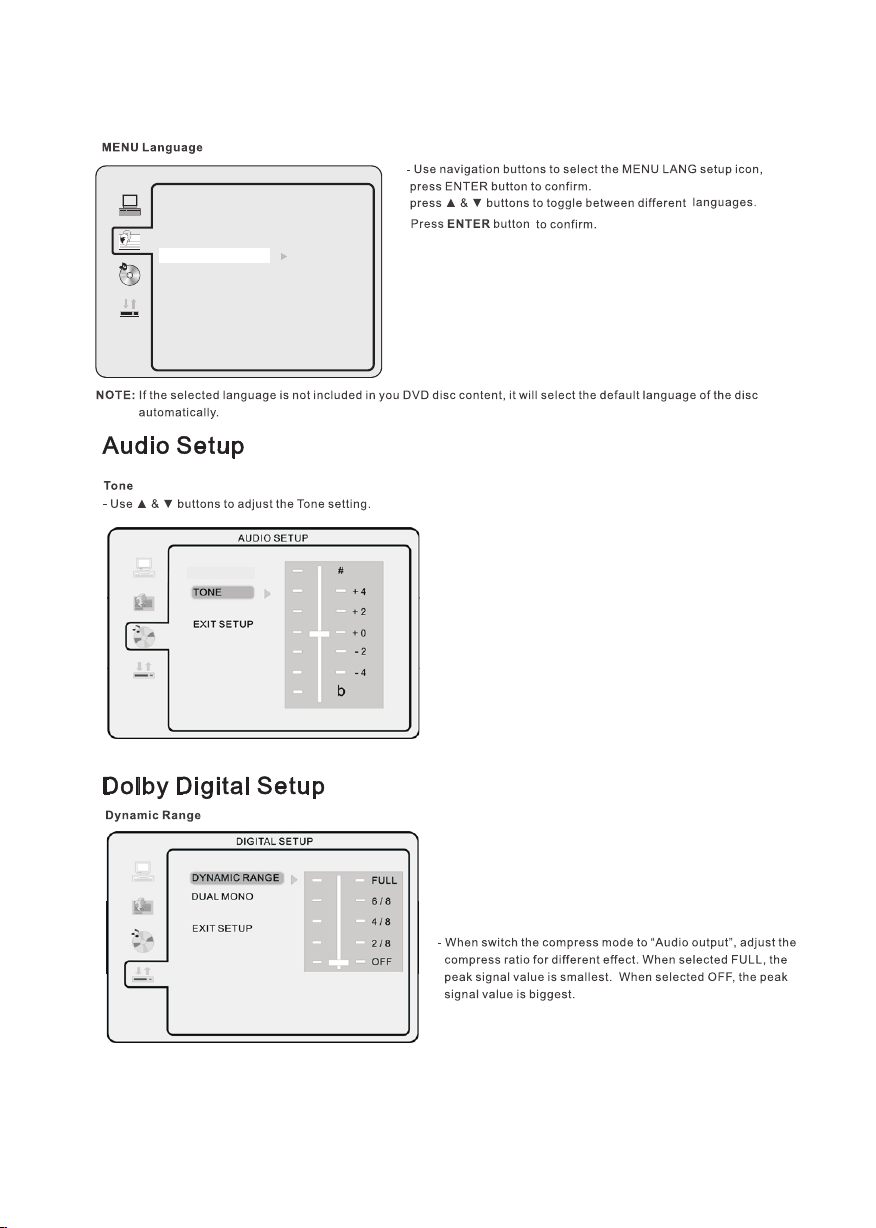
LAN GUAGE S ETUP
OSD L ANGUA GE
AUD IO LANG
SUB TITLE L ANG
MEN U LANG
EXI T SETUP
ENG LISH
GER MAN
SPAN ISH
FRE NCH
POR TUGUE SE
ITAL IAN
RUS SIAN
DUT CH
22
Page 25
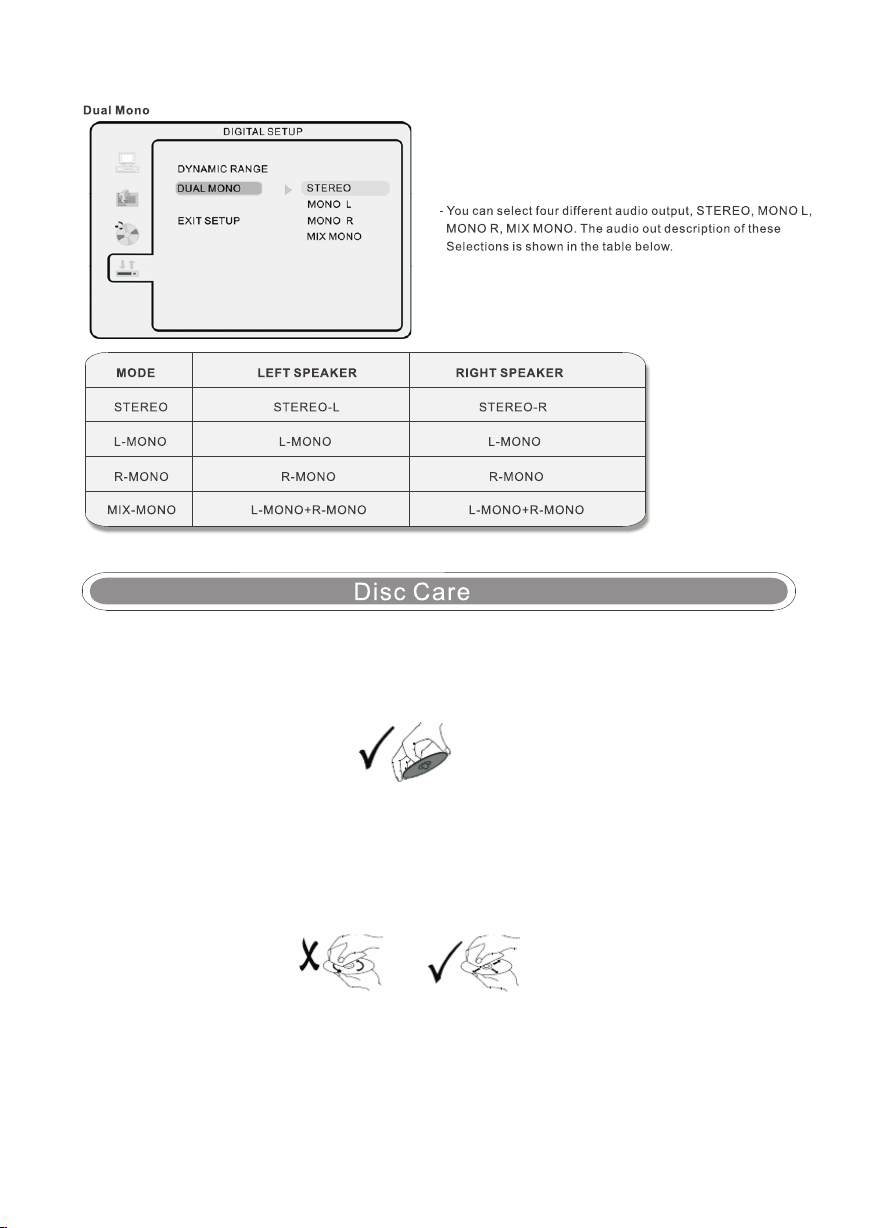
Handling Di scs
Do not touch th e pla yback sid e of th e disc. Hol d the d isc by the edges s o tha t
fingerpri nts d o not get on th e sur face. Nev er st ick paper or tap e on th e disc.
Storing Dis cs
After pl ayi ng, store the d isc i n its case. Do no t expose the dis c to di rect sunl igh t
or head sourc e and n ever leav e it in a p arked car e xpo sed t o direct su nli ght.
Cleaning Di scs
Fingerpri nts a nd dust on th e dis c can cause p oor p icture quali ty an d sound
distortio n. Be fore play ing ,clean th e dis c with a clean clo th. W ipe the
disc from the c ent er out.
Do not use stro ng so lvents su ch as a lcohol, ben zine,thinn er, co mmercia lly
available c lea ners,or a nti -static s pra y intended for o lde r vinyl rec ord s.
23
Page 26
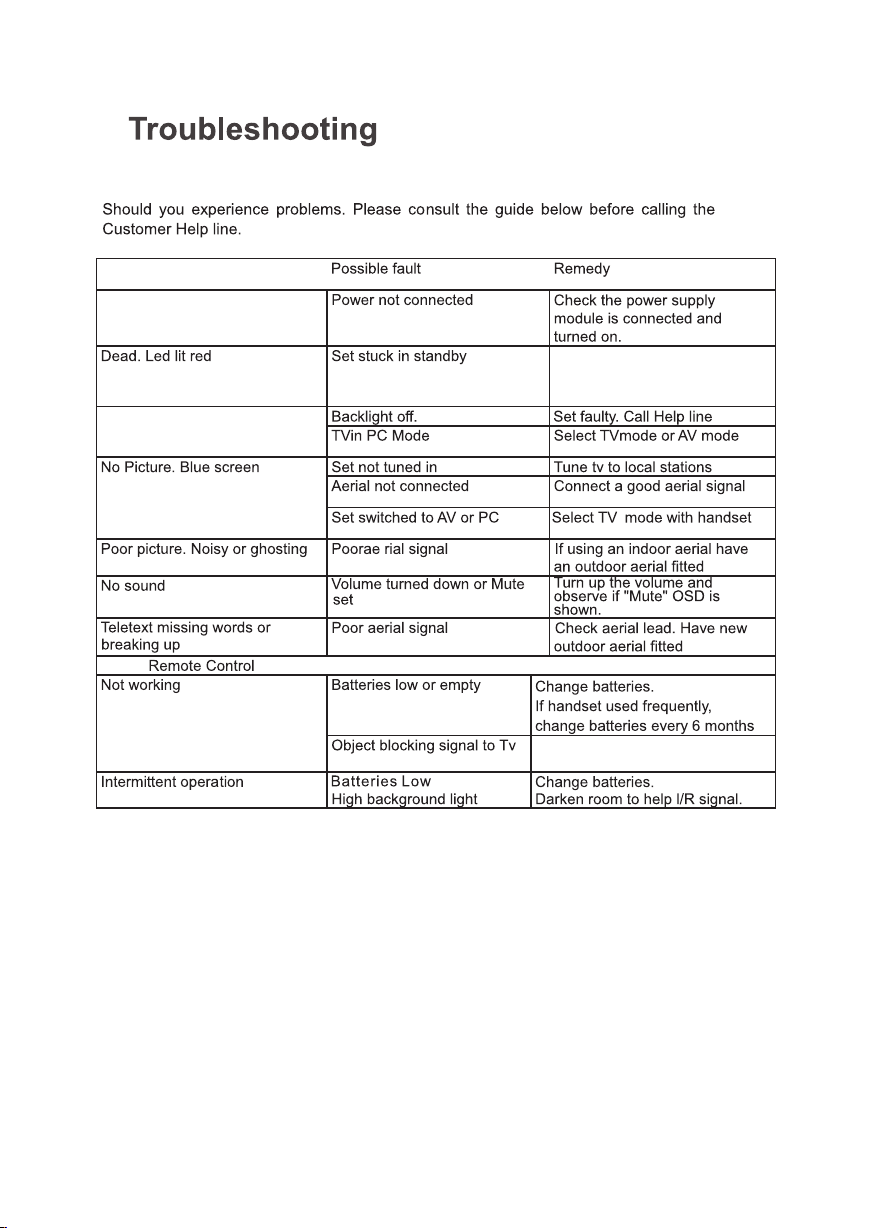
8.
TV Probl em
Dead. No R ed or G reen led light
No Pictu re le d Green Sound OK
Press Power button on the TV or
remove mains power and
reconnect after 30 sec's
Move objects in Infrared signal path
or Wireless Head Phones
Other Note s:
Static or ot her e xte rna l interference may cause the p lay er to b eha ve abnormally. If this
occurs, un plu g the p owe r-supply cord from the outle t and p lug i t bac k in to reset the
player. If th e pro ble m sti ll persists, then please dis con nec t the p ower and consult a
qualifie d tec hni cian.
24
 Loading...