

Page 1

TINYOM / HELYOMBT
UTILITIES
USER GUIDE
Page 2

2
TXcom makes no guaranteed declaration or offer concerning the contents or use of
this manual, and notably refutes any express or implicit liability as regards the
merchandisable quality or suitability for a particular use of the product. In addition
TXcom reserves the right to update this publication and to make changes at any time
without notice.
TXcom refutes any liability concerning any modifications that might be made to the
commodities supplied.
You use this equipment at your own risks and perils. TXcom will not be held liable for
any direct or indirect losses or damage resulting from its use.
Moreover, TXcom reserves the right to modify its products, entirely or in part, at any
time without notice.
This hardware is guaranteed by TXcom for one year from the date of delivery. During
this period, any defective equipment item will be repaired or replaced without charge.
Copyright © 2005 TXcom. All rights reserved.
This manual is intended for the private use of the recipient, whether supplied on
paper or in electronic form. It may not be modified or copied by any means
whatsoever without written authorization from TXcom.
All names of products mentioned in this documentation are registered trademarks of
their respective manufacturers.
P/N : 6063
Version 2.03 Septembre 2007
Page 3

TINYOM / HELYOMBT UTILITIES USER GUIDE
3
Presentation........................................................................................ 5
Using TXcom reader ........................................................................... 6
Pairing ................................................................................................ 6
Creating a SPP connection...................................................................... 7
Master mode .................................................................................... 7
Slave mode....................................................................................... 8
Starting / Turning off........................................................................... 9
Starting........................................................................................... 9
Turn off .......................................................................................... 9
Operating ........................................................................................... 9
Charging the Battery .......................................................................... 11
Installing the Hand strap (TINYOM)..................................................... 11
The utilities ...................................................................................... 11
TinyomSet HelyomSet...................................................................... 11
ComclavXP...................................................................................... 12
BDAprint ....................................................................................... 12
TinyomSet HelyomSet Software ....................................................... 13
Installation ....................................................................................... 13
Description ....................................................................................... 14
General Settings ................................................................................ 16
Radio............................................................................................. 16
Transmission mode .......................................................................... 17
Bar code Add-Ons ........................................................................... 18
Power management .......................................................................... 19
Bar code Settings............................................................................... 20
Default bar code ............................................................................. 20
Enabling a bar code.......................................................................... 21
Disabling a bar code......................................................................... 21
Trigger Settings ................................................................................ 22
One shot ........................................................................................ 23
Hold .............................................................................................. 23
Multiscan ....................................................................................... 24
Firmware Upgrade .............................................................................. 26
ComClav Settings ............................................................................... 27
Setting Up the TXcom reader ........................................................... 29
Upgrading TXcom reader firmware................................................... 30
Resetting TXcom reader ................................................................... 32
Default Configuration ........................................................................ 33
Creating a new configuration file ..................................................... 34
Page 4

4
Loading a new configuration ............................................................ 35
ComClavXP Software ........................................................................ 36
Installation ....................................................................................... 36
Starting ComClavXP............................................................................ 36
BT Connection.................................................................................... 36
Stopping a BT connection..................................................................... 37
Ending ComClavXP............................................................................... 37
Setting Parameters ............................................................................ 37
ComClavCE Software ........................................................................ 39
Starting ComClavCE ............................................................................ 39
BT Connection.................................................................................... 39
Stopping a BT connection..................................................................... 41
Ending ComClavCE............................................................................... 41
Setting Parameters ............................................................................ 42
ComClavMobile Software .................................................................. 44
Starting ComClavCE ............................................................................ 44
Bluetooth Configuration on Windows Mobile............................................ 45
BT Connection.................................................................................... 47
Stopping a BT connection..................................................................... 48
Ending ComClavCE............................................................................... 49
BDAprint Software ............................................................................ 50
Safety / Regulatory............................................................................ 52
Page 5

TINYOM / HELYOMBT UTILITIES USER GUIDE
5
Presentation
The Tinyom and the HelyomBT are Bluetooth laser scanner, the
Tinyom have the distinctive feature of being hand free. They
communicate with any device equipped with a Bluetooth module.
The Tinyom and the HelyomBT work in the same manner except for
the triggering. In the following documentation, TXcom reader means
that the feature applies for both units.
Only SPP profile (Serial Port Profile) is supported. This profile allows
you to establish a serial link between two Bluetooth devices.
The Bluetooth device must be a PC (BALADYOM, ....), a tablet PC, a
PDA (PREMIOM, ....), a printer.
Depending on the device Operating System, TXcom reader will operate
in master mode or in slave mode.
Tinyom HelyomBT
Page 6

6
TinyomSet software is a utility to set up and upgrade the Tinyom, and
HelyomSet the equivalent for the HelyomBT. ComClavXP, ComClavCE
software are utilities compatible for both units.
TinyomSet and HelyomSet are programming tools of the Tinyom and
the HelyomBT and also tools to create initialization files which will be
used by Conclav software.
ComClavXP and ComClavCE are keyboard emulation which also make it
possible to initialize TXcom reader.
Using TXcom reader
Pairing
To pair TXcom reader to a Bluetooth device
In master mode
Read the bar code label containing the Bluetooth Device Address
of the remote device with the TXcom reader.
Label Format
code 128
BDA Address {FNC3}aabbccddeeff{FNC3}
Where
aa hexadecimal value of the first byte of the BDA address
bb hexadecimal value of the second byte of the BDA address
....
ff hexadecimal value of the last byte of the BDA address
When the TXcom reader is put on the charger, it switches to slave
mode.
You need to pair it before using it.
Page 7

TINYOM / HELYOMBT UTILITIES USER GUIDE
7
In slave mode
Read the bar code hereafter with the TXcom reader and activate
the Bluetooth device discovery from the remote device to find
the TXcom reader and connect it to the Bluetooth device.
Slave Mode
The Tinyom BDA address is located under the Tinyom, near the
fastener.
The HelyomBT BDA address is located behind the HelyomBT
laser window.
Creating a SPP connection
Install on your PC a Bluetooth Software, before plug-in Bluetooth
device.
When the installation is completed, proceed as follows:
Master mode
1. Check your Bluetooth device address
Start / Settings / Control Panel / Bluetooth
Configuration / Hardware Tab
Page 8

8
2. Print a bar code containing the BDA address of the device.
See Label format on page 6 and see BDAprint software on page 50
3. In Bluetooth properties, unitck Secure Connection
Start / Settings / Control Panel / Bluetooth
Configuration / Client application / Proprieties button
4. Scan the BDA label with TXcom reader.
Slave mode
1. Open the Bluetooth serial port.
2. Search for Bluetooth device.
Start / Programs / My Bluetooth Places / Bluetooth Menu
/ Search for device Option
Page 9

TINYOM / HELYOMBT UTILITIES USER GUIDE
9
3. Connect the Bluetooth device to TXcom reader.
Starting / Turning off
Starting
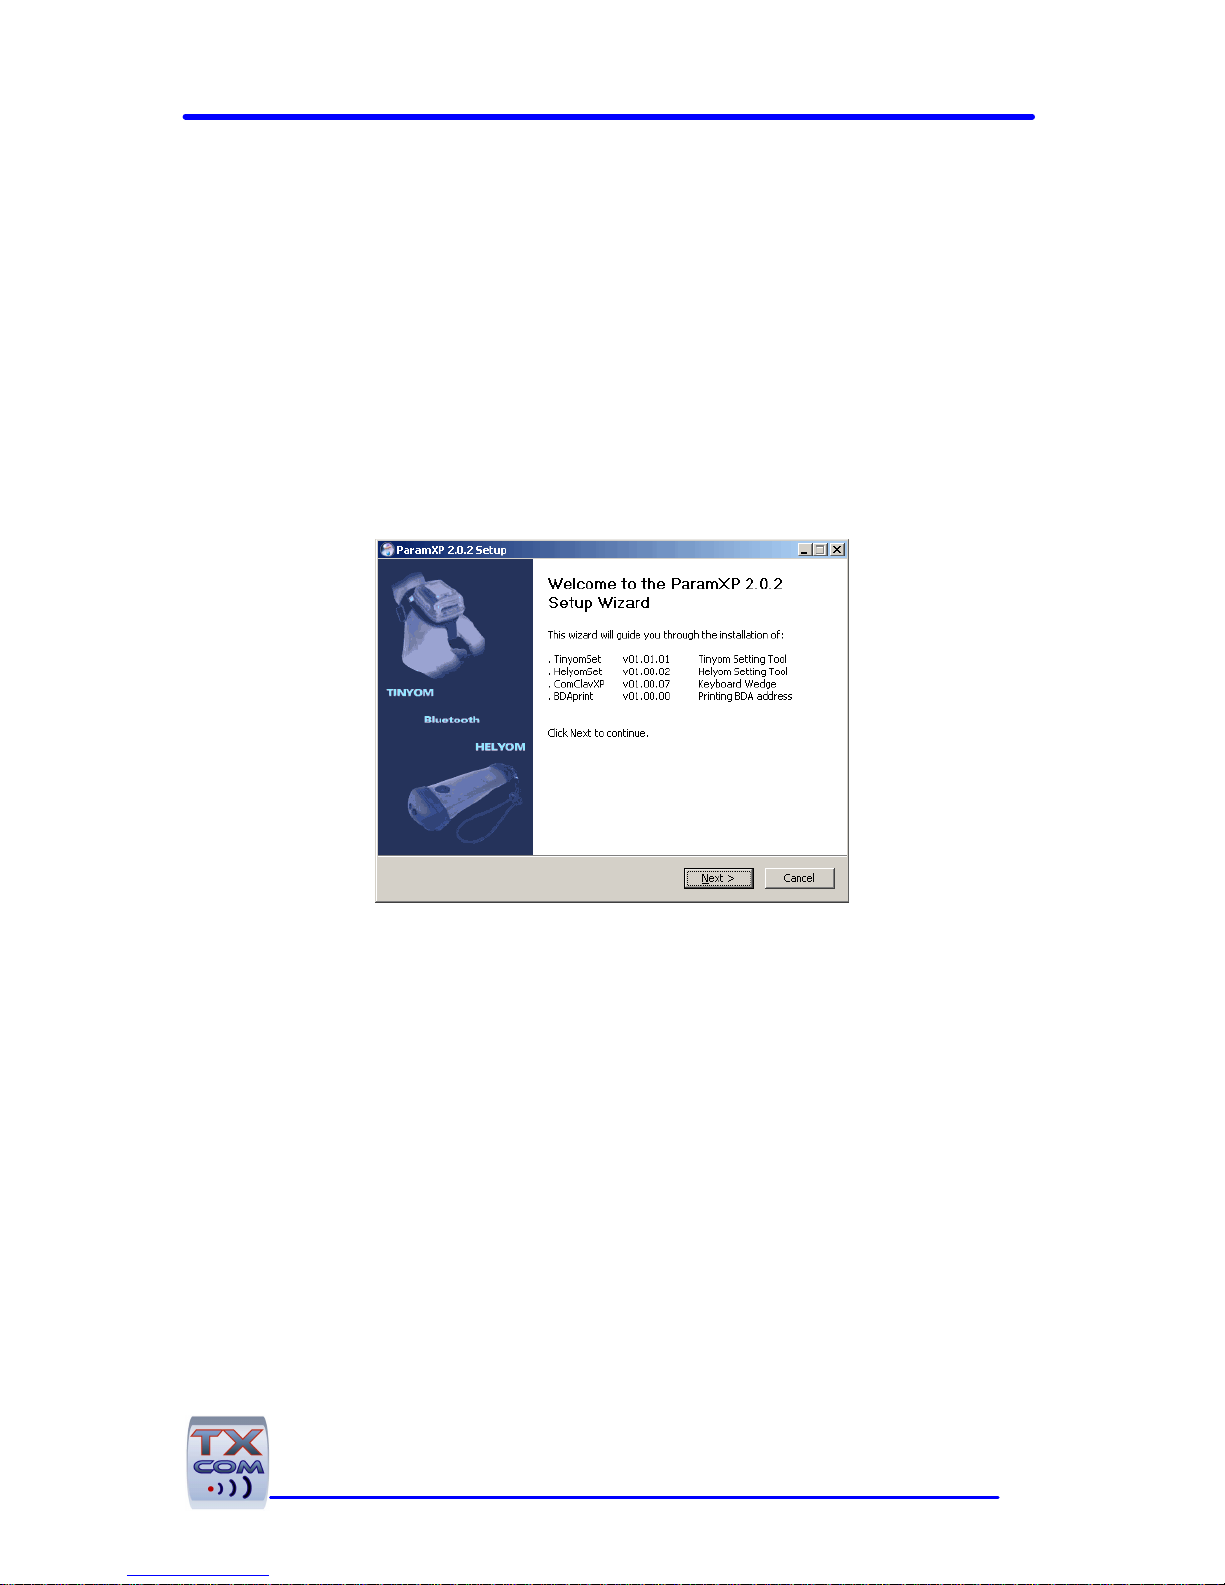
For the Tinyom, press lightly on the touch sensor during one second.
For the HelyomBT, press the trigger button during 1 second.
Turn off
The TXcom reader turns off:
• Automatically after a configurable delay without activity,
this delay is set to 1 hour by default,
• By a long touch of roughly 2 seconds on the sensor when the
long touch triggering mode is set to ON/OFF (See Trigger
setting on page 21),
• For the Tinyom, by a long touch greater then 7 seconds and
after that the 3 LED green, red, blue flash briefly.
Operating
The laser reading is triggered by the activation of the touch sensor or
the motion sensor for the Tinyom, by the trigger button for the
HelyomBT or by radio for both.
Read could be one-shot mode or burst mode.
1. Start the laser scanner.
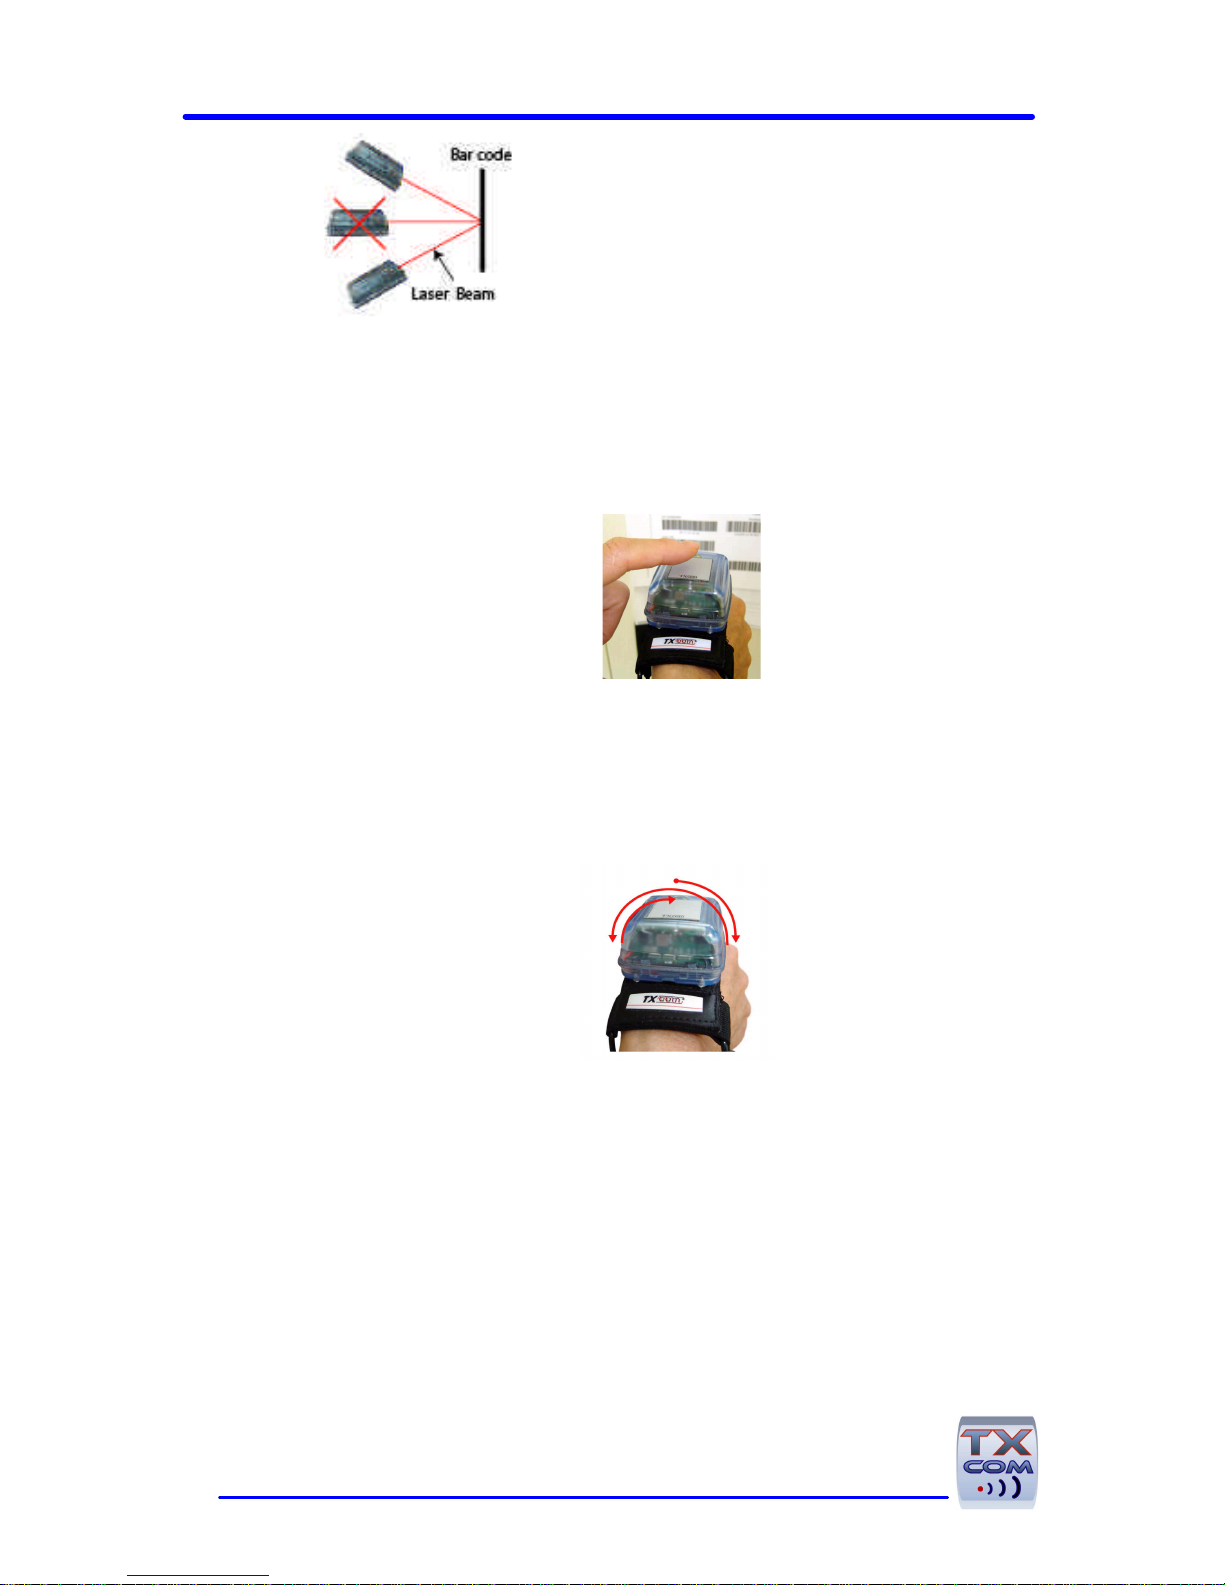
2. Aim the laser window on the bar code label to read.
Hold the laser scanner at a slight angle to the bar code, other than
perpendicular.
Page 10
10
3. Start scanning by one of the following modes:
One shot mode
Default mode.
• By the touch sensor or the trigger button
or
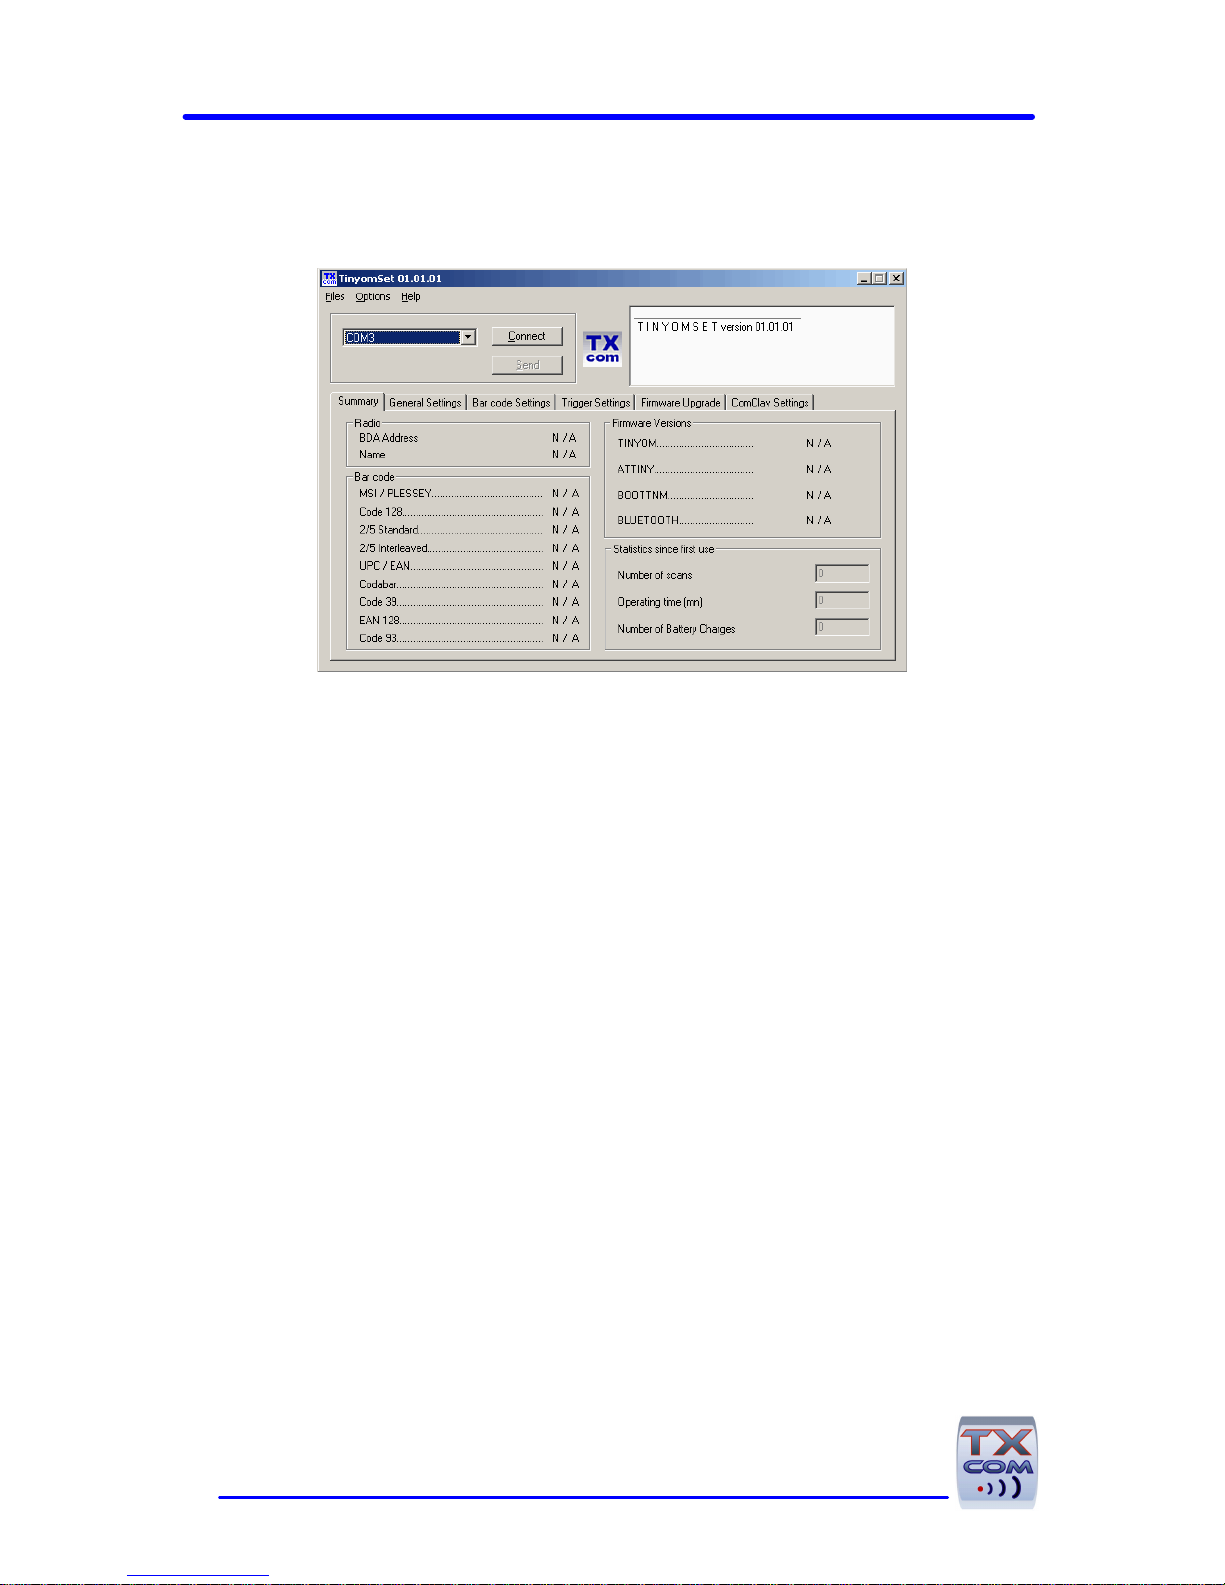
• By the motion sensor
This one detects a preset movement (wrist in stable position,
then movement from left to right or vice versa, then return in
stable position, then the laser beam starts).
In this mode, once the beam is on, it remains on without any user
action until that the TXcom reader reads a bar code. To make the
next read, it is necessary to start the laser once again.
Hold mode
Page 11

TINYOM / HELYOMBT UTILITIES USER GUIDE
11
Default mode.
By a long press until a bar code read.
In this mode, to keep the beam on, the user should press the touch
sensor or the button until that the TXcom reader reads a bar code. To
make the next read, it is necessary to start the laser once again.
Burst mode
Default mode.
By a long press of roughly one second on the touch sensor or the
trigger button.
In this mode, once the beam is on, it remains on without any user
action until that the TXcom reader reads a bar code and starts
automatically the beam for the next read after a configurable delay.
Charging the Battery
The battery must be charged between -20°C and +45°C.
Please refer to the Quick Guide provided with the reader.
Installing the Hand strap (TINYOM)
Please refer to the Quick Guide provided with the reader.
The utilities
On the CDROM ship with the TXcom reader, you can find the ParamXP
Setup for Windows XP which installs the following utilities:
TinyomSet HelyomSet
This software is used to set up and upgrade the firmware of
respectively the Tinyom and the HelyomBT.
Page 12

12
ComclavXP
This software is used to send bar codes read in keyboard emulation.
BDAprint
This software is used to print the pairing label of the TXcom reader.
Page 13
TINYOM / HELYOMBT UTILITIES USER GUIDE
13
TinyomSet HelyomSet Software
TinyomSet and HelyomSet software allow modifying parameters and
upgrading the firmware of respectively the Tinyom and the HelyomBT.
Installation
Install ParamXP Setup on your PC under Windows XP.
Page 14
14
Description
In the upper part of the screen, you will find:
• The Menu bar
• Message window, where messages are displayed
• Virtual port used by the Bluetooth connection
• Connect / Disconnect button to establish the connection
from the Bluetooth device to the TXcom reader
• Send button to send edited data to the TXcom reader.
On the lower part of the screen, you will find different tabs:
• Summary
• General settings
• Bar code settings
• Trigger settings
• Firmware upgrade
• ComClav settings.
Settings are accessible when the TXcom reader is connected to a
Bluetooth device or when editing a ComClav.ini file.
Message window
Page 15
TINYOM / HELYOMBT UTILITIES USER GUIDE
15
Once the TXcom reader paired to the Bluetooth device, select the
virtual port used by the Bluetooth connection then click on Connect
button to establish connection. Data will be displayed after a while in
Summary tab.
Summary
In Summary tab, basic data are displayed (BDA address, TXcom
reader name, Bar code enabled, firmware version, and statistics since
first use).
Page 16
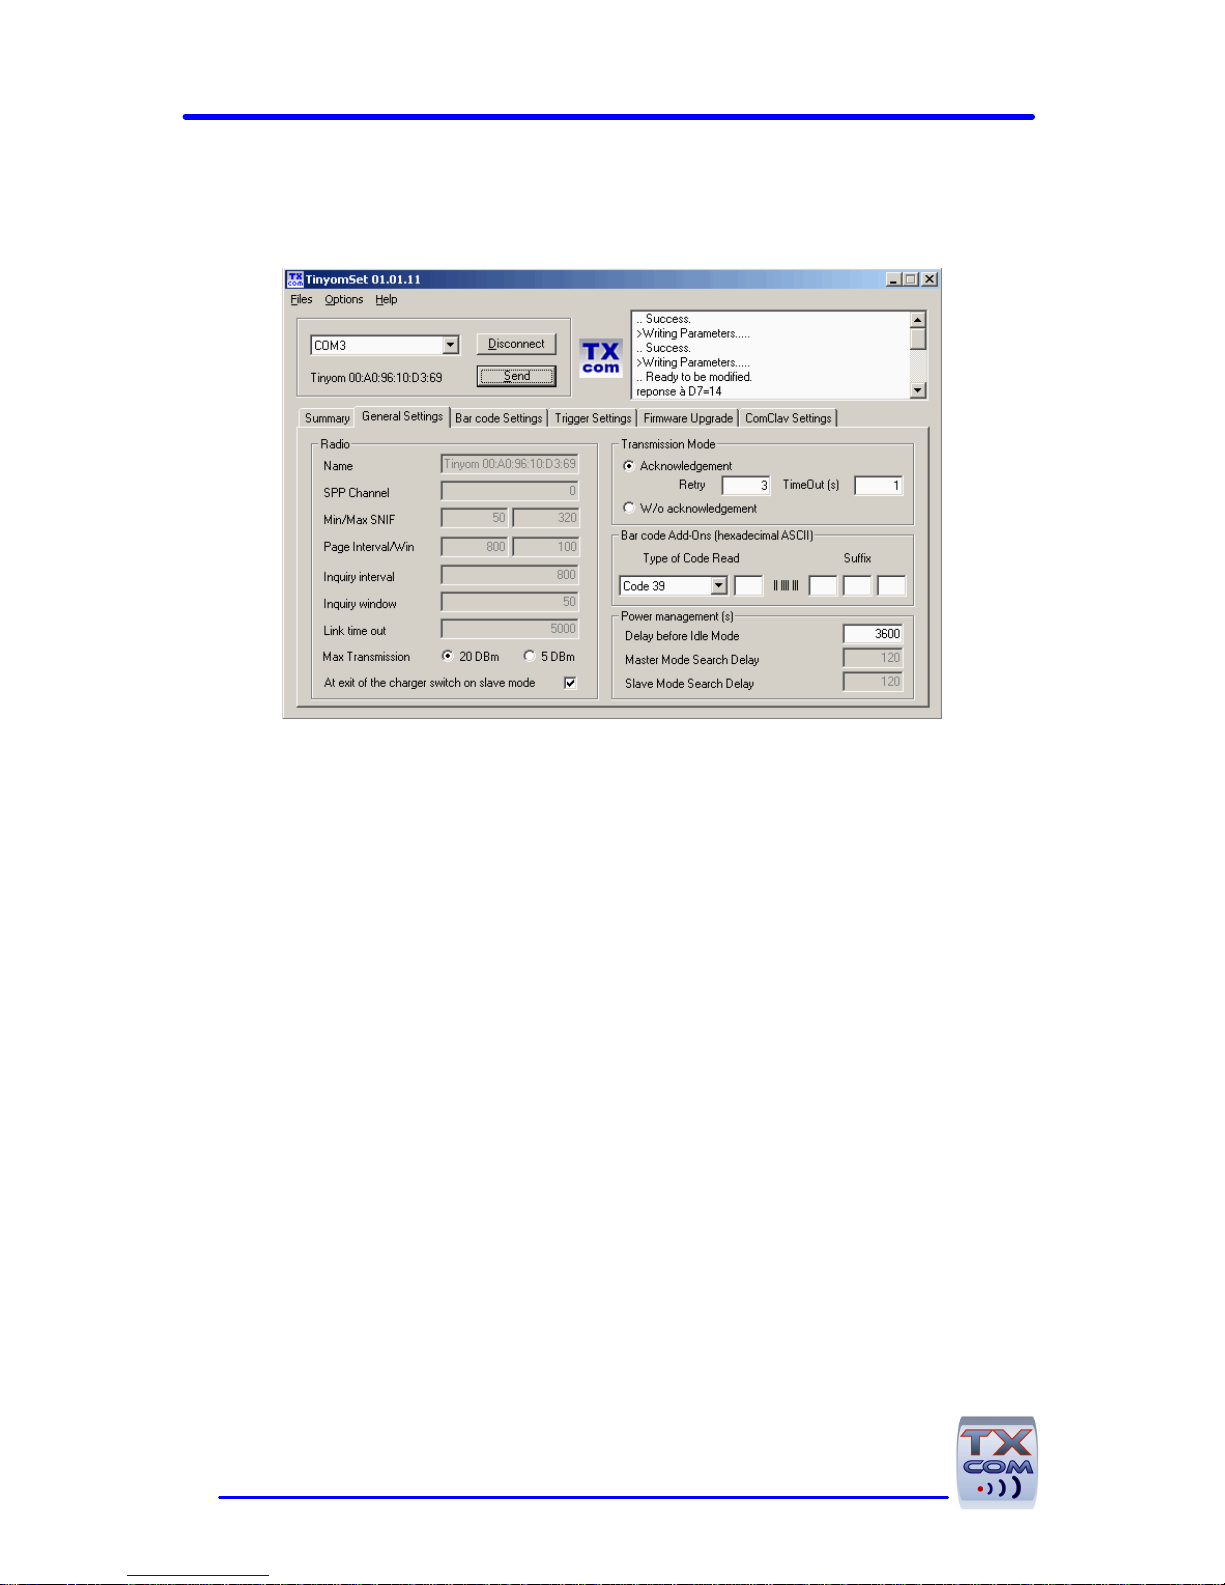
16
General Settings
Radio
TXcom reader is compatible with Bluetooth Class I and Class II. By
default, it is set to Class I but it is possible to change it through Max
Transmission parameter.
When At exit of the charger switch on slave mode
parameter is ticked, if the TXcom reader is used in master mode, the
user should scan the pairing label after each charge, this protect from
undesired connection if the TXcom reader change frequently from a
Bluetooth device to another. On the other hand, if the TXcom reader
is paired with a fix Bluetooth device, it is possible to untick this
Max
Transmission
Class
Open field
range
20 dBm I 100 m
5 dBm II 15 m
Page 17

TINYOM / HELYOMBT UTILITIES USER GUIDE
17
parameter, TXcom reader will try to connect to the last device with
which it was connected from charger exit.
Transmission mode
With acknowledgment
After a bar code read, the TXcom reader sounds a good read
beep and sends the bar code. It waits for acknowledgment during
TimeOut delay in seconds. When it receives the acknowledgment,
the TXcom reader sounds a good transmission beep and the
green LED flashes fast. If it doesn’t receive the
acknowledgment, the TXcom reader tries to send once again the
bar code. When the number of retry defined by Retry is
exceeded, the TXcom reader sounds 3 beeps and the red LED
flashes fast.
This mode allows indicating to the user a transmission problem
between the TXcom reader and the remote Bluetooth device.
Without acknowledgment
The TXcom reader sends a bar code. The TXcom reader sounds 2
beeps and the green Led flashes fast.
In this mode, there’s no control of the good transmission of the
bar code to the Bluetooth device.
We recommend to use acknowledge mode to secure communication
between TXcom reader and Bluetooth device.
Page 18

18
Bar code Add-Ons
Type of code read prefix and suffix can be transmitted with the bar
code.
Type of Code Read
The type of code read can be sent with the bar code. This character
(hexadecimal ASCII) when sent, is located in front of the bar code.
By default, no prefix is sent.
For each type of code enter the hexadecimal ASCII value of the
character to add.
Example:
Read Code
Entered value
(hexadecimal ASCII)
Character
sent as prefix
Code 39 41 A
Interleaved 2/5
49 I
Standard 2/5 52 R
Codabar 46 F
UPC/EAN 45 E
Code 128 43 C
MSI/PLESSEY 4D M
Code 93 47 G
EAN 128 4A J
CODABLOCK F 56 V
Suffix
The bar code can end with a suffix. It includes one to three
characters, coded in hexadecimal ASCII.
Example to send character Carriage Return (CR), enter value 0D.
Page 19

TINYOM / HELYOMBT UTILITIES USER GUIDE
19
Power management
The parameter Delay before idle mode defines the delay without
activity after which the TXcom reader turn off. This delay is set to 1
hour par default.
Page 20

20
Bar code Settings
Default bar code
CODE 128
CODE EAN 128
Symbology
Bar code parameters
Selected bar
code
Page 21

TINYOM / HELYOMBT UTILITIES USER GUIDE
21
CODE 39
CODE 93
CODABAR
CODE UPC/EAN
Enabling a bar code
Select the bar code by clicking on, its parameters are displayed
Set up the parameters
Tick the check box to enable the symbology.
Disabling a bar code
Select the bar code and untick the check box
Page 22

22
Trigger Settings
Trigger settings vary from the Tinyom to the HelyomBT.
Trigger Settings Tab TinyomSet
Trigger Settings Tab HelyomSet
The laser reading is triggered by the activation of the touch sensor or
the motion sensor for the Tinyom, the trigger button for the
HelyomBT, or by radio through a protocol for both.
Page 23

TINYOM / HELYOMBT UTILITIES USER GUIDE
23
Read could be either one shot mode or burst mode or hold.
Default value Tinyom HelyomBT
Long Touch Burst scan Hold
Short Touch One shot One shot
Movement One shot
One shot
This read mode can be activated:
• By a short touch on the sensor or the button
• By activation of the motion sensor for the Tinyom
In this mode, once the beam is on, it remains on without user action
until that the TXcom reader reads a bar code. To make the next read,
it is necessary to trig the laser once again.
Hold
In this mode, to keep the beam on, the user should press the touch
sensor or the button until that the TXcom reader reads a bar code. To
make the next read, it is necessary to start the laser once again.
Page 24

24
Multiscan
This burst mode can be activated:
• By a short touch on the sensor
• By a long touch on the sensor or the button
• By activation of the motion sensor
In this mode, once the beam is on, it remains on without any user
action until that the TXcom reader reads a bar code and starts
automatically the beam for the next read after a configurable delay.
When Burst mode is active, the TXcom reader sounds 3 beeps and the
green LED flashes twice.
Burst mode is stopped:
• By a short touch on the sensor
• By activation of the motion sensor
• After a read failure (default value)
• After the read of the number of bar code defined by Max
Nb of Scans
In burst mode in Burst Scan area Interscan Delay parameter, it
is possible to adjust the wait delay between each read by 100 ms step.
By default, the delay is set to 1 second.
If No Duplicate Scan is ticked, the TXcom reader check the read
code compared to the previous read. If the code is different, it is
sent, if not it is not validated.
The TXcom reader turns off after a long touch of one second on the
sensor if the trigger is set to ON/OFF.
Page 25

TINYOM / HELYOMBT UTILITIES USER GUIDE
25
In Scan area, the delay during which the laser beam remains on is
configurable (parameter Scan Delay). It is set to 3 seconds par
default.
In Sensitive Movement area, 3 sensibility levels can be selected.
It is recommended to use the Easy trigger during the first use of
the Tinyom, and select the Normal trigger afterwards to avoid
undesired trigger while hand moves.
Page 26

26
Firmware Upgrade
In Firmware versions it appears:
For the Tinyom firmware
The current version into the Tinyom (TINYOM Product)
The version to be loaded (TINYOM File)
For the ATTINY software
The current version into the Tinyom (ATTINY Product)
The version to be loaded (ATTINY File)
The ATTINY software manages only the motion sensor and the
battery charger.
Page 27

TINYOM / HELYOMBT UTILITIES USER GUIDE
27
ComClav Settings
It allows creating a new ComClav.ini file. This file will be used by
ComClav keyboard emulation.
Page 28

28
Parameters Designation
COM Serial port on which the TXcom reader is connected
BDA Address
TXcom reader Bluetooth Address (6 x 2 hexadecimal
bytes)
Keyboard AZERTY or QWERTY
Initialization frame
When this parameter is ticked, the configuration saved
in ComClav.ini file will be upload in the TXcom reader.
Stroke delay
Delay in millisecond between each character before it is
sent to the host. This delay is used to control the flow
of data from the Tinyom.
Default value : 0 no delay
Bar Code Add-Ons
Prefix and suffix which frame the bar code. They
include one, two or three characters in hexadecimal
ASCII.
Example: to add character Carriage Return at the end
of the code, enter value 0D.
Page 29

TINYOM / HELYOMBT UTILITIES USER GUIDE
29
Setting Up the TXcom reader
1. Run TinyomSet.exe or HelyomSet.exe
2. In menu options select the language.
3. Select the COM port on which the TXcom reader is
connected.
Check the virtual port number in Bluetooth properties on your PC.
Start / Settings / Control Panel / Bluetooth
Configuration / Client Application / Proprierties
button
4. Click on Connect button.
If the connection is successful, the message Ready to be
modified is displayed in the message window.
Basic information is displayed in Summary tab.
5. Modify bar code settings and/or trigger settings. Then click
on Send button.
A message Success is displayed in the message window.
6. When finished, click on Disconnect button and exit
TinyomSet or HelyomSet.exe
Page 30

30
Upgrading TXcom reader
firmware
Recommendation: be sure that the battery is charged before
upgrading Txcom reader.
1. Run TinyomSet.exe or HelyomSet.exe
2. Select the COM port on which the TXcom reader is
connected.
3. Click on Connect button.
4. Select Firmware Upgrade tab.
5. Select Firmware type: Tinyom or Attiny Firmware.
6. Click on Browse button and select the binary file to be
loaded.
7. Click on Write button to upgrade the TXcom reader.
8. While loading the file, TXcom reader green LED flashes, the
red LED flashes in loop.
The messages Starting upgrade, Writing block n, then
Ending upgrade are displayed on your PC.
At the end, a beep sounds.
Page 31

TINYOM / HELYOMBT UTILITIES USER GUIDE
31
9. Click on Disconnect button and exit TinyomSet. or
HelyomSet.exe
Page 32

32
Resetting TXcom reader
It may be necessary to reset TXcom reader.
1. Run TinyomSet.exe or HelyomSet.exe
2. Select the COM port on which the TXcom reader is
connected.
3. Click on Connect button.
4. Select Options / Commands / Reset option.
5. Exit TinyomSet or HelyomSet.exe
A reset causes a Bluetooth disconnection. It loads the previous
configuration in the TXcom reader.
Page 33

TINYOM / HELYOMBT UTILITIES USER GUIDE
33
Default Configuration
Triggerring mode Default Configuration
One shot
By short touch
By movement
Burst mode By long touch
Max number of scans 0 (unlimited number of scans)
Interscan delay 1s
Duplicate scan No control
Bar code Default
Configuration
Enabled
Symbologies
CODE 128
CODE EAN 128
CODE 39
CODE 93
CODABAR
CODE UPC/EAN
Suffix1 00
Suffix2 00
Suffix3 00
The reading of this code will return all parameters to their default
value (factory settings).
Default Configuration
Page 34

34
Creating a new configuration file
When you have to set several TXcom readers, it is recommended to
create a ComClav.ini configuration file using TinyomSet or
HelyomSet software, then to charge this file on each Bluetooth
terminal.
During the execution of ComClavXP or ComClavCE on the Bluetooth
terminal, the initialization frame created by TinyomSet will be thus
sent to the TXcom reader.
To create a TXcom reader configuration file:
1. Run TinyomSet.exe or HelyomSet.exe
2. Select Files /New.
3. Edit parameters in the different tabs.
4. Save the new configuration (Files / Save) in ComClav.ini
file.
Page 35

TINYOM / HELYOMBT UTILITIES USER GUIDE
35
Loading a new configuration
To load a new configuration:
1. Run TinyomSet.exe or HelyomSet.exe
2. Establish a Bluetooth connection between the Tinyom and
the device.
3. Select Files / Open.
4. Open the file to be downloaded in the dialog box.
5. Click on Send button.
The message Success is displayed in message window.
Page 36

36
ComClavXP Software
ComClavXP is a keyboard emulation software for Windows XP. It
allows redirecting the bar code read to the keyboard.
Installation
ComClavXP software is installed when you execute ParamXP Setup on
your PC.
Starting ComClavXP
1. Run ComClavXP.
2. The following screen is displayed.
ComClavXP is started automatically and the window goes to the system
tray. TXCom green icon appears in system tray.
BT Connection
In master mode, pair the TXcom reader to the Bluetooth device by
scanning the BDA address of the device.
In slave mode, open the serial port, and then connect the Bluetooth
device to the TXcom reader.
The connection is established when the TXcom reader blue LED
flashes briefly.
Page 37

TINYOM / HELYOMBT UTILITIES USER GUIDE
37
Stopping a BT connection
It depends on Bluetooth device. Putting the TXcom reader on the
charger also ends connection.
Ending ComClavXP
To exit ComClavXP, right click on TXcom icon in system tray and
select Exit.
Setting Parameters
1. Run ComClavXP.
Ensure TinyomSet or HelyomSet is not running, when you run
ComClavXP.
2. Click on TXcom green icon in system tray.
The following screen is displayed.
3. Click on Stop button. TXcom icon in system tray switches to
red.
4. Set up the virtual port in which the TXcom reader is
connected.
Select the keyboard (AZERTY ou QWERTY).
Page 38

38
5. Then click on Options button to set up Prefix and Suffix in
hexadecimal and set up transmission mode. Example to add
Carriage Return at the end of the code, enter value 0D in
Suffix area.
When the Acknowledgment parameter is ticked, the TXcom
reader waits for acknowledgment after sending a bar code.
The Initialization Frame parameter, when ticked, will load the
configuration of ComClav.ini file to the TXcom reader erasing
the previous configuration.
The Initialization Frame parameter is accessible when the
Acknowledgment parameter is ticked.
6. Click on OK to confirm the parameters.
7. Click on Start button to start program.
Page 39

TINYOM / HELYOMBT UTILITIES USER GUIDE
39
ComClavCE Software
ComClavCE is a keyboard emulation software for Windows CE. It
allows redirecting the bar code read to the keyboard.
ComClavCE is compiled with ARMV4I processor and use HCI Bluetooth
stack. It is compatible with Windows CE version 4.2 and higher.
Starting ComClavCE
1. Run ComClavCE.
ComClavCE starts automatically and the window goes to the system
tray.
2. Click on the TXcom icon in the system tray.
The following screen is displayed.
BT Connection
1. Click on the green TXcom icon in the system tray.
Page 40

40
2. Then click on Stop button in the displayed screen.
TXcom icon becomes red in the system tray.
3. Click on Options button
4. Click on Display Local BDA button, the following screen is
displayed
Page 41

TINYOM / HELYOMBT UTILITIES USER GUIDE
41
5. If you use a TXcom reader equipped with a CMOS reader,
scan the bar code on the Windows CE terminal, if not edit
the pairing label with BDAprint utility using the BDA address
displayed and scan it.
6. Close the pairing screen by clicking on the cross of the Title
bar, and click on the OK button of the Options window.
7. Click on Start button
The TXcom reader blue LED flashes briefly.
Stopping a BT connection
1. Click on TXcom green icon in system tray.
2. Then click on Stop button in the displayed screen.
The TXcom icon switched to red in thesystem tray.
Ending ComClavCE
After stopping BT connection, exit ComClavCE by clicking on the cross
in the title bar. A password is required. The default password is
txcom. Confirm by Ok.
Page 42

42
Setting Parameters
1. Run ComClavCE.
2. Click on the TXcom icon in the system tray.
The following screen is displayed.
3. Click on Stop button.
4. Set the parameters.
Select the keyboard (AZERTY or QWERTY).
5. Then click on Options button to set up Prefix and Suffix in
hexadecimal. Example to add Carriage Return at the end of
the code, enter value 0D in Suffix area.
Page 43

TINYOM / HELYOMBT UTILITIES USER GUIDE
43
The Initialization Frame parameter, when ticked, will load
saved configuration to the TXcom reader erasing the previous
configuration.
6. Click on OK to confirm parameter.
7. Click on Start button to save parameters and start
ComClavCE.
The window goes to the system tray.
Page 44

44
ComClavMobile Software
ComClavCE is a keyboard emulation software for Windows Mobile. It
allows redirecting the bar code read to the keyboard.
ComClavCE is compiled with ARMV4I processor and use HCI Bluetooth
stack. It is compatible with Windows Mobile version 2003 and higher.
Starting ComClavCE
1. Run ComClavCE.
ComClavCE starts automatically and the window goes to the system
tray. The icon remains red as long as no TXcom reader is
connected.
2. Click on TXcom icon in the system tray.
The following screen is displayed
Page 45

TINYOM / HELYOMBT UTILITIES USER GUIDE
45
Bluetooth Configuration on Windows Mobile
1. On Windows Mobile Bluetooth device, go to Bluetooth
parameters Start/Settings/Connections/Bluetooth
2. Activate Bluetooth by ticking Turn on Bluetooth
Page 46

46
3. In COM Ports, select New Incoming Port
4. Select the virtual port to use and untick Secure
Connection then click on Finish
The following screen is displayed, click on ok
Page 47

TINYOM / HELYOMBT UTILITIES USER GUIDE
47
BT Connection
1. Click on TXcom red icon in the system tray.
2. Then click on Stop button in the displayed screen.
3. Select the virtual port created in Bluetooth configuration
(see Bluetooth Configuration on Windows Mobile).
Page 48

48
The Initialization Frame parameter, when ticked, will load
saved configuration to the TXcom reader erasing the previous
configuration.
4. Edit the pairing label with BDAprint utility by using BDA
address of Windows Mobile device and scan it.
Click on Start button, TXcom icon becomes green when the
TXcom reader is connected to the Windows Mobile dive.
The TXcom reader blue LED flashes briefly.
Stopping a BT connection
1. Click on the green TXcom icon in the system tray.
2. Then click on Stop button in the screen displayed.
TXcom icon becomes red in the system tray.
Page 49

TINYOM / HELYOMBT UTILITIES USER GUIDE
49
Ending ComClavCE
After stopping BT connection, exit ComClavCE by clicking on the cross
in the title bar. A password is required. The default password is
txcom. Confirm by Ok.
Page 50

50
BDAprint Software
BDAprint software allows printing the pairing bar code label used to
connect the TXcom reader in master mode. It is supplied with
TinyomSet HelyomSet and ComclavXP when installing ParamXP.
1. Run BDAprint
2. Right click,
3. Select option BDA / ADD address, the following screen is
displayed :
4. Set the BDA address of the Bluetooth device and click on OK
button,
Page 51

TINYOM / HELYOMBT UTILITIES USER GUIDE
51
5. Select option Files / Print, choose the printer and click
on OK,
6. Exit BDAprint.
Page 52

52
Safety / Regulatory
FCC NOTE:
Interference statement:
This device complies with Part 15 of the FCC Rules.
Operation is subject to the following two conditions:
(1)this device may not cause harmful interference, and
(2)this device must accept any interference received, including interference
that may cause undesired operation.
Modification statement:
The FCC requires the user to be notified that any changes or modifications made to
this device that are not expressly approved by TXCOM, may void the user ’ s
authority to operate the equipment.
Class B digital devices regulatory notice:
This equipment has been tested and found to comply with the limits for a Class B
digital device, pursuant to Part 15 of the FCC Rules. These limits are designed to
provide reasonable protection against harmful interference in a residential
installation. This equipment generates, uses, and can radiate radio frequency energy
and, if not installed and used in accordance with the instructions, may cause harmful
interference to radio communications. However, there is no guarantee that
interference will not occur in a particular installation. If this equipment does cause
harmful interference to radio or television reception, which can be determined by
turning the equipment off and on, the user is encouraged to try to correct the
interference by 1 or more of the following measures:
- Reorient or relocate the receiving antenna
- Increase the separation between the equipment and receiver
- Connect the equipment into an outlet on a circuit different from that to
which the receiver is connected
- Consult the dealer or an experienced radio or television technician for
help
Page 53

TINYOM / HELYOMBT UTILITIES USER GUIDE
53
LASER (Excluding CMOS CCD version)
Class 2 Bar Code Reader.
Low power laser. Eye protection is normally afforded by aversion responses.
Standard: EN60825-1 1994 edition
PRECAUTIONS FOR SAFE HANDLING
These products include lithium ion batteries; do not open, crunch or incinerate the
product.
Improper handling of lithium ion batteries may result in injury or damage from
electrolyte leakage, heating, ignition or explosion.
Batteries must not be charged above 45°C.
There is no servicing parts inside: products should not be opened except by qualified
servicing personal.
DISCARDING SCANNER AND CHARGER
According to European Directive 2002/96/CE of 2003/01/27 on waste electrical and
electronic equipment (WEEE) producer and distributor provide freely tacking-back
and recycling device at end of life.
 Loading...