

Page 1
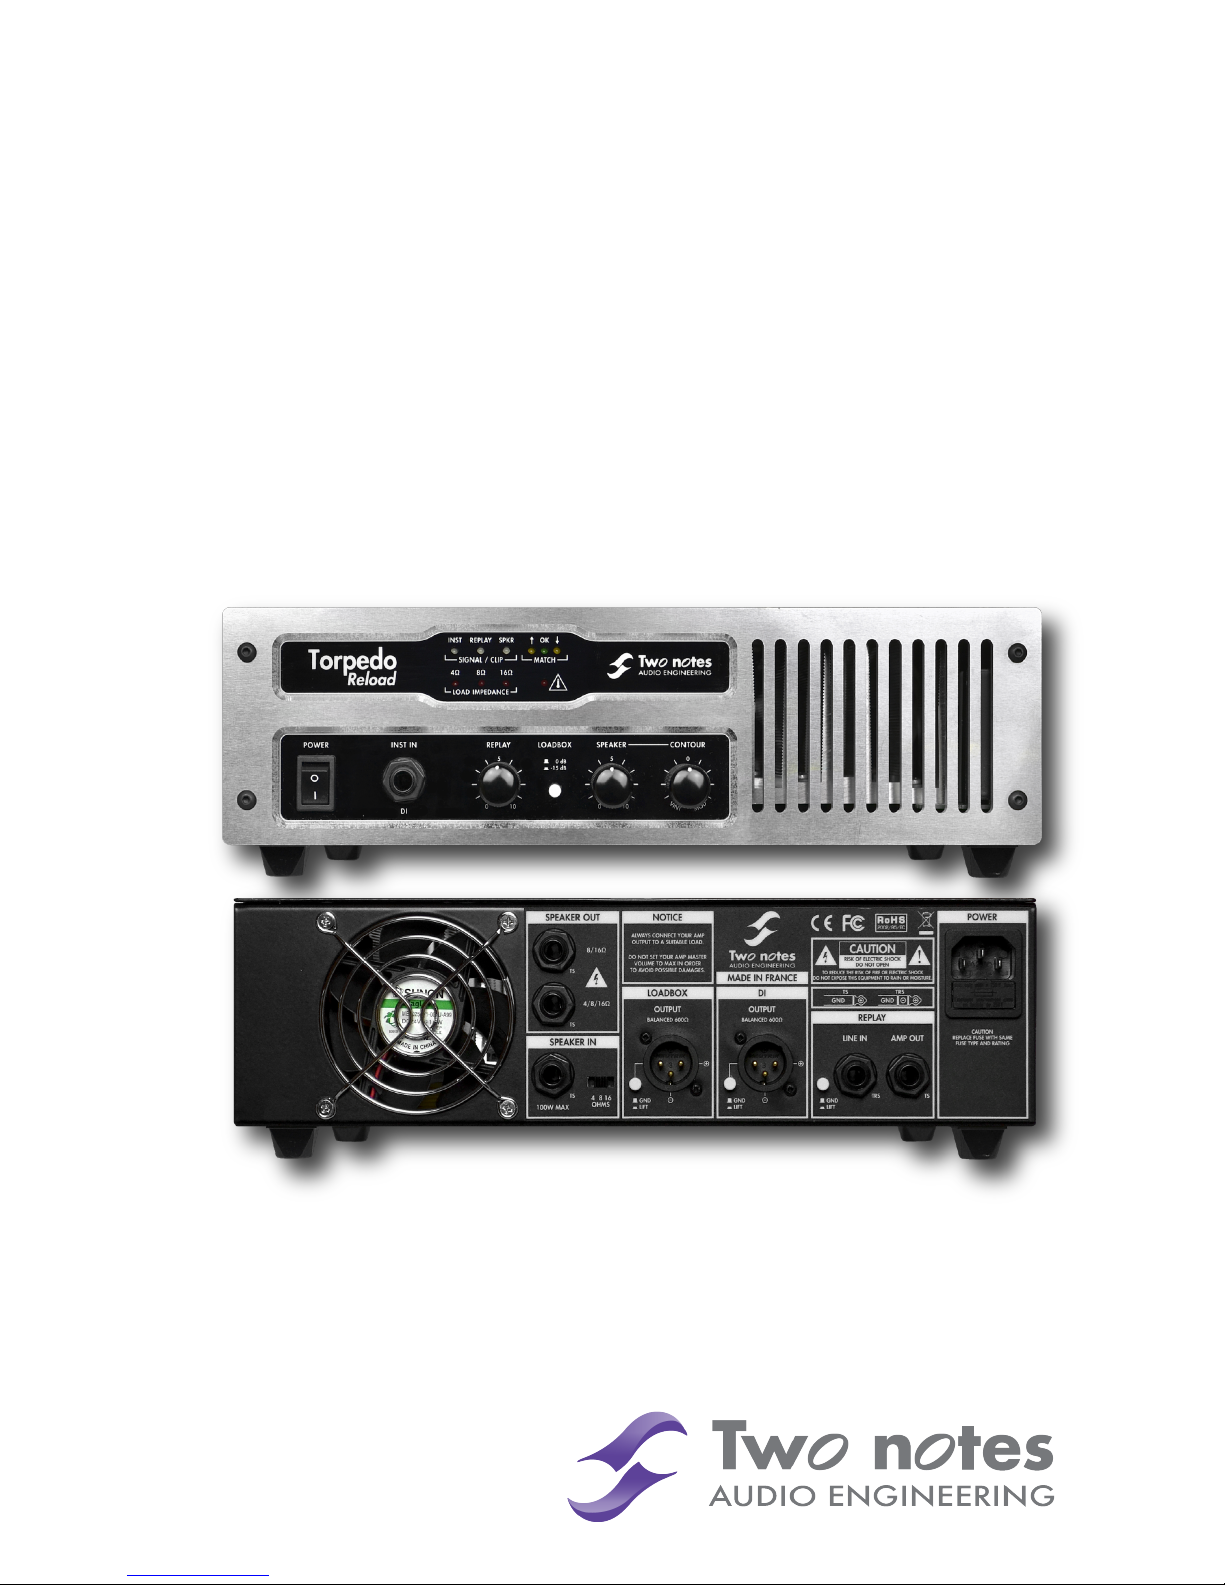
Torpedo Reload
Guitar Connectivity... Perfected!
User’s Manual
V 1.03- 06/03/2014
Page 2

Page 3

Torpedo Reload User’s Manual
Manual Version V 1.03- 06/03/2014.
The complete electronic version of this manual, as well as the Two Notes Audio Engineering software and hardware products, are subject to updates. You can download the most recent versions
of the products on the following website: http://www.two-notes.com.
This manual describes the Torpedo Reload and provides instructions for its operation. It is highly
recommended that you read this document before using the product. The contents of this manual
have been thoroughly verified and it is believed, unless stated otherwise, to accurately describe the
product at the time of shipment from the factory or download from our website.
Two Notes Audio Engineering is a registered trademark of:
OROSYS SAS
145 rue de la Marbrerie, BAL n°6
34740 Vendargues
France
Tel: +33 (0)484 250 910
Fax: +33 (0)467 595 703
Contact and support: http://support.two-notes.com/
Website: http://www.two-notes.com
This document is the exclusive property of OROSYS SAS. In the interest of product development,
OROSYS SAS reserves the right to change technical specifications, modify and/or cease production without prior notice. OROSYS SAS cannot be held responsible for any damage, accidental or
otherwise, that results from an inappropriate use of the Torpedo Reload. Please refer to the safety
instructions included in this manual. The reproduction of any part of this document is strictly forbidden
without the written authorization of OROSYS SAS.
All product names and trademarks are the property of their respective owners. Product names
and trademarks found in this document were used during the development of the Torpedo Reload
product but are in no way associated or affiliated with OROSYS SAS.
Two Notes Audio Engineering Torpedo Reload 3
Page 4

Page 5

Contents
1 Foreword 7
1 Safety instructions . . . . . . . . . . . . . . . . . . . . . . . . . . . . . . . . . . . . . . . . . . . . 7
1.1 Risk of electric shock . . . . . . . . . . . . . . . . . . . . . . . . . . . . . . . . . . . . . . 7
1.2 Reader warning . . . . . . . . . . . . . . . . . . . . . . . . . . . . . . . . . . . . . . . . . 7
1.3 Mains power . . . . . . . . . . . . . . . . . . . . . . . . . . . . . . . . . . . . . . . . . . . 7
1.4 Ground connection . . . . . . . . . . . . . . . . . . . . . . . . . . . . . . . . . . . . . . 8
1.5 Conditions for safe use . . . . . . . . . . . . . . . . . . . . . . . . . . . . . . . . . . . . 8
1.6 Cleaning . . . . . . . . . . . . . . . . . . . . . . . . . . . . . . . . . . . . . . . . . . . . . 8
1.7 Maintenance . . . . . . . . . . . . . . . . . . . . . . . . . . . . . . . . . . . . . . . . . . 8
2 Declaration of conformity . . . . . . . . . . . . . . . . . . . . . . . . . . . . . . . . . . . . . . . 8
3 Contents of the package . . . . . . . . . . . . . . . . . . . . . . . . . . . . . . . . . . . . . . . 9
4 Disposal of Waste Equipment by Users in Private Household in the European Union . . . . 9
5 Warranty . . . . . . . . . . . . . . . . . . . . . . . . . . . . . . . . . . . . . . . . . . . . . . . . . 10
2 Recommendation on the proper use of a loadbox with a tube amplifier 11
1 What is a loadbox? . . . . . . . . . . . . . . . . . . . . . . . . . . . . . . . . . . . . . . . . . . . 11
2 Which output volume for my amplifier? . . . . . . . . . . . . . . . . . . . . . . . . . . . . . . . 12
3 Is the use of a loadbox totally silent? . . . . . . . . . . . . . . . . . . . . . . . . . . . . . . . . 12
3 About the Torpedo Reload 13
1 Introducing the Torpedo Reload . . . . . . . . . . . . . . . . . . . . . . . . . . . . . . . . . . . 13
2 Front panel . . . . . . . . . . . . . . . . . . . . . . . . . . . . . . . . . . . . . . . . . . . . . . . . 14
3 Rear panel . . . . . . . . . . . . . . . . . . . . . . . . . . . . . . . . . . . . . . . . . . . . . . . . 14
4 The Torpedo Reload’s advanced functions . . . . . . . . . . . . . . . . . . . . . . . . . . . . 15
4.1 RE-ACT™ . . . . . . . . . . . . . . . . . . . . . . . . . . . . . . . . . . . . . . . . . . . . . 15
4.2 Hi-Z instrument DI . . . . . . . . . . . . . . . . . . . . . . . . . . . . . . . . . . . . . . . . 15
4.3 REPLAY™ . . . . . . . . . . . . . . . . . . . . . . . . . . . . . . . . . . . . . . . . . . . . . 15
4.4 MATCH™ . . . . . . . . . . . . . . . . . . . . . . . . . . . . . . . . . . . . . . . . . . . . . 16
5 The Torpedo technology and Torpedo Wall of Sound plugin . . . . . . . . . . . . . . . . . . 16
6 Torpedo Wall of Sound, only a speaker simulation? . . . . . . . . . . . . . . . . . . . . . . . 17
6.1 Tube Stage Output . . . . . . . . . . . . . . . . . . . . . . . . . . . . . . . . . . . . . . . 17
6.2 Post FX section . . . . . . . . . . . . . . . . . . . . . . . . . . . . . . . . . . . . . . . . . 18
6.3 The new Wall of Sound III . . . . . . . . . . . . . . . . . . . . . . . . . . . . . . . . . . . 18
4 Connecting the Torpedo Reload 19
1 Overview . . . . . . . . . . . . . . . . . . . . . . . . . . . . . . . . . . . . . . . . . . . . . . . . . 19
2 LED indicators . . . . . . . . . . . . . . . . . . . . . . . . . . . . . . . . . . . . . . . . . . . . . . 20
3 DI recording . . . . . . . . . . . . . . . . . . . . . . . . . . . . . . . . . . . . . . . . . . . . . . . 20
4 Power attenuator and load box . . . . . . . . . . . . . . . . . . . . . . . . . . . . . . . . . . . 21
Page 6

4.1 RE-ACT™, how does it work? . . . . . . . . . . . . . . . . . . . . . . . . . . . . . . . . . 21
4.2 Connection . . . . . . . . . . . . . . . . . . . . . . . . . . . . . . . . . . . . . . . . . . . 22
4.3 Contour . . . . . . . . . . . . . . . . . . . . . . . . . . . . . . . . . . . . . . . . . . . . . 23
5 Re-amplification using REPLAY™ . . . . . . . . . . . . . . . . . . . . . . . . . . . . . . . . . . . 23
5.1 Silent REPLAY™ . . . . . . . . . . . . . . . . . . . . . . . . . . . . . . . . . . . . . . . . . 24
5.2 The full setup: DI + LOADBOX + miking . . . . . . . . . . . . . . . . . . . . . . . . . . . 24
5.3 MATCH™ . . . . . . . . . . . . . . . . . . . . . . . . . . . . . . . . . . . . . . . . . . . . . 25
5.4 MATCH™ without the original guitar . . . . . . . . . . . . . . . . . . . . . . . . . . . . 25
5 Setting up Torpedo Wall of Sound 27
1 Installation . . . . . . . . . . . . . . . . . . . . . . . . . . . . . . . . . . . . . . . . . . . . . . . . 27
1.1 On a PC using Windows™ OS or an Apple Mac™ using OSX™ . . . . . . . . . . . . 27
1.2 Registering Torpedo Wall of Sound . . . . . . . . . . . . . . . . . . . . . . . . . . . . . 27
2 Using Torpedo Wall of Sound with an amplifier or a preamplifier . . . . . . . . . . . . . . . . 27
3 Using Torpedo Wall of Sound with a software or hardware amplifier emulator . . . . . . . 28
4 Software and cabinets update . . . . . . . . . . . . . . . . . . . . . . . . . . . . . . . . . . . 29
6 Using Torpedo Wall of Sound 31
1 Torpedo Wall of Sound interface . . . . . . . . . . . . . . . . . . . . . . . . . . . . . . . . . . . 31
2 Routing of Torpedo Wall of Sound: stereo and mono to stereo track . . . . . . . . . . . . . 32
3 Routing of the Torpedo Wall of Sound: mono track . . . . . . . . . . . . . . . . . . . . . . . 33
4 General controls . . . . . . . . . . . . . . . . . . . . . . . . . . . . . . . . . . . . . . . . . . . . 33
5 Input gain and output volume controls . . . . . . . . . . . . . . . . . . . . . . . . . . . . . . . 33
6 Presets . . . . . . . . . . . . . . . . . . . . . . . . . . . . . . . . . . . . . . . . . . . . . . . . . . 34
7 Power Amp . . . . . . . . . . . . . . . . . . . . . . . . . . . . . . . . . . . . . . . . . . . . . . . 35
8 Power amp, cabinet and microphone selection . . . . . . . . . . . . . . . . . . . . . . . . . 35
9 Miking . . . . . . . . . . . . . . . . . . . . . . . . . . . . . . . . . . . . . . . . . . . . . . . . . . . 36
10 EQ . . . . . . . . . . . . . . . . . . . . . . . . . . . . . . . . . . . . . . . . . . . . . . . . . . . . . 37
11 Exciter . . . . . . . . . . . . . . . . . . . . . . . . . . . . . . . . . . . . . . . . . . . . . . . . . . . 37
12 Comp . . . . . . . . . . . . . . . . . . . . . . . . . . . . . . . . . . . . . . . . . . . . . . . . . . . 38
13 Setup . . . . . . . . . . . . . . . . . . . . . . . . . . . . . . . . . . . . . . . . . . . . . . . . . . . 38
14 Wall of Sound section . . . . . . . . . . . . . . . . . . . . . . . . . . . . . . . . . . . . . . . . . 39
15 Want more cabs? . . . . . . . . . . . . . . . . . . . . . . . . . . . . . . . . . . . . . . . . . . . 40
16 Hotkeys . . . . . . . . . . . . . . . . . . . . . . . . . . . . . . . . . . . . . . . . . . . . . . . . . . 41
7 Specifications 43
1 Torpedo Wall of Sound specifications . . . . . . . . . . . . . . . . . . . . . . . . . . . . . . . . 43
1.1 Available Power Amplifiers . . . . . . . . . . . . . . . . . . . . . . . . . . . . . . . . . . 43
1.2 Available Microphones . . . . . . . . . . . . . . . . . . . . . . . . . . . . . . . . . . . . 43
1.3 List of WoS speaker cabinets provided with the Torpedo Reload . . . . . . . . . . . 44
2 Torpedo Reload specifications . . . . . . . . . . . . . . . . . . . . . . . . . . . . . . . . . . . . 45
2.1 Internal circuit diagram . . . . . . . . . . . . . . . . . . . . . . . . . . . . . . . . . . . . 45
2.2 Audio connections . . . . . . . . . . . . . . . . . . . . . . . . . . . . . . . . . . . . . . . 45
2.3 Possible post-attenuation speaker combinations . . . . . . . . . . . . . . . . . . . . . 46
2.4 Minimal attenuation, maximal output power . . . . . . . . . . . . . . . . . . . . . . . 46
2.5 Technical data . . . . . . . . . . . . . . . . . . . . . . . . . . . . . . . . . . . . . . . . . 47
8 Technical support 49
Page 7
Foreword
Part 1
Foreword
1 Safety instructions
Before using the product, it is necessary to carefully read and to bear in mind the following information. Keep this document in a safe place as it is important for the protection of both user and
product. Should you suspect any malfunction of the device, always seek the assistance of a qualified
technician.
1.1 Risk of electric shock
CAUTION
RISK OF ELECTRIC SHOCK
DO NOT OPEN
AVIS : RISQUE DE CHOC ELECTRIQUE. NE PAS OUVRIR.
The warning panel located at the back
of the unit lists all the messages related
to your safety. All the internal parts of the
unit must only be manipulated by quali-
fied technician.
The triangle with a lightning bolt means that some parts of the product, even
when the power is turned off or unplugged, can retain voltage high enough to
cause serious electric shock. Any operation that requires opening the device
should be left to a qualified technician.
1.2 Reader warning
The triangle with an exclamation mark highlights important messages concerning the correct use of the device.
1.3 Mains power
Please verify that the voltage required by the device matches the voltage of your country. If it is does
not or if you are unsure, do not connect the machine to the wall outlet, as this may result in damages
Two Notes Audio Engineering Torpedo Reload 7
Page 8

Foreword
to the machine and injuries to the user. This product should not be used during thunderstorms. In
cases of severe weather with risks of lightning, unplug the mains power supply to reduce the risk
of electric shock and fire. The mains power cable provided with the machine complies with the
standards of the country where you purchased the product. If replacement is needed, please use a
standard compliant cable.
1.4 Ground connection
For safety reasons, the machine needs to be plugged to a wall outlet providing a ground connection.
If your electric installation does not provide a ground connection or if you are unsure, please ask a
qualified electrician for help.
If your mains power cable doesn’t match your wall outlet, ask a qualified electrician for help.
Never remove the outer or inner ground connection of the unit to prevent risks of electric shock or
fire.
1.5 Conditions for safe use
The Torpedo Reload must never be used near a heat source, near a flame, in the rain, in damp areas,
near any liquid of any sort. When transporting the unit, care needs to be taken to avoid any shocks
that could cause damage that would require the assistance of a qualified technician.
1.6 Cleaning
Always use a piece of dry and soft cloth with no alcohol or solvents for cleaning. Please keep the
unit clean and free from dust.
1.7 Maintenance
All maintenance operations must be performed by service centers approved by OROSYS SAS or by
qualified technicians. Never try to repair the machine by yourself.
2 Declaration of conformity
Manufacturer: OROSYS SAS
Category of product: digital audio signal processor
Product: Torpedo Reload
Test Manager: Guillaume Pille
The Two Notes Torpedo Reload is certified to be compliant to the CE and FCC standards:
• EN 55103-1 : 1996 and EN 55103-2 : 1996.
• EN 60065 05/2002 + A1 05/2006.
• EMC directive 89/336/EEC and Low Voltage Directive 73/23/EEC.
• FCC Part 15 : 2008.
• ICES-003 : 2004.
• AS/NZS 3548 class B for Australia and New Zealand.
8 Two Notes Audio Engineering Torpedo Reload
Page 9
Foreword
• IEC : 2008 - CISPR 22 class B.
3 Contents of the package
The shipped package contains:
1. One Torpedo Reload unit in a protecting sleeve,
2. One mains power cable,
3. One owner’s manual.
The complete electronic version of this manual as well as the Torpedo Remote and BlendIR software programs are subject to updates. You can download the most recent versions of those products
on the following website: http://www.two-notes.com.
4 Disposal of Waste Equipment by Users in Private Household in the
European Union
This symbol on the product or on its packaging indicates that this product must not be disposed of with your other household waste. Instead,
it is your responsibility to dispose of your waste equipment by handing it
over to a designated collection point for the recycling of waste electrical and electronic equipment. The separate collection and recycling
of your waste equipment at the time of disposal will help to conserve
natural resources and ensure that it is recycled in a manner that protects human health and the environment. For more information about
where you can drop off your waste equipment for recycling, please
contact your local city office, your household waste disposal service or
the shop where you purchased the product.
Two Notes Audio Engineering Torpedo Reload 9
Page 10

Foreword
5 Warranty
OROSYS SARL warrants that this TWO NOTES AUDIO ENGINEERING product shall be free of defects in
parts and workmanship when used under normal operating conditions for a period of two (2) years
from the date of purchase. This warranty shall apply to the original purchaser when purchased from
an Authorized TWO NOTES AUDIO ENGINEERING dealer.
IMPORTANT: PLEASE RETAIN YOUR SALES RECEIPT, AS IT IS YOUR PROOF OF PURCHASE COVERING
YOUR LIMITED WARRANTY. THIS LIMITED WARRANTY IS VOID WITHOUT YOUR SALES RECEIPT.
Defective products that qualify for coverage under this warranty will be repaired or replaced,
(at OROSYS SAS’s sole discretion) with a like or comparable product, without charge. In the event
that warranty service be required, Please contact your authorized TWO NOTES AUDIO ENGINEERING
dealer in order to obtain an RMA to return the complete product to the Authorized TWO NOTES
AUDIO ENGINEERING Service Center closest to you, with proof of purchase, during the applicable
warranty period.
Transportation costs to the service center ARE NOT INCLUDED in this limited warranty. OROSYS SAS
will cover the cost of standard ground return transportation for repairs performed under this warranty.
This limited warranty becomes void if the serial number on the product is defaced or removed,
or if the product has been damaged by alteration, misuse including connection to faulty or unsuitable ancillary equipment, accident including lightning, water, fire, or neglect; or if repair has been
attempted by persons not authorized by OROSYS SAS.
Any implied warranties, including without limitation, any implied warranties of merchantability or
fitness for any particular purpose, imposed under state or provincial law are limited to the duration
of this limited warranty. Some states or provinces do not allow limitations on how long an implied
warranty lasts, so the above limitations may not be applicable.
OROSYS SAS ASSUMES NO LIABILITY FOR PROPERTY DAMAGE RESULTING FROM ANY FAILURE OF THIS
PRODUCT NOR ANY LOSS OF INCOME, SATISFACTION, OR DAMAGES ARISING FROM THE LOSS OF USE
OF SAME DUE TO DEFECTS OR AVAILABILITY OF IT DURING SERVICE.
In case you must absolutely send your TWO NOTES AUDIO ENGINEERING product to any other
location, it is of vital importance that you keep the original packing material. It is very difficult to
avoid damage when shipping the product without that material. OROSYS SAS is not responsible for
damages caused to the product by improper packaging and reserves the right to charge a reboxing
fee for any unit returned for service without the original packing material.
THE FOREGOING CONSTITUTES THE ONLY WARRANTY MADE BY OROSYS SAS WITH RESPECT TO THE
PRODUCTS AND IS MADE EXPRESSLY IN LIEU OF ALL OTHER WARRANTIES EXPRESSED OR IMPLIED.
10 Two Notes Audio Engineering Torpedo Reload
Page 11
Part 2
Recommendation on the proper use of
a loadbox with a tube amplifier
1 What is a loadbox?
In the normal use of a tube amplifier, it is highly recommended that you always connect its power
output to a speaker cabinet prior to powering it up. The speaker cabinet (4, 8 or 16 Ohms) must
always be connected to the corresponding speaker output of your amplifier. Not doing so can lead
to partial or complete destruction of the output stage of the tube amplifier.
Most tube amplifier makers protect their products with fuses or other protection systems, but some
amplifiers still remain not or insufficiently protected. It is impossible to predict the behavior of all the
amplifiers on the market in case of use without a load (a speaker cabinet or a loadbox).
The electronic term that describes the speaker cabinet with respect to the amplifier is the "load":
we say the cabinet "loads" the amplifier. The term "loadbox" fits any product that embeds a load.
The main parameter of the loadbox is its impedance, expressed in Ohms. An 8-Ohm loadbox must
be plugged to the 8-Ohm speaker output of the amplifier.
The power sent to the load is turned into heat, so please follow the cooling recommendation of
the loadbox — otherwise overheating may cause damage, both to the loadbox and to the amplifier.
The Torpedo Reload is a loadbox. This term indicates that the Torpedo Reload is a load which can
electrically replace the speaker cabinet while dissipating (transforming into heat) the power coming
out of the amplifier.
The embedded load in the Torpedo Reload is a reactive one: it embeds a specific circuit to
simulate the complex impedance of a real speaker. This kind of system is widely used in the industry
to silently test amplifiers.
Always connect the speaker out of your tube amplifier to an appropriate load (speaker cabinet or load box). Torpedo Reload , once powered up, is such a load. Please note that you must always power up
the Torpedo Reload before your amplifier.
Two Notes Audio Engineering Torpedo Reload 11
Page 12
Recommendation on the proper use of a loadbox with a tube amplifier
2 Which output volume for my amplifier?
The correct use of your amplifier with a loadbox requires some precautions. Because of the silence
while playing, it is much easier to accidentally run your amplifier beyond the reasonable limits set by
the manufacturer than when using a real speaker cabinet with it. This can lead to faster tube wear
and, in some cases, to more serious inconveniences.
When first testing the amplifier at high volume, monitor the color of the
tubes and the general state of the amplifier. Red-glowing tubes or any
appearance of smoke are signs of a problem that may result in partial
or complete destruction of the amplifier.
Keep in mind that the "sweet spot" - the perfect running point of the amplifier, the one that will
give you the tone you’re looking for - is rarely obtained at maximum volume. In addition, the volume
control of the amplifier is usually logarithmic, which means the volume goes up quickly on the first
half of the potentiometer rotation, reaches its maximum at 12 o’clock, and doesn’t change much
beyond this point. Therefore, you can reach the maximum volume of your amplifier even if the volume
potentiometer is not set at maximum.
By reaching the maximum output power of your amplifier, you will hear a lot of distortion, which
may not sound as well as you may hope. In fact, most amplifiers sound rather poorly at maximum
volume. Always keep in mind that your amplifier may not have been conceived to be used at
maximum volume for a long period of time. Running an amplifier at high volume will cause premature
wear of the tubes and possible malfunctions or damages at the output stage.
The fact that the volume control of your amplifier is not set at maximum doesn’t mean your amplifier is not running at maximum volume.
A good habit is to keep the usual volume setup you would use in rehearsal or on stage, rather than just following what the volume potentiometer indicates.
3 Is the use of a loadbox totally silent?
We usually talk about "silent recording" when a loadbox is involved. If we compare the loadbox
solution to a traditional cabinet miking solution, it is obviously several orders of magnitude quieter,
but you will still experience some minor sounds, noises, that have to be taken into account:
• Your guitar or bass strings can be heard. This is obvious, but it can be disturbing, depending on
your environment.
• You may hear some noise coming out of your Torpedo Reload when playing, like there is a tiny
speaker inside the box. This is perfectly normal and there is no reason to worry. The sound is
produced when power goes through the coil of the reactive load embedded on the Torpedo
Reload. The vibration is related to what power comes out of the amplifier connected to the
Torpedo Reload and to the signal’s frequency content (notes played are heard). Your amplifier
may also produce similar noise, at the output transformer’s level. Such noise is usually not heard,
simply because it is normally overcome by the sound coming from the loudspeaker.
• The Torpedo Reload embeds a fan, as there is quite a lot of power dissipated into heat inside the
box. We selected a so called "silent fan", but as it is running fast, it is never entirely silent. This said,
you can consider that, in normal use (hearing your guitar through monitors, or headphones), you
can barely hear that fan.
12 Two Notes Audio Engineering Torpedo Reload
Page 13

Part 3
About the Torpedo Reload
1 Introducing the Torpedo Reload
Two Notes Audio Engineering is proud to introduce the Torpedo Reload, the all-in-one analog interface for recording guitars and basses in the studio. This product has been developed through years
of technical research, with great attention paid to the needs of guitarists, bassists and sound technicians who are confronted with the challenges posed by miking amplified instruments, whether on
stage or in the studio. Our goal is to provide ease of use, reliability, versatility and, above all, perfect
audio quality.
The Torpedo Reload is the interface everyone involved in modern guitar and bass recording situations needs. It was designed at first as the perfect interface between a guitar or bass amplifier and
a sound card, so you can send the best signal possible to our Torpedo Wall of Sound plug-in, which
embeds the Torpedo technology.
Recording your guitar or bass amplifier in silence has always been the purpose of the Torpedo
products, but with the Torpedo Reload Two Notes has striven to gather together all of the major
functions and products you may need in a recording room:
• A Hi-Z instrument DI so you can record you guitar’s signal directly;
• The most transparent power attenuator and loadbox with multi-impedance input and continuous volume setting, from a minimal attenuation to 0dB. Two Notes creates the RE-ACT™ technology;
• A re-amplifying interface with a special function to perfectly adjust the level sent from the audio
interface to the amplifier. Two Notes creates the REPLAY™ and MATCH™ functions.
Record your guitar using the DI, send the signal back to your amp using REPLAY™, drive your
amplifier the way it should be driven and lower the level or simply make it silent with RE-ACT™, record
the signal from the load box, and even use your own microphones and cabinets for a 3rd take - all
simultaneously if needed!
This product has been thoroughly tested in professional studio and stage environments and is
the alternative many musicians have been expecting for the professional sound capturing of their
amplified instruments. The Torpedo Reload coupled with Torpedo Wall of Sound will give you the
elusive sound of the greatest recording studios and producers, any time, anywhere.
Two Notes Audio Engineering Torpedo Reload 13
Page 14
About the Torpedo Reload
2 Front panel
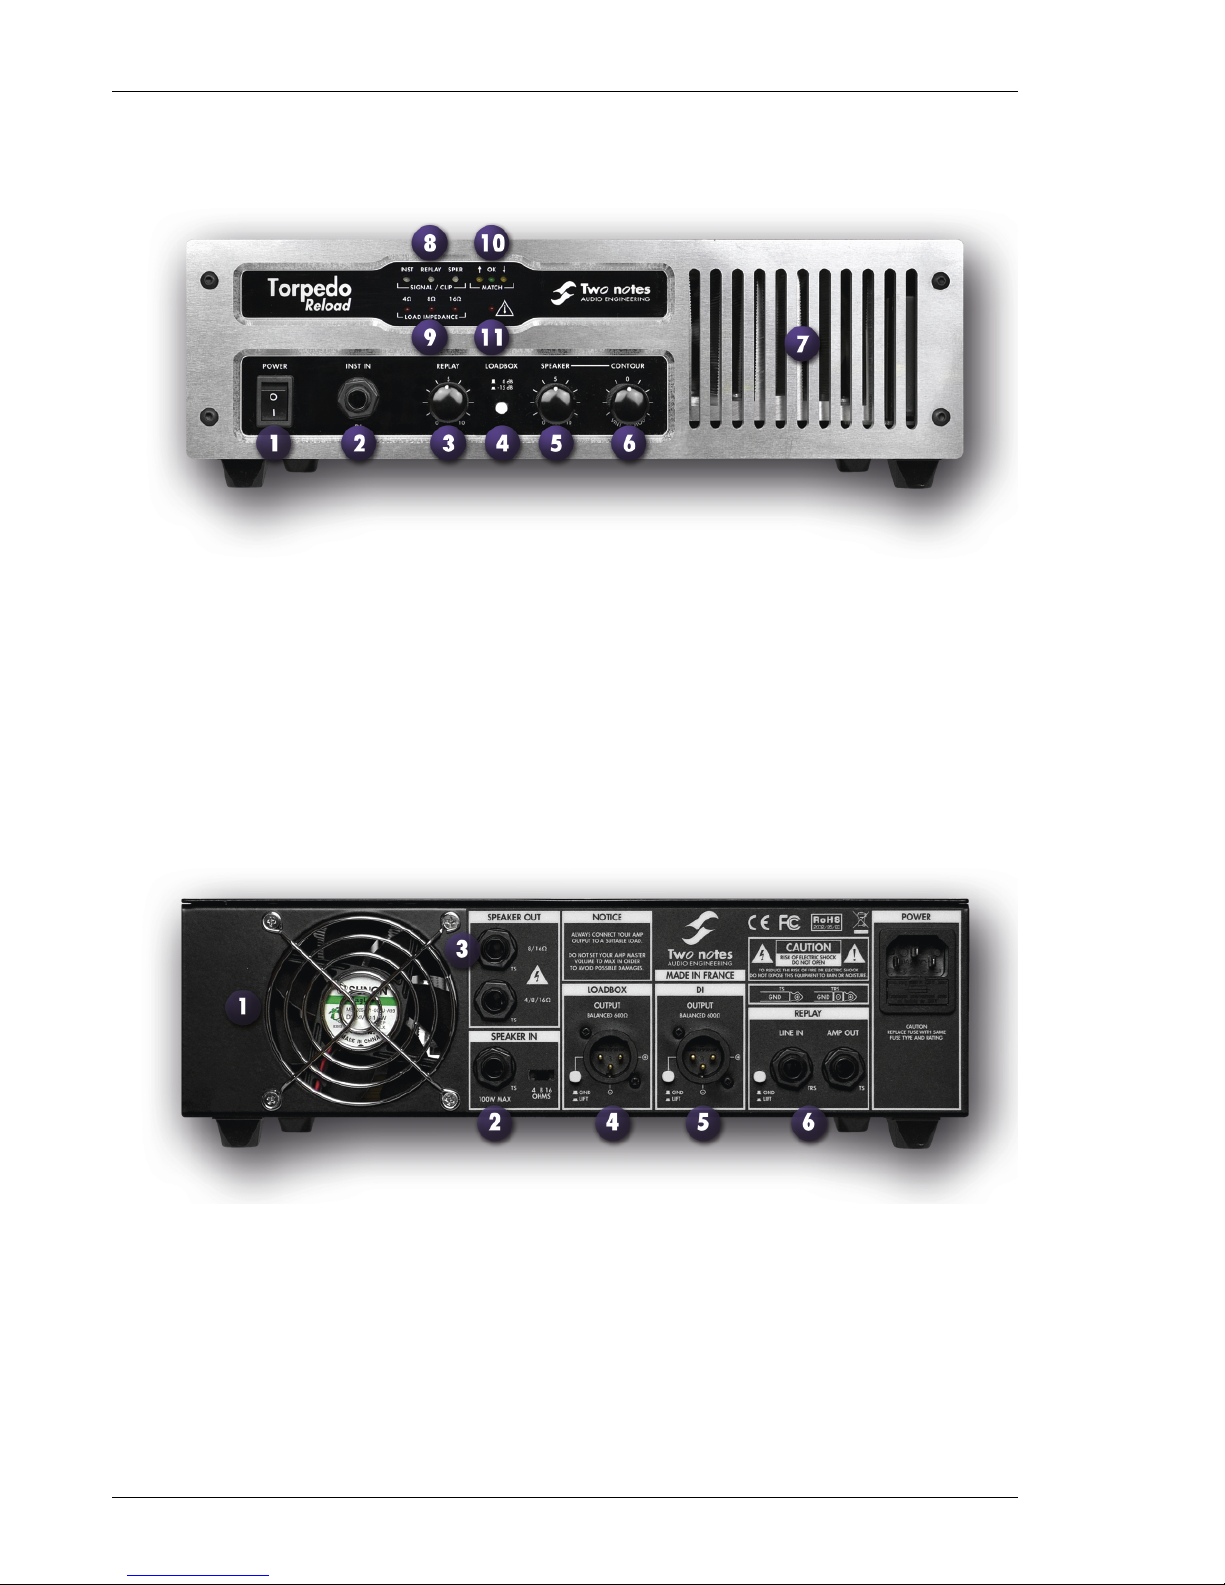
Figure 3.1: Front panel of the Torpedo Reload
1 ON/OFF switch 4 Loadbox output level 7 Air vent 10 MATCH™ indicators
2 Hi-Z Instrument input 5 Speaker attenuator volume 8 Signal indicators 11 Heat warning
3 REPLAY™ level 6 Contour 9 Load impedance indicators
3 Rear panel
Figure 3.2: Rear panel of the Torpedo Reload
1 Cooling fan 4 Loadbox output (balanced)
2 RE-ACT™ speaker input 5 DI output (balanced)
3 RE-ACT™ speaker outputs 6 REPLAY™ I/Os
14 Two Notes Audio Engineering Torpedo Reload
Page 15

About the Torpedo Reload
4 The Torpedo Reload’s advanced functions
4.1 RE-ACT™
Attenuators are usually known for the negative impact they have on your tone in cases of heavy attenuation, which is mainly due to the fact that the load presented to the amplifier will vary depending
on the attenuation level. On the contrary, the Reactive-Active technology (RE-ACT™) presents your
amplifier with a consistent speaker’s impedance no matter what level of attenuation you are at, thus
preserving the specific character of your amplifier.
With a choice of 4, 8, or 16 Ohms, your amplifier (up to 150W RMS, 200W peak) will actually see
real speaker impedance, and your tone will remain constant throughout the continuous attenuation
curve.
The attenuated outputs and the loadbox output can be used at the same time, so you can
simultaneously record the dry output from your amplifier’s speaker output and perform a traditional
miking of your cabinet(s). You can plug or unplug the speaker cabinet anytime without worrying
about its impedance with regards to the amplifier’s speaker output impedance, as the two are totally
independent.
Another issue with amplifier attenuation has to do with how our ears perceive the sound. In effect,
the lower the volume of the sound is, the less we hear low and high frequencies. That is because
our hearing is way better at low volumes for the mid frequencies of the voice, for example. The
CONTOUR parameter can be seen as a loudness compensation effect, but it can also be used as a
creative effect. Turn the button to the left (Vintage) and you will get a rich, medium-centered tone
with a lot of presence. Turn CONTOUR to the right (Modern) and you will get more bass and treble, a
V-shaped tone to get those frequencies your ears cannot perceive at low volume. Or simply to get
that ultra-tight metal tone or ultra-warm clean tone you are looking for...
Please note that a minimal attenuation is applied to the input power amplifier signal, whatever the
position of the SPEAKER potentiometer. There is no bypass mode in the Torpedo Reload, meaning the
sound will always be attenuated at the Torpedo Reload SPEAKER output. This attenuation is a function
of several parameters, read more about that in our Specifications section 7.2.4.
4.2 Hi-Z instrument DI
Plug your guitar or bass into the DI input and send that signal to your microphone preamplifier connected to your recorder. If the DI signal is too strong for your preamplifier, you can connect the DI
output to a Line input, by using an XLR-XLR cable or XLR (female) to Jack 6.35mm (1/4”) TRS. At that
stage what you want is clarity and Two Notes preserves your guitar’s tone, as you will certainly want
to re-inject it into your amp through the REPLAY™.
This DI signal is also suitable to feed any kind of amplifier-modeling software that can be followed
by the Torpedo Wall of Sound plug-in.
Please note that here is no hardwired splitter function in the Torpedo Reload. To feed at the
same time your DAW and an amplifier, you will need to send back the signal from the DAW using the
REPLAY™ interface. Please read about the REPLAY™ function to discover this new and very effective
way to record your instrument.
4.3 REPLAY™
One of the most interesting options in studios nowadays: play the guitar one day, and mike the amplifier (or many different amps) another. The Torpedo Reload is your re-amplifying device of choice.
Two Notes Audio Engineering Torpedo Reload 15
Page 16

About the Torpedo Reload
The REPLAY™ output follows a low-impedance unbalanced design to ensure the best conditions
when sending the signal to the amplifier. The ground lifts will allow you to solve any grounding issues
that may come up when you are setting up the kind of complex wiring you can use with the Torpedo
Reload.
The most difficult part in re-amplification techniques is finding the output level on the DAW (Digital
Audio Workstation) that matches the level of your guitar when it is directly connected to the amplifier.
This problem is now solved, thanks to the Torpedo Reload’s unique MATCH™ feature.
4.4 MATCH™
This Two Notes innovation is the solution to the problem of level adjustment when re-amplifying. If
the level is too high your amplifier will tend to over-saturate, if the level is too weak the tone will lack
dynamics and liveliness.
MATCH™ compares the signal as it comes from the guitar (plugged to the DI input) with the signal
that has been recorded (and which is sent to the REPLAY™ Line Input) so that what you send the
amp is the ideal level only. Now you can be sure that the signal you send from the DAW is exactly
what your guitar itself would be sending.
You may even perform a MATCH™ with two different signals: if you have a previously recorded
track, for instance, but do not have the guitar with you — plug a similar guitar into the DI In and
match it to the signal!
5 The Torpedo technology and Torpedo Wall of Sound plugin
The Torpedo technology was created as a solution to the high pressure musicians commonly have to
deal with: lack of time, limited gear availability, loud amplifiers they cannot play at desired volume,
or bulky and heavy cabinets to carry. In addition, many musicians are more comfortable with their
analog amplifier and effects pedals, and are reluctant to perform using digital modeling systems that
may compromise their playing style and sound.
Two Notes has developed a unique technology based on an adaptation of convolution techniques. Starting with the measurement of an actual cabinet + microphone setup, the Torpedo products embedding digital processing can accurately reproduce the system as it was measured, as well
as the microphone’s position in space. In order to take full advantage of these digital algorithms, the
audio design of the highest quality guarantees a huge dynamic range and tone fidelity, and concurs
in bringing the ultimate playing experience.
The impulse response (IR) of a system describes it behavior under the form of a very detailed filter.
The convolution technique uses IRs to simulate the behavior or particular systems, such as reverbs,
speakers, EQ, etc.
It is the most accurate way to simulate sound signatures that are linear (i.e. without distortion) and
time-invariant (i.e. no effect like modulation, compression, hysteresis...). It is particularly well suited for
speaker miking simulation.
The Torpedo Reload comes with a Torpedo Wall of Sound plugin license. Torpedo Wall of Sound
offers a "virtual" alternative to traditional miking to achieve a degree of realism never experienced
previously with simulators. The musician simply plugs the Torpedo Reload in place of his/her cabinet,
connecting the amplifier’s speaker output to it and without modifying any of his/her usual settings
(or connected effect pedals as applicable). From there, the Torpedo Reload Loadbox output signal
can be sent to any microphone preamplifier and that signal recorded thanks to your DAW on a track
embedding the Torpedo Wall of Sound plugin.
16 Two Notes Audio Engineering Torpedo Reload
Page 17

About the Torpedo Reload
Torpedo Wall of Sound comes with a library of 24 cabinets and 8 microphones among the most
commonly used models in the world. You will achieve perfect virtual miking by choosing one cabinet
and one microphone, and fine-tuning the position of the microphone in front of the cabinet.
6 Torpedo Wall of Sound, only a speaker simulation?
The Torpedo Wall of Sound is a software plug-in you can embed in your recording program. The plug-
in should be used on tracks containing guitar or bass signal recorded from a preamplifier (guitar, bass,
or any product with a line output) — or from a loadbox like the Torpedo Reload if you want to record
the signal coming from the speaker output of your amp.
The role of this plug-in is to replace the following elements of the traditional guitar or bass setup:
• the guitar/bass power amplifier
• the speaker cabinet
• the microphone
• the microphone preamplifier
to provide a signal that is the closest possible to actual guitar/bass miking as achieved traditionally
in a professional studio environment.
The miking is achieved in 3 steps with the Torpedo Wall of Sound :
1. choose a power amplifier (or switch it off if you are using a loadbox), a speaker cabinet and a
microphone (Amplifier, speaker and microphone section),
2. place the microphone in the virtual studio (Miking window and parameters),
3. shape the signal (Low Cut, Eq, Exciter and Comp sections).
With each step, Two Notes Audio Engineering implements its know-how to bring you the most
advanced simulations on the market and ensure perfect realism both for the musician (playing sensations) and for the listener (sound quality).
Note: the evaluation version of Torpedo Wall of Sound is limited to 8 microphones and 2 cabinets;
the Torpedo Wall of Sound Reload Edition offers 24 cabinets.
6.1 Tube Stage Output
The Torpedo Wall of Sound handles any kind of instrument track. When using a guitar/bass preamplifier with other speaker emulators, the guitarist/bassist may miss the power amplifier’s contribution to
the overall sonic texture. Many musicians get their sound from some particular use of that element
and the Torpedo Wall of Sound offers you the possibility to do the same.
Two Notes has developed an original tube stage modeling, which allows you to choose between
4 different tube models in Push-Pull or Single Ended configurations. You can push this tube stage like a
conventional amplifier and look for that subtle yet particular distortion. If the Torpedo Wall of Sound is
used as a super-DI for keyboards, this feature that was originally developed for guitarists and bassists
can also be very interesting to warm-up the sound of a synthesizer, organ or a digital piano.
Two Notes Audio Engineering Torpedo Reload 17
Page 18

About the Torpedo Reload
6.2 Post FX section
During a guitar/bass sound miking session, it is a common practice to apply some essential processes
on the signal before sending it to the recorder or the front mixing console.
In the Torpedo Wall of Sound, you will find most of those essential processes for the control of your
sound, no matter what situation and type of instrument:
• low-cut filter,
• 5-band graphic equalizer with two modes (guitar and bass),
• 1-band exciter to give the sound a certain character, or to add presence, or "air", in the sound,
• a powerful compressor to control the signal’s dynamics.
6.3 The new Wall of Sound III
What could be better than sending your guitar’s sound through the best cabinet & miking simulation
on the market? Sending it through dozens of the best cabinets and microphones and mix them up!
The WoS III Edition of the Torpedo Wall of Sound is a multichannel cabinet + microphone simulator:
• Up to 100 cabs and microphones simultaneously in one single plugin
• Low CPU usage
• Ultra-low latency (max <0.26ms)
• Linked or independent dual channel mixing
• Enhanced user interface to manage all the channels
• 3rd-party Impulse Response (or IR) compliant, fast switch between the IR’s
• Mix Two Notes cabinet files with any other IR files on the market
• Try all the cabinets FOR FREE and buy the ones you like in the built-in "Boutique".
18 Two Notes Audio Engineering Torpedo Reload
Page 19
Part 4
Connecting the Torpedo Reload
1 Overview
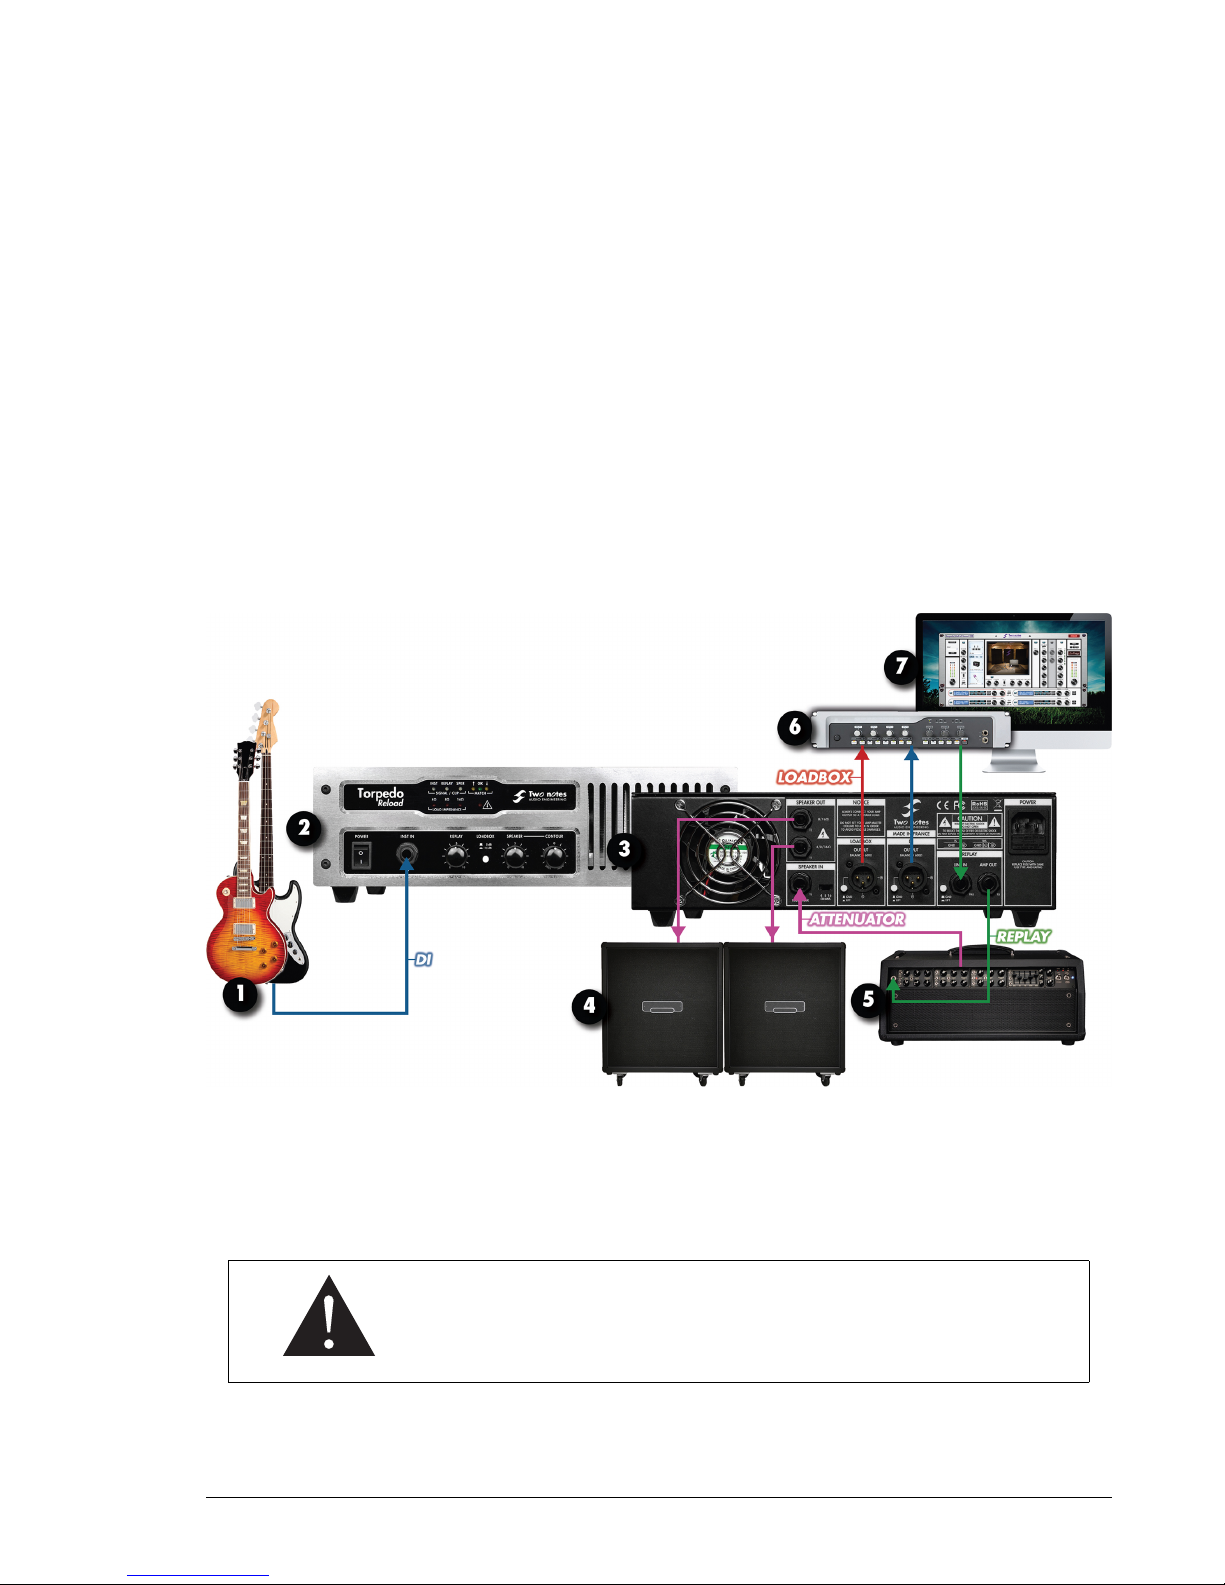
The Torpedo Reload offers a solution for silent and quality sound pick-up in many situations. The
following illustrations show the most common situations the Torpedo Reload has been created for.
1 Guitar/bass 3 Torpedo Reload Rear 5 Guitar/bass amp 7 PC/MAC with Torpedo Wall of Sound
2 Torpedo Reload Front 4 Speaker cabinets 6 Audio interface
All functions work at the same time, but we will first show a variety of the more simple setups.
Please keep in mind that tube amplifiers MUST be connected to an appropriate load (cabinet or loadbox). Always plug the speaker output
from your amp to the speaker input of the Torpedo Reload, and select
the matching impedance.
Two Notes Audio Engineering Torpedo Reload 19
Page 20
Connecting the Torpedo Reload
2 LED indicators
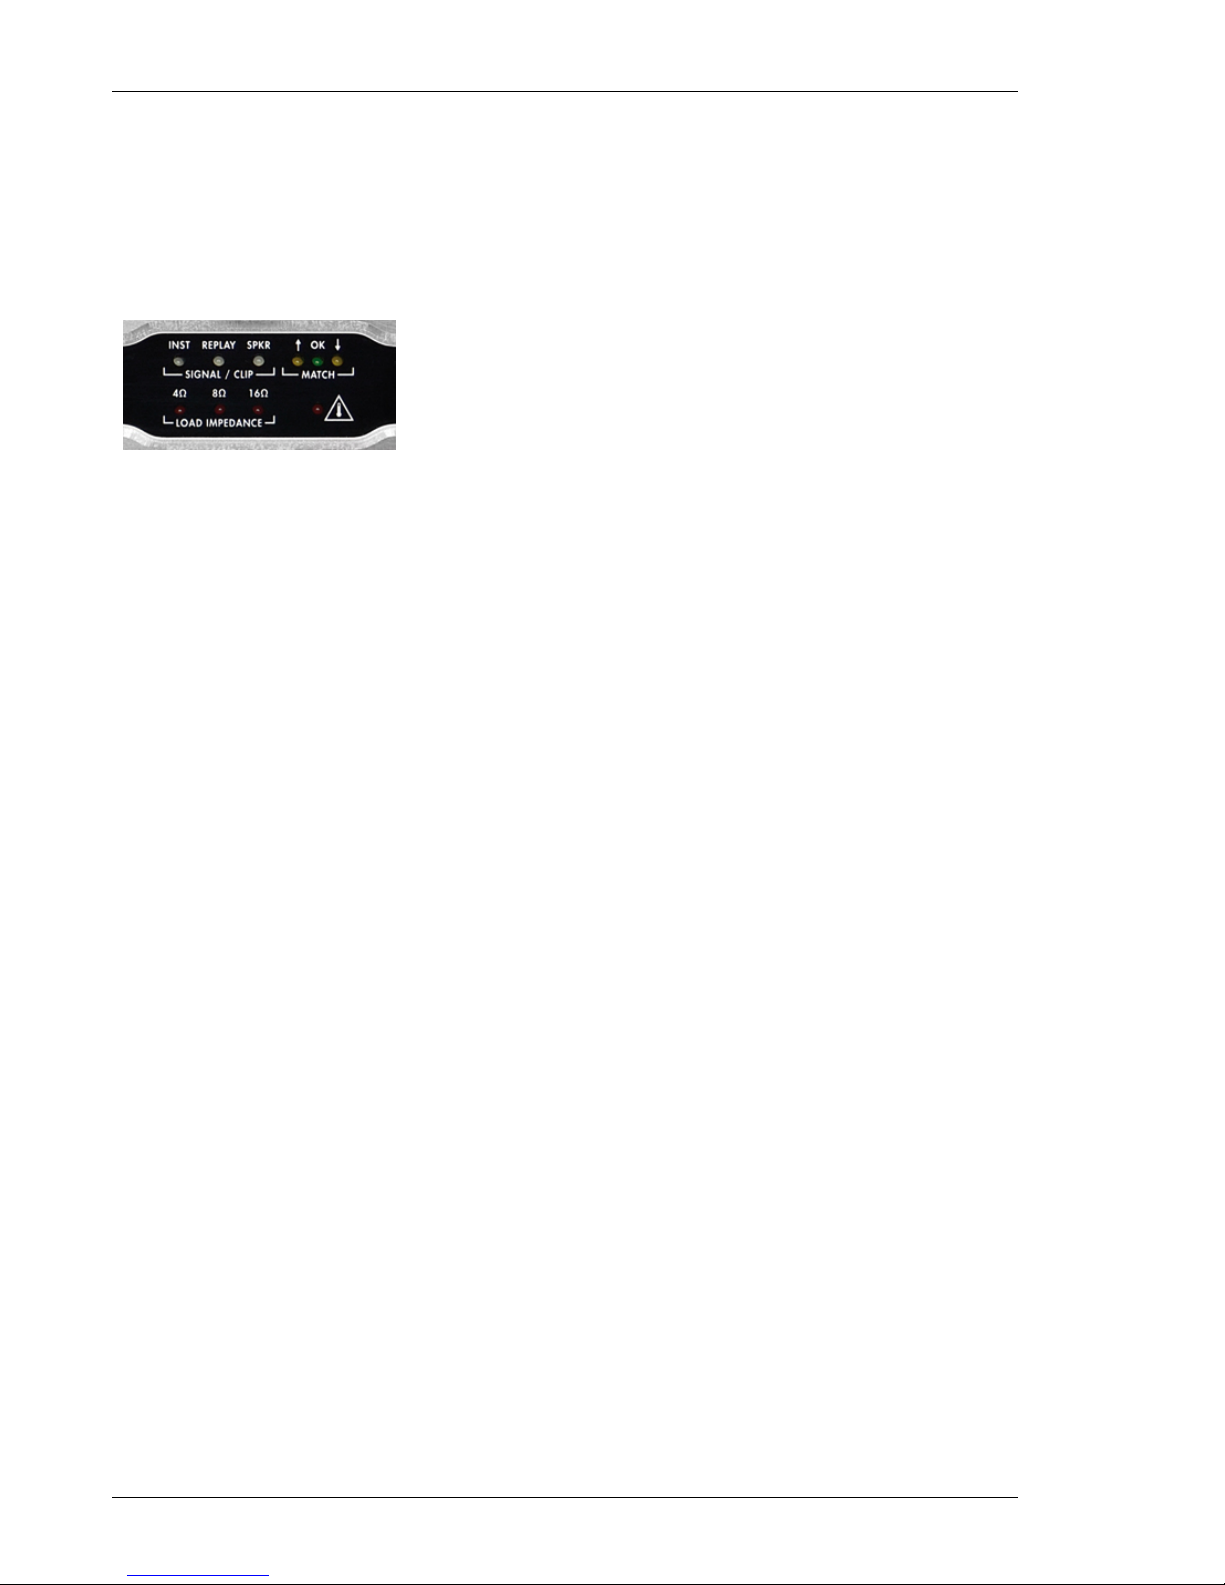
You will find different LED indicators on the Torpedo Reload front panel:
• SIGNAL / CLIP: indicates the presence of a signal in either the DI,
REPLAY™ or SPEAKER input (green color). The LED lights up red
whenever that signal is too strong — if so, you need to lower the
volume at the corresponding input.
• MATCH™: Increase the REPLAY™ potentiometer value if the up arrow lights up, and lower the value if the down arrow lights up. "OK"
means that the level of the signal sent to the amplifier through the
REPLAY™ Amp Out and that of the guitar’s signal in the DI input
are at matching volumes.
• LOAD IMPEDANCE: shows the selected impedance on the Torpedo Reload. This value must
match the value of your amplifier’s speaker output. Go to the back of the Torpedo Reload and
select either 4, 8 or 16 Ohms.
NB: The Torpedo Reload must be turned off when you select the SPEAKER input impedance. Your
amplifier should not be powered on during the process.
• TEMPERATURE (Heat warning): this last indicator will light up if the temperature inside the Torpedo
Reload is too high, which activates the security load. If so, please lower the volume on your
amplifier or stop playing for some time, so the temperature decreases.
3 DI recording
This first setup is what you will use when you want to connect your instrument to your sound card
properly to do some recording and/or to feed an amp-modeler plugin. The Hi-Z (High Impedance)
instrument input of the Torpedo Reload will handle your guitar or bass signal so you face no loss of
dynamic or frequency:
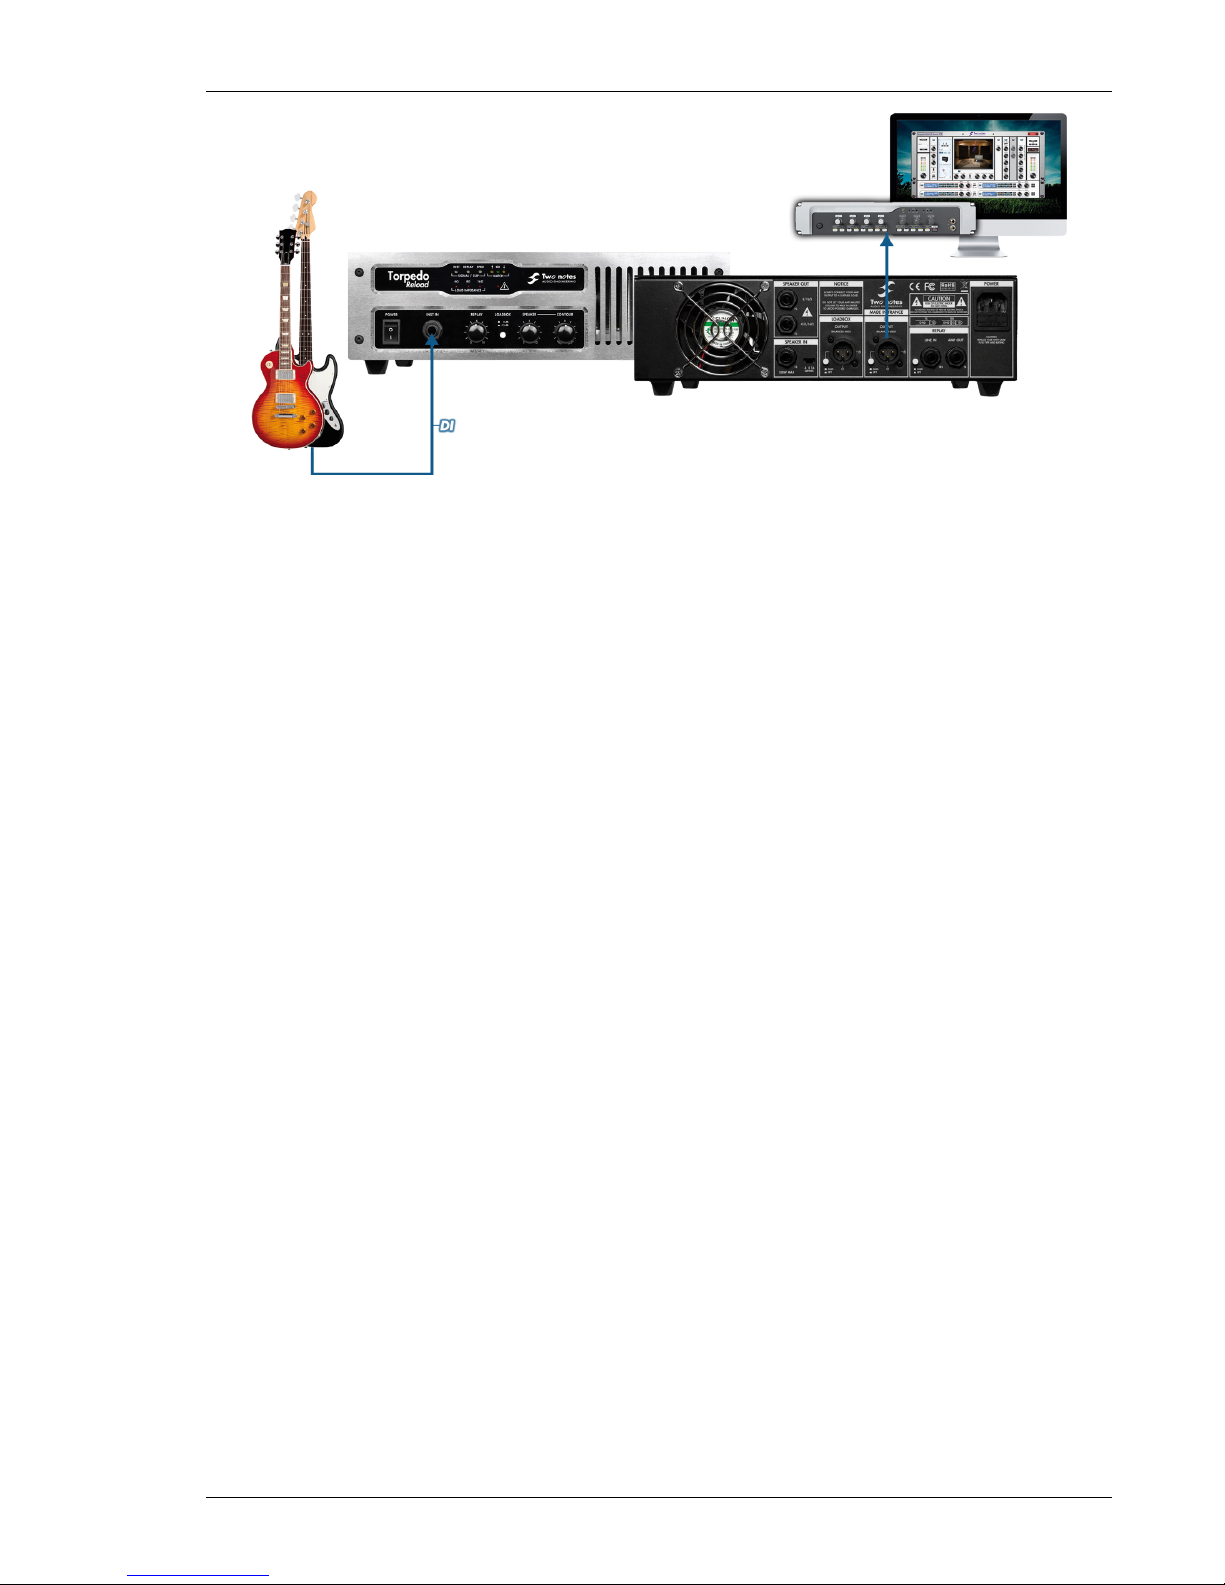
1. Plug your guitar to the DI input and the DI output to your microphone preamplifier (or channel 1
on the mixer, or embedded preamplifier on your audio interface), and that preamplifier to Line
channel input 1 on your audio interface.
2. Activate Track 1 for recording & live monitoring, select channel 1 as an input.
3. Start recording!
20 Two Notes Audio Engineering Torpedo Reload
Page 21
Connecting the Torpedo Reload
In any setup that involves a microphone preamplifier, it is important to set the correct gain on the
preamplifier so the level of the recorded track is high enough. It is commonly recommended to set
the gain on the preamplifier so the instrument’s signal will hit -16dB FS to -18dB FS (i.e., dB Full Scale,
the value indicated on your sound card and sequencer input meter).
4 Power attenuator and load box
4.1 RE-ACT™, how does it work?
Some attenuators are resistive, others are reactive, and most of them are passive.
Passive means that the attenuator’s electronics does not require a power supply.
Resistive means that the power out of your amplifier is tamed by the presence of one or several
resistors on the signal path. The load impedance plays a huge role on the sound, and a resistive
attenuator will make the tone somewhat darker, with losses in the high and low frequencies.
Reactive means that reactive elements (transformers, coils and/or capacitors) are used instead of
mere resistors. With this technology, the damping factor will decrease with the level of attenuation.
Most of the time, a reactive attenuator means losses in character and fidelity, "muddy" sound and
other unwanted effects.
Another downside of passive resistive/reactive attenuator is the way the listening level is controlled,
usually by some stepped potentiometer, which does not allow for precise volume setting, and limits
you to a set of fixed attenuations.
RE-ACT™ stands for "Reactive-Active Attenuator", which means it uses a reactive load and active
overall schematics. In effect, the RE-ACT™ can be described as the conjunction of two elements:
• a reactive loadbox inherited from the critically acclaimed Torpedo Live series, followed by
• an ultra-low-distorsion, wideband, low-noise solid-state amplifier based on a widely used HiFi
architecture.
The role of this system is to present a speaker-like impedance to your amplifier, get rid of the
power, then re-amplify it to the desired volume. This design offers a number of advantages over
resistive/passive ones:
• the amp is always connected to a fixed impedance, which is as close as possible to a real
speaker impedance;
Two Notes Audio Engineering Torpedo Reload 21
Page 22
Connecting the Torpedo Reload
• as the impedance does not change with the attenuation, the tone of your amp stays the same;
• the volume you hear in the room can be set continuously, you get REAL master-volume control
(SPEAKER parameter), after your amplifier’s master volume;
• the speaker-output impedance of your amplifier is independent from the speaker impedance
of the actual speaker cabinet you plug on the Torpedo Reload. This opens up a great many fun
possibilities of cabinet mixing.
4.2 Connection
Connecting the Reload as an attenuator is really quite simple, provided you observe the following:
• Always match the value of the impedance on the Torpedo Reload (either 4, 8 or 16 Ohms) to
your amplifier’s speaker-output impedance.
• The Torpedo Reload will normally get warm during use, so you must not put it in a closed box or
obstruct the air vents.
• You can connect one or two cabinets to the Torpedo Reload, or no cabinet at all if you want
to use the loadbox only (silent playing and recording).
• The impedance of the cabinets you may plug to your amp is independent from the impedance
of that amplifier. You can very well use the 8-Ohm speaker output of your amp while having one
8-Ohm cabinet and another 16-Ohm cabinet plugged to the Torpedo Reload ! Please refer to
"Possible post-attenuation speaker combinations", Part 7.2.3 for more information about cabinet
matching.
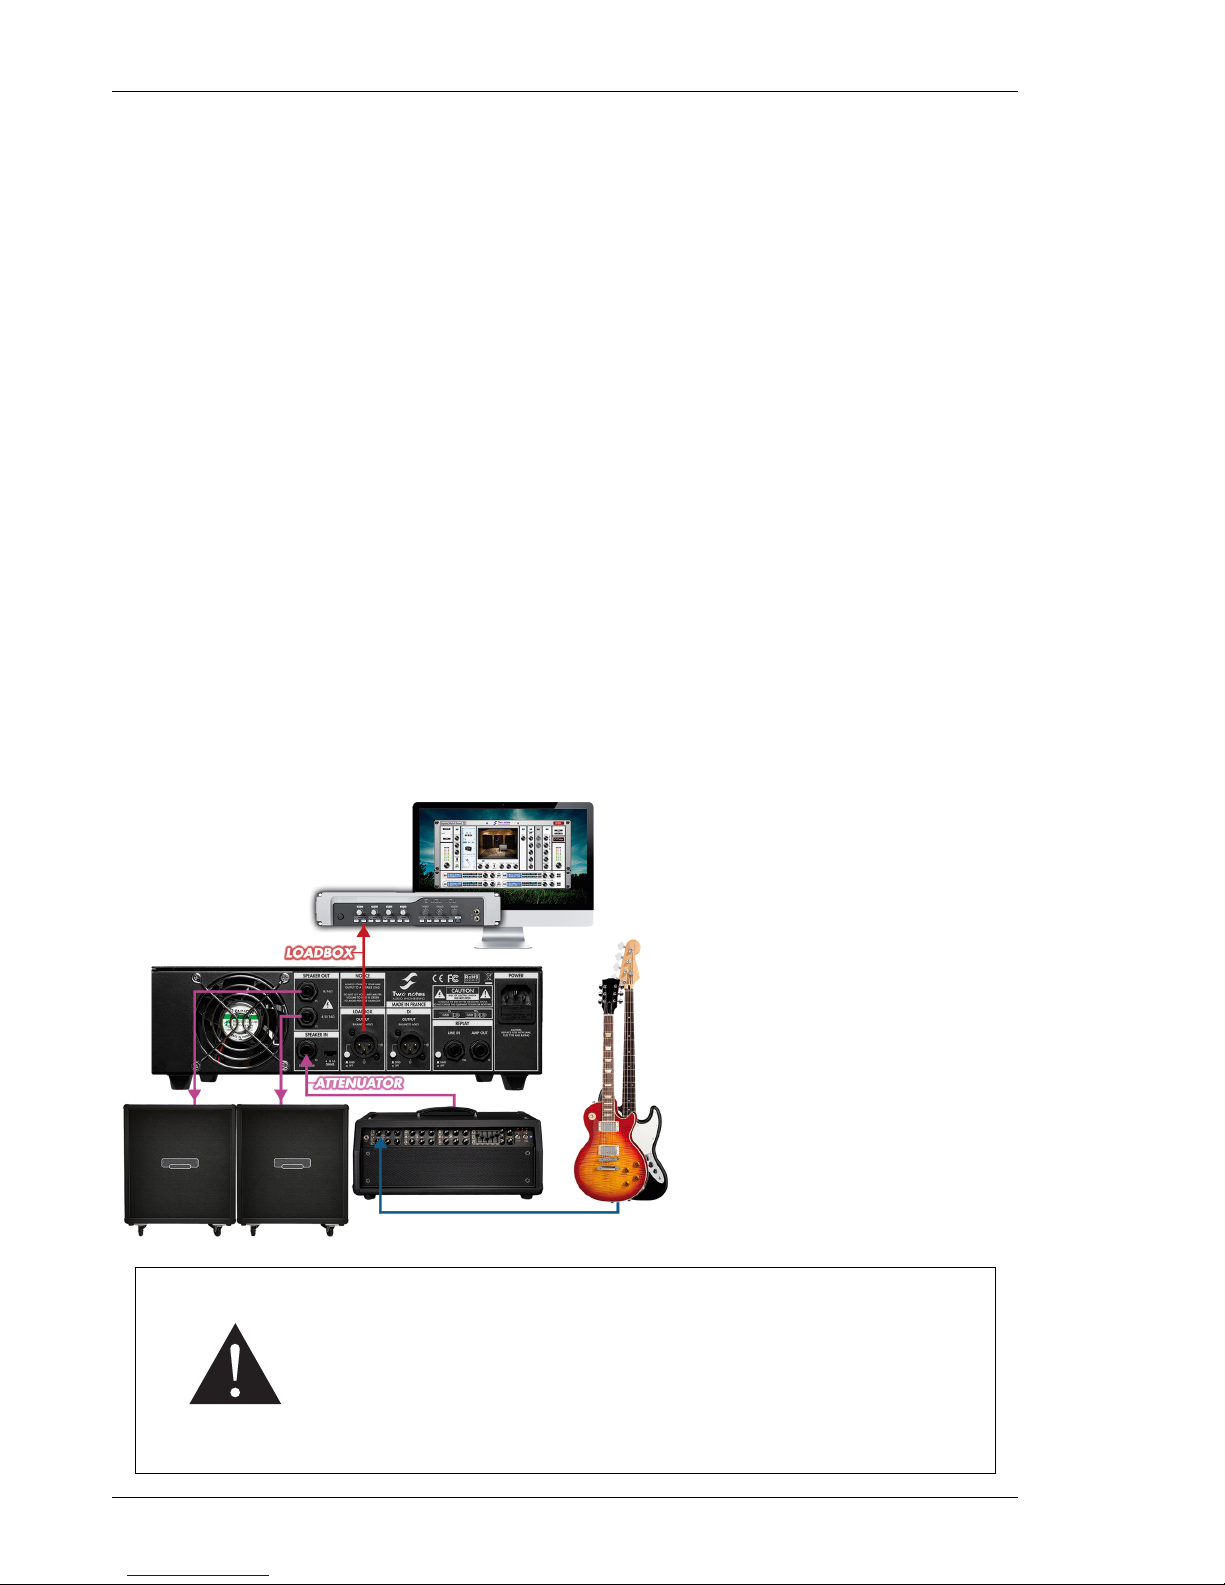
1. Connect your amplifier’s
speaker out to the Torpedo
Reload’s SPEAKER IN.
2. Make sure the impedance selected on the Torpedo Reload
matches the value at your
amp’s output.
3. Connect a cabinet to the
lower SPEAKER OUT jack.
4. Connect a second cabinet,
if needed, to the higher
SPEAKER OUT jack.
The loadbox inside the Torpedo Reload remains active whether you
have plugged a cabinet to it or not. We recommend using amplifiers
with a maximum power rating of 150 W RMS (200 W peak). Basically,
the loadbox turns your amplifier’s power into heat. If the temperature
inside the Torpedo Reload is too high due to an excess of power, DO
NOT WORRY: the active security system will put your amp on a safe
security load, while the Torpedo Reload cools down.
22 Two Notes Audio Engineering Torpedo Reload
Page 23
Connecting the Torpedo Reload
When you play your amplifier loud, you may hear some noise coming
out of the Torpedo Reload . This is perfectly normal and there is no reason to worry. The sound is produced when power goes through the coil
of the reactive load embedded in the Torpedo Reload . The vibration is
related to what power comes out of the amplifier connected to the Torpedo Reload and to the signal’s frequency content (i.e., notes played
are heard). Your amplifier may also produce similar noise, at the output
transformer’s stage. Such noise is usually not heard, simply because it
is normally covered by the sound coming from the loudspeaker.
The sound may be a little different depending on whether a Torpedo
Reload is placed between your amplifier and your cabinet or not. That
is normal, as the internal speaker impedance of the Torpedo Reload
will be slightly different from your cabinet’s. Most importantly, this slight
difference is constant and does not depend on the attenuation level.
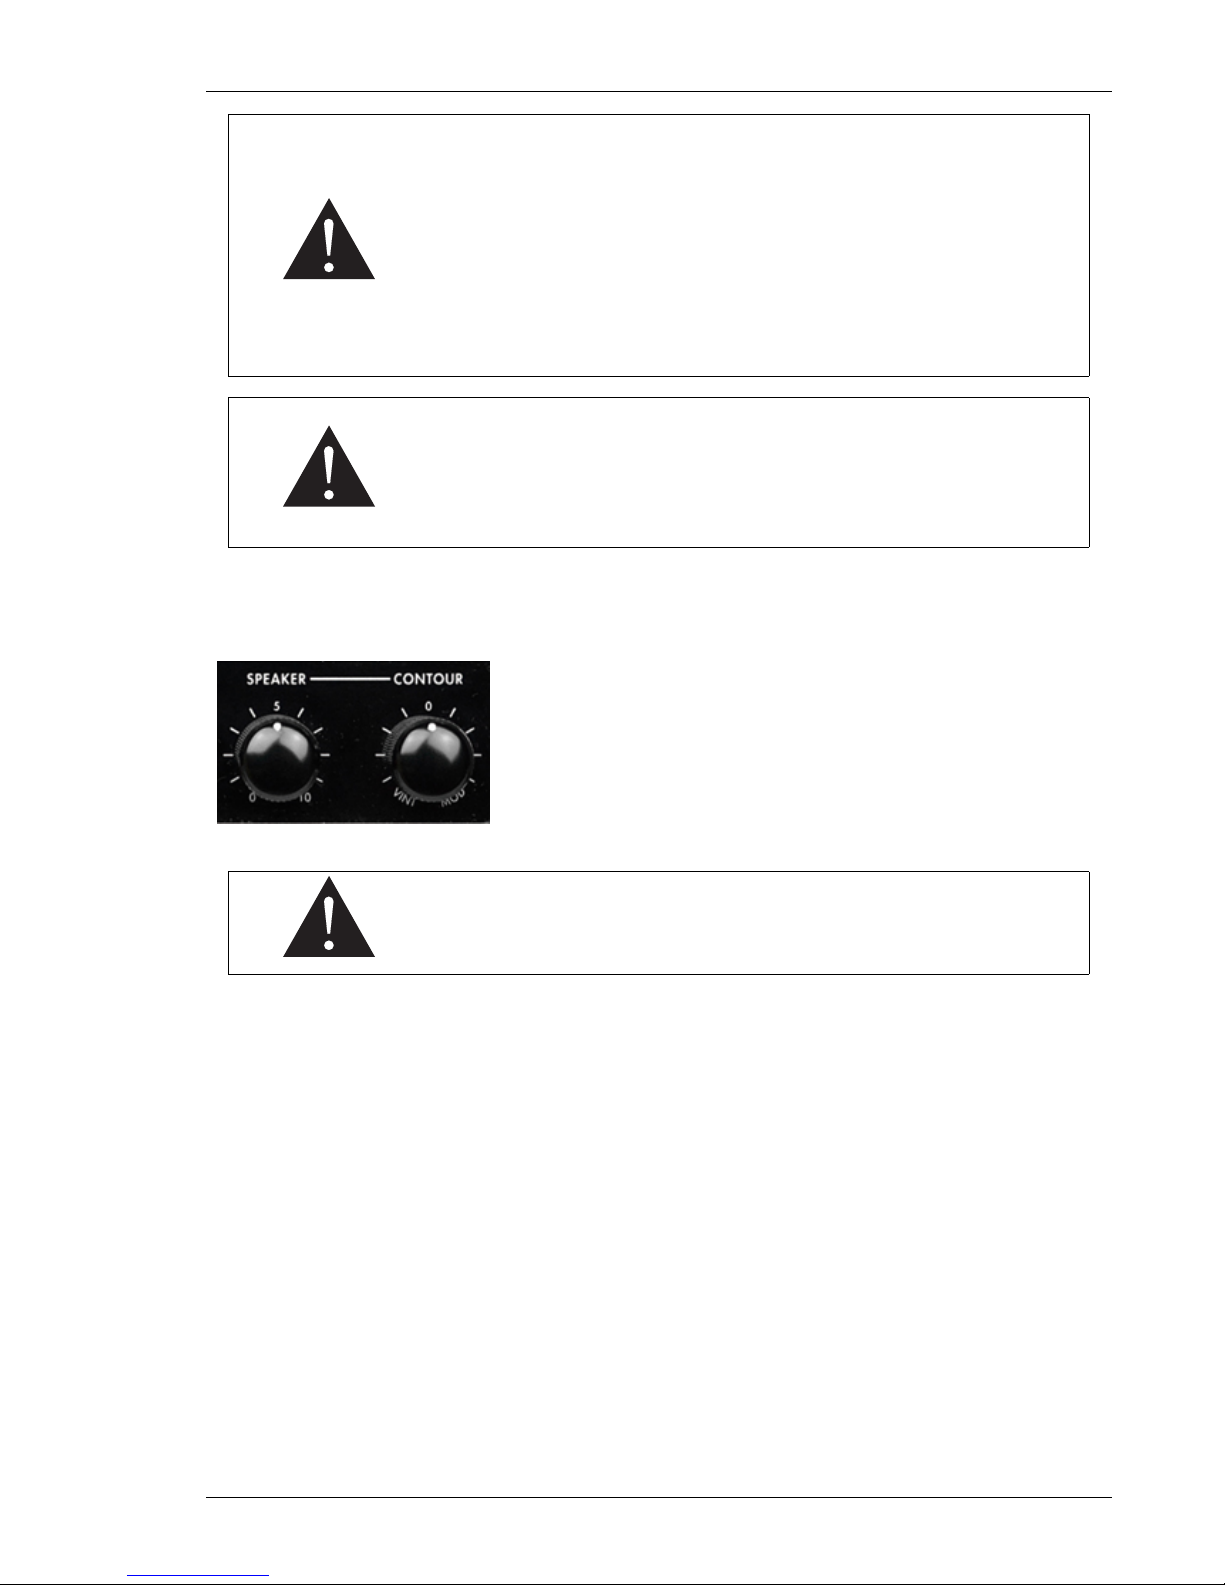
4.3 Contour
The CONTOUR parameter will help you find the tone you are searching for, at low volume. This filter changes the attenuated speaker output, from more medium and vintage tones to more modern and midscooped tones. Basically, when playing at low volume, you may want
to add that missing bass and treble, but we like to imagine a more
creative way of using the CONTOUR, by modifying the tonal characteristics of your amplifier during a recording through traditional miking.
CONTOUR has no effect on the DI, REPLAY™ or Loadbox outputs.
5 Re-amplification using REPLAY™
Re-amplification techniques are commonly used nowadays, mainly to let the guitarist record a dry
guitar in one place and time, and then have that dry recording sent to one or many amplifiers by a
sound engineer who will take the time to find the right combination for the song. This way a guitar
player who is equipped with a good quality DI and a DAW can take the time to quietly record at
home without travelling to a studio, and eventually get a pro recording of a real amplifier. For more
information about re-amping techniques, please read this Wikipedia article: http://en.wikipedia.
org/wiki/Re-amp.
With the Torpedo Reload, you can do both of those things: record the dry guitar with the DI, and
then use the REPLAY™ to send that guitar track back to an amplifier. We will here present first a silent
REPLAY™ (i.e., without actual cabinets plugged to the Torpedo Reload ), and then the full setup for
recording 3 different tracks at the same time.
Two Notes Audio Engineering Torpedo Reload 23
Page 24
Connecting the Torpedo Reload
5.1 Silent REPLAY™
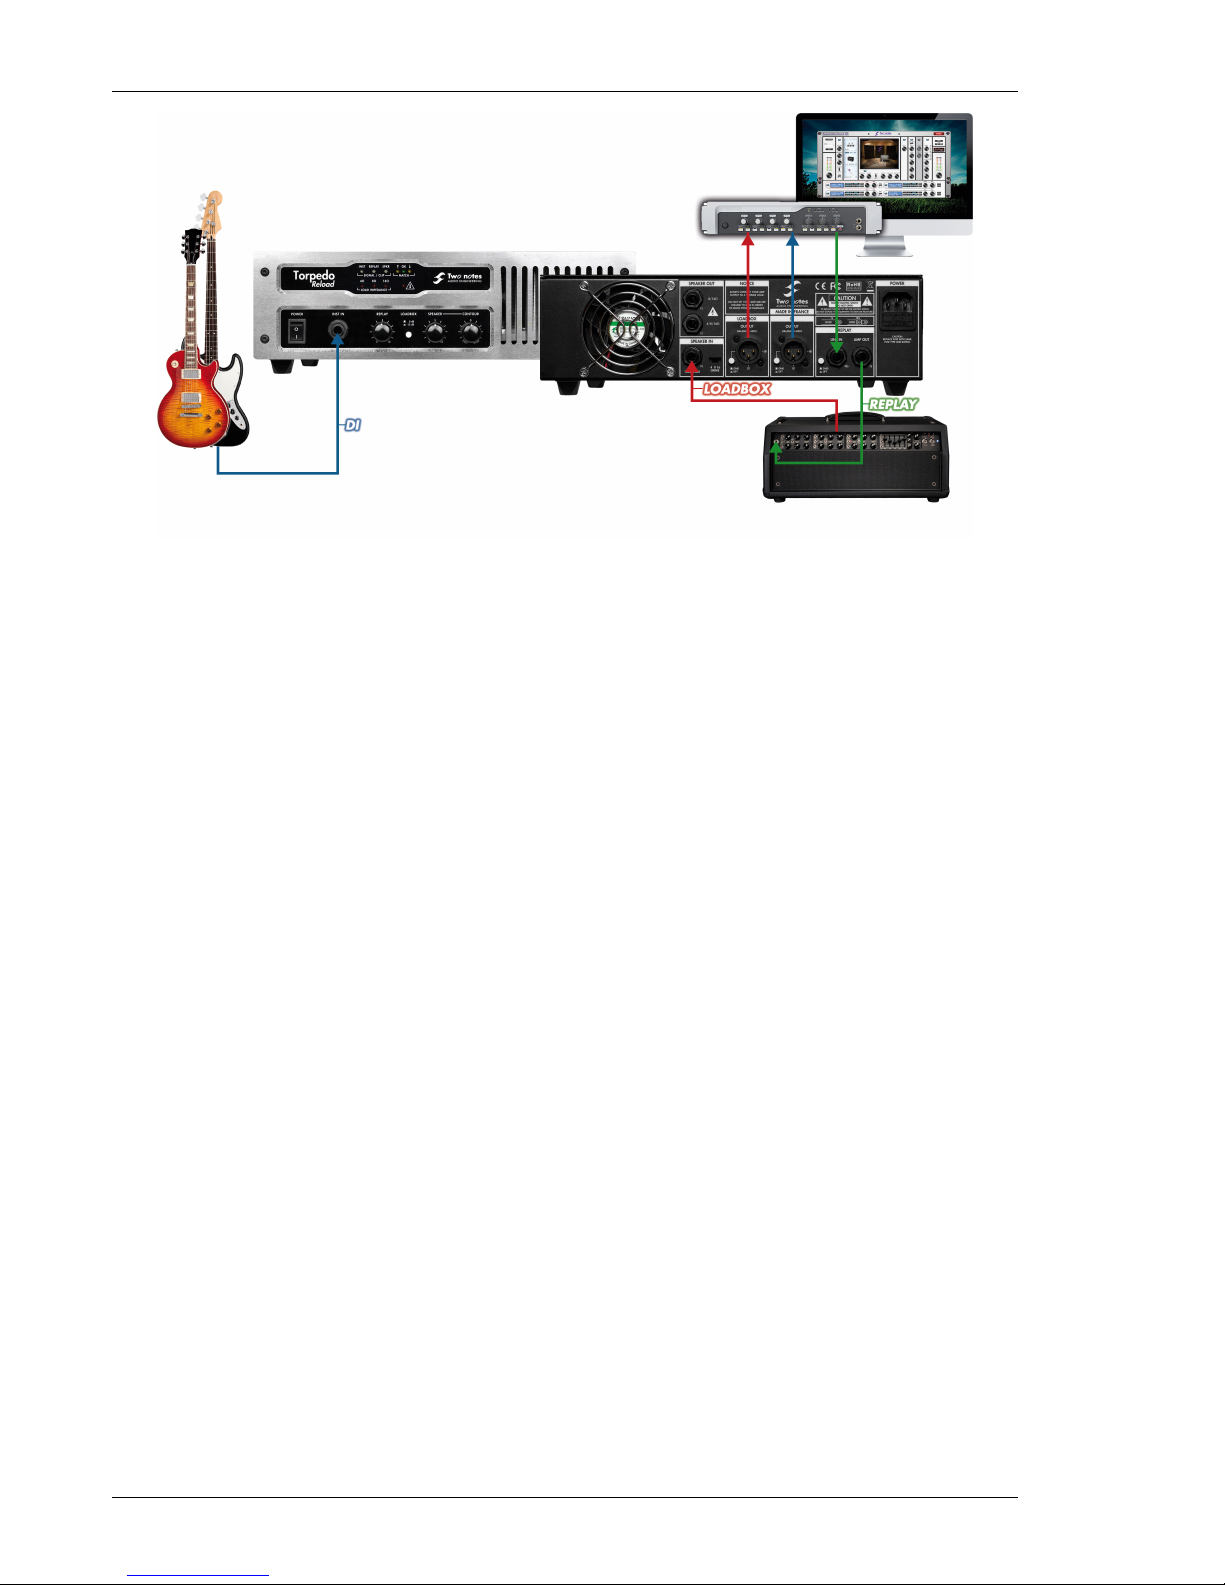
We shall assume here that the DI setup presented above ("3 Di recording") is already operational. On
track 1 of your sequencer you have recorded the sound sample of a dry guitar signal.
1. Route Track 1 so its output is sent to your audio interface’s output 3, if 1 & 2 are used as Master
output. It is important you use a different output from the Master one. This way you can hear the
replayed track on the Master output, while sending the dry track to another output. If you only
have 2 outputs, you can use output 1 to send track 1 and output 2 to hear the newly recorded
replayed signal.
2. Connect the interface’s output 3 into the REPLAY™ input.
3. Connect the REPLAY™ output to your amplifier’s input.
4. Connect your amplifier’s output to the Torpedo Reload’s speaker input.
5. Connect the Torpedo Reload’s Loadbox to your second microphone preamplifier (or channel
2 of the mixer, preamp 2 on the audio interface).
6. Connect the preamplifier to the Line channel input 2 on your audio interface.
7. Activate Track 2 for recording & live monitoring, select channel 2 as an input
8. You can insert Torpedo Wall of Sound on the track so you can perform (non-destructive) miking
while recording the dry signal of the amplifier.
9. Start recording!
5.2 The full setup: DI + LOADBOX + miking
In the previous setup we decided to achieve a silent REPLAY™, but you can perform some traditional miking at the same time, with a controlled sound level thanks to the Torpedo Reload’s power
attenuator.
1. Connect a cabinet to the Torpedo Reload’s speaker output, set the appropriate volume for the
cabinet using the SPEAKER potentiometer.
24 Two Notes Audio Engineering Torpedo Reload
Page 25
Connecting the Torpedo Reload
2. Plug a microphone to your third preamplifier (channel 3 on the mixer, etc.), place the microphone in front of the cabinet.
3. Connect the preamplifier to the Line channel input 3 on your audio interface.
4. Activate Track 3 for recording and eventually live monitoring to hear the result in the Master,
select channel 3 as an input.
5. Record!
When replaying with a high-gain amplifier, you may experience some
unwanted noises, at a level higher than what you were used to with a
guitar directly plugged into the amp. This is normal and mainly due
to the amp’s huge level of gain, whereas our setup here is more complex and more sensitive to every source of noise in it. The different
ground lifts we add to the Torpedo Reload will help, but may not be
enough. We recommend having the different products (instrument,
Torpedo Reload, computer, amplifier) as far as possible from one another, while keeping the unbalanced connections as short as possible.
A noise gate in the effects loop of the amplifier always helps a lot with
this kind of issue.
5.3 MATCH™
The unique MATCH™ function will compare the signal sent from the guitar with the signal coming
back from the audio interface. Use the REPLAY™ potentiometer to adjust the level of the track’s
signal.
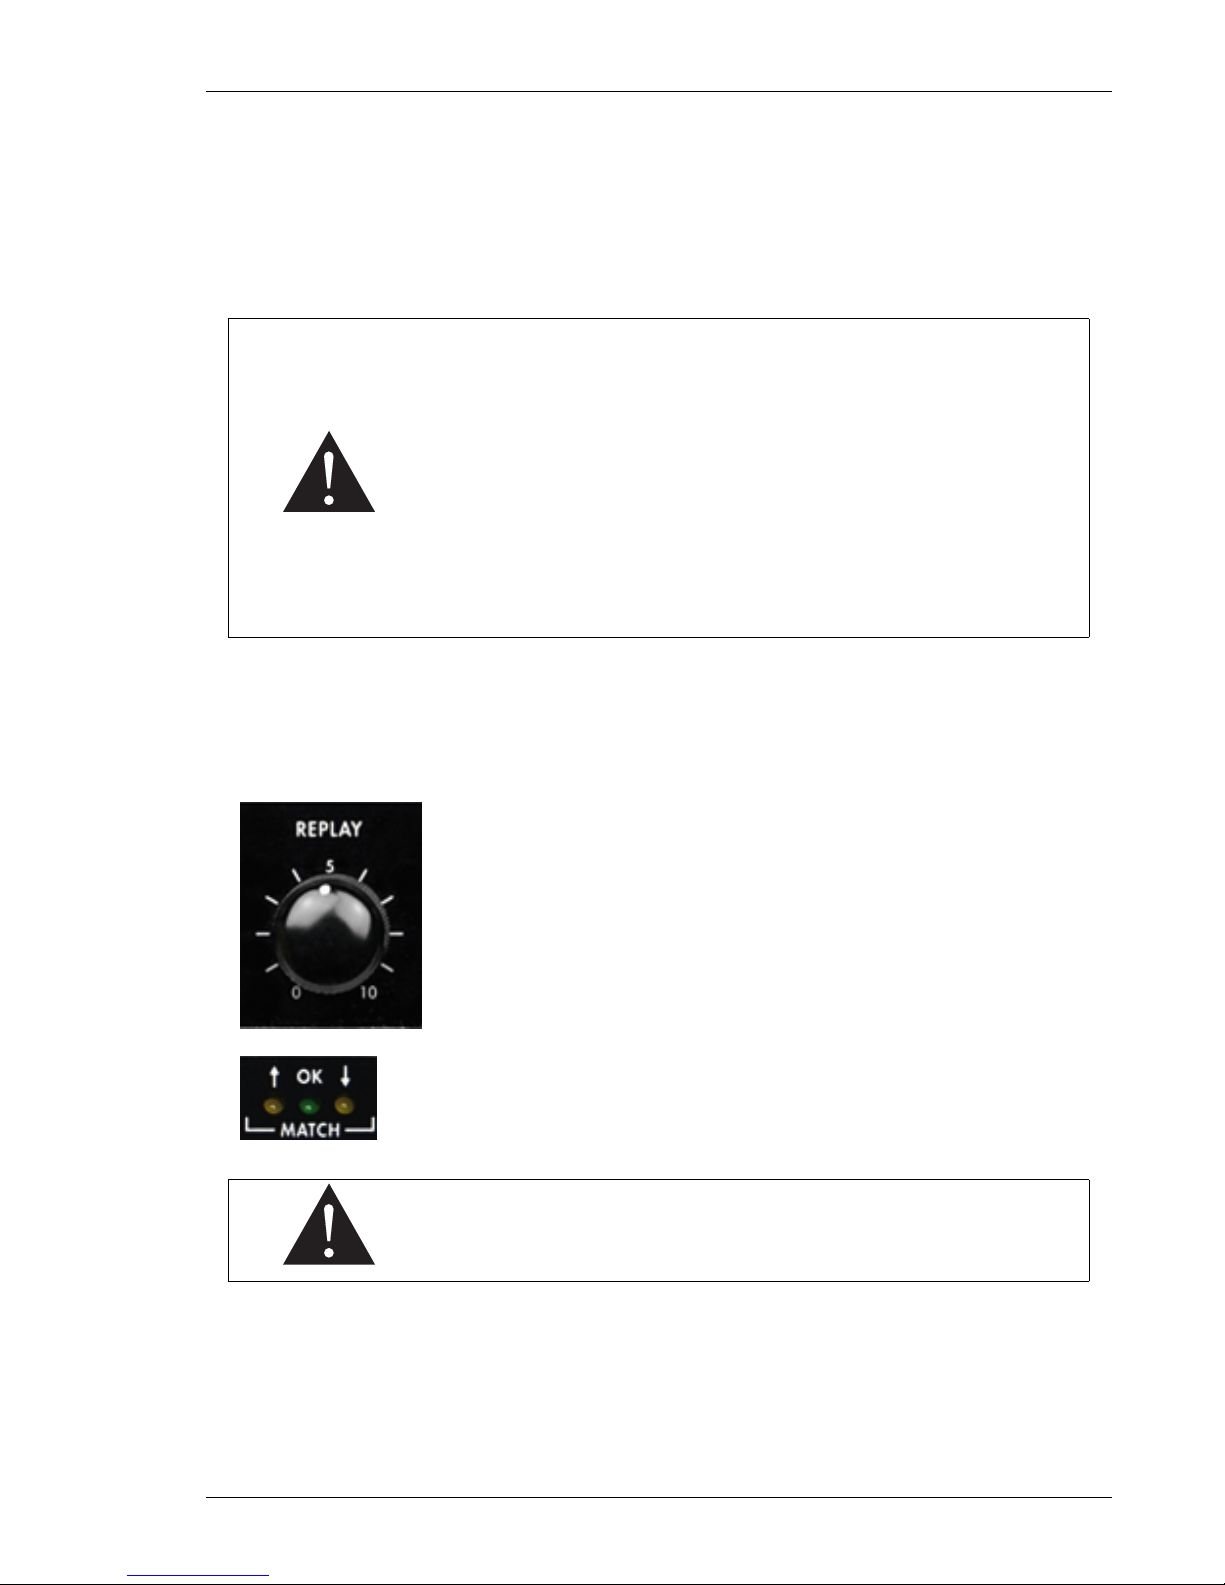
1. We shall assume here that the silent REPLAY™ setup is operative. Activate the track-1 monitoring so the guitar’s dry sound will
come back to the audio interface into the REPLAY™ input. That
way the Torpedo Reload will be able to compare the guitar’s signal with the one sent by the audio interface.
2. Play the guitar so you see a LED on the MATCH™ panel light up.
Increase or decrease the value of the REPLAY™ potentiometer
until the OK green led lights up, and your level-matching is done!
MATCH™ works best if the latency of your digital audio interface is set
to a value inferior to 20 milliseconds.
5.4 MATCH™ without the original guitar
You cannot use the MATCH™ function because your are replaying tracks that were recorded at a
different time and place? Try to get some information about the guitar/bass that was used. Find a
guitar with similar pickups (single coils, humbuckers, active...) and use MATCH™ as if this were the
guitar used during the initial guitar recording, to find the REPLAY™ potentiometer’s correct value.
Two Notes Audio Engineering Torpedo Reload 25
Page 26

Page 27

Part 5
Setting up Torpedo Wall of Sound
1 Installation
1.1 On a PC using Windows™ OS or an Apple Mac™ using OSX™
Before installing the Torpedo Wall of Sound software, make sure you have uninstalled any previous
version of the software to avoid any possible problems.
1. Download the version of Torpedo Wall of Sound you need from the Two Notes website using the
link: http://www.two- notes.com/en/software/torpedo-wall-of-sound-3/#download.
2. Unzip the software if needed.
3. Launch the .exe (Windows™ version) or the .dmg (Mac™ version).
4. Follow the instructions on your screen.
1.2 Registering Torpedo Wall of Sound
Torpedo Wall of Sound requires registering on the Two Notes website. During the installation process,
you will be asked to create a new profile, then you will be able to download a license and activate
you plugin online. Offline activation is also possible — please follow the instructions given during
installation.
Additional video tutorials on how to install and register Torpedo Wall of Sound can be found on
the Two Notes website: http://www.two-notes.com/en/software/torpedo-wall-of-sound-3/#tuto.
2 Using Torpedo Wall of Sound with an amplifier or a preamplifier
Torpedo Wall of Sound is a plugin you can embed in your DAW (Digital Audio Workstation) sequencer
as an insert effect on a guitar or bass track.
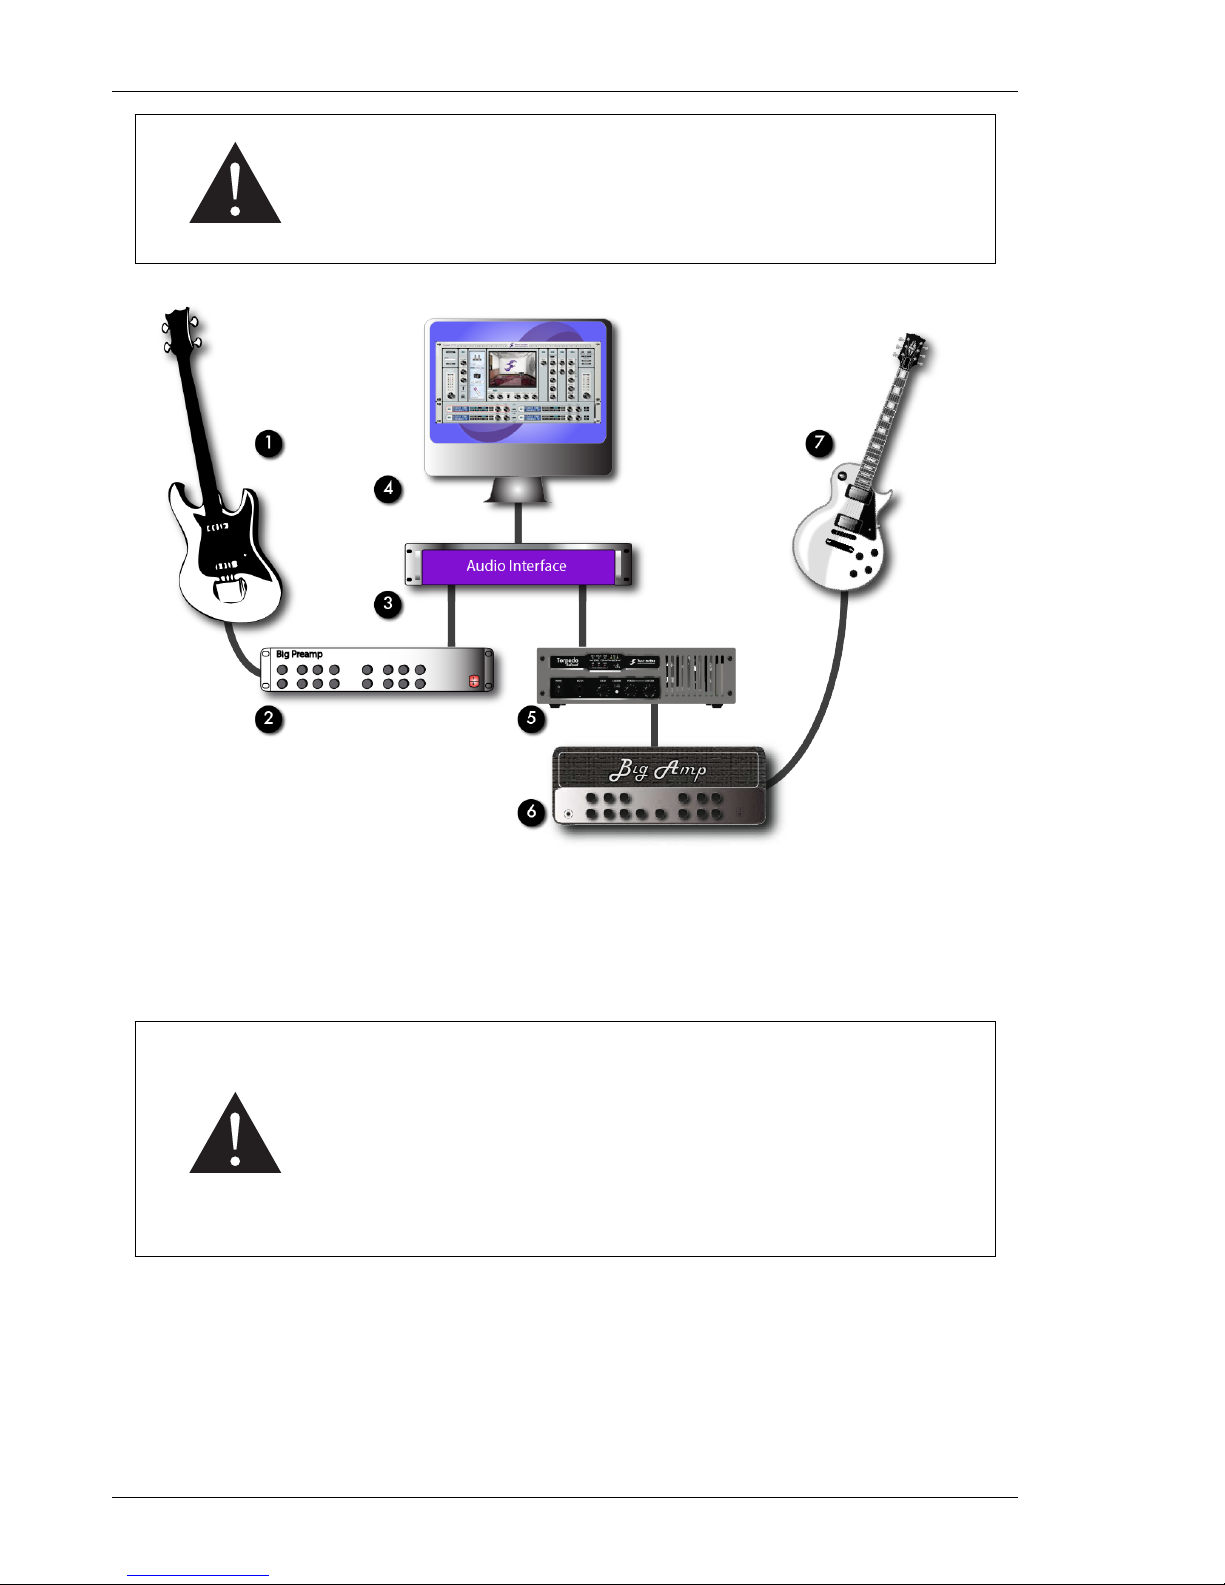
It is designed to work perfectly with a guitar or bass preamplifier’s line output or with a tube amplifier and the Torpedo Reload. The following schematics illustrate the way you should wire your system
up.
Two Notes Audio Engineering Torpedo Reload 27
Page 28
Setting up Torpedo Wall of Sound
Please note that some amplifiers or preamplifiers have a "frequency
compensated" output. Such output embeds a small circuit to emulate a miked speaker. Please do not use this output, or deactivate the
speaker emulation if possible, to get the best of your Torpedo Wall of
Sound software.
1 Guitar or Bass 3 Audio Interface 5 Torpedo Reload 7 Guitar or Bass
2 Guitar or bass preamplifier 4 PC/MAC with Torpedo Wall of Sound 6 Guitar or bass amplifier
Please keep in mind that the overall quality of the total sound chain is
always determined by its weakest component. The best performance
will be achieved with a perfect adaptation (impedance, level...) of
your preamp or Torpedo Reload’s output signal to your audio interface.
Your guitar or bass preamplifier may not deliver true line-level signals
and may use either line, microphone, or "something in-between" signals. Make sure the signal you put in the simulation is the best one
possible so you get the most out of your Torpedo Wall of Sound.
3 Using Torpedo Wall of Sound with a software or hardware amplifier
emulator
You may want to use Torpedo Wall of Sound in order to replace the speaker simulation of a plug-in or
hardware amplifier emulator. This may be a good idea, if you keep in mind the two cases you may
encounter and follow our recommendation:
28 Two Notes Audio Engineering Torpedo Reload
Page 29
Setting up Torpedo Wall of Sound
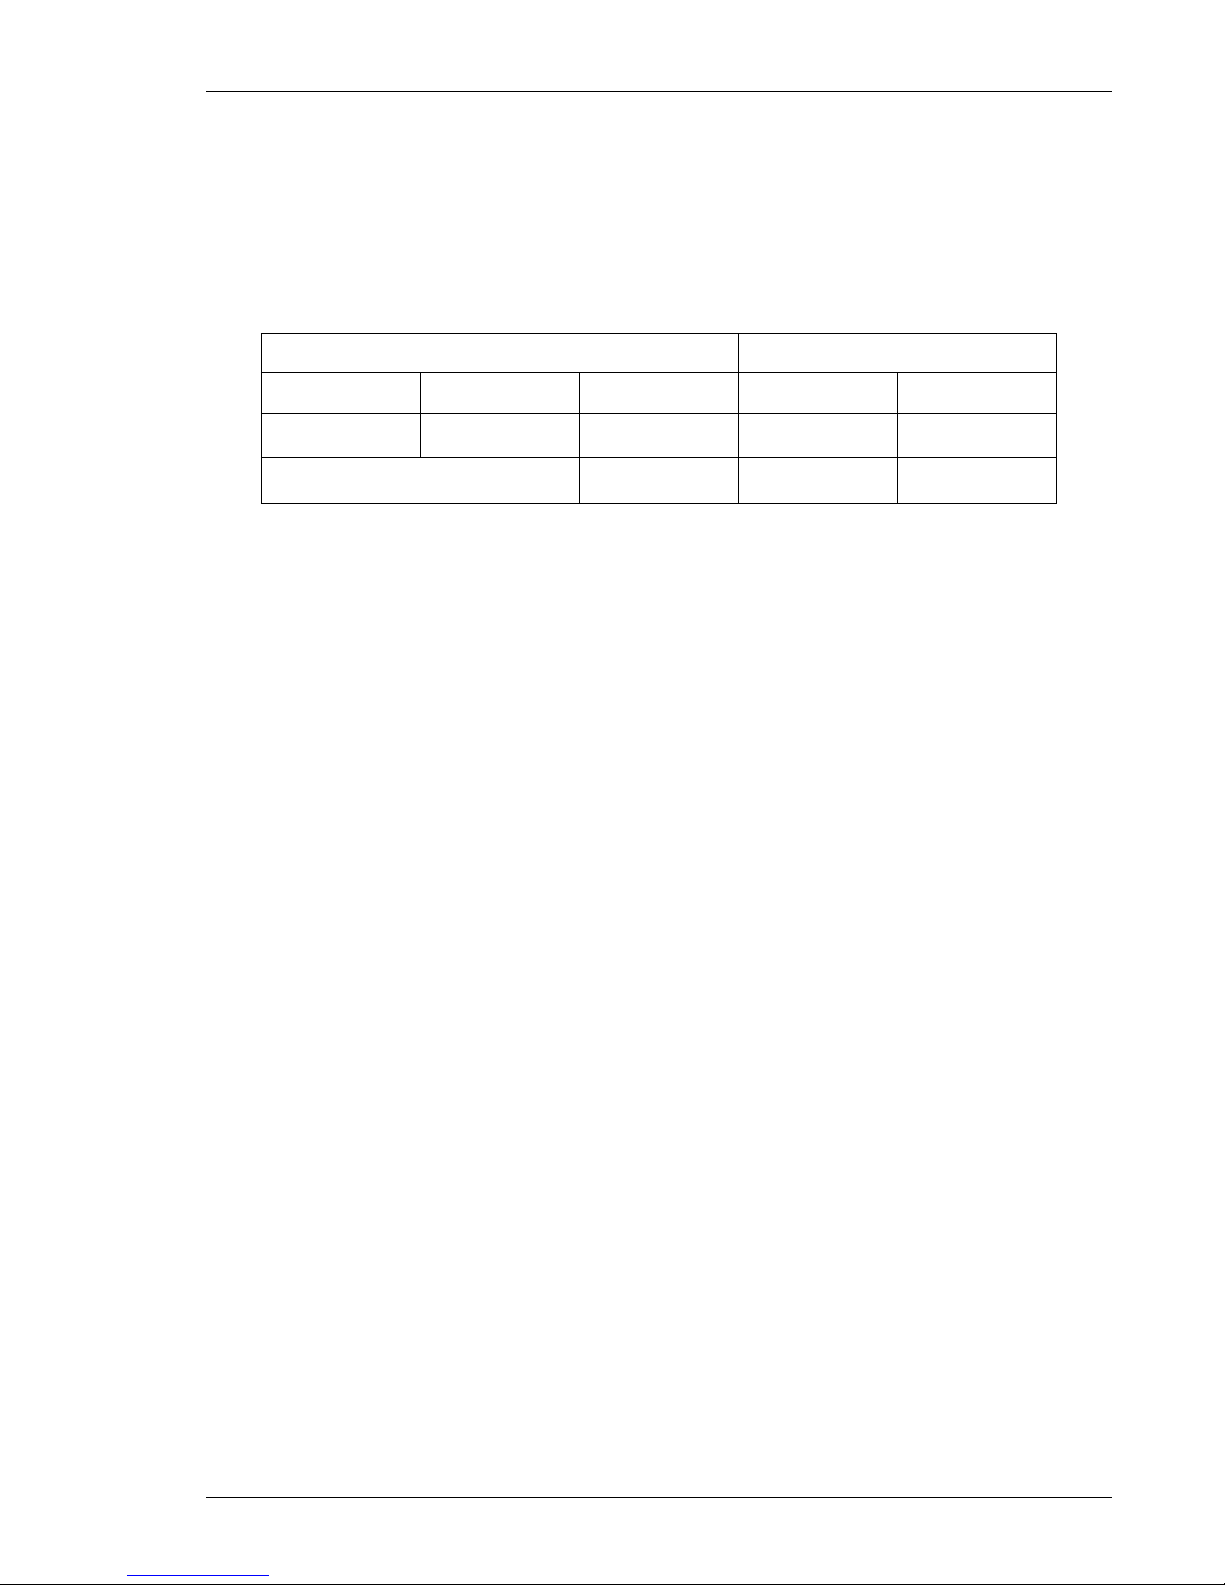
1. If the amplifier emulator embeds separate pre-amplifier and power-amplifier simulations: bypass
the speaker simulation AND the power-amplifier section of the amp emulator, and switch the
Torpedo Wall of Sound’s power-amp simulation on.
2. If it is not possible to bypass the power-amp simulation on the Amplifier emulator, switch off the
power amp on the Torpedo Wall of Sound plug-in.
The two cases can be summed up as follows:
Amplifier Emulator Torpedo PI-101
Preamp status Power Amp status Speaker status Power Amp status Speaker status
ON OFF OFF ON ON
ON
OFF OFF ON
Obviously, if the speaker simulation on the amplifier emulator cannot be bypassed, we do not
recommend using that simulation with Torpedo Wall of Sound.
4 Software and cabinets update
Every time you start a session using the Torpedo Wall of Sound plug-in, the plug-in will automatically
check for any newer version of the software and for a new license — if you buy new cabinets, for
instance. Every time an update is available form the Two Notes website, the plug-in will show a
window where you will have the choice to install the new software and cabinets or to do so later.
That function requires that your computer be connected to the Internet. If you prefer not to have your
studio computer connected, simply check the Two Notes website or read the Two Notes newsletter
so you can be informed of the latest updates.
Two Notes Audio Engineering Torpedo Reload 29
Page 30

Page 31
Part 6
Using Torpedo Wall of Sound
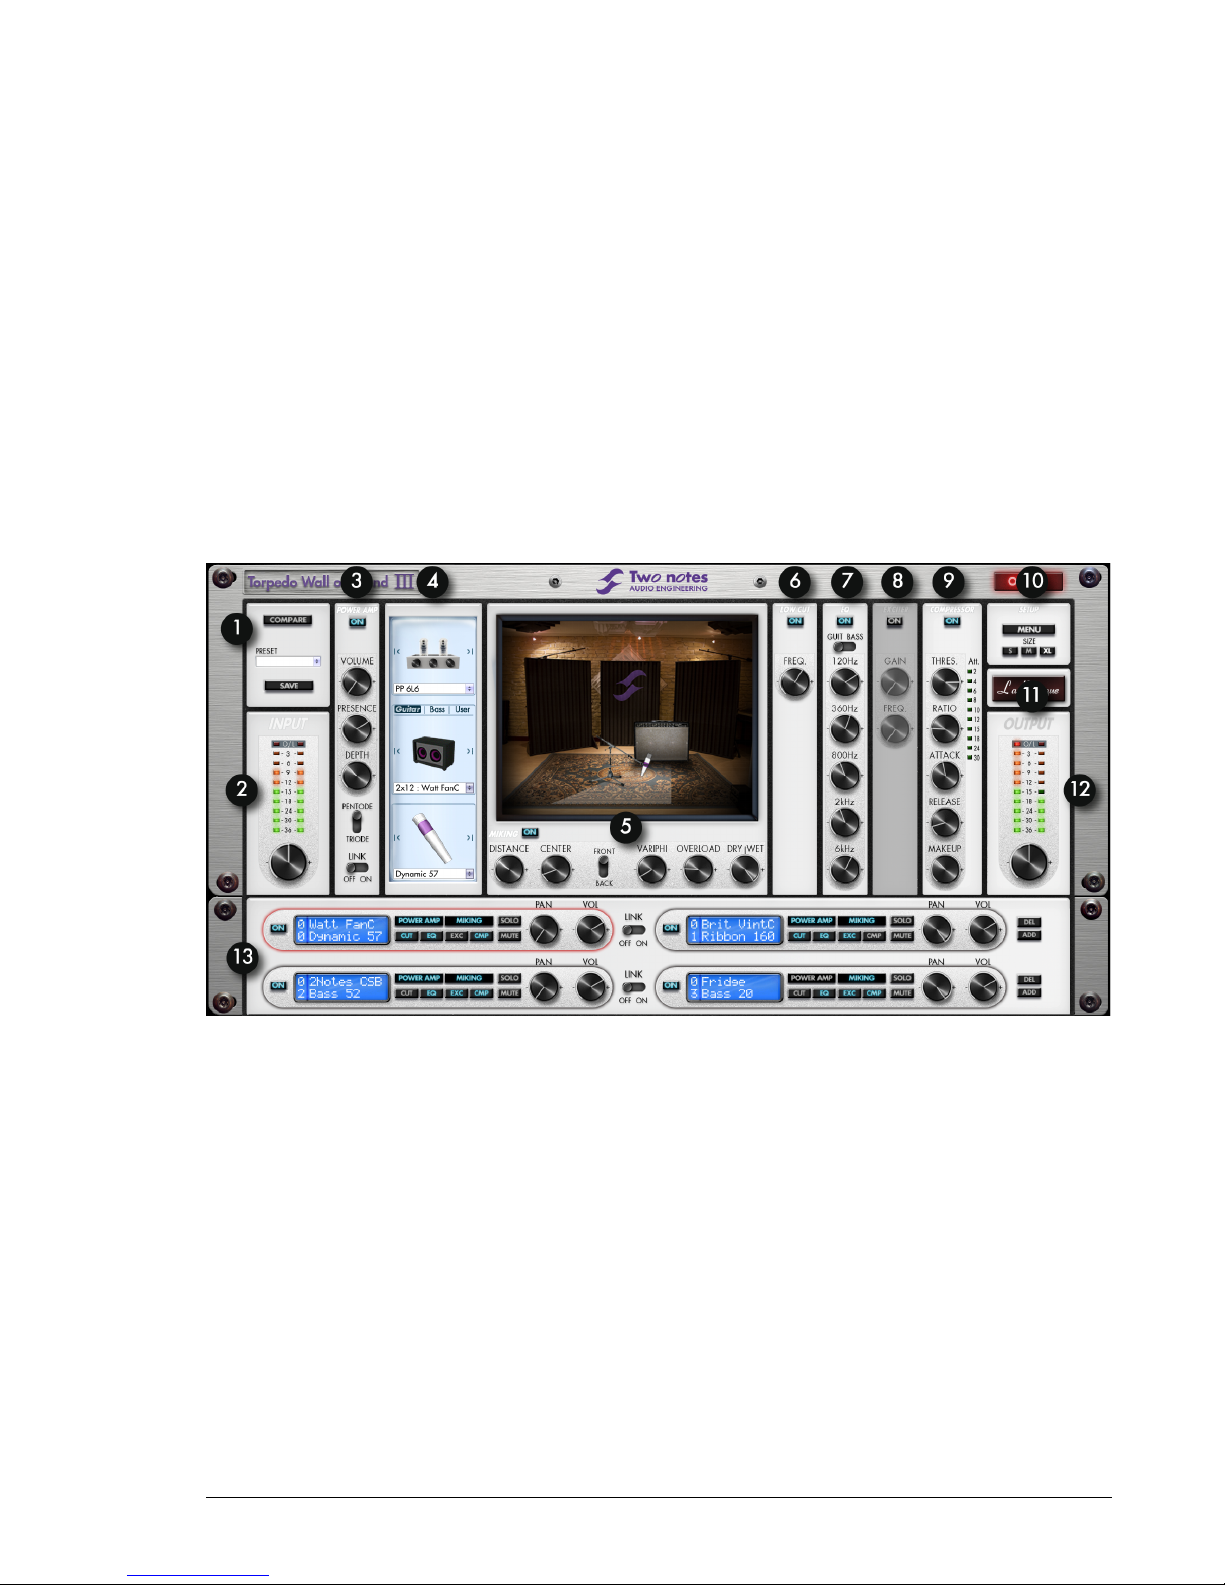
1 Torpedo Wall of Sound interface
1 Presets 5 Miking 9 Compressor 13 WoS section
2 Main input gain 6 Low cut 10 Setup parameters
3 Power amp parameters 7 EQ 11 La Boutique (the store)
4 Power amp, speaker and microphone selection 8 Exciter 12 Main output volume
Two Notes Audio Engineering Torpedo Reload 31
Page 32
Using Torpedo Wall of Sound
2 Routing of Torpedo Wall of Sound : stereo and mono to stereo track
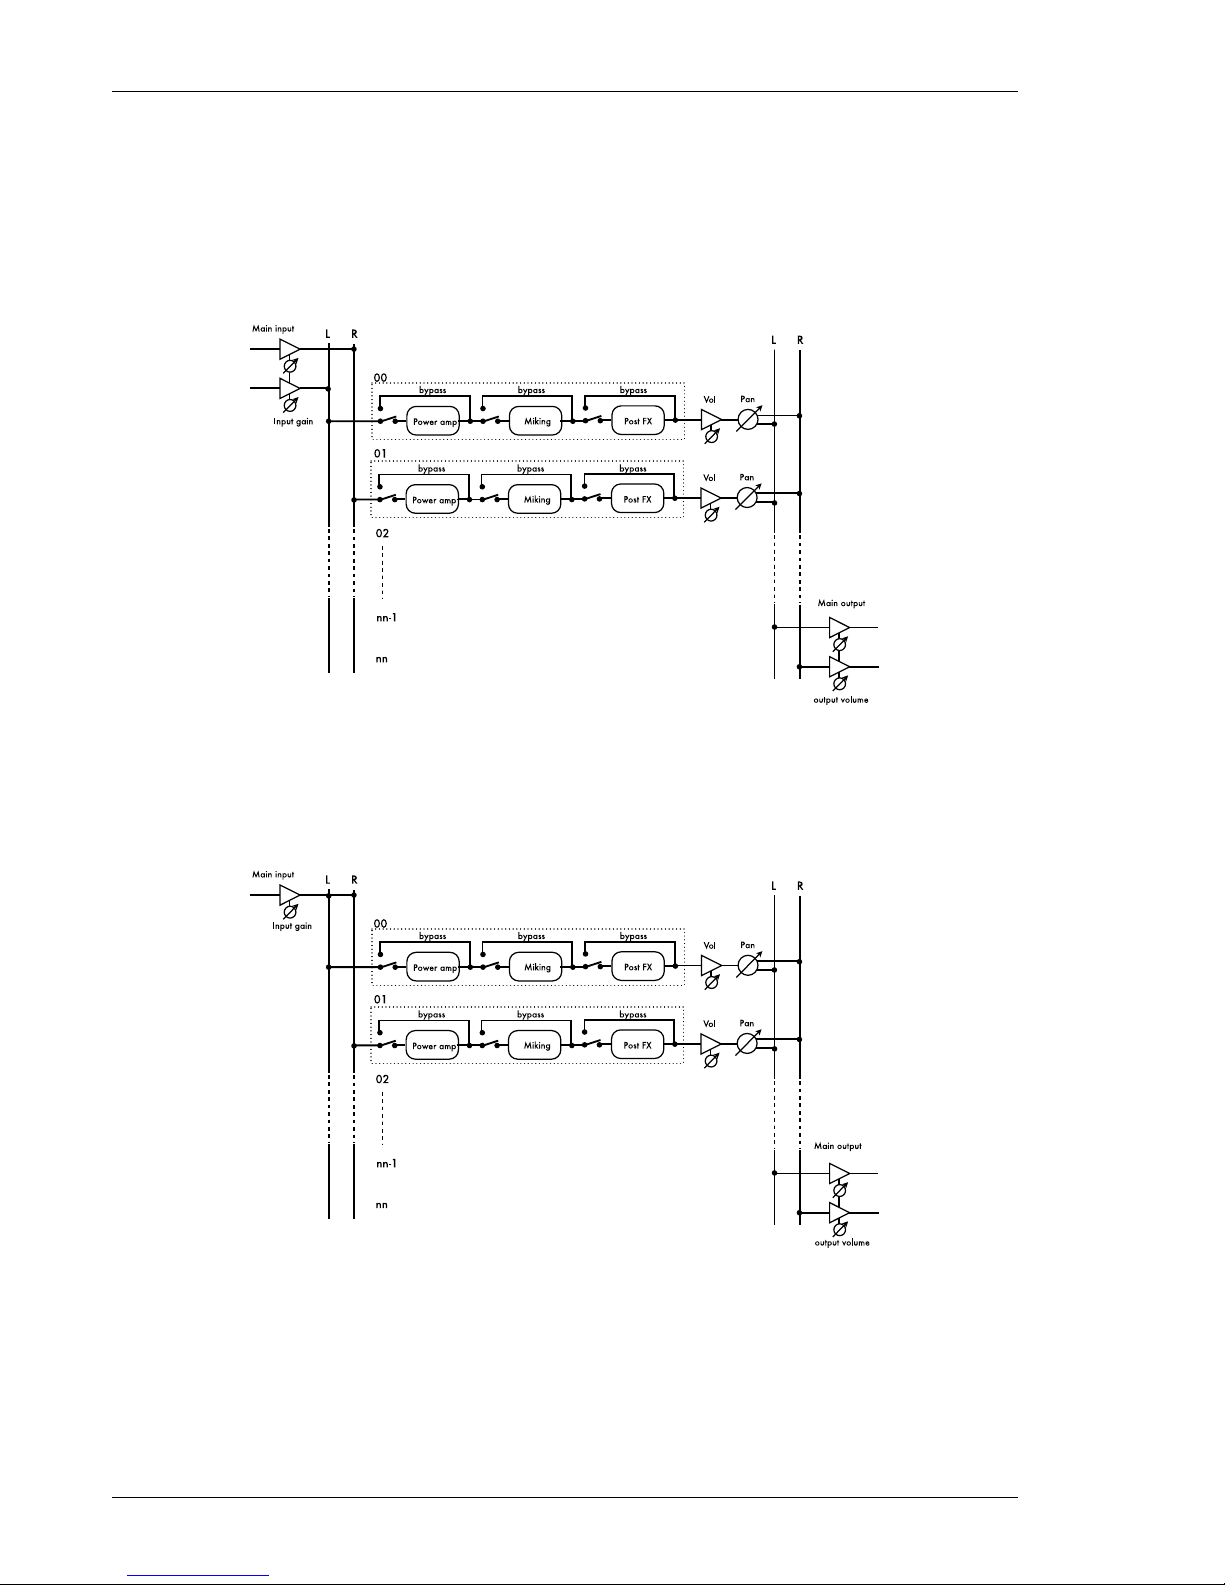
Torpedo Wall of Sound is designed to work with stereo / dual mono signals, so you can insert it on a
stereo track or a stereo bus. With Torpedo Wall of Sound you can handle as many as 100 different
cabinets and microphones simultaneously. The 100 cabinets are displayed on 50 channels. In other
words, one channel contains two cabinet-miking configurations. Each channel offers independent
controls for pan and volume.
Figure 6.1: On a stereo track
With certain software sequencers such as Logic Audio™, you will be able to load the plug-in as a
mono to stereo plug-in. That way, the mono input channel is sent to the plug-in’s two channels:
Figure 6.2: On a mono to stereo track
32 Two Notes Audio Engineering Torpedo Reload
Page 33
Using Torpedo Wall of Sound
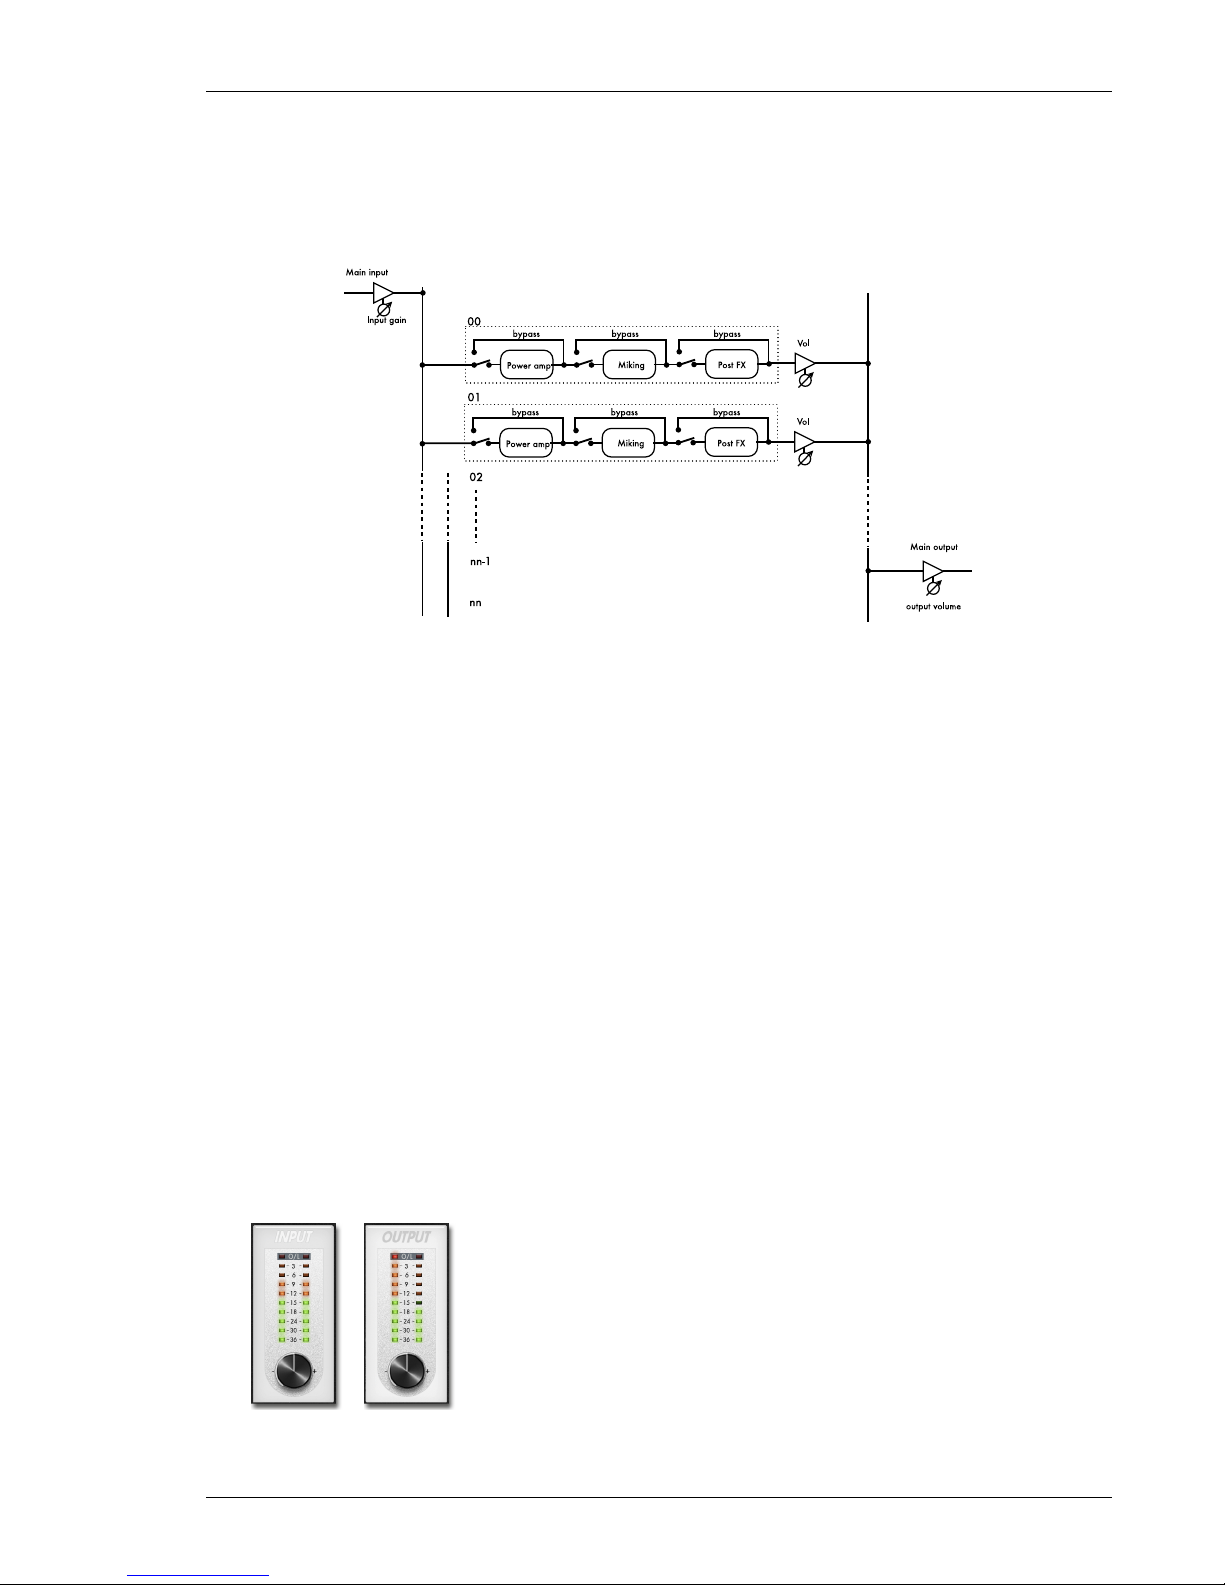
3 Routing of the Torpedo Wall of Sound: mono track
If you insert the plug-in on a mono track (in other words, mono in/mono out), the channels will take
the same input and process it in parallel.
Nevertheless, as the output is mono, the PAN parameter on every channel is deactivated.
Figure 6.3: On a mono track
If you have several mono tracks, always think of the possibility of sending them to a stereo bus.
For example, you may have your left and right guitars sent to the left and right channels of one
Torpedo Wall of Sound by simply panning the individual tracks left and right. What you will see is that
the guitars sent to the left channel of the plug-in will be processed on the left part of the channel
area on the Torpedo Wall of Sound, and the guitars sent to the right channel of the plug-in will be
processed on the right part of the channel area.
4 General controls
• You can change the parameters of the Torpedo Wall of Sound either by clicking on the controls,
pointing at a parameter and moving the mouse wheel, or double-clicking to enter a value.
• "alt"+click on a potentiometer to reset its value to the default value.
• On the "studio window", simply click on the microphone to move it around the room.
5 Input gain and output volume controls
Those potentiometers control the input gain and the output volume of the plug-in. It is absolutely critical that you avoid any saturation of the input or output signals or you may considerably reduce audio quality.
Two Notes Audio Engineering Torpedo Reload 33
Page 34
Using Torpedo Wall of Sound
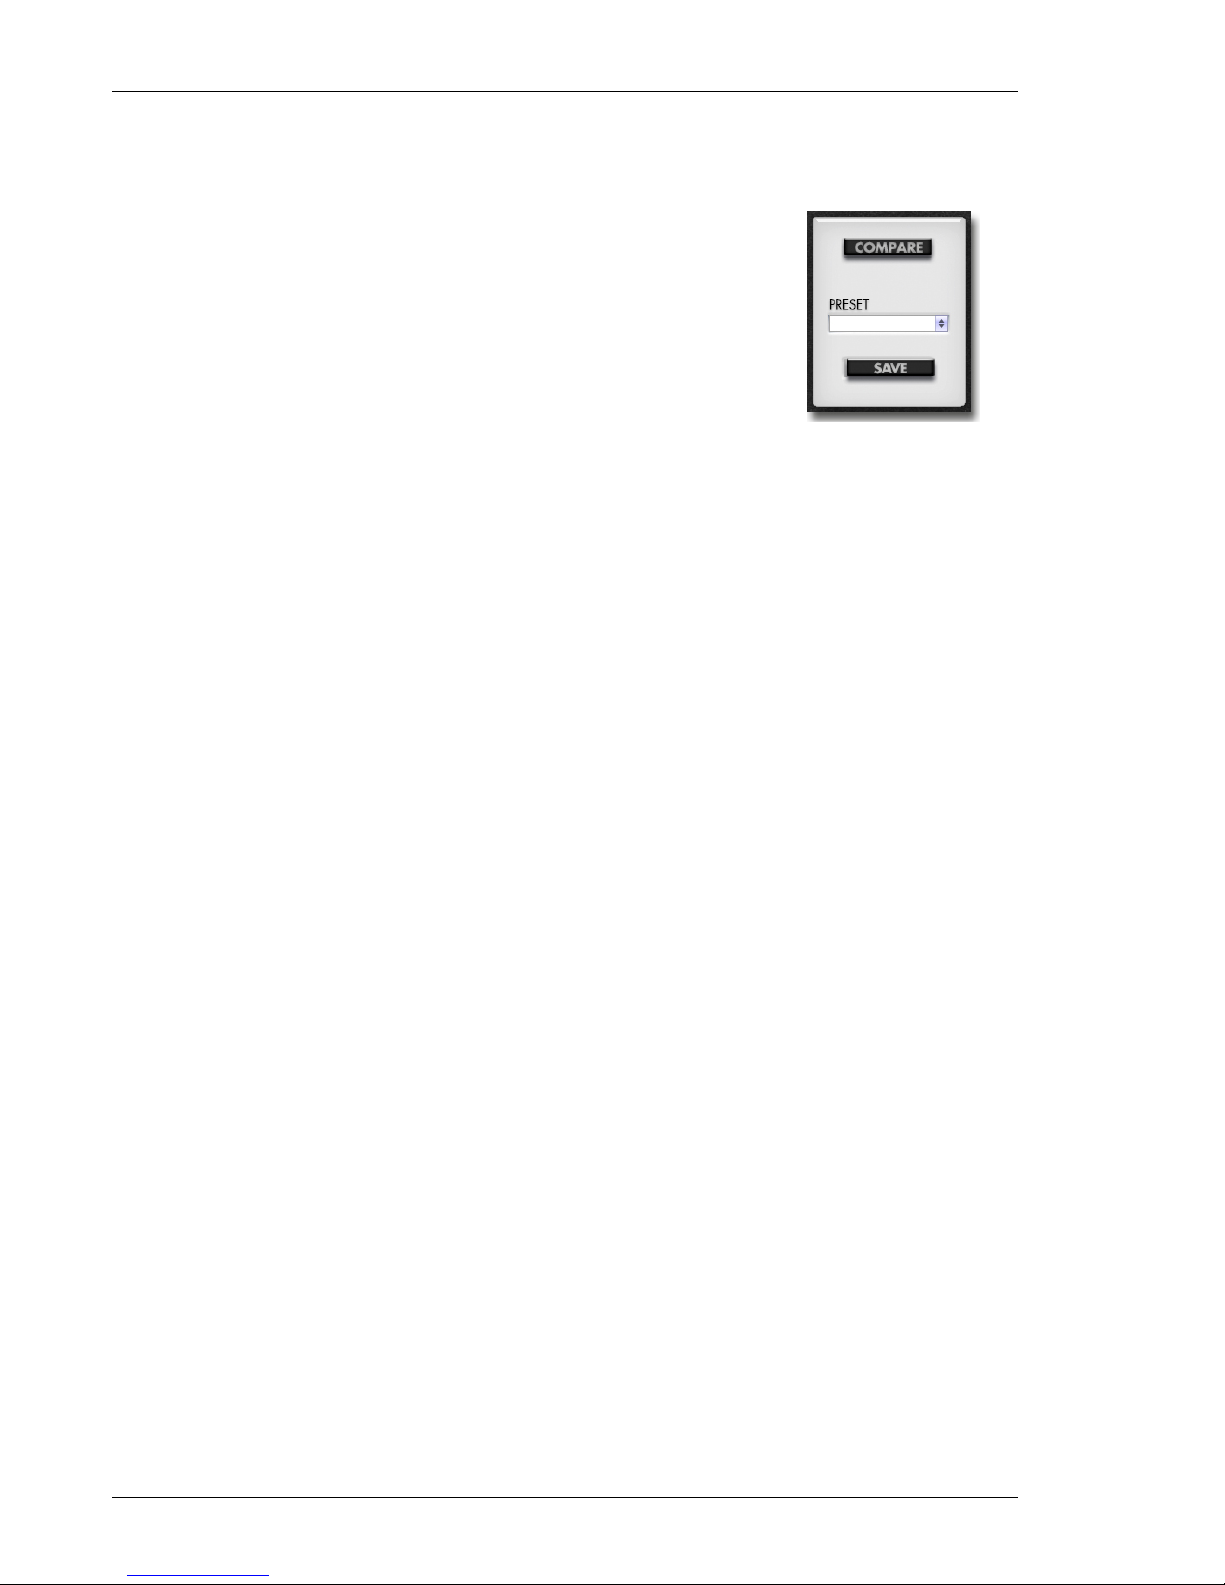
6 Presets
• Preset list: Click on the list to select the preset you want to load.
• SAVE: Click on the "SAVE" button to save the current preset.
• COMPARE: The "COMPARE" button controls an evolved compari-
son function developed by Two Notes Audio Engineering. Think
about it as a temporary set of parameters, re-initialized after
each startup of the unit. It can be used to quickly and easily
compare two sets of parameters. It can be compared to the
"Clipboard" filled by the "Copy" function on our personal computers.
The COMPARE workflow:
1. At startup, the normal set of parameters and the temporary one are the same.
2. You can switch between the temporary set and the normal one by briefly pressing the "COMPARE" button.
3. Any modifications made to either normal or temporary set are saved respectively in the normal
or temporary set, without affecting the other. You have two separate sets of parameters at
hand.
4. You can copy the normal set to the temporary one by pressing the "COMPARE" button for about
2 seconds. The "COMPARE" button flashes, indicating that the copy has been made.
5. Any changes made in a parameters set (normal or temporary) are automatically saved in this
set without affecting the other. You have two different and separated parameters sets at your
disposal.
Let’s look at an example:
1. Make sure the "COMPARE" button is off. Select a preset, add some modifications as desired: you
now have a new, particular set of parameters.
2. Save this current ("normal") set of parameters over the temporary one (see above). Now the
two sets are identical.
3. Make some more changes, for example change the speaker model. Now the two sets are
different: you can hear the difference by switching between the two (see above).
Another interesting way of using this feature is this: The temporary set of parameters is not dependent on any particular preset. When on the normal set of parameters, if you load a preset, the
content of the temporary set will not be affected. Thus, you can copy a preset into the temporary
set, then load a second one, and compare the two.
This constitutes a simple and fast way of comparing either a full preset to another, a modified
preset to the original one, or only changes affecting a single parameter.
34 Two Notes Audio Engineering Torpedo Reload
Page 35
Using Torpedo Wall of Sound
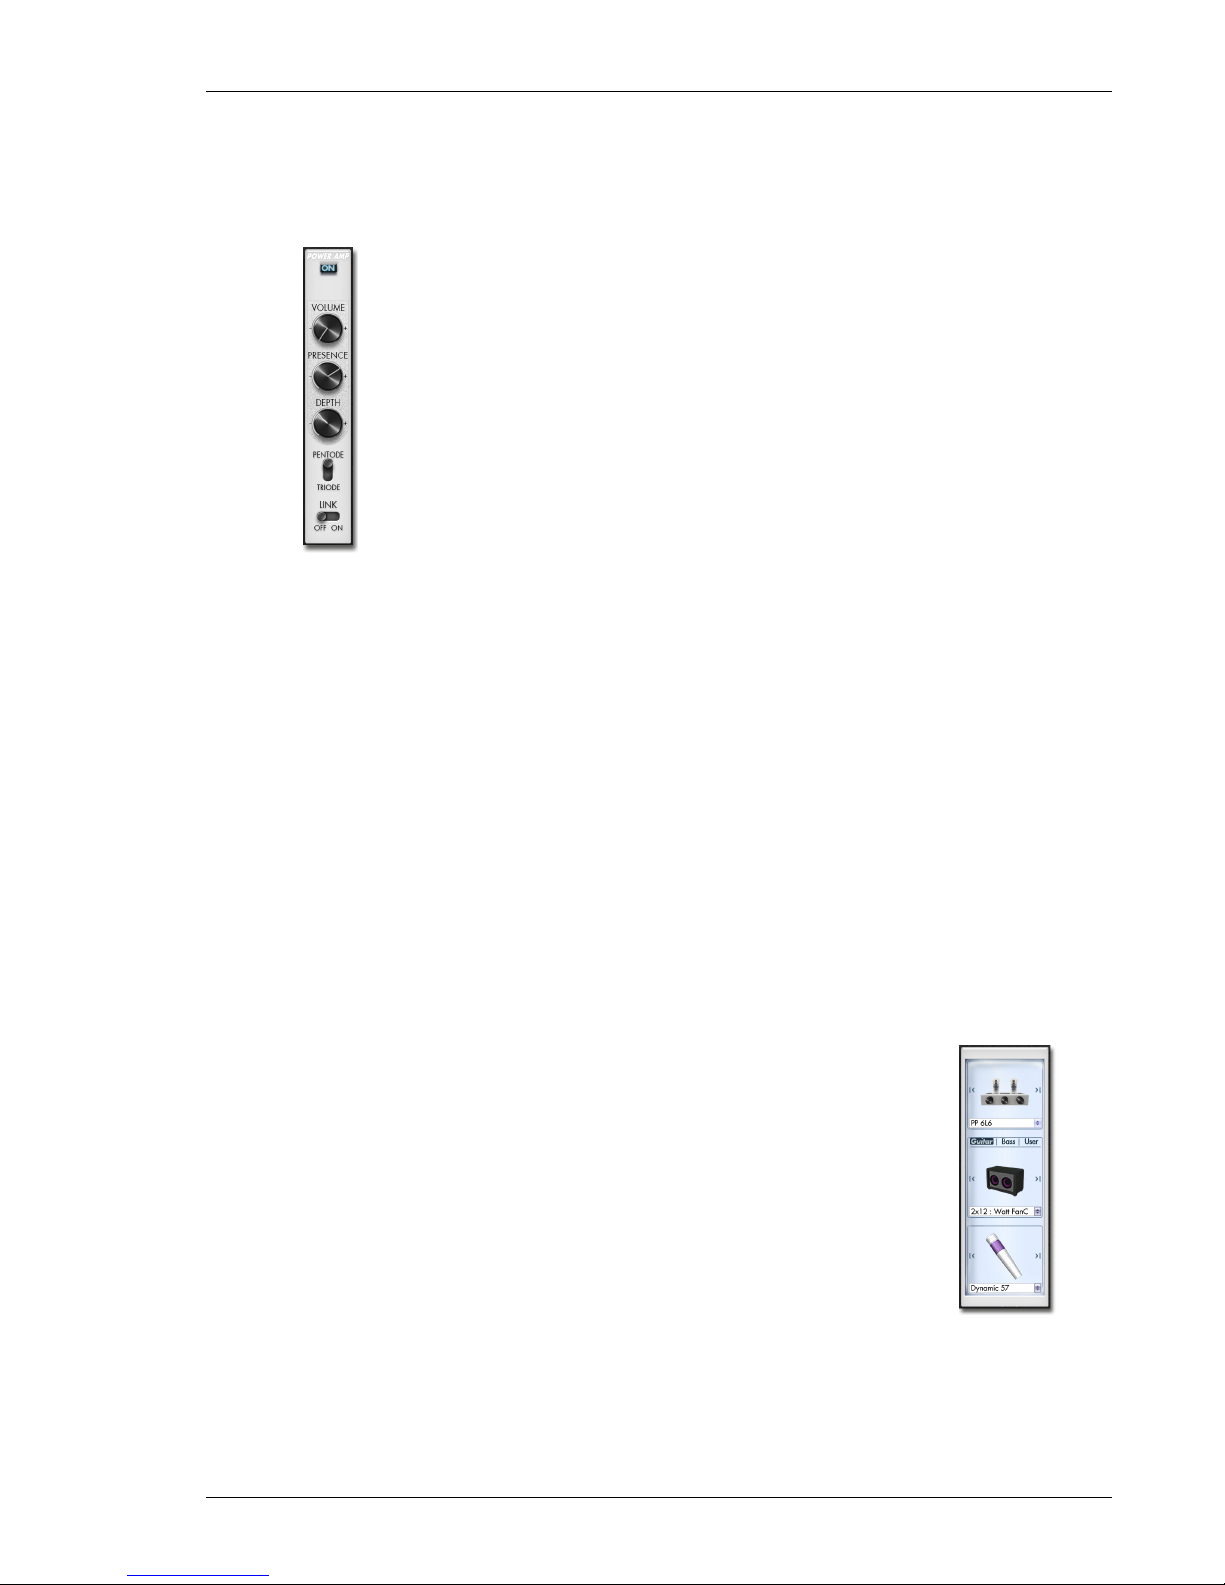
7 Power Amp
• Power Amp: Activate the power-amplifier simulation by turning
this parameter "On".
• Master Volume: Set up the output volume of your virtual power
amplifier.
• Presence: This setting affects the tube-stage frequency.
• Depth: This setting affects the tube-stage frequency (bandwidth).
• Pentode/Triode switch: Select how the tube is used, either in triode or in pentode mode. Pentode mode has more headroom
and volume than triode.
• Link: Activate the link function of the power amp. All the cabinets
and microphones you can choose will share the same poweramp section. This can be used for an artistic purpose or for CPUsaving optimization.
8 Power amp, cabinet and microphone selection
In this section, you can choose which simulated power amp, speaker cabinet and microphone you
want to use. You have 8 tube-stage configurations, 8 microphones and over 50 speaker cabinets
available. You can try the Two Notes speaker cabinets available at will on the built-in store (“Boutique”), and then buy the ones you prefer. (Get discounted pricing options as you buy more cabinets
at a time.) Find more information on http://www.two-notes.com/en/software/torpedo-wall-of-sound-3/.
Furthermore, the "User" tab gives you access to your own Impulse Responses (IR) (.tur files, measured with the TORPEDO Capture or BlendIR software), to IRs shared by other Torpedo Wall of Sound
users, or to "standard" third-party IRs (.wav or .aiff files), either downloaded or purchased.
This function expands the sonic and creative possibilities to infinity, do not hesitate to use audio
files with no direct link to speaker measuring, you will experiment totally new sonic textures.
• Amplifier list: Choose the circuit topology for the power amplifier (Push
Pull ou Single Ended) and the tube models (6L6, EL34, EL84, KT88) used
by the simulation
• Cabinet list: Determine the speaker cabinet model used for the simulation. You can choose between guitar, bass or user cabinet (please
read section 15 below for further information).
• Microphone list: Determine the microphone model used for the simulation.
Two Notes Audio Engineering Torpedo Reload 35
Page 36
Using Torpedo Wall of Sound
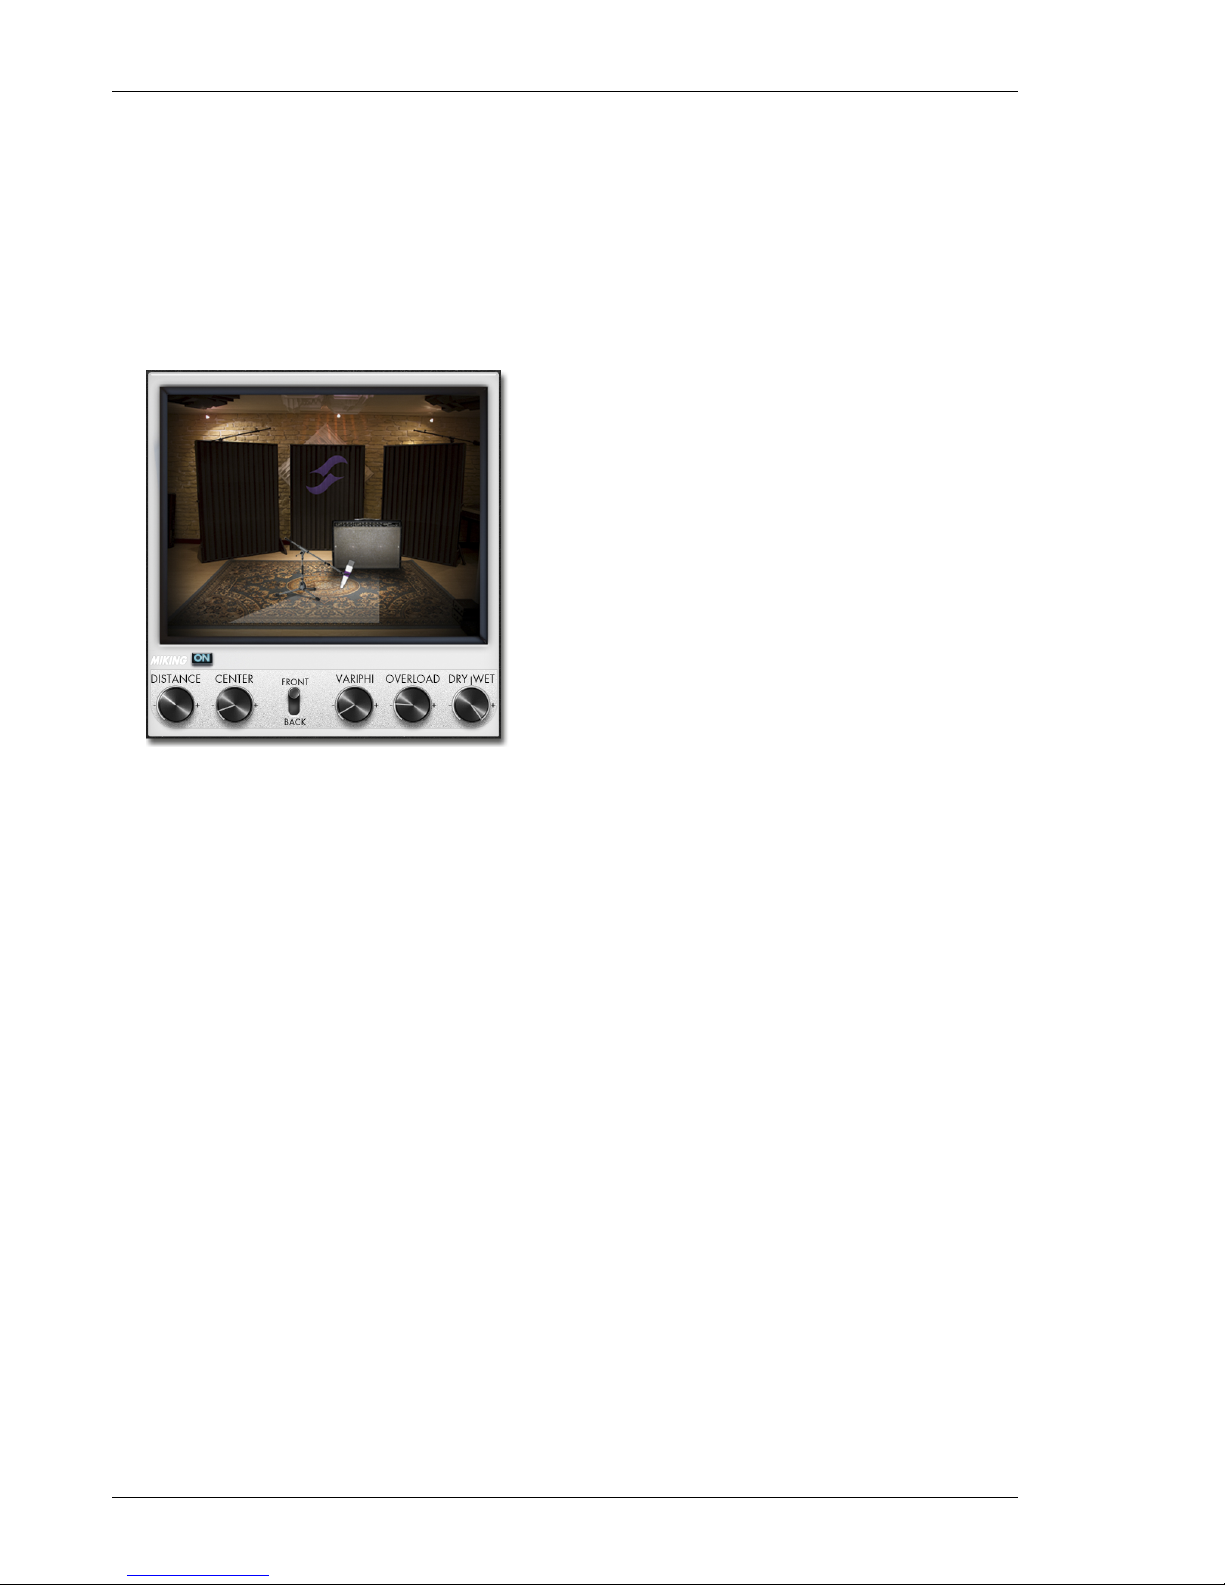
9 Miking
In the "MIKING" section, you take the place of the sound engineer looking at his record room through
the glass window. By using this section, you will find the "sweet spot", the perfect microphone position
for your take. You will also be able to control speaker saturation and balance between simulated
and non-simulated sound.
The first two parameters determine the microphone’s position. You can move the microphone
over a trapezoidal plane that is shown on the studio visualization. Simply click on the microphone to
move it around, or fine tune its position with the potentiometers.
• Distance: Determine the distance between
the simulated cabinet and microphone.
Placing a microphone close to the cabinet
will result in a precise sound with a large
amount of proximity effect (depending on
the chosen microphone model). When you
move the microphone away from the cabinet, you increase the proportion of the studio’s acoustics (early reflections) in the overall sound texture.
Furthermore, depending on the cabinet model used, and especially with the ones including multiple speakers, moving the microphone away can bring some higher frequencies back. This is simply
due to the directivity of the loudspeakers. At maximum positioning (100%), the microphone is placed
3 meters (10 feet) away from the cabinet.
• Center: Determine the distance between the axis of the loudspeaker and the microphone
(placed at right angle). The in-axis position (0%) allows for a maximum amount of treble sounds,
which are highly directional. Moving the microphone away from the axis decreases the treble
to the benefit of the bass response. At maximum positioning (100%), the microphone is placed
at the edge of the speaker when Distance is 0%, and 1 meter (3 feet) away from the axis when
Distance is 100%.
• Position: in standard sound capture, the microphone is usually placed in front of the cabinet.
However, placing the microphone behind the cabinet can be quite interesting. The sound is
usually softer and darker. This is particularly obvious with closed cabinet, and less with open
ones.
• Variphi: The Variphi parameter is a one-of-a-kind control, exclusive to the TORPEDO technology.
It allows you to modify the frequency content of the signal, using the properties of the sum of
two signals with different phase levels. You are emulating a situation where two microphones are
used, and the Variphi parameter controls the distance (hence the phase relation) between the
two microphones. To easily hear this effect, we recommend starting with a crunch/saturated
sound on your amplifier and changing the Variphi parameter. You will hear a periodic change in
the signal with frequency modifications. Using Variphi, you will fine-tune the frequency content
of the signal, whether you are looking for a "mid-scooped" or a "full" sound. Note that this parameter is always active. The "OFF" position is not a 0 value, but a first shift-phase value between
the first and the second virtual microphones.
36 Two Notes Audio Engineering Torpedo Reload
Page 37
Using Torpedo Wall of Sound
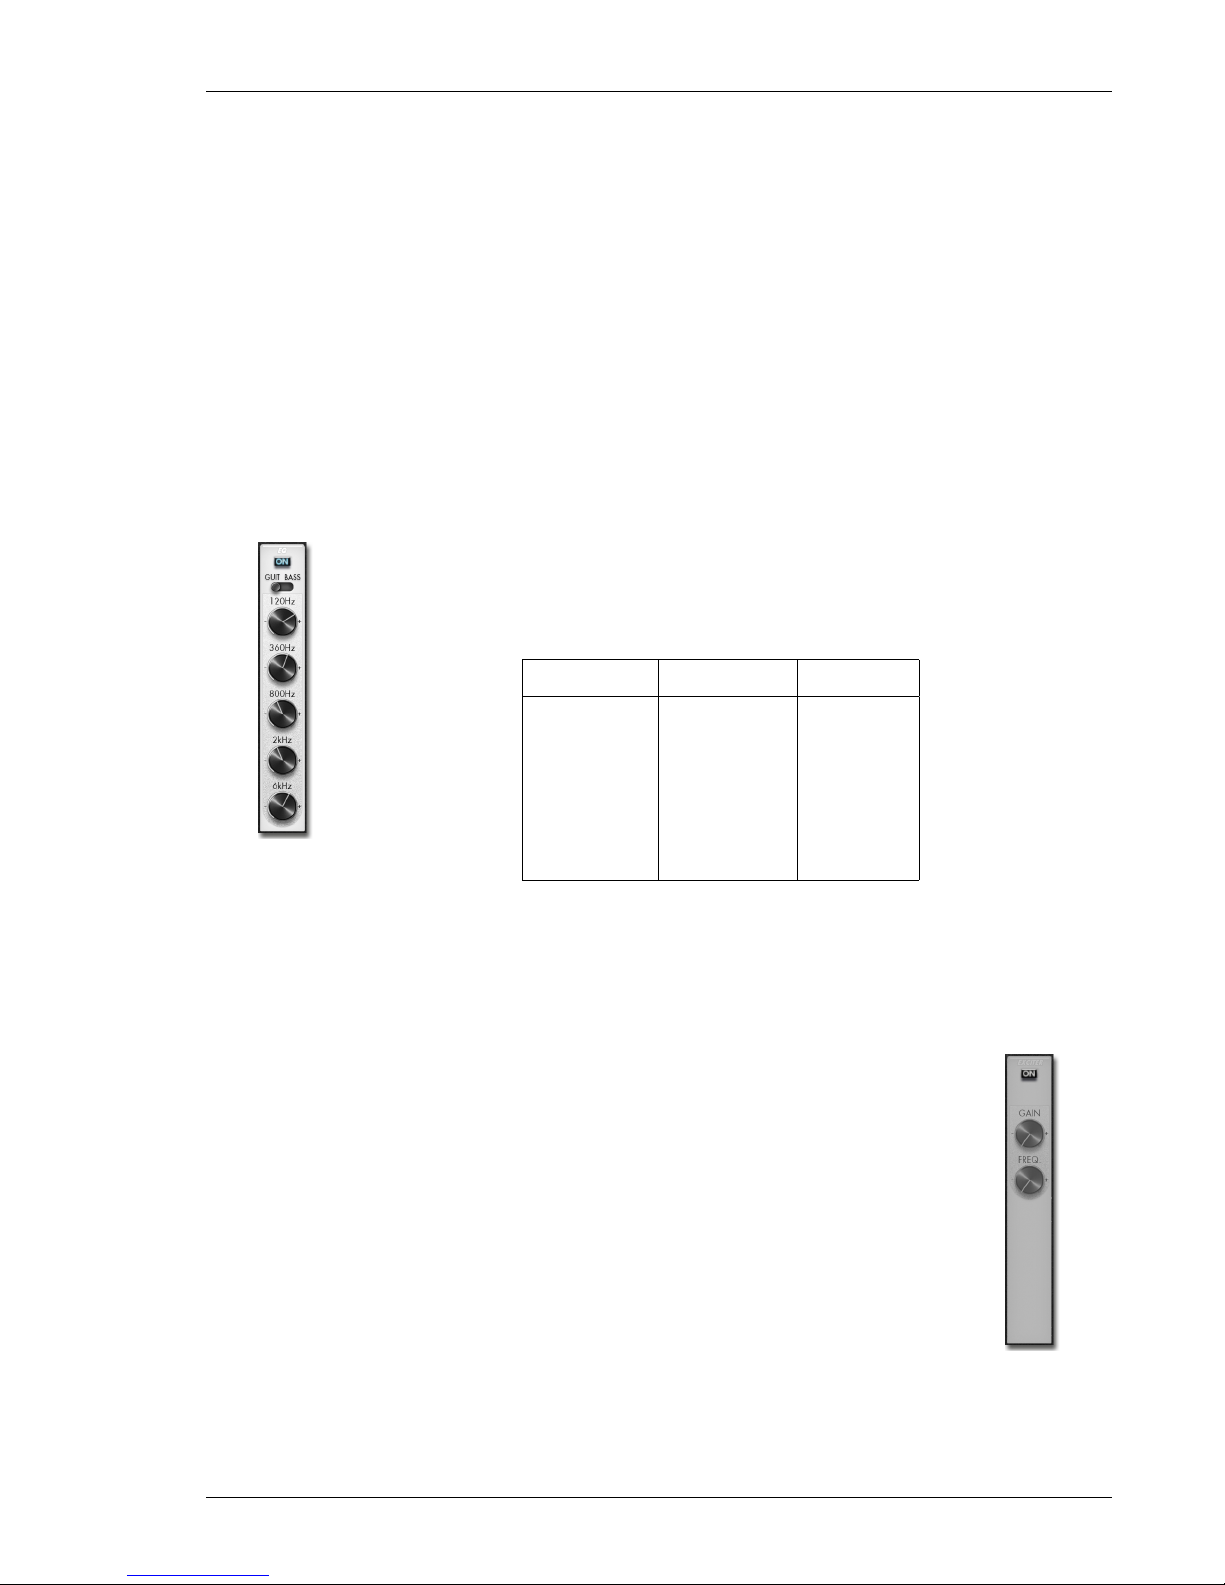
• Overload: A loudspeaker is essentially a system designed to faithfully reproduce the sound transmitted by the amplifier. However, a loudspeaker does have some particular audio properties of
its own, including some that depend on the level of power applied. The "Overload" parameter reproduces the natural saturation that occurs when the loudspeaker is driven too hard. At
maximum value, you get the sound of a loudspeaker coming close to destruction.
• Dry/Wet: Combine the dry, unprocessed sound, with the simulated one. This parameter is particularly interesting on clean sounds, or to search for new and original tones.
10 EQ
This is a simple yet powerful 5-band EQ. Shift the band frequencies by changing the mode (guitar or
bass) so as to focus on the signal frequencies pertinent for the corresponding instrument.
• EQ Mode: Off, Guitar or Bass. Please refer to the following table for references between the band and the cut frequencies in each mode.
• Low, LMid, Mid, HMid, High: band frequencies, from lowest to highest.
Band Guitar Mode Bass Mode
Low (shelf) 120Hz 50Hz
LMid (peak) 360Hz 120Hz
Mid (peak) 800Hz 360Hz
HMid (peak) 2000Hz 800Hz
High (shelf) 6000Hz 4000Hz
11 Exciter
An exciter is very useful to give a sound a certain character, or to add presence, or "air", in the sound.
The integrated exciter will allow you to add such features to your tone.
• Exciter: Switch the exciter ON or OFF.
• Gain: Control the amount of effect applied to the sound.
• Freq: Control the center frequency of the exciter. For example, presence
for guitar is usually found at 2 or 3 kHz. Air can be added by placing this
frequency at 6 or 8 kHz.
Two Notes Audio Engineering Torpedo Reload 37
Page 38
Using Torpedo Wall of Sound
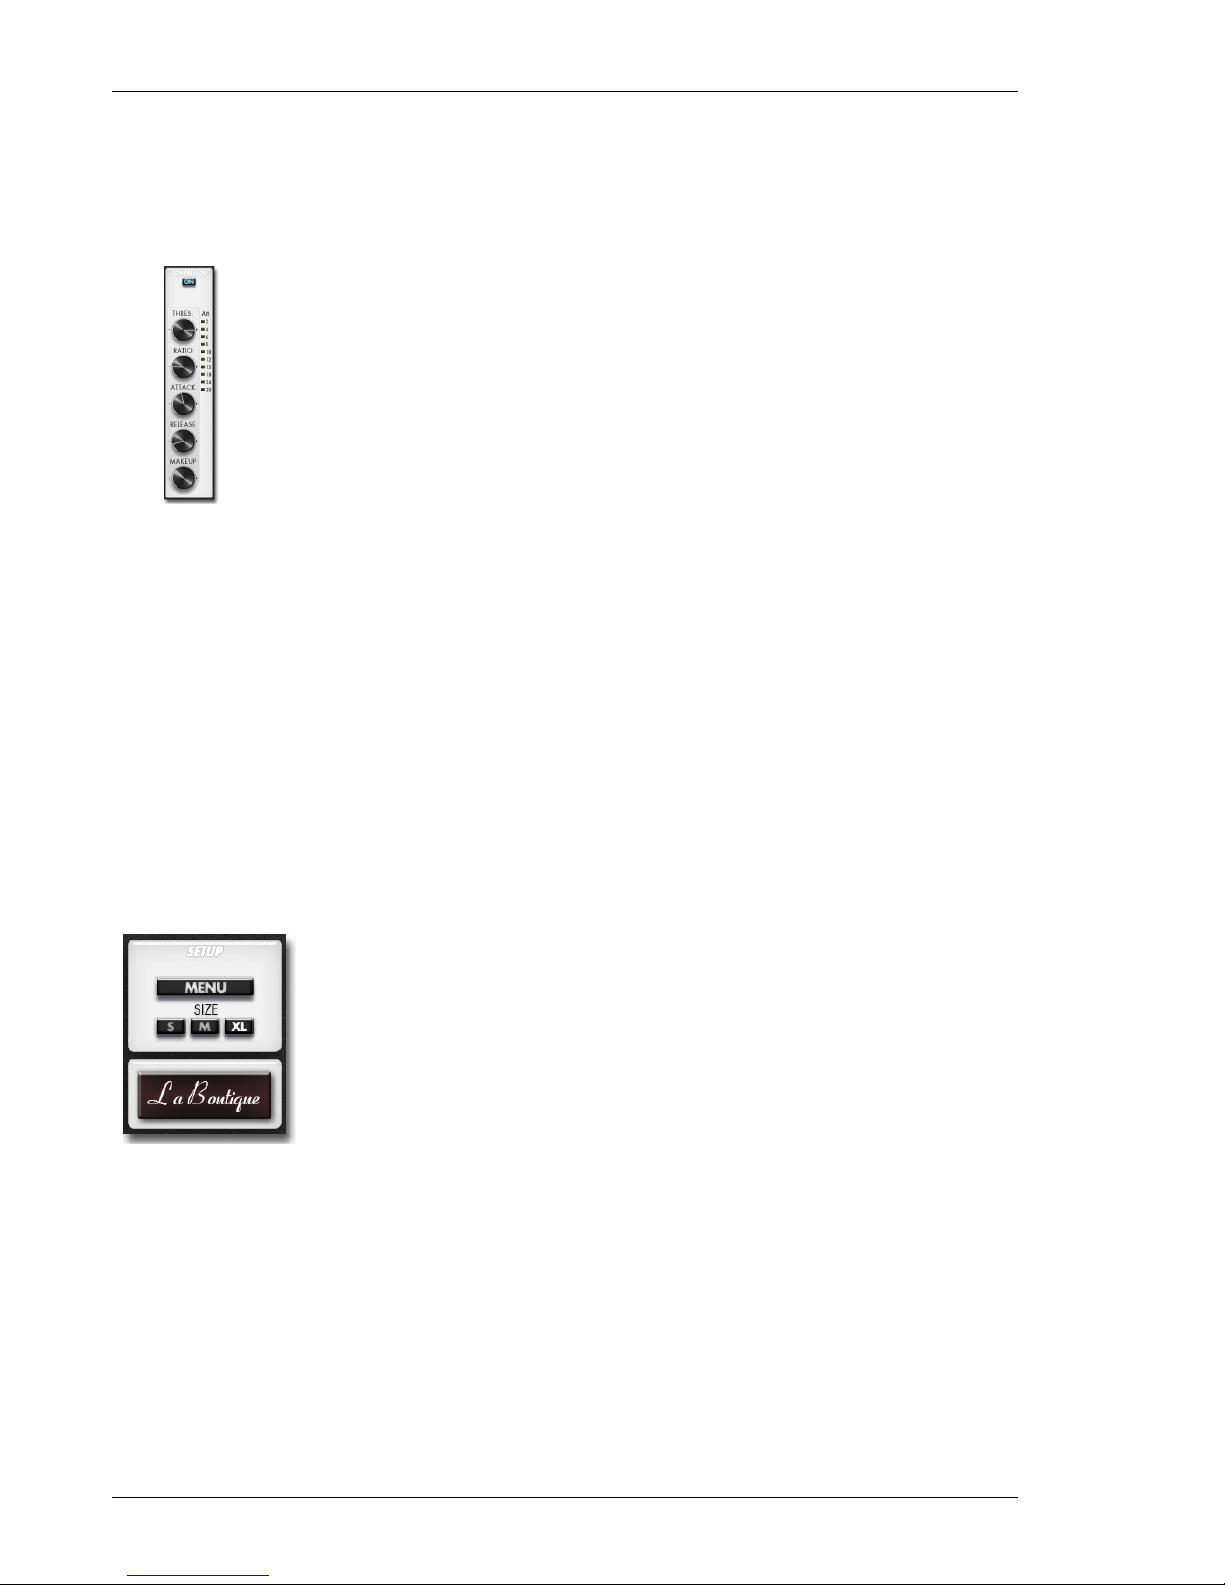
12 Comp
Using a compressor will reduce the dynamics of your sound, or control transients, or even to create
special effects, such as pumping. The parameters of the TORPEDO compressor are equivalent to a
standard studio compressor.
• Compressor: Turn the compressor ON or OFF. When ON, you may visualize
on the bargraph the level of compression applied to the signal, in dB scale.
• Threshold: Control the signal level above which compression occurs.
• Ratio: Control the compression ratio.
• Attack: Control the attack time, in milliseconds.
• Release: Control the release time, in milliseconds.
• Make-up Gain: Control the make-up gain added at the compressor’s output.
13 Setup
• PRESETS: Determines the default Presets folder where to store the preset files.
This folder is valid for any instance of the plug-in.
• IMPULSES: Determines the Impulses folder where third-party cabinet files (in
.wav and .aiff formats) and user files (.tur) are located for each instance of
the plug-in (see below how to add new cabinets). This setting is saved with
the current session of your plug-in host and you can save it with a Torpedo
Wall of Sound preset.
• GUI SIZE: Changes the size of the graphical interface window, from S (smallest size) to XL (biggest size), as best suits your screen’s resolution.
• INFOS: Gives access to "About", "Hotkeys", "User’s manual", "Check for updates" and "License info".
• La Boutique: Launches the Two Notes online store. Read more about the
Boutique in the "Want more cabs?" section.
After the first installation of the Torpedo Wall of Sound, the default Presets folder is located in:
• "Program Files/Two Notes Audio Engineering/Presets" on default Windows installation.
• "/Library/Application Support/Two Notes Audio Engineering/Presets" on default MAC installation.
38 Two Notes Audio Engineering Torpedo Reload
Page 39
Using Torpedo Wall of Sound
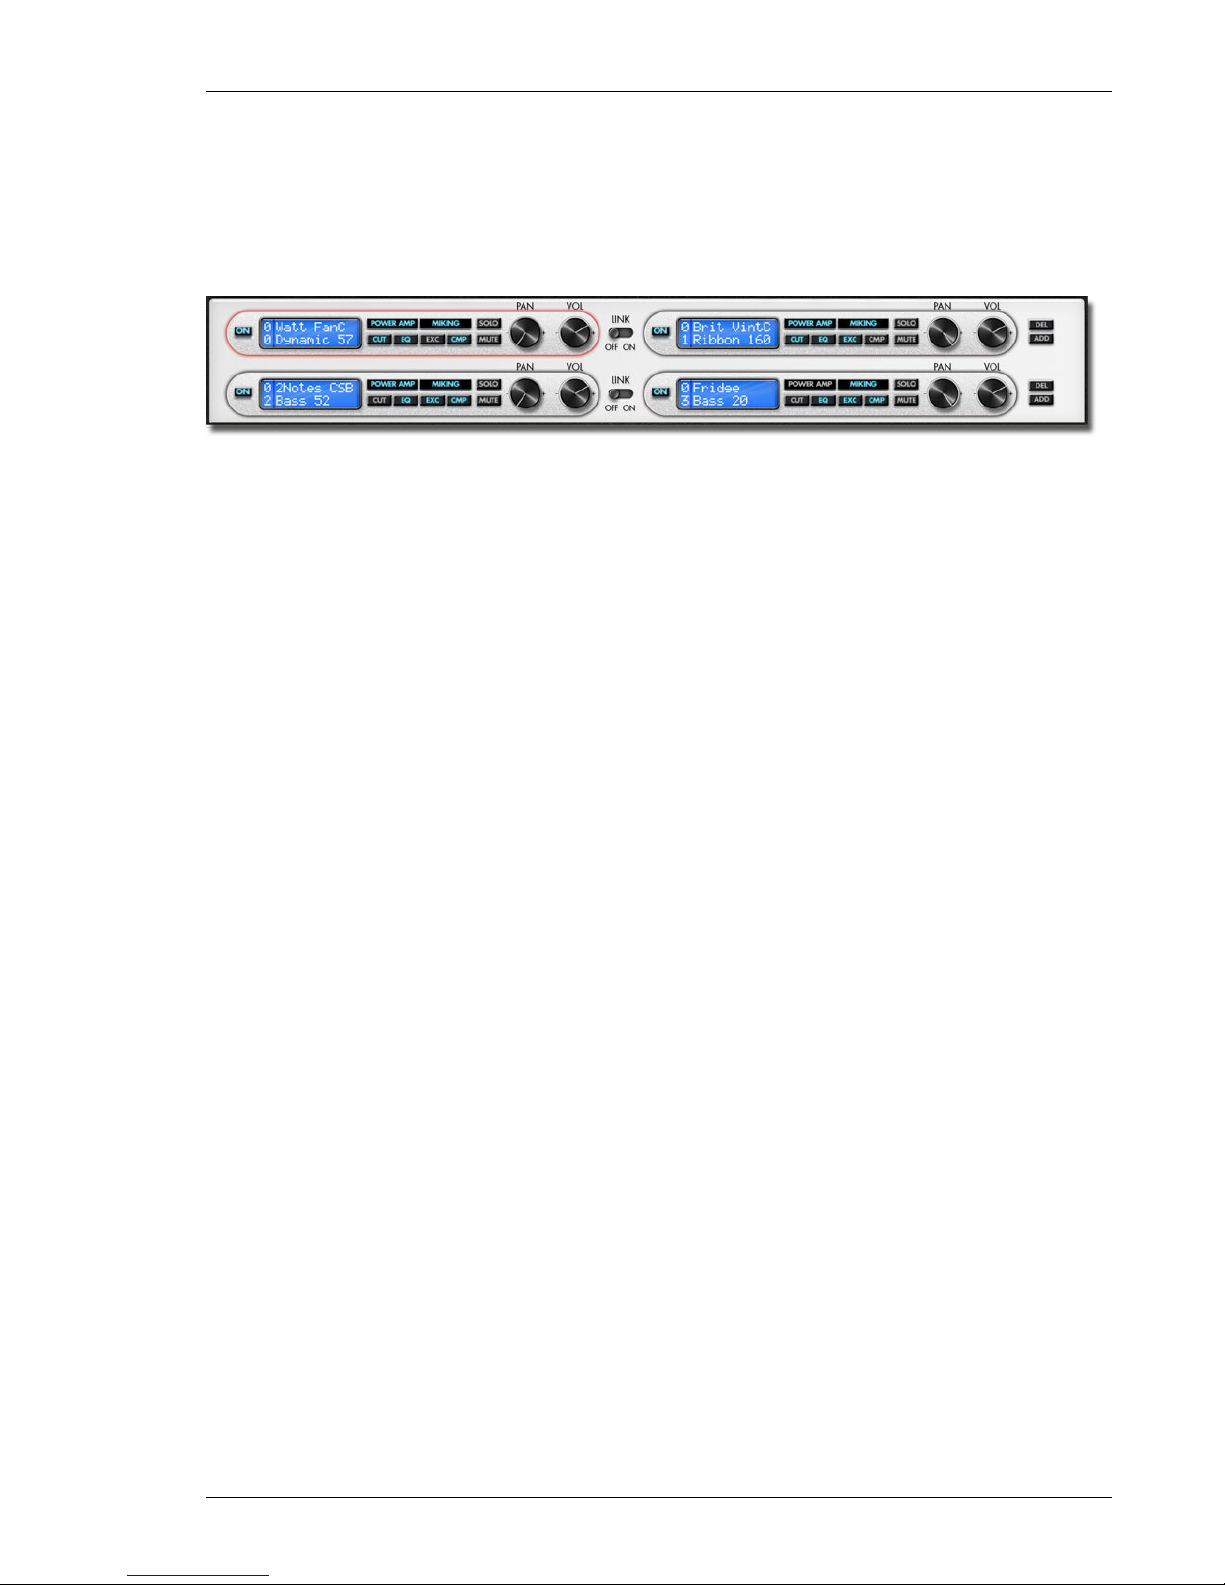
14 Wall of Sound section
In this section you will be able to add the channels you need to achieve the sound you have in mind,
using as many cabinets and microphones as you need (up to 100 over 50 channels)). Each channel
is a combination of a power amp, a cabinet and a microphone. On every WoS section line, you will
find two independent or linked channels that can be panned the way you want.
• ON: Switches the designed channel ON or OFF.
• Display screen: Displays the channel number (from 00 to 99), the cabinet and microphone
names.
• Quick bypass buttons: Switches the designed section( Power Amp, Miking...) ON or OFF.
• Solo: Puts the selected channel in SOLO mode.
• Mute: Mutes the selected channel.
• PAN: Determines where the channel will be placed across the stereo field.
• VOL: Determines the output volume of the selected channel.
• LINK: Links a line of channels to achieve tuning on both channels simultaneously. Useful when
you work with stereo signals.
• DEL: Deletes a pair of channels.
• ADD: Adds a pair of channels.
To activate a channel for editing, simply click anywhere on the channel zone (the red zone shown
on the figure above for channel 00). You can navigate through the channels by pressing the arrows
of your computer’s keyboard.
Two Notes Audio Engineering Torpedo Reload 39
Page 40
Using Torpedo Wall of Sound
15 Want more cabs?
• Two Notes cabinets:
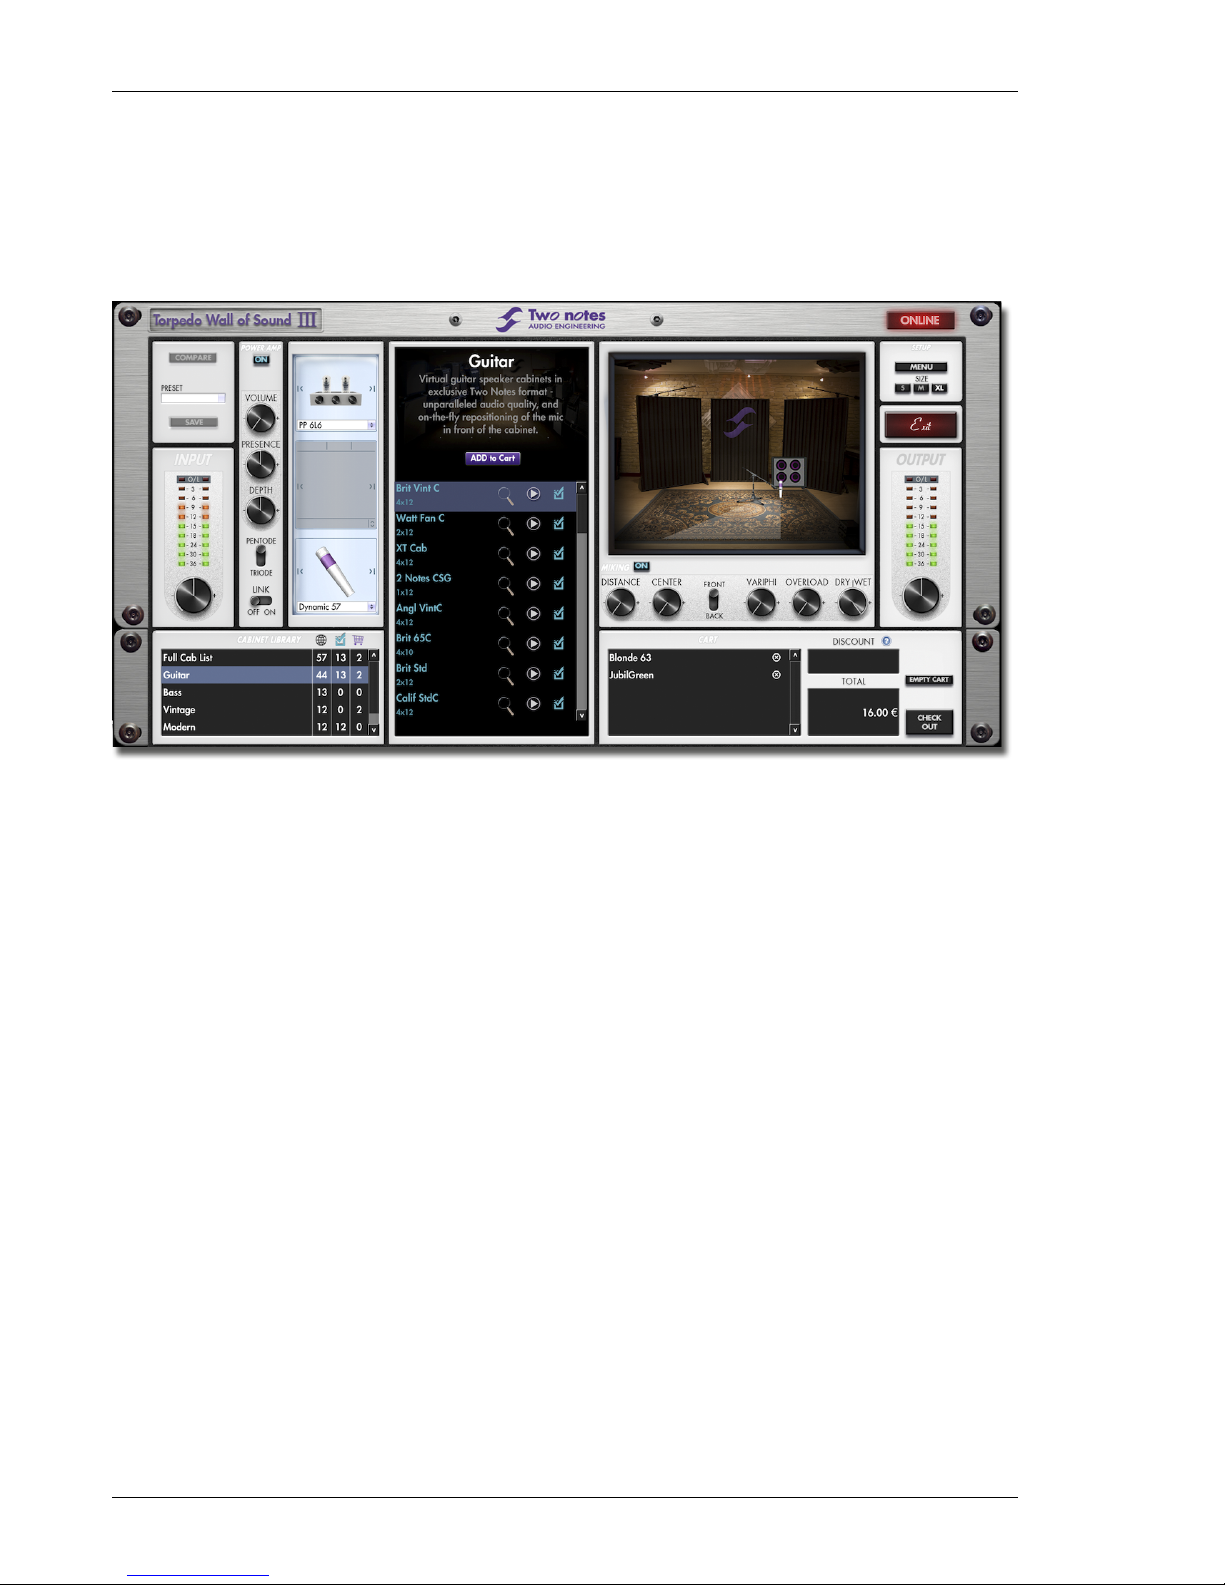
Torpedo Wall of Sound embeds the new Two Notes Boutique. This is an online store that gives
you access to all of the Two Notes virtual cabinets, captured with a set of 8 microphones. Make
sure you have a working Internet connection and click on La Boutique:
On the bottom left you find all of the cabinet collections, which are simple filters: selecting a
collection lets you see only the cabinets you may have an interest in. For example only bass or
vintage cabinets.
On the center panel you can:
– browse the cabinets,
– launch a real-time preview of the cabinet by pressing the "play" button,
– get a closer look at the cabinet.
When previewing a cabinet, you can move the microphone while playing any track so as to
listen to the tone of that particular cabinet.
On the bottom right side of the Boutique interface you will find the cart. By pressing the "ADD"
button on the cabinet panel, you will see the selected cabinet(s) appear on that panel. Depending on how many cabinets you wish to buy, you can get a discount. E.g., with more than
50 cabinets at a time, you get the biggest -65% "PROFESSIONAL" discount.
Once you have put all the cabinets you need in you basket, simply click on "Check out" to be
redirected to the Two Notes Store. The secured payment process uses your Internet Browser. No
billing or information on the payment method is stored on the plug-in, so as to ensure maximum
security.
• .tur files:
.tur are proprietary files created with the Two Notes Audio Engineering TORPEDO BlendIR software. The software is available for download from the Two Notes website. With TORPEDO BlendIR
40 Two Notes Audio Engineering Torpedo Reload
Page 41

Using Torpedo Wall of Sound
you are able to use the TORPEDO technology to capture the sound signature of your own cabinet and microphone in the deepest details.
To add a .tur file to your list, simply move the file to the root of the default Impulses directory, or
select another folder (see part 6.13) that will be saved with the current session of your plug-in
host. Please note that the files must reside at the root of that folder, without any subfolders. The
cabinet list in the plug-in will be automatically refreshed.
Please note that with .tur files you do not have access to the microphone positioning parameter.
• 3rd-party IR files in .wav or .aiff format:
The Torpedo Wall of Sound complies with third-party Impulse Responses (IRs) in .wav or .aiff
format.
To add a .wav or .aiff file to your list, simply move the file to the root of the default Impulses
directory or select another folder (see part 6.13) which will be saved with the current session of
your plug-in host. Please note that the files must reside at the root of that folder, without any
subfolders. The cabinet list in the plug-in will be automatically refreshed.
Note: with 3rd-party files you do not have access to neither microphone positioning nor overload parameters.
16 Hotkeys
Direction arrows Change channel focus
SHIFT + C Copy the selected channel
SHIFT + V Paste to the selected channel
SHIFT + change parameter
Link, change the counterpart parameter on the second channel
CTRL + change parameter
Fine control
ALT + click on a parameter
Set default value
Two Notes Audio Engineering Torpedo Reload 41
Page 42

Page 43

Part 7
Specifications
1 Torpedo Wall of Sound specifications
1.1 Available Power Amplifiers
Designation
Characteristics
SE 6L6
Configuration Single Ended - Class A with 6L6
SE EL34
Configuration Single Ended - Class A with EL34
SE EL84
Configuration Single Ended - Class A with EL84
SE KT88
Configuration Single Ended - Class A with KT88
PP 6L6
Configuration Push-Pull - Class AB with 6L6
PP EL34
Configuration Push-Pull - Class AB with EL34
PP EL84
Configuration Push-Pull - Class AB with EL84
PP KT88
Configuration Push-Pull - Class AB with KT88
1.2 Available Microphones
Designation
Inspired by
Dynamic 57
Dynamic microphone Shure™ SM57
Dynamic 421
Dynamic microphone Sennheiser™ MD421
Knightfall
Condenser microphone Blue™ Dragonfly
Condenser 87
Condenser microphone Neumann™ U87
Ribbon160
Ribbon microphone Beyerdynamic™ M160N
Ribbon121
Ribbon microphone Royer™ R121
Bass 20
Dynamic microphonee Electrovoice™ RE20
Bass 5
Dynamic microphone Shure™ Beta52
Two Notes Audio Engineering Torpedo Reload 43
Page 44

Specifications
1.3 List of WoS speaker cabinets provided with the Torpedo Reload
Designation Inspired by
GUITAR WoS cabinets
2Notes CSG Two Notes Custom 1x12" ElectroVoice® EVM12L
Angl VintC Engl® 4x12" Celestion® V30
Blonde 63 Fender® Bassman ’63 Blonde Tolex Piggy Back 2x12"
Brit 65C Marshall® 1965A 4x10" Celestion® G10L-35 closed back
Brit VintO Marshall® Slash Signature 4x12" Celestion® V30 open back
Calif StdC Mesa/Boogie® Rectifier® Standard 4x12" Celestion® V30 closed back
Eddie Peavey® 5150 2x12" Sheffield 1200
Free Rock2 VHT® Deliverance 2x12" Eminence® P50E
Green Tri Hughes&Kettner® Triamp 4x12" Celestion® Greenback
Jazz 120 Vintage Roland® JC120 2x12"
JubilGreen Marshall® 2550 2x12" Celestion® Greenback
Kerozen Diezel® 4x12" Celestion® G12K-100
Silver77 Vintage Fender® Twin Reverb® 2x12" orange JBL®
SilverJen Vintage Fender® Twin Reverb® 2x12" Jensen® C12K
The One Brunetti® Neo1512 1x15" + 1x12"
Vibro Utah Vintage 1961 Fender® Vibrolux® 1x12" original Utah speaker
BASS WoS cabinets
2Notes CSB Two Notes Custom 1x15"
Alu XL Hartke® XL 4x12"
AZ Ben SWR® Big Ben 1x18"
AZ Work SWR® WorkingMan 4x10"
Calif Low Mesa/Boogie® 2x10"
Fridge Ampeg® 8x10"
Heaven Bot David Eden® 1x15"
Marco Markbass® 2x10"
All other Two Notes speaker cabinets are available for testing and purchasing via the Torpedo Wall
of Sound plug-in.
Please visit http://www.two-notes.com/en/hardware/torpedo-reload/ for more information.
44 Two Notes Audio Engineering Torpedo Reload
Page 45
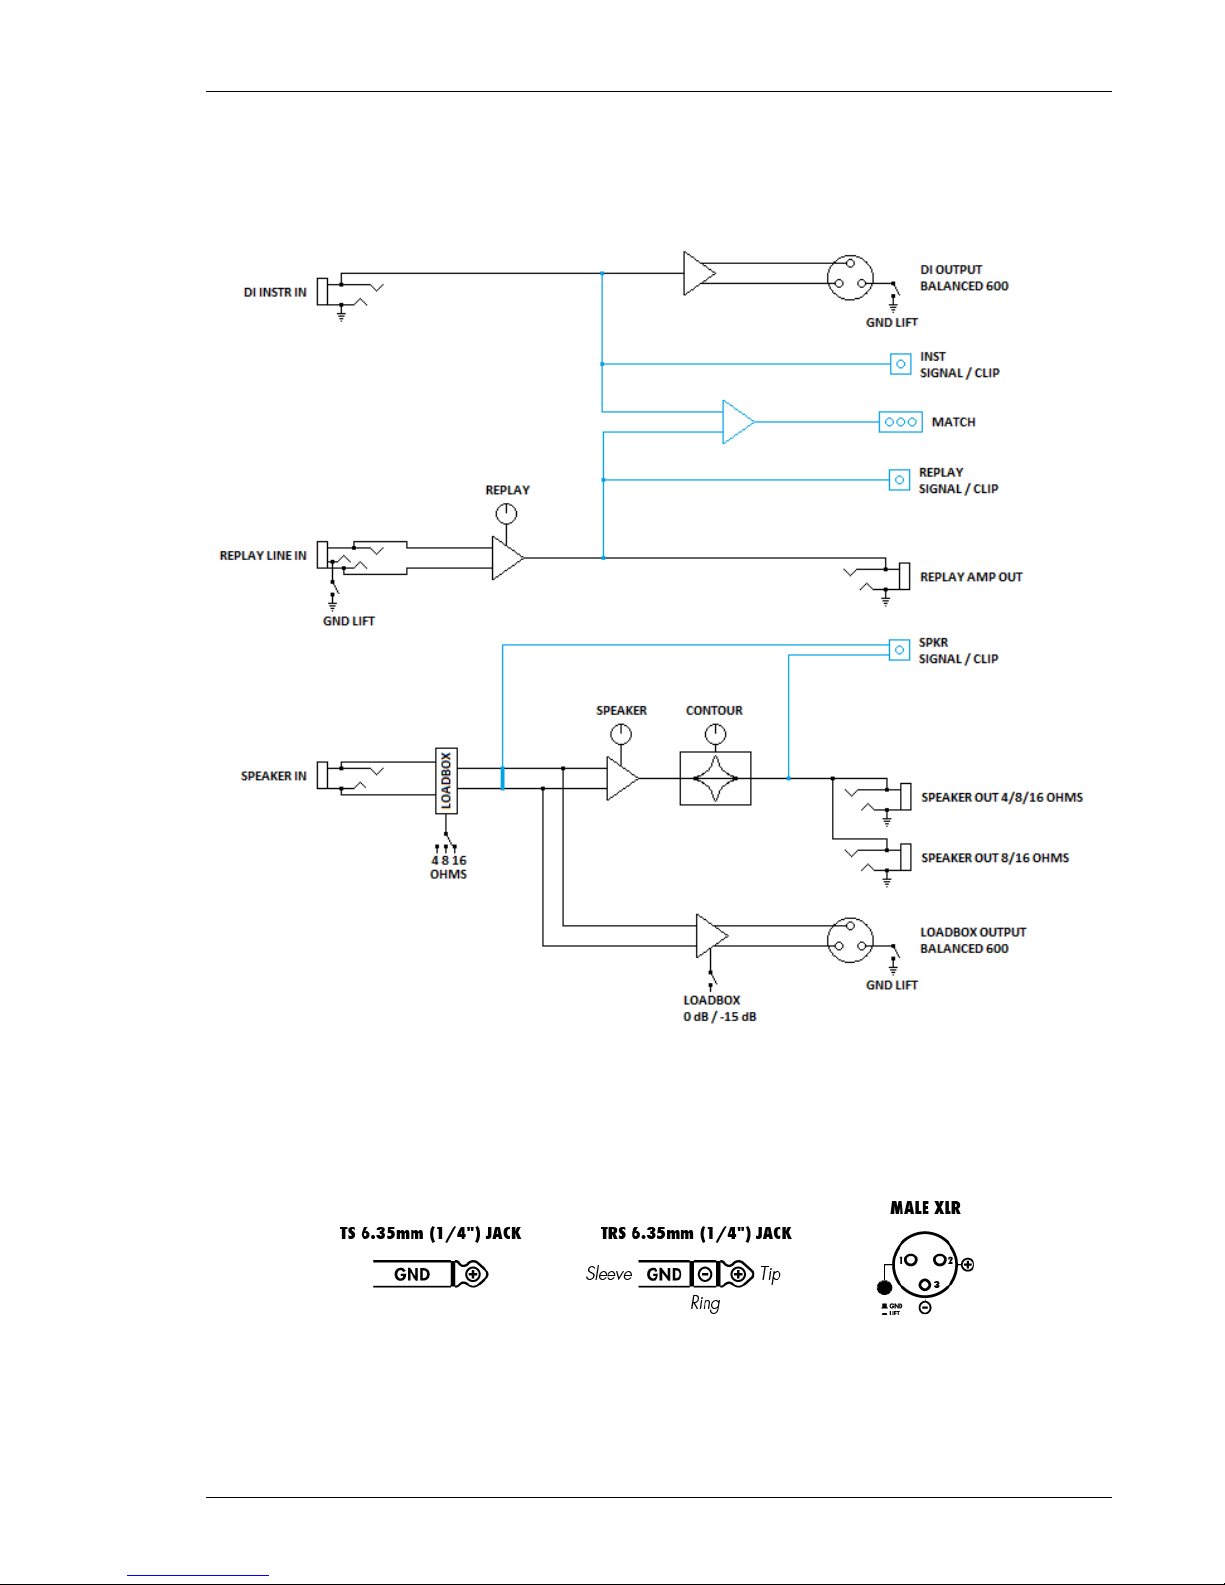
Specifications
2 Torpedo Reload specifications
2.1 Internal circuit diagram
2.2 Audio connections
You can connect the balanced outputs to a device embedding unbalanced I/Os. In that case,
you should use either mono plugs or stereo ones by bridging the Ring and Sleeve. For example, if
you wish to use an XLR-to-JACK cable on the Loadbox output, make sure that pin 1 and 3 of your XLR
connector are bridged.
Two Notes Audio Engineering Torpedo Reload 45
Page 46
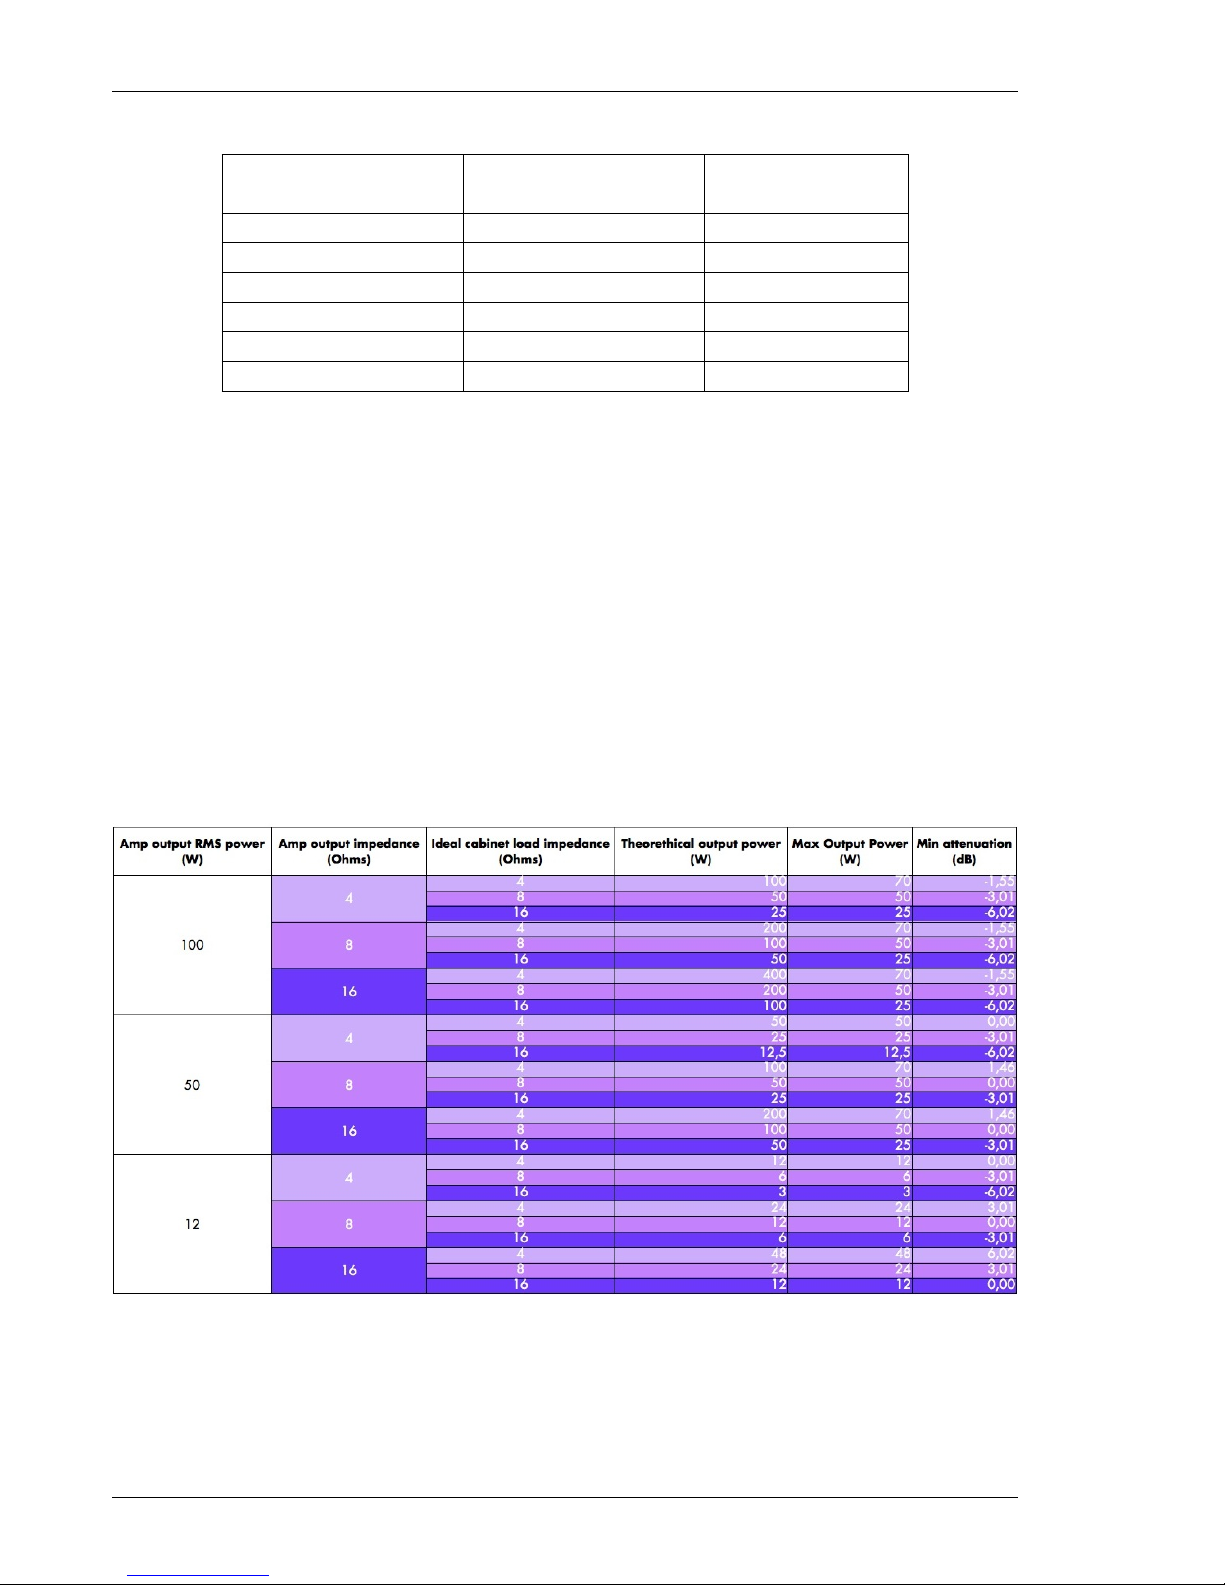
Specifications
2.3 Possible post-attenuation speaker combinations
Cabinet 1 impedance (Ohms) Cabinet 2 impedance (Ohms) Total impedance (Ohms)
Speaker output 1 Speaker output 2 (must be > 4 Ohms)
16 No cabinet 16
16 16 8
16 8 5,3
8 No cabinet 8
8 8 4
4 No cabinet 4
2.4 Minimal attenuation, maximal output power
Because of its electrical design, the Torpedo Reload applies a minimal attenuation to the incoming
power signal. That minimal attenuation is a function of the impedance you select at the input of the
product and the impedance of the cabinet you plugin the product’s Speaker Output.
This table covers the value of the minimal attenuation, depending of those parameters, for three
different input levels. The "Max Output Power" is the power the product can deliver (with the Speaker
potentiometer to its maximum before saturation), and "Min Attenuation" is the corresponding attenuation value.
The maximum power that the Torpedo Reload can deliver on its Speaker output is a function of
the power of the guitar amplifier which is generating the signal, but is also a function of that amp
impedance and the cabinet impedance. It is limited by the maximum output power rating of the
solid state amplifier embedded in the Torpedo Reload (70 W RMS under 4 Ohms, 50W RMS under 8
Ohms and 25 W RMS under 16 Ohms).
46 Two Notes Audio Engineering Torpedo Reload
Page 47

Specifications
2.5 Technical data
Designation
Characteristics
Speaker Input
Jack 6.35mm (1/4") unbalanced (TS, Tip/Sleeve)
Maximum input voltage: 140 Volts AC (45 dBu)
Security load: 220 Ohms / 10 Watts
Loadbox
Reactive load, nominal impedance: 4 or 8 or 16 Ohms switchable
Maximum continuous admissible power: 150 W (assuming proper ventilation)
Maximum temporary admissible power : 200 W (assuming proper ventilation)
Speaker Output
2 X Jack 6.35 mm (1/4") unbalanced (TS)
Minimal load: 4 Ohms
Maximum output level:
• 29 dBu @ 16 Ohms
• 28.5 dBu @ 8 Ohms
• 27 dBu @ 4 Ohms
Maximum output power:
• 25 W RMS@ 16 Ohms
• 50 W RMS@ 8 Ohms
• 70 W RMS@ 4 Ohms
Loadbox Output
Balanced male XLR
Output Impedance: 600 Ohms
Ground/Lift switch
Attenuation (speaker input to balanced loadbox output): 24.5 dB
Maximum output level (balanced): 20.5 dBu
Noise: under -98 dBu from 20 Hz to 20 kHz
Frequency response @ -1dB: 5 Hz to 24 kHz
Two Notes Audio Engineering Torpedo Reload 47
Page 48

Specifications
Designation
Characteristics
REPLAY™ Input
Jack 6.35mm (1/4") balanced (TRS, Tip/Ring/Sleeve)
Maximum input level: 36 dBu
Input impedance: 20 KOhms
Ground/Lift switch
REPLAY™ Output
Jack 6.35 mm (1/4") unbalanced (TS)
Impedance: 300 Ohms
Gain (In to Out): 0 to -inf dB, adjustable by potentiometer
Maximum output level: 19 dBu
Noise: under -98 dBu from 20 Hz to 20 KHz
Frequency response @ -1dB: 0 Hz to 18 kHz
DI Input
Jack 6.35 mm (1/4") unbalanced (TS, Tip/Sleeve)
Impedance : 1 MOhms
DI Output
Balanced male XLR
Impedance: 600 Ohms
Ground/Lift switch
Gain (In to balanced Output): 6 dB
Maximum in/out level: 20 dBu
Noise: under -98 dBu from 20 Hz to 20 kHz
Frequency response @ -1dB: 0 Hz to 18 kHz
Thermal security
Cooled by temperature-controlled fan
Thermal security: when overheating, the loadbox gets disconnected (leaving only a 220Ohm security load) and the signal is muted.
Power supply
IEC60320 C14 power connector
Input voltage: depending on your country of residence, from 100V to 230V, 50 to 60Hz
Power: approx. 100 W Max
Dimensions
Width: 320 mm
Depth: 178 mm, 200 mm including connectors and knobs
Height: 89 mm
Weight: 4.5 kg
48 Two Notes Audio Engineering Torpedo Reload
Page 49

Part 8
Technical support
Should you encounter a problem with your Torpedo Reload or need help regarding any technical
aspects, please note that Two Notes Audio Engineering has developed on-line services to provide
you with fast and efficient technical support, the Two Notes Help Desk which you will find at this
address:
http://support.two-notes.com/
Two Notes Website
On the http://www.two-notes.com website, you will find:
• news about the company and the products (news on the homepage),
• comprehensive information about the Torpedo Reload and its many applications (FAQ),
• firmware and software updates to download (products/Torpedo Reload/downloads),
• access to the Two Notes Store where you can buy new cabinets,
• the Torpedo BlendIR software (products/Torpedo Reload/downloads),
• an official forum where you can share tips and advice with other Torpedo users (forum).
The Two Notes Team often visits specialized forums to help out users.
E-mail
We do not offer technical support via e-mail. Please contact us via the Help Desk at the address
above.
Two Notes Audio Engineering Torpedo Reload 49
Page 50

Page 51
http://www.two-notes.com/
 Loading...