


Thank you for using CompeGPS Land/Air, the GPS data management and digital map
viewing software to help you manage your outdoor trips.
If you want to start using the program quickly, read the following pages. For more
detailed information on the operation of the system do not forget to consult the full user
manual. You can find it on the CompeGPS website (www.compegps.com).
1. CompeGPS Installation
The CompeGPS CD-ROM is self-executable. To install CompeGPS Land/Air do the
following steps:
1. Insert the CD-ROM into your CD reader and wait for it to execute the autorun.
2. Select the language.
3. Click the Install button and the CompeGPS installation wizard will start.
4. Follow the instructions shown on screen to complete installation.
If the CD-ROM does not start automatically, you must run the installation file manually.
Double click on setup_compeGPS.exe, located in the SETUP folder on the CD-ROM.
2. CompeGPS Land/Air Activation
You need to activate the program to work with it.
When starting the program for first time, you will be asked to introduce a register code
(license) for CompeGPS Land/Air or for one of the maps included in the extensive
catalogue of CompeGPS.
ENGLISH
If you have a CompeGPS Land/Air register code, enter it and follow instructions to
complete the activation of the program.
If the code entered belongs to a map, the program will be activated in basic mode* and
you will be able to work with the map using the basic functions.
If you do not have a register code (license), press 'free activation' and, after entering
your personal data, you will be able to work with the basic functions of the program*.
*Basic mode will also allow you to try advanced functions in that computer for 30 days.
1
3. Setting of Objects Folders
CompeGPS works with different objects: maps, tracks, routes, waypoints and profiles.
The default location for these items is 'Documents/CompeGPS'.
These objects can be stored in one or more locations in your computer. When the
program needs to access objects, it will use the folders configured for such use.
If data folders are not configured properly, lists of objects will not be correctly generated, for example in ‘Storage Files' at the data tree or when using the 'Search' function.
You can modify this setting from 'Menu > File > Options > Folders'.
4. Open an object (map, track, route, waypoints)
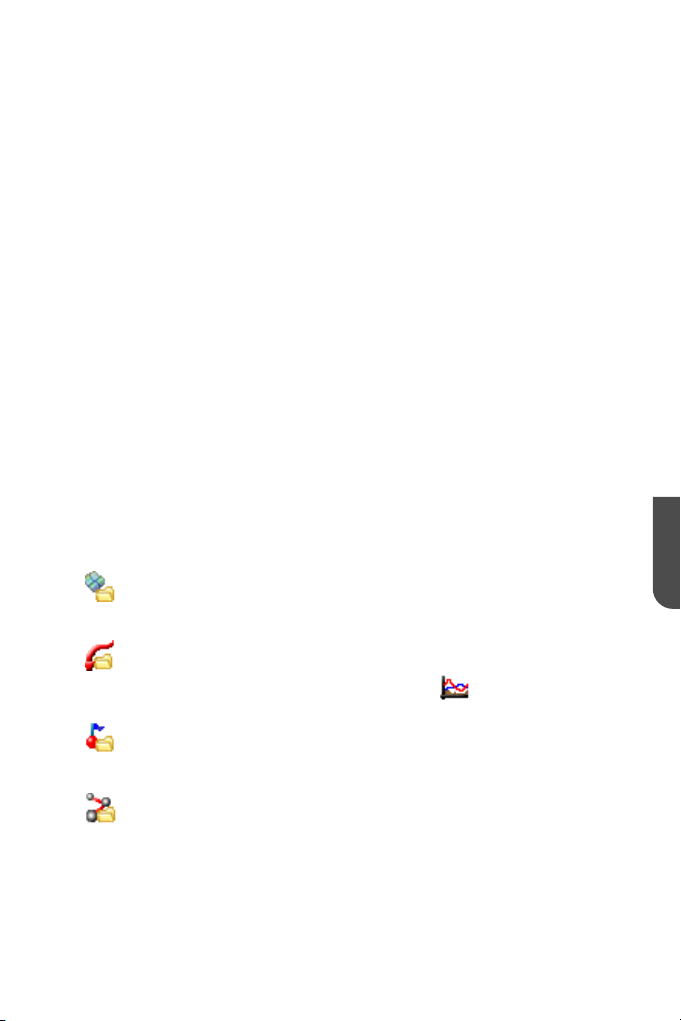
You can open files quickly by pressing the appropriate button on the buttons bar:
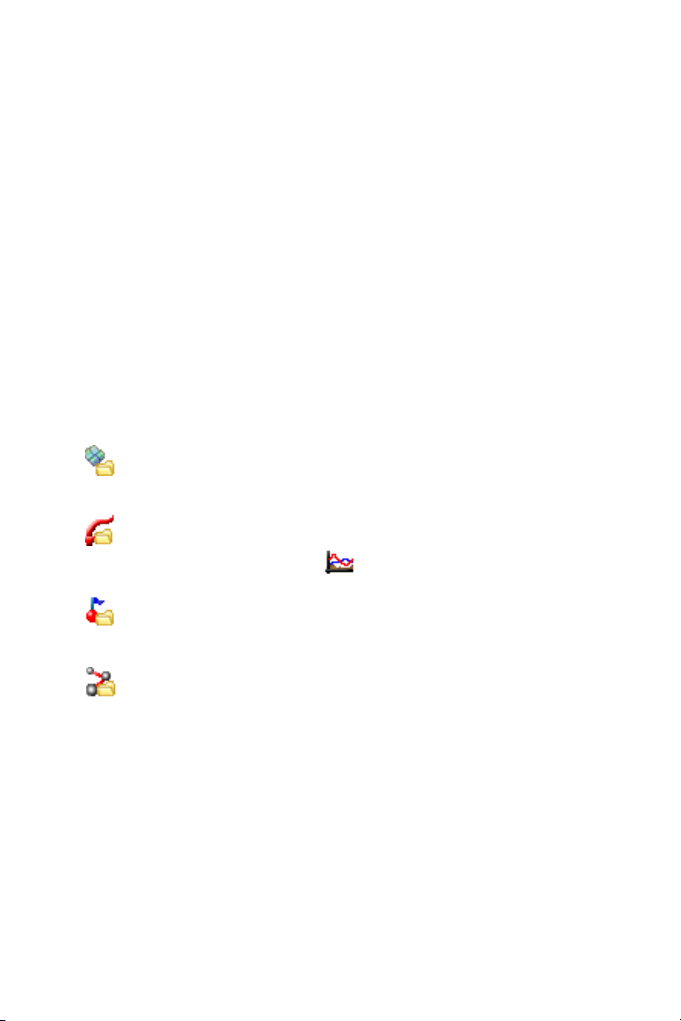
•
(Open a map): You can open raster maps (e.g. *.rmap, *.ecw, etc.), vectori-
als (e.g. *.vmap, *.shp, etc.) or digital elevation models (DEM).
(Open a track): You can open tracks in different formats (*.trk, *.gpx, *.kmz,
•
etc.). To see the track graph press
• (Open a waypoints file): A waypoints file contains individual waypoints. If
you create new waypoints, they will be added to the loaded file.
(Open a route): Routes are sequences of waypoints.
•
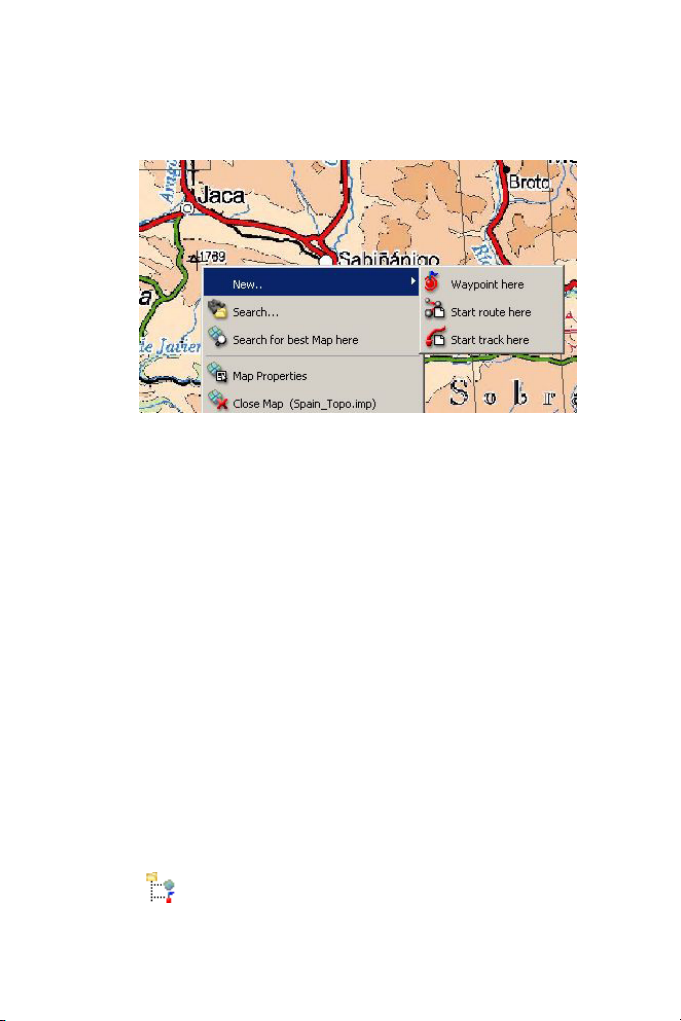
5. Create an object (track, route, waypoint)
The easiest way to create a new object is by right clicking on the map and selecting
'New...’.
Follow next steps:
1. Open a reference map on which to create the object.
2. Make a right click on the place you want to create the object and select 'New ...'
2
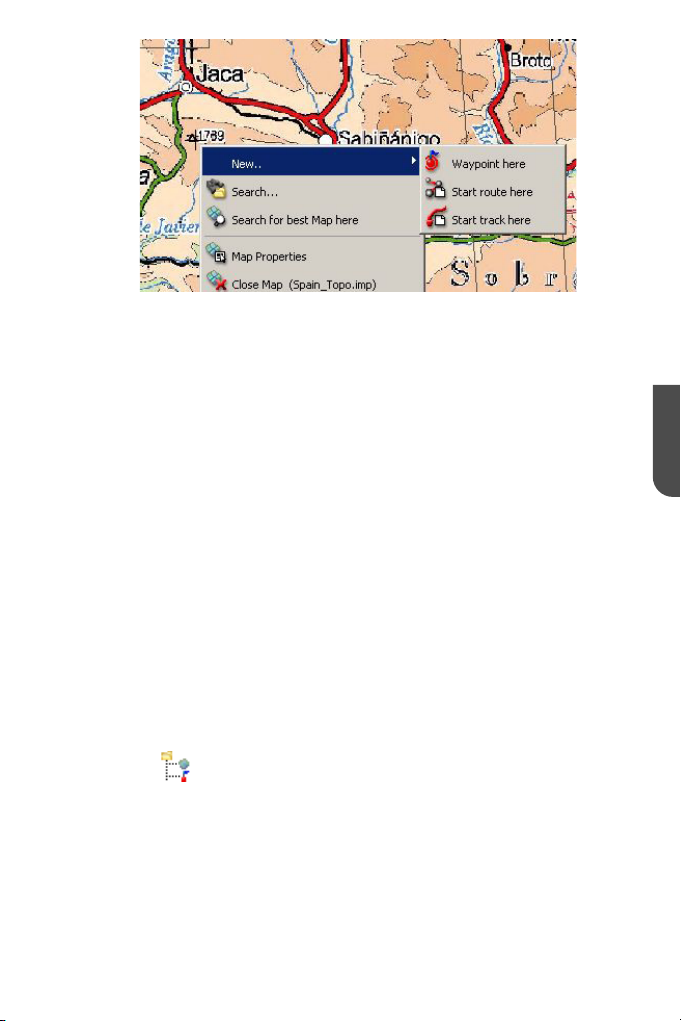
3. You can choose 3 options:
• Create a waypoint
• Create a route: This will create the first point of the route.
• Create a track: This will create the first point of the track.
To add points to the route or track, then check off successively on the map.
Press ESC to exit edit mode
To take up again editing of the route or track, make right click on the object and select
'Edit'.
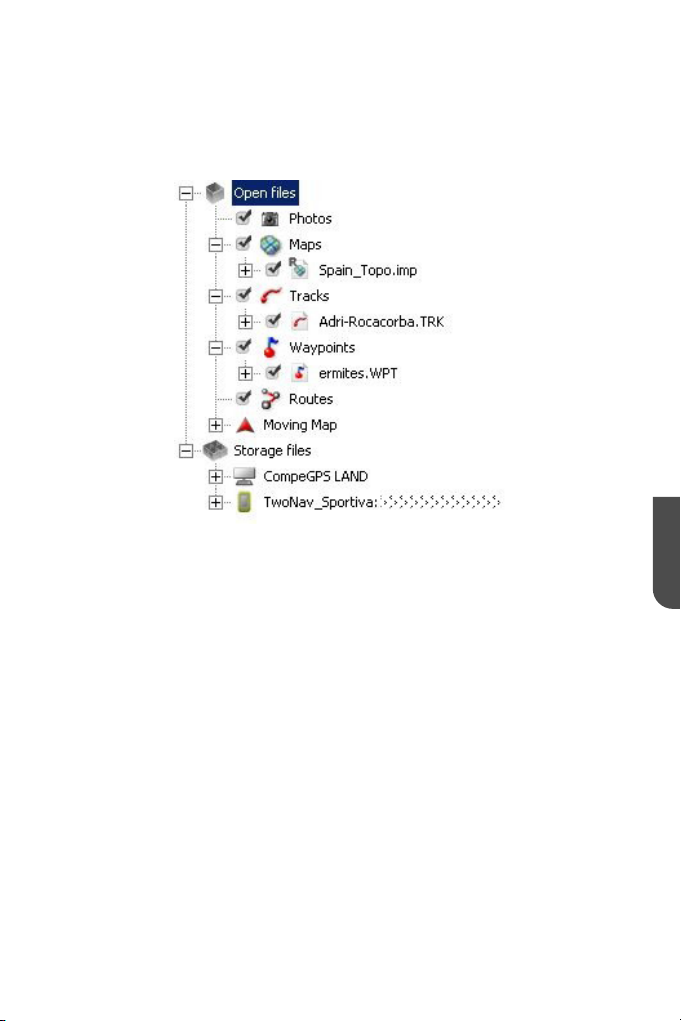
6. The data tree
The data tree is a handy tool that allows you to quickly see the files you have open at
that time. You can also manage the files that you have stored on your PC or in connected devices.
Press the button
The data tree is divided into two main sections:
• Open files: It will classify by object type (map, track, route, waypoint).
• Storage files: You can see the objects available in the memory of your PC
(CompeGPS Land). If you connect a device through USB direct communication
(Aventura, Sportiva, Evadeo) it will also appear here and you will be able to
to make appear the data tree.
3
ENGLISH
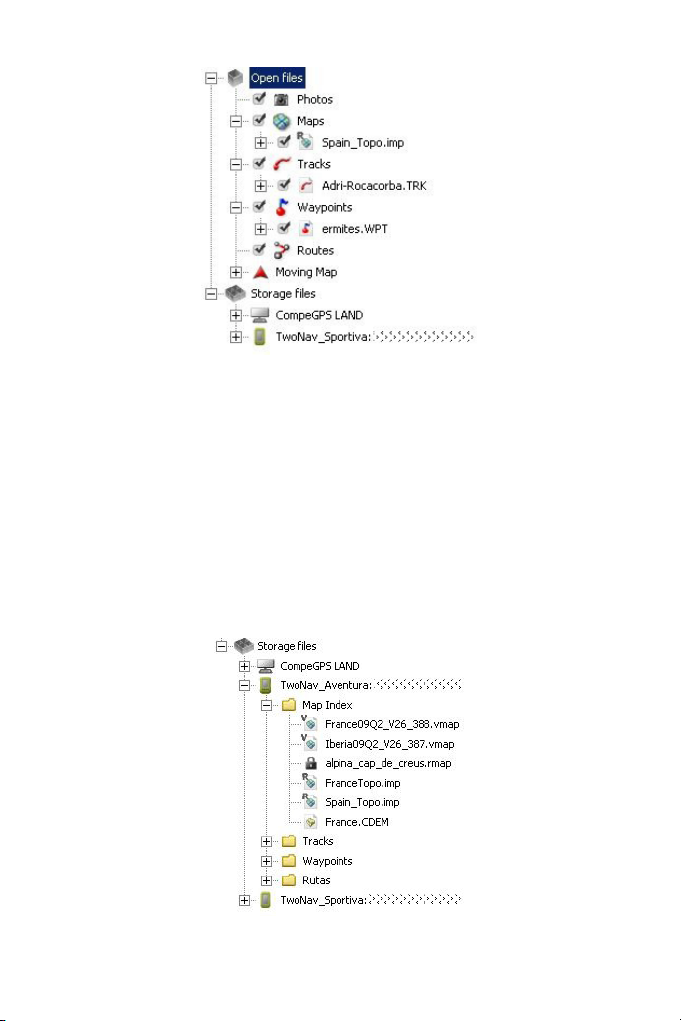
manage its files.
Right-clicking on elements of the data tree you can access many functions.
For example, if you do right click on an open file and select 'zoom here', it will focus
the selected object on the main window.
7. Communication with other devices
Communication with devices that have TwoNav Software (Aventura, Sportiva, Evadeo)
does not require any previous configuration. Just connect the device to the USB port
of your PC and see how it appears in the data tree, from which you can transfer all the
necessary information.
To communicate with GPS from other brands you should take into account the ‘Communication options’ and use the option 'Communications' in the main menu.
4
If the communication between the device and CompeGPS Land fails, you can try to
manage files directly using Windows explorer to copy/paste the files you want.
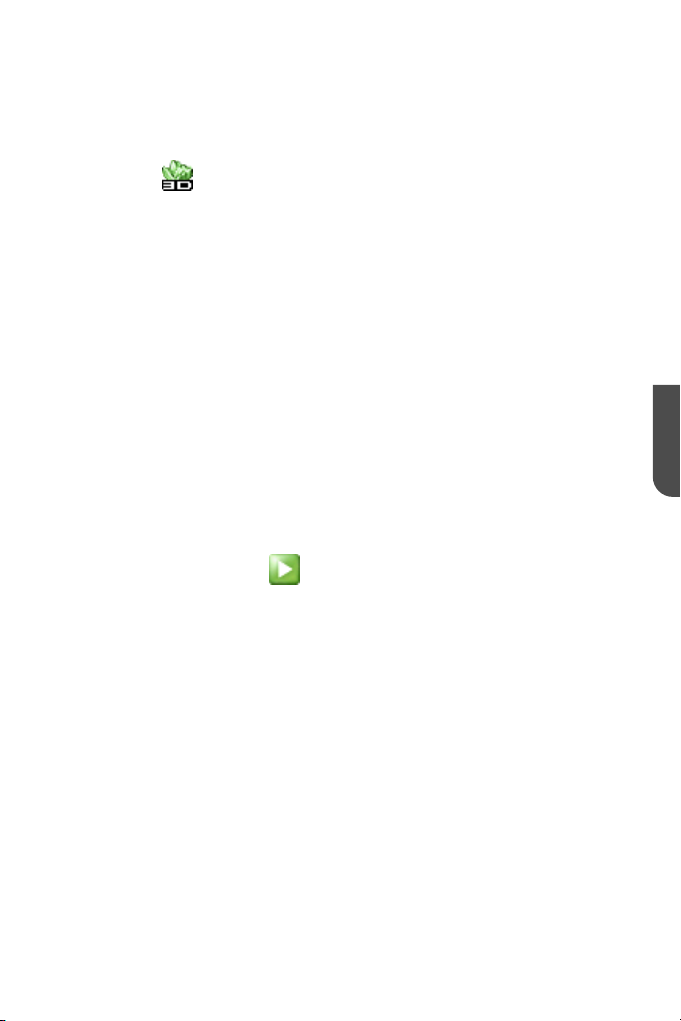
8. 3D View
Press the button (3D viewer) in the toolbar for a three-dimensional perspective
of loaded objects.
If you have a digital elevation model in your map folder, the program will load it automatically to display the terrain elevations.
If not available, the 3D view will be flat.
Use the mouse to control movement in 3D. By holding down each mouse button and
moving it you will get different effects:
• Left mouse button + drag: Move map
• Right mouse button + drag: Rotate Map
• Press wheel + drag: Ascent/Descent
• Turn wheel: Zoom
If you have a track loaded, press
to animate it.
9. Support
If you have any questions or problems using the software you can address to support
section of the CompeGPS’ website (www.compegps.com).
To perform custom queries you can use the ‘on-line’ support system by accessing to
http://support.compegps.com.
5
ENGLISH

Gracias por utilizar CompeGPS Land/Air, el programa de gestión de datos GPS y
visualización de mapas digitales que le ayudará a gestionar sus salidas al aire libre.
Si desea empezar a utilizar el programa rápidamente, lea las páginas que siguen.
Para obtener información más detallada sobre el funcionamiento del sistema no
olvide consultar el manual del usuario completo, que puede encontrar en la página
web de CompeGPS (
www.compegps.com).
1. Instalación de CompeGPS
El CD-ROM de CompeGPS es auto-ejecutable. Para instalar CompeGPS Land/Air
realice las siguientes operaciones:
1. Inserte el CD-ROM en su lector de CD-ROM y espere a que se ejecute el
‘autoarranque’.
2. Seleccione el idioma.
3. Pulse el botón Instalar y se iniciará el instalador de CompeGPS.
4. Siga las instrucciones que se muestren en pantalla hasta completar la instalación.
Si el CD- ROM no arranca automáticamente, deberá ejecutar el archivo de instalación
manualmente. Haga doble clic sobre setup_compeGPS.exe, que se encuentra den-
tro de la carpeta SETUP del CD-ROM.
2. Activación de CompeGPS Land/Air
Es necesario activar el programa para poder trabajar con él.
Al arrancar el programa por primera vez se le preguntará si dispone de algún código de registro (licencia) de CompeGPS Land/Air o de uno de los mapas del amplio
catálogo de CompeGPS.
Si dispone de un código de registro de CompeGPS Land/Air, introdúzcalo y siga los
pasos que se le indiquen para completar la activación del programa.
Si el código introducido es de un mapa, se activará el programa en modo básico* y
podrá trabajar con el mapa utilizando las funciones básicas.
Si no dispone de ningún código de registro (licencia), pulse ‘activación gratis’ y,
después de introducir sus datos, podrá trabajar con las funciones básicas del programa*.
6
*El modo básico le permitirá también probar las funciones avanzadas en ese ordenador durante 30 días.
3. Configuración de las carpetas de objetos
CompeGPS trabaja con diferentes objetos: mapas, tracks, rutas, waypoints y conjuntos.
La localización por defecto para estos elementos es ‘Documentos/CompeGPS’.
Estos objetos pueden estar guardados en una o más localizaciones de su ordenador.
Cuando el programa necesite acceder a los objetos, utilizará las carpetas que tenga
configuradas para tal uso.
Si no tiene correctamente configurada la carpeta de datos no se generarán correctamente las listas de objetos, por ejemplo en la sección ‘Archivos almacenados’ del
árbol de datos o al utilizar la función ‘Buscar’.
Puede modificar esta configuración desde ‘Menú > Archivo > Opciones > Carpetas’.
4. Abrir un objeto (mapa, track, ruta, waypoints)
Puede abrir archivos rápidamente pulsando el botón adecuado en la barra de botones:
•
(abrir mapa): Puede abrir mapas ráster (e.g. *.rmap, *.ecw, etc.), vectoria-
les (e.g. *.vmap, *.shp, etc.) o modelos de elevación digital (DEM).
ESPAÑOL
(abrir track): Puede abrir tracks en distintos formatos (*.trk, *.gpx, *.kmz,
•
etc.). Para ver una gráfica del track pulse el botón
• (abrir archivo de waypoints): Un archivo de waypoints contiene waypoints
individuales. Si crea nuevos waypoints, se añadirán al archivo cargado.
• (abrir una ruta): Las rutas son sucesiones de waypoints.
5. Crear un objeto (track, ruta, waypoint)
El modo más sencillo de crear un objeto nuevo es haciendo clic derecho sobre el
mapa y seleccionando ‘Nuevo…’.
7
Siga estos pasos:
1. Abra un mapa para tener una referencia sobre la que crear el objeto.
2. Clique con el botón derecho del ratón sobre el punto donde quiera crear el
objeto y seleccione la opción ‘Nuevo…’
3. Podrá elegir 3 opciones:
• Crear un waypoint
• Crear una ruta: Se creará el primer punto de la ruta.
• Crear un track: Se creará el primer punto del track.
Para añadir puntos a la ruta o track, vaya marcándolos sucesivamente sobre el mapa.
Pulse la tecla ESC para salir del modo edición.
Si desea retomar la edición de la ruta o el track más adelante, haga clic derecho sobre
el objeto y seleccione ‘Editar’.
6. El árbol de datos
El árbol de datos es una práctica herramienta que le permitirá consultar rápidamente
los archivos que tiene abiertos en ese momento. También podrá gestionar los que
tiene almacenados en el PC o en los dispositivos conectados.
Pulse el botón para que aparezca el árbol de datos.
El árbol está dividido en dos secciones principales:
8
• Archivos abiertos: Se clasificarán por tipo de objeto (mapa, track, ruta, way-
point).
• Archivos almacenados: Podrá ver los objetos disponibles en la memoria de
su PC (CompeGPS Land). Si conecta un dispositivo mediante comunicación
directa USB (Aventura, Sportiva, Evadeo), también aparecerá aquí y podrá
gestionar sus archivos.
Haciendo clic derecho sobre los elementos del árbol de datos podrá acceder a multitud de funciones.
Por ejemplo, si hace clic derecho en un archivo abierto y selecciona ‘zoom aquí’, el
objeto se centrará en la ventana principal.
ESPAÑOL
7. Comunicaciones con otros dispositivos
La comunicación con dispositivos que dispongan del software TwoNav (Aventura,
Sportiva, Evadeo) no requiere de ninguna configuración previa. Tan sólo conecte el
aparato al puerto USB del PC y verá cómo aparece en el árbol de datos, desde el cual
podrá transferir toda la información necesaria.
9

Para comunicarse con GPS de otras marcas deberá tener en cuenta las ‘opciones de
Comunicación’ y utilizar la opción ‘Comunicaciones’ del menú principal.
Si no consigue comunicar el aparato utilizando CompeGPS Land, puede intentar gestionar los archivos directamente utilizando el explorador de Windows para copiar/
pegar los archivos que desee.
8. Vista 3D
Pulse el botón (visor 3D) de la barra de herramientas para obtener una perspectiva tridimensional de los objetos cargados.
Si dispone de un modelo de elevación digital en su carpeta de mapas, el programa lo
cargará automáticamente para que se puedan moldear las elevaciones del terreno.
Si no dispone de él, la vista 3D será plana.
Utilice el ratón para controlar el movimiento en 3D. Manteniendo pulsados cada uno
de los botones del ratón y moviéndolo conseguirá diferentes efectos:
10

• Botón izquierdo + movimiento: Desplazar mapa
• Botón derecho + movimiento: Rotar mapa
• Pulsar ruedecilla + movimiento: Ascender/Descender
• Girar ruedecilla: Zoom.
Si tiene un track cargado, pulse
para ver una animación del mismo.
9. Soporte
Si tiene cualquier duda o problema con el sistema, puede consultar la sección de
soporte de la página web de CompeGPS (www.compegps.com).
Para realizar consultas personalizadas puede utilizar el sistema de soporte ‘on-line’ de
CompeGPS accediendo al espacio http://support.compegps.com .
ESPAÑOL
11

Merci d’utiliser CompeGPS Land/Air, le programme de gestion de données GPS et
de visualisation de cartes digitales qui vous permettra de profiter au maximum de vos
sorties de plein air.
Ce guide vous permettra de commencer à rapidement utiliser le logiciel, juste en lisant
les quelques pages suivantes. Pour des informations complémentaires sur son fonctionnement, veuillez consulter le manuel complet d’utilisateur, que vous pouvez trou
ver sur le site Internet de CompeGPS (www.compegps.com).
1. Installation de CompeGPS
Le CD-ROM de CompeGPS s’exécute automatiquement. Pour installer CompeGPS
Land/Air, effectuez les opérations suivantes:
1. Insérez le CD-ROM dans le lecteur de CD-ROM et attendre qu’il se lance
automatiquement.
2. Sélectionnez la langue.
3. Cliquez sur le bouton “Installer” afin de lancer l’installation du logiciel CompeGPS.
4. Suivez les instructions qui s’affichent sur l’écran jusqu’à ce que l’installation
soit terminée.
Si le CD- ROM ne se lance pas automatiquement, vous devrez l’exécuter manuellement depuis le dossier d’installation. Faîtes un double-clic sur le fichier setup_com-
peGPS.exe, qui se trouve dans le dossier SETUP du CD-ROM.
2. Activation de CompeGPS Land/Air
Il est nécessaire d’activer le logiciel pour commencer à l’utiliser.
Lors du premier lancement du programme, il vous sera demandé si vous disposez
d’un code d’enregistrement (licence) de CompeGPS Land/Air ou d’une des nombreuses cartes de notre catalogue CompeGPS.
Si vous disposez d’un code d’enregistrement CompeGPS Land/Air, introduisez-le et
suivez les différentes étapes affichées pour compléter l’activation.
Si le code introduit est celui d’une carte, le logiciel s’activera en mode basique et vous
pourrez travailler sur votre carte avec les fonctions de base (différentes des fonctions
avancées offertes par la version complète).
Si vous ne disposez d’aucun code d’enregistrement (licence), cliquez sur ‘activation
12

gratuite’ et, après introduction de vos données personnelles, vous aurez accès aux
fonctions avancées du programme pendant 30 jours. Ensuite, le logiciel basculera en
mode basique.
3. Configuration des dossier contenant les différentes données
CompeGPS permet d’afficher différents types de données: cartes, traces, routes,
waypoints et associations.
Le dossier par défaut contenant ces données se trouve dans ‘Documents/CompeGPS’.
Ces données (ou objets) peuvent être sauvegardés dans un ou plusieurs dossiers de
votre ordinateur. Lorsque le logiciel aura besoin d’accéder à ces données, il se rendra
aux dossiers qui auront été configurés préalablement.
Si vous ne configurez pas correctement les dossiers de données, les listes d’objets
ne pourront pas être correctement générées, comme par exemple la section ‘Fichiers
stockés’ de l’arbre de données ou en utilisant la fonction “Chercher”.
Vous pouvez à tout moment modifier la configuration des ces dossiers à partir de
‘Menu > Fichier > Options > Dossiers’.
4. Ouvrir un objet (carte, trace, route, waypoint)
Vous avez la possibilité d’ouvrir des fichiers rapidement en cliquant sur le bouton correspondant de la barre des tâches:
•
(ouvrir une carte): Vous pouvez ouvrir des cartes raster (par exemple
*.rmap, *.ecw, etc.), vectorielles (comme *.vmap, *.shp, etc.) ou modèles
d’élévation digitale (DEM).
(ouvrir trace): Vous pouvez ouvrir des traces de différents formats (*.trk,
•
*.gpx, *.kmz, etc.). Pour afficher le graphique de la trace, cliquez sur l’icône
• (ouvrir fichier de wapyoints): Un fichier de waypoints contient des way-
points individuels. Si vous créez des nouveaux waypoints, ils s’ajouteront à
13
FRANÇAIS

l’archive chargée.
(ouvrir une route): Les routes sont des successions de waypoints.
•
5. Créer un objet (trace, route, waypoint)
La façon la plus simple de créer un nouvel objet est d’effectuer un clic droit directement sur la carte à l’endroit souhaité et sélectionner ‘Nouveau…’.
Suivez ensuite les étapes suivantes:
1. Ouvrir une carte afin d’avoir une référence sur laquelle créer l’objet.
2. Faire un clic droit à l’endroit où vous souhaitez créer l’objet et sélectionner
l’option ‘Nouveau…’
3. Vous aurez alors le choix entre 3 options:
• Créer un waypoint
• Créer une route: le premier point de la route sera créé.
• Créer une trace: le premier point de la trace sera créé.
An d’ajouter des points à la route ou à la trace, marquez-les successivement sur la
carte.
Appuyer sur la touche “Echap” pour sortir du mode “édition”.
Si vous désirez retourner au mode “édition” de la route ou de la trace, effectuez un clic
droit sur l’objet et sélectionner “Editer”.
14

6. L’arbre de données
L’arbre de données est un outil très pratique qui vous permet de consulter rapidement
les fichiers actuellement ouverts. Vous aurez également la possibilité de classer et
rechercher ceux que vous possédez sur votre ordinateur ou sur les appareils qui y
seront connectés.
Appuyer sur le bouton pour faire apparaître l’arbre de données
Celui-ci se divise en 2 sections principales:
• Fichiers ouverts: Ils seront classes par type d’objets (carte, trace, route, way-
point).
• Fichiers enregistrés: Vous pourrez voir les fichiers de votre PC (CompeGPS
Land). Si vous connectez un appareil depuis la connexion USB (Aventura,
Sportiva, Evadeo), ils apparaîtront également et vous pourrez ainsi y transférer
tout type de données.
En effectuant un clic droit sur les éléments de l’arbre de données vous aurez accès à
de nombreuses fonctions.
Par exemple, si vous faîtes un clic droit sur un fichier ouvert, et vous sélectionner
“zoomer ici” l’objet se placera automatiquement au centre de la fenêtre principale.
7. Communication avec d’autres appareils
La communication avec les appareils disposant du logiciel TwoNav intégré (Aventura,
Sportiva, Evadeo) ne nécessite aucune configuration préalable à leur utilisation. Le
simple fait de les connecter au câble USB de votre ordinateur suffira à ce que le
15
FRANÇAIS

logiciel les reconnaisse. Ils apparaîtront alors directement sur l’arbre de données.
Si vous souhaitez communiquer avec des GPS d'une autre marque, il faudra vous
rendre l’option “Communication” du menu principal.
Dans le cas où vous ne pouvez pas communiquer avec votre appareil à travers le
logiciel CompeGPS Land, vous pouvez toujours manipuler les fichiers directement en
utilisant l’explorateur de Windows pour copier/coller les fichiers souhaités.
8. Vue 3D
Appuyer sur le bouton (vue 3D) de la barre d’outil pour obtenir une perspective
tridimensionnelle des objets chargés.
Si vous disposez d’un modèle d’élévation digitale dans votre dossier de cartes, le programme le chargera automatiquement afin de dessiner le relief du terrain.
Si vous ne disposez pas de ce modèle, la vue 3D sera plane.
Utilisez la souris pour contrôler les mouvements en 3D. En maintenant appuyer les
boutons suivants de la souris et en la déplaçant, vous obtiendrez les différents effets:
16

• Bouton gauche + mouvement: Déplacer la carte
• Bouton droit + mouvement: Tourner la carte
• Appuyer sur roue de la souris + mouvement: Monter/Descendre
• Tourner la roue de la souris: Zoom.
Si vous avez une trace chargée, appuyez sur
pour voir l’animation de celle-ci.
9. Support
Si vous avez le moindre doute ou problème concernant le fonctionnement du logiciel,
vous pouvez consulter les sections de support de nos pages Internet de CompeGPS
(www.compegps.com) ou de TwoNav (www.twonav.com).
Si vous ne trouvez pas de réponses à vos questions sur ces pages ou si vous souhaitez réaliser de plus précises, contactez nous depuis http://support.compegps.
com .
FRANÇAIS
17

Vielen Dank, dass Sie sich für CompeGPS, der Software für Kartenanzeige und GPS
Datenmanagement entschieden haben. CompeGPS Land wird Ihnen bei dem Verwalten Ihrer Outdoor Aktivitäten helfen.
Diese Kurzanleitung bietet Ihnen einen schnellen Einblick in die Software. Für ausführliche Informationen lesen Sie bitte die vollständige Bedienungsanleitung. Sie finden
die Bedienungsanleitung auf der CompeGPS Internetseite (www.compegps.com)
1. CompeGPS Installation
Die CompeGPS CD-ROM startet automatisch. Um CompeGPS Land/Air zu installieren, führen Sie bitte folgende Schritte durch.
1. Legen Sie die CD-ROM in das CD/DVD-Laufwerk Ihres Computer und warten
Sie bis die CD automatisch gestartet wurde.
2. Wählen Sie die Sprache aus.
3. Drücken Sie den Knopf Installieren und die CompeGPS Installationsroutine
startet.
4. Folgen Sie den Anweisungen auf dem Bildschirm um die Installation durch zu
führen.
Wenn die CD-ROM nicht automatisch startet, müssen Sie die Installation manuell
starten. Klicken Sie auf setup_compeGPS.exe in dem Ordner SETUP auf der CDROM
2. CompeGPS Land/Air Aktivierung
Um das Programm nutzen zu können, müssen Sie das Programm aktivieren.
Wenn Sie das Programm zum ersten Mal starten, werden Sie aufgefordert einen
Registrierungscode (Lizenz) für CompeGPS Land/Air oder einer im Lieferumfang enthaltenen Karte einzugeben.
Wenn Sie über einen Registrierungscode für CompeGPS Land/Air verfügen, geben
Sie bitte den Code ein und folgen den Anweisungen um die Aktivierung erfolgreich zu
beenden.
Wenn der eingegebene Code zu einer Karte gehört, wird das Programm im “Basic
mode*” aktiviert und Sie können die Karten mit den Basis Funktionen verwenden.
Wenn Sie über keinen Registrierungscode (Lizenz) verfügen, drücken Sie bitte
„kostenlose Registrierung“ und geben Ihre persönlichen Daten an. Sie können nun
das Programm mit den Basis Funktionen nutzen.
18

*Im Basic mode können Sie alle erweiterten Funktionen für 30 Tage auf Ihrem Computer verwenden..
3. Einrichten der Objektordner
CompeGPS arbeitet mit unterschiedlichen Objekten: Karten, Tracks, Routen, Wegpunkten und Profile.
Der Standardordner für diese Objekte befindet sich unter: ‘Dokumente/CompeGPS’.
Die Objekte können an einem oder mehreren Orten auf Ihrem Computer gespeichert
werden Das Programm sucht sich die Objekte aus den eingerichteten Ordnern wenn
die Objekte von dem Programm benötigt werden
Wenn der Datenordner nicht konfiguriert ist werden die verschiedenen Objekte nicht
richtig angezeigt. Z.B. im Datenbaum und in der Suchfunktion.
Sie können die Einstellung vornehmen unter: Menü -> Datei -> Optionen -> Ordner.
4. Ein Objekt öffnen (Karte, Track, Route, Wegpunkte)
Sie können schnell und einfach ein Objekt öffnen, indem Sie entsprechendes Symbol
in der Symbolleiste auswählen.
•
(Karte öffnen): Öffnen Sie verschiedene Karten wie Rasterkarten (z.B.
*.rmap, *.ecw, etc.), Vektorkarten (z.B. *.vmap, *.shp, etc.) oder digitale
Höhenangaben (DEM).
(Track öffnen): Öffnen Sie Tracks aus verschiedenen Formaten (*.trk, *.gpx,
•
*.kmz, etc.). Um die Trackgrafik zu sehen drücken Sie
• (Wegpunkte öffnen): Eine Wegpunktdatei kann unterschiedliche Weg-
punkte enthalten. Wenn Sie einen neuen Wegpunkt erstellen, wird der Wegpunkt automatisch in der geöffneten Datei gespeichert.
• (Route öffnen): Routen sind eine Folge von Wegpunkten.
5. Objekt erstellen (Track, Route, Wegpunkt)
Klicken Sie mit der rechten Maustaste in die Karte um schnell und einfach ein neues
19
DEUTSCH

Objekt zu erstelllen. Wählen Sie ‚Neu…’
Folgen Sie den nächsten Schritten
Öffnen Sie eine Referenzkarte in der Sie ein neues Objekt öffnen möchten.
1. Machen Sie einen rechtsklick an der Stelle, wo Sie ein neues Objekt erstellen
möchten und wählen Sie ‘Neu…‘'
2. Sie können zwischen drei Optionen wählen:
• Wegpunkt erstellen
• Route erstellen: Dieses erstellt den ersten Punkt einer Route.
• Track erstellen: Dieses erstellt den ersten Punkt eines Tracks.
Um weitere Punkte in einer Route oder Track zu erstellen, klicken Sie in der Karte die
entsprechende Position.
Drücken Sie ESC um die Bearbeitung zu beenden
Um nachträglich einen Track oder Route zu bearbeiten, machen Sie einen rechtsklick
auf das Objekt und wählen ‘Editieren’.
6. Der Datenbaum
Durch den Datenbaum haben Sie ein Tool um geöffnete Datein schnell verwenden
können. Sie können mit dem Datenbaum auch gespeicherte Daten auf Ihrem Computer oder verbundenen Geräten verwalten.
Drücken Sie das Symbol
20
um den Datenbaum zu öffnen.

Der Datenbaum ist in zwei Haupkategorien unterteilt:
• Offene Daten: Sortiert wird nach Objekttyp (Karten, Tracks, Routen, Wegpunk-
te).
• Datei speichern: Hier sehen Sie Objekte die auf Ihrem Computer in Com-
peGPS Land gespeichert sind. Wenn Sie ein mobiles Gerät(Aventura, Sportiva,
Evadeo) per USB mit dem Computer verbinden, wird das Gerät in dem Datenbaum angezeigt und Sie können die Daten auf dem Gerät verwalten.
Im Datenbaum können Sie mit einem Rechtsklick bei einem Element auf viele Funktionen zugreifen.
Zum Beispiel können Sie mit einem Rechtsklick eine Datei öffnen und mit ‘Zoom auf
Objekt’ wird das Objekt im Hauptfenster angezeigt.
7. Kommunikation mit mobilen Geräten
Geräte mit TwoNav Software (Aventura, Sportiva, Evadeo) komunizieren ohne weitere
Konfiguration mit CompeGPS Land. Verbinden Sie das Gerät mit dem USB-Port an
Ihrem PC und das Gerät wird in dem Datenbaum mit allen notwendigen Informationen
angezeigt.
21
DEUTSCH

Um CompeGPS Land mit GPS-Geräten von anderen Herstellern zu verbinden, gehen
Sie auf Menü -> Kommunikation -> Kommunikation konfigurieren und richten Sie Ihr
Gerät ein.
Wenn keine Kommunikation zwischen CompeGPS Land und Ihrem Gerät möglich ist,
können Sie die Daten mit dem Windows Explorer mit kopieren/einfügen auf das Gerät
kopieren.
8. 3D Ansicht
Drücken Sie das Symbol (3D Ansicht) in der Symbolleiste für eine 3D Ansicht
der geöffneten Objekte.
Wenn Sie ein digitales Höhenlinienmodell in dem Map-Ordner haben, lädt das Programm automatisch das Höhenlinienmodell und zeigt es in dem gewählten Bereich
der Karte an.
Wenn kein Höhenlinienmodell verfügbar ist, bleibt die 3D-Ansicht flach.
Nutzen Sie die Maus um die Bewegung in der 3D-Ansicht zu kontrollieren. Use the
mouse to control movement in 3D. Jeder Taste sind verschiedene Funktionen zuge-
ordnet.
22

• Linke Maustaste + ziehen: Karte bewegen
• Rechte Maustaste + ziehen: Karte drehen
• Rad drücken + ziehen: Anheben/Absenken
• Rad drehen Zoom
Wenn Sie einen Track geöffnet haben, drücken Sie
sehen.
um den Track animiert zu
9. Support
Wenn Sie Fragen oder Probleme mit der Software haben, besuchen Sie die Supportseite auf der CompeGPS Internetseite (www.compegps.com)
Für spezielle Anfragen erstellen Sie bitte eine Anfrage in unserem Online Support
System unter http://support.compegps.com.
23
DEUTSCH

Grazie per utilizzare CompeGPS Land/Air, il programma di gestione dei dati GPS e
visualizzazione di mappe digitali che vi aiuterà a gestire le vostre uscite all'aria aperta.
Se desiderate iniziare a utilizzare da subito il programma, leggete le seguenti pagine.
Per ulteriori informazioni sul funzionamento del sistema, consultare la versione completa del manuale dell’utente reperibile sul sito web CompeGPS (www.compegps.
com).
1. Installazione di CompeGPS
Il CD-ROM di CompeGPS è autoeseguibile. Per installare CompeGPS Land/Air, eseguite queste operazioni:
1. Inserite il CD-ROM nell’apposito lettore e attendete che venga eseguito il programma di avvio automatico.
2. Selezionate la lingua.
3. Premere il pulsante Installare per avviare la procedura d’installazione di CompeGPS.
4. Seguite le istruzioni riportate sullo schermo per completare la procedura di
installazione.
Qualora il CD- ROM non si avvii automaticamente, dovrete eseguire il file di installazione manualmente. Fate doppio clic su setup_compeGPS.exe che si trova dentro
la cartella SETUP del CD-ROM.
2. Attivazione di CompeGPS Land/Air
Per poter utilizzare il programma è necessario prima attivarlo.
Al primo avvio del programma, vi verrà chiesto se disponete un codice di registrazione
(licenza) (licenza) di CompeGPS Land/Air o di una delle mappe del vasto catalogo di
CompeGPS.
Se disponete di un codice di registrazione di CompeGPS Land/Air, introducetelo e
seguite i passaggi indicati dalle istruzioni per completare l’attivazione del programma.
Se il codice inserito è di una mappa, il programma sarà attivato in modalità base* e
con la mappa potrete unicamente utilizzare le funzioni base.
Qualora non disponiate di alcun codice di registrazione (licenza), premete su “Attivazione gratuita” e, una volta inseriti i vostri dati personali, potrete operare con le funzioni
base del programma*.
24

*La modalità base vi permetterà anche di provare per 30 giorni le funzioni avanzate sul
computer su cui è installato il programma.
3. Configurazione delle cartelle degli oggetti
CompeGPS opera con diversi oggetti: mappe, tracce, percorsi, tappe e combinazioni.
L’ubicazione per difetto di questi elementi è “Documenti/CompeGPS”.
Questi oggetti possono venir registrati in una o più ubicazioni sul computer. Quando
il programma deve accedere agli oggetti, utilizzerà le cartelle appositamente configurate per l’uso.
Se la cartella dei dati non è configurata correttamente, gli elenchi degli oggetti non
saranno generati correttamente, per esempio nella sezione “File memorizzati”’ della
struttura ad albero dei dati o utilizzando la funzione “Cerca”.
È possibile modificare questa configurazione da “Menu > File > Opzioni > Cartelle”.
4. Aprire un oggetto (mappa, traccia, rotta, waypoint)
È possibile aprire rapidamente i file premendo l’apposito pulsante sulla barra degli
strumenti:
•
(apri mappa): per aprire mappe raster (es. *.rmap, *.ecw, ecc.), vettoriali
(es. *.vmap, *.shp, ecc.) o modelli d’elevazione digitale (DEM).
(apri traccia): per aprire tracce in diversi formati (*.trk, *.gpx, *.kmz, ecc.).
•
Per visualizzare la grafica della traccia, premere il pulsante
• (apri file waypoint): un file waypoint contiene i singoli waypoint (tappe).
Qualora si creino nuovi waypoint, questi saranno aggiunti al file caricato.
• (apri rotta): le rotte sono successioni di waypoint.
5. Creare un oggetto (traccia, rotta, waypoint)
Il modo più semplice di creare un nuovo oggetto è quello di fare clic con il pulsante
destro sopra la mappa e selezionare “Nuovo…”.
25
ITALIANO

Procedete come segue:
1. Aprite una mappa per avere un riferimento dal quale creare un oggetto.
2. Fate clic con il pulsante destro del mouse sopra il punto dove desiderate creare
l’oggetto e selezionate l’opzione “Nuovo…”
3. Potete scegliere tra 3 opzioni:
• Waypoint qui: sarà creato un nuovo waypoint in quel punto
• Comincia rotta qui: sarà creato il primo punto della rotta.
• Iniziare traccia qui: sarà creato il primo punto della traccia.
Per aggiungere ulteriori punti alla rotta o alla traccia, segnarli in successione sopra
alla mappa.
Premete ESC per uscire dalla modalità modifica.
Per modificare in un secondo momento la rotta o la traccia, fare clic con il pulsante
destro sull’oggetto e selezionare “Modifica”.
6. Albero dei dati
L’albero dei dati è uno strumento molto comodo che permette di consultare in maniera
rapida i file aperti in quel momento. È anche possibile gestire i dati memorizzati sul PC
o nei dispositivi collegati.
Premere il pulsante per far apparire la struttura ad albero dei dati.
La struttura ad albero è divisa in due sezioni principali:
• Open files (File aperti): classificati per tipo di oggetto (mappa, traccia, rotta,
26

waypoint).
• Storage files (File memorizzati): è possibile visualizzare gli oggetti presenti
nella memoria del PC (CompeGPS Land). Qualora si connetta un dispositivo tramite connessione diretta USB (Aventura, Sportiva, Evadeo), apparirà
anch’esso e sarà possibile gestirne i file.
Facendo clic con il pulsante destro sugli elementi della struttura dei dati, potete accedere a tutta una serie di funzioni.
Per esempio, facendo clic con il pulsante destro su un file aperto e selezionando
“Zoom qui”, l’oggetto verrà centrato nella finestra principale.
7. Comunicazioni con altri dispositivi
La comunicazione con dispositivi dotati del software TwoNav (Aventura, Sportiva,
Evadeo) non richiede alcuna previa configurazione. È sufficiente connettere il dispositivo alla porta USB del PC e questo apparirà nella struttura ad albero dei dati, dalla
quale è possibile trasferire tutte le informazioni necessarie.
27
ITALIANO

Per comunicare con GPS di altre marche, tenete conto delle “opzioni di comunicazione” e utilizzate l’opzione “Comunicazione” del menu principale.
Qualora non riusciate a far comunicare il dispositivo utilizzando CompeGPS Land,
potete tentare di gestire i file direttamente utilizzando esplora risorse di Windows per
copiare/incollare i file desiderati.
8. Vista 3D
Premete il pulsante (modalità 3D) della barra degli strumenti per mostrare una
vista tridimensionale degli oggetti caricati.
Se nella cartella delle mappe disponete di un modello di elevazione digitale, il programma lo caricherà automaticamente per plasmare le elevazioni del terreno.
In caso contrario, la vista 3D sarà piatta.
Utilizzate il mouse per controllare i movimenti in 3D. Tenendo premuto uno dei pulsanti
del mouse e muovendolo si eseguiranno le seguenti azioni:
• Pulsante sinistro + movimento: spostare la mappa
• Pulsante destro + movimento: ruotare la mappa
• Premere la rotellina + movimento: salire/scendere
• Girare la rotellina: Zoom.
In caso di traccia caricata, premete
per vederne l’animazione.
9. Supporto
In caso di dubbi o problemi riguardo al sistema, consultate le sezioni di supporto dei
siti web CompeGPS (www.compegps.com) o TwoNav (www.twonav.com).
Per ottenere assistenza personalizzata, utilizzate il sistema di supporto “on-line” di
CompeGPS su http://support.compegps.com .
28
 Loading...