

twonav aventura 2.8 User Manual

http://www.CompeGPS.com http://Support.CompeGPS.com 1
TWONAV AVENTURA 2.8
User manual
1 Introduction ....................................................................................................... 6
2 Start up & Maintenance ................................................................................... 7
2.1 Care instructions .................................................................................................. 7
2.2 Basic parts of the device ..................................................................................... 7
2.3 Mounting ................................................................................................................ 8
2.4 Application status ................................................................................................ 9
2.5 Recharging .......................................................................................................... 10
2.6 Reset .................................................................................................................... 11
2.7 Updating the firmware ....................................................................................... 11
2.8 Connection to computer .................................................................................... 11
3 Operation ......................................................................................................... 12
3.1 Map window ........................................................................................................ 12
3.1.1 Explore the map ......................................................................................... 12
3.1.1.1 Anchor ................................................................................................... 12
3.1.2 Data mode ................................................................................................... 13
3.1.2.1 Basic functions ..................................................................................... 13
3.1.2.2 Additional functions ............................................................................. 14
3.1.3 Tool mode .................................................................................................... 15
3.1.3.1 Tool bar ................................................................................................. 15
3.1.3.1.1 Basic functions ................................................................................ 15
3.1.3.1.2 Additional functions ......................................................................... 16
3.1.3.2 Bottom bar ............................................................................................ 17
3.1.3.3 Hint ......................................................................................................... 17
3.2 Main menu ........................................................................................................... 17
3.3 Data lists .............................................................................................................. 18
3.3.1 Shifting over lists ........................................................................................ 19
3.3.2 Management of elements ......................................................................... 19
3.3.3 Actions on elements .................................................................................. 21
3.3.4 Order elements ........................................................................................... 22
3.3.5 2nd line data ................................................................................................ 23
3.4 Data pages ........................................................................................................... 24
3.5 Contextual menu ................................................................................................ 24
4 Navigation ....................................................................................................... 25
4.1 Modes ................................................................................................................... 25
4.1 Triplog .................................................................................................................. 25
4.2 Select destination ............................................................................................... 27
4.3 Set your alarms ................................................................................................... 28
4.4 Follow indications .............................................................................................. 29
4.5 Trip review ........................................................................................................... 30
5 Maps ................................................................................................................. 31

http://www.CompeGPS.com http://Support.CompeGPS.com 2
5.1.1 What is a map? ........................................................................................... 31
5.1.2 Supported formats ...................................................................................... 31
5.1.3 Properties .................................................................................................... 32
5.1.4 Multimaps .................................................................................................... 33
6 Waypoints/Routes/Tracks ............................................................................. 33
6.1 Descriptions ........................................................................................................ 33
6.1.1 Waypoints .................................................................................................... 33
6.1.1.1 What is a waypoint? ............................................................................ 33
6.1.1.2 Supported formats ............................................................................... 33
6.1.1.3 Properties .............................................................................................. 34
6.1.1.4 Active Waypoints File .......................................................................... 34
6.1.2 Routes .......................................................................................................... 35
6.1.2.1 What is a route? ................................................................................... 35
6.1.2.2 Supported formats ............................................................................... 35
6.1.2.3 Properties .............................................................................................. 35
6.1.3 Tracks........................................................................................................... 36
6.1.3.1 What is a track? ................................................................................... 36
6.1.3.2 Supported formats ............................................................................... 36
6.1.3.3 Properties .............................................................................................. 36
6.2 Basic operations ................................................................................................. 37
6.2.1 Creation of waypoints/routes/tracks ........................................................ 37
6.2.1.1 On the map ........................................................................................... 37
6.2.1.2 From data lists ...................................................................................... 38
6.2.1.2.1 Waypoints lists ................................................................................. 38
6.2.1.2.2 Routes lists ....................................................................................... 38
6.2.2 Move position of waypoints....................................................................... 38
6.2.3 Add waypoints to a route/track ................................................................. 39
6.2.4 Graph representation of routes/tracks .................................................... 39
6.2.5 Add associated files to waypoints/routes/tracks .................................... 40
6.2.6 Navigate to a waypoint/route/track .......................................................... 40
6.2.6.1 Navigation elements ............................................................................ 41
6.3 Advanced operations ......................................................................................... 42
6.3.1 Waypoints .................................................................................................... 42
6.3.1.1 Modifiy for all waypoints ..................................................................... 42
6.3.1.2 Reset ..................................................................................................... 42
6.3.2 Routes .......................................................................................................... 42
6.3.2.1 Modifiy for all waypoints ..................................................................... 42
6.3.2.2 Change the order of the waypoints in a route ................................. 42
6.3.2.3 Invert a route ........................................................................................ 42
6.3.2.4 Convert a route into a track ................................................................ 42
6.3.3 Tracks........................................................................................................... 43
6.3.3.1 Import altitudes .................................................................................... 43
6.3.3.2 Delete stopped points start/end ........................................................ 43
6.3.3.3 Reduce the number of points ............................................................ 43
6.3.3.4 Assign time/speed ............................................................................... 43
6.3.3.5 Delete aberrant points ........................................................................ 43

http://www.CompeGPS.com http://Support.CompeGPS.com 3
6.3.3.6 Invert track ............................................................................................ 43
6.3.3.7 Convert a track into a route ................................................................ 43
6.3.3.8 Track legs ............................................................................................. 43
6.3.3.8.1 Create legs ....................................................................................... 43
6.3.3.8.2 Operations with legs ....................................................................... 44
7 Additional features ......................................................................................... 44
7.1 Simulate ............................................................................................................... 44
7.2 Geocaching ......................................................................................................... 45
7.2.1 What is geocaching? ................................................................................. 45
7.2.2 Supported formats ...................................................................................... 45
7.2.3 Create field notes ....................................................................................... 46
7.2.4 Set status for geocaches .......................................................................... 46
7.2.5 Add associated files with Land/Air ........................................................... 46
7.2.6 Navigate a geocache ................................................................................. 47
7.3 e-Roadbook ......................................................................................................... 48
7.3.1 What is an e-Roadbook? .......................................................................... 48
7.3.2 Supported formats ...................................................................................... 48
7.3.3 Create an e-Roadbook with Land/Air ...................................................... 48
7.3.4 Navigate an e-Roadbook .......................................................................... 50
8 Settings ............................................................................................................ 51
8.1 System ................................................................................................................. 51
8.1.1 Device .......................................................................................................... 51
8.1.1.1 Default settings .................................................................................... 51
8.1.1.2 Status report ......................................................................................... 51
8.1.1.3 About ..................................................................................................... 51
8.1.1.4 Activation information .......................................................................... 51
8.1.2 Language ..................................................................................................... 51
8.1.3 Units ............................................................................................................. 51
8.1.4 Brightness .................................................................................................... 52
8.1.5 Audio ............................................................................................................ 52
8.1.6 Folders ......................................................................................................... 52
8.1.7 Time zone .................................................................................................... 53
8.1.8 Coordinates ................................................................................................. 53
8.2 Map ....................................................................................................................... 53
8.2.1 Automaps..................................................................................................... 53
8.2.2 Autozoom..................................................................................................... 54
8.2.3 Re-center ..................................................................................................... 54
8.2.4 Orient map ................................................................................................... 55
8.2.5 CDEM reliefs ............................................................................................... 55
8.2.6 3D ................................................................................................................. 56
8.3 Display ................................................................................................................. 57
8.3.1 Tracks........................................................................................................... 57
8.3.2 Hint ............................................................................................................... 58
8.3.3 Rotate screen .............................................................................................. 58
8.3.4 Nightview ..................................................................................................... 59
8.3.5 Pointer .......................................................................................................... 59

http://www.CompeGPS.com http://Support.CompeGPS.com 4
8.3.6 Themes ........................................................................................................ 60
8.3.7 Labels ........................................................................................................... 60
8.3.8 POI (Points Of Interest) ............................................................................. 60
8.3.9 Geocaching ................................................................................................. 61
8.4 Fields & Buttons ................................................................................................. 61
8.4.1 Data fields .................................................................................................... 61
8.4.2 Tool bar ........................................................................................................ 62
8.4.3 Map page ..................................................................................................... 62
8.4.4 Keys .............................................................................................................. 63
8.5 Alarms .................................................................................................................. 63
8.5.1 Data fields .................................................................................................... 63
8.5.2 Tracks........................................................................................................... 64
8.5.3 Leg change .................................................................................................. 64
8.5.4 Waypoints .................................................................................................... 65
8.5.5 Speedcams ................................................................................................. 65
8.5.6 Speed limit ................................................................................................... 66
8.5.7 Depth ............................................................................................................ 66
8.6 Training ................................................................................................................ 66
8.7 Vehicle ................................................................................................................. 67
8.8 Navigation ........................................................................................................... 67
8.8.1 Autoroute ..................................................................................................... 67
8.8.1.1 Restrictions ........................................................................................... 67
8.8.1.2 Recalculate ........................................................................................... 67
8.8.1.3 Calculation method .............................................................................. 68
8.8.2 Next waypoint ............................................................................................. 68
8.8.3 Estimated times .......................................................................................... 68
8.8.4 Slope ............................................................................................................ 69
8.9 Tracklog ............................................................................................................... 69
8.9.1 File ................................................................................................................ 69
8.9.2 Display ......................................................................................................... 70
8.9.3 Synchronization with navigation .............................................................. 70
8.10 Autonomy ......................................................................................................... 71
8.11 Communications ............................................................................................. 71
8.11.1 GPS ........................................................................................................... 72
8.12 Calibration ........................................................................................................ 72
8.12.1 Touchscreen ............................................................................................ 72
8.12.2 Altitude (Barometer) ............................................................................... 72
8.12.2.1 Barometer calibration .......................................................................... 73
8.12.3 Bearing (Compass) ................................................................................. 73
8.12.3.1 Compass calibration ........................................................................... 73
8.13 Advanced ......................................................................................................... 74
9 Management from a computer ..................................................................... 77
9.1 Open and analyse the data recorded by TwoNav ........................................... 78
9.2 Activate and transfer files between ‘Computer-TwoNav’ .............................. 78
9.2.1 Via contextual menu .................................................................................. 78
9.2.2 Dragging files directly from the data tree ................................................ 79

http://www.CompeGPS.com http://Support.CompeGPS.com 5
9.3 Update your device to the latest TwoNav version .......................................... 79
10 Warranty ....................................................................................................... 79
11 Appendix: Data fields ................................................................................. 81
12 Appendix: Tool bar buttons ....................................................................... 86
13 Appendix: Special characters ................................................................... 88

http://www.CompeGPS.com http://Support.CompeGPS.com 6
1 INTRODUCTION
CompeGPS dedicates all its experience and effort to enable you get the best out
of your outdoor activities such as hiking, cycling, trail running, geocaching…
TwoNav offers directional assistance, both on-road and off-road activities, this
assistance is invaluable in order to increase the safety of your itineraries. Despite
this, under certain circumstances, you may be distracted by misuse of the
application, in this case it may become a hazard either for you or the
environment. Please, use TwoNav application with responsibility.
Even TwoNav offers you the possibility to use this application in any type of
vehicle but it is very important to take into consideration a series of
recommendations and regulations to properly use the application:
Fit TwoNav application correctly: TwoNav should be fitted in a place
where it will not obstruct your visibility. Moreover, it must be secured to
ensure it cannot fall off easily and hinder driving.
Do not handle TwoNav while driving: Plan all details regarding your
itinerary before starting the navigation. Any change must be done with the
vehicle stopped in a safe place (not on the road or kerbs).
Guided by sound indications: TwoNav application will warn you with
sound infications of upcoming manoeuvres and when to carry them out. A
glance at the visual information displayed by TwoNav may be useful in
order to know which path you should take, but you must resort to this
visual information only if you can do it safely (vehicle stopped). When
driving, you should always keep your eyes on the road.
Front-seat passenger can easily help you: The driver is always facing
the road, so if you have a front-seat passenger, CompeGPS strongly
recommends this person to be in charge of handling the TwoNav
application. The front-seat passenger will be able to make any clarification
or changes in the navigation.
Getting it wrong is not a problem: If any indication provided by TwoNav
cannot be followed, the application will automatically re-calculate a new
itinerary adapted to the new situation. This makes sure that you will
always reach your final destination.
Maps always contain errors: Remember that it is impossible to have
100% updated information for all your maps. So, new streets, changes in
street directions or road restrictions may invalidate partially the calculation
of your itinerary. It is very important to be aware of these changes and to
get adapted to the new situation.

http://www.CompeGPS.com http://Support.CompeGPS.com 7
Traffic regulations have always preference: In order to fully comply the
traffic regulations of each country.
All new developments are based on suggestions and feedback from users like
you. If you would like to share your ideas and proposals with CompeGPS, feel
free to do it at http://CompeGPS.uservoice.com
If you have any questions or problems regarding the use of our products, please
contact the on-line technical support department of CompeGPS at
http://Support.CompeGPS.com
2 START UP & MAINTENANCE
2.1 Care instructions
Never submerge the device in water, not even when all lids are sealed. Avoid
vibration or harsh movements while USB port is connected. Vibrations may
deform the USB port whose repair is excluded from the warranty.
2.2 Basic parts of the device
‘ON/OFF’ key:
Press: Device on
‘HOLD’ key:
Short press: Lock/Unlock the device
Large press: Lock/Unlock the device and turn off the screen
‘MENU’ key:
Short press: Menu
http://www.CompeGPS.com http://Support.CompeGPS.com 8
Large press: (Without assignation)
‘PAGE’ key:
Short press: Data pages
Large press: (Without assignation)
‘MARK’ key:
Short press: Create waypoint
Large press: Create and edit waypoint
‘ESC’ key:
Short press: Recenter map
Large press: Screenshot
Note: You can customize button functions in ‘Main menu > Settings > Fields &
Buttons > Keys’.
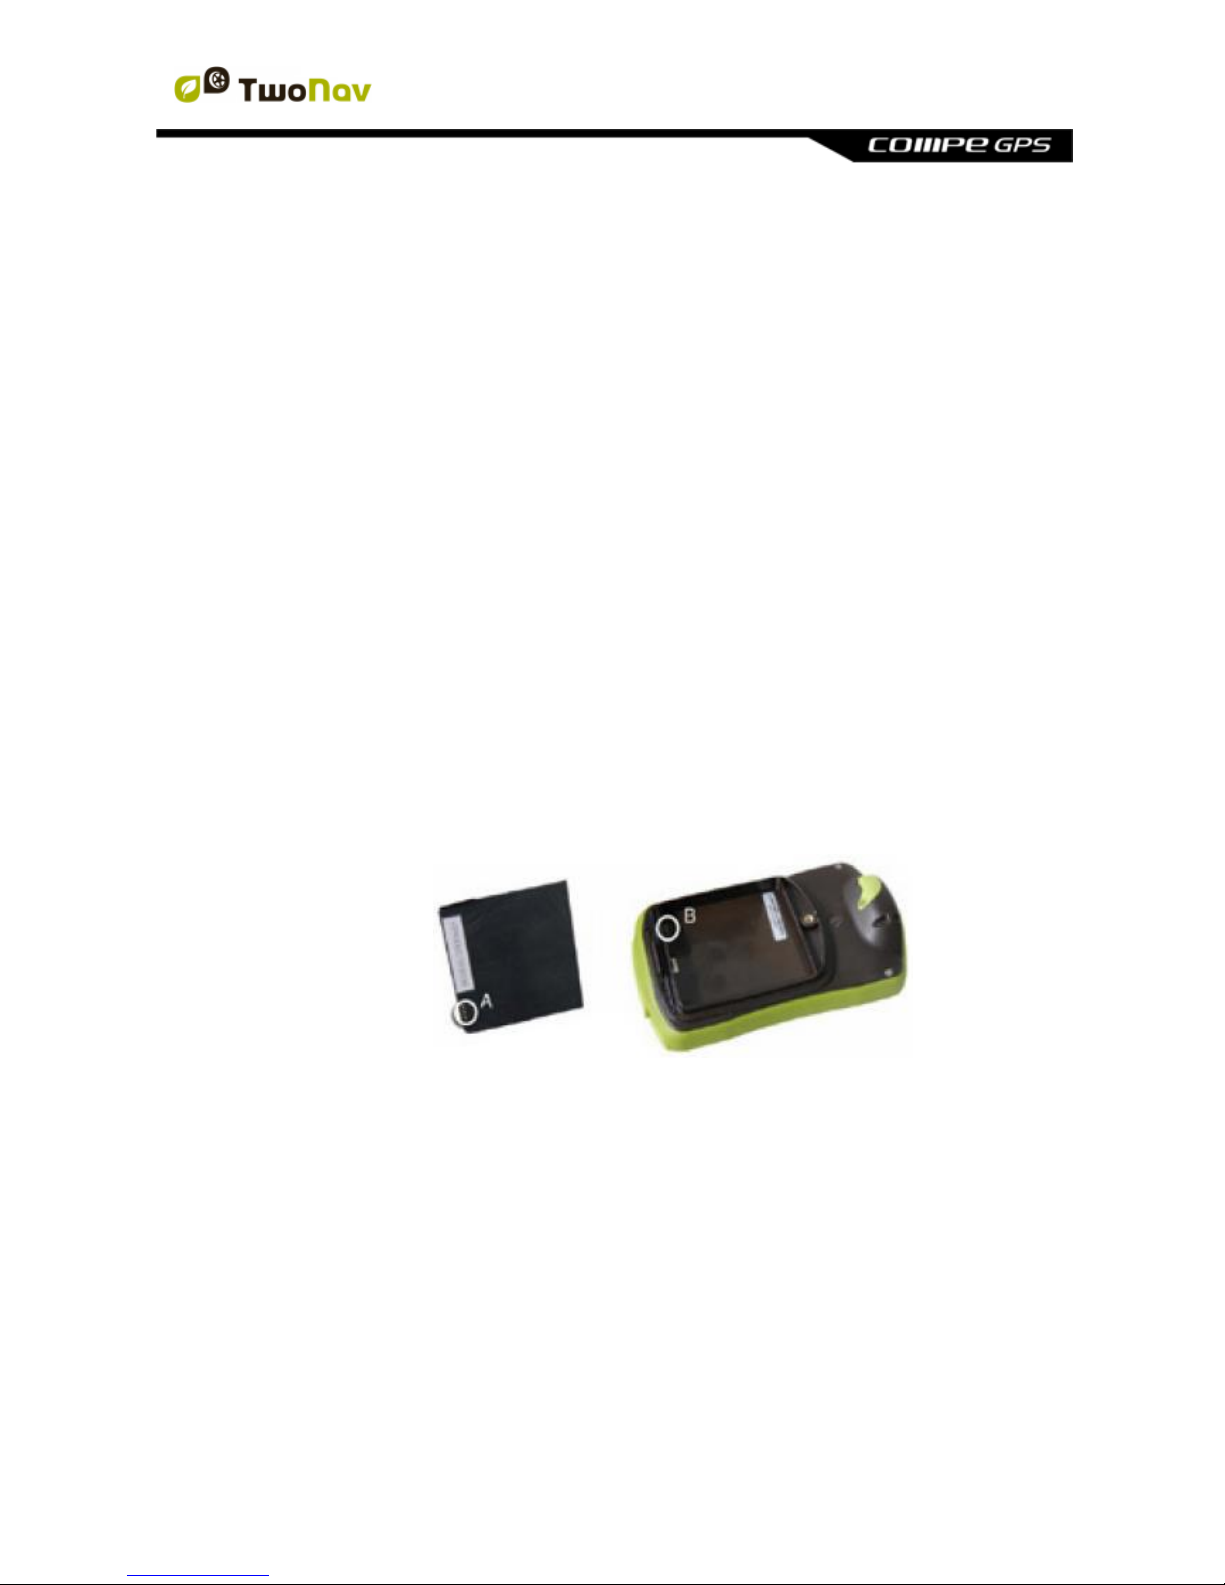
2.3 Mounting
Battery:
1. Open the battery compartment by making 4 complete anti-clockwise
turns, using the opening ring (pull strongly to fully remove the cover
compartment). Do not force the opening ring.
2. Place the li-ion battery inside the compartment (battery included
inside the product box), positioning the 3 battery unit contacts on
top of the permanent connectors within device.
3. Restore the battery compartment.
SD card:
1. Open the card compartment in the lower part of the device.
2. Place the SD card inside the compartment. Card’s sticker must face
the back side of the device.
http://www.CompeGPS.com http://Support.CompeGPS.com 9
3. Restore the card compartment taking care that it is correctly fitted
again.
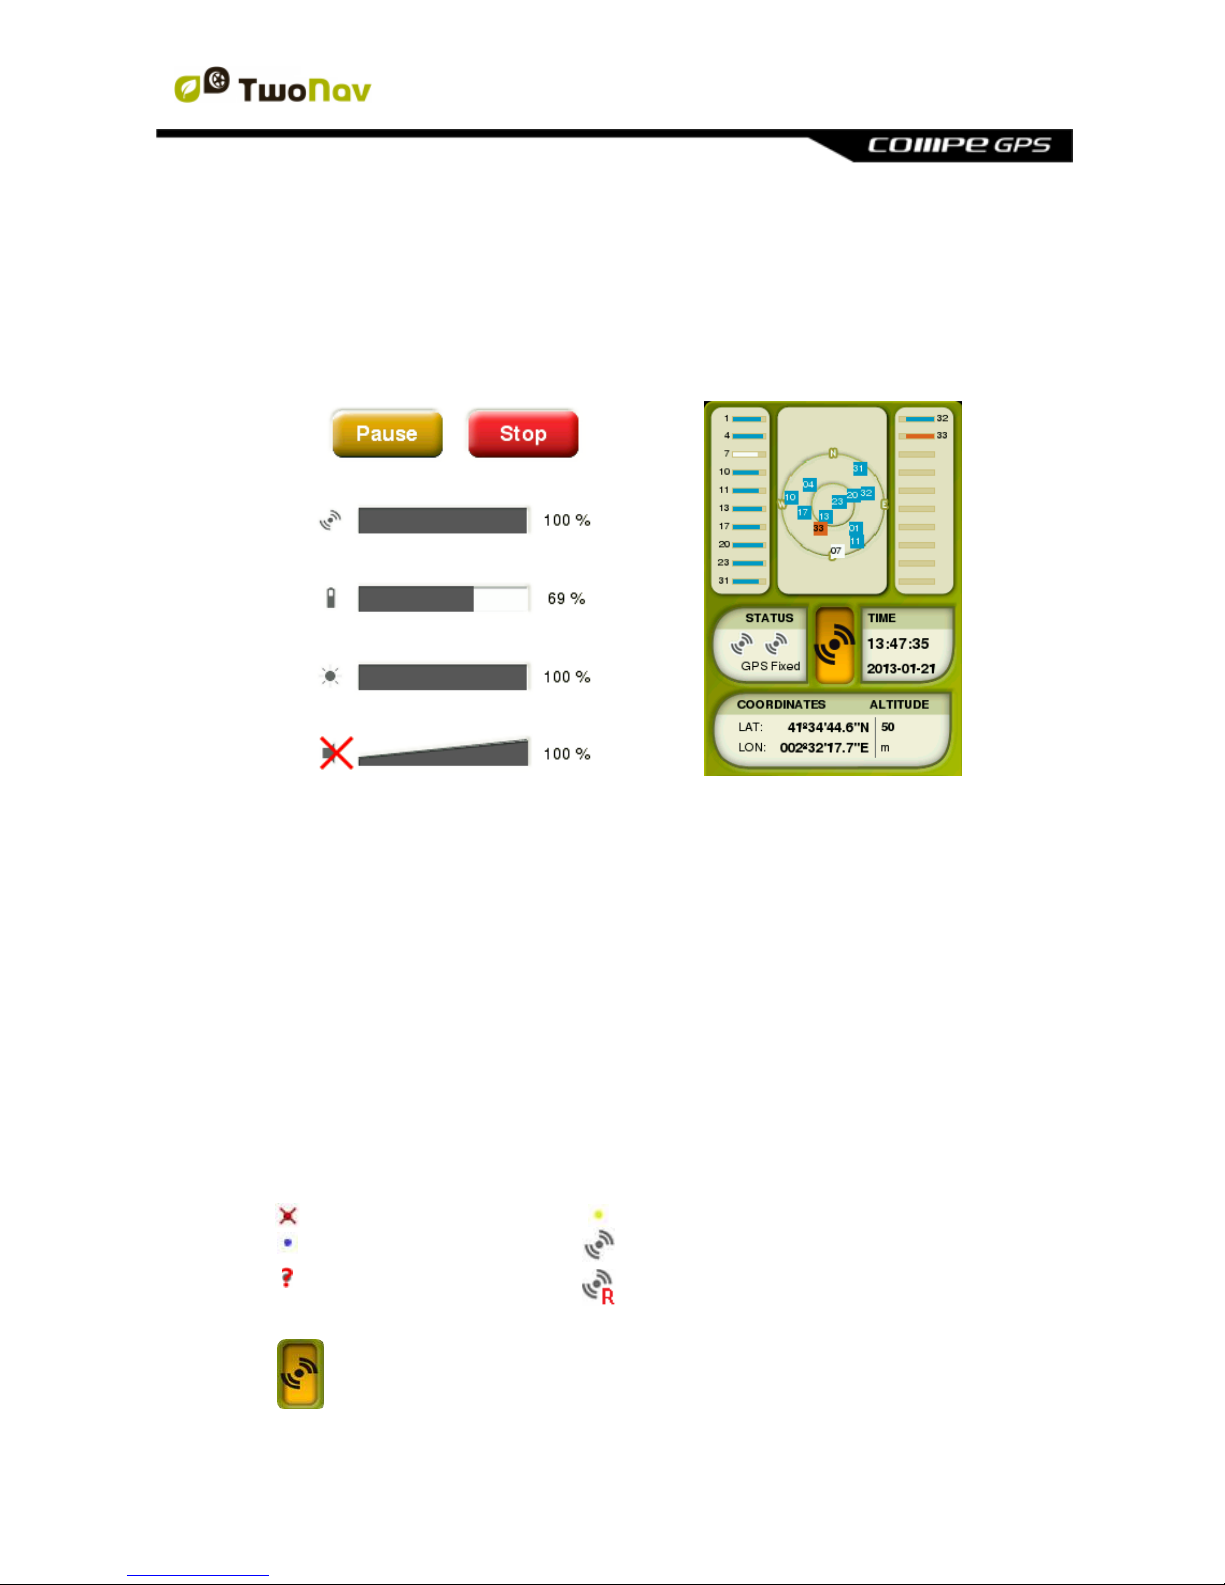
2.4 Application status
From ‘Main menu > Status’ you can check the status of general functions of
TwoNav application.
Triplog (recording of itinerary): ‘Triplog’ is the command allowing you to
manage the recording of your itinerary, your itinerary will be recorded
when ‘Triplog’ is started.
Reception and position of satellites: Check the number of satellites
available as well as their distribution orbiting over the vault and their
coverage.
By default, when TwoNav is launched, it will try to connect to available
satellites so that you can start working with GPS function. If GPS is
disconnected, TwoNav will not receive any position signal and many
application functions will stop working.
Possible states for GPS function:
Disconnected
Connected (without position)
Connecting
Connected (with position)
Error (not found)
Connected (with position) and
recording track
S
Simulating
Connect/Disconnect GPS function:
Press the central button to switch on/off the GPS of TwoNav.

http://www.CompeGPS.com http://Support.CompeGPS.com 10
Note: TwoNav will attempt to fix your current position, but if you are
somewhere without GPS coverage (for example: inside a building), GPS
status will turn into ‘Connected (without position)’.
Battery level: Check the current battery level for TwoNav application.
Screen brightness level: Set the general brightness level for the screen.
Audio level: Set the general audio and the volume of each audible
element individually.
2.5 Recharging
Your GPS device may operate around a maximum of:
TwoNav Aventura: 20 consecutive hours with no need of recharging.
Device’s screen uses an important amount of energy resources, so it is
recommended to turn it off while not using it. By doing this simple action, the
battery life will be longer. Moreover, remember that the screen of the device will
be turned off after inactivity.
Battery life can be increased by reducing the level of screen backlight or by
turning the screen off when not in use (configuring the automatic shutdown
screen function or by activating the standby mode with a long press on ‘Hold’ key
and selecting ‘Block’).
Configure more options at ‘Main menu > Settings > Autonomy’
Additionally, you can also recharge the li-ion battery of the GPS device using
several power sources:
Computer: When connecting the device to a computer, besides allowing
you to manage the data present in the memory, the battery is also
charged.
Wall charger: Charge the battery using a wall power point.
Car charger: Allows you to charge the battery during ‘On-Road’
navigations.
AA battery: Replaces the li-ion battery for 3 AA piles, increasing the
power of your device in case of emergency.

http://www.CompeGPS.com http://Support.CompeGPS.com 11
You can operate the device normally while connected to the power source,
except if it is connected to a computer. Then the device will only operate as a
massive storage unit.
Important: Avoid vibrations on device while USB port is connected. It may
deform USB port, being reparation out of warranty.
CompeGPS offers you a wide range of accessories in order to improve the
battery life of your device, get to know more about these accessories at
http://www.CompeGPS.com
2.6 Reset
It is recommended not to force the shutdown of the device unless it is necessary:
Force the device to switch off: Press the ‘Reset’ button.
2.7 Updating the firmware
TwoNav software is continually being improved in order to add new functionalities
and polish errors. Your device has several software levels:
Eboot/Iboot: Starting component which runs the operating system.
Operating system: Executed under TwoNav and controling the more
basic operations of the device.
TwoNav: Executed over the operating system and interacting with you.
Normally, software updates are for TwoNav, but eboot/iboot and operating
system can also have updates. Visit regularly www.CompeGPS.com in order to
be informed about the latest version for your device and to get to know the steps
to follow to update it.
2.8 Connection to computer
When TwoNav device is connected to computer by means of the USB wire, the
TwoNav application is closed and the device becomes a storage unit. New
storage units will then be shown on your computer:
GPS disk: Inner memory of the device.
Removable disk: Depending on the GPS device, a microSD or SD card
may be inserted.

http://www.CompeGPS.com http://Support.CompeGPS.com 12
This way you will be able to transfer data from your computer to the GPS device
and vice versa. Please note that the folders to save/take data in the GPS in the
memory card are:
Default folder for maps: ‘TwoNavData/Maps’
Default folder for your recorded tracks: ‘TwoNavData/Data/Tracklog’
Default folder for tracks/waypoints/routes: ‘TwoNavData/Data’
Important: While connected to computer, TwoNav cannot be operated. If the
device is connected to another external source (car or wall charger) you will be
able to do it.
Note: You can also transfer elements from Land/Air software (Windows/Mac
platforms), more information at http://www.CompeGPS.com
3 OPERATION
3.1 Map window
3.1.1 Explore the map
Move map: In order to explore the surroundings, drag the map by
interacting with the interface.
Zoom map: Use the ‘Zoom’ buttons to adjust the zoom level. You can also
adjust the zoom level using the keys of your device.
Recenter map: Press the ‘Recenter’ button when you wish return to your
current position.
Note: Although the management of elements is centralized at ‘Main menu >
Data’, it is also possible to carry out many other actions directly from the map
window or using the contextual menu (check the chapter ‘Contextual menu’).
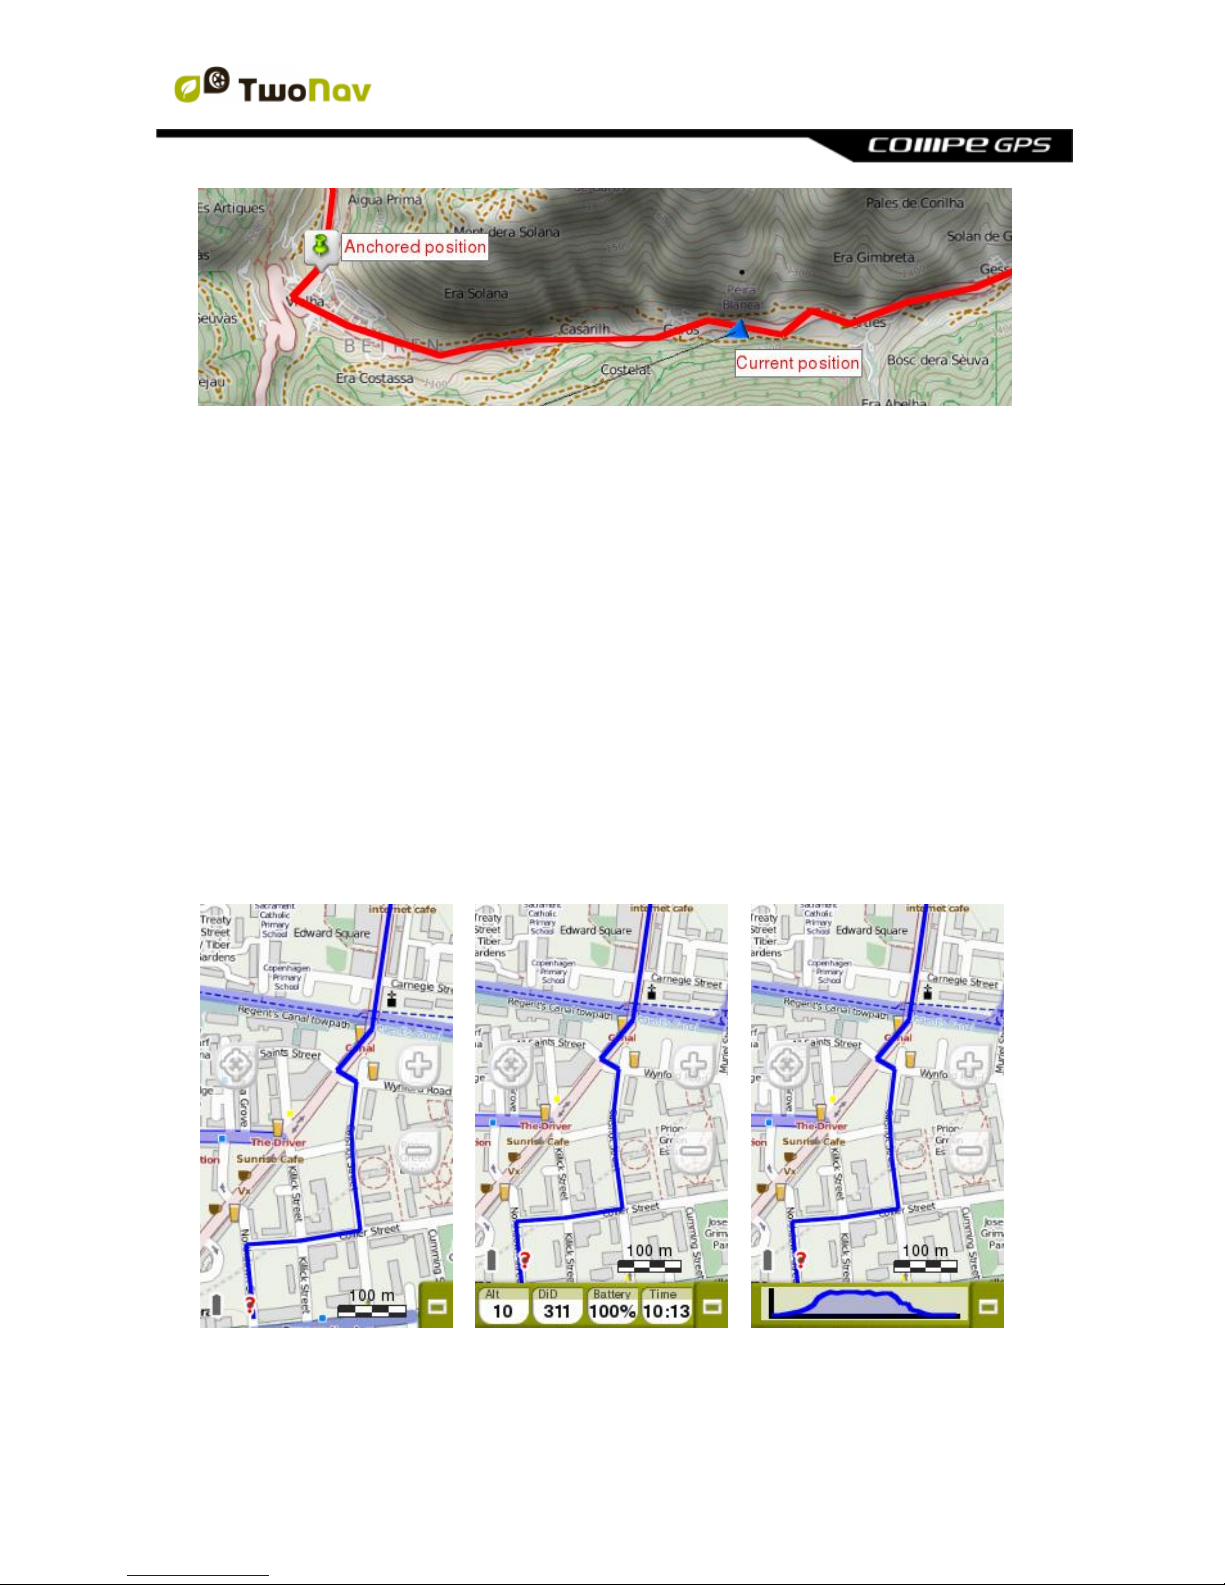
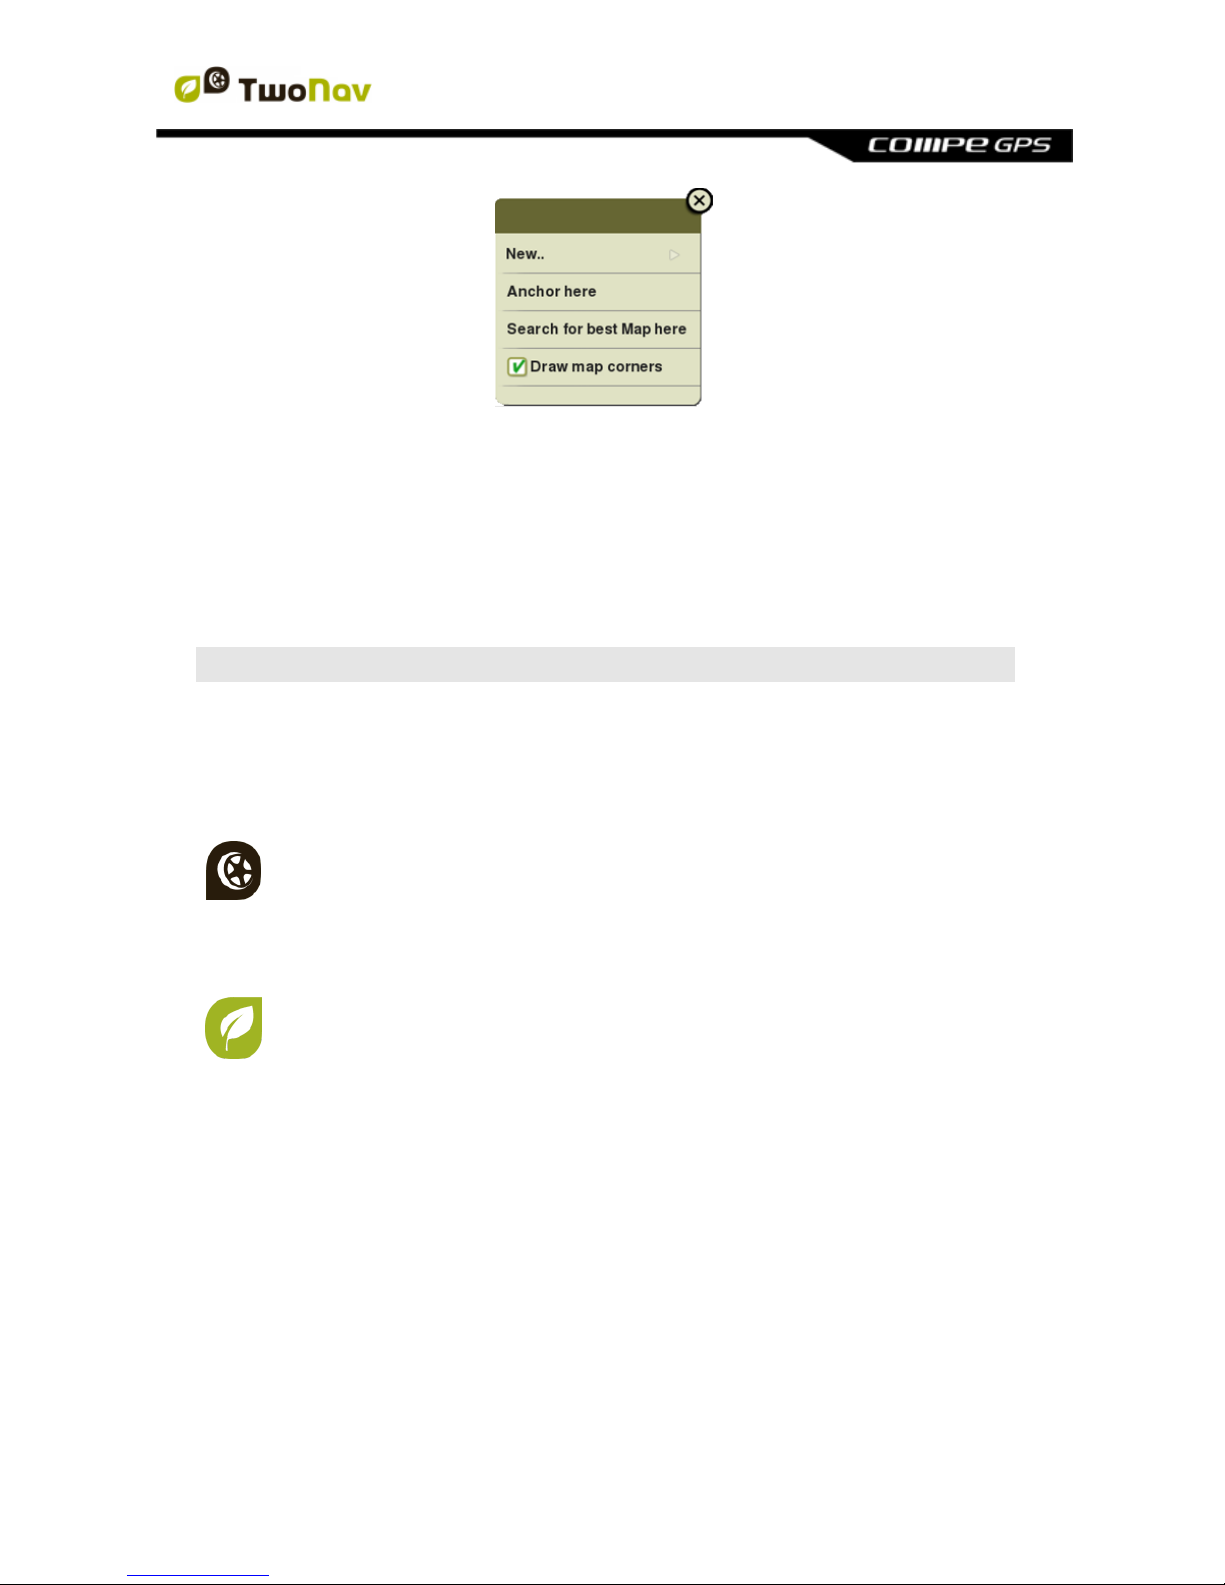
3.1.1.1 Anchor
To anchor a virtual position somewhere is to virtually replace your current
position for a new position in the map.
Once fixed, information displayed on proximity fields and ‘Hint’ function will be
based according to the new anchored position, and not on your real position.
Moreover, if 'Anchor here' is pinned, options such as 'Recenter' map will be
applied to the anchored waypoint instead of your current position.
http://www.CompeGPS.com http://Support.CompeGPS.com 13
In order to anchor a position reproduce any of these options:
'Map window > Contextual menu > Anchor here'
'Main menu > Data > Item > Contextual menu of waypoint > Anchor here'
In order to unpin the fixation and restore the current position as the default one,
press: ‘Contextual menu on the map > Unanchor’.
3.1.2 Data mode
3.1.2.1 Basic functions
By default, data bar shows a few relevant data fields. Additionally, when
navigating a route/track, it has an extra state which shows altitude profile.
Press the button at the right side to switch between different status:
Hidden data bar
>>>> Fields bar
>>>> Graph bar

http://www.CompeGPS.com http://Support.CompeGPS.com 14
The data fields contained in the data bar can be configured from ‘Main menu >
Settings > Fields & Buttons > Data fields’. You can also change a concrete data
field by opening the contextual menu on it.
Note: Access to the main menu directly by clicking on the data bar.
3.1.2.2 Additional functions
Additional functions on map window can be configured from ‘Main menu >
Settings > Fields & Buttons > Map page’.
Infocurrent: Information related to present position.
Default:
‘Off-Road’ mode: Compass
‘On-Road’ mode: Current street
Inside waypoint radius: Waypoint name (if waypoint has
associated files, click the clip icon to reproduce them).
Nextevent: Information related to the next position (direction and
distance). GOTO arrow shows direction of the following section of the
track. This parameter is the distance to calculate tangent to give direction.
Take the direction of this arrow as a reference to keep going your way.
Infonext: Information related to next events (not shown if no destination is
selected).
‘Off-Road’ mode: Name of the next waypoint (if waypoint has
description, it will be shown after the name).
‘On-Road’ mode: Next street (Some roads have information about
signposts. If this information is available ‘Infonext’ will show a
reproduction of the real signpost).
http://www.CompeGPS.com http://Support.CompeGPS.com 15
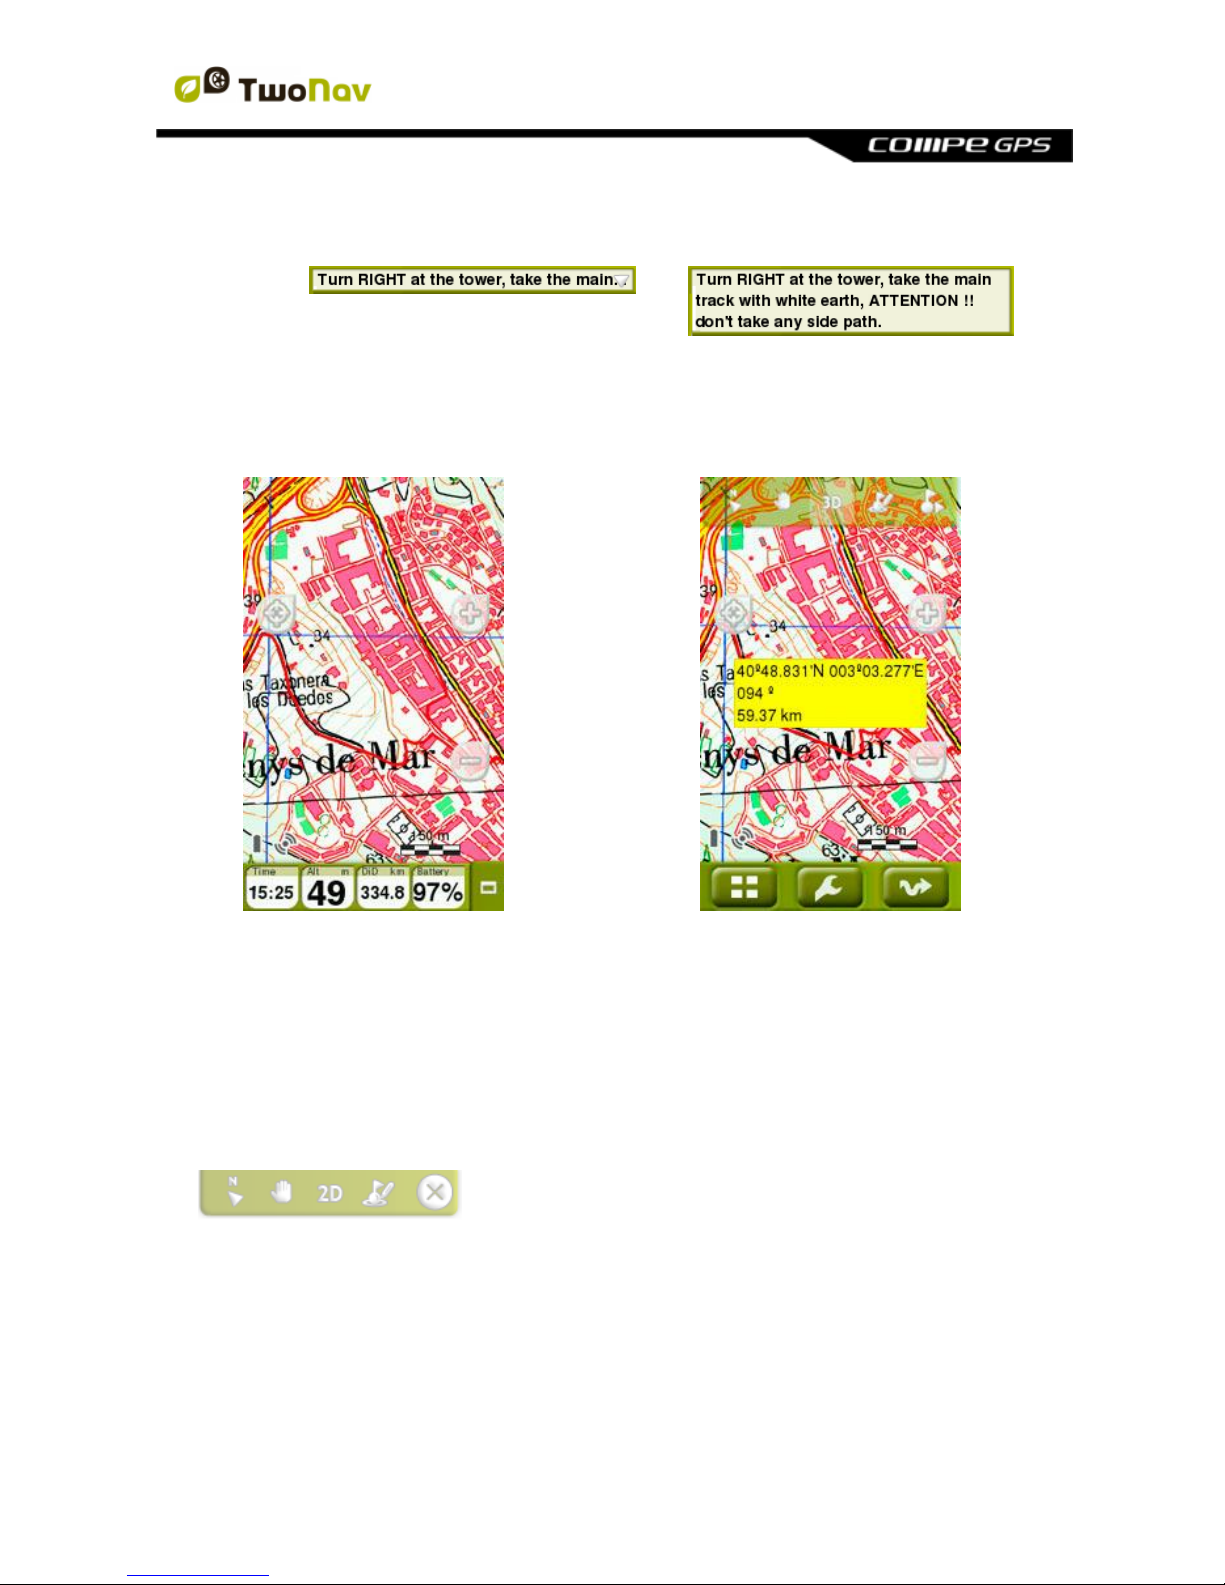
‘Infonext’ can be displayed in several states:
1. One line
3. Text viewer (fully displayed)
2. Extended
3.1.3 Tool mode
In order to access to the ‘Tool’ mode, do a short tap on any place of the map.
‘Data’ mode
<< >> ‘Tool’ mode + ‘Hint’ function
3.1.3.1 Tool bar
Allows a quick access to some functions (its content can be configured from
‘Main menu > Settings > Fields & Buttons > Tool bar’):
3.1.3.1.1 Basic functions
Mark and edit waypoint: Create a waypoint at current position and
access to its properties to modify them.
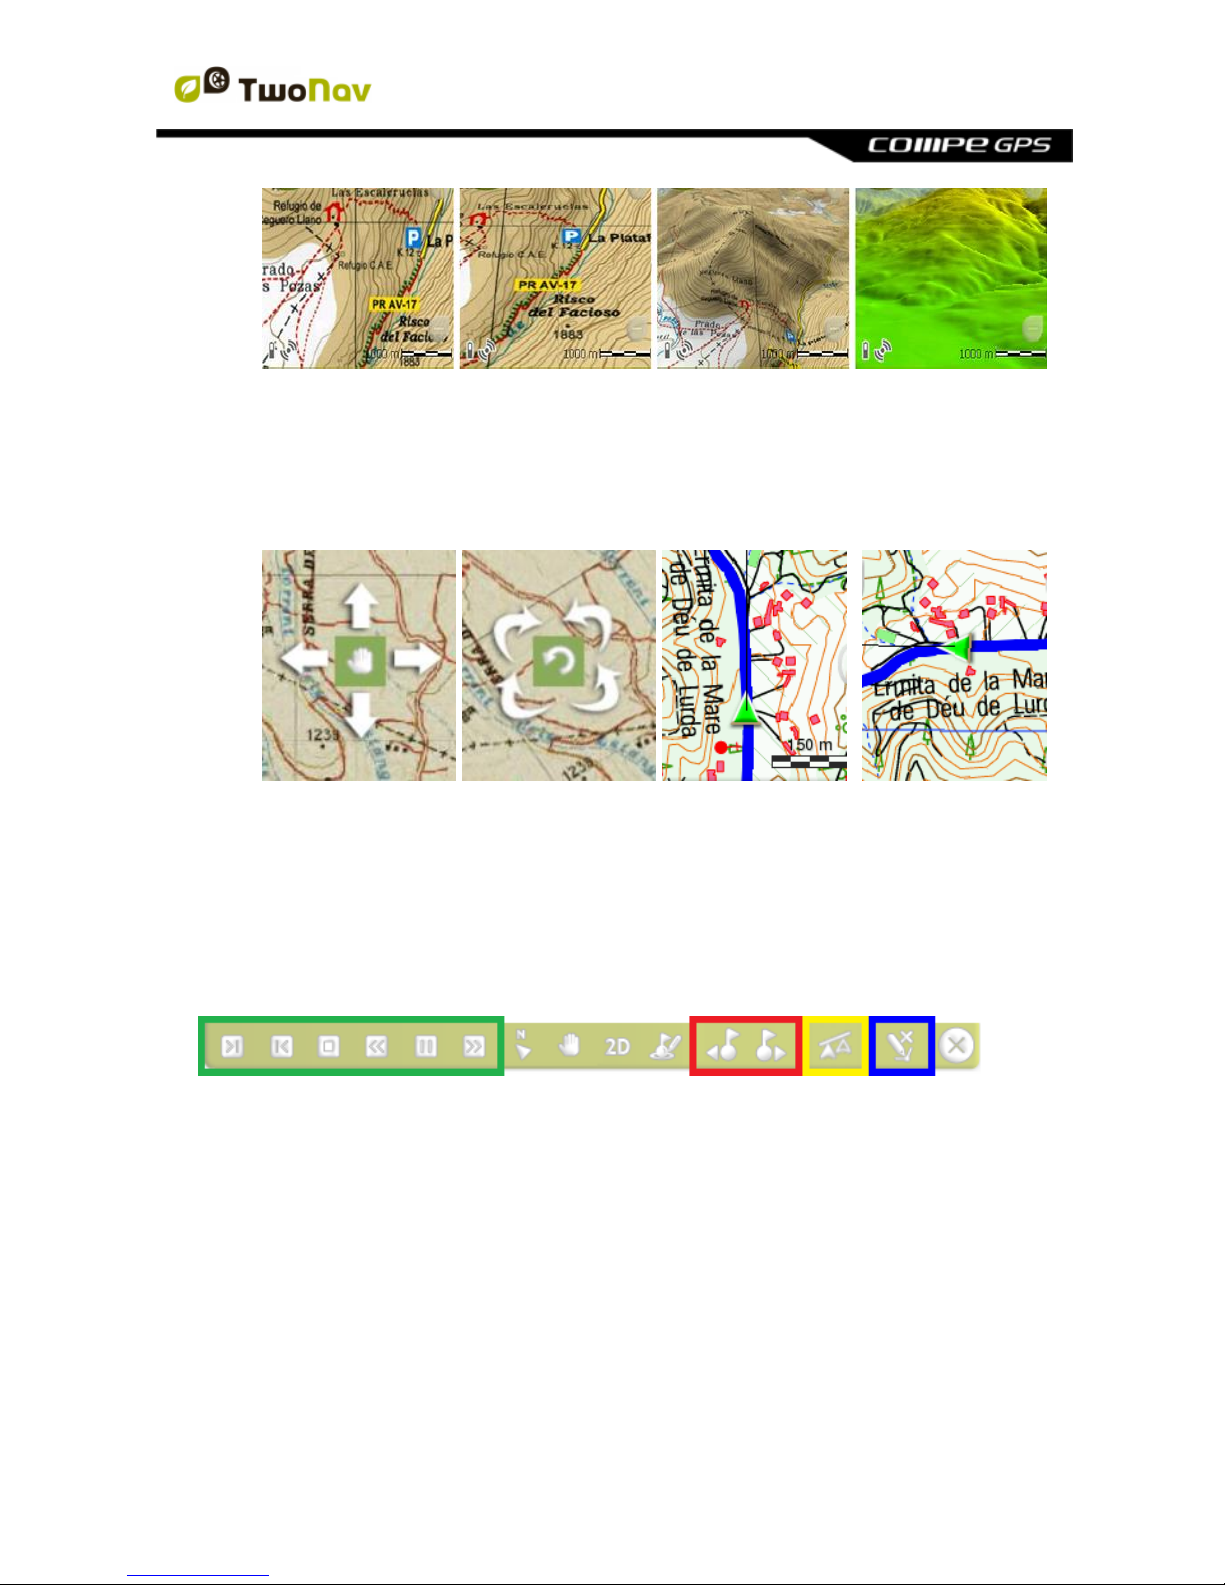
2D/3D/3D+: Switch between different map perspectives: ‘2D > 3D > 3D+’.
http://www.CompeGPS.com http://Support.CompeGPS.com 16
2D
>>>>
3D flat
>>>>
3D+
>>>>
3D+ only relief
Move map (Panning/Rotate): Move the map without changing its
orientation or change the orientation of the map in a clock-wise, anti clockwise sense or up/down.
Orient map (North up/Track up): The map may be fixed on the north or
rotate according to your movements.
Note: You can also include and remove the functions of the tool bar according to
your needs from ‘Main menu > Settings > Fields & Buttons > Tool bar’.
3.1.3.1.2 Additional functions
Extra buttons are automatically added to tool bar in specific situations:
Simulating mode: ‘Pause’, ‘Stop’ and several functions to manage the
speed of the simulation.
Navigating mode: ‘Next waypoint’ and ‘Previous waypoint’ to jump to next
waypoint or go back to the previous one.
Competing against the ‘Virtual Coach’: ‘Synchronize Virtual Coach’ to
automatically place the ‘Virtual Coach’ at your current position (only if
‘Virtual Coach’ function is enabled).
http://www.CompeGPS.com http://Support.CompeGPS.com 17
Editing mode: When the edition of tracks/routes is finished, press ‘Close
edition’ to close the editing mode.
3.1.3.2 Bottom bar
Allows a quick access to some functions:
Main menu
Page tools
Start/Pause
Note: Do a short tap again on the map to show ‘Hint’ information. ‘Tool’ mode
and ‘Hint’ will be automatically hidden after 3 seconds.
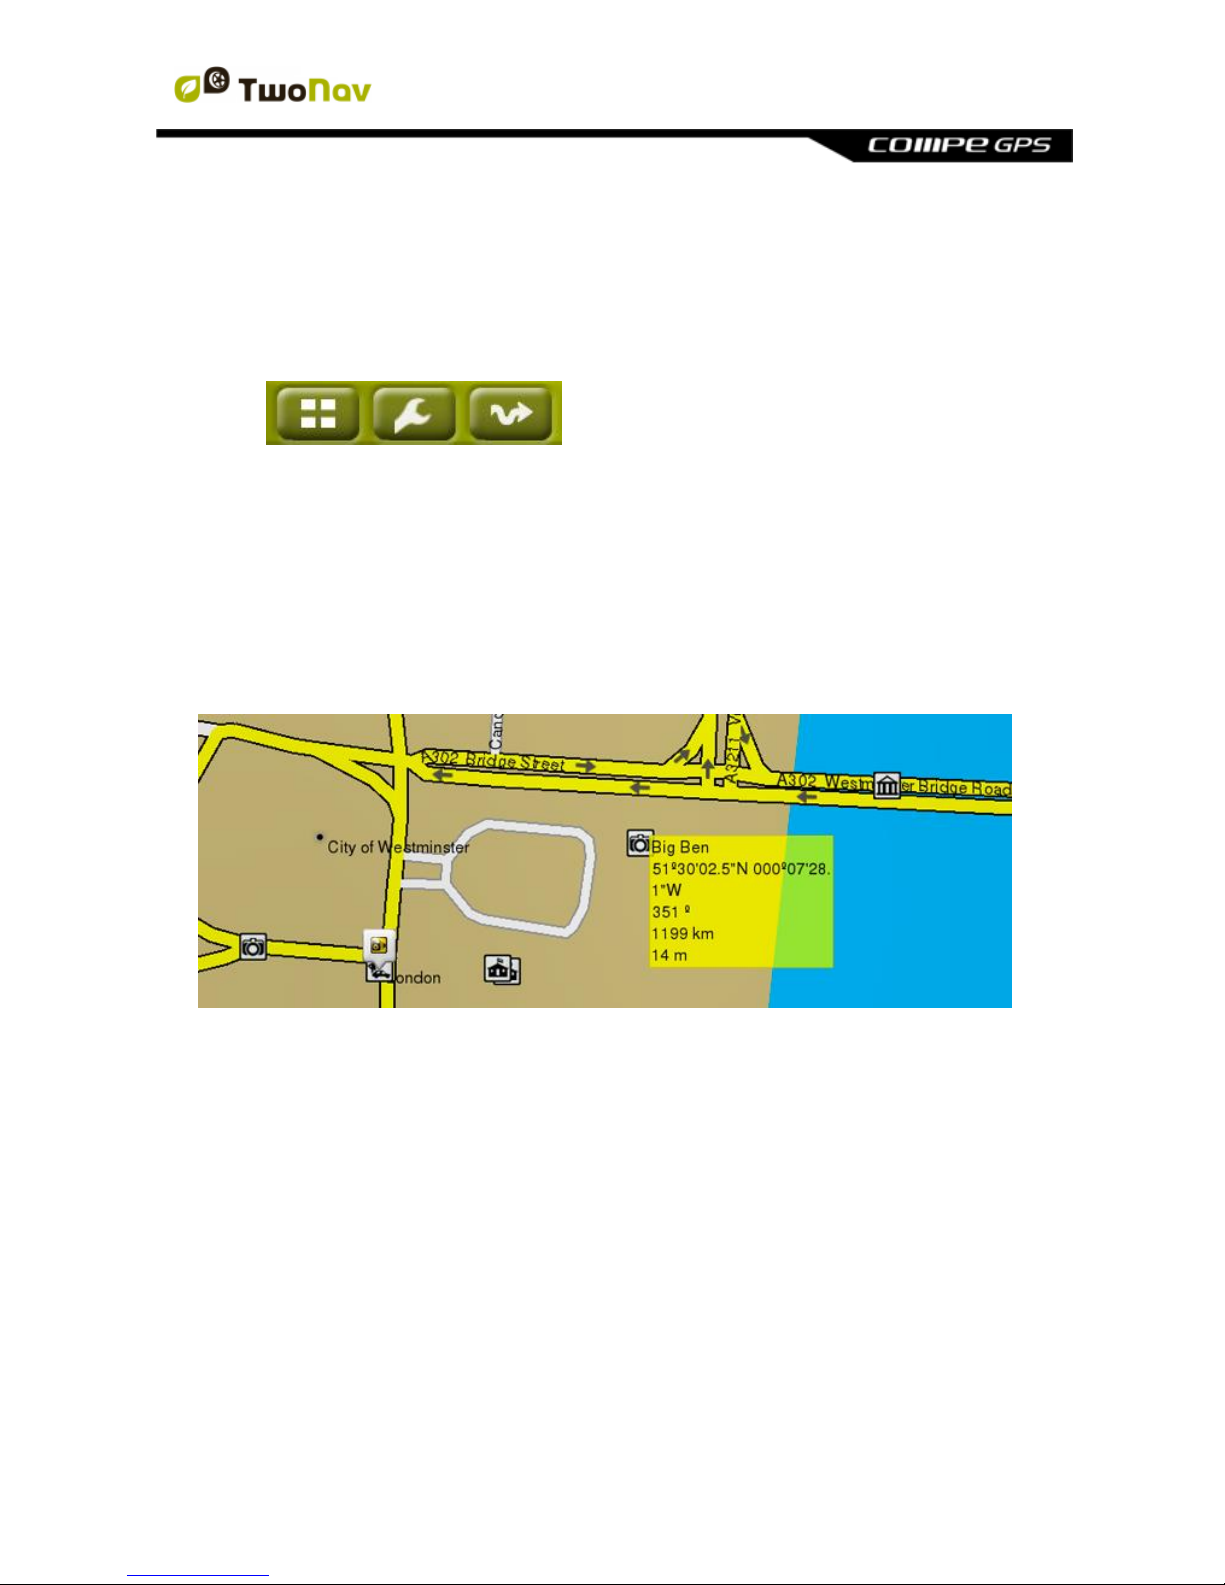
3.1.3.3 Hint
If ‘Hint’ function is enabled (‘Main menu > Settings > Display > Hint’), when
clicking any point on the map window, TwoNav will show useful information of the
specific point that you selected.
This function can be fully customized according to your will: add or exclude the
data fields that later on will be displayed on the map window: map information,
coordinates of this position, bearing to this position, distance to this position,
altitude of this position...
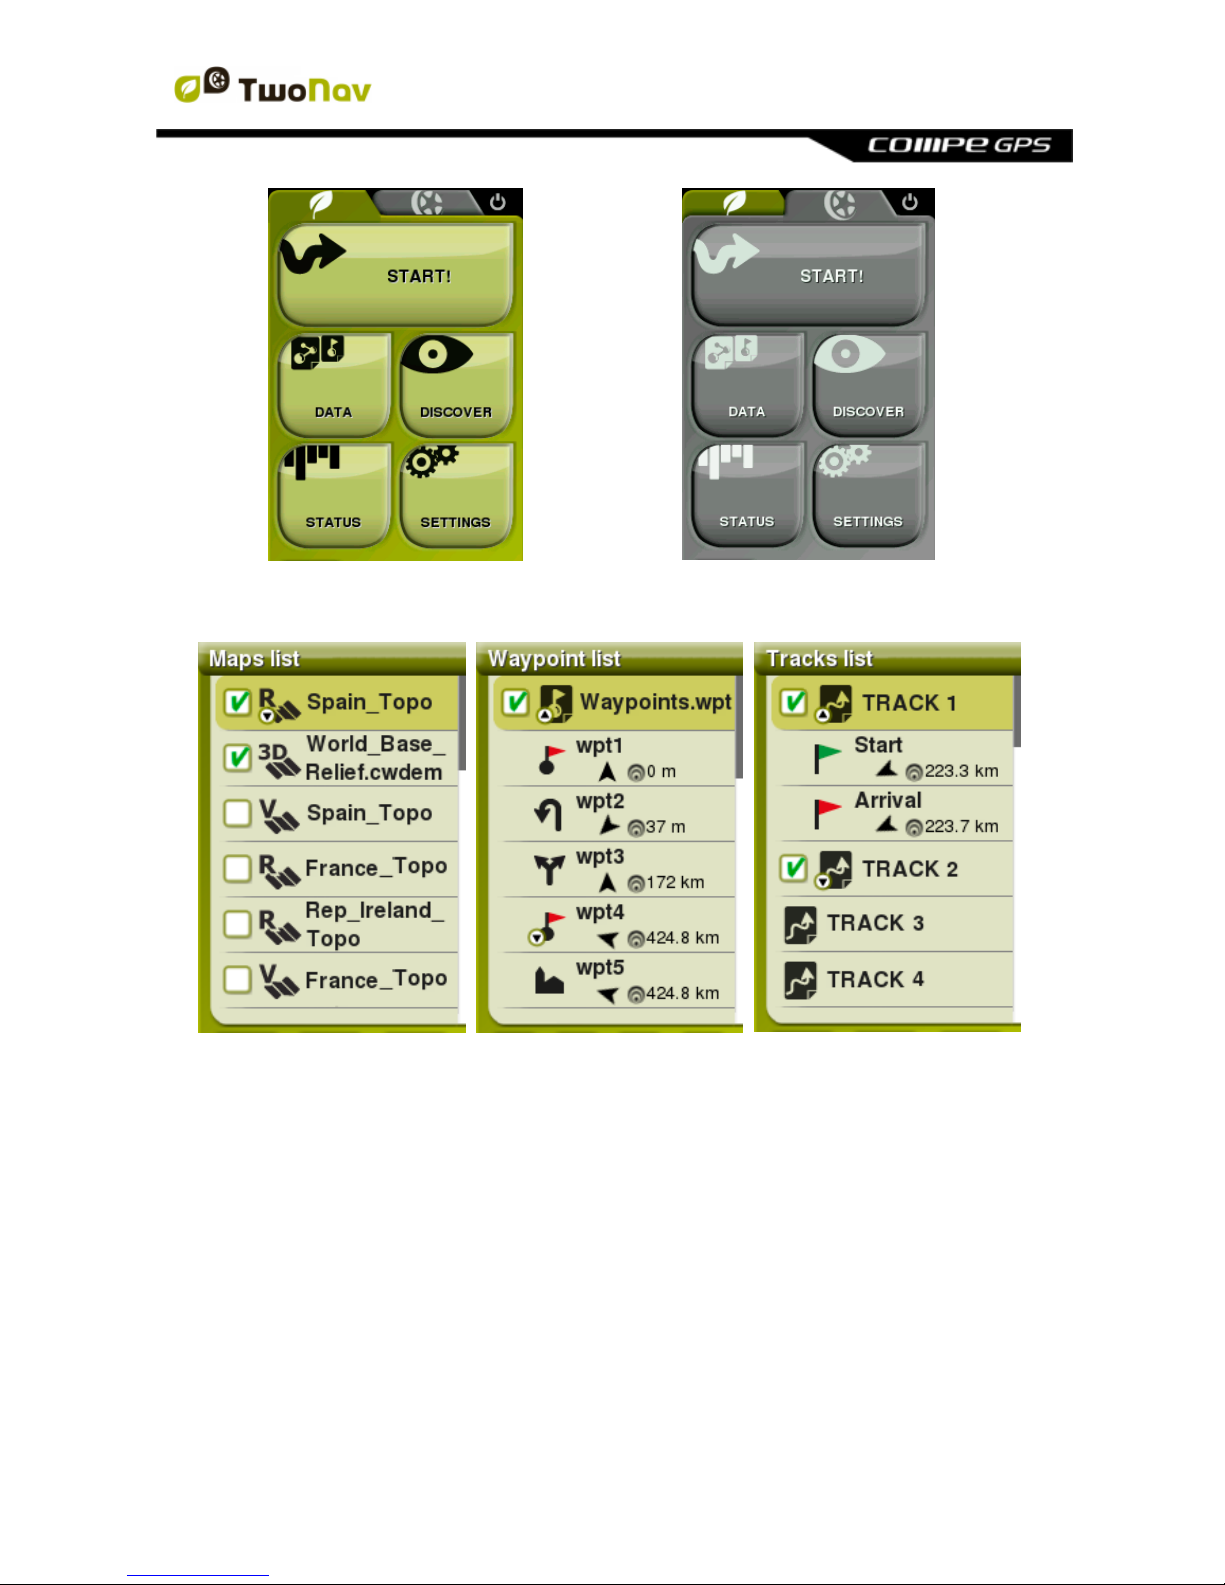
3.2 Main menu
From the main menu, you can manage most of the system’s functions by
accessing the different sections. Press on menu elements in order to activate
them or access their sub-menus.
http://www.CompeGPS.com http://Support.CompeGPS.com 18
3.3 Data lists
List of maps
List of waypoints
List of tracks
At ‘Main menu > Data’, you will be able to manage the available files on your
device. Files to be taken into consideration on these lists are the files saved at:
Default folder for maps: ‘TwoNavData/Maps’
Default folder for your recorded tracks: ‘TwoNavData/Data/Tracklog’
Default folder for tracks/waypoints/routes: ‘TwoNavData/Data’
Although the management of elements is centralized at ‘Main menu > Data’, is
also possible to carry out many other actions directly from the map window or
using the contextual menu.
http://www.CompeGPS.com http://Support.CompeGPS.com 19
Note: You can also transfer elements from Land/Air software (Windows/Mac
platforms), more information at http://www.CompeGPS.com
3.3.1 Shifting over lists
A scroll system has been developed in order to facilitate the shifting through
these lists, which allows for the movement around the different options by
dragging the finger upwards or downwards.
Short shift: The last displayed element will become the first on the list.
Long shift: The list will keep scrolling down and it will stop at the end or
by pressing on it.
If you want to move along the lists in a more accurate way, you may use the side
arrows to achieve a more controlled movement.
Note: You can also use the keys of your device to move along menu lists.
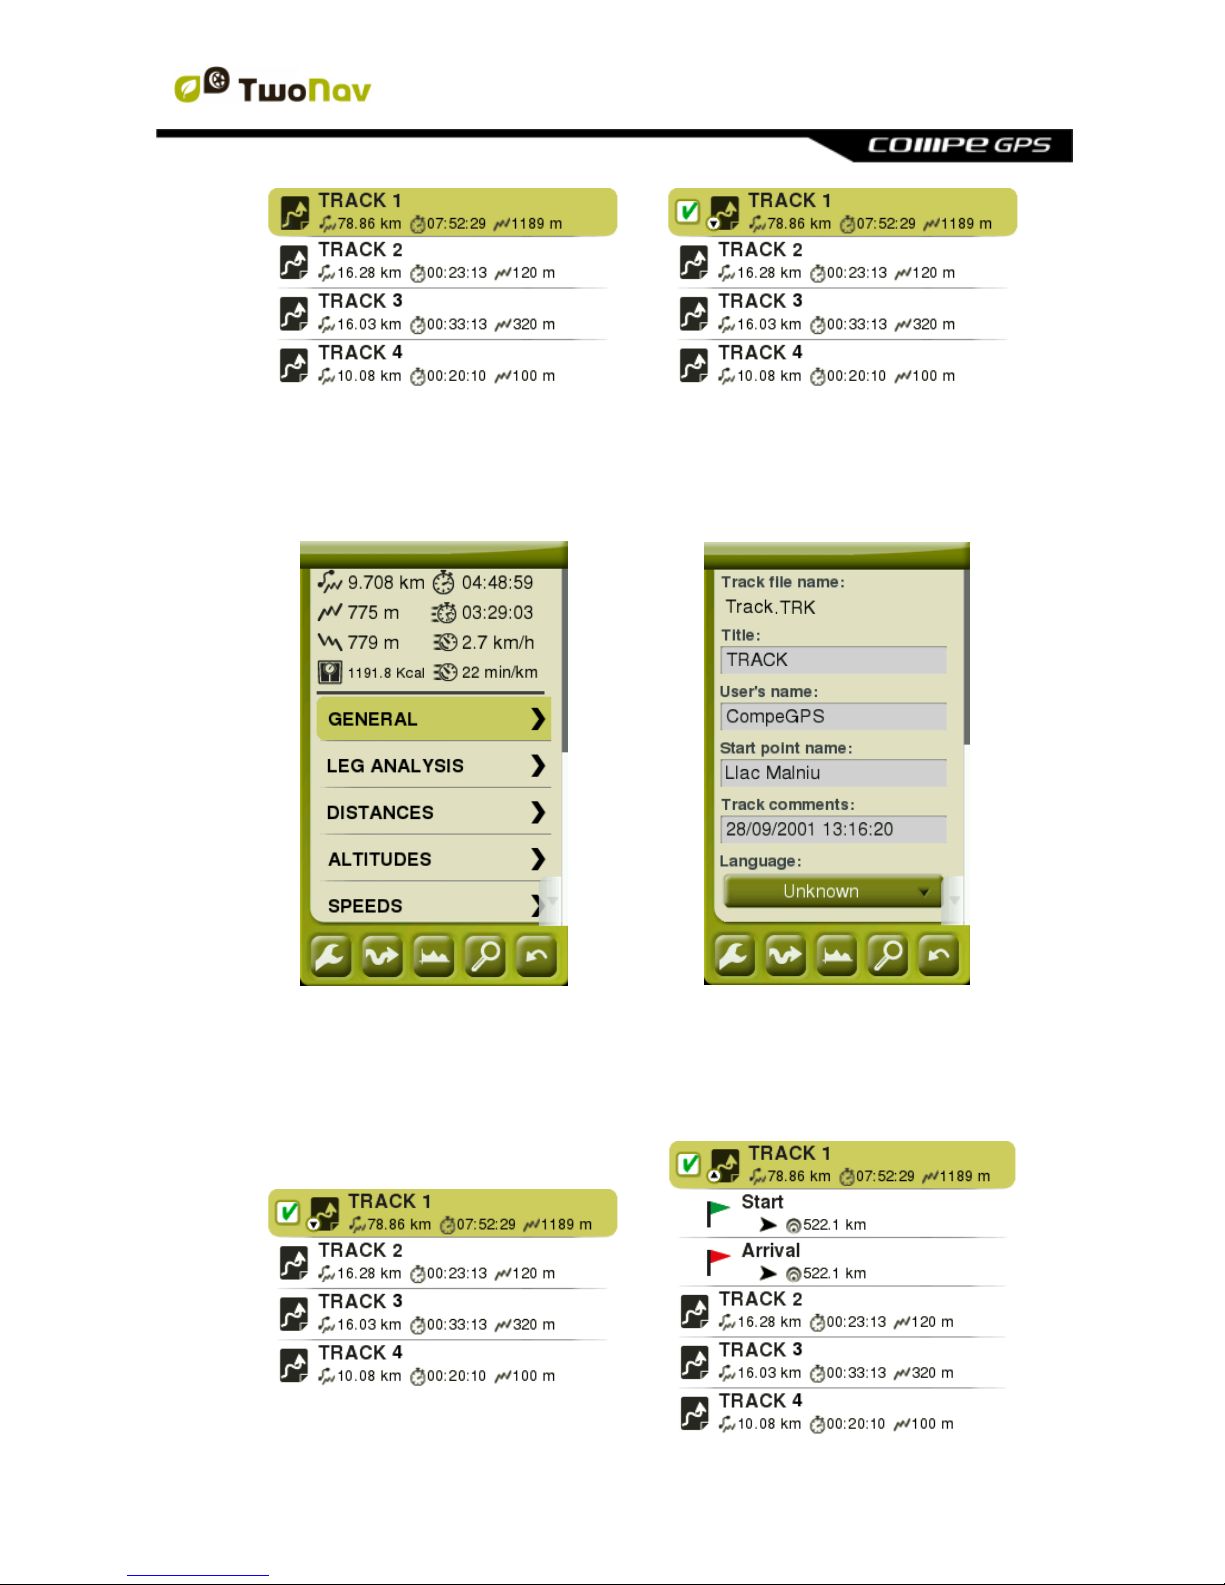
3.3.2 Management of elements
1. General view: Opened elements are placed at the top of the list with a
ticked square.
2. Open element: Press the name of the element.
http://www.CompeGPS.com http://Support.CompeGPS.com 20
>
>
>
>
>
>
>
>
3. Check the properties: Press the name of the opened element. At
properties window, you can check all the information related to the
element and carry out several actions (available information will depend
on selected element).
>
>
>
>
>
>
>
>
>
>
>
>
>
>
>
>
>
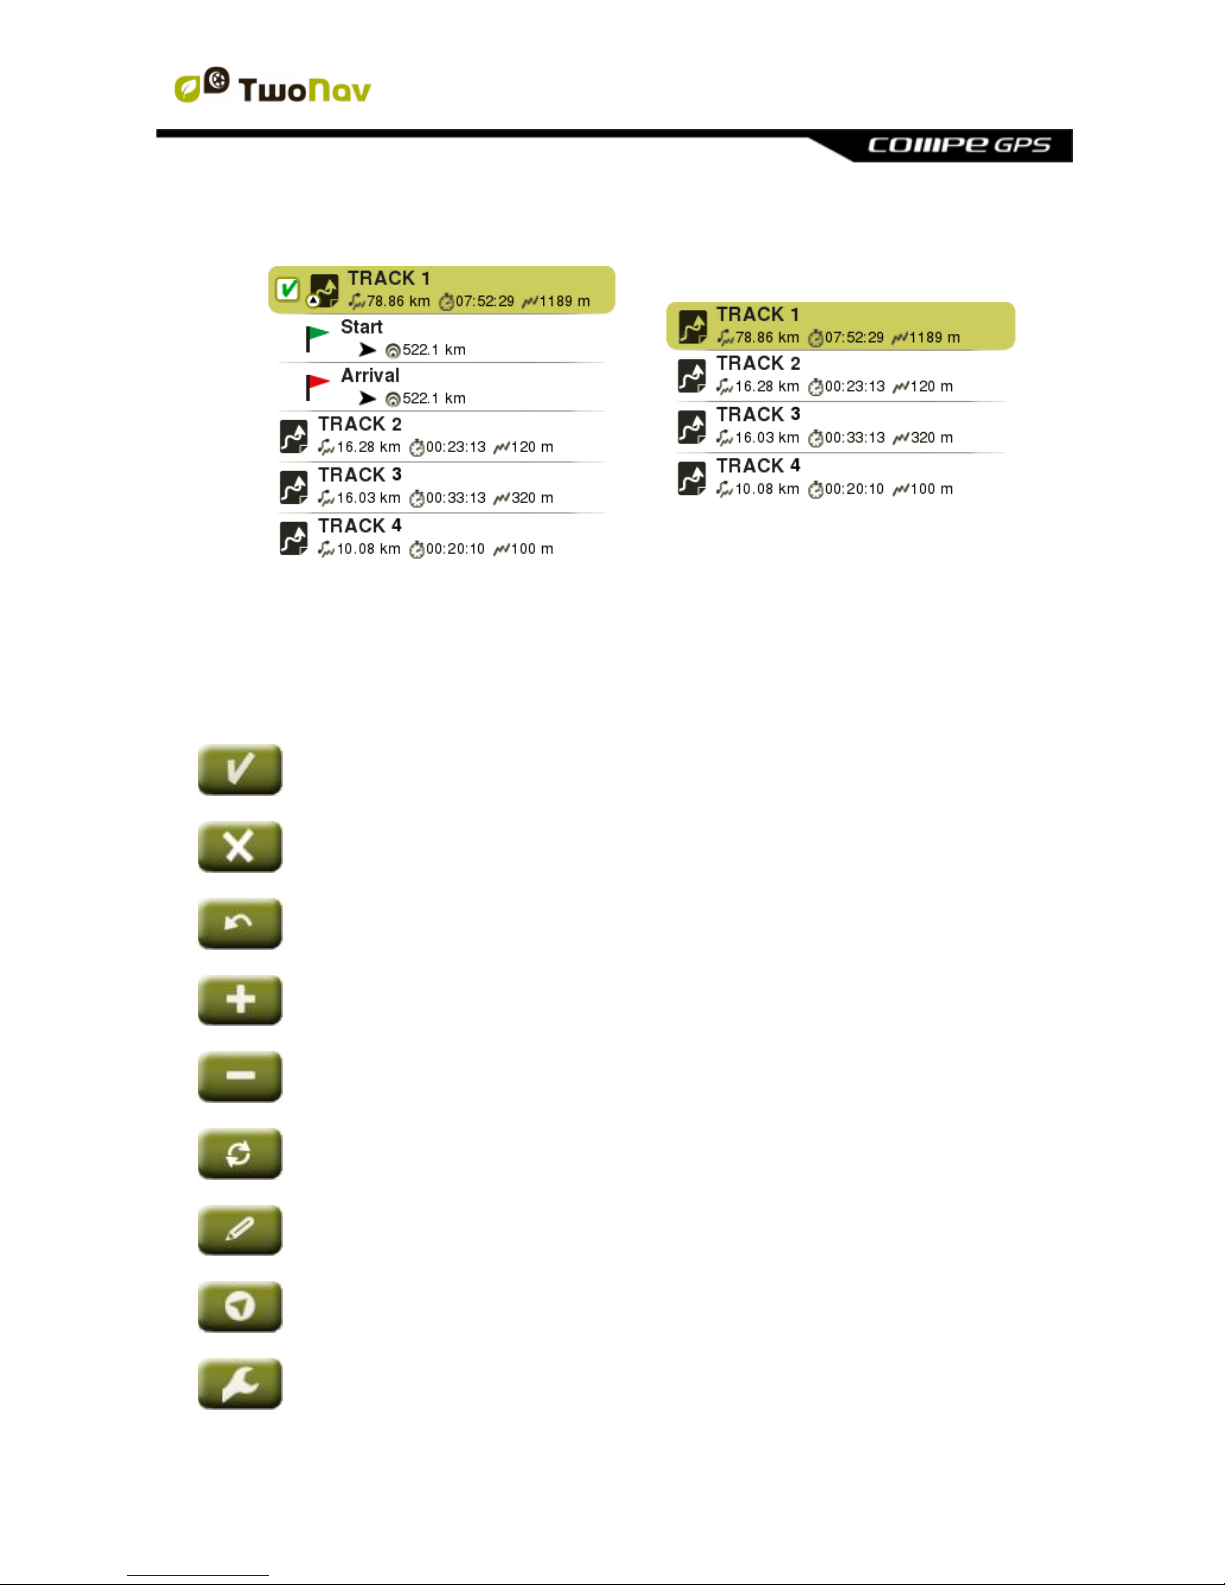
4. Display subelements: Some elements might have subelements (for
example: waypoints or roadbook points), in order to display them press the
icon of the opened element. In order to hide them, press again the icon of
the element.
>
>
>
>
>
>
>
>
>
>
>
http://www.CompeGPS.com http://Support.CompeGPS.com 21
5. Close element: Press the ticked square of the element.
>
>
>
>
>
>
>
>
>
>
>
3.3.3 Actions on elements
In data lists you are able to carry out several actions on elements using the
buttons at the bottom of the list, available functions will depend on selected
element:
‘Accept’
‘Cancel’
‘Go back’ to the previous window.
‘Add new item’ in a list of items.
‘Delete item’ in a list of items.
‘Refresh’, refreshes a list of items.
‘Rename item’ from a list of items.
‘Map window’, main application window.
‘Page tools’ allows you to open specific configuration tools of the
section where you are working in at the moment.
http://www.CompeGPS.com http://Support.CompeGPS.com 22
‘Navigate element’ shows a trip preview allowing to configure your
personal alarms before starting the navigation.
‘Zoom to it’ shows that element on map (preview window) allowing
you to zoom to it directly.
Only for maps: ‘Full list of maps’, TwoNav lists all available maps.
If not, it shows only the maps from your current area.
Only for waypoints: ‘Create new waypoint’
Only for routes: ‘Create new route’
‘Graph representation’ of the selected element.
‘Alarms’ configuration.
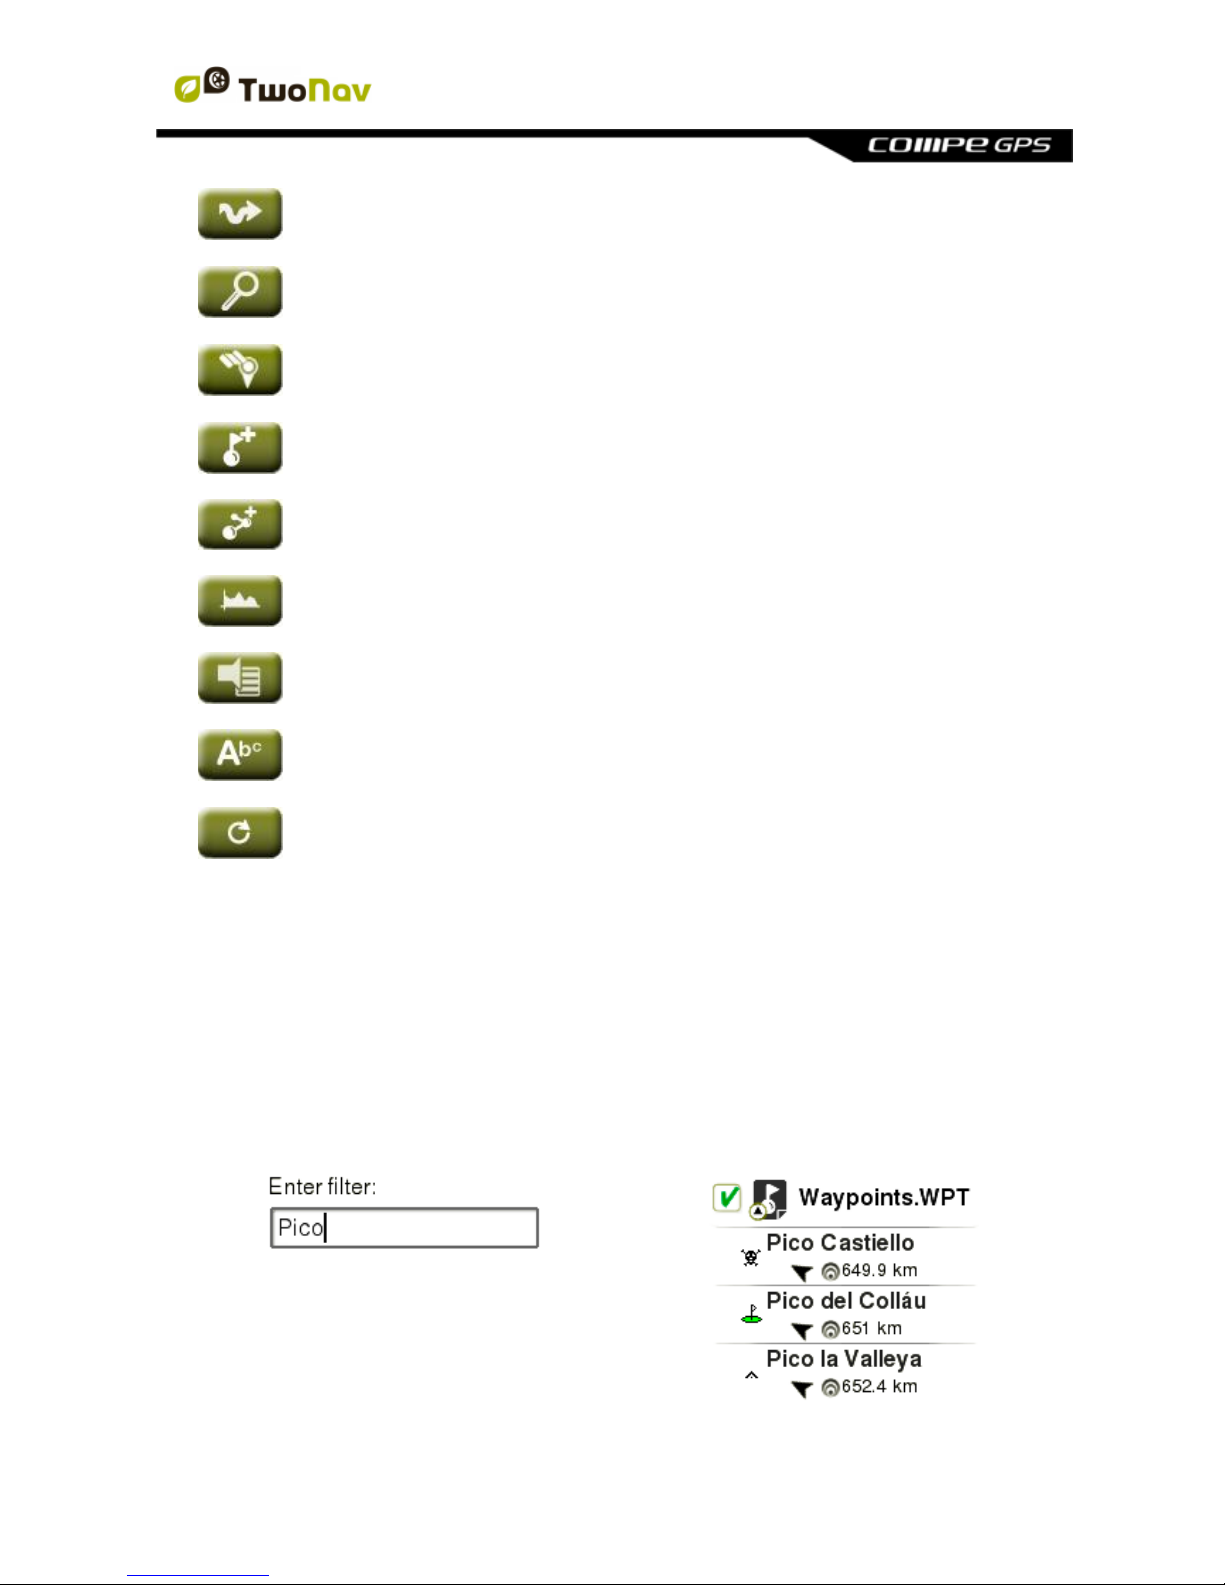
‘Name filter’, elements which do not contain the entered combination
of characters will be automatically hidden.
‘Default configuration’ returns to the default configuration.
Note: Remember that you can also open the contextual menu to use more
functions on specific elements.
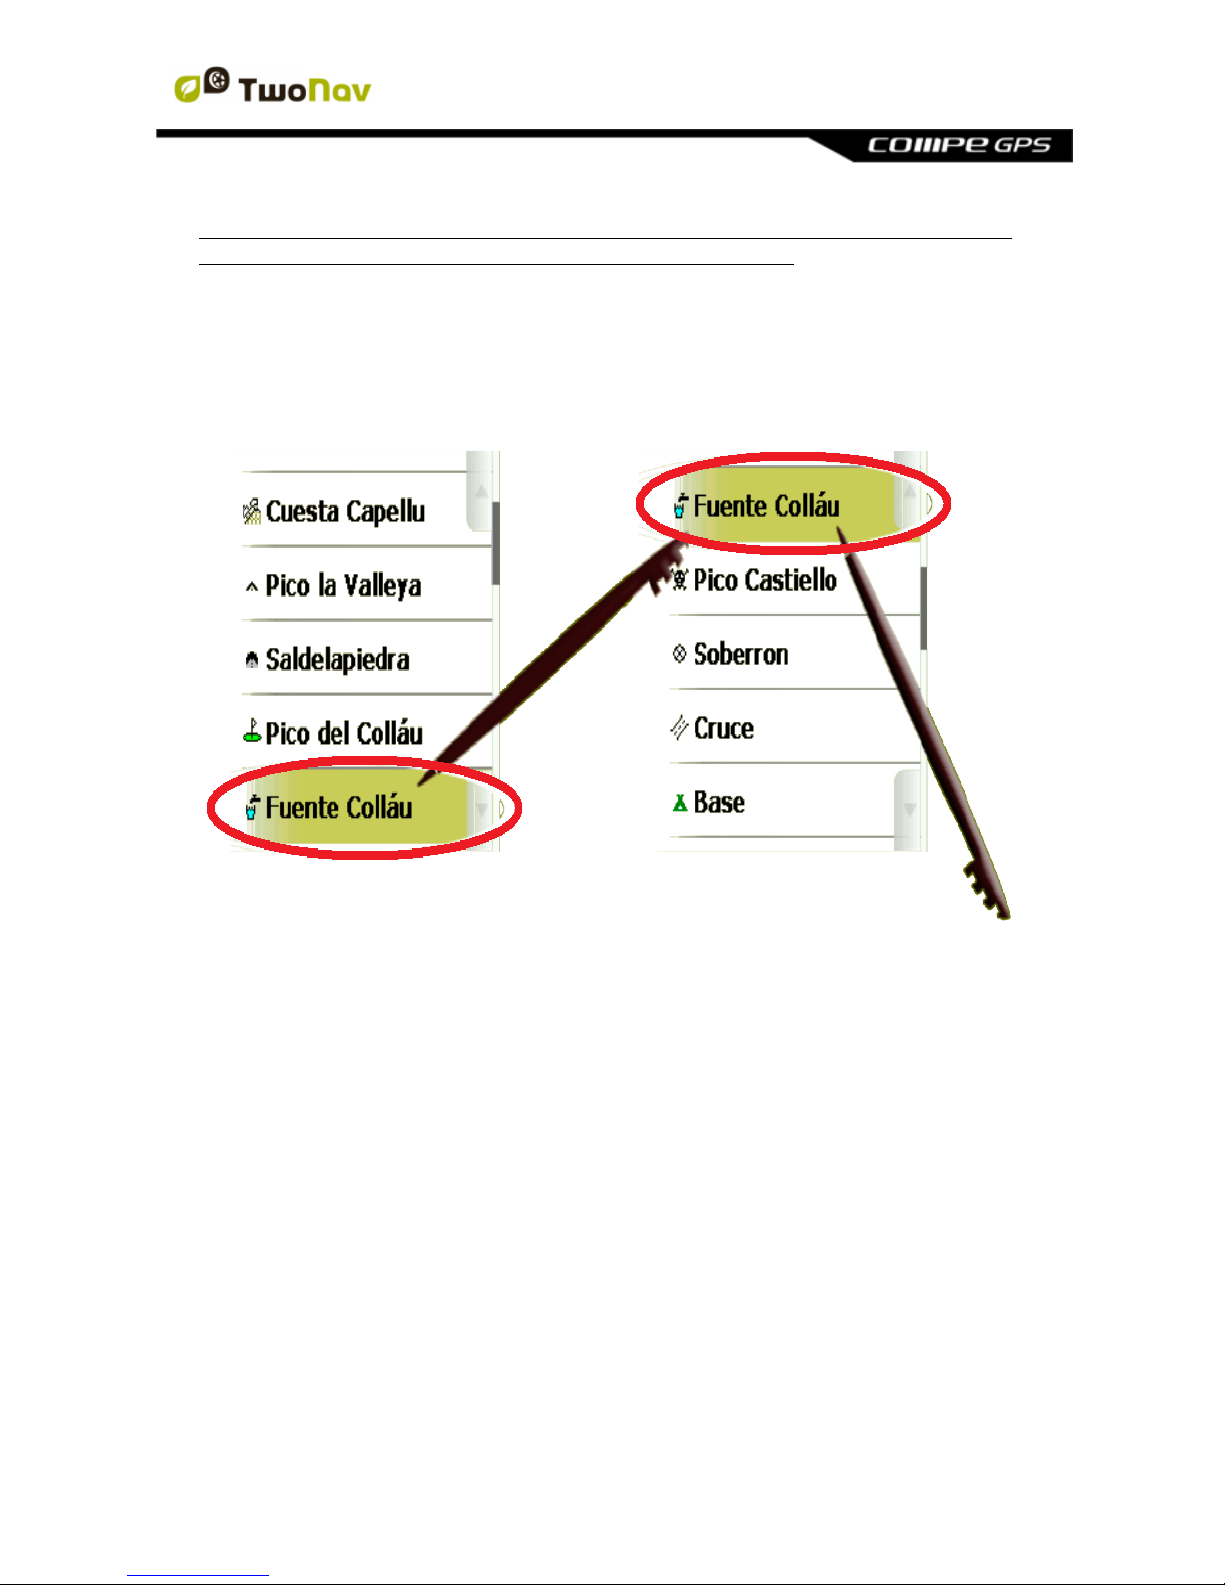
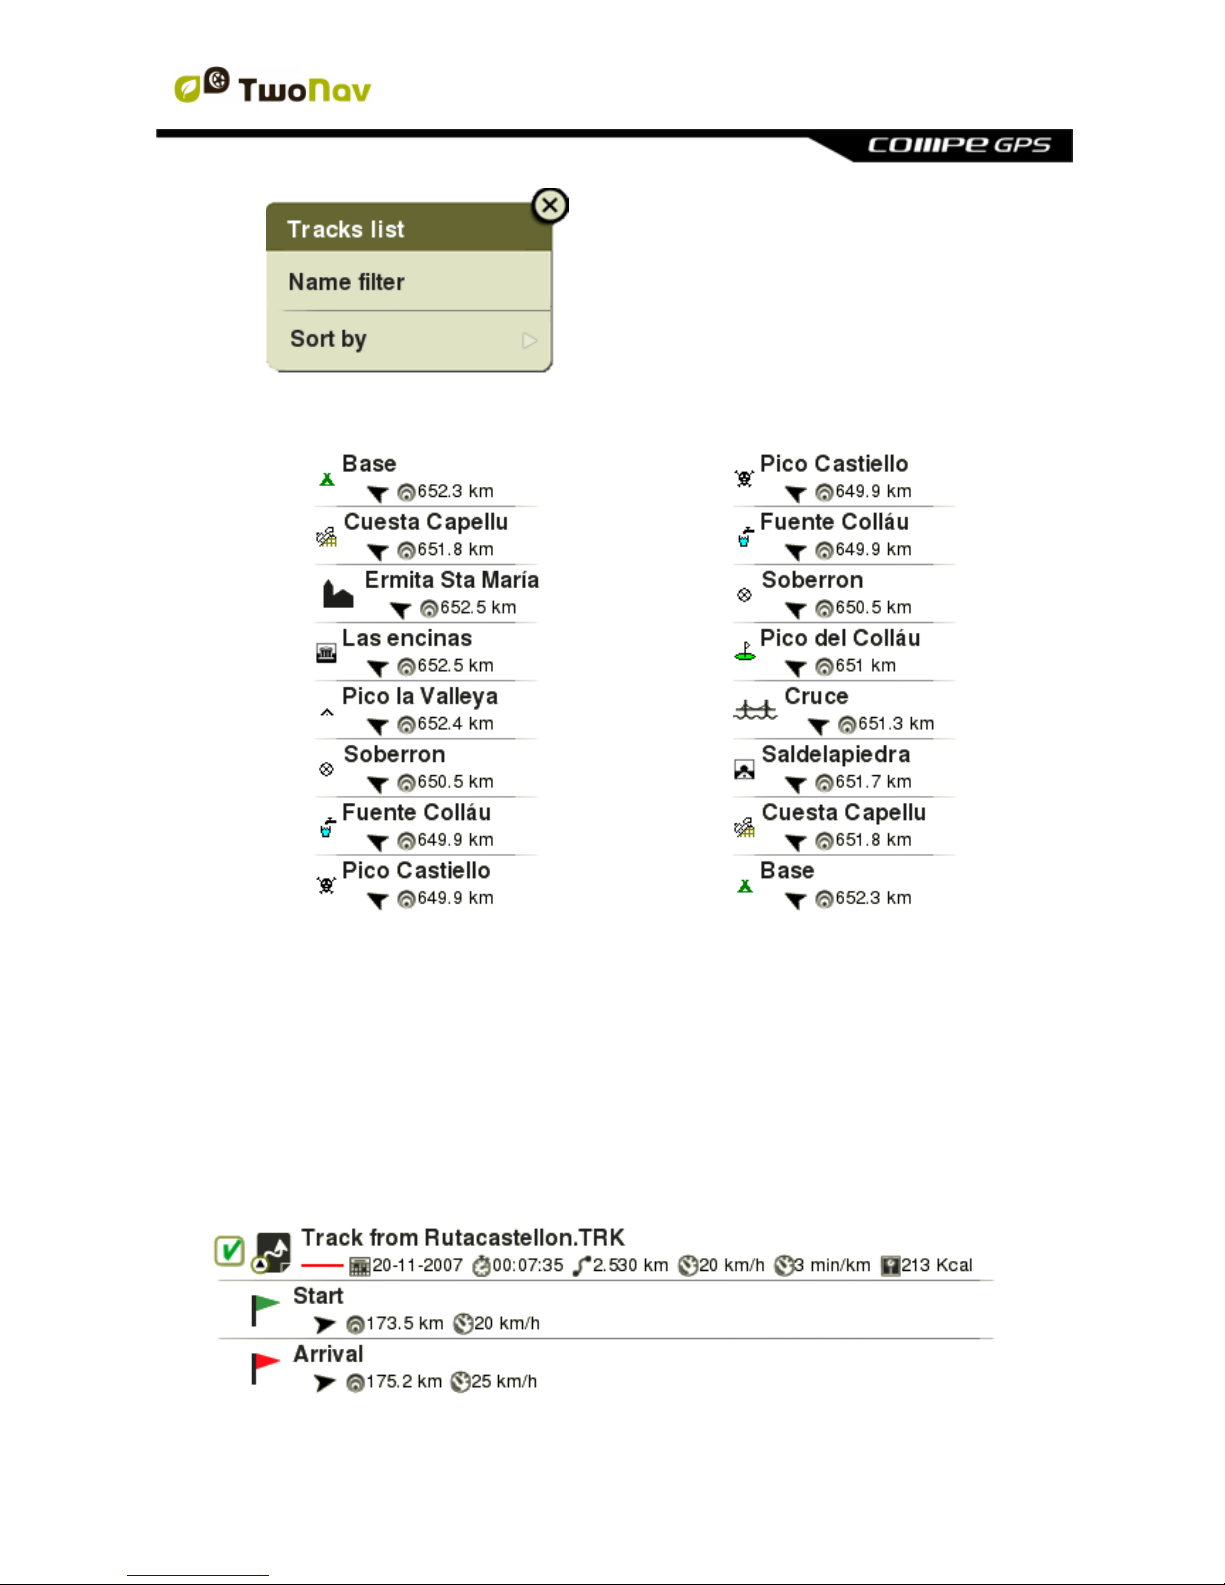
3.3.4 Order elements
Elements contained in any list can be ordered or filtered in different ways, press
‘Page tools’:
Name filter: Elements which do not contain the entered combination of
characters will be automatically hidden.
>>>>
http://www.CompeGPS.com http://Support.CompeGPS.com 23
Sort by: Set the rule to order the elements (by name, by proximity…).
Waypoints non sorted
original list of waypoints
>>>>
Waypoints sorted
by proximity
3.3.5 2nd line data
TwoNav allows you the possibility to display more information for listed
waypoints/tracks. Extra information will be presented in a 2nd line right after the
name of the item with information such as date, distance, height, relative bearing
arrow… Select the information that you want to display from ‘Page tools > 2nd
line data'.
http://www.CompeGPS.com http://Support.CompeGPS.com 24
Note: Information contained in the 2nd line is only available for elements which
have been saved using TwoNav 2.5 or Land/Air 7.3 software (or higher).
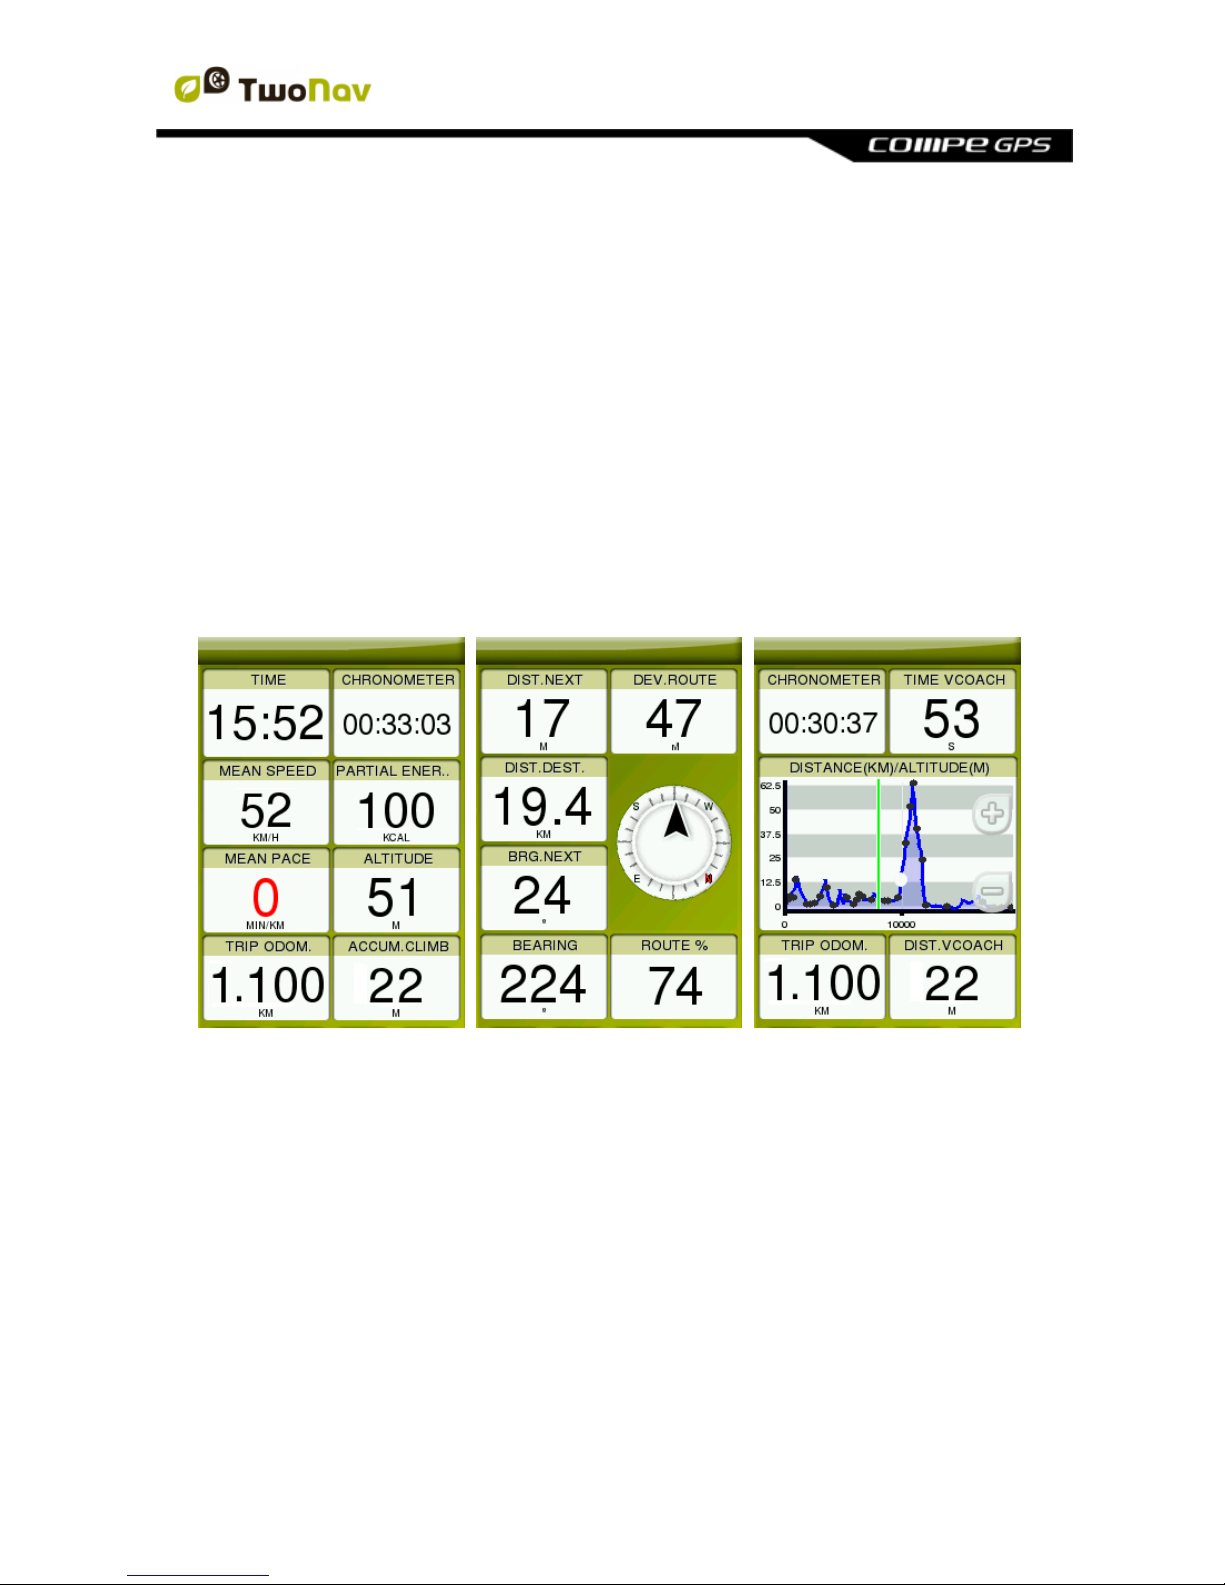
3.4 Data pages
During your navigation, TwoNav records many interesting data, this information
(data fields) is usually very interesting to analyse and compare (speed, height,
distances...). Open data pages from:
‘Main menu > Discover > Data page’
‘Page’ key
Data pages offer you an additional space to the data bar where a larger number
of data fields are displayed. When opening a contextual menu on a data field,
you will find the available functions associated to that field.
Data page
>>>>
Compass page
>>>>
Graph page
Data fields are configurable to have a different set for ‘On-Road’ or ‘Off-Road’
modes. Changes made in one mode will not affect the other.
The data fields contained in the data pages can be configured from ‘Main menu >
Settings > Fields & Buttons > Data fields’. You can also change a concrete data
field by opening the contextual menu on it.
3.5 Contextual menu
TwoNav uses contextual menus to enter the most adequate functions for each
moment using a quick shortcut: to open the contextual menu of any element
press on it for one second.
http://www.CompeGPS.com http://Support.CompeGPS.com 25
Depending on the element on which you open the contextual menu, you may
enter different functions. You can access to the contextual menu of:
Map window
Data fields
Data lists
4 NAVIGATION
4.1 Modes
TwoNav has 2 navigation modes which can be selected by pressing the tabs of
the main menu:
The ‘On-Road’ mode is based on door to door navigation, using a
routable road map to automatically calculate the best route to
destination.
Note: ‘On-Road’ mode can only be used when a road maps is loaded.
The ‘Off-Road’ mode is based on the useage of previously created
references (waypoints/routes/tracks). Route will not be automatically
calculated, a straight line will link your current position to your
destination.
Note: ‘Off-Road’ mode can be used with any type map.
Important: Before you start navigating, it is very important to set your vehicle so
the system configuration and calculations will be adapted according to the
selected vehicle (‘Main menu > Settings > Vehicle’).
4.1 Triplog
‘Status’ window has several buttons to control the ‘Triplog’ command during your
outdoor activities, by default your itinerary will be recorded when ‘Triplog’ is
started:

http://www.CompeGPS.com http://Support.CompeGPS.com 26
Start/Pause: Press this button to start the trip (select destination) or to
pause it at any moment (data fields, recorded track and other functions are
synchronized, so you will pause all counters until the trip is resumed
again).
Note: By default, 'Triplog' function is automatically start after TwoNav is
launched.
Stop: Press this button to finish the current trip and show the 'Trip review'.
The track of your trip is saved at ‘Tracklog’ folder. But you can directly review
your recorded tracks from the list of tracks (‘Main menu > Data > Tracks >
Tracklog’).
‘Tiplog’:
Stopped
‘Triplog’:
Recording
‘Triplog’:
Paused
Page tools:
more options
Once the trip is started, you can press ‘Page tools’ to find out more commands to
control the 'Triplog':
Trip review: Summary of your trip up to that moment, very useful to
analyse all kind of relevant data recorded during your itinerary.
Change destination: Define a new destination for your trip, keep
recording the current ‘Triplog’ or start a new one.
Reset ‘Triplog’: Start a brand new track at this point, data fields and
recorded track will be restarted again.
‘Tracklog’ options: Options to control 'Tracklog' function.
A security system has been added to TwoNav in order to avoid losing tracks in
case you forget to start ‘Triplog’ function. If the option 'Save discarded Tracklog
in trash' is enabled, when options 'Pause' or 'Finish trip' are pressed, the
following movements will be automatically recorded as backup track copy inside
‘TwoNavData/Data/Tracklog/Trash’ folder.

http://www.CompeGPS.com http://Support.CompeGPS.com 27
Note: If you record more than one track at the same day, file’s names will be
distinguished by a number at the end of the file name. This number identifies the
order in which the tracks were created (for example: ‘2008-12-15-01.TRK’, ‘200812-15-02.TRK’…).
4.2 Select destination
Once you have pressed ‘Start!’, select your destination:
Place (waypoint/geocache/coordinates/…)
Waypoint: Select a waypoint among the waypoints loaded or
created by you.
Favourites: Create your own list of favourite places. By doing this,
you will be able to navigate to them quickly. In order to manage
your favourite places, press ‘Edit’ and create them.
Route: Select a route among the routes loaded or created by you.
Geocache: Select a geocache among the geocaches loaded or
created by you.
By map: Select directly on the map the exact location where you
want to navigate to.
Bearing: The destination point will be determined by setting the
bearing and the distance that you are about to navigate.
Address (only available when road maps are loaded): Enter any
address where you want to navigate to.
POI: Internet offers you an enormous database of points of interest
(gas stations, hospitals, cash dispensers…) that can be
downloaded and easily upload to TwoNav. Select the exact POI
where you want to navigate to.
Coordinates: Type the exact coordinates for your destination.
Track (select a track among the tracks loaded or created by you)
Training (specially designed to improve your performance)
Free: No destination is determined. You set your own movements
with no restrictions.
 Loading...