

Page 1

2010-2011 CanAm Spyder RT
PARTS LIST
I n s t a l l a t i o n I n s t r u c t i o n s
1 Juice Box Pro™
1 USB Cable
1 Top Tune CD-ROM
1 Installation Guide
2 Velcro strip
1 Alcohol swab
1 Posi-tap
THE IGNITION MUST BE TURNED
OFF BEFORE INSTALLATION!
DOWNLOAD THE TOPTUNE SOFTWARE
AND LATEST MAPS FROM OUR
WEBSITE:
www.twobros.com
PLEASE READ ALL DIRECTIONS BEFORE STARTING INSTALLATION
401 S. Grand Ave. Santa Ana, CA 92705
(800) 211-2767 www.twobros.com
TRB001-283 www.twobros.com 10-11 Spyder RT1
Page 2
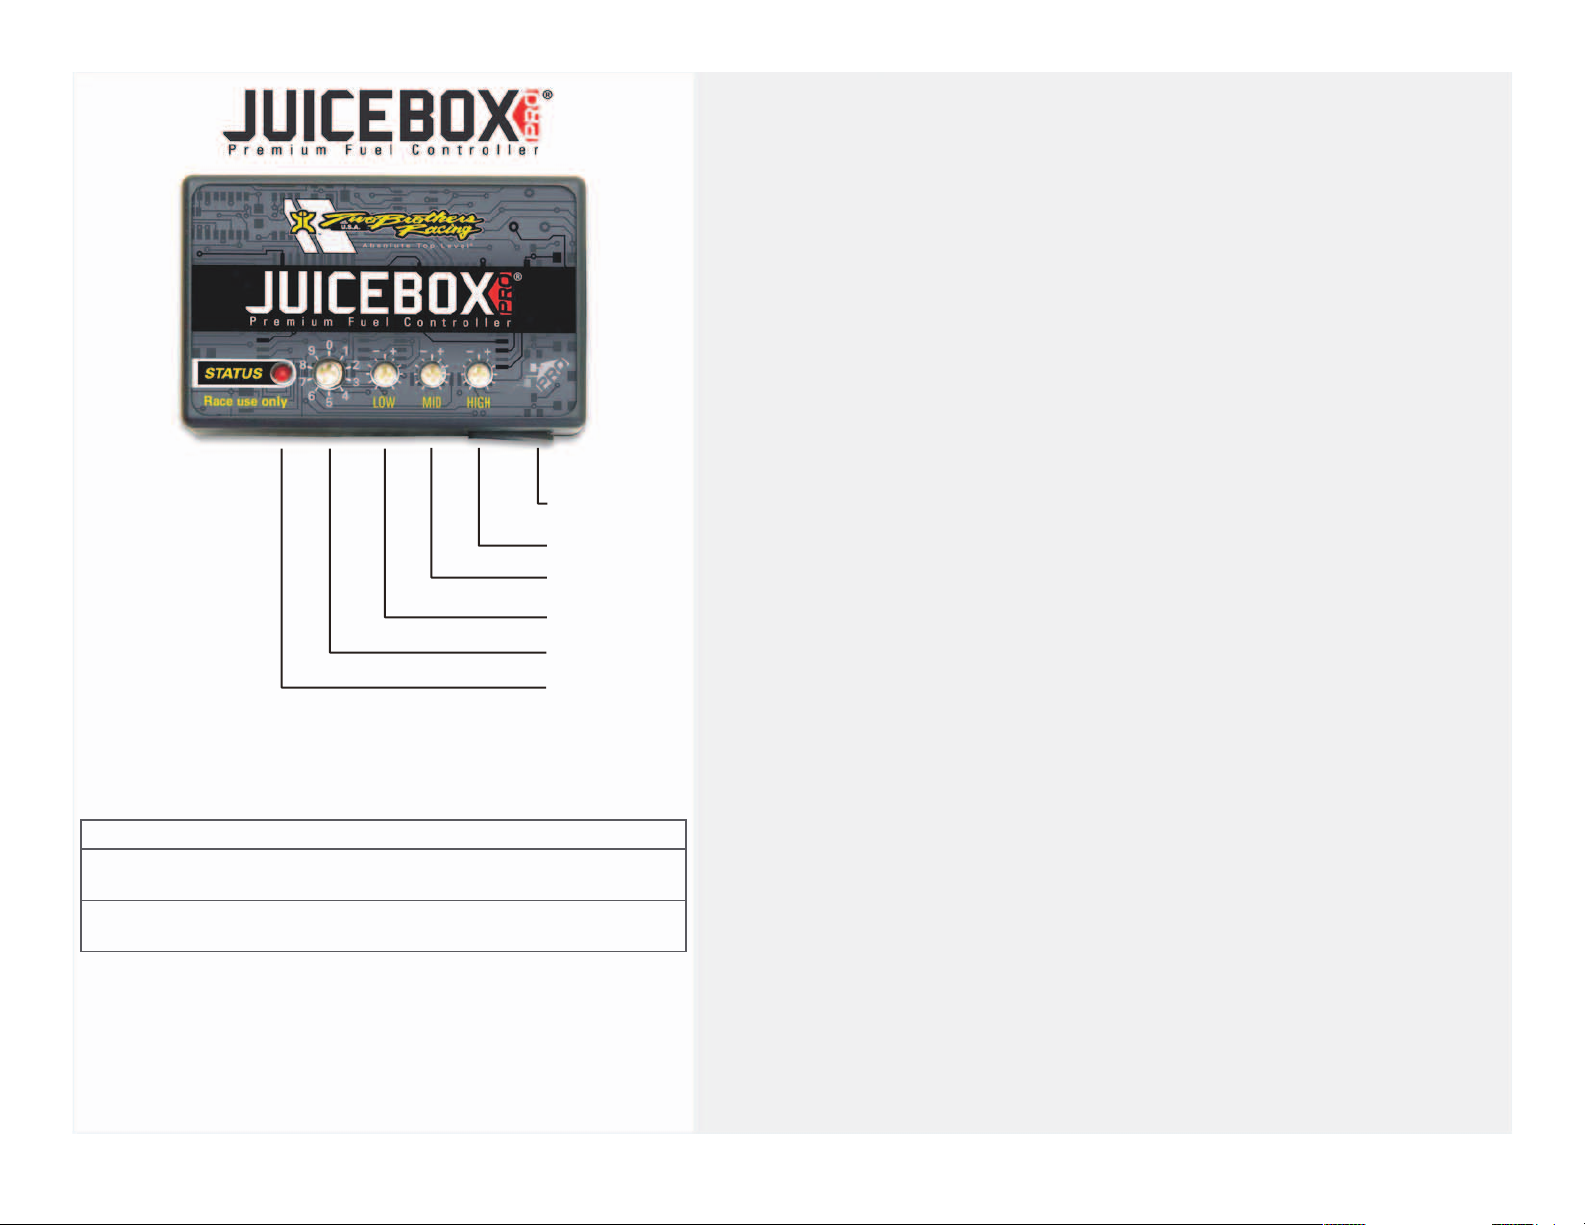
S electing the M ap Position
The J uice Box Pro com es loaded with up to ten m aps . U s ing a #1 Phillips
scr ewdr iver, turn the map select dial to to ggle betw een the loaded m aps . Refer to
the map po s ition ta ble below for the m a ps included in y our J uice B ox Pr o.
U s ing the R P M R ange Dials
The Low , M id, and High RPM Dials refer to the R PM range, in thirds , of your
vehicle. E ach dial allo w s +/- 10% fuel a djustm ent on top of what fuel changes are
done in the map. W ith the dial fa cing s traight up, there is no additional fuel change.
For exam ple, if you r vehicle r evs to 15,00 0 RPM :
• the low R P M dial w ill a djust 0-5000 R P M
• the m id R P M dial w ill a djust 5001-10000 R PM
• the high R PM dial w ill a djust 100 01-15000 R PM
U s ing Top Tune
Take y our tuning to the nex t le vel with the Top Tune s oftware.
Position 0 Zero map
Position 1 Stock exhaust
Stock air filter
Position 2 Two Brothers slip-on
Stock air filter
U S B Port
High RPM Dial
M id D ia l R PM
Lo w D ia l R PM
M ap S elect
S tatus L ight
(Pow er to U nit)
2010-2011
CanAm Spyder
2010-2011
CanAm Spyder
Installing the Top Tune S oftw a re
1 Ins ert the CD provided into your com puter ’s cd-rom driv e. The launch program
will run autom atically.
If a uto-run is dis abled, double-click the M y Com puter ico n then double-click the
CD drive icon. Double-click TB R Top Tune.exe to m anua lly start the CD.
2 Click Ins tall S oftw are and follow the on-s cre en ins truction s to install the Top
Tune software. The Top Tune s oftware and maps will be s tored in C :\Program
File s \TB R Top Tune.
3 Click M ap Database. A ll m aps w ill a utom atica lly be installed to the C:\Pr ogr am
File s \TB R Top Tune\maps fo lder.
Loa ding A dditional M aps
1 Connect the U S B ca ble from the com puter to the J uice B ox Pro. Verify the cable
is fully seated in the J uice B ox Pro.
2 R un the Top Tune software by double-clicking the program icon installed on your
deskto p or o n y our start m enu .
3 Click Open M ap File and s elect a map file.
4 Click S end M a p. You can s end the map to a ny of the ten map pos itions.
Altering M aps Us ing Top Tune
The values in the map repre s ent a percenta ge of fu el change ov er s tock. A value of
10 in the map indicates at that thr ottle pos ition a nd R PM ran ge the vehicle will be
10% richer tha n stock. If the value is -10, then it w ould be 10% leaner than s to ck. You
ha ve the a bility to fine tune you r fuel curv e by altering thes e v a lues. The Top Tune
softwar e allows a v a lue of +250 to -100 in each cell.
TBR001-283 www.twobros.com 10-11 Spyder RT
Page 3
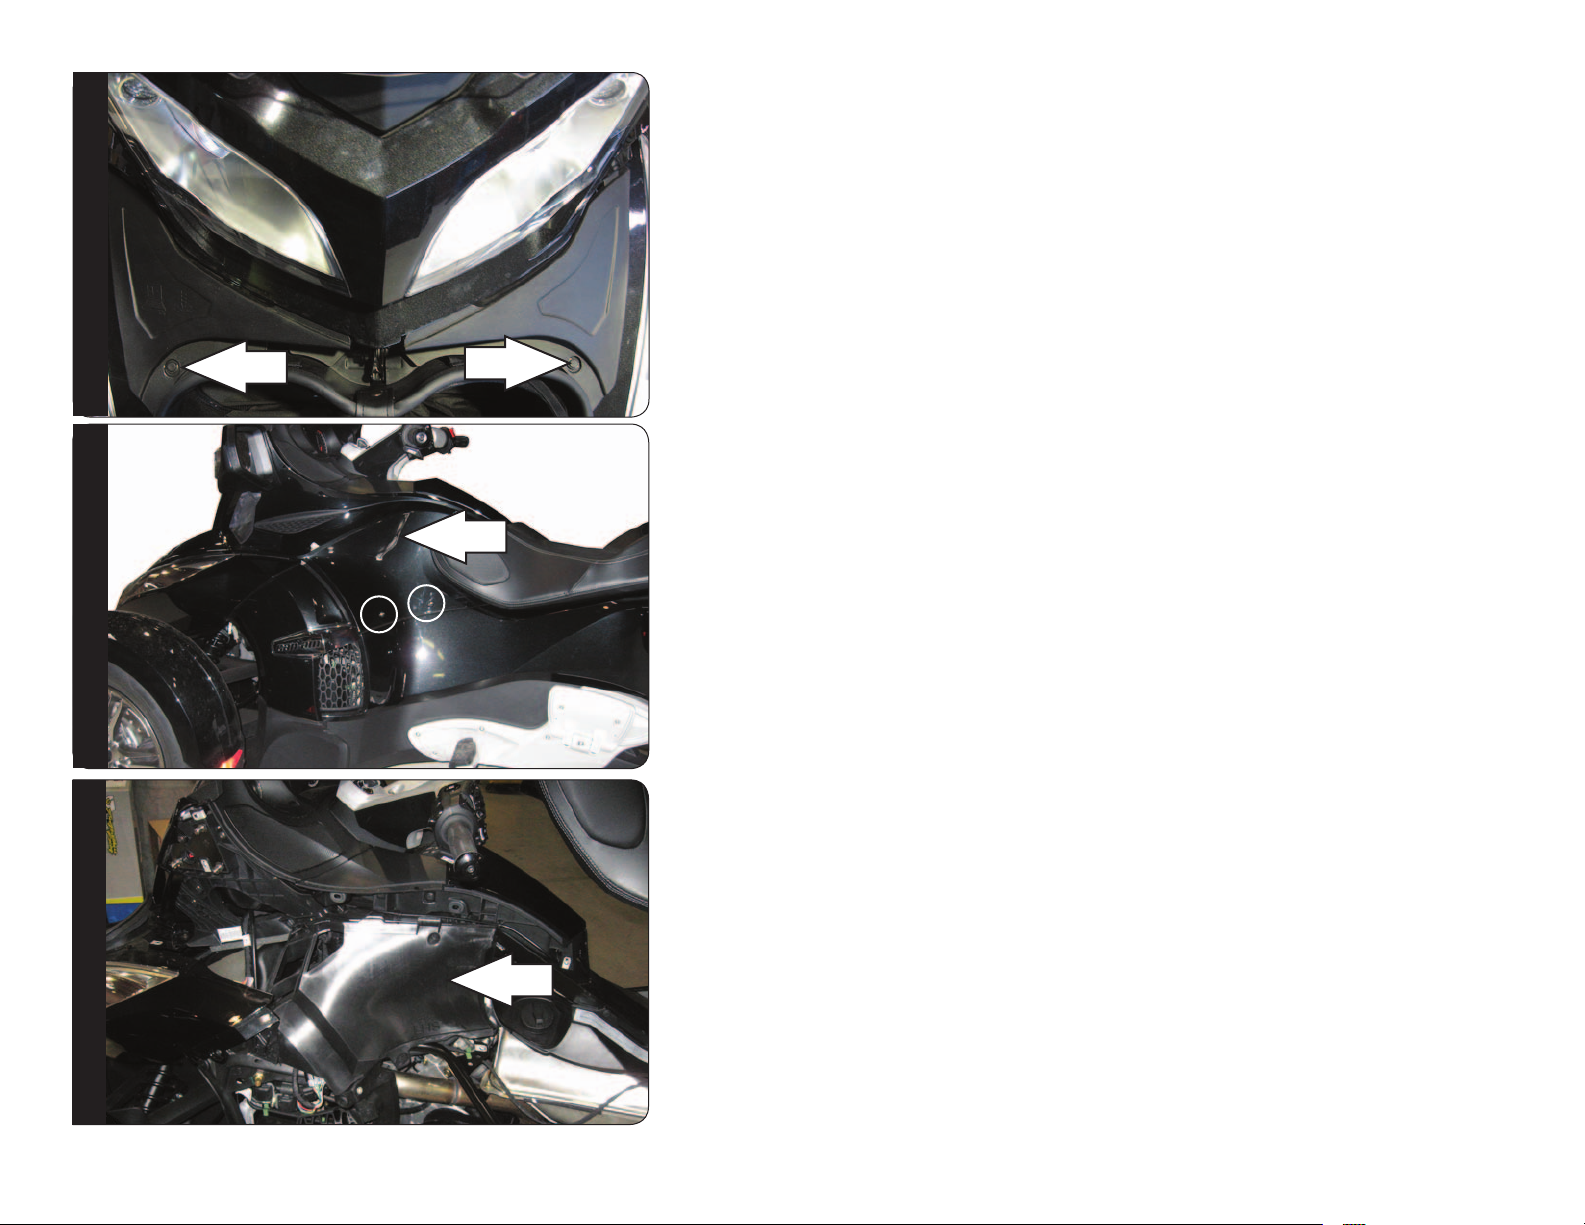
FIG.A
1 Open the seat and the front storage compartments.
2 Remove the two covers under the front storage lid (Fig. A).
Remove the push pins
3 Remove the lower cover in Figure B by pulling outwards.
4 Remove the mirror by pulling outwards and up.
FIG.B
FIG.C
TBR001-283 www.twobros.com 10-11 Spyder RT
5 Remove the upper side cover.
The 2 silver bolts circled in Figure A do NOT need to be removed. Pull outwards
in this area.
6 Remove the inner side cover (Fig. C).
Figure C is shown with the lower side panel removed. This panel does NOT need
to be removed to perform steps 5 & 6.
7 Repeat steps 3 thru 6 for the right hand side.
Page 4

8 Using the supplied velcro secure the Juicebox Pro unit in place under the seat
(Fig. D).
FIG.D
FIG.EFIG.F
9 Route the Juicebox Pro harness down the left side of the vehicle and go
towards the throttle bodies.
10 Remove the mounting bolt for the MAP sensor on the left side of the throttle
bodies.
This allows access to the injector.
11 Unplug the stock wiring harness from the injector (Fig. F).
TBR001-283 www.twobros.com 10-11 Spyder RT
Page 5

FIG.G
FIG.HFIG.J
12 Plug the YELLOW colored wires from the Juicebox Pro in-line of the stock
wiring harness and injector.
13 Unplug the stock wiring harness from the injector on the right hand side
(Fig. H).
This connection is located to the Right, Rear of the air box.
14 Plug the ORANGE colored wires of the Juicebox Pro in-line of the stock wiring
harness and injector.
TPS
15 Locate the Throttle Position Sensor on the left
side of the throttle bodies.
Posi tap
16 Use the supplied Posi-tap attach the GREY wire
of the Juicebox Pro to the WHT/BRN wire of the
TPS wiring harness.
Figure J is shown with the TPS harness
disconnected from the sensor. Make sure to
reconnect the harness to the sensor.
TBR001-283 www.twobros.com 10-11 Spyder RT
Page 6

17 Attach the ground wire of the Juicebox Pro to the rear cylinder head on the left
side (Fig. K).
FIG.K
FIG.LFIG.M
Remove the stock bolt and insert bolt thru the eyelet of the Juicebox Pro ground
wire and reinstall bolt into head.
18 Unplug the stock wiring harness from the front O2 sensor (Fig. L).
This connection is located on the left hand frame rail by the front cylinder
19 Plug the 4 pin connector labeled FRONT in-line of the stock O2 sensor and
wiring harness.
20 Unplug the stock wiring harness from the rear O2 sensor (Fig. M).
This connection is located on the right side of the vehicle between the air box and
the coolant reserve bottle.
TBR001-283 www.twobros.com 10-11 Spyder RT
Page 7

FIG.N
21 Plug the 4 pin connector labeled REAR in-line of the stock O2 sensor and
wiring harness.
The Juicebox Pro for this model controls the stock closed loop area. This area
is represented by the highlighted cells shown in Figure P. The Juicebox Pro is
designed to achieve a target AFR of 13.6:1. You must retain your stock O2
sensors.
FIG.P
TBR001-283 www.twobros.com 10-11 Spyder RT
It is not recommended to alter the values in the highlighted area unless
instructed to do so by a Two Brothers technician.
 Loading...