

Page 1
Installation Instructions
2010 BMW
V.A.L.E.
V A R I A B L E A X I S L O C K I N G E X H A U S T
S1000RR
Full Ex haust System
Part# 00 5-2810106V-B / 005-2810107V-B / 005-2810108V-B
Parts List
Qty. Description Part Number
1 Muffler Canister Varies
1 Header Kit 005-28101HK
1 Slip Tube 005-28101S
1 Canister Clamp Varies
1 HARDWARE KIT 005-281-3C
4 6x20mm Socket Head Cap Screws 005-SH620
4 6mm Lock Washers 005-WL6
2 X-Ring (half) 005-7-2-3
2 8mm Flange Nut 005-FN8
1 8x45mm Flat Head Socket Cap Screw 005-SHF845B
1 66mm Barrel Clamp 005-27-66MSH
1 Decorative Countersunk Washer 005-WA8-B
1 8x25mm Hex Bolt 005-HB825
1 Mounting Bracket 005-281-B2
1 22mm Black AL Spacer 005-S-22A
1 5mm Long Handle Ball End Hex Key 005-9-18610
1 T20 Torx Hex Key 005-9-15820
1 TBR Sticker Kit 015-10212
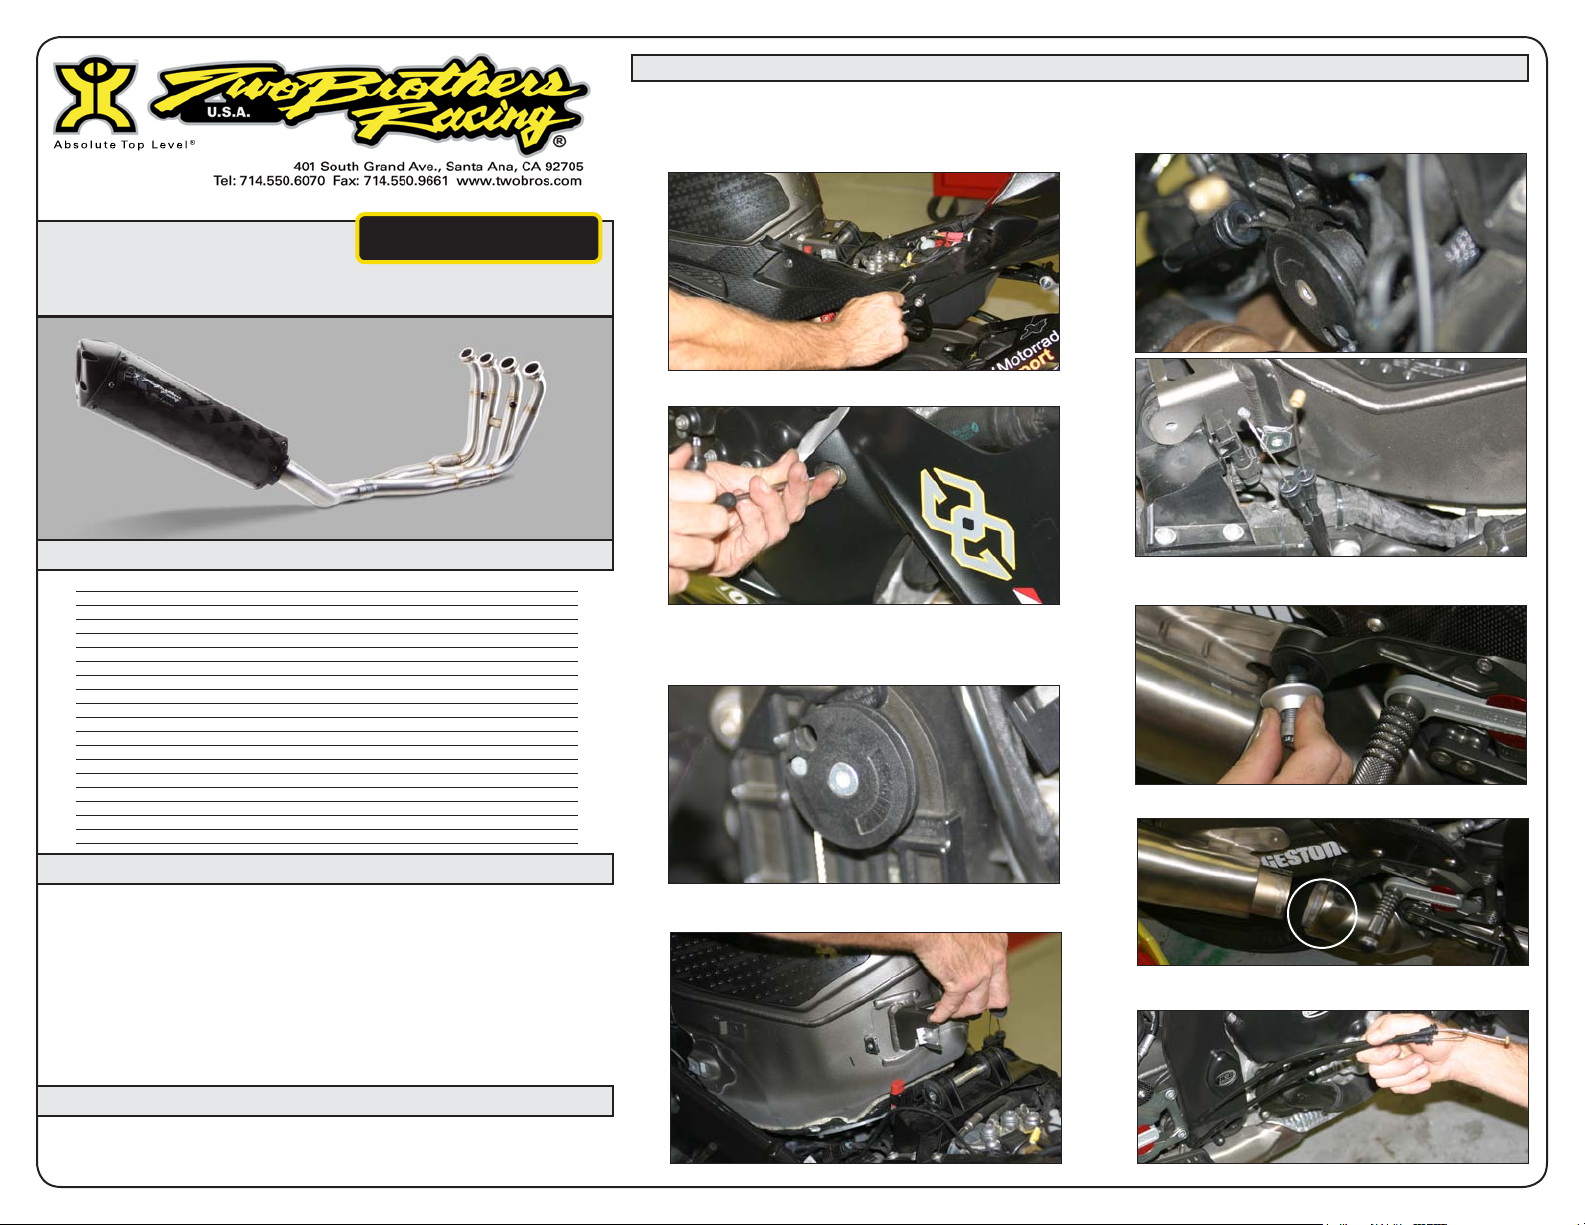
1. Make sure the bike is completely cool before starting
the installation. Make sure the bike is secure on a
stand or ideally a service lift.
2. Remove seat.
TM
3. Remove left and right upper and lower fairings.
4. Carefully remove crossover servo cable. Do not turn
servo wheel (damage may occur if you do). Keep
servo plugged in. This servo is located on left side of
motorcycle at the lower front of fuel tank.
6. Remove both cables from servo carefully. Do not
turn servo, the servo must stay plugged in and on
motorcycle.
7. Remove muffler mounting bolt and inside spacer,
these will not be re-used.
8. Loosen joint clamp and remove muffler assembly.
IMPORTANT - PLEASE READ CAREFULLY
We recommend that this performance part be installed by a qualied motorcycle
technician. If you have any doubts as to your ability to install this performance
part, please consult with your local motorcycle dealer. Read all instructions rst
before starting installation. Make sure the motorcycle and exhaust system are
completely cool before starting the installation. Also, make sure the bike is secure
on a centerstand or ideally a service lift during installation. Be sure to save all stock
components for possible use later.
**This product has not been tested with all available accessories and some
items may cause excessive heat. Excessive heat may cause damage to your
vehicle. Two Brothers Racing will not be responsible for damaged parts.
Warranty
Two Br others Racing p roducts are in tended for clo sed cour se comp etition purposes only, and the refore a re sold “as
is” withou t wa rranty. Two Br others Racing speci fically disclai ms any warranties of merch antability or fitne ss f or a
particu lar purpose and disclai ms all respon sibility fo r consequent ial and inci dental damag es or any ot her losses ar ising
from th e use of th ese product s or parts.
5. Remove/lift fuel tank to access second servo, located
under rear of fuel tank.
9. Remove cables from motorcycle being careful not to
damage or scratch the bike.
Page 2
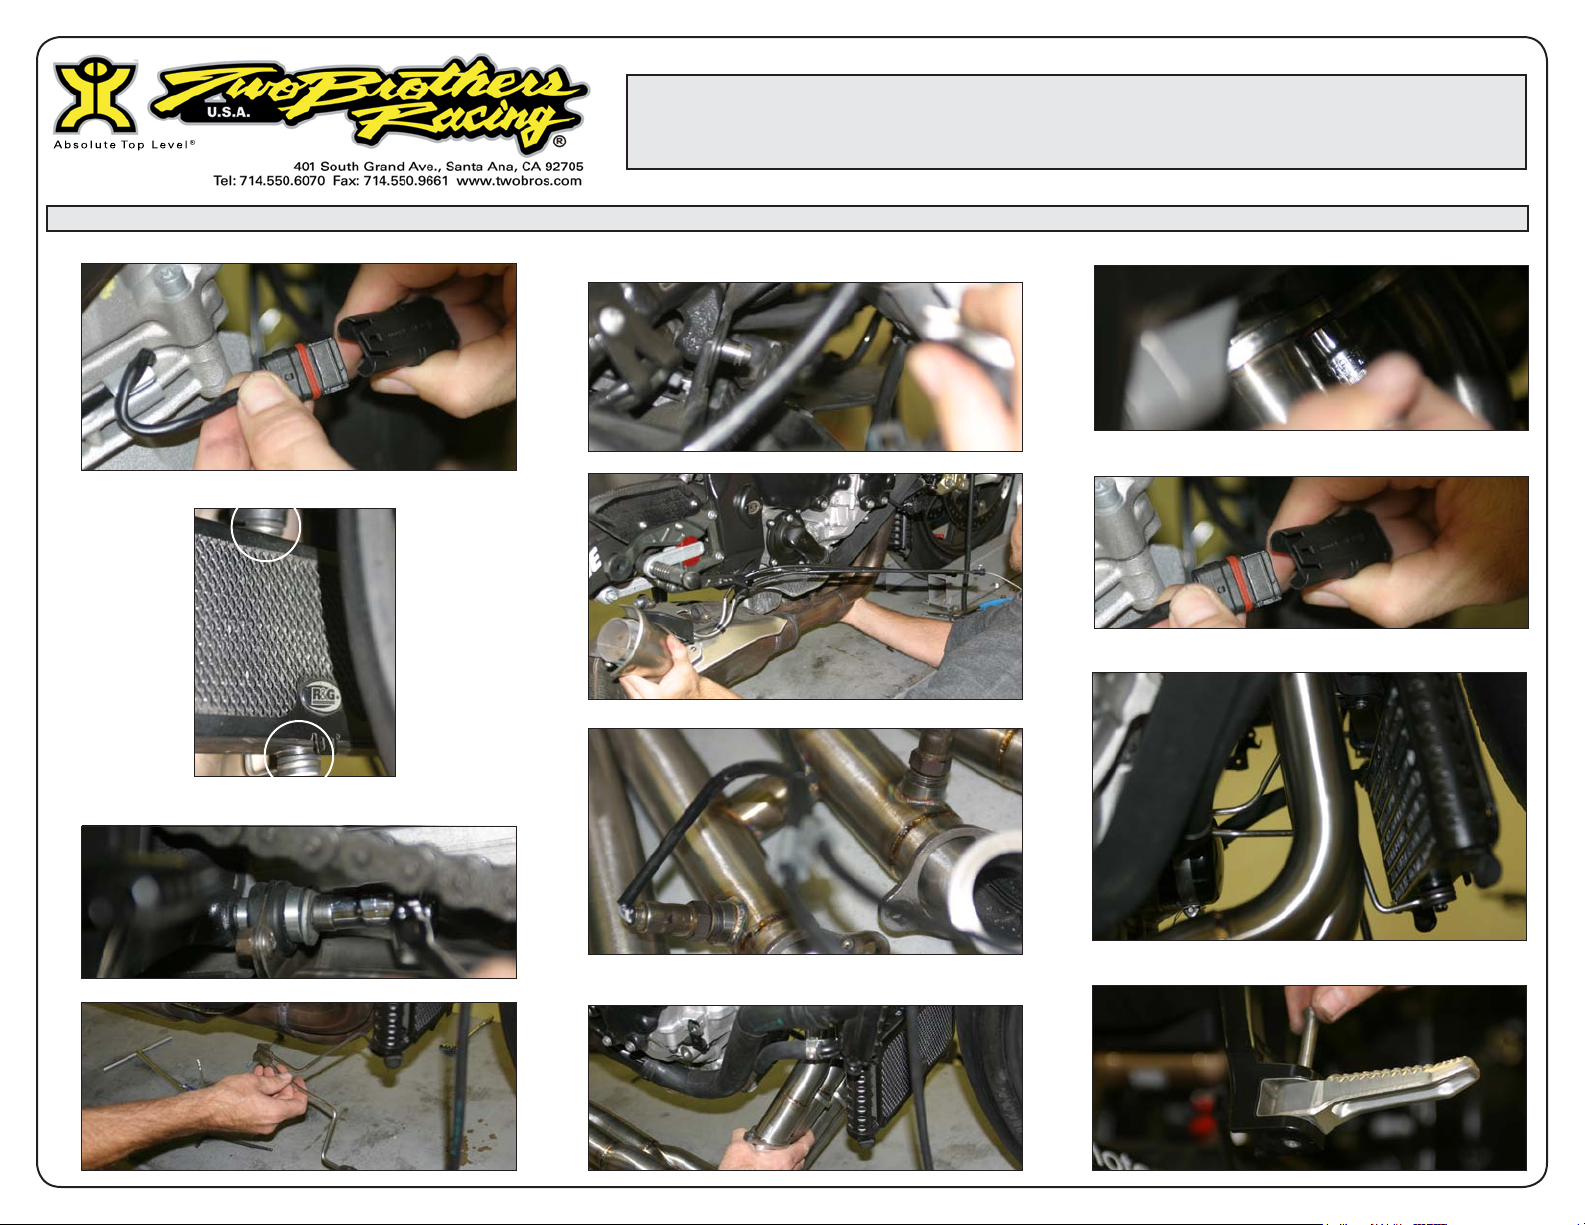
10. Un-plug both left and right O2 sensors.
2010 BMW
S1000RR
FullExh aust System
Part# 00 5-2810106V-B / 005-2810107V-B / 005-2810108V-B
Installation Instructions
14. Remove radiator top bolt and dislodge radiator to allow for
better access to headers.
18. Tighten all header bolts.
11. Remove radiator clips from both radiator and oil cooler.
12. Remove both rear mounting exhaust bolts from rear of
header pipe.
13. Remove oil cooler support.
15. Remove header bolts and then remove header assembly.
16. Install left and right O2 sensors on header prior to install.
17. Install header assembly making sure to re-use the OEM
gasket between header and cylinder head.
19. Plug-in O2 sensors and route cables away from headers
through stock retaining clips.
20. Re-install oil cooler brace and secure in place with OEM
hardware. Re-install radiator and clips.
21. Remove right side passanger foot peg.
Page 3

22. Install supplied TBR hex-head bolt.
23. Install supplied muffler mounting bracket to newly installed
bolt and secure in place with 8mm flange nut.
2010 BMW
S1000RR
FullExh aust System
Part# 00 5-2810106V-B / 005-2810107V-B / 005-2810108V-B
Installation Instructions
25. Install TBR muffler assembly to bike, use supplied barrel
clamp at joint and rubber lined muffler clamp
27. Align muffler and securely tighten the x-ring bolts in a cross
pattern.
28. Tighten the barrel clamp at mid-pipe joint, then muffler
clamp.
29. Re-install bodywork and check to be sure there is clearance
between exhaust tubing and all bodywork.
24. Attach TBR muffler to supplied slip-on tube using the
provided four 6x20mm socket head cap screws, washers
and thread-lock.
26. Loosely attach to bracket using the supplied bolt with decorated
washer and spacer using the supplied 8mm flange nut.
30. Before you run the bike, clean off all fingerprints and
dirt, as any oily residue will etch the metal and become
somewhat permanent when the system gets hot. Also,
remove any protective plastic from the name badges
on the muffler canister(s) or the muffler clamp(s). Run
the bike and enjoy. It is normal for some white smoke to
appear the first time you start the bike. This is packing/
manufacturing oil from inside the pipe burning off. After
50 to 100 miles, recheck all fasteners for tightness.
Page 4

2010 BMW
S1000RR
FullExh aust System
Part# 00 5-2810106V-B / 005-2810107V-B / 005-2810108V-B
TM
2010 BMW
V.A.L.E.
V A R I A B L E A X I S L O C K I N G E X H A U S T
S1000RR
Full Ex haust System
Part# 00 5-2810106V-B / 005-2810107V-B / 005-2810108V-B
Qty. Description Part Number
1 Muffler Canister Varies
1 Header Kit 005-28101HK
1 Slip Tube 005-28101S
1 Canister Clamp Varies
1 HARDWARE KIT 005-281-3C
4 6x20mm Socket Head Cap Screws 005-SH620
4 6mm Lock Washers 005-WL6
2 X-Ring (half) 005-7-2-3
2 8mm Flange Nut 005-FN8
1 8x45mm Flat Head Socket Cap Screw 005-SHF845B
1 66mm Barrel Clamp 005-27-66MSH
1 Decorative Countersunk Washer 005-WA8-B
1 8x25mm Hex Bolt 005-HB825
1 Mounting Bracket 005-281-B2
1 22mm Black AL Spacer 005-S-22A
1 5mm Long Handle Ball End Hex Key 005-9-18610
1 T20 Torx Hex Key 005-9-15820
1 TBR Sticker Kit 015-10212
Warranty
Two Brothe rs Racing p roducts are intended fo r closed co urse compet ition purpo ses only, and therefore are sold “a s is”
without warranty. Two B rothers Rac ing specifi cally discla ims any war ranties of merchantabi lity or fit ness for a particular
purpose and discla ims all res ponsibility for conseq uential and incidental damages or any other losses aris ing from the use
of thes e products or parts.
Care & Cleaning
Care & Cleaning
Keep system free of dirt and moisture. Store in a cool, dry place. Make sure vehicle is
completely cool before maintenance.
Stainless Header System: Polished stainless steel pipes will turn a light golden hue
after a few heat cycles, this is a normal characteristic of high quality stainless steel.
Clean using a mild water based spray cleaner. Always apply cleaner or polish with a soft,
clean cloth.
Titanium Header System: Polished titanium pipes will experience color shift ranging
from deep blue/purple through amber after a few heat cycles. This is a normal
characteristic of high quality titanium. Clean using a mild water based spray cleaner.
Always apply cleaner or polish with a soft, clean cloth.
Polished Aluminum Canisters: Use an aluminum or mag wheel polish to restore the
bright finish to factory spec.
Brushed Aluminum Canisters: Clean using a mild water based spray cleaner. Always
apply cleaner or polish with a soft, clean cloth.
Carbon Fiber Canisters: Clean using a mild water based spray cleaner. Always apply
cleaner or polish with a soft, clean cloth. Always make sure the fiberglass packing inside
is in good condition and not burned out, as exhaust heat inside an empty canister will
deteriorate the carbon fiber sleeve.
TBR sells repack kits (Road - #005-10 038, Offroad - #005-10038MX) that include
everything you need to easily do it yourself.
Titanium Mufflers: For cleaning use a mild water based spray cleaner. Always apply
cleaner or polish with a soft, clean cloth. Always make sure the fiberglass packing inside
is in good condition and not burned out, as exhaust heat inside an empty canister will
deteriorate the carbon fiber sleeve.
TBR sells repack kits (Road - #005-10 038, Offroad - #005-10038MX) that include
everything you need to easily do it yourself.
Repack all road canisters at the first signs of packing material deterioration. Part #005-10038
Repack all offroad canisters after every 10 hours of use. Part #005-10038MX
NEVER dyno test your bike with carbon fiber or titanium canisters installed - the
intense heat and lack of cooling air can quickly burn through the canister material. Two
Brothers Racing does not provide a warranty for burned canisters.
 Loading...