

Page 1
Two Brothers Racing
Front Fork Springs
Honda CRF/XR50
010-6-30
We recommend that this performance part be installed by a qualified
motorcycle technician. If you have any doubts as to your ability to install
this performance part, please consult with your local motorcycle dealer.
Read all instructions first before starting installation. Make sure the
motorcycle and exhaust system are completely cool before starting the
installation. Also, make sure the bike is secure on a centerstand or
ideally a service lift during installation. Be sure to save all stock
components for possible use later.
Two Brothers Racing products are intended for closed course competition purposes only, and therefore are sold
“as is” without warranty. Two Brothers Racing specifically disclaims any warranties of merchantability or fitness
for a particular purpose and disclaims all responsibility for consequential and incidental damages or any other
losses arising from the use of these products or parts.
Warranty
1. Make sure the bike is completely cool before starting the
installation. Make sure the bike is secure on a
centerstand or ideally a service lift.
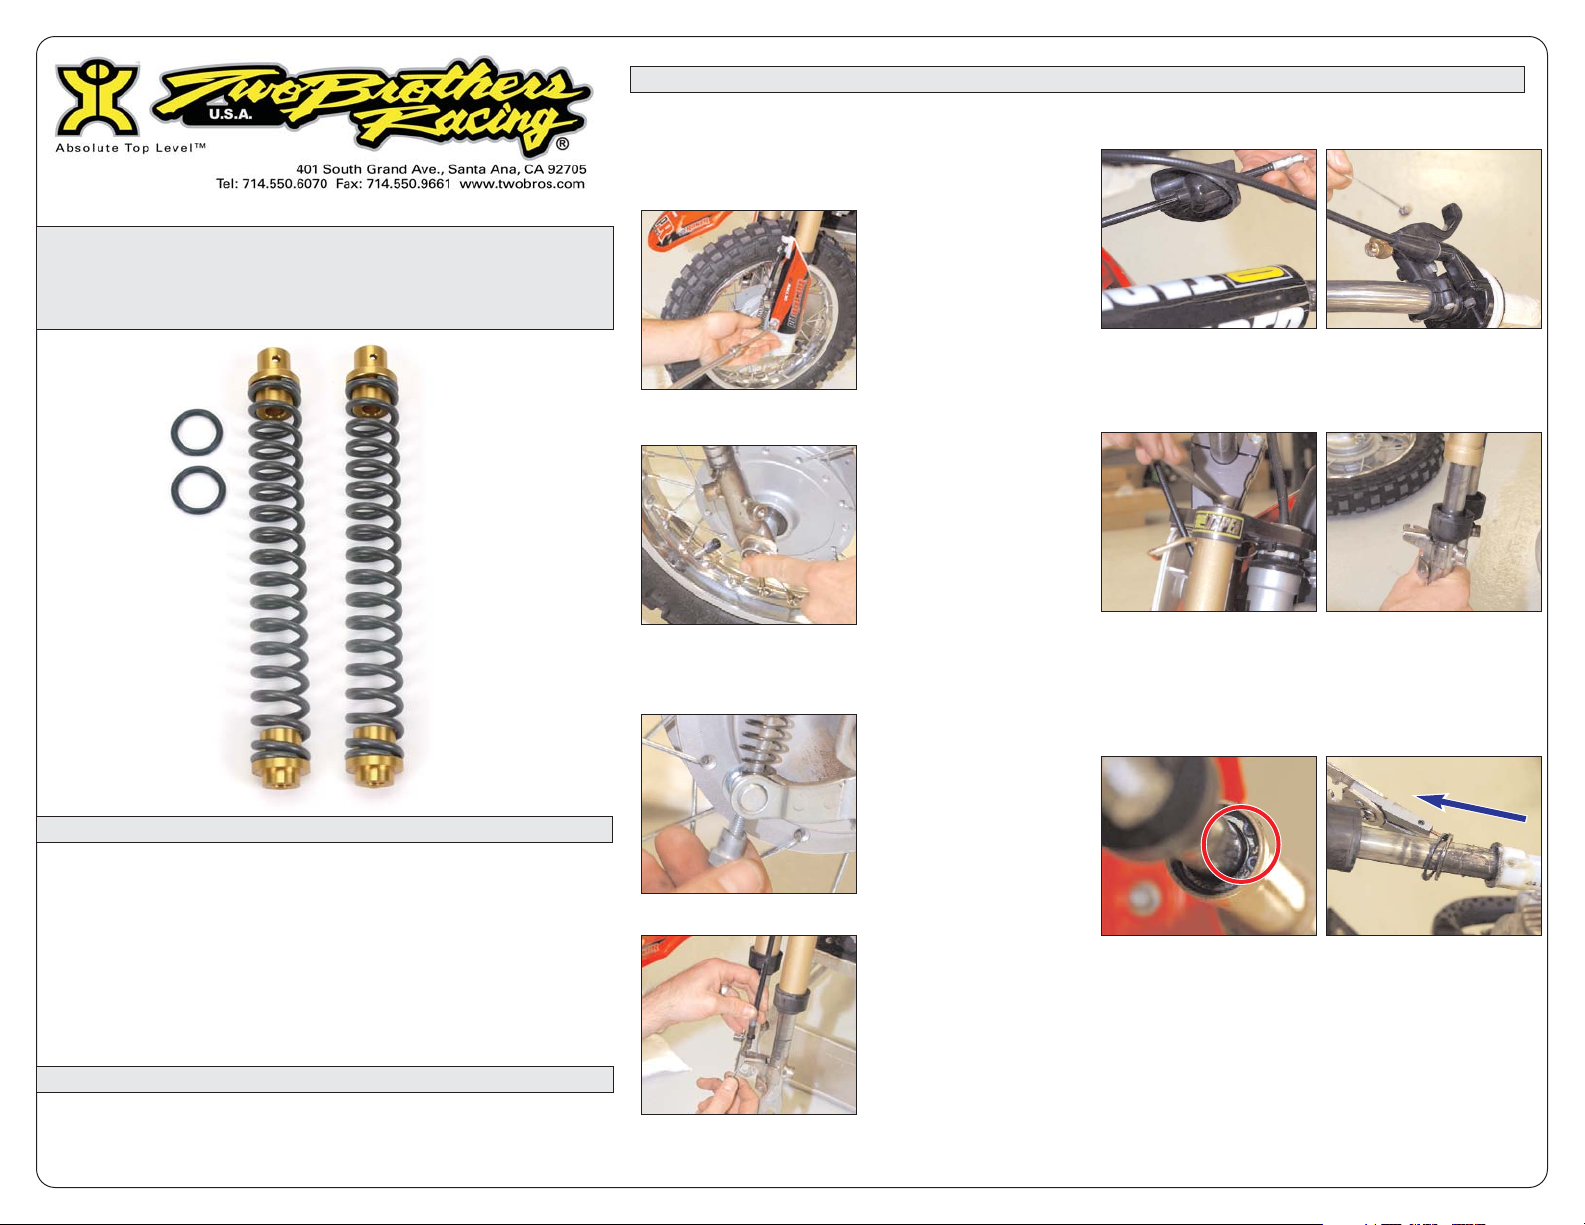
2. Using a 5mm Allen wrench, remove the stock fork guards.
3. Using 14mm and 19mm wrenches, remove the front
wheel and remove the front axle.
4. Loosen the wing-nut on the bottom of the front-brake
assembly, as shown. Make sure not to lose the spring,
which is likely to bounce away somewhere if you're not
careful.
5. Remove the brake cable from the left fork leg.
6. Remove the front-brake cable from the front-brake lever.
7. Using a 14mm wrench, loosen or remove the bolts from
the top of each fork leg, as shown above. As you loosen
the bolts, you may have to hold the lower fork leg
because it can turn with the bolt.
8. Remove the rubber boot that sits in the junction between
the lower and upper fork legs, then use a rag to clean
out the dirt and grease inside the bottom of the top fork
leg. After that, use the snap-ring pliers to remove the
circlip from inside the area you just cleaned out. The rest
of the fork and its internals will come out with the circlip.
...continued on page 2
Installation Instructions
010-6-30_fork-springs
IMPORTANT - PLEASE READ CAREFULLY
1 of 3
Page 2

9. Put the flat, gray bushing at the bottom of the fork spring into
the vice, but be gentle with it because it can break. Take
a 1/8-inch drift and a hammer and punch out the pin as you
see here. Do not lose this pin.
10. Slip the new spring into the bushing as shown below, making
sure to line up the holes in the bushing, fork tube and gold
spring end.
11. Hammer the pin back into the hole, making sure it's recessed
below the bushing because you don't want it scraping the
sides of the fork tube. Repeat starting for the other fork leg.
12. Keep in mind, when you put the fork internals back into the
fork tubes, the notches on the top of the internals point
toward each other in the front end of the bike.
13. The brake-side fork leg goes on the rider's left. Grease up the
fork springs, and then re-insert the fork legs into the upper
fork tubes, then reinstall the bolts on the top of the triple
clamp and screw them into place, making sure that the notch
on the top of the fork internals is pointing inward toward the
opposite fork leg. Be prepared to hold the bottom of the fork
leg in place in order to tighten the top bolt completely.
14. Next, reinstall the circlips just like you found it to begin with,
and then use an open ended wrench to push it into place until
it makes an audible clicking noise.
15. Slide the rubber boot back up over the junction between the
bottom and top of the fork leg.
16. Take the front wheel and re-install it on the bike, making sure that
the brake side is on the rider's left, and line up the groove in the
drum brake with the notch on the inside of the left fork leg.
...continued on page 3
Installation Instructions
010-6-30_fork-springs
2 of 3
Page 3

17. Now, re-install the front axle and tighten it using a 14mm
wrench on the rider's right and a 19mm on the rider's left.
18. Re-install the fork guards using a 5mm Allen wrench.
19. Take the supplied longer front-brake cable, and then route the
end with the notch on the cable back into the front-brake lever.
20. Route the bottom end of the brake cable through the fork
guard and then through the top tab on the fork tube. Then
replace the spring you removed in Step 4, route the threaded
end through the tab on the brake assembly, and then replace
the wing-nut to hold the brake in place.
21. Adjust the brake cable to the desired tension.
22. Carefully double check your work to insure that all hardware is
securely fastened.
NOTES:
Installation Instructions
010-6-30_fork-springs
3 of 3
 Loading...