

Page 1

Installation Instructions
V.A.L.E.
2008 Kawasaki
V A R I A B L E A X I S L O C K I N G E X H A U S T
Teryx 750
V. A.L.E. ™ Com plete D UAL Exha ust Sys tem wit h M-7 Caniste rs
Part # 0 05-224 0106D
Parts List
Qty. Description Part Number
1 Left Muffler Canister M-7 005-224-206ML
1 Right Muffler Canister M-7 005-224-206MR
1 Rear Header 0 05-22401H-R
1 Front Header Assembly #1 005-22401H-F1
1 Front Header Assembly #2 005-22401H-F2
4 Heavy Duty Muffler Clamp 005-2C4
1 HARDWARE KIT 005-224-3C
2 Header Collar Long 005-224-17L
2 Steel Header Flange 005-224-15S
2 X-Lite V.A.L.E Retaining Ring 005-7-2-2
3 80mm Spring 005-S-80
2 Billet Bolt-on Muffler Mount (Front) 005-224B
2 Billet Bolt-on Muffler Mount (Back w/ radius) 005-188B
10 8x25mm Socket Head Cap Screws 005-SH825
14 M8 Split High Collar Lock Washers 005-WL8
8 M6 Split High Collar Washers 005-WL6
4 8x1.25mm Pitch Metal Locking Flange Nuts 005-FNL8
2 8mm Flange Nuts 005-FN8
4 8mm Large Flat Washers 005-WO8
4 8x20mm Socket Head Cap Screws 005-SH820
2 Spark Arrester Screen (Installed) 005-106S
8 6x14mm Socket Head Cap Screws 005-SH614
1 14” Tube with Brackets 005-22401B
2 Needle Shim 005-224NS
1 #150 Main Jet 005-224MJ150
1 #145 Main Jet 005-224MJ145
1 5mm Long Handle Ball end hex key 005-9-18610
1 Permatex High Strength Threadlock 031-P09179
1 TBR Logo Decal Kit 015-10212
1. Make sure the UTV is completely cool before starting the installation. Make sure the UTV is secure with the parking brake set.
2. Remove bed from unit by removing pins, frame mounts and
wires. Get a second person to help lift bed assembly off the
vehicle.
TM
3. Remove heat-shield.
4. Remove driver and passenger seats.
5. Remove engine upper covers by removing the quick rivets with
a flat screwdriver and screws with Phillips screw driver.
6. Remove center cover by removing the quick rivets with
a screwdriver.
7. Remove seat lower cover by removing the quick rivets and
screws attaching it to the frame.
8. Remove lower left seat plate to access the front header flange nuts.
9. Remove engine bottom guard by removing (10) engine guard
bolts from underneath of vehicle.
10. Remove OEM muffler and header pipes.
IMPORTANT - PLEASE READ CAREFULLY
We recommend that this performance part be installed by a qualied motorcycle technician.
If you have any doubts as to your ability to install this performance part, please consult with
your local motorcycle dealer. Read all instructions rst before starting installation. Make sure
the UTV and exhaust system are completely cool before starting the installation. Be sure to
save all stock components for possible use later.
NOTE: Instructions continued on Page 2...
Page 2
Installation Instructions
V.A.L.E.
2008 Kawasaki
V A R I A B L E A X I S L O C K I N G E X H A U S T
Teryx 750
V. A.L.E. ™ Com plete D UAL Exha ust Sys tem wit h M-7 Caniste rs
Part # 0 05-224 0106D
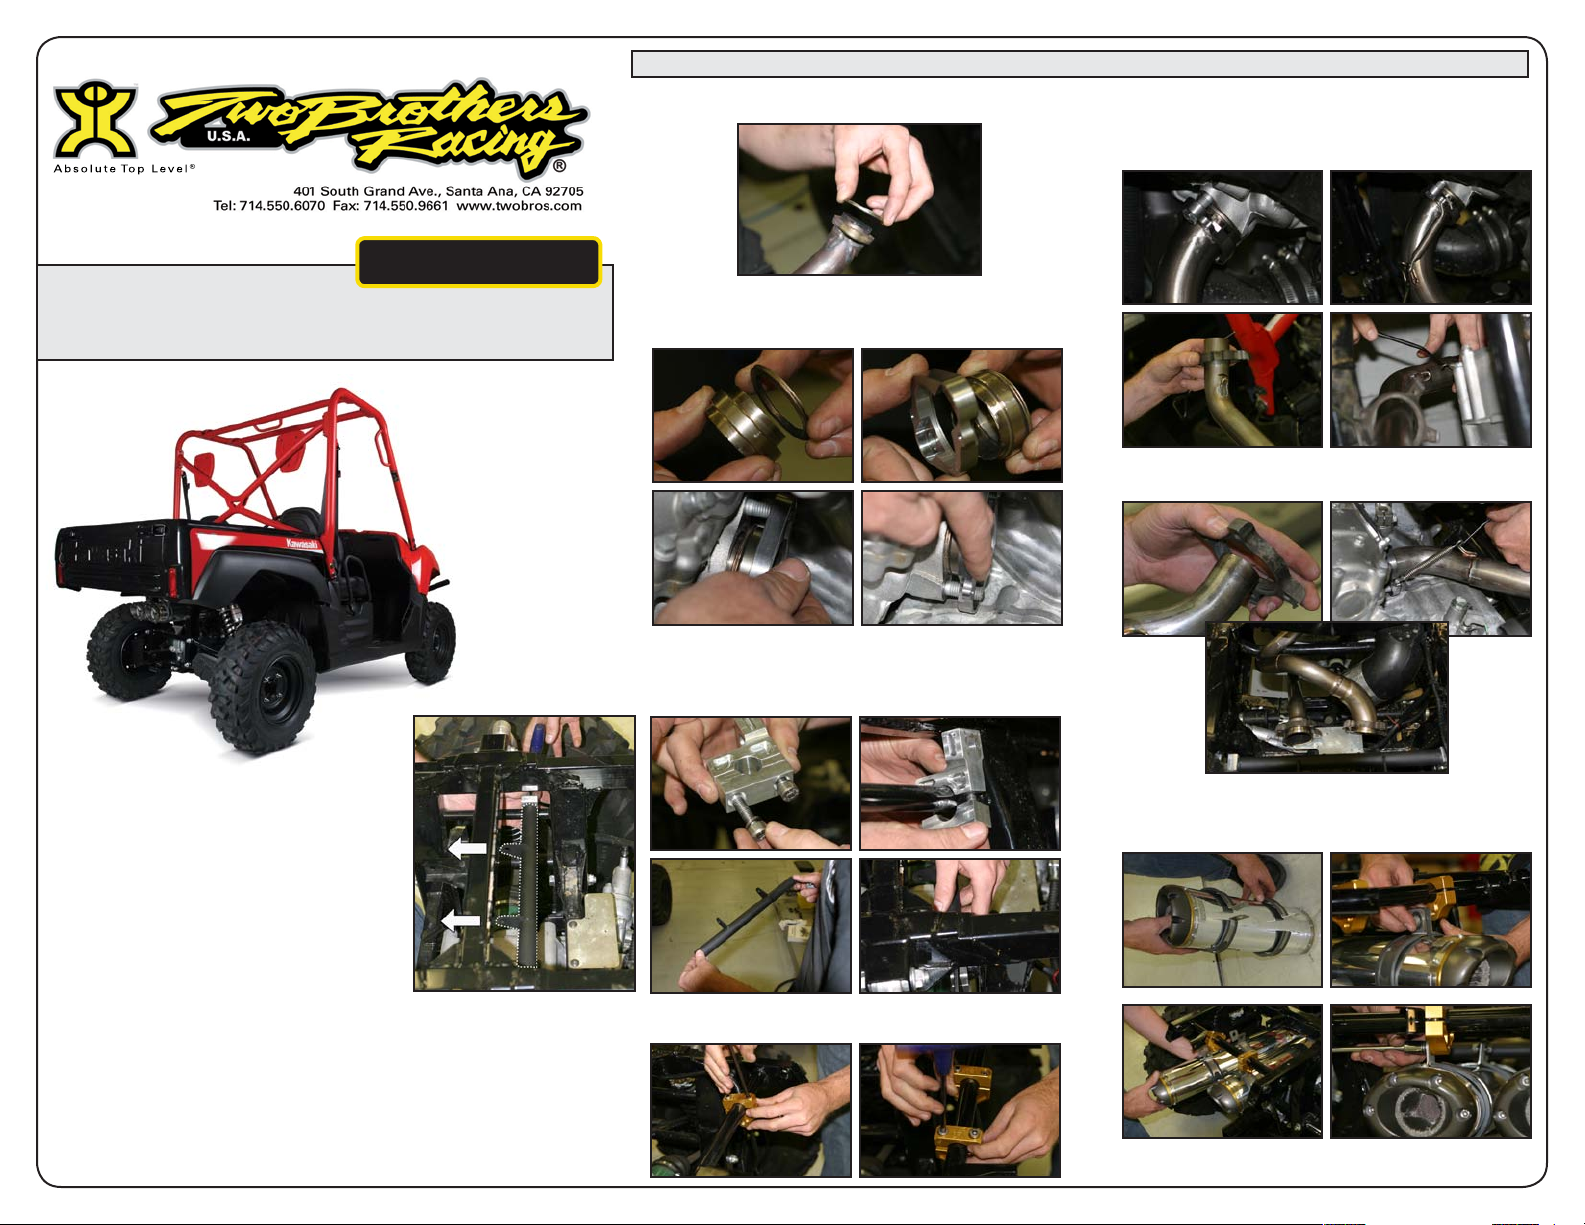
11. Remove gasket from header collar.
TM
12. Install OEM header collar gasket and supplied TBR header
collars and flanges to the engine. Secure with supplied locking
bolts to 13 ft. lbs.
13. Install rear muffler mounting supports and mounting bar to rear
frame section as shown with muffler mounting tabs facing the rear
of vehicle. Secure with the 8mm socket head cap screws and lock
washers provided. Tighten when everything is aligned to 13 ft. lbs.
15. Install front header pipe “A” and attach to header collar with
supplied spring. Then join with front header pipe “B” and join
with spring. make sure an x-ring is on the tube before joining
them together.
16. Install rear header and attach to header flange with supplied
spring. Make sure x-ring is on header pipe.
14. Install rear mounting brackets to rear frame tube as shown.
Leave loose for now.
17. Install the TBR mufflers using the rubber lined muffler clamps
and supplied bolts and loosely attach mufflers to muffler
mounting brackets.
NOTE: Instructions continued on Page 3...
Page 3

Installation Instructions
V.A.L.E.
2008 Kawasaki
V A R I A B L E A X I S L O C K I N G E X H A U S T
Teryx 750
V. A.L.E. ™ Com plete D UAL Exha ust Sys tem wit h M-7 Caniste rs
Part # 0 05-224 0106D
005-2240106D
Qty. Description Part Number
1 Left Muffler Canister M-7 005-224-206ML
1 Right Muffler Canister M-7 005-224-206MR
1 Rear Header 0 05-22401H-R
1 Front Header Assembly #1 005-22401H-F1
1 Front Header Assembly #2 005-22401H-F2
4 Heavy Duty Muffler Clamp 005-2C4
1 HARDWARE KIT 005-224-3C
2 Header Collar Long 005-224-17L
2 Steel Header Flange 005-224-15S
2 X-Lite V.A.L.E Retaining Ring 005-7-2-2
3 80mm Spring 005-S-80
2 Billet Bolt-on Muffler Mount (Front) 005-224B
2 Billet Bolt-on Muffler Mount (Back w/ radius) 005-188B
10 8x25mm Socket Head Cap Screws 005-SH825
14 M8 Split High Collar Lock Washers 005-WL8
8 M6 Split High Collar Washers 005-WL6
4 8x1.25mm Pitch Metal Locking Flange Nuts 005-FNL8
2 8mm Flange Nuts 005-FN8
4 8mm Large Flat Washers 005-WO8
4 8x20mm Socket Head Cap Screws 005-SH820
2 Spark Arrester Screen (Installed) 005-106S
8 6x14mm Socket Head Cap Screws 005-SH614
1 14” Tube with Brackets 005-22401B
2 Needle Shim 005-224NS
1 #150 Main Jet 005-224MJ150
1 #145 Main Jet 005-224MJ145
1 5mm Long Handle Ball end hex key 005-9-18610
1 Permatex High Strength Threadlock 031-P09179
1 TBR Logo Decal Kit 015-10212
18. Join the right muffler to the rear header using the supplied
6x14mm socket head cap screws and lock washers provided.
Tighten the bolts in a cross pattern to 115 in. lbs. when alignment is correct.
TM
19. Join the left muffler to the front header and repeat the previous
steps.
20. Tighten all mounting hardware.
21. We recommend changing the main jets on each
carburator and adding a 0.5mm shim under each needle.
The front cylinder main jet we used is 150 and the rear
cylinder is 142. The pilot screws we set at 2.5 turns out.
*These settings were made with stock air box and Two Brothers
Racing Dual exhaust.
22. Re-install all heat shields, engine guards and engine covers.
23. Re-install seats and cargo bed and secure with OEM hardware.
24. Double check your work to be sure everything is in place and
securly fastened.
25. Re-pack every 8-12 hours and more frequently when sound tips
are used. Failure to re-pack is not a reason for warranty. If discoloration is visable it must be replaced with a TBR re-pack kit
(005-10038MX-17).
26. Before you run the UTV, clean off all fingerprints and dirt, as any
oily residue will etch the metal and become somewhat permanent when the system gets hot. Run the bike and enjoy. It is
normal for some white smoke to appear the first time you start
the bike. This is packing/manufacturing oil from inside the pipe
burning off. All muffler bolts and mounting hardware should be
checked frequently or every 2-5 hours.
Maintenance
• Check your hardware every 10 hours of operation,
including the bolts on the muffler assembly.
• Packing should be replaced every 15 hours of operation.
• Quiet inserts are also available. P1 Powertip (005-P1), P1R Powertip (005-P5) and P4 Powertip (005-P4)
• In order to maintain optimal performance, it is
recommended that this spark arrestor be cleaned after
every 30 hours of use.
Spark Arrester is included with all M-7 V.A.L.E. stainless/aluminum
exhaust systems. These tips prevent broadcasting sparks with no
appreciable loss of horsepower. Additionally this tip prevents the
introduction of foreign matter into the exhaust system.)
(Our U.S. Forestry Service approved
Care & Cleaning
Care & Cleaning
Keep system free of dirt and moisture. Store in a cool, dry place. Make sure vehicle is
completely cool before maintenance.
Stainless Header System: Polished stainless steel pipes will turn a light golden hue
after a few heat cycles, this is a normal characteristic of high quality stainless steel.
Clean using a mild water based spray cleaner. Always apply cleaner or polish with a soft,
clean cloth.
Polished Aluminum Canisters: Use an aluminum or mag wheel polish to restore the
bright finish to factory spec.
Repack all road canisters every 3,000 miles. Part #005-10038
Repack all offroad canisters after every 10 hours of use. Part #005-10038MX
NEVER dyno test your bike with carbon fiber or titanium canisters installed - the
intense heat and lack of cooling air can quickly burn through the canister material. Two
Brothers Racing does not provide a warranty for burned canisters.
Warranty
Two Brothers Racing products are intended for closed course
competition purposes only, and therefore are sold “as is” without
warranty. Two Brothers Racing specifically disclaims any warranties
of merchantability or fitness for a particular purpose and disclaims all
responsibility for consequential and incidental damages or any other
losses arising from the use of these products or parts.
 Loading...