

Twister Storm 3DX Assembly & Flight Training Manual

SpecificationS
Main rotor diameter..............................................720mm
Tail rotor diameter .................................................135mm
Length ..................................................................... 630mm
Weight (not incl. receiver & battery) .......500g (17.5oz)
contentS
1..................................................... Assembled helicopter
1.......Twister 2.4GHz 6 Ch. computer radio - installed*
1.....................Planet R6M 2.4GHz receiver - installed*
1.........................Twister HL400 tail lock gyro - installed
4..........................................EnErg S7.5 servos - installed
1...........Cyclone 440 Turbo brushless motor - installed
1................ Twister 25 amp speed controller - installed
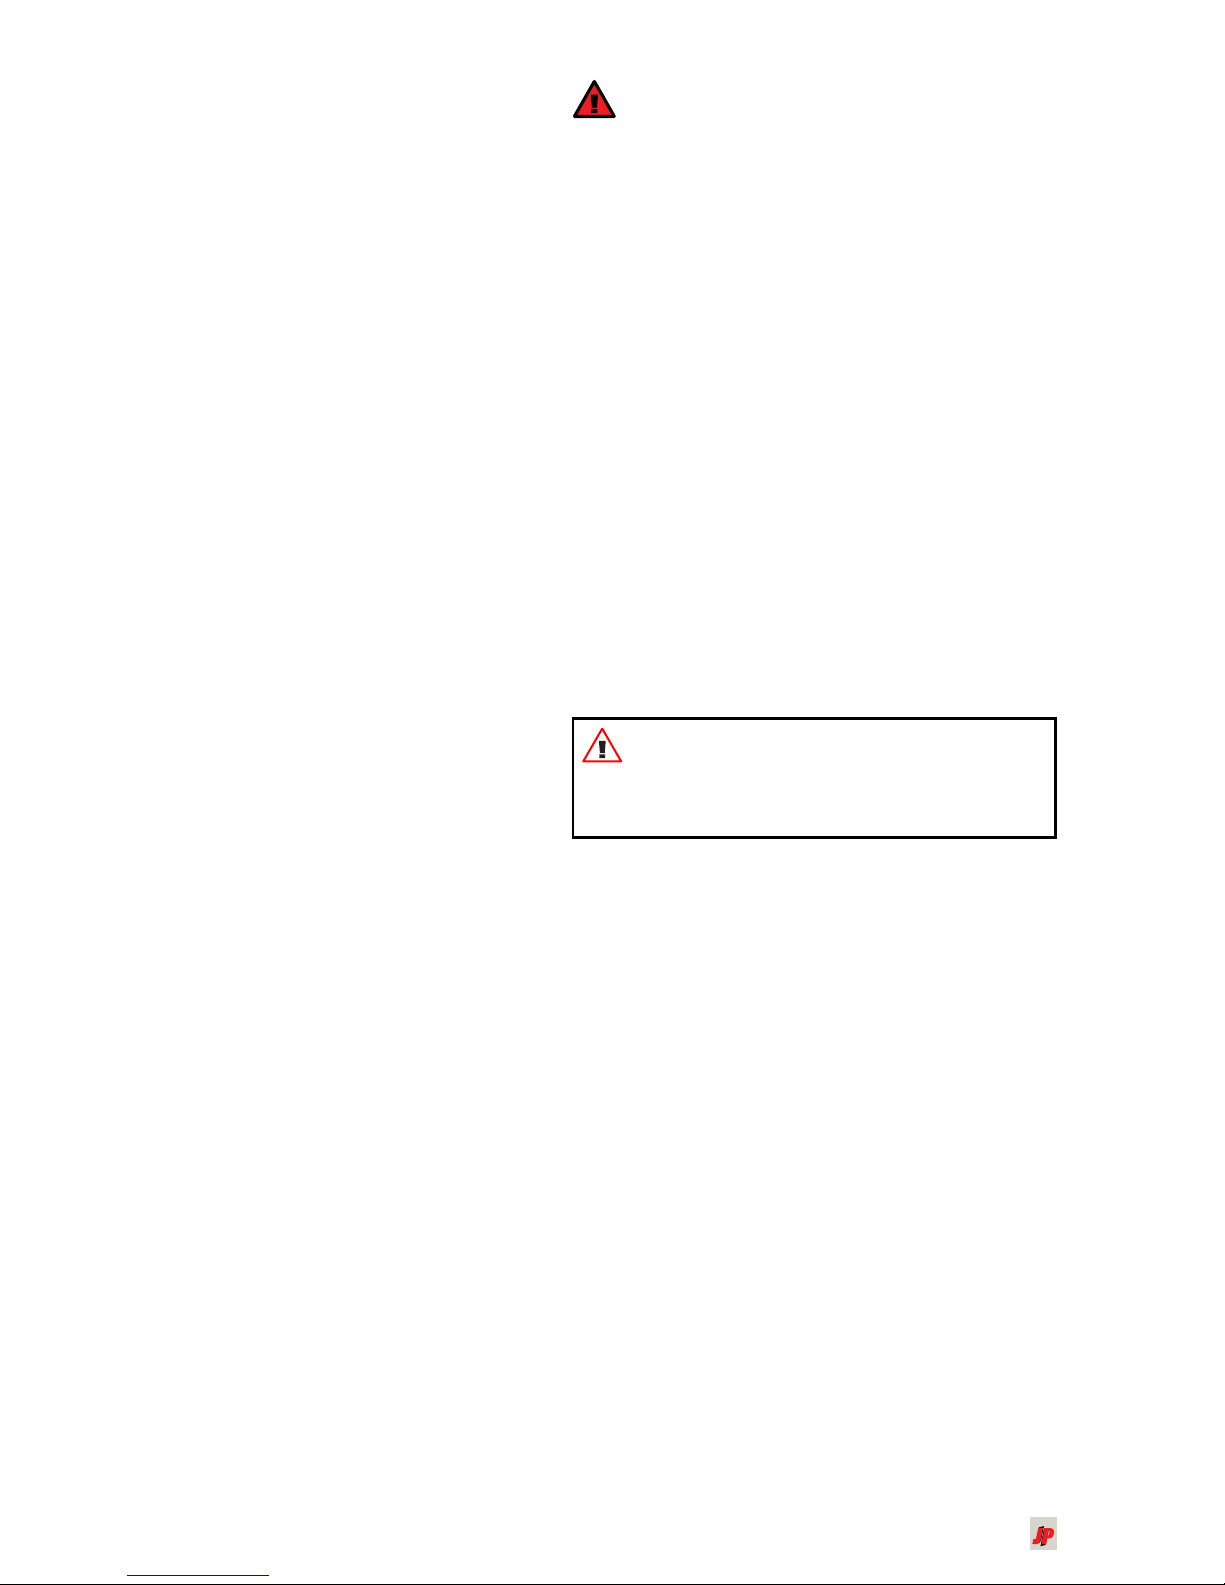
1.................Twister 11.1V lithium polymer battery pack
1............... Twister lithium polymer 12V DC/DC charger
1.................................Twister 240V mains power supply
1.........................................................Foam blade retainer
8................................................AA size pencell batteries
1.........................Twister Storm 3DX instruction manual
featureS
■ Test-Flown & Flight-Guaranteed!
■ CCPM 120° flight control system for precise control
■ 3D flight performance without upgrading
■ High performance, low current, brushless motor
■ Digital proportional Twister R/C 2.4GHz transmitter
with silky smooth sticks*
■ High quality ball bearings
■ Planet R6M 6-channel receiver installed*
■ High performance, low friction belt tail drive
■ Professional HL 400 tail lock & std dual rate gyro
■ Autorotation freewheel fitted
■ Professional digital servos installed
■ Strudy 2-part main frame design
■ Thrust & ball raced main blade grips
■ Ball raced tail pitch slider
■ Twin ball raced tail pitch bell crank
■ Twin boom support kit fitted.
*Twister Storm 3DX is available in two versions.
This item is not included in the 'Radio Ready' version.
twiSter Storm 3DX
electric 400 claSS 3D aerobatic rtf heli
the profeSSional 3D helicopter
V7.10
R/C
TWISTER
Factory-assembled Storm 3DX helicopter with 2.4GHz 6 channel 8-model memory radio*,
brushless motor, ESC, lipo, charger, power supply, heading lock gyro and MORE!
the profeSSional choice
for 3D aerobaticS!
Assembly & Flight Training guide
the profeSSional choice for
ultimate 3D flight!
Vital Safety information
☛
If you have no experience flying R/C helicopters, it
is highly recommended that you seek advice from your
supplier and/or an experienced R/C helicopter pilot.
☛
Read all instructions carefully prior to assembling
and before flying the helicopter.
☛
Seek advice should any information be unclear.
You assume all risk and responsibility when using this
model.
☛
Keep well clear of rotating blades. Never wear
loose clothing when operating helicopters. Always
wear protective eye wear.
☛
Only fly in areas where it is safe to do so and in
areas where the flying of R/C models is permitted.
☛
Do not fly near people, animals, buildings or
obstacles.
☛
Do not fly your model at head height.
☛
Do not fly your model within 5 metres of yourself or
any other person.
guarantee/warranty
J.Perkins Distribution Ltd and Model Engines (Aust.) Pty. Ltd. Guarantee this product to be free from manufacturing
and assembly defects for a period of one year from the time of purchase. This does not affect your statuary rights.
This warranty is not valid for any damage or subsequent damage arising as a result of a crash, misuse, modification or
for damage or consequential damage arising as a result of failure to observe the procedures outlined in this manual.
Operation of this model is carried out entirely at the risk of the operator. Please note that, whilst every effort is made to
ensure the accuracy of instructions and material included with this product, mistakes can occur and neither J.Perkins
Distribution Ltd/Model Engines (Aust.) Pty. Ltd nor it’s distributors will be held liable for any loss or damage arising from
the use of this model or for any loss or damage arising from omissions or inaccuracies in the associated instructions or
materials included with this product
We reserve the right to modify the design of this product, contents and manuals without prior notification.
© 2010 J.Perkins Distribution Ltd, Lenham, Kent, UK ME17 2DL. www.jperkinsdistribution.co.uk
Model Engines (Aust.) Pty. Ltd., Noble Park, Victoria 3174, Australia. www.modelengines.com.au
All rights reserved. E&OE
Contents
Introduction .................................................... 1
Crashes & spare parts .......................... 1
Never flown? Please read............................ 1
Preparing for flight ........................................ 2
1. Unpack your Twister Storm 3DX ...... 2
Battery & charger .......................................... 2
2. Connect charger to power supply ... 2
3. Connect the battery to the charger . 2
Lithium Polymer Battery Safety .................. 3
Final flight preparation ................................. 3
4. Installing the battery .......................... 3
5. Rotor blades check ............................ 3
6. Linkage check ..................................... 3
7. Switch on transmitter ........................ 3
8. Range check ....................................... 4
9. Control Check ..................................... 4
Advanced Flying Features............................ 4
3D/Idle Up Switch .................................. 4
Troubleshooting ............................................. 5
Vibration .................................................. 5
Main rotor does not turn ....................... 5
Main rotor turns but helicopter does not
take off ..................................................... 5
Spares and option parts ............................... 6
Exploded diagram .................................. 6
Exploded drawing ref no's .................... 8
Spare parts listing .................................. 9
Option parts ........................................... 13
http://www.jperkinsdistribution.co.uk
weee DiSpoSal
Do not dispose of this product with other household waste.
Instead, it is your responsibility to dispose of your waste
equipment by handing it over to a designated collection point for
the recycling of waste electrical and electronic equipment. The
separate collection and recycling of your waste equipment at
the time of disposal will help to conserve natural resources and
ensure that it is recycled in a manner that protects human health
and the environment. For more information about where you can
drop off your waste equipment for recycling, please contact your
local council, your household waste disposal service or the shop
where you purchased the product.
warning!
FAILURE TO OBSERVE SAFETY GUIDLINES MAY LEAD
TO PERSONAL INJURY OR DAMAGE!

1
http://www.modelengines.com.au
TWISTER
introDuction
About the Twister Storm 3DX
The Twister Storm 3DX is designed to fly aerobatic
and 3D manoeuvres using the latest generation
brushless motors and lithium polymer battery packs
and without the need for upgrades.
The Twister Storm 3DX’s state of the art 120 degree
CCPM control system ensures precise control. This
control system combined with precision wooden
main rotor blades gives the Twister Storm 3DX its
precise flight characteristics.
The high performance and efficient Cyclone 440
Turbo brushless motor, powers the Twister Storm
3DX through aerobatics with ease. The use of high
quality ball races throughout the helicopter and
the belt driven tail drive system, not only ensures
smooth operation, but by reducing friction, flight
times increase as a result of the lower current draw.
Factory Assembled
The Twister Storm 3DX comes assembled with four
EnErg S7.5 servos installed along with a Twister
2.4GHz 6 channel computer radio* with 8 model
memory. A high performance brushless motor,
Twister 25A speed controller and a Twister HL400
tail lock gyro are also fully installed at the factory.
craSheS & Spare partS
The Twister Storm 3DX has been designed to be
strong and easy to repair, however, should the
helicopter crash, there is a chance that parts will
be damaged. In the event of a crash, it is important
that the helicopter be thoroughly checked before
undertaking further flights to ensure that no danger
could be posed to yourself, bystanders or property.
If the structural integrity of any part is in doubt,
the part should be replaced. Crash damage is NOT
covered by warranty.
Use the exploded view at the rear of this manual,
along with the listed part numbers, and contact your
hobby supplier for the required parts.
neVer flown? pleaSe reaD...
The Twister Storm 3DX is for accomplished R/C
helicopter pilots. If you are new to R/C helicopter
flying, we would recommend starting with one of
the easier to fly members of the Twister family of
helicopters before progressing to the Twister 3D
Storm.
Safety Information
Radio Control Models are not toys and serious injury
to persons or damage to property can result if not
used in a responsible manner.
In flight the main rotor blades can approach
2000rpm, therefore never fly closer than 5 metres
and never fly your model at head height.
In the UK, please observe the principles of safety
as outlined by the governing body for model flying,
the British Model Flying Association (BMFA). www.
bmfa.org
In Australia, please observe the guidelines for the
safe operation of radio control models as outlined
by the Model Aircraft Association of Australia
(MAAA). www.maaa.asn.au
J Perkins Distribution Ltd declares that this remote controlled
model helicopter is in compliance with the essential requirements
and other relevant provisions of Directive 1999/5/EC.
A copy of the declaration of conformity can be obtained from
J Perkins Distribution Ltd, Ashford rd, Lenham, Kent. ME17 2DL
0678
*Twister Storm 3DX is available in two versions.
This item is not included in the 'Radio Ready' version.
2
http://www.jperkinsdistribution.co.uk
TWISTER
preparing for flight
1. unpack your twiSter Storm
3DX
Carefully remove the model and other items
from the packaging.
Inspect the model to check that nothing
is damaged and that all components have
been included.
Insert 8 AA batteries into the transmitter
battery compartment being careful to
observe battery polarity, (refer to the Twister
RC radio instructions).
battery & charger
The included balancing type charge comes with
both and AC power adapter and a power lead for
12V DC operation.
2. connect charger to power
Supply
The charger supplied is designed to
automatically charge the LiPo battery in
around 1 hour from a discharged state.
The charger is powered by the supplied
240V AC power supply or alternatively, a 12V
DC power source such as a 12V gel cell or
car battery can be used.
Plug the connector from the AC power
adapter or the 12V DC power lead into the
socket on the right hand side of the charger.
See below:
If using a 12VDC power source, connect
the red alligator clamp to the positive (+)
terminal and the black alligator clamp to the
negative (-) terminal.
The Red ‘CHARGE’ LED will flash and the
cell LEDs will be solid red.
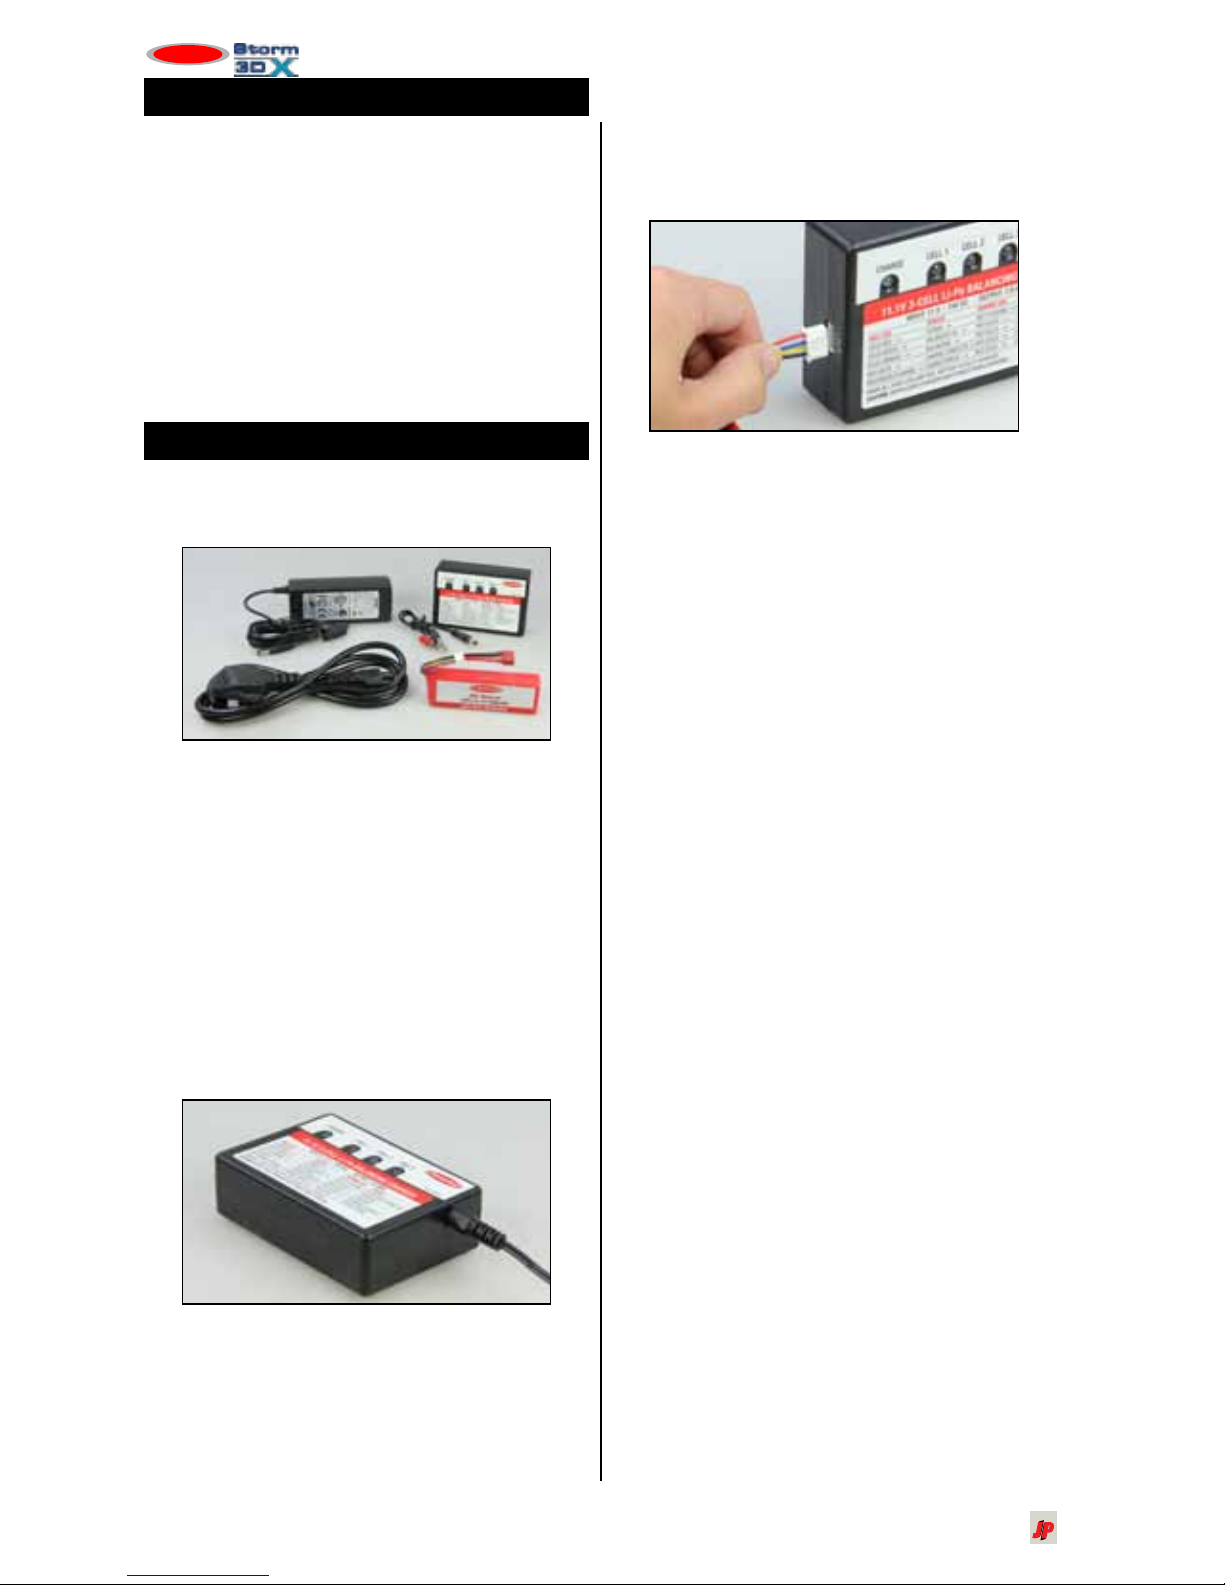
3. connect the battery to the
charger
Plug the white 4 pin connector on the flight
battery into the socket on the left side of the
charger.
The "CHARGE" LED will glow solid red and
the 'Cell' LEDs will be solid green or oramge
depending on the state of the battery cells.
The instructions on the front of the charger
give full details on the status of the LED
indicators and the battery charge status.
When the battery is fully charged, all four
LEDs will glowa solid red.
The battery can now be disconnected from
the charger and is ready for use.
WARNING!
Li-poly batteries can be dangerous!
Do not leave battery unattended when charging
Do not attempt to charge a warm battery. Allow
battery to cool before charging.
Disconnect battery immediately should battery
become hot to touch.
3
http://www.modelengines.com.au
TWISTER
lithium polymer battery Safety
Before Charging Li-Po Batteries
Before charging your battery, check for any
visible damage e.g. check if the battery has
expanded or swollen in size or if the cells
have been punctured.
If any of the above is true: DO NOT CHARGE
THE BATTERY!
Charging Li-Po Batteries
ONLY use a charger designed to charge
Lithium Polymer batteries. NEVER use any
other type of charger.
Never charge a hot battery.
Always allow battery to cool after flying
before recharging.
Never attempt to charge at a faster rate than
recommended in the instructions.
Check the battery cell count matches the
charger cell count switch (if fitted)
Never charge unattended. Always stay
with the battery whilst charging in case of
overheating and risk of fire.
Only charge on non-flammable surfaces e.g.
concrete floor (outside) or pyrex or ceramic
container. NEVER charge inside a car!
Stop charging immediately should battery
become hot to touch during charging.
In the event of a fire, use sand to extinguish
the flames. DO NOT USE WATER
Using Li-Po Batteries
Do not modify or change any part of the
battery or lead.
Do not remove the heat shrink covering
Any modification may damage the battery
and invalidate any warranty claim.
Do not place battery near fires or any high
temperature object or device.
Do not charge batteries whilst driving.
Do not store batteries in a motor vehicle.
Do not allow batteries to get wet or
submerged in any liquid.
Do not short circuit batteries.
Should skin or eyes come in contact with the
electrolyte, rinse thoroughly with water and
seek medical assistance.
final flight preparation
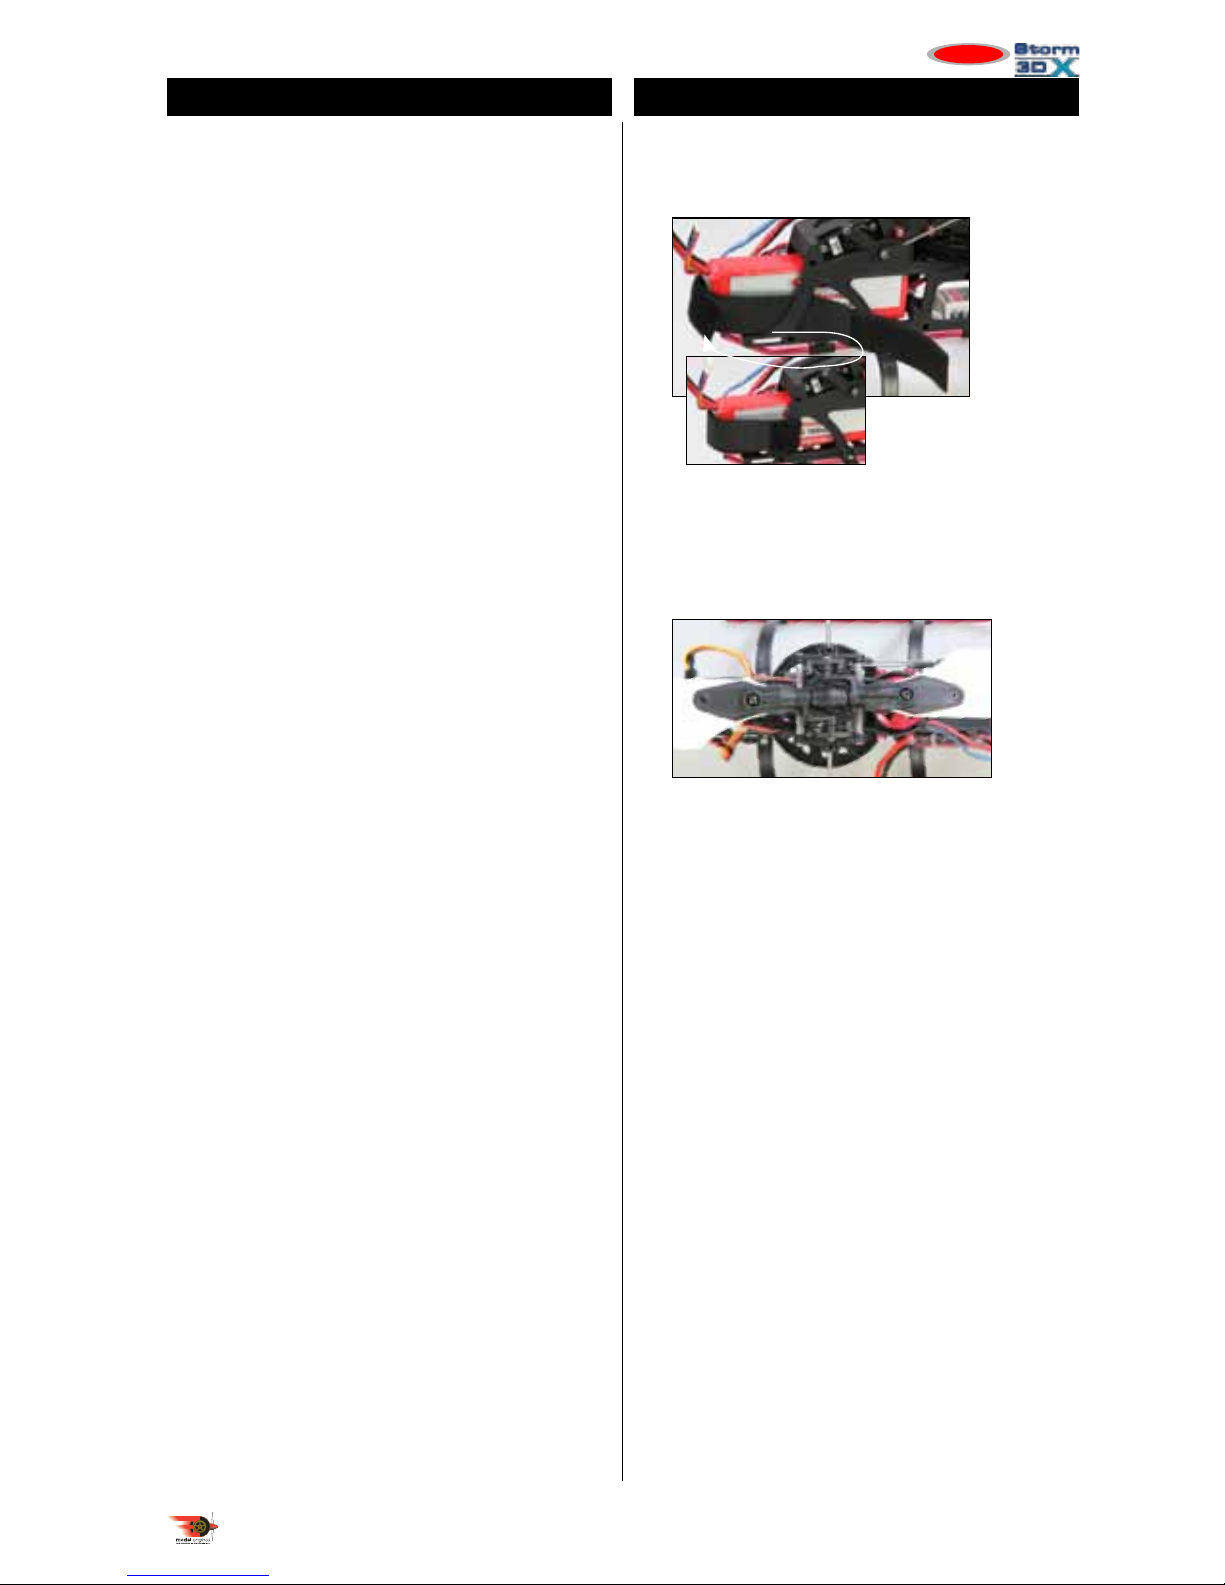
4. inStalling the battery
Secure the battery to the mounting tray with
the Velcro strap provided. See below:
5. rotor blaDeS check
Unfold the main rotor blades to the flying
position as shown below.
Check the rotor blade bolt tension. Blades
should move with slight pressure applied.
6. linkage check
Check that all linkages and connectors
are attached and that rotating parts rotate
smoothly.
Make sure that all linkages move freely with
no binding or tightness. Free up any linkages
that feel too tight.
7. Switch on tranSmitter
If you have purchased the Twister Storm 3DX with 6
channel radio included please follow the instruction
below, if you are using your own radio, please
follow the instruction for that radio.
The Twister Storm 3DX is changeable
between Mode 1 or Mode 2 transmitter. The
Twister RC Radio Instruction manual shows
the layout of both transmitter types.
Move the throttle stick and throttle trim to
the lowest (low throttle position) position.
Centre the trim levers on the other 3
functions.
Make sure that the ‘3D’ (idle up) switch and
the ‘throttle hold’ switch are pushed fully
back (towards the back of the transmitter).
Switch on the transmitter.
Turn on the helicopter by connecting the
connector from the speed controller to
 Loading...