

Twister Medevac 2.4 Assembly & Flight Training Manual
This high performance model must be assembled according to the
instructions. May cause serious injury to persons or property if not
used responsibly or if operated without due caution.
Twister medevac 2.4
Ready to fly 4 channel R/c helicopteR
Assembly & Flight Training guide
SpecificationS
Main rotor diameter.............................................................................. 340mm
Fuselage length ..................................................................................... 365mm
R/C transmitter.....................................................Planet 5 2.4GHz Advanced
Cyclic steering ............................................... hi-torque EnerG micro servos
On-board electronic control..................Twister 3-in-1 unit & R6M 2.4GHz
On-board power ...................7.4V 800mAh Li-polymer (with balance lead)
Model weight (no battery) ...........................................................179g (6.3oz)
Flying weight .................................................................................. 222g (7.8oz)
Flight time per charge ..........................................10 minutes (approximate)
Main drive .................................twin motors + ballraced steel main shafts
Primary electronic stabilisation..................on-board piezo yaw rate gyro
Kit contentS
Twister Medevac helicopter ..........................................................................1
Planet 5 Advanced 2.4GHz transmitter .........................................................1
Planet R6M 2.4GHz receiver...........................................................................1
Twister “3 in1” on-board electronics unit ....................................................1
EnErG micro servos .........................................................................................2
Twister 7.4V lithium polymer battery pack ...................................................1
Twister Lithium polymer 12V DC Balancer Charger ...................................1
Twister 240V mains power supply .................................................................1
Twister Medevac instruction manual ...........................................................1
Twister Medevac DVD ....................................................................................1
FREE main blades (upper & lower)....................................................... 2 sets
Flight Simulator USB cable set (connects transmitter to a PC) ...............1
AA transmitter batteries .................................................................................4
V8.09

Vital Safety info
Please read all instructions carefully before using this
model. If any information in this manual is unclear,
please contact your supplier for help.
Please note especially the potential dangers associated
with the rotating parts in this model:
DANGER—Wear protective eyewear when using model
helicopters!
DANGER—Do not wear loose clothing or ties!
DANGER—Keep well clear of rotating blades!
DANGER—Never fly near children or animals!
about the flyinG aRea
ReQuiRed
The Twister Medevac is designed primarily for indoor
use—or outdoors in flat calm conditions. A hard, flat
surface clear of all obstacles with an area of around 400
square feet is the minimum recommended requirement.
However, you should fly only where it is safe to do so.
about tRaininG,
cRaSheS & SpaRe paRtS
The Twister Medevac has been designed to be strong
and very easy to repair, however, the helicopter is not
invulnerable and most people will tip their helicopter
over or break parts during their flying career. This is
quite normal. All parts are available as spares from
your supplier. Study the exploded view of the helicopter
carefully to understand the relationship between parts
and how to replace them if necessary. Crash damage is
not covered by warranty.
GuaRantee/waRRanty
J. Perkins Distribution Ltd and Model Engines (Aust.) Pty. Ltd.
guarantee this product to be free of manufacturing or assembly
defects for a period of one year from time of purchase. This does
not affect your statutory rights. This warranty is not valid for any
damage or subsequent damage arising as a result of a crash,
misuse, modification or for damage or consequential damage
arising as a result of failure to observe the procedures outlined
in this manual. Operation of this model is carried out entirely
at the risk of the operator. Please note that, whilst every effort
is made to ensure the accuracy of instructions and material
included with this product, mistakes can occur and neither J.
Perkins Distribution Ltd/Model Engines (Aust.) Pty. Ltd. nor it’s
distributors will be held liable for any loss or damage arising
from the use of this model or for any loss or damage arising from
omissions or inaccuraccies in the associated instructions or
materials included with this product.
We reserve the right to modify the design of this product,
contents and manuals without prior notification.
© 2007 J Perkins Distribution Ltd, Lenham, Kent, UK ME17 2DL.
www.jperkinsdistribution.co.uk
Model Engines (Aust.) Pty. Ltd., Noble Park, Victoria 3174,
Australia. www.modelengines.com.au. All rights reserved. E&OE.
table of contentS
Guarantee/warranty ........................................ 2
Introduction ...................................................... 3
New to R/C helicopters? ................................ 3
General safety concerning helicopters ...... 4
Welcome ........................................................... 4
A. Kit contents .......................................... 4
B. Transmitter part names ...................... 5
C. Reversing switches ............................. 5
D. Transmitter mode conversion ........... 5
Flight preparation ............................................ 6
A. Fitting the flybar ................................... 6
B. Lithium polymer flight battery ............ 7
C. Charging the flight battery ................. 7
D. Fitting the flight battery ...................... 8
E. Linkage checks .................................... 8
Transmitter layout throttle left (mode 2) ...... 9
A. Stick and trim control summary ........ 9
Transmitter layout throttle right (mode 1) ... 10
A. Stick and trim control summary ........ 10
Power checks and connecting up ............... 11
A. Connecting the Li-po battery ............. 11
B. Swashplate level check(Mode 2) ..... 12
C. Swashplate roll check(Mode 2 ) ....... 12
D. Swashplate elevator check(Mode 2) 13
E. Throttle check(Mode 2 transmitter) .. 13
F. Yaw check .............................................. 13
G. Range check ........................................ 14
Flight controls mode 2 .................................... 14
A. flight controls layout ........................... 14
B. Right stick unit functions .................... 15
C. Left stick unit functions ...................... 15
Flight controls mode 1 .................................... 16
A. flight controls layout ........................... 16
B. Right stick unit functions .................... 17
C. Left stick unit functions ...................... 18
Fine tuning of yaw control ............................. 19
3 in 1 unit adjustors .................................. 19
Damage prevention features ......................... 19
LBW (Low Battery Warning) beacon .... 19
MOPS ......................................................... 19
How does a helicopter fly? ............................ 20
Flight training guide ........................................ 21
The flying area .......................................... 21
Positioning your Twister Medevac ....... 21
Increase throttle gently ........................... 21
Walking the helicopter ............................ 21
Taking the first 'hop' ................................ 22
Hovering and manoeuvres ..................... 22
Beyond the hover ..................................... 22
Troubleshooting ............................................... 23
Lithium polymer battery safety...................... 23
Parts listing....................................................... 24
Exploded view.................................................. 26
USB PC flight simulator cable ....................... 27
Option Parts ...................................................... 27
Binding the TX to the RX................................. 30

intRoduction
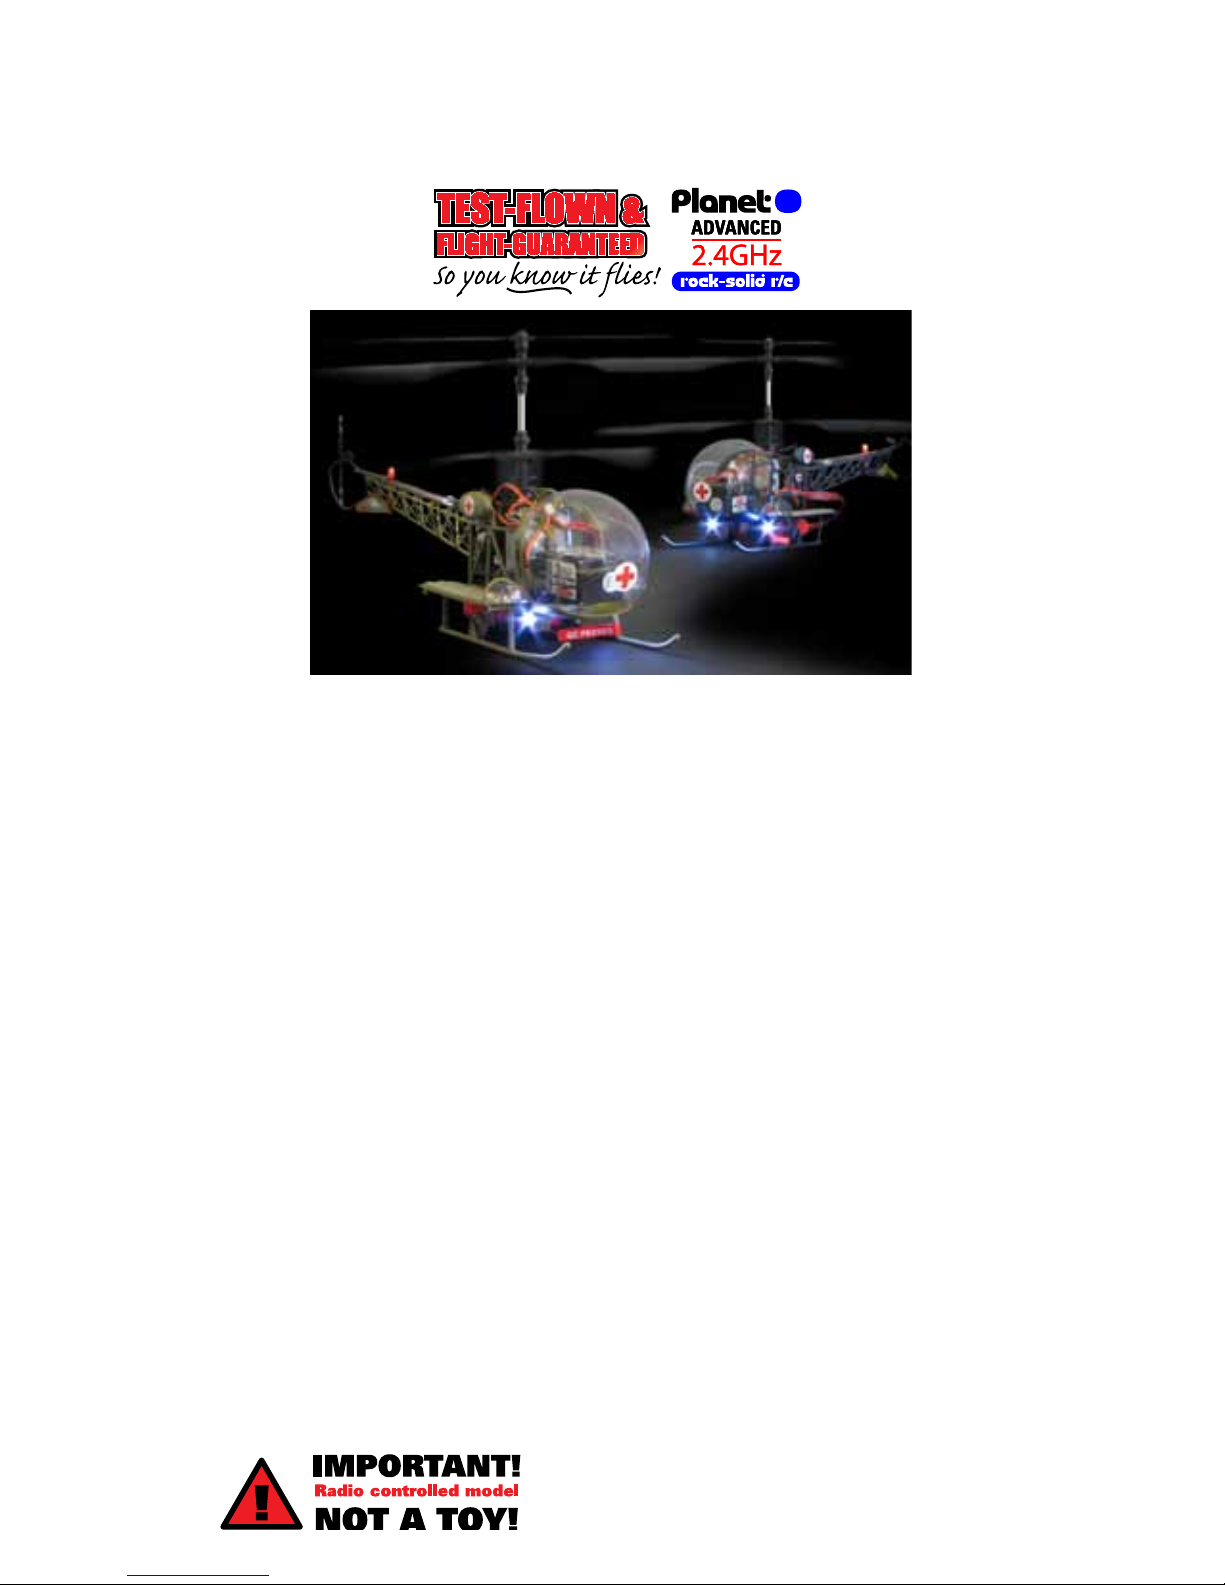
Thank you for buying one of the most complete, most stable, high quality scale RC helicopters
available today.
It almost hovers by itself!
The co-axial rotors and ingenious design of this helicopter make RC helicopter flight accessible and
practical to virtually anyone interested in RC helicopters!
The Twister Medevac demonstrates remarkable hovering stability and will help guide pilots into successful
flight in the shortest possible time.
Test-flown, Flight Guaranteed and Ready to Fly!
The Twister Medevac is ready to fly and is designed for use indoors and outdoors (in calm conditions) in
an adequate and safe space. The helicopter is designed by expert engineers and assembled at the factory.
It is very strong and designed with numerous innovative safety features. The Twister Medevac uses the
highest quality drive, power and control systems.
Above all, this is one of the most fun-packed models we have ever flown and we hope you will enjoy flying
it as much as we have!
State-of-the-art electronics in one package
The '3-in-1' on-board electronics package includes piezo gyro, electronic mixers and speed controllers
PLUS an LED system check, and a motor safe-start facility.
Professional Planet 5 2.4GHz R/C included
The transmitter and receiver have been designed for precision helicopter and aircraft flying and feature
Adanced 2.4GHz control and high quality adjustable height stick units (convertible between Mode II
(throttle left) and Mode I (throttle right)).
The transmitter incorporates full 4-function control via two dual axis control sticks and a 5th function
for lights/retracts, etc, socket for an optional Flight Simulator cable set, reversing switches, moulded
ergonomic rear and side grips, carry handle, neckstrap hang point and a charging socket (for charging
optional rechargeable transmitter batteries).
Spares & Option Parts
All spare and option parts are available for the Twister Medevac and can be purchased through model and
hobby outlets.
new to R/c helicopteRS?
Welcome to the thrilling challenge that is RC model helicopter flying!
If you are new to RC helicopters, please do not expect to be able to open the box and immediately 'fly
around'. RC helicopters are fun to fly but require some training in order to be flown successfully.
Helicopter flight techniques must be learnt
The model is not a toy and requires preparation before, during and after flight. It also requires a
commitment to spend a bit of time learning the procedures required for it's successful operation.
To most people, this is an interesting and exciting challenge, however, we recognise this may not be what
you expected from this product.
Therefore, if this is not what you expected, we advise you not to buy it.
Flight Training Guide and DVD included!
We have included a section on Basic Helicopter Flight Theory as well as a Flight Training Guide AND a
Medevac Flight Training DVD—all written and produced with the aid of experienced RC model helicopter
pilots.
We hope this material will help you succesfully explore real RC helicopter flying.
Please note that we do not guarantee that by following the information included with this product you will
be bound to achieve successful helicopter flight. Neither do we guarantee you will not break anything!!
4
http://www.jperkinsdistribution.co.uk
Twister Medevac
GeneRal Safety conceRninG helicopteRS
Please be aware that rotating blades can inflict painful and possibly serious injuries to people, animals or
objects should the rotors strike someone or something. We recommend people use protective eyewear
when operating this model.
Radio controlled models themselves can reach high speeds and cover significant distances rapidly if
control is lost. This model is capable of speeds around 20mph (30kph).
The model must therefore be used responsibly and with great care generally.
The model operates on the 2.4GHz radio band using the latest 2.4GHz technology, thereby providing probably the best interference rejection of any R/C system available today. This technology eliminates pilot
frequency worries as the radio encodes it's own unique frequency data at startup in a manner similar to a
bluetooth device.
Please observe the model flying safety code of the British Model Flying Association which can be found at
the the following address:
http://www.bmfa.org
welcome
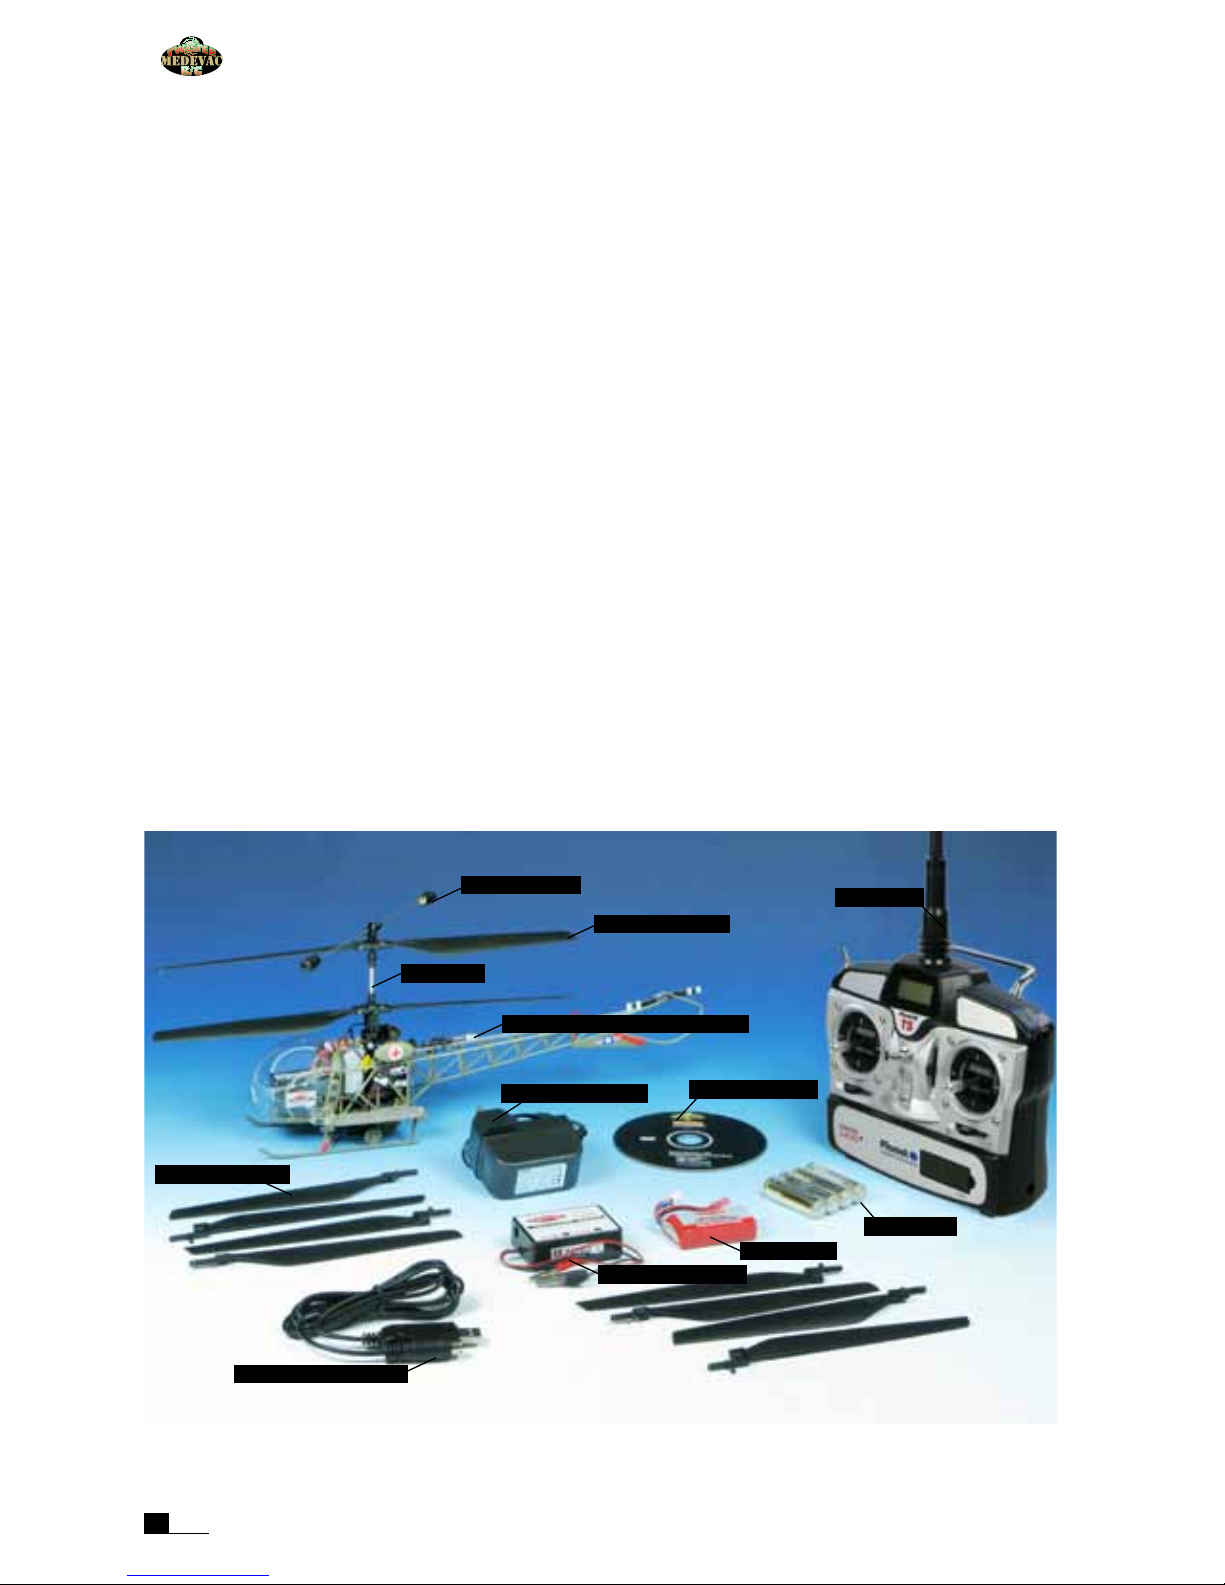
A. KIT CONTENTS
1. Carefully remove the model and other items from the packaging.
2. Insert the 4AA alkaline batteries supplied into the transmitter battery compartment being careful to
observe battery polarity.
Although the Twister Medevac is strong, all model helicopters require careful handling and a delicate
touch. In particular, take great care with the electrical connections to and from the '3-in-1' control unit and
also the main rotor associated parts.
SAFETY NOTE!
Do not shorten the receiver aerial or modify it in any way.
LBW - Low Battery Warning beacon
Flybar assembly
Main shaft
Main blades upper
DC balancer charger
Li-po battery
Tx batteries
Mains power supply
Spare main blades
Instructional DVD
Transmitter
Flight Sim USB cable set
5
http://www.modelengines.com.au
Twister Medevac
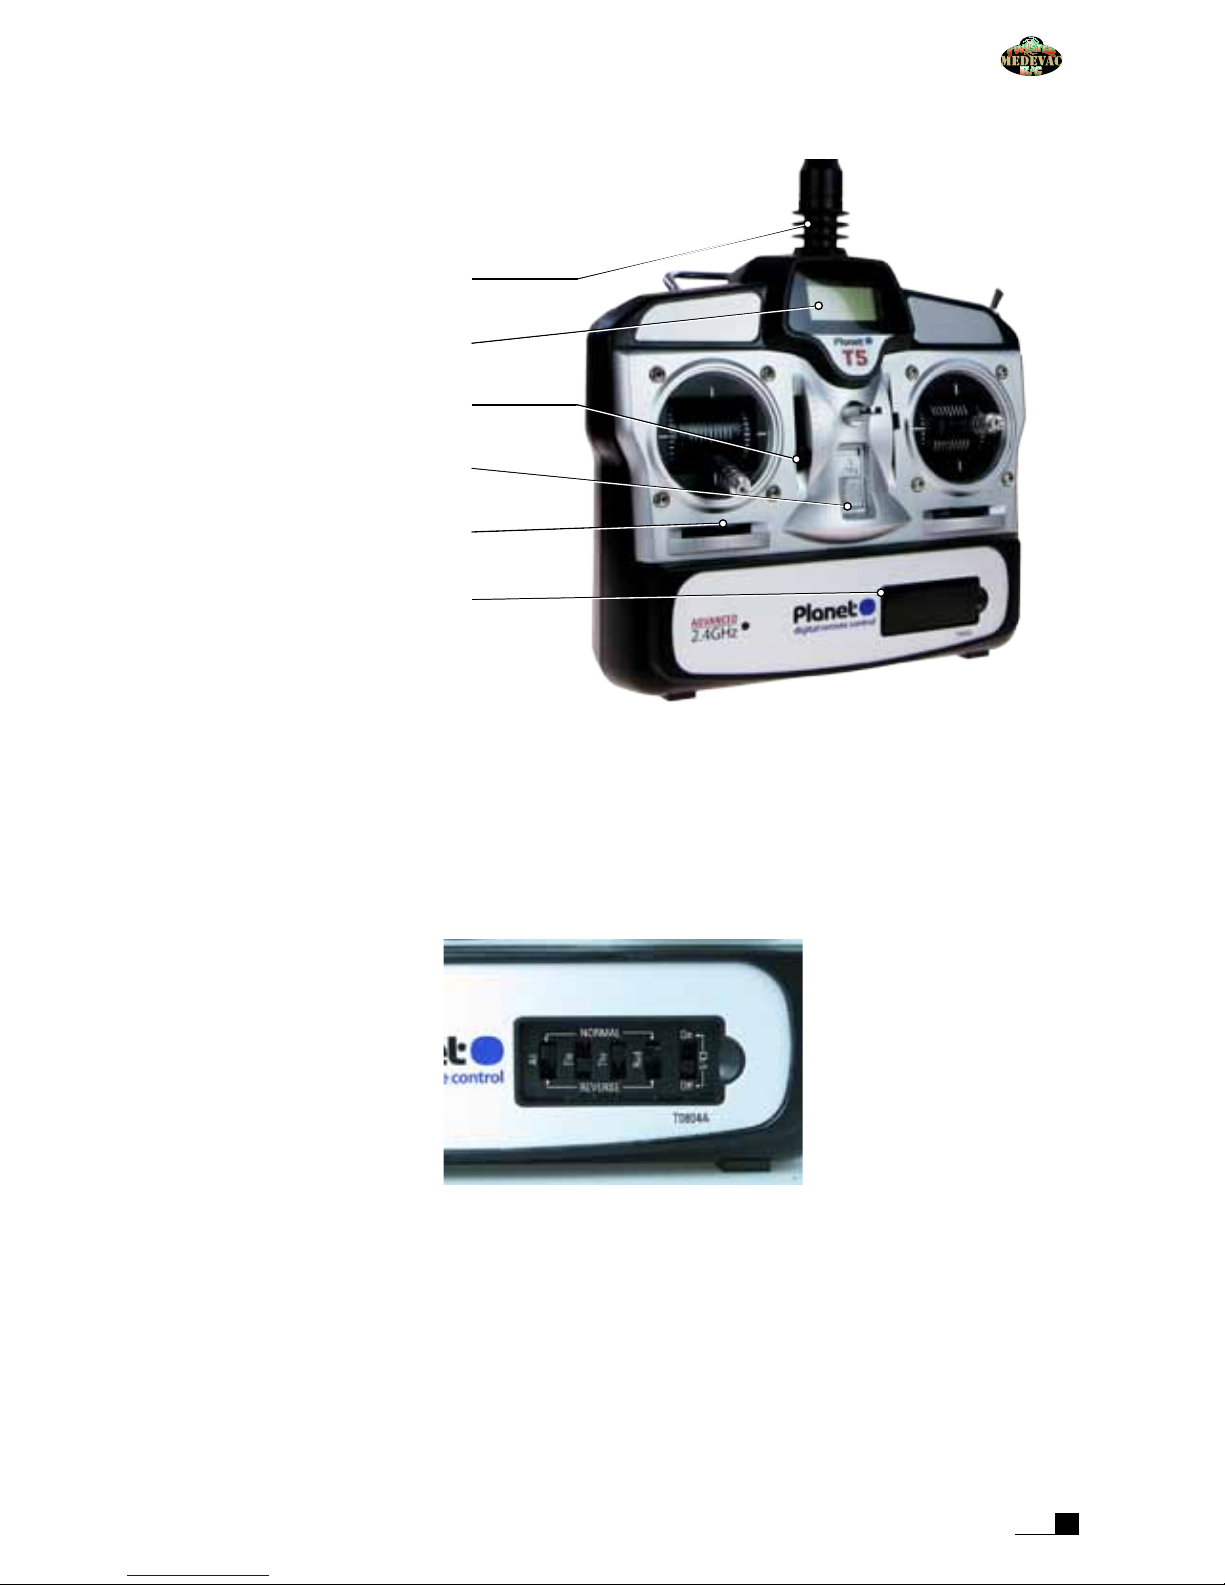
B. TRANSMITTER PART NAMES
Transmitter battery compartment is located on the reverse side of the transmitter.
Aerial
Battery status LCD
Control trim
ON/OFF switch
Dual axis control stick
Reversing switch cover
C. REVERSING SWITCHES
Reversing switches are used to reverse the direction of the four flying controls.
They are factory-set and should NOT be switched for flying your Twister Medevac.
They may be useful if you use other models or fly the many models available within R/C flight simulators.
The reversing switches are located on the front panel of the transmitter.
D. TRANSMITTER MODE CONVERSION
The transmitter can be converted from throttle left to throttle right and vice versa (i.e. between mode 1 and
mode 2) by appointed engineers. Please contact your supplier for details.
6
http://www.jperkinsdistribution.co.uk
Twister Medevac
fliGht pRepaRation
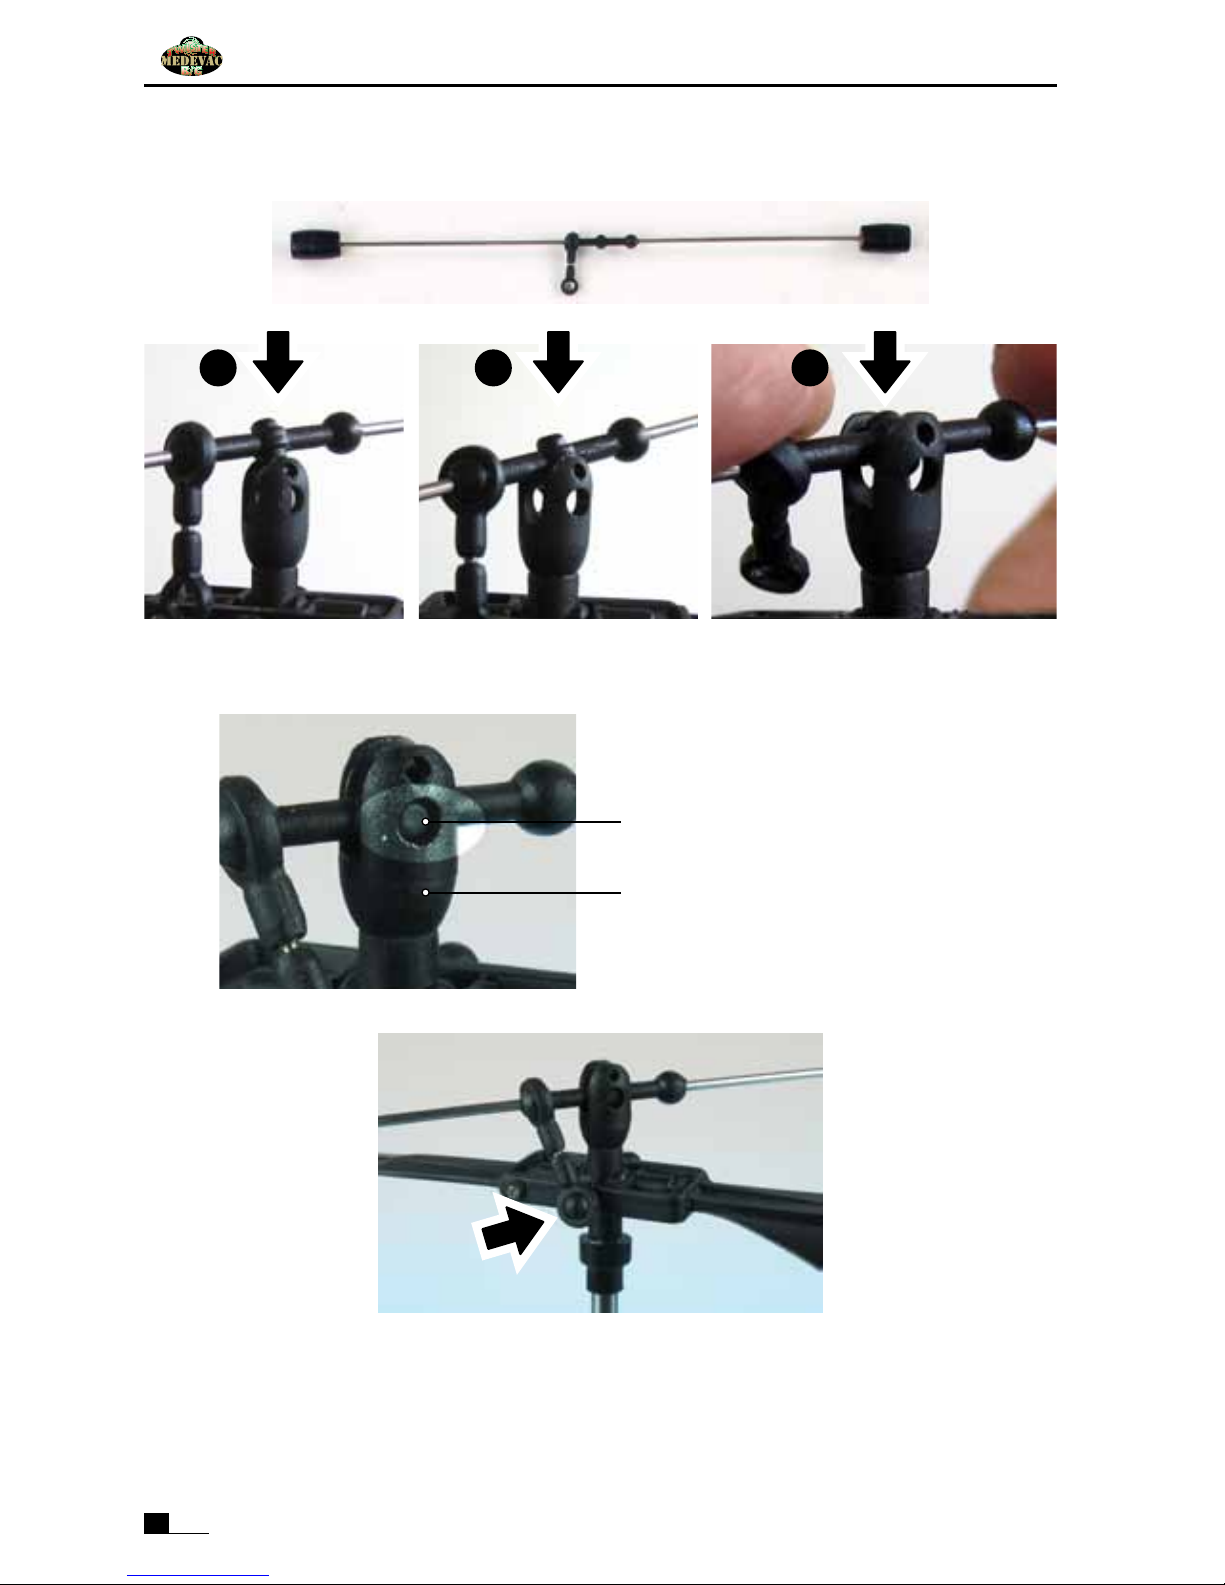
A. FITTING THE FLYBAR
1 2 3
1. The flybar is supplied loose. Carefully snap fit the flybar unit into the mouldings at the top of the
main shaft following the sequence outlined above. The moulded 'flybar locating lugs' must snap into
the matching holes in the 'flybar hub'.
Flybar hub
Flybar locating lug in matching hole
2. The assembled flybar hub unit should look like the above.
3. Snap the plastic flybar link into position on a ball arm as shown above.
The flybar must be free to rock with no friction or sticking!
It should appear to sit 'loosely' in position—double check before proceeding!

7
http://www.modelengines.com.au
Twister Medevac
B. LITHIUM POLYMER FLIGHT BATTERY
Charging lead only
The Lithium polymer (Li-po) flight battery is a high power battery designed to give a flight time of 10 minutes
per charge. It is supplied in a partially charged state.
As well as a red JST polarised lead (for connection later to the 3-in-1 board), the battery is also fitted with a
white 3-pin polarised connector. This is the charge lead. Connect this white plug to the 12V charger.
Always leave the battery in a partially charged state. Never leave it in a discharged state.
The battery should be recharged when the LBW beacon on the tail of the helicopter starts to flash blue, or
if you notice the helicopter is losing power. At this point land and recharge the battery.
Do not be tempted to run the battery past this stage as you will be over-discharging and the battery may be
damaged.
WARNING!
We recommend that you use only the supplied Twister charger with this battery.
WARNING!
Over-discharging will shorten the life of the battery or destroy it. Stop flying immediately the LBW (Low
Battery Warning) beacon starts flashing and recharge the battery.
WARNING!
Do not short circuit—battery may explode. See page 23.
PLEASE READ THE SAFETY PROCEDURES FOR HANDLING LI-POLY BATTERIES AT THE END OF THIS
MANUAL ON PAGE 23 BEFORE PROCEEDING FURTHER.
C. CHARGING THE FLIGHT BATTERY
The charger is designed to automatically charge the Li-Po battery in about 1 hour from a discharged state.
The 12V DC automatic charger is powered by the 240 Volt power supply illustrated above.
Alternatively, you can use a 12 volt sealed lead acid battery to power the DC automatic charger.

8
http://www.jperkinsdistribution.co.uk
Twister Medevac
1. Connect the charger to your power source. The 'POWER' LED will flash red.
2. Plug the 3-pin connector on your Li-po battery into the socket in the right side of the charger.
The green LED will light and the red LED will glow solid red.
3. When the battery is fully charged the green LED goes out. Disconnect the battery from the charger.
4. Disconnect the 12V power source from the charger. Your Li-po battery is ready for use.
D. FITTING THE FLIGHT BATTERY
1. Slide the charged battery pack into the battery holder but do not connect the power lead yet!
Ensure the battery is slid all the way home and retained with a small piece of velcro fastening (attached to
the battery and lower battery holder).
E. LINKAGE CHECKS
1. Check that all linkages and connectors are attached and that rotating parts are free to rotate
smoothly.
2. Check that all linkages move freely with no binding or stiffness. Free off any linkages that show any
sign of tightness or binding.
9
http://www.modelengines.com.au
Twister Medevac
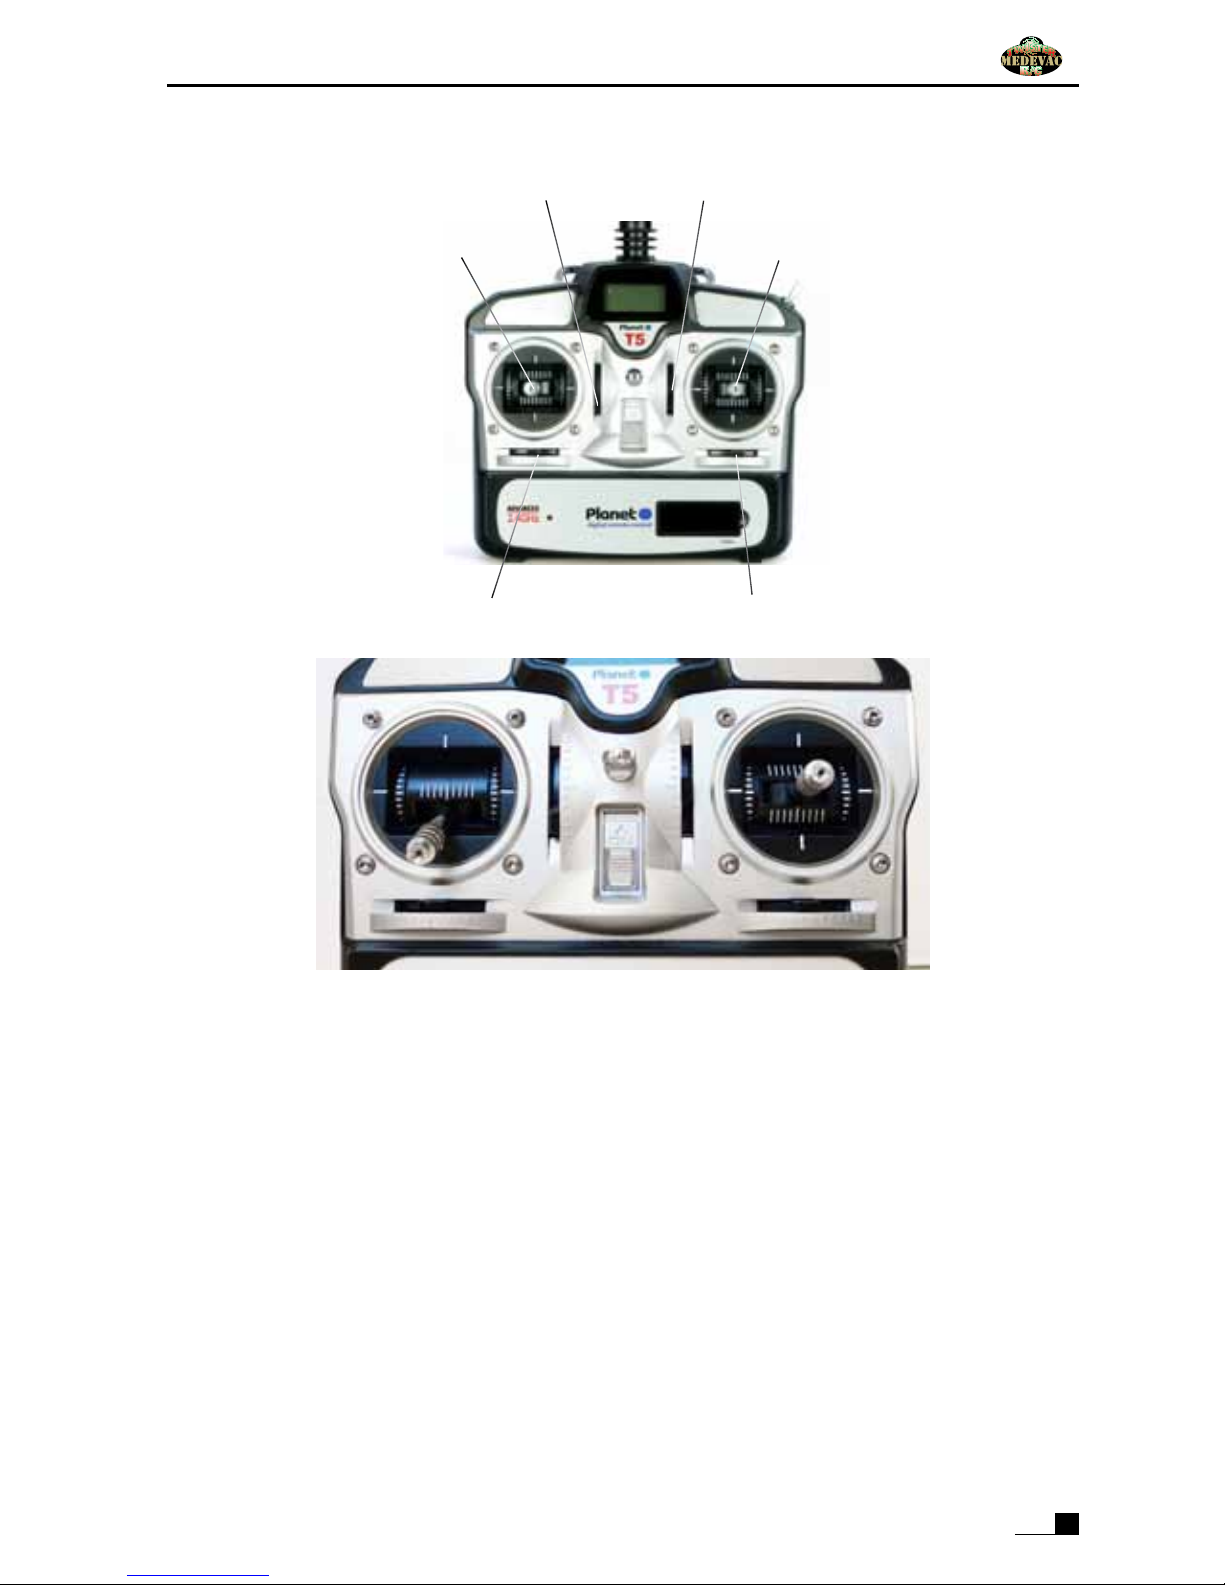
tRanSmitteR layout thRottle left (mode 2)
A. STICK AND TRIM CONTROL SUMMARY
Throttle trim Fore and aft cyclic trim
Yaw trim Roll cyclic trim
Throttle/Yaw
stick
Cyclic control
stick
1. Move the throttle (left stick) and throttle trim of your transmitter to the lowest (low throttle) position
as shown above.
2. Centre the trim levers of the 3 other transmitter functions.
3. Switch on the transmitter.
10
http://www.jperkinsdistribution.co.uk
Twister Medevac
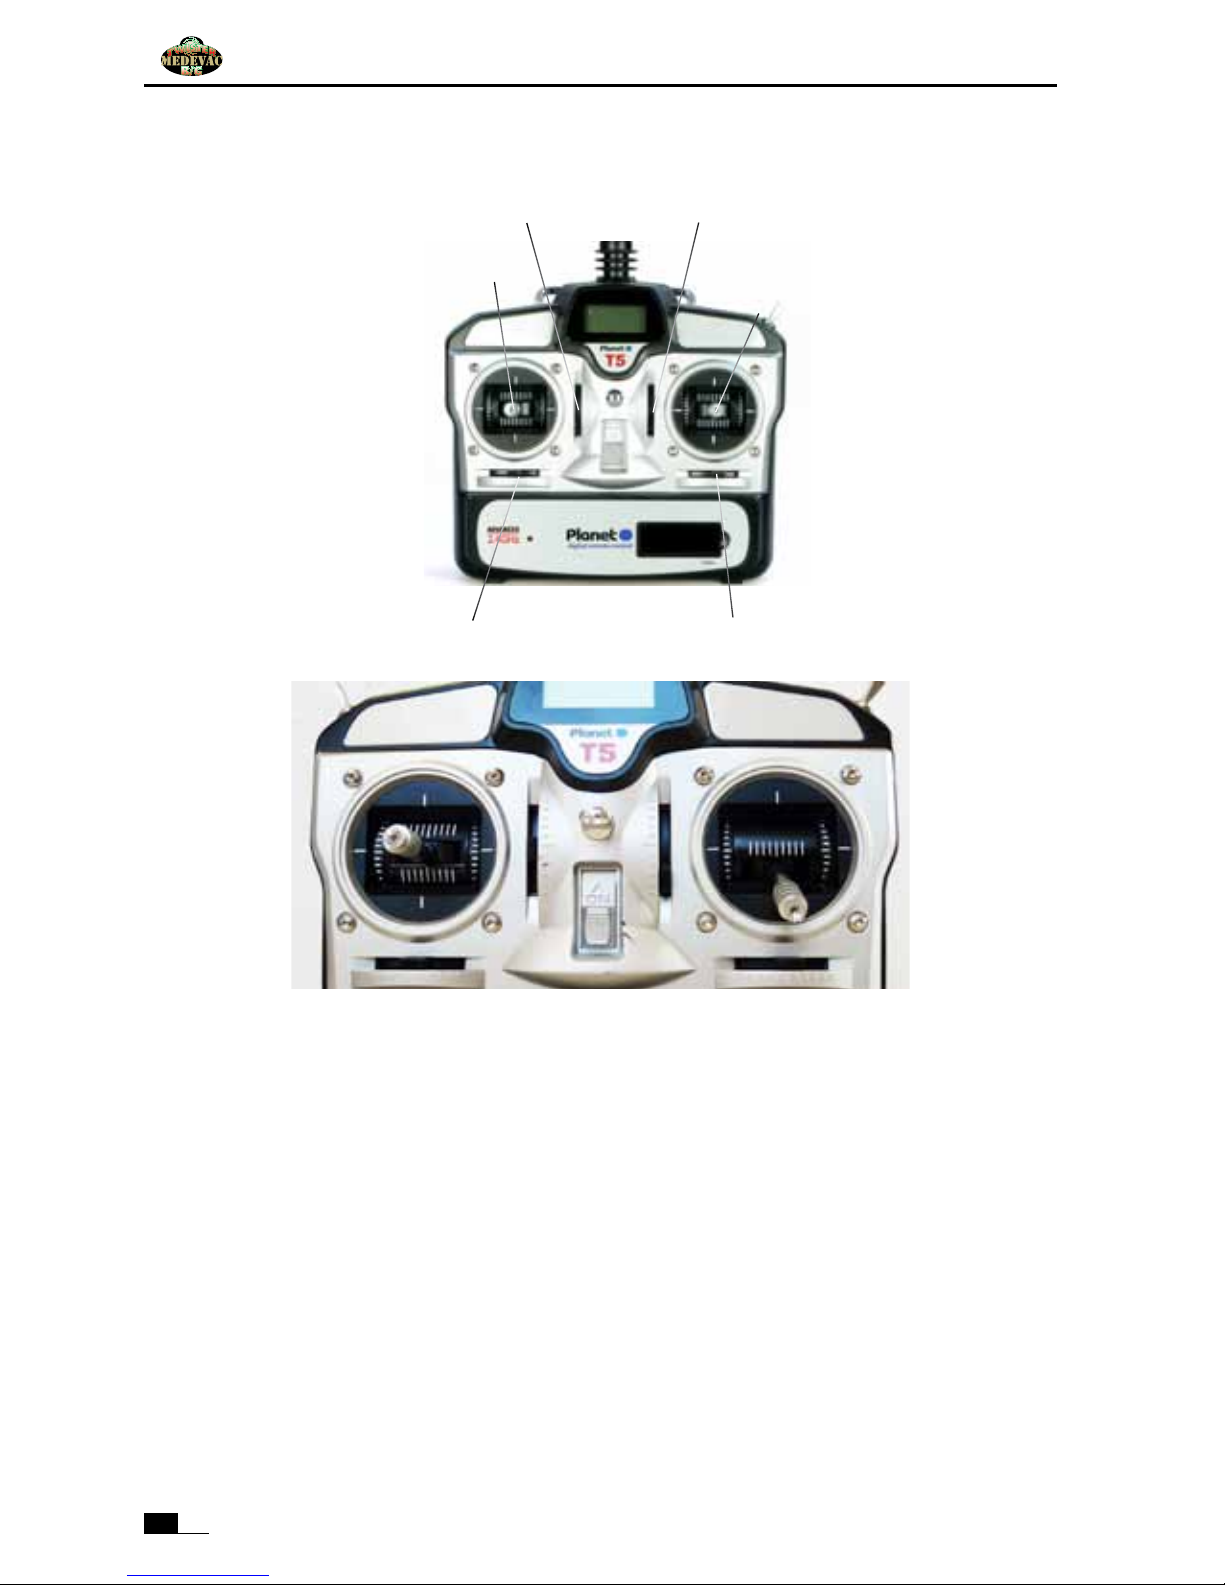
tRanSmitteR layout thRottle RiGht (mode 1)
A. STICK AND TRIM CONTROL SUMMARY
Throttle/Roll
control
stick
Throttle trimFore and aft cyclic trim
Yaw trim Roll cyclic trim
Fore and
aft/Yaw
stick
1. Move the throttle (right stick) and throttle trim of your transmitter to the lowest (low throttle)
position as shown above.
2. Centre the trim levers of the 3 other transmitter functions.
3. Switch on the transmitter.
 Loading...