

Twisted Hobbys Twisted Racer Mustang, Twisted Racer Rare Bear, Twisted Racer Nemesis User Manual
Page 1

Twisted Racer Series
Mustang / Nemesis / Rare Bear
MOTOR: 1x 24g to 26g / 1450kV Outrunner
ESC: 1x 10 to 12amp
SERVOS: 2x 5g to 7g / 1x 9g
PROP: 8x4 DD Prop
BATTERY: 3s / 600-850mAh
Rev: 2016.03.22.v01a
RADIO: 4 channel
WINGSPAN: 31”
LENGTH: 28”
AUW: 230g (depends on equipment)
USA Distributor
Twisted Hobbys
www.twistedhobbys.com
page 1
Page 2

TWISTED HOBBYS
West Milford, NJ 07480
Website: www.twistedhobby s.com – email: sales@twistedhobb ys.com
Thank you fo r your pur chase of this mod el from Twisted Hobb ys’. Please read through the entire
man u al befo re b eginning to build this m od el. I f y ou have an y questions please contact us at the above
indicated em ail add ress.
WA RNING INF ORM ATION
This R/C Aircraft is not a toy! Read and un derstand the entire m anual before assem bly. If misu sed , it
can cause ser ious b odily harm and property dama ge . Fly only in o pen area s, an d AMA (Academy of
Model Aeronau tics) ap proved fly ing s ites . Do not over look the w arnings and in structions en closed or
those provided by oth er manufactures’ products. I f you are n ot an e xperienced pilot and airplan e
modele r you must use the help o f an exper ienced pilot or an authorized flight instructo r for the
buildin g and fly ing of this m ode l aircraft.
These instru ctions are s uggestio ns only on h ow to assemble this model. Ther e ar e othe r w ays a n d
me thod s to do so. Twisted Ho bbys has no control over the fin al assembly , the materi als an d
accessories us ed when a ss embling this kit, or the manner in which the asse mbled m odel , installed
radi o gear and ele ctronic p arts are used and m aintained. Thus, n o liability is assumed o r accepted for
any dama ge resulting from the use of the assembled m odel a ircr aft or from this ins truction manual
including but n ot lim ited to dir ect, indirec t, inc idental, special, and c onsequential d am ages. By the
act o f using this u ser-ass embled product, the u se r accepts all r esu lting liability. In no event s hall
Twisted Hobbys’ liability exce ed the original purch ase pr ice of the kit.
SHIPPING DA MAGE
Twisted Hobb ys check s each plane befor e shipping to ensure that e ach ki t is in fine condi tion. We
have no b earing on the cond ition o f a ny c om ponent p arts damaged by use, mo dification, or assemb ly
of the m odel. I n spect the com ponents o f this k it upon receipt. If you find any parts damaged or
mi ssing, contact Twisted Hobbys immediately . We w ill n ot accep t th e return or rep lacement of parts
on which ass embly wo rk has a lre ady begun . Twisted Hobby s res erves the r igh t to chan ge this
wa rran ty at anytim e w ithout notic e.
OUR M IS SION
To provide the be st products and service to our customer s at the lowest prices
possible. We take great pride in our comp any, our commitm ent to customer
service and in the produc ts we se ll. O ur online s tore is d esigned to provide you
with a safe and se cure environment to browse our product catalog.
Rev: 2016.03.22.v01a
page 2
Page 3

SAFETY NOTES
Before assembling and flying this model, read carefully any
instructions and warnings of other manufacturers for all the
products you installed or used on your model, especially radio
equipment and power source.
Check thoroughly before ever flight that the airplanes’
components are in good shape and functioning properly. If you
find a fault do not fly the model until you have corrected the
problem.
Radio interference caused by unknown sources can occur at any
time without notice. In such a case, your model will be
uncontrollable and completely unpredictable. Make sure to
perform a range check before every flight. If you detect a control
problem or interference during a flight, immediately land the
model to prevent a potential accident.
Youngsters should only be allowed to assemble and fly these
models under the instruction and supervision of an experienced
adult.
Do not operate this model in a confined area.
Do not stand in line with, or in front of a spinning propeller and
never touch it with any ob ject.
IMPORTANT: PRIOR TO ANY ASSEMB LY
Please Note: after removing kit from shipping box,
lay each piece flat on a hard surface, this will
allow the airframe to straighten out if lightly bend
from shipping. Do not worry since EPP is very
pliable and can be bend back if bend out so shape
easily.
Rev: 2016.03.22.v01a
page 3
Page 4

31 inches
28 inches
230g
Li-pol
3s 600-850
2204-2206
24g-26g
8x4 DD
V1.0
Kit Contents:
* fuselage
* wings
* horizontal stabilizer
Accessory Pack Contents:
* carbon rod 1.5dia x 50mm ... 2x
* clevis with brass pins ... 8x
* heat shrink tube ... 5x
* threaded ends ... 2x
* plastic control arm set ... 1x
* plywood motor mount and shims
Horns etc.:
1. elevator horn
2. rudder horn
3. ailerons horns
You may also need:
* sharp x-acto knife
* philips screwdriver
*
tweezers
* little pliers
* CA glue medium + thin, CA kicker
* Welders or Foam Tac
* 1mm Dia drill
* ruler
* pencil (marker)
* fine handsaw (Dremmel)
* vertical stabilizer
* accessory pack
* pushrods and stiffener set
1.
PLEASE READ BEFORE BUILDING
The pictures in the Manual are of the Nemesis
Airframe. The other airframes build in the exact
same way, but it should be noted that there may
be subtle differences from this model and the
FOR ADDITIONAL BUILD INFORMATION SEE
THE LAST PAGES OF THIS MANUAL FOR
DETAILED DESCRIPTIONS RELATING TO
3. 3.
2.
one you are building.
EACH PHOTOGRAPH.
Rev: 2016.03.22.v01a
page 4
Page 5
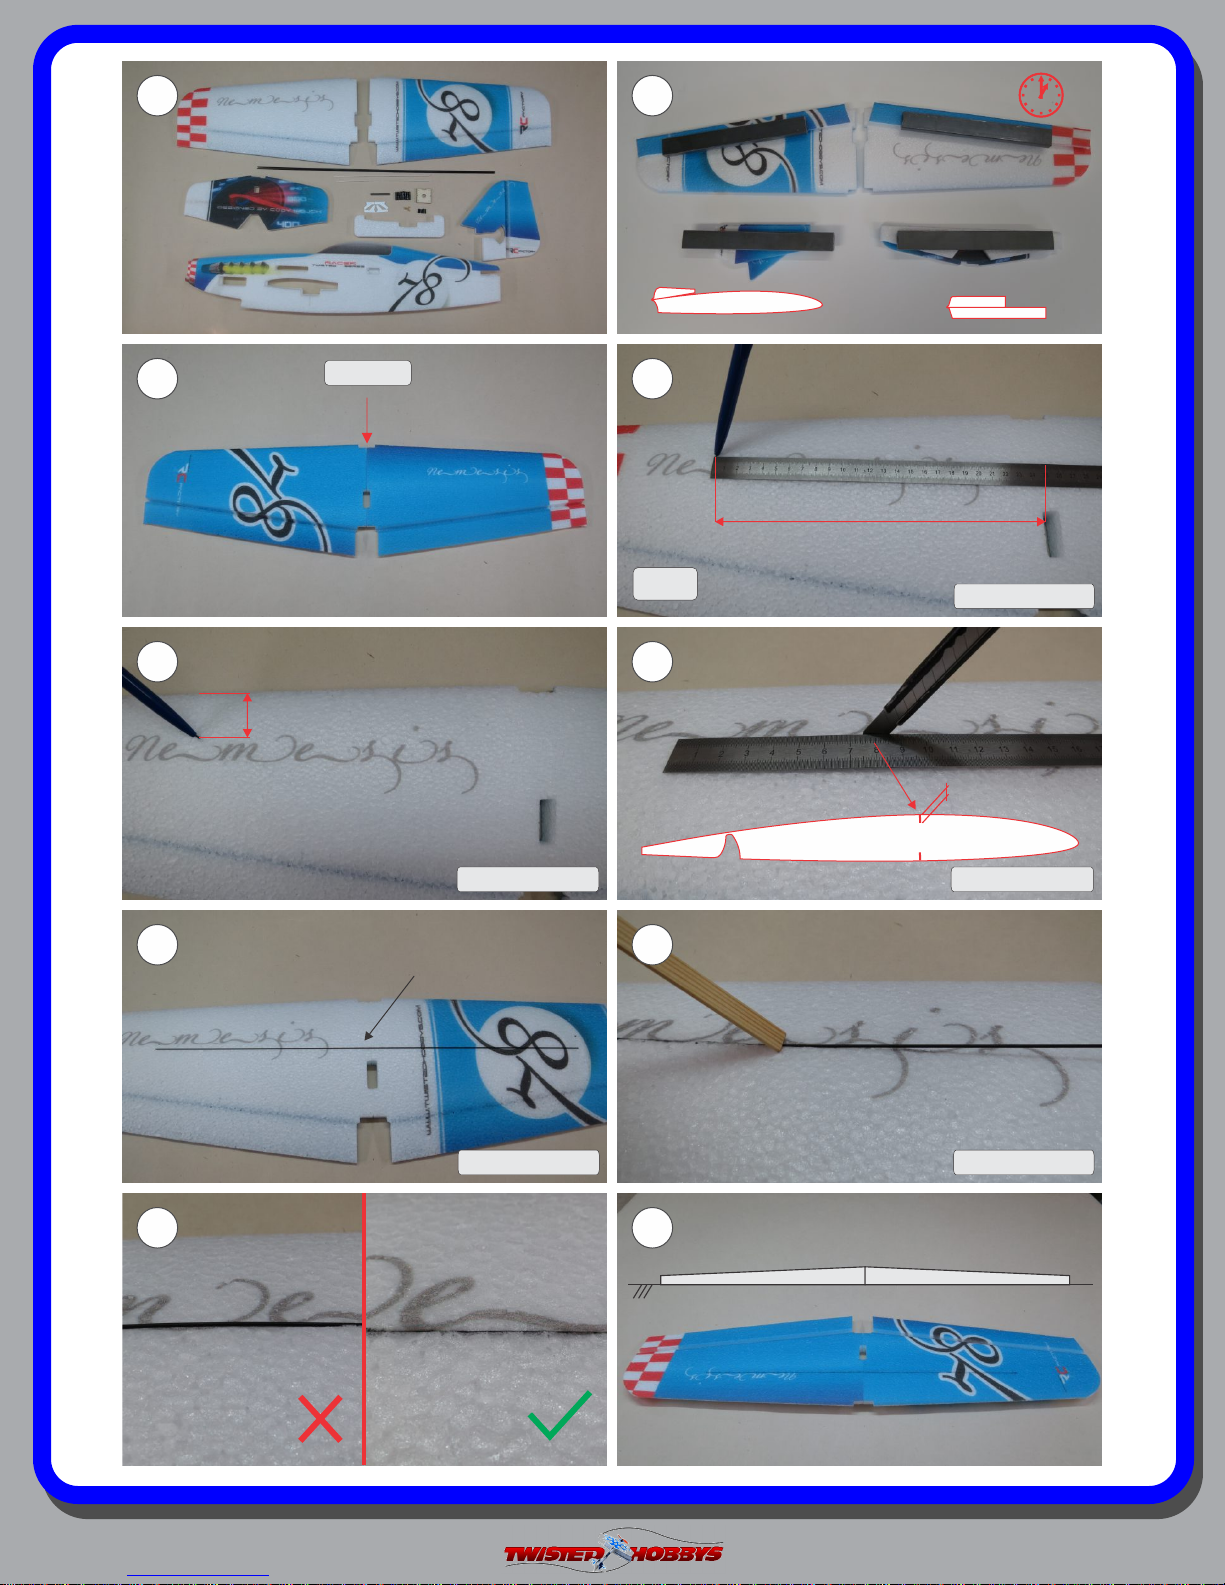
1.
2.
min. 1h
3.
Welders
4.
250mm
L+R
5.
6.
from both sides
50mm
3mm deep
from both sides from both sides
7.
carbon rod 1.2mm dia x 500mm
8.
9.
Rev: 2016.03.22.v01a
from both sides from both sides
10.
page 5
Page 6
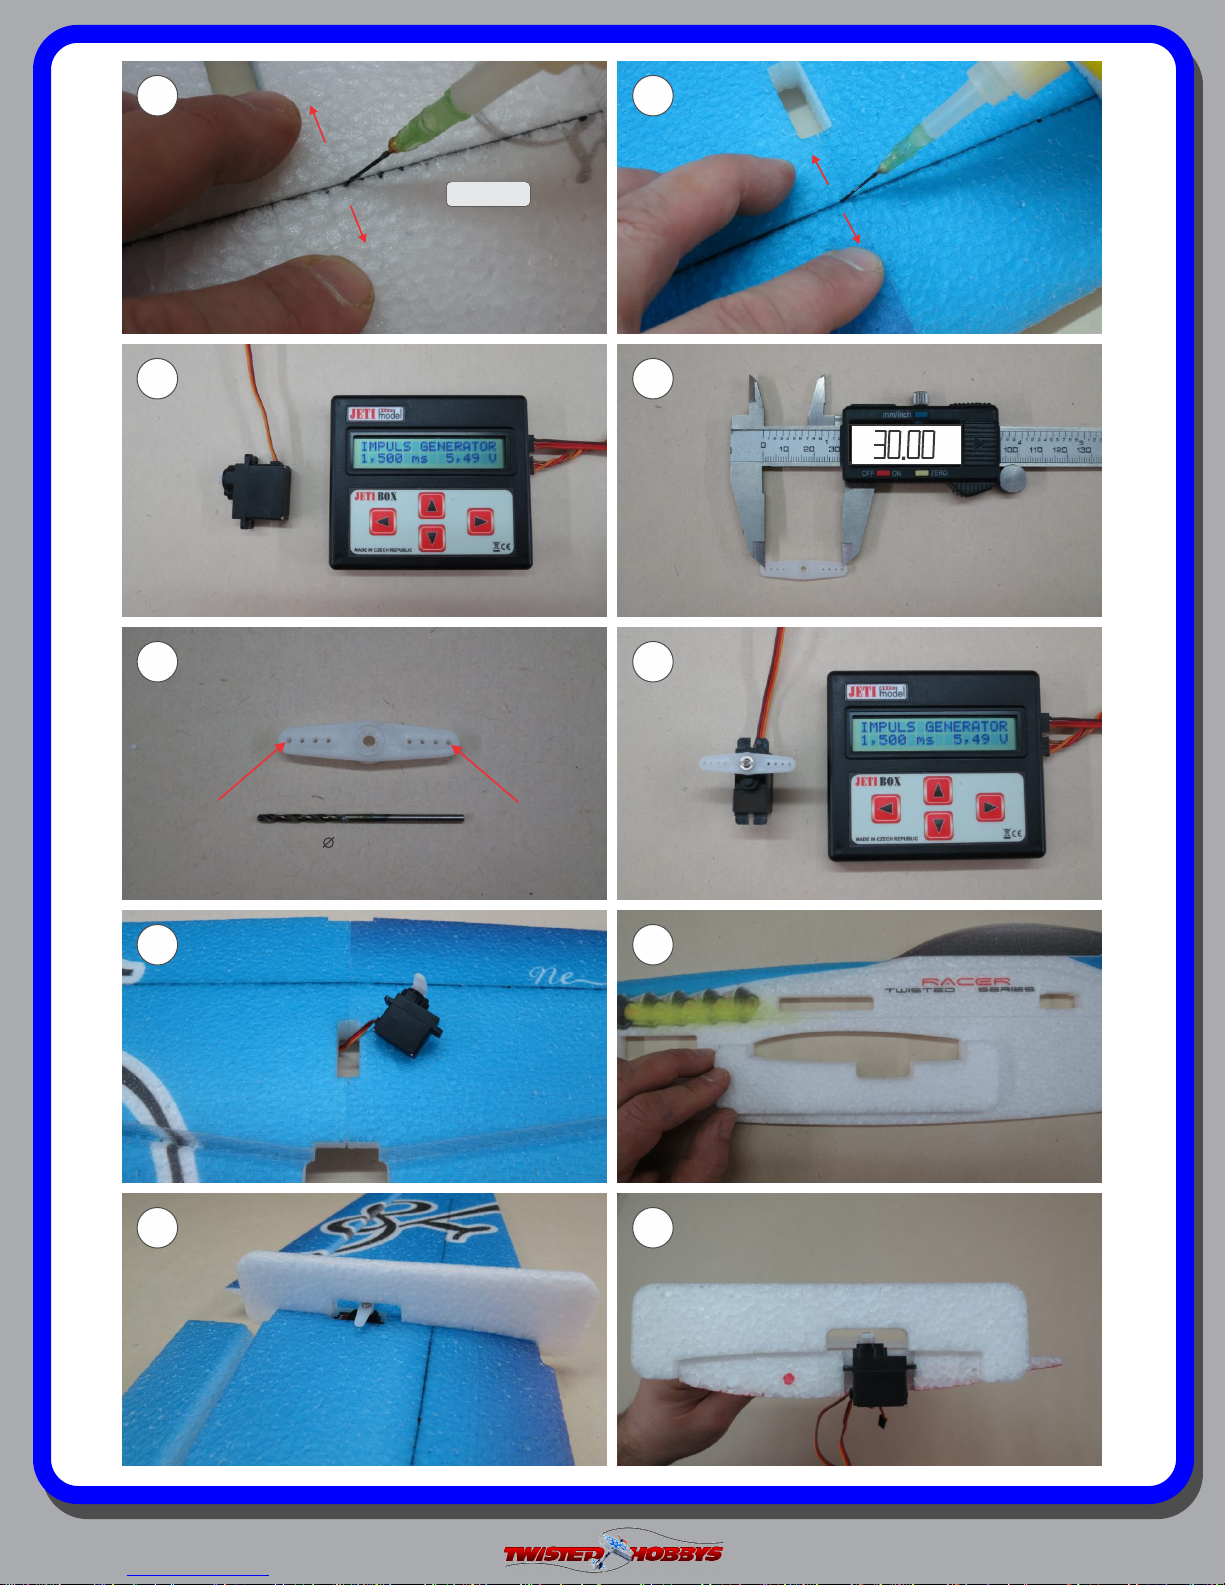
11.
12.
Thin CA
13.
15.
9g
servo centered
1mm
1. Top
2. bottom
14.
mm
16.
17.
19.
18.
20.
Rev: 2016.03.22.v01a
page 6
Page 7

21.
22.
23.
25.
Thin CA
24.
26.
3.
3.
L+R
27.
29.
carbon 1.5x50mm
L+R
28.
30.
Thin CA
Medium CA
Rev: 2016.03.22.v01a
page 7
Page 8

31.
32.
33.
35.
37.
34.
36.
cut
38.
Thin CA
39.
Rev: 2016.03.22.v01a
40.
Welders
alternate method
page 8
Page 9

41.
alternate method
3.
42.
Cut
1.
2.
43.
45.
47.
Medium CA
Test direction of rotation
44.
Up
Cut
Welders
46.
48.
49.
Rev: 2016.03.22.v01a
50.
Welders
page 9
Page 10

51.
52.
55.
Carbon Rod 1.0 dia x 500mm
from both sides
from both sides
54.53.
56.
15mm Cut
(Right side only)
57.
59.
58.
Thin CA
60.
Rev: 2016.03.22.v01a
page 10
Page 11

61.
62.
Thin CA
63.
65.
67.
64.
Thin CA
66.
Welders
Welders
68.
69.
Rev: 2016.03.22.v01a
Welders
Welders
70.
Carbon Rod 1.0 dia x 330mm
page 11
Page 12

71.
72.
Heat gun
Thin CA
73.
2x 6g
servo centered
75.
77.
74.
(L+R)
76.
78.
Thin CA
79.
Rev: 2016.03.22.v01a
80.
page 12
Page 13

81.
82.
83.
85.
87.
84.
Cut
86.
alternatively
88.
89.
Rev: 2016.03.22.v01a
90.
page 13
Page 14

91.
92.
Thin CA
93.
95.
97.
94.
96.
98.
99.
Welders
Rev: 2016.03.22.v01a
Welders
100.
Welders
page 14
Page 15

101.
102.
103.
105.
107.
104.
106.
108.
mm
109.
Rev: 2016.03.22.v01a
Medium CA
110.
3S 600-850mAh
page 15
Page 16

111.
112.
113.
115.
117.
L+R
114.
116.
Cut -1mm
L+R
118.
This completes the build. Center of Gravity, Control Throws and some
basic radio settings are on the following pages.
Another good resource is RC Groups. Threads for these models can be
found there under the Electric Warbird section.
Rev: 2016.03.22.v01a
page 16
Page 17

center of
gravity
C.G. - 45mm from wing’s leading edge
CG = 45mm
control throws
Advanced & Racing
Ailerons: +/- 25 deg
Rudder: +/- 30 deg
Elevator: +/- 25 deg
Expo to suit
Beginner & Sport
Ailerons: +/- 20 deg
Rudder: +/- 25 deg
Elevator: +/- 20 deg
Expo to suit
Rev: 2016.03.22.v01a
page 17
Page 18

pre-flight & testing
Preght Checks Preght Checks
Motor: Should run smoothly at all stick
positions, and transition smoothly from low
to high RPM. If the motor is turning
backwards, reverse two of the three wires
between the motor and ESC. Check that the
screws holding the motor to the airframe are
tight and secure.
Flight Controls: Set all to neutral or level
positions with sticks in the neutral positions.
Ensure that all controls and linkages move
freely. Double check that all hinged areas
are free from rips or tears. Verify proper
control surface directions. Right Roll is –
right aileron up, left aileron down, Left Roll is
left aileron up and right aileron down.
Batteries: Should be fully charged prior to
each flight. Watch transmitter battery level
and follow manufactures recommendations.
Motor battery should not be drained any
f u r t h er t ha n r e co mm en de d b y t h e
manufacture, use a timer to prevent an over
discharged condition.
The first flights should be done with the CG
at the recommended position, and reduced
control rates until comfortable with your
handling of the aircraft. As your experience
with the aircraft grows experiment with
different CG points and control rates. After
all flights, check the aircraft over for damage
and/or other items that may adversely affect
flight performance.
This EPP Pylon Racer is a full performance
a i r c ra f t a nd w i l l p r ov i d e h o u rs o f
entertainment, including the occasional
crash. If, as the result of a crash, the foam
tears, simply glue with Welders or CA.
Many pilots prefer Welders because it
remains flexible after drying. CA however, is
more suited for the “quick” repair.
This aircraft can be flown indoors or
outdoors. It is however designed specifically
for outdoor flying and will be right at home in
the local park or other similar sized venue.
Radio: All trims should be set to neutral and
throttle in the low position. Check that rate
switches and mixes are set properly.
Range Check: With and without the motor
running per radio manufactures instructions.
If there is insufficient range or significant
reduction with the motor running, resolve
and re-test before flying.
Be safe and enjoy, thank you again for purchasing a Twisted Hobbys’ Product!
Rev: 2016.03.22.v01a
Storage
This EPP plane should be stored resting it's
landing gear or hung from the prop. Storing
in other fashions that put stress on the
airframe could cause the airframe to distort.
Storage in a hot car could also cause
damage.
page 18
Page 19

Rev: 2016.03.22.v01a
page 19
Page 20

Rev: 2016.03.22.v01a
page 20
Page 21

Rev: 2016.03.22.v01a
page 21
Page 22

Rev: 2016.03.22.v01a
page 22
Page 23

Rev: 2016.03.22.v01a
page 23
 Loading...