

Twin-Star International DFS-550-0, DFS-550-21 Homeowners Operating Manual
INSTRUCTION MANUAL ENCLOSED
MANUEL D’INSTRUCTION À L’INTÉRIEUR
MANUAL DE INSTRUCCIONES ADJUNTO
STOP
STOP
ATTENTION
IF YOU HAVE ANY PROBLEMS OR QUESTIONS, EMAIL
OR CALL CUSTOMER SERVICE BEFORE YOU RETURN
THIS PRODUCT TO THE STORE WHERE IT WAS PURCHASED.
For Customer Service: www.twinstarhome.com
in English Call: 800-318-9373
in Spanish Call: 800-318-9373
in French Call: 800-318-9374
PARE
PARE
ATENCIÓN
SI TIENE ALGÚN PROBLEMA O PREGUNTAS,
ENVÍE UN MENSAJE DE CORREO ELECTRÓNICO O LLAME AL SERVICIO
DE ATENCIÓN AL CLIENTE ANTES DE DEVOLVER
ESTE PRODUCTO A LA TIENDA EN LA QUE LO COMPRÓ.
Servicio de atención al cliente: www.twinstarhome.com
Línea para llamadas en inglés: 800-318-9373
Línea para llamadas en español: 800-318-9373
Línea para llamadas en francés: 800-318-9374
ARRÊT
ATTENTION
ARRÊT
SI VOUS AVEZ DES PROBLÈMES OU DES QUESTIONS,
ENVOYEZ UN COURRIEL AU SERVICE À LA CLIENTÈLE OU APPELEZ LE
SERVICE À LA CLIENTÈLE AVANT DE RETOURNER
CE PRODUIT OÙ VOUS L’AVEZ ACHETÉ.
Pour le service à la clientèle : www.twinstarhome.com
pour le service en anglais, appelez au: 800-318-9373
pour le service en espagnol, appelez au: 800-318-9373
pour le service en français, appelez au: 800-318-9374
INSTRUCTION MANUAL ENCLOSED
MANUEL D’INSTRUCTION À L’INTÉRIEUR
MANUAL DE INSTRUCCIONES ADJUNTO
ELECTRIC STOVE WITH HEATER
VENT FREE DECORATIVE ELECTRIC STOVE
HOMEOWNERS OPERATING MANUAL
MODEL: DFS-550-0
CONSUMER SAFETY INFORMATION
PLEASE READ THIS MANUAL BEFORE INSTALLING
AND OPERATING THIS APPLIANCE
WARNING!!
IF THE INFORMATION IN THIS MANUAL IS NOT FOLLOWED
EXACTLY, AN ELECTRIC SHOCK OR FIRE MAY RESULT CAUSING
PROPERTY DAMAGE, PERSONAL INJURY OR LOSS OF LIFE.
DO NOT STORE OR USE GASOLINE OR OTHER FLAMMABLE VAPORS
AND LIQUIDS IN THE VICINITY OF THIS OR ANY OTHER APPLIANCE.
Thank you and congratulations on your purchase ofaTwin-Star International, Inc.
stove. Please read the Installation&Operating Instructions before using this
appliance.
IMPORTANT: Read all instructions and warnings carefully before starting installation.
Failure to follow these instructions may result inapossible electric shock, fire hazard
and/or injury and will void the warranty.
For Customer Service:
www.twinstarhome.com
In English Call: 800-318-9373
In French Call: 800-318-9374
In Spanish Call: 800-318-9373
WARNING: THIS IS AN UNVENTED,
ELECTRIC APPLIANCE. DO NOT
ATTEMPT TO BURN WOOD OR
MANUFACTURED FIRELOGS IN OR
ON THIS APPLIANCE OR GRATE.
Distributed by
Twin-Star International, Inc. Under license.
duraameTM and the duraame ame
logo are trademarks of Duraame, Inc.
Twin-Star International, Inc.
Delray Beach, FL 33445
Made in China • Printed in China
E-1
Made in China
Printed in China
©2011, Twin-StarInternational,Inc.
IMPORTANT INSTRUCTIONS
When using electrical appliances, basic precautions should always be followed to reduce the risk of fire,
electrical shock, and injury to persons including the following:
1. Read all instructions before using this appliance.
2. This appliance is hot when in use. To avoid burns,
do not let bare skin touch hot surfaces. If provided,
use handles when moving this appliance. Keep
combustible materials, such as furniture, pillows,
bedding, papers, clothes and curtains at least 3 feet
(0.9 m) from the front of this appliance.
WARNING: In order to avoid overheating, do not
cover the heater. It cannot be used in a wardrobe.
3. CAUTION: Whenever the heater is left operating
and unattended, extreme caution is necessary if
children or invalids are nearby.
4. The appliance is not to be used by children or
persons with reduced physical, sensory or mental
capabilities, or lack of experience and knowledge,
unless they have been given supervision or
instruction.
5. Children being supervised not to play with the
appliance.
6. If possible, always unplug this appliance when
not in use.
7. Do not operate any heater with a damaged cord or
plug or after the appliance malfunctions, or if it has
been dropped or damaged in any manner.
8. If the supply cord is damaged, it must be replaced
by the manufacturer, its service agent or similarly
qualified persons in order to avoid a hazard.
9. Any repairs to this fireplace should be carried out
by a qualified service person.
10. Under no circumstance should this fireplace
be modified. Parts having to be removed for
servicing must be replaced prior to operating this
fireplace again.
11. Do not use outdoors.
12. This heater is not intended for use in bathrooms,
laundry areas and similar indoor locations. Never
locate this appliance where it may fall into a
bathtub or other water container.
13. Do not run cord under carpeting. Do not cover
cord with throw rugs, runners or the like. Arrange
cord away from traffic areas and where it will not
18. The heaters must not be located immediately
below a socket-outlet.
19. Do not insert or allow foreign objects to enter any
ventilation or exhaust opening as this may cause an
electric shock or fire, or damage the appliance.
20. To prevent a possible fire, do not block air intakes
or exhaust in any manner. Do not use on soft
surfaces, like a bed, where opening may become
blocked.
21. This appliance has hot and arcing or sparking parts
inside. Do not use it in areas where gasoline, paint
or flammable liquids are used or stored. This
fireplace should not be used as a drying rack for
clothing. Christmas stockings or decorations should
not be hung in the area of it.
22. Use this appliance only as described in the
manual. Any other use not recommended by the
manufacturer may cause fire, electric shock or
injury to persons.
23. Avoid the use of an extension cord because the
extension cord may overheat and cause risk of
fire. However, if you have to use an extension
cord, the cord must be No.14 AWG minimum size
and rated not less than 1875 Watts. The extension
cord must be a three wire cord with grounding type
plug and cord connection. The extension cord shall
not be more than 20 feet (6 m) in length.
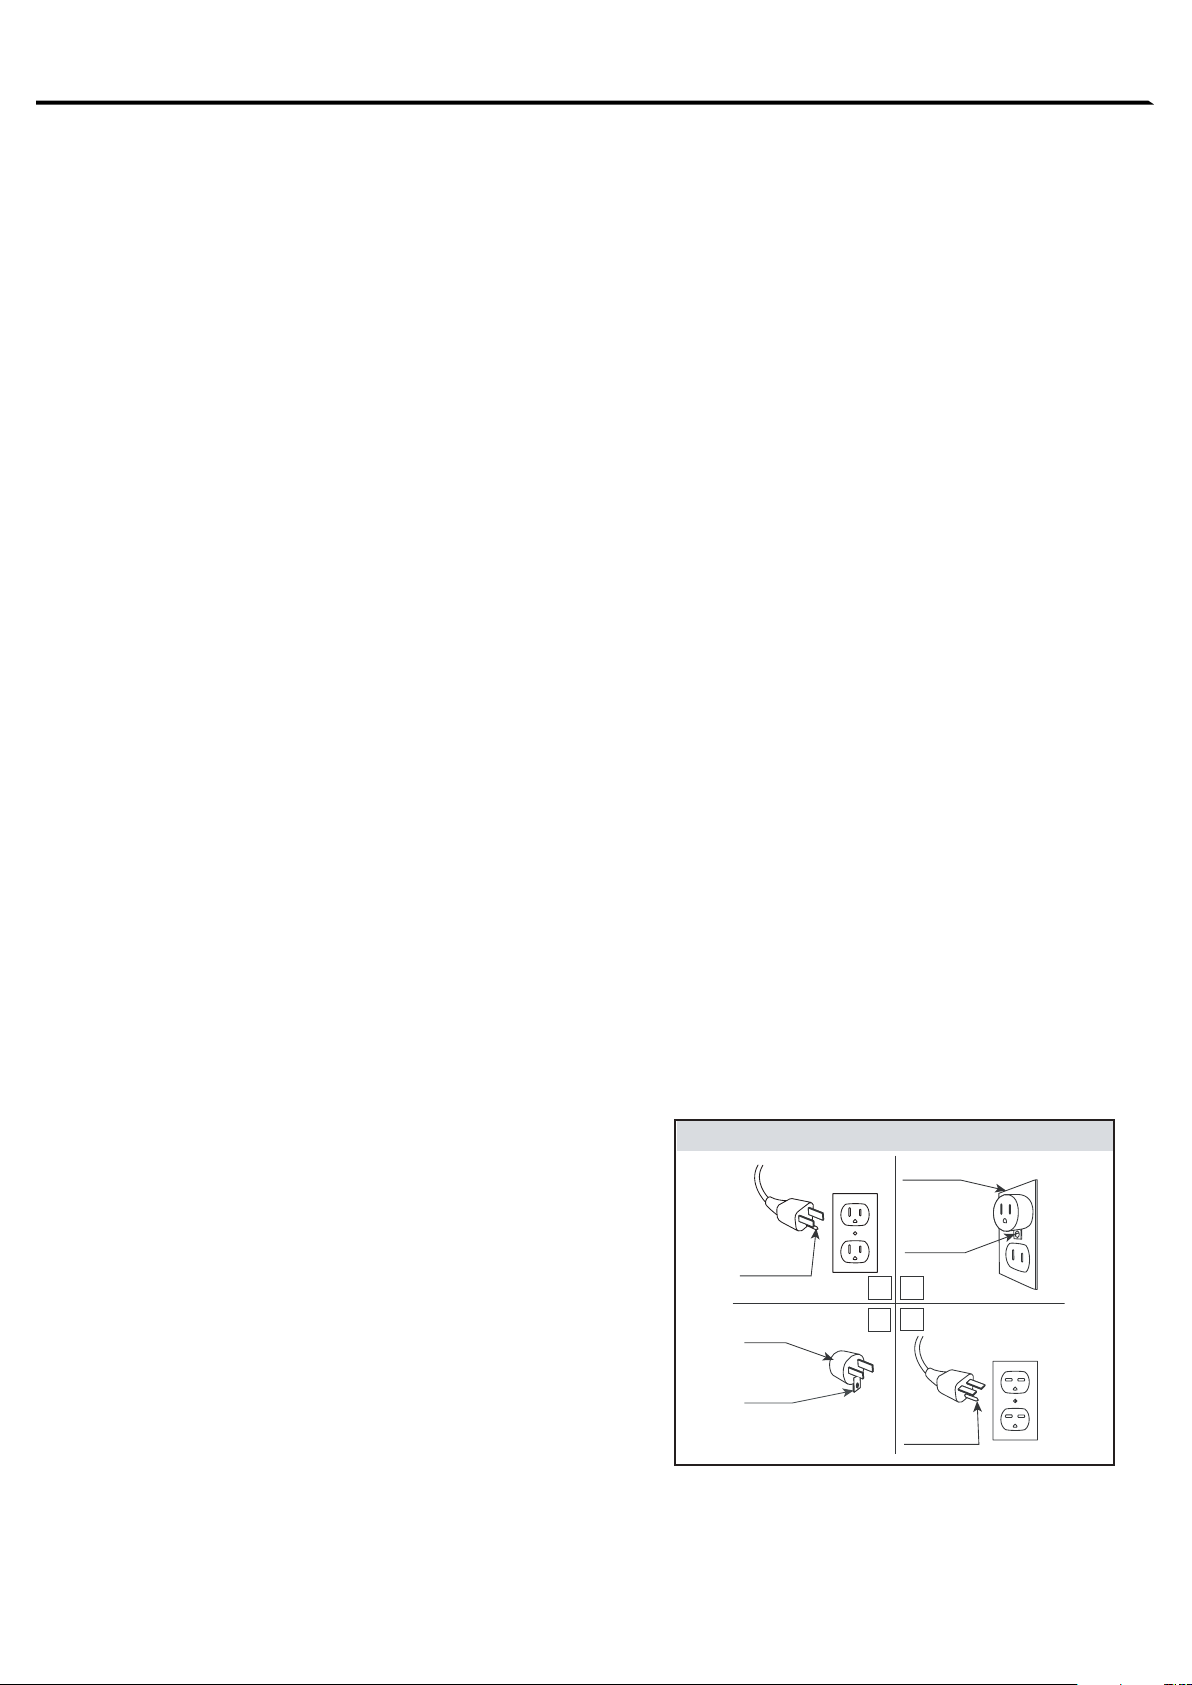
24. See directions in Figure 1.
This heater is for use on 120 volts. The cord has a
plug as shown in figure 1. See Figure 1 for grounding
instruction. An adapter as shown at C is available for
connecting three-blade grounding type plugs to
two-slot receptacles. The green grounding plug
extending from the adapter must be connected to a
permanent ground such as a properly grounded
outlet box. The adapter should not be used if a
three-slot grounded receptacle is available.
Figure 1
COVER OF GROUNDED
OUTLET BOX
be tripped over.
14. To disconnect this appliance, turn controls to the
off position, then remove plug from outlet.
15. Connect to properly grounded outlets only.
16. This appliance, when installed, must be electrically
grounded in accordance with local codes or, in the
GROUNDING PIN
ADAPTER
A
C
METAL SCREW
B
D
absence of local codes, with the current CSA C22.1
Canadian Electrical Code or for U.S.A. installations,
GROUNDING
MEANS
follow local codes and the National Electrical
Code, ANSI/NFPA NO.70.
GROUNDING PIN
17. There is a thermostat limiter inside the heater.
When the inner temperature over heating or occurs
abnormal heating, the thermostat protective device
SAVE THESE
would cut off power supply to avoid the fireplace
damaged or risk of fire.
INSTRUCTIONS
E-2
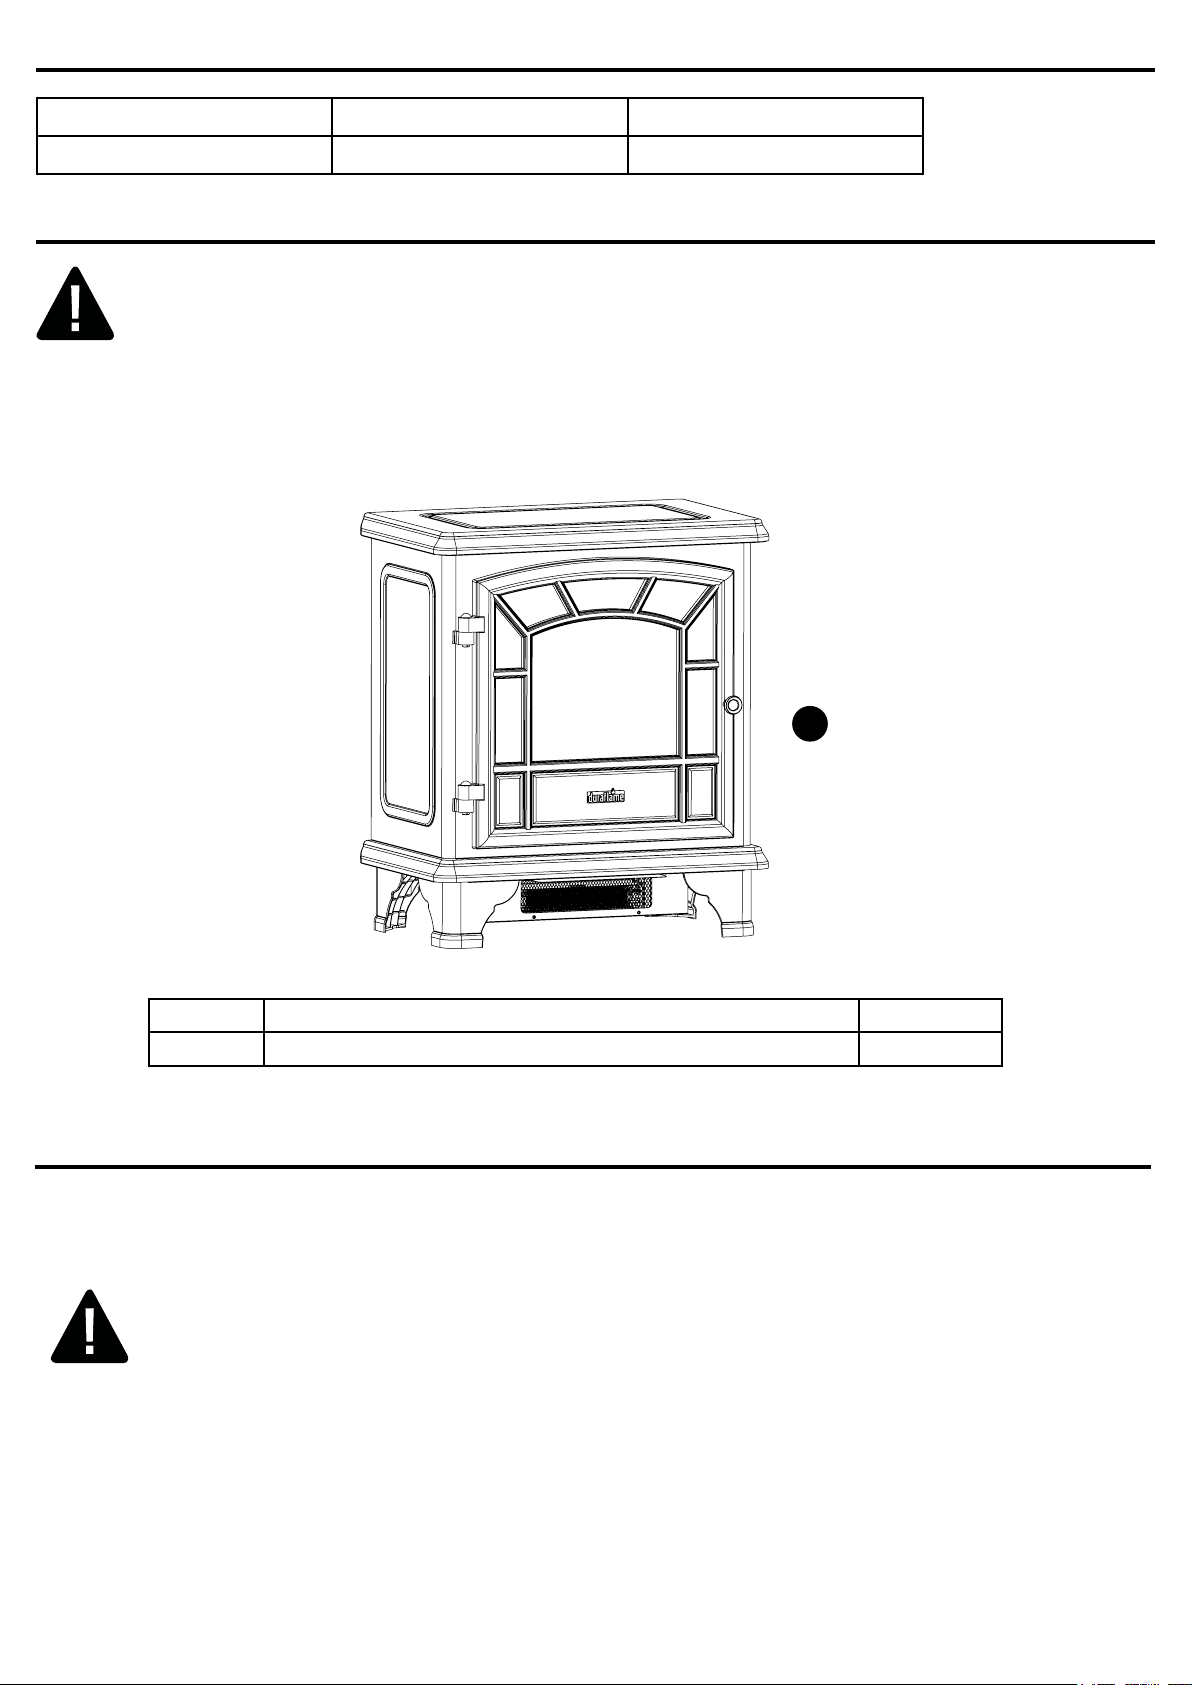
PRODUCT SPECIFICATIONS
VOLTAGE AMPS WATTS
120 VAC, 60 Hz 12.5 Amps 1500 Watts
PACKAGE CONTENTS
CAUTION
To avoid injury from unexpected starting or electrical shock, do not plug the power cord into a
source of power during unpacking and assembly. The cord must remain unplugged whenever
you are adjusting/assembling the replace.
If any part is missing or damaged, do not attempt to use or plug in the power cord until the
missing or damaged part is correctly replaced. To avoid electric shock, use only identical
replacement parts when servicing double-insulated tools.
A
Fig. 2
Part Description Quantity
A Stove 1
PREPARATION
STOVE LOCATION
When choosing a location for your new stove, follow the instructions listed in the <IMPORTANT
INSTRUCTIONS> section in page 2.
Cold climate installation recommendation: When installing this unit against a
non-insulated exterior wall or chase, it is mandatory that the outer walls be insulated to
conform to applicable insulation codes.
ELECTRICAL CONNECTION
A 15-Amp, 120-V, 60 Hz circuit with a properly grounded outlet is required. Preferably, the replace will
be on a dedicated circuit as other appliances on the same circuit may cause the circuit breaker to trip or
the fuse to blow when the heater is in operation. The unit comes standard with 6-ft. (1.83 m) three-wire
cord, exiting from the rear of the replace. Avoid using an extension cord. If an extension cord must be
used, it must be a minimum 14 AWG, three wire with grounding type plug connector and rated not less
than 1875 Watts. The cord shall not be more than 20 feet (6 m) in length.
E-3
OPERATING INSTRUCTIONS
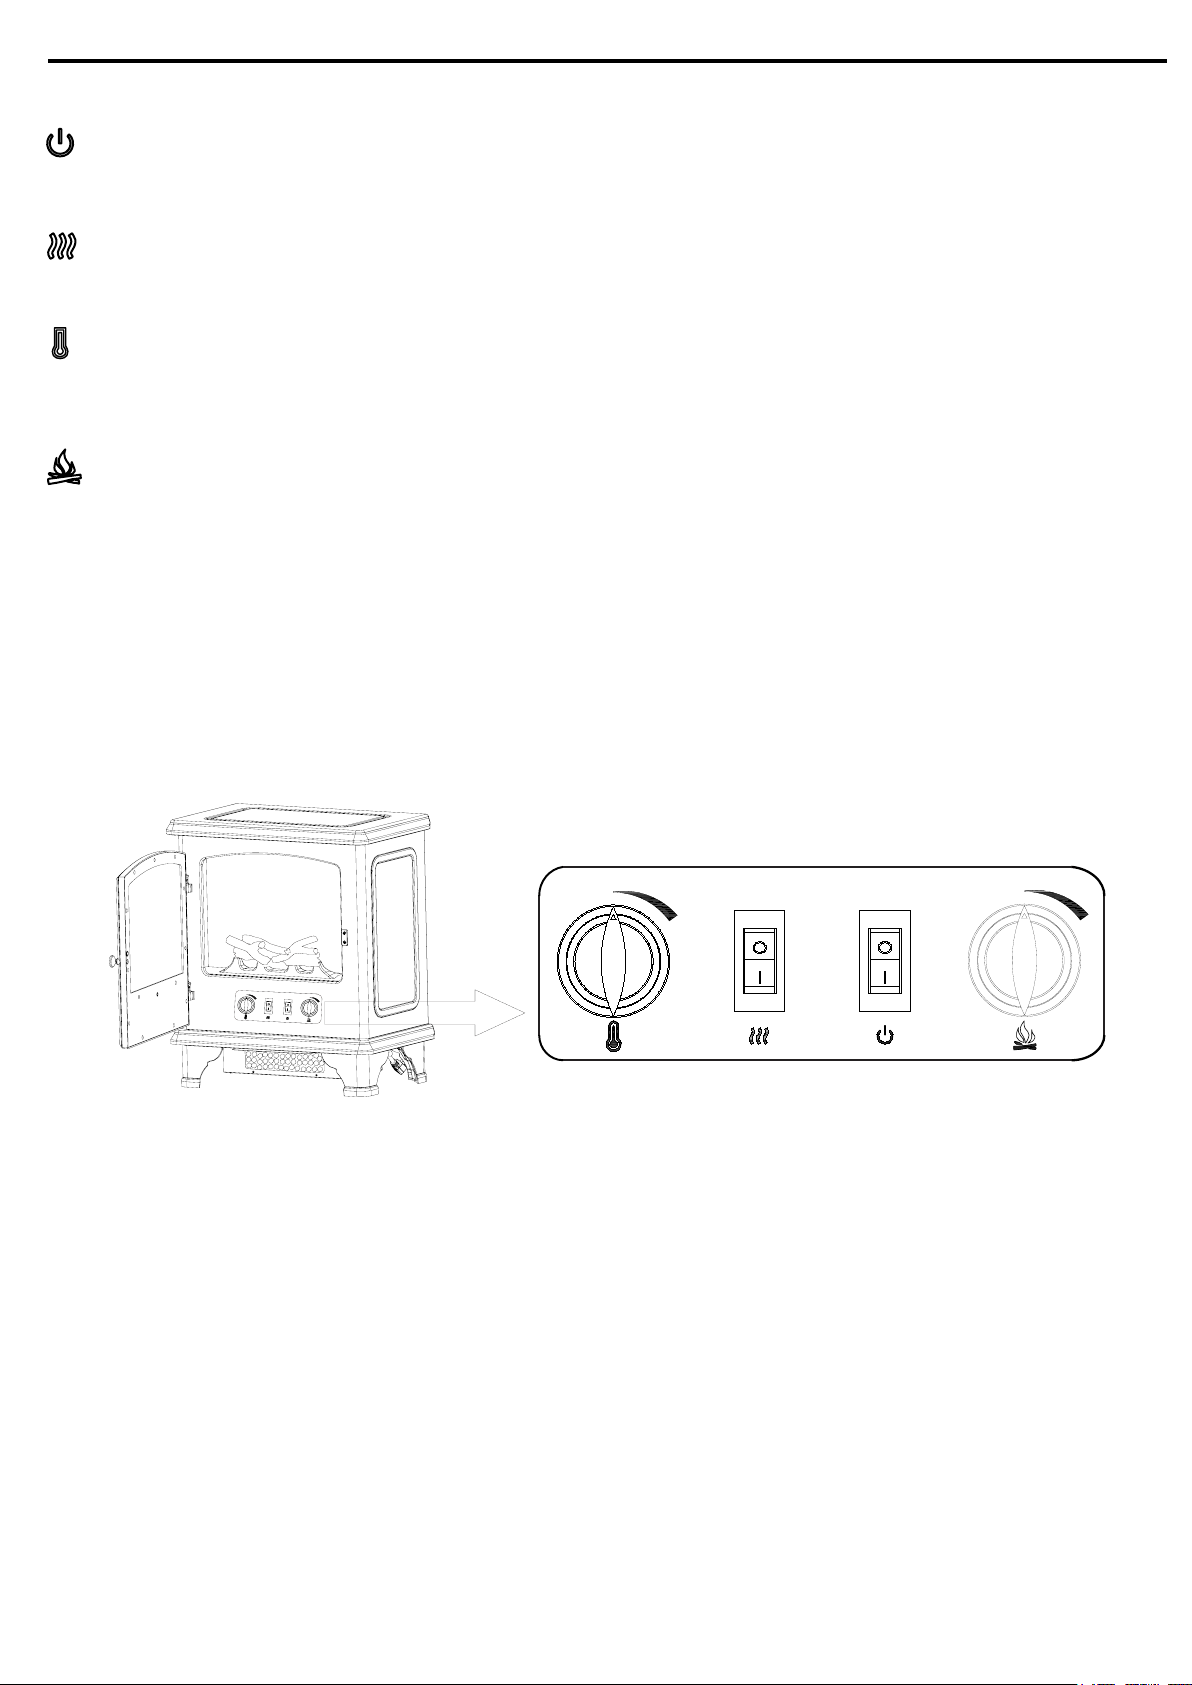
TO ACCESS CONTROL PANEL - Open the door to access the control panel.
- POWER
The Power switch supplies power to all of the functions of the replace and will illuminate the ame
effect. This switch must be lit for any of the functions to work.
- HEAT
Your replace consists of a fan-forced wire element type heater. The HEATER switch turns the heater
ON and OFF. This switch must be lit for the heater function to work.
- TEMPERATURE
The Temperature control knob helps regulate the ambient temperature level. The further the knob is
rotated clockwise, the higher the set point temperature. Turning the knob counter-clockwise will lower
the set point temperature.
( + - ) - BRIGHTNESS
The Flame Brightness control knob adjusts the ame brightness. Turning the knob to the left
(counter-clockwise ) dims the ame effect. Turning the knob to the right brightens the ame effect.
WARNING: Turn the power off when servicing this appliance. First turn the main power switch
to the “OFF” position. Then remove the electrical plug from the wall outlet.
Model #: DFS-550-0
Fig. 3
E-4
CARE AND MAINTENANCE
CLEARANCE TO COMBUSTIBLES
Keep electrical cords, drapery, furniture and other combustibles at least 3 ft (0.9 m) from the front of the
heater and away from the sides.
CLEANING TRIM
Clean the metal trim using a soft cloth, slightly dampened with a citrus oil-based product and buff with
a soft, clean cloth. DO NOT use brass polish or household cleaners as these products will damage the
metal trim. Purchase citrus oil-based products at a hardware store.
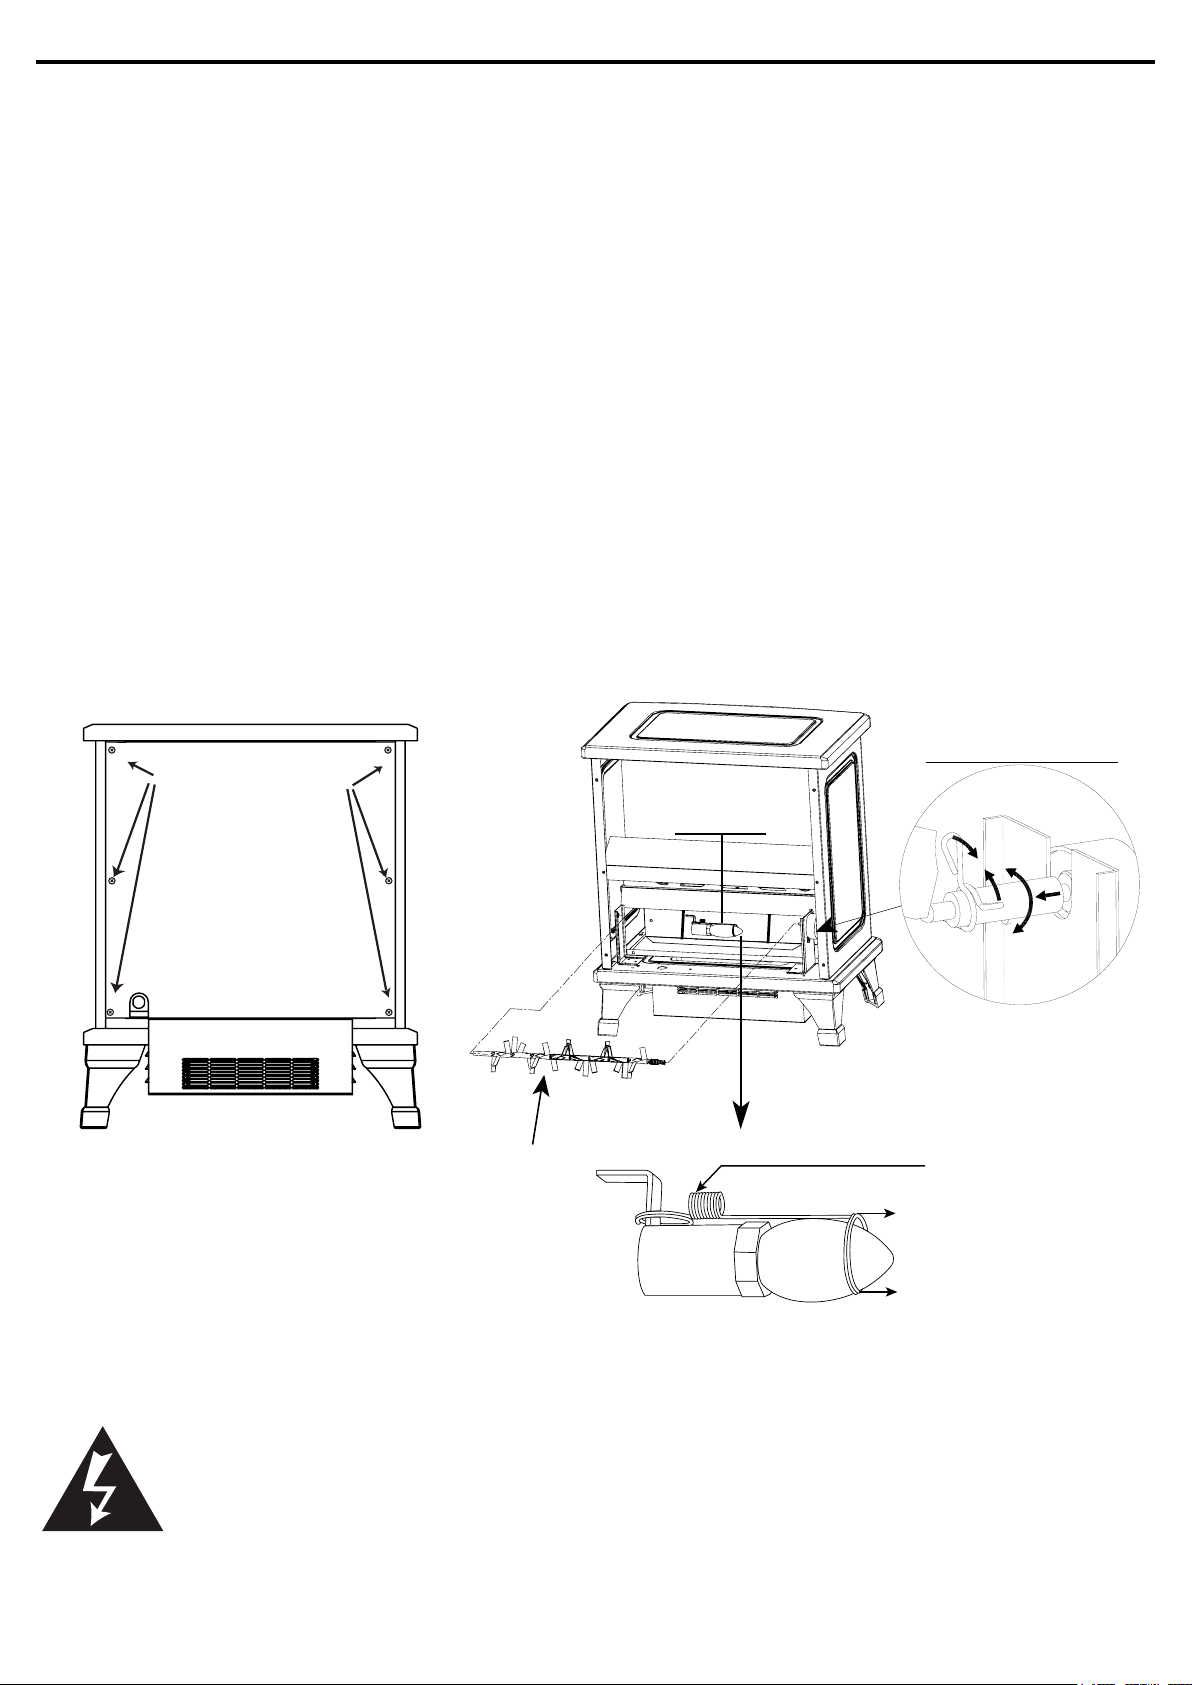
REPLACING THE LIGHT BULB
This electric stove uses one clear 120-V, 40-watt, E12 socket base light bulb (candelabra base, B bulb).
Access the 40-watt bulb through the rear access panel (see illustration below).
1. Turn the main power switch off, and then unplug the power cord from the wall outlet.
2. If the stove has been operating, let the unit cool at least 2 hours.
3. Loosen the screws holding the stove back panel to the main body of stove (see Fig 4).
4. Pinch the spring clip to loosen the spindle, and gently turn and pull the rubber gromet out of the
spinner motor shaft. (see Fig.5).
5. Pull the spinner out of the bracket.(see Fig 5).
6. Remove light bulb and replace with one clear 120-V, 40 Watt E12 Socket base light bulb (Fig.6).
7. Place rear access panel back into position and tighten screws (do not over-tighten).
1. Loosen Phillips
head screws
2. Remove back
panel to access
light bulb
3. Replace the
light bulb
Fig. 4
Spinner
Pinch this spring clip to
loosen. Gently turn and
pull the rubber grommet
from out of the motor
shaft.
Ember bed
light bulb
Fig. 5
Light bulb holding spring
Pull
Pull
Fig. 6
WARNING:Do not exceed 40 watts per bulb. Use of higher rated bulb may result
in a re, causing property damage or personal injury.
E-5
MAINTENANCE OF MOTORS
• The motors used on the fan and the ame generator assembly are pre-lubricated for extended
bearing life and require no further lubrication. However, we recommend periodic cleaning/vacuuming
of the fan/heater
• Make sure the unit is turned OFF and unplugged whenever you are cleaning the heater or replace.
WARNING: Make sure the power is turned off before proceeding. Any electrical repairs
or rewiring of this unit should be carried out by a licensed electrician in accordance with
national and local codes.
If repairing or replacing any electrical component or wiring, the original wire routing,
color coding and securing locations must be followed.
WARNING: Electrical outlet wiring must comply with local building codes and other
applicable regulations to reduce the risk of re, electrical shock and injury to persons.
WARNING: Do not use this replace if any part of it has been under water. Immediately
call a qualied service technician to inspect the replace and replace any part of the
electrical system.
WARNING: Disconnect power before attempting any maintenance or cleaning to reduce
the risk of re, electrical shock or personal injury.
TROUBLESHOOTING
PROBLEM POSSIBLE CAUSE CORRECTIVE ACTION
1. No power, switches do not
light up.
2. Switches light up,
but no ame effect.
3. Logs glow, ame effect
does not work.
4. Flame effect operates, but
heater does not blow warm
air.
5. Heater doesn’t work, but
Power and Heater switches
are in the “ON” position and
thermostat is set on the
highest level.
1. Power cord was not plugged
into the outlet.
2. Broken or loose bulb. 2. Remove the back panel and
3a. Spinner fell from bracket
3b. Spinner motor doesn’t work.
4a. Heater switch is in “OFF”
position.
4b. Thermostat is in low
position.
5a. The thermal protector has
tripped.
1. Check that the unit is plugged
into a standard 120-v outlet.
check for any broken or loose
light bulb.
3a. Remove the back panel.
Check to see if “spinner” is
correcrly mounted to the
motor.
3b. Check to see if spinning motor
is functioning. If not, call
customer service.
4a. Check that heater switch is in
“ON” position. Switch should
light up.
4b. Make certain that thermostat
is turned toward the highest
position.
5a.Turn all switches to the “OFF”
position and unplug the unit
from the wall outlet for 5
minutes. After 5 minutes, plug
the unit back into wall outlet
and operate as normal.
E-6
 Loading...