

Page 1
User Guid
e
User's Guide
Myy
M
Maaxx
M
Dee
D
moonnssttrraattiioonn KKiitt
m
V2.0
Page 2

Contents
1. Introduction .................................................................................................................3
2. Demonstration Kit contents .........................................................................................3
3. Pairing the sticker with the phone ...............................................................................4
4. Demo applications........................................................................................................5
4.1. Write Tag ........................................................................................................................................ 5
4.2. Read Tag ......................................................................................................................................... 5
4.3. E-Purse ............................................................................................................................................ 5
5. MyMax Architecture Overview ....................................................................................6
6. MyMax battery.............................................................................................................7
6.1. Autonomy........................................................................................................................................ 7
6.2. Battery recharging procedure ......................................................................................................... 7
6.3. Recharging ...................................................................................................................................... 8
6.4. Checking the state of charge of the battery.................................................................................... 8
A. Epurse demo .............................................................................................................. 10
B. Appendix - Tag Reader demo .....................................................................................14
TWINLINX SA all rights reserved Demonstration User Guide V2.0 2 of 16
Page 3
1. Introduction
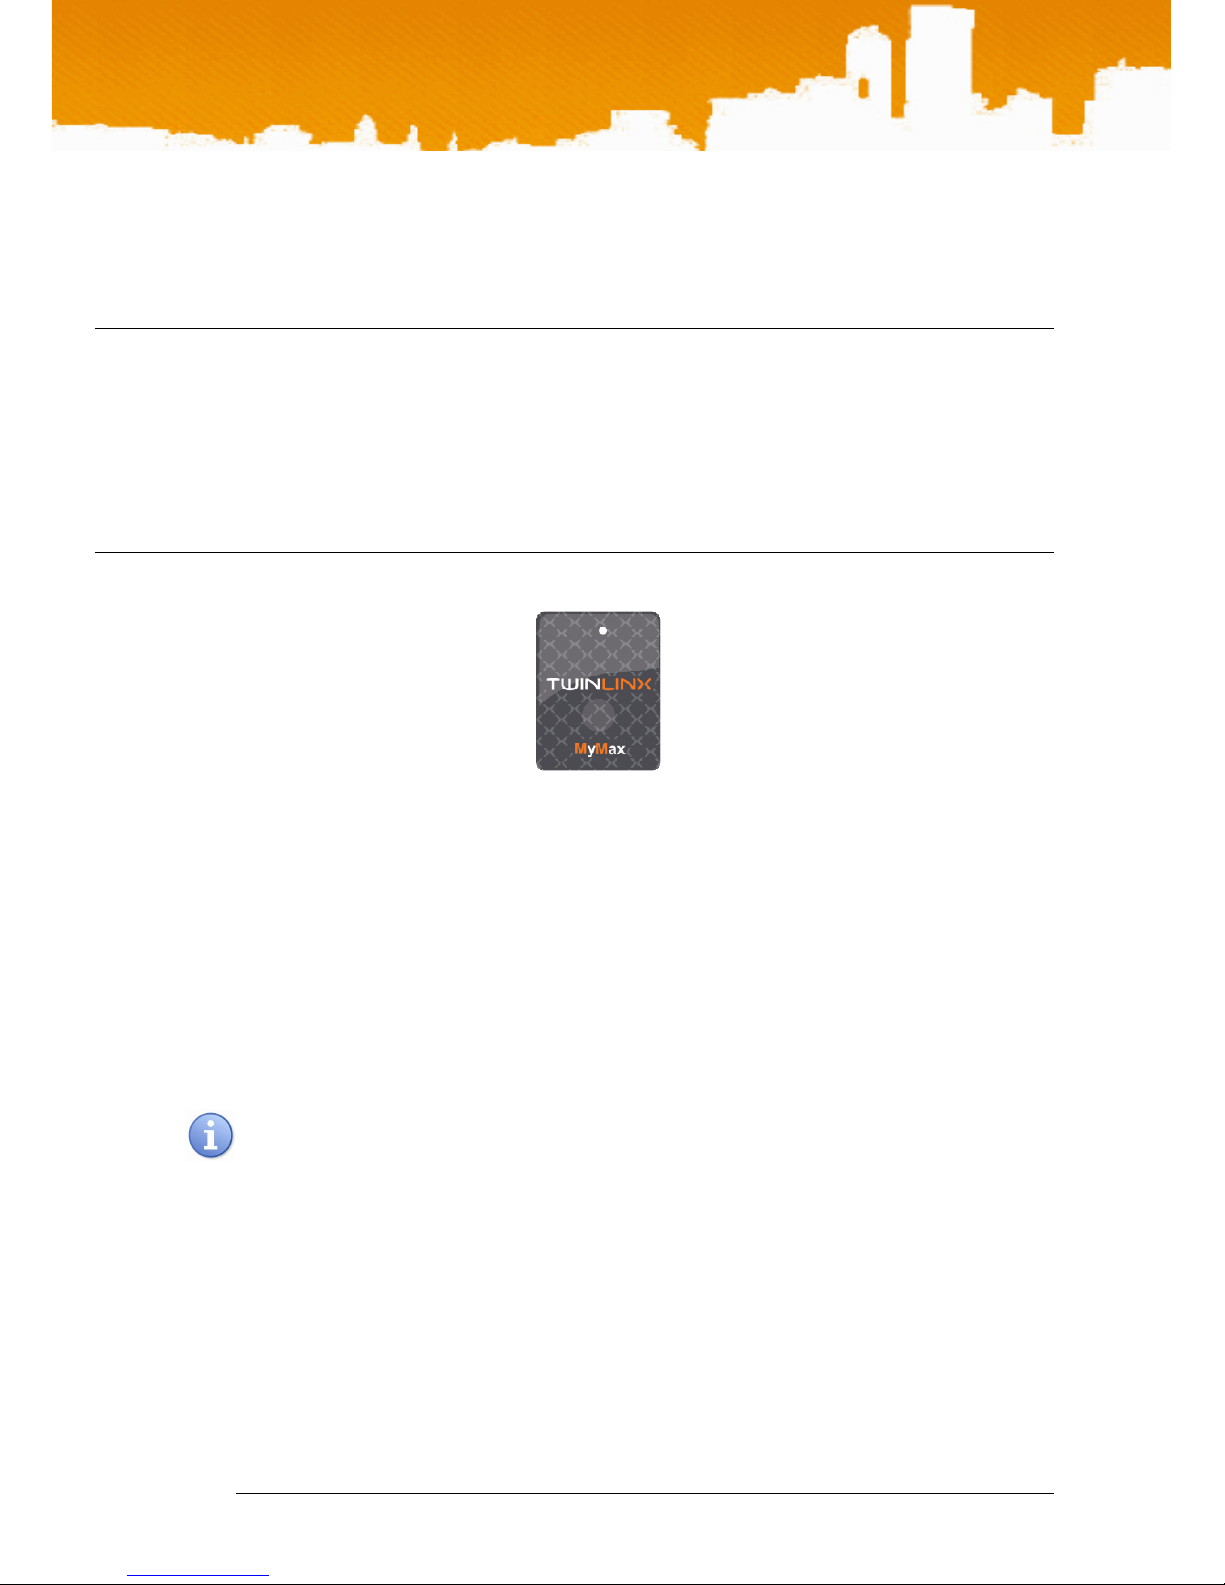
This demo kit is designed to help you try out and experience the MyMax mobile NFC sticker on
mobile phone models from most of the leading manufactures.
2. Demonstration Kit contents
User Guide
- User guide documentation (download)
MyMax USB Charger
MyMax stickers
Plastic sticker holders
NFC tags
Plastic sticker holders are included to allow you to easily remove the sticker and test with
different phones.
TWINLINX SA all rights reserved Demo User Guide V2.0 3 of 16
Page 4
3. Pairing the sticker with the phone
The first step in working with the MyMax sticker is to pair it with the mobile phone. This is
achieved in the same way as you would pair any other device to your phone.
1. Select the ‘add a new bluetooth device’ option from his handset's bluetooth
configuration menu
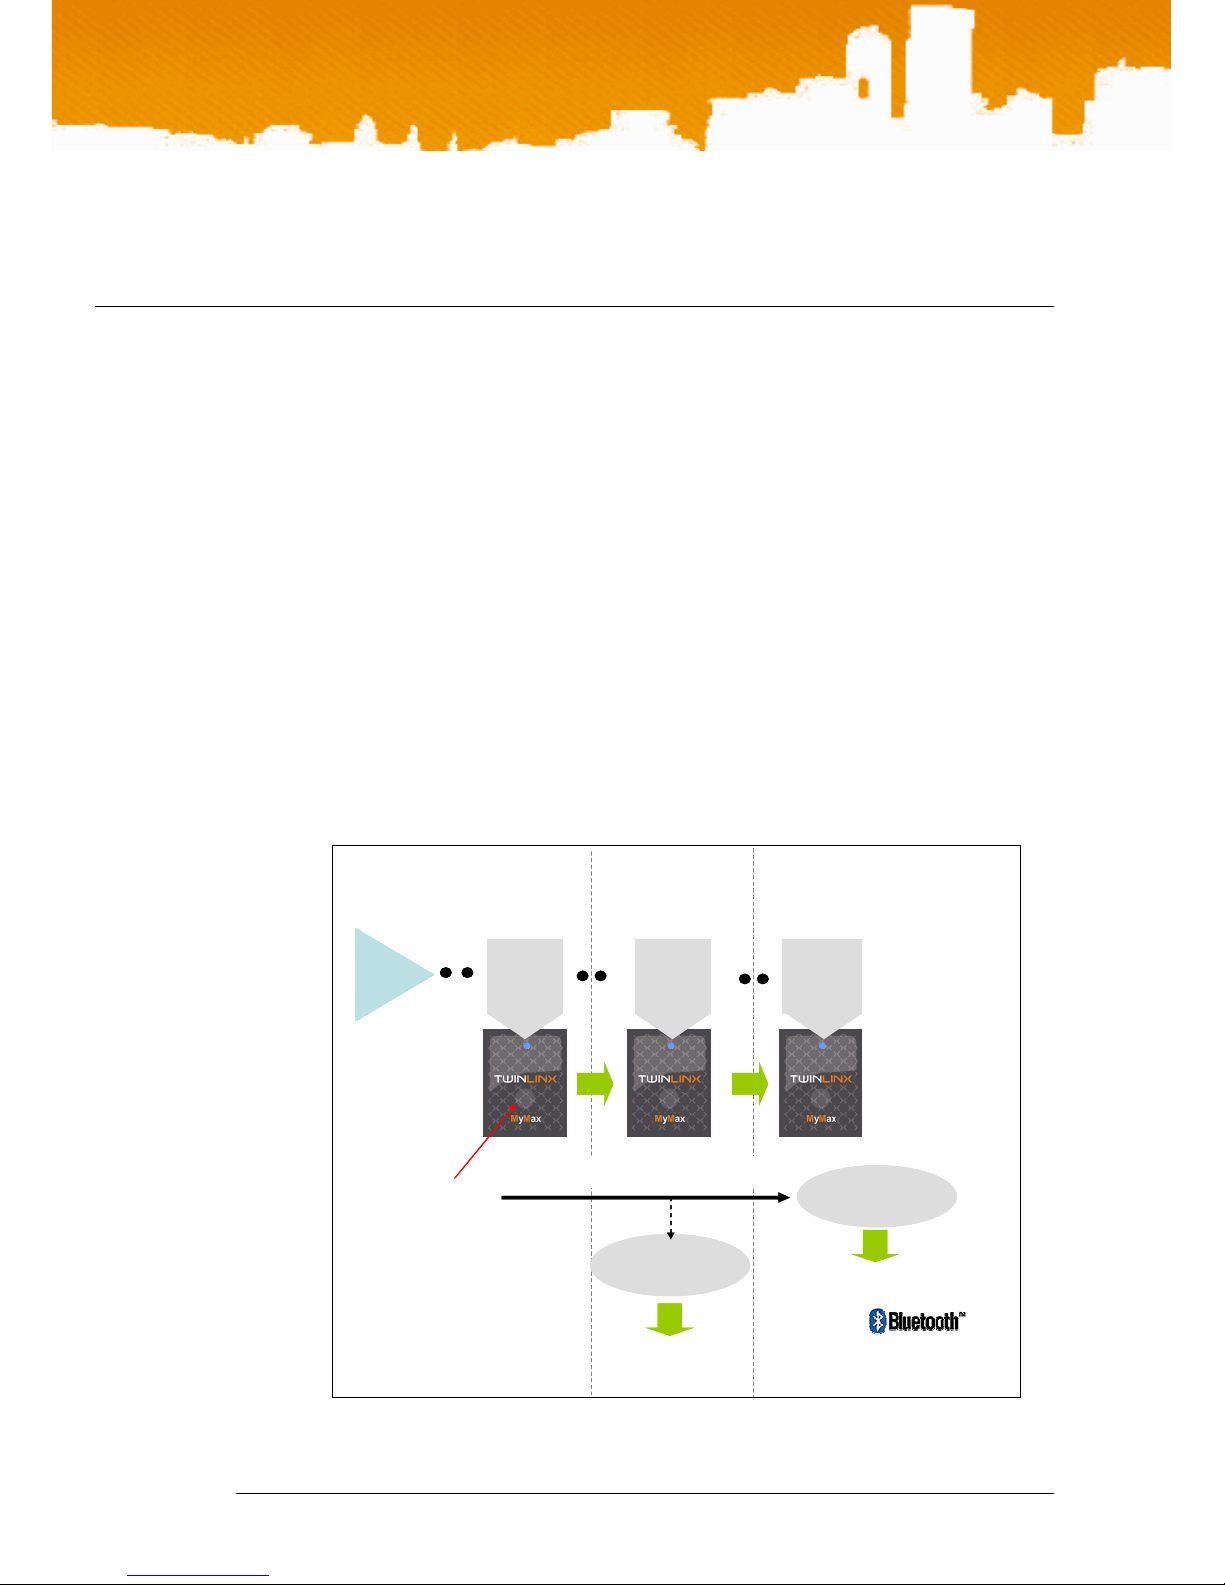
2. Press MyMax main button more than 6 sec in order to switch it into Pairing Mode.
Its LED should light ON and switch first to a fast blinking mode after 3 sec and finally
start blinking slowly after 3 more sec indicating to the user that he can release the
button.
3. Check for MyMax name in the list of visible bluetooth devices detected by the
handset and select it.
4. Enter on the handset the pairing code 1234 associated to MyMax demo devices
5. To pair with a different handset
User Guide
Remove the sticker from the old handset and approach it to the new handset
Repeat the same procedures 1-6 with the new handset
Re-charging
LED
LED
Press down
Press down
Button
Button
ON
ON
Re-charging
Phase
Phase
Rapid
Rapid
Blinking
Blinking
~3s ~6s
~3s ~6s
Release
Release
Button
Button
Bluetooth
Bluetooth
Pairing Phase
Pairing Phase
Slow
Slow
Blinking
Blinking
Release
Release
Button
Button
Bluetooth Pairing
Bluetooth Pairing
TWINLINX SA all rights reserved Demo User Guide V2.0 4 of 16
Place on
Place on
charger
charger
Page 5

4. Demo applications
First of all you should download the demo MIDlets (ePurse, Read Tag, Write Tag and MyMax
Info) to your Phone from the following Twinlinx site:
www.twinlinx.com/SDK2/MIDlets
4.1. Write Tag
This MIDlet uses the MyMax reader function to write data to an external tag. Three
functions are pre-defined
i. Write a URL into the tags memory
ii. Write a Telephone N°
iii. Write some Text
User Guide
4.2. Read Tag
This MIDLet reads tags previously configured with Write Tag and depending on the data
written by TagSetter will either:
iv. Display stored URL and ask to connect to the Website or Server
v. Display stored Telephone N° and ask if you want to dial this number
vi. Display stored text
A description and installation of the Write Tag and Read Tag demos can be found in Appendix B.
4.3. E-Purse
This demo uses the MyMax- Secure Element and is based around a simple electronic
purse where money stored in the sticker can either be debited via the PC reader or
credited via the phone. The resulting value may then be displayed on the phones screen.
This demo shows the sticker working in passive mode and active mode where a
connection is established between the phone and the secure element in the sticker.
A description and installation of the E-Purse demo can be found in Appendix A.
TWINLINX SA all rights reserved Demo User Guide V2.0 5 of 16
Page 6
5. MyMax Architecture Overview
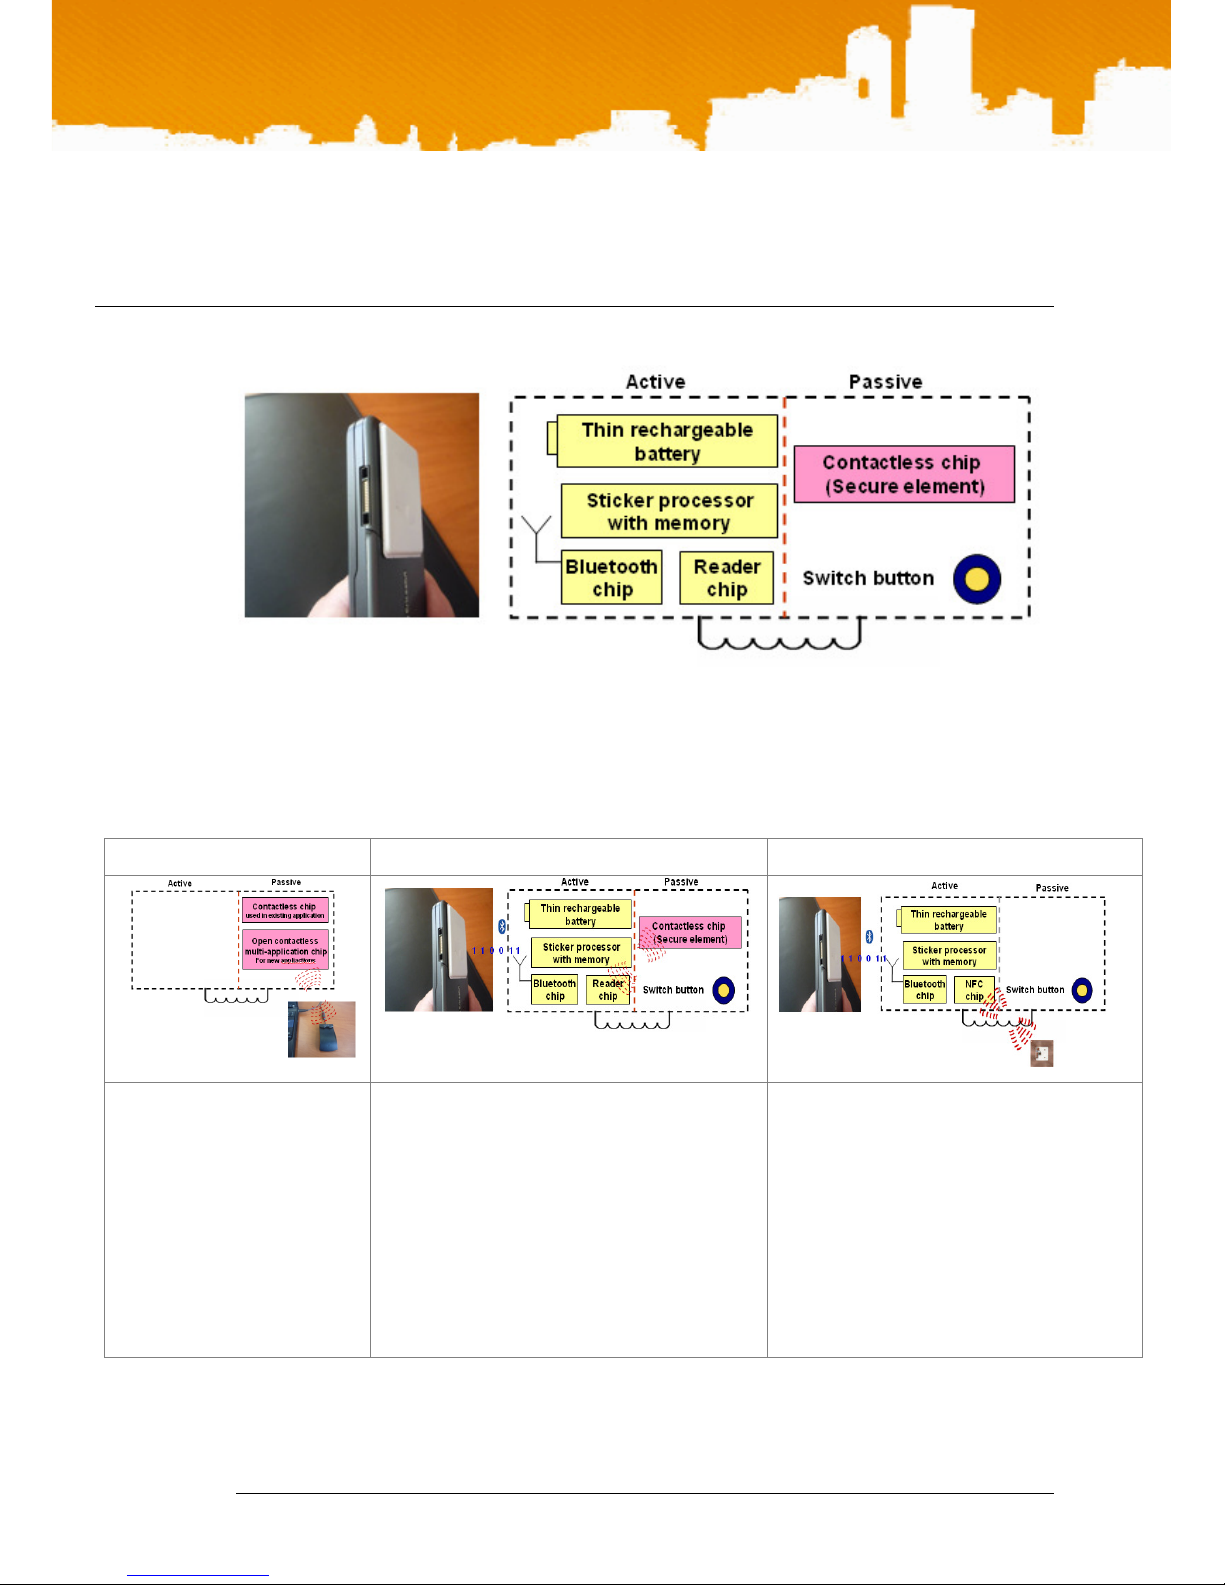
Fig 1. MyMax architecture
User Guide
MyMax consists of an active and passive part. The active part is used to wake up the sticker and
establish communicate between the mobile phone via Bluetooth to either the internal passive
Contactless chip or an external NFC tag/card via HF 13,56MHz (ISO 14443). This leads to 3
possible modes of operation.
Fig 2. Operating Modes
1. Passive Mode 2. Internal Reader Mode 3. External Reader Mode
Operates like a contactless card
Energy supplied by external
reader field
Sticker is switched off – no
battery power consumption
Natural Battery off – works
when both phone or sticker
batteries are dead
Upto 2 different Contactless
chips can be integrated
Button used to wake up the sticker
Communication established between sticker and
phone via bluetooth
Internal Reader opens up a data channel between
the sticker active and passive Contactless chips
Ant-collision used to select the right chip
Data can now be read and written from the phone
to the passive Contactless chips
Passive chip security (if used) can be managed on-
line through a secure server linked via GSM
Button used to wake up the sticker
Communication established between sticker and
phone via bluetooth
Internal Reader opens up a data channel
between the sticker active and an external tag or
card
Data can now be read and written from the
phone to the passive Contactless chips
Passive chip security (if used) can be managed
on-line through a secure server linked via GSM
TWINLINX SA all rights reserved Demo User Guide V2.0 6 of 16
Page 7
6. MyMax battery
6.1. Autonomy
In passive (card) mode the sticker battery is not used and the secure element or passive chip
gets its energy from the external reader RF field. The battery is used when the sticker connects
to the phone either to read external tags or communicate with the internal secure element.
The autonomy will vary greatly with the application need to connect to the sticker, in some
cases like an Airline boarding pass it could be twice a week or for a metro ticketing application
twice a day. The heaviest use on the battery comes from external Tag reading where the sticker
is active for longer periods of time.
In any case we estimate that around 5000 connections to the internal secure element and 400
tag reads are possible before re-charging the stickers battery as described below
6.2. Battery recharging procedure
User Guide
In order to recharge the battery, the sticker must be switched to this specific operation mode. In
order to do this, the main button of the sticker must be pressed at least 3 sec until the LED starts
blinking with its specific reloading mode sequence (3 quick blinks every 2 sec) indicating that the
sticker is ready for recharging. The button should be released when this happens (pressing it too
long, ie more than 6 sec, would indeed bring the explicit pairing mode blinking sequence
described at the beginning ot the document). The sticker should then be positioned on its
charger or any active 13,56 Mhz RFID reader, button face down. If no RFID field is detected
within 30 sec, the sticker will automatically switch off.
The full charging cycle requires 4 to 6 hours. The sticker can be removed from its charger at
anytime during the charging cycle in order to either verify its charging status (it will resume its
quick blink sequence if the charge cycle is not complete) or interrupt the charging cycle. To
resume the charge, put the sticker back on its charger before 30 sec. To quit the charging cycle
and return to the normal operation mode press the button which will switch it Off. The sticker
will also automatically switch off if not returned on the charger within 30 sec.
During the recharging cycle, once the RFID field has been detected, the LED is switched off as it
cannot be seen when the sticker is positioned on the charger. When removed from the charger,
if the LED start blinking again, it indicates that the charge is not complete yet. Only when the
LED remains off, is the charge complete (provided the charger has not been disconnected of
course).
For this design version of the sticker, the Battery voltage should not be below 3.7V, once it
reaches 3.8V it is advised to re-charge.
TWINLINX SA all rights reserved Demo User Guide V2.0 7 of 16
Page 8
User Guide
6.3. Recharging
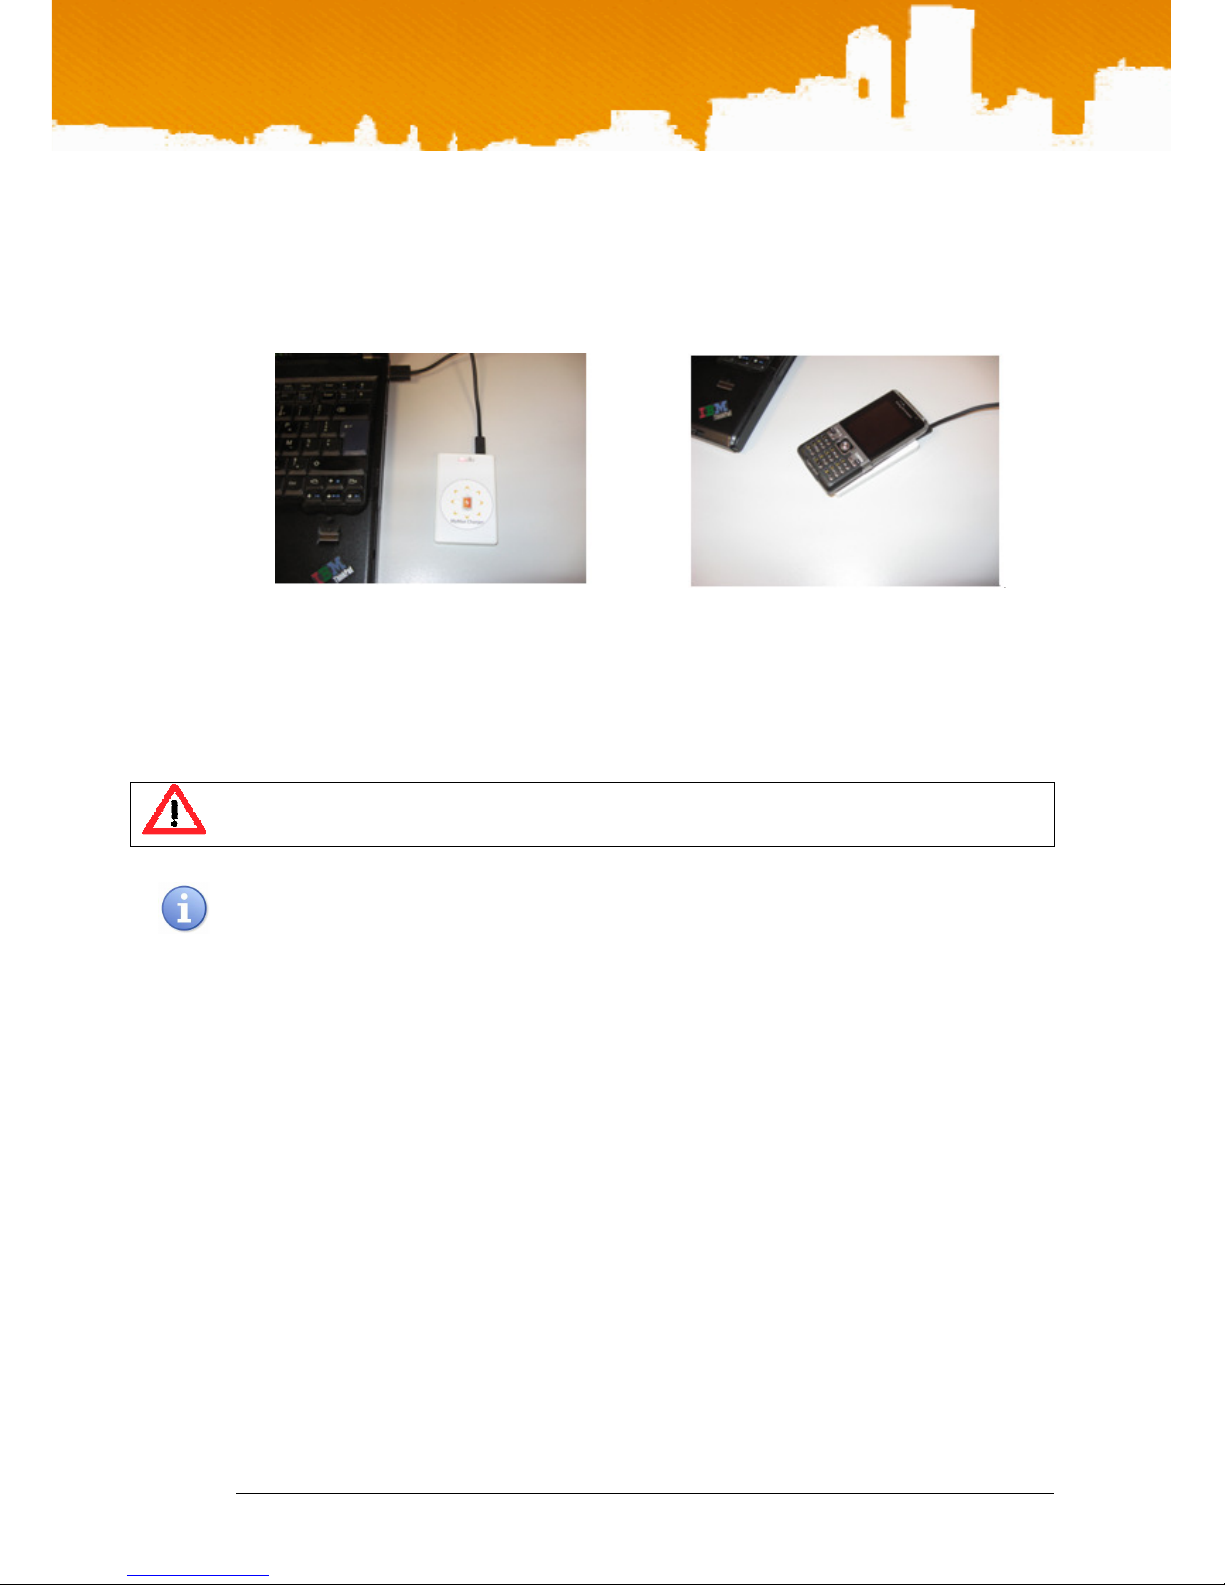
Re-charging the MyMax battery is achieved via an RF field emitted by the USB connected
charger included in the kit.
MyMax Charger
MyMax being charged
• Plug in the charger to any USB port (alternatively in any USB AC-DC adaptor), this will
automatically start the generation of the RF field (the LED on the charger will switch ON)
Place the sticker on top of the charger,
The orientation of the sticker is important, make sure that the side with the button is facing
downwards as shown in the diagram, otherwise the sticker will not recharge.
Depending on the state of the battery in can take around 4 hours to fully recharge it.
6.4. Checking the state of charge of the battery
The battery level can be monitored from the application midlet MyMax Info which returns a
value corresponding to the battery voltage. When fully loaded this value should be between
4.1V and 4.2V.
If the battery needs recharging (below 3.7V), the sticker will not start in normal operation mode.
It will instead display 3 quick blinks and automatically switch off. Once in this mode the explicit
pairing sequence is also disabled. Only the battery recharging mode is available (see above).
• Go to the Menu where the MIDlet was installed.
• Click on Mymax Info
TWINLINX SA all rights reserved Demo User Guide V2.0 8 of 16
Page 9
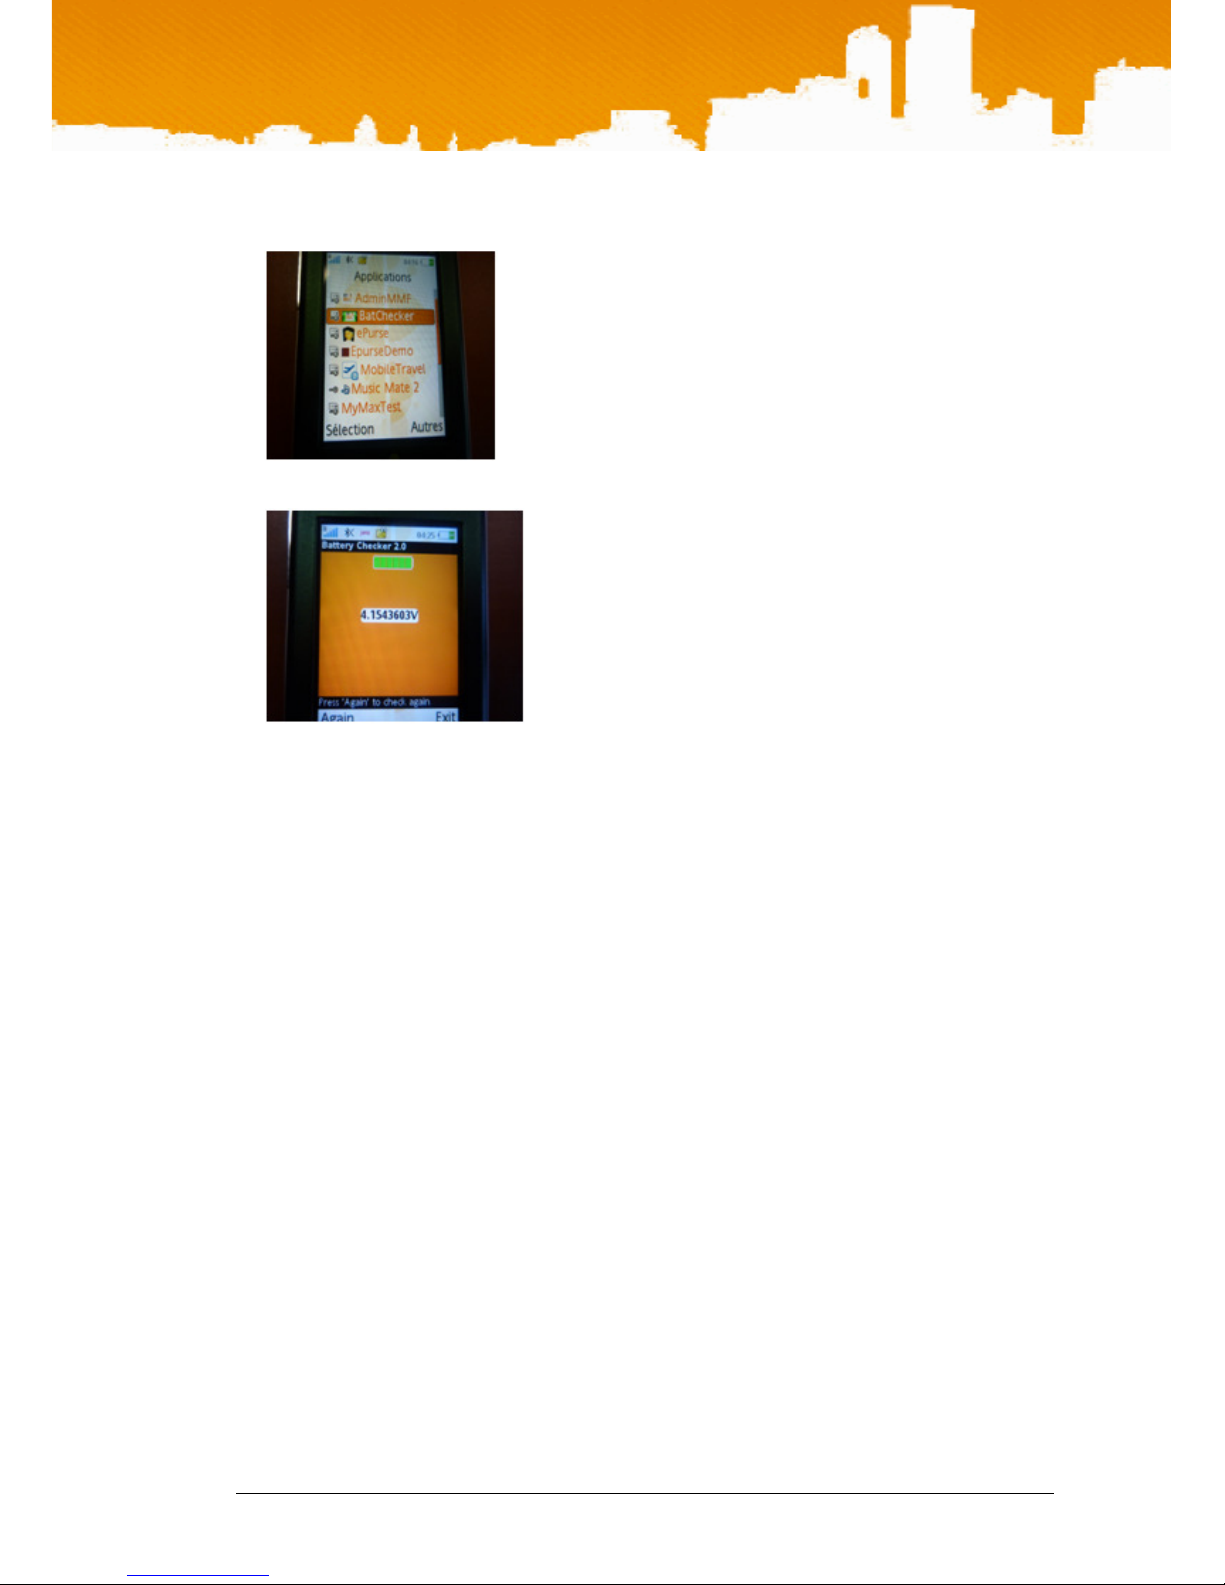
• Switch on the sticker
User Guide
The battery level is displayed
TWINLINX SA all rights reserved Demo User Guide V2.0 9 of 16
Page 10
A. Epurse demo
Introduction
This simple demo is based on a stored value purse where an amount of money is registered
in the sticker’s passive chip. The value can then be displayed either by running the Epurse
application on the phone (active mode) or just waving the sticker in front of the PC reader
running the Epurse demo. Value can be added using the phone and debited using the PC
application.
You will first need to acquire a Contactless only PC/SC reader (example: ACS: www.acs.com.hk) and
install it on your PC
Connect the PCSC reader to any USB port
User Guide
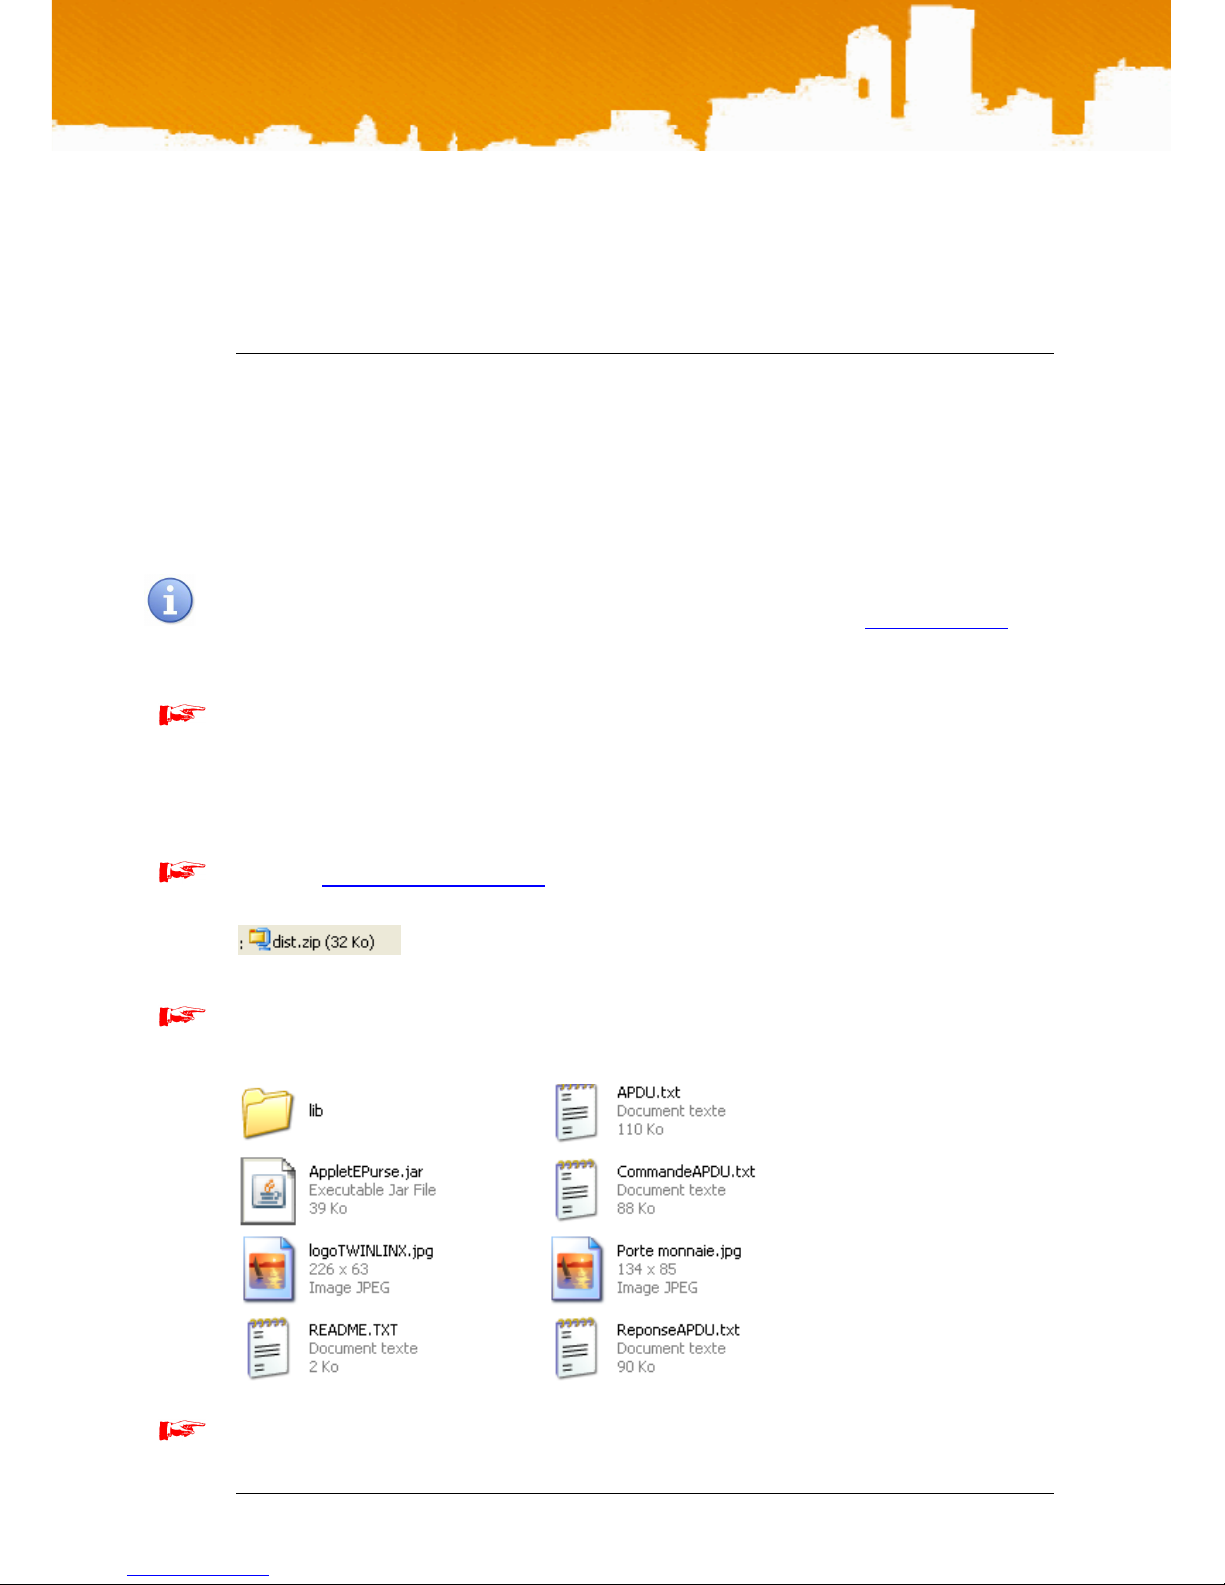
Installing the Epurse terminal Demo on a PC
Go to the www.twinlinx.com/demos site and down load the MyMax epurse demo for windows
Go to the ‘ dist ‘ directory
Click on AppletEpurse.jar
TWINLINX SA all rights reserved Demo User Guide V2.0 10 of 16
Page 11
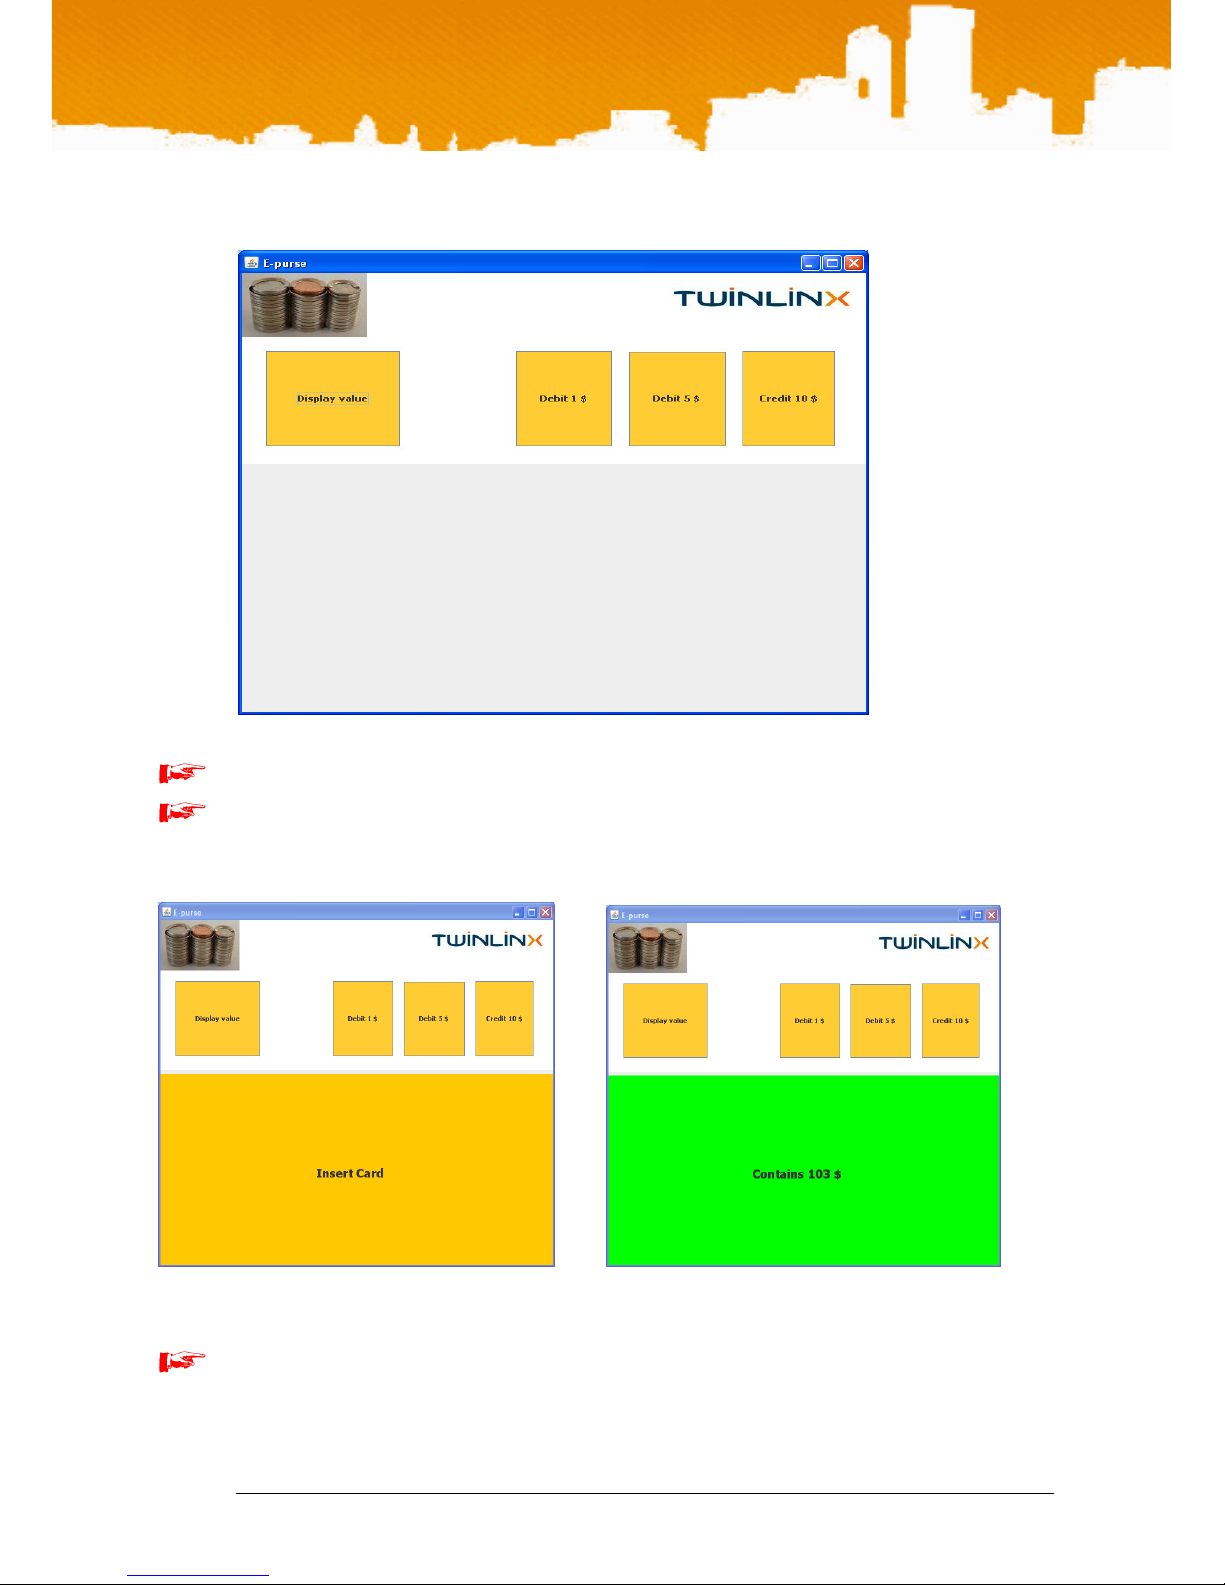
User Guide
Click on the Display value button
Place the sticker over the reader to display the current value stored in the sticker’s passive
contactless chip.
Click on the Debit 5€ and display the updated value
TWINLINX SA all rights reserved Demo User Guide V2.0 11 of 16
Page 12
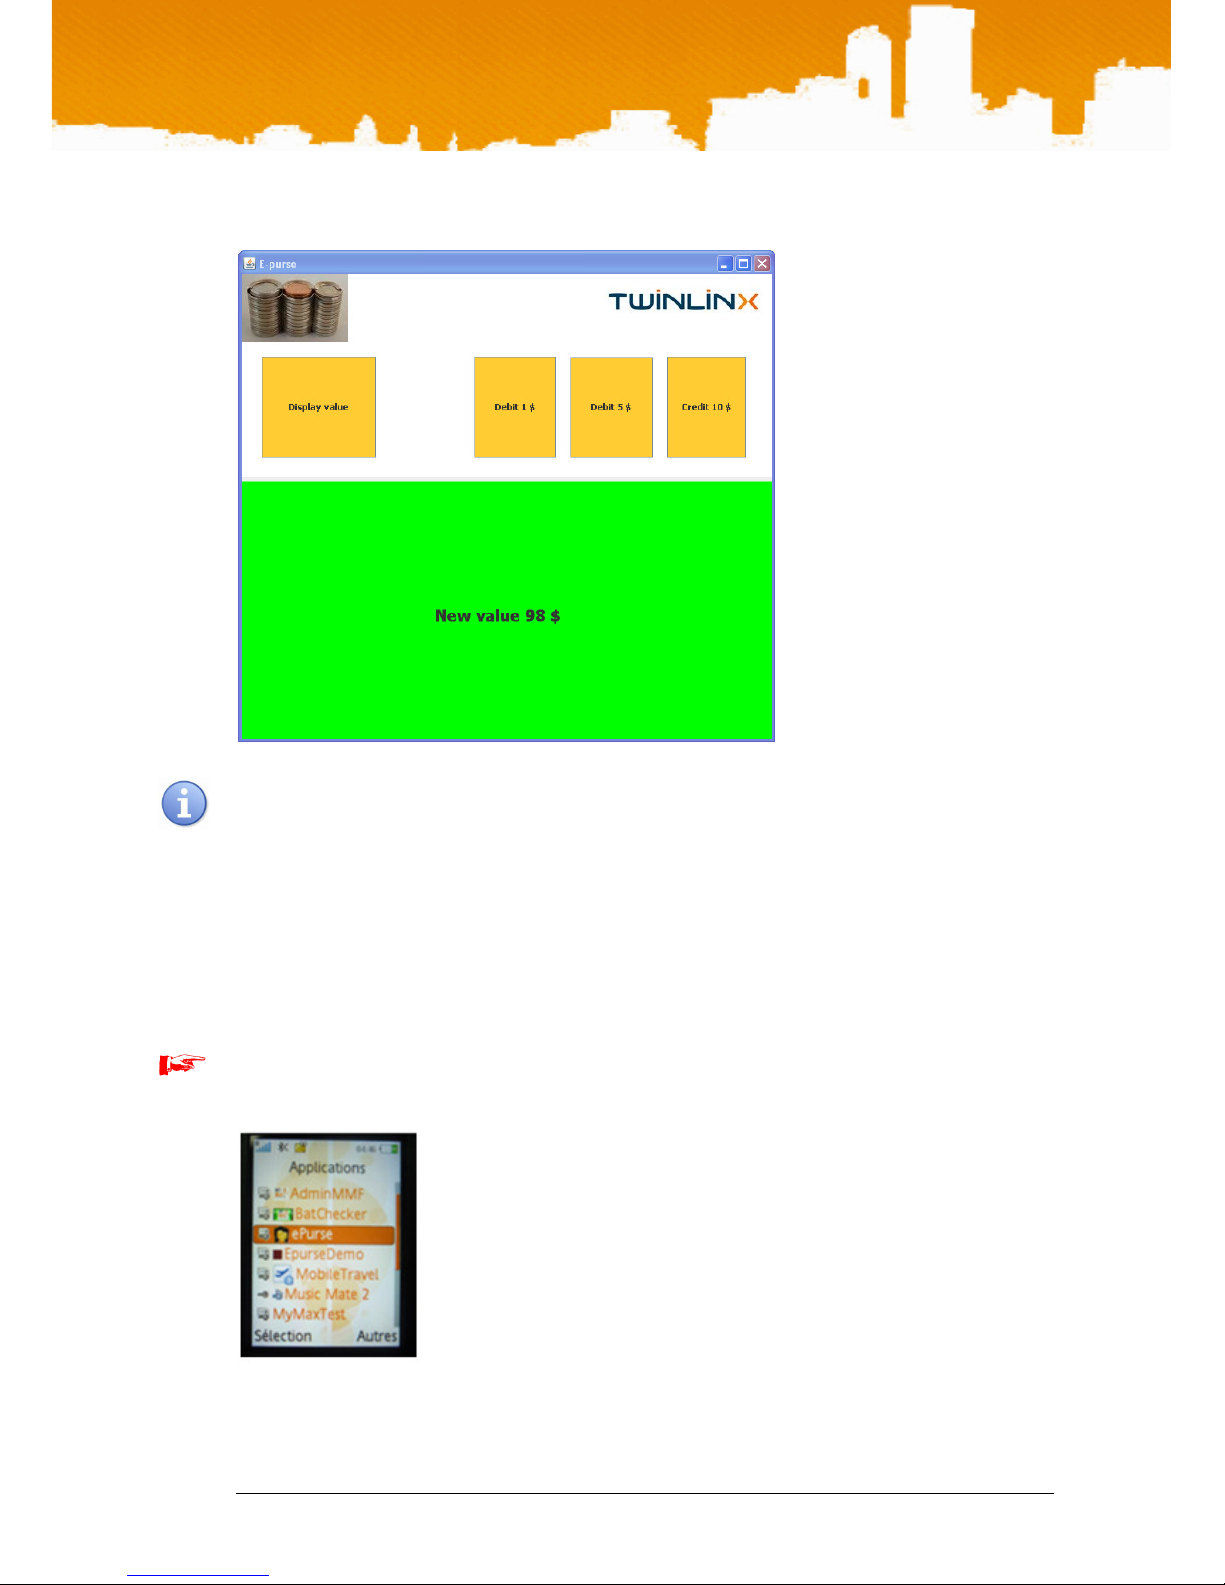
User Guide
In this first step the MyMax Sticker is operating completely in passive mode just like a Contactless
smart card. The active part of the sticker is shutdown and the internal battery is not used, with
energy being supplied by the PC reader RF field.
Step 2: Reading the Sticker Epurse stored value on the mobile phone.
The next step is to verify the amount now stored in the sticker Epurse.
Select the E-Purse demo application
TWINLINX SA all rights reserved Demo User Guide V2.0 12 of 16
Page 13
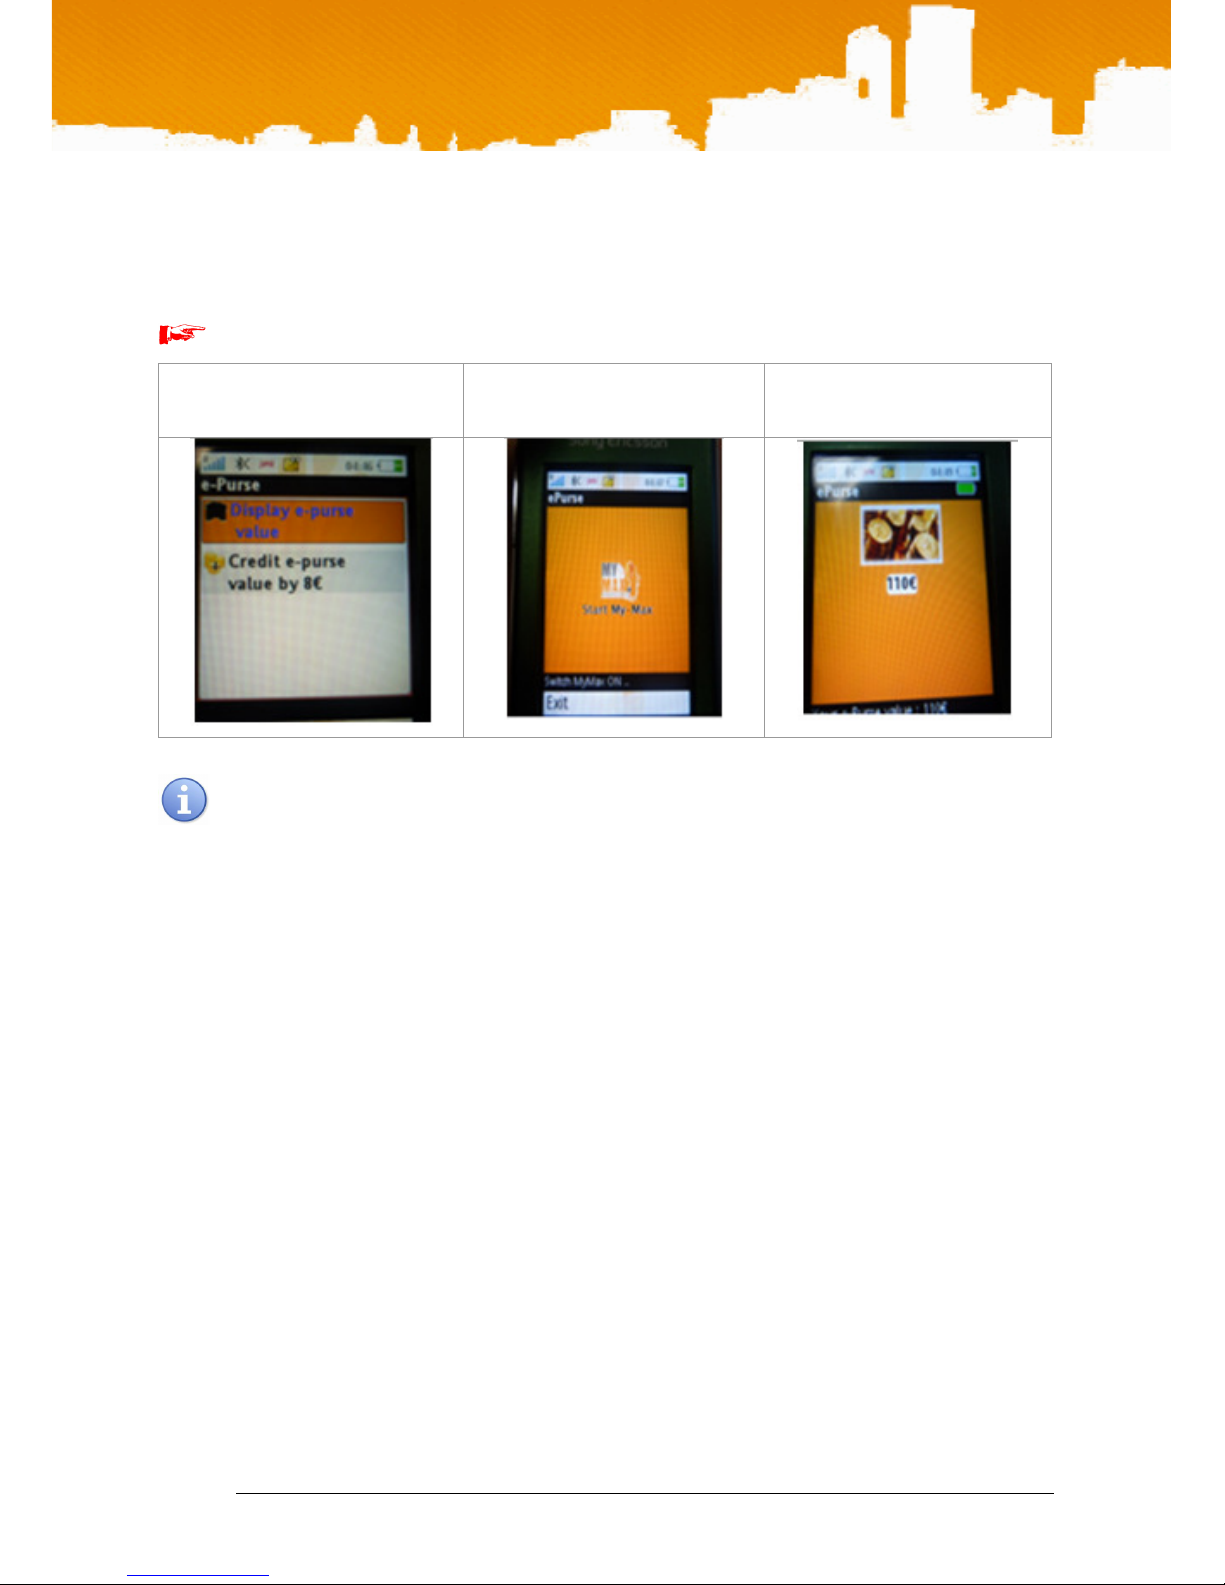
Navigate through the menus as shown below
User Guide
Display e-purse Value Start MyMax
Display value
(switch on the sticker)
In this operation the sticker is switched on and a communication channel via Bluetooth is
established. The Epurse application Midlet (Java applet) in the phone then sends a series of Card
type commands (see Appendix c) to read the Epurse value in the sticker’s passive chip. Once this
is completed the sticker is shutdown by the application midlet in order to save energy.
TWINLINX SA all rights reserved Demo User Guide V2.0 13 of 16
Page 14
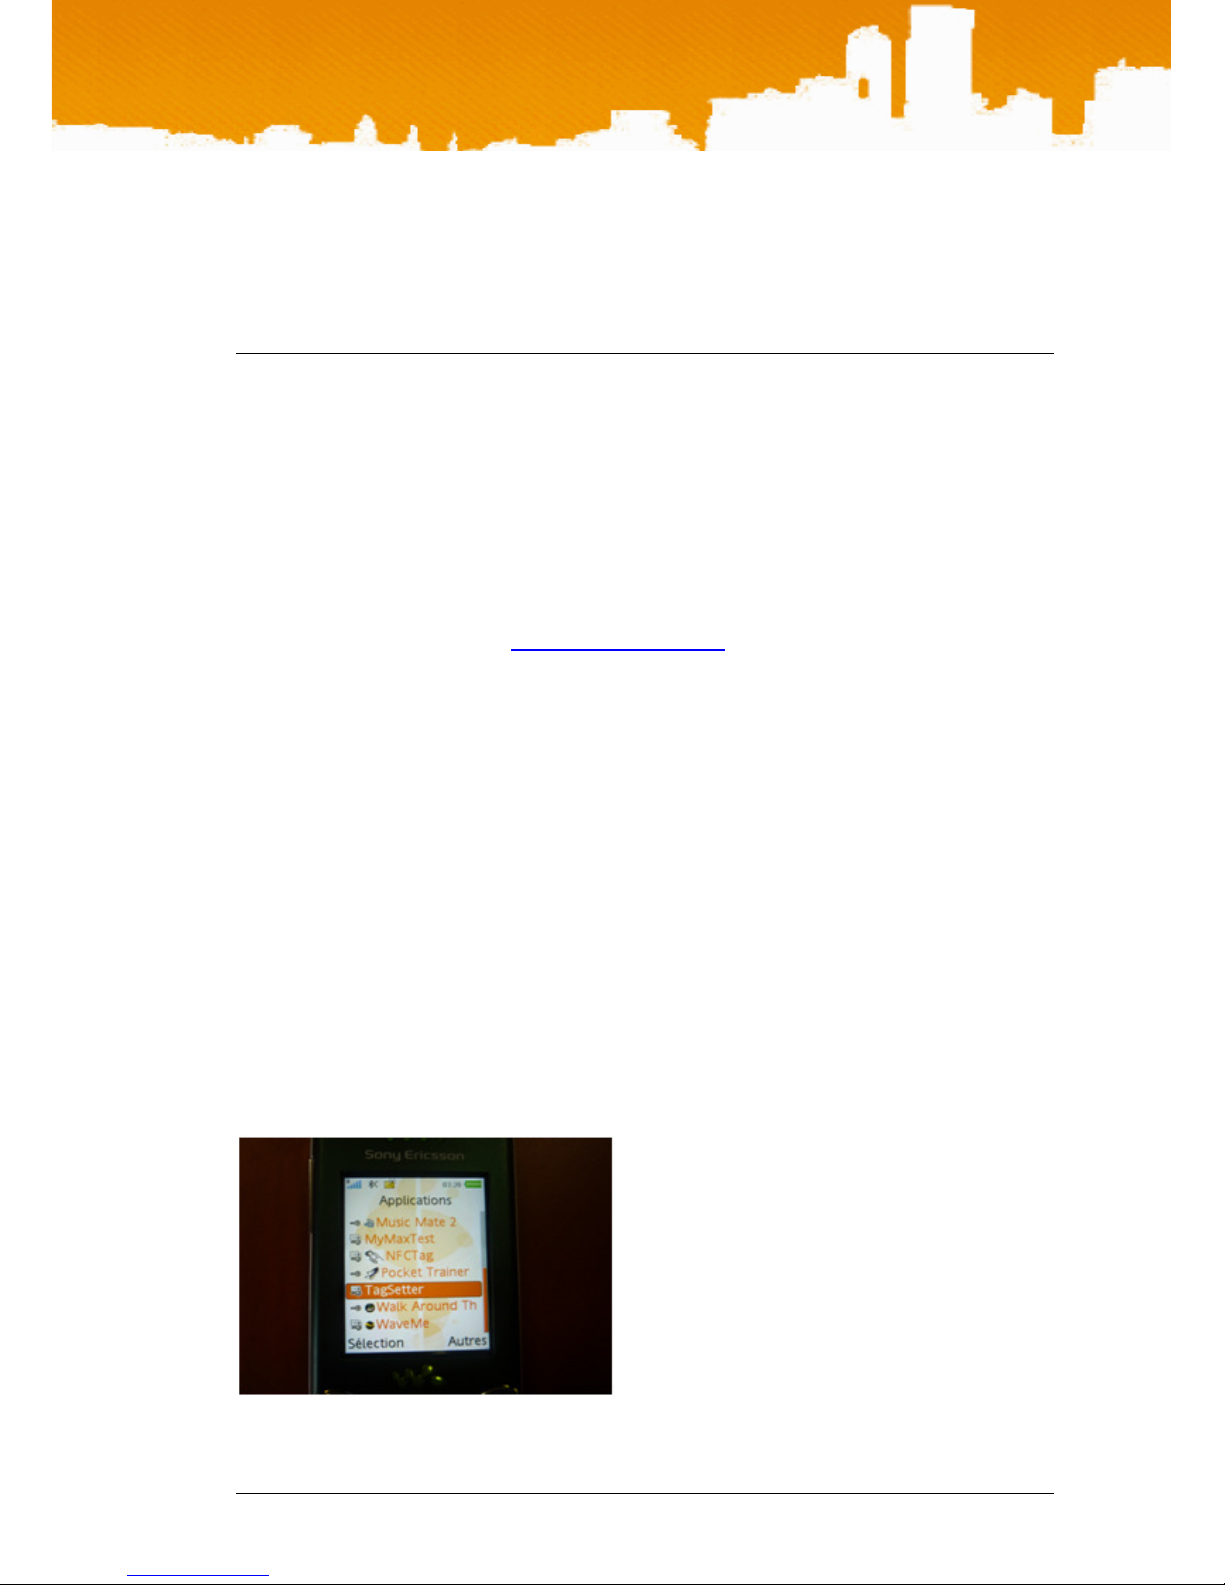
B. Appendix - Tag Reader demo
Introduction
This demo shows how the MyMax Reader function of the sticker which is able to read and
write information to external NFC tags. The tag type provided in the development kit is based
on the ISO 14443A protocol.
The demo manages 3 different applications.
1. URL: A URL (example: http://www.twinlinx.com) is written into the tag. A subsequent
read can then either go directly to the http site or just display the URL text.
2. Make a call: A telephone number can be written into the tag. A subsequent read will
allow the user to either call this number, send an SMS, or register the N° in the
telephone.
User Guide
3. Text: Text entered on the telephone screen can be written to the tag . A subsequent
read of the tag displays the text on the phones screen.
Running the demos
• Ensure that the MIDLets Read Tag and Write Tag are loaded into your telephone as described
earlier.
Writing to the Tag
• Click on the Menu Write Tag
TWINLINX SA all rights reserved Demo User Guide V2.0 14 of 16
Page 15
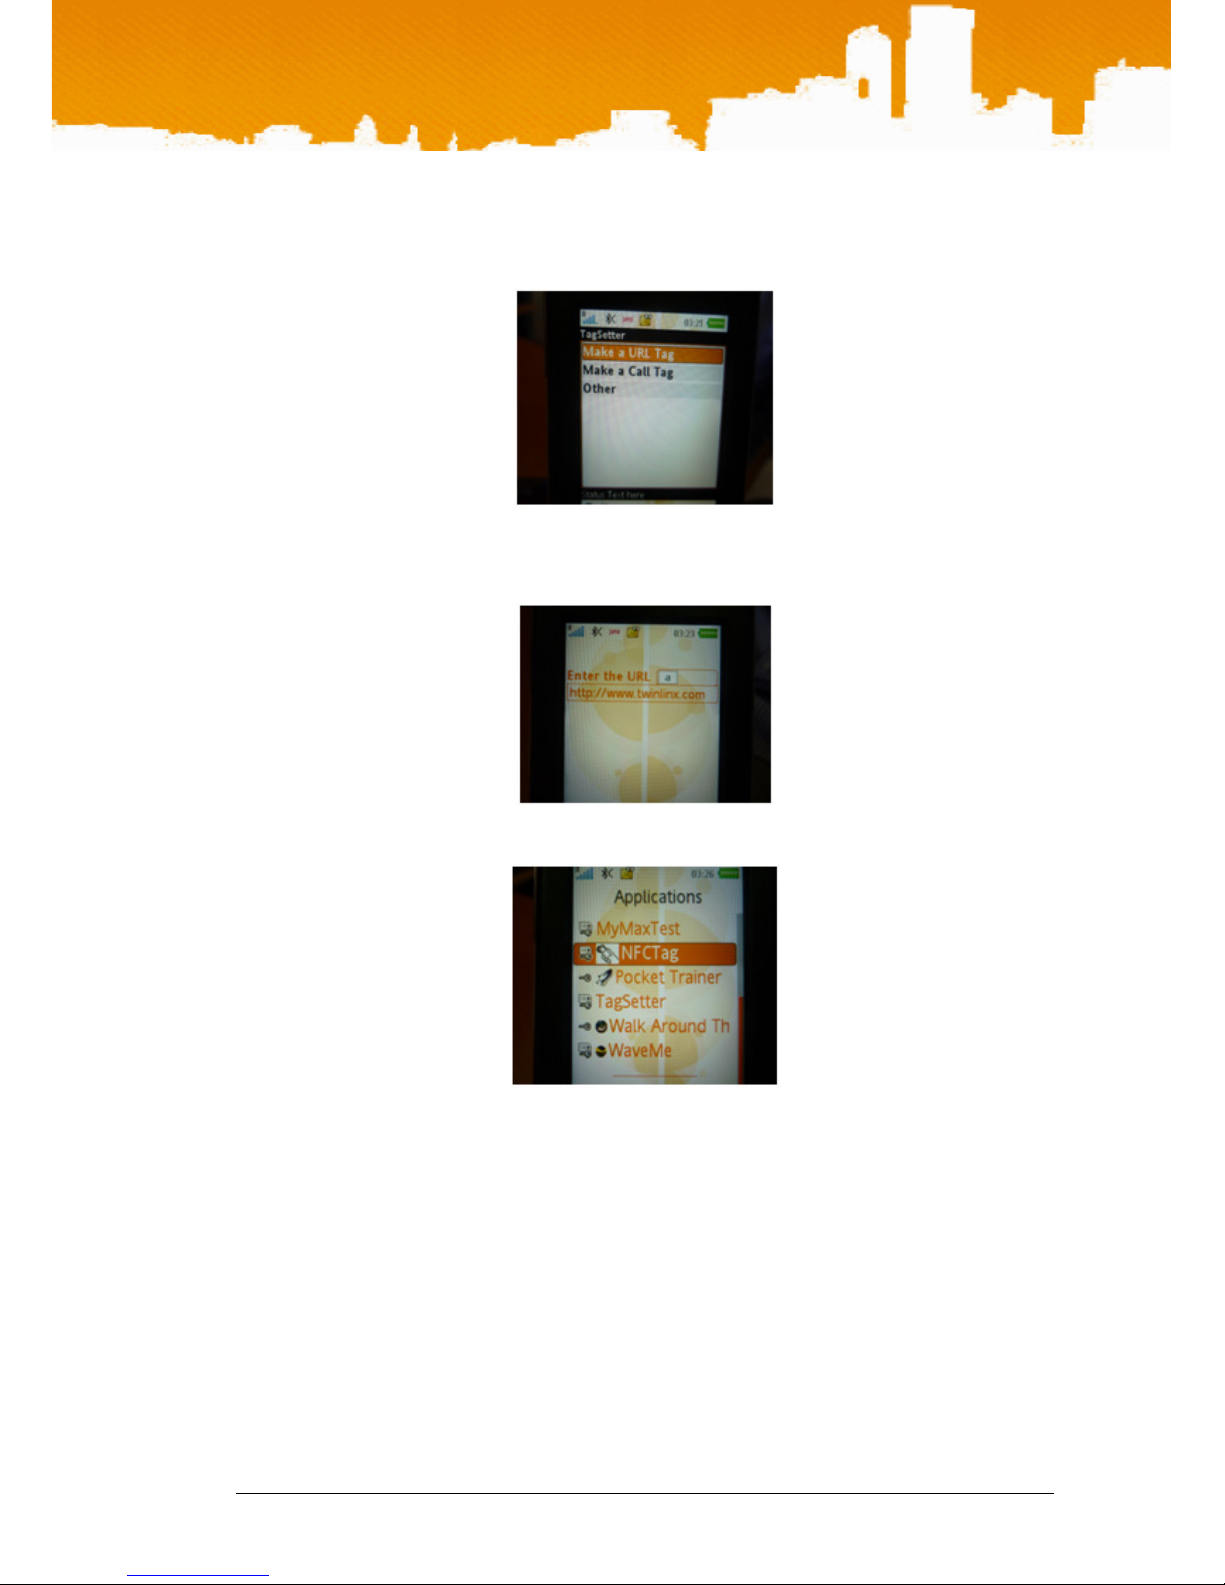
• Choose for example ‘Make a URL Tag’
• Choose for example ‘Make a URL Tag’
• Enter the URL and click on Submit
User Guide
• Go to the menu NFCTag
• Switch on the Mymax sticker and approach the sticker to the Tag (< 1cm)
Tag Information (URL, Tel N°, Text) will then be displayed on the phones screen
TWINLINX SA all rights reserved Demo User Guide V2.0 15 of 16
Page 16

User Guide
To our valued customers
We constantly strive to improve the quality of all our products and documentation. If you
find any information that is missing or appears in error, please use the contact section below
to inform us. We appreciate your assistance in making this a better document.
For further information, do not hesitate to contact us at:
TWINLINX
Espace descartes BAT B
425 Rue Rene Descartes
13857 Aix-en-Provence
France.
Tel : +33 442-500-804
http ://www.twinlinx.com
E-mail : [email protected]
TWINLINX SA all rights reserved Demo User Guide V2.0 16 of 16
 Loading...