

Twinhead TKI400ABGSG22 User Manual
User’s Guide
Sahara Slate PC® i400 Series
Tablet PC

Chapter 00
Preface
Reading this manual will help you get the most out of your new
Sahara Slate PC. If you are a new computer user, or just new to
Tablet PCs, you should read through the manual carefully before
first using your new Sahara Slate PC.
Visit us online at www.tabletkiosk.com for additional resources
and information to help you get the most from your Sahara Slate
PC i400 Series Tablet PC.
Copyright
©2007 Sand Dune Ventures, Inc. All Rights Reserved. All product
information is subject to change without notice. Sahara Slate PC
is a registered trademark and TabletKiosk is a trademark of Sand
Dune Ventures, Inc.in the United States and/or other countries.
Microsoft, Windows XP, Windows Vista and the Windows logo are
either registered trademarks or trademarks of Microsoft
Corporation in the United States and/or othercountries. Intel,
Core, Centrino Duo, Celeron, Core Duo Inside logo, Celeron
Inside logo and Centrino Duo Inside logo are trademarks or
registered trademarks of Intel Corporation in the United States
and/or othercountries. The Bluetooth® word mark and logos are
owned by the Bluetooth SIG, Inc. and any use of such marks by
TabletKiosk is under license. Linux is a registered trademark of
Linus Torvalds.
Chapter 00: Preface i

Disclaimer
The specifications and information in this manual are subject to
change without prior notice in order to improve reliability,
design and/or function, but this does not represent a
commitment on the part of the manufacturer. The manufacturer
assumes no responsibility for errors or omissions in this
document.
In no event will the manufacturer be liable for direct, indirect,
special, incidental, or consequential damages arising out of the
use, or inability to use, the Tablet PC or this documentation, even
if advised of the possibility of such damages.
This document contains proprietary information protected by
copyright. All rights are reserved. No part of this manual may be
reproduced by any mechanical, electronic, or other means in any
form without prior written permission of TabletKiosk.
If you have any questions regarding the Sahara Slate PC, or the
information contained within this manual, please contact
TabletKiosk at info@tabletkiosk.com.
Safety Instructions
For your safety and that of your equipment, please follow these
rules for handling and care of your Sahara Slate PC. Keep this
User’s Manual handy for later reference by you and other users.
Never use sprays, liquids or cleaning detergents for cleaning the
Sahara Slate PC Tablet. Use a micro fiber cloth for cleaning the
touch screen. Avoid the use of tissue paper since the tissue fibers
can easily lodge between the touch screen and the top cover of
the tablet.
Never pour liquids into any openings or directly on the Sahara
Slate PC. This could result in fire or electrical shock.
Ensure the voltage range of the power outlet is between 100V
and 240V before connecting the Sahara Slate PC. Exceeding the
ii Chapter 00: Preface

maximum rated voltage may cause damage to the AC adapter or
to the Sahara Slate PC. This could result in fire or electrical shock.
When the AC adapter is plugged into an electrical outlet, place
the power cord so it will not be stepped or walked on. Do not
place objects over or on the power cord.
Use the Sahara Slate PC in a clean, dry, temperature controlled
environment. Do not use the Sahara Slate PC in areas of high
humidity, around water or outdoors while it is raining.
Never open or disassemble the Sahara Slate PC. For safety
reasons, and to prevent permanent damage, the equipment
should only be repaired by qualified service personnel.
Contact a qualified service center if any of the following issues
should arise:
1. the AC adapter, power cord or plug is damaged
2. liquid has been spilled into the Sahara Slate PC
3. the Sahara Slate PC has been exposed to excessive moisture
4. the Sahara Slate PC exhibits errors and/or does not function
according to specifications
5. the Sahara Slate PC has been dropped or otherwise
physically damaged
Lithium batteries can be dangerous. There is a danger of
explosion if the battery is incorrectly replaced. Replace only with
the same or equivalent type recommended by the manufacturer.
Dispose of used batteries according to state or local hazardous
waste requirements.
Under no circumstances should the user attempt to disassemble
the power supply.The power supply has no user-replaceable
parts and its insides contain components that are electrically
Chapter 00: Preface iii

charged with hazardous voltage levels that can cause serious
personal injury. A defective power supply must be returned to
your dealer.
Safety Notices for the Power Cord
This equipment has a 2 or 3-wire power cord. Replace the power
cord if it becomes damaged. Contact your dealer for an exact
replacement.
In the U.S.A. and Canada, the power cord must be a UL-listed
detachable power cord (in Canada, CSA-certified).
2-wire cord SPT-2 18AWG
3-wire cord SVT or SJT, 18 AWG, 3-conductor
The cord should be provided with a molded-on cord connector
body at the other end. The cord length must not exceed 3
meters.
Outside the U.S.A. and Canada, the plug must be rated for 250
VAC, 2.5 amp minimum, and must display an international
agency approval marking. The cord must be suitable for use in
the end-user’s country. Consult your dealer or the local electrical
authorities if you are unsure of the type of power cord to use in
your country. Voltage changes occur automatically in the power
supply.
Notice of FCC Compliance
a. Federal Communications Commission (FCC) Requirements,
Part 15:
This equipment has been tested and found to comply
with the limits for a Class B digital device, pursuant to
Part 15 of the FCC Rules. These limits are designed to
provide reasonable protection against harmful
interference in a residential installation. This equipment
iv Chapter 00: Preface

generates, uses, and can radiate radio frequency energy
and if not installed and used in accordance with the
instruction manual may cause harmful interference to
radio communications. However, there is no guarantee
that interference will not occur in a particular
installation. If this equipment does cause harmful
interference to radio or television reception, which can
be determined by turning the equipment off and on,
the user is encouraged to try to correct the interference
by one or more of the following measures:
Reorient or relocate the receiving antenna.
Increase the separation between the equipment and
receiver.
Connect the equipment into an outlet on a circuit different
from that to which the receiver is connected.
Consult the dealer or an experienced technician for help.
Use only shielded I/O cables to connect I/O devices to this
equipment.
You are cautioned the changes or modifications not
expressly approved by the party responsible for
compliance could void your authority to use the
equipment.
b. Regulatory information / Disclaimers
Installation and use of this device must be in strict
accordance with the instructions included in the user
documentation provided with the product. Any
changes or modifications (including the antennas)
made to this device that are not expressly approved by
the manufacturer may void the user’s authority to
operate the equipment. The manufacturer is not
responsible for any radio or television interference
caused by unauthorized modification of this device, or
Chapter 00: Preface v

the substitution of the connecting cables and
For operation within 5.15 ~ 5.25GHz frequency range, it is
restricted to indoor environment.
equipment other than manufacturer specified. It is the
responsibility of the user to correct any interference
caused by such unauthorized modification, substitution
or attachment. Manufacturer and its authorized resellers
or distributors will assume no liability for any damage or
violation of government regulations arising from failing
to comply with these guidelines.
c. For portable devices without co-location condition (eg.
notebook pc)
FCC RF Radiation Exposure Statement:
1. This Transmitter must not be co-located or operating in
conjunction
2. This equipment complies with FCC RF radiation exposure
limits set forth for an uncontrolled environment.This device
was tested for typical lap held operations with the device
contacted directly to the human body to the back side of the
Tablet PC. To maintain compliance with FCC RF exposure
compliance requirements,please follow operation instruction
as documented in this manual.
d. SAR Exposure
This device has been tested for compliance with FCC RF
Exposure (SAR) limits in typical flat configurations.
In order to comply with SAR limits established in the
ANSI C95.1 standards, it is recommended when using a
Tablet PC that the integrated antenna is positioned
more than 1.5cm from your body or nearby persons
during extended periods of operation. If the antenna is
positioned less than 1.5cm from the user, it is
recommended that the user limit the exposure time.
vi Chapter 00: Preface

FCC Statement to Users for the FaxModem
This equipment complies with Part 68 of the FCC rules. On the
bottom of this equipment is the label that contains, among other
information, the FCC Registration Number and Ringer
Equivalence Number for this equipment. IF REQUESTED, THIS
INFORMATION MUST BE GIVEN TO THE TELEPHONE COMPANY.
The REN is useful to determine the number of devices you may
connect to your telephone line and still have all of those devices
ring when your telephone number is called. In most, but not all
areas, the sum of the REN’s of all devices connected to one line
should not exceed five (5.0).
To be certain of the number of devices you may connect to your
line, as determined by the REN, you should contact your local
telephone company to determine the maximum REN for your
calling area.
If your telephone equipment causes harm to the telephone
network, the telephone company may disconnect your service
temporarily. If possible, they will notify you in advance. But if
advance notice isn’t practical, you will be informed of your right
to file a complaint with the FCC.
Your telephone company may make changes in its facilities,
equipment, operations or procedures that could affect the
proper functioning of your equipment. If they do, you will be
notified in advance to give you an opportunity to maintain
uninterrupted telephone service.
The telephone company may ask you to disconnect this
equipment from the network until the problem has been
corrected or until you are sure that the equipment is not
malfunctioning. This equipment may not be used on coin service
provided by the telephone company.
Chapter 00: Preface vii

The Telephone Consumer Protection Act of 1991 makes it
unlawful for any person to use a computer or their electronic
device to send any message via a telephone facsimile machine
unless such message clearly contains in a margin at the top or
bottom of each transmitted page or on the first page of the
transmission the following information:
The date and time of transmission
Identification of either business, business entity or individual
sending the message;
Telephone number of either the sending machine, business
entity or individual.
In order to program this information into your fax/modem,
please refer to the appropriate instructions in your fax/modem
manual.
Note-TNV Safety Caution:
To reduce the risk of fire, use only No. 26 AWG or larger
telecommunication line cord. Avoid using a telephone (other
than a cordless type) during an electrical storm. There may be
a remote risk of electric shock from lightning. Do not use the
telephone to report a gas leak in the vicinity of the leak.
Canadian EMI Compliance Statement
This Class B digital apparatus meets all requirements of the
Canadian Interference - Causing Equipment Regulations.
IC Warning statement:
a. WLAN
“To prevent radio interference to the licensed service,
this device is intended to be operated indoors and away
from windows to provide maximum shielding.
Equipment (or its transmit antenna) that is installed
outdoors is subject to licensing.”
viii Chapter 00: Preface

b. For LPD
Radiation Exposure Statement:
This equipment complies with IC radiation exposure limits set
forth for an uncontrolled environment. End users must follow the
specific operating instructions for satisfying RF exposure compliance.
To maintain compliance with IC RF exposure compliance requirements,
please follow operation instruction as documented in this manual.
“Operation is subject to the following two conditions:
(1) this device may not cause interference, and (2) this
device must accept any interference, including
interference that may cause undesired operation of the
device.”
This Class B digital apparatus complies with Canada RSS-210.
The abbreviation, IC, before the registration number signifies
that registration was performed based on a Declaration of
Conformity (DoC) indicating that Industry Canada technical
specifications were met. It does not imply that Industry Canada
approved the equipment.
European Union CE Marking Declaration
This product has been tested and found to comply with the EMC
requirement subject to the EU directive for CE marking.
Chapter 00: Preface ix

This page intentionally left blank.

Table of Contents
Getting Started 1
What’s in the Box 1
Setting Up Your Sahara Slate PC 2
Step 1: Inserting the Battery Pack 2
To Remove the Battery Pack 3
Step 2: Connecting the Tablet PC to an external power source 3
Step 3: Connecting applicable peripherals and
networking cables (optional) 4
Step 4: Powering on the Sahara Slate PC 4
Step 5: Navigating with the Stylus Pen 5
Touring Your Sahara Slate PC 9
Front View 10
Top View 12
Left Side View 14
Back View 16
Right View 18
Bottom View 18
Battery Usage and Care 21
Using the Battery for the FirstTime 21
Charging the Battery Under Typical Conditions 22
Problems Charging the Battery 23
Battery Status 23
Low Battery Warnings 23
About Battery Pack Usage 24
Real Time Clock Battery 24
Storing a Battery 25
Table of Contents xi

Upgrading Your Sahara Slate PC 27
Before you Begin ANY Upgrade Procedure 27
Upgrading Memory (RAM) 28
Upgrading the Hard Disk Drive (HDD) 30
Replacing the Wireless Networking Card (Advanced) 32
Troubleshooting 35
General Hardware Problems / Possible Causes and Solutions 35
Audio Problems/Solutions 35
Battery Problems/Solutions 36
Internet Problems/Solutions 36
Networking Problems/Solutions 37
Power Problems/Solutions 37
Screen Display Problems/Solutions 38
USB Problems/Solutions 38
Upgrade Problems/Solutions 39
Contacting Your Dealer 40
Specifications 43
xii Table of Contents


This page intentionally left blank.

Chapter 01
Getting Started
Your Sahara Slate PC was designed to allow you to get up and
running and quickly as possible. Due to the fact that the Sahara
Slate PC ships to various countries around the world, set-up may
vary slightly depending on where you are located.
If you have any questions that are not answered by this manual
to y o ur s at i sf a ct io n , pl ea s e vi sit o ur w ebs ite a t
www.tabletkiosk.com for more information or to submit a
support request.
What’s in the Box
Your Sahara Slate PC should come securely packaged in its
shipping container along with the below listed items
contact your dealer immediately if you find that anything is
missing or damaged.
1. Sahara Slate PC i400 Series Tablet PC
2
1
. Please
2. Power Cord
3. AC Adapter
4. Slip Case
5. Simple Stand
6. User’s Manual, Utilities/Drivers Disc, System Restore Disc
7. Standard Lithium Ion Battery Pack
1
Contents of the packaging may change without notice. Please check our
Chapter 01: Getting Started 1
3

website at www.tabkletkiosk.com for the most up-to-date list if your package
contents vary from this list.
2
There are three models in the Sahara Slate PC i400 Series: i412T / i440T / i440D.
Please check to make sure you have received the correct model
3
Please be sure to check that the System Recovery Disc matches the Operating
System (OS) preloaded on your Sahara Slate PC. There will not be a System
Restore Disc included if you ordered your Tablet PC without an OS option.
Setting Up Your Sahara Slate PC
Please read the following steps to begin using your new Tablet
PC as quickly and trouble free as possible.
1. Inserting the Battery Pack (if yourTablet PC shipped from
the dealer without it pre-inserted).
2. Connecting the Sahara Slate PC to an external power source
3. Connecting applicable peripherals and networking cables
(optional)
4. Powering on the Sahara Slate PC
5. Navigating on-screen with the stylus pen
Step 1: Inserting the Battery Pack
Turn the tablet over and place it, screen down, on a solid, clean,
flat surface.
CAUTION: When turning the Sahara Slate PC over, be careful not to
place it on a surface that could scratch or damage the screen. Place
the included slip case on the surface before carefully setting the
computer down to protect the screen.
Align the battery into the battery compartment and then slide it
into the computer until it clicks securely into place.
Slide the battery lock tab (the tab closest to the top of the tablet)
in the opposite direction of unlock arrow engraved into the tab
itself. Once the lock tabs clicks into position, the battery should
be securely seated.
2 Chapter 01: Getting Started
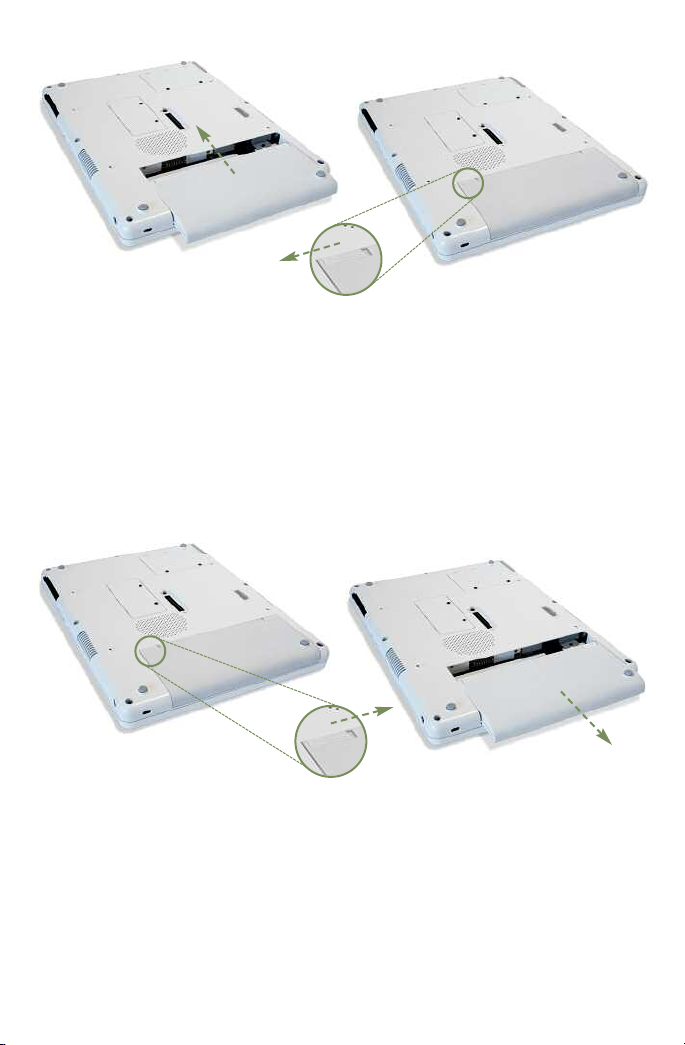
Inserting the battery
To Remove the Battery Pack
Turn off the Sahara Slate PC and remove the power cord from the
“DC Power In” port. Turn over the computer and place it on a
solid, flat surface. Slide the Locking Tab in the direction of the
arrow engraved on the tab to set it in the unlock position. Use
your other hand to slide the battery latch in the direction of the
arrow engraved on the tab and hold it there. Use both hands to
carefully side the battery out of the bay.
Removing the battery
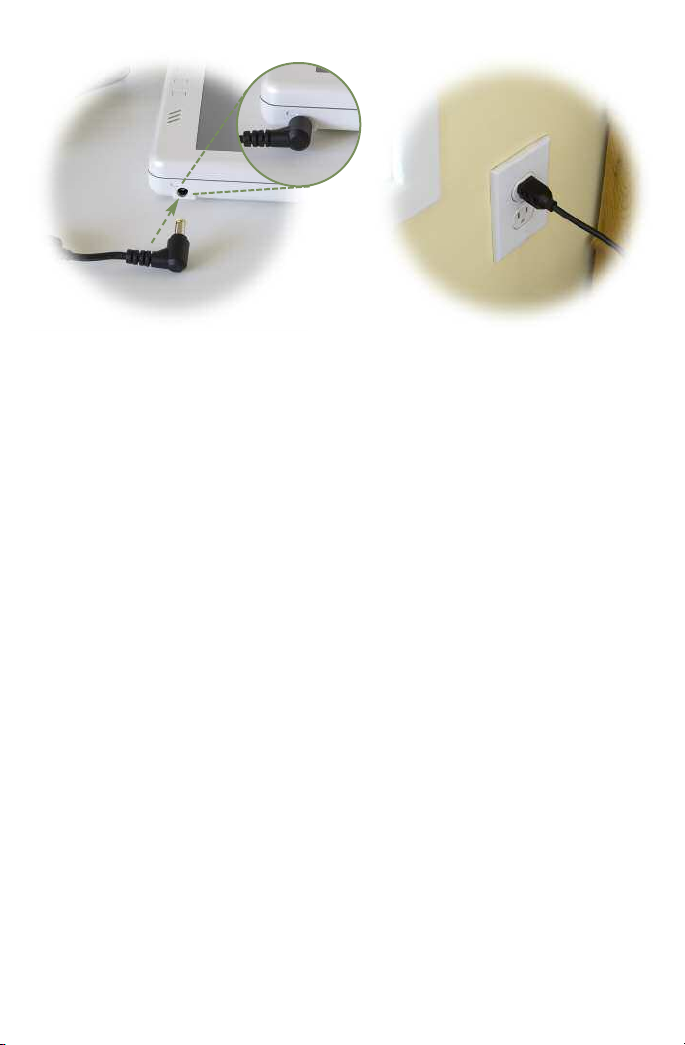
Step 2: Connecting the Tablet PC to an external power source
Locate the AC Adapter and the power cord. Plug the power cord
securely into the AC adapter. Plug the AC adapter’s connection
cable into the“DC Power In”port on the top of the Tablet. Once
the adapter plug is securely in place, plug the power cord into an
external power socket.
Chapter 01: Getting Started 3
!@
Plugging into an
external power source
NOTE: When you first connect the tablet into an external power
source, the battery charge indicator will begin to glow amber. When
the battery is fully charged the indicator will turn green. (See the
section entitled Battery Care for tips on maximizing battery life and
performance.)
Step 3: Connecting applicable peripherals and networking
cables (optional)
If you have any external peripherals you’d like to use with the
tablet (i.e. USB mouse, USB keyboard, etc.) or are planning to
connect to the internet and/or corporate LAN using a wired
connection (RJ-45) as opposed to wirelessly, connect them now
(see the next section, Getting to know your Tablet PC, to identify
which ports to use).
Step 4: Powering on the Sahara Slate PC
Locate the three power switches on the top on the tablet. The
far left switch (closest to the PCMCIA Expansion slot) is the
computer’s main power toggle. Slide it toward the right side of
the unit and hold it there until it emits a blue glow (about one to
two seconds) and then release it. The Sahara Slate PC will now
boot up.
4 Chapter 01: Getting Started
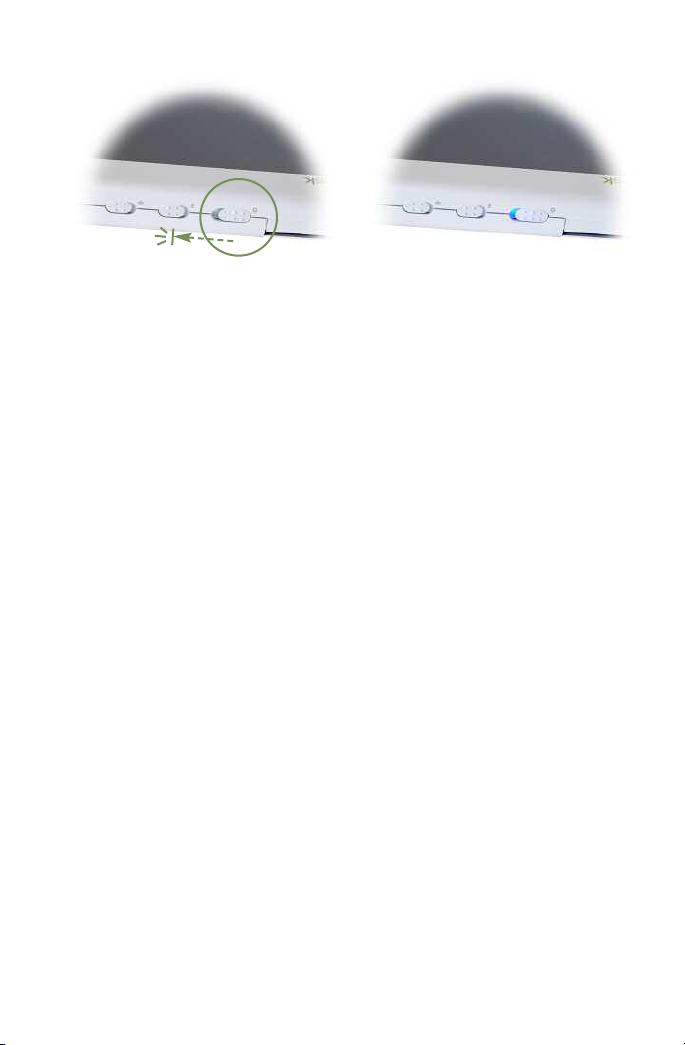
Powering on the Sahara Slate PC.
Slide and hold the toggle switch until it lights up blue.
Step 5: Navigating with the Stylus Pen
Unlike a standard laptop or desktop PC, standard navigational
activities are completed using the stylus pen, or even your
fingers if using the touch screen. The tablet will react to the pen
differently depending on what mode you are using.
TouchScreen mode: Navigating with a touch screen is different
than navigating with a mouse. The pen will interact with the
computer whenever you touch it to the screen.
Hold the pen as if you were writing with a standard ink pen.
Instead of sliding the pen around the screen to get to where you
are going, just tap on what you want to interact with. Sliding the
pen while lightly touching the tip to the screen will move the onscreen pointer around similarly to if you were using a mouse and
holding down the left mouse button. In other words you would
be performing what is know as a drag operation.
Also, remember that since the screen is sensitive to touch,
resting your hand on the screen while using the pen might make
the pointer react unpredictably.
Chapter 01: Getting Started 5
 Loading...