


Twin Eagles Outdoor
Refrigerator and Beer Dispenser
18611 revB
Models: TEBK24-B
TEOR24-C

STARTING OUT
Remove Packaging
Your refrigerator has been packed for shipment with all
parts that could be damaged by movement securely fastened. Before using, be sure all packing materials and tape
have been removed.
Important
Keep your carton packaging until your refrigerator has been
thoroughly inspected and found to be in good condition. If
there is damage, the packaging will be needed as proof of
damage in transit.
Note to Customer
This merchandise was carefully packed and thoroughly
inspected before leaving our plant. Responsibility for its safe
delivery was assumed by the carrier upon acceptance of the
shipment. As directed on the side of your packing carton,
claims for loss or damage sustained in transit must be made
on the carrier as follows:
• Exterior Damage
Make thorough damage notation on your delivery receipt
and have driver acknowledge by signature and date. Send
a written request asking for an inspection report from the
carrier. Include the name of the carrier representative and
the date the inspection was requested. Retain the inspection
report and receipt for filing of the claim.
• Concealed Damage
This must be reported to the carrier within 15 days. Obtain
inspection report from the carrier. Retain the inspection
report for filing the claim.
DO NOT RETURN DAMAGED MERCHANDISE TO THE
MANUFACTURER - FILE THE CLAIM WITH THE CARRIER.
2
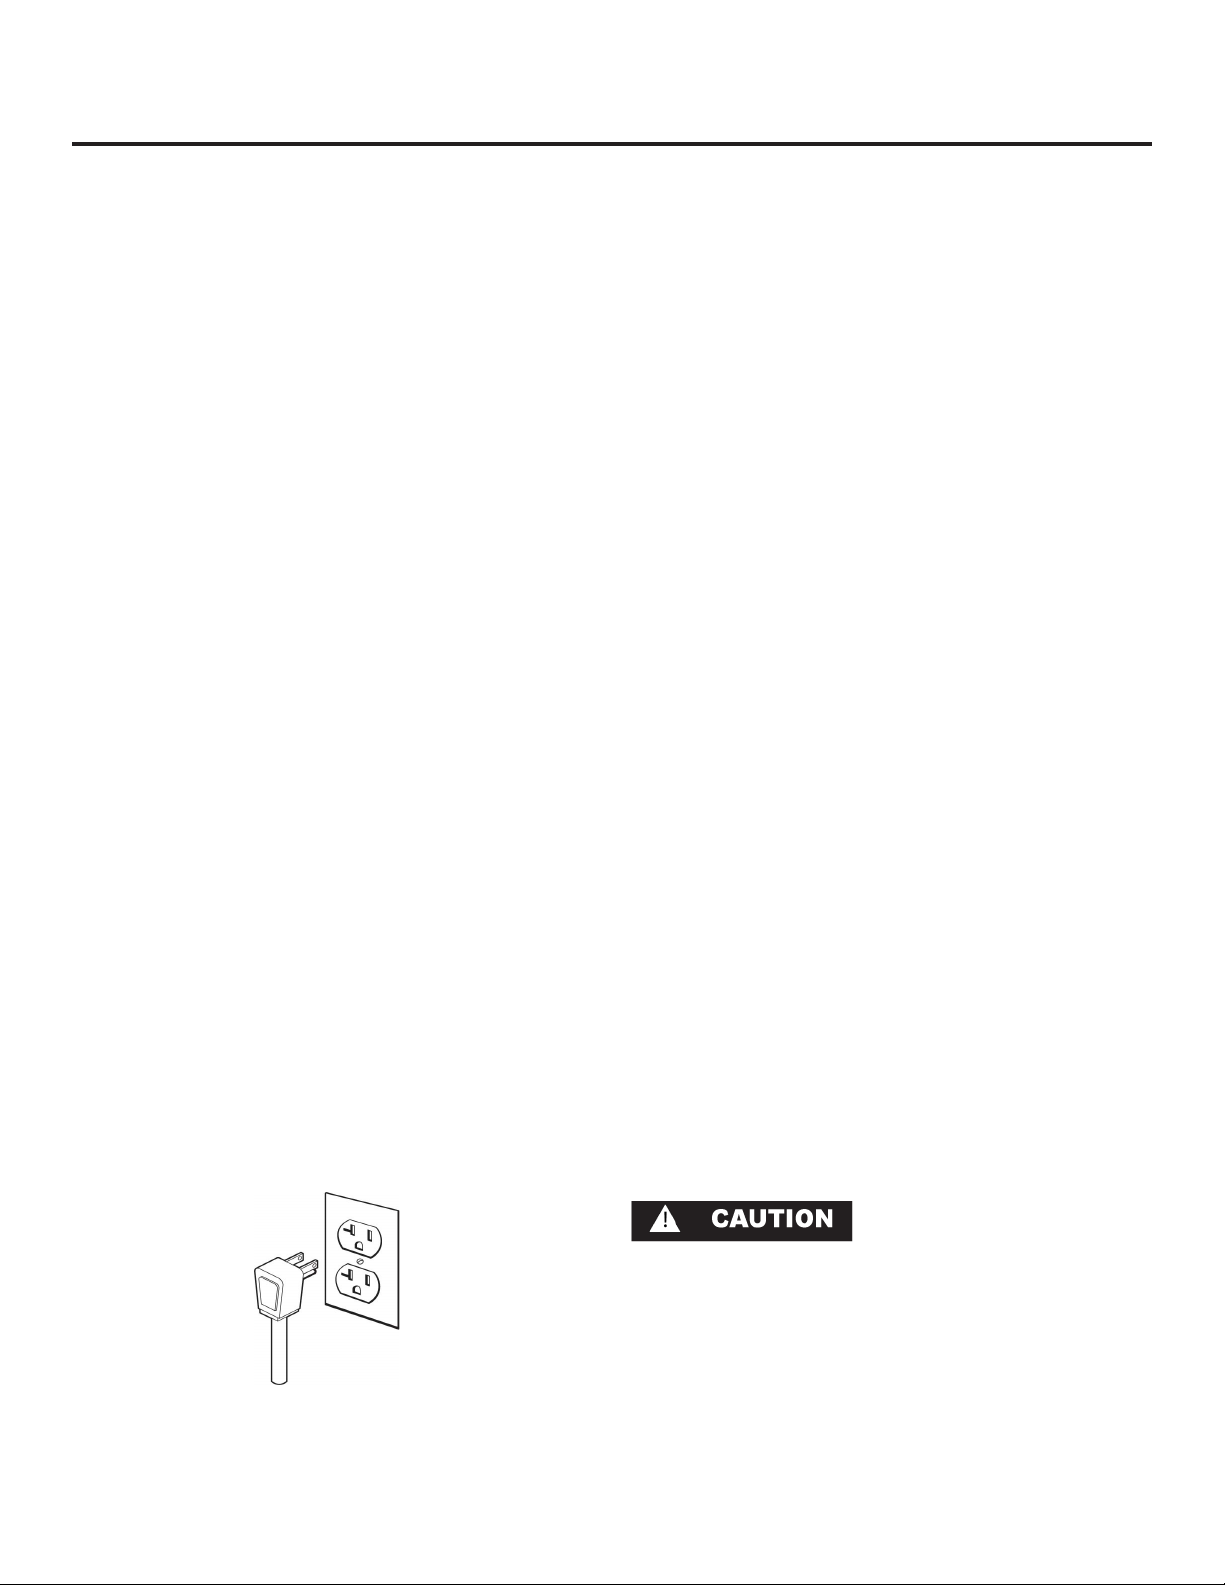
TABLE OF CONTENTS AND INSTALLATION
Table of Contents
Starting Out ..............................................................
Carton Packaging and Damage ..............................
Table of Contents ......................................................
Installation ................................................................
Select Location .......................................................
Cabinet Clearance .................................................
Electrical Connection ..............................................
Grounding .............................................................
Leveling Legs ..........................................................
Front Grille .............................................................
Specifications ............................................................
Outdoor Beer Dispenser .........................................
Outdoor Refrigerator ..............................................
Operation, Beer Dispenser .........................................
Temperature Control ..............................................
Automatic Defrost ..................................................
Things to Remember ..............................................
Energy Saving Tips .................................................
Operation, Refrigerator ..............................................
Starting Your Refrigerator .......................................
Set Temperature ....................................................
Refrigerator Operation ..........................................
Alarms ..................................................................
Alarm mute ...........................................................
Additional Control Features ....................................
Care and Cleaning ...................................................
Condenser Air Flow ...............................................
Cabinet and Door ..................................................
Care of Unit ...........................................................
Power Failure .........................................................
Light Bulb Replacement ..........................................
Trouble Shooting Your Refrigerator .............................
Warranty ..................................................................
Obtaining Service ......................................................
Warranty Registration ................................................
2
2
3
3
3
3
3
3
4
4
4
4
4
5
5
5
5
5
6
6
6
6
6
6
7
8
8
8
8
8
8
9
10
11
11
Select Location
The proper location will ensure peak performance of your
aappliance. Choose a location where the unit will be out
of direct sunlight and away from heat sources. Best performance will be maintained when installed within the following parameters.
• Unit should be operated in a properly ventilated area
with ambient temperatures above 40º and below 100ºF.
• Installation should be such that the cabinet can be
moved for servicing if necessary.
Cabinet Clearance
Ventilation is required from the bottom front section of the
unit. Keep this area open and clear of any obstructions.
The adjacent cabinets and counter top can be built around
the unit as long as no top trim or counter top is installed
lower than the top of the hinge.
Electrical Connection
Use nominal 115 VAC, 60 Hz only. DO NOT USE AN EXTENSION CORD.
Grounding Method
This product is factory equipped with a power supply cord
that has a three-pronged, grounded plug. It must be
plugged into a mating grounding type receptacle in accordance with the National Electrical Code and applicable
local codes and ordinances (see Figure 1). If the circuit does
not have a grounding type receptacle, it is the responsibility and obligation of the customer to exchange the existing
receptacle in accordance with the National Electrical Code
and applicable local codes and ordinances. The third
ground prong should not, under any circumstances, be cut
or removed.
Figure 1
A ground fault circuit interrupter electrical receptacle is to
be used to supply electrical power to this refrigerator for
outdoor applications. Contact an electrician if you need to
install one to supply electrical power to this appliance.
Do not splash or spray water from a hose on the refrigerator. Doing so may cause an electrical shock, which may
result in severe injury or death.
This unit should not under any circumstances be ungrounded.
3
SPECIFICATIONS
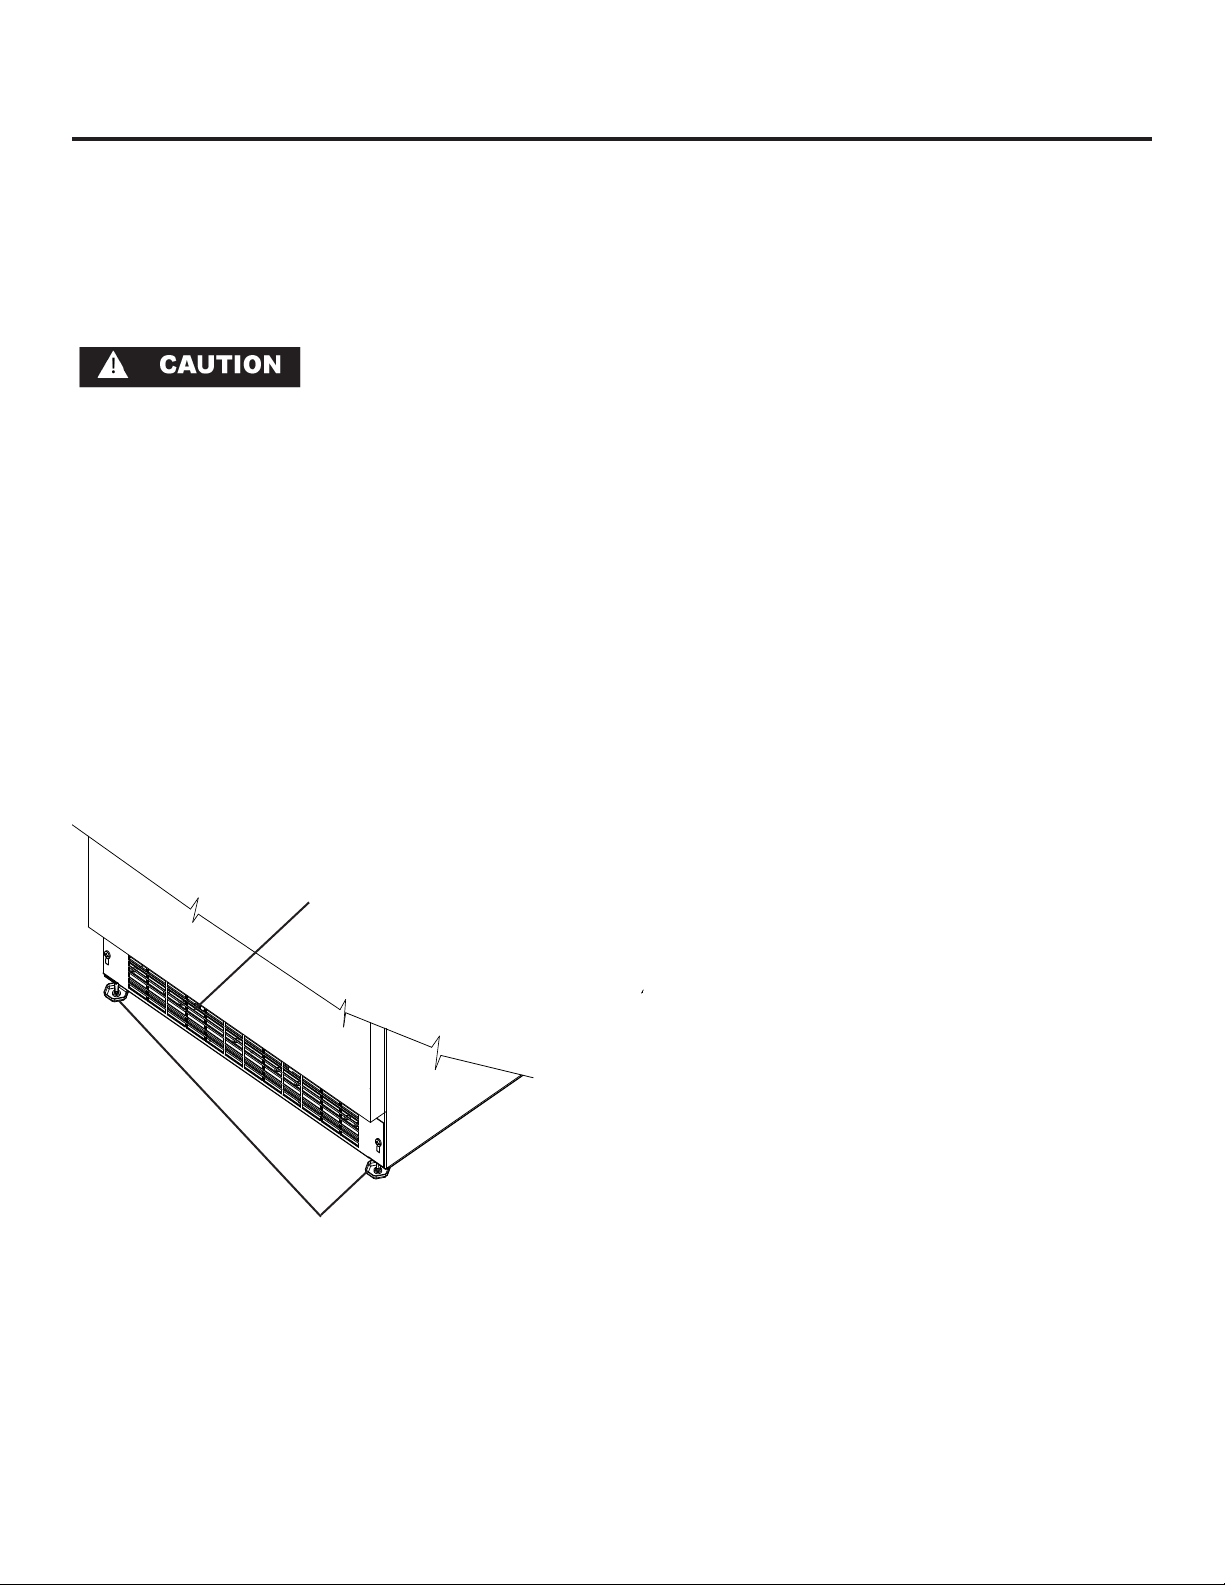
Leveling Legs
Adjustable legs at the front and rear corners of the unit
should be set so the unit is firmly positioned on the floor and
level from side to side and front to back. Turn leveling legs
clockwise to raise unit, counterclockwise to lower it. (See
Figure 2)
Front Grille
Do not obstruct the front grille. The openings within the front
grille provides air to flow into and exit from the refrigerator
condenser. For this reason it is important this area to not be
obstructed and be kept clean. Twin Eagles does not recommend the use of custom made grilles as air flow may be
restricted because of inadequate openings. (See Figure 2).
OUTDOOR BEER DISPENSER
(TEBK24-B*)
The TEBK24-B, Half Keg Beer Dispenser is specially configured for built -in use. This model holds half or quarter kegs,
and comes complete with draft tower, hoses, CO2 tank and
regulator, drip tray, and interior floor shield.
• Suitable for outdoor use
• 201 stainless steel exterior sides, top, and full wrap
door for superior corrosion and impact resistance
• May also be used for indoor applications
• Thermostatically-controlled temperature is adjustable
from 33° to 52° F
• Full auto defrost
• Cut-Out Dimensions: (34”H x 24”W x 24”D)
OUTDOOR REFRIGERATOR
(TEOR24-C*)
The auto-defrosting TEOR24-C includes two wire shelves
which are perfect for storing marinating meats, side dishes,
and beverages; while the door mounted shelves add additional room for condiments, marinades, and mixers. Both
the cabinet and the door are crafted of beautiful and rugged stainless steel.
Front Grille,
keep this
area open.
Figure 2
Leveling Legs
4
• Suitable for outdoor use
• 201 stainless steel exterior sides, top, and full wrap
door for superior corrosion and impact resistance
• May also be used for indoor applications
• Two removable wire shelves, as well as three door
shelves provide ample, flexible storage
• Automatic interior light
• Temperature range: 33° to 45°F
• Full auto defrost
• Cut-Out Dimensions: (34”H x 24”W x 24”D)
* Please note: For the constant advancement of our products, Twin Eagles reserves the right to change specifications,
designs, and materials of the products without prior notification.

Temperature Control
Ini ally set the cold control knob (see Figure 3) to “4” which is
midway between the highest and lowest numbers. A er a minimum of 2 hours, adjust the control to the temperature that suits
you. The higher the number you select, the cooler the cabinet
interior temperature. The control knob “set” point is established
by the indicator point (triangle) located at the top as shown.
The cold control knob is located behind the grill at the bo om
front area of the cabinet. The control knob can be accessed
through an opening in the grill. The control knob can be rotated
to the desired se ng by the use of a fl at bladed screwdriver
inserted into the slot which is located in the front center sec on
of the control knob.
Refrigerator Automa c Defrost
All refrigerator and beer dispenser models automa cally defrost
their cooling plate during each compressor “off ” cycle. No
manual defros ng is required.
OPERATION, BEER DISPENSER
Cold control shown in “OFF” se ng.
C
R
O
E
L
D
Figure 3
Things to Remember
1. Allow 24 hours for your refrigerator to reach a new temperature se ng.
2. The motor will start and stop o en. It must do this to maintain the temperature you select.
3. Keep your refrigerator reasonably level.
4. Unplug the refrigerator before working on anything with the
electrical system.
5. Exercise cau on when sweeping, vacuuming, or mopping
near the front of the unit. Damage to the grill and/or the
light fi xture can occur.
6. For all cleaning of the refrigerator, mix 2 tablespoons of baking soda with 1 quart of warm water or use a mild soap. DO
NOT use strong cleaners or scouring powder or pads.
7. Keep your refrigerator out of direct sunlight.
8. DO NOT splash or spray water on or under the refrigerator.
9. Clean you refrigerators condenser periodically to maintain
proper cooling performance.
Energy Saving Tips
Ways to save power, save money, and s ll enjoy your refrigera-
tor.
1. Reduce door openings.
2. Close the door as soon as you can.
3. Keep the condenser coil clean.
4. Adjust the temperature control to a warmer se ng when
prac cal.
5. Don’t put hot foods in the refrigerator.
6. Keep the unit away from the stove or other heat source.
5

OPERATION, REFRIGERATOR
NOTE
Door Switch
During ini al startup, or any me power is interrupted, there will
be an approximate 5 minute delay before the refrigerator starts.
During this period the controller will be assessing the temperature in the refrigerator and the display will appear erra c, this is
normal. The desired temperature set point can be programmed
during this start up period.
Star ng your refrigerator
The refrigerator will begin start up when ini ally plugged in or
when power resumes a er a power outage. At this me the refrigerator will take approximately 5 minutes to begin running as
noted above. If the refrigerator has been turned off during use,
“OFF” will appear on the display. To start the refrigerator from
the “OFF” posi on press and hold the ON/OFF bu on for three
seconds.
Set temperature
To set temperature set point, press and con nue to hold “SET”
bu on. A er one second, set point will be displayed. While
holding “SET” bu on use the “WARMER” or “COLDER” bu on to
desired set point.
NOTE: Momentarily pressing & releasing “SET” bu on will access
informa on menu of control. Refer to appendix A for informa on
on this feature.
Refrigerator opera on
The available temperature range of the refrigerator is 33° to 45°
(1° to 7° C).
It may take up to 24 hours for your refrigerator to reach desired
temperature. This will depend on amount of contents loaded
and number of openings and closings of the door.
For best results allow refrigerator to “pull down” to desired set
point before loading. Once contents are loaded, allow at least 48
hours for temperature to stabilize before making any adjustments to the set point.
Alarms
Your refrigerator control will monitor refrigerator func on and
alert you with a series of audible and visual alarms.
• Door Ajar Alarm: If the door has been le
open for over fi ve (5) minutes, the alarm
will sound in one (1) second intervals. The
display panel will fl ash “do” and the LED light will be a steady
amber color. This will stop as soon as the door is closed.
Control
Figure 4
• High and Low Temperature Alarm: If your
unit reaches an unacceptable temperature
outside of your set point, the alarm will
sound in one (1) second intervals. The
display panel will fl ash either “hi” or “Lo”
depending upon the condi on and the LED light will be a steady
amber color. “hi” indicates that the temperature is 10° F (5.5°C)
above the set point and “Lo” indicates that the temperature is
10° F (5.5°C) below the set point. The alarm will remain ac ve
un l the condi on is corrected.
NOTE: During ini al appliance start-up, the high temperature
alarm may sound un l the interior temperature reaches set
point.
• Temperature Sensor Fault: If the controller
detects that the temperature sensor is
not properly func oning, a temperature
sensor alarm will sound. “E1” will fl ash on the display, and an
alarm will sound. Please call AGA MARVEL Customer Service or
your dealer if this error code is displayed.
• Condenser Needs Cleaning:
When the refrigerator has reached the
recommended amount of run me to necessitate cleaning the air fl ow, “cL” will fl ash on the display as a
reminder. See the “Care and Cleaning” sec on for cleaning
instruc ons.
To clear the alarm:
1) Press and release the “SET bu on four mes.
“cnd” will be displayed on the screen.
2) While “cnd” is displayed, press and hold the “SET” but-
ton. The display will show the number of weeks the
refrigerator has been running.
3) While holding the “SET” bu on, press and release the
ON/OFF bu on. The number shown on the display will
reset to 0.
4) Release the “SET” key.
Alarm Mute
Press any key to mute the audible por on of an alarm,.
NOTE-This ac on will only mute the alarm. If the condi on that
caused the alarm con nues, the alarm code will con nue to fl ash
and will sound for 20 seconds every 60 minutes.
Turning Refrigerator Off
To turn refrigerator off , press and hold “ON/OFF” bu on for
three (3) seconds. “OFF” will appear on the display.
6

OPERATION, REFRIGERATOR
Addi onal Control Features
Informa on Menu:
The following features are available on the Informa on Menu.
• Current Temperature
• Maximum Stored Temperature
• Minimum Stored Temperature
• Total Opera ng Time Of The Condenser
• Keypad Lockout
To access the Informa on Menu Press “SET” bu on momentarily
and release.
Once in the informa on menu, the WARMER and COLDER keys
may be used to scroll through the informa on menu. Addi onally, pressing and releasing the SET key will advance the informa on menu.
The informa on menu will automa cally exit a er several seconds with no key presses.
Current Interior Temperature (tI): Press and
hold the “SET” key to display the current inte rior temperature.
Maximum Stored Temperature (thi): Maxi mum stored temperature is the maximum
temperature refrigerator has achieved since
temperature set point was entered. Press and hold the “SET” key
to display the maximum temperature stored. The data can be
cleared by pressing “SET” and “ON/OFF” simultaneously while
the value is displayed. NOTE: It is normal for refrigerator temperature to fl uctuate from set point by several degrees.
Keypad Lockout Feature (Loc): This feature
is useful for prohibi ng changes in the
temperature set point or accidentally turning the
unit off . Press and hold the “SET” key to display the cur-
rent “Loc” se ng. If “No” is displayed, Lock
out is OFF and all keys are enabled. If “Yes”
is displayed, Lockout is ON and the “ON/OFF”, “WARMER”, and
“COLDER” keys are disabled. However, the key tones remain
enabled. While holding the “SET” key, press the “WARMER” or
“COLDER” key to select the desired state. Release the “SET” key
to confi rm the selec on.
NOTE: The Informa on/Lockout Key “SET” remains enabled
regardless of the “Loc” se ng.
Minimum Stored Temperature (tLO): Mini mum stored temperature is the minimum
temperature refrigerator has achieved since
temperature set point was entered. Press and hold the “SET” key
to display the minimum temperature stored. The data can be
cleared by pressing “SET” and “ON/OFF” simultaneously while
the value is displayed. NOTE: It is normal for refrigerator temperature to fl uctuate from set point by several degrees.
Total Opera ng Time of the Condenser Since
the Last Cleaning (cnd): Press and hold the
“SET” key to display the total opera ng hours
of the compressor since the last cleaning. The control stores
the total opera ng hours of the compressor to determine the
volume of air that has moved across the condenser coils. This
number is displayed in weeks. A reminder is displayed when a
cleaning is recommended (see Alarm Codes). The recommended
cleaning period is the equivalent of one year of air volume. The
data can be cleared by pressing the “SET” and “ON/OFF” keys
simultaneously while the value is displayed
7

CARE AND CLEANING
Condenser Air Flow
The machine compartment located beneath the cabinet does
not require frequent cleaning; however, sa sfactory performance depends on adequate ven la on. Be sure nothing obstructs the required air fl ow openings in front of the cabinet. At
least once or twice a year, brush or vacuum lint and dirt from the
front grille openings.
Cabinet and Door
The stainless steel cabinet and door can be cleaned with a stainless steel cleaner and a so cloth. NEVER use abrasive scouring
cleaners, rough cloth, or cleaning pads.
Interior and Door Gasket
Wash interior compartment with mild soap and water. You can
also use a solu on of 2 tablespoons of baking soda to 1 quart
of warm water. Do NOT use an abrasive cleaner, solvent, polish
cleaner or undiluted detergent.
Care of Unit
1. Avoid leaning on the door, you may bend the door hinges or
p the unit.
2. Exercise cau on when sweeping, vacuuming or mopping
near the front of the unit. Damage to the grille can occur.
3. Periodically clean the interior of the unit as needed.
4. Periodically check and/or clean the front grille as needed.
Light Bulb Replacement
DISCONNECT THE POWER CORD BEFORE ATTEMPTING LIGHT
BULB REPLACEMENT. Failure to do so may result in an electrical
shock that could severely injure you.
The refrigerator uses one, 15 wa incandescent light bulb to
illuminate the interior of the refrigerator. The light bulb is a very
reliable electrical component, but should it not func on properly, please call the dealer where you purchased your refrigerator
from for a replacement light bulb. Use only an original equipment light bulb from your dealer or Twin Eagles.
Do NOT under any circumstance use a light bulb that exceeds 15
w a s !
To replace the light bulb, disconnect power to the unit. Unscrew
the old light bulb located behind the display housing at the top
of the unit. Set the old light bulb aside. Screw the new light
bulb into place. Reconnect power to the unit. Check to see if the
light bulb operates properly to complete the installa on.
The light bulb is not covered by your warranty. A replacement
bulb can be obtained from your dealer or from Twin Eagles.
In the event of a power failure
Minimize the number of door openings to prevent a gradual rise
in temperature while the power is off .
Help Prevent Tragedies
Each year children die because they climb inside a discarded
refrigera on product, get trapped inside, and suff ocate. Take
precau ons to prevent such tragedies by removing the door or
by taping or chaining it shut before discarding.
8

TROUBLESHOOTING
Troubleshooting
Your refrigerator requires little service because the best and
most up to date materials, equipment, and quality methods
are employed throughout the manufacturing process.
Please record pertinent information about your appliance
purchase in the table to the right for future reference. Contact information for service is on page 11.
If trouble occurs during normal operation, first check the
troubleshooting information below to see if any of these
simple steps may correct the problem.
For Your Records
Date of Purchase
Dealer’s name
Dealer’s Address
Dealer’s City
Dealer’s State
Dealer’s Zip Code
Appliance Serial Number
Appliance Model Number
Date Warranty Card Sent (Must
be within 10 days of purchase).
Electrocution Hazard - Never attempt to repair or perform
maintenance on the unit until the main electrical power has
been disconnected.
Problem Possible Cause Remedy
Unit not cold enough. • Control set too warm.
• Adjust temperature colder. (See
page 5 or 6). Allow 24 hours for
•
• Airflow to front grille blocked.
temperature to stabilize.
• Airflow must not be obstructed to
front grille. See “clearances” on
page 3.
• Excessive usage or prolonged door
openings.
• Door gasket not sealing properly.
• Allow temperature to stabilize for
at least 24 hours.
• Adjust or replace door gasket.
Unit too cold. • Control set too cold. • Adjust temperature warmer. (See
page 5 or 6). Allow 24 hours for
temperature to stabilize.
No interior light in cabinet. • Light bulb burned out. • Replace light bulb.
Light will not go out when door is
closed.
• Door not activating light switch. • Verify cabinet is level, refer to page
4 for leveling instructions.
• Verify the door is aligned properly.
Noise or Vibration. • Unit not level. • Level unit, see “Leveling Legs” on
page 4.
Unit will not run. • Unit turned off.
• Power cord not plugged in.
• No power at outlet.
• Turn unit on. See page 5 or 6.
• Plug in power cord.
• Check house circuit.
9

WARRANTY
En re Product
Limited One Year Parts and Labor Warranty
Twin Eagles warrants that it will supply all necessary parts and
labor to repair or replace in the end user’s home or offi ce, any
component which proves to be defec ve in material or workmanship, subject to the condi on and exclusions stated below,
for a period of one year from the date of purchase by the end
user.
The above warranty does not cover:
• Shipping costs of replacement parts or returned defec
ve parts.
• Customer educa on or instruc ons on how to use the
appliance.
• Any content loss due to product failure.
• Removal or installa on.
Nor do the above warranty covers failure of this product or its
components due to:
• Transporta on or subsequent damages.
• Use commercially or use other than normal household
or small offi ce.
• Improper installa on, misuse, abuse, accident or altera
on, use on wiring not conforming to electrical codes,
low or high voltages, failure to provide necessary main
tenance, or other unreasonable use.
The warranty sets forth herein is the only warranty extended
by Twin Eagles. Any implied warran es, including the implied
warranty of merchantability, are limited to the dura on of these
express warran es. In no event shall Twin Eagles be liable for
any consequen al or incidental damages or expenses resul ng
from breach of these or any other warran es whether express or
implied.
Some states do not allow the exclusion or limita on of consequen al damages or a limita on on how long an implied warranty lasts, so the above exclusion or limita on may not apply
to you. This warranty gives you specifi c legal rights and you may
have other rights that may vary from state to state.
No person, fi rm, or corpora on is authorized to make any other
warranty or assume any other obliga on for Twin Eagles. These
warran es apply only to products used in any of the fi y states
of the United States and the District of Columbia.
To obtain performance of this warranty, report any defects to:
Twin Eagles
13231 E 166th St.
Cerritos, CA 90703
(562) 802-3488
Parts or Service Not Supplied or Designated by Twin Eagles
The above warranty also does not apply if:
• The original bill of sale, deliver date, or serial number
cannot be verifi ed.
• Defec ve parts are not returned for inspec on if so
requested by Twin Eagles.
• The refrigera on equipment is not in the possession of
the original end use purchaser.
10

11

41012167 revB
12
 Loading...