

Page 1

A
MGR, MGI Modular Gravity Hood
(throat sizes 72" & smaller)
INSTALLATION & ASSEMBLY MANUAL
See Catalog 4720 for sizes that ship assembled.
IM-4720NFS
August 2013
Qty
24 Cap Screw, Serrated Flange, 1/4-20 x 5/8"
24 Hex Nut, Serrated Flange, 1/4-20
Qty
4 Doubler plates
4 Cap Screw, Serrated Flange, 5/16-18 x 3/4"
4 Hex Nut, Serrated Flange, 5/16-18
Note: Not always required.
Qty
16 Nut Clip - 1/4-20
24 Cap Screw, Serrated Flange, 1/4-20 x 1"
8 Hex Nut, 1/4-20
Hardware Kit #1A
Item
Hardware Kit #1C
Item
Hardware Kit #2
Item
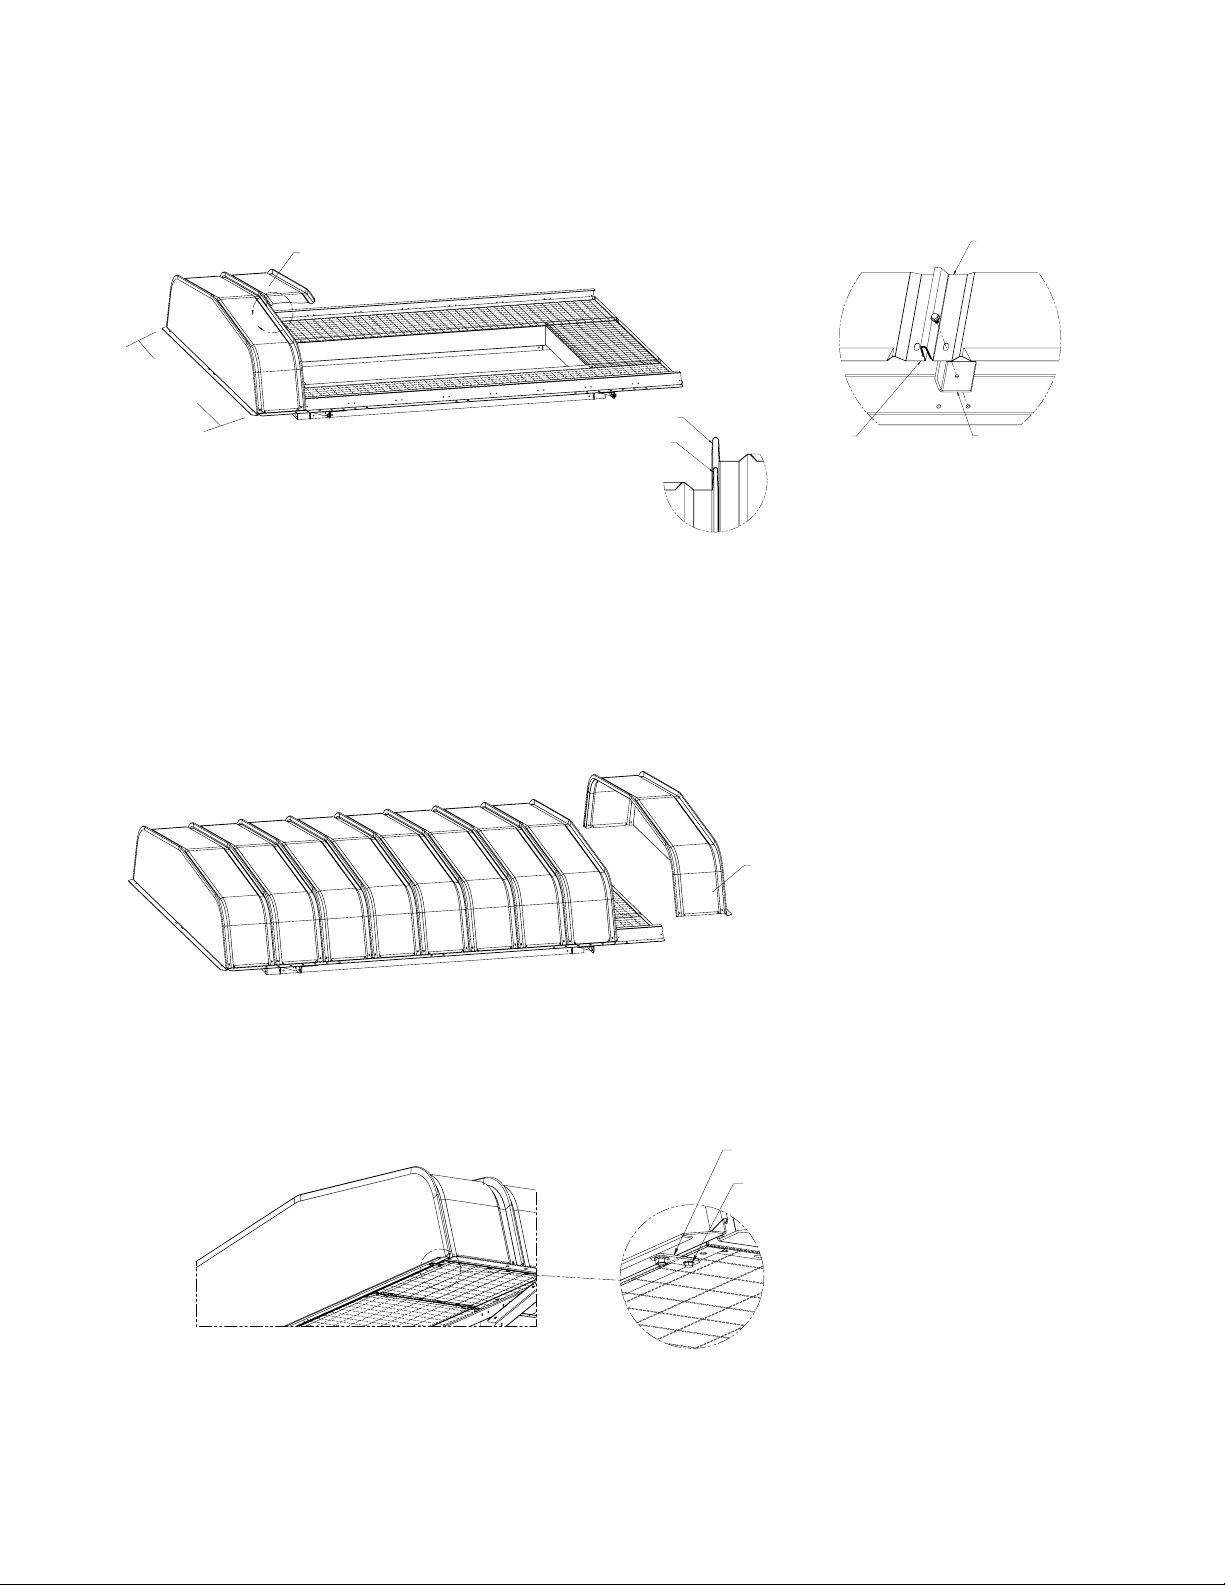
Figure 1.
Qty
8 Cap Screw, Serrated Flange, 5/16-18 x 3/4"
8 Hex Nut, Serrated Flange, 5/16-18
Qty
40 Screws, #12 x 3/8"
Qty
A/R Hood Clips (Only for hood panels longer than 108")
Hardware Kit #3
Item
Hardware Kit #4A
Item
Hardware Kit #5
Item
Hood Panel
Hood End Panel
Assembly (Female Rib)
Hood End Panel
ssembly (Male Rib)
Hood Rail Assy
Birdscreen Assy
Fixed
Base Assy
Birdscreen Assy
Removable
Hood Support Angle
©2013 Twin City Fan Companies, Ltd.
Page 2

Step 1 – Base Assembly
Curb Base Side
Figure 2.
Fasteners (Kit #1A and #1C) – Note: There may
be extra fasteners.
Lay out the Curb Base Side and Curb Base
End in approximate location to each other. See
Figure 2. Use (3) 1/4-20 fasteners for 5" base
height and (4) 1/4-20 fasteners for 12" base
height. Leave top two holes open on the Base
End. Note: Hand tighten only until Step 3. On
some hoods, a Doubler Plate is required. See
Detail A in Figure 2.
Curb Base End
Doubler Plate
DETAIL A
* When Kit 1C provided.
Screw
Hex Nut
Step 2 – Hood Mount Bars
Fasteners (Kit #1A and #1C)
Loosely assemble Hood Mount Bars on both sides of the Curb Base Ends using (4) 1/4-20 fasteners per side. On
hoods using a Doubler Plate, mount Brace using 5/16-18 hardware. See Figure 3b.
Figure 3a. Figure 3b.
Hood Mount Bar
Hood Mount Bar
Brace
Step 3 – Caulk
Caulk inside corners of base assembly and tighten all fasteners. Install assembly onto roof curb before proceeding.
Ensure that assembly is properly anchored to roof curb.
Step 4 – Birdscreen
Fasteners (Kit #2) – Note: There may be
extra fasteners.
Install nut clips onto Hood Mount Bars as
shown. Center Fixed Birdscreen on assembly with equal overhang on both sides.
Attach using (4) 1/4-20 x 3/4" fasteners
per birdscreen as shown.
Figure 4.
Screw
Nut Clip
Hood Mount Bar
Extension Tab
Fixed Birdscreen
Overhang
Overhang
2 Twin City IM-4720NFS
Page 3

Step 4 – Birdscreen (Continued)
End Panel Assy,
Male
- This flange must
Removable
Install two Removable Birdscreens. After positioning the assemblies, rotate the locking tabs in place and tighten.
Figure 5.
Birdscreen
Locking Tab,
rotate into place
and tighten
Removable
Birdscreen
Detail of locking tabs
Step 5 – Hood Rails
Fasteners (Kit #3) – Note: There may be extra fasteners.
Install two Hood Rail Assemblies to the Hood Mount Bars using cap screws and nuts. Do not fully tighten fasteners.
They will be tightened in Step 8.
Figure 6.
Hood Rail Assembly
Base Assembly
Hex Nut,
Flanged Head
Screw,
Serrated Flange
Step 6 – Hood End Panel
Fasteners (Kit #4A and #5) – Note: There may be extra fasteners.
Install Male End Panel Assembly using #12 screws.
Figure 7.
End Panel Assembly
-Male-
Sheet metal Screw
IMPORTANT
male. Refer to Figure 8.
- This flange must be
Figure 8.
Male Flange
(Narrow)
End View of Panel
Female Flange
(Wide)
3 Twin City IM-4720NFS
Page 4
Step 7 – Hood Panels
Female
Female
Fasteners (Kit #4A and #5)
Install Hood Panels using #12 screws. Place female end of next panel over male end of end panel. See Detail A.
On sizes where hood width is 108" and larger, hood clips must be installed at each interlocking rib while installing
the panels. Position the Hood Panel in place and reach underneath to slide the Hood Clip into place. See Detail B.
Figure 9.
Hood Panel
A
Hood
Width
Male
Male
NOTE: Use Hood Clips on Hood Panels 108" and wider.
DETAIL B
DETAIL A
Hood Clip
Step 8 – Hood End Panel
Fasteners (Kit #4A)
Install Female End Panel Assembly using #12 screws. Fully tighten the Hood Mount Bar/Side Rail fasteners from
Step 5.
Figure 10.
Step 9 – Screen Clips
Rotate Screen Clips on End Panel Assembly to support the bird screen.
Figure 11.
Screen Clip
End Panel Assembly
-Female-
#12 Screw
TWIN CITY FAN & BLOWER | WWW.TCF.COM
5959 Trenton Lane N | Minneapolis, MN 55442 | Phone: 763-551-7600 | Fax: 763-551-7601
3MWG08/13
 Loading...