

HANDSFREE 2.0
Twiins® - Smart Series
INSTRUCTION MANUAL
Phone, Music & Maps
1
2
3
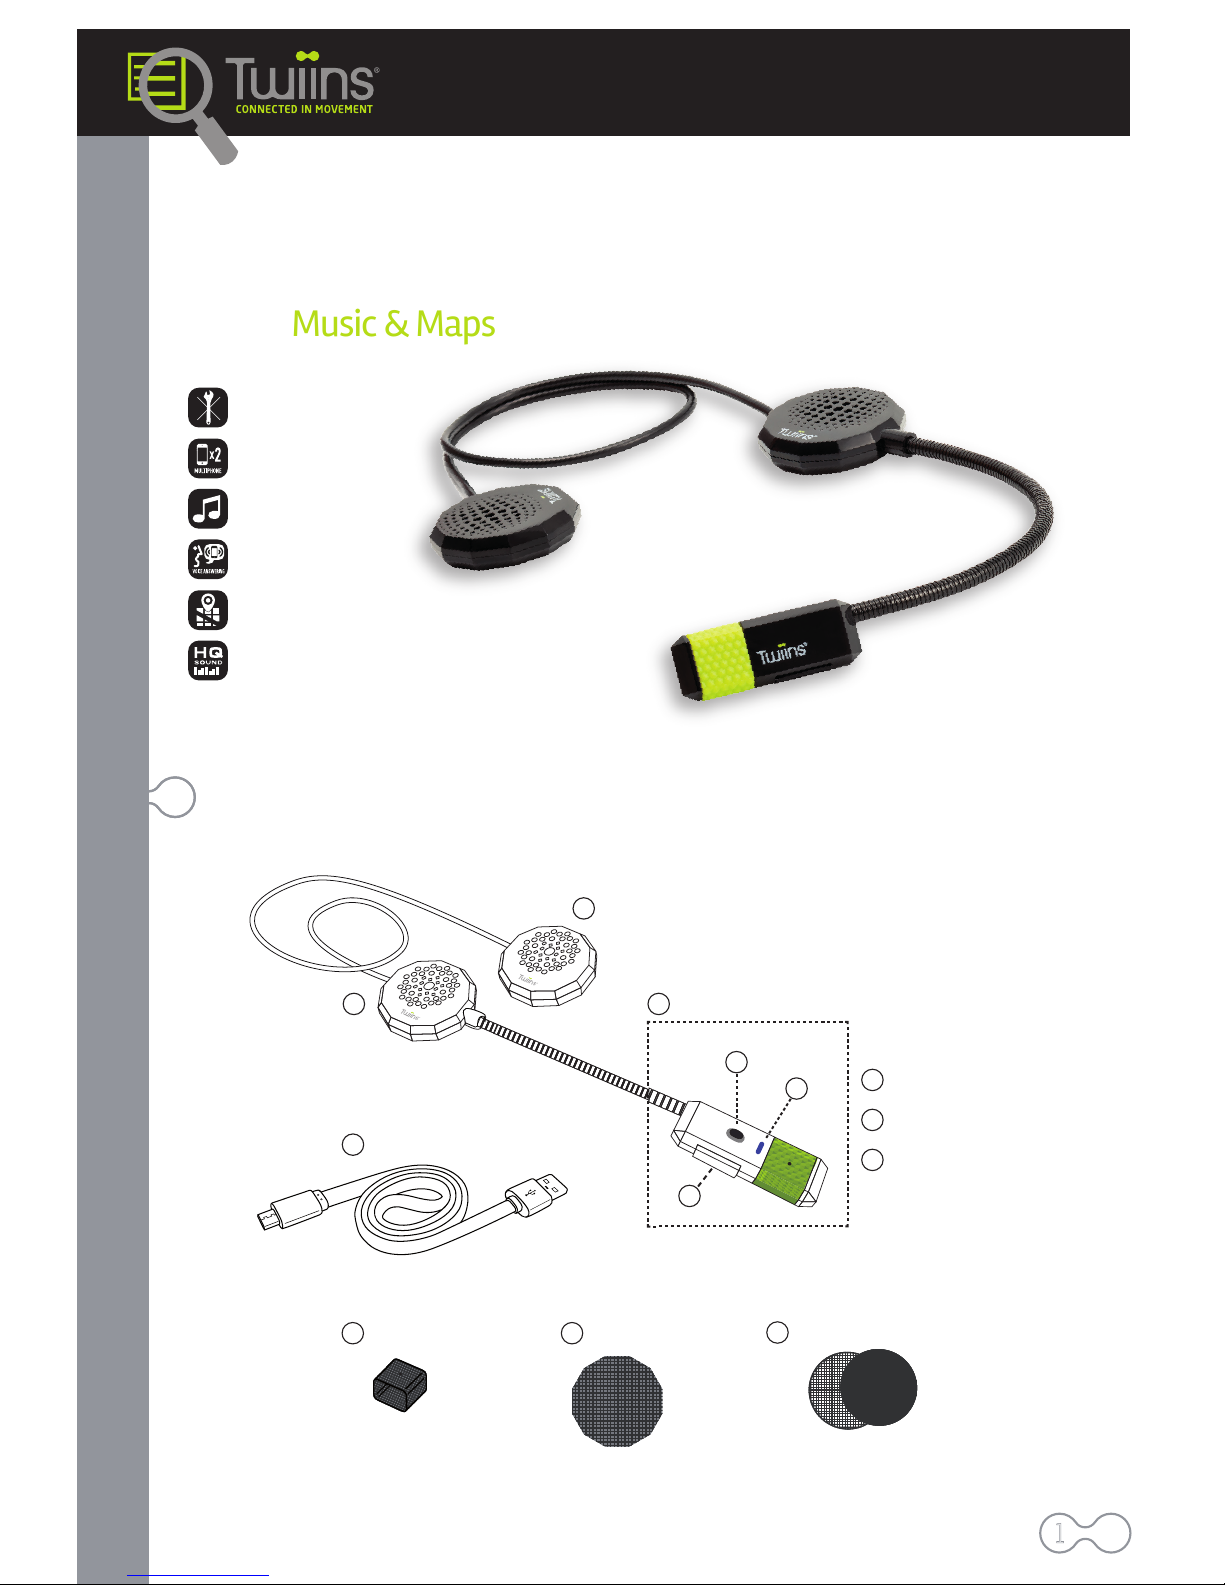
button
LED indicator
1b
1a
USB charging port1c
handsets
1b
1a
1c
Components
4
USB charging cable
speaker velcro x2 units each
comfort pad
foam x2 units
7
spare mic band
65
1
2
Installation
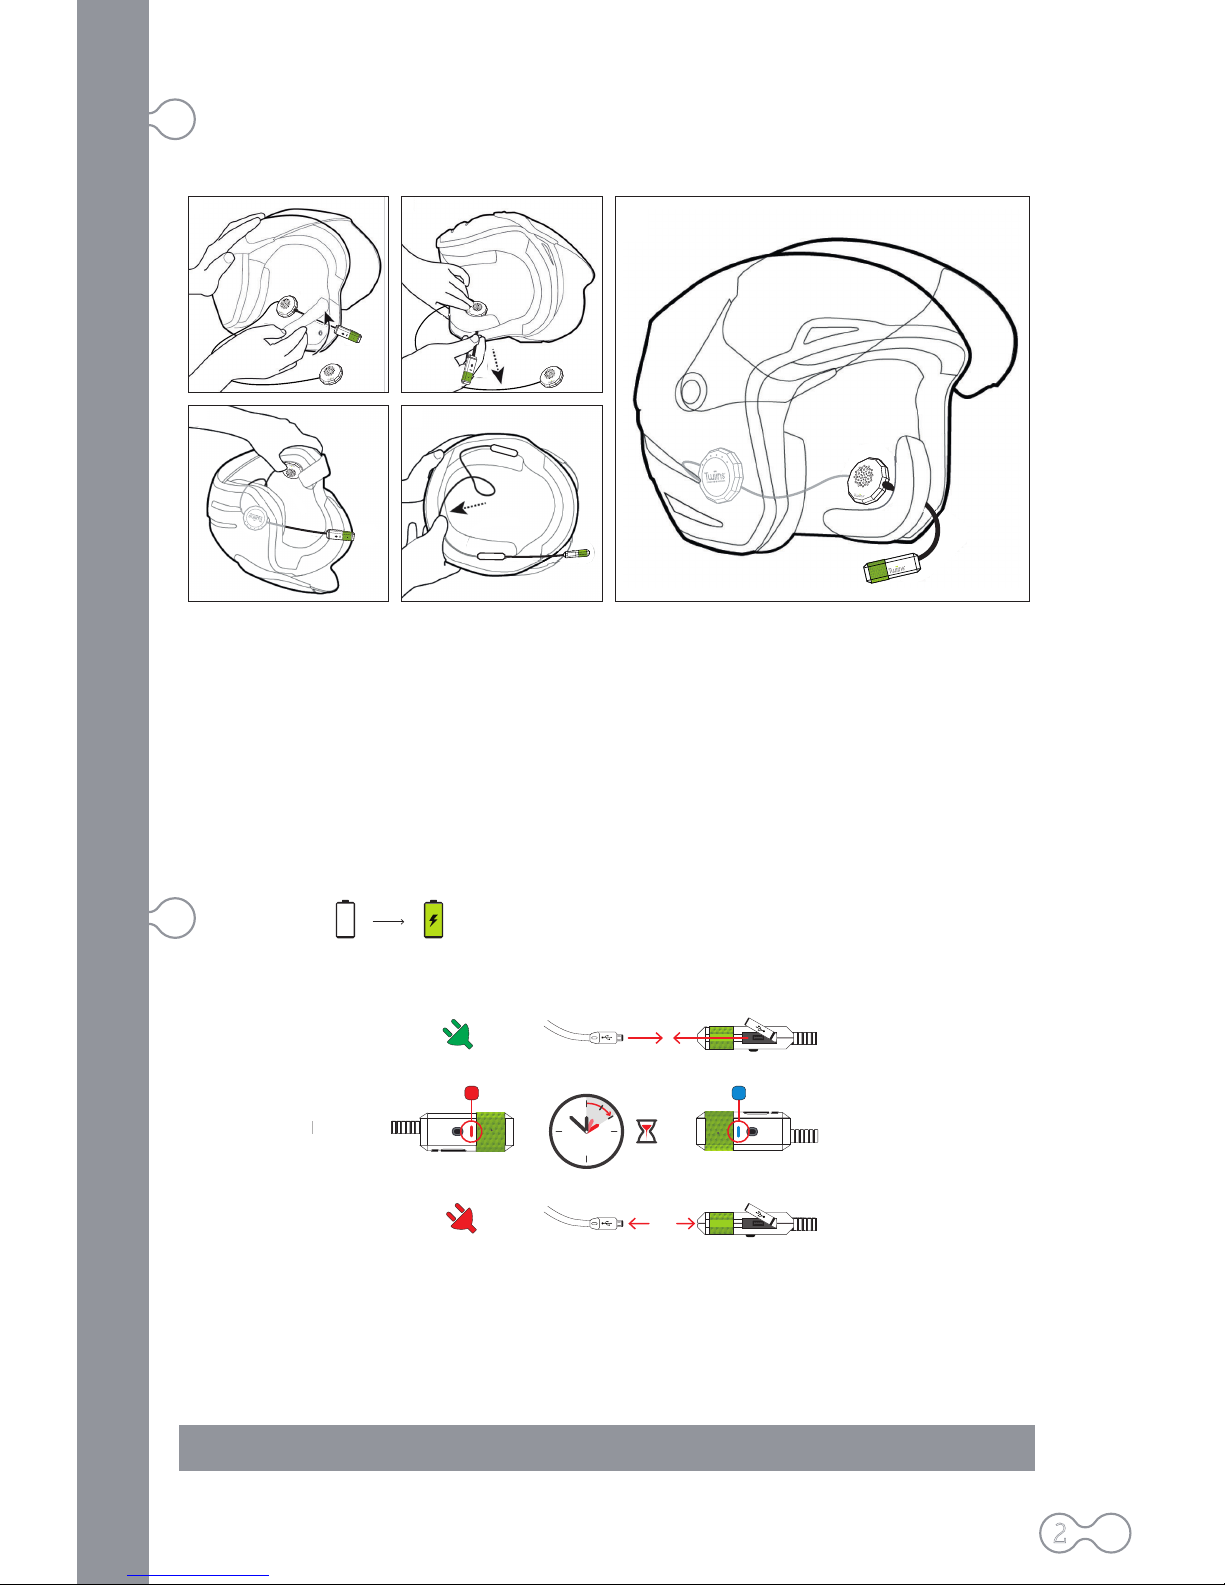
The Twiins® HANDSFREE 2.0 is very easy to install into a helmet. Remove the side padding from the inside of the helmet (if it can be
removed) and place the handsets (2) and (3) at the height of your ears. The device is designed so that the main unit with the boom
microphone is placed on the left side. The wire between headset (2) and (3) must be stored inside the helmet, under the padding. In
order to fix the headphones, two velcro pads are provided (male and female) with an adhesive backing (7). In case you need to use the
velcro, stick the male part of the pad onto the device and the female part onto the inside of the helmet.
Depending on the internal configuration of each type of helmet, it may be necessary to use the entire velcro pad or only a part of it (see
figure 2). In some cases, it may only be necessary to stick the male part onto the device as the inside of the helmet may have padding
that can serve as velcro (female).
If needed, comfort pads (6) to place on the headphones are also provided, in order to improve comfort against your skin.
Place the microphone (1) on the front section of the helmet close to and oriented towards your mouth.
3
1
2
4
Charging
0% 100%
Before using your Twiins® HANDSFREE 2.0 device for the first time, you must charge the device completely.
Connect the terminal (1c) to the provided USB charging cable (4) and then connect the cable to a USB charging port.
While charging, the red LED light will switch on (1a) and it will change to blue once charging has been completed.
NOTE: Don’t pull on the cable to disconnect it from the USB port.
NOTE: As time goes by, batteries gradually lose their charge. This is why it’s important to charge the battery fully before using the device
and allow the battery to use almost all of it’s charge in between charging cycles.
NOTE: To ensure proper function, do not operate the Twiins® HANDSFREE 2.0 device while charging.
WARNING: If you plan to store your Twiins® device for a long period of time, be sure to recharge it at least once every six months to
ensure perfect battery performance.
3
Multiphone
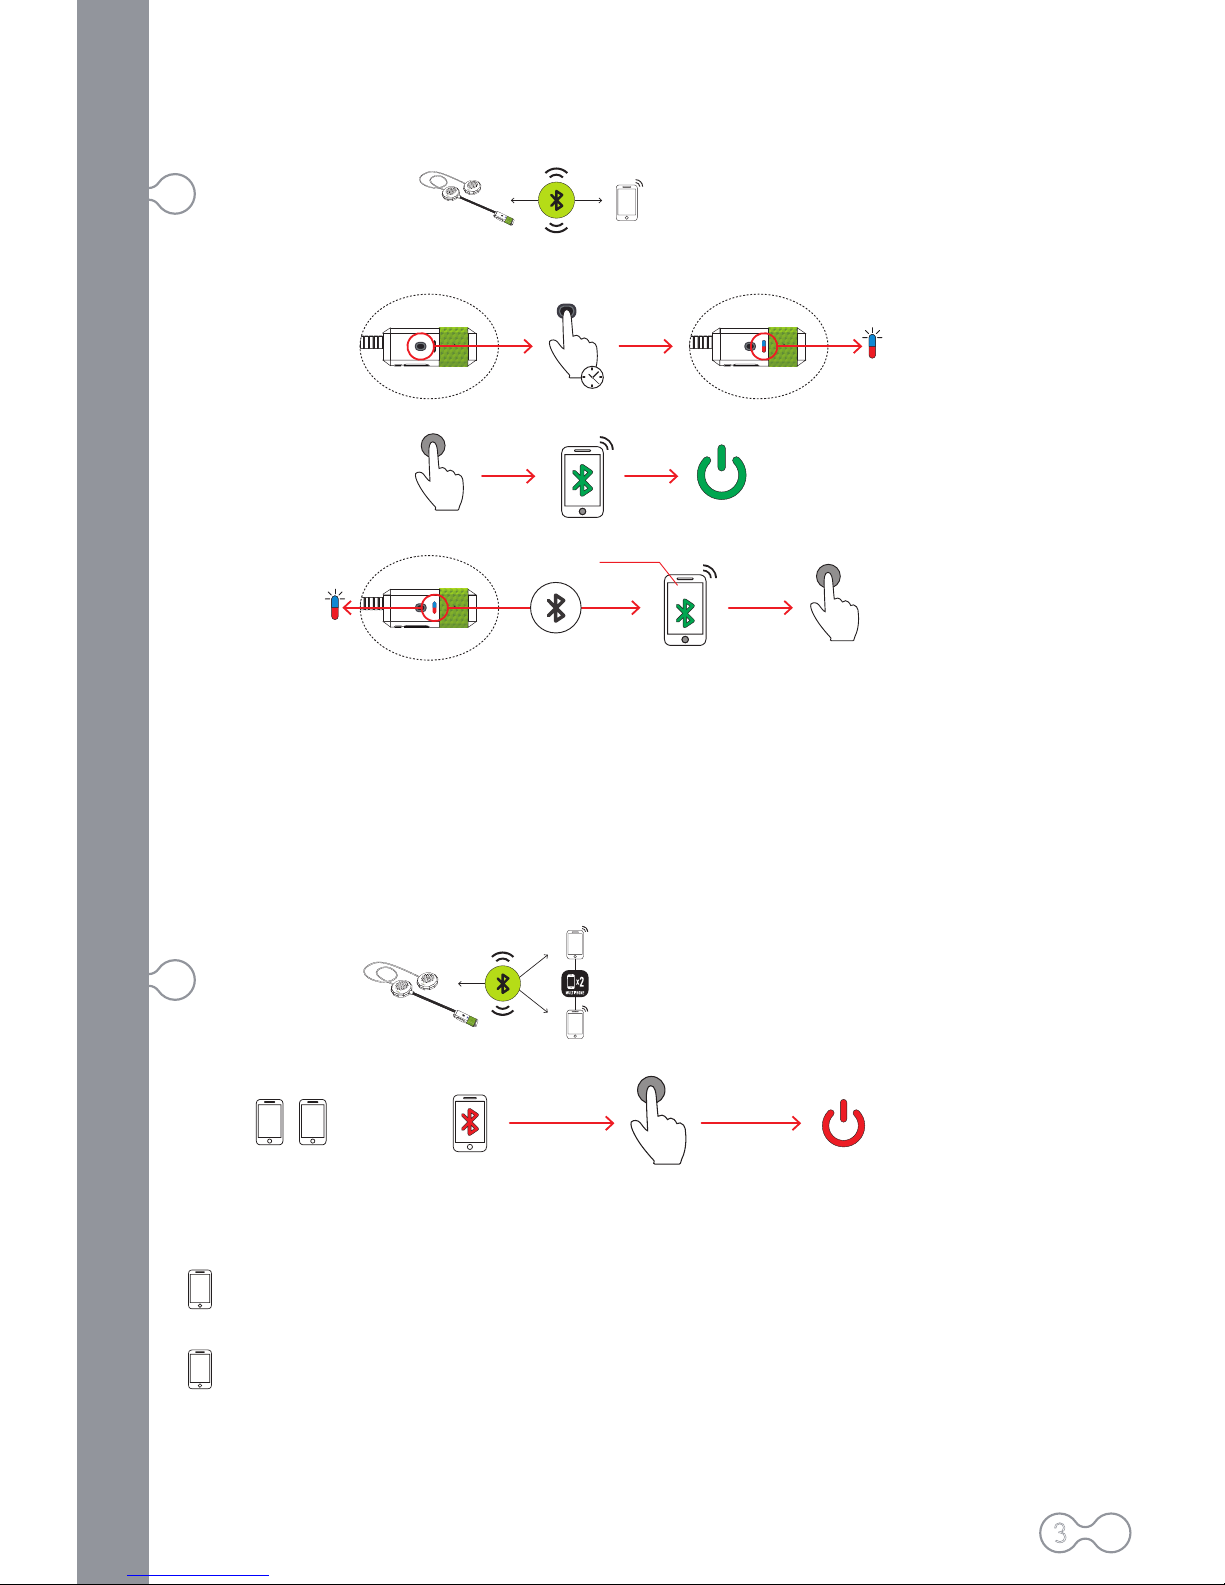
1
1 2
To make connexion easier, please make sure that Bluetooth® is off in both devices.
Once mobile 2 is paired, you can turn on Bluetooth® on mobile 1.
Pair mobile 1 with Twiins® HANDSFREE 2.0 (follow steps on Linking / Paring section).
Turn off Bluetooth® on mobile 1 and the Twiins® HANDSFREE 2.0 device.
2
Now pair mobile 2 to the same Twiins® HANDSFREE 2.0 device (follow steps on Linking / Paring section).
Linking/Pairing
To use the Twiins® HANDSFREE 2.0, it’s necessary to pair it to the Bluetooth® device you wish to connect it to (mobile phone, GPS
navigator). While the device is switched off, hold the control button (1b) until the LED indicator (1a) begins flashing in Red and Blue. The
mobile phone or GPS navigator will find the device under the name HANDSFREE 2.0. Select the HANDSFREE 2.0 device and, if
necessary, enter the access code: 0000.
NOTE: Pairing is a process that only needs to be completed once. When the Twiins® HANDSFREE 2.0 is paired to a specific device,
both devices will connect automatically when switched off and on.
NOTE: Depending on your phone’s Operating System software version, there is a possibility that during the phone’s Bluetooth® device
search you have to turn off the phone’s Bluetooth® functionality and turn on again after 2 or 3 seconds so that the Twiins® device is
found properly. This is normal and it should only happen during the first pairing with that phone.
6“
HANDSFREE 2.0
HANDSFREE 2.0
1
2

Switching on/off
2“
5“
Switching off: press and hold the control button (1b) for a few seconds until the speakers provides an acoustic signal and the LED
indicator (1a) begins flashing in red before the device powers off.
Switching on: press and hold the button (1b) for a few seconds until the speakers provides an acoustic signal and the LED indicator
(1a) begins to flash in Blue.
Call functions
x1
x2
Answering by pressing the button (1b): press the control button (1b) only once.
Callback to the last dialed number: press the control button (1b) twice. This depends on the features and configuration of your
mobile phone.
When there is an incoming call, the speakers will provide an acoustic signal.
Answering through a voice command: answer the call by speaking any word out loud (e.g. “Answer!”).
Ending a call: press the control button (1b) only once or wait until the other person hangs up.
Rejecting an incoming call: press the control button (1b) twice, as soon as you hear the acoustic signal for an incoming call.
4

5
Technical Specifications
• Bluetooth® specification v4.0 Class 2.
• Bluetooth® Profiles: HSP v1.2, HFP v1.6,
EDR, A2DP v1.2, AVRCP v1.4, DI v1.3.
• Up to 10 meters range.
• Foam speaker covers with Velcro.
• One button multifunction control.
• Microphone with noise reduction
• Polymer Lithium Battery 110 mAh.
• Stand by time: up to 3 days.
• Charging time: 2 h.
• Talk time: 8 h.
• Total weight: 35 gr.
• Operation frequency: 2.4 GHz
• Power supply: DC 3.7V.
.
Adjusting the volume
The Twiins® HANDSFREE 2.0 device is pre-programmed with a volume level that allows for optimal listening at speeds of up to 80 km/h
(50 mph). To adjust the volume, use the volume controls on the connected device.
Volume perception may vary depending on the position and separation of the speakers from your ear, as well as the type of helmet and
motorcycle, external conditions and other factors.
Playing music from your mobile phone
Once the Twiins® HANDSFREE 2.0 is paired to a mobile phone capable or transmitting music through Bluetooth® A2DP, activate music
on the phone and it will immediately be heard through the Twiins® HANDSFREE 2.0 device. Music and volume can only be controlled
from the phone or device, depending on its features and configuration.
While you listen to music, all call features will remain active. In case you receive an incoming call, music will pause and, when the call
ends, playback will resume. Likewise, music will resume after making a call.

Troubleshooting
Please check the link www.twiins.com/en/faq
Carefully read the manufacturer’s Twiins® product instruction manual and follow its recommendations. Do not make changes or
modifications to prevent affecting the normal operation of the device andoverriding the operations for which they were created.
6
WARNING: User information
This device has been tested and meets all the requirements needed to provide reasonable protection against harmful interference in a
residential facility. This device generates, uses and can radiate radiofrequency energy and, if it is not installed or used according to the
instructions, it can cause radio communication interferences. However, there is no guarantee that interferences will not occur in a specific
facility. If this device causes harmful interferences to radio or television reception, it can be checked by turning it on and off. It is
recommended that the user trying to correct the interference do so by using one of the following measures:
• Move the receiving antenna to a new direction or position.
• Increase the distance between the device and the receptor.
• Connect the device to a socket on a different circuit than that of the receptor.
• If the problem persists, contact your distributor or a radio/TV technician for help.
Copyright
Manufacturer’s Declaration
MATGroup™
The Twiins® HANDSFREE 2.0 device uses components with the latest technology and is manufactured to high standards.
To keep your device from inadvertently becoming damaged, please read the following recommendations carefully:
• Do not attempt to open any of the system components, since the electronic parts inside it may become damaged. Do not attempt to
open or change the battery as it may be dangerous.
• Keep the Twiins® HANDSFREE 2.0 out of the reach of children.
• Keep the Twiins® HANDSFREE 2.0 in a dry place. Humidity and condensation may damage the electronic circuits.
• Avoid exposing the device to extreme temperatures. Intense cold may create condensation inside the components as these warm up.
Extreme heat may damage the battery, circuits or casings.
• Do not drop, hit or bend the components as the internal circuits may become damaged.
• Do not paint or decorate the Twiins® HANDSFREE 2.0 as the casings may become damaged or impede correct operation.
• Do not use chemical products, solvents or detergents to clean the Twiins® HANDSFREE 2.0 as these may damage the device.
Care and maintenance
Devices, marketed under the Twiins® brand, have been manufactured according to the requierements stipulated by the appllicabcce
regulation at the national, European and international level, and meet the quality and safety standars that all electronic audio devices
must have.
MATGroup
™ is the sole owner of the content rights of this instruction manual. All intellectual property rights are reserved.
Twiins® brand and technologies are registered and patented by MATGroup
™.

This product has a 2-year guarantee, starting after the time of purchase. The guarantee is only valid with the presentation of the sales
receipt or original purchase invoice issued at the Twiins® point of sale, showing the purchase date. The guarantee does not cover natural
wear defects from the use or improper use of the device. We recommend that you read the instruction manual and respect all the
indications on the correct use of this product, as well as the maintenance conditions and the manufacturer’s care label. The guarantee
does not cover damages caused to the device due to an accident, handling, modifications, repairs, corrosive materials, liquids, improper
air flow or any other cause, including events of force majeure, or defects due to the use of accessories that are not Twiins® originals.
Likewise, any modification to or removal of the stamps, labels or product indications invalidate the guarantee.
Limitation of liability
In addition to the legal grounds for limitation of liability, the manufacturer shall not be held responsible for any consequences derived from
the improper use of the product, or any case in which the user employs it in violation of the traffic law, safety regulations or any other
regulation.
GUARANTEE
7
Safety warning
The use of electronic communication devices while driving a motor vehicle or performing any kind of activity requiring your full attention
can lead to serious accidents, injuries or even death.
You are responsible for the proper use of the Twiins® device, and for ensuring that it is compatible and does not violate traffic, safety
or any other laws or provisions in your country or jurisdiction.
The manufacturer warns you that you must respect the current traffic laws to prevent traffic accidents and recommends avoiding risky
situations. Exercise due caution while driving and pay attention to the road. You are responsible for keeping your attention on driving
and traffic, weather conditions and the road, as well we avoiding any distraction that may affect or distract your attention from driving.
Avoid using this product at gas stations, fuel tanks or close to explosive substances. Keep the volume to reasonable levels, preventing
noise pollution.
Hearing loss
The prolonged use of audio devices, together with excessive volume, can lead to a loss or decrease of hearing.
Pacemaker, hearing aids and other medical devices
Ensure to verify that there are no interferences between your medical devices and the Twiins® electronic communication device,
respecting the applicable regulations and the manufacturer’s instructions for both devices.
In any case, we recommend that you consult your doctor and the manufacturer of the medical device on the terms of use to verify their
compatibility. Follow the suggested precautionary measures.
Environmental warning
This symbol advises on the applicable treatment of electronic devices at the end of their service life in the European Union and in
European countries with a selective waste collection system. It is used to indicate that this product cannot be treated as normal
household waste and must be sent to a specific collection point for electronic devices.
By ensuring this product is disposed of correctly, you will help prevent negative consequences for the environment and human health
that could arise from improper handling when disposing of this product. Recycling helps conserve natural resources. To receive
detailed information about recycling this product, please contact your city hall, the nearest recycling collection point or the
establishment where you purchased the product.
IMPORTANT SAFETY INFORMATION

?
?
?
www.twiins.com
USER
MANUALS
 Loading...