

Page 1
Discovery Quick GuideDiscovery
TWIG Discovery
Benefon® is a registered trademark of Benefon Oyj.
Copyright© 2000 Benefon Oyj, Finland. All rights reserved.
www.benefon.com
YZ3020
Benefon OYJ
P.O. Box 84
FIN – 24101
Salo
Finland
Tel: +358 277 400
Fax: +358 2733 2633
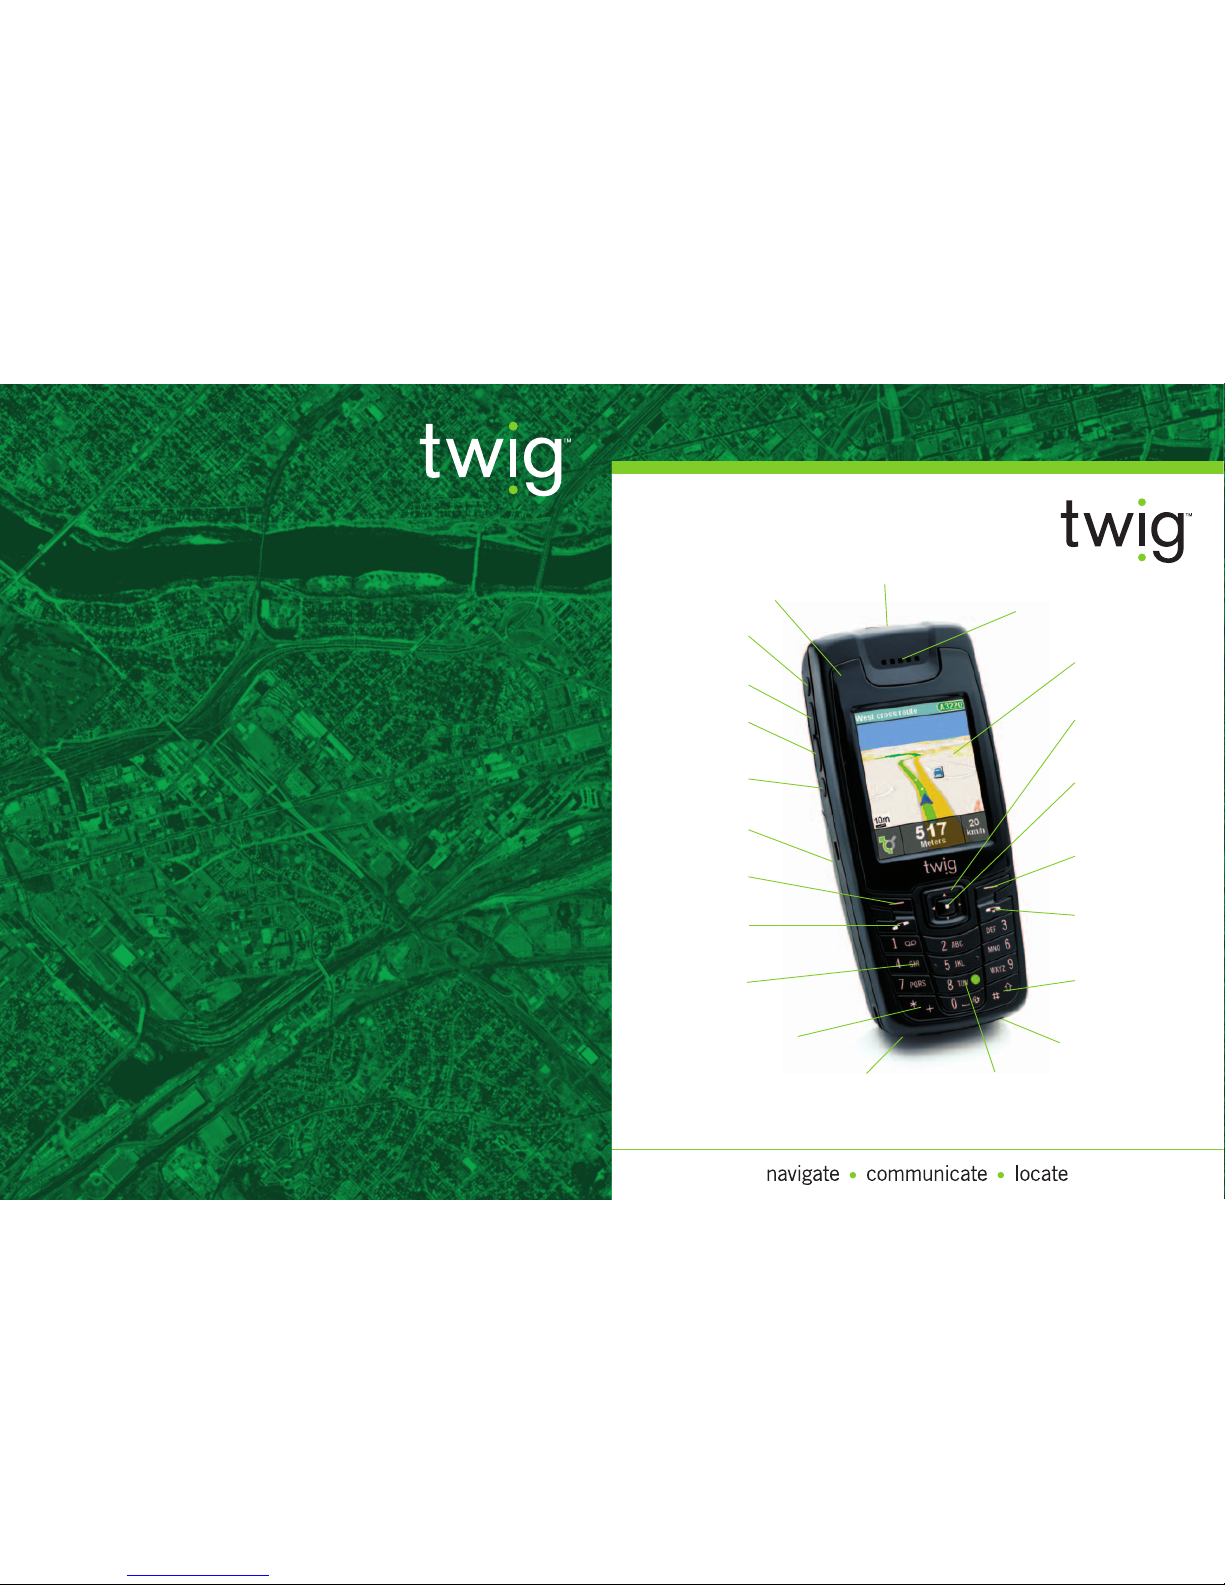
Emergency key
Earpiece
Display
Arrow key
(4 dimensional)
Middle key
Right function
key
Hook-down
key
Hash key
TWIG key
Microphone
Star key
Alphanumeric
keys (0 - 9)
Hook-up
key
Left function
key
Battery
Volume down
Volume up
Power on/off
Indicator LED
Main menu/
application
switch button
Bottom
connector
Page 2
Guide to screen icons
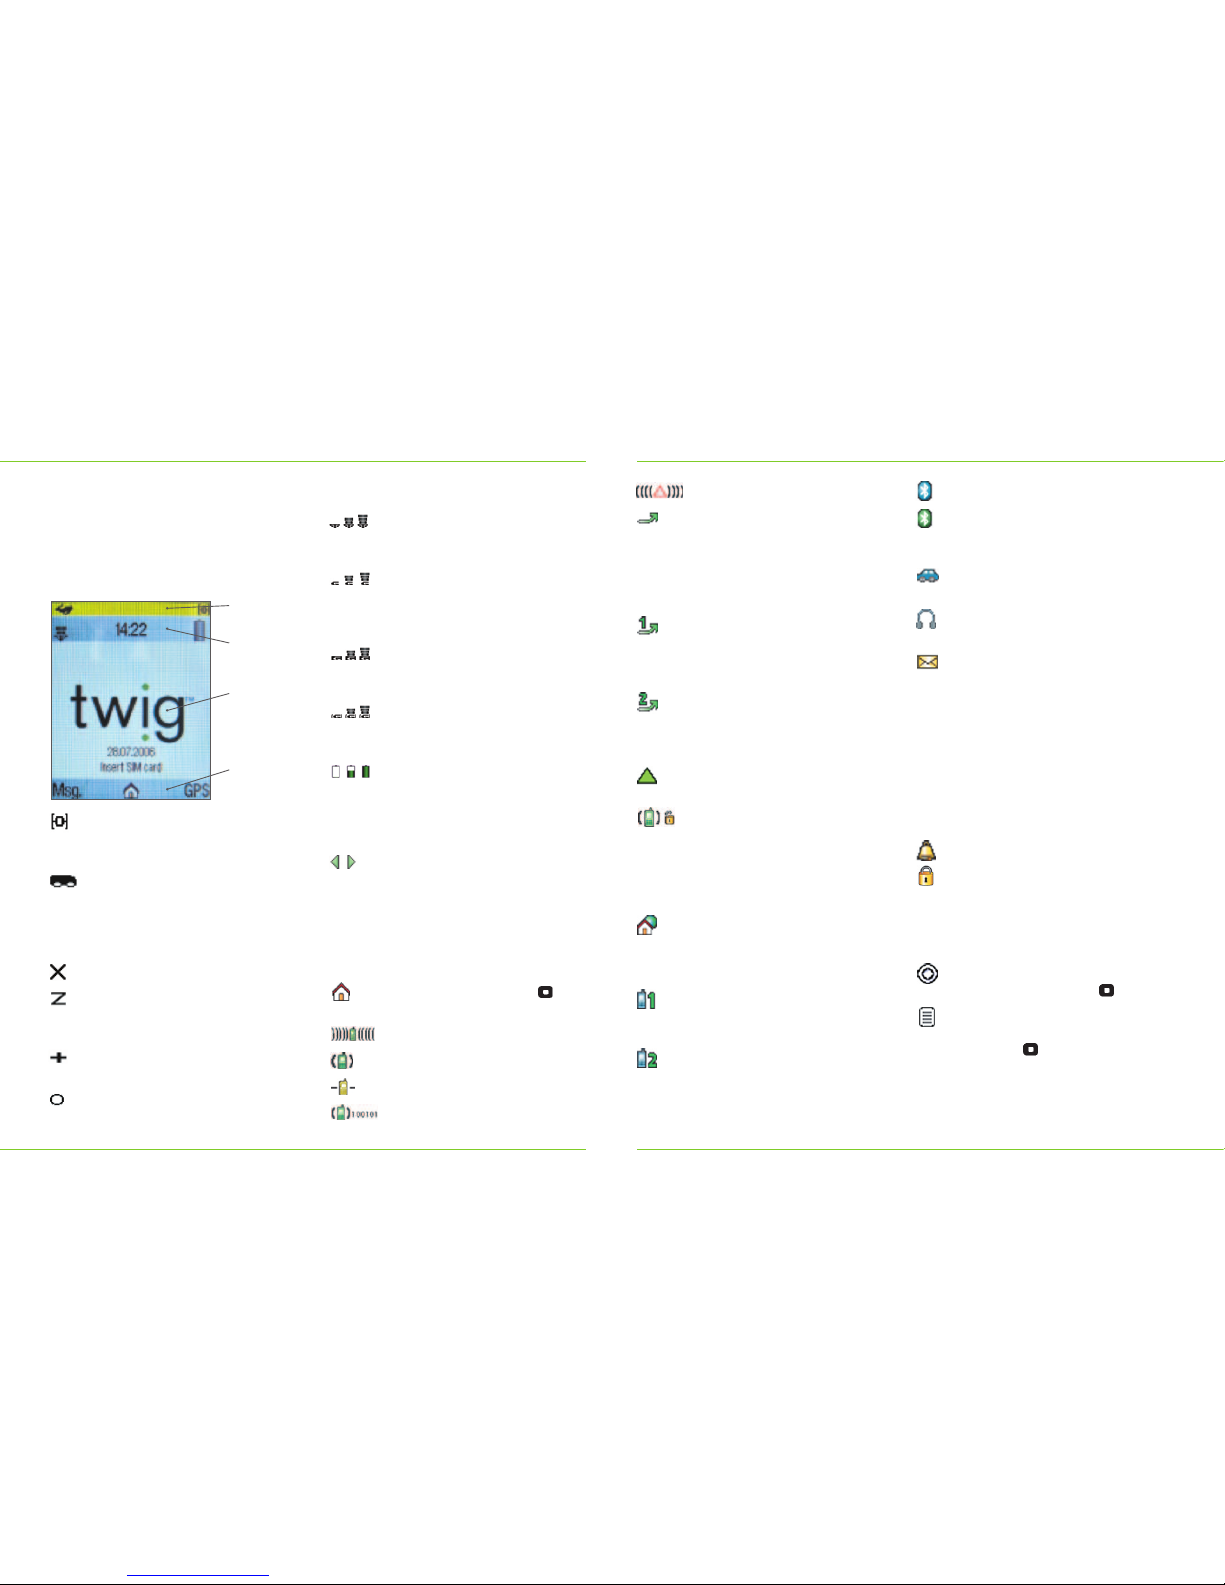
A TWIG Alert call is in progress.
All voice calls (both lines if ALS,
i.e. Alternate Line Service, is in
use) are diverted to voice mailbox
or some other phone number.
The type of service depends on
your network operator.
All voice calls of line1 are diverted
to voice mailbox or some other
phone number. This symbol is
used only if the SIM card has ALS.
All voice calls on line2 are diverted
to voice mailbox or some other
phone number. This symbol is
used only if the SIM card has ALS.
Roaming. The phone is using a
different network operator.
Normally most networks cipher
calls. However, some networks
may not support ciphering.
If the network connection
becomes unciphered during the
call, this symbol will be shown.
Home zone. Note that the home
zone feature is only available for
supported network operators and
it also requires a suitable SIM card.
Active line1. Shown when the
SIM card has ALS and the line1
is active.
Active line2. Shown when the
SIM card has ALS and the line2 is
active. Note that only one line can
be active at the time.
Bluetooth connection is switched on.
Bluetooth is active.
Note: If no Bluetooth symbol is
shown, Bluetooth is switched off.
Carkit. Carkit is connected to
the phone.
Headset. Headset is connected
to the phone.
You have received a new message
or messages. The messages are
waiting in the Inbox. Also shown
if ALS (Alternate Line Service) is
in use and you have unread
messages from both lines.
Flashing envelope indicates that
there is no space for receiving new
messages, until some stored ones
have been deleted. Messages may
be waiting at the SMS centre.
Alarm clock is activated.
Keypad is locked. When phone
lock is on, a large version of the
icon is displayed.
Soft key area
Select. You can select or activate
an option by pressing .
Options. A list of options is
available and accessible by
pressing .
Screen Navigation
Note that the display symbols may vary
depending on, for example, the colour
theme in use.
Guide to Display Icons
GPS indicator. As satellite signal
strength increases, smaller circles
are shown.
In the left corner of GPS area you
can see an icon indicating your
currently selected GPS profile.
You can change the icon for each
profile in GPS profiles.
GPS connection is off.
GPS connection is on but the
device is not currently trying to
calculate position or update data.
GPS uses other than user defined
parameter in calculating a position.
GPS has encountered an error.
Title area
GSM network indicator. Located
on the left corner of the title area.
The more bars, the better the signal.
GPRS indicator. If SIM card
and network support GPRS,
the indicator is shown instead
of the GSM indicator.
GPRS connection is attached and
data transfer is in process. Shows
blinking with GPRS indicator.
GPRS is temporarily suspended.
Shows blinking with GPRS
indicator.
Battery indicator. The level of
charge in the battery is indicated
by the degree of dark shading on
the battery indicator. Located in
the right corner of the title area.
Arrows left/right indicate that
scrolling in horizontal direction is
possible. You can, for example,
select pictures one after another
in normal screen.
Body area
Main menu symbol. Press
to enter the main menu.
Incoming call.
A call is in progress.
There is a call on hold.
A data call is in progress.
GPS Area:
GPS symbols
Title Area:
Signal strength
information
Body Area:
Information on
cellular status
and wallpapers
Soft Key Area:
Options and
functionality
Page 3

Guide to keys
Menu key. Press to access the main
menu where all the applications are
located. You can also press and hold
the menu key to swap between open
applications.
Power on/off. Press to turn the
phone on/off.
Volume up. Press to increase
the volume.
Volume down. Press to decrease
the volume.
Emergency key. Rescue button,
located on the top of the phone.
Press to make an alert call to
pre-defined numbers, or launch
telematics application.
Hook-up key. Press to make a
call/answer an incoming call.
Hook-down key. Press to end the call.
Arrow keys. Press to scroll lists and
views and select options. Moving
up/down/right/left depends on the
edge pressed.
Middle key. Press to execute
commands/ go forward/access
options.
Left function key. Quick action key
for most common operations, such
as opening or saving applications
or items.
Right function key. Press to
clear/quit/cancel/go backwards.
Alphanumeric keys (0 - 9). Press to
key in phone numbers/input text.
TWIG Key. Press and hold to start
the TWIG Navigation application.
The navigation key works when the
phone is in stand-by mode. A short
press on this key in TWIG Navigation
application, allows quick access to
TWIG Navigation base menu.
Hash key. Press to access special
functions.
Star key. Press to access special
functions.
Display LED. Shows blinking when
the display light is off. The LED
indicates the status of the phone:
RED LED: Blinks once every 2
seconds when the battery is low.
If there are missed events, and the
battery is low it blinks once a second.
GREEN LED: Blinks once every 2
seconds when power is on and the
phone is in stand-by mode. If there
are missed events, it will blink once
a second.
Display LED indicator can be turned
off in Settings.
Battery. Power source of the phone.
Bottom connector. Socket for
connecting the phone to a
charger/computer.
2
Contents
Getting started
Set up ..............................................4
Turning on the TWIG Discovery ..........5
Setting time and date ........................5
Copying SIM records to
phone memory ..................................6
Partnership/Synchronisation................6
Volume control ..................................6
Navigation
GPS Navigation ................................7
Settings ............................................7
Entering a location ............................8
Setting your home location ................8
TWIG Finder and Alert ......................8
Making a call whilst navigating ..........9
Sending location to a non-TWIG
phone ............................................10
Establishing GPS position ................10
Changing the scale ..........................10
What TWIG displays ........................10
Saving power ..................................10
Additional maps for going abroad......11
Kilometers or miles display ..............11
Favourites v History ........................11
General
Setting Hot/Quick keys ....................12
Menu manager ................................12
Scroll keys ......................................12
Application switch button ................12
Battery management ........................13
Using your TWIG safely in car ..........13
Bluetooth setup ..............................13
WAP set up ....................................14
Messaging ......................................14
Extras ............................................14
Making a call ..................................15
Sending and receiving SMS
and MMS messages ........................15
3
Page 4
Getting started
Memory card
Navigation maps are pre-programmed onto the SD card. You can also use your memory
card as an external storage for e.g. maps, pictures and sounds.
Turning on the TWIG Discovery
Press and hold down the Nupper button on the left hand side for a few seconds.
To turn off, repeat. If the phone asks for a code, key in the code and then press the left
function key to confirm. Use the right function key to correct any mistakes.
The phone will now enter standby mode.
Main menu
To access the main menu press the centre button of the 4-way key nwhen the
phone is idle.
You can also access the main menu when in GPS mode by pressing the Application
Switch button .
Setting time and date
The time and date will be updated automatically when the TWIG gets its first GPS
position. To enter the time/date menu access the Main menu and select Tools>
Settings>Phone and then scroll down to Date and Time and select using Press
n
left/right to select your option.
Setting the time manually
When User Defined is showing on the display press nand then key in the correct
time. Press Enter to save your settings.
Setting the time using GPS
When GPS Defined is showing on display press and then enter your time zone.
Default is +00:00 (GMT).
Setting the date
When User Defined is showing on the display press Enter and then key in the
correct date. Press Enter to save your settings.
5
Getting started
Set up
Inserting cards and battery
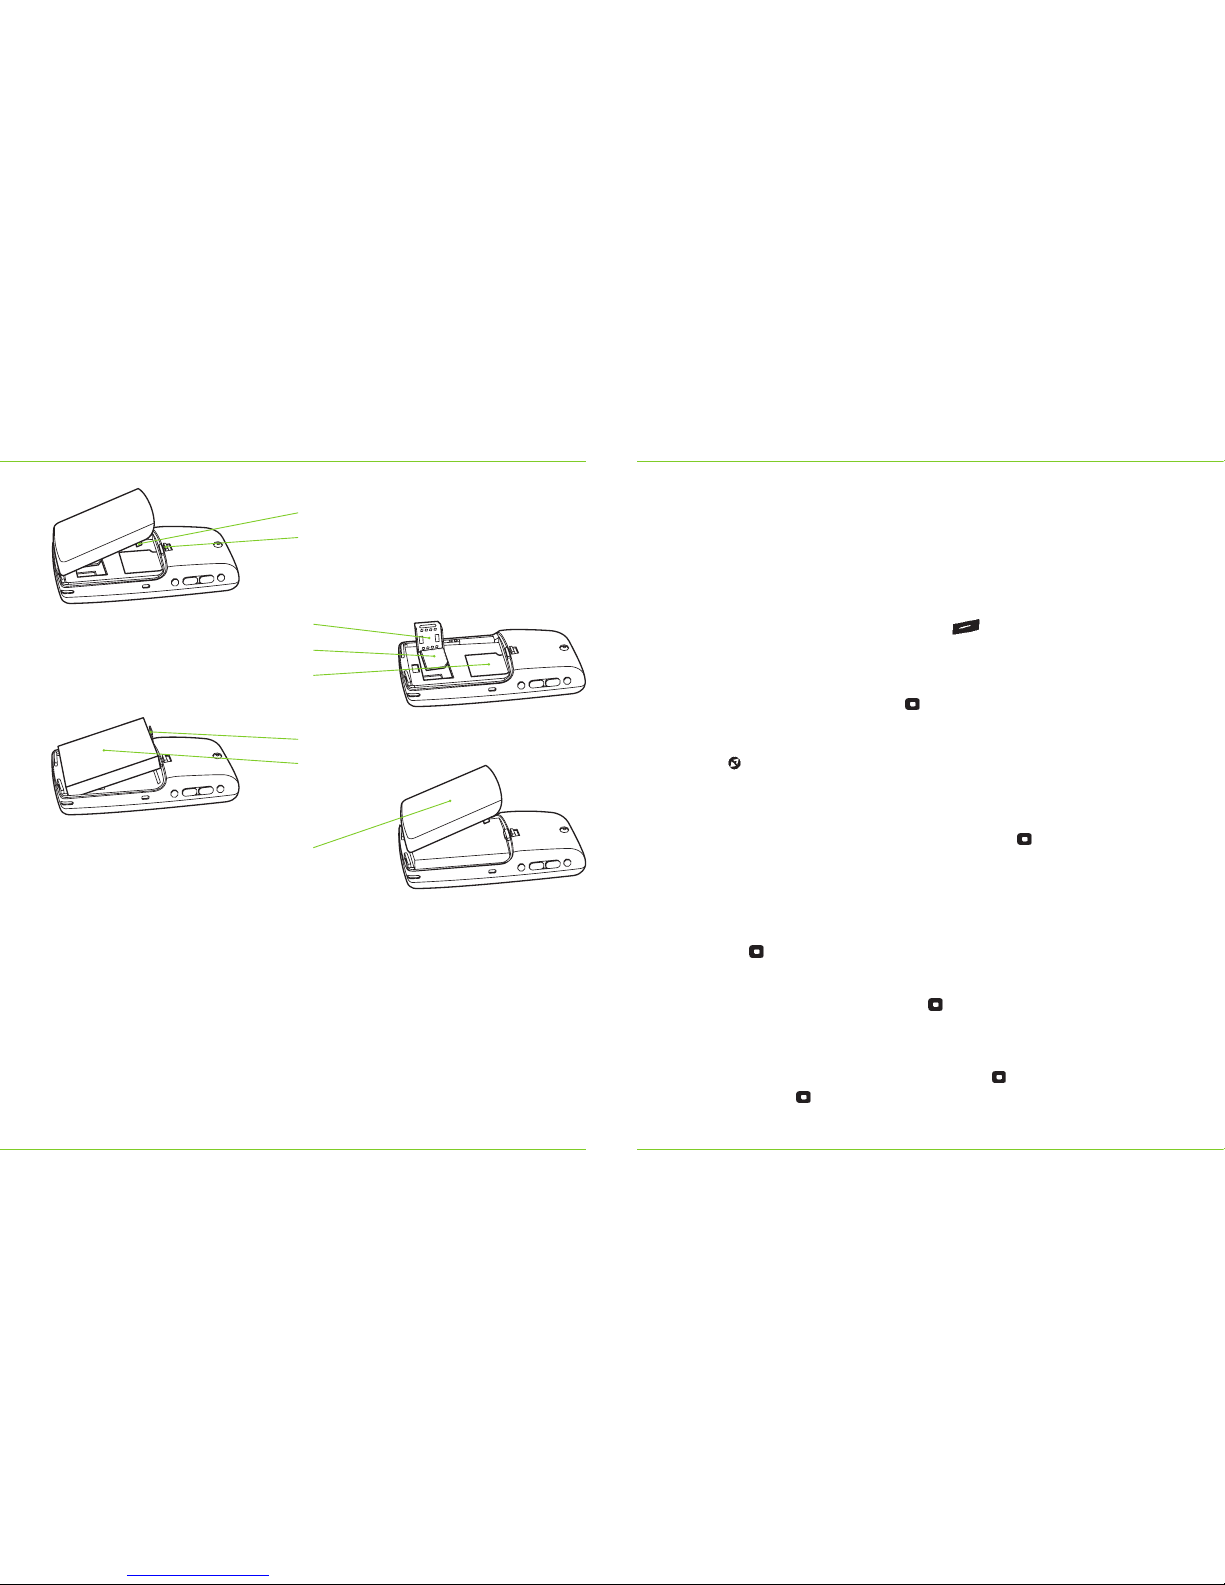
1. Remove cover from the back of the phone.
2. Slide in Memory Card. Place SIM card in slot. Slide holder to the right.
3. Insert battery.
4. Click cover back into place.
5. Charge the battery. Plug charger cable into the round connector hole on bottom
right of the phone.
Note:
The battery icon will appear to indicate charging has begun. It takes 2.5 hours to fully charge
the battery.
4
Side tab
SIM card holder
Memory card holder
SIM card
Back cover release catch
Cover
Battery release catch
Battery
1.
3.
2.
4.
Page 5

Navigation
GPS Navigation
Switching on TWIG navigation
Enter the Main menu and select Navigation
or
Hold down the TWIG/Numeral 8 key 8 for one second and the welcome screen
will start.
Settings
Display
The map can be displayed as a 2D or 3D display. To change display simply use the
left and right arrows n. Once you have selected a route there is a third screen which
shows next navigation instruction.
Setting screen backlight
Enter the Main menu and select Tools>Settings>Phone> Display>Lights>Backlight
When using TWIG in the car powered by the adaptor we recommend Always On
is selected.
Calculation display
TWIG can calculate ETA/Distance/Time etc. Enter the Navigation menu by pressing .
Select Settings>Calculation display and select/deselect ETA, Distance, Time or Speed.
Voice guidance
You can be advised of your route by voice. When in either 2D or 3D map display press
to access TWIG Navigation and scroll down to Settings>Voice Guidance. Here you
can select voice volume and type.
GPS settings
GPS is automatically switched on when navigation is activated, and off when navigation
is deactivated. Press the up arrow nto access the Quick menu and scroll to Set GPS
Profile. Press to set the required profile. Full power is only required when in the car.
Economy power will conserve battery power whilst walking or cycling.
7
Getting started
Copying SIM records to phone memory
Enter the Main menu and select Contacts. At the top of the screen, next to the
heading Contacts you will notice a green function arrow, press the right arrow key and
select SIM Phonebook. The SIM card may take a few moments to be read, depending
on its size. All SIM contacts will be displayed. Scroll down to any contact, and press
Enter scroll down to Copy to contacts, press select All and press .
You can copy one, several or all contacts from the SIM card to phone memory.
Entering a new contact
Press left arrow key n.
Alternatively use the Main menu and select Contacts>New Contact and press Enter.
Add your new contact information, press Save and confirm.
Copy contact entry to SIM
Enter the Main menu and select Contacts. Highlight the contact to copy, press
Enter and select Copy To SIM. Copied to SIM will then be displayed.
Partnership/Synchronisation
You can use the PC Tools provided to make backups and manage your phonebook,
pictures etc. Your TWIG can also sync with Outlook/Lotus Notes and other programmes
on your PC via the enclosed PC/TWIG connection USB lead.
Install the TWIG CD-ROM first.
Volume control
You can adjust the speaker volume during a call or in Navigation mode by using the
volume buttons located on the left hand side of the phone. Alternatively in either 2D
or 3D map display press the .to access TWIG Navigation and scroll down to
Settings>Voice Guidance. Here you can select voice volume.
Sound profiles
To set call alert volume and type press the nbutton up or down to access the
Quick menu. Select Sound Profile and choose from the list presented.
6
Page 6

Navigation
Select the contact you wish to find and press the main button to place a tick in the
box. Then press left soft key Save. Then press the main key and select Find and press
to request their position.
When they accept your request you will receive their position.
Press .Yes to go to the 2D map centered on the partner’s position.
TWIG Alert
Your TWIG can be programmed to make emergency calls or texts to a pre-determined
number. These calls will be made when you press and hold the Alert Key located on
the top edge of the phone.
To set up the TWIG Alert number access the Phone menu and select
Tools>Settings>TWIG Alert. Here you can enter the numbers you wish TWIG Alert to
call or send text messages to. The text message will also contain information about
your location.
The Alert Key can be disabled in the TWIG Alert menu.
This can also be accessed via the web interface via the Services section at
www.benefon.com
Making a call whilst navigating
TWIG allows you to make a voice call while using the navigation system. Hold down the
application menu key for a few seconds (or press it once to access Main Menu and
then select contacts or exit to IDLE and then dial).
Holding down the application menu key will bring up the icons of current programs
that are running (similar to Alt + Tab on a PC). Select Home then access contacts as
previously mentioned. To return to navigation menu when you have finished your call
repeat the initial process i.e. a long press of the application menu button and select
Navigation.
Please Note:
That whilst making a telephone call you will not receive or be able to view navigation
instructions.
9
Navigation
Entering a location
In either 2D or 3D map display press and select Route to to access the TWIG
Routing menu. Hi-light Address and . Your country will already be set as default.
Choose your location by either City, Road, House Number or Postcode.
When you enter a city, road name or postcode, TWIG will attempt to auto complete
using its database. When you have set your location destination, select Route.
Tip:
When entering a postcode – a long hold of the number buttons will prevent you from having
to scroll through the keys choices.
Setting your home location
This will enable you to quickly navigate back to this destination by holding down the
TWIG key 8and selecting route to home. This works only when in the Map screen.
In either 2D or 3D map display press and hold to access the TWIG Navigation
menu and scroll down to Settings>Home>Set Home and press . Enter your home
location details and press OK.
We recommend that you set your home destination immediately.
Tip:
You can also use this function to set a place to return to, for example when parking your car
in an unfamiliar town.
TWIG Finder and Alert
With TWIG Finder you can find the current location of any other TWIG user in your
contacts. TWIG can then display their position on the 2D map, from here you can route
to their given location.
TWIG Finder
In either 2D or 3D map display press and hold the to access the TWIG Navigation
menu and scroll down to select TWIG Finder. Select Find Contact then press the left
soft key and add the contact you wish to find (please note that they must be other
TWIG owners).
Press the left soft key Add and scroll through your contacts.
8
Page 7

Navigation
Always on is recommended when running navigation whilst using the car adaptor.
GPS power
To adjust GPS power settings enter the Main menu and select Tools>Settings>GPS
Profiles and press enter . You can choose from Economy or Full power.
Additional maps for going abroad
Your TWIG can be used abroad. Additional maps can be obtained by visiting the
www.benefon.com e-shop.
Kilometers or miles display
Enter the Main menu and select Tools>Settings>Phone and scroll down to Units and
press enter. Here you can select kilometers or miles as your preferred measurement.
Favourites v History
To make it even easier to use the navigation system, TWIG lets you choose two
shortcuts to finding routes.
Favourites
Here you can store frequent destinations. In either 2D or 3D map display press the
to access the TWIG Navigation menu and scroll down to Favourites and press enter.
Here you can add a new Favourite destination.
If you already have a Favourite stored, then in either 2D or 3D map display select Route
To and then Favourites. You can then select the stored favourite route you require.
History
TWIG remembers your most recent destinations. To find a previous route from either
the 2D or 3D map, display select Route To and then History. You can then select the
past route you require.
11
Navigation
Sending location to a non-TWIG phone
TWIG can use MMS or e-mail to send your location co-ordinates and/or a map picture
of your location to a non-TWIG mobile phone.
In either 2D or 3D map display press the to access the TWIG Navigation menu and
scroll down to Send Map and select using the . Choose either MMS or email and you
will be prompted for the recipient’s details. Either choose from your contacts using Add
or enter a new recipient.
Establishing GPS position
Please note that GPS positioning cannot generally be established from inside
a building.
When you activate TWIG Navigation it will take approximately 40 seconds for the
system to see the satellites and get online. It may take longer on first activation
depending on how visible the satellites are. The system requires at least four satellites
to be visible to enable much greater precision.
To monitor progress you can view the GPS monitor.
Changing the scale
Whilst in map display press the up/down to zoom in and out of the map.
Please Note:
Zoom out functionality is limited in 3D mode.
What TWIG displays
Although TWIG is an accurate navigational aid with roads, it does not show information
such as small tracks, paths, woods, valleys, etc. TWIG is therefore not suitable for use
as an orienteering tool for country walkers.
Saving power
Backlight
To adjust display settings enter the Main menu and select Settings>Display.
In the Display menu scroll down to Backlight and press enter. Here you can choose
whether the backlight is always on or automatically dimmed. By setting the backlight
to a lower brightness power will also be saved.
10
Page 8
General
Battery management
When using TWIG as either a GPS device or as a phone while in-car, TWIG should
be placed on charge using the cigarette lighter socket charger provided.
When on foot or on bicycle economy mode should be selected.
To preserve the life of your battery do not use the phone in extremes of high or low
temperature. High temperatures in particular will accelerate the battery discharging
process. If you are not using the Bluetooth function turn it off, as this will consume
excess power. Refer to GPS Power for further power saving advice.
Using your TWIG safely in car
You should not make or receive phone calls when driving unless the phone is using an
approved hands-free adaptor, for example a Bluetooth headset. Do not use the phone
at refuelling points and other potentially explosive areas. When using the GPS in the
car, place the TWIG in the provided car cradle ensuring the unit can be seen easily
without requiring you to unduly take your attention off the road ahead. At the same
time power the TWIG using the cigarette lighter socket charger provided.
Bluetooth set up
TWIG is equipped with Bluetooth technology to allow it to communicate with other
Bluetooth devices within range. To use the Bluetooth setup menu press the Main
menu and select Tools>Bluetooth and press enter to view the Bluetooth menu.
To link to another Bluetooth device first turn on Bluetooth in the Settings menu in
Bluetooth menu and then go back and choose Paired devices from the settings menu.
You will be prompted to begin a search for local devices, which must have Bluetooth,
enabled and be set to ‘visibility on’ to be detected.
WAP set up
WAP browsing is available depending on your service provider and type of connection.
To set up WAP enter the Main menu and select WAP. TWIG will display No
Connection and then a blank screen. Press enter to go to WAP Menu, scroll down
and select Settings. Enter the Main menu and select Tools>Connection.
Generally your phone will have been pre-programmed by your service provider.
Your provider can also remotely send the required settings to the handset.
13
General
Setting Hot/Quick keys
Hot/Quick keys are a way of accessing TWIG features quickly and in the way you
personally prefer. Please note that doing so may affect guidelines in this document.
There are two methods:
a) Main Menu>Tools>Settings>Phone>Shortcuts. Select quick key actions for the left
and right soft keys and the 4 way navigation key.
b) Long hold the buttons 1 - 9 individually to assign quick dial numbers to each.
However please note buttons 1 and 9 are already assigned to voice mail and TWIG
Navigation. The 8 button is the TWIG key and cannot be reprogrammed.
Menu manager
You can change the way the Menu icons are displayed in order to suit your preferences
using Menu Manager. Enter the Main menu and select Tools>Settings>Phone and
scroll down to Menu Manager and press enter.
Re-arranging icons
Choose Move to rearrange the icons on screen to your preference.
Moving icons to different folders
You can also choose to move icons to different folders, for example to bring a game
up to the first menu screen so it takes less time to access.
You can also create your own folders. To access the customize menu options press
enter whilst in Menu Manager.
Scroll keys
When in the SMS, MMS or email mode you can move the input cursor up, down and
left and right using the n. When in Navigation, Apps Swapper and GPS screens
scrolling sideways is possible, if you see two green arrows in title area.
Application switch button
Hold down the application menu for a few seconds. This will bring up the icons
of current programs that are running (similar to Alt + Tab on a PC).
12
Page 9

General
Messaging
Switching between small letters, capital letters and numbers
Pressing the hash key # allows you to switch input style.
Display Selected Display Selected
ABC Capital letters abc All small letters
Abc Initial capital letters 123 Number mode
Predictive text
You can choose to have TWIG predict the words you intend writing from its own built in
dictionary. To use predictive text you must first set it up. Enter the Main menu and
select Tools>Settings>Phone>Language>Predictive input and select On using the enter
key . When in SMS mode you will notice a blue EN icon in the top right corner of
the screen this signals that Predictive Text in English is activated. Holding down the
hash key will display a list of other available languages. You can turn Predictive text off
again by pressing 1key while writing.
Accepting or changing the word predicted
If the word predicted is correct, press [0 key] or n. If it is not correct press
.
Word to choose another. If you wish to add your own word to the dictionary, press
Teach
.
after inputting your word using the standard entry method.
Special characters
To input common special characters such as ? ! - ) etc, press repeatedly until
the desired character is displayed.
To display the entire range of special characters press and hold then select
the character required and press Enter .
Extras
TWIG can help you manage your life with built in clock, alarms, notepad, calculator
and currency converter.
Enter the Main menu and select Extras. By default Euro is the base currency.
14
General
Making a call
In standby mode simply key in the number required and press l.
To enter a country code for international calling press twice and then key in the
country code i.e. +33 for France. Then enter the local number without the first number
i.e. for 0545 XXX XXX you would remove the first zero. Then press l.
Contacts list
Use left arrow short key
or
To make a call from your contacts list enter the Main menu and select Contacts.
Scroll to the required contact to call and press l.
Sending and receiving SMS and MMS messages
SMS messages are plain text, MMS messages contain images, sounds etc.
Sending a SMS message
In the main screen select Msg>New Message>SMS. Either input the number of the
person you are sending to, or select from your contact list using Add. Use the down
arrow to highlight the message area and create your text message. When ready press
enter and then select Send and press enter .
Receiving a text (SMS) message
In the main screen select Msg>Inbox. The last received message is always at the top
of the list. Select Open to read.
Sending a MMS message
In the main screen select Msg>New Message>MMS. Either input the number of the
person you are sending to, or select from your contact list using Add. Use the down
arrow to select the message area and create your text message.
To add content, highlight the message field and press enter and then select
Send and press enter, select Insert and then choose your content from the
menu options.
15
 Loading...