

Page 1

FABRICATOR 211i & 252i ROLL CAGE ASSEMBLY INSTRUCTIONS
Manual 0-5233
Roll Cage Kit for Fabricator 211i
Part Number: W4015104
Manufacturer: Thermadyne Industries
Address: 82 Benning Street West Lebanon,
New Hampshire 03784 USA
Telephone: 1-800-426-1888 • Fax: 1-800-535-0557
Email: sales@thermalarc.com
www.thermalarc.com
General Information
This document provides a guide for the assembly and installation of the Roll Cage Kit onto the Fabricator 211i/252i
power source. The Roll Cage protects the Fabricator power source case from collision damage plus doubles as a
sturdy hand lifting frame.
NOTE
The Roll Cage Kit is designed to fit the Fabricator 211i/252i power source without any modifications.
NOTE
Only the Roll Cage Kit or Welding Equipment Cart may be fitted to the Fabricator 211i/252i power
source at any one time.
Roll Cage Kit for Fabricator 252i
Part Number: W4015101
Assembly Instructions
!
WARNING
Do Not lift the Roll Cage / power supply via a crane or similar means. The Roll Cage / power supply
should only be lifted by hand.
For an Equipment Cart specically designed for use with the Fabricator 211i or Fabricator 252i plus gas cylinder,
welding gun and various accessories, use Part No. W4015001.
Recommended Tools
12mm or 4mm Open Ended Wrench or 6” Adjustable Wrench
6mm Allen Wrench (Hex Key)
T25 Torx-Bit for power source case screw
Assembly Instructions
WARNING
Unplug the Fabricator power source unit before attaching the Roll Cage Kit.
NOTE
Use the following assembly procedure to attach the Roll Cage to the Power Source. It is difficult to
attach the Power Source to a fully assembled Roll Cage.
© 2012 by Thermadyne Industries
February 3, 2012 1 0-5233
Page 2
FABRICATOR 211i & 252i ROLL CAGE ASSEMBLY INSTRUCTIONS
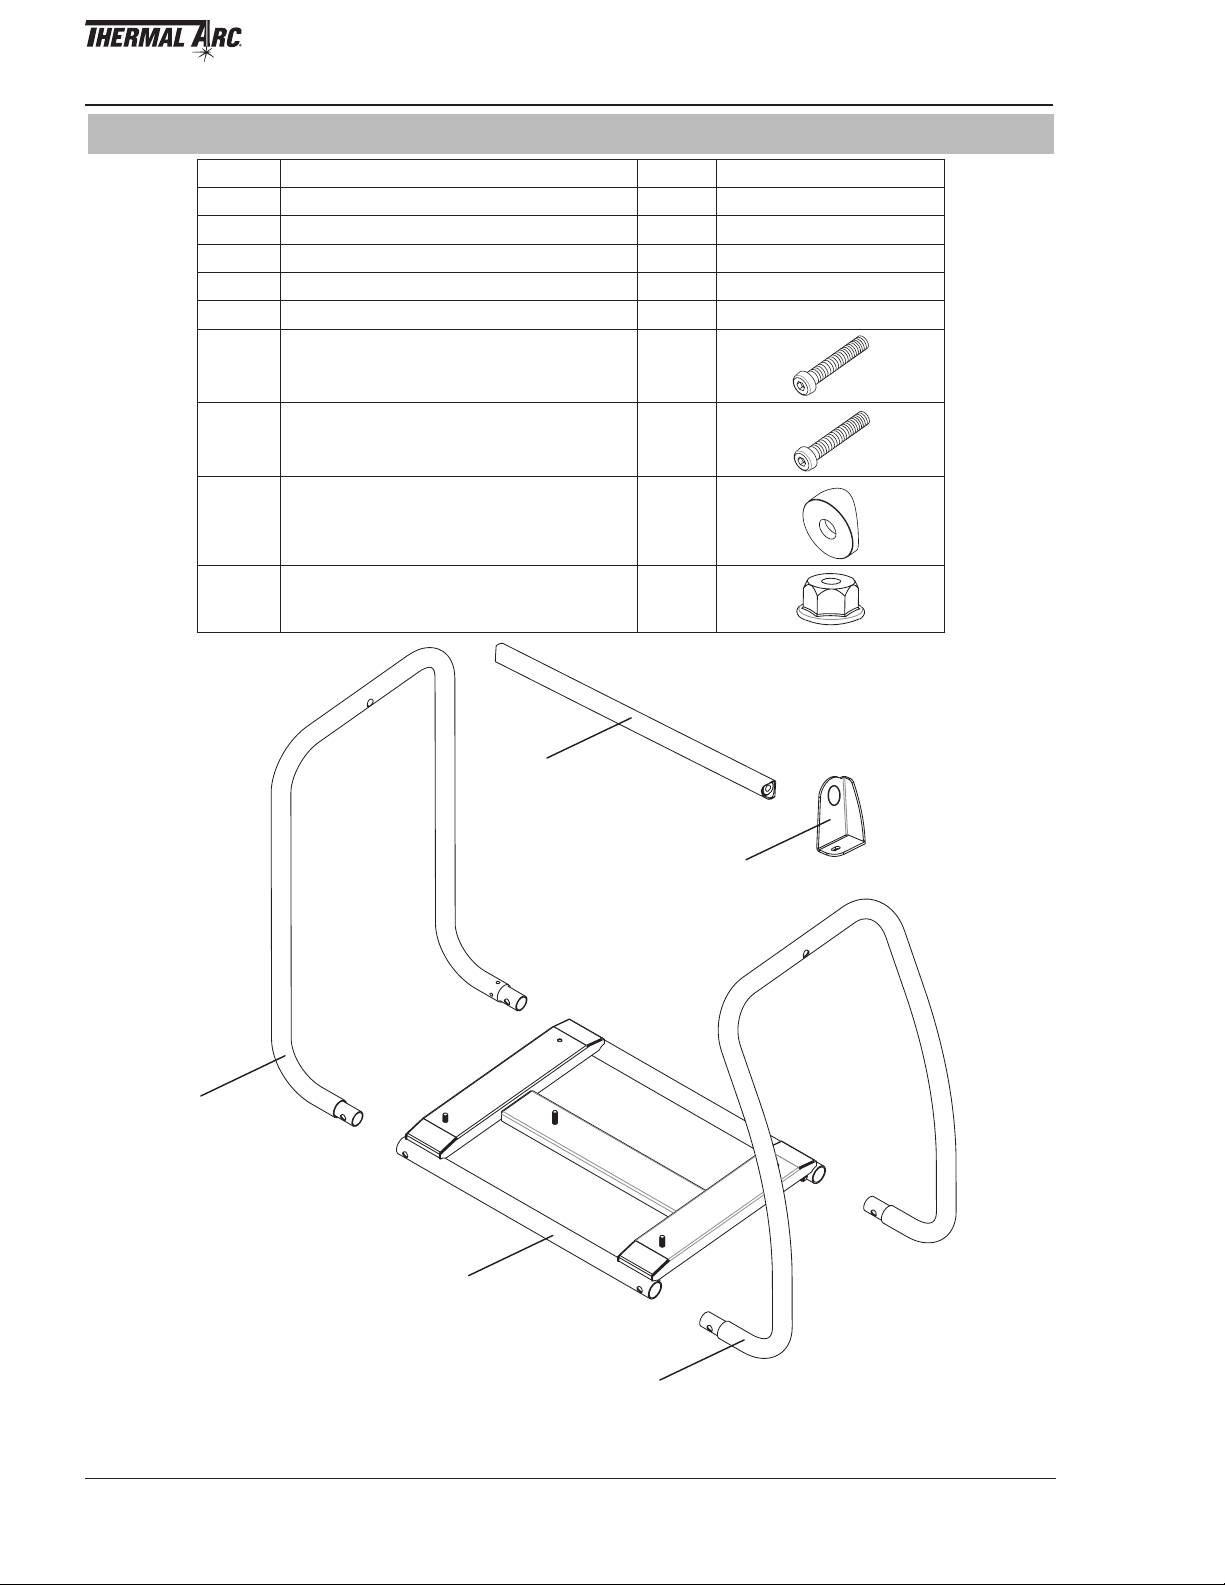
Supplied Parts
Item Description Qty
1 Rear Frame 1
2 Base Assembly 1
3 Front Frame 1
4 Top Support Plate 1
5 Handle 1
M8 x 40mm Socket Cap Screw
6
Torque force: 19 - 22 ft lb (26 - 30 N.m)
M8 x 20mm Socket Cap Screw
7
Torque force: 19 - 22 ft lb (26 - 30 N.m)
Saddle Washer (M8)
8
Nut (M6)
9
Torque force: 14 - 17 ft lb (19 - 23 N.m)
2
4
6
3
5
4
1
2
Art # A-10447
3
February 3, 2012 2 0-5233
Page 3
FABRICATOR 211i & 252i ROLL CAGE ASSEMBLY INSTRUCTIONS
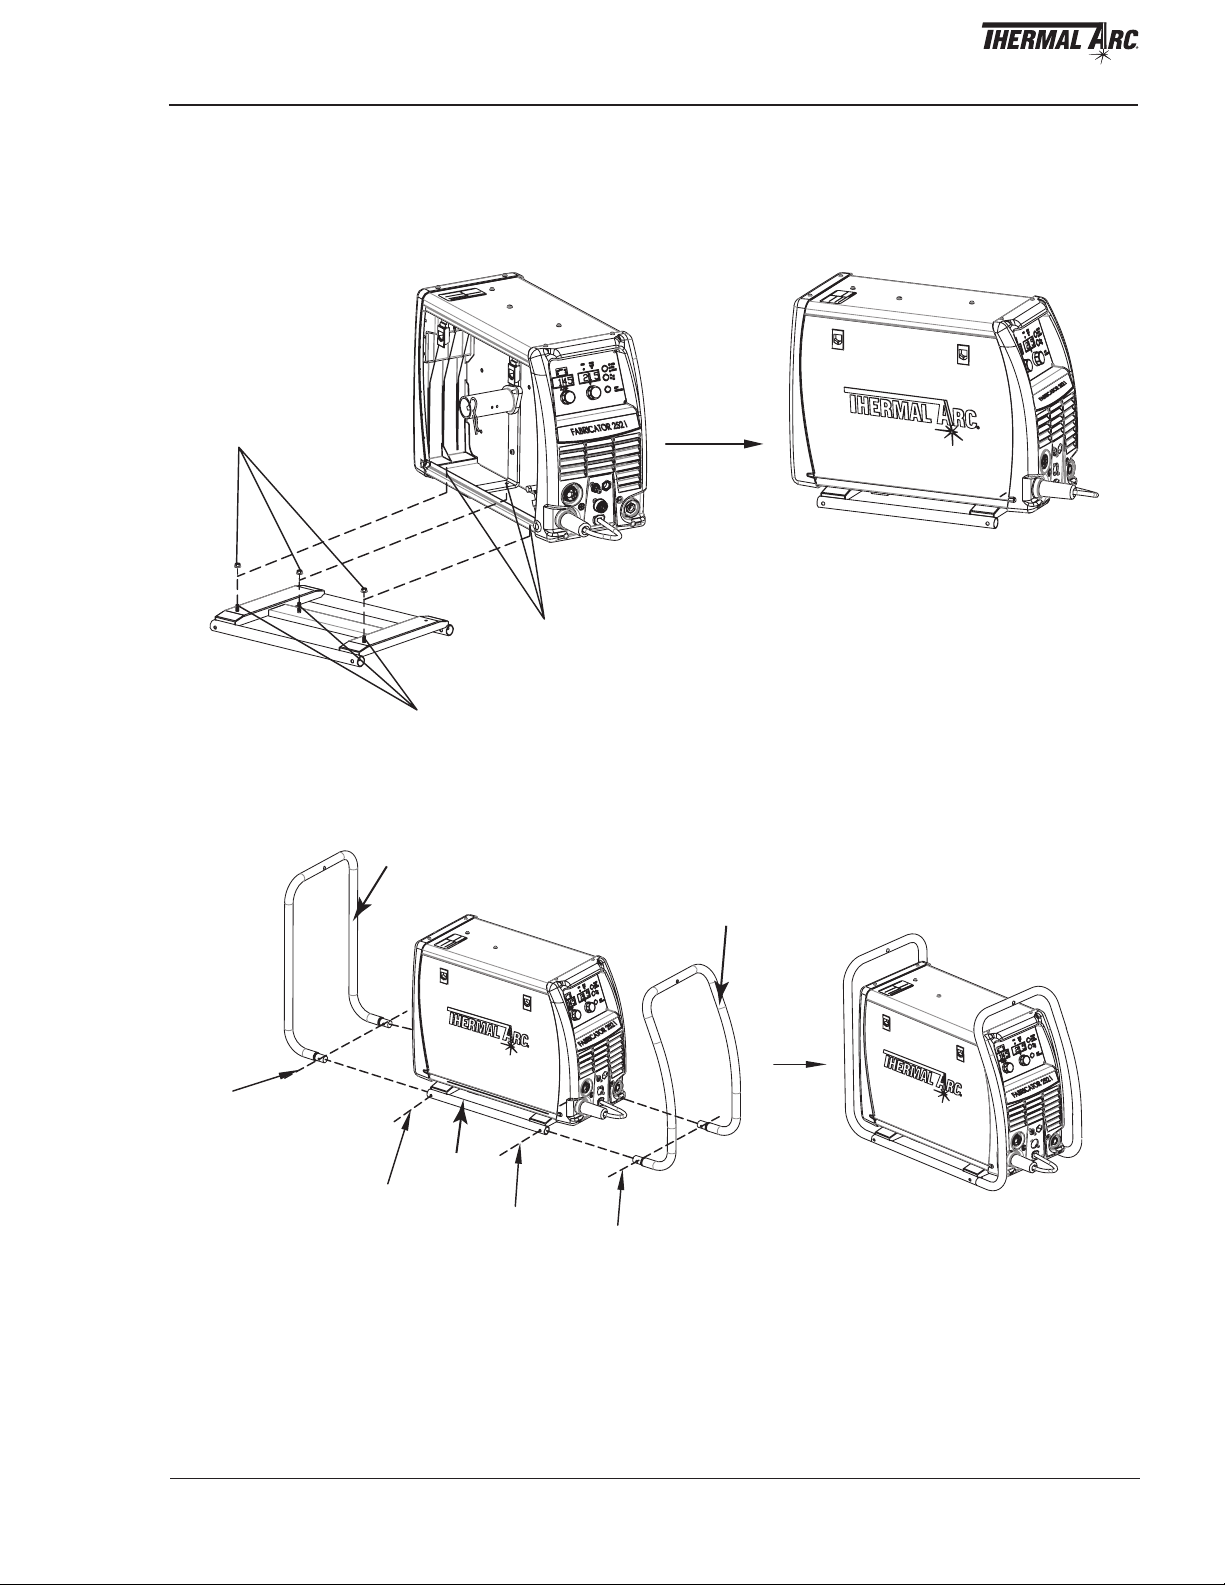
Rear Frame
A. Mount power source to Base Assembly
1. Open the wire feed compartment door and mount the power source to the Base Assembly (Item 2), carefully aligning the 3 mounting studs in the Base Assembly with the 3 holes in the power source.
2. Fasten all 3 M6 Nuts (Item 9) onto the 3 Base Assembly studs to secure the power source onto the roll
cage base.
3 Nuts
3 Holes
3 Studs
B. Install Front and Rear Frames
1. Install the Rear Frame to the Base Assembly and align Axes A with Axes B.
2. Install the Front Frame to the Base Assembly and align Axes C with Axes D.
Axes A
Base Assembly
Axes B
Axes C
Axes D
Art # A-11094
Front Frame
Art # A-11095
February 3, 2012 3 0-5233
Page 4

FABRICATOR 211i & 252i ROLL CAGE ASSEMBLY INSTRUCTIONS
3. Fasten the assembled Roll Cage together, using the following hardware:
Socket Cap Screw (Item 7)
•
• Saddle Washer (Item 8)
Saddle Washer
Socket Cap Screw
Art # A-11096
C. Install Handle to the Roll Cage
1. Remove the Screw from the top cover using the Torx-Bit T25. Keep this screw as it will be reinstalled later
in Step 5.
Specication of the Screw is M6 x 12mm.
Screw
Art # A-10604
February 3, 2012 4 0-5233
Page 5

FABRICATOR 211i & 252i ROLL CAGE ASSEMBLY INSTRUCTIONS
Top Support Plate
2. Insert Handle (Item 5) through hole in Top Support Plate (Item 4).
3. Place the Handle against the Front and Rear Frame with holes on the ends of the Handle aligned with holes
on the Frames.
4. Use fasteners to fasten the Handle and the Frames together.
Fasteners are as follows:
• Socket Cap Screw (Item 6)
• Saddle Washer (Item 8)
Rear Frame
Handle
Saddle Washer
Socket Cap Screw
Front Frame
Art # A-10605_AB
5. Reinstall the Screw (taken out in Step 1) to the Fabricator 211i/252i. Fasten the Screw to secure the power
source to the Roll Cage.
February 3, 2012 5 0-5233
Page 6

FABRICATOR 211i & 252i ROLL CAGE ASSEMBLY INSTRUCTIONS
D. When all the procedures are done, it should look like Figure below:
!
WARNING
Fully tighten all the fasteners (refer to torque force data in Supplied Parts section).
Art # A-10606
February 3, 2012 6 0-5233
Page 7

FABRICATOR 211i & 252i ROLL CAGE ASSEMBLY INSTRUCTIONS
This page left blank intentionally
February 3, 2012 7 0-5233
Page 8

Printed in: China
U.S. Customer Care: 800-426-1888 / FAX 800-535-0557 • Canada Customer Care: 905-827-4515 / FAX 800-588-1714
International Customer Care: 940-381-1212 /
FAX 940-483-8178
•
www.thermalarc.com
W ORLD HEADQUARTERS : 16052 Swingley Ridge Road, Suite 300 • St. Louis, Missouri 63017 U.S.A.
A Global Cutting & Welding Market Leader
THE AMERICAS EUROPE ASIA/PACIFIC
Denton, TX USA
U.S. Customer Care
Ph: 1-800-426-1888 (tollfree)
Fax: 1-800-535-0557 (tollfree)
International Customer Care
Ph: 1-940-381-1212
Fax: 1-940-483-8178
© 2010 Thermadyne Industries, Inc. www.thermadyne.com
Miami, FL USA
Sales Office, Latin America
Ph: 1-954-727-8371
Fax: 1-954-727-8376
Oakville, Ontario, Canada
Canada Customer Care
Ph: 1-905-827-4515
Fax: 1-800-588-1714 (tollfree)
Chorley, United Kingdom
Customer Care
Ph: +44 1257-261755
Fax: +44 1257-224800
Milan, Italy
Customer Care
Ph: +39 0236546801
Fax: +39 0236546840
Cikarang, Indonesia
Customer Care
Ph: 6221-8990-6095
Fax: 6221-8990-6096
Rawang, Malaysia
Customer Care
Ph: +603 6092-2988
Fax: +603 6092-1085
Melbourne, Australia
Australia Customer Care
Ph: 1300-654-674 (tollfree)
Ph: 61-3-9474-7400
Fax: 61-3-9474-7391
International
Ph: 61-3-9474-7508
Fax: 61-3-9474-7488
Shanghai, China
Sales Office
Ph: +86 21-64072626
Fax: +86 21-64483032
Singapore
Sales Office
Ph: +65 6832-8066
Fax: +65 6763-5812
™
 Loading...