

Page 1

User Manual
A breakthrough in personal sound amplification technology
Page 2

Ear Technology Corporation proudly
offers a breakthrough in personal sound
amplification technology: TweakConnect.
TweakConnect is a personal sound
amplifier that pairs the sophisticated
sound processing and easy
personalization of Tweak hearing products
with the most intuitive app on the market.
Other products force you through a
hearing test, then program the hearing
device with an algorithm that THEY
decide is ‘best’ for you. TweakConnect
gives YOU “The Power of Choice,”
enabling YOU to select the settings that
provide the best result for you. With the
app on your smartphone, you can easily
fine tune and further adjust the settings at
a moment’s notice no matter where you
happen to be. Tweak contains the same
components found in high-end hearing
aids that cost thousands of dollars: digital
signal processing, high-end feedback
cancellers, microphones, speakers,
and bio-compatible plastics. It also
incorporates a digital volume control to
give you even more flexibility in different
environments.
TweakHearing.com
A PSAP is a wearable electronic product that is not intended to compensate for
impaired hearing, but rather is intended for non-hearing impaired consumers to
amplify sounds in the environment for a number of reasons, such as for recreational
activities. PSAPs are not intended to diagnose, treat, cure or mitigate disease.
If you think you have an undiagnosed hearing loss or have a
history of excessive wax build-up, consult a hearing healthcare
professional prior to using this product.
TweakConnect FEATURE BENEFIT
Slim profile case with thin tube or
thick tube with ear hook
Comfortable fit, barely visible; package includes a
variety of tips, tubes, and ear hook giving you more
fit and listening options
Sophisticated, innovative, patented
technology
More freedom than ever before, allowing you to
choose your listening preference
Digital processor pre-loaded with 5
acoustic algorithms plus additional
fine-tuning selections
Easily sample settings and make small adjustments
to the selection to achieve best sound
Access to three listening modes:
Quiet, Noise, and Telecoil
Allows you to quickly and easily adapt to different
environments using TweakConnect app or rocker
switch on instrument
Dual microphones Two microphones work together to provide true
directionality
Digital volume control For subtle volume changes within your
amplification profile
Access volume using TweakConnect app or rocker
switch on instrument
Cutting-edge automatic feedback
control
Minimizes “whistling”, while allowing the ear canal
to remain open
Fast-acting sound-activated
compression
Improves audibility of soft sounds and softens
sudden loud sounds
Preset 12 band graphic equalizer Finely adjusted tuning curves, providing smooth,
natural sound, with amplification only where
it’s needed
Uses common #312 battery Powerful performance, yet small and economical
Average battery life: 5 to 7 days
Low battery tone indicator Early warning system so you have time to change
the battery before it quits
Quiet mode (“omni-directional”)
PROGRAM 1
“All-around sound,” for quiet environments
Noise mode (“directional”)
PROGRAM 2
Focused hearing reduces background noise and
clatter in noisy environments.
Telecoil mode
PROGRAM 3
For better hearing on the phone and in looped
environments
Page 3

Contents
6 Box Contents
8 General Description
10 TweakConnect Components
11 Battery Information
12 Preparing for Use
15 Inserting a Battery
16 Phone Settings
17 Downloading and
Installing the App
18 Wearing Your TweakConnect
20 Daily Use
23 Caring for Your
TweakConnect
27 Troubleshooting Tips
33 How to Start Over
35 Warranty and
Owner Information
Page 4

7
6 Box Contents
Box Contents
IMPORTANT —
TweakConnec t app must be downloaded in The App Store. See
page 17 for instructions.
THREE DOMES
ONE 12mm VENTED DOME
TWO CLOSED DOMES
(9mm and 12mm)
TWO 9mm VENTED DOMES
TWO THIN TUBES– 2B, Left and Right
EARHOOK
SOUND TUBE
CLEANING TOOL
EARHOOK ACCESSORIES PACK
THIN TUBE ACCESSORIES PACK
ONE SLEEVE TIP
CLEANING LINE
User Manual
Carrying
Case w/
Amplier
Two
Accessories
Packs and
Batteries
(See opposite
page for details)
Quick Start
Guide
Warranty
Information
BATTERY
CARD (size 312)
TWEAK / CARRYING CASE
Page 5
8 General Description
9
TweakConnect has three
listening modes: Program 1:
omni-directional (for quiet
environments), Program 2:
directional (for noisy
environments), and Program 3:
telecoil (for use with telephone
or loop systems).
The TweakConnect app is used
during initial set up to try out
and then lock in your desired
amplification setting that
becomes your amplification
‘profile’, and it stays with you as
you switch between Quiet, Noise
and Telecoil modes. You can still
fine tune it using the app or the
rocker switch volume control.
The app or the rocker switch is
used to switch between listening
modes for Quiet, Noise, and
Telecoil.
In the section “Wearing Your
TweakConnect” (page 18)
you’ll learn how to position the
instrument on your ear.
General Description
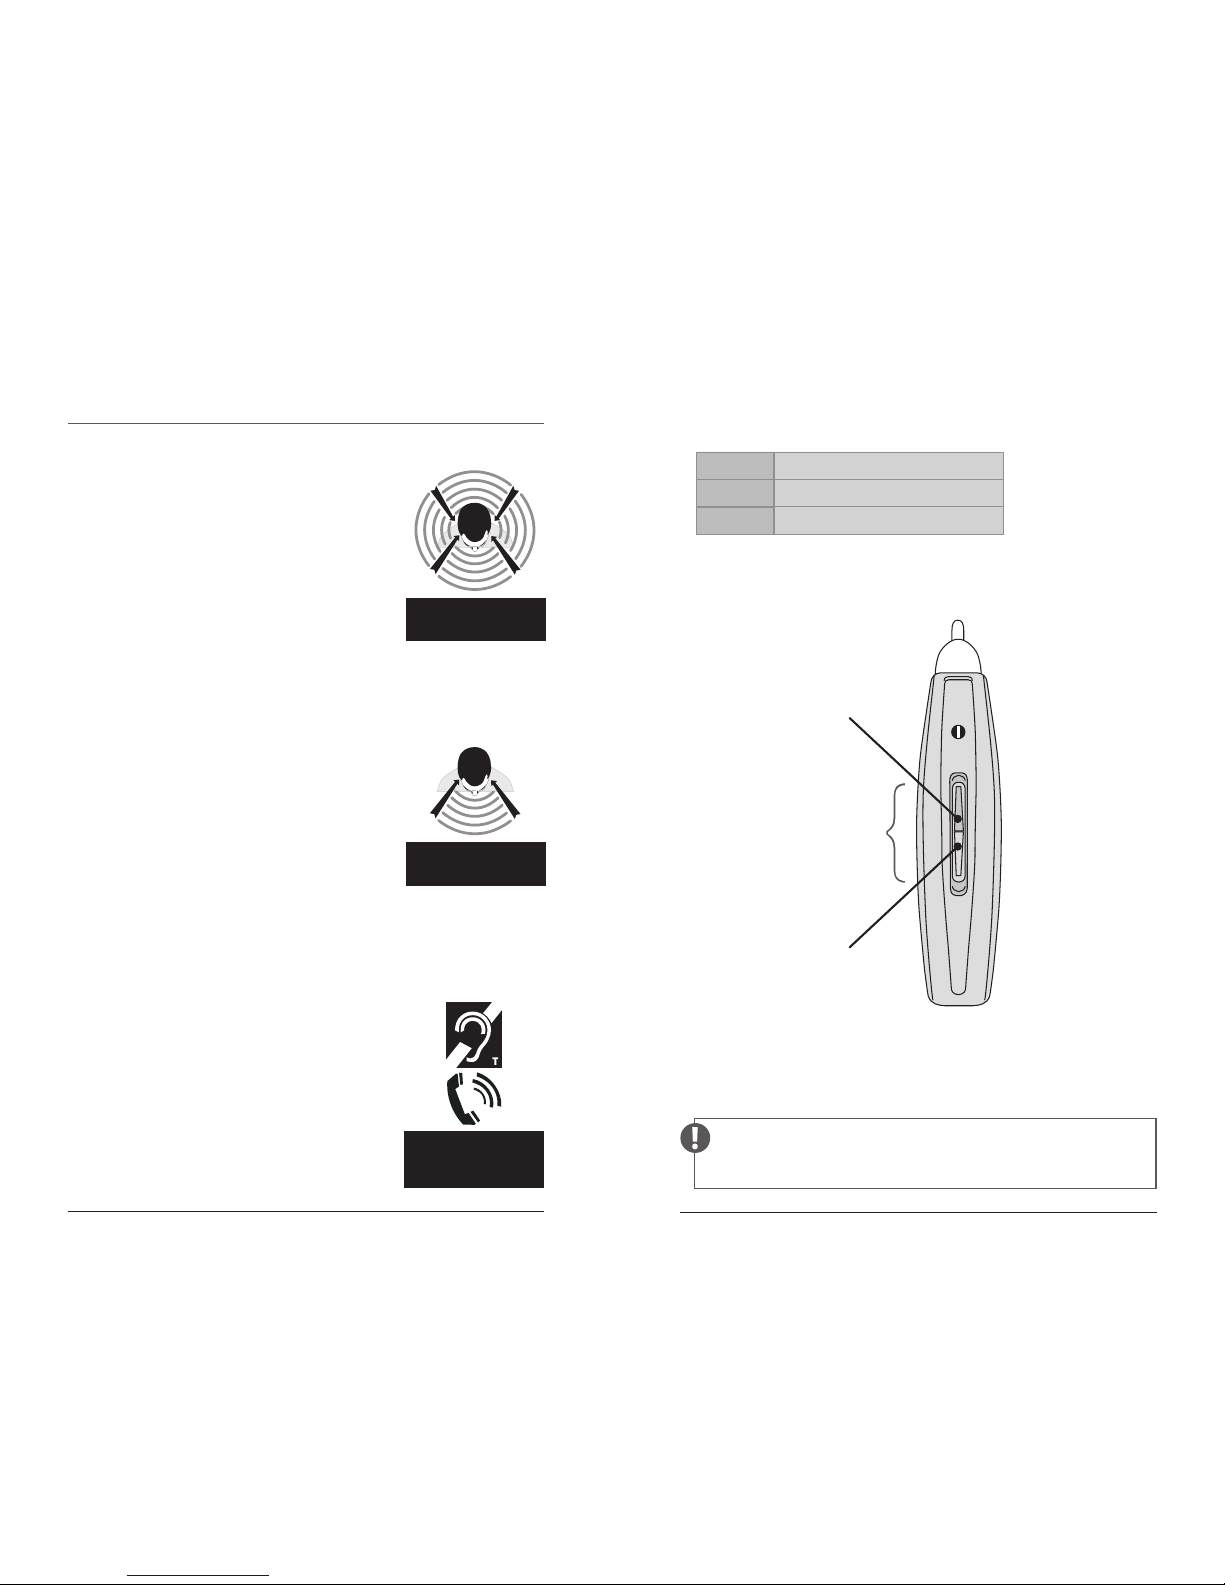
Each time it‘s powered on, TweakConnec t will start in omnidirectional or Quiet mode (Program 1) at 70% volume.
QUIET Voice conrmation “Program 1”
NOISE Voice conrmation “Program 2”
T-COIL Voice conrmation “Program 3”
OMNI-DIRECTIONAL
(all-around sound)
OMNI
PROGRAM 1– QUIET
DIRECTIONAL
(focused listening)
FOCUS
PROGRAM 2– NOISE
HEARING LOOP
(for telephone
or loop systems)
PROGRAM 3–TELECOIL
ROCKER
SWITCH
UPPER
PORTION
LOWER
PORTION
Page 6
10 Components
Battery Information 11
Components
Battery Information
TweakConnect uses a commonly available 312 zinc
air battery. With normal full-time use, the battery will
last approximately five to seven days.
When the battery is depleted, remove and replace
it immediately. When not in use, be sure to turn off
your TweakConnect by opening the battery door
part way.
Low Battery Warning
For your convenience, TweakConnect warns you
when the battery is almost depleted. You will hear a
voice prompt “low battery” which indicates it’s time
to change the battery.
IMPORTANT —
Always discard used batteries. Sma ll
batteries can be harmfu l if swallowed.
Keep bat teries out of reach of pets a nd
small childre n. In case of ingestion, seek
medical attention im mediately and
call (collect, if nece ssary) the National
Battery Ingestion Hotline at
202- 625-3333. For more info visit
www.poison.org/battery
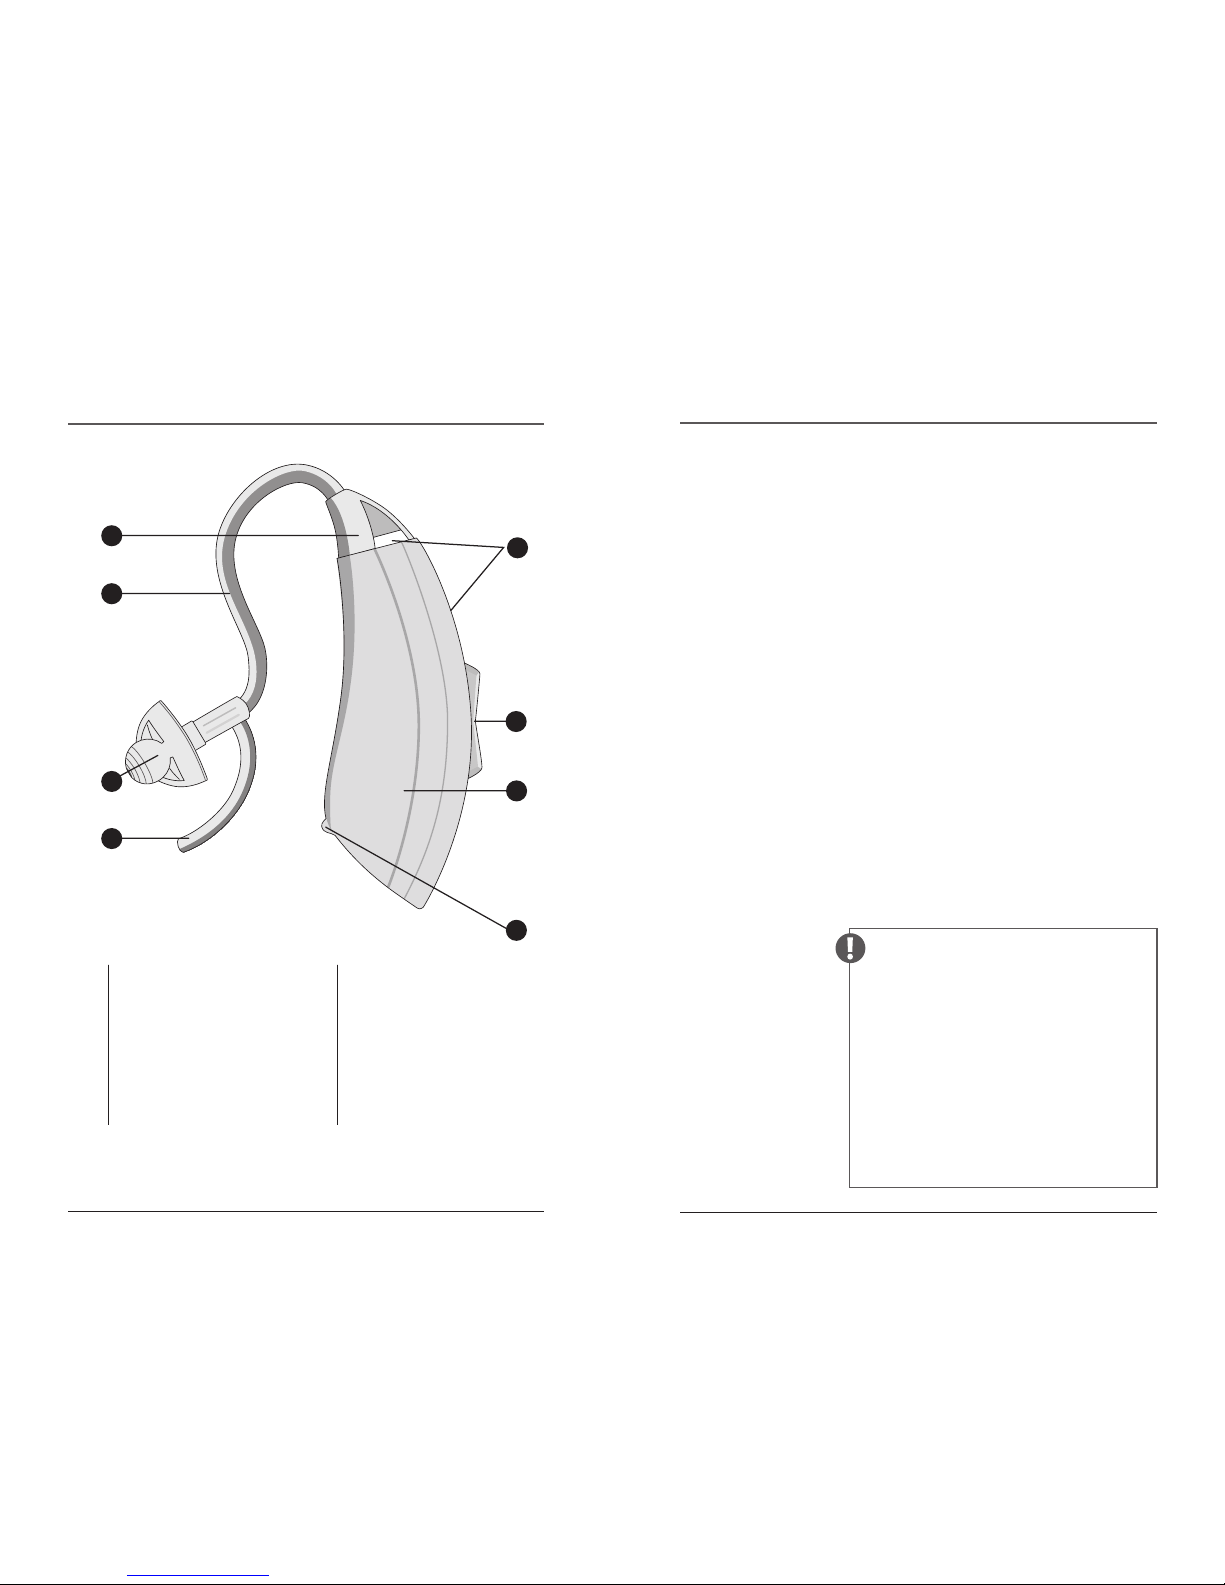
1 RETAINING LOCK
2 DOME (dome or sleeve)
See illustrations on page 7.
3 THIN TUBE (for sound)
4 TUBE CONNECTOR HEAD
5 MICROPHONES
2
1
3
4
5
6
7
8
6 ROCKER SWITCH /
VOLUME CONTROL
7 AMPLIFIER CASE
8 BATTERY COMPARTMENT
DOOR TweakConnect is
turned o by opening the
battery compartment door
part way.
Page 7

12 Preparing for Use–Thin Tube
Preparing for Use–Thick Tube 13
Your TweakConnect package includes
two sets of accessories: 1) a pack of
thin tubes and domes/tips plus,
2) an earhook power accessories
pack. (See page 7 for included
Preparing for Use–Thin Tube Preparing for Use–Thick Tube
grasp the ear tip with one hand
and the tube with the other and
pull the ear tip off. To install the
new ear tip, push it straight onto
the tube.
The larger and closed domes will give you more bass
sound and permit more volume with less chance of
feedback. The smaller domes and sleeve tip give the
greatest comfort and most “open” sound.
Connecting the Thin Tube to the Amplifier
Align the tube connector end
with the end of the amplifier,
then
push the tube straight
onto the sound post.
components.) Text code on the sound tube, near
the tip represents the length of tube (2B) and which
ear. Blue=Left. Red=Right.
Changing the Ear Tip
In order to get the most comfortable fit, you may
want to try the different ear tips. To change, simply
If you’re using the earhook instead of the thin tube,
follow the instructions below.
Connecting the Earhook to the Amplifier
From the earhook accessory pack
(see page 7), choose the earhook
then attach it to the amplifier by
pushing it straight onto the
post
until the two flat surfaces
are flush together.
Position Amplifier and
Sound Tube on the Ear
Position the amplifier with the
attached earhook over the ear as
shown.
Measuring the Sound Tube
Next, insert dome comfortably
into the ear canal and align the
sound tube towards the end of
the earhook as shown. Mark the
location where the sound tube
crosses the earhook.
Page 8

Inserting a Battery 15
14 Preparing for Use–Thick Tube
1 Lift the notch at the edge of
the battery compartment
and swivel open the door of
the battery compartment.
2 Remove the brown-colored
tab on a new battery (size
312). Wait two (2) FULL
minutes for battery to fully
activate.
Insert the battery
with the
positive “
+” side
facing up
.
Notice the “+” on the edge
of the battery door to
assist you in finding the
proper orientation.
Inserting a Battery
ON–When th e battery d oor is comple tely closed, yo ur TweakConnec t is on.
OFF– To turn o ff your TweakCo nnect, ope n the batter y door part w ay.
3 Gently close the battery door. It should close
easily; do not force the door closed.
If resistance is experienced while closing the battery
door, make sure the battery is inserted properly.
When the battery door is completely closed, your
TweakConnect is ready for operation.
Preparing for Use– Thick Tube continued
Trimming the Sound Tube
Remove the amplifer and tube
from your ear and cut the tube
0.2” (3mm) above the mark on
the tube. To assemble simply
slide the tube over the end of
the earhook.
Cut here
Connecting Sound Tube to the Earhook
Attach the tube to the earhook
by pushing the open end of the
tube onto the small end of the
earhook until tight.
Attaching a Dome to the Sound Tube
Choose a dome from the
accessories then attach it to the
thick tube by pushing it straight
onto the tube until snug.
Instruc tional videos ca n be found in the TweakConnect Support
section of TweakHearing.com
Page 9

Downloading and Installing the App 17
16 Phone Settings
Downloading and Installing the
TweakConnect App
Phone Settings
Locate the TweakConnect Smartphone
Application in The App Store
The TweakConnect application (often abbreviated
and referred to as an ‘app’) is currently available only
for the iPhone. Android version is coming soon. The
app is located in The App Store. The App Store can
Enable Wi-Fi on your iPhone
Go to iPhone Settings, select Wi-Fi. On the next
screen, move slider to the right to turn on Wi-Fi.
Close Settings.
Enable Bluetooth on your phone
Go to Settings, tap Bluetooth, slide the On/Off
button to toggle Bluetooth on. Close Settings.
Download and install the app to your phone
In The App Store,
locate the
TweakConnect app.
Select GET to begin
downloading the app.
Once download is complete, launch the app by
tapping it on your iPhone screen, or selecting OPEN
if the app installation
process was left at
that stage.
typically be found on
the main screen of
your smartphone.
Page 10

18 Wearing Your TweakConnect
19
Wearing Your TweakConnect
Place the TweakConnect over
your ear. Grab the loose end
of the tubing and gently insert
the tip into the ear canal. If
you’re using the thin tube,
position the retaining lock in
the bowl of the ear. (Sound
tube used with earhook does
not have a retaining lock.)
Now place the amplifier behind your ear with the
tube (or earhook) wrapped over the top of your ear.
When properly inserted, the tubing will lay close to
the head around the front of the ear and into the
canal. You can check this by moving your finger
down the tubing, into the ear. Using a mirror at first
may be helpful to properly position TweakConnect.
If the loose end doesn’t stay in your ear, you may
need a different length thin tube. Additional
sizes are available at TweakHearing.com or by
calling 1-888-815-3240.
Watch the “First Time Set Up” videos within the app.
Follow initial prompts within the app. For first time
users, watch the videos–tutorials for using the app.
Proceed to set up
Screen commands will walk you through each
of the simple steps to make the sound of your
TweakConnect device exactly what works for you.
Wearing Your TweakConnect continued
Insert
dome
in your
ear canal.
Page 11

20 Daily Use
21
Daily Use
ON When the battery door is completely closed,
your TweakConnect is on.
OFF Open the battery door part way to turn off
your TweakConnect.
TweakConnect:
Once you have locked in your preferred
listening profile, you have three listening modes
available – Quiet, Noise, and Telecoil. You have two
ways to switch between the programs– digitally by
using the app, or manually, on the device.
Using your smartphone: open the TweakConnect
app. Main Menu will appear–select the desired
program by touching the appropriate button.
If changing programs using the instrument: press
and hold the rocker switch for THREE (3) seconds
then release. Pressing and holding the upper rocker
switch advances to the next program. Pressing
and holding the lower rocker switch reverts to the
previous program.
Whether you use the app or the rocker switch to
change programs, you will hear a voice confirmation
verifying the program change: “Program One” for
Quiet, “Program Two” for Noise, and “Program Three”
for Telecoil.
In all three programs, you can still adjust the volume.
The volume can be adjusted through the app or
using the rocker switch on the device.
Using your smartphone: open the TweakConnect
app. Select Volume Control from the Main Menu.
Move the slider to adjust the volume, then select
“Done”.
Page 12
22 Daily Use
Caring for Your TweakConnect 23
Daily Use continued
Adjusting the volume on the Tweak instrument:
quickly tap the upper portion of the rocker switch
to your increase the volume. Quickly tap the lower
portion to decrease the volume. With each tap of
the rocker switch you will hear a confirmation beep
as you increase or decrease the volume level.
Be sure to keep your TweakConnect dry at all times.
See page 23 for additional tips on caring for your
TweakConnect.
IMPORTANT: To extend the ba ttery life, tu rn off your
TweakConnec t by opening the batter y door whenever the device
is not in use.
Caring for Your TweakConnect
The following instructions will assist in extending
the life of your TweakConnect amplifier.
Cleaning the Exterior
You should inspect and clean your TweakConnect
every day. To clean, gently wipe the surface with a
soft, dry cloth or a moist non-alcohol disinfecting
wipe. Do not allow water or liquid to enter any
openings.
The most common causes of amplifier problems are
moisture and wax. The daily use of a Dry & Store®
appliance is recommended to reduce moisture
and wax buildup. Dry & Store products may be
purchased at www.dryandstore.com.
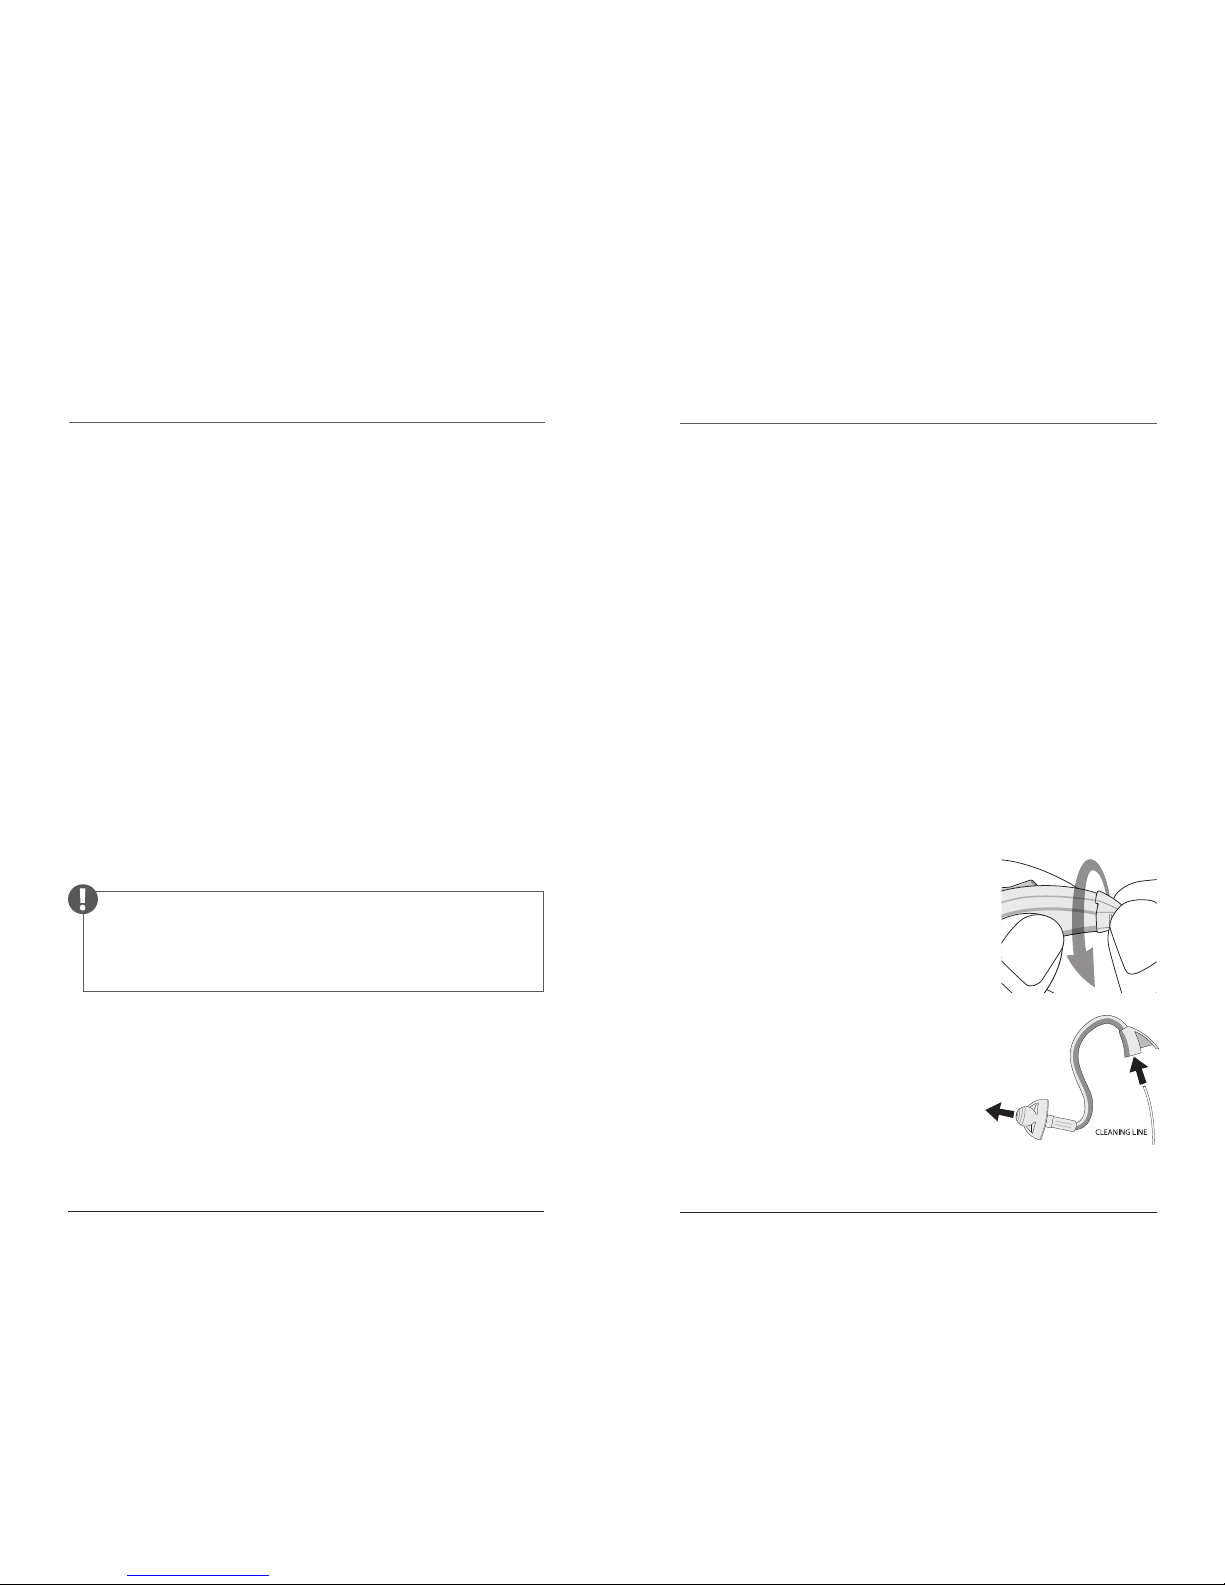
Cleaning the Tip and Tube
Remove the tube from the
case by
twisting the tube
connector at least 45° then
pulling it off
. Use the same
method for an earhook.
Wipe the exterior of the tube
and tip. Use the cleaning line
provided to clean the tube and
tip, by pushing the cleaning line
through the tube. A brush is
also included for cleaning debris from the dome tip.
Page 13

24 Caring for Your TweakConnect
25
(Insert the cleaning line at the connector end where
the tube attaches to the amplifier case and push out
through the tip.)
Re-attach the tube by aligning the tube connector
end with the end of the amplifier case, then
push
the connector straight onto the sound post until
it snaps into place
. There is no need to rotate the
tube when re-attaching.
Do not rinse or submerge these parts in water.
IMPORTANT:
Do not use cleaning line while tube is attached to device.
Tube must be detached from the instrument before cleani ng.
There is a risk of damage if a water
drop becomes trapped in the tube. If
this should occur, it will prevent sound
from coming through the tube and
may be harmful to TweakConnect’s
electronics.
* Drying appliances by Dry & Store include the DryMax®,
DryMax-UV, Global II, Zephyr, DryDome,® or DryCaddy.®
Changing the Tube and Tip
The tube and tip should be changed periodically,
typically 2 or 3 times per year. When the tube or tip
become soft, discolored, kinked, or damaged, obtain
replacements by calling 1-888-815-3240 or visiting
TweakHearing.com
When you change the tip, make sure it is securely
fastened to the sound tube before inserting it in
your ear.
Extended Storage
If it is necessary to store your TweakConnect
amplifiers for an extended amount of time, follow
these steps:
Remove the batteries. Clean your TweakConnect
according to instructions in this manual. A full
cycle in a drying appliance* by Dry & Store® is
recommended prior to extended storage. Place
TweakConnect in an airtight container with a
desiccant such as a Dry-Brik® or DryCaddy® disc.
Then store in a cool, dry place.
Caring for Your TweakConnect continued
Page 14

DO
DON’T
26
Troubleshooting Tips 27
Do Place your TweakConnect amplifiers in a dryer
by Dry & Store every night to remove moisture and
prevent corrosion.
Do Always carry spare batteries.
Do Safely store TweakConnect when not in
use. Keep out of reach of small children and
pets. In particular, dogs may be irritated by the
feedback (“whistling”) sound and attracted by
the owner’s scent. This often results in a chewed
and/or ingested device. (A drying appliance by
Dry & Store is recommended for storage whenever
TweakConnect is not being worn.)
Don’t Leave TweakConnect on the radiator, near a
stove, in a sunny window, in a car or in any other
hot place. Excessive heat or cold can damage the
instrument.
Don’t Wear TweakConnect when using a hair dryer
or when at the beauty salon, spa or barber.
Don’t Apply hair spray when wearing your
TweakConnect. It can damage the microphone or
other components.
Don’t Wear TweakConnect while taking a bath,
shower, spa treatment or while swimming.
Don’t Store TweakConnect in the bathroom during
a shower or near a steam room, as moisture created
by the steam may cause damage.
Troubleshooting Tips
No Sound or Not
Loud Enough
Ensure that the batter y door is closed.
Replace the battery.
Make sure the tip/dome is not clogged.
Make sure the amplifier case and tubing are
clean and dry.
Make sure that the amplifier case is
positioned properly behind the ear, and that
the tip/dome is positioned properly in the
ear canal.
Make sure the volume is turned up, by
tapping the upper portion of the rocker
switch.
Remove the sleeve tip and attach one of the
dome tips. Try the vented dome first, and if
still not enough sound, try the closed dome.
Be sure to secure the tip/dome. See page 12.
Excessive ear wax can prevent sound from
entering the ear. Contact your physician.
Changes in your hearing can affect how you
hear with TweakConnect. Contact a hearing
healthcare professional if you suspect any
change in your hearing condition.
Your TweakConnect may need to be reset
for more volume. See page 33 (“How to Start
Over”) for instructions
Page 15

28 Troubleshooting Tips
29
Troubleshooting Tips continued
Whistling
(“Feedback”)
Your TweakConnect has a best-in-class
feedback management system. However,
when your hand is near the device, you
may hear a whistling noise, which is called
“feedback.” This may be caused by amplified
sound bouncing off your hand back into the
instrument. The noise usually quits when
you take your hand away.
If the whistling doesn’t stop once you’ve
moved your hand away, ensure that the
amplifier case is positioned properly behind
the ear, and that the tip/dome is positioned
properly in the ear canal.
Try adjusting the volume. Tap the lower
portion of the rocker switch to decrease
volume.
Consider using one of the domes instead
of the sleeve tip. If feedback continues,
consider using one of the more closed
domes or change to an earhook with a
dome.
Your TweakConnect may need to be reset.
See page 33 (“How to Start Over”) for
instructions.
If the above fails to reduce feedback, call
TweakConnect Support at 1-888-815-3240.
Sound is
Distorted,
Unclear,
Intermittent or
has Static Noise
Replace the battery.
Make sure the tube and tip/dome are not
clogged. (Refer to page 23 for cleaning
instructions.)
Make sure the amplifier is clean and dry.
We recommend nightly use of a drying
appliance by Dry & Store to remove
moisture and prevent corrosion.
If you are near an electromagnetic field
(e.g. near a computer screen or fluorescent
lights), step away to see if the static clears.
Your TweakConnect may have a poor
batter y contact or may not be set up
properly. Call TweakConnect Support at
1-888-815-3240.
Page 16

30 Troubleshooting Tips
31
Troubleshooting Tips continued
TweakConnect
app freezes while
programming
If the app freezes while you’re still
programming the device, it will be
necessary to start over.
First, turn off the TweakConnect device
you’re currently programming by opening
the battery door. Wait 10 seconds then close
the battery door to power on the device.
The app should recognize the device and
continue with programming.
If the steps above do not allow you to start
programming again, try the following. Turn
off the device (if programming two devices,
turn off both) by opening the battery door.
Close the TweakConnect app then restart
the app. Follow the prompts on the screen,
closing the device battery door when
specified and continue to program the
device(s).
If you’re still having trouble with the app
and/or device(s), turn off the device(s)
and close the app. On your iPhone, go to
Settings > Bluetooth. Below MY DEVICES
there will be one (possibly two) devices
named “L200B”. Beside each of these at the
far right, you will see the “i” (information
icon). Touch the blue “i” and the options
for the device will appear. At the top of the
screen, select “Forget This Device”. When
prompted to confirm this action, select
“Forget Device” again (at the bottom of the
screen). Remember to do this for both
devices if you’re programming two. Close
Settings.
Restar t the TweakConnect app. Follow the
prompts on the screen, closing the battery
door when instructed and continue to
program the device(s).
Lastly, follow the instructions in step 3
above, adding an additional step. After
you’ve “forgotten” the devices in Bluetooth
Settings, delete the TweakConnect app
from your iPhone. Reinstall it from The
App Store then launch the app and start
programming.
Page 17

32 Troubleshooting Tips
How to Start Over 33
How to Start Over
After wearing TweakConnect for a while, you may
decide you want to try a different Amplification
Profile than the one you initially selected. However,
if you simply want more bass sound, remove the
sleeve tip and attach one of the dome tips instead.
This may resolve the issue and resetting is no longer
necessary.
TweakConnect may be reset by selecting the “Start
Over” option on the Main Menu of the app.
Troubleshooting Tips continued
Connection
Problems
Make sure the amplifier has a working
batter y inside and the bat tery compartment
door is fully closed.
Place amplifier on your ear and press the
upper portion of the rocker switch and
listen for any beeps or voice prompts.
Since Bluetooth has a limited connection
range, make sure the amplifier is near the
smartphone – within 4 feet.
If TweakConnect app is still unable to
connect to the amplifier, replace the battery.
The app may no longer connect to the
amplifier if the battery is low.
Restar t the TweakConnect app. Turn the
amplifier off and back on by opening then
closing the battery door.
If you are still experiencing connection
problems, call TweakConnect Support at
1-888-815-3240.
Page 18

34
Warranty
See warranty card for more information.
Owner information
Each TweakConnect has a serial number (S/N)
located on the battery compartment door.
Please record this serial number in the owner
information section below.
Owner Name: ________________________________________
TweakConnect Purchase Date: ___________
LEFT RIGHT
Serial Number
Color
Amplification Setting
Selected
This page is intentionally left b lank.
Page 19

TweakHearing.com
1-888-815-3240
A PSAP is a wearable electronic product that is not intended to
compensate for impaired hearing, but rather is intended for non-hearing
impaired consumers to amplify sounds in the environment for a number
of reasons, such as for recreational activities. PSAPs are not intended to
diagnose, treat, cure or mitigate disease.
If you think you have an undiagnosed hearing loss or have a history of
excessive wax build-up, consult a hearing healthcare professional prior to
using this product.
worldwide patents: www.eartech.com/patents
A breakthrough in personal sound amplification technology
TWCONN USER MNL 0319 Rev C
 Loading...