

Page 1

Instruction Manual
www.TweakHearing.com
A sound amplifi er for people who are not ready for a hearing aid.
®
Page 2

Contents
4 General Description
5 Components
6 Battery Information
7 Preparing for Use
8 Inserting a Battery
10 Wearing Tweak Mini
11 Set-Up
13 Daily Use
14 Care
17 Do’s and Don’ts
19 Troubleshooting Tips
22 How to Reset
23 Owner and Warranty Information
Congratulations on your Tweak® Mini purchase.
Tweak Mini is a personal sound amplifi cation
product (PSAP). We know your new Tweak Mini
will soon be indispensable to you. With amazing
sound quality, Tweak Mini delivers both confi dence
and comfort so that you never miss a moment!
Tweak Mini is a sophisticated sound amplifi er
utilizing innovative, patented technology that
allows you to select and set your desired
amplifi cation setting from a range of acoustic
alternatives. Developed by an audiologist in
conjunction with a team of acoustic engineers,
Tweak Mini can help you hear better in group
settings, restaurants, theatres, meetings, and other
challenging listening environments.
Please read this manual for complete
set-up and operating instructions before using
your new sound amplifi er.
www.TweakHearing.com
Page 3
TuneAmp FOCUS SET-UP (continued)General Description
4 General Description Components 5
TIPS
Tweak Mini has a single microphone that picks up sounds
from all directions. We call it “all-around sound.” It is ideal for
quiet listening environments.
Your Tweak Mini package includes two thin tubes (Right
and Left) in a size that fi ts most users. The thin tube delivers
amplifi ed sound from Tweak Mini into your ear.
The rocker switch on the back of Tweak Mini is used during initial set up to
lock in your desired amplifi cation setting. Once your amplifi cation selection is
made, the rocker switch also serves as a volume control, so you can still fi ne
tune it for different situations.
During set-up you’ll learn how to position the Tweak on your ear and how to
pick your favorite amplifi cation setting. Your Tweak Mini package includes:
2 Small (1B) Tubes (Right and Left) with Sleeve Tips pre-installed
1 Large (10 mm) Vented Dome Tip
1 Large (12 mm) Closed Dome Tip
It is important for the sound tube and tip to fi t properly in your ear.
If you need a different length tube or different size tip, please call
1-888-815-3240 for assistance, or visit www.TweakHearing.com.
Now, let’s get started!
TUBES
X-Small 0B
Small 1B
Medium 2B
Large 3B
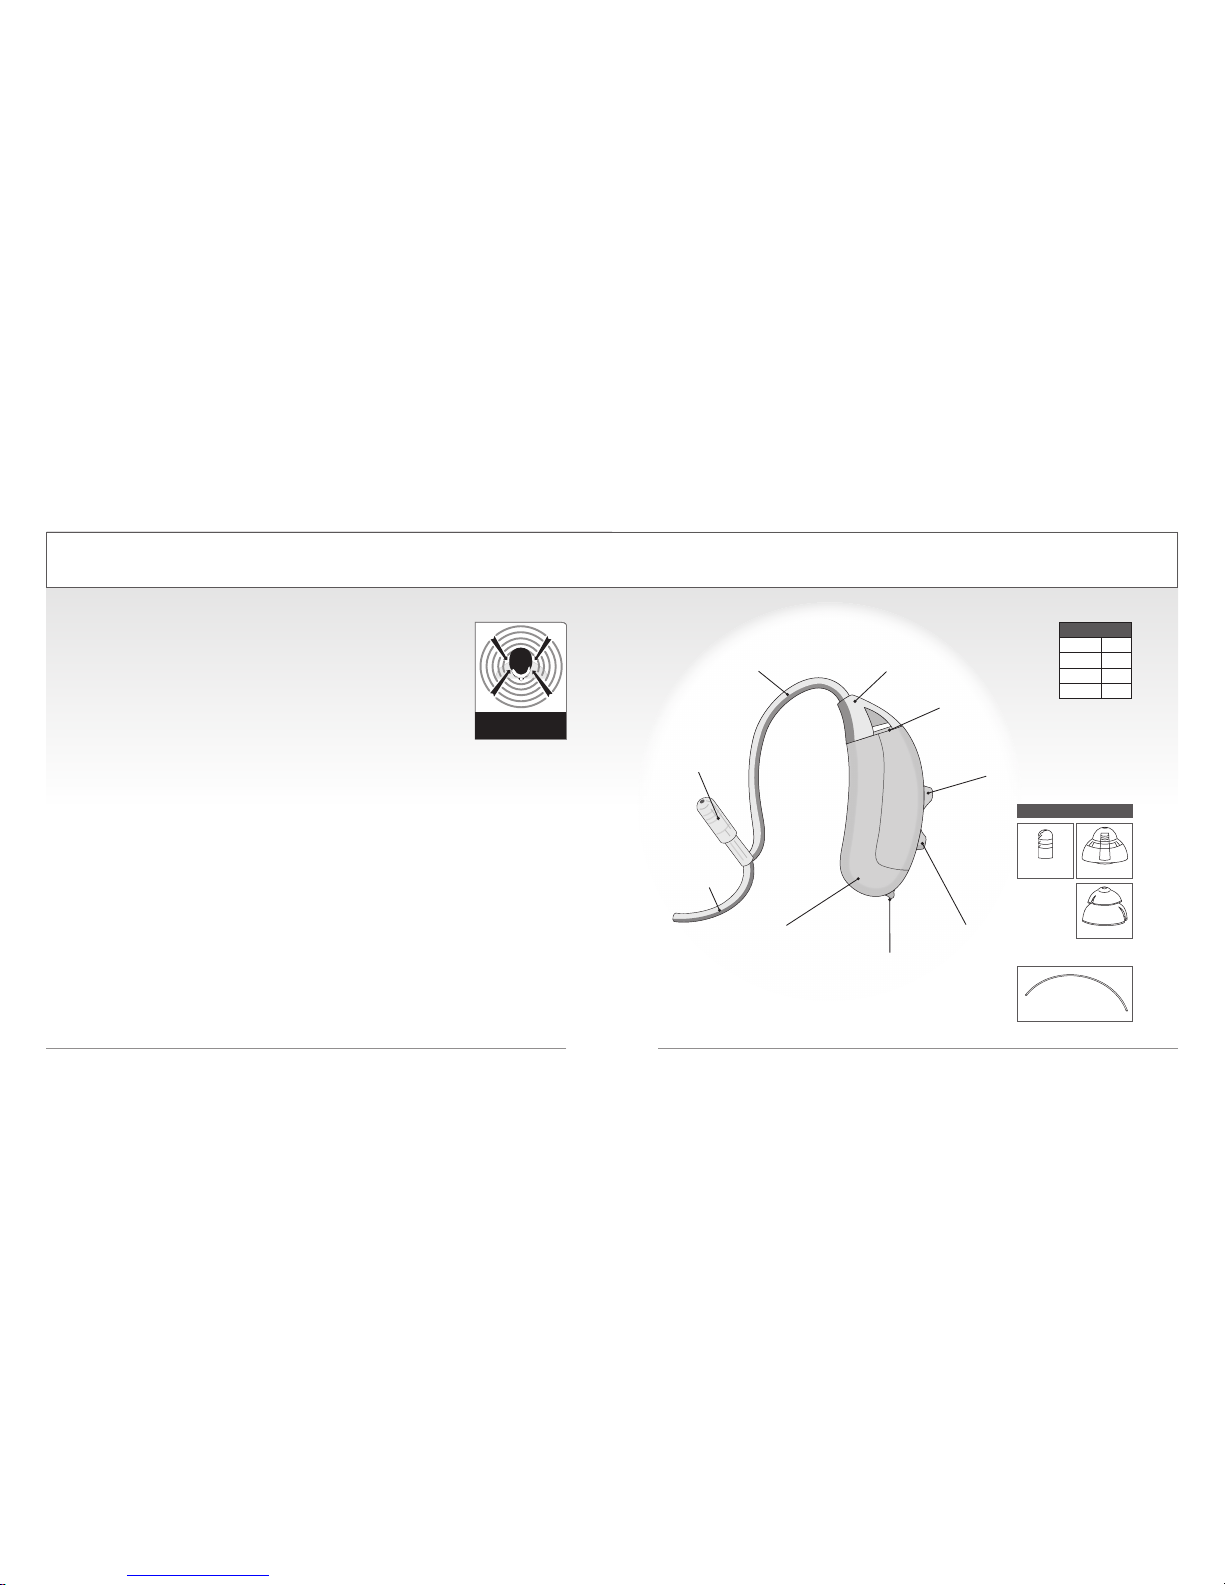
Components
OMNI-DIRECTIONAL
(all-around sound)
OMNI
THIN TUBE
(for sound)
TIP
(Sleeve or Dome)
See illustrations at right
RETAINING
LOCK
TUBE CONNECTOR HEAD
MICROPHONE
ROCKER SWITCH / LOWER
ROCKER SWITCH / UPPER
AMPLIFIER CASE
BATTERY COMPARTMENT DOOR
Turn off your Tweak Mini by opening the
battery compartment door part way.
VENTED DOME
CLOSED DOME
CLEANING LINE
SLEEVE
Page 4

Battery Information
FIGURE 2FIGURE 1
6 Battery Information Preparing for Use 7
Tweak Mini uses a 10A zinc air battery.
With normal full-time use, the battery will last
approximately fi ve days.
When the battery is depleted, remove and
replace it immediately. Replacements may be
purchased at www.TweakHearing.com
When not in use, be sure to turn off your
Tweak Mini by opening the battery door part
wa y.
(FIGURE 3, PG. 8)
Low Battery Warning
For your convenience, Tweak Mini warns you
when the battery is almost depleted. You will
hear three sets of double beeps every 10 minutes,
indicating it’s time to change the battery. Once the
voltage drops below 0.95V, Tweak Mini emits six
sets of double beeps, then shuts down.
Important —
Always discard
used batteries.
Small batteries
can be harmful
if swallowed.
Keep batteries
out of reach of
pets and small
children. In case
of ingestion, seek
medical attention
immediately and
call (collect, if
necessary) the
National Battery
Ingestion Hotline
at 202-625-3333.
For more info visit
www.poison.org/battery
Tweak Mini comes with two thin tubes, one for your right ear and one for
your left ear. “Sleeve” tips are already installed on these tubes, so all you
have to do is pick either a right or a left tube, and connect it to the amplifi er
case.
Tubes are marked with red lettering for the right and blue lettering for the
left.
(F IG URE 1)
Align the tube connector end with the end of the case, then push the tube
straight onto the sound post until it snaps into place.
(FIG URE 2)
Text represents size of tube.
Color of text indicates right
or left. Red=right, Blue=left
TIPS
Preparing for Use
VENTED DOME
CLOSED DOME
SLEEVE
Page 5

Inserting a Battery
ON–When the battery door is
completely closed, your
Tweak Mini is on.
OFF–To turn off your Tweak Mini,
open the battery door part way.
FIGURE 3
FIGURE 4
FIGURE 5
8 Inserting a Battery Inserting a Battery 9
1 Lift the notch at the edge of the battery compartment and swivel
open the door of the battery compartment.
(FIGU RE 3)
2 Remove the yellow-colored tab on a new battery (size 10A).
Insert the battery with the positive “+” side facing up.
(FIGURE 4)
3
Gently close the battery door. It should close easily; do not force
the door closed.
(FIGURE 5)
If resistance is experienced while closing the battery door, make sure the
battery is inserted properly. When the battery door is completely closed,
your Tweak Mini is ready for operation.
Page 6

Wearing Tweak Mini
FIGURE 6 FIGURE 7
10 Wearing Tweak Mini Tweak Mini Set-Up 11
Place the Tweak Mini over your ear. Grab the loose end of the tubing
and gently insert the tip into the ear canal. Position the retaining lock in the
bowl of the ear.
(FIGURE 6) It may be helpful to gently pull the top of the ear
back and up, to open the ear canal when inserting the tip.
When properly positioned, the tubing will lay close to the head around
the front of the ear and into the canal. You can check this by moving your
fi nger down the tubing, into the ear.
Using
a mirror at fi rst may be helpful to properly
position Tweak Mini.
Now it’s time to set up your Tweak Mini.
The fi rst step is to choose your preferred
amplifi cation setting. It’s what makes Tweak
so unique, and it’s easy to do.
(If the tip doesn’t stay in your ear, you
may need a different length tube. Additional
sizes of tips and tubes are available at
www.TweakHearing.com or by calling
1-888-815-3240.
Select Your Amplifi cation Setting
With a fresh battery inserted and Tweak Mini properly placed in your ear,
you are now
ready to choose your preferred amplifi cation setting.
Start out in a quiet environment. The fi rst time you turn on Tweak Mini, it will
be at the lowest amplifi cation setting. How does it sound?
To try the next level of amplifi cation, press and release the top part of the
rocker switch
(FIGURE 7). You will hear two beeps, indicating you are now at
Amplifi cation Setting Two.
What you are doing is
sampling the available
acoustic settings. There
are four different settings
for you to try.
You can press either the upper or lower portion
of the rocker switch to try out the different
amplifi cation settings. Take as long as you want
to try the different settings.
Amplifi cation
Setting
Number of
Beeps
ONE 1 beep
TWO 2 beeps
THREE 3 be eps
FOUR 4 be eps
Tweak Mini SET-UP
UPPER
PORTION
LOWER
PORTION
ROCKER
SWITCH
Insert tip
in your
ear canal.
RETAINING
LOCK
Page 7

Tweak Mini SET-UP (continued)
12 Tweak Mini Set-Up Daily Use 13
Dome tip options: If you decide you want more bass
sound, try replacing the sleeve tip with the vented dome tip
included with your Tweak Mini package. If you are hearing
feedback (whistling), replace the tip with the closed dome
tip. Caution:
If you change the tip, be sure the tip is securely
fastened on the tube before inserting it in your ear.
Lock in your Preferred Amplification Setting
After you decide which Amplification Setting you like best, your next step
is to lock in that setting.
Press and HOLD
the rocker switch for ten seconds, until you hear a long
beep. (Pressing and holding either the upper or lower portion of the rocker
switch locks in your setting.)
Congratulations! Your setup is complete. You have locked in your
preferred amplification setting. From now on, Tweak Mini remembers which
amplification setting you picked.
If you decide later that you want to reset your Tweak Mini to a different
amplification setting, see page 22.
Tweak Mini is so easy to use, and it’s smart, too.
Once you’ve completed the inital set-up, your Tweak Mini will start at your
favorite setting every time you turn it on.
Plus, for different listening environments, you can still “tweak” the volume up
or down, using the rocker switch.
To increase volume: press the upper portion of the rocker switch.
To decrease volume: press the lower portion of the rocker switch.
Note:
To extend the battery life, turn off your Tweak Mini by opening the
battery door whenever the device is not in use.
OFF – Open the battery door part way to turn off your Tweak Mini.
ON–When the battery door is completely closed, your Tweak Mini is on.
Important: Be sure to keep your Tweak Mini dry at all times. See page 17
for additional tips on caring for your Tweak Mini.
Daily Use
Page 8

Care
CLEANING LINE
FIGURE 10
FIGURE 9
14 Care Care 15
The following instructions will assist in extending the life of your Tweak Mini
amplifi er.
Cleaning the Exterior
You should inspect and clean your Tweak Mini every day. To clean, gently
wipe the surface with a soft, dry cloth or a moist non-alcohol disinfecting
wipe. Do not allow water or liquid to enter any openings.
The most common causes of amplifi er problems are moisture and wax.
The daily use of a Dry & Store
®
appliance is recommended to reduce
moisture and wax buildup. Dry & Store products may be purchased at
www.TweakHearing.com or www.DryandStore.com
Cleaning the Tube and Tip
Wipe the exterior of the tube and tip every day. A
thorough cleaning of the tube and tip is recommended
every few days to prevent wax buildup.
Use the cleaning line provided to clean the inside of
the tube and tip, by pushing the cleaning line through
the tube.
(FIGURE 9)
First, remove the tube from the case by
twisting the tube connector at least 45°
then pulling it off.
(FI GU RE 10)
Insert the line at the connector end where
the tube attaches to the amplifi er case
and push out through the tip.
Re-attach the tube by aligning the
tube connector end with the end of the
amplifi er case, then push the connector
straight onto the sound post until it snaps into place. There is no need to
rotate the tube when re-attaching.
Do not rinse or submerge these parts in water. There is a risk of damage
if a water drop becomes trapped in the tube. If this should occur, it will
prevent sound from coming through the tube and may be harmful to
Tweak Mini’s electronics.
Page 9

Care (continued)
16 Care Do’s and Don’ts 17
Changing the Tube and Tip
Tweak Mini comes with two standard tubes (small/1B, right and left.)
The tube and tip should be changed periodically, typically 2 or 3 times
per year. When the tube or tip become soft, discolored, kinked, or
damaged, obtain replacements by calling 1-888-815-3240 or visiting
www.TweakHearing.com/shop/
(Remember to order tips when placing
your order for tubes.)
To change the tip, simply pull it straight off the tube and push the
replacement straight on. Caution: Be sure the tip fits tightly on the tube
before inserting it in your ear. See previous page for instructions on
removing and reattaching the tube.
Extended Storage
If it is necessary to store your Tweak Mini amplifiers for an extended
amount of time, follow the steps below:
Remove the batteries. Clean your Tweak Mini according to instructions
in this manual. A full cycle in a Dry & Store
®
appliance is recommended
prior to extended storage. Place Tweak Mini in an airtight container with
a desiccant such as a Dry-Brik
®
or Dry Caddy® disc. Then store in a cool,
dry place.
DO place your Tweak Mini amplifiers in a dry and secure place
every night. An electronic Dry & Store
®
appliance is recommended
for the most effective way to remove moisture, prevent corrosion,
reduce wax buildup, and extend the life of your Tweak Mini.
DO always carry spare batteries.
DO safely store Tweak Mini when not in use. Keep out of reach
of small children and pets. In particular, dogs may be irritated
by the feedback (“whistling”) sound and attracted by the owner’s
scent. This often results in a chewed and/or ingested device.
(Dry & Store
®
is recommended for storage whenever Tweak Mini is
not being worn.)
DO clean tube and tip 2 or 3 times per week with the cleaning
line provided.
(SEE PAGE 14.)
DO change tubes and tips every 4 to 6 months.
Do’s and Don’ts
Page 10

Do’s and Don’ts (continued)
18 Do’s and Don’ts Troubleshooting Tips 19
DON’T leave Tweak Mini on the radiator, near a stove, in a sunny
window, in a car or in any other hot place. Excessive heat or cold
can damage the instrument.
DON’T wear Tweak Mini when using a hair dryer or when at the
beauty salon, spa or barber.
DON’T apply hair spray when wearing your Tweak Mini. It can
damage the microphone or other components.
DON’T wear Tweak Mini while taking a bath, shower, spa
treatment or while swimming.
DON’T store Tweak Mini in the bathroom during a shower or
near a steam room, as moisture created by the steam may cause
damage.
No Sound
or Not Loud
Enough
Ensure that the battery door is closed.
Replace the battery.
Make sure the tube and tip are not clogged– use the cleaning
line just to be sure. (See pages 14-15.) This is the most common
reason for users to have little or no sound.
Make sure the amplifier case and tubing are clean
and dry.
Make sure that the amplifier case is positioned properly behind
the ear, and that the tip is positioned properly in the ear canal.
Make sure the volume is turned up, by depressing the upper
portion of the rocker switch.
Excessive ear wax in the ear can prevent sound from entering the
ear. Contact your physician.
Changes in your hearing can affect how you hear with Tweak
Mini. Contact a hearing healthcare professional if you suspect
any change in your hearing condition.
Your Tweak Mini may need to be reset. See page 22
for instructions.
Troubleshooting Tips
Page 11

Troubleshooting Tips (continued)
20 Troubleshooting Tips Troubleshooting Tips 21
Sound is
Distorted,
Unclear,
Intermittent
or has Static
Noise
Replace the battery.
Make sure the tube and tip are not clogged– use the cleaning
line to be sure. (Refer to pages 14-15.)
Make sure the amplifier is clean and dry. We recommend nightly
use of a Dry & Store appliance to remove moisture, prevent
corrosion, and reduce wax buildup.
If you are near an electromagnetic field (for example, a computer
screen or fluorescent lights), step away to see if the static clears.
Your Tweak Mini may need to be reset. See page 22 for
instructions. Once reset, repeat steps on page 11 and choose
a lower Amplification Setting. (Example: If you’re currently on
Amplification Setting 3, consider Amplification Setting 2.)
Your Tweak Mini may have a poor battery contact or may not be
set up properly. Email info@TweakHearing.com or call
1-888-815-3240 Monday - Friday 8 am- 5:30 pm ET.
Whistling
(“Feedback”)
Your Tweak Mini has a best-in-class feedback management
system. However, when your hand is near the device, you may
hear a whistling noise, which is called “feedback.” This may be
caused by amplified sound bouncing off your hand back into
the instrument. The noise usually quits when you take your hand
away.
If the whistling doesn’t stop once you’ve moved your hand away,
ensure that the amplifier case is positioned properly behind the
ear, and that the tip is positioned properly in the ear canal.
Try adjusting the volume. Tap the lower portion of the rocker
switch to decrease volume.
Make sure the tube and tip are not clogged– use the cleaning line
to be sure. (Refer to pages 14-15.)
Try using one of the provided domes.
Your Tweak Mini may need to be reset. See page 22 for
instructions. Once reset, repeat steps on page 11 and choose
a lower Amplification Setting. (Example: If you’re currently on
Amplification Setting 3, consider Amplification Setting 2.)
If the above fails to reduce feedback, email
info@TweakHearing.com or call 1-888-815-3240
Monday - Friday 8 am- 5:30 pm ET.
Page 12

How to Reset
22 How to Reset Owner and Warranty Information 23
Owner information
Each Tweak Mini has a serial number located on the underside
of the amplifi er. Please record this serial number in the owner information
section below.
After wearing Tweak Mini for a while, you may decide you want to try a
different Amplifi cation Setting than the one you initially selected.
Tweak Mini may be reset by following these simple steps:
1 With a battery inserted, open the battery door.
2 Press and hold the top or bottom part of the rocker switch.
3 While still pressing and holding the rocker switch, close the
battery door.
4 Continue pressing the rocker switch for at least 25 seconds, then
release the rocker switch.
5 Open the battery door.
6 When you close the battery door again, Tweak Mini is reset.
You may now proceed to select a new Amplifi cation Setting.
See page 11 for instructions.
Owner Name: _________________________________________________
Tweak Mini Purchase Date: _______________________________________
Place of purchase: _______________________________________________
Warranty
See warranty card for more information.
LEFT RIGHT
Serial Number
Color
Amplifi cation Setting
Page 13

www.TweakHearing.com
1-888-815-3240
A PSAP is a wearable electronic product that is not intended to compensate for impaired
hearing, but rather is intended for non-hearing impaired consumers to amplify sounds in
the environment for a number of reasons, such as for recreational activities. PSAPs are not
intended to diagnose, treat, cure or mitigate disease.
If you think you have an undiagnosed hearing loss or have a history of excessive wax buildup, consult a hearing healthcare professional prior to using this product.
worldwide patents: www.eartech.com/patents
TW MINI_INS ENG 0115
 Loading...