

Page 1
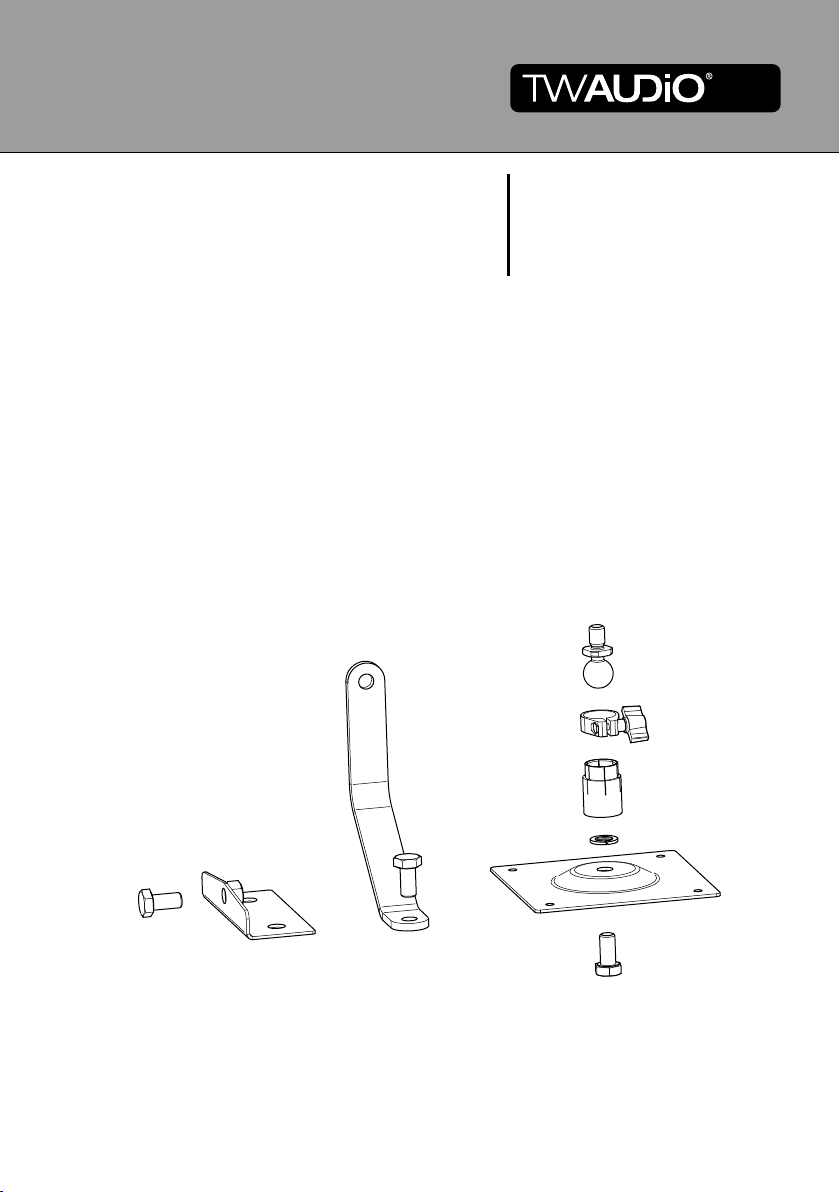
Assembly ManualMKC5
Page 2
- ENGLISH -
Contents
1. Safety | Intended use........................................................ 27
2. Purchased parts package................................................. 29
3. Wall plate.......................................................................... 30
4. Adapter bracket................................................................ 34
5. Mounting bracket.............................................................. 38
6. Disposal............................................................................ 45
Introduction
Thank you for choosing a high quality product „MADE IN GERMANY“ from TW AUDiO.
MKC5 is an mounting kit for the loudspeaker C5.
The features of this accessory kit are its uncomplicated quick handing, its unobstrusive look and its
ratio in size and weight.
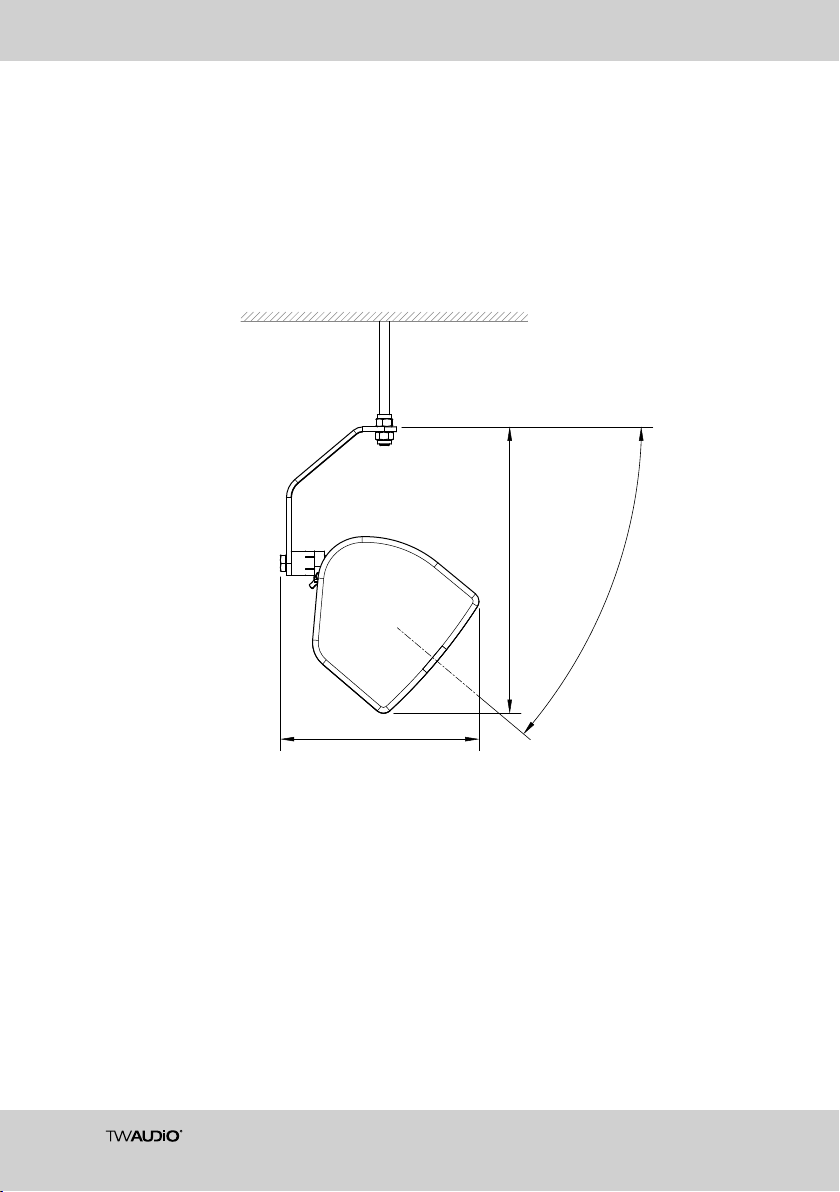
If you lend your product to another par ty, inform that par ty of the safety-related handling procedures
and hand over this assembly manual. Additional copies of the manual can be obtained through
TW AUDiO free of charge or downloaded directly from our website: www.twaudio.com
24
Page 3
Assembly Manual / MKC5
TIP
Introduction in the assembly manual
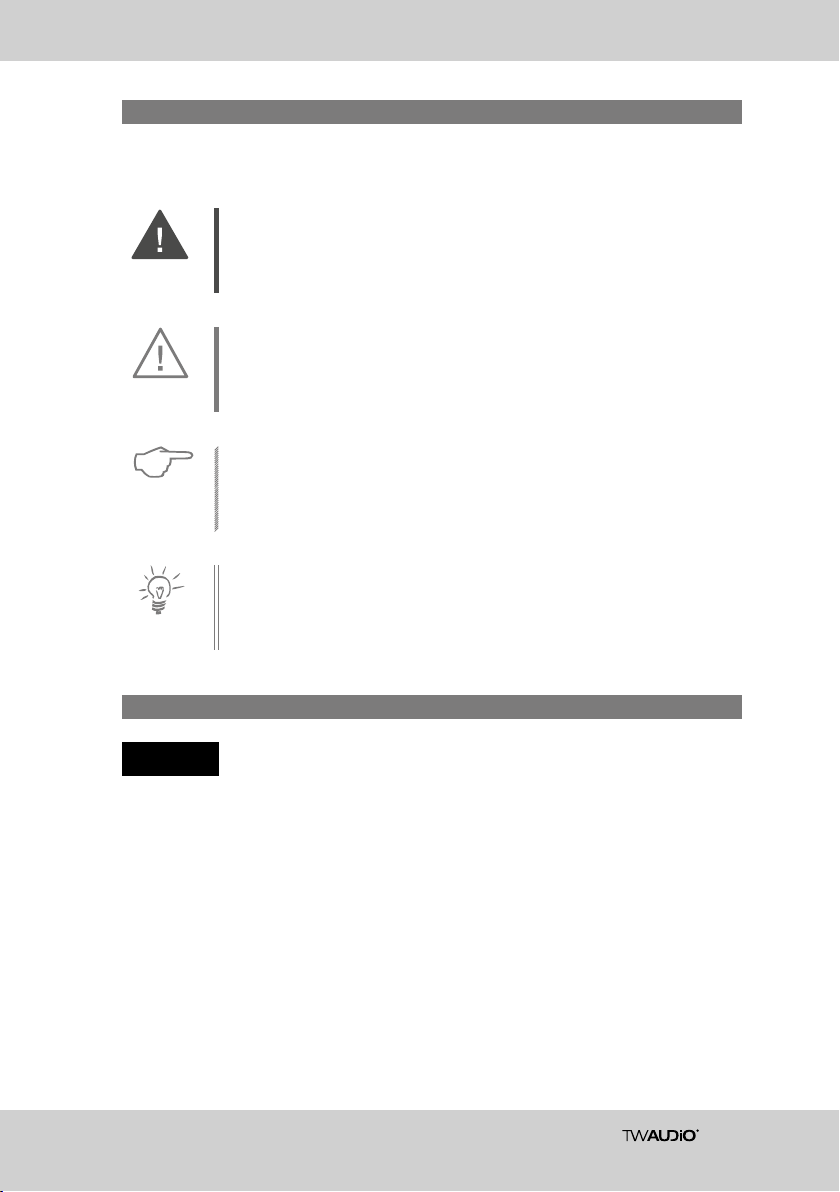
Strictly adhere to the instructions contained in this assembly manual which are marked as follows:
This symbol in combination with the signal word „Warning“ identifies a potentially
hazardous situation. Failure to comply with this safety instruction can lead to serious
WARNING
CAUTION
NOTE
injury or even death.
This symbol in combination with the signal word „Caution“ identifies a potentially
hazardous situation. Failure to comply with this safety instruction can lead to light
or moderate injury.
This symbol in combination with the signal word „Note“ identifies a potentially hazardous situation. Failure to comply with this safety instruction can lead to product
damage.
This symbol in combination with the signal word „Tip“ identifies additional information or notes that will simplify working with TW AUDiO products on the basis of
practical experience.
Notes on the products
Read manual
before use!
Before setting up the device, carefully read the assembly manual and keep this
document in a safe place together with the MKC5 mounting kit.
25
Page 4

Assembly Manual / MKC5
General information
Assembly manual: AM-MKC5
Version 1.0 en, 01/2016
© by TW AUDiO 2016; all rights reserved.
All information contained in this assembly manual was correct to the best of our knowledge at the time
of printing.
Quality warranties or assurance of suitability for a certain type of use based on the technical specifications, dimensions and weights are not granted by TW AUDiO.
TW AUDiO also shall not assume liability for any secondary damage (property damage and/or personal
injury) nor for the failure to comply with this assembly manual.
TW AUDiO reserves the right to make changes that take into account the latest engineering
advancements.
TW AUDiO is pleased to receive suggestions for improvement and recommendations on this assembly
manual. Please send us any feedback you may have to the following e-mail address.
TW AUDiO GmbH
Osterholzallee 140-2
71636 Ludwigsburg
Phone: +49 7141 488989-0
Fax: +49 7141 488989-99
26
Page 5
Assembly Manual / MKC5
1. Safety | Intended use
Please adhere to the following safety instructions to avoid risks when handling the mounting kit.
The MKC5 was developed for professional use in sound systems. The mounting kit may only be used
by trained and qualified personnel.
Note the handling modes described in this assembly manual.
Other uses are not permissible.
TW AUDiO shall not be liable for any damage that ensues from unintended use.
Check that the accessory kit is complete and that all parts are in good condition
before mounting them.
WARNING
WARNING
The accessory kit contains specific screws and nuts. Do not use other screws or
nuts as these can damage the threads and threaded inserts.
The C5 is only to be used with accessory kit MKC5. Description for mounting is in
the assembly manual. Other applications are not permissible.
All parts described in the manual (wall plate, adapter bracket, mounting bracket)
are only to be used as described. Any other use is not permissible and may lead to
injury and damage of the parts.
Any form of modifications of the elements is strictly prohibited. Risk of injury!
CAUTION
WARNING
WARNING
The C5 and the mounting kit MKC5 are suitable for indoor and outdoor applications.
The MKC5 should be handled by qualified and trained personnel only. Before every
use the MKC5 has to be checked if it is ready for use.
Do not use the MKC5 if any form of damage is visible.
27
Page 6
Assembly Manual / MKC5
Before mounting the MKC5 check that walls, ceilings, tripods are capable of
carrying the payload of the MKC5.
WARNING
CAUTION
WARNING
The MKC5 has a payload of 5 kg. Do not exceed this payload.
Make sure that no water pipes, electrical lines or any other lines are behind the
intended place of mounting.
Only use wall plugs and screws which are suitable for the intended place of mounting. All screws must be set and tightened properly. Ensure that your fixing holes
have the correct depth and diameter. Always use all fixing holes.
Once mounted, the C5 has a swivel range. Ensure no object from the mounting set
is within this swivel range. The C5 must be able to be swiveled freely.
Do not squeeze or twist the electrical cables of the C5 during installation. The respective national electrotechnical rules and regulations are applicable.
Always use the spring washer for added safety. It will prevent the screws from becoming loose. Spare parts are available from TW AUDiO.
When the C5 is being moved frequently, the couplings may become loose. Please
check the connections regularly and tighten if necessary. If tightening is not possible, then the mounting elements must be exchanged (screw Nr.1, nut Nr.9, spring
washer Nr.8, ball pin Nr.7).
28
Please keep all mounting elements away from children! The small parts can easily
be swallowed and lead to suffocation!
WARNING
Page 7
Assembly Manual / MKC5
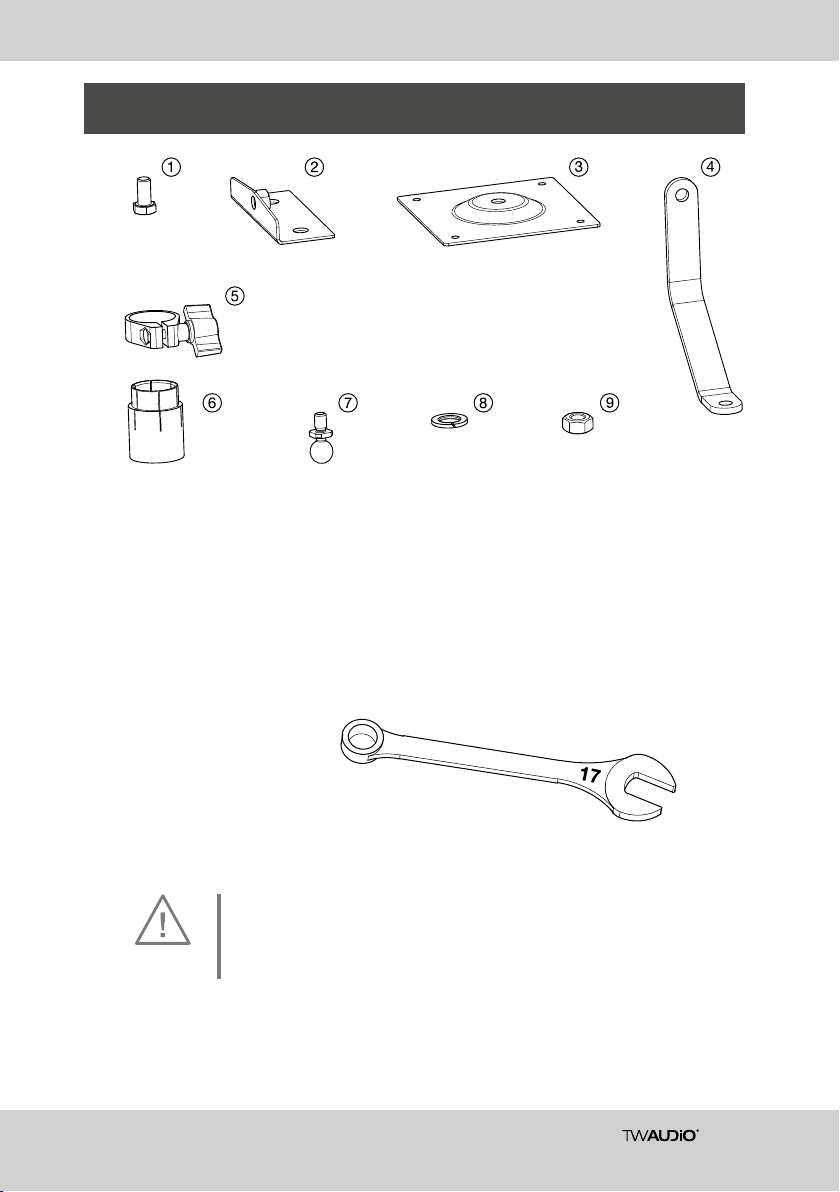
2. Purchased parts package
1. Hexagon head screw M10 x 16.........................................................................................3 pcs
2. Adapter bracket................................................................................................................. 1 pc
3. Wall plate............................................................................................................................ 1 pc
4. Mounting bracket............................................................................................................... 1 pc
5. Clamp with thumbscrew
6. Ball mount.......
7. Ball pin........
8. Spring washer
9. Nut M10.....
........................................................................................................................ 1 pc
...................................................................................................................... 1 pc
..........................................................................................................................1 pc
...................................................................................................... 1 pc
.................................................................................................................... 1 pc
Needed tool:
Combination spanner SW17.
An anti-twist protection is fixed at the ball pin and the hexagon head screws. This
prevents the ball pin and screws from loosening.
CAUTION
29
Page 8
Assembly Manual / MKC5
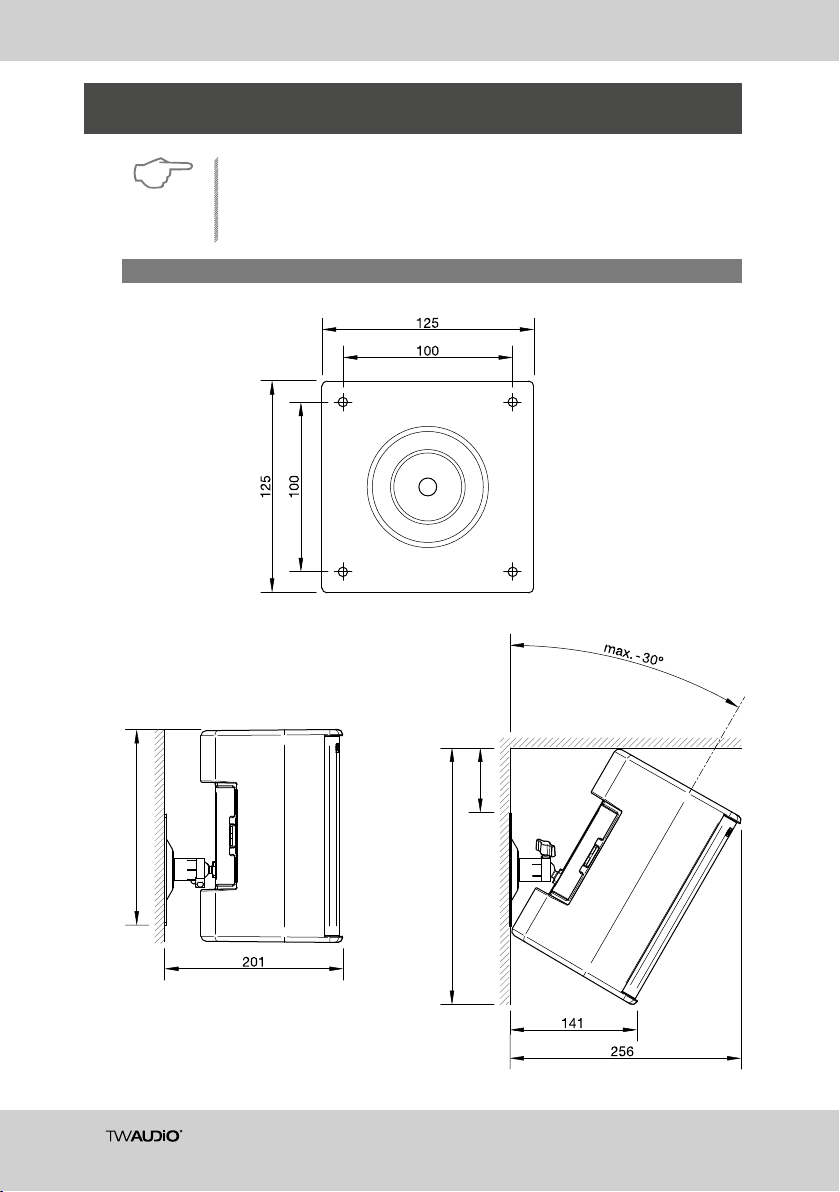
3. Wall plate
The wall plate can be mounted at ceilings, walls and other suitable surfaces. Please
NOTE
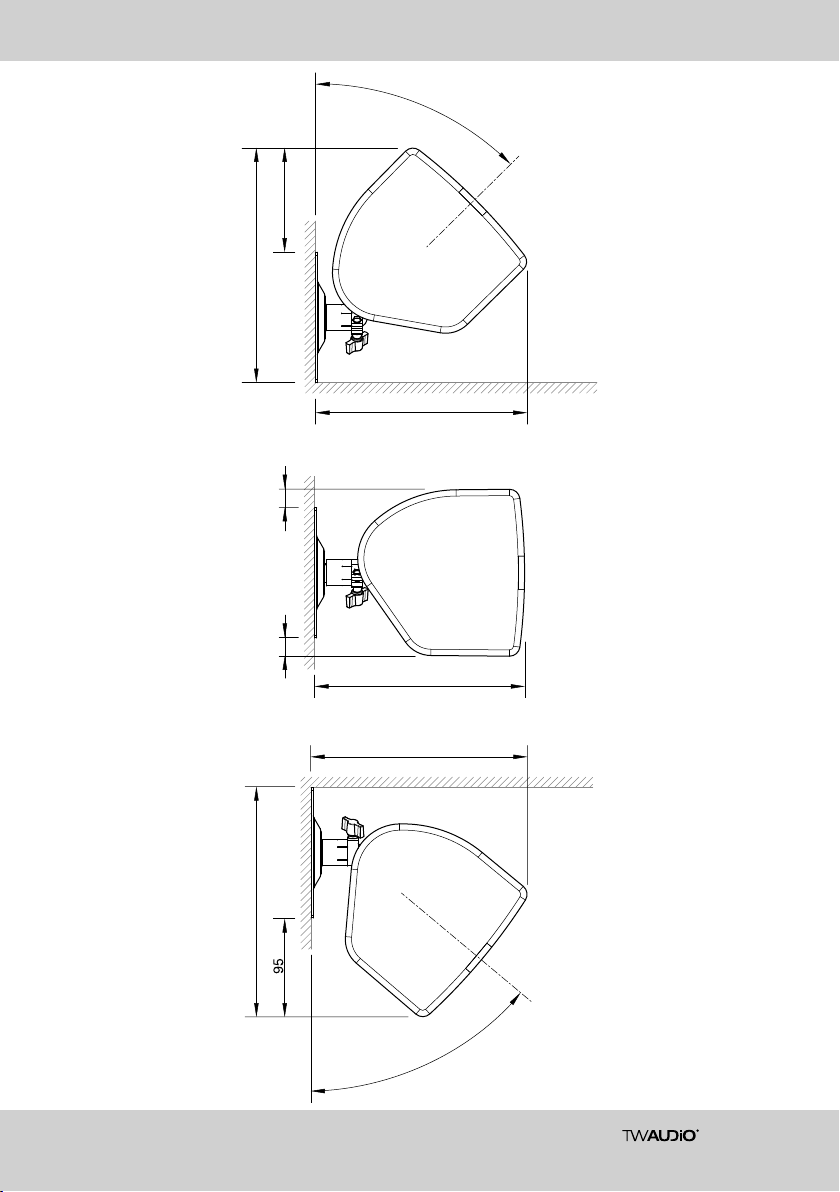
Installation dimensions | all dimensions in millimeter
use the fittings from our mounting kit.
30
73
220
284
Page 9
225
18
100
m
a
203
Assembly Manual / MKC5
x
.
4
0
°
220
18
203
207
°
0
4
-
.
x
a
m
31
Page 10
Assembly Manual / MKC5
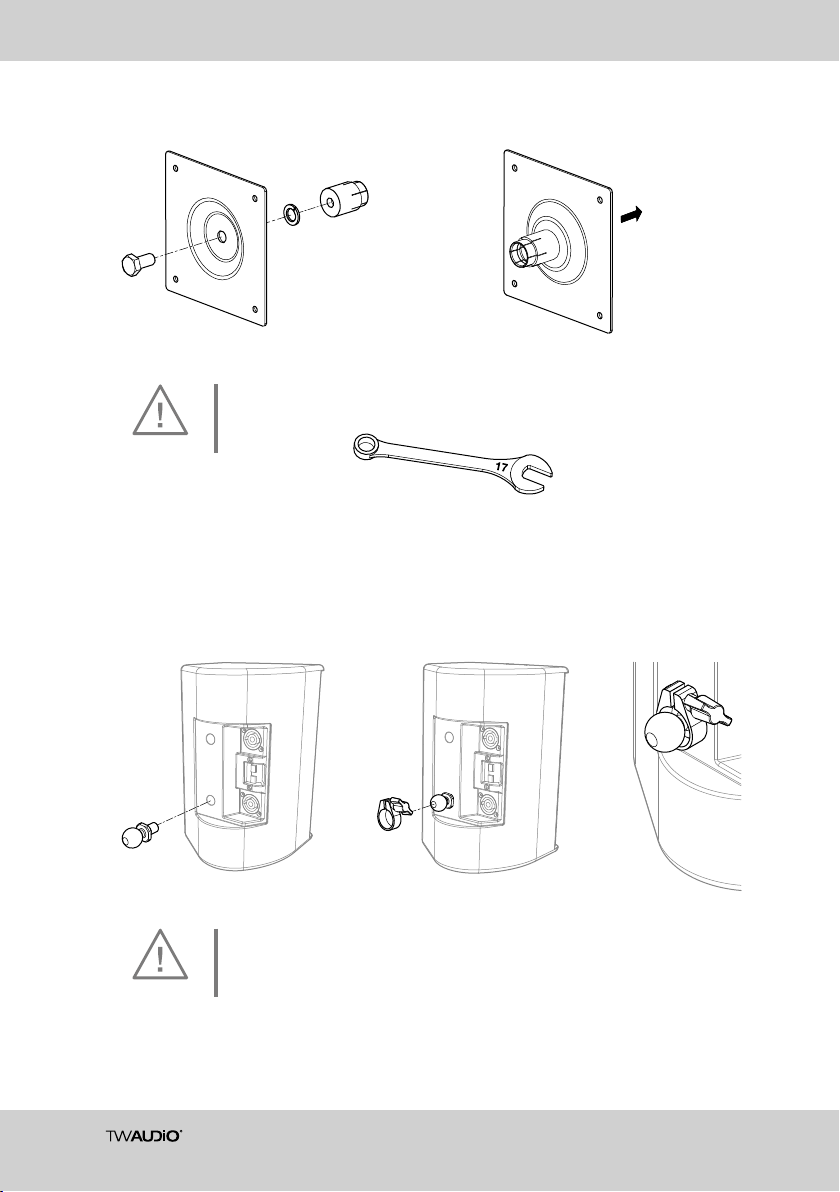
Wall / ceiling
CAUTION
Tighten screw
properly! (18 Nm)
Tighten ball pin properly!
(18 Nm)
Use compatible mounting material.
Place the clamp above the ball pin.
32
CAUTION
Page 11
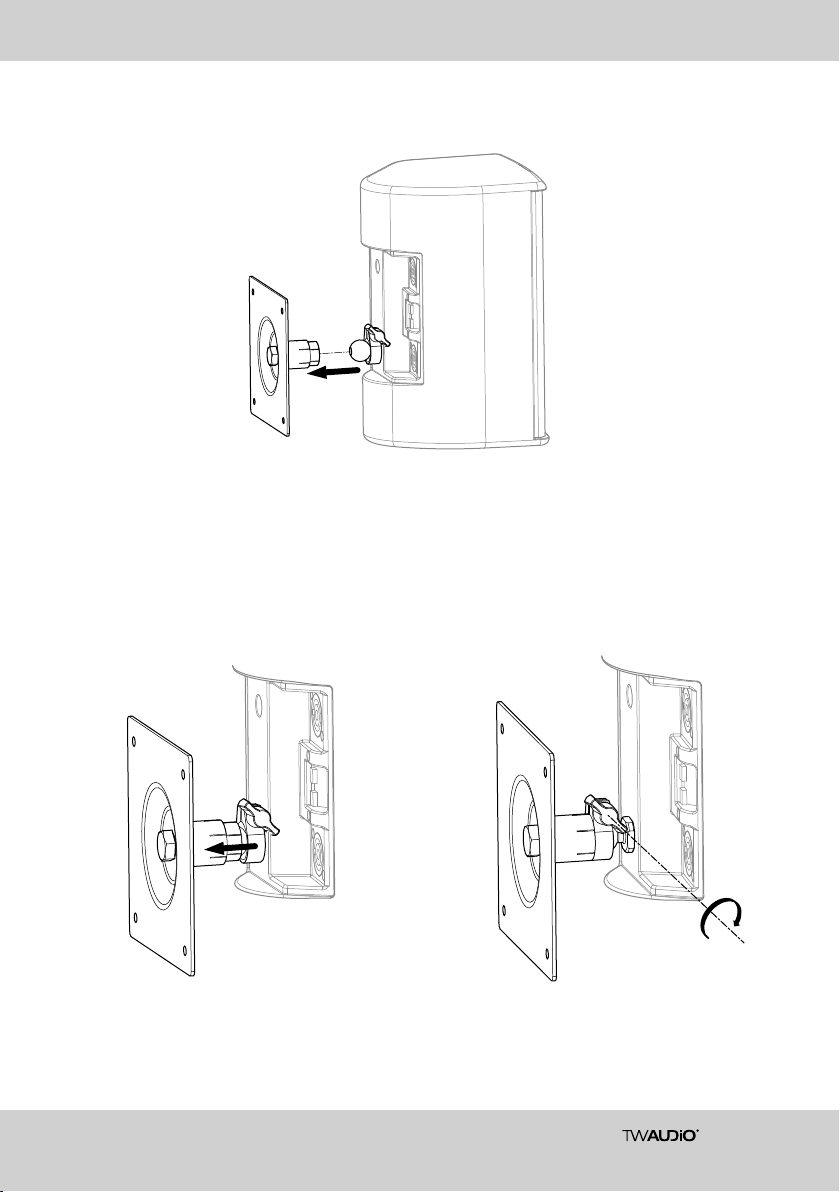
Plug the ball mount on to the ball pin.
Assembly Manual / MKC5
Tighten the thumb screw of the clamp.Pull the clamp over the ball mount.
33
Page 12
Assembly Manual / MKC5
4. Adapter bracket
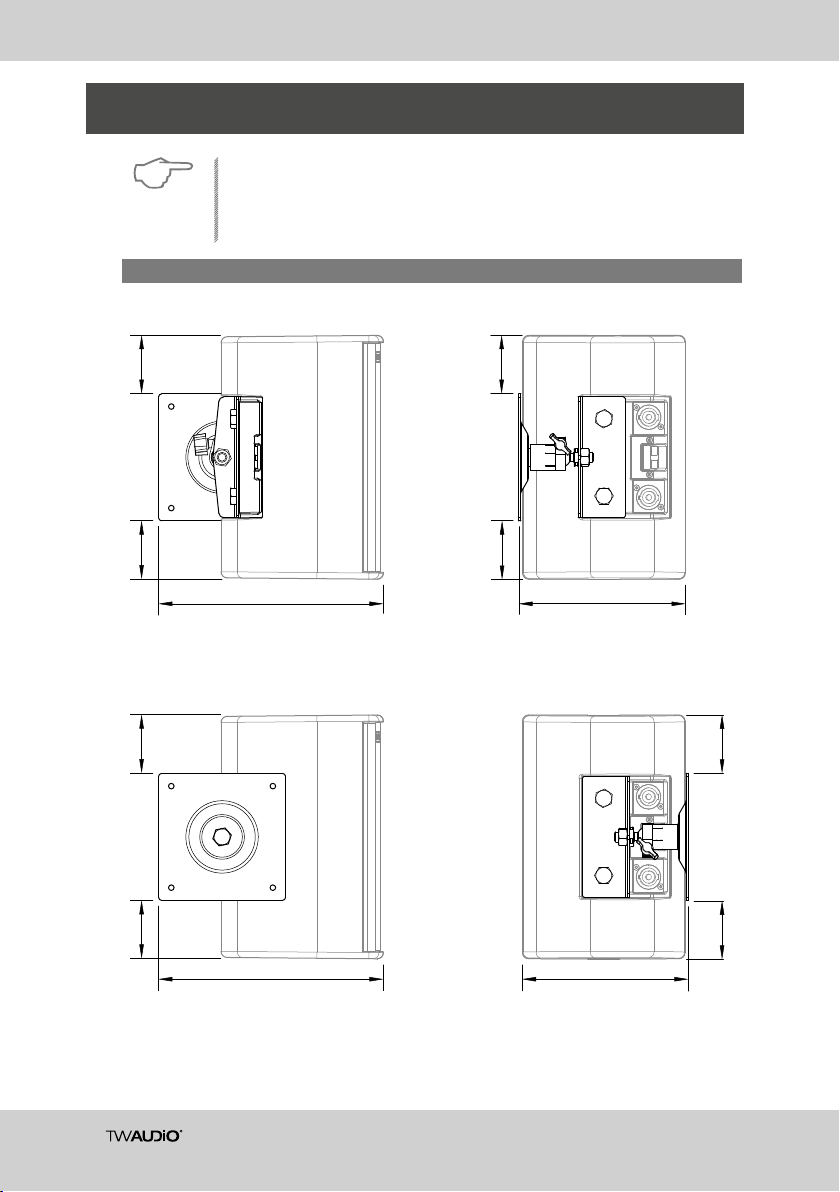
The adapter bracket can be mounted on ceilings, walls and other suitable surfaces.
NOTE
Installation dimensions | all dimensions in millimeter
Please use the fittings from our mounting kit.
57 57
222
57 57
222
57 57
164
57
57
164
34
Page 13
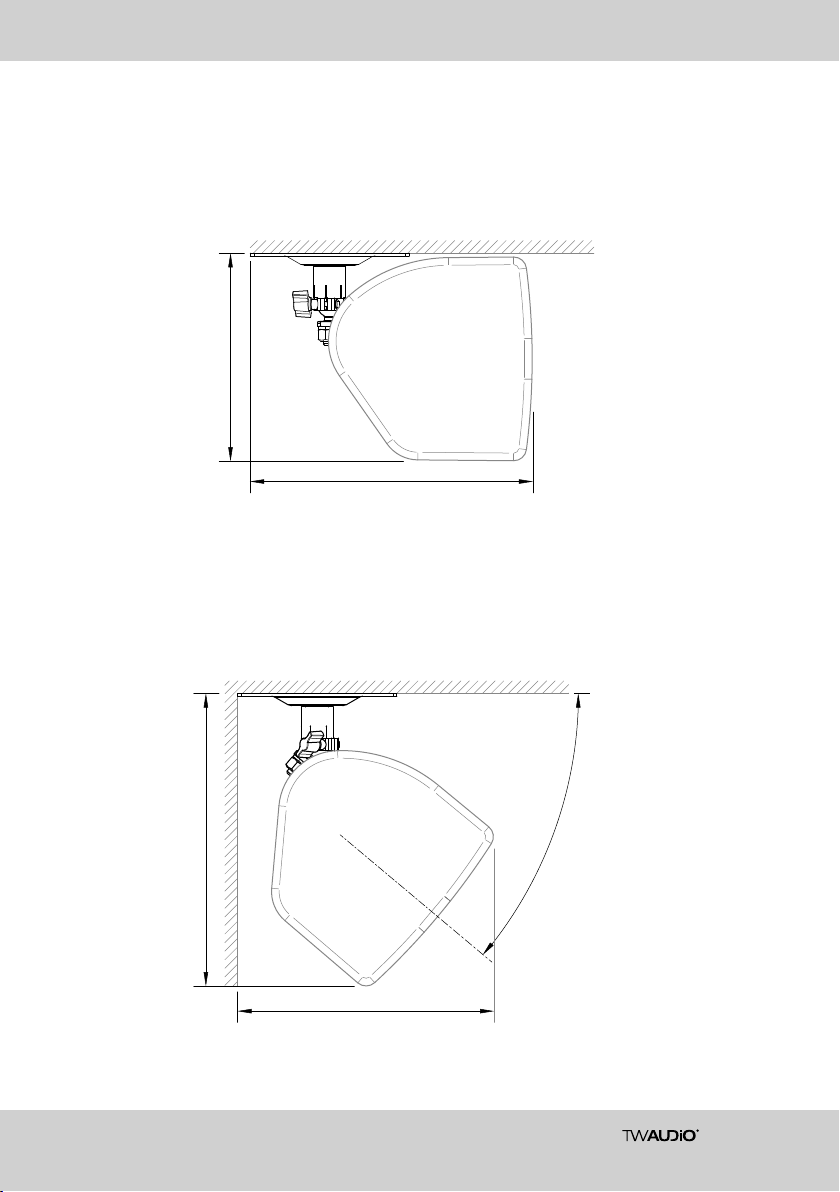
163
Assembly Manual / MKC5
227
230
201
°
0
4
-
.
x
a
m
35
Page 14
Assembly Manual / MKC5
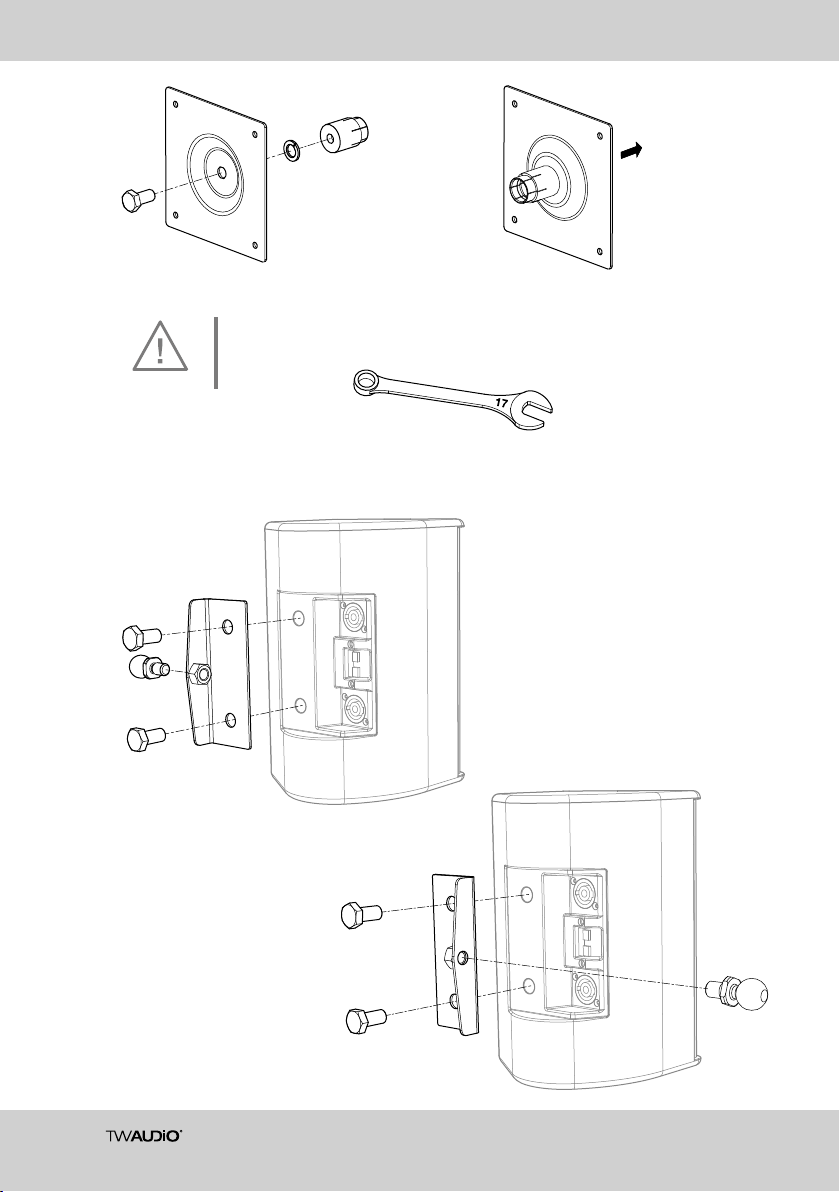
Wall / ceiling
CAUTION
Version 1:
Tighten screw properly!
(18Nm)
Use compatible mounting material.
36
Version 2:
Page 15
Assembly Manual / MKC5
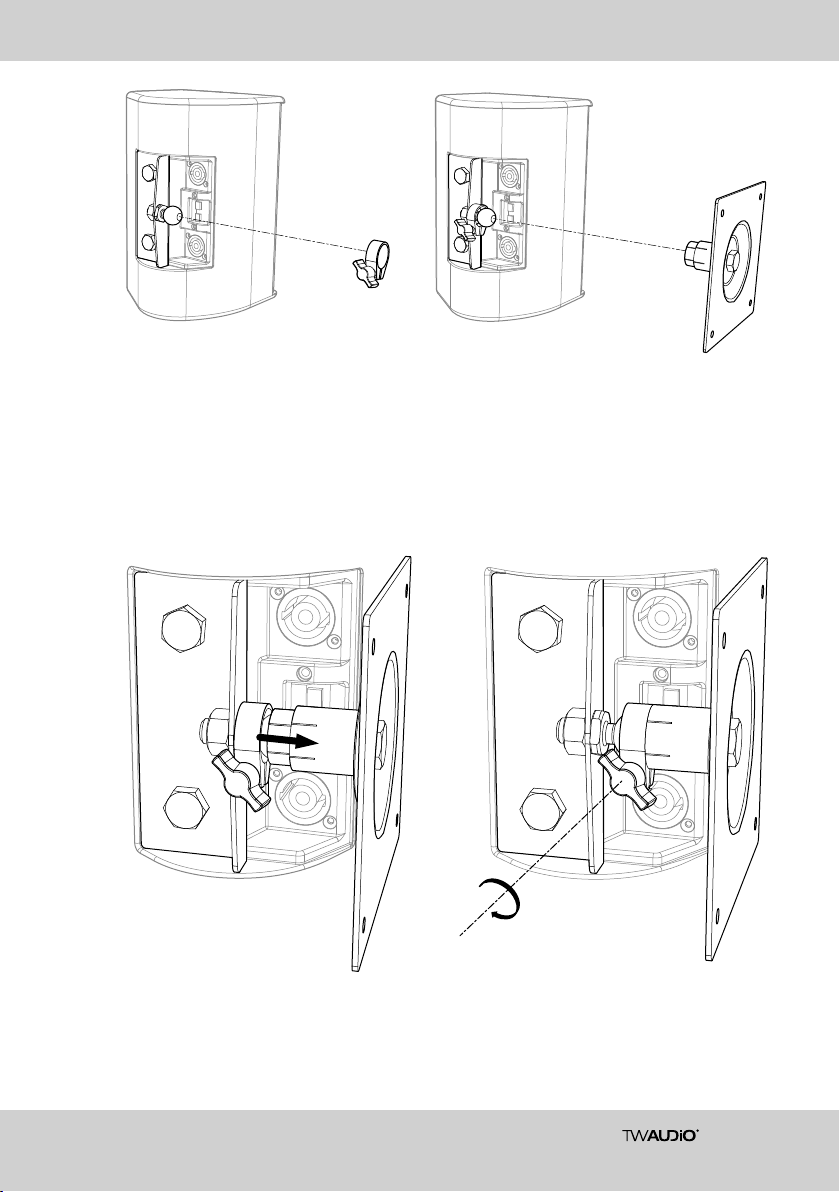
Place the clamp above
the ball pin.
Plug the ball mount on to
the ball pin.
Pull the clamp over the
ball mount.
Tighten the thumb screw of
the clamp.
37
Page 16
Assembly Manual / MKC5
5. Mounting bracket
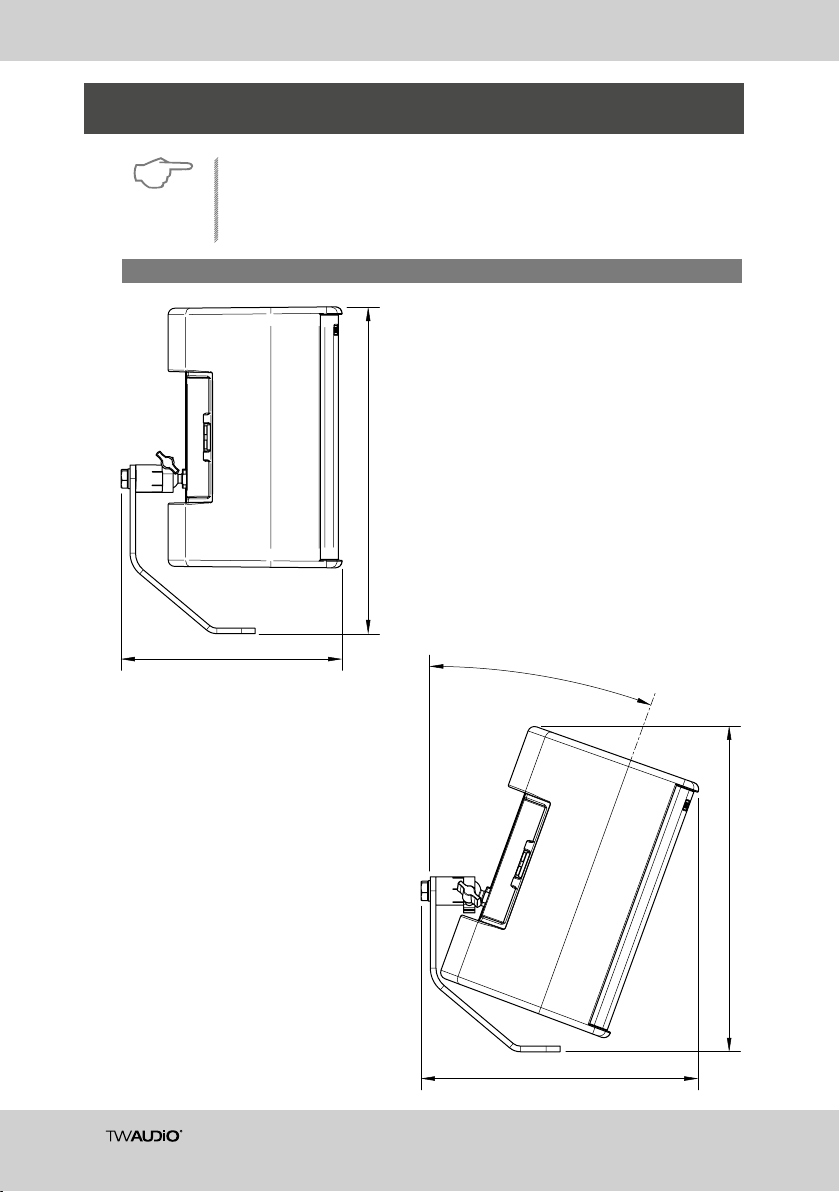
The mounting bracket can be used for mounting on walls, ceilings, tripods as well
NOTE
Installation dimensions | all dimensions in millimeter
as threaded rods. Please use the fittings from our mounting kit.
300
38
203
m
a
x
.
-
2
0
°
288
246
Page 17
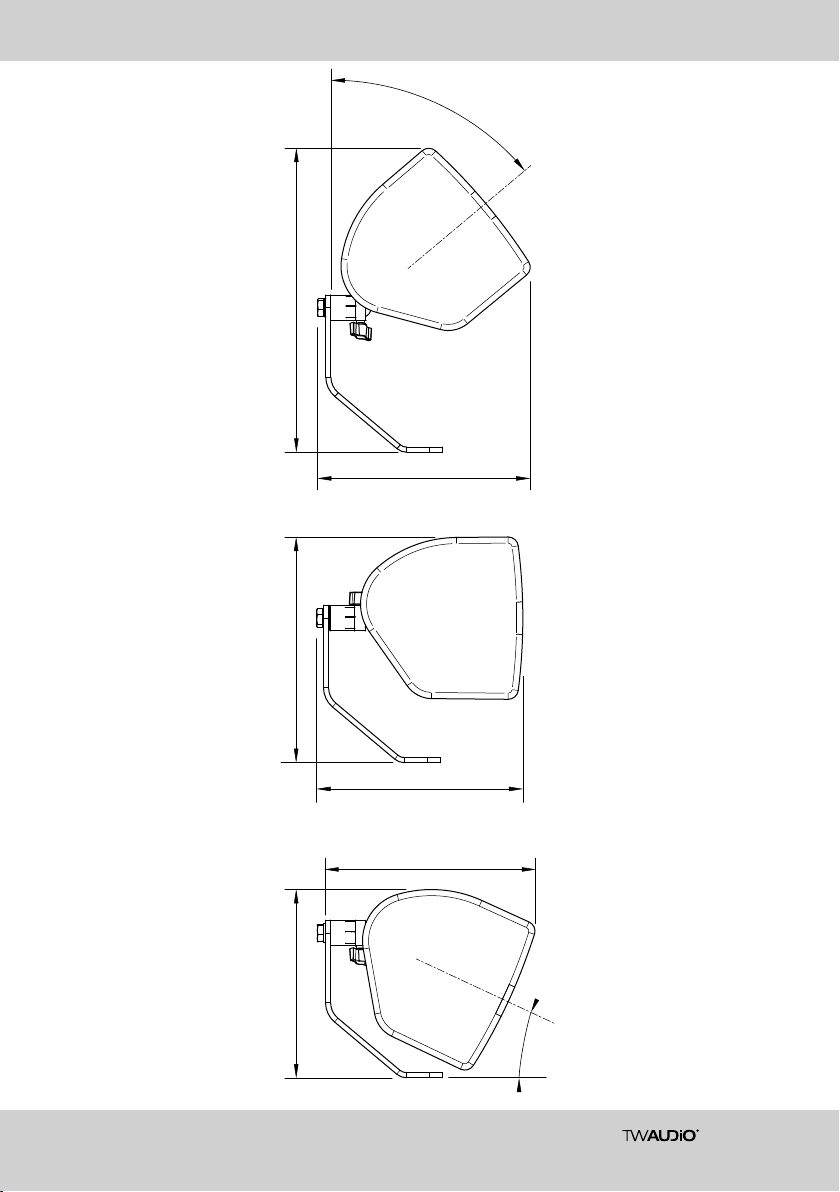
300
210
Assembly Manual / MKC5
4
0
°
222
186
203
214
°
5
2
-
.
x
a
m
39
Page 18
Assembly Manual / MKC5
300
°
0
4
-
.
x
a
m
40
208
Page 19
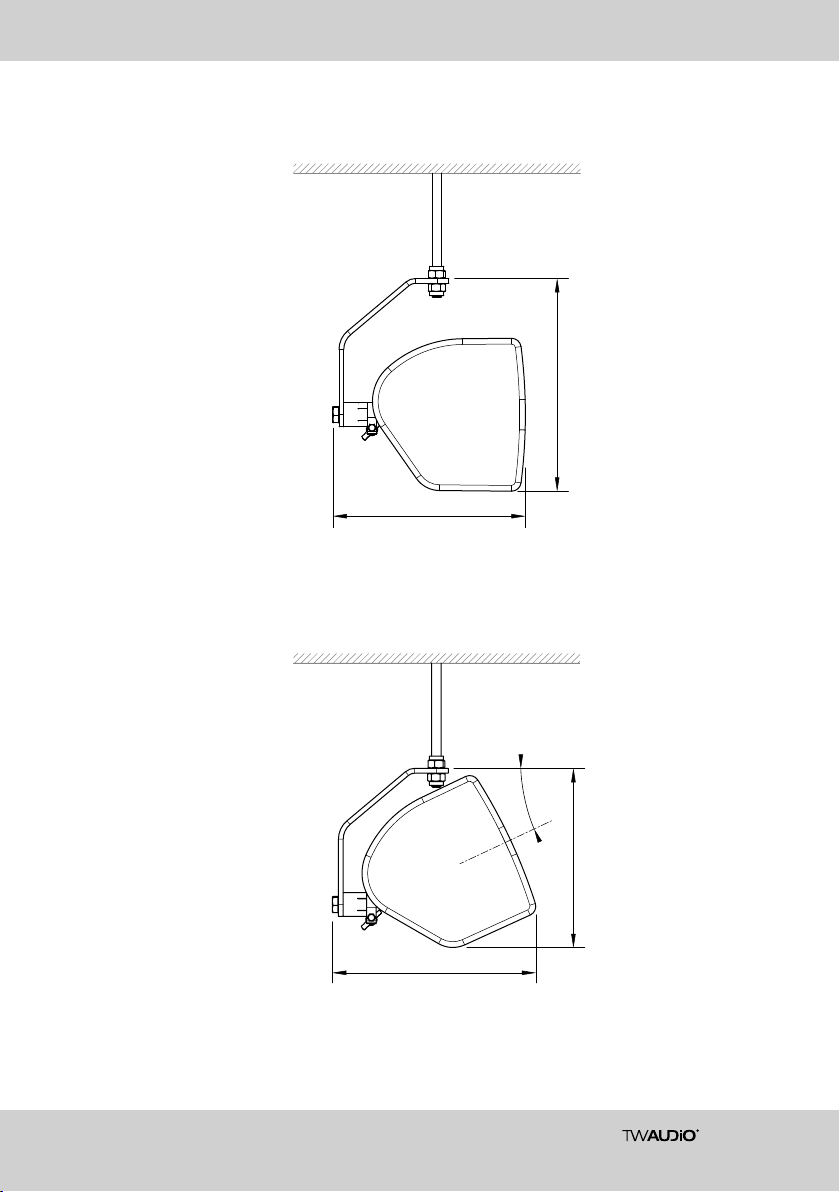
201
Assembly Manual / MKC5
222
213
m
a
x
.
2
5
°
187
41
Page 20
Assembly Manual / MKC5
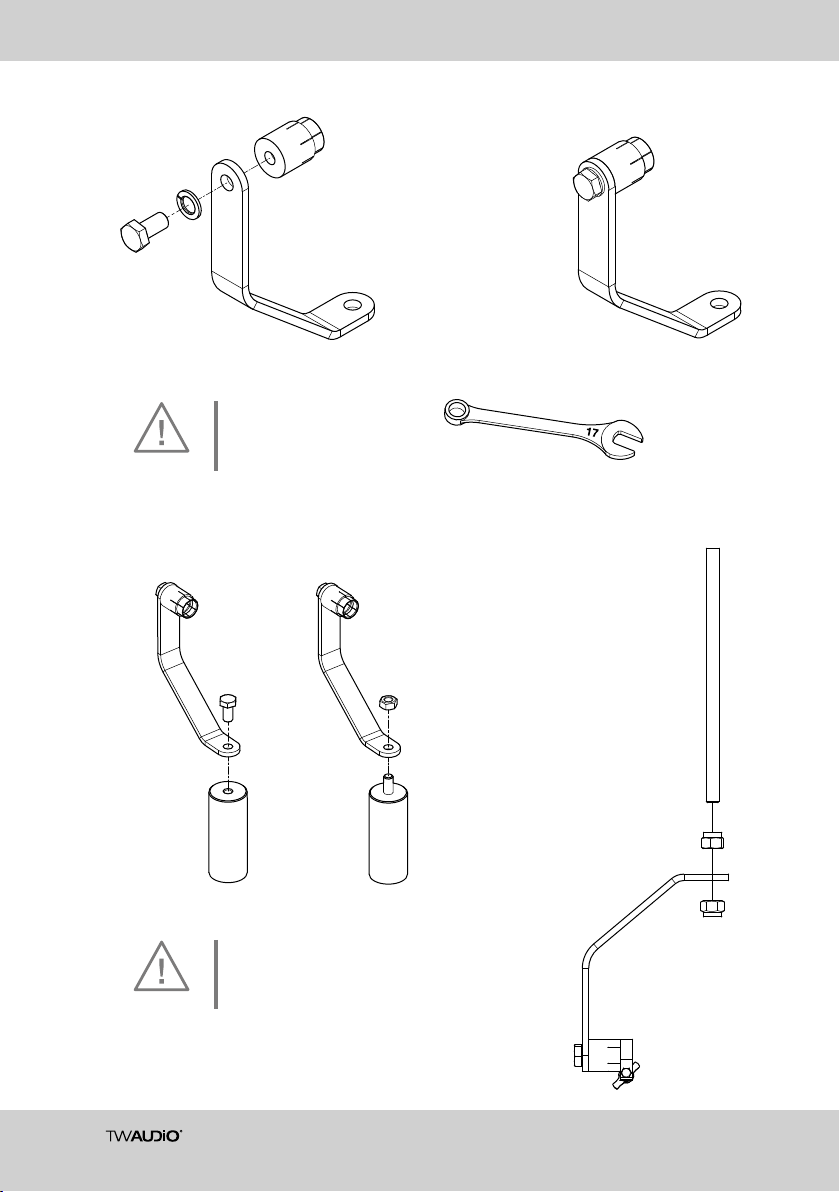
Tighten screw
properly! (18 Nm)
CAUTION
42
Tighten screw / nut properly!
(18Nm)
CAUTION
Page 21
Assembly Manual / MKC5
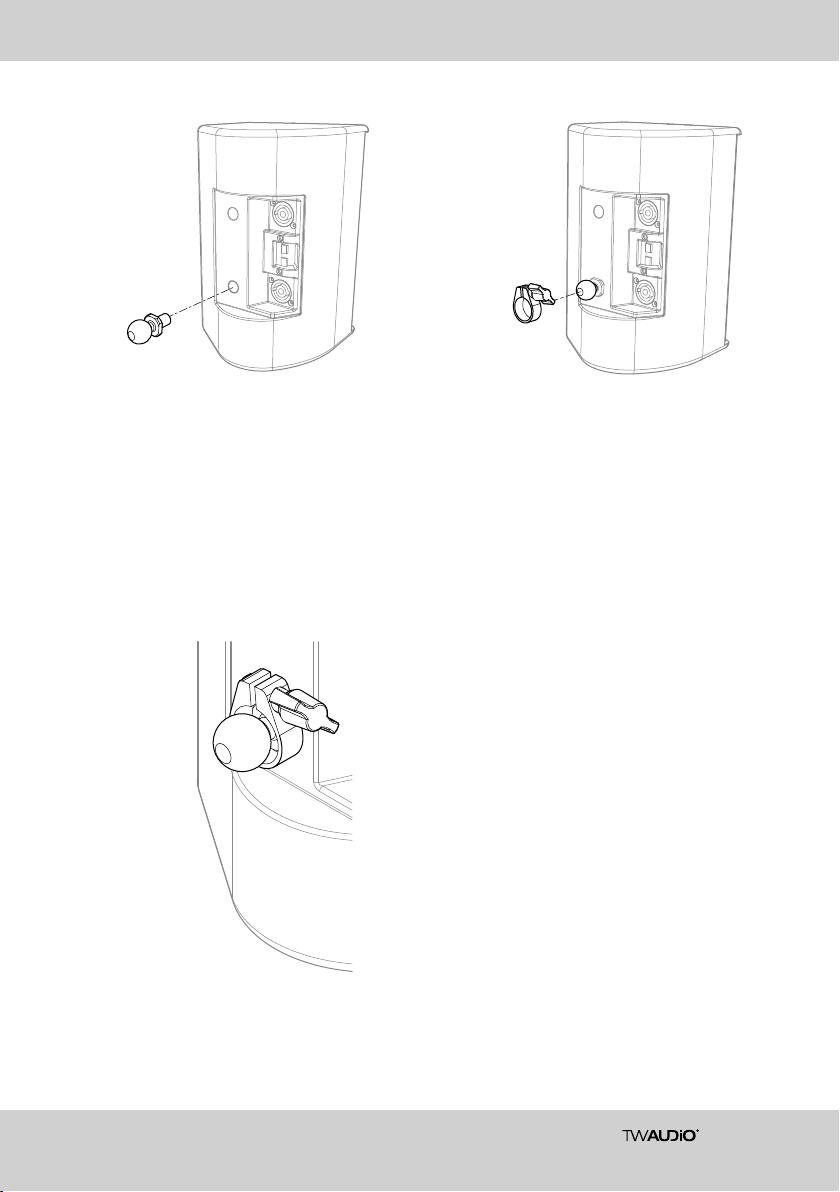
Place the clamp above the ball pin.
43
Page 22
Assembly Manual / MKC5
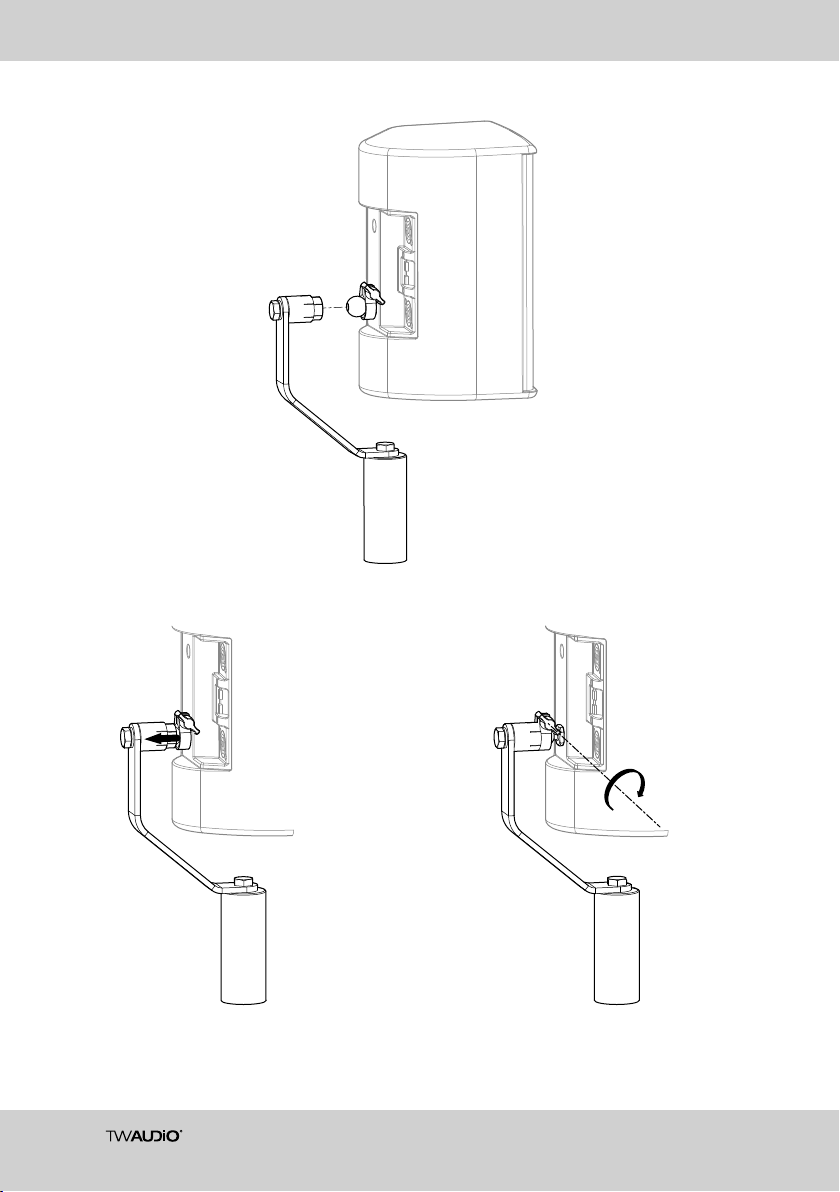
Plug the ball mount on to the
ball pin.
Pull the clamp over the
ball mount.
44
Tighten the thumb screw of
the clamp.
Page 23

Assembly Manual / MKC5
6. Disposal
All products of TW AUDiO GmbH are so-called B2B products. This means that they are sold by a
commercial business to a commercial business. TW AUDiO products that bear the trash can symbol
shown here are only permitted to be disposed of by TW AUDiO.
If you have any question regarding the disposal of used devices, please contact us under the following
telephone number:
+49 7141 488989-0
In countries outside of the European Union, follow the local regulations.
45
Page 24

TW AUDiO GmbH
Osterholzallee 140-2
71636 Ludwigsburg
Germany
P: + 49 7141 488989-0
F: + 49 7141 488989-99
E: [email protected]
W: www.twaudio.com
MKC5 | 2016-1 | 3520
 Loading...