

TVT TD-8423IS Quick Start Manual
HD PTZ Camera
Quick Star t Guide
■ Please read thi s instruction ca refully b efore u sing the pr oduct
and keep it for fur ther reference .
■ All the example s and pictures use d here are fo r refer ence only.
■ The contents of t his manual are sub ject to cha nge wit hout
notice.
Overview
1
1
3
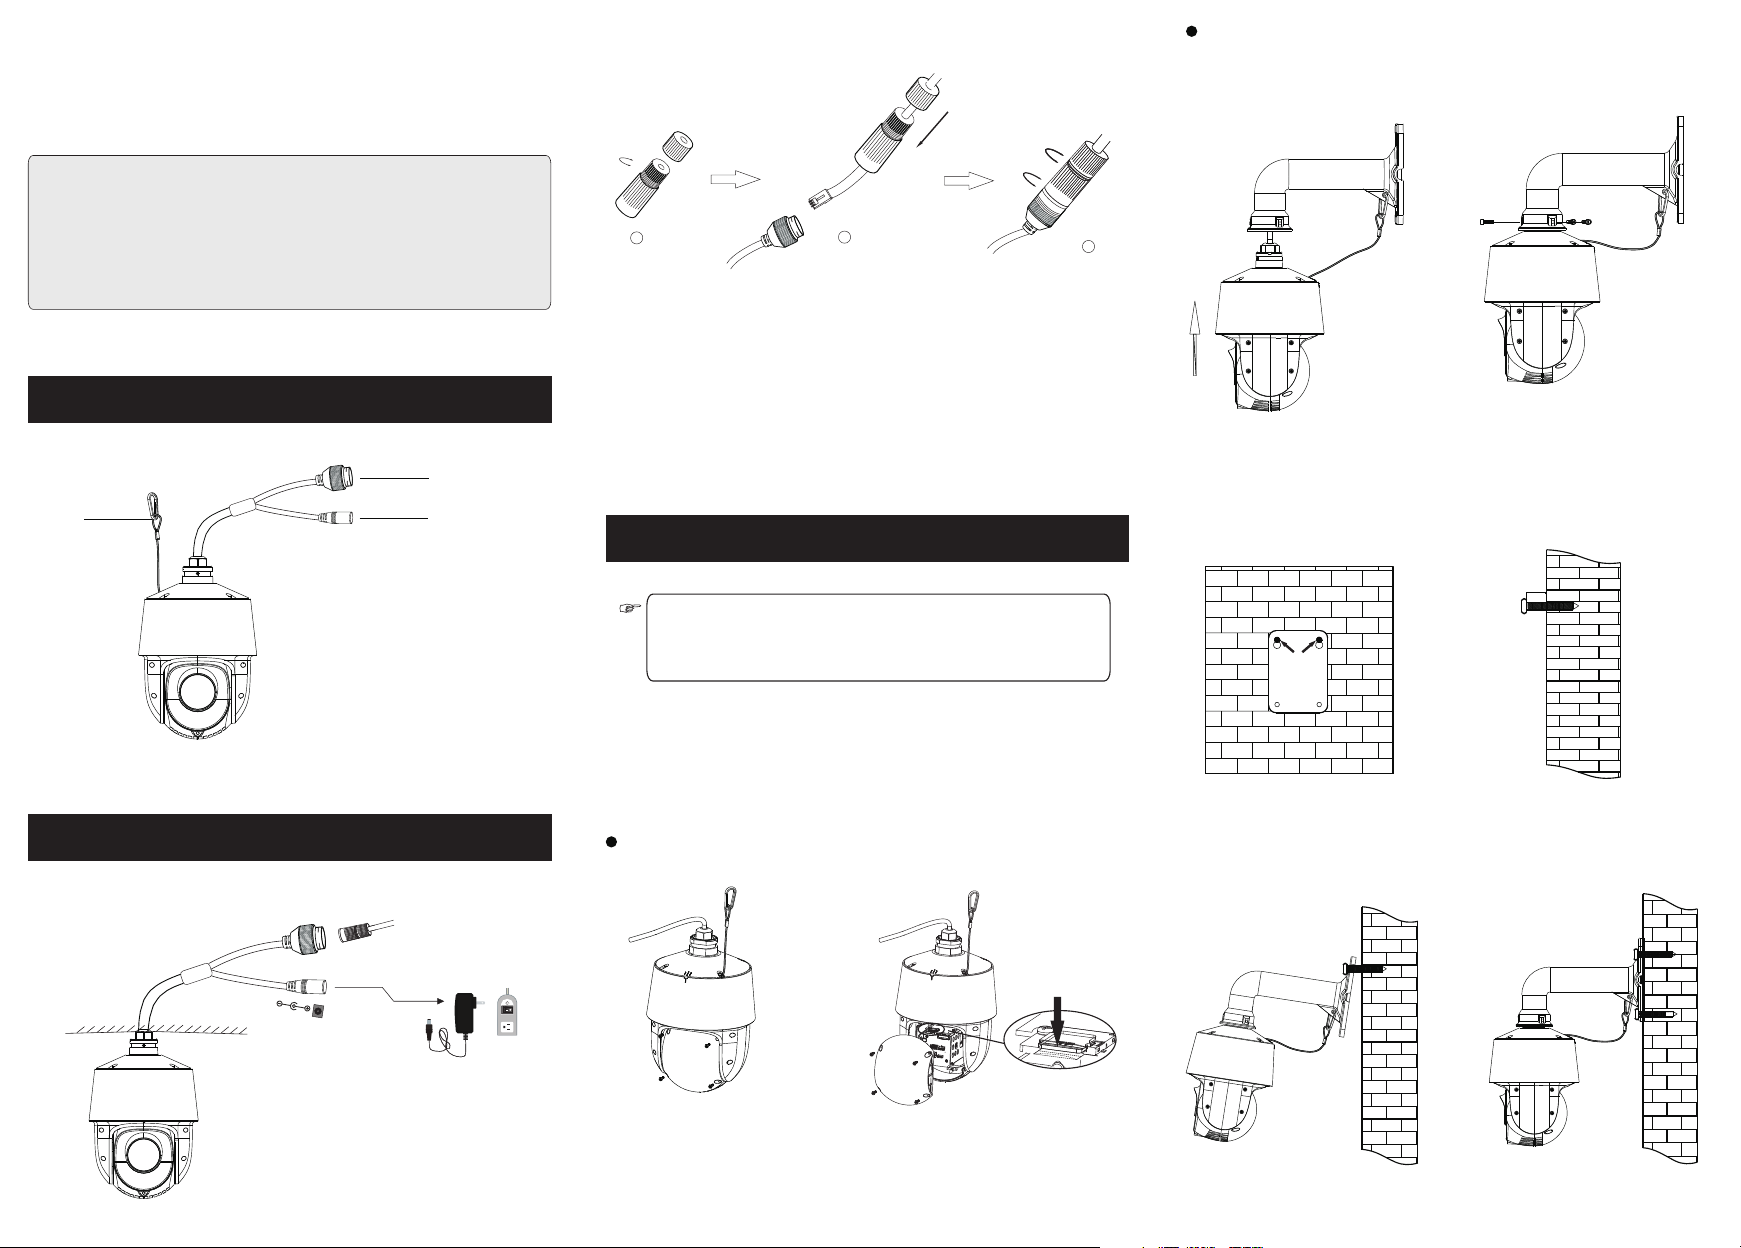
1 Ethernet conn ector
2
3 Safe ty wire
2
Powe r connect or
► Conn ecting Ne twork C able
1
① Loos en the nut fr om the main elemen t.
② Run the network c able (without RJ 4 5 connect or) thr ough the
both elements . Th en crimp th e cable with RJ 45 con nector.
③ Conn ect the cab le to the her metic c onnecto r. Then tighten th e
nut and the main co ver.
Installation
3
Please make su re the wall is strong enough to bear the dome
camera’s we ig h an d th e camera is powered off during
installati on .
2
3
Wall Moun ting
1. Pull the cables t hr ou gh t he
bracket.
3. Drill the screw h ol es o n th e wa ll
according to the drill template. Th en
insert the plastic plugs into th e holes.
2. Secure the PTZ ca me ra t o th e
bracket with scr ew s.
4. Fix two screws to t he h ol es a s
indicated by the a rr ow s (l ef t)
and leave 12mm cle ar an ce .
12
Cable Connection
2
DC12V
This P TZ camera s upports wall or ce iling mou nting . Please se lect
a way to install as n eeded. The fo llowing instru ctions are for
reference onl y.
Micro SD Card Install ation
le
b
Ca
ork
w
t
Ne
Insert a micro
SD card
1. Loosen the four s cr ew s of
the cover and then r em ov e
the cover.
2. Insert a micro SD card as indicated
above and then install the cover back.
5. Connect the cab le s an d th en
hang the bracket o n th e wa ll .
6. Fix the bracket t o th e wa ll
with four screws .
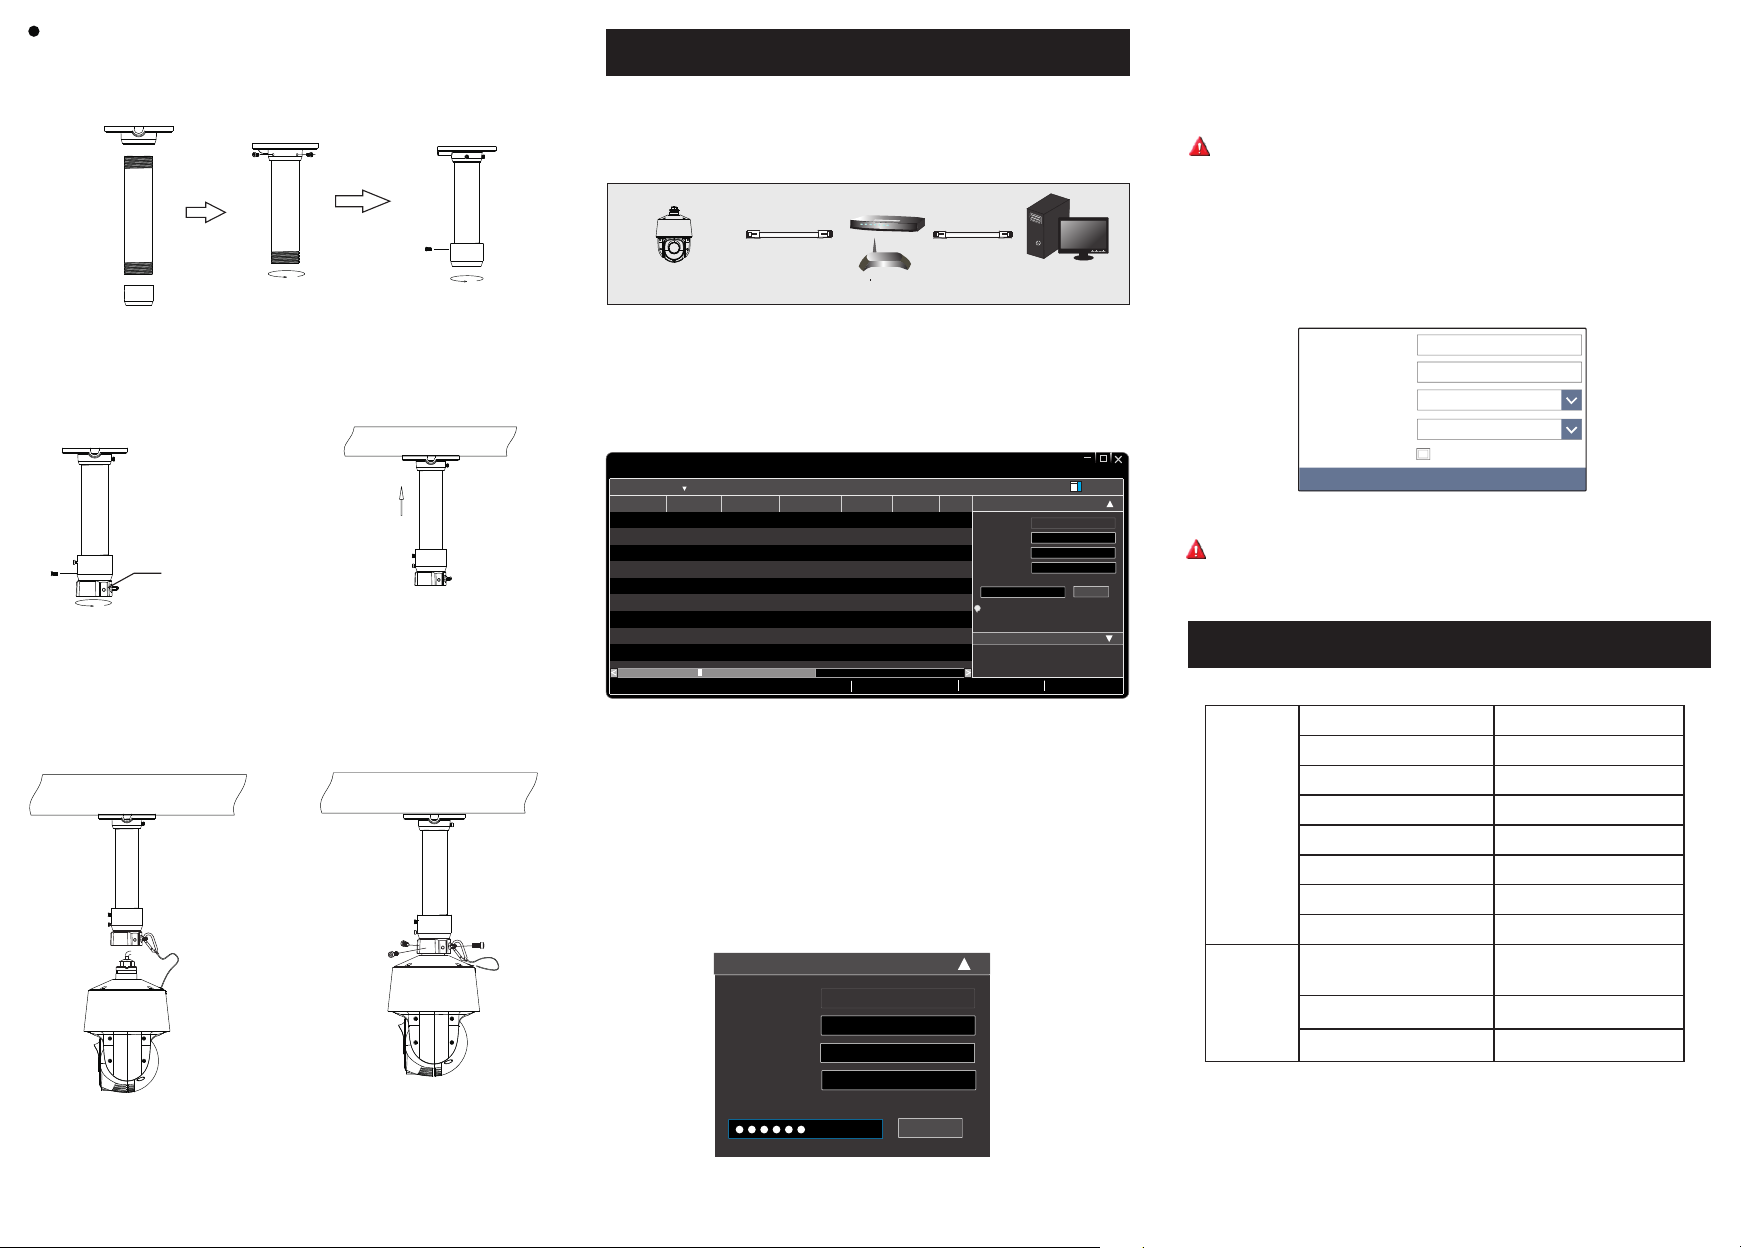
Ceil ing Mount ing
1
. Install the ceil in g mo un ti ng b racket according to the follo wi ng
instruction.
Network Connection
4
Here w e take acce ssing IP camera v ia LAN for ex ample .
● Access the cam era through IP- Tool
Switc h
Net work Cabl e Net work Cabl e
PTZ Camera
Route r
Compu te r
For ex ample, th e IP address of you r compute r is 192. 168.1.4 . So the
IP address of the camera shall be changed to 192.168.1.X. After
modification, please enter the password of the administrator and click
“Modify” button t o modify th e setti ng.
The defaul t passw ord of the ad minis trator is “ 123 45 6”.
④ Double-click the PTZ camera listed in the IP-Tool or manually enter
the IP address in the address bar of the web browser to connect the PTZ
MENU
camera. Then follow directions to download and install the plugin.
Enter the usern ame and password i n the login i nterf ace.
⑤
. Mount the adapte r tu be t o th e
2
bracket and fix it w it h a sc re w.
Adap te r tu be
4 C on ne ct c ab le s and then hook
.
the safety wire to t he a da pt er t ub e.
.
3 S ec ur e th e wa ll m ounting
bracket to the cei li ng .
5 F ix t he P TZ c am er a to the
.
adapter tube wit h sc re ws f ir ml y.
① Make sure that the camera and the PC are connected via LAN.
② Find the IP-Tool fro m the CD and th en install it in the c omputer.
After tha t, run th e IP-Tool as sho wn below.
Dev ice Net work Se arch
Imm ediat e Refre sh
Devi ce Name Devi ce Type IP Addr ess Http P ort Data P ort
name
name
name
Total De vice: 3
IPC
IPC
IPC
Prod uct Mod el
unkn own
192. 168.2 26.20 1
unkn own
192. 168.1 .2
unkn own
192. 168.1 .3
Loca l IP Addre ss:19 2.168 .1.4
80
9008
80
9008
80
9008
Subn et Mask :255. 255.2 55.0 Gate way: 19 2.168 .1.1 DNS:21 0.21 .196. 6
Subn et
Modi fy Netw ork Par amete r
255. 255.
Mac Add ress
255. 255.
IP Addr ess
Subn et Mask
255. 255.
Gate way
i
Tip: E nter th e admin istra tor pas sword, and
then m odify t he netw ork par amete rs.
Restore IPC Default Configuration
Abo ut
CE :98 : 23 :75 :3 5 :22
192 . 168 . 226 . 20 1
255 . 25 5 . 255 . 0
192 . 168 . 226 . 1
Modi fy
③ Modi fy the IP ad dress. The de fault IP addres s of this camera is
192. 168.226 .201. Click the in formation of the c amera lis ted in the
abov e table to sh ow the network inf ormatio n on the ri ght hand.
Modi fy the IP ad dress and gatewa y of the came ra and ma ke sure its
netw ork addre ss is in the same loca l network segmen t as the
computer’s. Ple ase modif y the IP address of y our device accor ding
to the practica l situation.
Modify N et wo rk P ar am et er
Mac Addre ss
IP Address
Subnet M as k
Gatewa y
CE :98 :23 : 75 : 35 : 22
192 .1 68 . 1 . 2 01
255 . 255 . 25 5 . 0
192 .1 68 . 1 . 1
Name:
Password:
Stream Typ e:
Language
admin
Password
1920x1080 2 5f ps
English
Reme mb er m e
Logi n
The defaul t usern ame is ad mi n; the default pas sword is 123 45 6.
5 Preset Description
Run tra ck 1
Run cru is e 1
Run 2cruis e
Run 3cruis e
Run 4cruis e
OSD men u
Enabl e ra nd om scan
Enabl e P- PS CAN
Set ran do m sc an; Task auto
call th e be gi nning poi nt
Set lef t bo rd er of P-PSC AN
Set right border of P-PSC AN
Call Pr es et
Set Pre se t
Call No . 90 P reset
Call No . 91 P reset
Call No . 92 P reset
Call No . 93 P reset
Call No . 94 P reset
Call No . 95 P reset
Call No . 97 P reset
Call No . 99 P reset
Set No. 9 1 Pr eset
Set No. 9 2 Pr eset
Set No. 9 3 Pr eset
Modify
45004 30 01 239 A0
 Loading...