

Page 1

P702W
USER'S MANUAL
Second Publication
November 1998
Page 2

Who should use this manual...
Congratulations on your purchase of TVsurf! This manual will guide you through
the setup and assist you in connecting TVsurf to the proper devices. It also provides a guide through the TVsurf Browser and Email Application. Many useful
graphics are included in this manual for illustration.
GES Part No: 54300121
TVsurf manual
GES Singapore Pte Ltd
28 Marsiling Lane
Singapore 739152
Tel: 7329898
Fax: 3687671
All Rights Reserved.
Printed in Singapore.
Second Edition - November 1998
NOTICE
Our company may make improvements and/or changes in the product(s) described
in this publication at any time without notice. Changes are made periodically to
the information herein, these changes will be incorporated in new editions of the
publication. This publication may include technical inaccuracies or typographical
errors.
TRADEMARKS
All registered trademarks are the property of their respective owners.
Page 3

FCC Information
This equipment has been tested and found to comply with limits for a Class
B digital device, pursuant to Part 15 of FCC Rules. These limits are designed to provide reasonable protection against harmful interference when
the equipment is operated in a residential installation. This equipment generates, uses, and can radiate radio frequency energy and, if not installed
and used in accordance with the instruction manual, may cause harmful
interference to radio communications. However, there is no guarantee that
interference will not occur in a particular installation. If this equipment
does cause interference to radio or television reception, which can be determined by turning the equipment off and on, the user is encouraged to try
to correct the interference by one or more of following measures:
- Reorient or relocate the receiving antenna.
- Increase the separation between the equipment and the receiver.
- Connect the equipment into an outlet on a circuit different from
that to which the receiver is located.
- Consult the dealer or an experienced radio/TV technician for help.
Operation of this equipment in a residential area may cause harmful interference in which case the user will be required to correct the interference at
his own expense. Any changes or modifications not expressedly approved
by the manufacturer could void the user’s authority to operate the equipment.
FCC ID: JUK0798GES702
CE Certification
This device complies with the requirements of the EEC directive 89/336/
EEC with regard to "Electromagnetic compatibility."
Page 4

CONTENTS
Chapter 1 Introduction
Introduction ........................................................................... 1-1
1.1 What exactly is TVsurf? ............................................ 1-2
Chapter 2 Overview of TVsurf
Overview of TV Surf ............................................................ 2-1
2.1 Front View of TVsurf................................................ 2-2
2.2 Back View of TVsurf ................................................ 2-3
2.3 Video Settings ........................................................... 2-4
2.4 Remote Control Functions......................................... 2-5
2.5 Wireless Keyboard .................................................... 2-6
Chapter 3 Get Started!
Get Started! ........................................................................... 3-1
3.1 Check List.................................................................. 3-1
3.2 Placement of TVsurf ................................................. 3-2
3.3 Connection of TVsurf................................................ 3-3
3.3.1 Connecting to the Power Supply ............................ 3- 3
3.3.2 Connecting the Telephone Line ............................. 3-4
3.3.3 Connecting the Video and Audio Cable................. 3-4
3.3.4 Connecting the S-Video Cable ............................... 3-5
3.4 Setting TVsurf's Video Settings ................................ 3-6
3.5 Wireless Keyboard .................................................... 3-6
3.6 Switching on your TV ............................................... 3-7
3.7 Switching on TVsurf ................................................. 3-7
3.8 Settings Up TVsurf.................................................... 3-7
3.8.1 Connection Environment...................................... 3-10
3.8.2 Browser Environment........................................... 3-12
3.8.3 Mail Environment................................................. 3-14
3.8.4 Template Configuration ....................................... 3-15
3.8.5 System Environment ............................................ 3-18
3.9 Connecting to the Internet with TVsurf .................. 3-20
Page 5

Chapter 4 The Browser
The Browser .......................................................................... 4-1
4.1 Outline ....................................................................... 4-1
4.2 Browser Screen and Menu ........................................ 4-2
4.3 Control....................................................................... 4-5
4.3.1 Scheme ................................................................... 4-5
4.3.2 Scroll ...................................................................... 4-5
4.3.3 Move and select the focus ...................................... 4-5
4.3.4 Form ....................................................................... 4-5
4.3.5 Switching Frames ................................................... 4-6
4.3.6 Clickable Map ........................................................ 4-6
4.3.7 Sound Files ............................................................. 4-7
4.3.8 User Authentication................................................ 4-8
4.4 Entry of Characters.................................................... 4-9
4.4.1 Supported Functions............................................... 4-9
4.4.2 Template ............................................................... 4-10
4.5 Browser Functions................................................... 4-11
4.5.1 Selecting a page from history............................... 4-12
4.5.2 Mail ...................................................................... 4-12
4.5.3 Favorites ............................................................... 4-13
4.5.3.1 Select Page/Register: Change Title ................... 4-14
4.5.4 Jump ..................................................................... 4-15
Chapter 5 Mail Operation
Mail Operation................................................................. 5-1
5.1 Outline ....................................................................... 5-1
5.2 Writing a mail............................................................ 5-2
5.3 Receiving a mail ....................................................... 5-2
5.3.1 Mail Listing ............................................................ 5-2
5.3.2 Received Mail ........................................................ 5-4
5.4 Attached File ............................................................. 5-5
5.4.1 GIF file ................................................................... 5-6
5.4.2 WAV Files.............................................................. 5-7
5.5 Saving addresses........................................................ 5-7
5.6 Automatic checking for new mails............................ 5-8
5.7 Saving a mail ............................................................. 5-8
5.8 Sending an email ....................................................... 5-9
5.8.1 Entry of an address ................................................. 5-9
5.8.2 Template ............................................................... 5-10
Page 6

5.8.3 Attach a file .......................................................... 5-10
5.8.4 Saving a mail sent................................................. 5-11
5.8.5 Saving a mail not sent .......................................... 5-12
5.8.6 Reply to a mail ..................................................... 5-12
5.8.7 Forward mail ........................................................ 5-13
5.8.8 Address Book ....................................................... 5-13
5.9 Attach Data List....................................................... 5-14
5.10 Mail List At Server ................................................ 5-14
Appendix A Additional Information
Features ................................................................................ A-1
Appendix B
Warning and Cautions.......................................................... B-1
Troubleshooting ................................................................... B-1
My Favourite Pages
For your records
The serial number of this product is on the backpanel of TVsurf. Write the serial
number in the space below and keep this guide as a permanent record of your
purchase to aid in identification in the event of theft or loss.
Model Name: TVsurf
Model Number: P702W
Serial Number:
Purchase Date:
Warranty Card Number:
Page 7

Warning and Cautions / Troubleshooting
Appendix B
Warnings and Cautions
I
TVsurf should be placed on a horizontal stable surface and about 10cm
from any object for good ventilation. Avoid covering the top of the unit.
Do not place the unit in direct sunlight, near a heat source or near any
water, oil or smoke.
Never attempt to repair the defective unit yourself. Opening and removing
the cover may expose you to dangerous hazards. Always consult an authorised service personnel.
Clean the unit with a soft and dry cloth when necessary. Do not pour or
use any chemical cleaners on TVsurf as it may have a detrimental effect
on the unit.
When removing AC power plug, always hold the plug and not the cable.
z
T roubleshooting
No dial tone message
• Check the telephone connection. Ensure that the line is connected and
is not engaged.
• Test the telephone connection to the ISP by connecting the telephone
line to your phone and dial the ISP phone number. If it is engaged, wait
for a few minutes and reconnect. If you do not hear a dial-tone, contact
the ISP helpdesk number or the public telephone service line.
• Is an outer line number necessary before the actual ISP number is
dialled
• Check that the phone line cable is connected from the wall socket to the
"line" input of TVsurf.
B-1
Page 8

TVsurf User's Manual
No display on TV screen
• Ensure that the TV is switched on.
• Check that TVsurf is connected to the TV properly.
• Check whether the TV is on the correct source selection (AV1 AV2 or
10, 11).
• Check that the reset button is not stuck.
• Check that the AC power source is on.
No colour
Check your video settings. Refer to Pg 2-4.
Full screen is not seen
• Check your video settings. Refer to Pg 2-4.
• Check your TV for a resizing function and resize the screen accordingly.
No graphics/images displayed on web page
• Reload the web page.
• Graphics may be too large to be displayed in the image memory. Reset
and reload the page.
• TVsurf does not support all graphics. Therefore, there is no gurantee
that TVsurf will display all graphics.
• When you scroll a web page away from a downloading image, the
downloading of that image will halt until you reload the page again.
No sound
• Ensure that audio cables are connected properly
• TVsurf supports downloadable "wav" files and there is no guarantee
that it will support other sound formats.
B-2
Page 9

Warning and Cautions / Troubleshooting
Unable to move cursor to the desired hyperlink.
• The web page display may contain a frame window. Use the [Frame]
button on the remote control or [Frame] hotkey on the keyboard to move
to the target frame.
• Try moving the cursor in a different direction. Sometimes when trying
to move to a link on the right or left of the screen, you may first have to
move a line up or down.
• Check if the batteries of the remote control or wireless keyboard are
placed properly or need to be replaced.
Internet web server error
• The page may not exist. Check the typing or try it again when the
communication traffic has reduced.
• The URL (address of the page http://www....) might have been typed in
wrongly.
Logon authentication error message
• Check the login name and password (case sensitive).
• Reset the unit and try to connect again. If problem persists, contact the
ISP helpdesk.
Clicking on link and nothing happens
• Refer to the communication indicators (refer to Figure 4-2 on page
4-2) to see if the web page is loading. If the 4 lights are flashing, it
indicates that there is communication between TVsurf and your Internet
Service Provider and your page is just taking some time to download.
This is due to high traffic within the Internet Service Provider.
B-3
Page 10

Additional Information
Appendix A
Additional information
This chapter provides more information about TVsurf.
Features
CPU Unit
q PA-RISC Embedded Processor, 66 MHz Operation Frequency
q 8K Write-Back Cache for enhanced performance
q 4M Bytes DRAM (EDO or Fast Page)
q 2MB Flash Memory, for Operating System and Applications
q NetFrontTM Browser and Email Application
Stand By Processor
q Stand-by Processor for Power-Saving Management
q External IR Remote Signal Monitor
Modem Unit
q 33.6Kbps modem
q Data Mode 33.6Kbps, V.34, V.32bis, V3.2, V.22bis, V.22A/B,
V.23 and V.21; Bell 212A, and 103
q V17, V.29, V.27ter, and V.21 ch2, Class 1 using 56K chip
q Voice/Audio Mode Enhanced ADPCM
compression/decompression 8 bits
q Autospan simultaneous audio/voice and data transmission
q Commutation S/W compatible with AT command sets
A-1
Page 11
TVsurf User's Manual
Display Unit
q Supports EDO DRAM from 1MB up to 4MB
q Provides the Best Text and Video quality for Composite
Underscan TV output using proprietary 3-line buffer FlickerFree technology
q Single crystal integrated TV encoder for direct NTSC/PAL
output
q NTSC (640x480, 60hz), PAL(800x600 and 640x480 at 50Hz)
q S-video & composite video output directly connected to TV video
input port
Power Unit
q External Wall Adapter
q 90-260Vac Universal AC Input
q 5Watts Power Dissipation
Remote Control Unit
q IR Remote Controller
- 38Khz Carrier
q IR Remote Keyboard (Optional)
- 86 Keys slim Keyboard 360(L) x 165(W) x 35(H)
- 38Khz carrier, 1.67Kbps transfer rate
- 5 meters, +/- 30 degree
A-2
Mechanical Unit
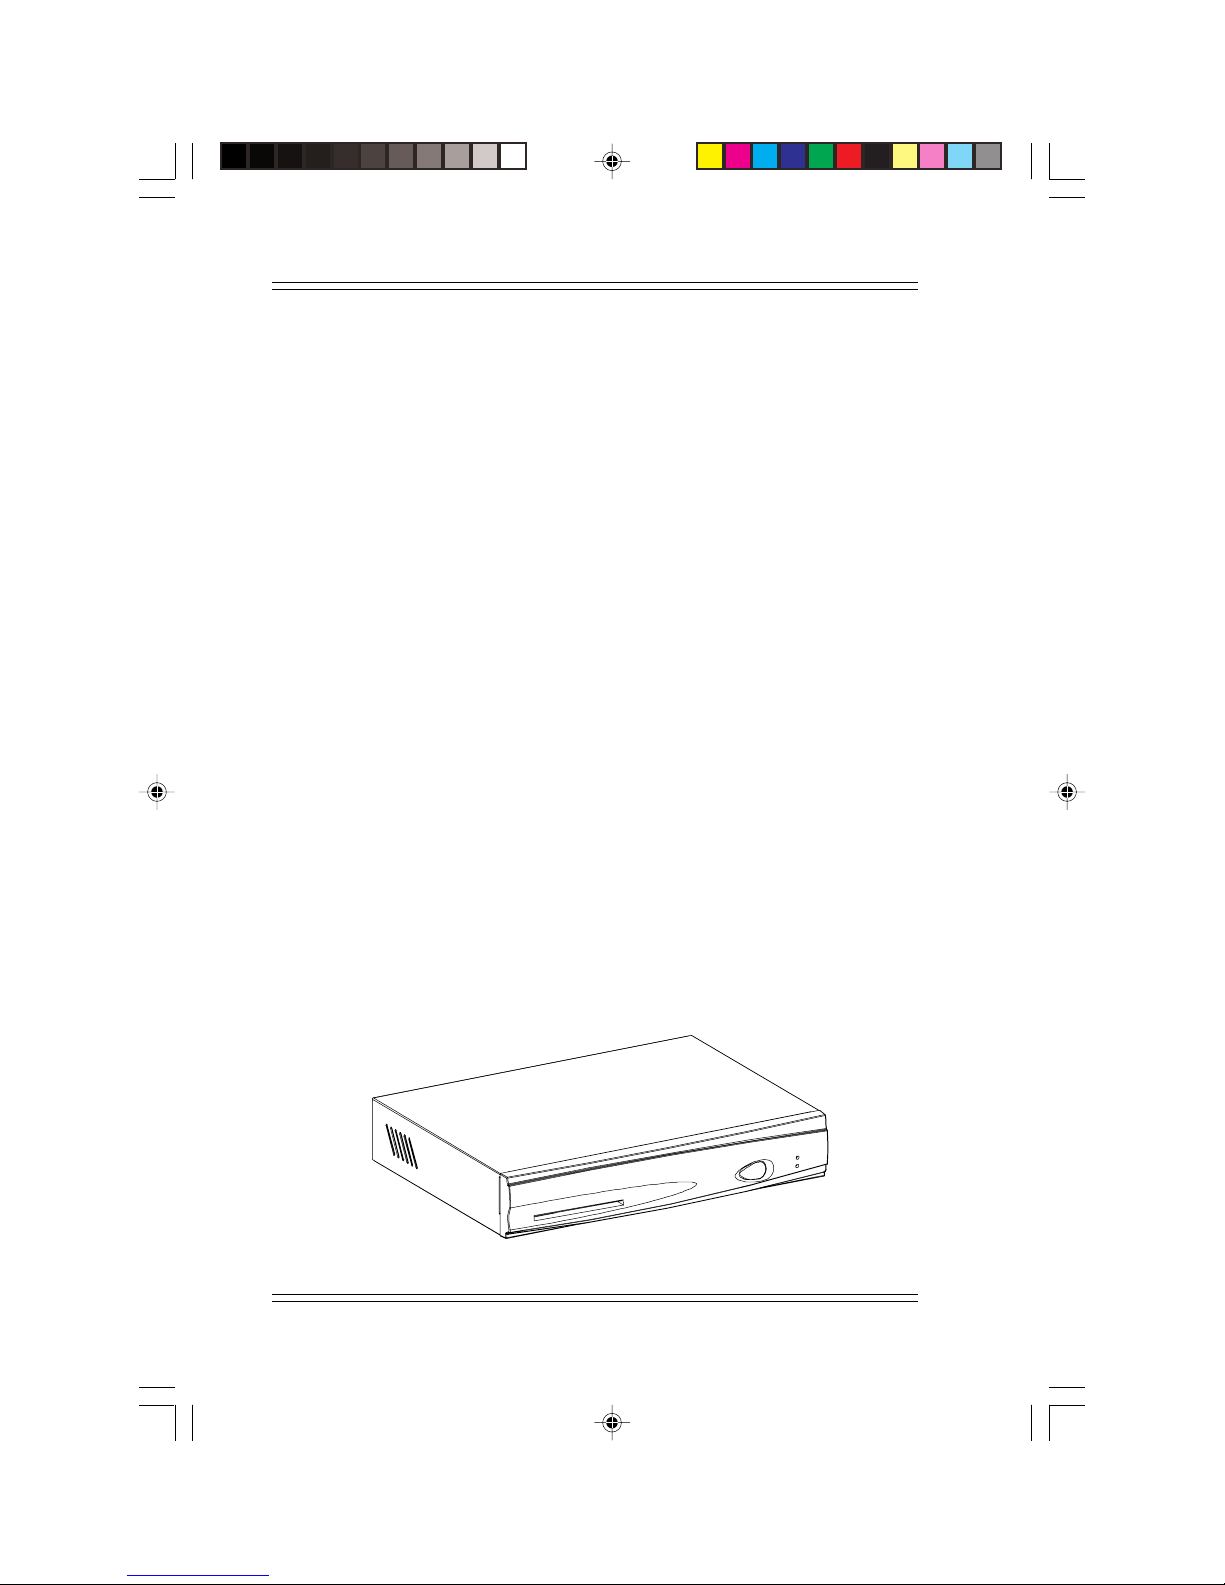
q Dimension: 212(L) x 140(W) x 38(H) mm
Page 12
Introduction
Chapter 1
Introduction
TVsurf is simple to use. It is ideal for anybody who wants to gain easy
access to the Internet.
GES Singapore Pte Ltd has designed this device to allow anyone without
any special skills or complex equipment to gain access to the Internet.
Using only a TV, a standard voice telephone line, and an internet account,
you can have a fast and user friendly access to the Internet community
using the simplest of equipment.
The Internet is an information highway that spans the globe. TVsurf's
user friendly Web browser gives you the tools and features to exploit the
Internet as a useful communications medium. Features such as email and
web browsing are all integrated into TVsurf.
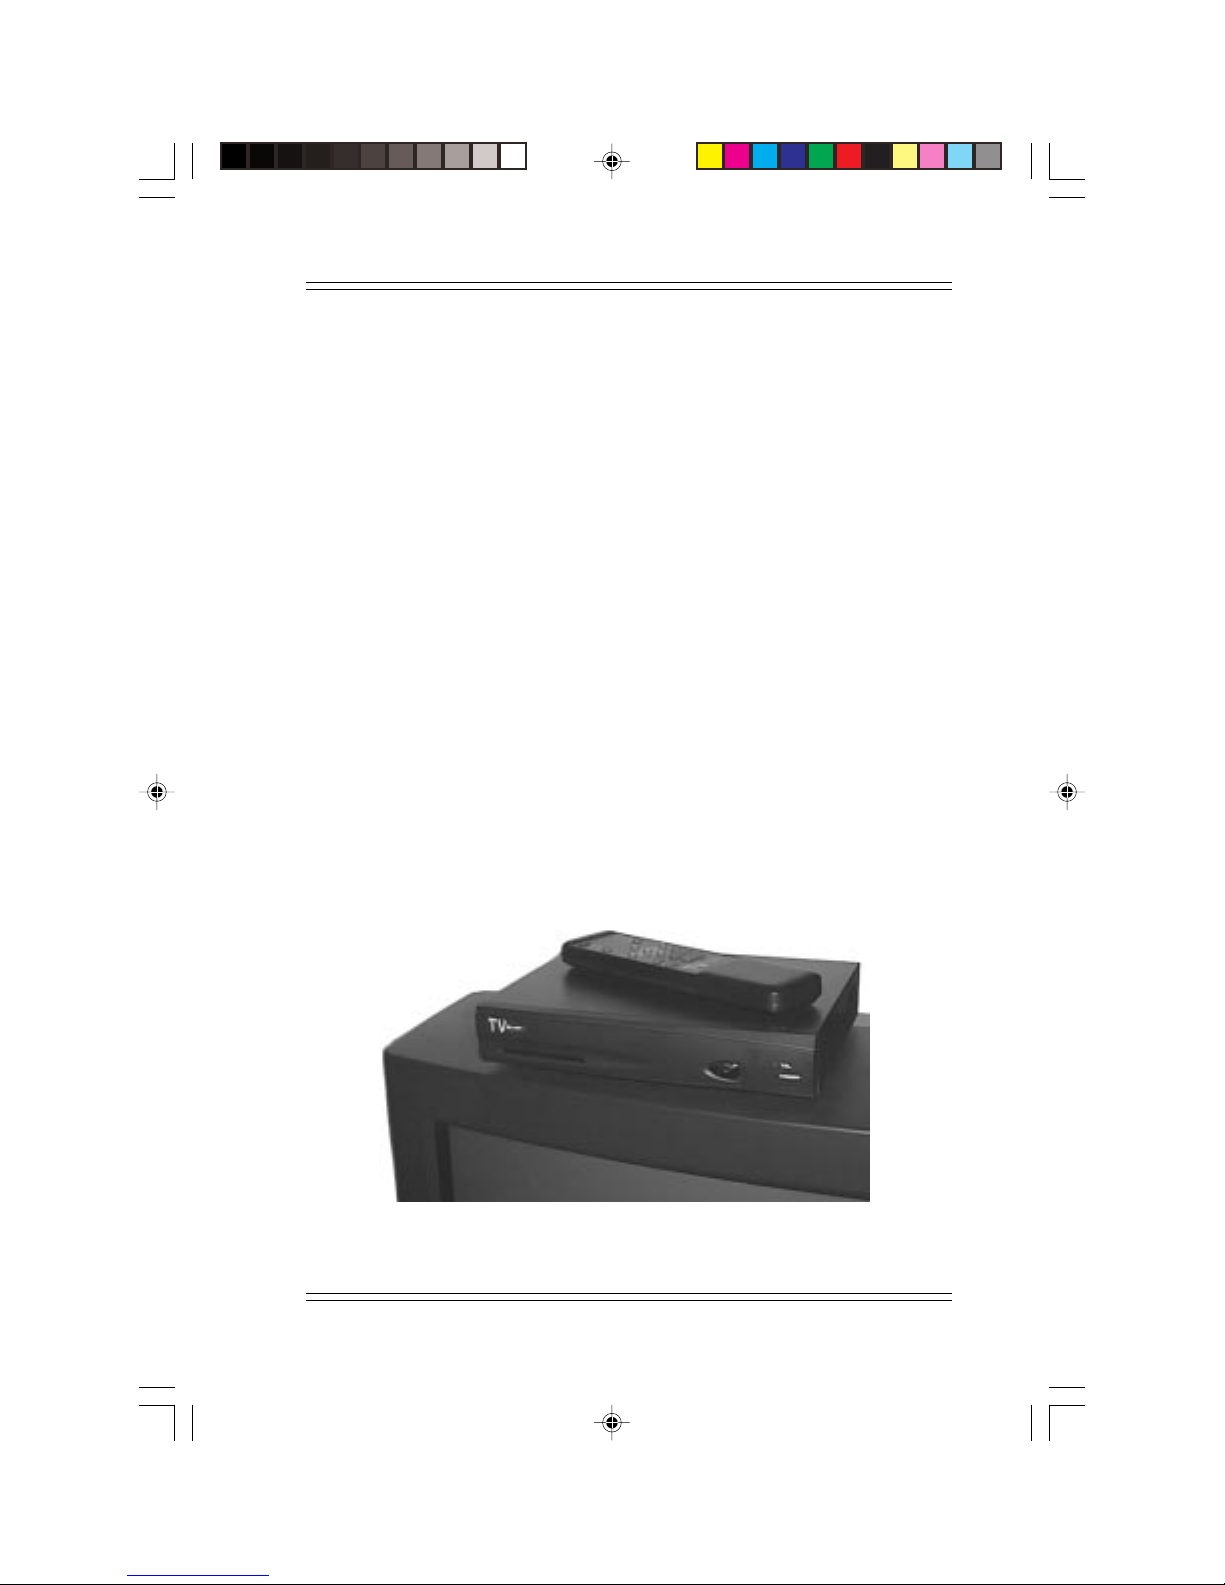
The TVsurf displays on a television and with the infrared remote control
or a wireless keyboard (optional), you will be able to enjoy the Internet’s
vast wealth of information.
1-1
Page 13
TVsurf User's Manual
1.1 What exactly is TVsurf?
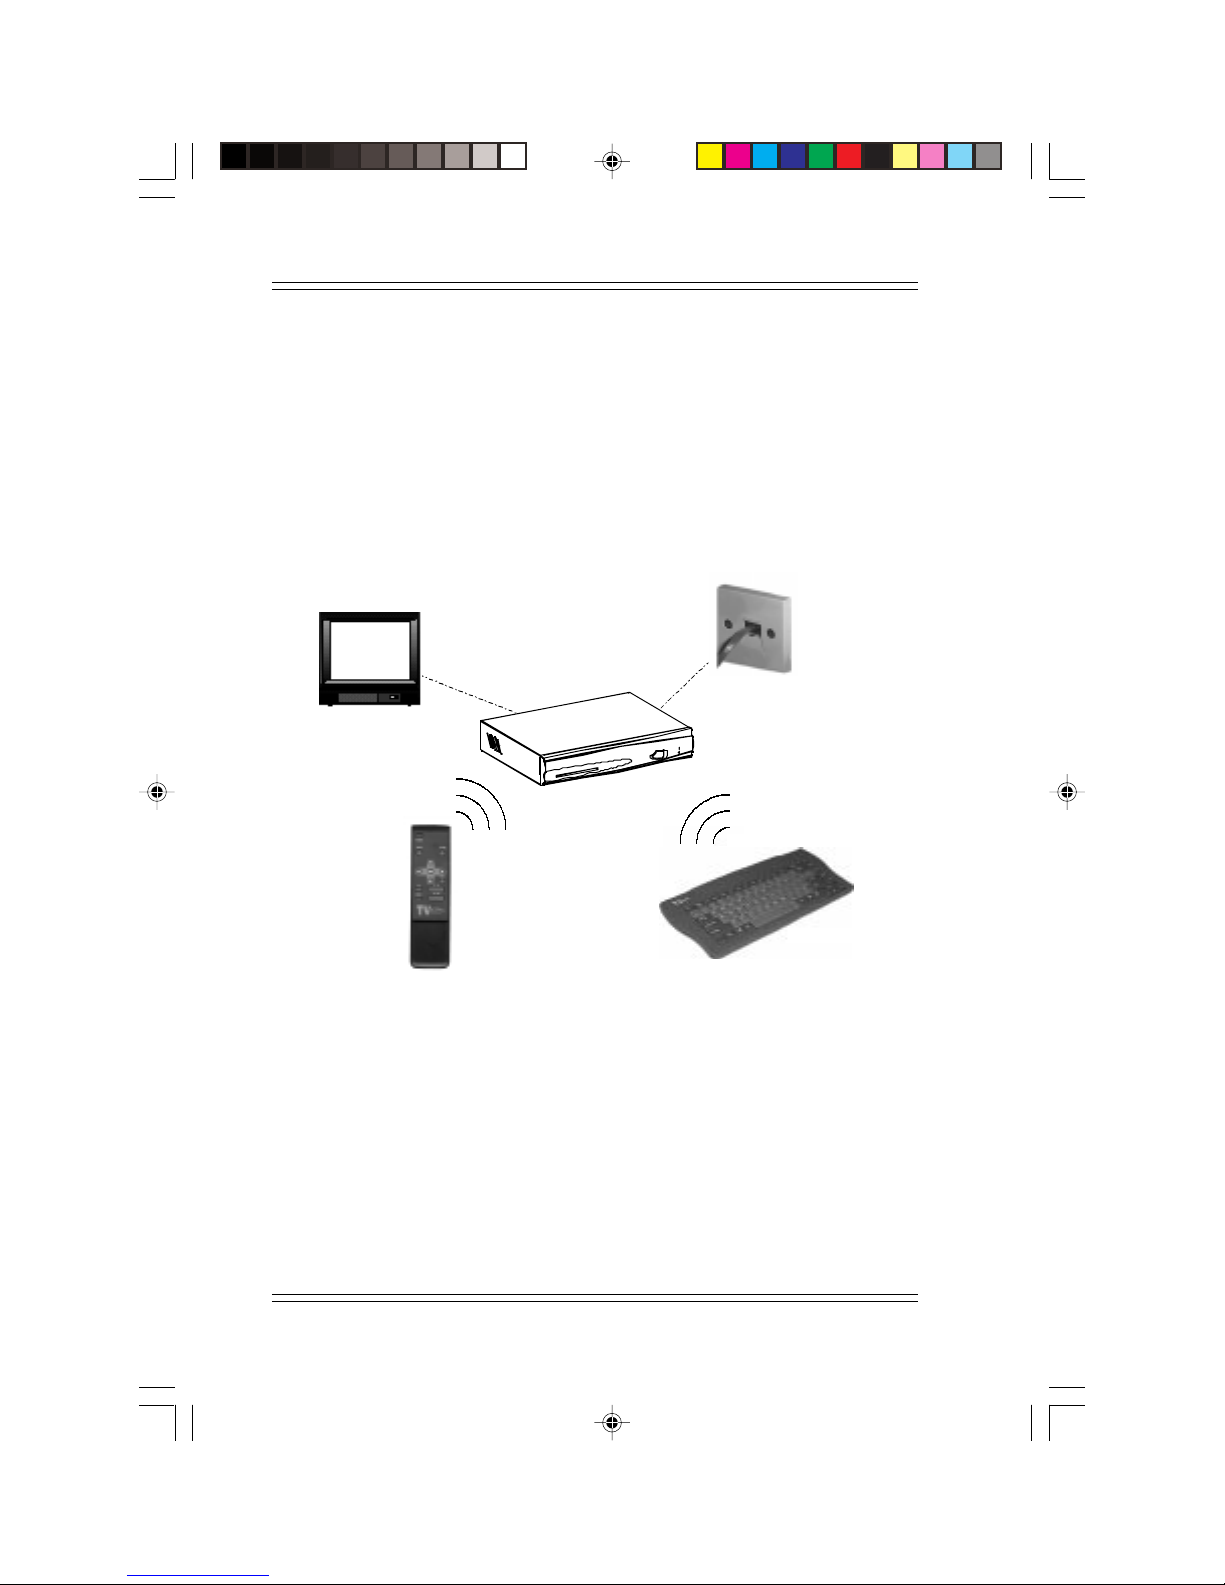
TVsurf is an Internet set top box for the television. It provides convenient
access to the Internet, and displays web pages on your television screen.
TVsurf has a modem that connects directly to your telephone line. A remote controller and an optional wireless keyboard allows you to surf and
email from the comfort of your living room.
Wall Socket
Television
POWER
FRAME
ZOOM
GO
ESC
Scroll Up
DEL
Scroll Down
MENU
Remote Control
Wireless Keyboard
(Optional)
Figure 1-1 What is TVsurf
Note:
F
You will need an internet access account before you can surf or email.
Please refer to your local Internet Service Provider (ISP) for more information.
1-2
Page 14
Overview of TVsurf
Chapter 2
Overview of TVsurf
This chapter provides a general introduction to the features of TVsurf.
Illustrations of the front and back views of TVsurf are provided to assist
you with your connection to a television.
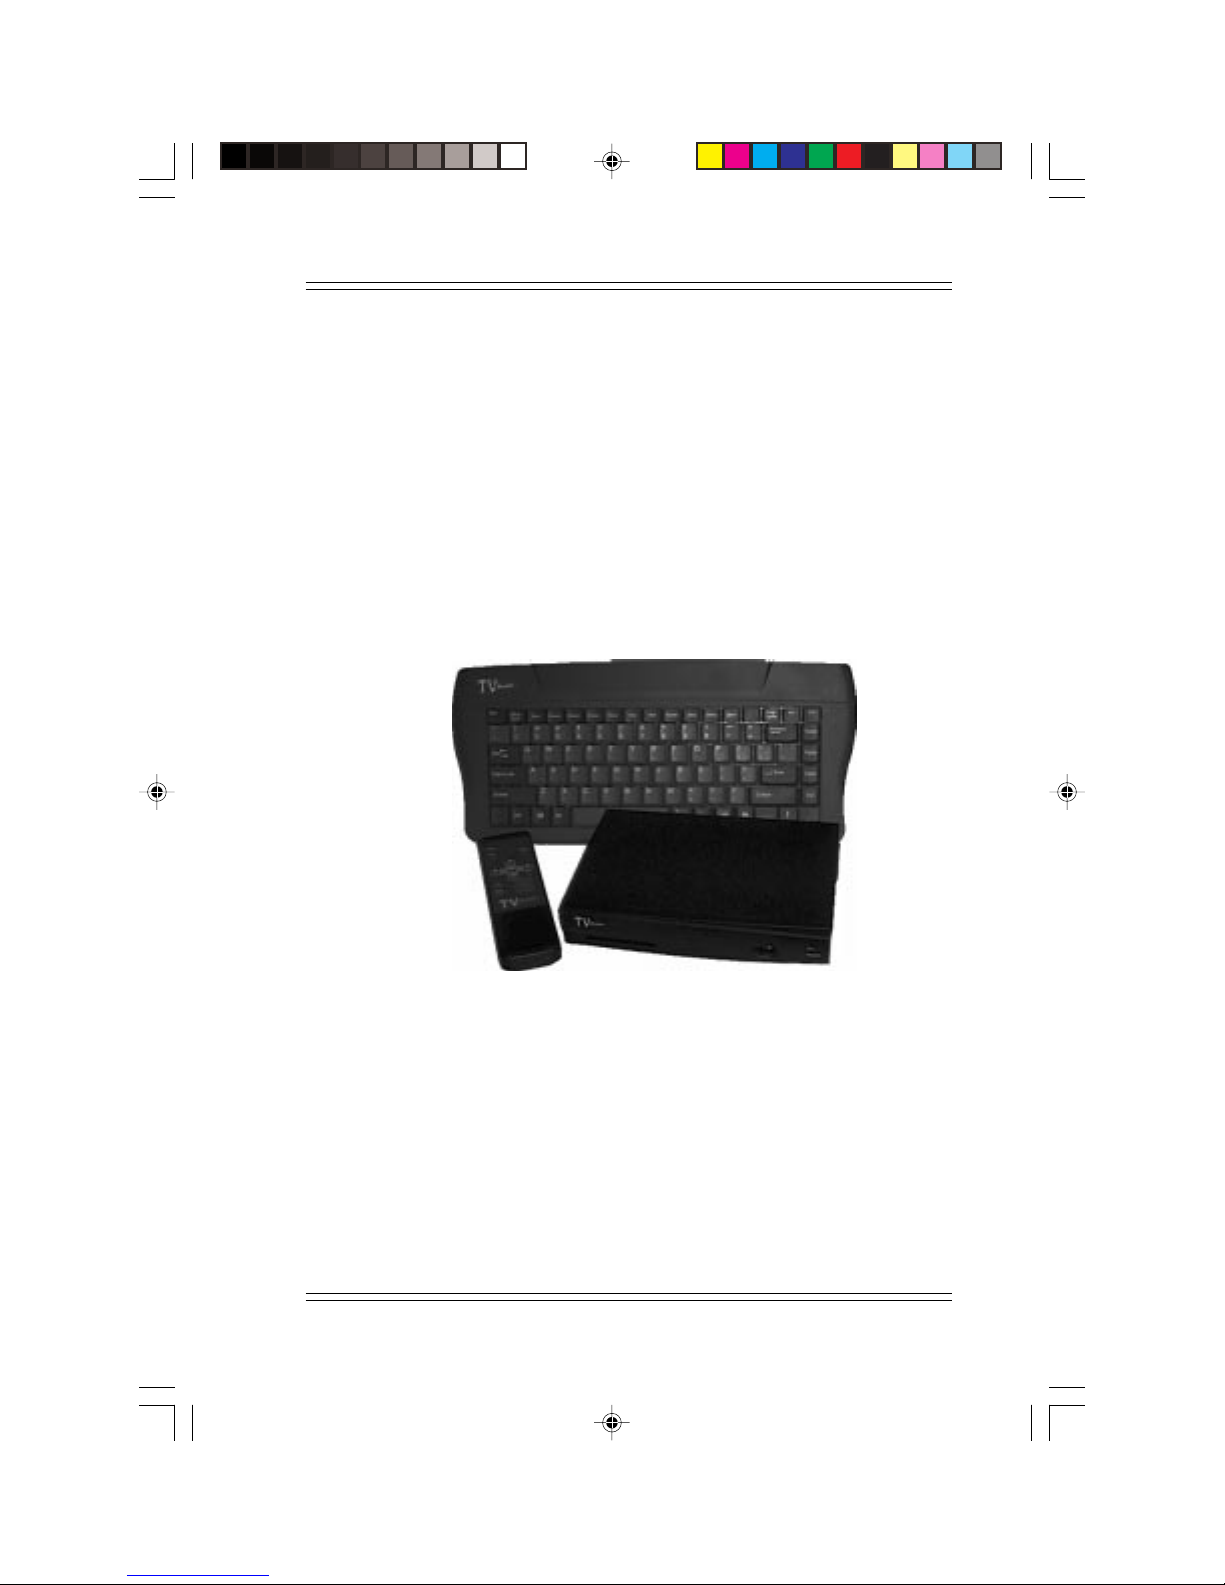
The TVsurf package comes with the remote control and other connecting
cables. Please refer to Page 3-1 for the TVsurf checklist to make sure you
have everything provided. The wireless keyboard is an optional item.
Figure 2-1 Overview of TVsurf
2-1
Page 15
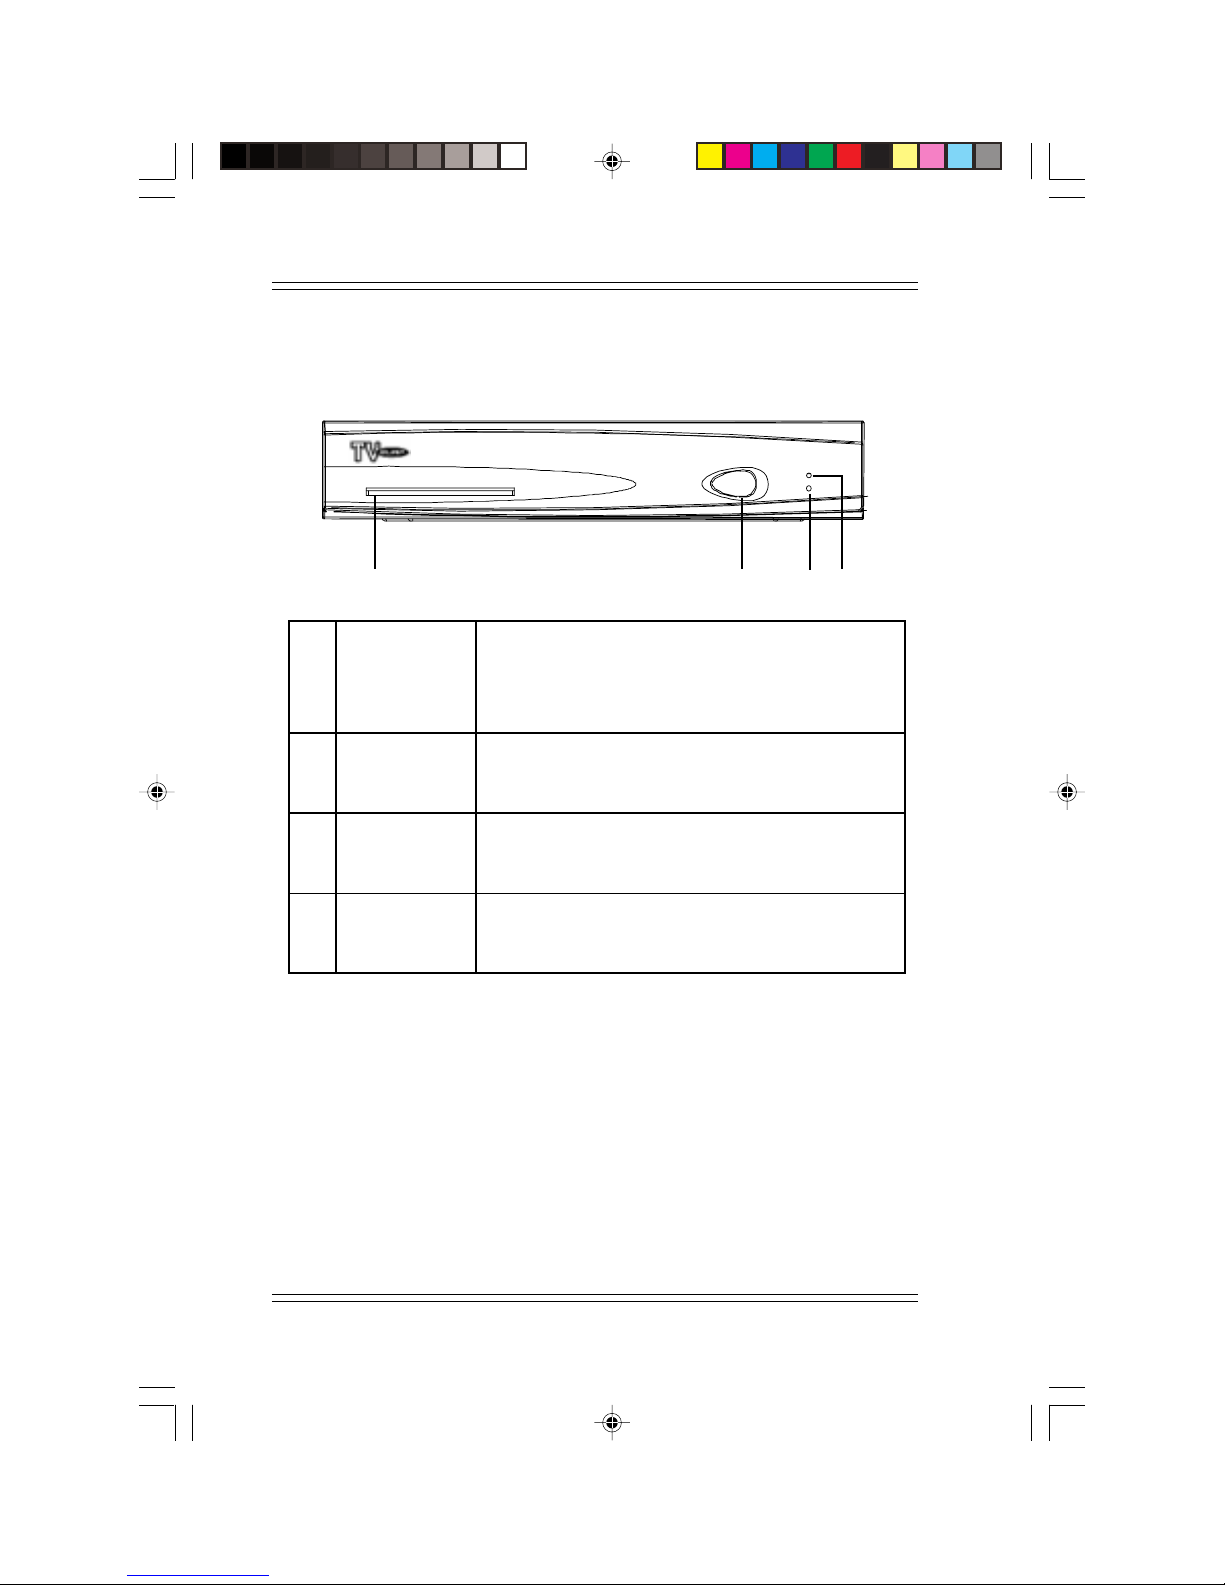
2.1 Front View of TVsurf
Green LED
j
k
l
TEL
POWER
Infrared
receiver /
Reset Button
Indicates that TVsurf is connected to the telephone
line and that the modem is active and is connected
to the Internet.
Red LED - Indicates that TVsurf is switched on.
Green LED - Indicates that TVsurf is connected to
a power source but on standby mode.
The remote control or wireless keyboard should be
pointed towards the receiver. It is also a reset button which re-initialises the unit.
TVsurf User's Manual
jklm
2-2
m
Smart Card
Reader
This Smart Card reader will be available in the next
version.
Table 2-1 Front View of TVsurf
Page 16
Overview of TVsurf
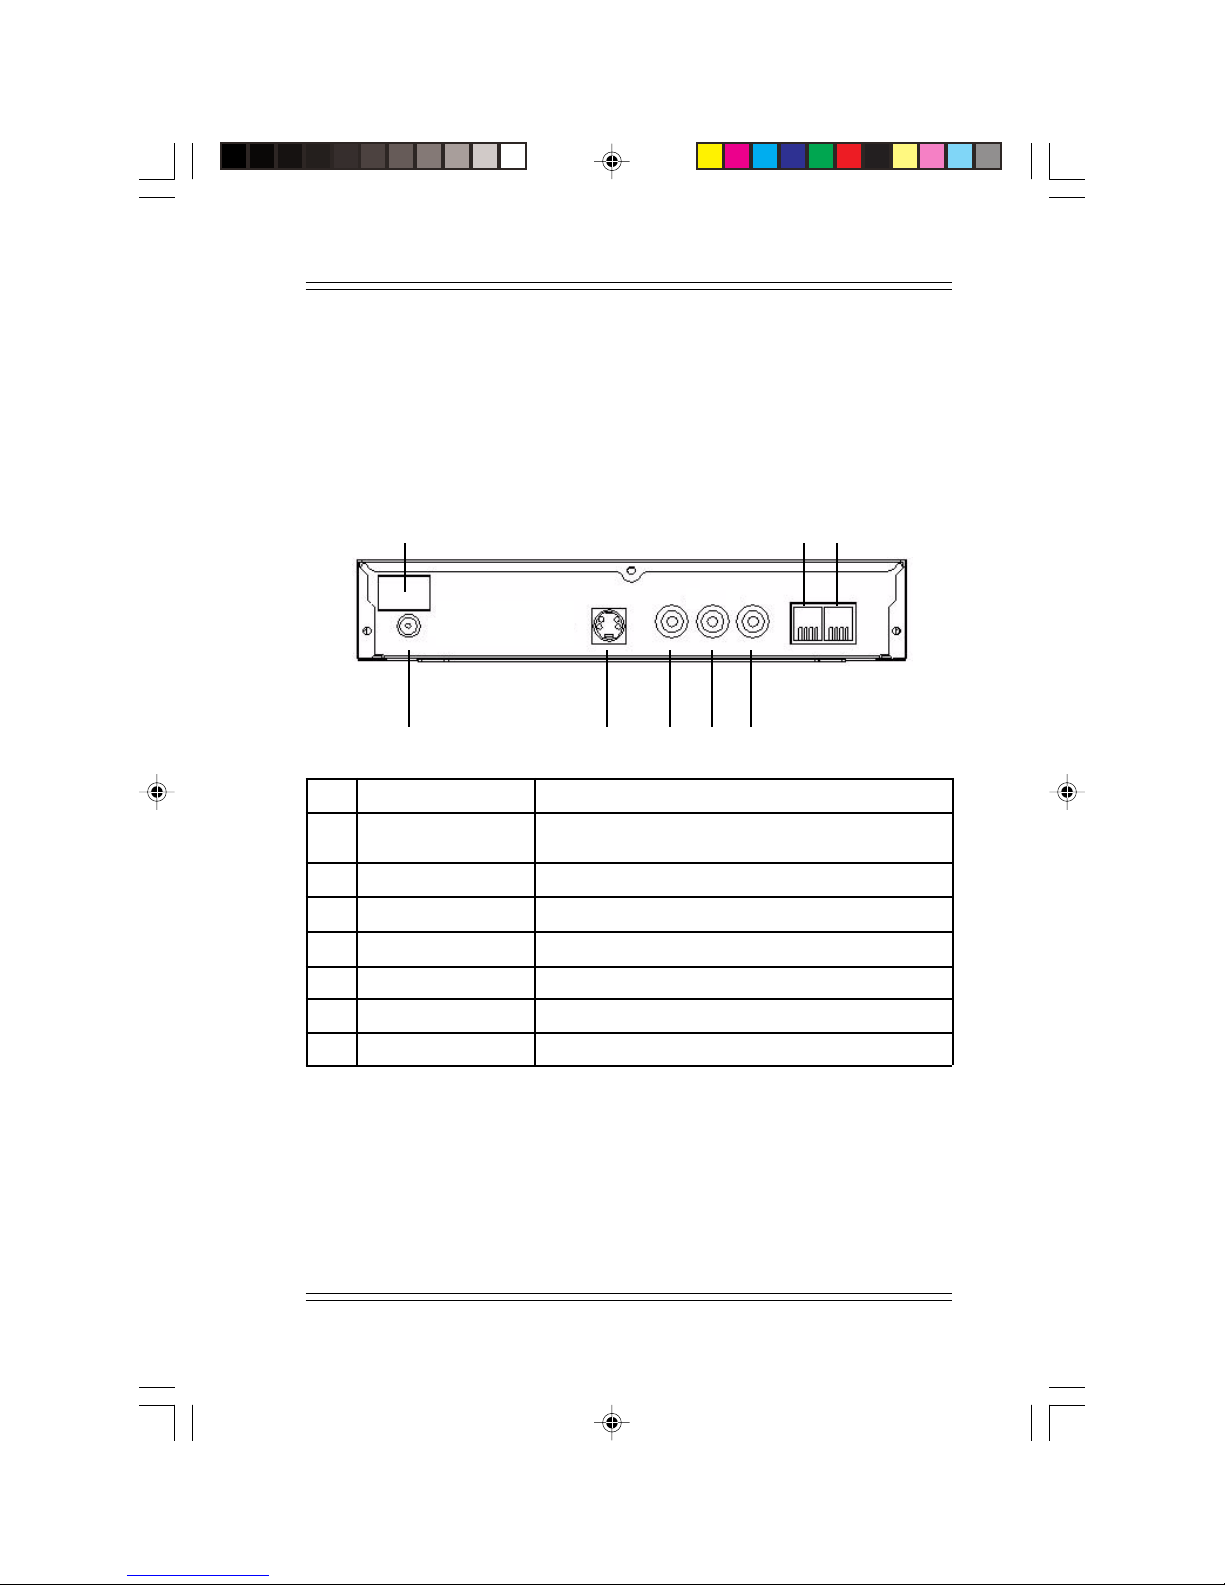
2.2 Back View of TVsurf
To begin using TVsurf, you will first have to make a few simple connections.
Shown below are the connectors from the back of TVsurf to the television and
other peripherals.
j
mn
ON/OFF Switch
j
Phone
k
Line
l
Power
m
S-Video
n
Video Out - Yellow
o
Audio (L) - White
p
Audio (R) - Red
q
l
opkq
Switches TVsurf on or off.
Connects to your phone if you are sharing
the phone line with TVsurf.
Connects a telephone line to the wall socket.
Connects the power AC power cord.
Connects to the S-Video input of the TV.
Connects to the video input of the TV.
Connects to the Audio (L) input of the TV.
Connects to the Audio (R) input of the TV.
Table 2-2 Back View of TVsurf
2-3
Page 17
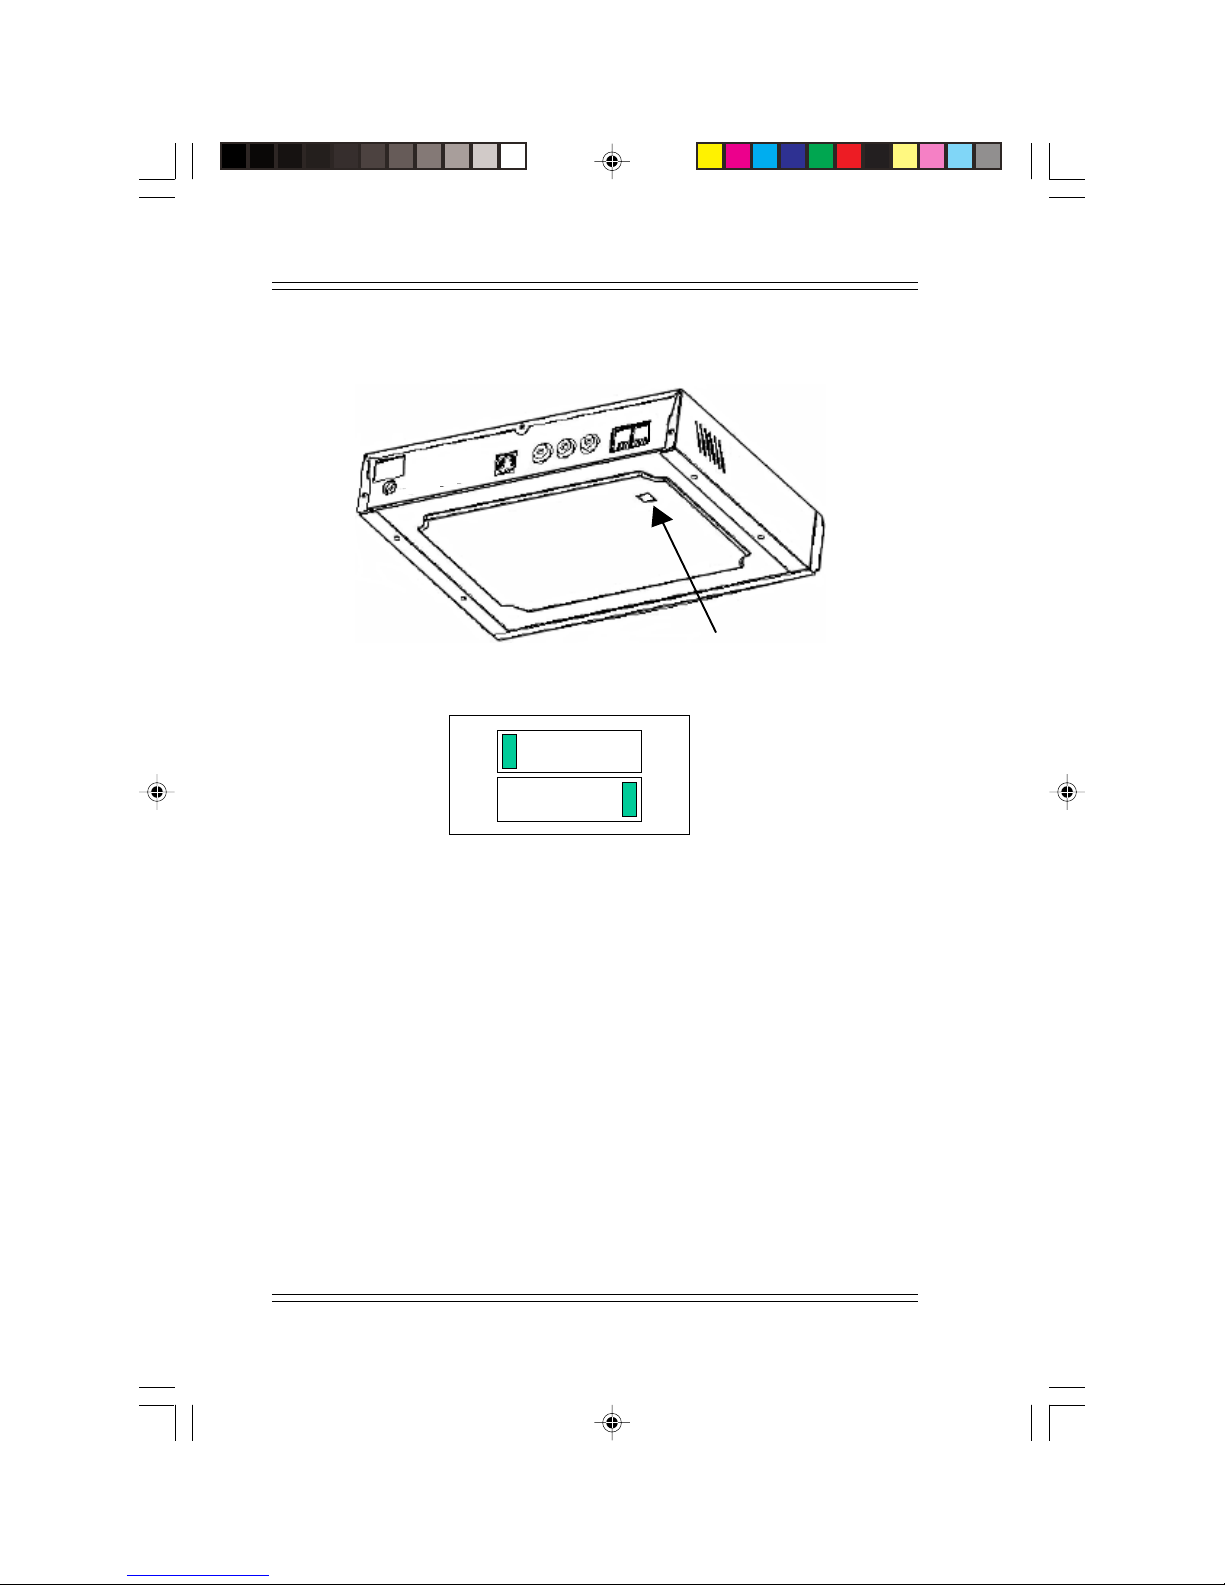
2.3 Video Settings
TVsurf User's Manual
Switches
CVBS
NTSC
On the bottom of TVsurf, there are 2 switches for selection of video mode and TV
system. By default, it is placed such that CVBS (Composite Video) and PAL are
selected. You may use a pointed object (eg. pen) to set it otherwise. You may
choose between Composite Video or S-Video Mode depending on the TV type
and either NTSC or PAL depending on your TV system.
2-4
1
2
O N
S-VIDEO
PAL
Page 18
Overview of TVsurf
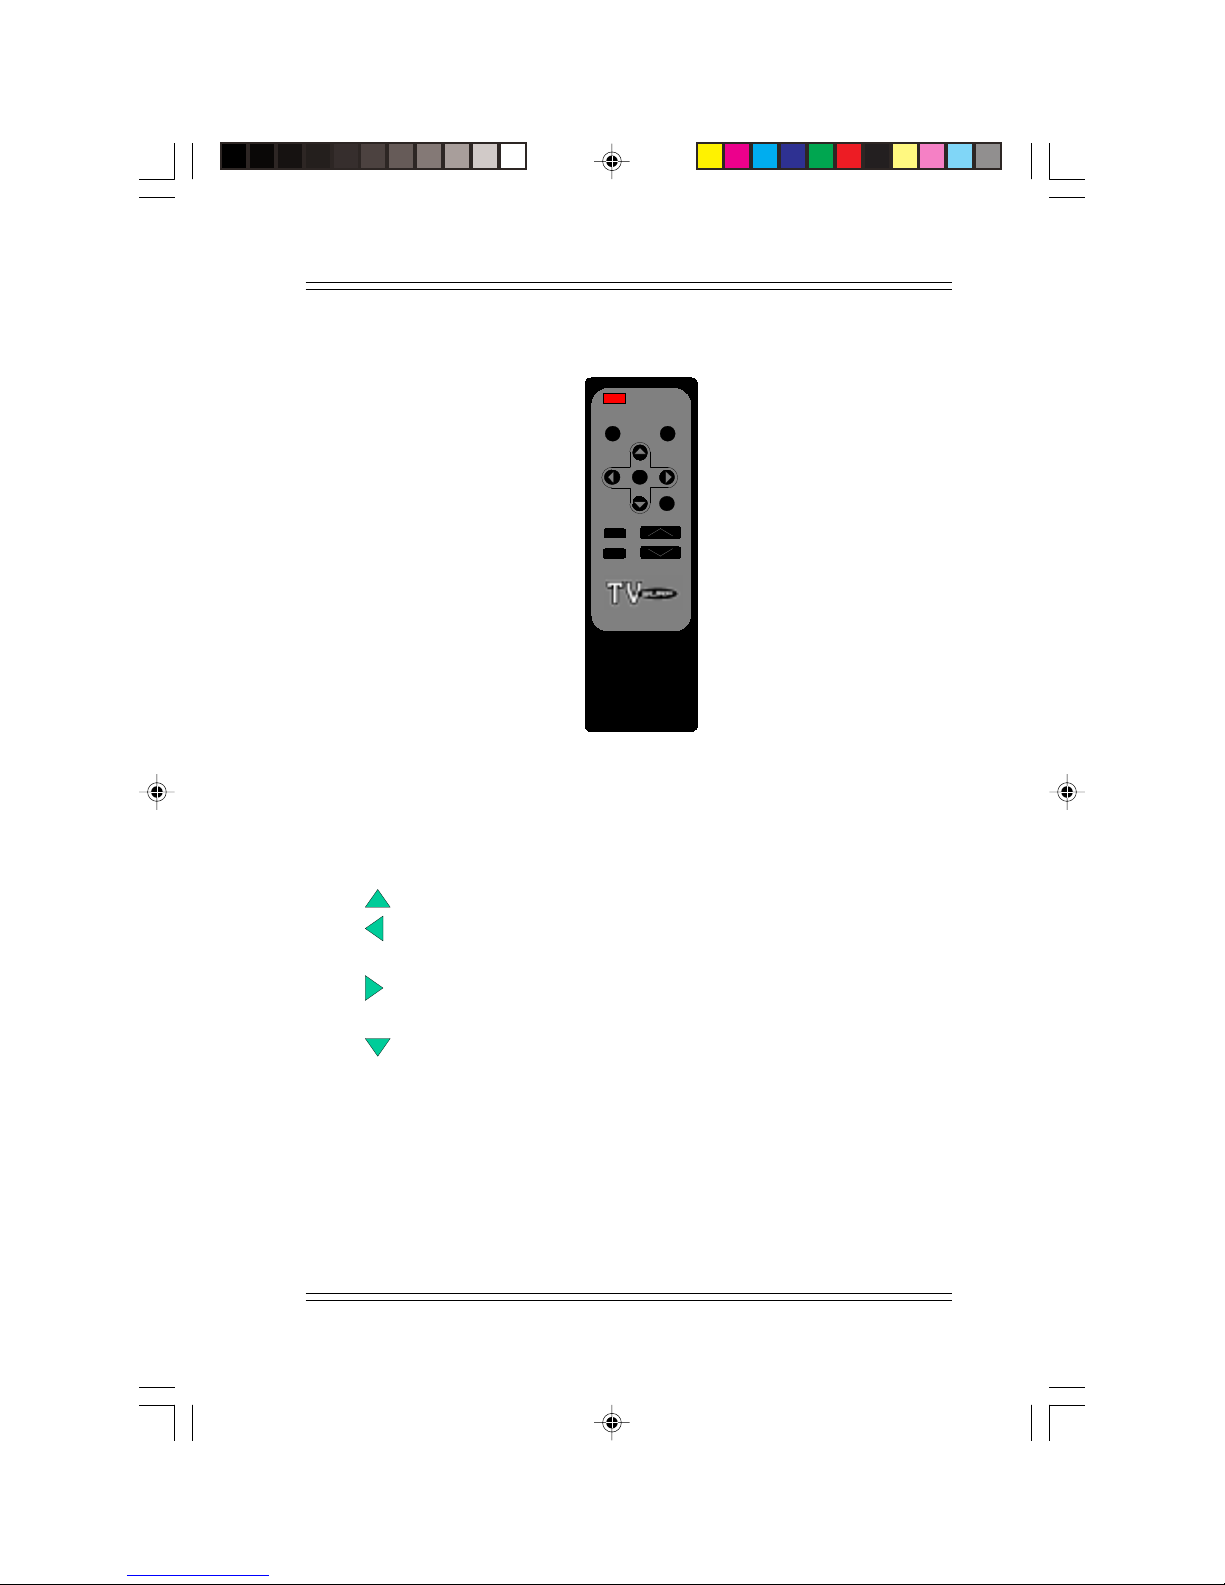
2.4 Remote Control Functions
POWER
FRAMEZOOM
GO
ESC
PgUp
DEL
PgDn
MENU
Figure 2-2 Remote Control Functions
POWER: Switches on/off TVsurf.
ZOOM: Enlarges the text on a web page.
FRAME: Changes focus between frames.
Goes to a selection one level up.
Scrolls screen to the left or goes to one selection to the left.
Go: Accepts a selection made.
Scrolls screen to the right or goes to one selection to the
right.
Goes to a selection one level down.
ESC: Rejects selection or escapes from any selection.
DEL: Deletes text which you have entered.
PG UP: Scrolls the screen by one page upwards.
PG DN: Scrolls the screen by one page downwards.
MENU: Displays the menu bar.
2-5
Page 19
TVsurf User's Manual
2.5 Wireless Keyboard (Optional)
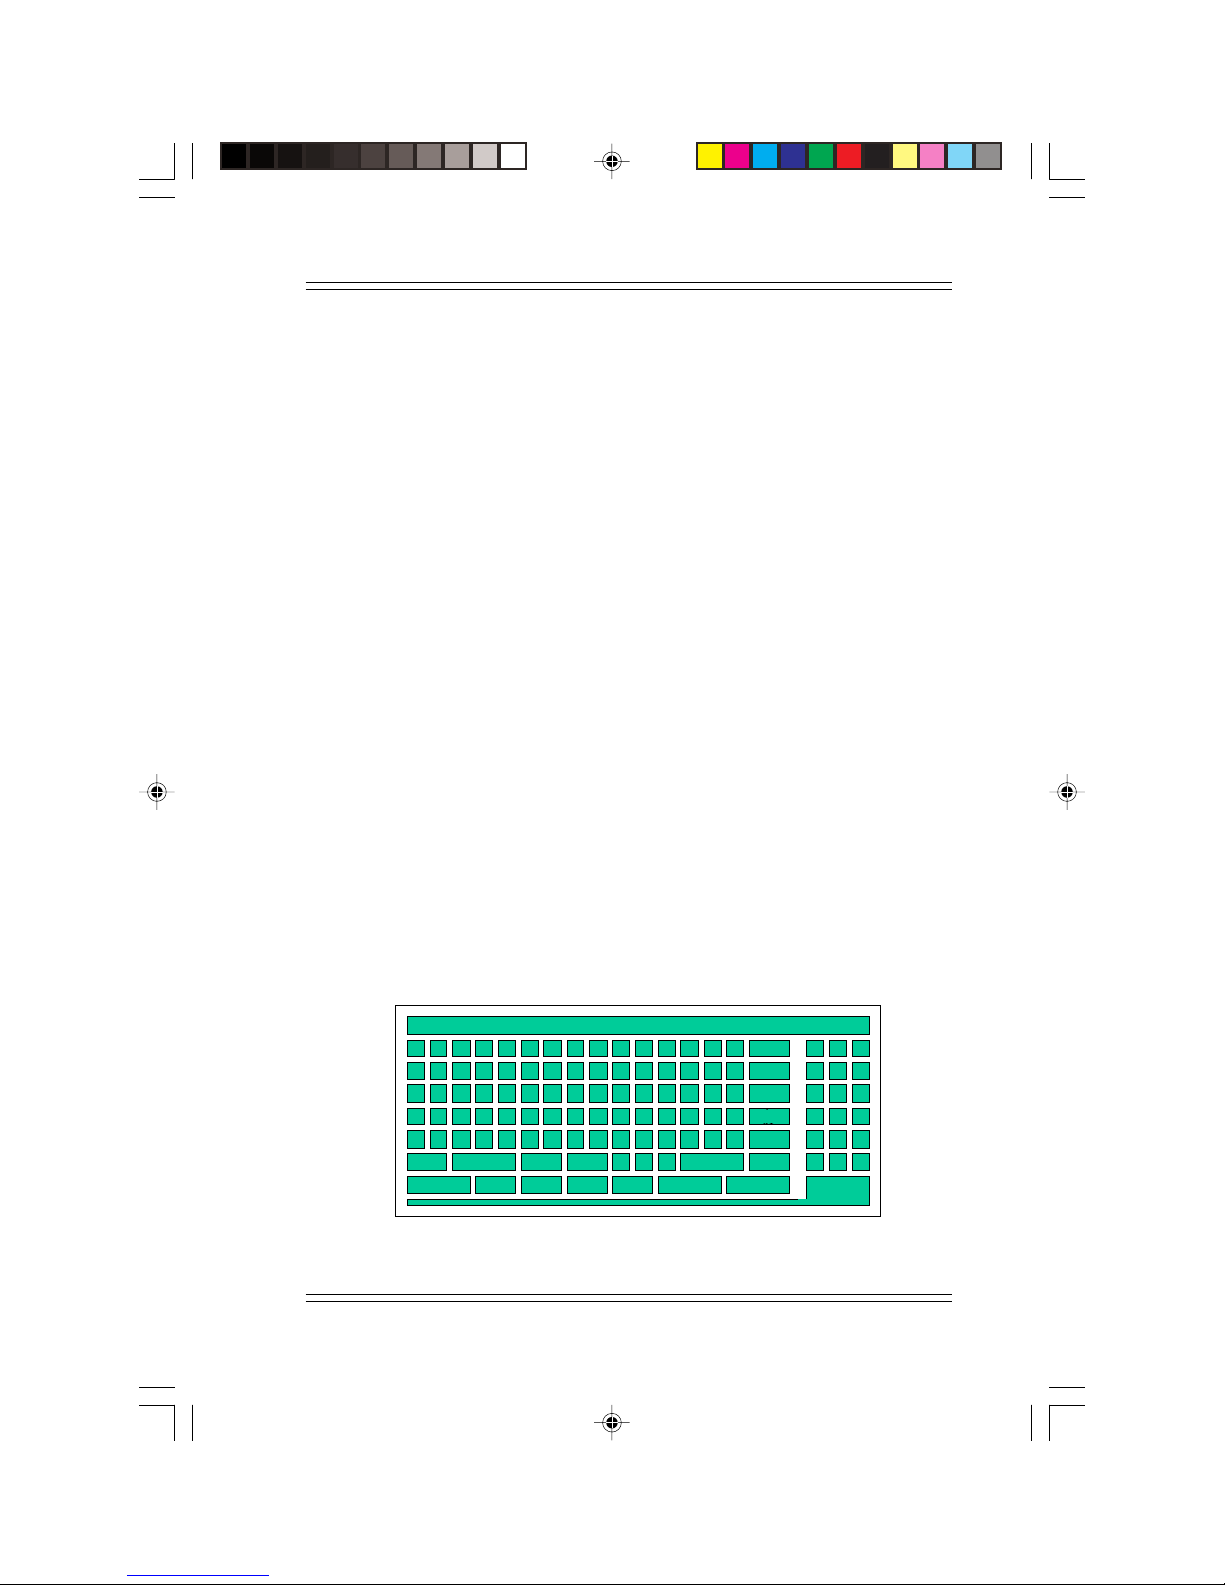
Figure 2-3 Wireless Keyboard
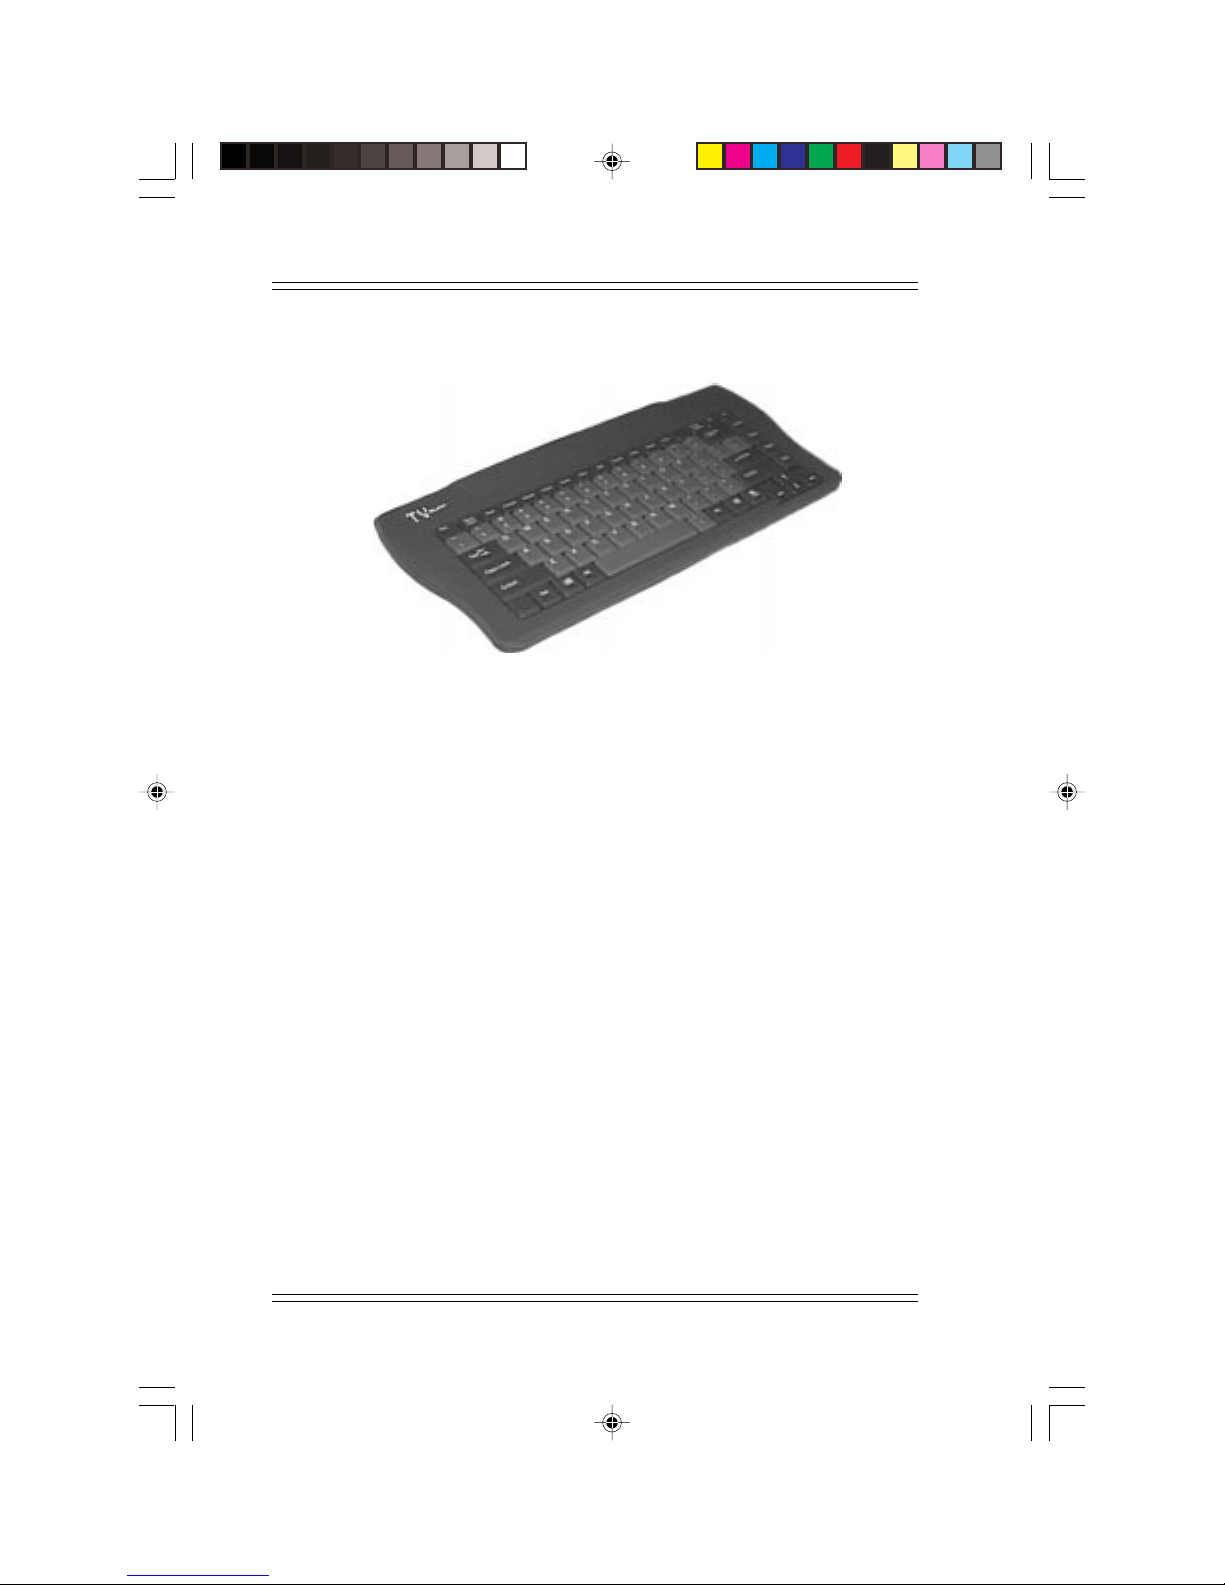
The wireless keyboard is an optional peripheral which you may use with TVsurf.
With this keyboard, you will find it very convenient to surf the Internet or write
your email from the comfort of an armchair. It is ergonomically designed for an
easy and firm grasp during typing.
It requires two AAA batteries which should be changed every 6 months (normal
operation).
Note:
F
When using the wireless keyboard to enter information in the Browser
and Mail Application, press the [ESC] key to cancel or the [Menu/Input]
key to confirm what you have keyed in and return to the previous screen.
2-6
Page 20

Overview of TVsurf
Definition of keyboard function keys:
The wireless keyboard has 13 function keys that are used as "hot keys".
You can save time and effort by using them.
Menu/Input: Displays the Menu Bar/Confirms text entry.
Back: Returns to the previous page.
Forward: Forwards to the next page (provided it was viewed
previously).
Reload: Refreshes the current page.
Frame: Switches the focus between frames.
Home: Displays the homepage defined in the Browser
Environment.
Stop: Stops the loading of the current web page.
Mail: Begins the TVsurf Mail Application.
Favorite: Displays a list of your bookmarked web sites. You
may add or edit the list.
Jump: Allows you to key in a URL (http://...) and connects
to that web page.
Setup: Displays the setup menu.
Zoom: Increases or decreases font size accordingly.
Power On/Off: Switches TVsurf on or off.
2-7
Page 21

MY NOTES:
TVsurf User's Manual
2-8
Page 22
Get Started!
Chapter 3
Get Started!
This chapter will be useful for anyone who is using TVsurf for the first
time. Each section of this chapter will describe what you should do from
the moment you take TVsurf out of the box till you enter the TVsurf Browser
and Mail Application. At the end of this chapter you will be sitting on
your couch and using TVsurf, all ready to enjoy the vast information which
the Internet can provide!
3.1 Check List
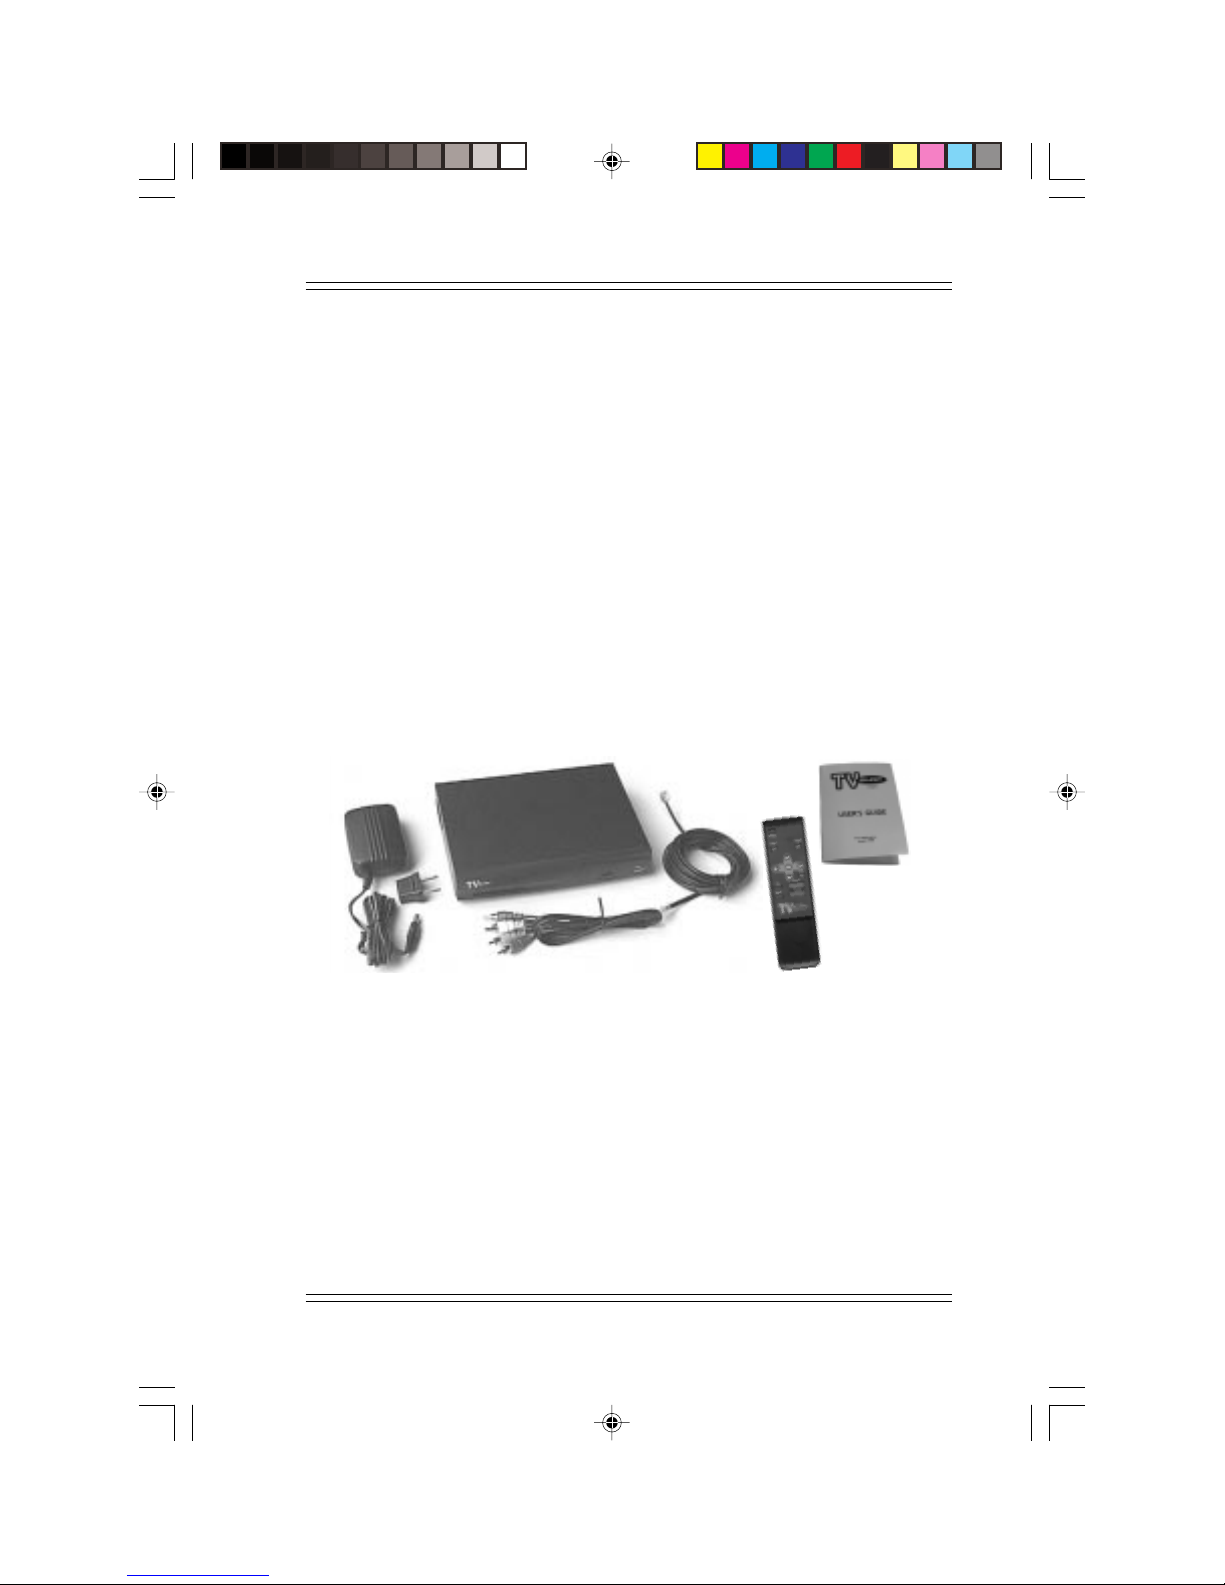
First of all, make sure everything you bought is in front of you. TVsurf,
the remote control and all necessary wires come in a single box. The keyboard is in a separate box. Let's go through a list of things you should
have.
1
2
3
6
5
Figure 3-1 What you should have in the TVsurf box
1. TVsurf
2. Telephone Line Cable
3. TVsurf User's Manual
4. Remote Control
5. Video & Audio Cable (3 way RCA cable)
6. Power Adapter (with a 2 pin adapter plug)
Note:
F
The S-Video cable is not provided with TVsurf.
4
3-1
Page 23
TVsurf User's Manual
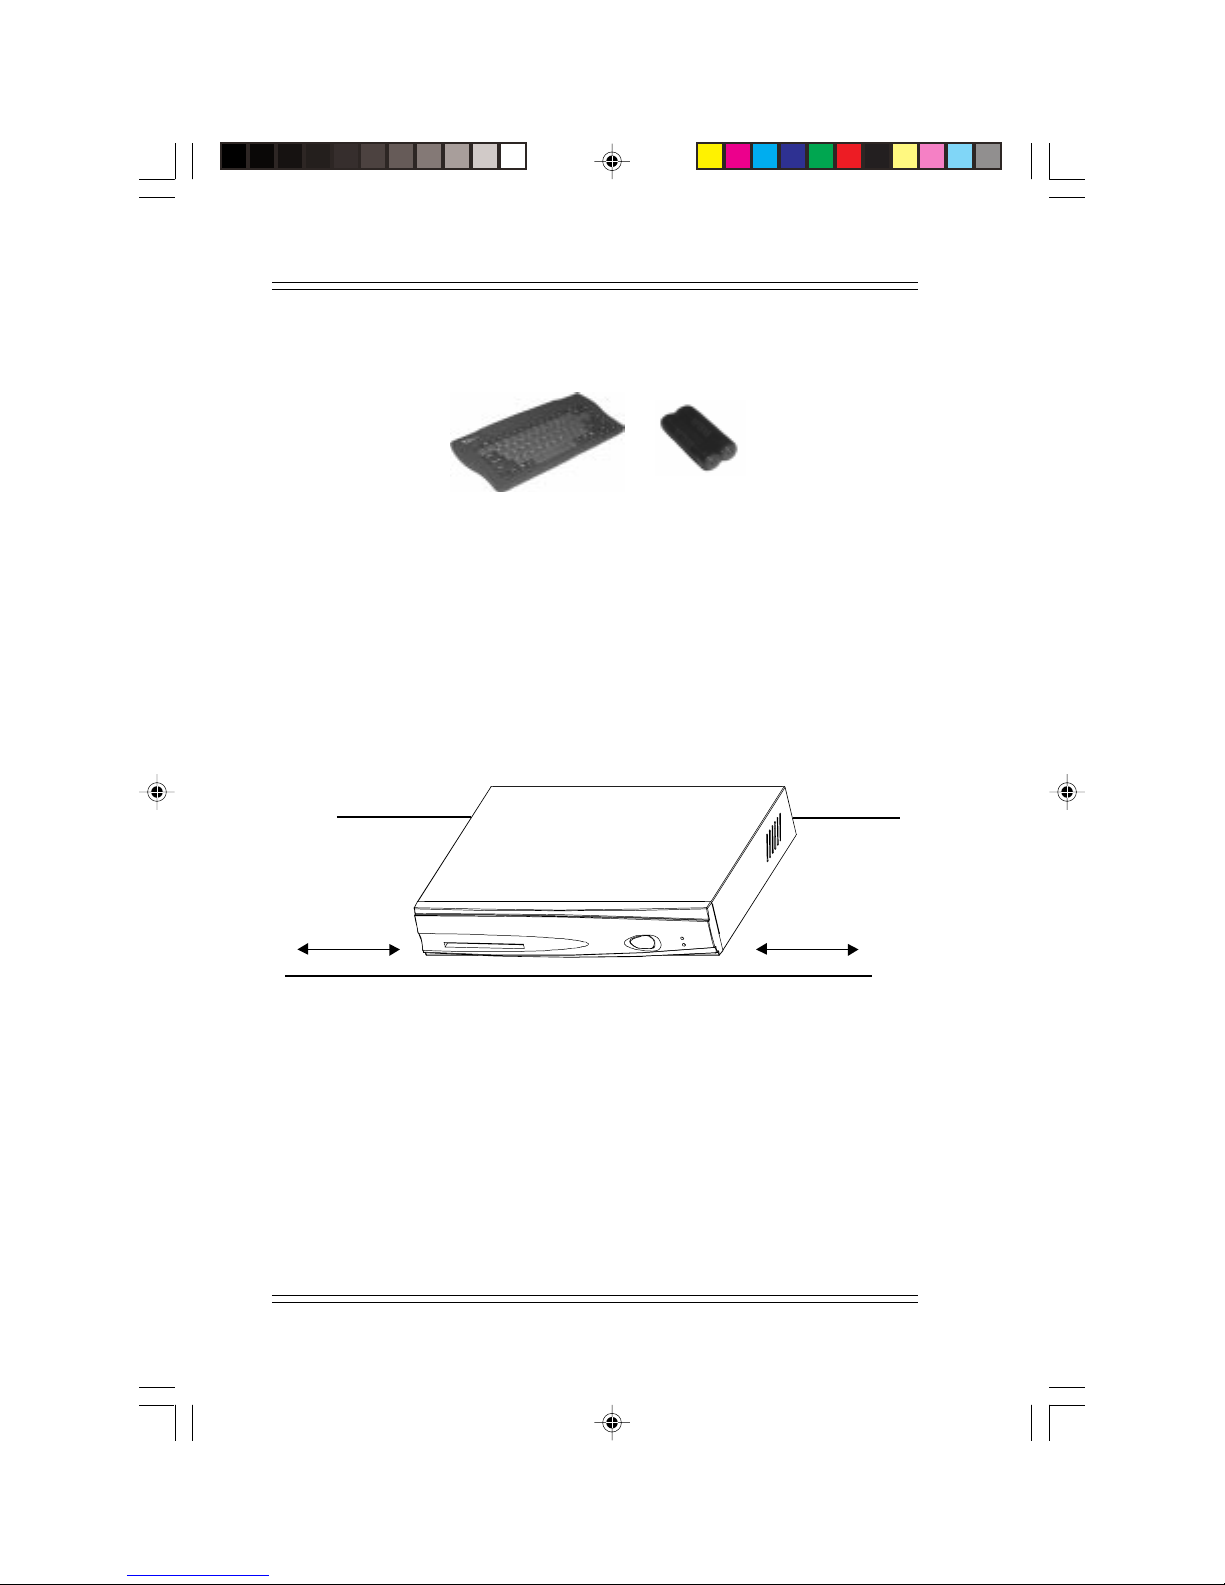
The keyboard comes in a separate box. In that box you should find the
following:
12
Figure 3-2 What you should have in the keyboard box
1. Keyboard
2. 2 "AAA" batteries
3.2 Placement of TVsurf
First of all, you should find a suitable location to set up TVsurf. Make sure
that it is about 10cm from any object for good ventilation. Please refer to
the Appendix B for more advice on the placement of TVsurf.
10cm 10cm
Figure 3-3 Placement of TVsurf
3-2
Page 24
Get Started!
3.3 Connection of TVsurf
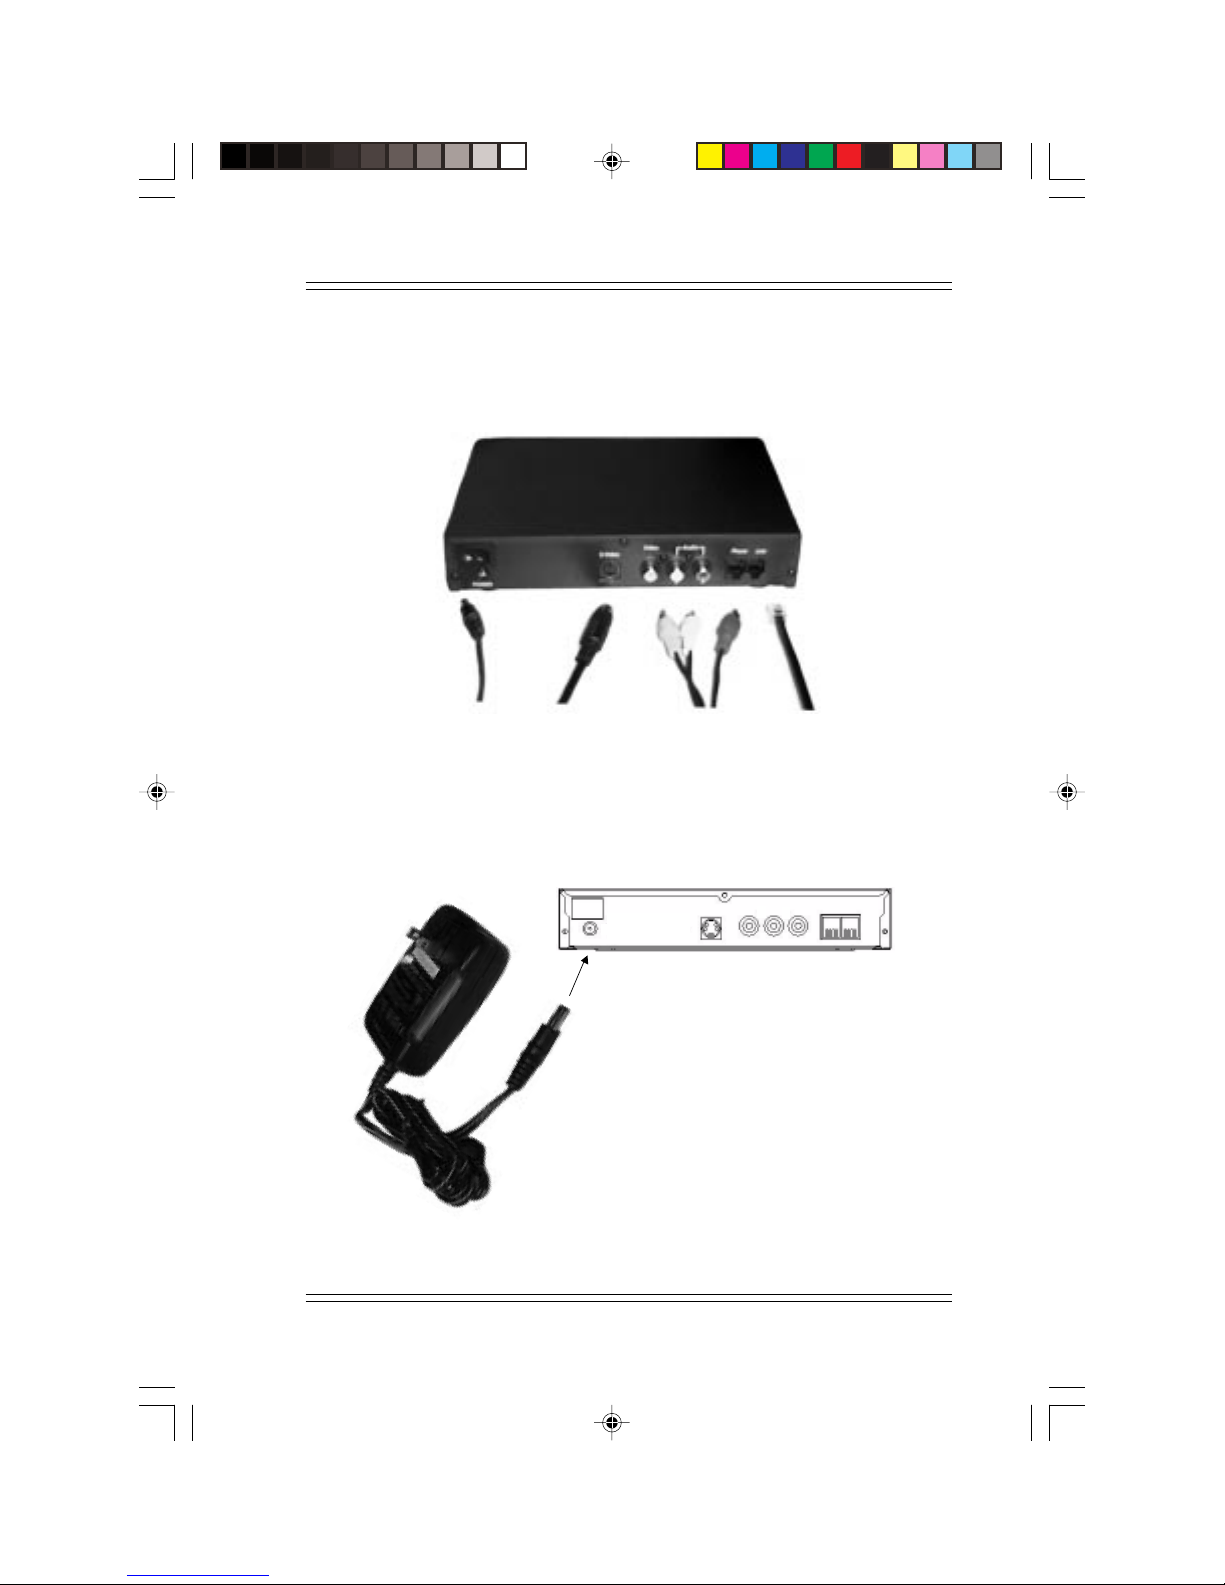
With reference to section 2.2 on Page 2-3, you may now begin to make
necessary connections to TVsurf.
Power
Adapter
S-Video
Cable
Video and
Audio Cable
Figure 3-4 Connection of TVsurf
3.3.1 Connecting to the Power Supply
POWER
Power
Adapter
Figure 3-5 Connection of TVsurf to the Power Supply
Telephone
Line
3-3
Page 25
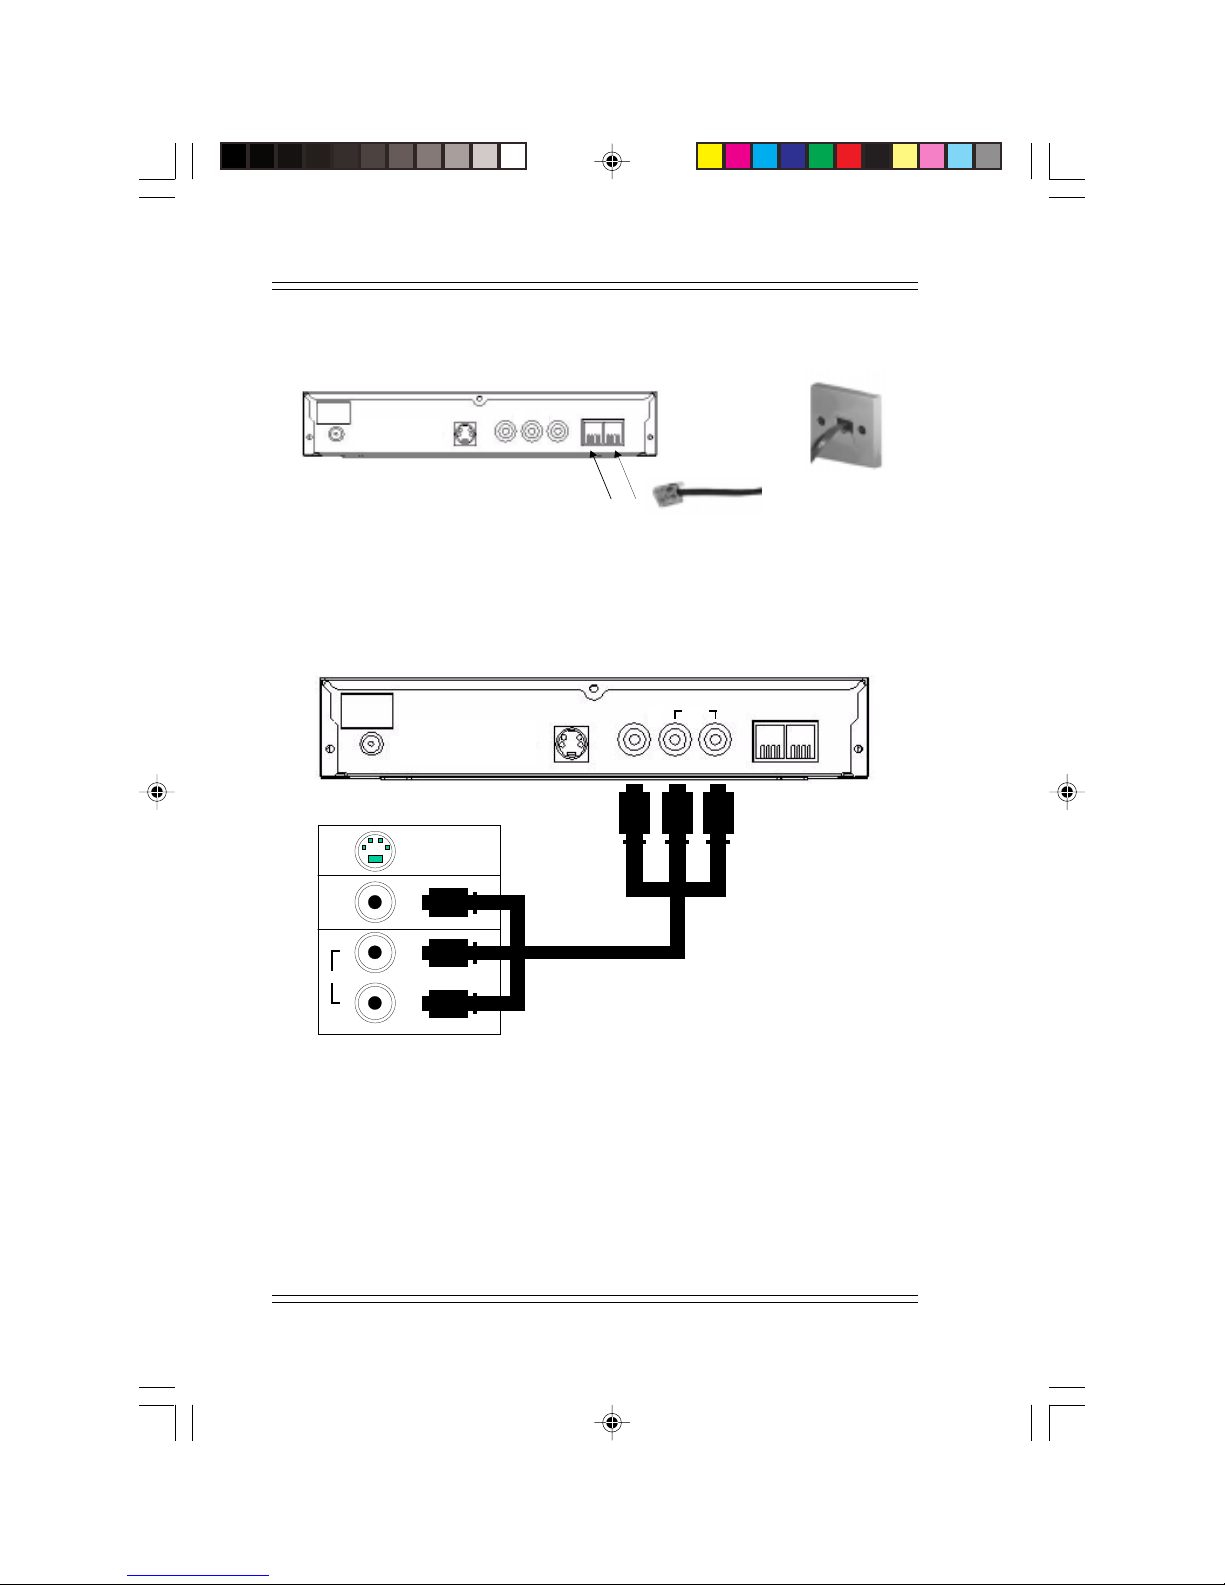
3.3.2 Connecting the Telephone Line
TVsurf User's Manual
Phone Line
Telephone
Line to the
Wall socket
Telephone Line
to the Phone
Figure 3-6 Connection of TVsurf to the telephone line
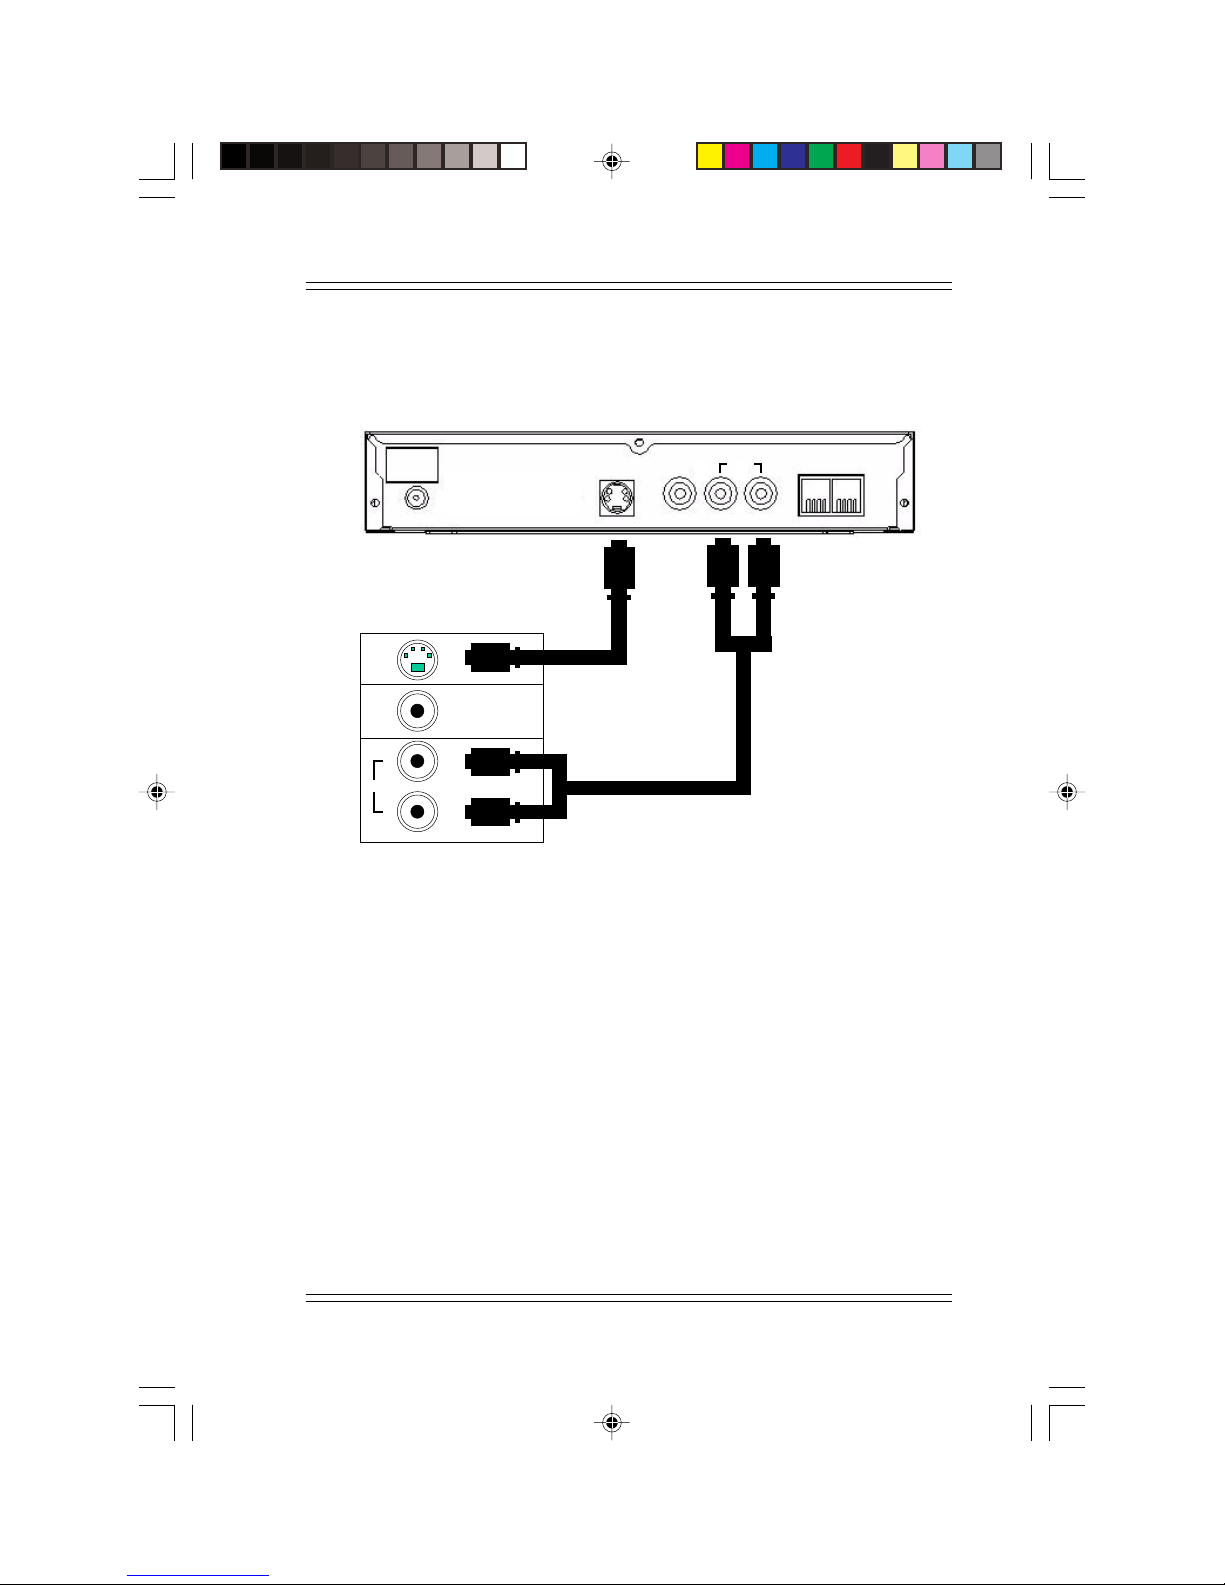
3.3.3 Connecting the Video and Audio Cable
Video
Audio
Video
Yellow
L
R
White
Red
Audio
LR
Video and
Audio Cable
Figure 3-7 Connection of TVsurf to the Video and Audio Cable
Note:
F
TV specifications differ. Your TV may have only one input for audio. In
this case, use either the white or red cable.
3-4
Page 26
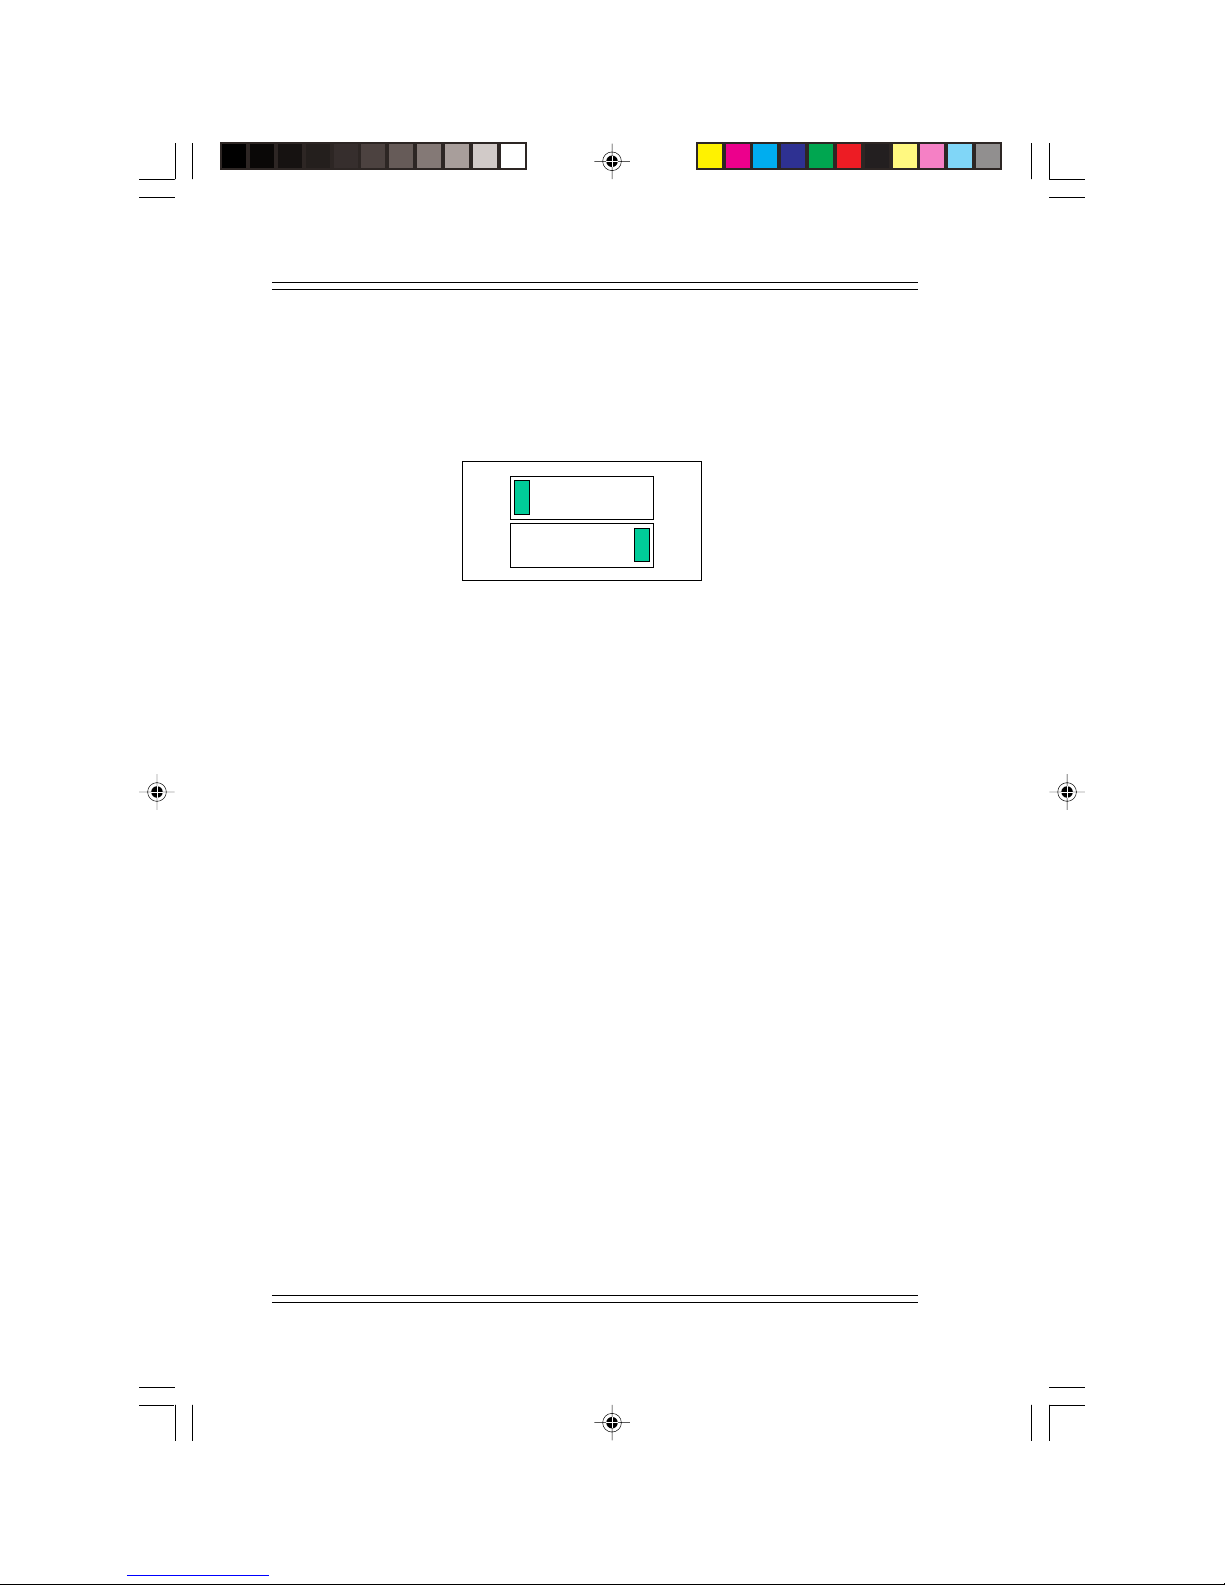
Get Started!
3.3.4 Connecting the S-Video Cable
Instead of the yellow video connection, use an S-video cable if your TV
supports this function.
S-Video
S-Video
S-Video Cable
L
Audio
R
White
Red
Audio Cable
Figure 3-8 Connection of TVsurf to the S-Video Cable
Note:
F
The S-video cable is not supplied with the TVsurf package.
Audio
LR
3-5
Page 27
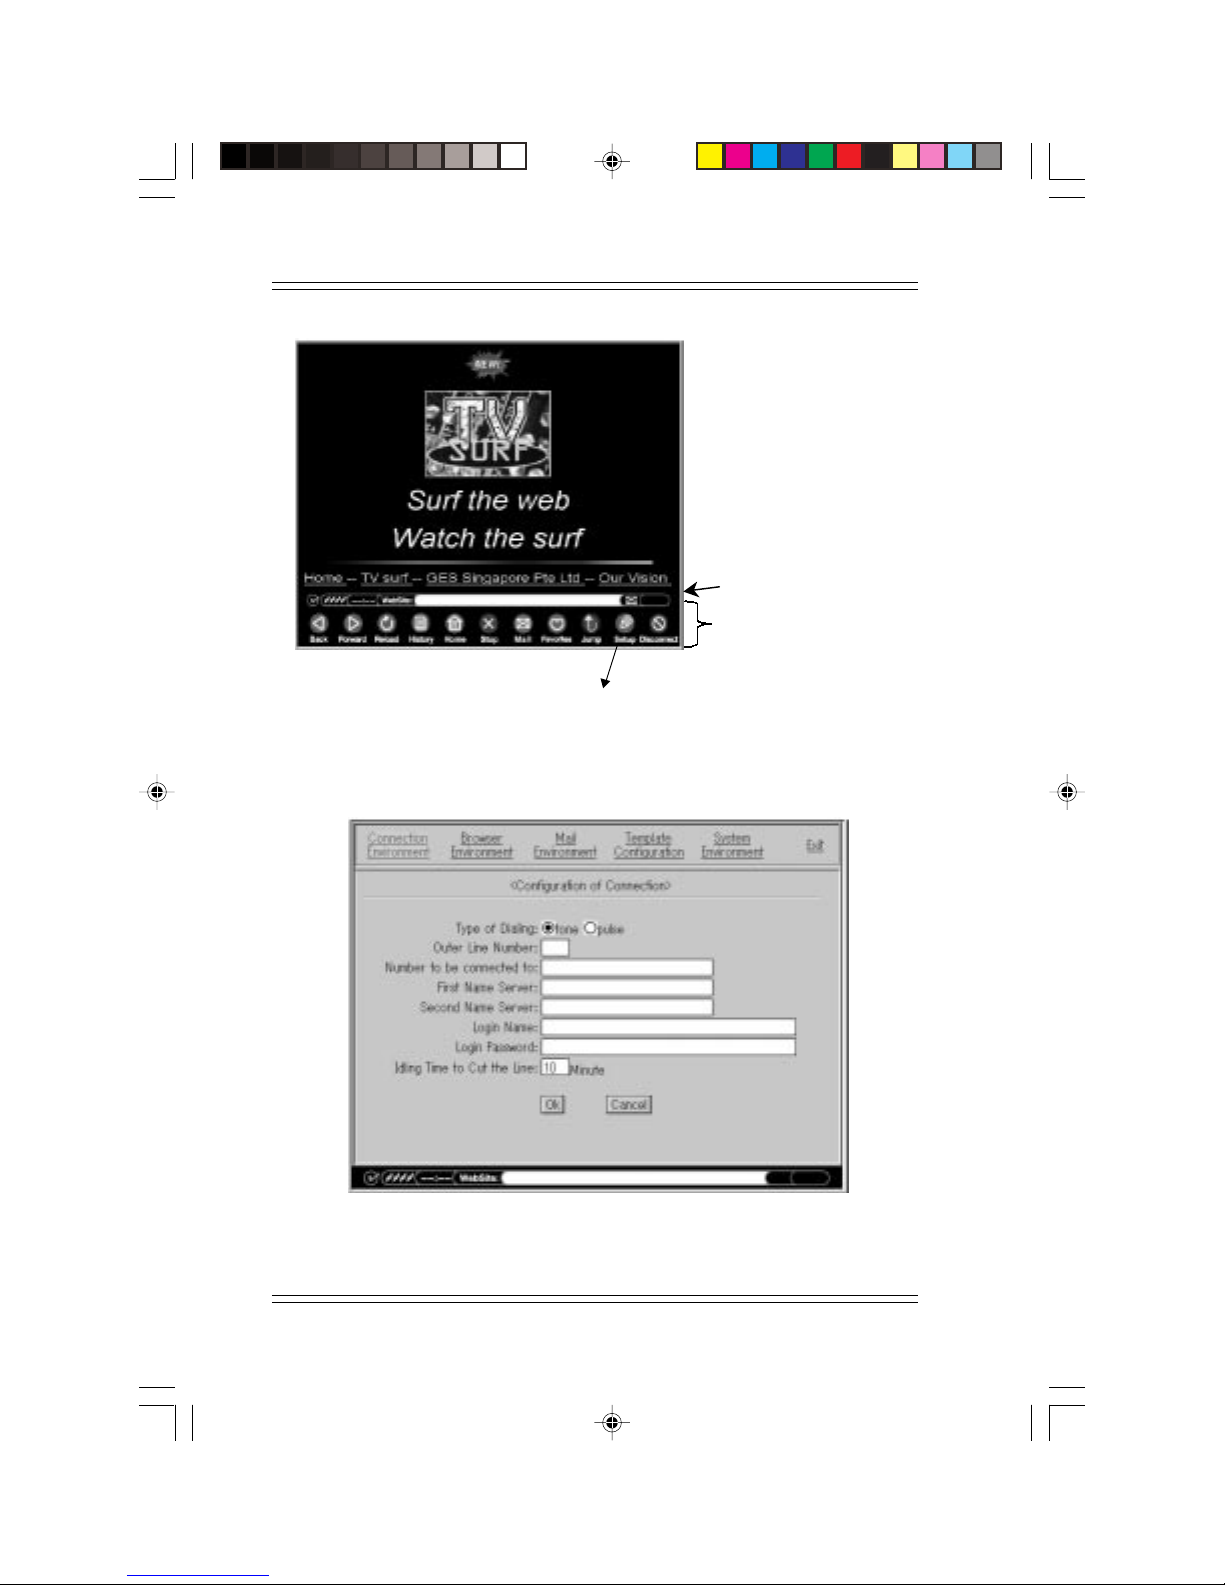
TVsurf User's Manual
3.4 Setting TVsurf's Video Settings
By default, it is set to the Composite Video Mode (the video mode when
not using the S-video option) and PAL. Make sure you set the video settings before switching on TVsurf.
CVBS
NTSC
Depending on the country you are in, you may have to select either NTSC
or PAL for your television type. If you are not sure about these settings,
you could either check your television User's Guide or test the output of
TVsurf when using both selections and set it to the option which gives the
best results.
Note:
F
Use the S-video mode if it is supported by your TV. S-video mode provides
clearer images and its performance is noticeably better than Composite
Video mode. You may to refer to section 2.3 Video Settings on Page 2-4
1
2
O N
S-VIDEO
PAL
3.5 Wireless Keyboard (Optional)
Insert the 2 "AAA" batteries into the battery compartment on the bottom
on the keyboard. T ake note to install these batteries in the proper direction
(refer to the plus and minus markings on the battery). There are engraved
markings in the battery compartment to provide assistance in correct installation of the batteries.
Note:
F
When using the wireless keyboard and remote control, always remember
to face the infrared emitter of the keyboard towards TVsurf. This is to
enable easy transmission of the information from the keyboard to TVsurf.
3-6
Page 28

Get Started!
3.6 Switching on your TV
Switch on your TV and select a video channel/source. This could either be
the channel/source from your video recorder or Laser Disc or Video compact disc player. For example, 10, 11, 12 or AV1, AV2, AV3...etc. Refer to
your TV manual for more information.
3.7 Switching on TVsurf
After you have ensured that all the connections and the placement of TVsurf
is alright, please switch it on. The ON/OFF switch is located at the top left
of TVsurf's back panel. You may also press the [Power] button on the
remote control or [On/Off] key on the wireless keyboard.
When TVsurf is on, a front page is loaded. This front page works like a
web page. Click on other links to find out about TVsurf and the makers of
TVsurf. This front page may be different from the one shown on Page 3-8.
3.8 Setting Up TVsurf
Before you are able to access the Internet, you are required to set up several options.
TVsurf has five setups that can be changed while the browser is running.
1. Connection Environment
2. Browser Environment
3. Mail Environment
4. Template Configuration
5. System Environment
For the Internet and Mail access using TVsurf, just setup the Connection
Environment, Browser Environment and Mail Environment. There is no
immediate necessity to set up the T emplate Configuration and System Environment options at this moment (you may want to go through it later).
The Setup screen will be displayed when "Setup" is selected from the
Browser menu. See Figure 3-10 on Page 3-8.
3-7
Page 29
Switches to setup screen, such as
connection, browser and mail.
Figure 3-9 Selection of the Setup icon
TVsurf User's Manual
Status bar
Browser menu
Use [Menu] button on
the remote or [Menu/
Input] key on the keyboard to activate.
3-8
Figure 3-10 Connection Environment
Page 30
Get Started!
To display the Browser Menu, press the [Menu] button on the remote
control or the [Menu/Input] key on the keyboard (refer to Figure 3-9 on
Page 3-8). Navigate to the Setup icon using the left and right arrow keys
on the Browser Menu and press [Enter] to select it. You may also press the
[Setup] hotkey on the keyboard. You will then see the Setup Screen. See
Figure 3-9 on Page 3-8.
To get from one environment setup to the next,
• when currently not in any setup, use the arrow keys to move to the
desired setup environment and press the [GO] button or [Enter] key to
select it.
• when already in the setup screen of any environment, scroll down to
the [CANCEL] option and press the [GO] button or [ENTER] key to
get back to the environment setup options.
To key in information in the setup menu,
• using the arrow buttons/keys, scroll to the desired box. Press the [GO]
button or [ENTER] key on either the remote control or wireless
keyboard.
• a text box will appear on the screen and in this box, type the necessary
information.
Note:
F
If you do not have a wireless keyboard, the soft keyboard will appear for
you to key in text. Using the arrow buttons on your remote control, you
may select the text you require.
A B C D E F a b c d
G H I J K L
M N O P Q R
S T U V W X
Y Z $ % ^ ?
Spc
http://
Texts
Del
g h i j k l
m n o p q r
s t u v w x
y z / . ; :
www.
LeftUpDown Right
e f | [ ] .co
- < C .ac 4 5
! < C .or 7 8
/ ( ) .jp 0 .
# ‘ ` .com * +
@ ~ _ .html
DelAll Enter
.gov
.edu
.org
.sg/
.com/
ESC
1 2 3
\ , =
Figure 3-11 Software Keyboard
6
9
:
-
Exit
3-9
Page 31

TVsurf User's Manual
To confirm the text you have entered,
• Press the [Exit] button on your soft keyboard or
• Press the [Menu/Input] hotkey on your wireless keyboard
To cancel, press the [ESC] button/key
Note:
F
The setup is stored after clicking "OK". If another environment is selected
or the program is terminated prior to clicking "OK", the new setup will
not become effective.
3.8.1 Connection Environment
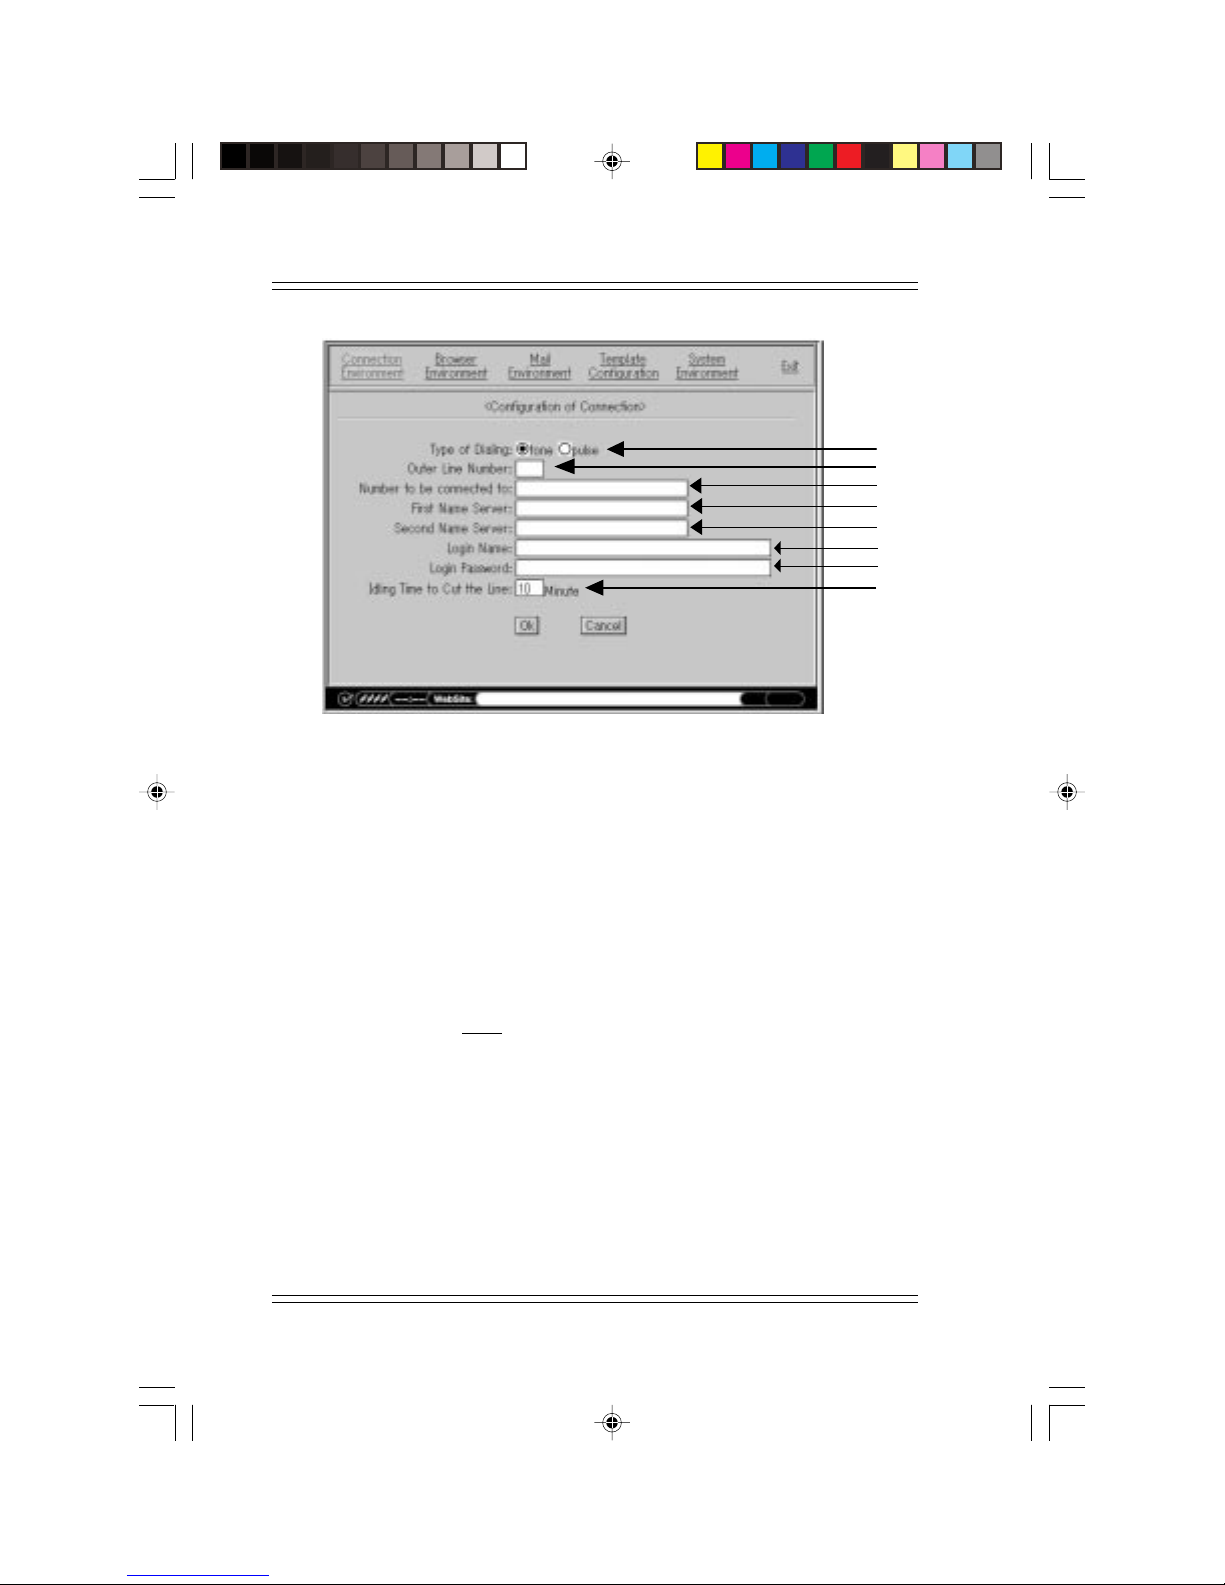
This section describes how to setup the dial up connection (with reference
to the Figure 3-12 found on the next page). In the following description,
underlined text denotes the default value.
1 Type of Dialing (Tone, Pulse)
Select the dial method. It is normally set to the Tone.
2 Outer Line Number
This is the number which TVsurf will dial before calling your Internet
Service Provider. Most of the time this is a single number used to access
to an external connection. For example, in some offices, a number '9' is
required to be pressed before you are able to call someone outside of the
office. The number '9' is therefore considered as the Outer Line Number.
In most cases, when a call is made from home, the Outer Line Number is
not necessary and the Outer Line Number entry box can be left empty.
3 Number to be connected
This is the number TVsurf will dial. This number will be used to connect
to your Internet Service Provider (ISP). Y ou will be able to find this number
in your ISP User's Guide.
3-10
Page 32

Get Started!
4 First Name Server
This can be found in your Internet Service Provider User's Guide. It will
look something like this, 123.321.88.99. These series of numbers indicate
the location of the first ISP server to which TVsurf can connect and access
the Internet. It is also called the Primary DNS or First Domain Name.
5 Second Name Server
This can be found in your Internet Service Provider User's Guide. It will
look something like this, 123.321.88.99. These series of numbers indicate
the location of the second ISP server which TVsurf can connect and access the Internet. It is also called the Secondary DNS or Second Domain
Name. Certain ISPs may not provide this. In this case, leave this blank.
6 Login Name
This is the name you use to login to your ISP account. This name is provided by your ISP upon applying for your Internet account.
7 Login Password
This is the dial-in password provided by your ISP upon applying for your
Internet account.
8 Idling Time to Cut the Line (10 minutes)
When you do not access any web site for sometime (idling), TVsurf can
disconnect from the Internet automatically. This saves cost for Internet
account plans that are based on connection time. You can therefore set the
time before disconnection. TVsurf will automatically reconnect when necessary .
3-11
Page 33
TVsurf User's Manual
1
2
3
4
5
6
7
8
Figure 3-12 Connection Environment
3.8.2 Browser Environment
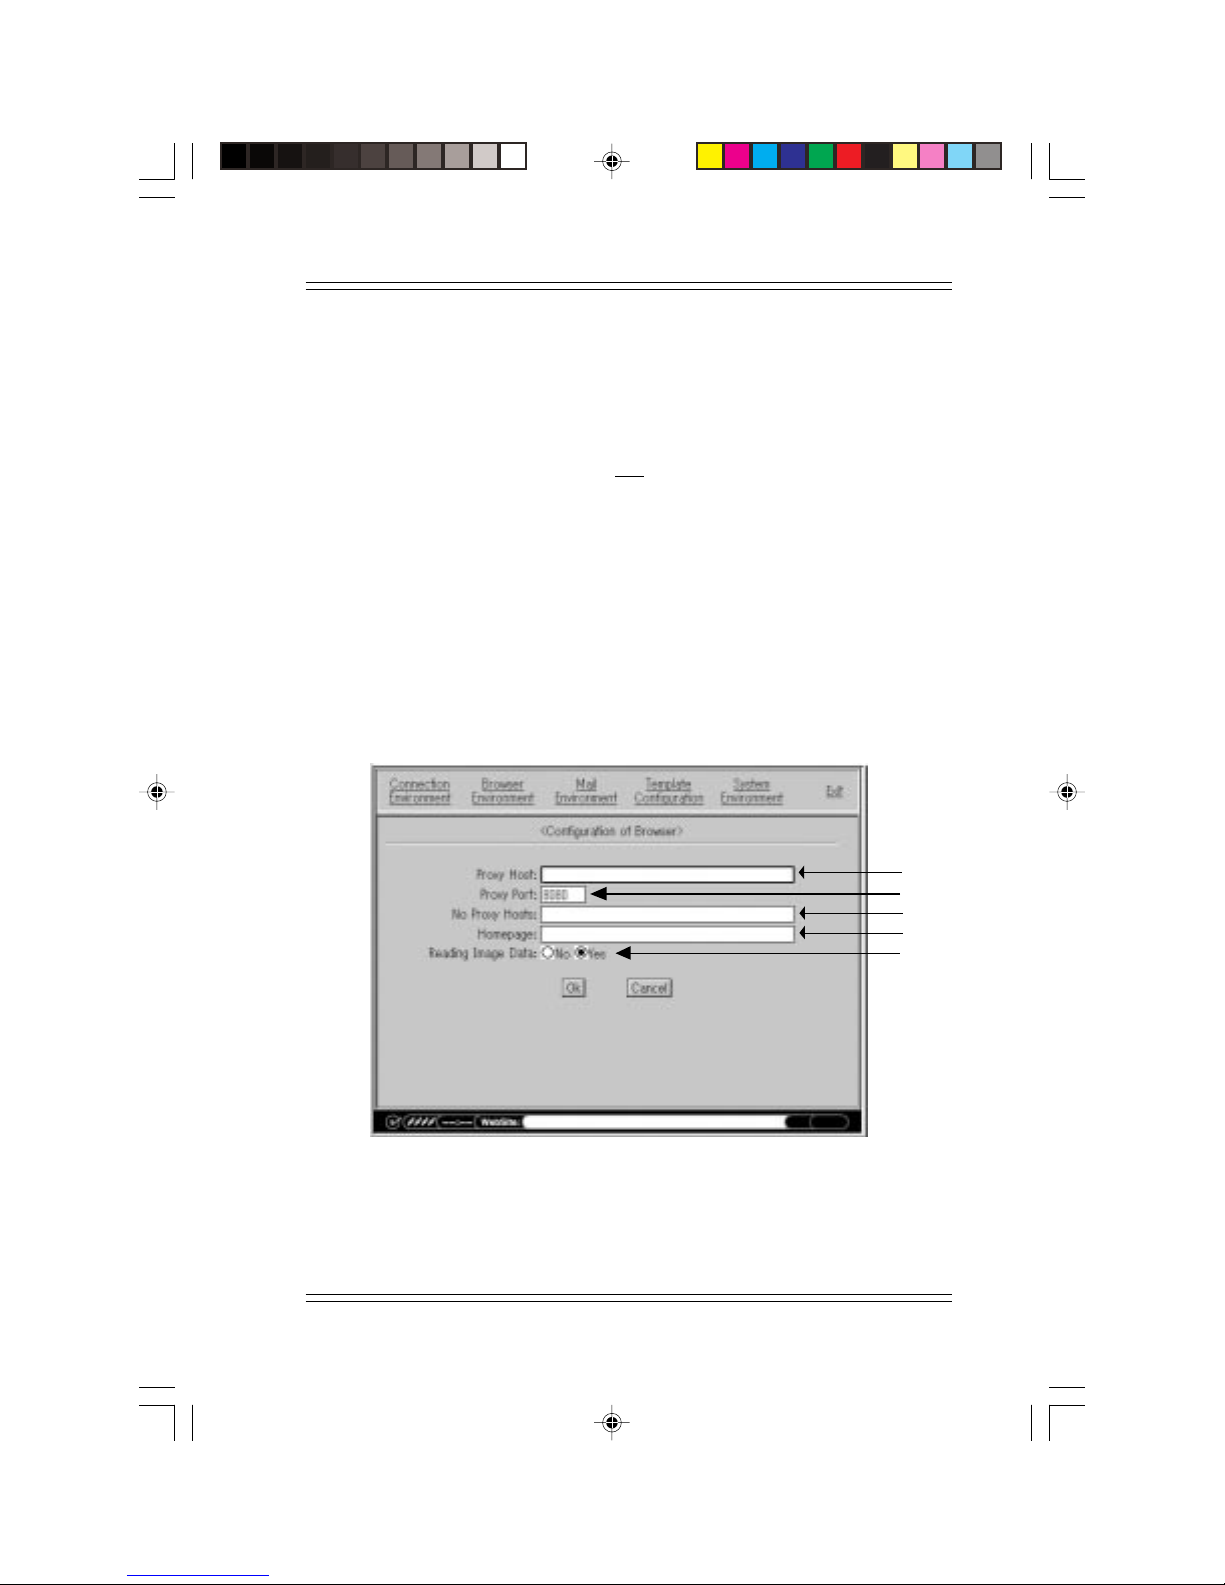
This section describes how to setup the Browser Environment (with reference to the Figure 3-13 found on the next page). In the following description, underlined text denotes the default value.
1 Proxy Host
Setup the host name of your ISP proxy server. The proxy server host name
can be found in your ISP User's Guide and would look something like this,
"proxy .tvsurf.com.sg". If no proxy host name is provided, please leave this
box blank.
2 Proxy Port (8080)
Setup the port number. This can be found in your ISP User's Guide. If no
proxy host name is provided, please leave this box blank.
3 No Proxy Hosts
If you are accessing the Internet on an ISP which does not use any proxy
host, write down the host name (eg. "noproxy.tvsurf.com.sg") in this entry
box. If you are not sure about this, refer to your ISP User's Guide or call
your ISP Helpdesk.
4 Homepage (file1\:1.htm)
When you enter TVsurf, you can set the first page in which TVsurf will
3-12
Page 34
Get Started!
display. In this entry box, you are required to setup the URL (eg.http://
www.anywebsitename.com") for the default homepage. Connection will
be made automatically if a web site on the Internet is chosen as the default
homepage.
1
2
3
4
5
6
7
8
5 Reading Image Data (No, Yes)
Select whether GIF and JPEG images are displayed or not. In case that it
is not displayed, the layout is same as the one which is displayed but
images are empty rectangular boxes. The layout itself will not change
even if “NO” is selected.
Note:
TVsurf does not support all graphic formats. There is no guarantee that it
will display all graphics.
F
Figure 3-13 Browser Environment
1
2
3
4
5
3-13
Page 35
TVsurf User's Manual
1
2
3
4
5
6
7
8
9
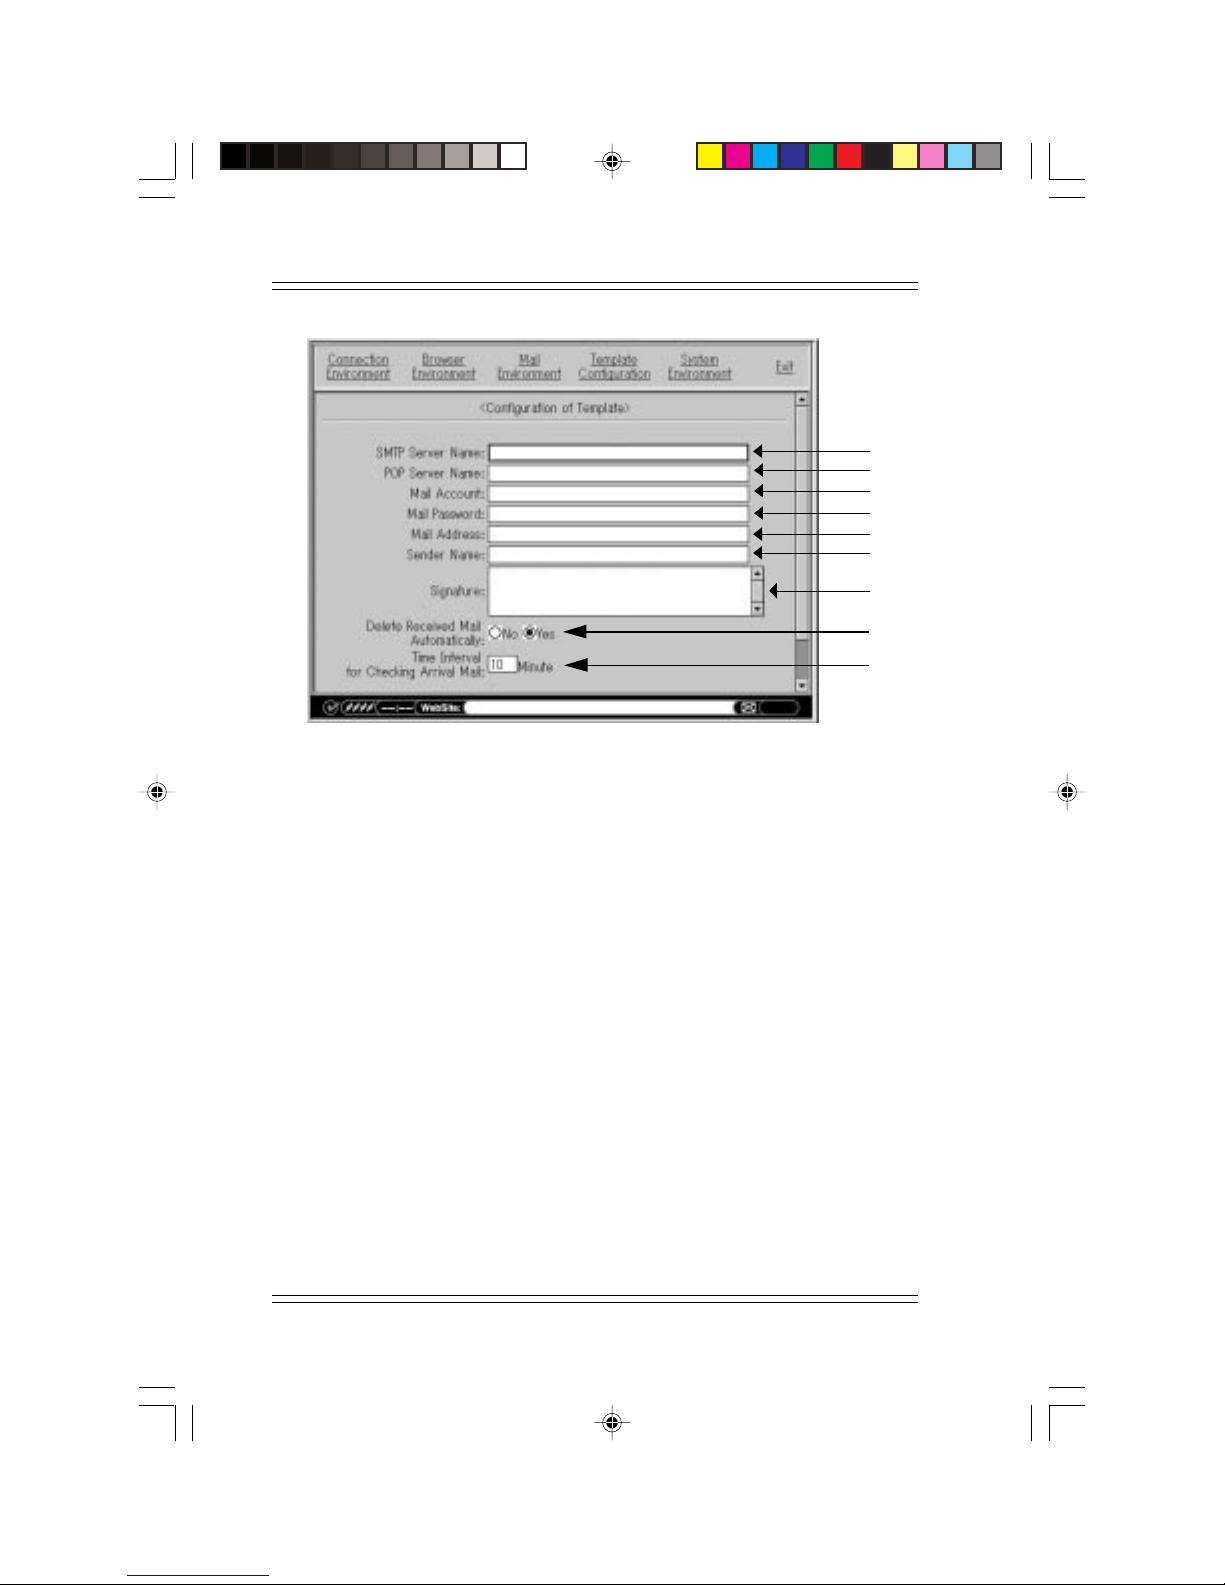
Figure 3-14 Mail Environment
3.8.3 Mail Environment
This section (with reference to the Figure 3-14) describes how to setup the
environment for mail exchange.
1 SMTP Server Name
Setup the domain name of the SMTP server. This can be found in your ISP
User's Guide and will look something like this, "smtp.tvsurf.com.sg".
2 POP Server Name
Setup the domain name of the POP3 server. This can be found in your ISP
User's Guide and will look something like this, "po.tvsurf.com.sg".
3 Mail Account
This is the log-in name you use for your mail account. This is provided by
your ISP upon applying for an email account.
4 Mail Password
This is the password of your mail account and is provided by your ISP
upon applying for an email account.
3-14
Page 36

Get Started!
5 Mail Address
T ype in your email address (eg. [email protected]) here so as to enable
replied email to be sent back to you. Your email address is provided by the
ISP upon applying for an email account.
1
6 Sender Name
Setup the sender name which would be displayed when a mail is sent. The
name which the typed in here will be displayed when sending email.
7 Signature
Setup your signature. This is any additional information which you want
to add in every email you send. Most email users write their names and
email address here. This file is thus called the Signature file.
8 Delete Received Mail Automatically (No, Yes)
Your ISP server normally stores all your incoming mail until you have
downloaded it. Keep it to the default selection of "Yes" if you want to keep
your mail in the ISP server even after downloading. However, be sure that
your ISP mailbox quota has not been exceeded. If this happens, new mail
cannot be received. Check with your ISP on the amount of mail its mailboxes
can contain.
9 Time Interval for Checking Arrival Mail (10 minutes)
Setup the time interval to check for incoming mail when TVsurf is connected to the Internet.
3.8.4 Template Configuration
T emplate allows you to store useful sentences, names, addresses, telephone
numbers, etc. Using the Template allows you to save time and effort keying in text which is often required. For character entry, refer to "4.4 Entry
of Characters".
Note:
F
The template function is only available when using the soft keyboard.
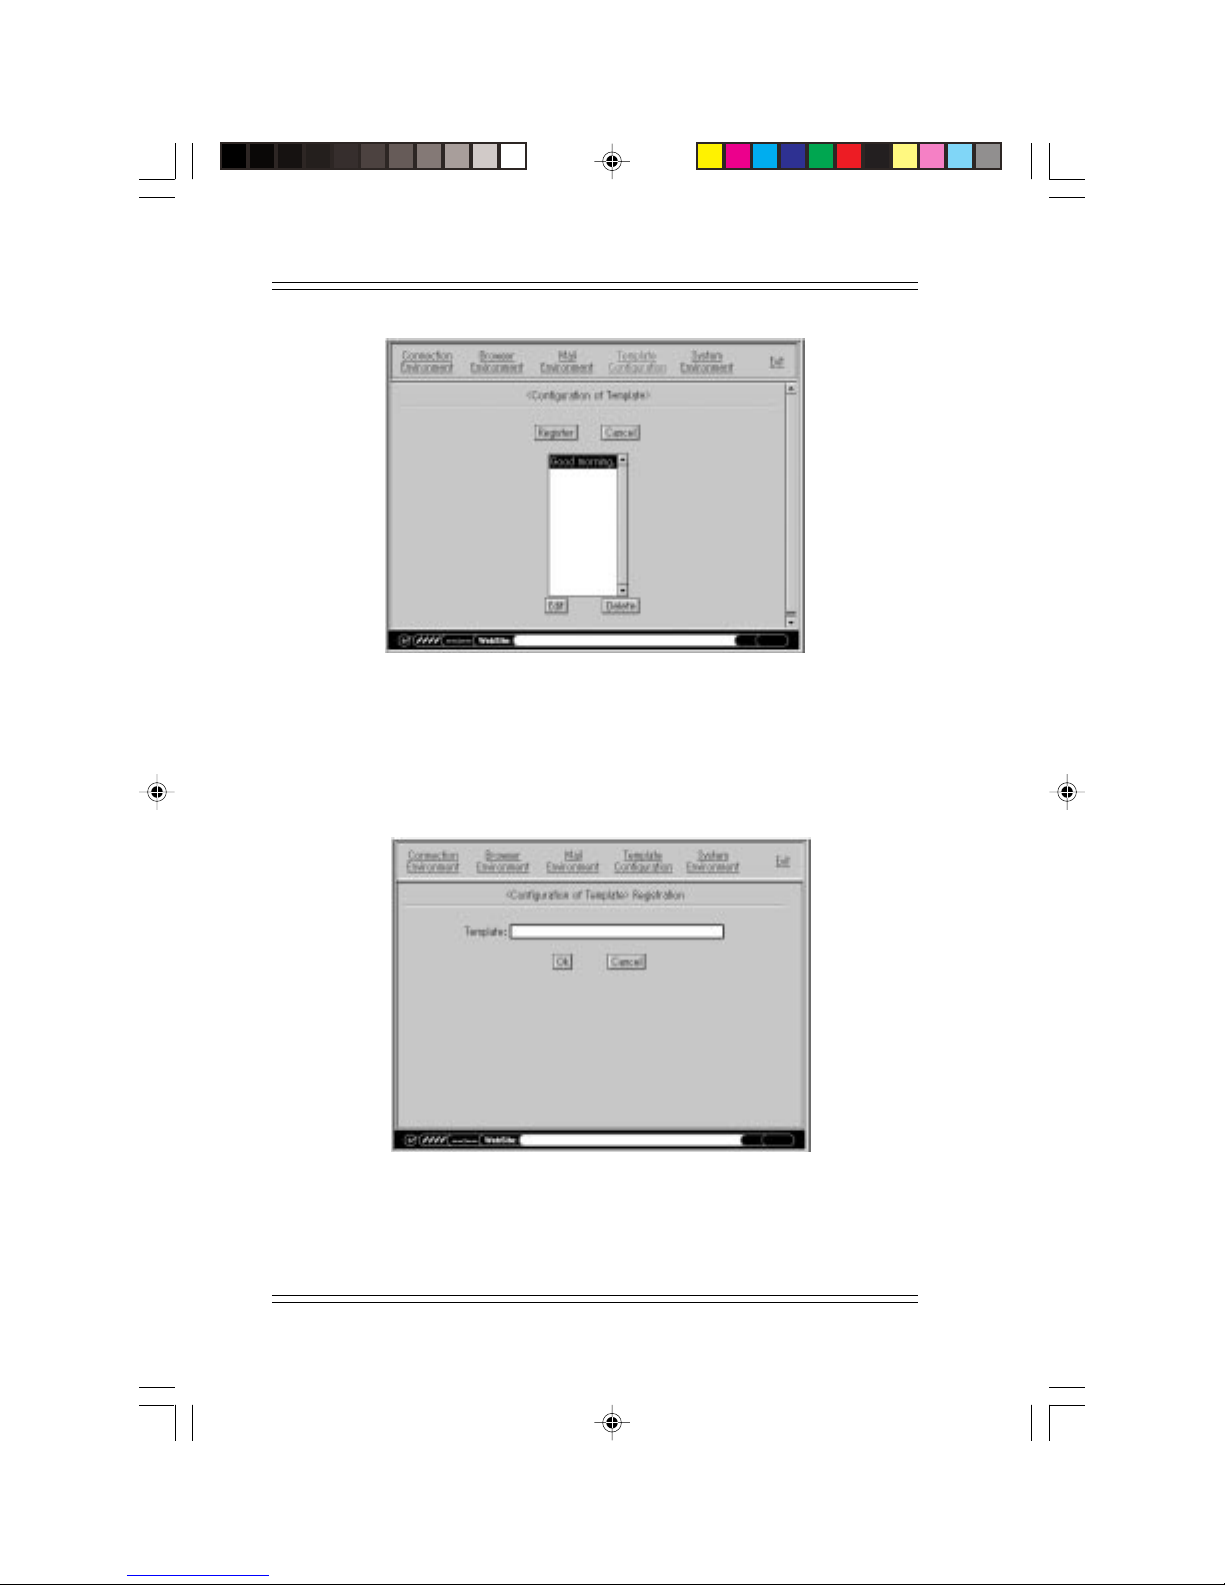
Initial screen
The list of standard sentences which are registered is shown. Refer to
Figure 3-15 for an example.
3-15
Page 37
TVsurf User's Manual
Figure 3-15 Template Configuration - Initial screen
Registration
New standard sentence can be added to the list of previously registered
templates. Select [Register] and then key in the sentence that you would
like to register as a template. Select [Ok] to save. Refer to Figure 3-16.
Figure 3-16 Template Configuration - Registration
3-16
Page 38

Get Started!
Edit
You may edit any registered sentence. Select [Edit] and you may then key
in the new sentence. Select [Ok] to save. Refer to Figure 3-17.
A B C D E F a b c d
G H I J K L
M N O P Q R
S T U V W X
Y Z $ % ^ ?
Spc
http://
Texts
www.
Del
LeftUpDown Right
e f | [ ] .co
g h i j k l
m n o p q r
s t u v w x
y z / . ; :
@ ~ _ .html
- < C .ac 4 5
! < C .or 7 8
/ ( ) .jp 0 .
# ‘ ` .com * +
ESC
DelAll En ter
1 2 3
\ , =
Exit
6
9
:
-
Figure 3-17 Template Configuration - Edit
Delete
Use the arrow keys to select the templates you wish to delete and delete
them by selecting [Delete]. Press [OK] to confirm. Refer to Figure 3-18.
Figure 3-18 Template Configuration - Delete
3-17
Page 39

TVsurf User's Manual
Using Templates
When using the soft keyboard, press [Texts] to get to the Template menu.
From here, select the Template you want to use and then select [OK] to
confirm your choice. The text will appear in the text box. Please refer to
"4.4.2 Template".
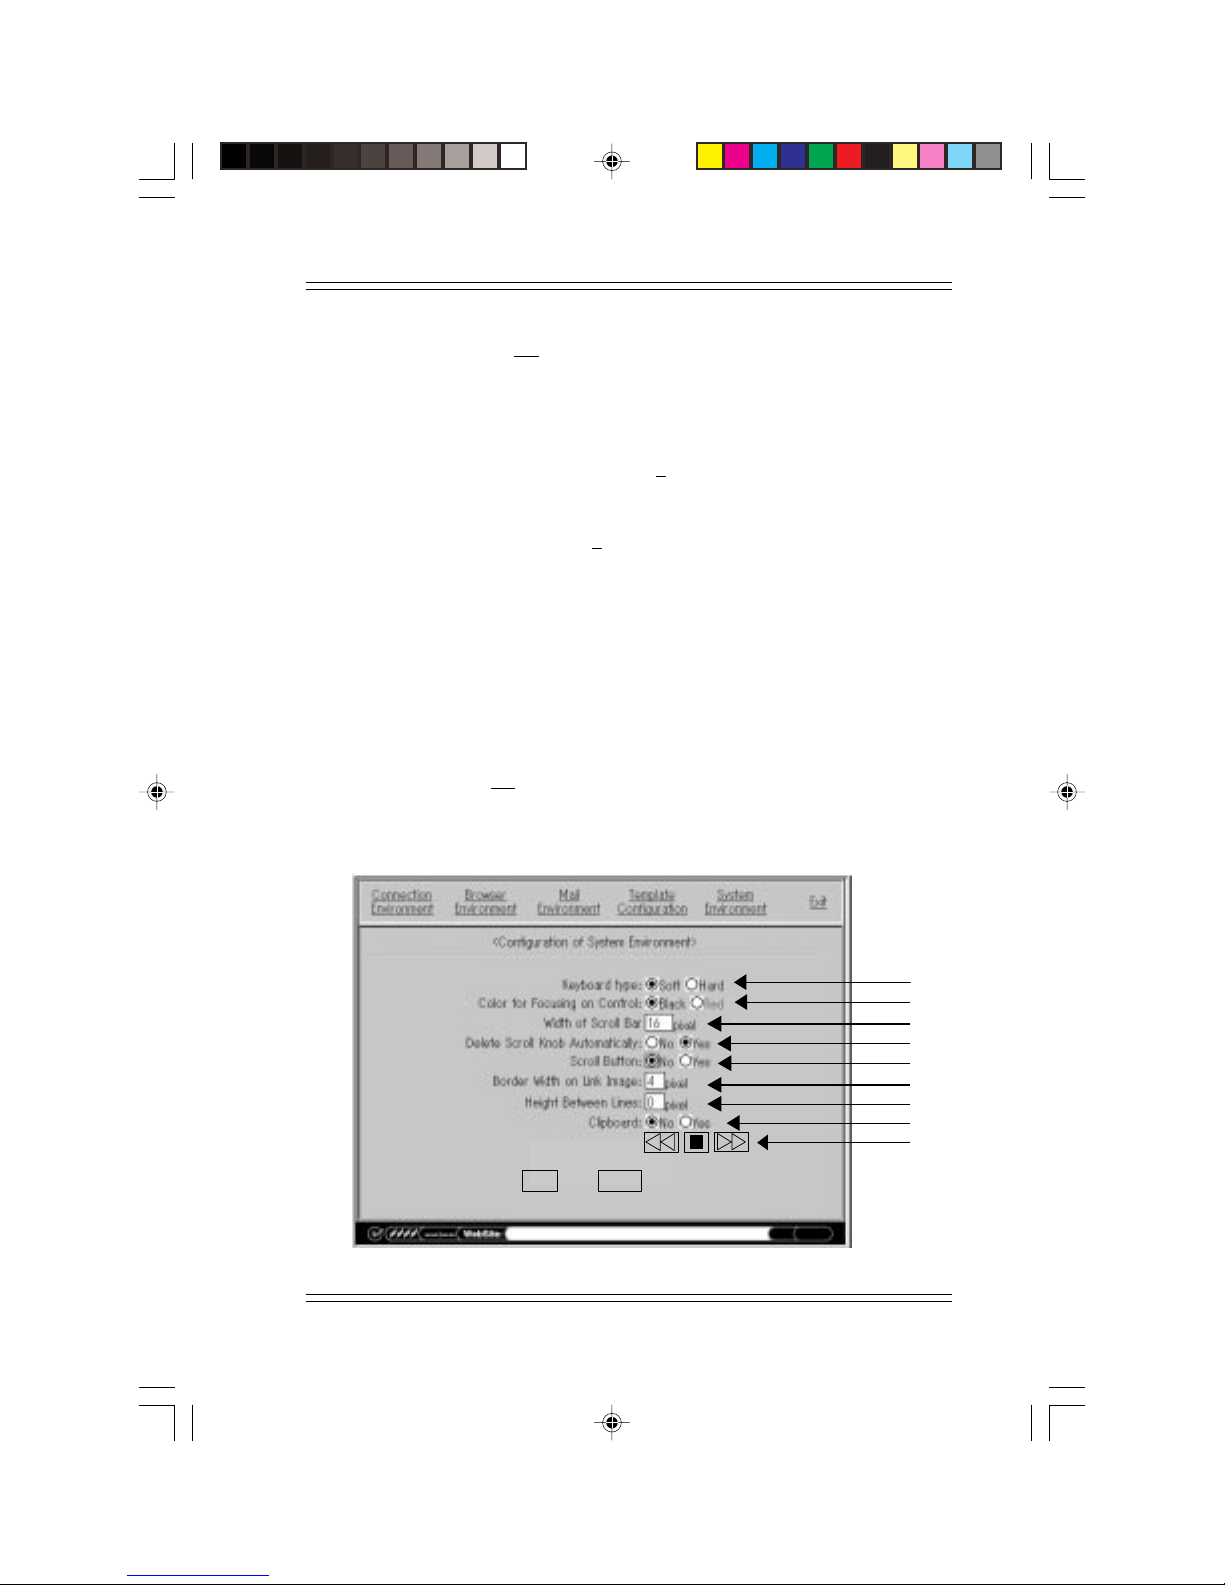
3.8.5 System Environment
This section describes how to setup the System Environment (with reference to the Figure 3-19 found on page 3-19). In the following description,
underlined text denotes the default value.
1 Keyboard Type (Soft, Hard)
Selection of the type of keyboard.
If you do not have the wireless keyboard, keep it at the default setting of
[soft] to use the software generated keyboard. You may want to refer to
"4.4 Entry of Characters".
If you have bought the wireless keyboard, you may select either option as
TVsurf will still recognise input from the wireless keyboard even if the
software keyboard option has been checked.
2 Colour for Focusing on Control (Black, Red)
When you use your arrow back and forth to move from link to link, the
border of the active link will be highlighted. You may choose the colour in
which the link will be highlighted here.
3 Width of Scroll Bar (16pixel)
You can setup the width of the scroll bar. These scroll bars are displayed
automatically if there is any image that cannot be contained in just one
browser screen. There are two scroll bars. One at the bottom and one
located to the right of your browser screen. If you choose a larger number
the width of the scroll bar will be wider.
4 Delete Scroll Knob Automatically (No, Yes)
Select whether the knob is displayed on the scroll bar of the list box and
text box.
3-18
Page 40
Get Started!
5 Scroll button (No, Yes)
Select whether the scroll button (a triangular button) is displayed at the
top and bottom, or the right and left of the scroll bar, or not displayed at
all.
6 Border Width on Link Image (4 pixel)
This is to set the width of the border of the active link.
7 Height Between Lines (0 pixel)
Setup a height between lines of the text. To make the text more readable,
you may want to increase the height between lines.
8 Color Burst Adjustment
Due to different TV makes, this option has been added so as to customize
the colour of TVsurf applications to match your TV colour resolution. The
left button decreases colour intensity and the right button increases colour
intensity. The centre button returns the colour to TVsurf default settings.
9 Clipboard (No, Yes)
Select whether the clipboard is used or not. This will be available in the
next version.
Color Burst Adjustment:
Ok Cancel
Figure 3-19 System Environment
1
2
3
4
5
6
7
8
9
3-19
Page 41
TVsurf User's Manual
3.9 Connecting to the Internet with TVsurf
After setting up your TVsurf (see section 3.8), you may begin surfing the
Internet!
Quick Note:
F
Remember to set your Video Settings (see section 3.4) correctly before
starting to surf the Internet.
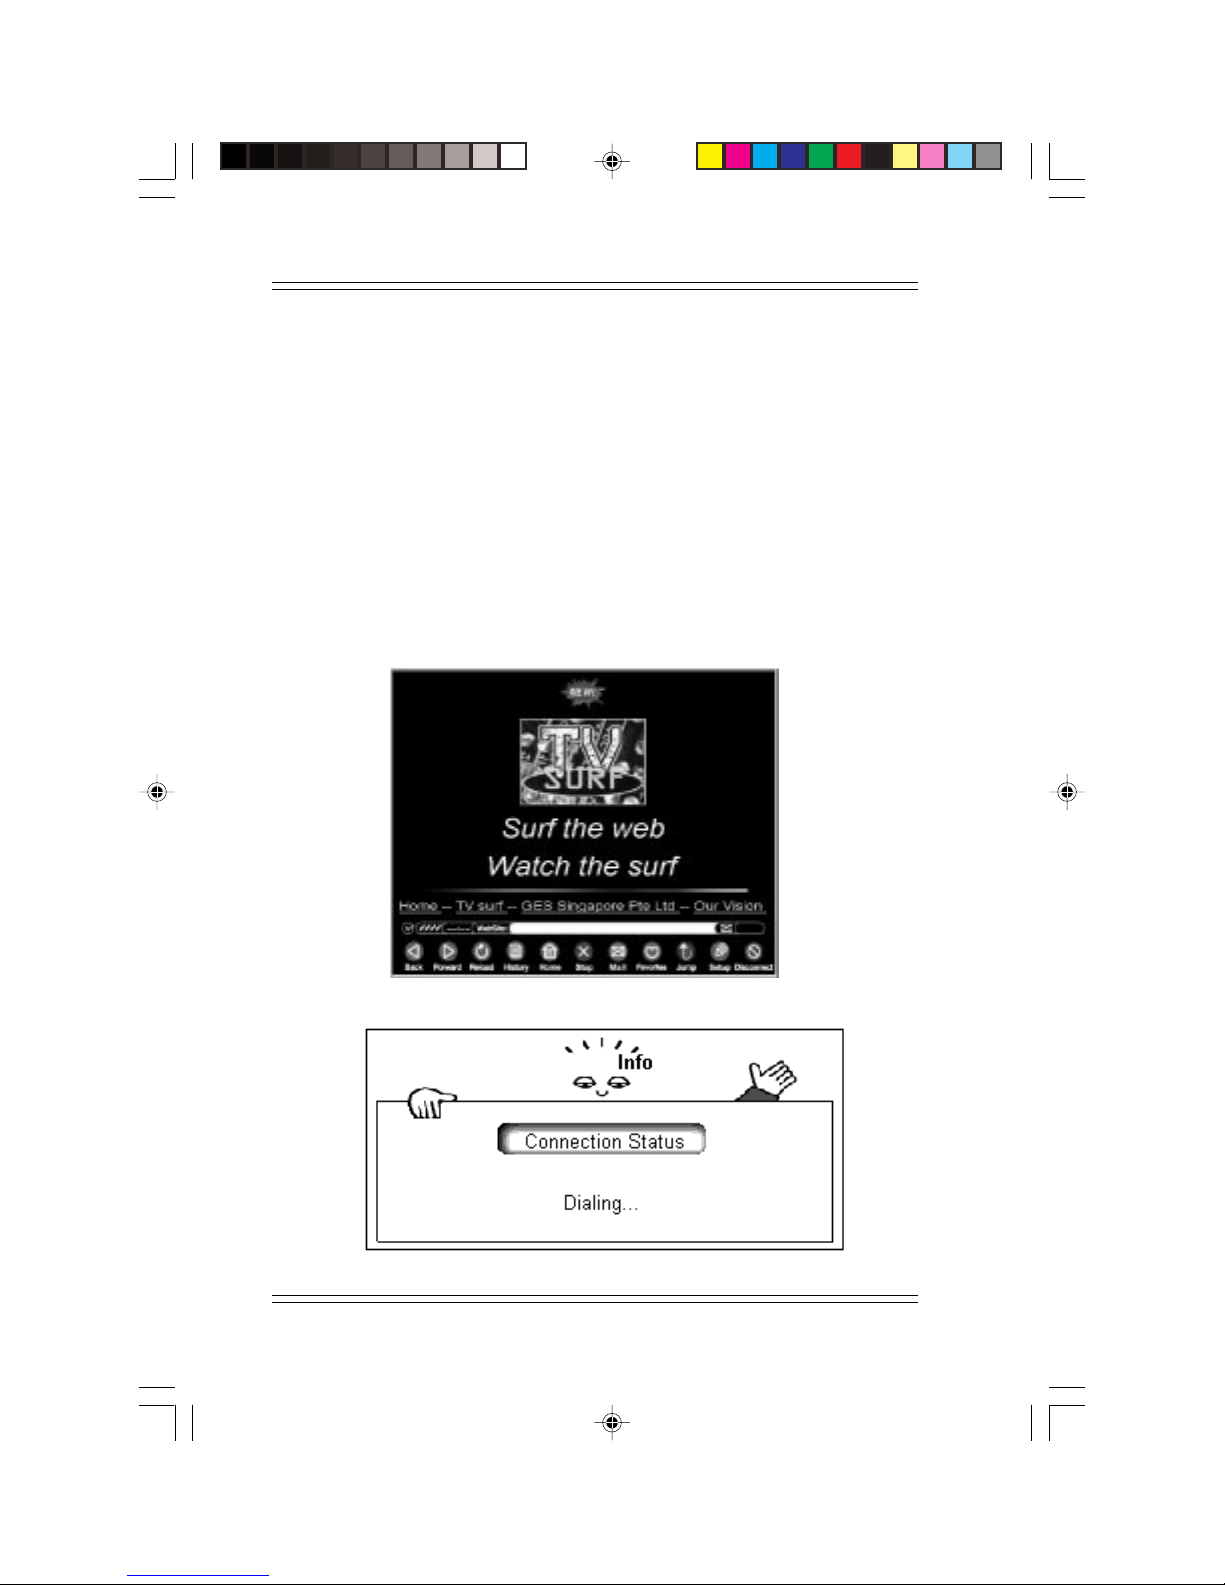
When you switch TVsurf on, you will enter a front page (see Figure 3-20).
This front page works like a web page. Click on other links to find out
about TVsurf and the makers of TVsurf. If you want to immediately start
the browser and email application, Jump to a desired website.
3-20
Figure 3-20 Front Page
Figure 3-21 Connection screen
Page 42

Get Started!
If you have configured your Internet Service Provider (ISP) information
correctly, connection to the ISP would be made automatically when you
try to access any web site (e.g. clicking on [Home] or [Jump] on the Browser
Menu). When connecting, you will see the connection screen (Figure 3-
21). For more information about how to use the TVsurf to surf the Internet,
refer to Chapter 4 The Browser.
Note:
F
The [PG UP] and [PG DN] on the remote, or [Home], [PgUp], [PgDn] and
[End] on the keyboard will only function when there is a web page on the
screen. If you activate the functions stated above, TVsurf will scroll along
the current page. This may cause problems when there is no web page
displayed.
3-21
Page 43

MY NOTES:
TVsurf User's Manual
3-22
Page 44
The Browser
Chapter 4
The Browser
4.1 Outline
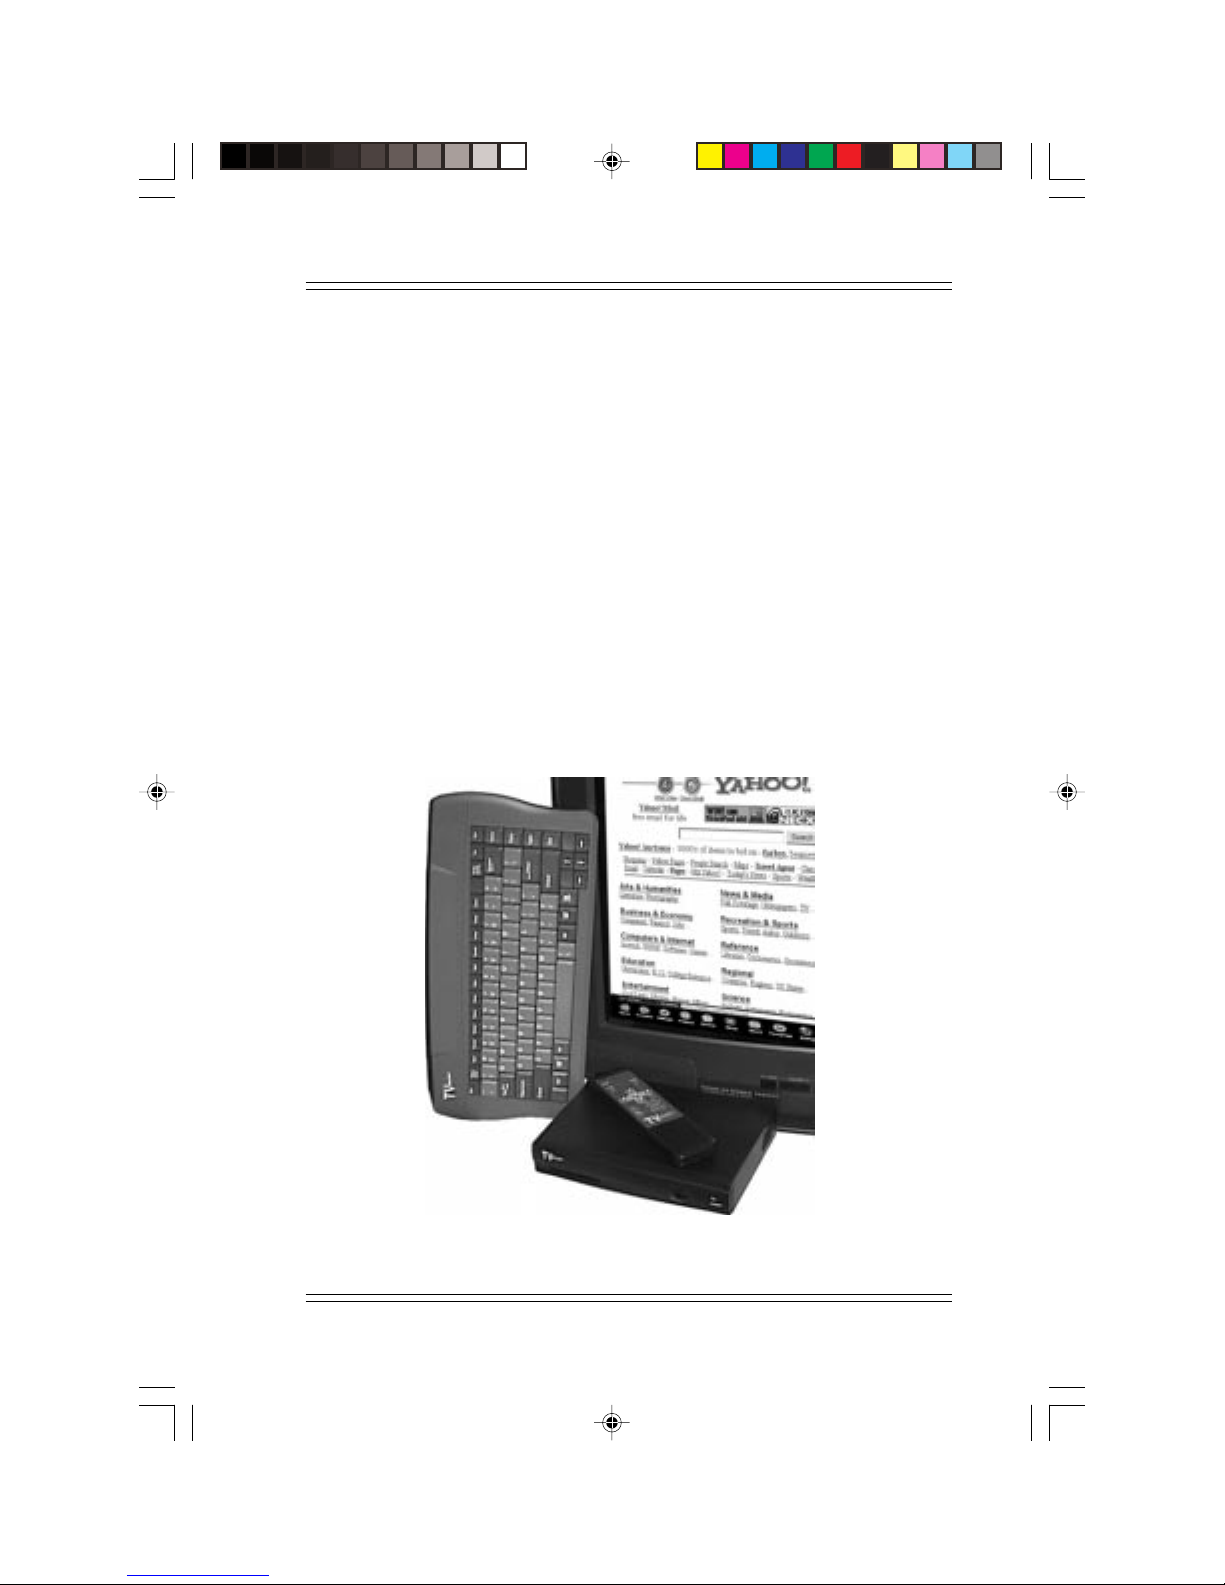
The following pages describe how to use the TVsurf to start exploring the
Internet and to write or receive email. Many illustrations are provided to
give you a clear and concise explanation on how to surf the Internet with
TVsurf. TVsurf uses NetFrontTM browser and email application from Access Co., Ltd.
Note:
F
Make sure to configure TVsurf properly with your ISP information before
connecting to the Internet. However, if you have already setup the information but still unable to connect to the Internet, please refer to the Appendix for a Troubleshooting Guide.
Figure 4-1 Using the TVsurf Browser to surf the Internet
4-1
Page 45
TVsurf User's Manual
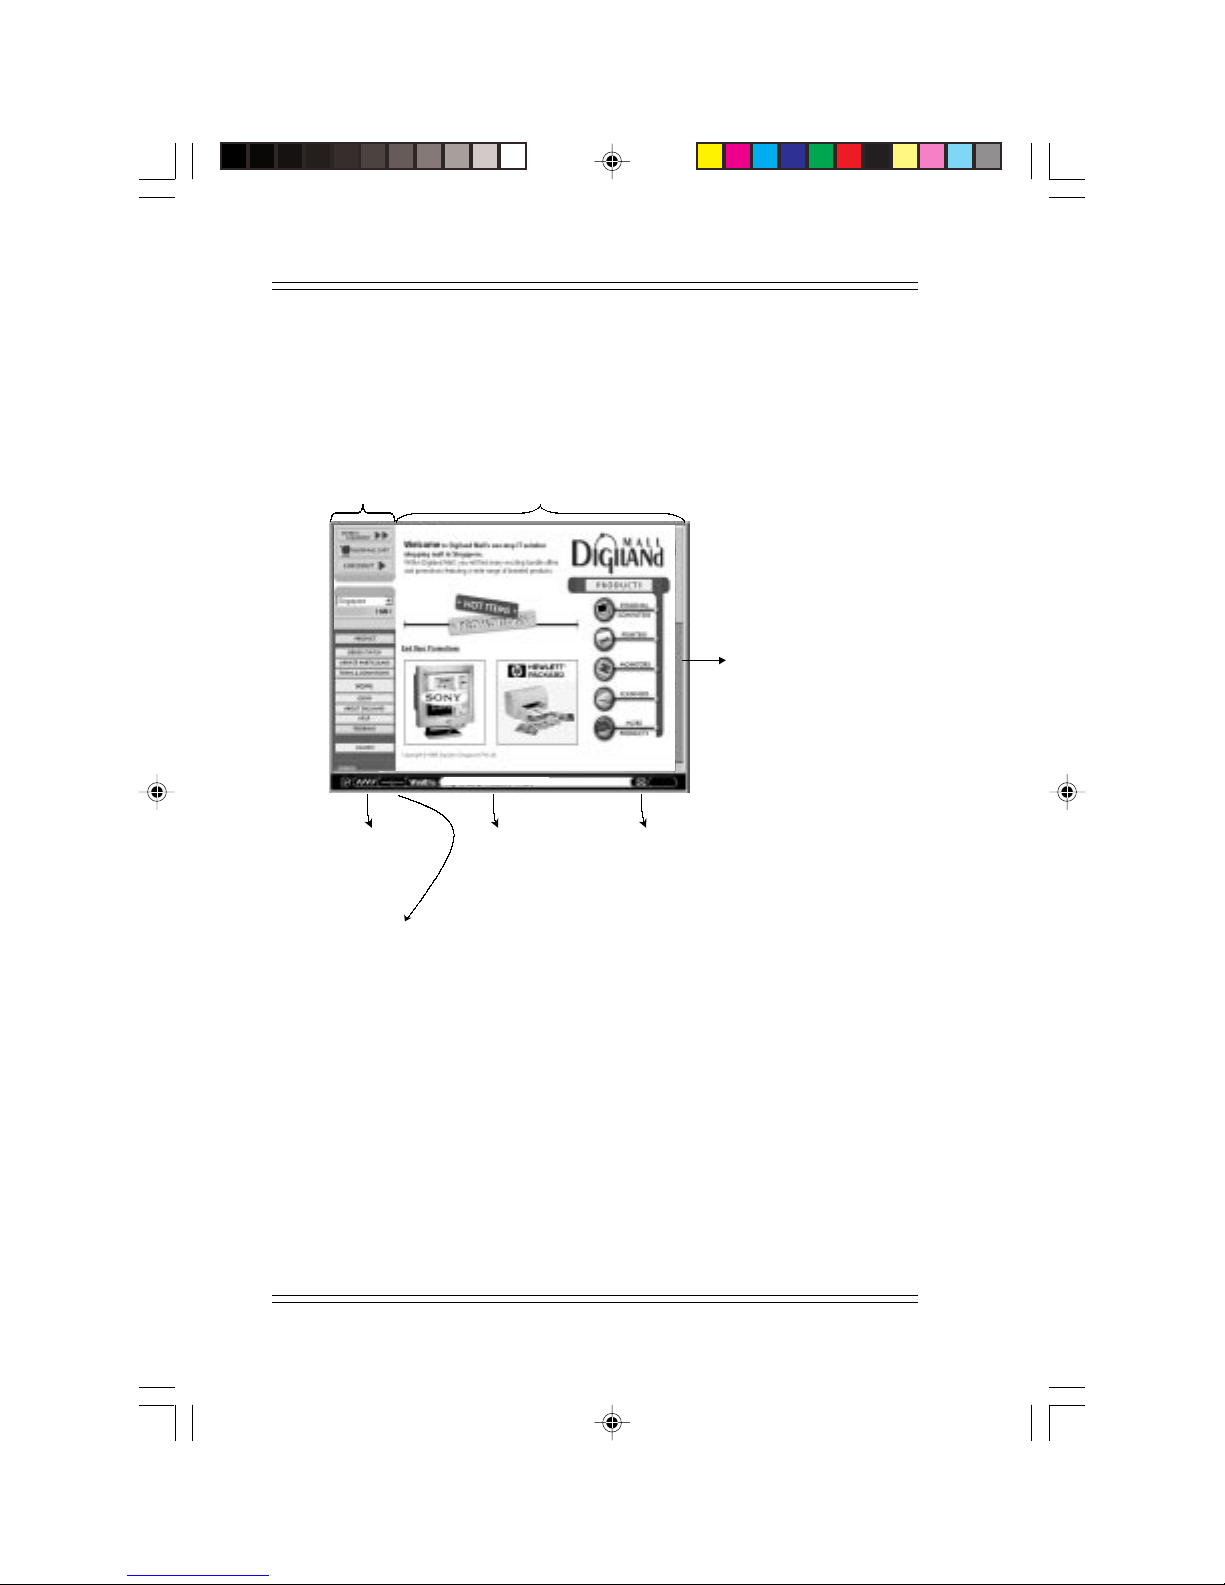
4.2 Browser screen
The following is an example of a home page which has 2 frames displayed
by the browser. You may switch to the desired frame by using the [Frame]
button on the remote control or keyboard. Then use the [PgUp] and [PgDn]
buttons to scroll accordingly.
Frame 1
Communication
Indicator
On-Line timer
Frame 2
GES
GES
http://www.digiland.com.sg
Address of the
current page
Displays the
received mail
Figure 4-2 Internet Application
Scroll every page by
selecting [PgUp] or
[PgDn] on the remote
control or wireless
keyboard.
4-2
Page 46
The Browser
4.3 Browser menu
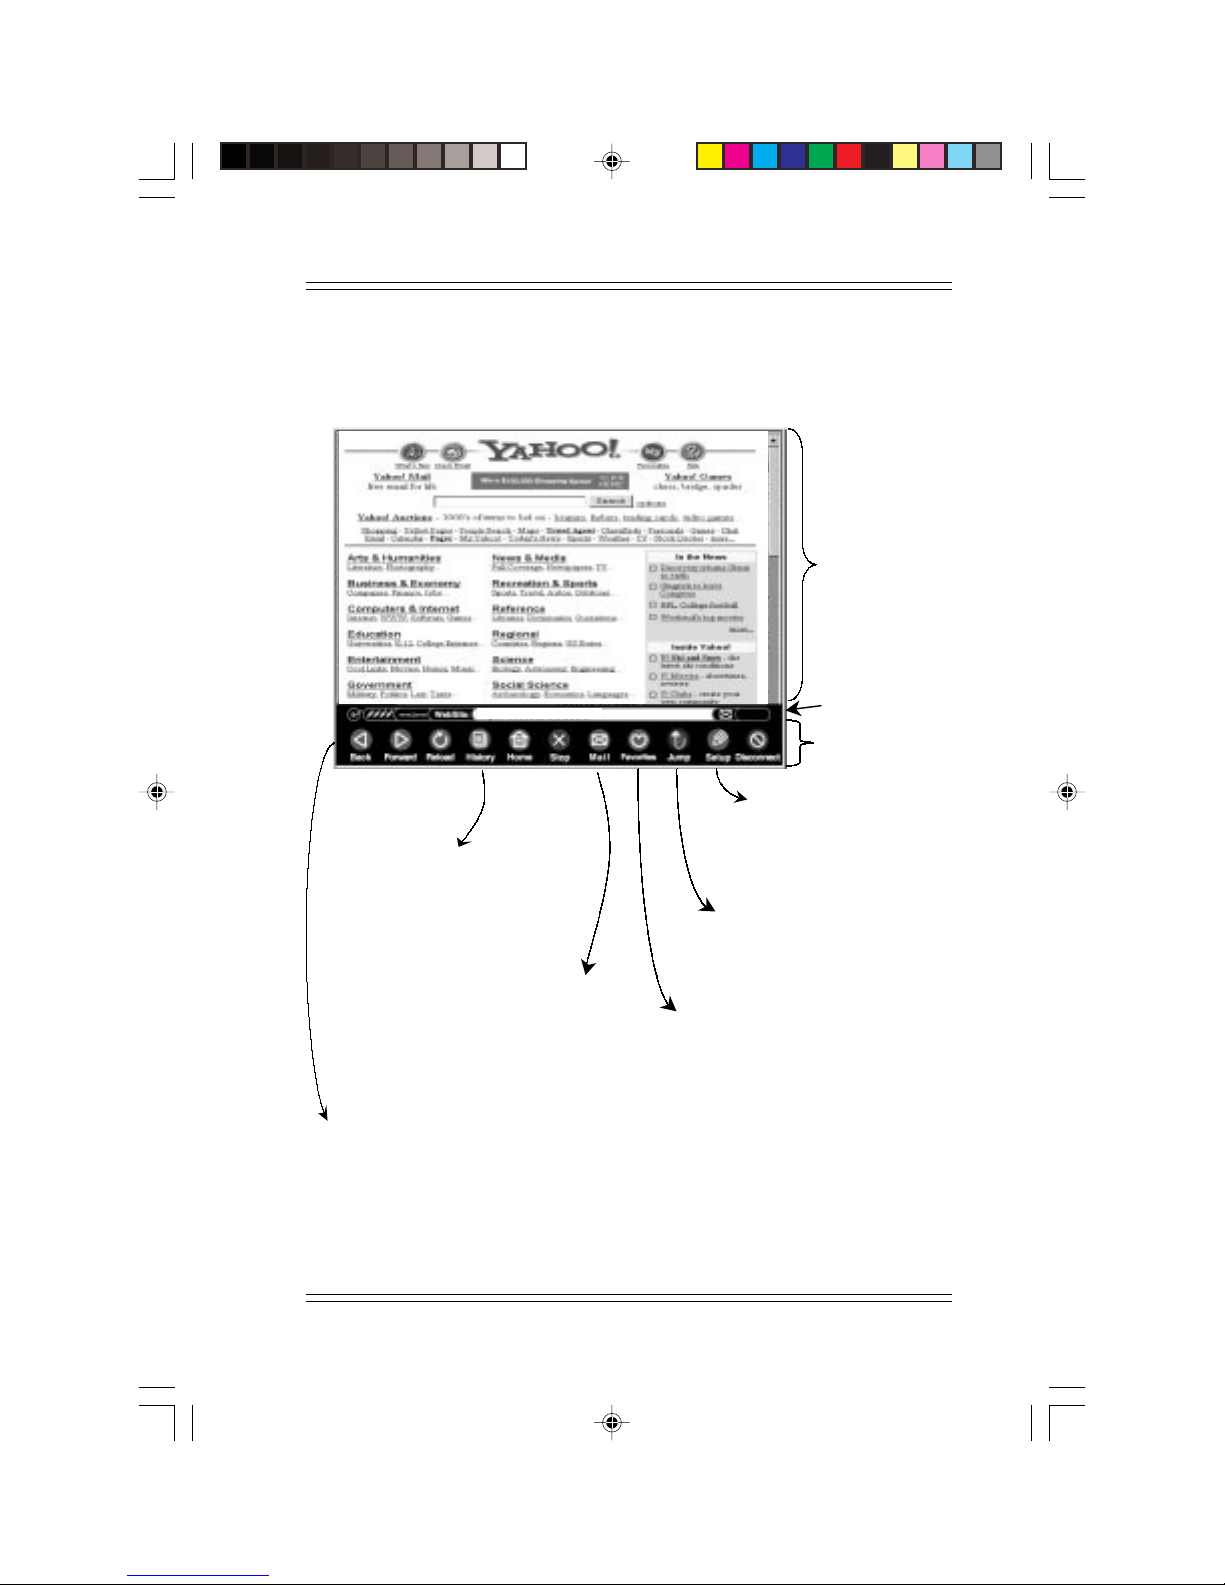
Here is an outline of the browser menu.
GES
GES
Browser screen
http://www.yahoo.com
Displays a list of sites which
you have previously visited.
Select from this list and jump
to the desired URL. See section 4.5.1.
Switches to the mail
function screen. See
Chapter 5 Mail Operation.
This menu bar will be terminated
when [ESC] button, [Menu] button
or [Menu/Input] key is pressed.
Figure 4-3 The Browser Menu
Status bar
Browser menu
Switches to setup screen,
such as connection,
browser and mail. See
Section 3.8.
Displays the dialog box for
URL input. Jumps to the
designated page. See Section 4.5.4.
Displays a list of your favorite
pages. If you want to add any pages
to this list, you can register it here.
See section 4.5.3.
4-3
Page 47
TVsurf User's Manual
To display the browser menu
Press the [Menu/Input] key on the keyboard or press the [Menu] button on
the remote control.
To terminate the menu
Browser menu will be terminated when the [ESC] button, [Menu] button
or [Menu/Input] key is pressed.
To select an item
Move the focus with the left or right arrow buttons, and select the item
using the [GO] button or [ENTER] key.
If the menu is displayed again, the focus is on the item which was selected
previously. If the menu is terminated without selection, that item is not
memorized.
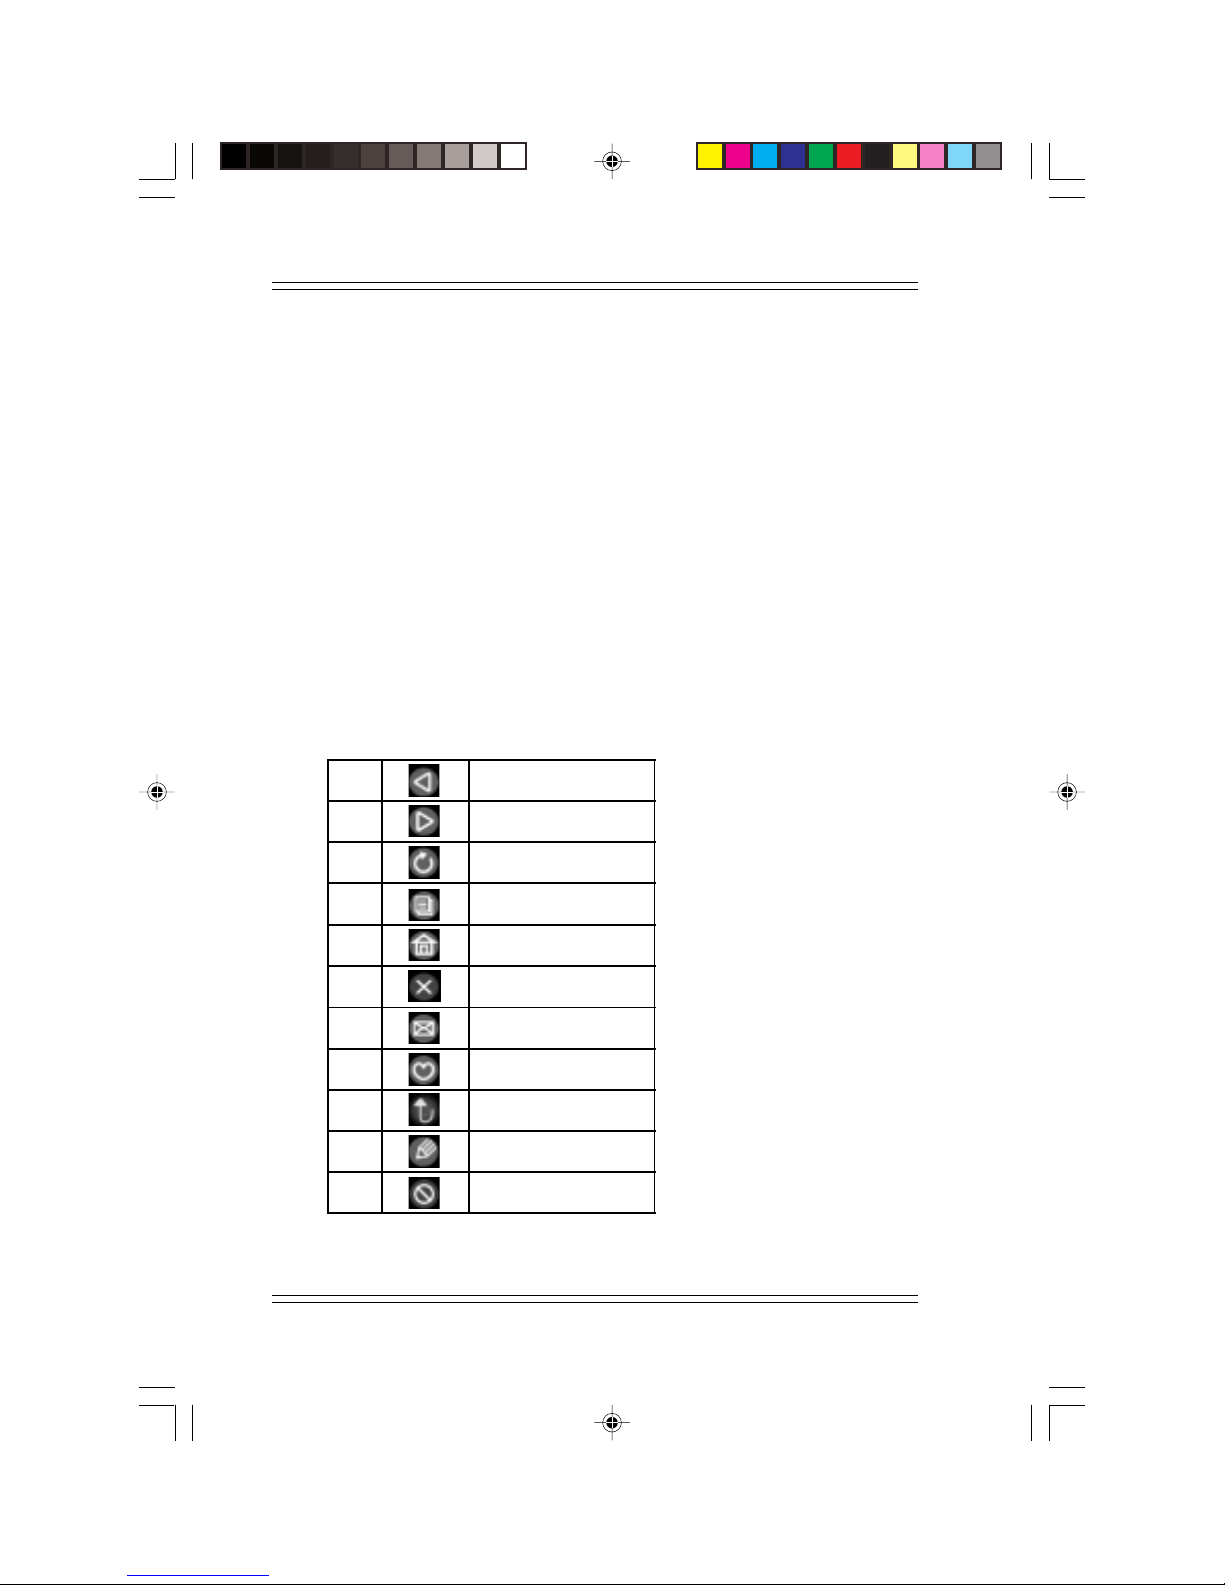
Functions on the menu
4-4
1
2
3
4
5
6
7
8
9
10
11
Back
Forward
Reload
History
Home
Stop
Mail
Favorites
Jump
Setup
Disconnect
Table 4-1 Functions on the Menu
Page 48

The Browser
4.3 Control
4.3.1 Scheme
TVsurf can support the following schemes and protocols for obtaining
information.
http:
Information of WWW server’s resource on the Internet.
mailto:
Switch to the screen of an outgoing mail which includes the receiver's
address automatically.
4.3.2 Scroll
There are several scrolling methods available.
You may scroll page by page using [PgUp] and [PgDn] on either the remote control or wireless keyboard.
Note:
F
Scrolling is done automatically when the focus is moved by the up/down
arrow key and moved out from indicated screen. When the browser is not
able to display the entire horizontal scope of a particular image or table, a
horizontal scroll bar appears automatically at the bottom of the screen or
the table.
4.3.3 Move and select the focus
The focus is shown by a coloured stick or underline. Move with the arrow
keys on either the remote control or the keyboard. Page scrolling is done
automatically. Selection is made by the [Enter] key or [Go] button.
4.3.4 Form
To enter data in the "entry form" of the displayed page, make sure the
form is highlighted then either use your remote control, keyboard or the
soft keyboard and press the [GO] button, [Enter] key on the selected form.
You may then key in the required text. The soft keyboard will be displayed
automatically if “soft” is selected in the environment setup menu. Please
see "4.4 Entry of Characters" for operation.
4-5
Page 49
TVsurf User's Manual
4.3.5 Switching frames
In order to switch between frames, use the [Frame] button on the remote
control or [Frame] hotkey on your keyboard. This would let you switch
focus between frames. The current frame that is in focus would be highlighted.
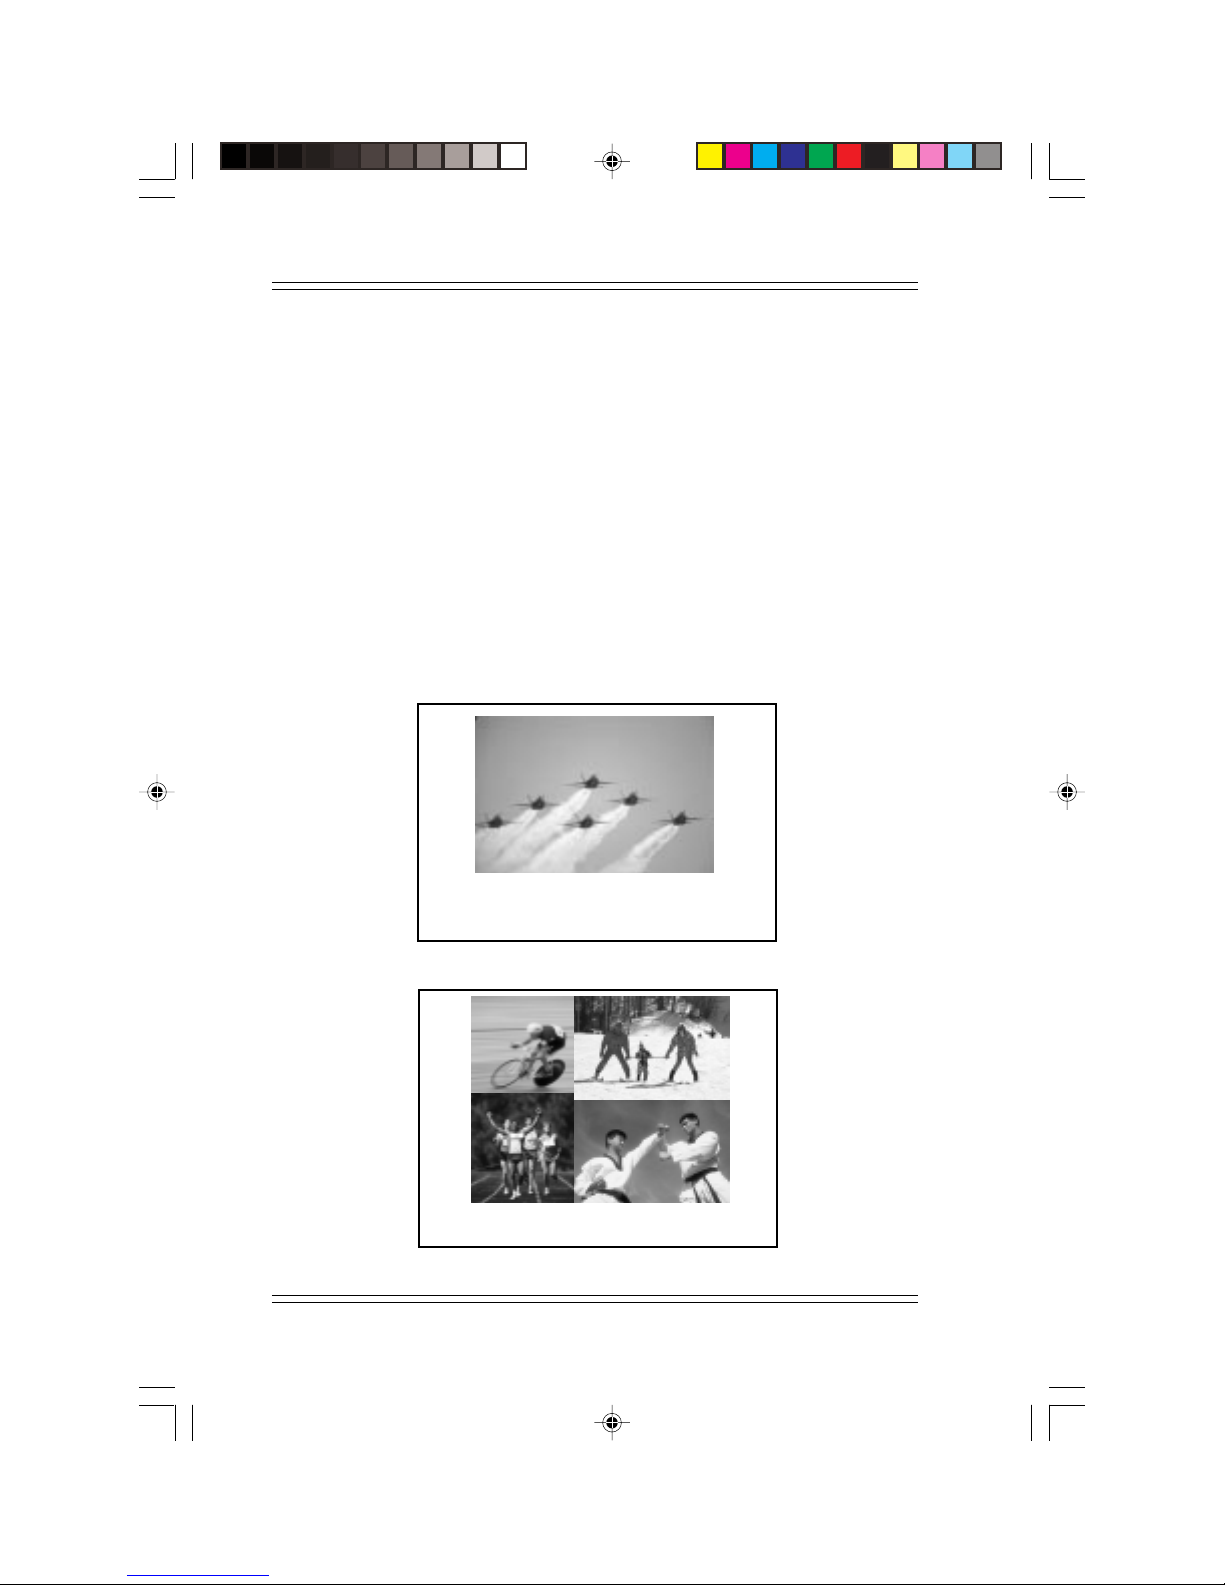
4.3.6 Clickable map
Clickable map allows you to select a control in the image such as a map/
image. When the focus is on the image, the frame will turn bold as with
the usual image. A cross cursor is displayed in the middle of the focus
when the [GO] button or [Enter] key is pressed and the cursor can be
moved by the arrow keys. The focus is cancelled when [ESC] is pushed.
In order to activate the control function, press the [GO] button or [Enter]
key when the focus is on the desired position.
+
4-6
Plane 1 - Plane 2 - Plane 3 - Plane 4
Plane 5 - Plane 6
+
Cycling - Skiing - Running - Karate
Page 50
The Browser
4.3.7 Sound Files
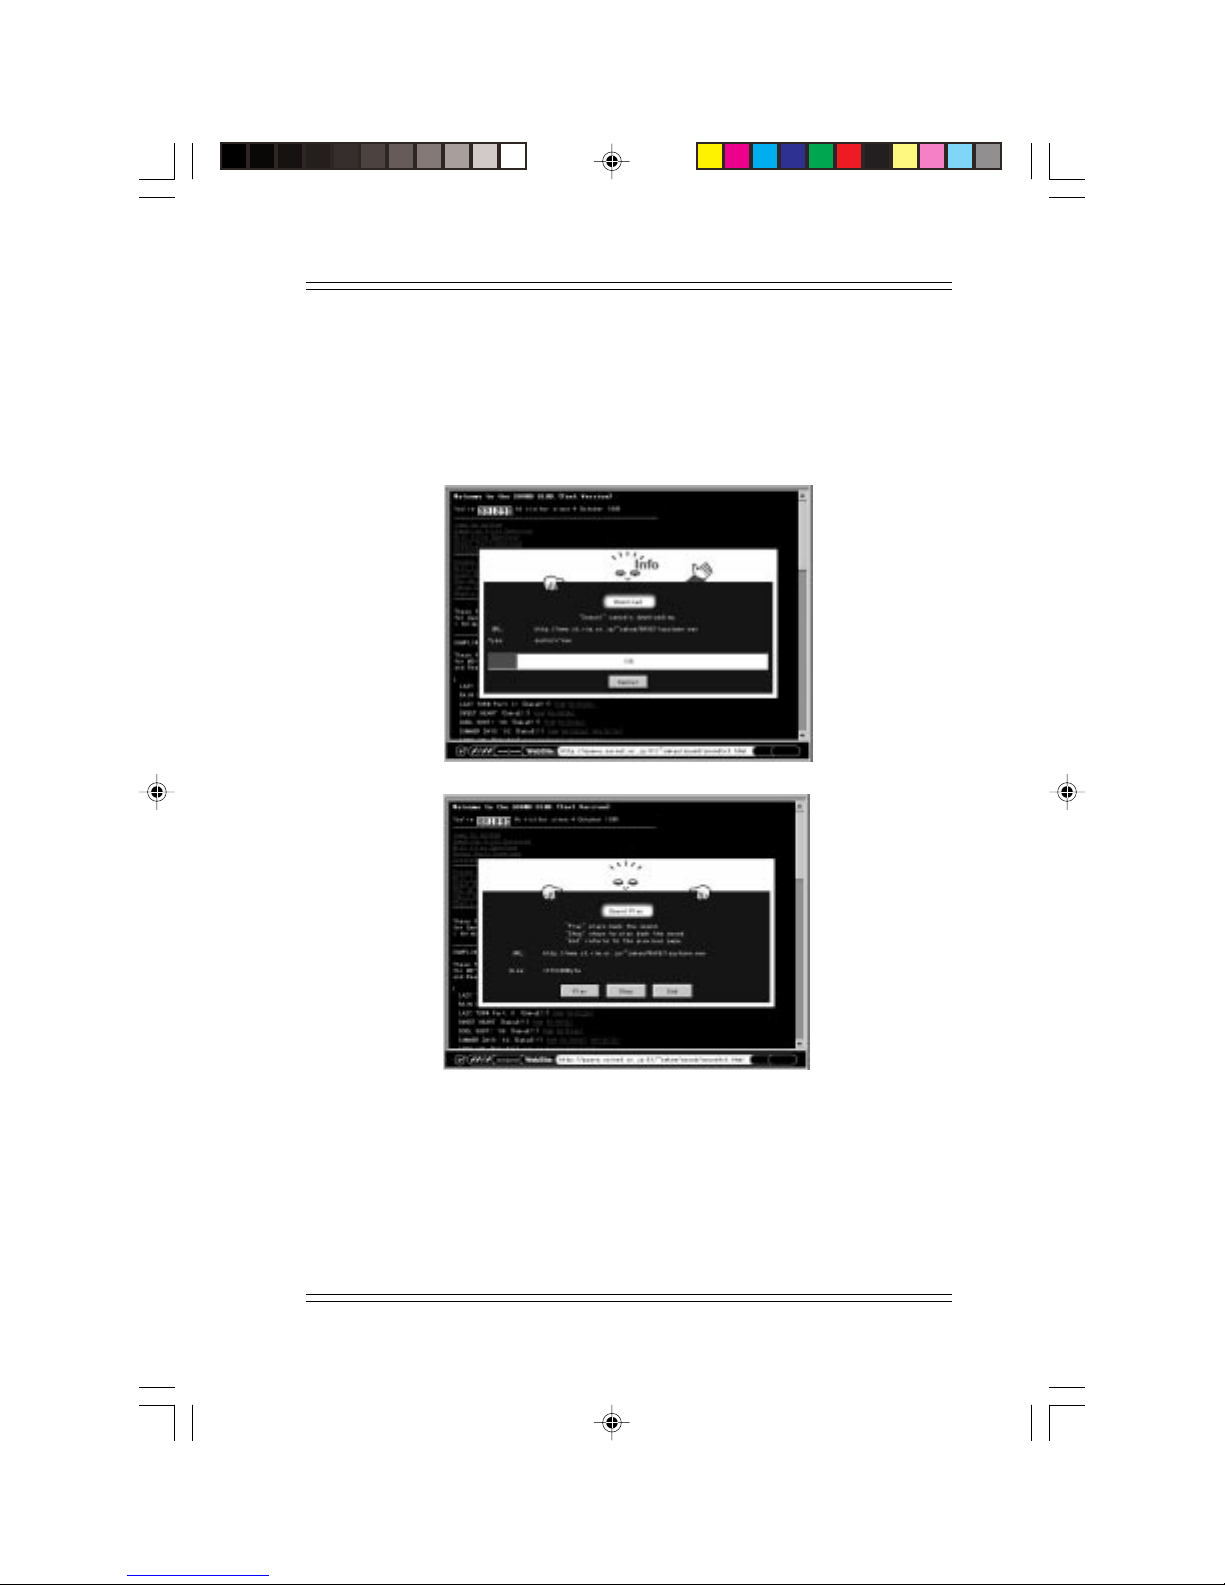
You may download sound files if the file is in "wav" format. The audio
data will be downloaded automatically when the file is selected. This operation can be cancelled during downloading. When the downloading is
complete, the playback dialog box is displayed.
Figure 4-4 Sound Files
4-7
Page 51
TVsurf User's Manual
4.3.8 User Authentication
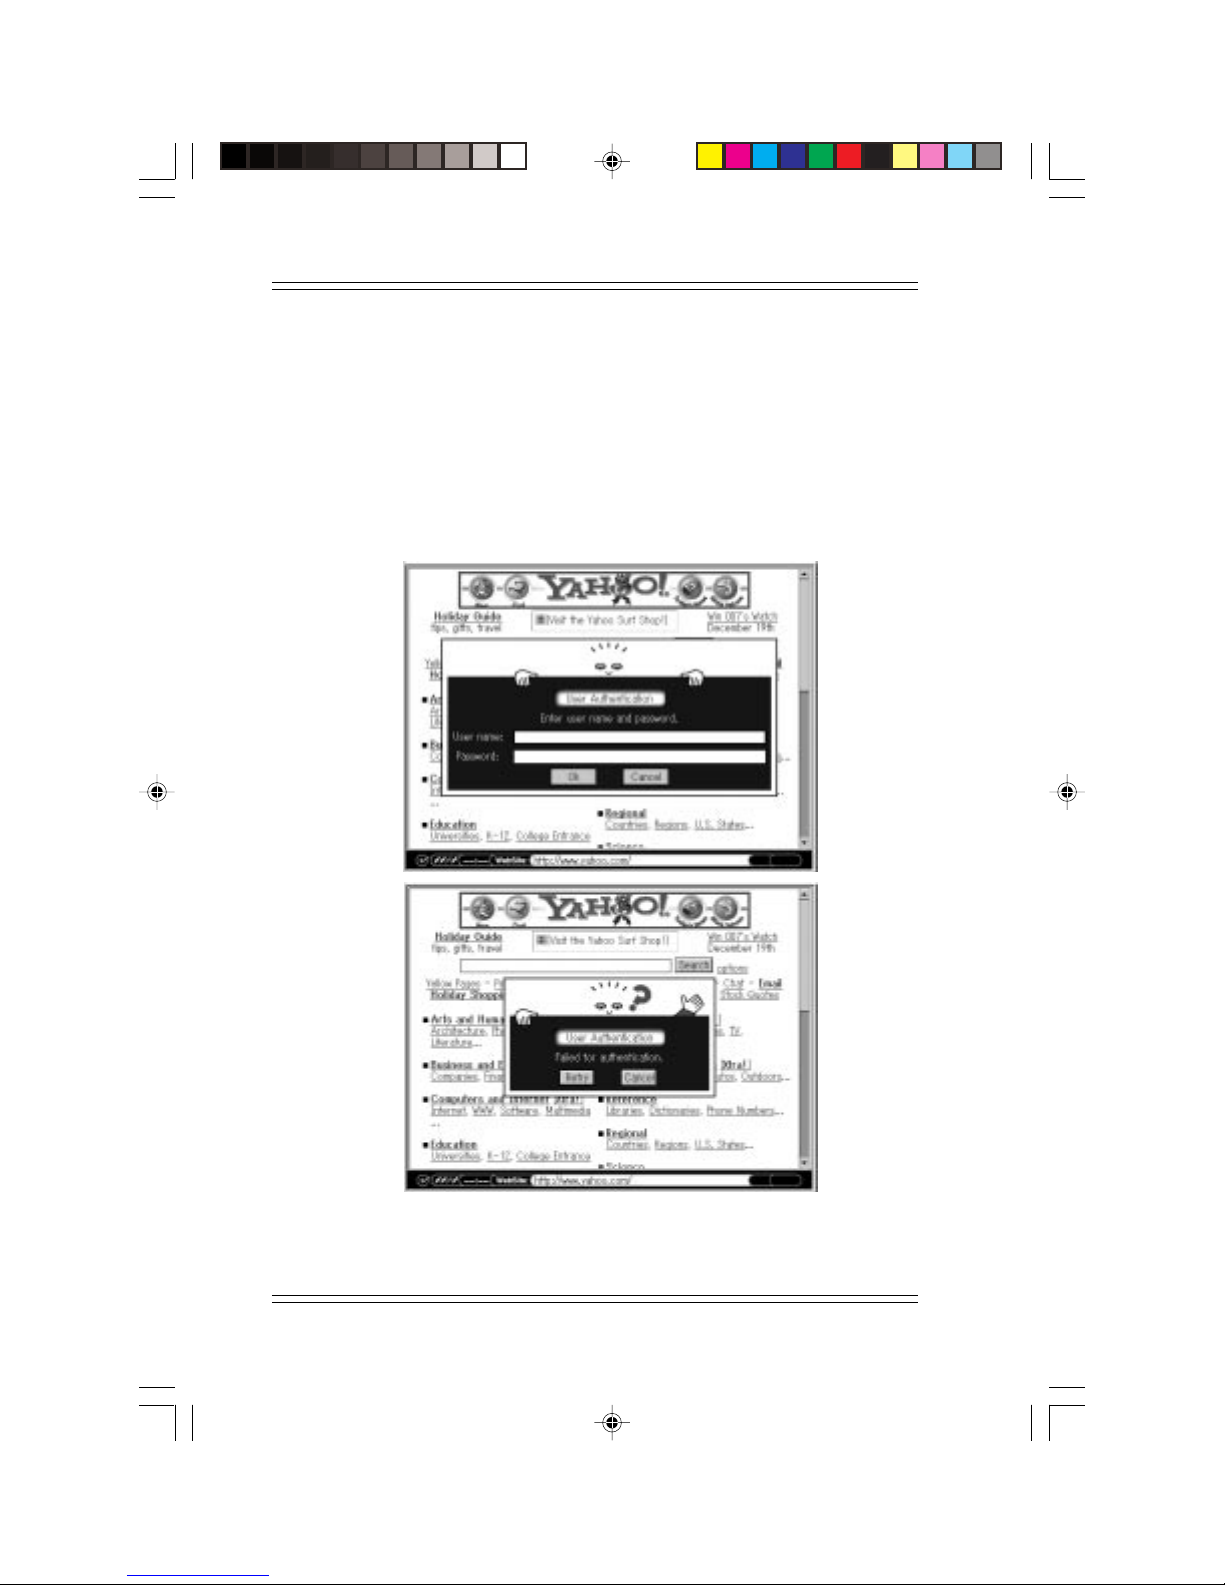
Some site may require authentication before you are able to access it. When
viewing a secure site, a user authentication dialog box is displayed and a
user name and password will be requested. You may have to register with
the site to get your user name and password.
The site can be visited if the user authentication is successful. If not, an
error message is displayed and the browser will return to the previous
page.
4-8
Figure 4-5 User Authentication
Page 52
The Browser
4.4 Entry of Characters
4.4.1 Supported Functions
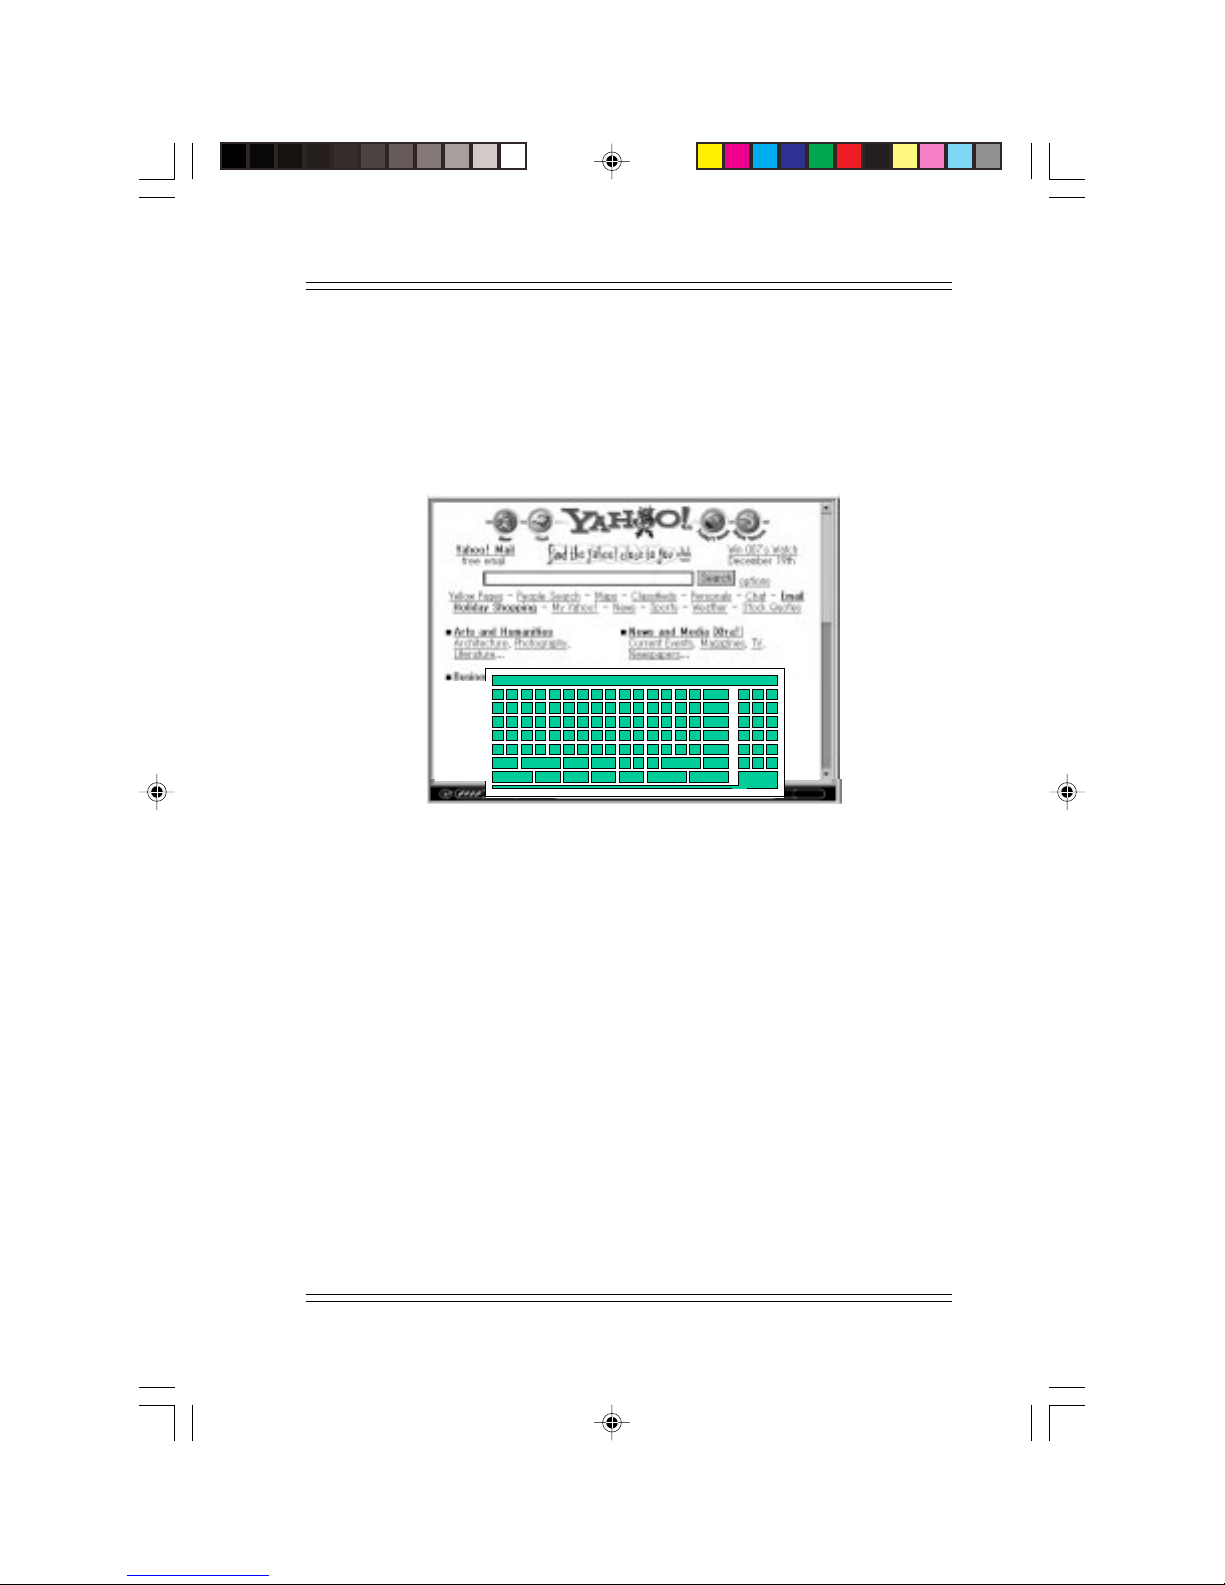
1 Alphabets, Numbers
2 Symbols
3 Template (Please refer to section "3.8.4 Template Configuration")
A B C D E F a b c d
G H I J K L
M N O P Q R
S T U V W X
Y Z $ % ^ ?
Spc
http://
Texts
www.
Del
LeftUpDown Right
g h i j k l
m n o p q r
s t u v w x
y z / . ; :
@ ~ _ .html
e f | [ ] .co
- < C .ac 4 5
! < C .or 7 8
/ ( ) .jp 0 .
# ‘ ` .com * +
DelAll En ter
1 2 3
6
9
:
\ , =
Exit
-
ESC
Figure 4-6 Entry of Characters
If you are using the soft keyboard, scroll to the box on the web page in
which you have to enter the information and press [Go] on the remote
control. The soft keyboard appears and you may enter the necessary information in the text box. Select [Exit] to confirm your entry or press the
[ESC] button on the remote control to cancel.
If you are using the wireless keyboard, scroll to the box on the web page in
which you have to enter the information and press [Enter]. A text box
appears at the bottom of the browser screen. Y ou may then use the wireless
keyboard to necessary information. Press [Menu/Input] to confirm your
entry or the [ESC] key to cancel.
Note:
F
When using the wireless keyboard to enter information in the Browser
and Mail Application, press [ESC] to cancel or [Menu/Input] to confirm
what you have keyed in and go to the previous screen.
4-9
Page 53
TVsurf User's Manual
4.4.2 Template
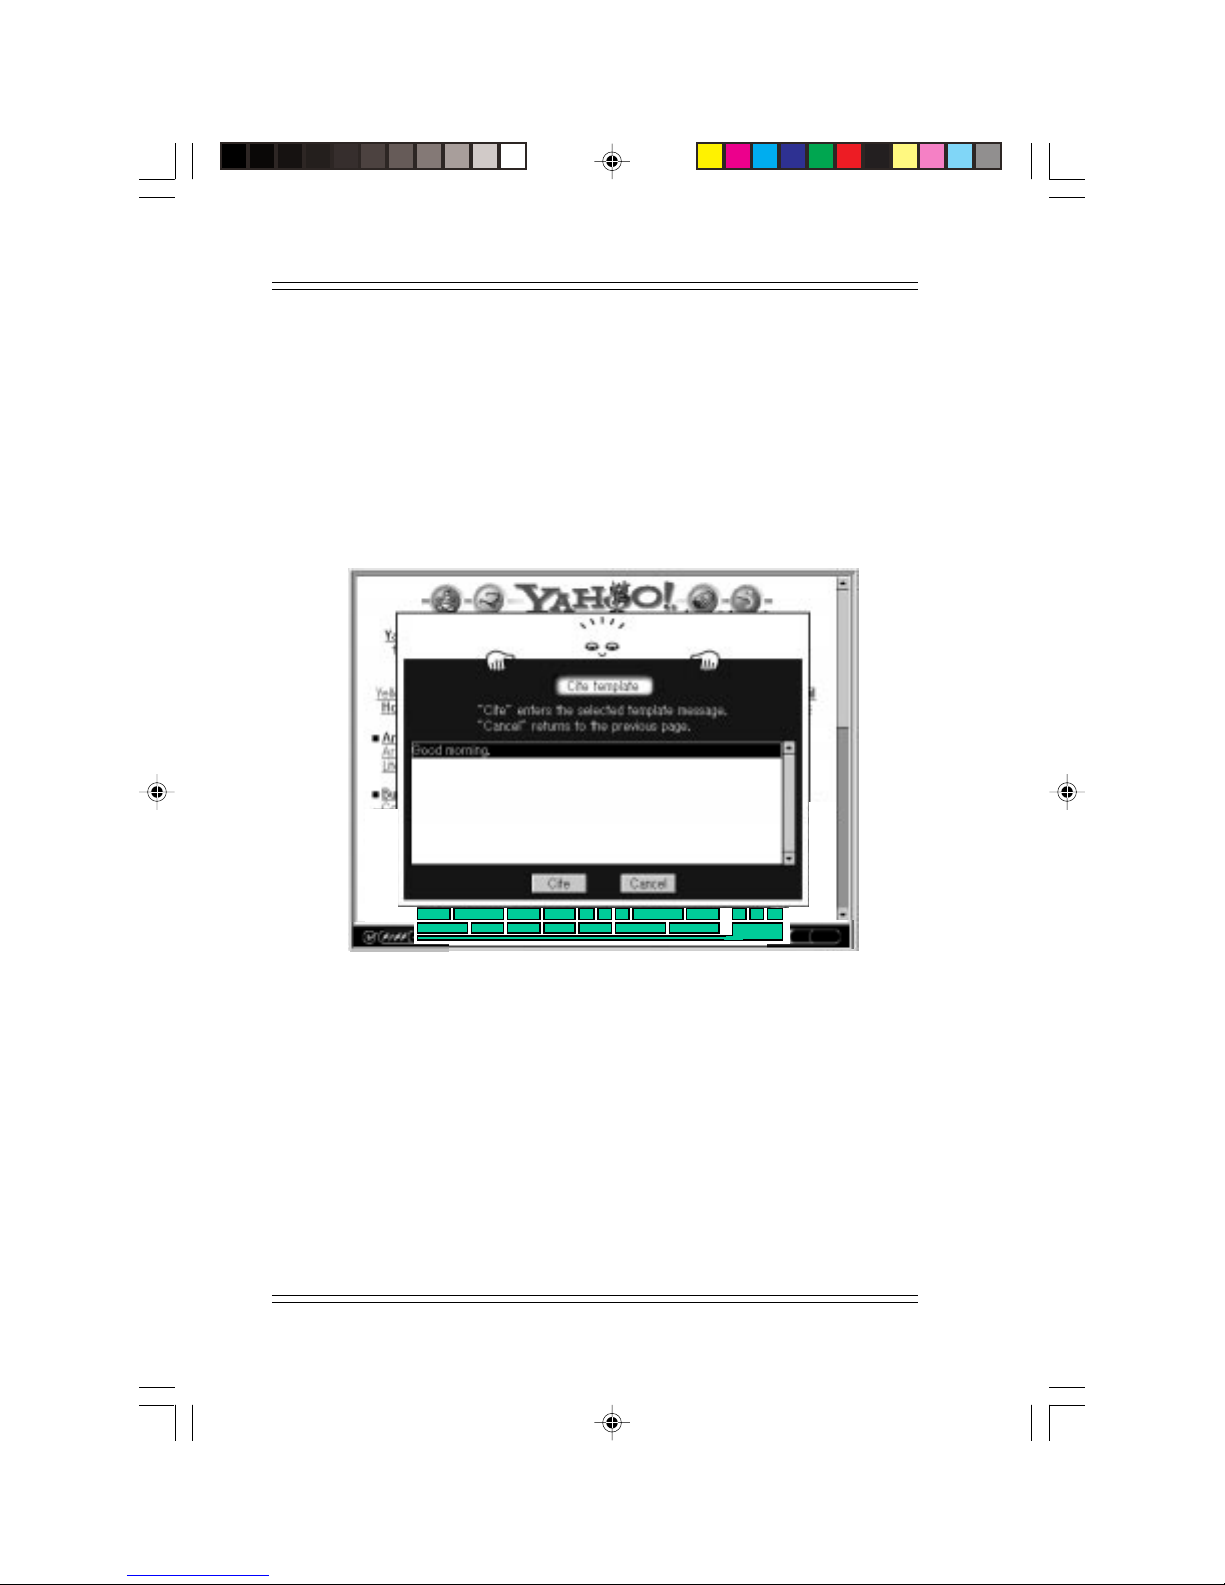
Enter a template into the form by using the soft keyboard [Texts] key.
Refer to section 3.8.4 on how to register templates.
Using Templates
When using the soft keyboard, press [Texts] to get to the Template menu.
From here, select the Template you want to use and then select [OK] to
confirm your choice. The text appears in the text box in the soft keyboard.
4-10
Texts
http : //
Del
www.
LeftUpDown Ri ght
@ ~ _ .html
DelAll Enter
ESCSpc
\ , =
Exit
Figure 4-7 Entry of Characters - Template
Page 54
The Browser
4.5 Browser Functions
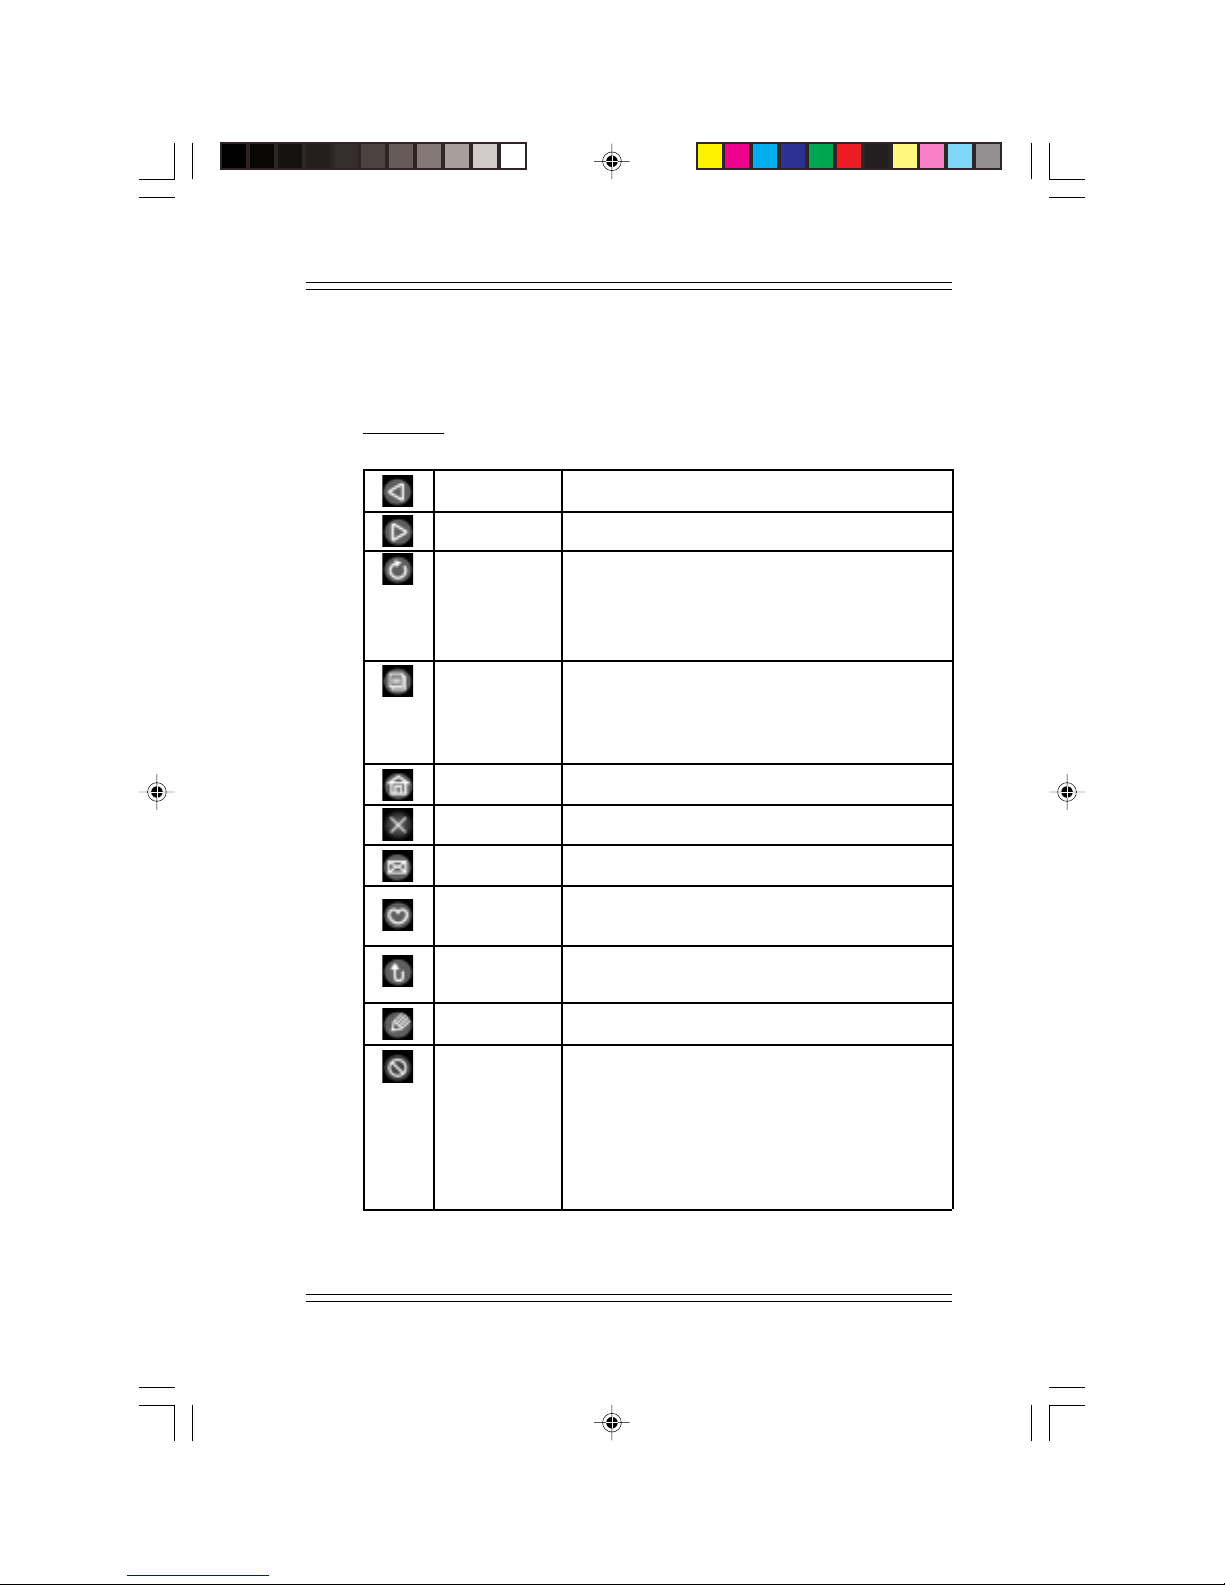
Following functions are provided by the browser menu.
Operation
Back
Forward
Reload
History
Home
Stop Stops loading a page.
Mail
Favorites
Jump
Setup For setting up connection, browser and mail.
Disconnect
Returns to the previous page.
Goes to the next page.
Reloads or refreshes the current page. Y ou may
want to use this option when you wish to see
the latest updated page since you visited it
within the current surfing session.
Shows the history of URL visited since starting
up the browser. A page can be selected from
this list and shown again. Please refer to “4.5.1
Selecting a page from history” for details.
Jumps to the registered URL.
Switches to the mail screen (see section 4.5.2).
Stores the information of favourite homepages.
Please refer to “4.5.3 Favourites” for details.
Jumps to a specific URL. Please refer to “4.5.4
Jump” for details.
Terminates the connection. You may want to
disconnect to save online time eg. when reading information from a web page.
You may reconnect when you finish when you
jump to the next page, type in a new URL or
select a page from History..
Table 4-2 Browser Functions
4-11
Page 55
TVsurf User's Manual
4.5.1 Selecting a page from history
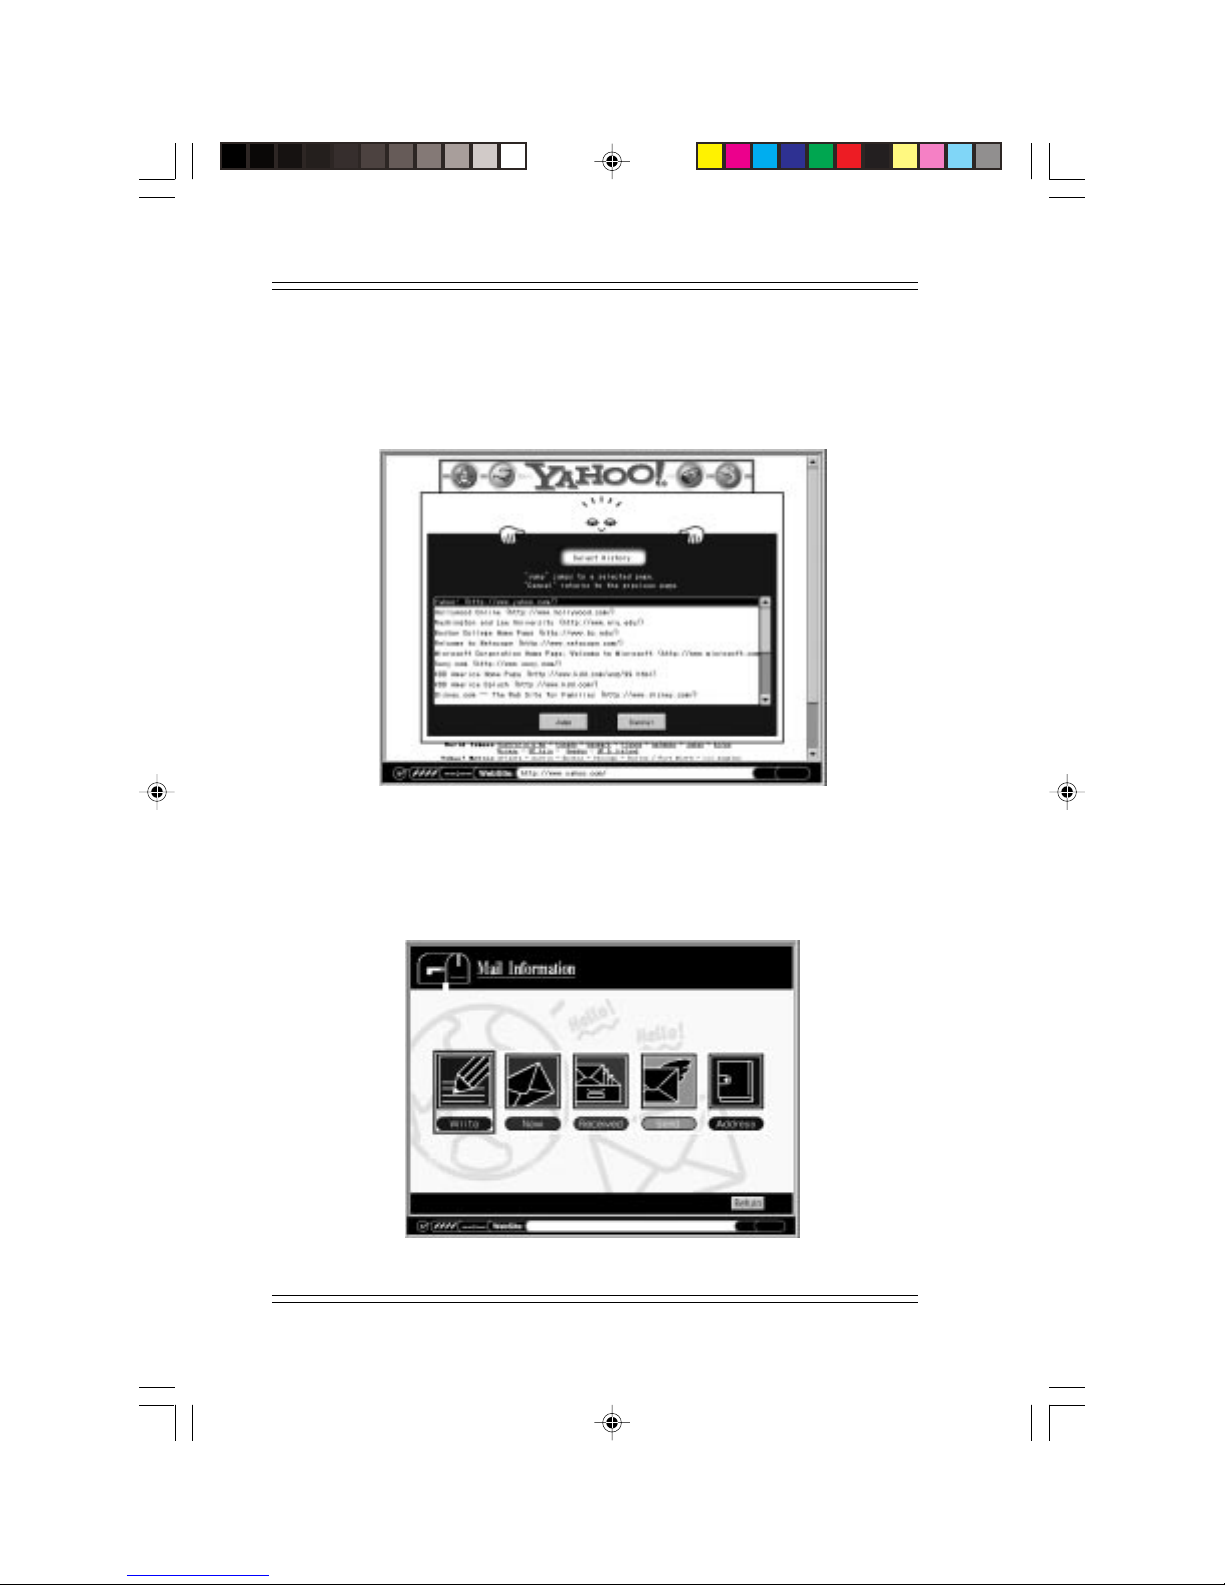
Displays the list of titles and URLs of the currently viewed pages. URL at
the top of the list is selected as default. Selection can be made with the
arrow keys.
Figure 4-8 Selecting a page from history
4.5.2 Mail
Switches to the mail function screen. Goes back to the previous browser
screen when [Return] is pressed. Please refer to "Chapter 5 Mail Operation" for more information.
4-12
Figure 4-9 Mail Function Screen
Page 56
The Browser
4.5.3 Favorites
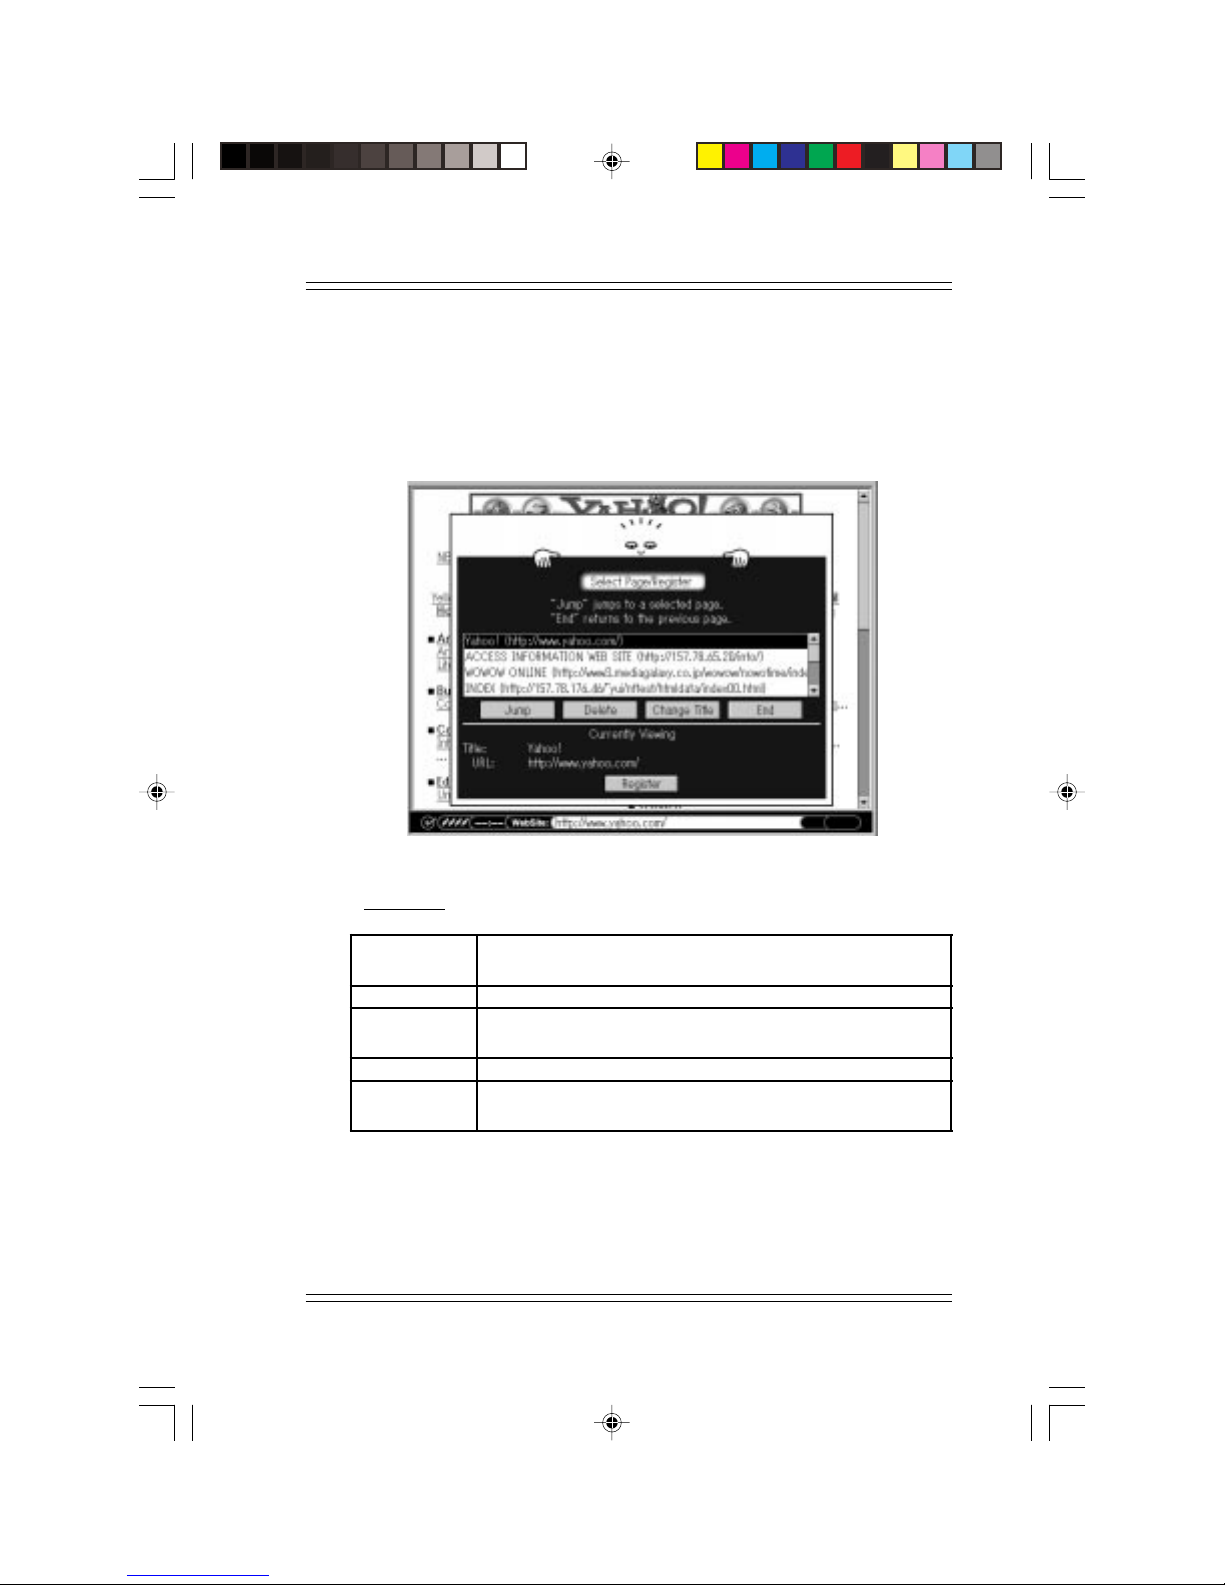
You can bookmark your favorite pages here. This is used to display and
register the title and the URL of the current page, and to jump, delete or
change the title of the registered URL. The newly registered titles will be
added to the top of the list.
Figure 4-10 Favorites
Operation
Jump Chooses a registered URL on the list and loads the URL.
Connects the line if URL is on the Internet.
Delete Deletes a registered URL.
Change Title Changes the title of a registered URL. The dialog box
for changing the title is displayed.
End Exits from the current dialog box.
Register Registers the title and URL which is currently shown.
You may want to refer to section 4.5.3.1.
When you want to exit, press the [Tab] key on the keyboard and scroll to
the [End] selection or you can just press the [ESC] button/key and the
focus will go to the [End] selection. Then press the [GO] button or the
[Enter] key.
4-13
Page 57
TVsurf User's Manual
4.5.3.1 Select Page/Register: Change Title
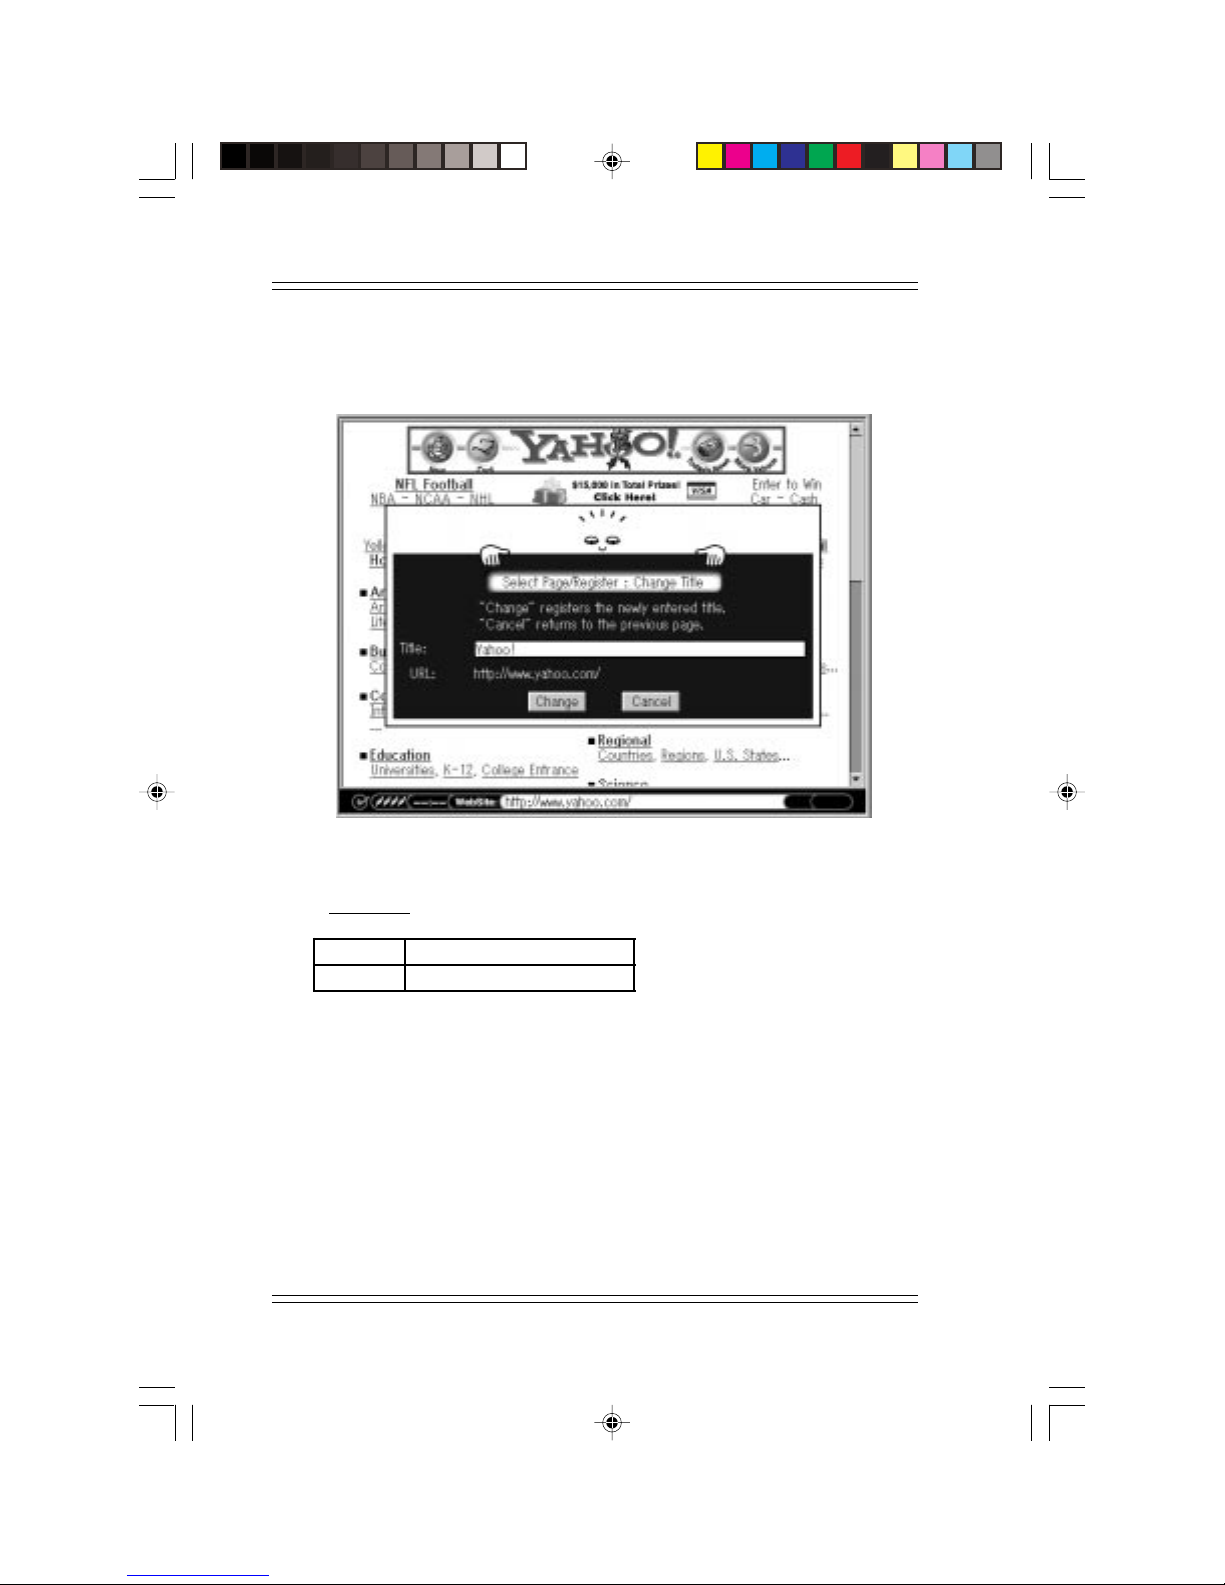
Changes the titles of the pre-registered URL in the Favorites list.
Figure 4-11 Change Title of URLs
Operation
Change Puts the change in effect.
Cancel Closes the dialog box.
A new title can be entered by moving the focus on the title and pressing
[GO] button or [Enter] key.
4-14
Page 58
The Browser
4.5.4 Jump
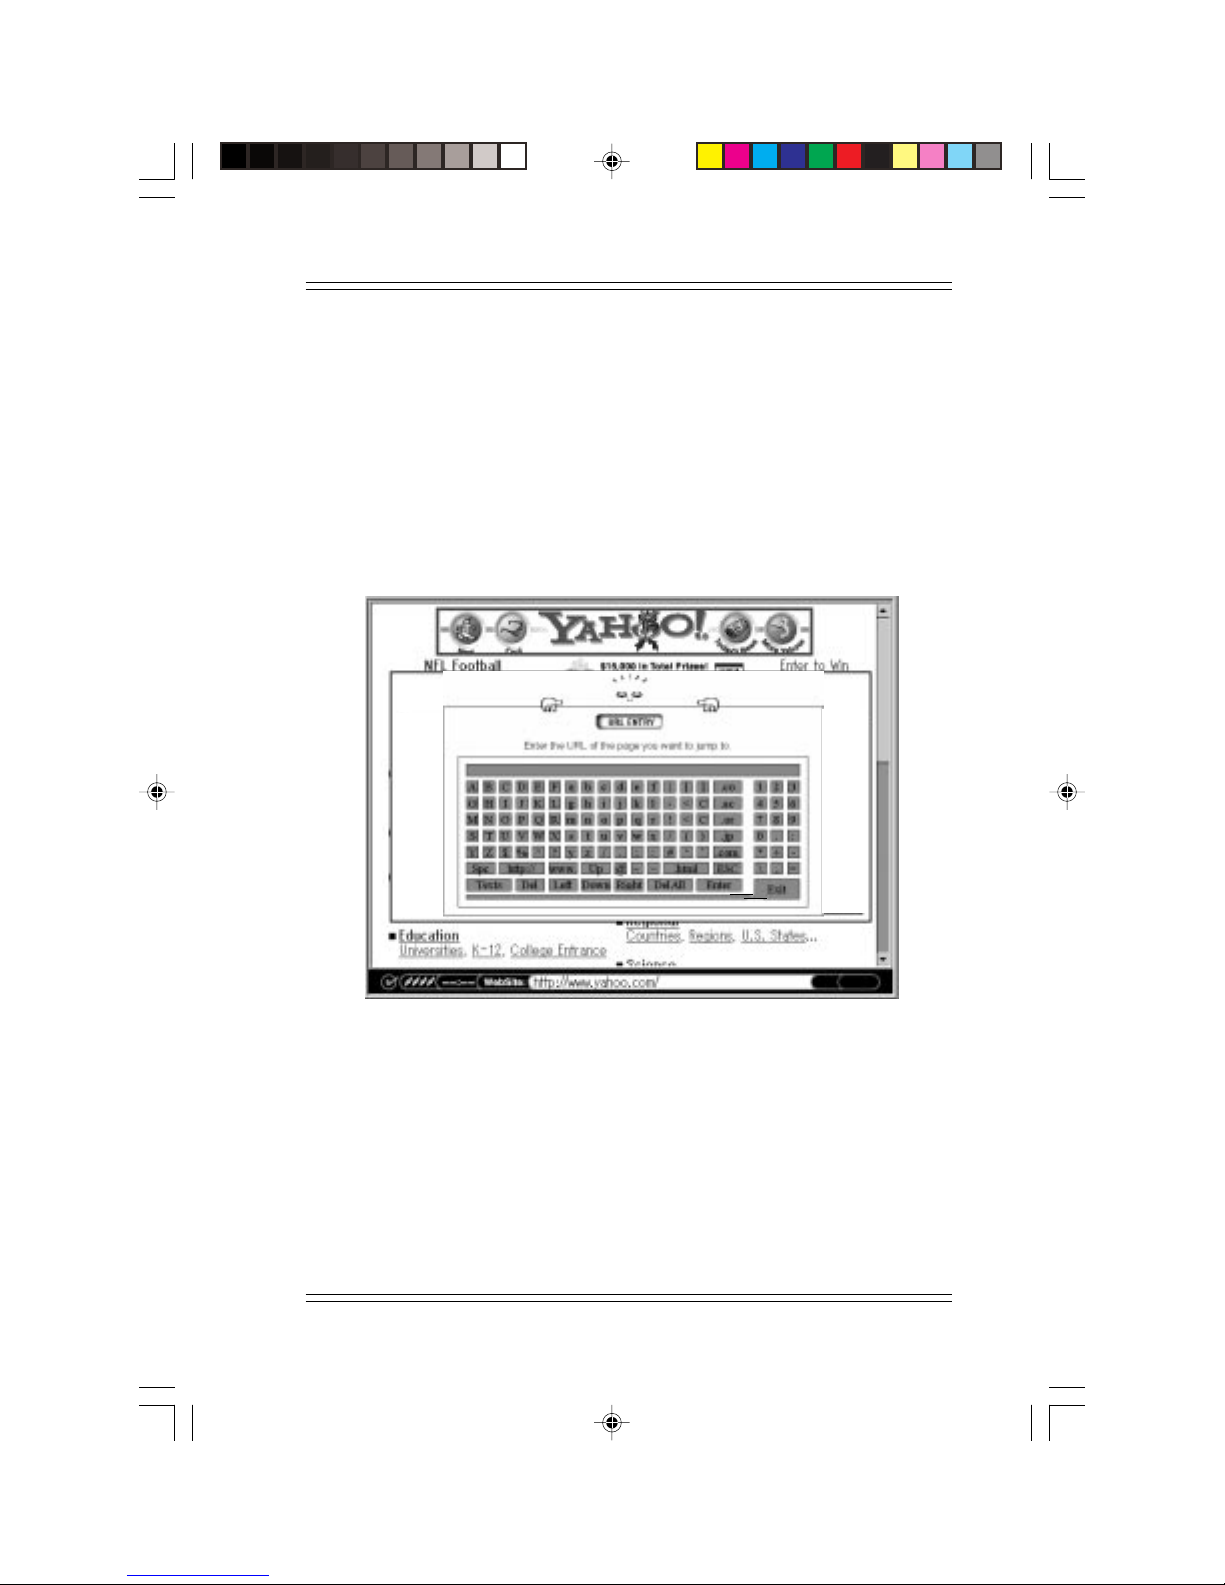
Select this option if you want to jump to a desired web site. A dialog for
making direct URL (http://www.... ) entry is available. After typing the
URL, press [Exit] when using the soft keyboard or [Menu/Input] on the
wireless keyboard to jump to the URL.
If you have changed your mind about going to that particular web site and
want to remain on the current web page, press the [ESC] button/key to
cancel the option.
Figure 4-12 Jump
4-15
Page 59

MY NOTES:
TVsurf User's Manual
4-16
Page 60
Mail Operation
Chapter 5
Mail Operation
5.1 Outline
Connection of TVsurf to the mail server is made when a user selects the
send or receive command. After receiving/sending mails, disconnection is
made automatically so users can read/write off-line.
TVsurf uses the protocols SMTP and POP3 for sending and receiving
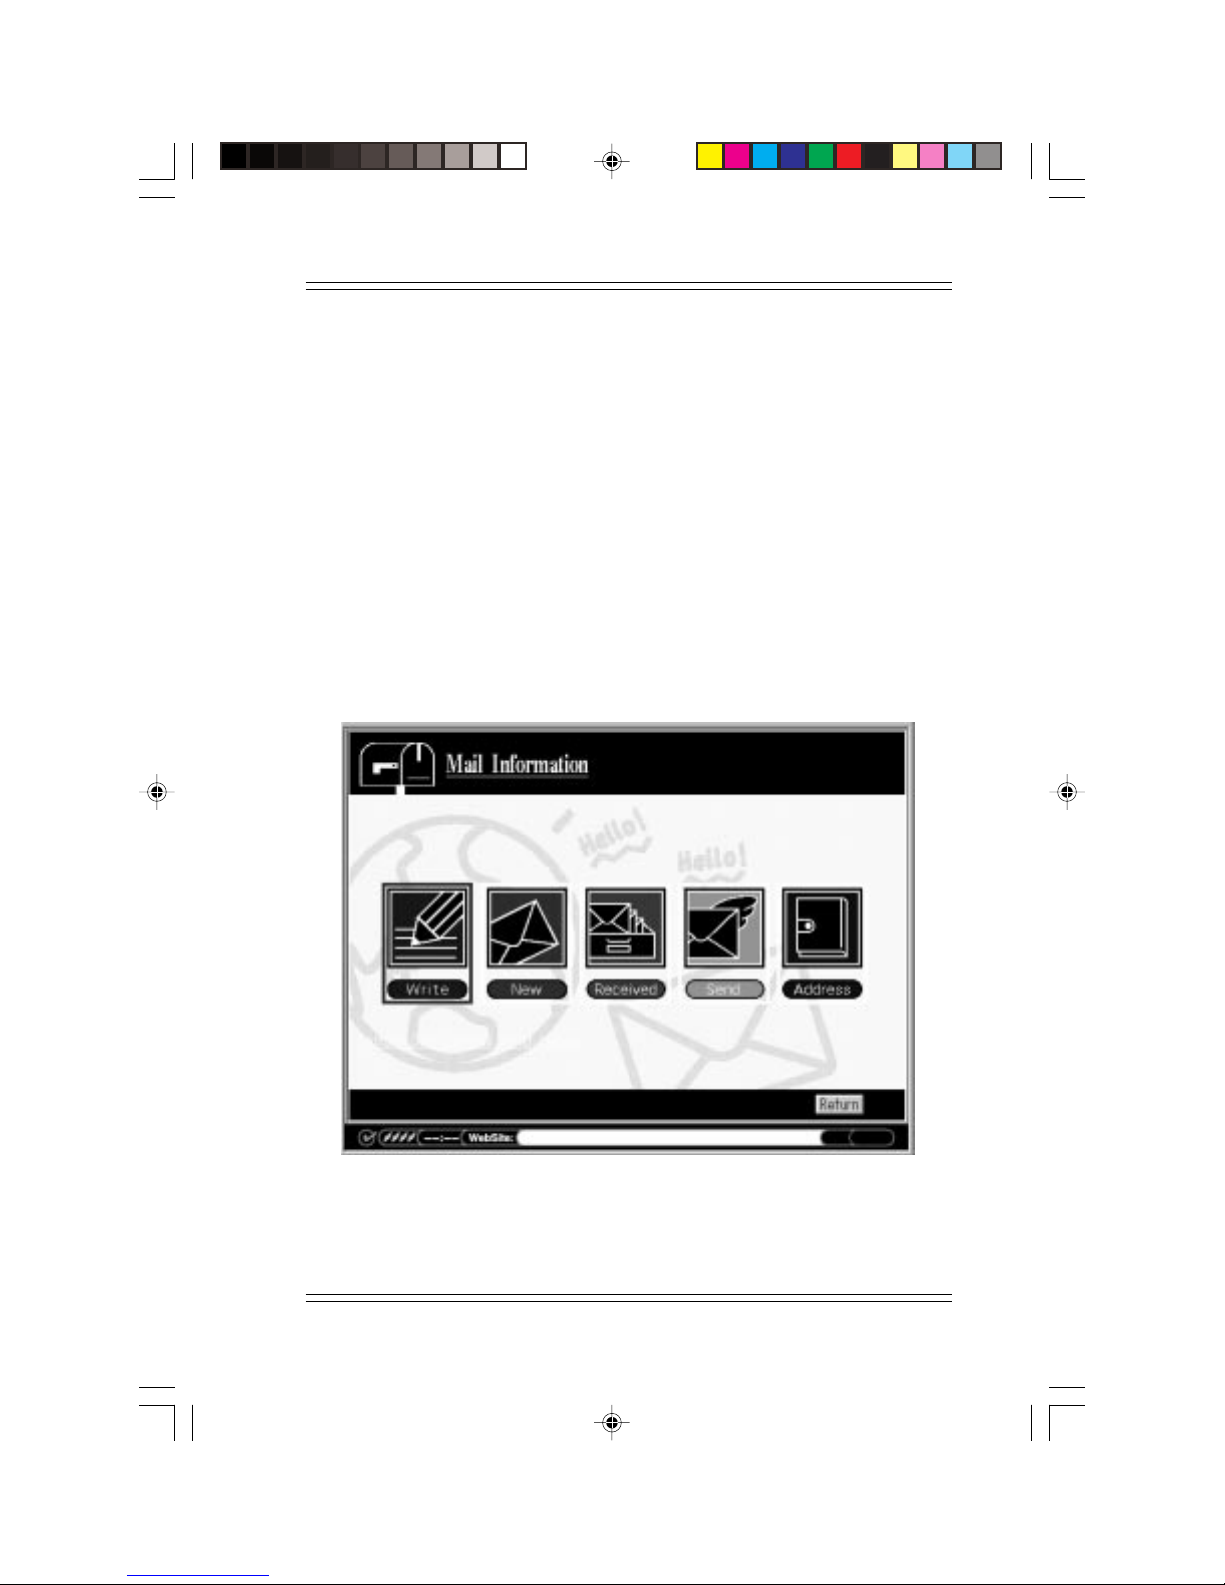
mail. By selecting Mail in the menu bar, the mail menu appears which
includes Write, New, Received, Sent, Address, Attach Data List and Mail
List at Server.
Mail List At ServerAttach Data List
Figure 5-1 Mail Operation
5-1
Page 61

TVsurf User's Manual
Quick Note:
F
Make sure to setup your mail environment before sending or receiving
email. Please refer to section 3.8.3 on Page 3-14 on instructions to setup
TVsurf to send and receive email.
5.2 Writing a mail
You may begin writing a new mail by selecting the Write option on the
mail menu. When you want to manually key in addresses or write a mail,
press [GO] button or the [Enter] key and a text box will appear. Type in
the addresses or message. Pressing the [Menu/Input] key on the wireless
keyboard or [Exit] on the software keyboard will confirm entry and get
back to the mail screen. Refer to section "5.8 Sending a mail" for more
details.
5.3 Receiving a mail
5.3.1 Mail listing
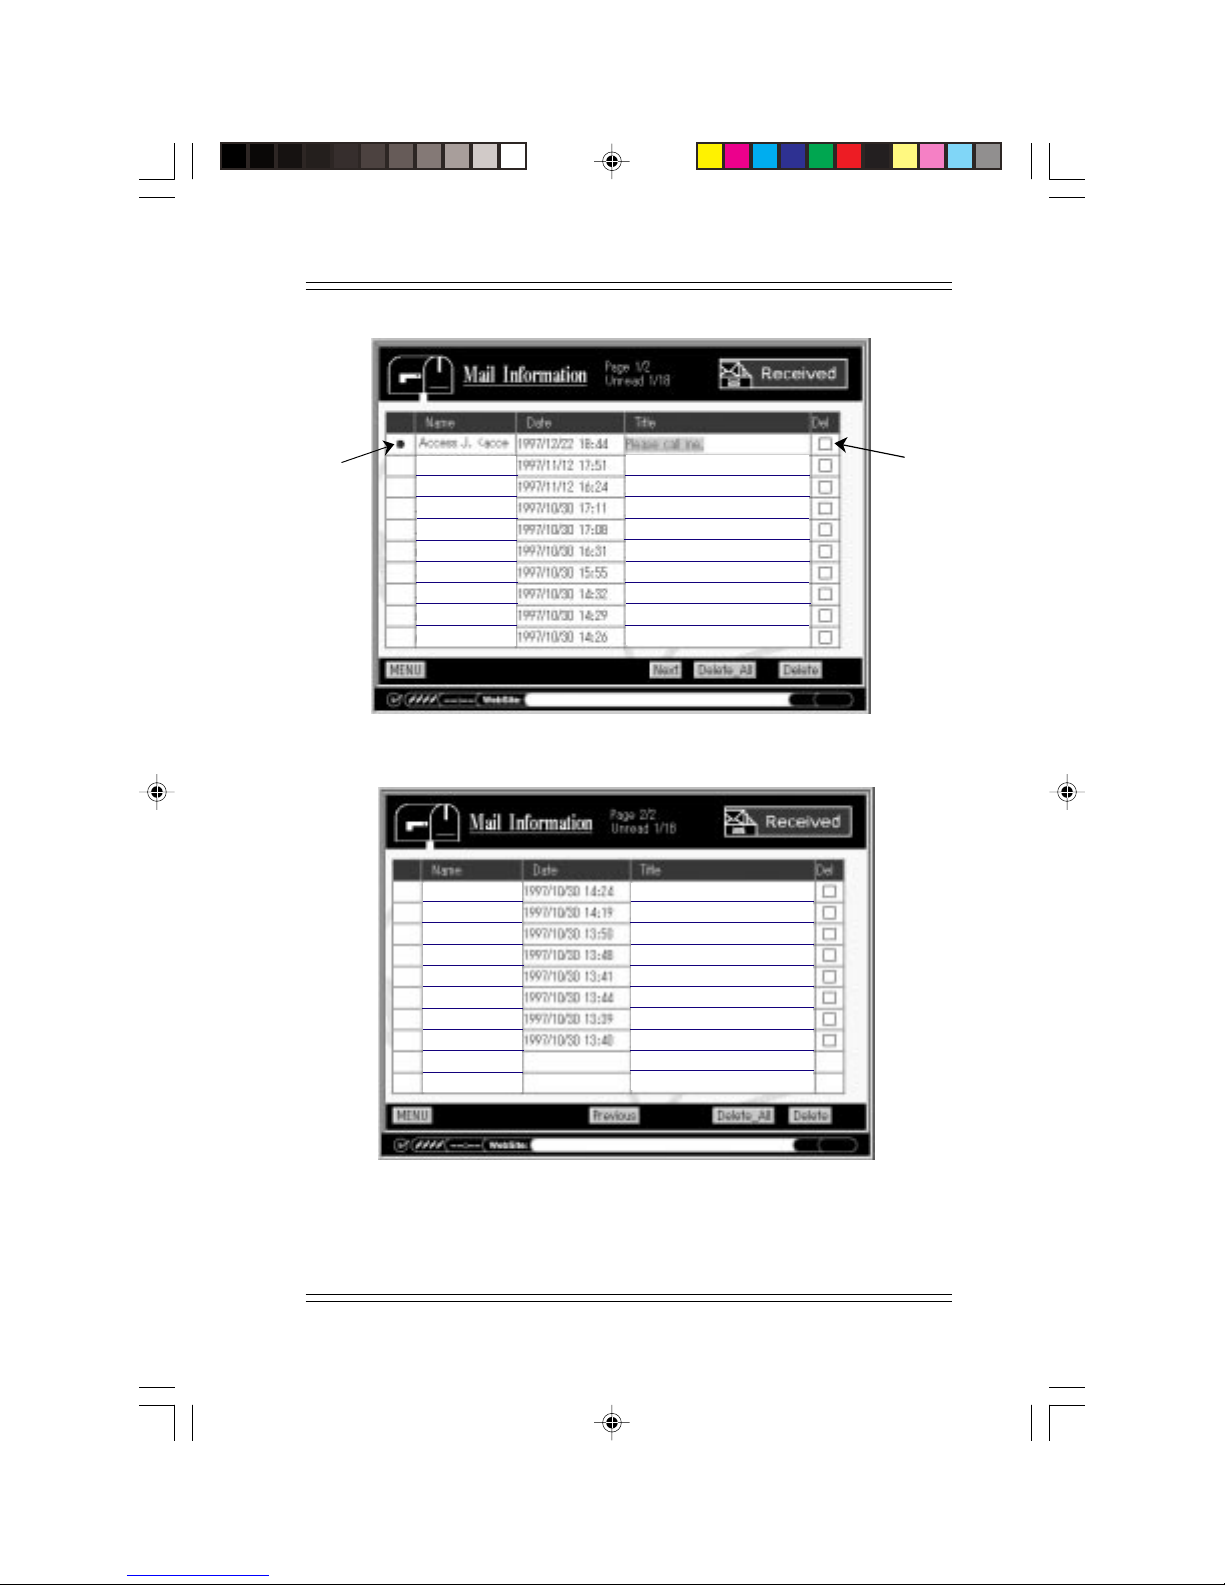
By selecting New or Received, the list of new or received mails appears.
When New is selected, new mails are downloaded from the server.
Columns
Icons for unread mail, name of sender, date and time mail was sent, and
titles are indicated.
Order of mail
The mail received most recently is shown at the top. When the listing of
the mail is more than what the screen allows, the [Next] button appears
and the next page can be accessed by selecting that button.
Deletion of mail
A mail can be deleted from the listing. By checking the Delete box and
clicking the [Delete] button, checked mail will be deleted all together. If
all the mail should be deleted, select the [Delete_All] button.
5-2
Page 62
Mail Operation
Unread
Icon
John Smith <john Regarding matter at hand
Mary Lamb <mary Message1
Tan CK <cktan@ Please reply
Joseph Chu <chu Urgent case
Irene Lim <lim@ Information needed...
Jacqueline <jacqu Please call me
Serena Teo <sere Materials status
Quinn Mark <quin Confirmation of case
Jonathan Goh <jo Issue to settle
Figure 5-2a Mail Listing - First Screen
Claudia See<clau Presentation material
Cindy Lee <cindy Please reply.
Laura Foo <foolau Urgent case
Christopher <chris Materials to be bought
Colin Chua<colin Quotation
Peter Lau<peterla Important visit
Marcus Wee<mar Information provided
Larry Tan <tanlarr Regarding matter at hand
Delete
box
Figure 5-2b Mail Listing - Second Screen
5-3
Page 63

TVsurf User's Manual
5.3.2 Received mail
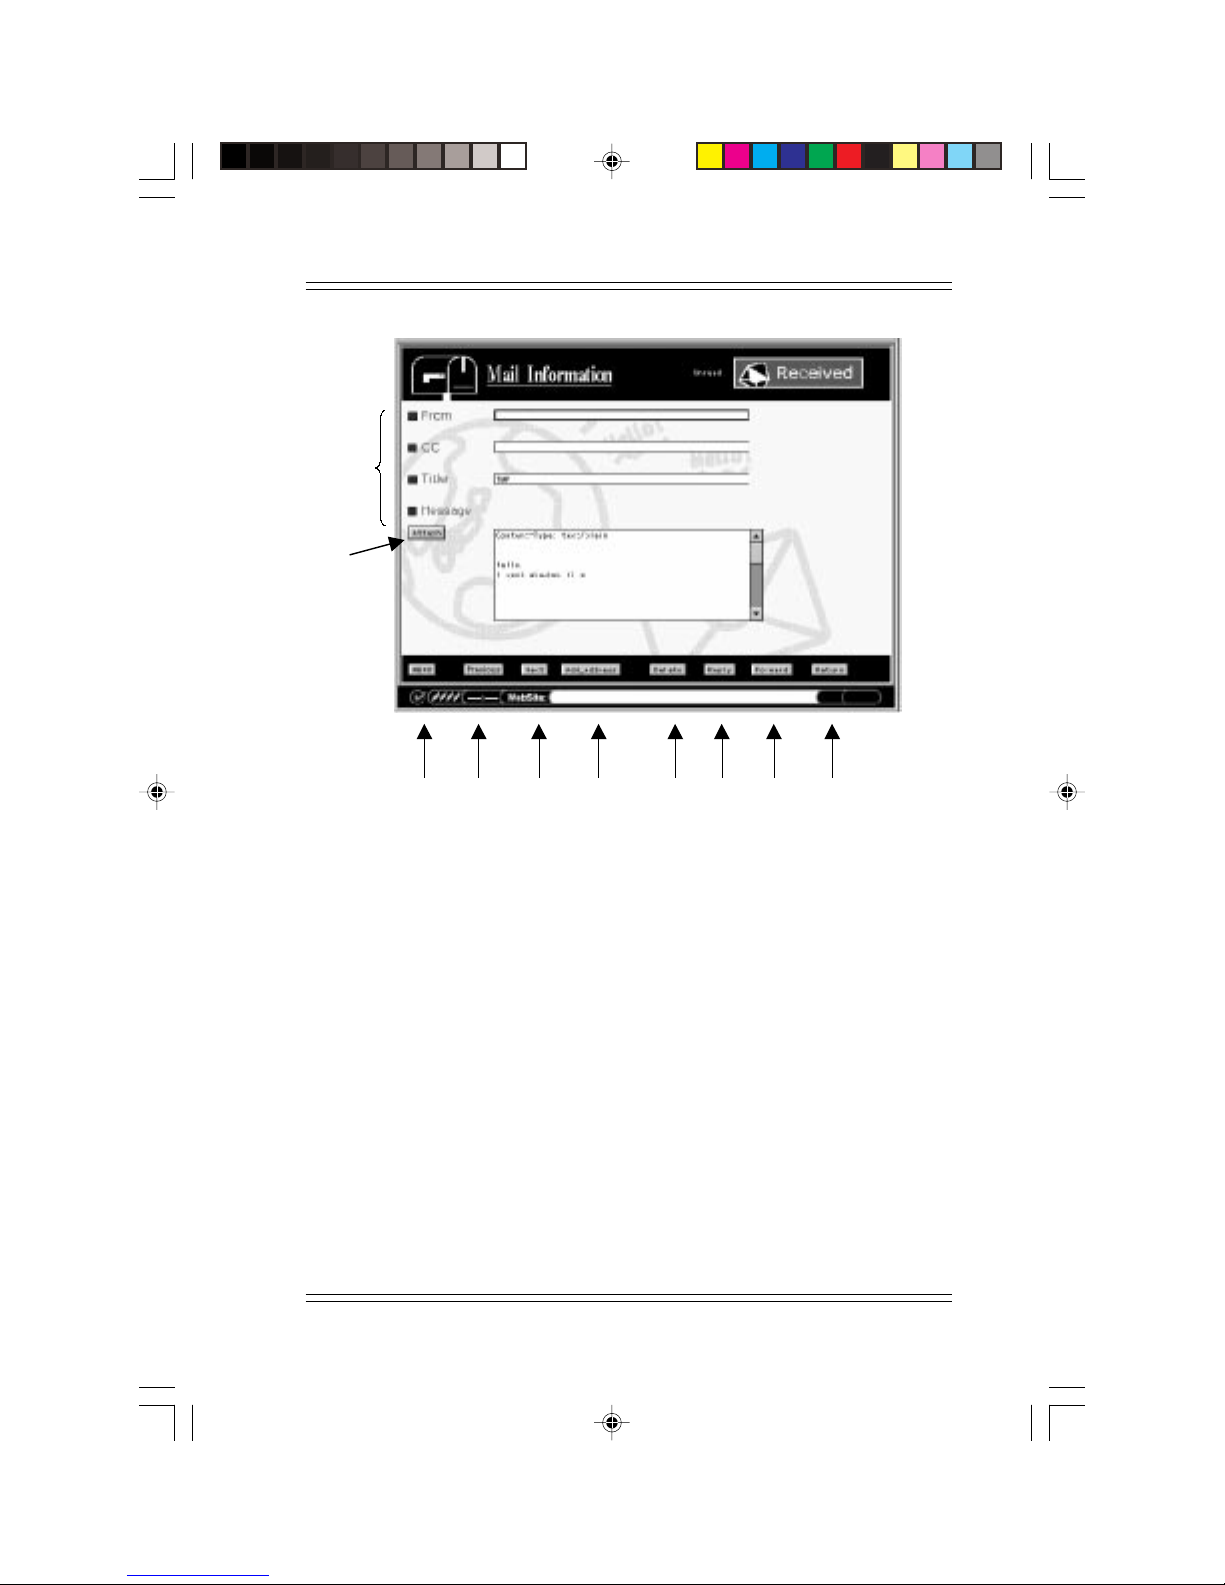
This section describes what you would see in the received mail screen.
(With reference to the Figure 5-3 found on the next page).
1 Columns
“From”, “CC”, “Title”, and “Message” are indicated.
2 Attach
Appears if there is an attached file. (Refer to section 5.3).
3 MENU
Goes back to the first screen.
4 Previous
The previous mail appears.
5 Next
The next mail appears.
6 Add_Address
You may add the sender's email address to your address book. Refer to
section 5.4 and 5.8.8 for more details.
7 Delete
Deletes the current mail.
8 Reply
To reply to the sender of the current email. Refer to section 5.8.6.
9 Forward
To forward to current email to other people. Refer to section 5.8.7.
10 Return
Returns to the Mail Main Menu
5-4
Page 64
Mail Operation
1
2
4 5 6 7 8 9 103
Figure 5-3 Received Mail
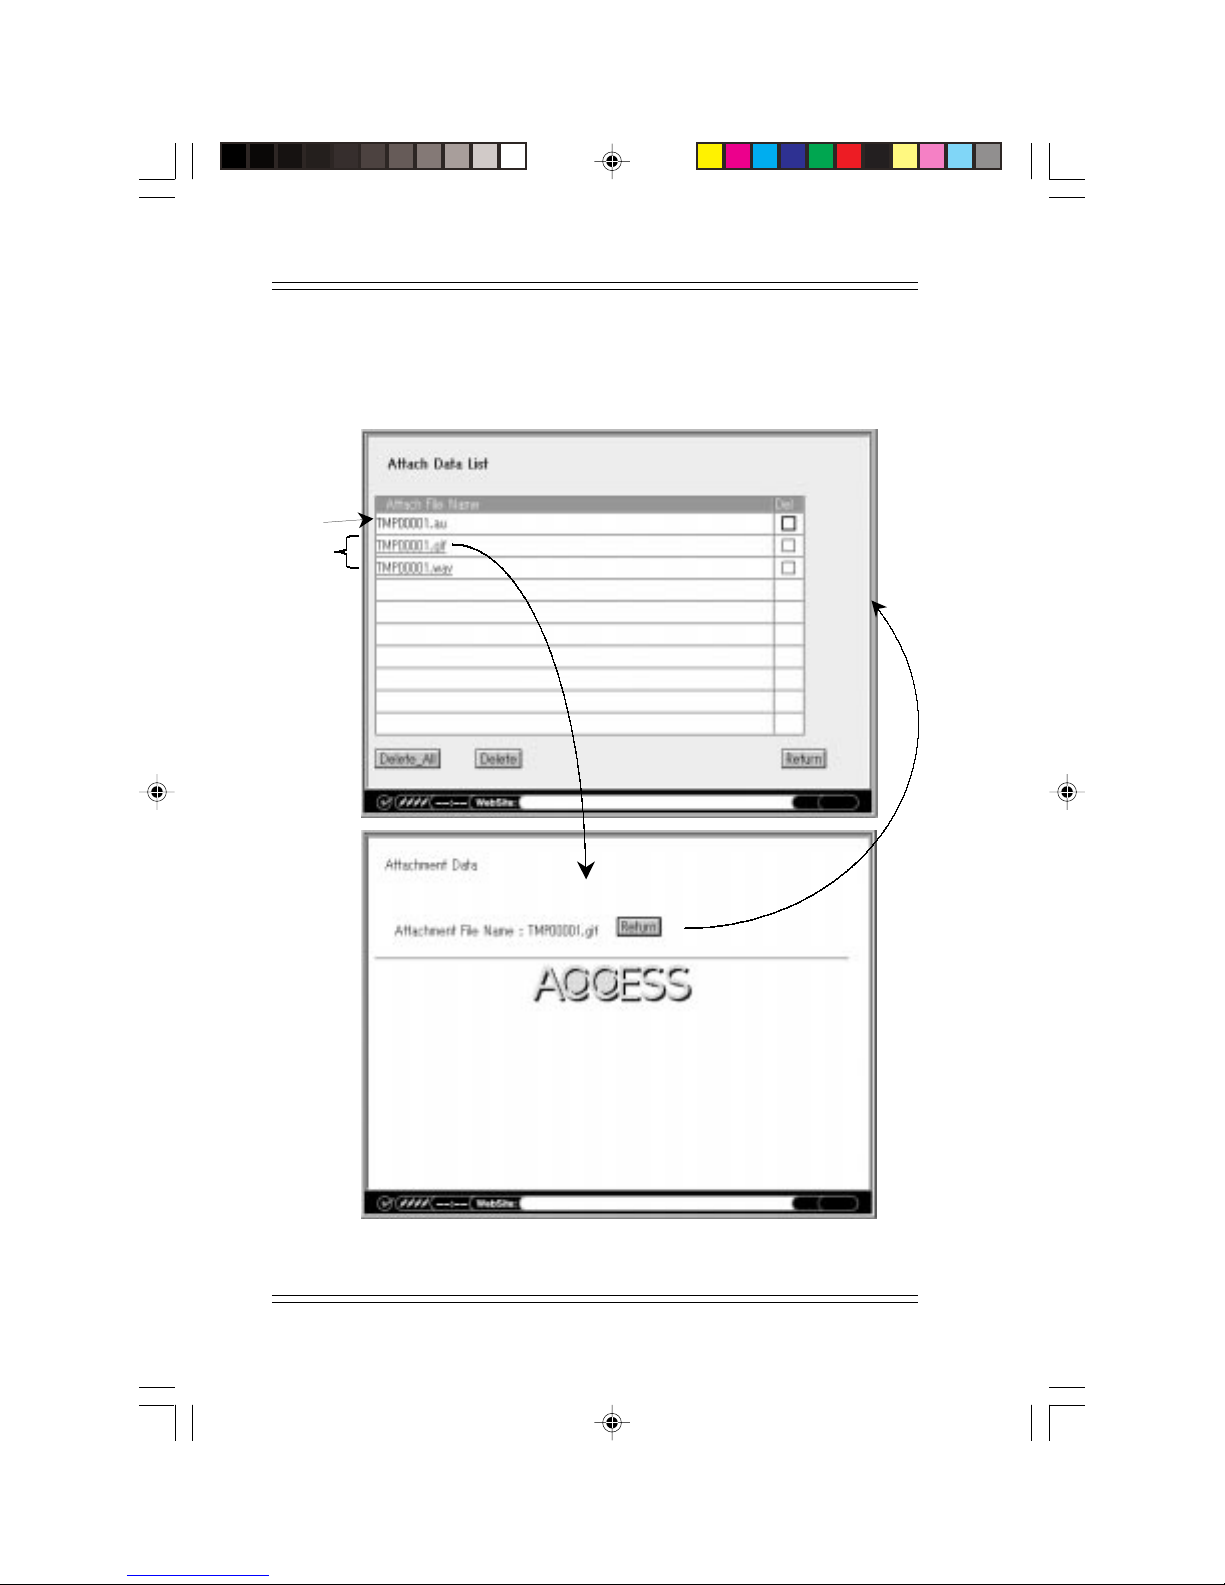
5.4 Attached file
You may view attached files upon opening an email which includes the
attachment and clicking the Attach button (refer to Figure 5-3), or clicking the Attach Data List option found at the below the 5 mail options in
the Mail Main Menu.
Among available attached files, text and HTML file appears as the body of
the message, and GIF and WAV files are shown in the attached data list
when the "Attach" button is selected. An attached file can be opened by
selecting it in the list. If other types of files (that are not supported by
TVsurf) are attached, it would be listed but cannot be selected.
5-5
Page 65
TVsurf User's Manual
5.4.1 GIF File
Select the file to display the picture. Selecting [Return] allows you to go
back to the attached data list.
Cannot be
viewed
Can be
viewed
5-6
Figure 5-4a Attached File - GIF File
Page 66
Mail Operation
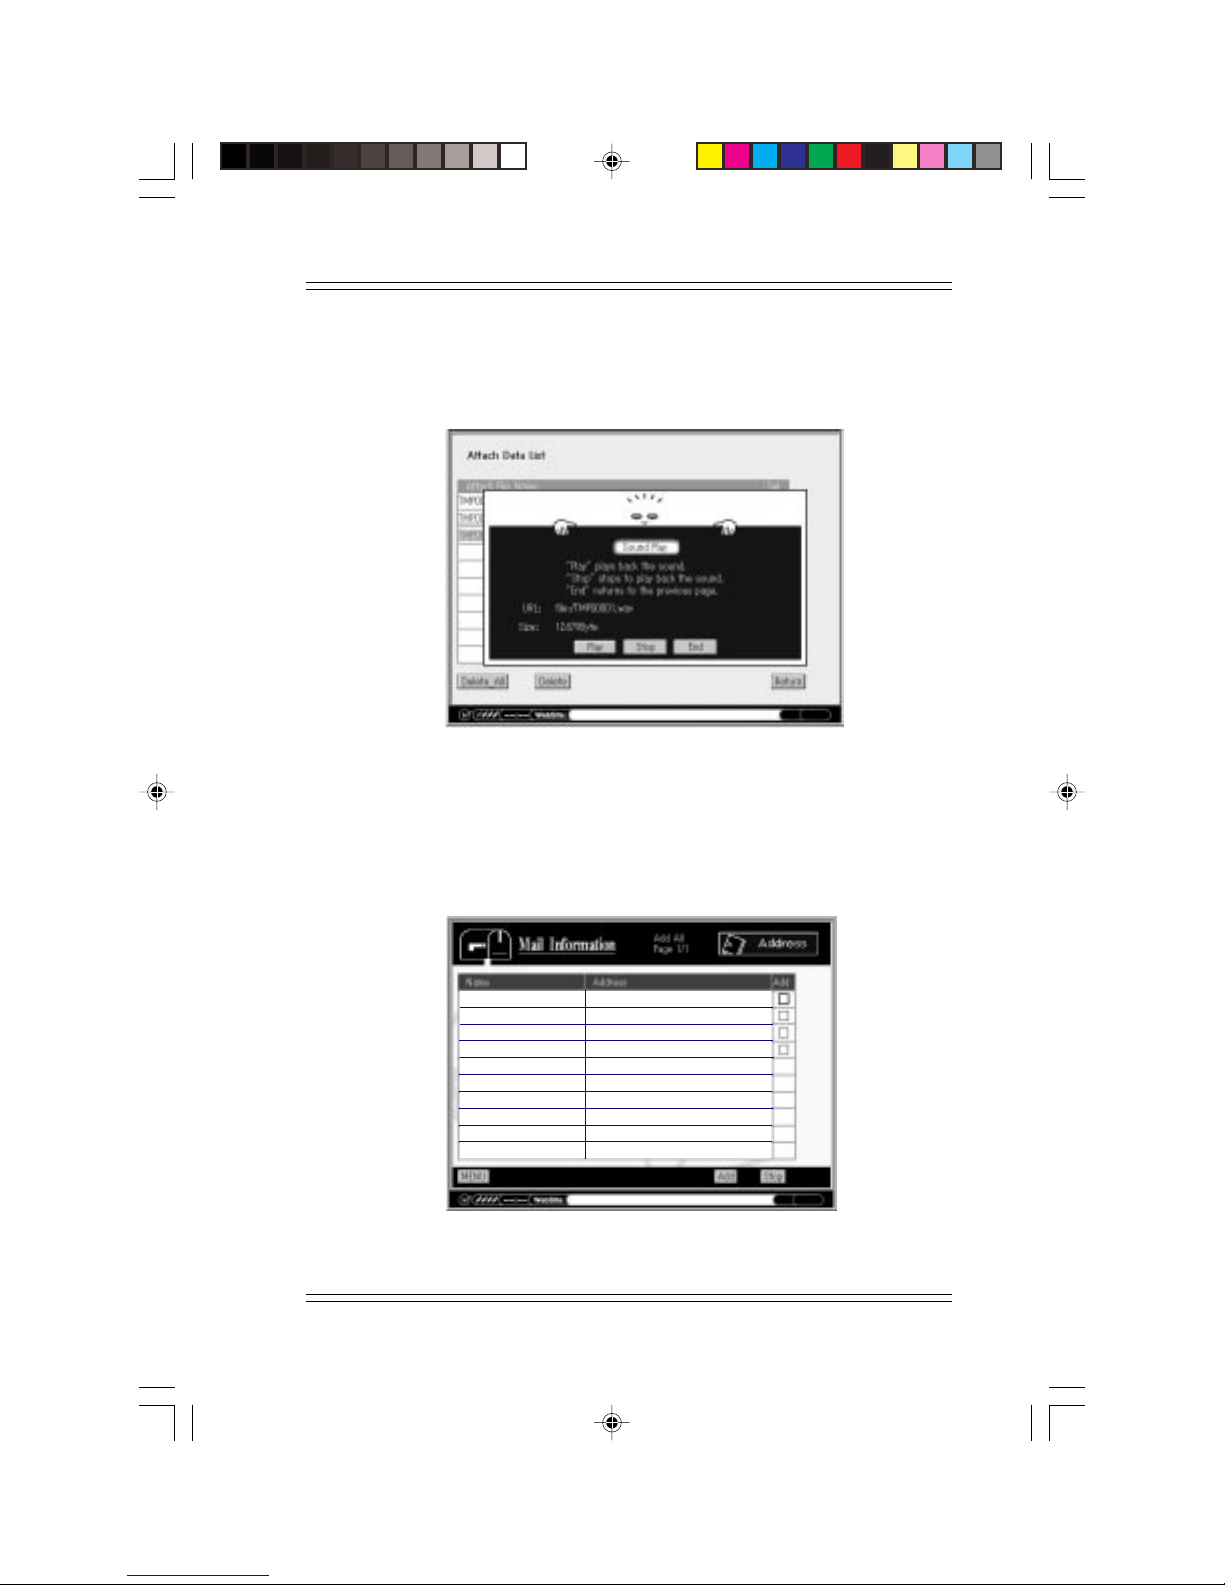
5.4.2 WAV File
Select the file to play the sound. [End] allows you to go back to the attached data list.
Figure 5-4b Attached File - "Wav" File
5.5 Saving addresses
An address can be added to the address book from the received message.
Sender, To, CC are indicated in order . Check the Add box, and the address
is added at the end of the book.
John
[email protected]email
Figure 5-5 Saving Addresses
5-7
Page 67
TVsurf User's Manual
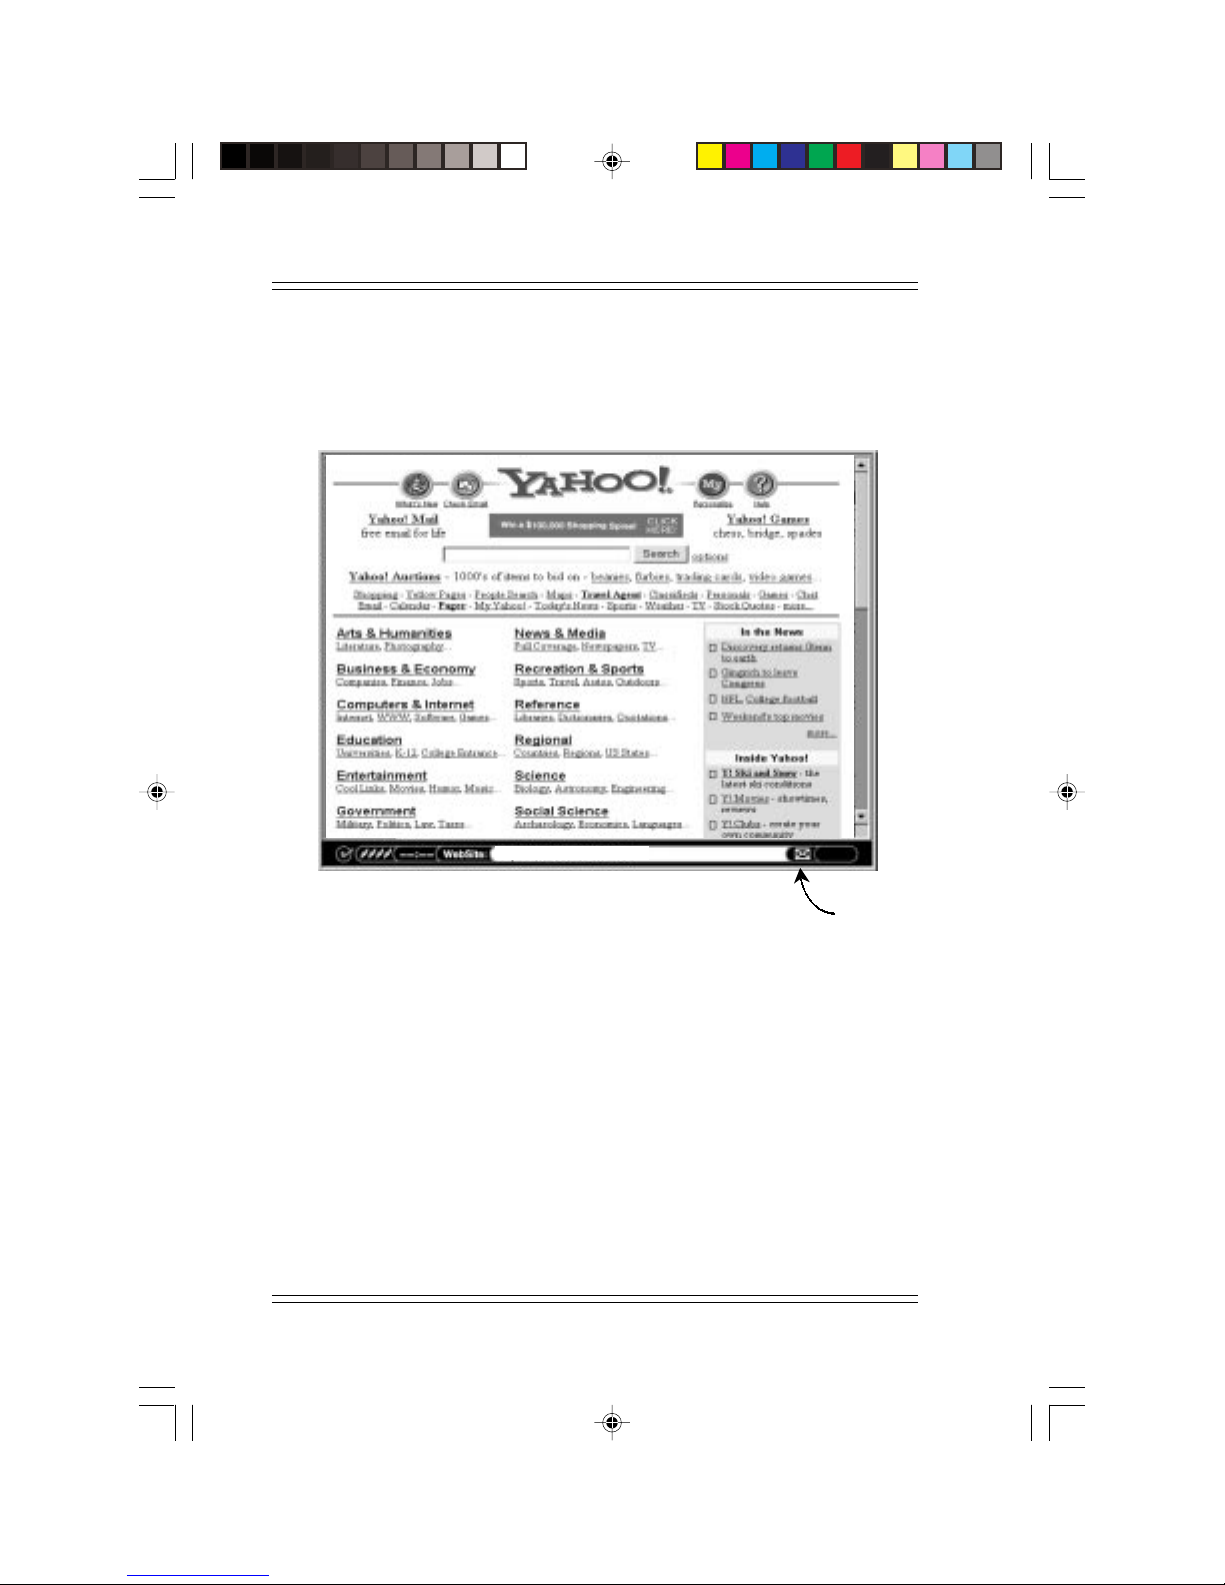
5.6 Automatic checking for new mails
After connecting to the Internet, TVsurf checks for new mail in the background at a specified interval and indicates the arrival of new mail with a
blinking icon.
GES
GES
http://www.yahoo.com
Mail arrival icon
Figure 5-6 Automatic Mail Checking
5.7 Saving a mail
The received mail is saved locally in TVsurf so reading and writing can be
done off-line. No more than 30 pieces of mail can be received, and, in that
case, reception is stopped and a warning will appear. You will then be
required to delete unwanted email so as to receive new email. A mail
larger than 30 KB is received after deleting the oversized portion.
5-8
Page 68
Mail Operation
5.8 Sending an email
5.8.1 Entry of an address
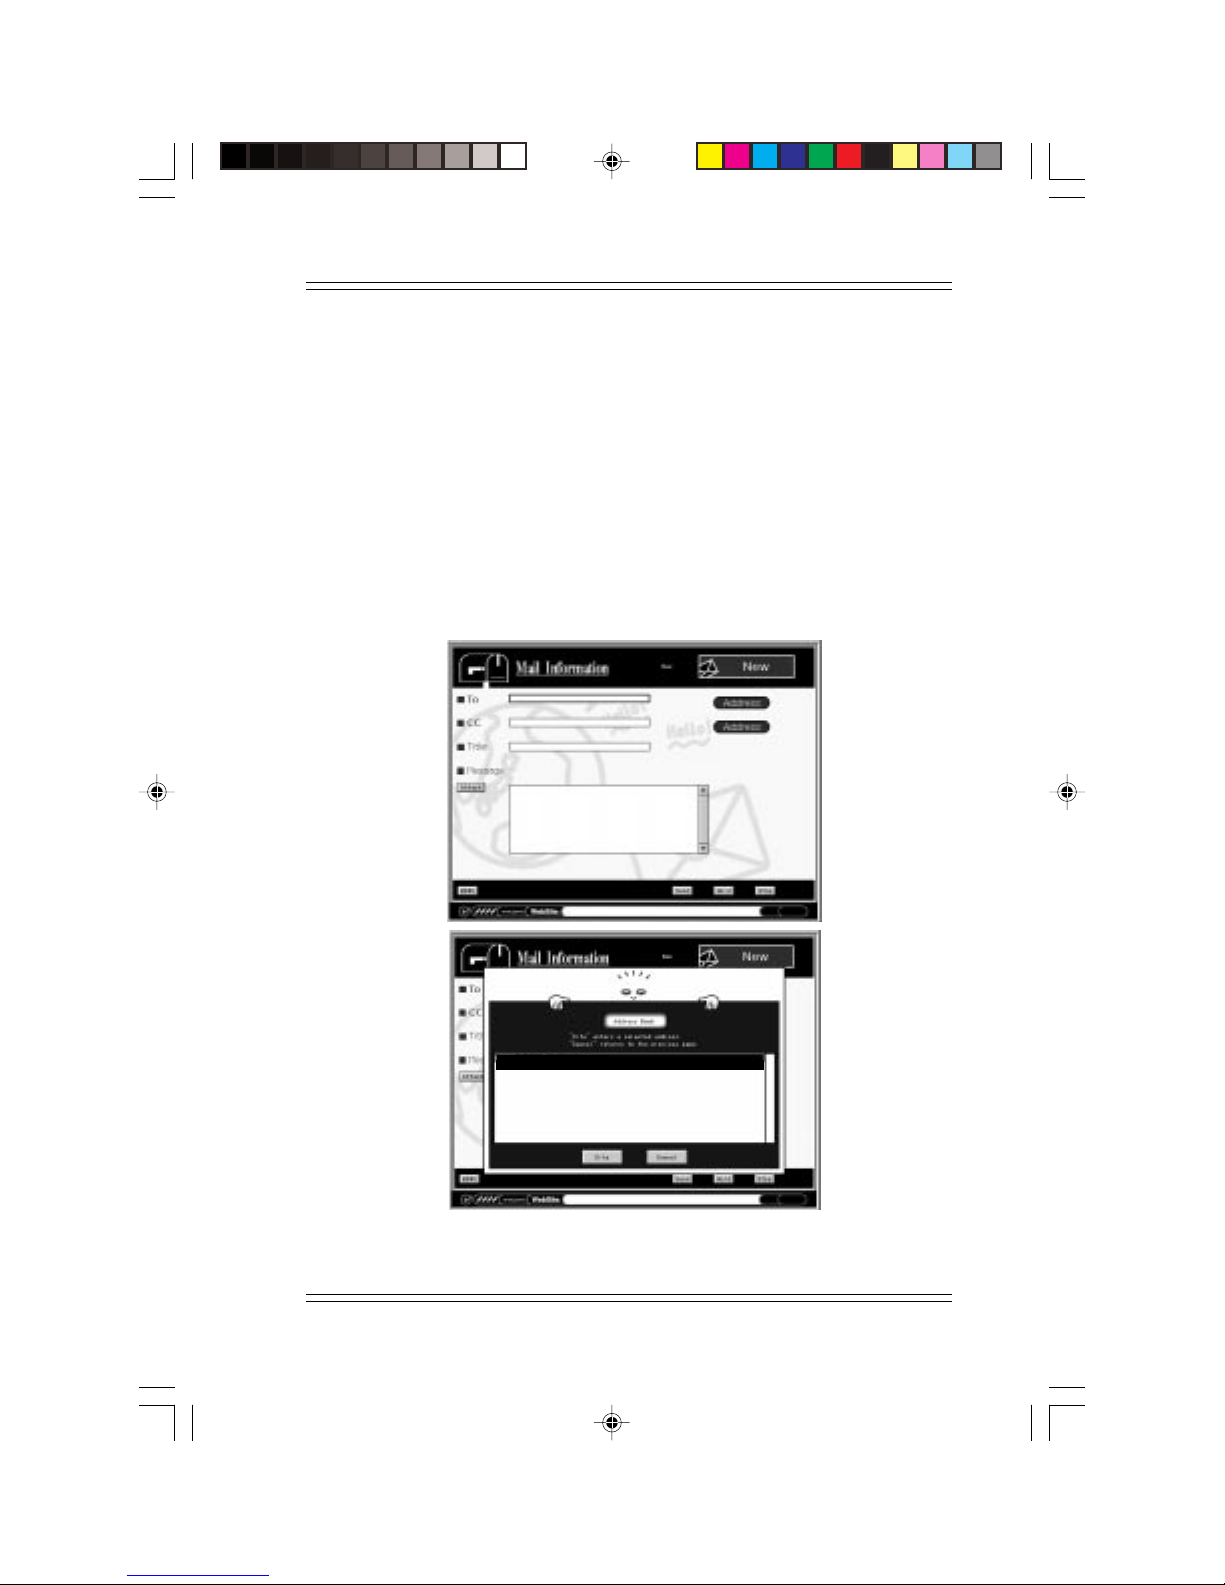
Entry to the To and CC columns can be done by either keying in the addresses directly in the text box when you press [Enter] or selecting them
from the address book.
By selecting [Address], the address list appears. Select an address and
click on [Cite]. Additional address can be entered by placing a comma
after the previous address. For easy operation, focus stays in the address
book after the entry. Go back to the message screen by [Cancel]. Press
[Send] to send mail and [Hold] or [Stop] otherwise.
MAIL 4 U
Figure 5-7 Sending a mail - Entry of an address
5-9
Page 69
TVsurf User's Manual
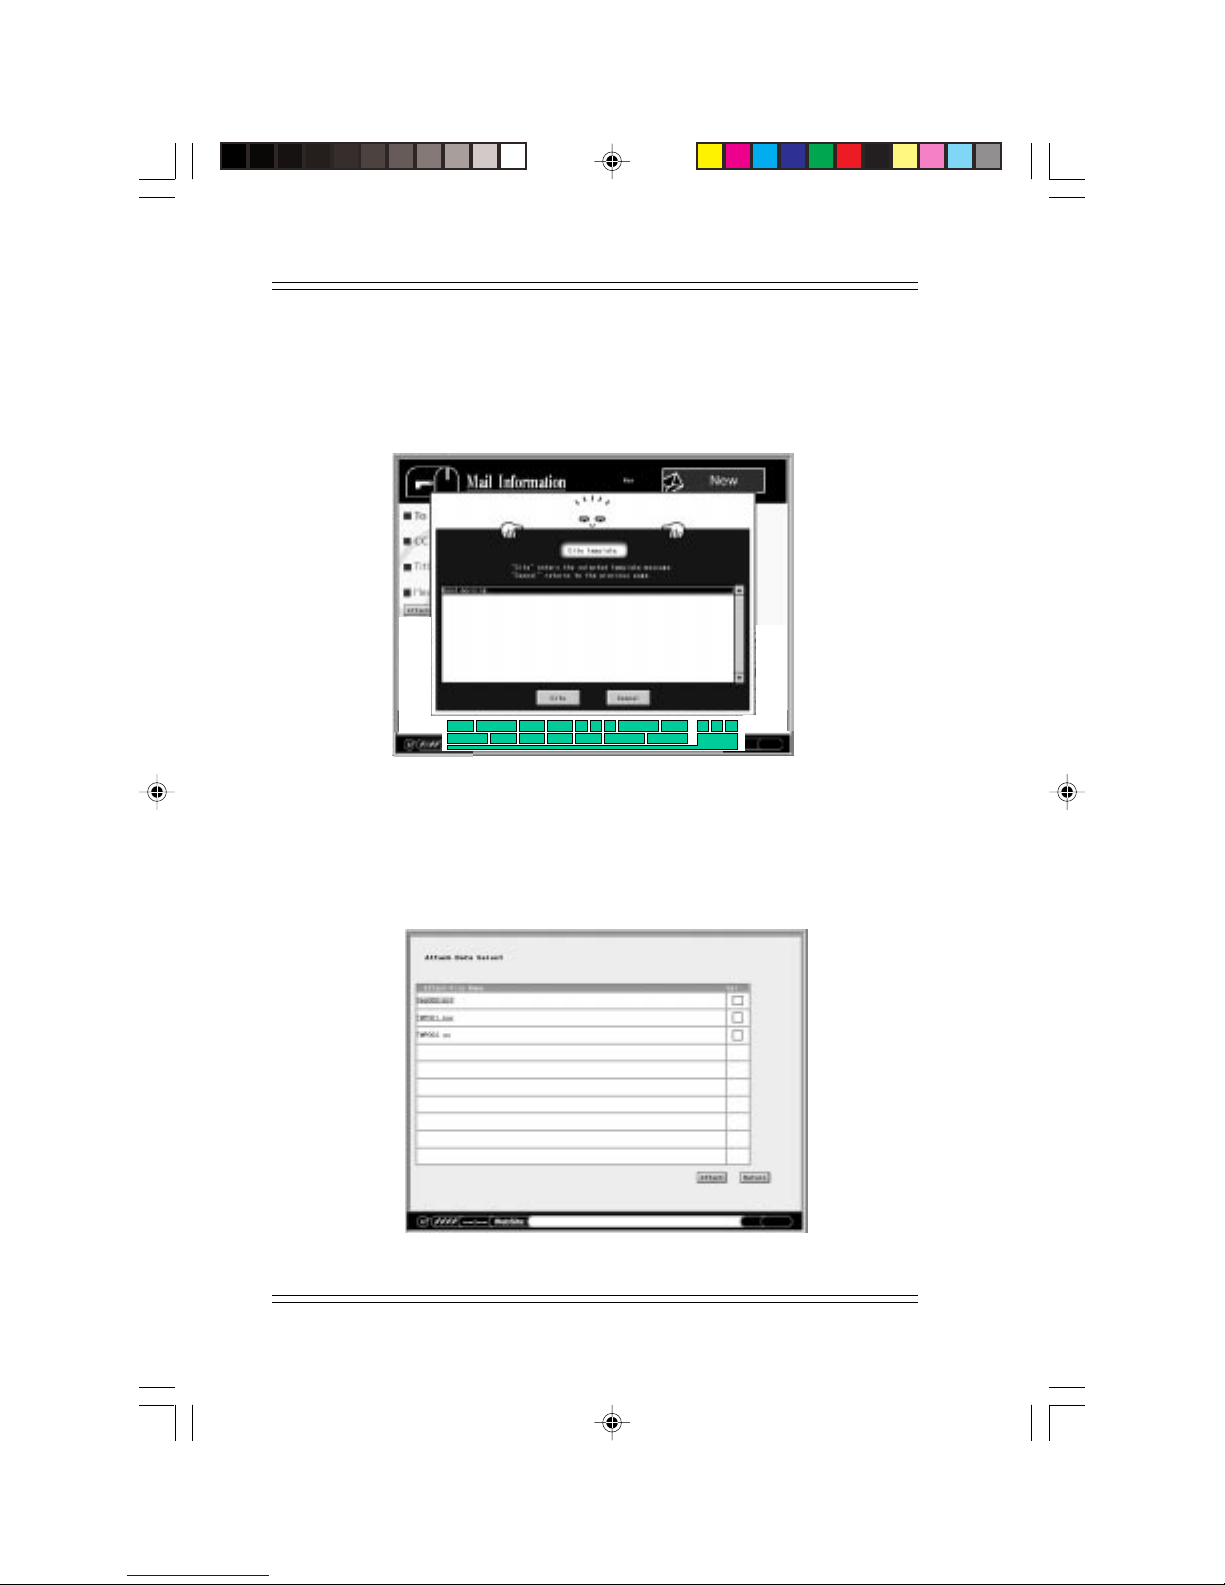
5.8.2 Template
Any number of template sentences can be selected from template list when
the software keyboard's [text] button is selected. Entry of characters can
also be made with the soft keyboard.
Texts
http : //
Del
www.
@ ~ _ .h tml
LeftUpDown Right
DelAll Enter
ESCSpc
\ , =
Exit
Figure 5-8 Template
5.8.3 Attach a file
The file that came attached to a received mail can be attached to a new
mail you want to send. Press the [Attach] button, go to the attached file
list, choose a file and select the [Attach] button again.
Figure 5-9 Attach a File
5-10
Page 70
Mail Operation
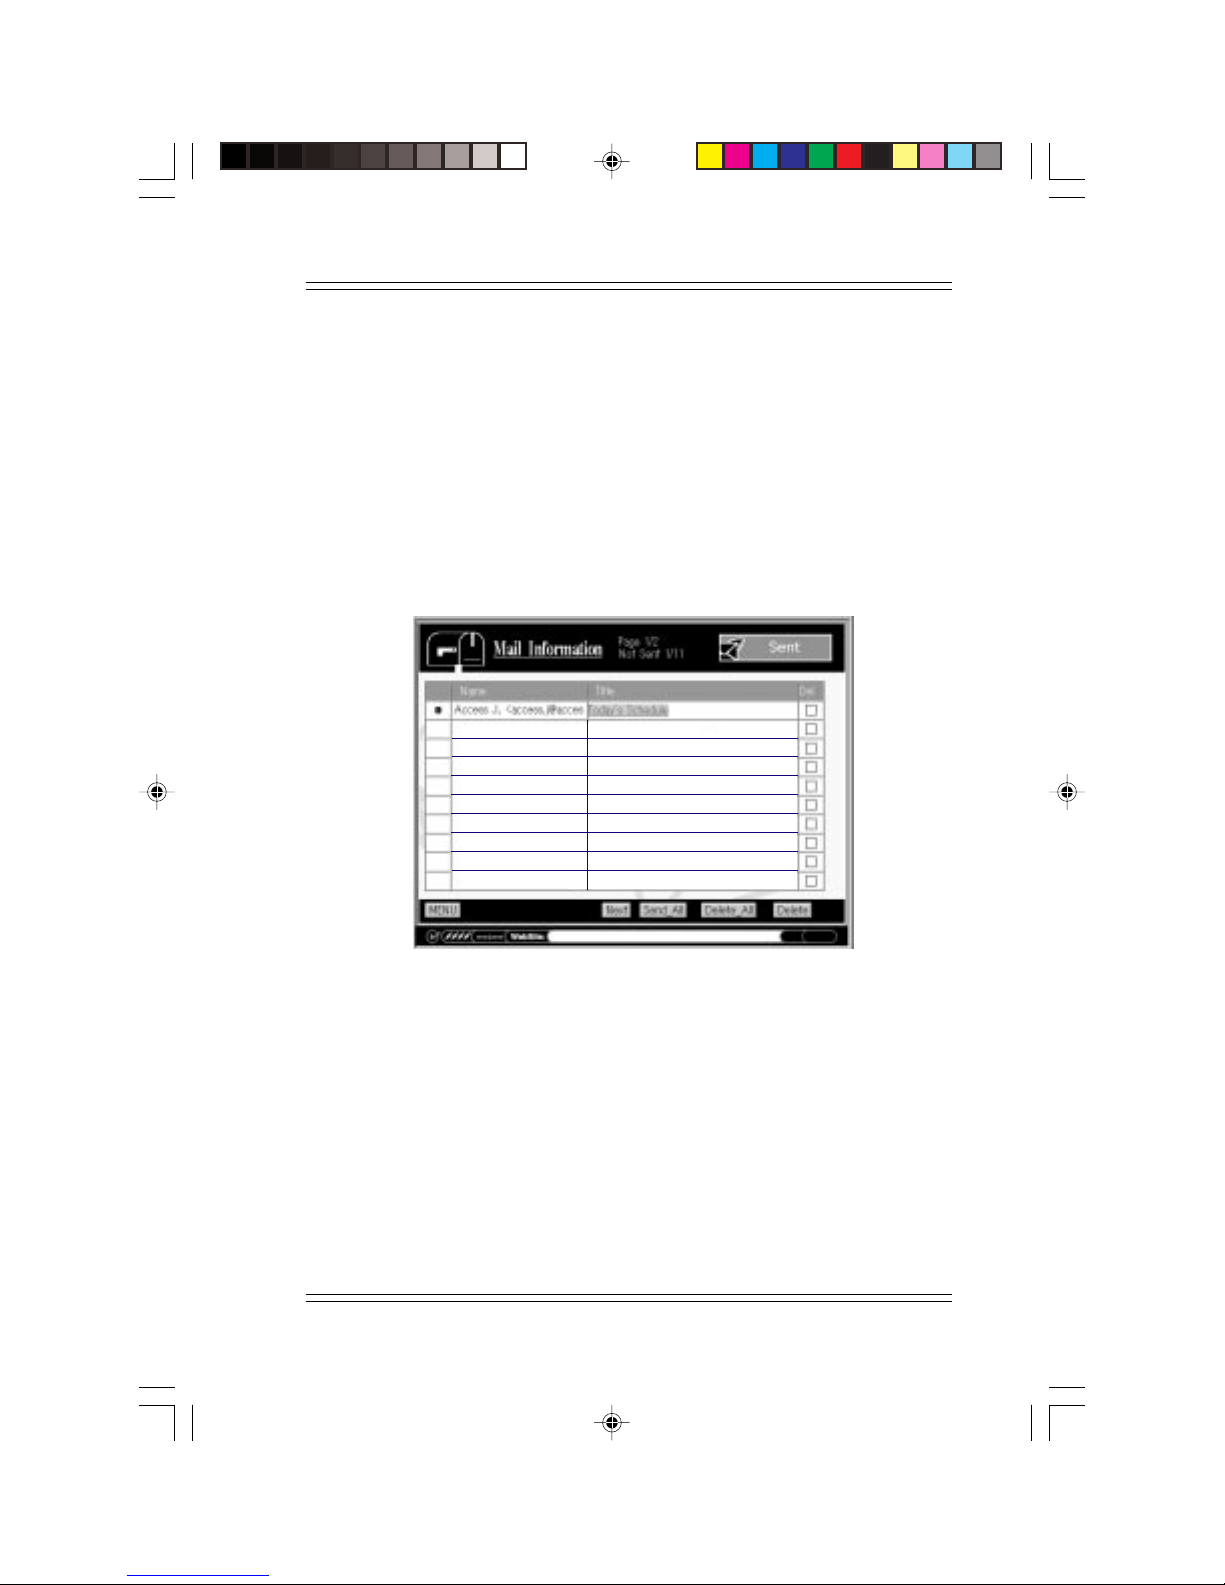
5.8.4 Saving a mail sent
A sent mail is saved in the sent mail list. Latest mail is shown on the top
of the list. An old mail can be resent as a new mail. Re-sending a mail that
could not be sent because of a send error can also be done.
The sent mail list appears by selecting the [Send] in the mail menu. The
columns have icons for unsent mail, receipient's name and title. A mail
can be deleted from the listing by checking the Delete box and clicking the
[Delete] button, all the checked mail will be deleted together. If all the
mail should be deleted, select the [Delete_All] button.
MAIL 4 U
MAIL 4 U
Figure 5-10 Saving a mail sent
5-11
Page 71
TVsurf User's Manual
5.8.5 Saving a mail not sent
To save a written mail without sending it, add it to the sent mail list by
selecting [Hold]. All the held mail will be sent by selecting [Send_All].
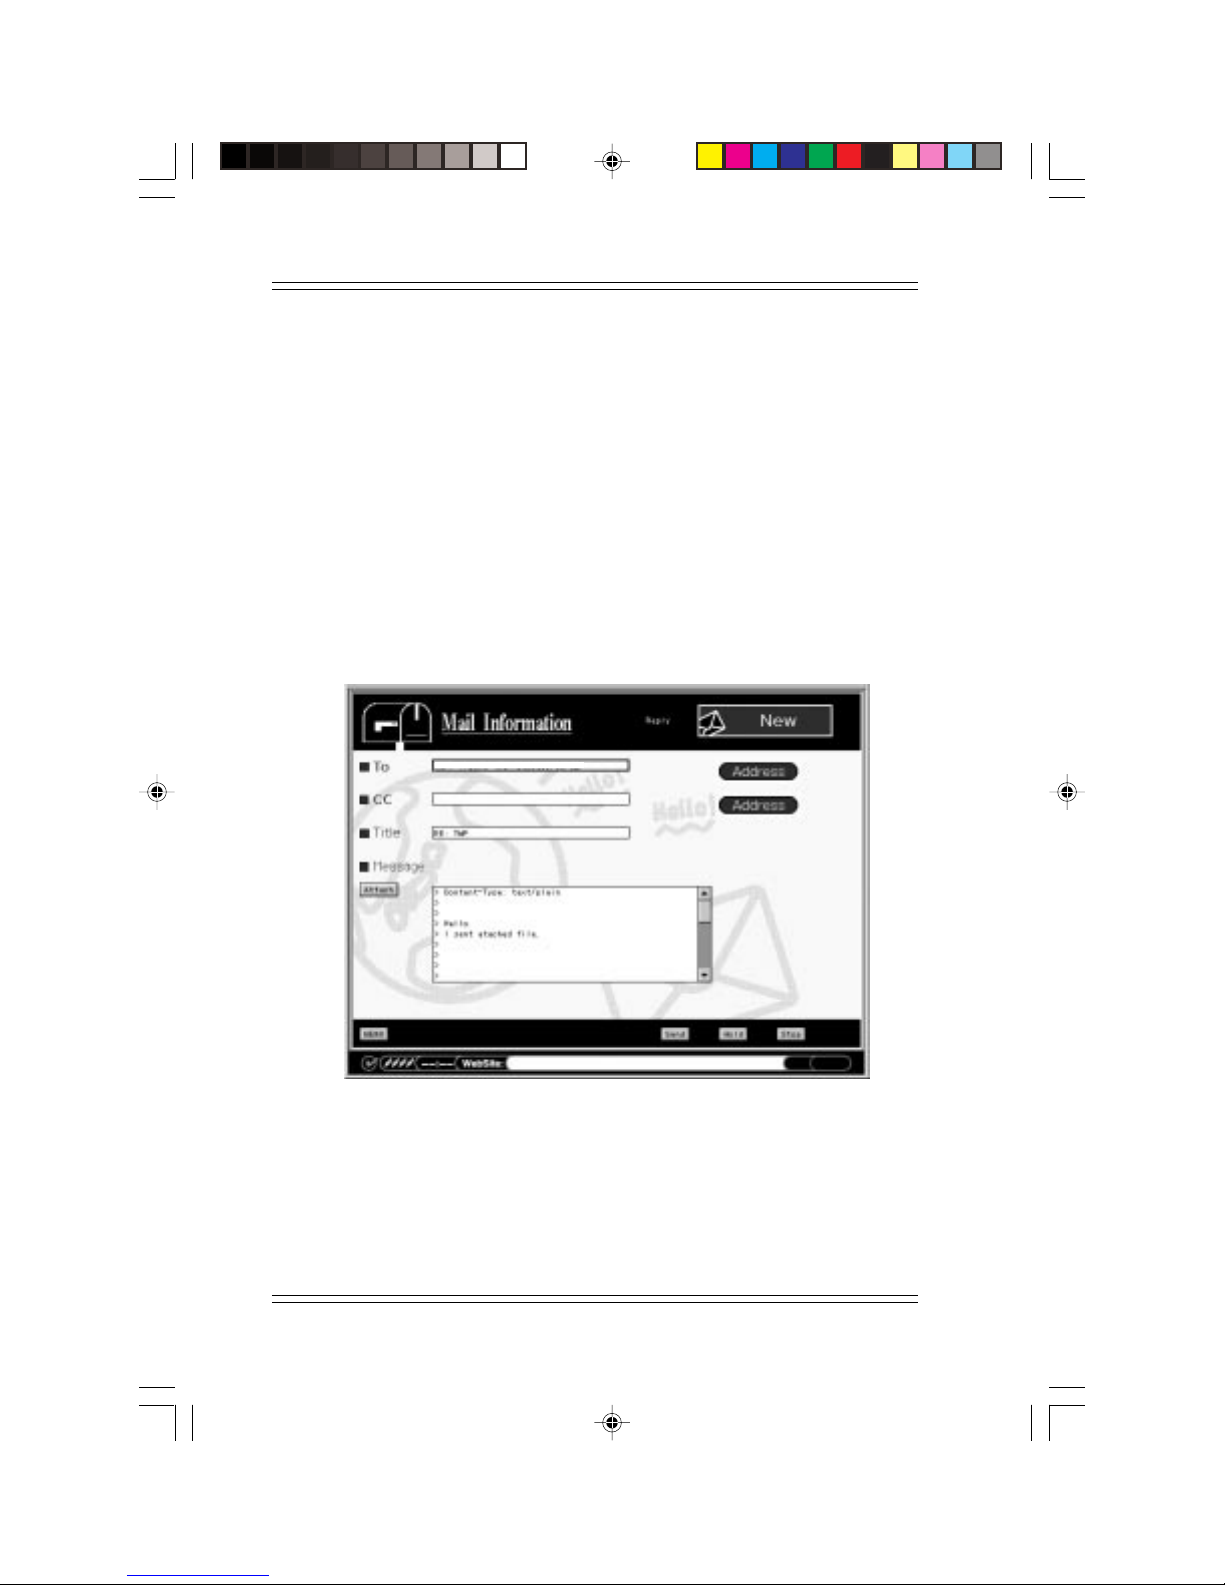
5.8.6 Reply to a mail
By selecting [Reply] in the received mail screen, a Reply Mail screen appears with To, CC, Title and Message entries. “ >” denotes the original
message. "RE:" is added to the original title.
1. The reply is sent to the original sender.
2. Reply to a forwarded mail is sent to the sender who forwarded the
original mail.
5-12
Figure 5-11 Reply Mail
Page 72
Mail Operation
5.8.7 Forward mail
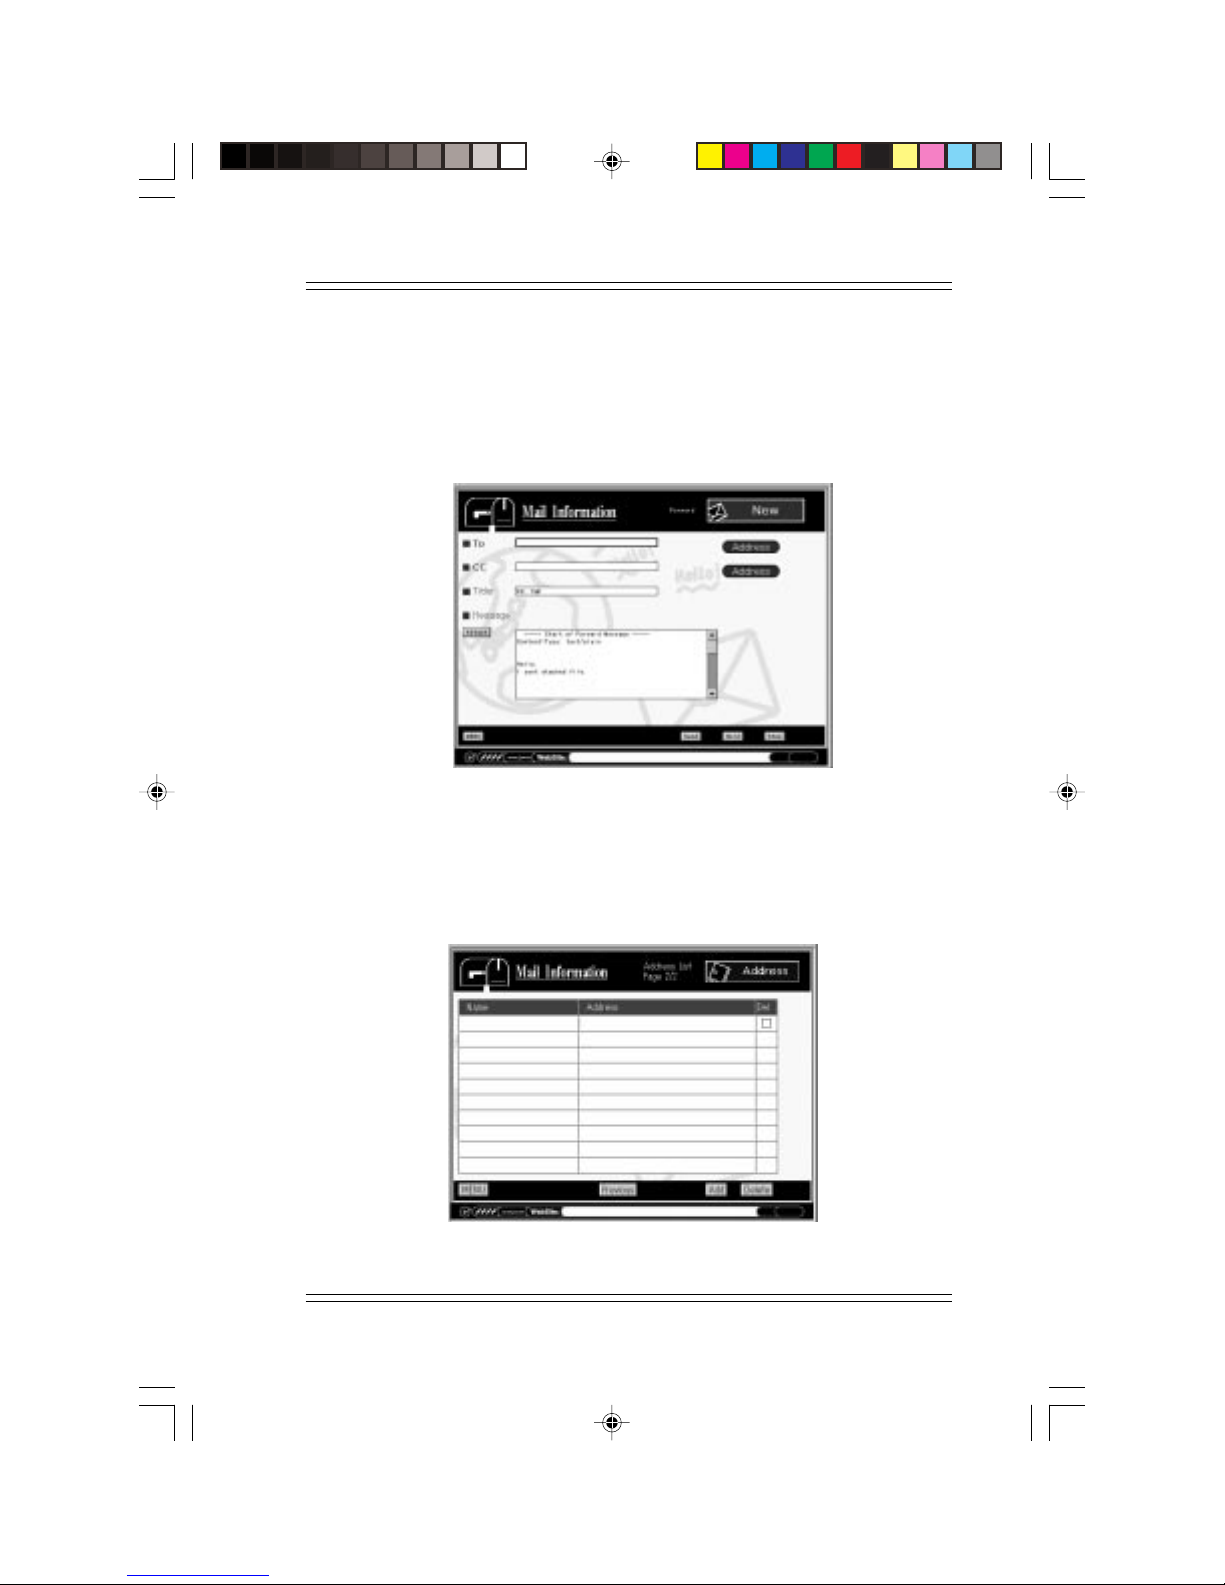
Forwards the message. “>” is not added to each line. “Start of Forward
Message” and “End of Forwarded Message” are added to the beginning
and the end of the cited message. “FW:” is added to the original title.
To: column is originally empty.
Figure 5-12 Forward Mail
5.8.8 Address Book
An email address can be stored in the address book. An address can only
be registered if its name is specified. Adding, editing and deleting of the
addresses can be made.
email
John
Figure 5-13 Address Book
5-13
Page 73

TVsurf User's Manual
5.9 Attach Data List
This is a list of attachments currently stored in TVsurf will be displayed.
This is the same list that appears when you want to add an attachment to
an email. You may view or delete any of the attachments here.
5.10 Mail List At Server
This is a list of the email which is currently stored on your ISP. If you do
not find any email here, the reason would be that you have chosen not to
have a copy of your mails stored in the ISP server. You may change this
option in the Mail Environment Setup. Please refer to section 3.8.4 for
more information.
5-14
Page 74

My Favourite Pages
My Favourite Pages
1. http://www.
2. http://www.
3. http://www.
4. http://www.
5. http://www.
6. http://www.
7. http://www.
8. http://www.
9. http://www.
10. http://www.
11. http://
12. http://
13. http://
14. http://
15. http://
16. http://
17. http://
18. http://
19. http://
20. http://
21.
22.
23.
24.
25.
 Loading...