

Page 1
PORTABLE DVD PLAYER DVB-T TV
TV STAR TD3 LCD COMB0
Page 2

Precautions
To prevent electric shock or fire hazard do not expose the unit to rain or
moisture.Warning To avoid electric shock or fire hazard,do not open the
cabinet,refer servicing to qualified person only.
This symbol is intended to alert the user to the presence of
uninsulated “dangerous voltage”within the product’s enclosure that
may be of sufficient magnitude to constitute a risk of electric shock
to persons.
This symbol is intended to alert the user to the presence of
important operating and maintenance servicing instructions in the
literature accompanying the appliance. warning to avoid electric
shock please ensure plug is inserted completely.
Warning: for safety we advise that it is not allowed to watch video
during driving!
Point for attention
and CLASS 1refers to laser beams of
CLASS 1 LASER PRODUCT:
This marking indicates the presence of laser beams used in this unit,
the weaker class. There is no
danger
of hazardousradiation outside this
unit.
1
Page 3
Point for attention
2
4
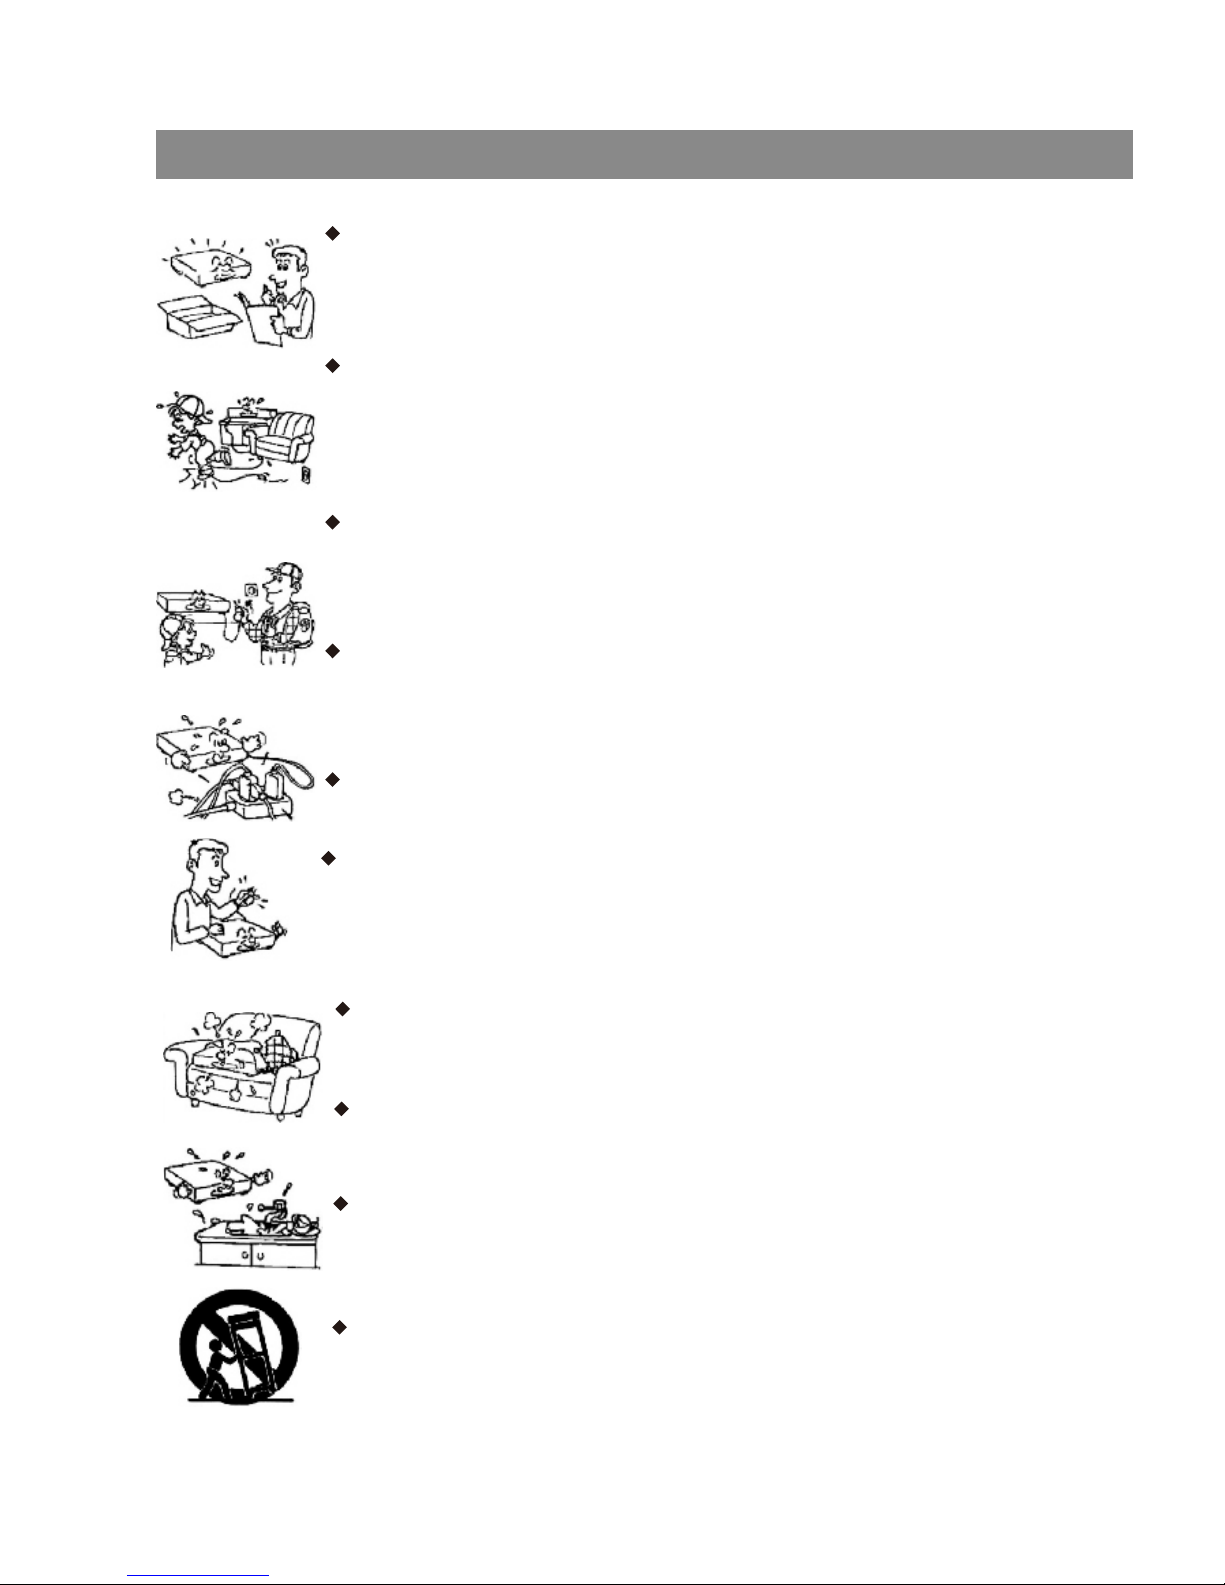
Please read this safety&operation manual before you install
and use the unit,and please follow the instruction.Pay attention
to warning and do follow them.
Route the power cord so that it is not likely to be walked on or
pinched by items placed upon or against them,paying particular
attention to the plugs,receptacles,and the point where the cord
exists from the appliance.
Please disconnect the unit under these conditions:Lightning,
Rainstorm or you won't use it for a long time,this can avoid
electric shock.
Do not overload wall outlets,extension cords or convenience
receptacles beyond their capacity,since this can result in fire or
electric shock.
Do not use suitable outlet,it might be dangerous.
The power requirement of this unit is 100~240VAC,50Hz/60Hz.
and the power source in China and Hong Kong mainland is
220V AC/50Hz.
Check the connection reguarly.If any rupture of failure in
insulation,call for a maintenance man to replace them.
To ensure reliable operation,and to protect it from overheating,
the unit must be put in somewhere well ventilated
Do not use power-line operated sets near water-for example,
near a bathtub, washbowl,kitchen sink,or laundry tub,in a wet
basement,or near a swimmingpool,etc.
Do not place the unit on an unstable object,the set may fall,
causing serious injury to a child or an adult,and serious
damage to the unit.
Page 4

Point for attention
Never let any liquid spattered on the unit.It might cause electric
Never place the unit near or over such objects:for example,
radiator, heat register,stove or other heat sources
(including amplifier).
Unplug the unit from the wall outlet before cleaning or
polishing it.Do not use liquid cleaners or aerosol cleaners,use
a cloth lightly dampened with water for cleaning the exterior of
the unit.
Never place heavy object on the unit.
Notice:
Keep safety utilization of electric power. electrical wire of
peripherals should marked with safety label.and the wire cannot
be lose its security feature for random replacement.following
this can avoid electric shock or fire hazard,in case such
accident happens,you should contact qualified technician.
copyrights:
the copyright protected content cannot be copied.broadcasted,
screened,cablecasted, played publicly and rented,unless it is
authorized.
shock or fire hazard.
Do not use cracked or anamorphic discs, or it might damage the
loader.
Do not repair the unit yourself,opening or removing the cover
may expose you to dangerous voltage or other hazards, refer all
servicing to qualified service
personnel.
Unplug the unit and refer servicing to qualified service
personnel under the following conditions:
3
Page 5

Point for attention
4
A.when the power cord or plug is damaged or frayed.
B.If liquid has been spilled or objects have fallen into the unit.
C.The unit has been exposed to rain or water.
D.If the unit does not operate normally when following the
operating instructions.
E.If the unit has fallen or the cabinet has been damaged.
F.When the unit exhibits a distinct change in performance-this
indicates a need for service.
Tips:Upon completion of any service or repairs to the set,ask the
service technician to perform routine safety checks to determine
that the unit is in safe operating condition.
Page 6
Point for attention
5
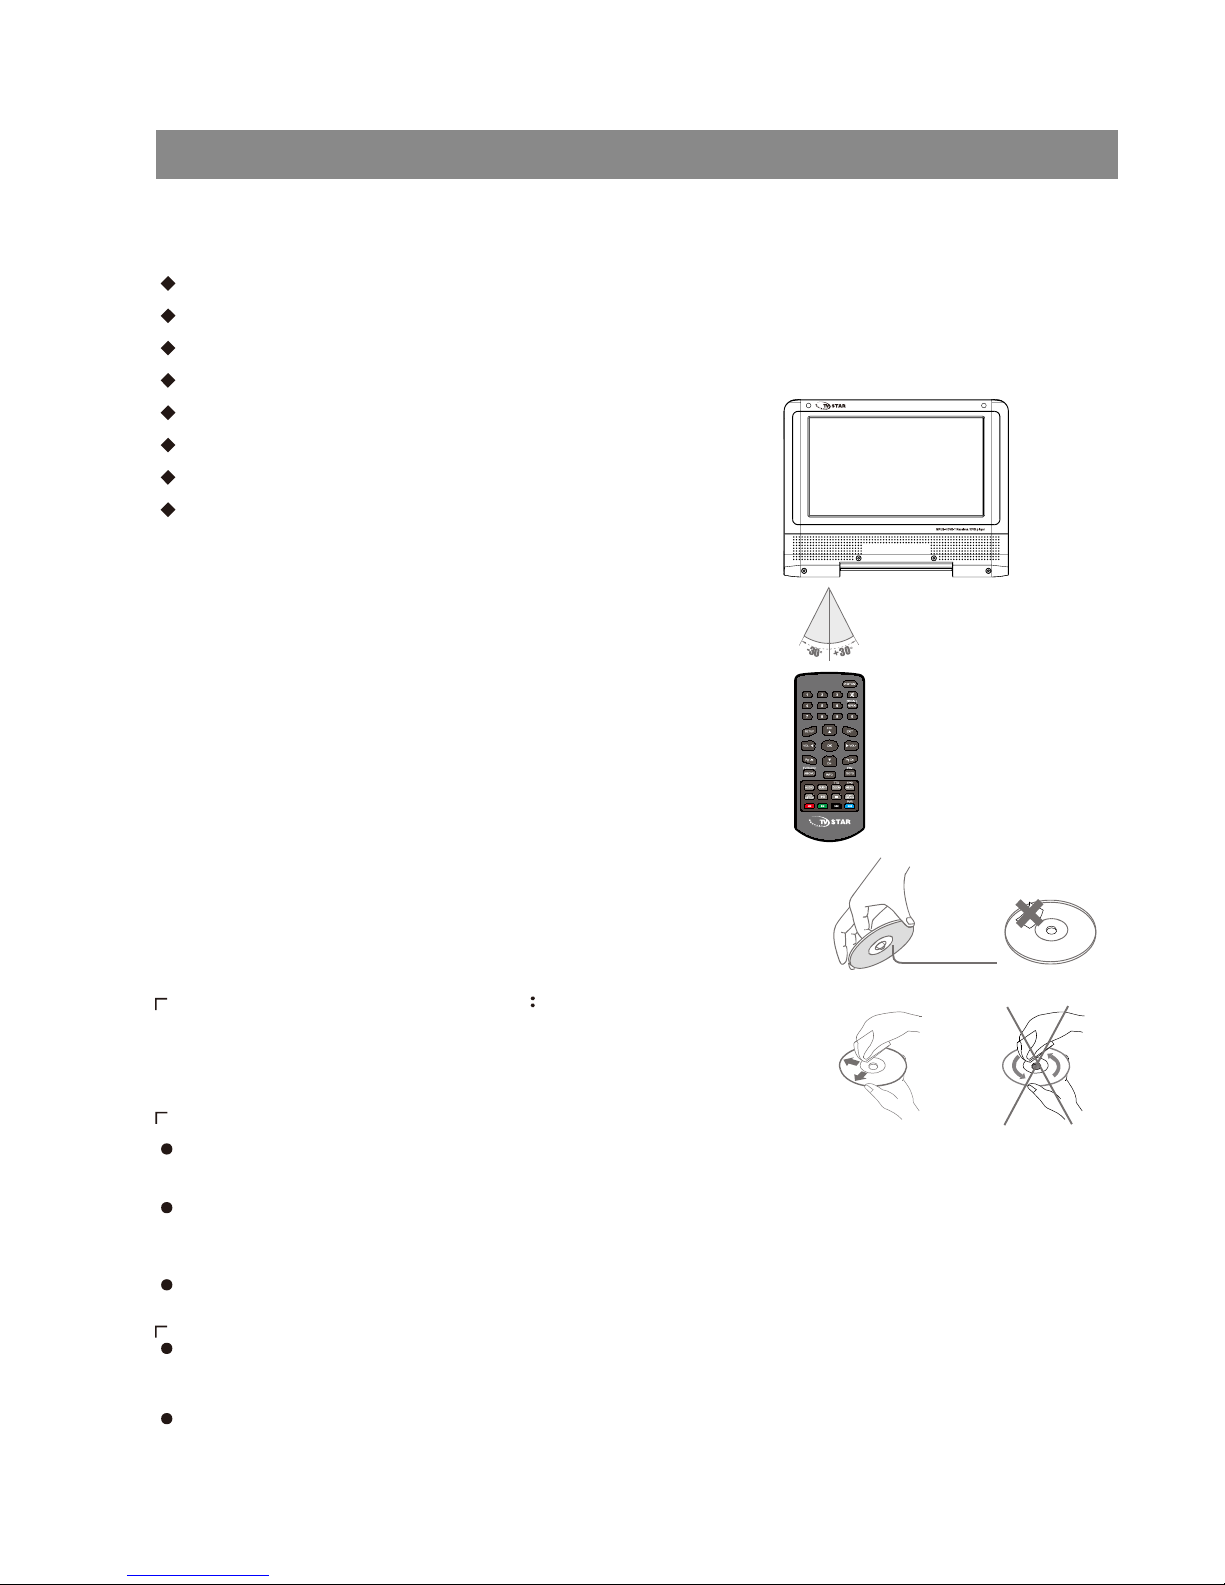
REMOTE FUNCTIONS
Aim the remote directly at the receiver on the unit while operating.
Do not drop the remote control on the floor or impact any other object.
Do not place the remote in a hot or moist location.
Do not let any water or other liquid fall on the remote.
Do not open the remote.
Distance about 7m from the receiver.
Angle about 30 left/right from the axle wire.
Do not expose the remote control to direct
sunlight or other heating sources.
The remote control may get damaged.
From3to7meters
REC
Notes about handling discs
Handle the disc by its edge,do not touch the surface.
Do not stick any kind of object on the disc surface .
Finger mark or dust on the surface may cause change in picture
and sound.
Clean the disc with a cleaning cloth.Wipe the disc from the center
out.If soft cloth cannot wipe the dust,use a wet cloth,then use a
dry cloth.
Notes about storage of discs
After playing,store the disc in its case
Placing heavy object on it or stacking will make the disc bend.
Notes about the disc
Do not use chemical products such as benzine,etc...
Do not expose the disc to direct sunlight or other heat sources.
Notes about cleaning discs:
:
Page 7

Features
6
Features
Ɣ
LQFK7)7/&'
Ɣ
RUDVSHFWUDWLR
Ɣ
%XLOWLQVSHDNHU(DUSKRQHRXWSXW
Ɣ
7KUHHNLQGVRISRZHUVXSSO\3RZHU$GDSWHU/L1LRQSRO\PHUFKDUJHDEOH
EDWWHU\DQGFDUDGDSWHU
Ɣ
/L1LRQSRO\PHUFKDUJHDEOHEDWWHU\RQHIXOO\FKDUJHGEDWWHU\FDQODVWIRU
KRXUV
Ɣ
,QWHOOLJHQWFKDUJLQJIXQFWLRQ
Ɣ
8VH3RZHU$GDSWHU/L1LRQSRO\PHUFKDUJHDEOHEDWWHU\\RXFDQFKDUJH
ZKLOHSOD\LQJ
Ɣ
RKPVDQWHQQDMDFN
Ɣ
$QWHQQDIRU'9%7
Ɣ
5HPRWHFRQWURO
Ɣ
$XGLR9LGHRFDEOH
Ɣ
(DUSKRQHVPPMDFN
Ɣ
'LJLWDO'9%779WXQHU
Ɣ
6XSSRUW$872VHDUFKDQG0$18$/VHDUFK
Ɣ
6XSSRUW(3*
Ɣ
6XSSRUW0XOWLODQJXDJH26'
Ɣ
6XSSRUW&+$11(/&21752/(',77,0(5+,'(168%7,7/(
Ɣ
6XSSRUW7(/(7(;7IXQFWLRQ
Ɣ
'LVFVSOD\EDFN'9'03(*-3(*03&''$&'5&'5:03(*
YHUVLRQV
Page 8
Operation interface
7
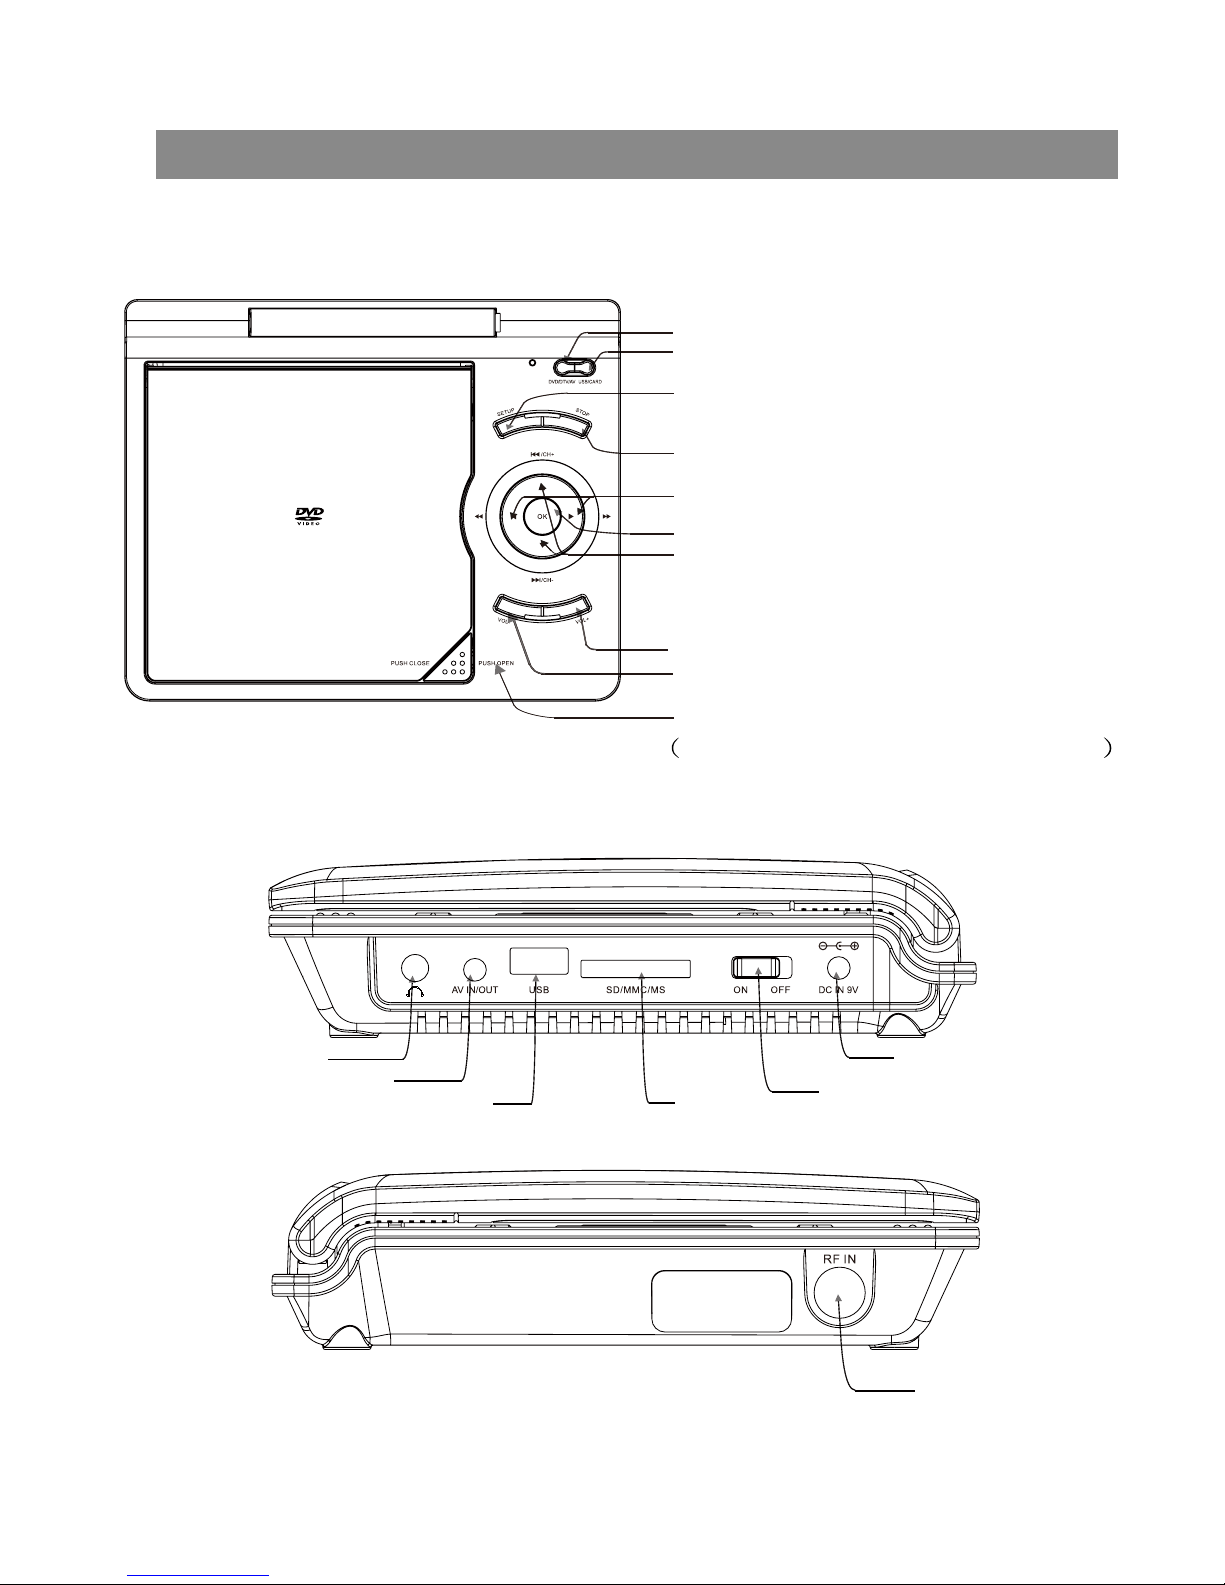
Direction function in setup condition ,
Fast playback function in play condition
Direction function in setupcondition/
Switch USB(DVD)/CARD button(DVB)
Volume up button
Volume down button
Push Open
press this button to open th e tray
(DVD)
Stop
Switch DVD/DVB-T/AV Button
Change channels by "UP" and "DOWN"
in(DVB) mode .
Play/pause(DVD)/Channel list(DVB)
/
OK
setup
/
(DVB )
setup
Mainbody operation interface
Connection interface
Earphone output
AV input/output
USB
CARD READER
POWER BUTTON
DC INPUT
RF ANT
Page 9
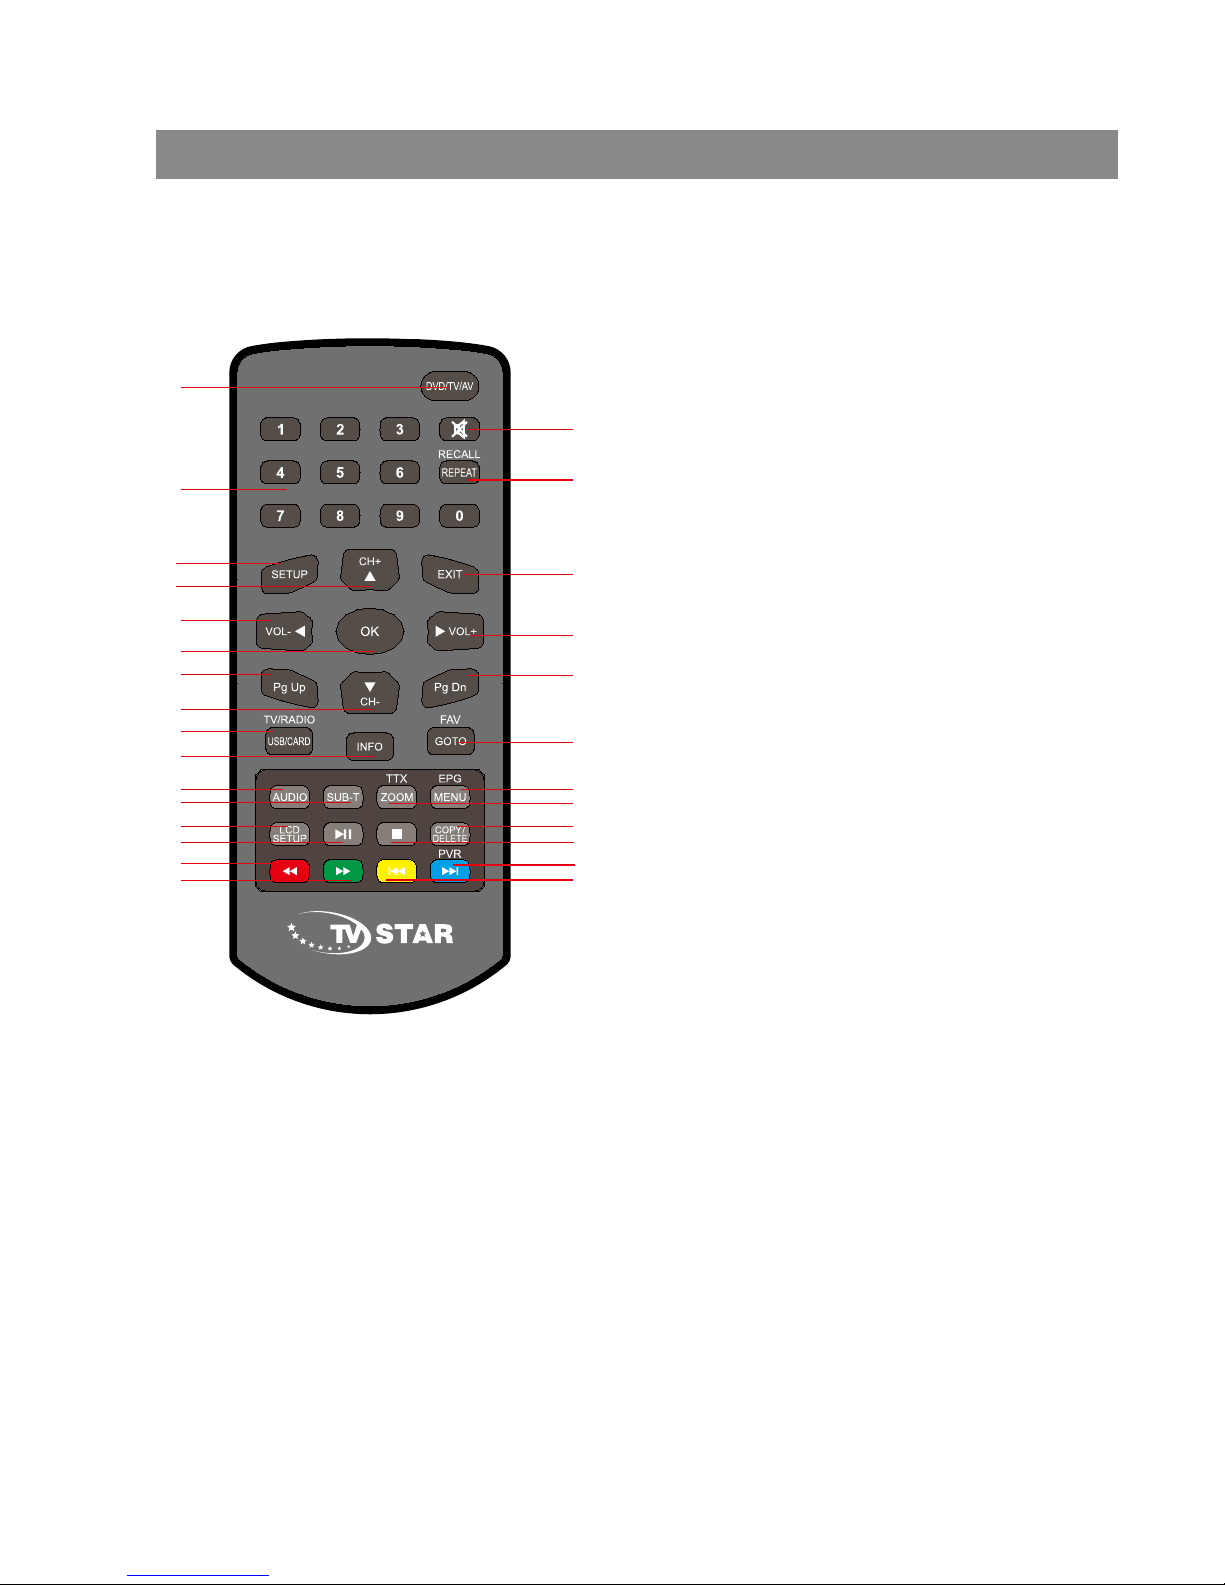
Operation interface
8
REC
5
6
7
9
11
10
13
12
14
15
16
8
1
2
3
4
17
23
22
24
25
26
27
28
18
19
20
21
1. DVD/TV/AV
2. Number keys
3. Set up
4. Channel up
5. Left / Volume DOWN
6. OK
7. Pg up
8. Channel down
9. TV/RATIO/USB/CARD
10. Info
11. AUDIO
12. Subtitle function
13. LCD Setup
14. PLAY/PAUSE
15. Fast backward/RED BUTTON
16. Fast forward/GREEN BUTTON
17. Switch Sound/Soundless button
18. Recall/Repeat
19. Exit
20. Right / Volume UP
21. Pg Dn
22. FAV/GOTO
23. EPG/MENU
24. TTX/ZOOM
25. RECORD/COPY DELETE
26. STOP
27. PVR/BLUE BUTTON/Skip forward
28. YELLOW BUTTON//Skip backward
Page 10
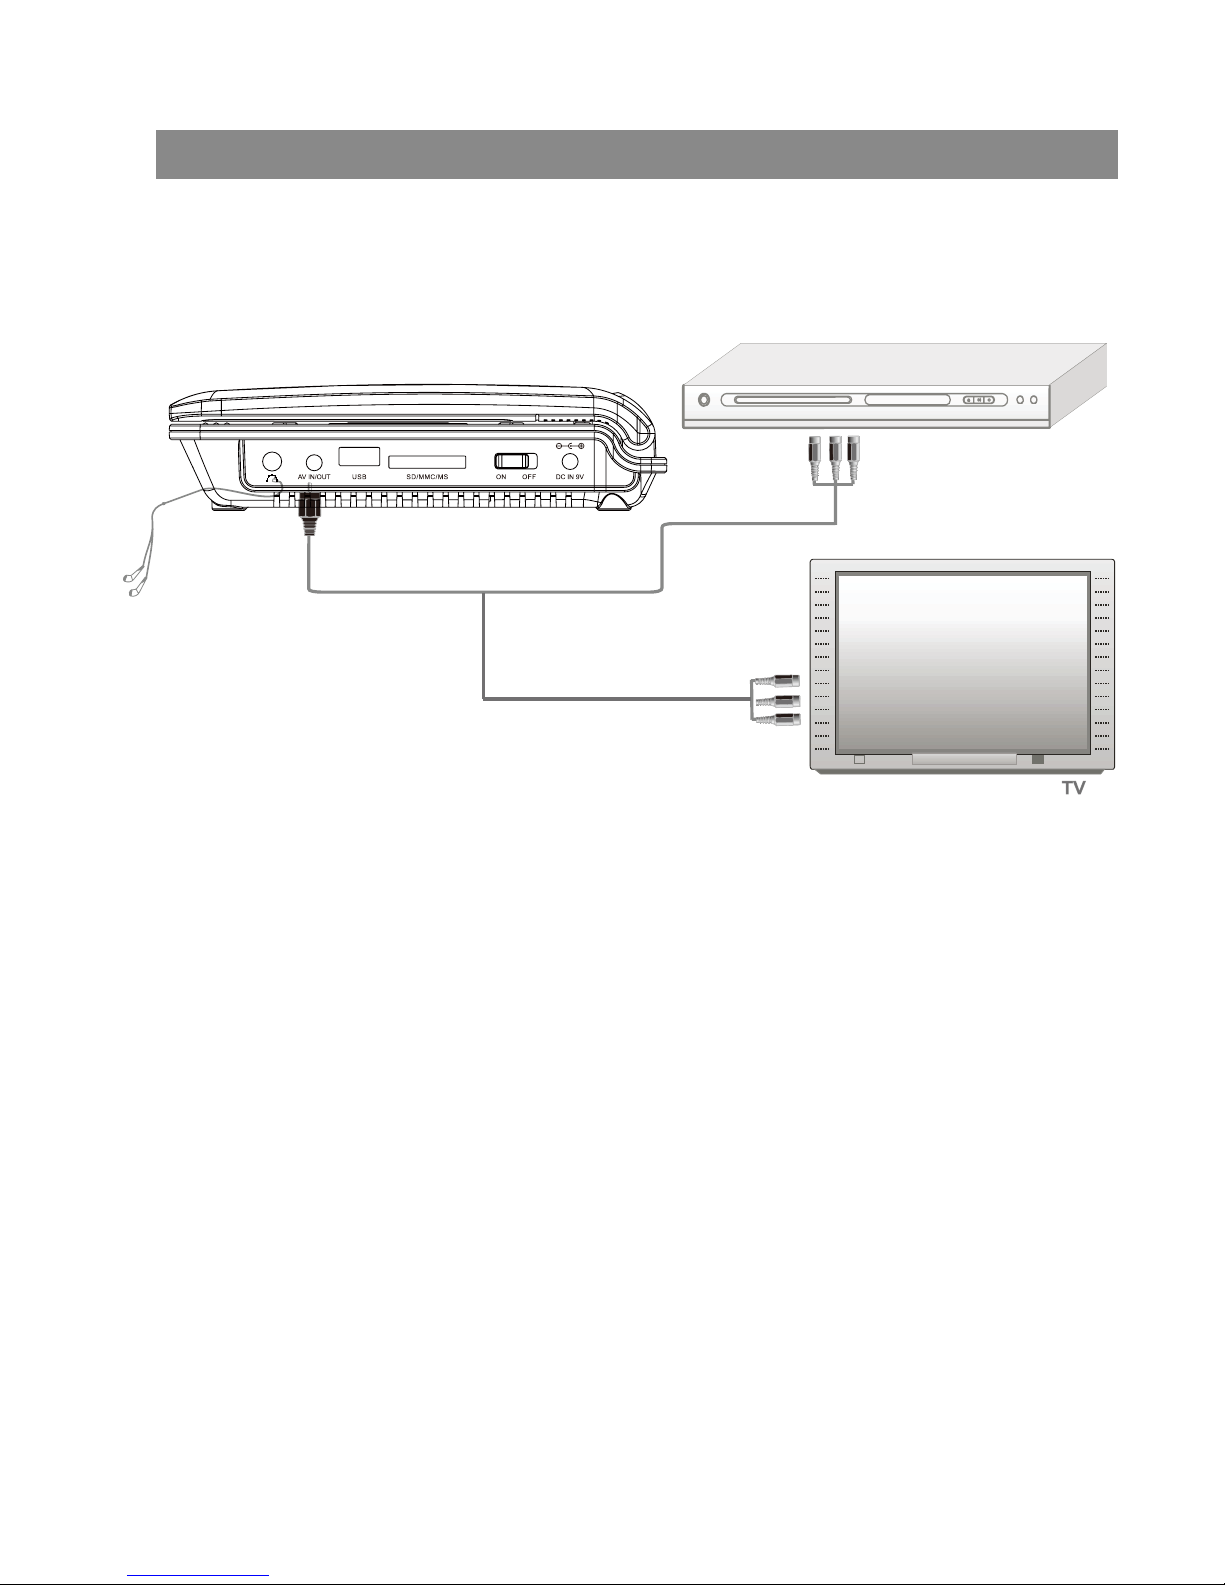
System connection
9
AV input/output and earphone connection
AV connect
Yellow Red
white
VCD, DVD play/VCR
w
ol
l
e
Y
d
eR
ei
t
h
w
Notice:Please turn off all devices before connection.
Ɣ
As per the picture, use the A/V cable to connect the portable TV player
to a TV or other devices.
Ɣ
Turn on the portable TV player and the other unit to which connection
has been made.Press the mode button on the portable TV player or on
the remote control to enter in A/V mode.
Ɣ
Note:The audio output only supports Analogue output.
Use the AV cable in the accessory bag,connect the audio/video output
on this unit to the corresponding Input on TV or stereo amplifier.
Page 11
Basic playback
10
Basic operatio
【On/Off】
After connecting the AC adaptor, press the on/off button and the unit will turn into
working status.
【STOP】
When playing DVD,SVCD/CVD,VCD and CD disc,press the button once and the
unit will memorize the current position. Press play/pause button and the unit will
start from where you stop.Press stop button twice the unit will stop and will lose the
last memory.
【Play/pause】
When playing disc press the button once to pause the current playback, Press
once more to resume playback.
【SKIP】
When playing disc, press to play last chapter or title.
When playing disc press to play next chapter or title.
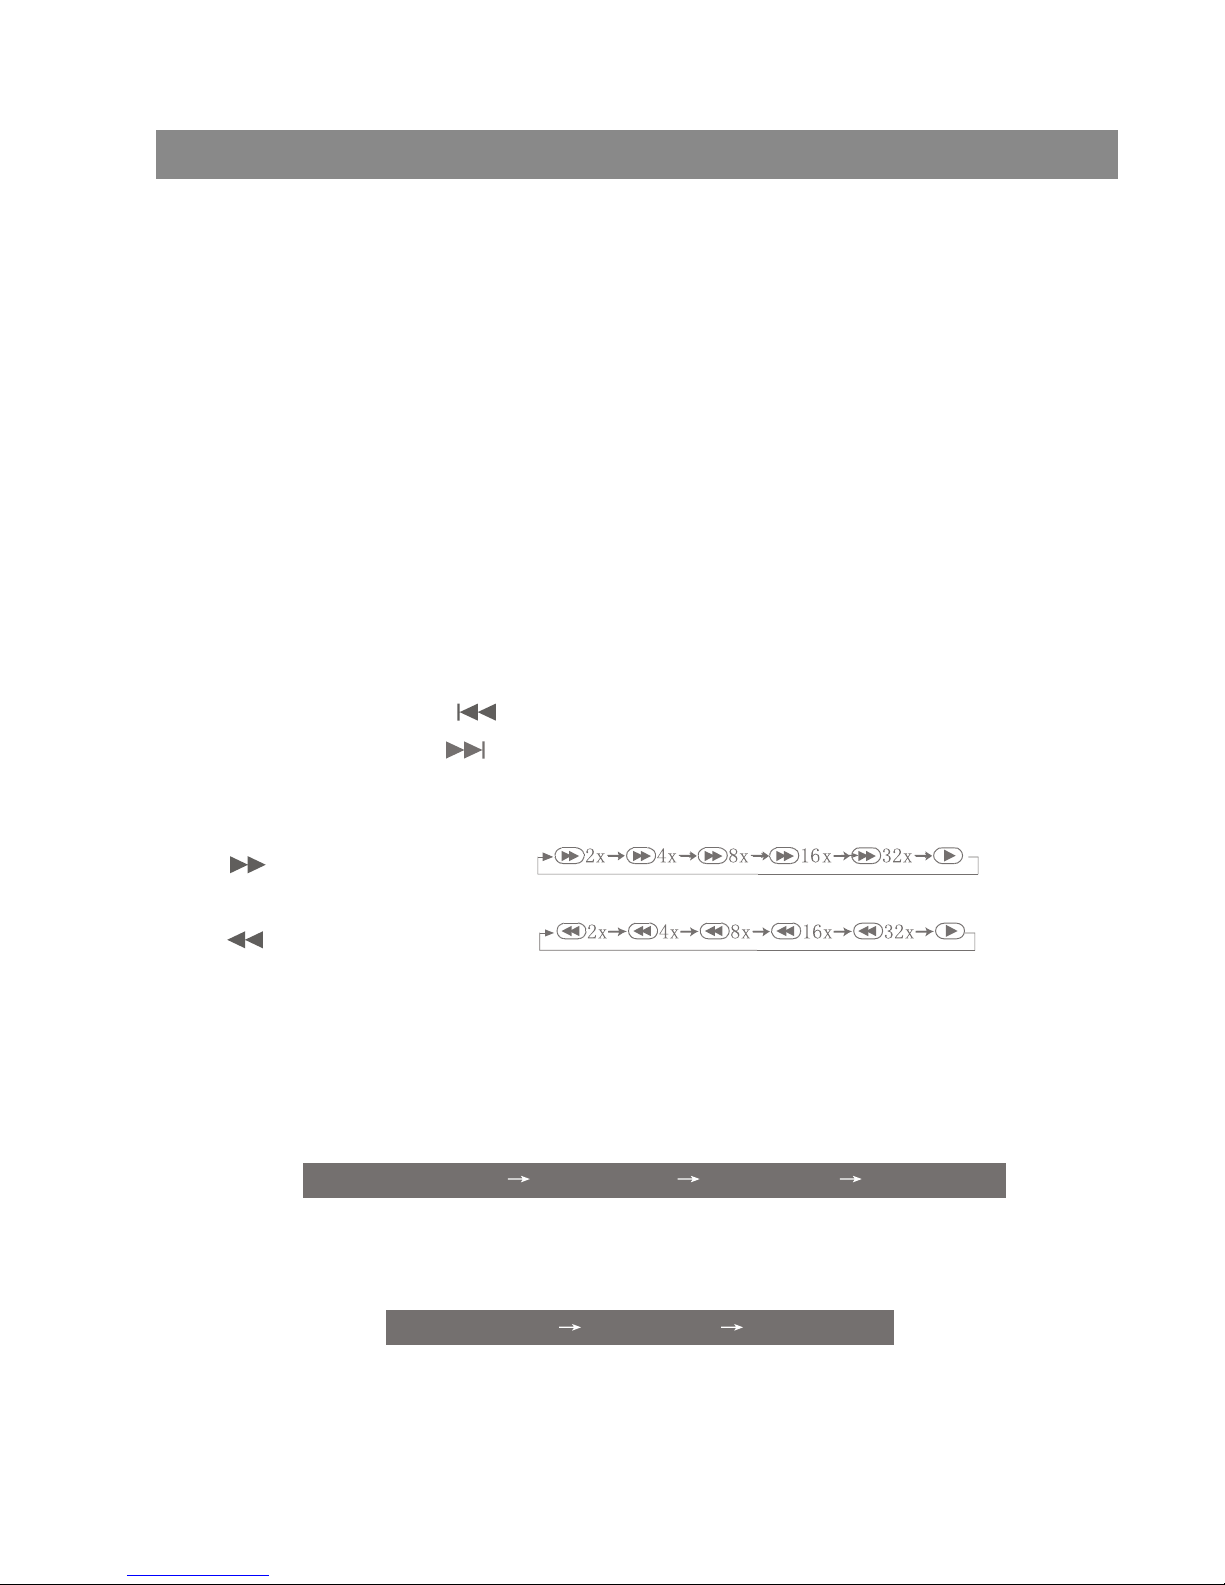
【Fast play】
When playing disc,press the button to fast play forward or backward.
Press ,playback speed will be
Press ,playback speed will be
Under fast play status,pressing [play/pause] will resume normal playback.
【Repeat】
This function activates “repeat one title only, one chapter, one track, or the whole
disc”.
When playing a DVD, press the repeat button and the following display will appear:
When playing a CD, VCD 1.1,SVCD or VCD 2.0 in pbc mode, if the repeat button
is pressed, the following display will appear
【Mute】
Press MUTE once,the sound will be turned off and the LCD monitor will show the
Chapter repeat Title repeat Full repeat Repeat off
Track repeat Full repeat Repeat off
Page 12
Basic playback
11
volume ,Press once more the volume will return.You can also resume the volume
by volume button + -.
【Volume】
The volume can be adjusted by volume button + -.
【Number buttons】
When playing CD,DVD,SVCD,VCD discs, number buttons will be unavailable when
PBC is on .
You can choose the track you want directly by number buttons.For example,if you
want to play track 8, press 0 first then press 8,if you want track 18,press 1 first then
press 8.
【Audio】
When playing a multi channel SVCD, VCD, CD disc, press the "audio" key to chose
a different audio output. The following display will appear:
Stereo---Left channel---Right channel
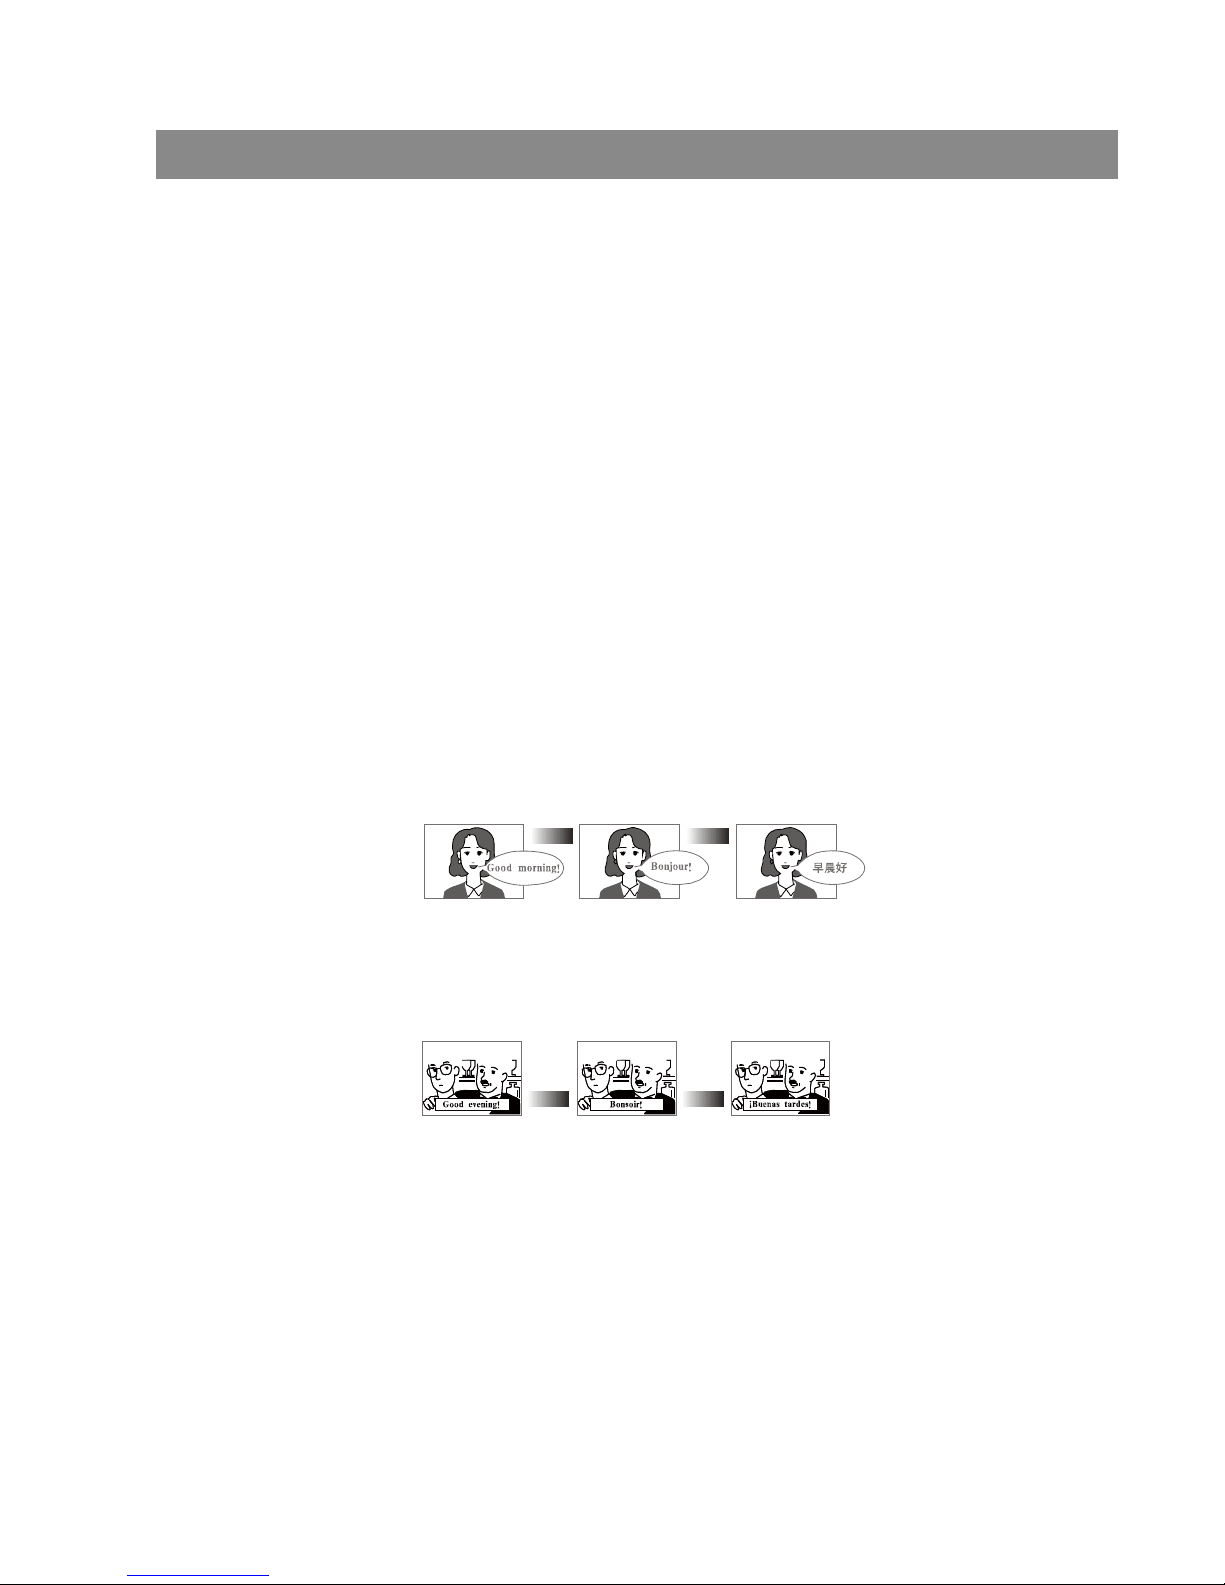
When playing a multi-language DVD, SVCD disc, press the "audio" key to chose
the desired language. The following display will appear:
【Subtitle 】
playing a Multi-Language disc, press the "SUBTITLE” key to chose a subtitle. The
following display will appear.
【Menu】
when playing a SVCD, VCD2.0 disc, press the "MENU" BUTTON to activate/
dissactivate the PBC function.
【Copy/Delete】
when playing from USB/CARD device, press “copy delete” botton to copy items
from USB to card or card to USB, or delete items from USB/card.and it can also
copy mp3,mpeg4,jpeg items from disc to USB/CARD.
Subtitle1/3
Subtitle2/3
Subtitle3/3
Page 13
Basic playback
12
Subtitle/chapter/time
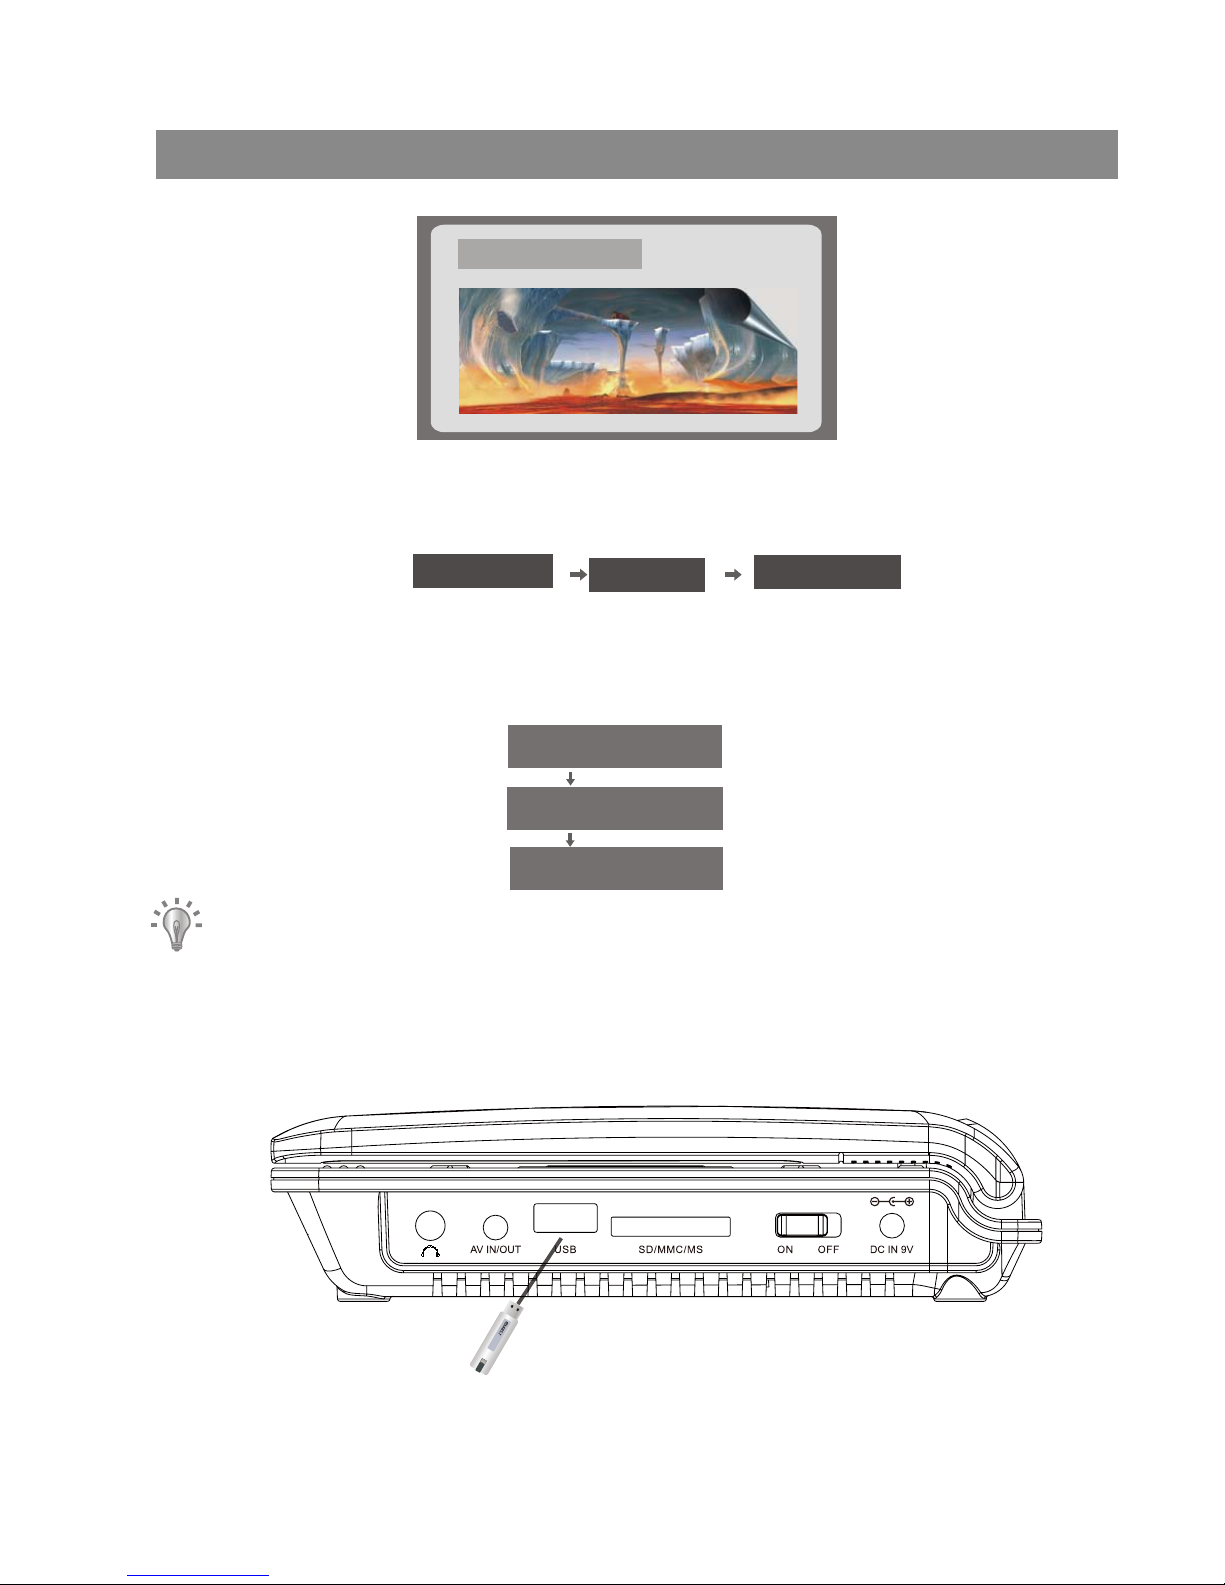
When playing back a DVD disc, press the "GOTO” key. The unit will display the
search menu on the TV screen. See below picture.
When playing back a SVCD, VCD disc, press the "GOTO” key. The unit will display
the Search menu onthe TV screen. See below picture.
Move the cursor keys to chose the desired function. Press "enter” key into
searching status chose the desired items by number key.
USB connection
Full disc time
Chapter time
Repertoire time
Title chapter T time Chapter time
itle
Page 14
Basic playback
13
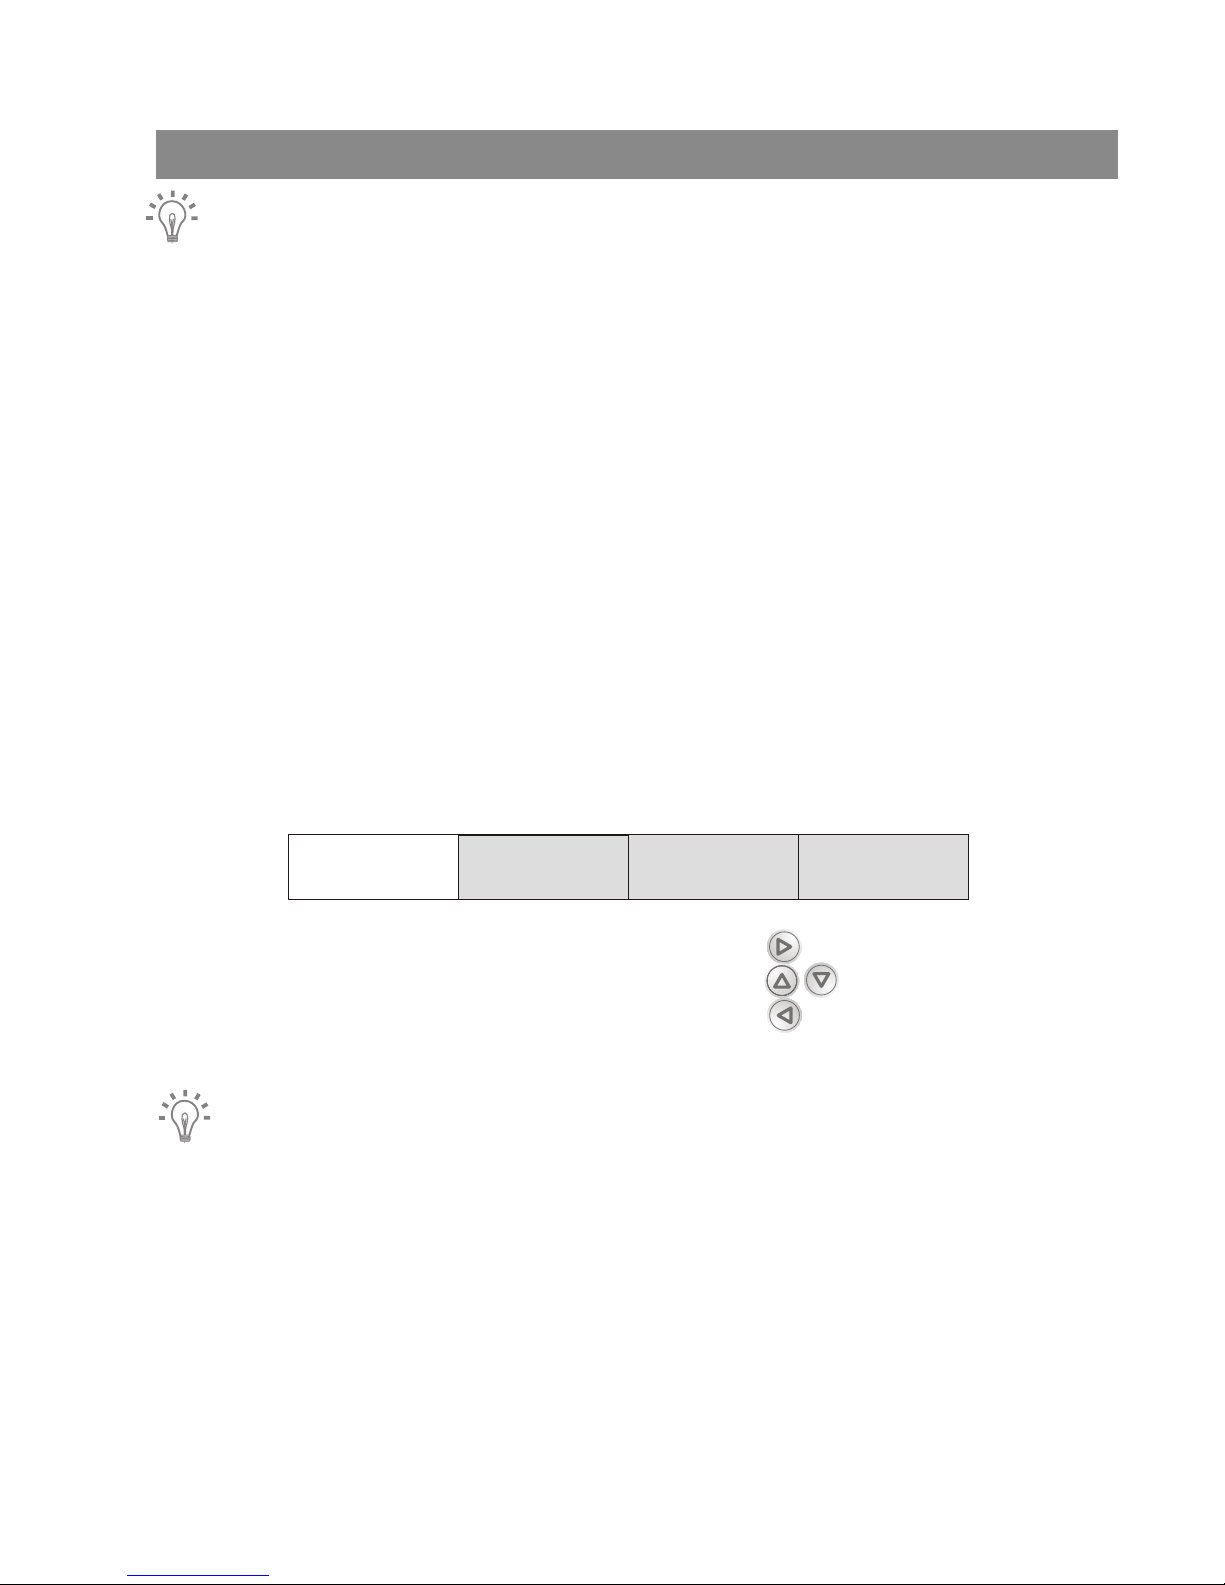
This unit can support USB1.1 and USB2.0 .
The unit can support most of the USB flash. The following formats are supported.
JPEG, MP3,MP4,XVID,AVI.(Some files may not work as not all formats and codecs
are included)
When using a USB stick or a HDD drive, make sure the format used is FAT 32.
USB function
In order to use the USB or the card reader, the unit should be in “Stop” or “No disc”
mode,Press the USB button on the DVD player. The loading time of the files and
the content will depend on the size of these,and the amount of files. After having
loaded the file, use the Key arrow buttons to select the files and press the “Enter”
button to confirm,If you want to stop the playback,press the USB button.
Setup menu
When the unit is in working process, press the setup key to enter the main menu
system. See the below picture.
Choose the desired function using the direction keys and press "OK” to confirm.
Choose the desired function using the direction keys and press "OK” to confirm.
Return to the setup menu by using the direction keys Press setup to edit the
menu.
Note:
By moving the cursor to the selected item, a display will appear at the bottom
displaying the information
The unit will memorize the setup configuration once it is powered off.
The unit can only enter in setup mode if it is in”stop”mode or tray is opened.
General Audio Video Preference
Page 15
System setup
14
General setup
GENERAL SETUP
TV DISPLAY PS
OSD LANG ENG
CAPTIONS OFF
SCREEN SAVER ON
LAST MEMORY OFF
MP3 Lyric
ON
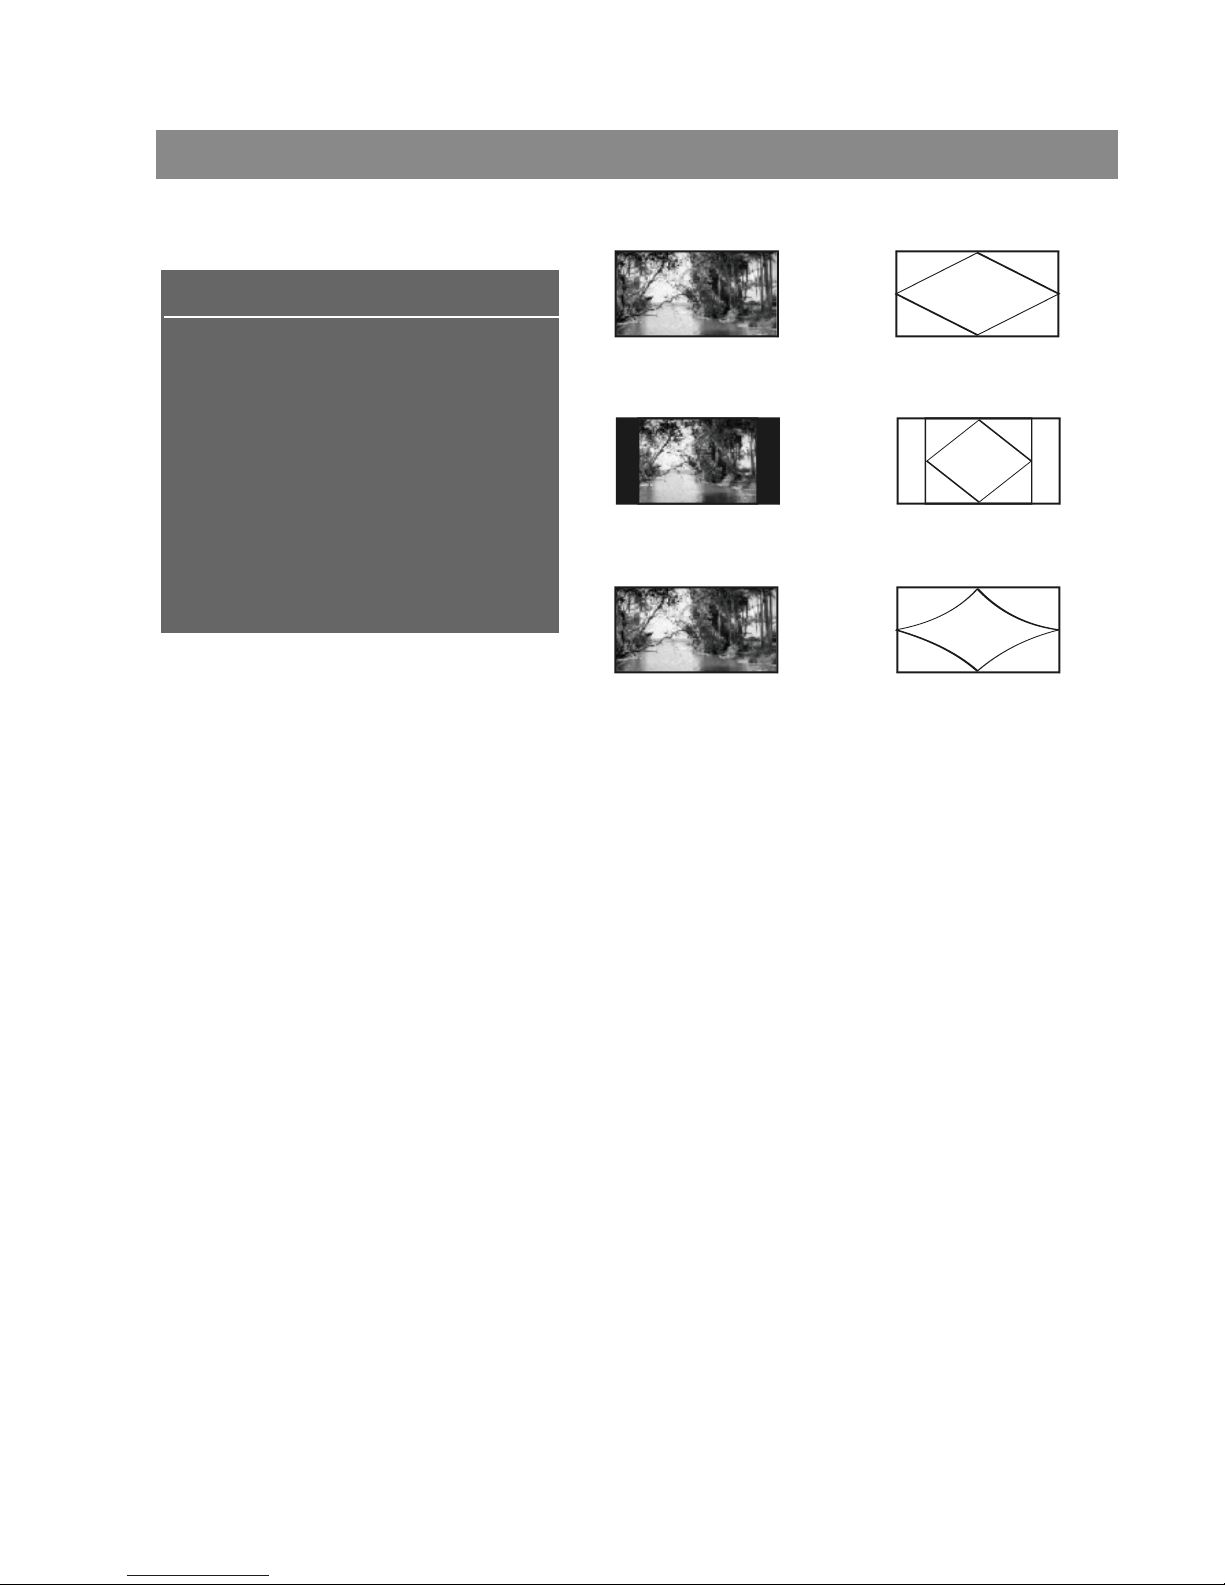
LCD display Normal/PS
Normal/PS: display full image
LCD display Normal/LB
Normal/LB display the image as 4:3
LCD display Wide
Wide Display the image as 16:9
OSD language:choose the desired language .
Caption: When playing back a disc, turn on or off the caption function
This function will show or hide the information on the screen.
This function is used for persons with hearing or viewing problems.
Note:The caption function will only work if the DVD disc contains this
Information.
Screen Saver: If the screen saver is on, when your player is in stop,open
or no disc state, or there is a frame frozen for several minutes, the screen
saver will be activated. This feature can protect the screen from burn-in
damage.
ON: Choose this setting to activate the screen saver.
OFF: Choose this setting to cancel the screen saver.
Last memory:
This function memorizes the end of the last playback and will resume from
that point if the function is enabled.
MP3 Lyric:
When playing mp3 in usb/card/disc device,if the mp3 lyric in the same dir
of the device,the lyric will display in the button of the screen.
Page 16

System setup
15
Audio setup
AUDIO SETUP
DOWNMIX STR
Dynamic
HDCD 1X
EQ TYPE None
Downmix
LT/RT:when playing 5.1ch disc,the left
output channel includes signal of entire
left channel,partial center channel and
left& right surrounding channels;the
right channel includes signal of entire
right channel, partial center channel
and left&right surrounding channels.
Stereo:when playing 5.1ch disc,the left output channel includes signal of
entire left channel and part of center channel,the right channel includes
signal of entire right channel,part of center channel.
Dynamic:
If watching large dynamic scope movie program at night,select this mode
to reduce the volume, meantime keep the little minutia EQ high level, thus
it can avoid troubling neighbors without detracting volume quality.
EQ Type:
Seven modes are available. Select “live” to get live music effect. When EQ
type is off, the sound of the disc will output directly. You can setup the
other items to reach your requirement.
HDCD:
This setup can change output sample rate when playing HDCD disc. Setup
for 44.1K, the system can output all signals of the disc sample rate from 0
to 44.1K the signal over 44.1K being cut. Setup for 88.2K, the system can
output all signals of the disc sample rate from 0 to 88.2K, the signal over
88.2K being cut.Setup for off, the system will output all signals without any
limit.44.1KHz = 1X ; 88.2KHz = 2X
Video setup
VIDEO SETUP
Quality
VIDEO SETUP
BRIGHTNESS 00
CONTRAST 00
SHARPNESS LOW
Page 17

System setup
16
Brightness:
Setup this item to control the brightness of image, available range from
–20 to +20.
Contrast:
Setup this item to control the contrast of image, available range from –16
to +16.
Sharpness:
Setup this item to control the sharpness of image, available range as high
– medium – low.
Preference setup
TV TYPE:
The unit can correspond with erery type
of TV all over the world, Select your
TV type on this item:
Auto: Select TV type according to the
color system of the playing disc
automatically.
NTSC: Taiwan, Japan and USA use this
type.
PAL: HongKong, China and Europe use
this type, When TV type is
inconsistent with this setup, the screen
will be in black strip state.
PREFERENCE PAGE
TV TYPE NTSC
AUDIO SPA
DISC MENU SPA
SUBTITLE SPA
PARENTAL
PASSWORD
DEFAULT
PBC ON
Audio: Subtitle and disc menu language setup:
when the disc has correspondent subtitle, audio and menu language
supporting, menu is valid, if the playing disc defaults preferred language,
this setup will be invalid.
Parental control:
Adjust parental control to control the playing rated disc.
Default:
Return the player defaults to the original factory settings.
Password Mode:
When the mode is "OFF", setup the age control directly; when the mode is
"ON", setup the age control only with password, using password to operate
every time.
Password Change:
Setting up this item, the TV screen will show as following picture:
Page 18

System setup
17
The initial password of the unit is 8806.After changing the password, press the
select key to finish.
Page 19
4. Welcome Page
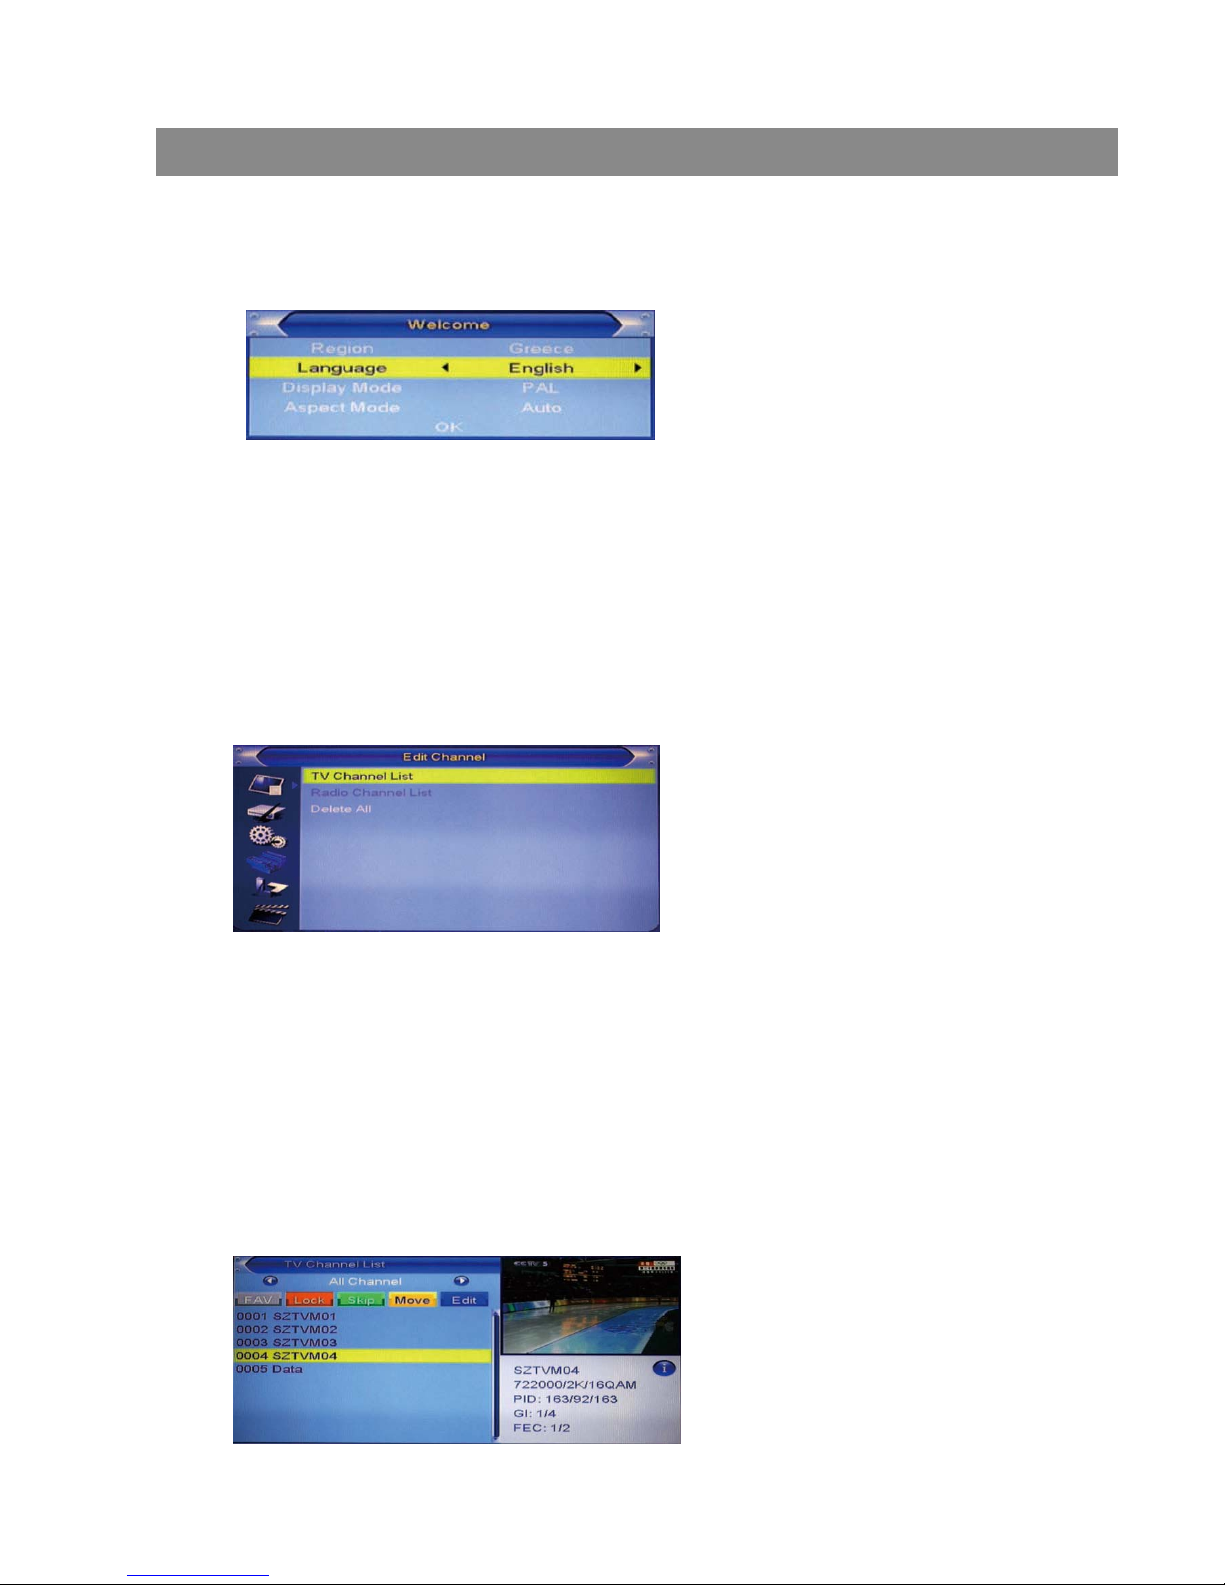
When turn on the power for the first time, the welcome page will be
shown as below:
4 Press [Exit] key to exit wecome page and enter into main menu.
1 Press [Up/Down] key to move highlight.
2 Press [Left/Right] key to select region, language, Display mode, Aspect
mode.
3 Move highlight to [OK] button and press [OK] key to begin the auto scan.
1 Press [Up/Down] key to select menu pages among Edit Channel,
Installation, System Setup, Tools, Game, and REC.
2 Press [OK] or [Right] key to enter the “Edit Channel”. If Menu Lock is “On”,
a dialogue inquires the password, “0000” is for default.
3 Press [Up/ down] key to select menu items among TV Channel List,
Radio Channel List and Delete All.
4 Press [Left] key or [Exit] key to go back to main menu.
5.1 TV Channel List
When entering the “TV Channel List” menu, the window shows as below.
5. Edit Channel
When pressing the [SETUP] key to enter the main menu, which shows
as below:
Basic Operations
18
Page 20

1 Move the highlight by pressing [Channel Up/Channel Down] key then press
[OK] key to preview the current highlighted program in the preview window.
2 By pressing [Page Up/Page Down] key to execute the Page Up/Page
down function.
3 By pressing the [Volume Up/Volume Down] key to switch to different
Program Group.
4 By pressing the [SETUP] or [Exit] keys to go back to the “Edit Channel”
menu.
5 By pressing the color key to execute the corresponding functions in
“Channel List.
5.1.1 Favorite
1 Press the [FAV] key, and then [OK] key to open the “Favorite” window .
2 Move the highlight among the 8 favorite groups by pressing [Channel
Up/Channel Down] key, and press [OK] key to make a favorite mark in
the left side of the selected Favorite group.
3 Press [OK] key on the marked Favorite group to cancel the existing
favorite mark.
4 After marking, press [Exit] key to go back to “TV Channel List”, there
will be a favorite mark beside the marked channel
5.1.2 Lock
1 Press [Red] key to enter the lock mode.
2 Press [Up/Down] key to move the highlight, and press [OK] key to
display a dialogue to ask you to input password, “0000” is for default.
If the correct password is entered, then a “lock mark” can be seen on
the right side of the highlighted channel.
3 After saving and exiting the menu, the password dialog will be required
while you want to watch the locked channel.
5.1.4 Move
1 Press [Yellow] key, then press [Up/Down] key to move the highlight
and press [OK] key to make a mark. There will be a “moving mark” in the
right side of the selected channel .
5.1.3 Skip
1 Press [Green] key to enter skip mode.
2 Press [Up/Down] key to move the highlight and press [OK] to make a
“skip mark” in the right side of the highlighted channel.
3 After saving and exiting menu, the channel will be skipped while user
change channel in the full screen
Basic Operations
19
Page 21
5.1.5 Edit
1 Press [Blue] key to open “Edit” menu.
2 Press [Exit] to exit “Edit Channel” menu. If you have done some modification
in “Edit Channel” menu, the system will show up a message box to
inquire you whether saving or not when exiting.
5.1.5.1. Sort
1 Press [Red] key can open the “Sort” window. There are four kinds of
sorting approaches. By Press [Channel Up/Channel Down] key to move
highlight and press [OK] key to confirm your selection.
2 The four kinds of sorting approaches are:
Name (A-Z): Sorting in Alphabetical descending Order.
Name (Z-A): Sorting in Alphabetical ascending Order.
Lock: Collecting all locked channels and list in the bottom of TV Channel List.
Default: Return to original setting order.
2 By pressing [Up/ down] key to move the selected channel to the
position that you want to place. Press [OK] key to confirm your decision.
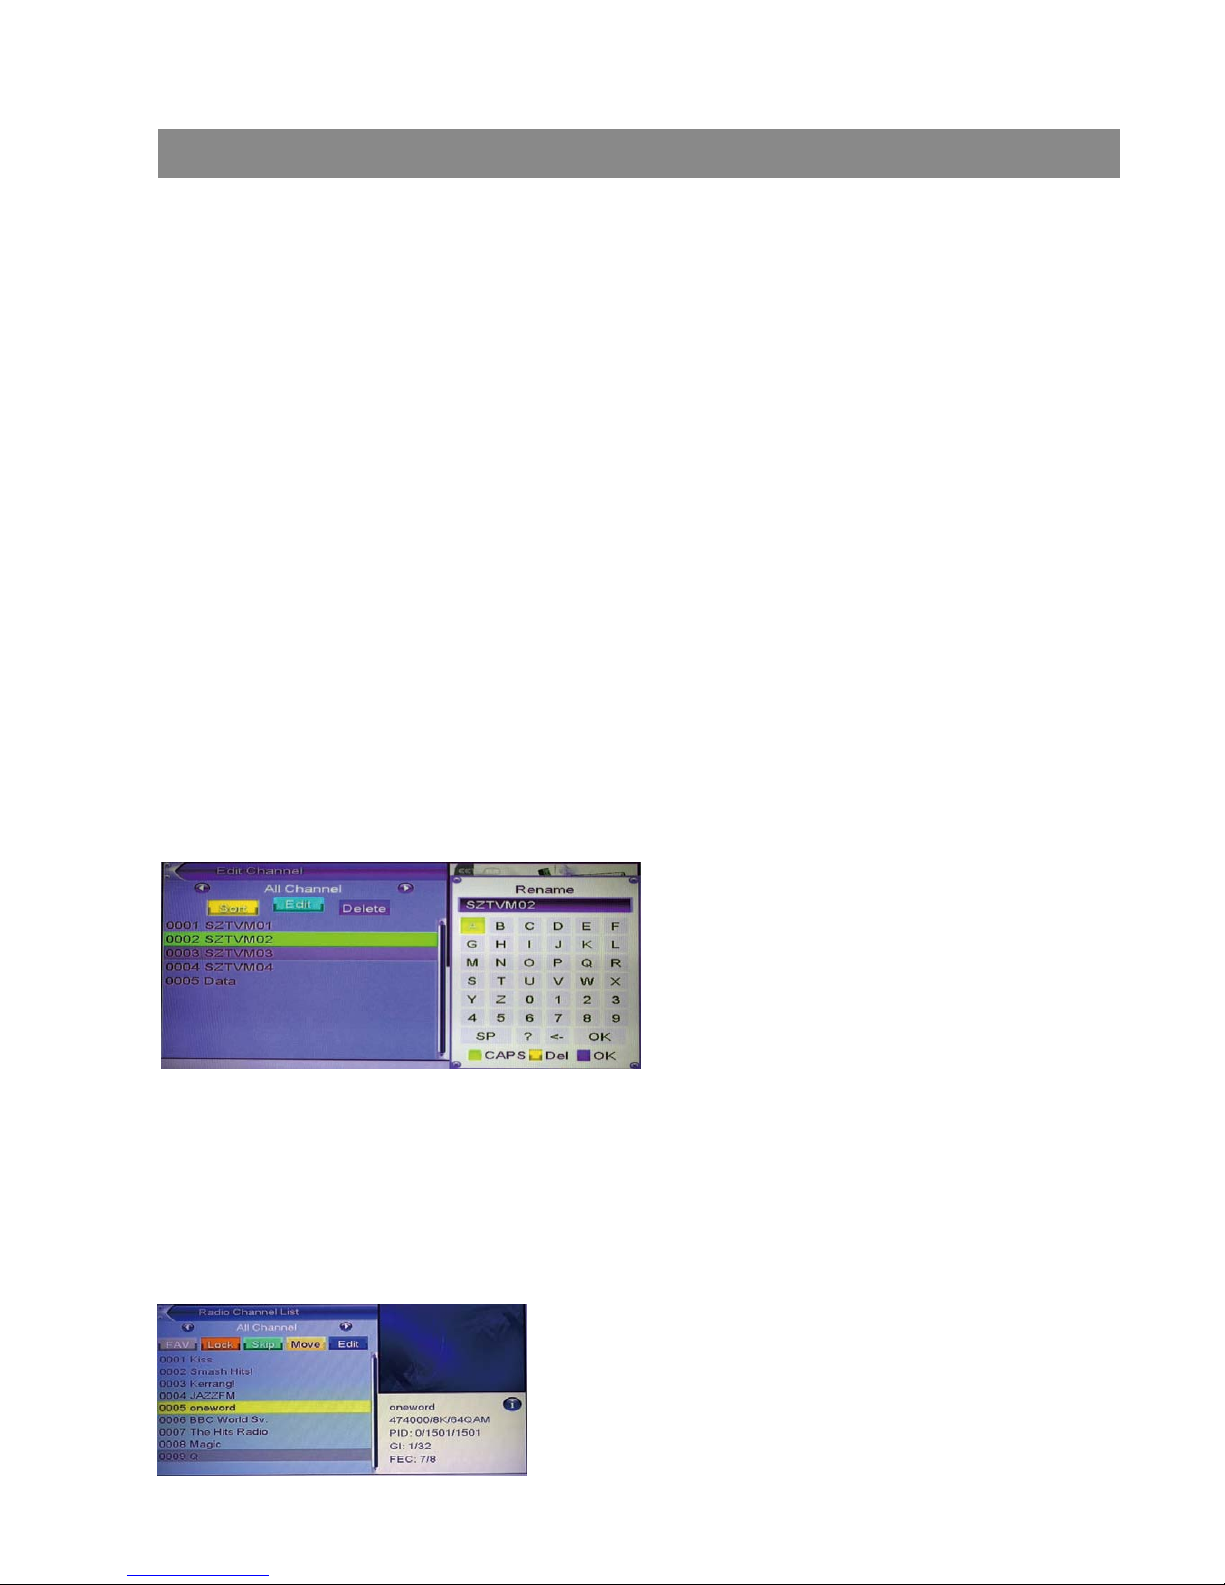
5.1.5.2. Edit
In “Edit Channel” menu, press [Green], then press [Up/Down] key to move
the highlight and press [OK] key to open the “Rename” window. Which shows
as below:
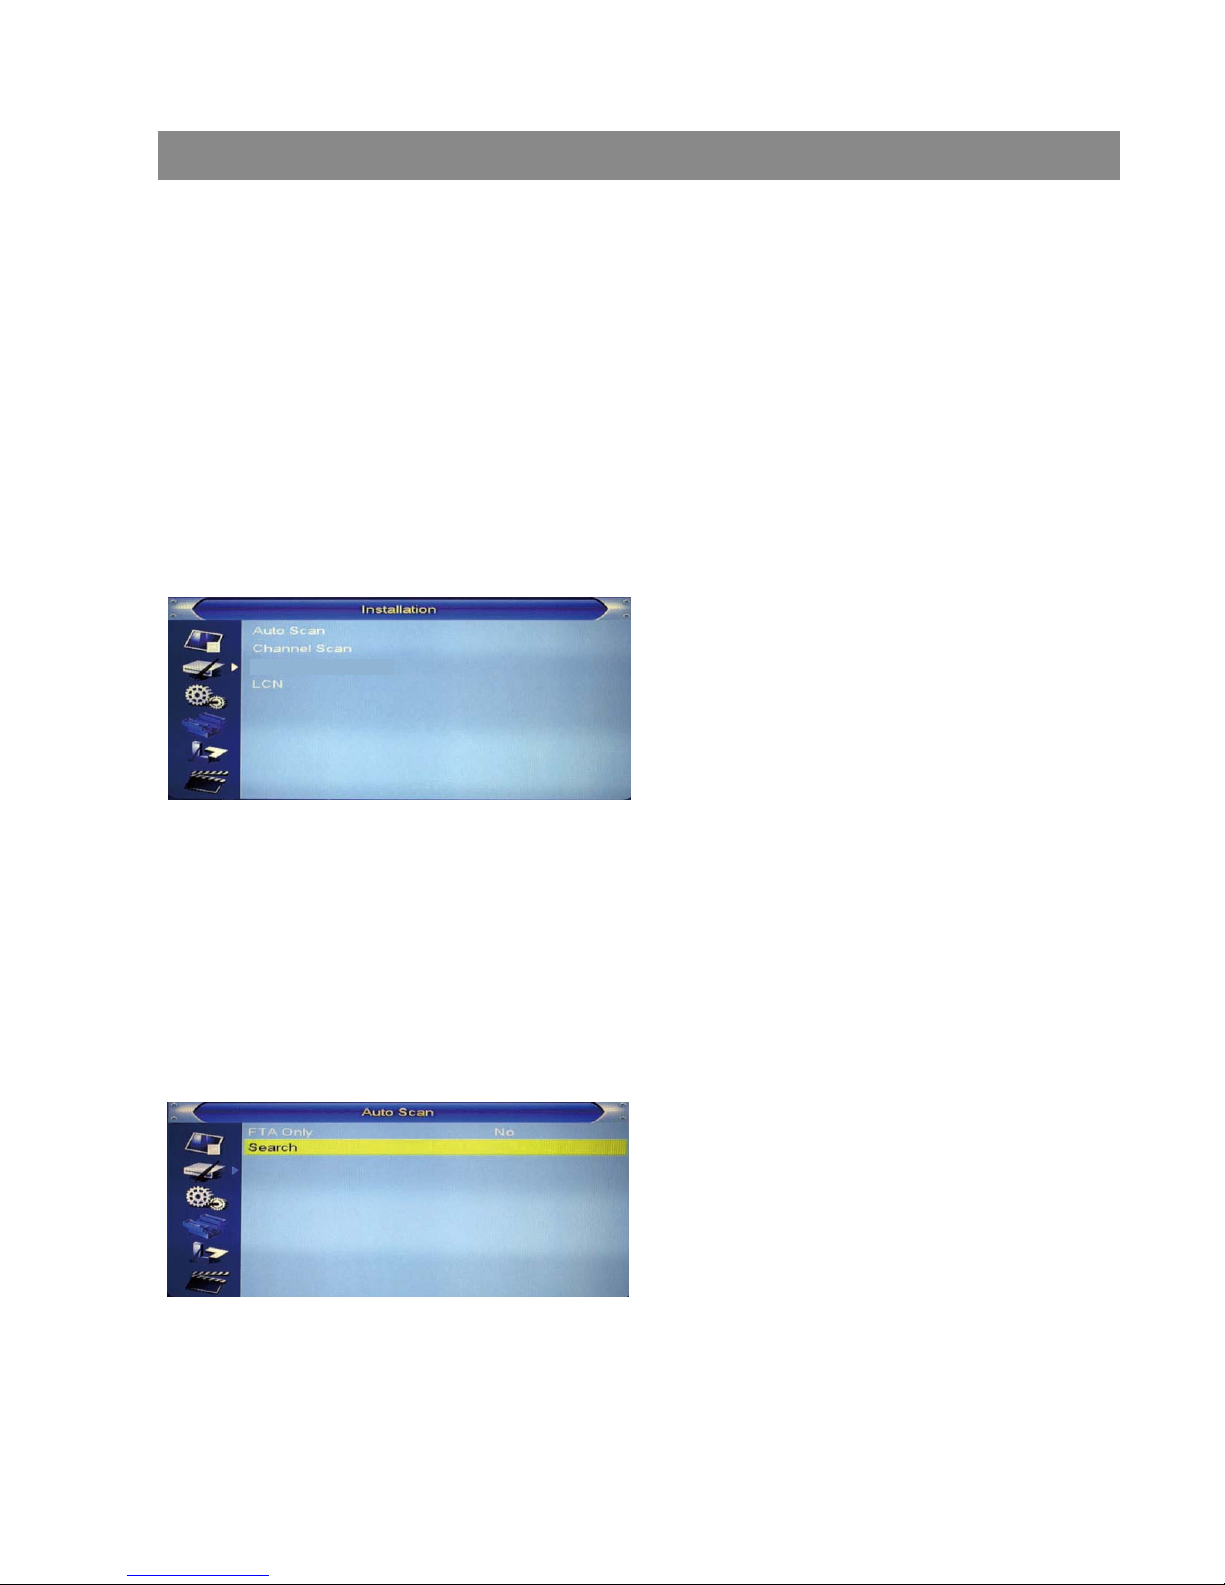
5.2 Radio Channel List
Basically, the operations in “Radio Channel List” are almost the same as
those of the “TV Channel List”.
5.1.5.3. Delete
Press [Blue] key, then press [Up/Down] key to move the highlight and press
[OK] key to make a delete mark in the right side of the highlighted channel.
After save and exit “Edit Channel” menu, the marked channel will be deleted.
1 Press [Yellow] key to switch whether capital or not.
2 Press [Red] key to delete the char
on the cursor.
3 Press [Blue] key to save the
modification.
Basic Operations
20
Page 22
5.3 Delete All
Press [OK] key, it will pop up a warning message to inquire you whether
delete all services or not .
1 If the selection is “Yes”, all channels will be deleted.
2 If the selection is “No” or press [Exit] key, this function will be ignored
directly without saving.
Frequently asked Questions
Q: IF I recklessly delete all channels, what should I do?
A: There are two ways to restore:
To re-search all channels in “Installation” functions.
Use “load Factory setting” function to restore all channels in “Tools” function.
6. Installation
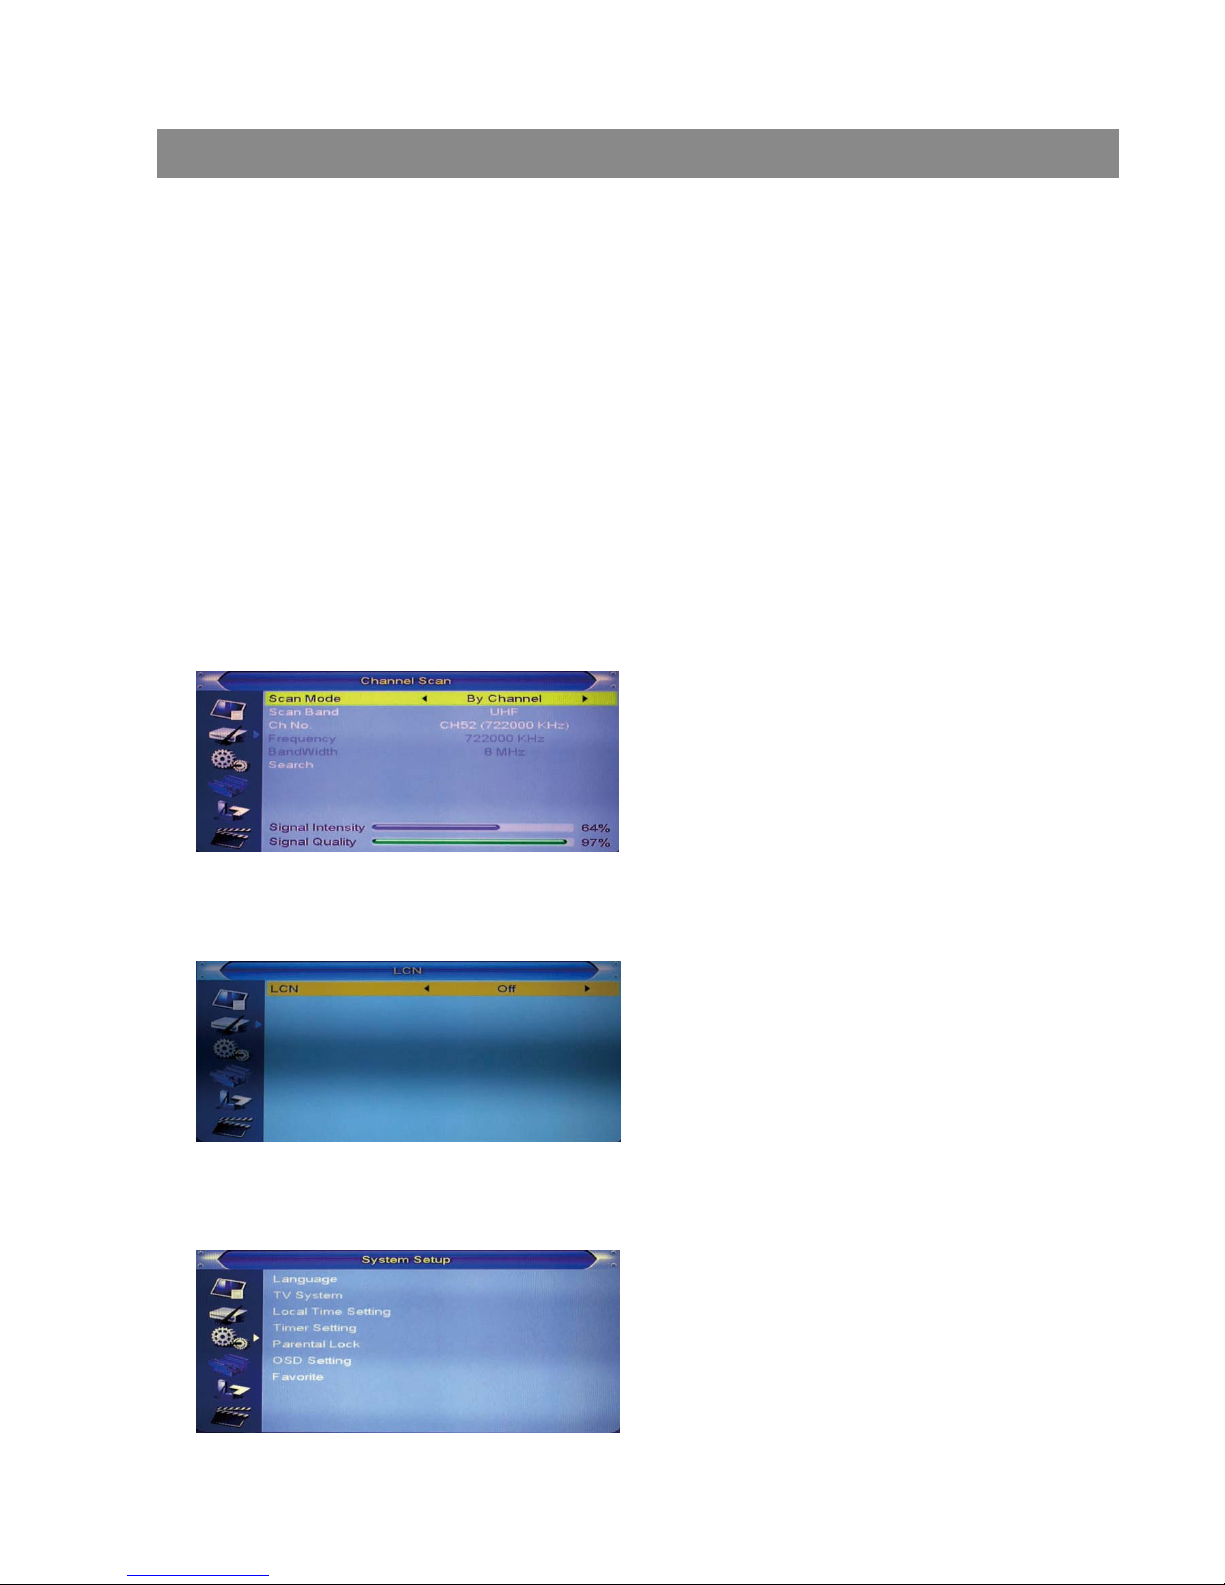
When you enter the “Installation” menu, the menu will be displayed as below:
1 Press [Up/Down] key to select menu pages among Auto scan, Channel
scan, Aerial adjustment, LCN.
2 Press [OK] or [Right] key to enter the “Installation”. If Menu Lock is “On”,
then a dialogue to inquiry the password will be shown. The default
Password is “0000”.
3 Press [Up/ down] key to select menu items.
4 Press [Left] key or [Exit] key to go back to main menu.
6.1 Auto Scan
When you enter to “Auto Scan” menu, there will display the screen like below:
1 In “FTA only” item, press [Left/Right] key to turn yes/no.
2 Moving the highlight to “Search” item and press [OK] key to start scanning.
3 In the “Auto Scan” menu, press [Exit] key to draw back from the scanning.
Basic Operations
21
Page 23
7 Press [Exit] key to exit the scanning.
6.2 Channel Scan
When entering to “Channel Scan” menu, a channel scan menu will be
shown as below:
1 There are two choices of “Scan Mode,” by channel or by frequency.
If you scan by channel, “Scan Band” and “Ch No” are available to be
adjusted. If you scan by frequency, “Frequency” and “Bandwidth” are
available to de adjusted.
2 There are two choices of “Scan Band,” “UHF” or “VHF.”
3 There are 56 choices of “CH No” ranging from In frequency
“CH05(177500Hz) ” to “CH69(858000Hz).”
4 You can adjust any frequency to search by.
5 There are three choices of “Bandwidth”, 6, 7, and 8 MHz.
6 When you complete your modification, move highlight to “Search” item
and press [OK] key, then it will begin to scan.
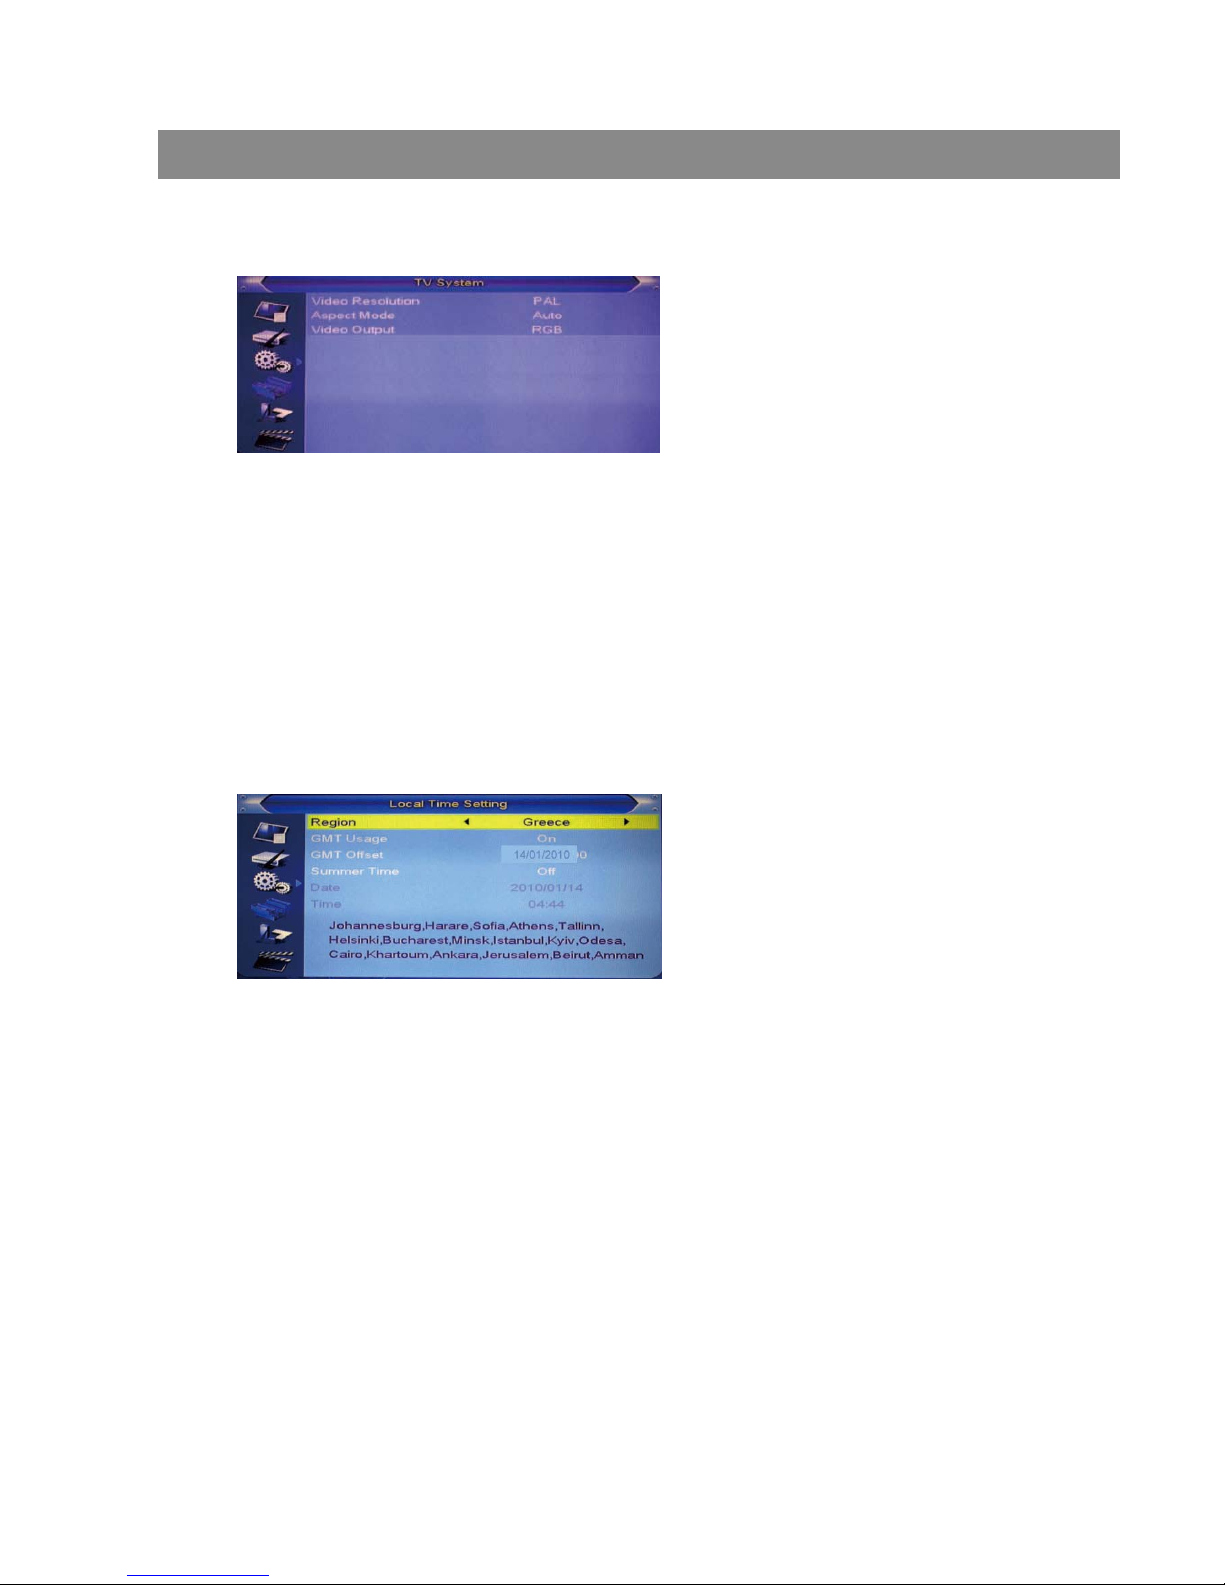
When entering to “System Setup” menu, a menu will be displayed as below:
6.3 LCN
LCN: To toggle the LCN mode On/Off
7. System Setup
Basic Operationss
22
Page 24

Press [Up/Down] key to select menu pages among Language,TV system,
Local time setting, Time setting Parental lock, Osd setting,Favorite.
7.1 Language
When entering the “Language” menu, you will see the screen as below:
1 Language: press [Volume Up/ Volume Down] key to select menu languages,
the selections of languages include:Danish,English,German,French,
Spanish,Italian, Portuguese,Greece
2 First Audio: Some channels have more than one available audio
language; with this function, a user can set the first audio for this channel.
If the playing channel has the same audio as the “First Audio” you set, system
will play this audio language as default. If the channel hasn’t the suited
audio language, then the system will compare automatically with the
second audio language.
3 Second Audio: If the channel contains the audio track corresponding to
the “Second Audio” instead of the “First Audio”, system will play the
second audio language as default. If no audio language corresponds to
the “Second Audio”, then the default language of current channel will
be played automatically.
4 Subtitle Language: Some channels have more than one subtitle for
choosing.With this function, a user can set the specified subtitle language.
If the playing channel has the same subtitle language as the “Subtitle
Language” the user set, system will play this subtitle language as
default. If the channel hasn’t the suited subtitle language, then the
default subtitle language of current channel will be played automatically.
5 Teletext: The user can set teletext language. If the streams have this
language you can see the teletext in language you set.
6 Press [Exit] key to draw back from “Language” menu.
Basic Operations
23
Page 25
The following options are provided:
4:3 PS AUTO
4:3 LB AUTO
16:9 AUTO
Auto means system won’t do any aspect ratio switching.
3 Press [Exit] key to draw back from “TV System” menu
7.2 TV System
When entering the “TV System” menu, you will see the screen as below:
1 Video Resolution:To switch the system output video resolution.
2 Aspect Mode:To switch the screen aspect ratio. By pressing [Left/Right] key
to select each mode circularly.
1 Region: Select the country which the user is in.
2 GMT Usage: Set to be ON/OFF.
3 GMT Offset: Valid only when the setting of “GMT Usage” is “On”. By
pressing [Left/Right] keys to switch “GMT Offset” values ranging from
-11:30 ~ +12:00, with the increment unit by half an hour.
4 Summer Time: Valid only when the setting of “GMT Usage” is “On”. When
“Summer Time” is “On”, one hour will be added .
5 “Date” and “Time” items: Valid only when the setting of “GMT Usage”
is “Off”. By pressing [Left/Right] keys to moving highlight and the number
keys for inpout.
6 Press [Exit] key to draw back from “Time” menu
7.3 Local Time Setting
Basic Operations
24
Page 26

7.4 Timer Setting
Select “Timer Setting” item and press [OK] key to enter “Timer list” menu.
Press [up/down] key to select a timer, then press [OK] key to open and
adjust the timer menu.
7.5 Parental Lock
Press [OK] key on “Parental Lock” item, a dialogue will be pop up to ask
for the password (“0000” for default.) Once the user make the password
correct, a screen will be shown as below.
1 Menu Lock: determining the users’ intention to block the following menus
with password: “Edit Channel /Installation/Tools”.
2 Channel Lock: determining the users’ intention to play or lock channels
with password. If the setting is “Yes”, then the password will be asked
to play the channels with lock mark.
3 New Password: used for revising password, by keying in the new
password in this item. After the 4 digital numbers are filled, the Confirm
Password item will ask you to input the new password again. If the password
is correct, the screen will show up a message of “Saving Data, Please
Wait…” After finishing saving and drawing back to “System Setup” menu,
the revising is completed.
4 Press [Exit] key to draw back from the “Parental Lock” menu.
7.6 OSD Setting
Basic Operations
25
Page 27
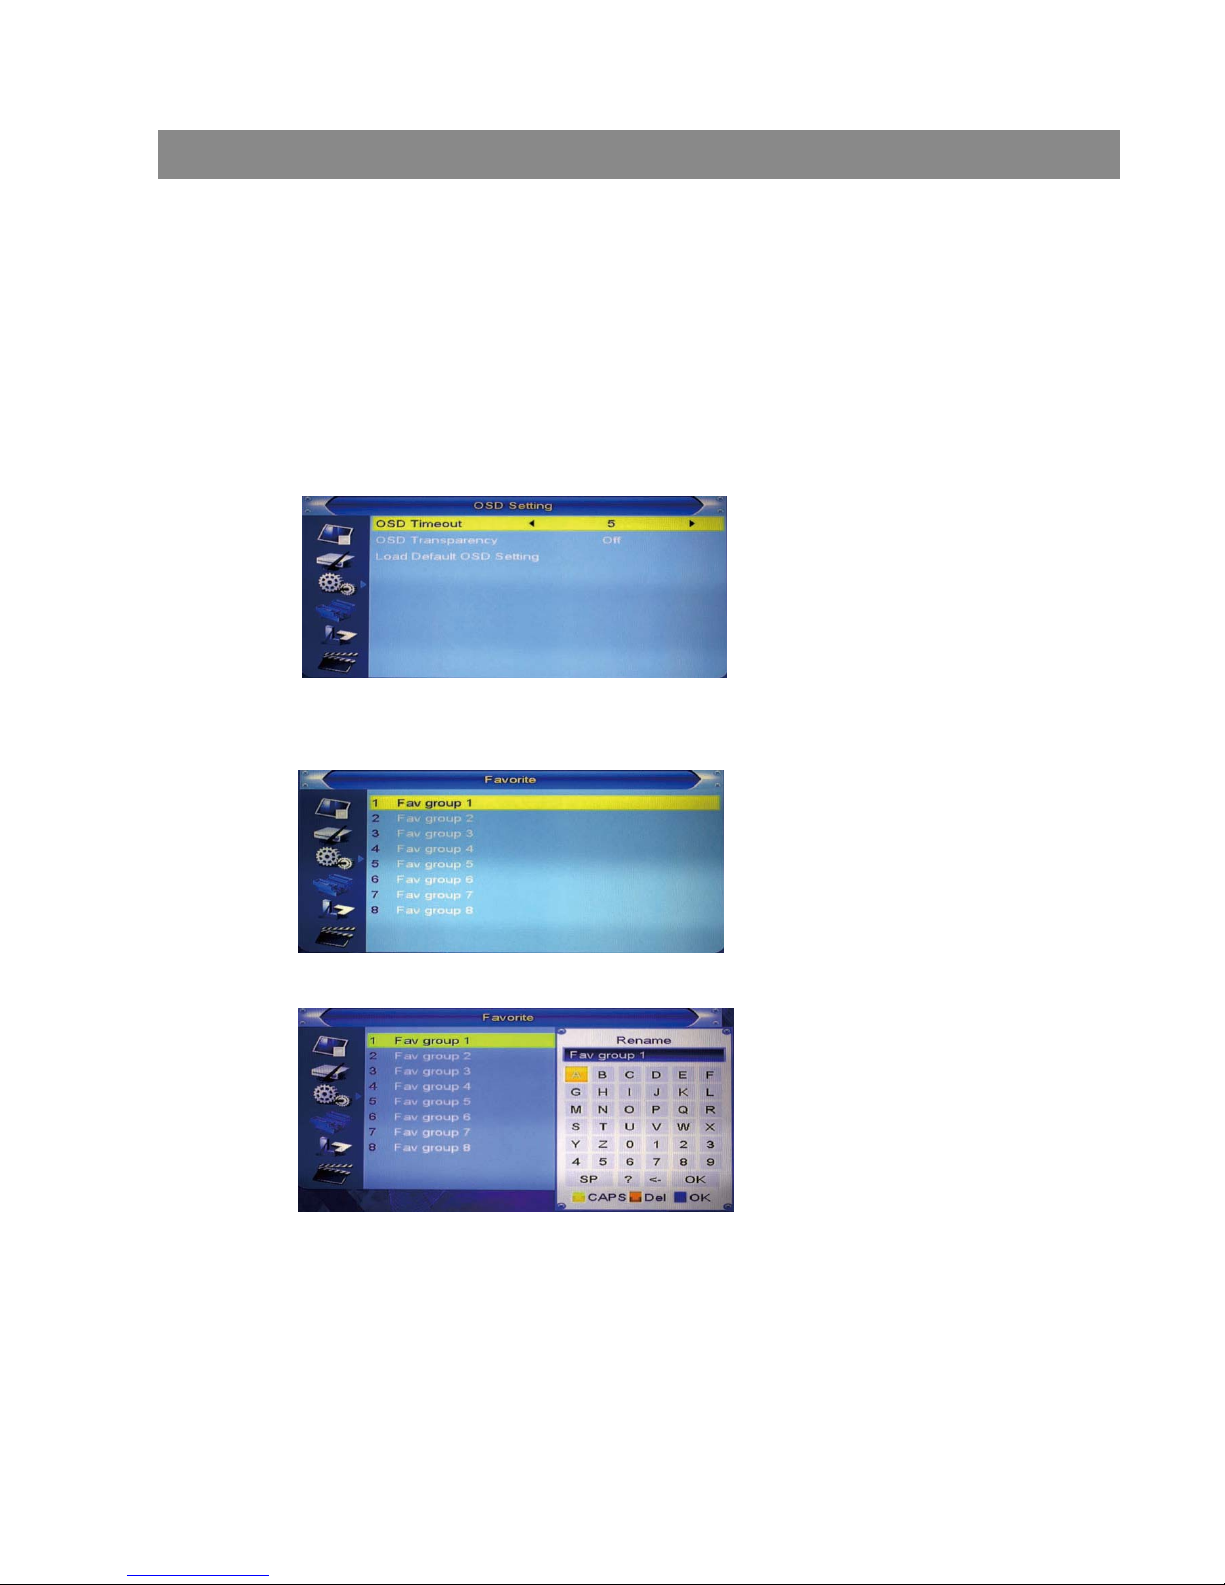
When entering the “OSD Setting” menu, a screen will be shown as below:
1 OSD Timeout: set the duration of showing up for the program banner which
contains some information about the channel and shows up once the
channel is changed.
2 OSD Transparency: set the transparency of OSD.
Press [Left/Right] key to select the values. There are 5 levels of
transparency, 10%, 20%, 30%, 40%, and “Off” (Opaque of the OSD).
3 Load Default OSD Setting: press OK to restore default OSD setting.
4 Press [Exit] key to draw back from the “OSD Setting” menu.
7.7 Favortie
When entering the “Favorite” menu, a screen will be shown as below:
press [OK] key to rename the favorite group. A dialog shows as below:
8. Tools
1 Press [Yellow] key to switch whether capital or not.
2 Press [Red] key to delete the char on the cursor.
3 Press [Blue] key to save the modification.
Press [OK] or [Right] key to enter the “Tools”. If Menu Lock is “On”, it will
display a dialogue for user to key in password. The default Password is “0000”.
Basic Operations
26
Page 28
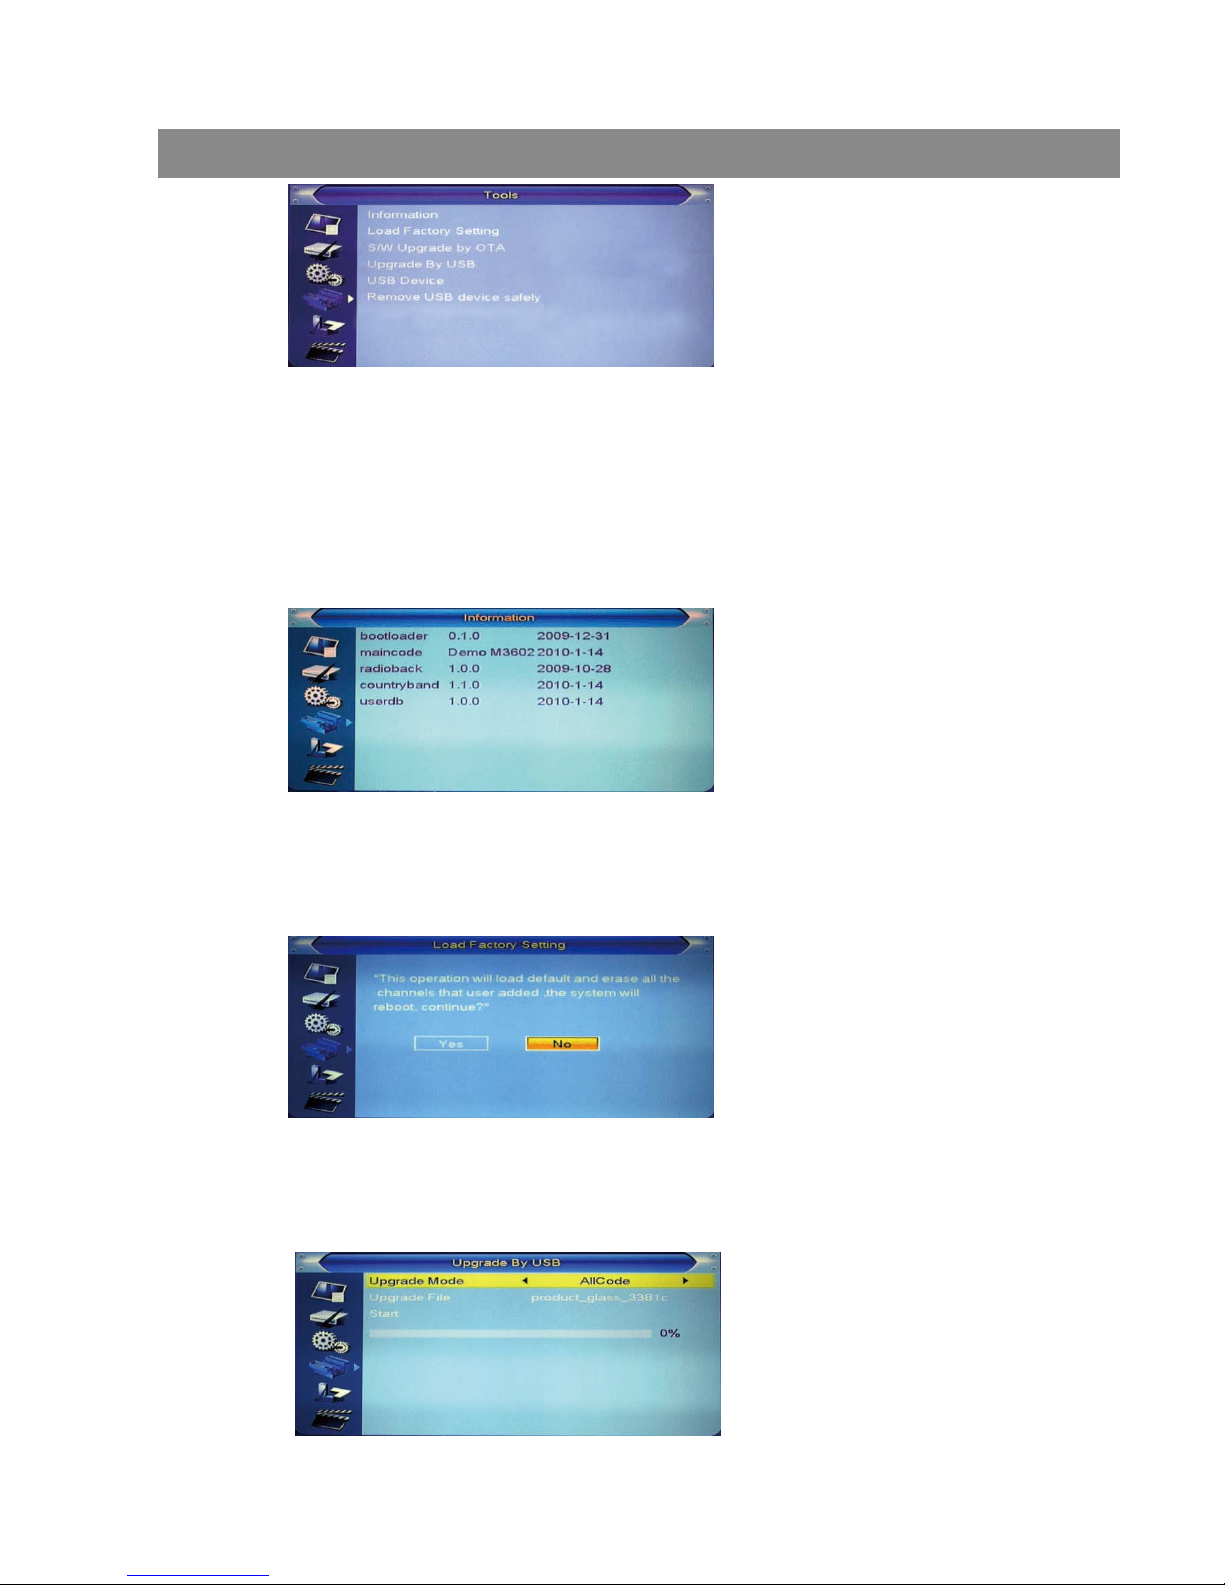
In “Tools” menu:
1 Press [Up/Down] key to select menu pages among Information, Load
factory setting, S/W Upgrade by OTA, Upgrade by USB, USB device,
Remove USB device safely.
8.1 Information
When entering the “Information” menu, a screen will be shown as below.
It shows the version and date for the items such as “boot loader, main
code, radio back, country band, user db” information.
8.2 Load Factory Setting
press [OK] to load defaults settings, warning inquiry will be popup as below.
Once the “Yes” option is chosen, the all revised parameters of the receiver
will be reset to the default alue. Please use this function carefully.
8.3 Upgrade by USB
This function is only valid when the USB device has been plugged-in and
attached at the receiver box. Open Upgrade by USB menu according to
Menu -> Tools-> Upgrade By USB.
Basic Operations
27
Page 29
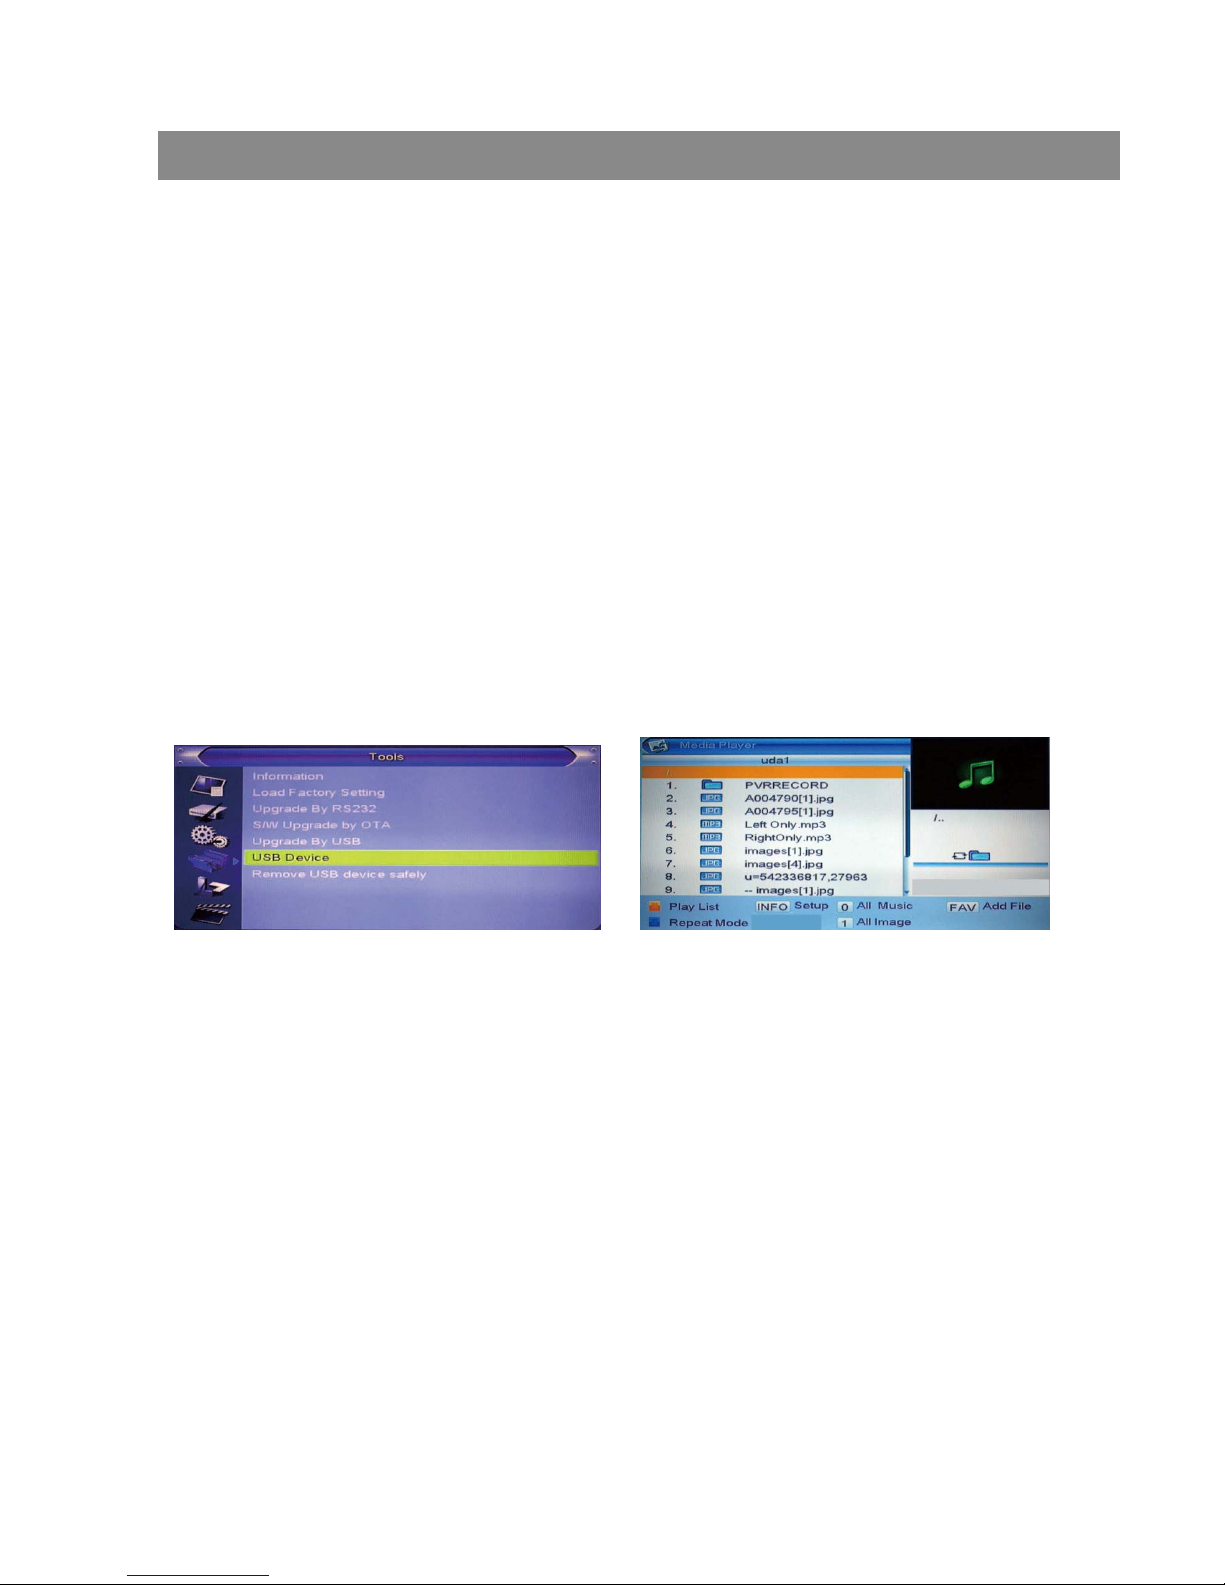
1. All Code: the user can only upgrade whole file to the STB flash ROM.
Please rename the new file name
to be the format as “all*.bin”, Then
Press OK key to start upgrade by USB.
8.4 USB Device
USB menu will automatically be shown once inserting the USB disk to
USB port, except the status of auto scanning, multi picture displaying,
and upgrading.
Another way to open USB menu is to go step by step
according to SETUP ->Tools->USB Device. USB menu will be disabled when
the USB device is unplugged. Media Player List will not be saved after
unplugging USB and/or going to standby and power off.
Media player menu will be shown as below:
2. Main Code: the user can only upgrade part of the main code. Please
confirm the upgrading file format is “mcd*.bin” Radio Back: the user
can upgrade the background logo. Please confirm the associated file
name of the upgrading file to be as “*.m2v”
key operations:
FAV key: Put the selected file to play list .
0 Key: All the MP3 files in current directory will be added into MP3 play
list .
1 Key: All the Image files in current directory will be added into Image
play list .
Yellow Key: The “Please select play list type” operation window will be
shown by pressing Yellow key. After that, the user can play the image
or music by choosing the files. If here is no file in the directory, an
operation window “This type of play list doesnot exist” will be shown.
INFO: Set up slide show of images.
Blue Key: To rotate among the 3 repeat modes provided as below:
Basic Operations
28
Page 30
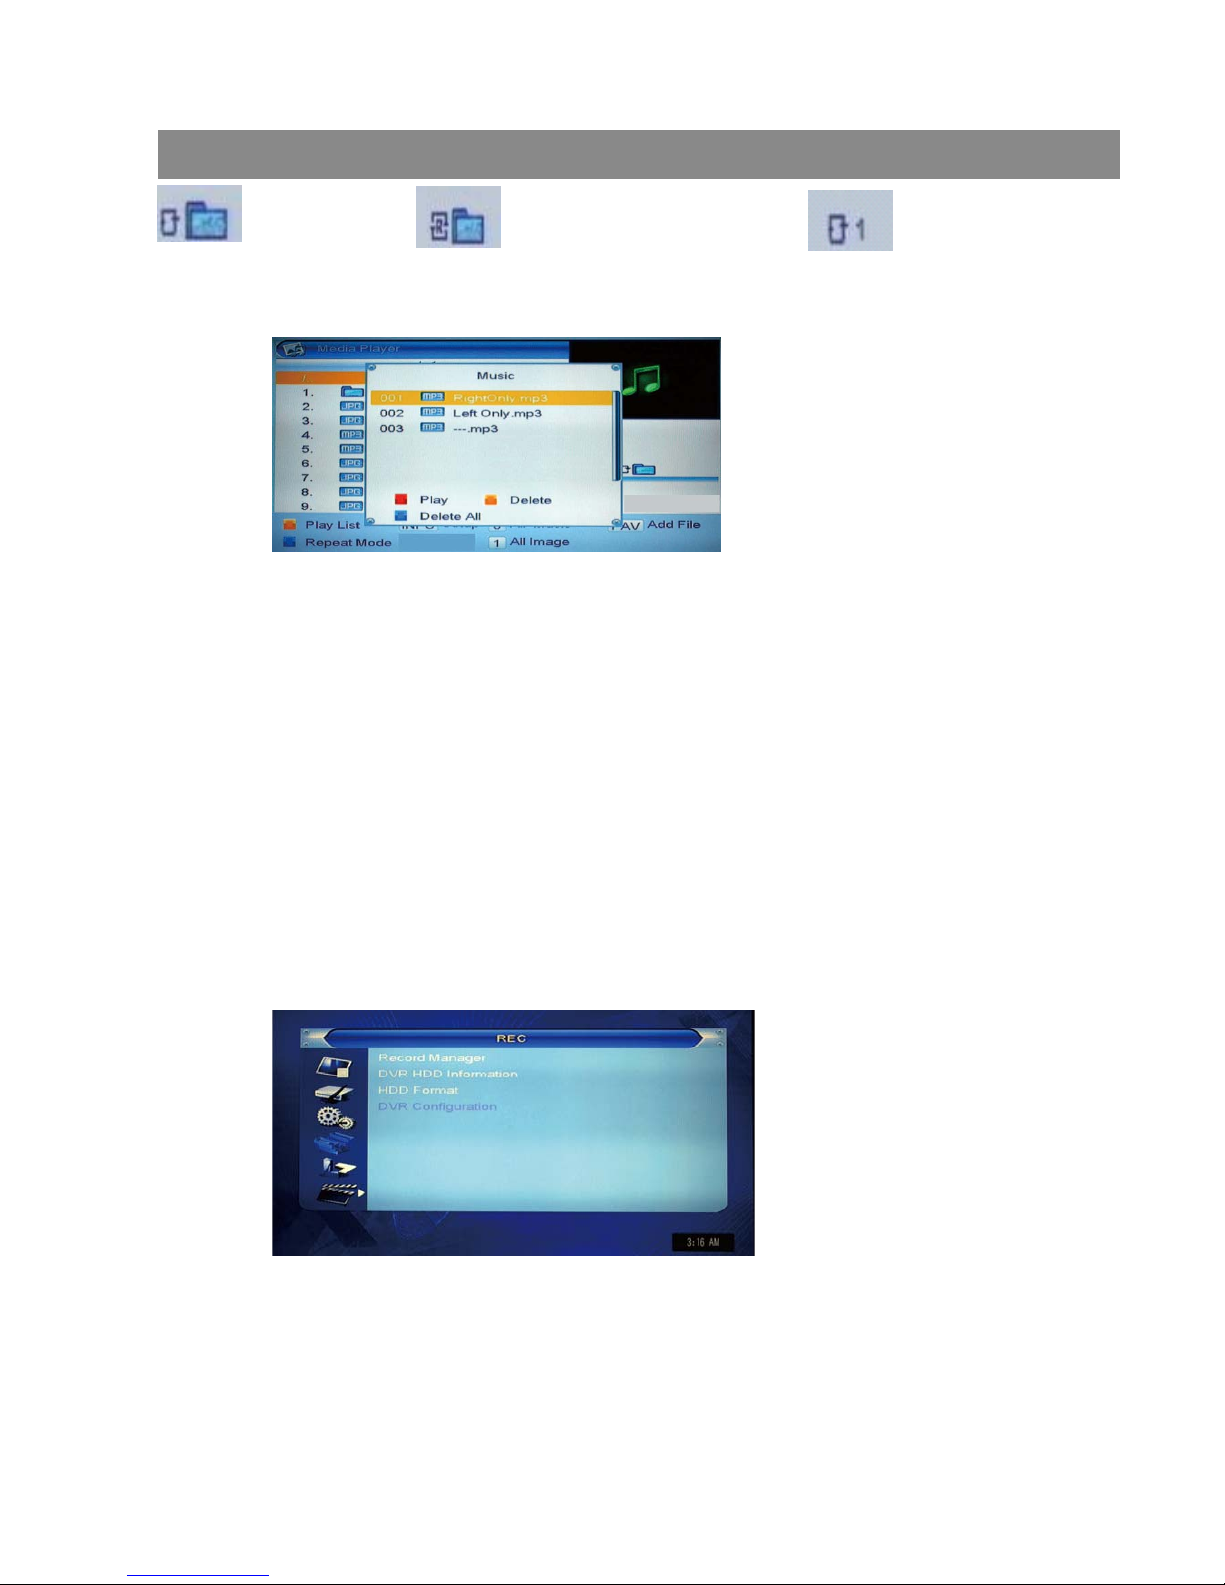
9. Game
There are three games for selection:Othello/Sodolcu.
Music/Image play operation
Red Key: Play the file list from the 1st music file.
Yellow Key: Delete the file highlighted by Yellow key.
Blue Key: Delete all files by blue Key, with a
remind “Are you sure to save?”
8.5 Remove USB device safely
Before removing the USB device, press “Remove USB device safely” first,
with a reminding “You can safely remove USB device now!”. Then the USB
device can be removed without concern.
Press Yellow key to enter into playlist and select music/group image
Repeat Folder
The entire Random Folder
Repeat Single
1 Press [Up/Down] key to select menu pages among record manager
Record manager, DVR HDD Information,Dvr configuration.
2 Press [OK] or [Right] key to enter the “REC”. If Menu Lock is “On”, it will
display a dialogue for user to key in password. The default Password is “0000”.
10. REC
When you enter to “REC” menu, you will see the screen like below:
Basic Operations
29
Page 31
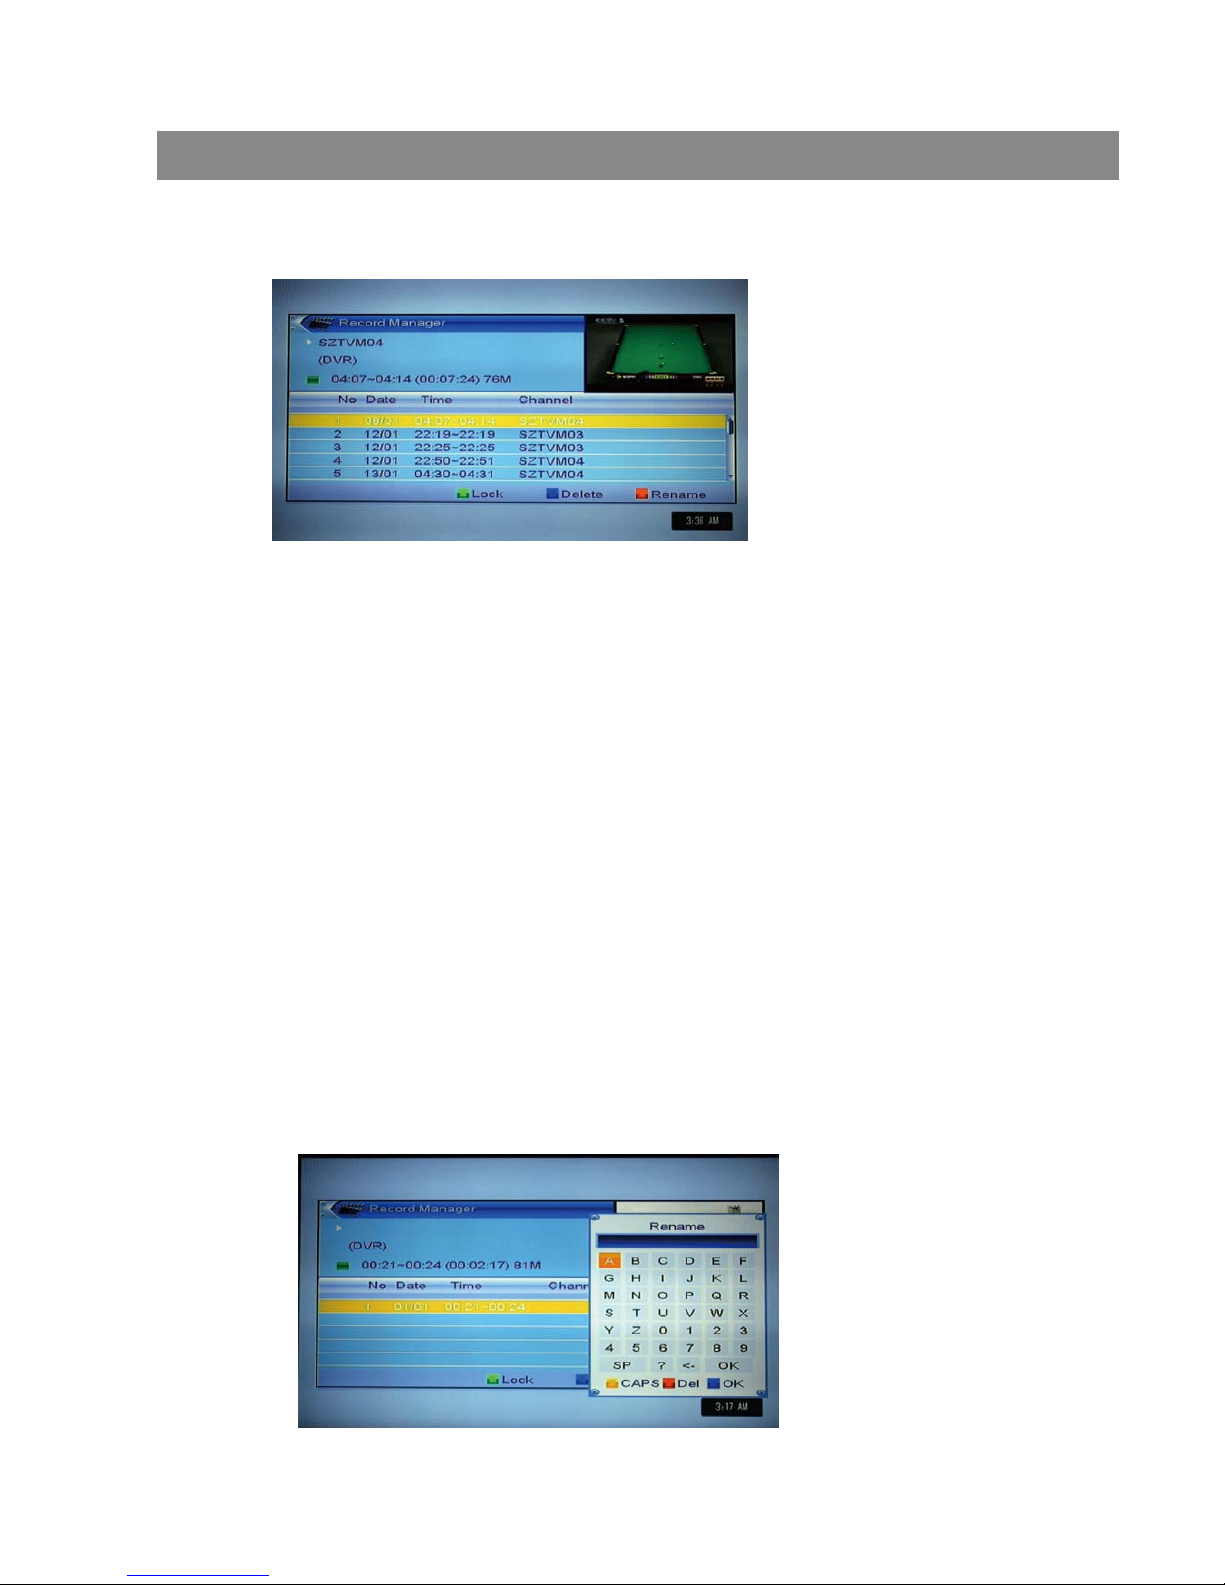
1 Press [Green] key to lock a program on HDD.
2 If you want to cancel the lock mark for a program, press [Green] key
again. It will ask you to input password. Once you input the correct
password, it will cancel the lock feature for the program.
10.1.1 Lock
10.1.2 Delete
1 Press [Blue] key to make a delete mark on the highlight program.
10.1 Record manager
3 Press [Up/Down] key and [OK] key to select menu items.
4 Press [Left] key or [Exit] key to go back to main menu.
10.1.3 Rename
1 Press [Red] key to rename the highlight program. It will show the “Rename”
window.
2 You can press [Yellow] key to switch capital and lowercase.
3 Press [Red]key to delete the char on the cursor.
1 Move the highlight to “DVR HDD Information” and press [OK] key. It will
display “DVR HDD information” as below:
10.2 DVR HDD Information
2 If you want to cancel the delete operation, press [Blue] key again to
cancel the delete mark.
3 When exit the “Record Manager” menu, all the delete mark channel will
be deleted directly.
Basic Operations
30
Page 32
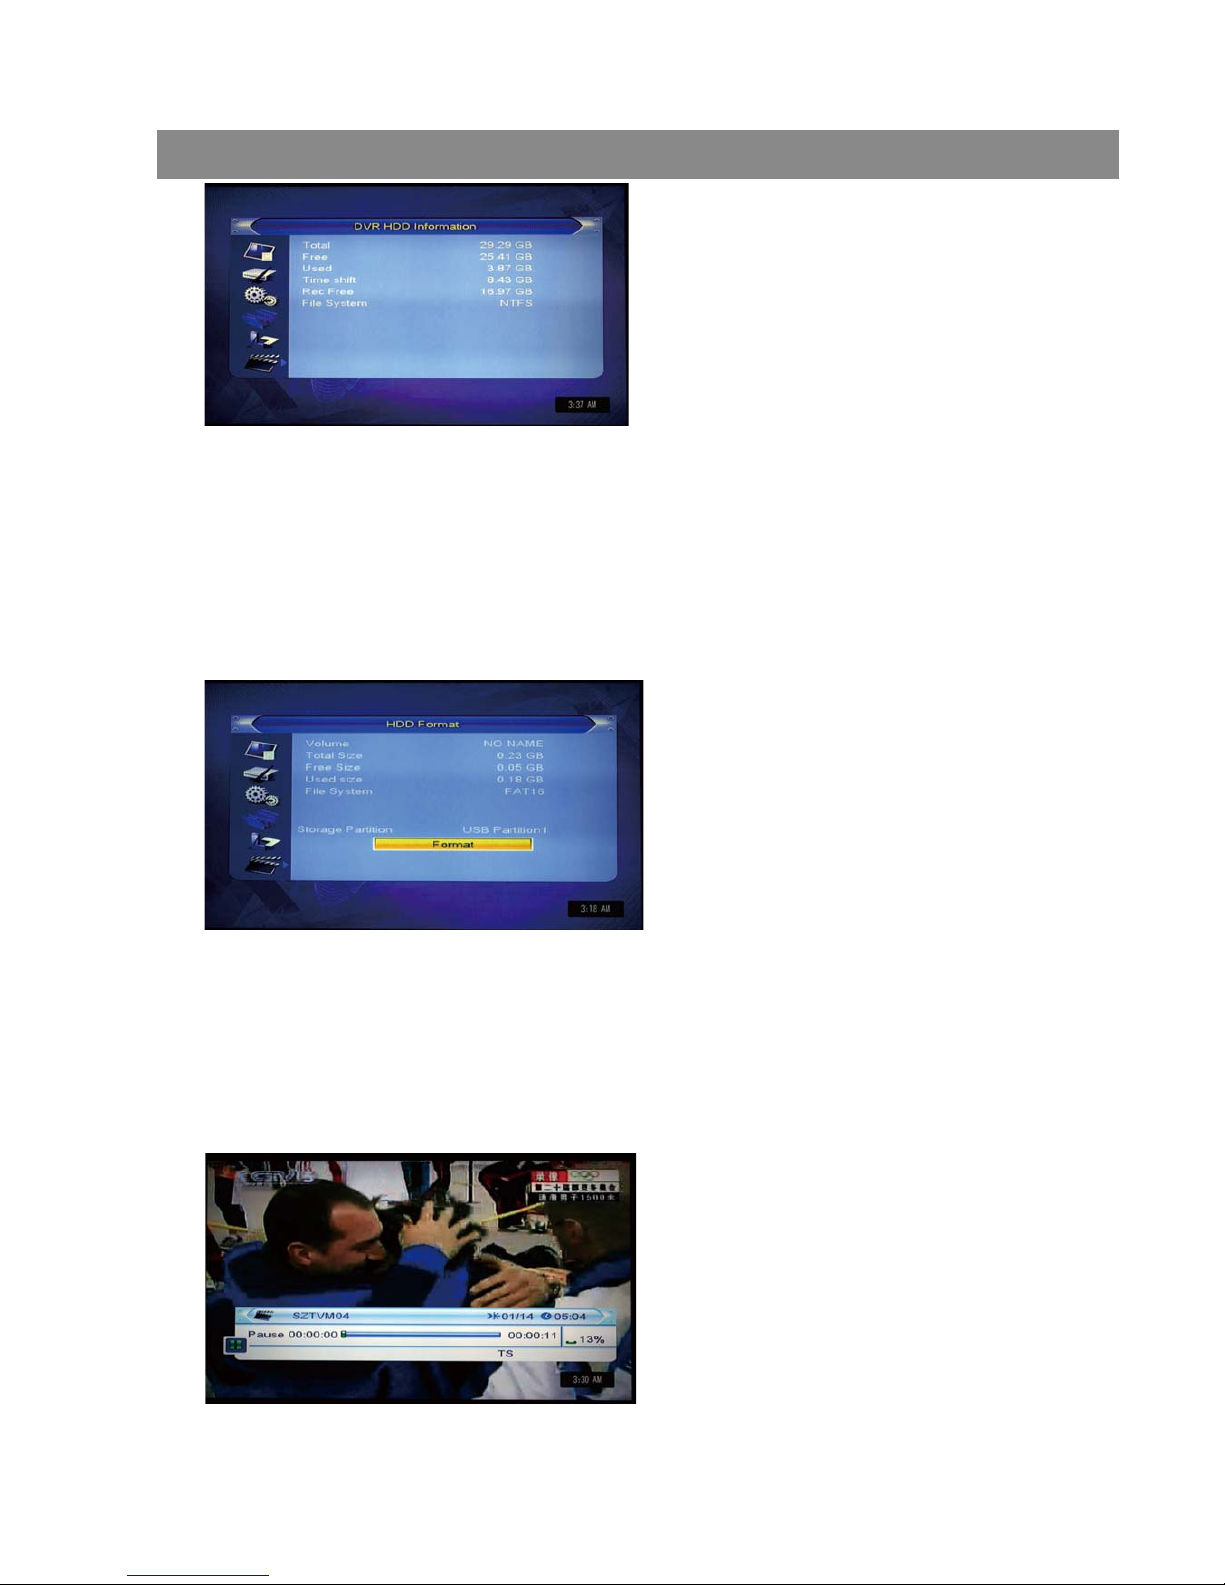
10.3 HDD Format
1 Move the highlight to “HDD Format” and press [OK] key. It will display
“Format” as below.
2 When you press [OK] key again, there are three choices listed as
“FAT,” “NTFS,” and “Cancel.” If you select “FAT” or “NTFS,” it will format
the HDD by the corresponding format. Otherwise, you can select
“Cancel” to cancel the format procedure.
10.4 DVR Configuration
10.4.1 Timeshift
Set up digital video recording
1. Turn ON/OFF timeshift
2. Set record type: TS/PS
3. Record selection
Basic Operations
31
Page 33
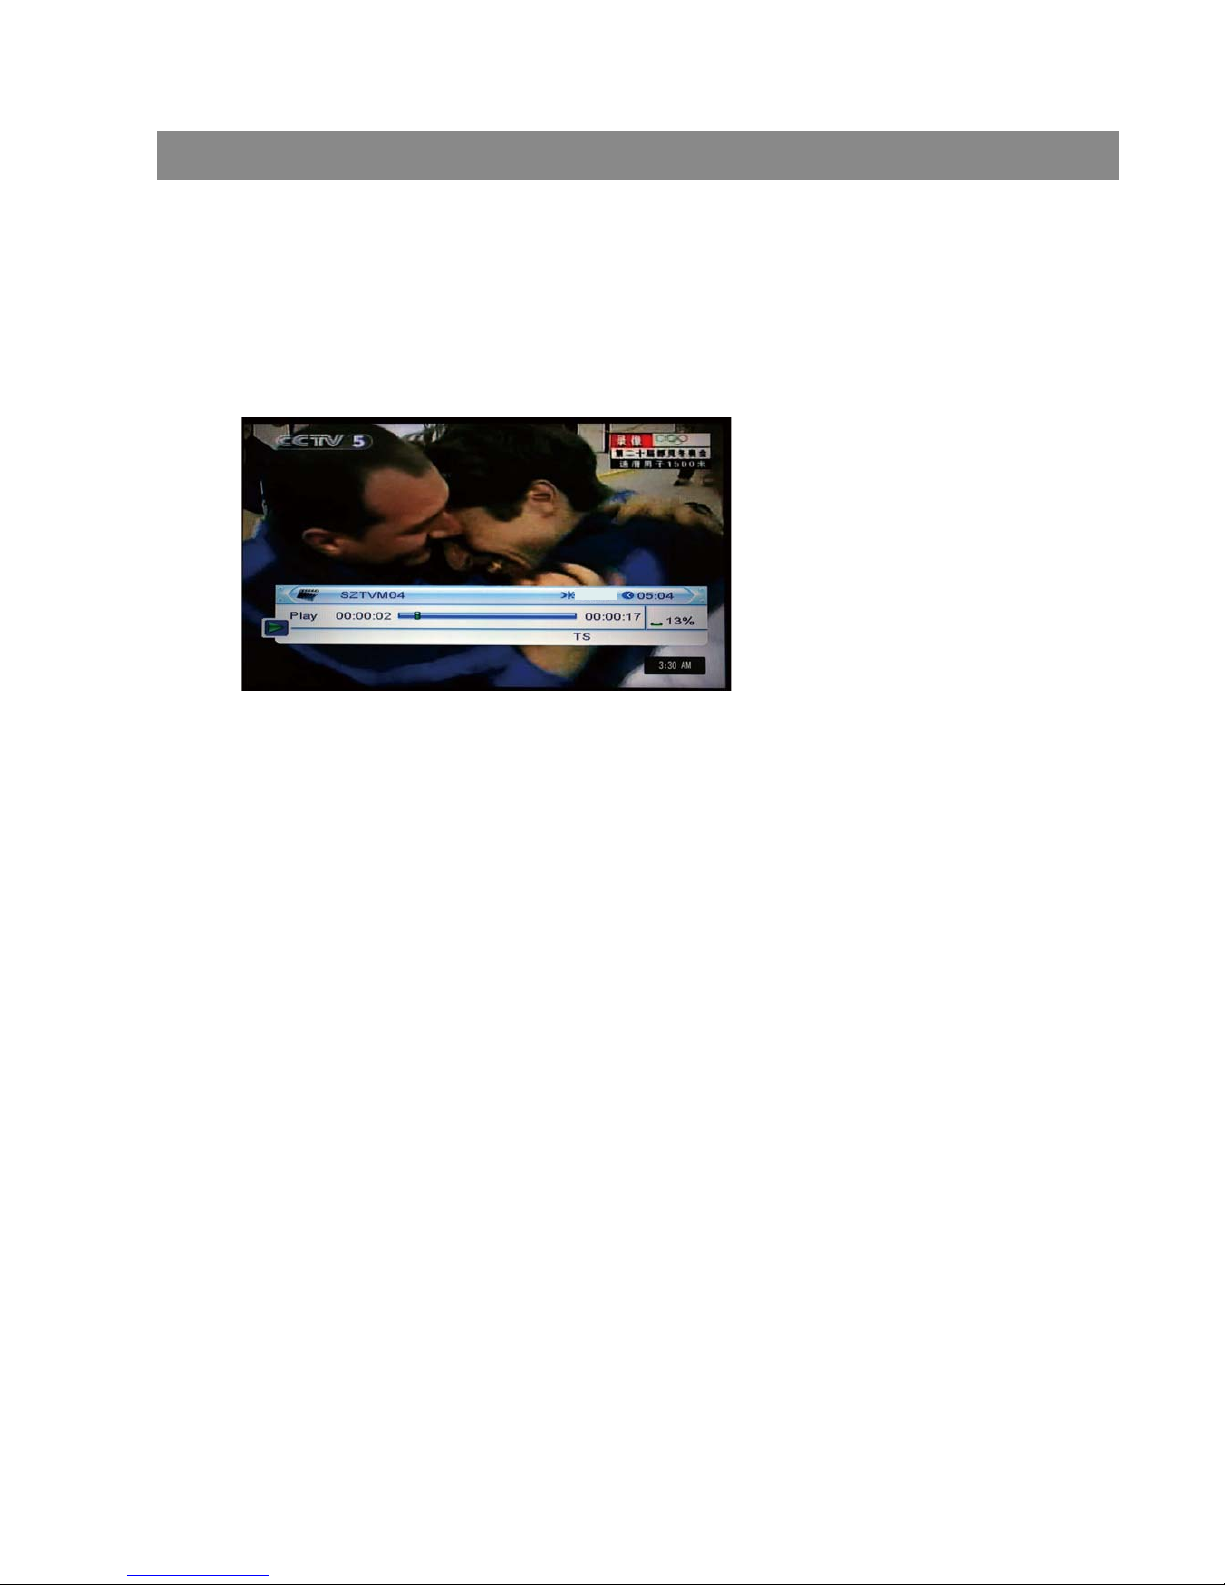
1 Press [PAUSE] key to see time shift OSD as below:
2 You can press [Left/Right] to move the slide to left or right. Press [OK]
key to play the point where the slide is.
3 You also can press [Pause] /[fast back]/[slow /back] can realize these
function. Then it will enter the mode which is playing the recorded
program on HDD. (like the picture below) Then you can do pause, fast
forward, fast back, slow forward, and slow back.
1. Press record key to start recording
2. Press record key again to set and adjust recoring duration time
10.4.2 Record
3. Press [Stop] key first time to end the playing mode.
Press [Stop] key second time to stop the recording
4. Press blue key to show the recorded files fastly,press OK to play the
selected file.
11. Hotkey
11.1 Power
1 Press [Power] Key can enter the Standby state
2 In Standby state, press [Power] Key again can call back the unit and go
on play the previous channel
3 User can also disconnect the device’s main power to end the Standby state.
11.2 Channel Up/Channel Down
In full screen, press [CH+/CH-] to change channel.
11.3 Volume Up/Volume Down
In full screen, press [VOL+/VOL-] to adjust volume.
11.4 Number 0~9
In full screen, use number key and press [OK] on the Remote Control
Unit to change channel.
11.5 TV/RADIO
In TV mode, pressing [TV/RADIO] key can switch to Radio mode. In Radio
mode, press [TV/RADIO] key to switch to TV mode.
Notes: Time Shifting/recording will only be available when USB/ HDD is
connected to system and read/write speed is high enough to do that.
14/01
Basic Operations
32
Page 34
3 Mode: Left/Right/Stereo/Mono
11.7 Mute
1 Press [MUTE] key to mute the sound and the screen will show up mute OSD.
2 Press [MUTE] key again to restore sound.
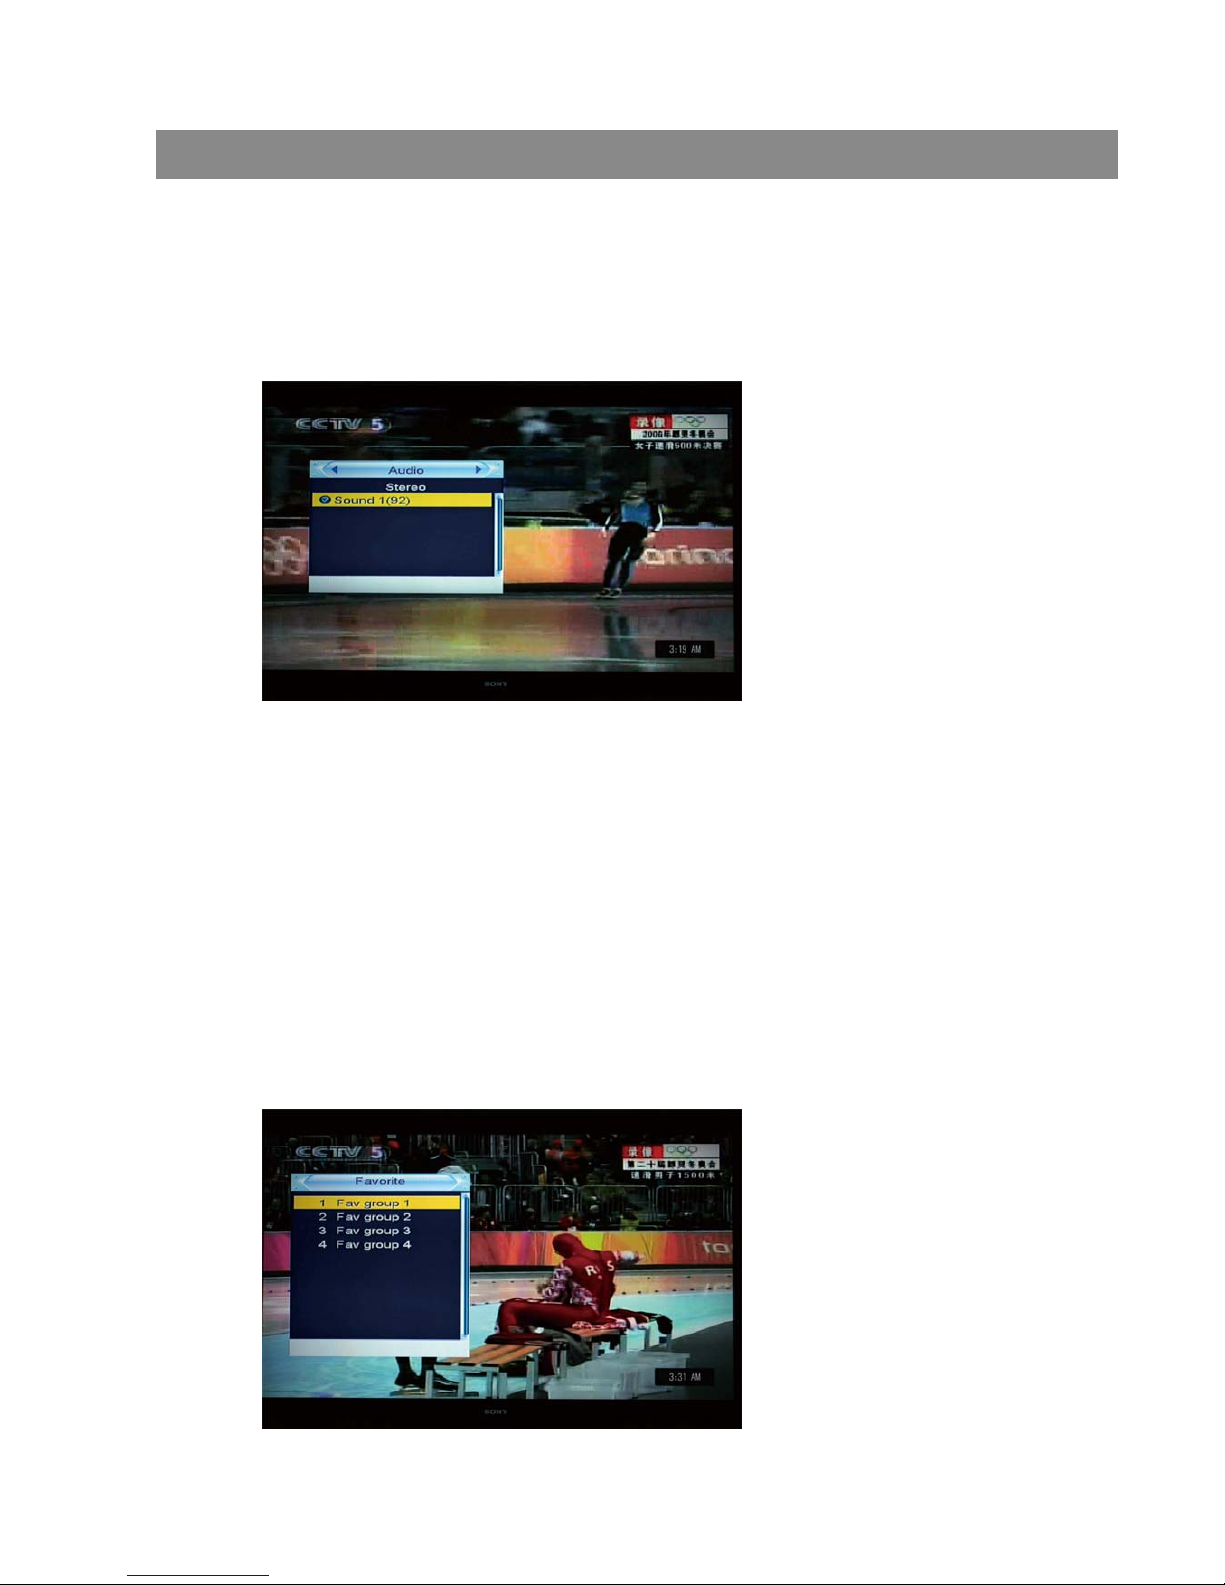
11.8 Favorite
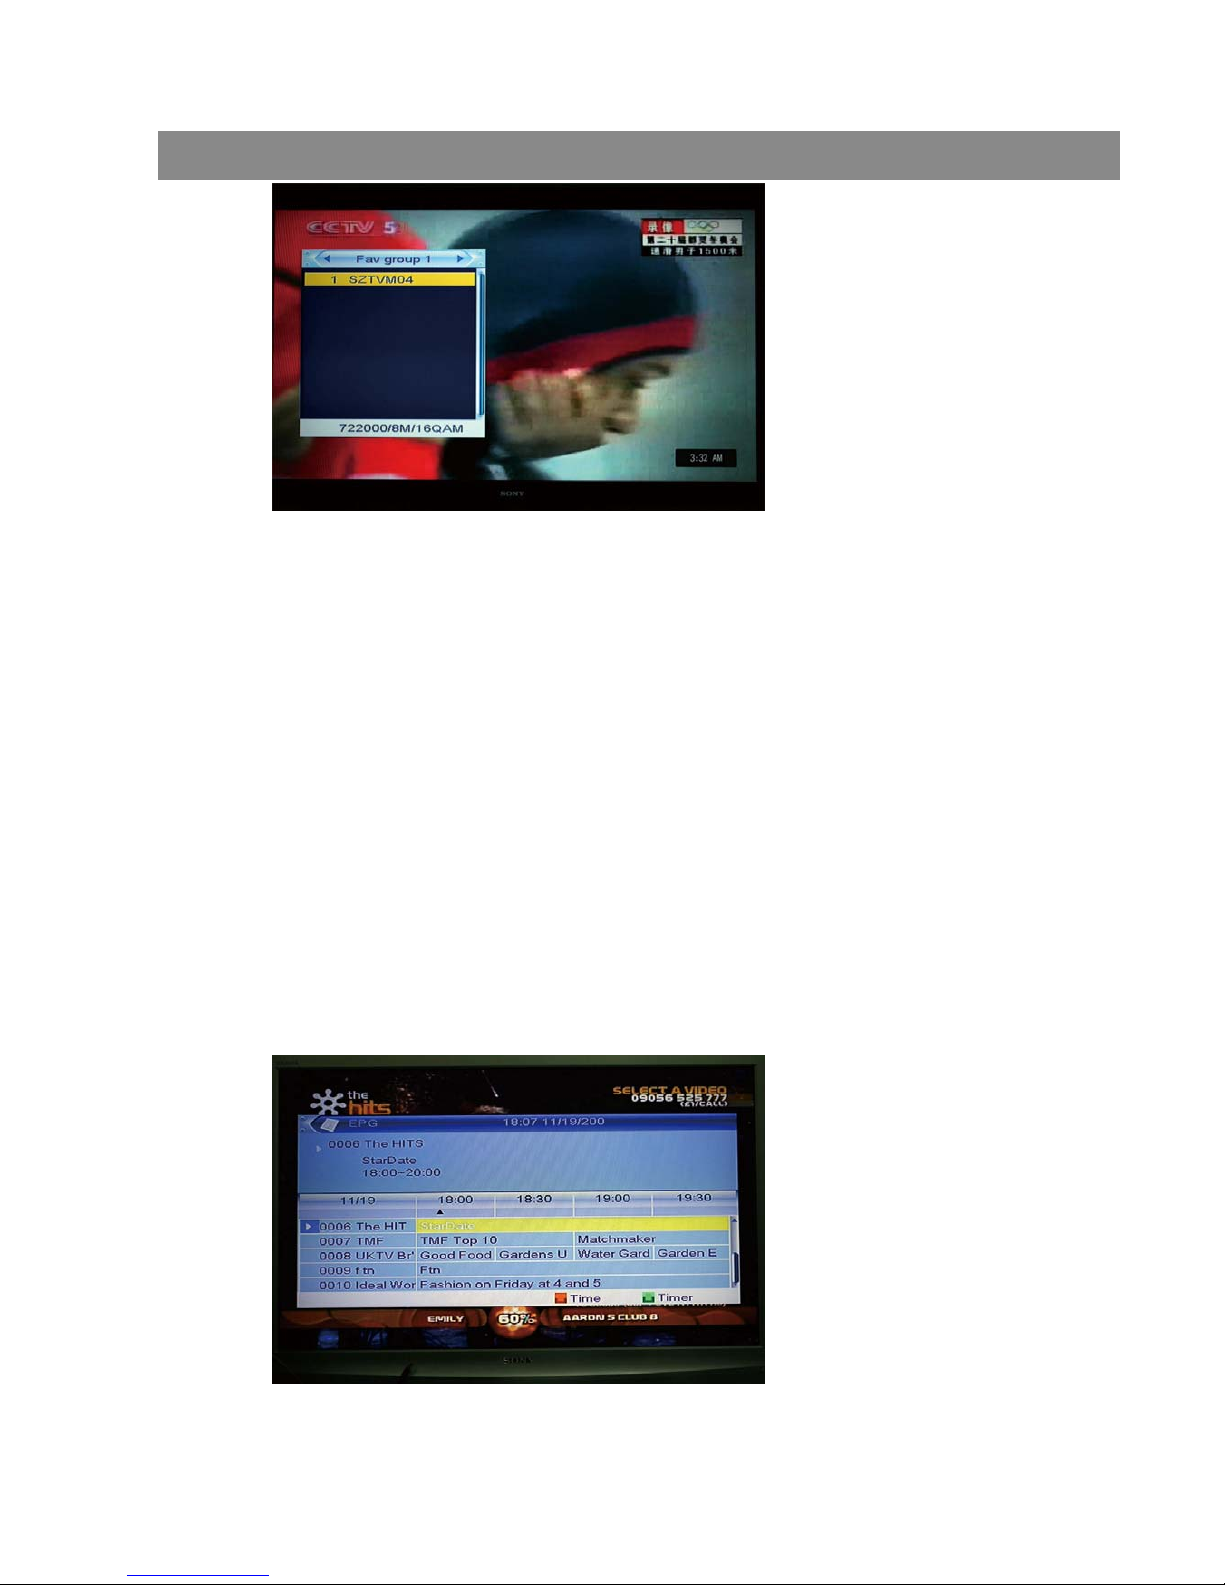
1 In full screen, press [FAV] key, it will display a window of “Favorite
Group” on the left of the screen, which you can watch like below.
11.6 Audio
1 In full screen, press [AUDIO] key can open the “Audio” window on the
screen.
2 You can modify the audio track by press [Channel Up / Channel Down]
key and modify the audio mode by press [Volume Up / Volume Down] key.
2 In the window of “Favorite”, you can move highlight by press [Channel
Up/Channel Down] key and press [OK] key to select favorite group.
3 In the window of “FAV group X”, you can move highlight by press
[Channel Up/Channel Down] key and press [OK] key to select favorite
channels. Pressing [Page Up/Page Down] keys can implement the “Page
up/Page down” function
Basic Operations
33
Page 35
11.9 Recall
Press [RECALL] key will directly switch to the previous channel that you
played before current channel.
Q: Why the screen displays “No Favorite Channel”, after pressing
[Favorite] key?
A: It is because that you haven’t set any channels as “favorite channel”.
Please refer to Favorite
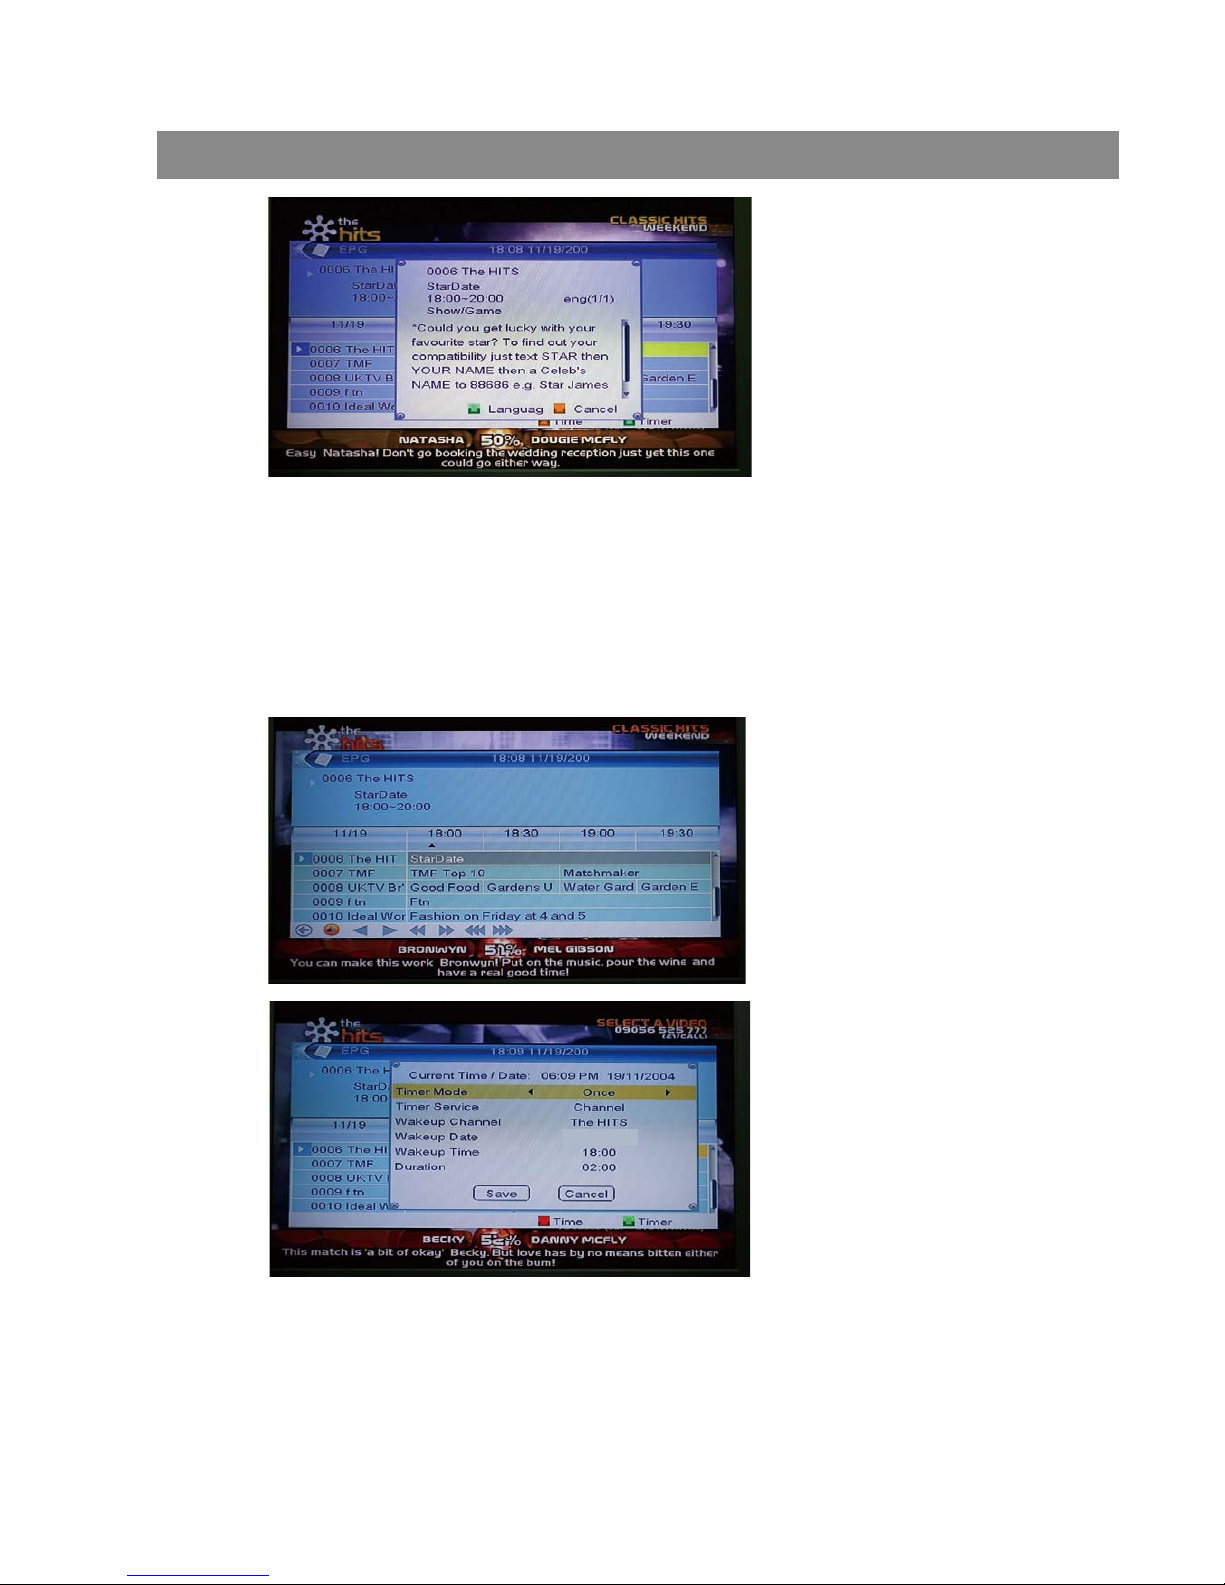
11.10 EPG
1 The STB has an Electronic Program Guide (EPG) to help you navigate
channels through all the possible viewing options. The EPG supplies
information such as channel listings and starting and ending times for all
available channels. Press [EPG] key to display EPG screen.
4 You also can press [Volume Up/Volume Down] keys to select different
“Favorite Group”.
5 Press [Exit] key to exit the current window.
Frequently Asked Question
2 Press [OK] key in each item can see more detail information and press
[Red] key to cancel
Basic Operations
34
Page 36
11.11 Subtitle
Press [SUBTITLE] key in full screen, you can select subtitle and teletext
subtitle language or switch subtitle off.
11.12 TEXT
4 Press [Green] key in EPG menu can open timer menu. User can save
a timer as he want.
5 In EPG menu, press [Exit] to close EPG screen.
3 Press [Red] key in EPG menu can display “Time Bar” Menu. In “Time
Bar” menu, you can press [Left/Right] to select “back/current time/last
program or –0:30/next program or +0:30/-2:00/+2:00/last day /next day”.
Press [Up/Down] key to channel change.
19/11/2004
Basic Operations
35
Page 37
4 Press [Page Up/Down] key to page up and page down.
5 Press [Exit] key to exit the channel list.
11.14 Exit
Press [EXIT] key can exit the current menu to last menu or close the window.
11.16 Channel List
1 In full screen, press [OK] key or [CH.LIST] can enter “Channel List”.
2 Press [Left/Right] key to change favorite.
3 Press [Up/Down] key to move highlight and press [OK] key to play the
highlighted channel.
19/11
1 Press [TEXT] key in full screen, you can open teletext page on the
channel which has teletext information.
2 If the channel has no teletext information, it will show “No Data” on the
screen.
11.13 Menu
1 Press [SETUP] key can open the menu, exit the current menu to last
menu or close the window.
11.15 Information
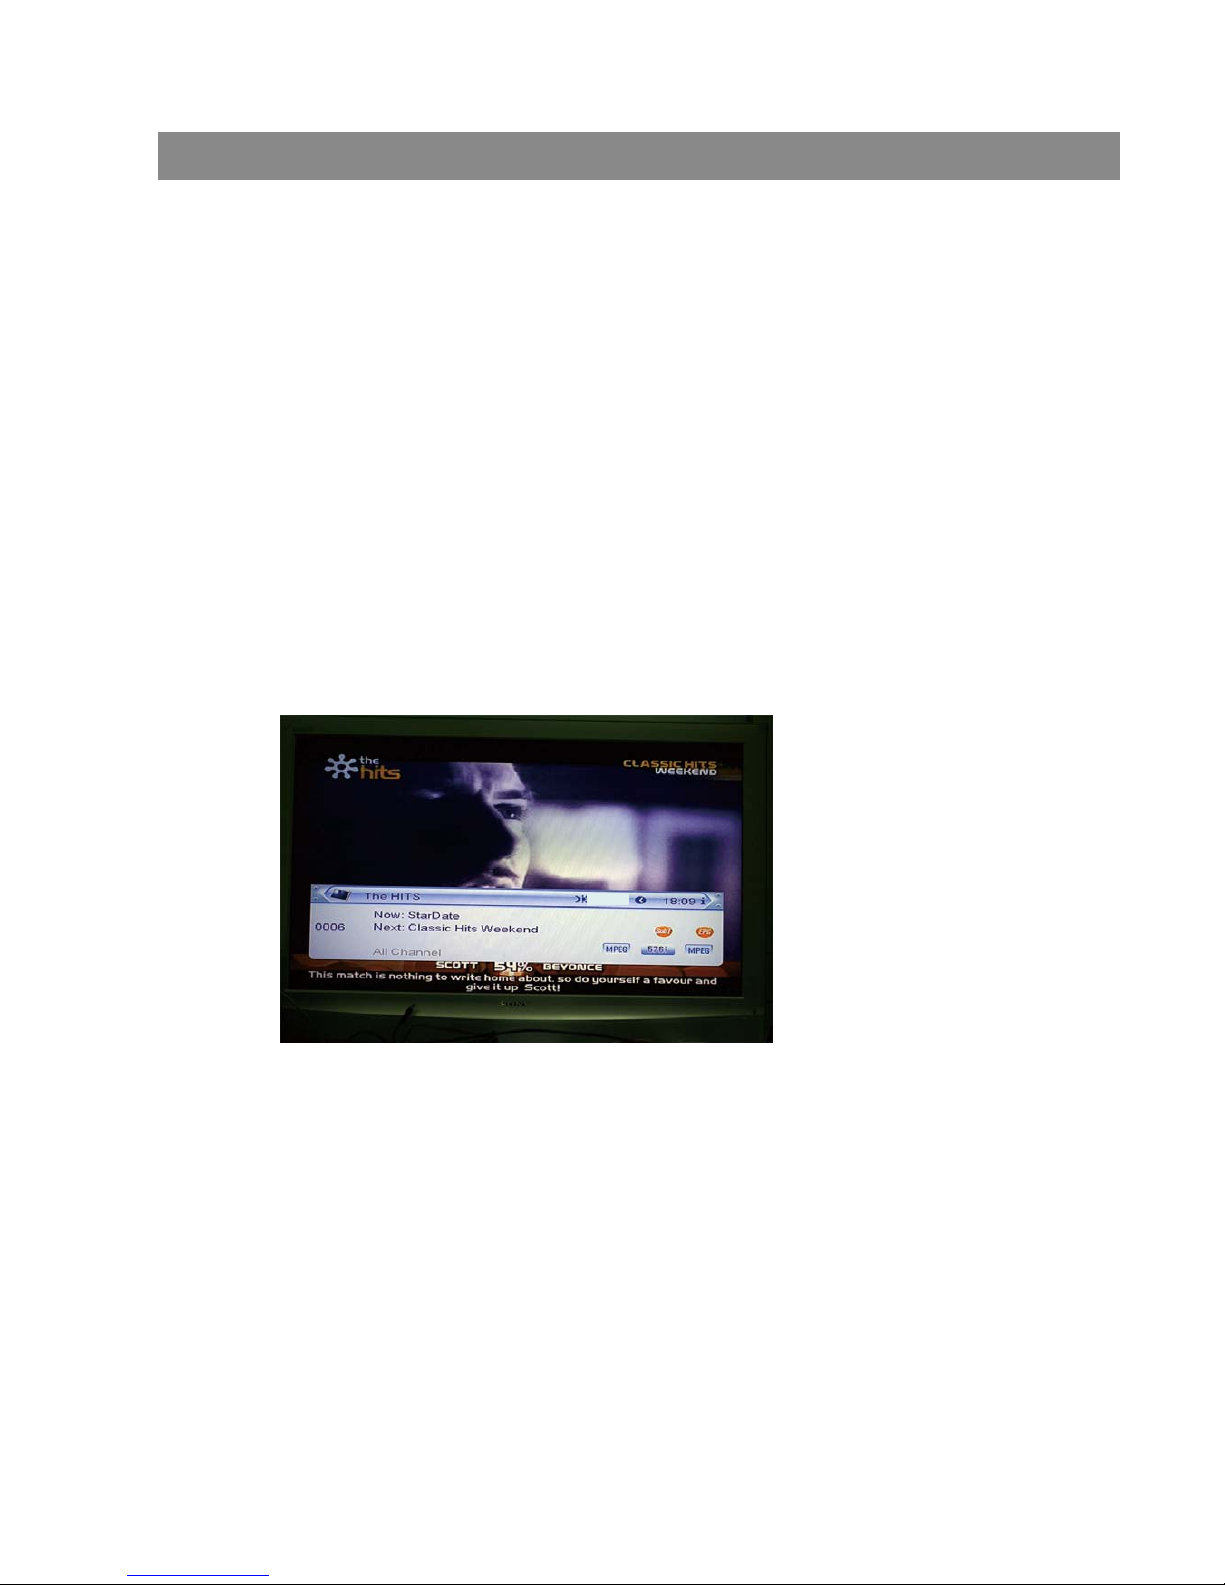
1 In full screen, press [INFO] key can open information screen, it will shows
program banner.
2 In the program banner, press [INFO] key again, the window shows the
parameters of current channel.
Basic Operations
36
Page 38

11.17 Page Up/Page Down
1 In Channel list, press [Page+/Page-] key can page up and page down
the channel list.
11.18 Record
1 Press [Record] key can record current program to USB disc. The
default record duration is 2 hrs.
2 Press [Record] key again can input record duration.
11.19 PLAY/Pause
Press [PLAY] key can change to normal playback mode while other
trick mode is enabled such as PAUSE, Forward or Reverse.
1 In playing mode, press [Pause] key, the picture will be paused, but the
sound of the channel will still continues.
2 Press [PAUSE] key again, the screen’s picture will skip over to the
current playing picture, and the sound of the channel will correspond playing.
3 In playing mode, press [Pause] key, the picture will be paused, but the
sound of the channel will still continues.
4 Press [PAUSE] key again, the screen’s picture will skip over to the
current playing picture, and the sound of the channel will correspond playing.
11.20 STOP
1 In the time-shift mode, press [STOP] key can stop time-shift play and
comeback to life position.
2 When recording, press [STOP] key will list the recording programs.
Press [STOP] again will stop recorder.
3 When playing recorded file from record manager, press [stop] key will
stop playing file and comeback to record manager menu.
11.21 FB
Press [FB] button rewinds backward with X2, X4, X8, X16 and X24 speed.
Press [FF] button plays forward with X2, X4, X8, X16 and X24 speed.
11.22 FF
Basic Operations
37
Page 39
0000
Basic Operations
38
Page 40

DVB-T
Tuner:
Frequency range: VHF 174MHz to 230MHz
UHF 470MHz to 862MHz
Band width: 7/8MHz
Antenna input: 75 ohms
Modulation:
modulation scheme: COFDM – 2k/8k
modulation OFDM: QPSK/QAM16,QAM64
Decoding: MPEG-2MP@ML
Aspect ratio: 4:3 - 16:9
Functions: Epg/Lcn/Teletext/Fav/Timer/parental lock/multi audio /subtitle
Conformity: EN 300744
SD/MMC INPUT
from SD/MMC input it is possible to record programs from DVB-T
and play files JPEG/MP3/WMA or
recorded.
Display: LCD TFT 7”
Basic Operations
39
Page 41

DVD Specifications
USB INPUT
from USB input it is possible to play files: MPEG2/MPEG4/JPEG/
VCD/MP3/WMA
DVD/MPEG4/VCD/JPEG/MP3/CD disc player
Supported MPEG4 formats: 3.11 / 4 / 5 versions
MP3: 32k – 320k UDF/ISO9660 file system
Controls: Play/Pause/Stop/Skip/fast forward-backward
Repeat/Zoom/Subtitle/Parental lock
Multi Audio/Screen Saver
Frequency response: 20Hz to 20KHz
S/N ratio:>90db
Basic Operations
40
Page 42

AC/DC adaptor: AC 100 - 240V-50/60Hz 0,45A DC 9,0V – 1,0A
Max Consumption: <12W
Lithium battery : 7,4V / 1500mA
Fast charge (OFF): 2.5 / 4 hours
Slow charge (ON): 6 / 8 hours
AV input/output: CVBS video 2 channels
Earphones output: 5mW (3.5mm jack)
Dimensions: 198(L) x 160 (D) x 40(H) mm
Basic Operations
41
 Loading...