

Page 1
ENGLISH
DIGITAL TV RECEIVER
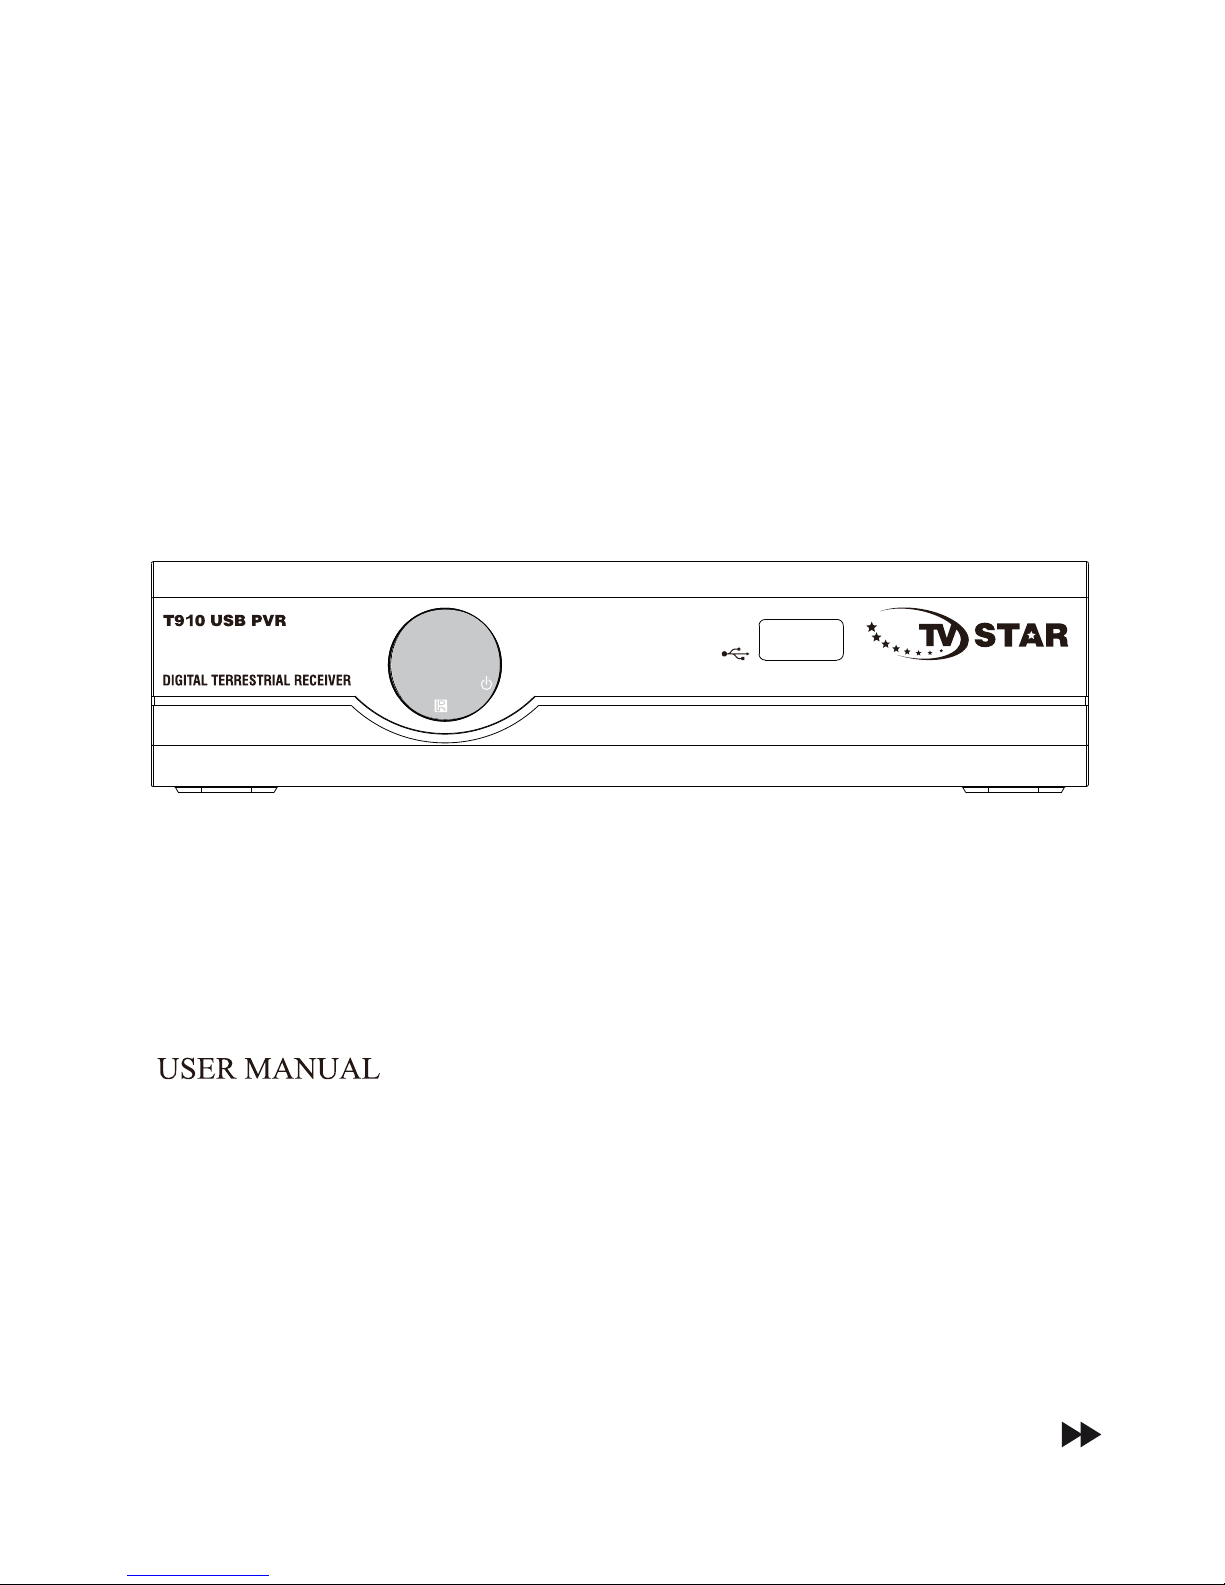
TV STAR T910 USB PVR
Page 2

CONTENIDO
1.SAFETY INFORMATION.......................................................................
2.INTRODUCTION...................................................................................
3.SYSTEM CONNECTION.......................................................................
BASIC OPERATIONS
4.WELCOME PAGE ................................................................................
5.EDIT CHANNEL....................................................................................
6.INSTALLATION.....................................................................................
7.SYSTEM SETUP ..................................................................................
8.TOOLS .................................................................................................
9.GAME....................................................................................................
10.REC.....................................................................................................
11.HOTKEY..............................................................................................
1
2-4
5
6
6-9
9-11
11-15
15-17
17
18-21
21-25
Page 3
Safety Information
Page 4
Safety Information
Page 5
Introduction
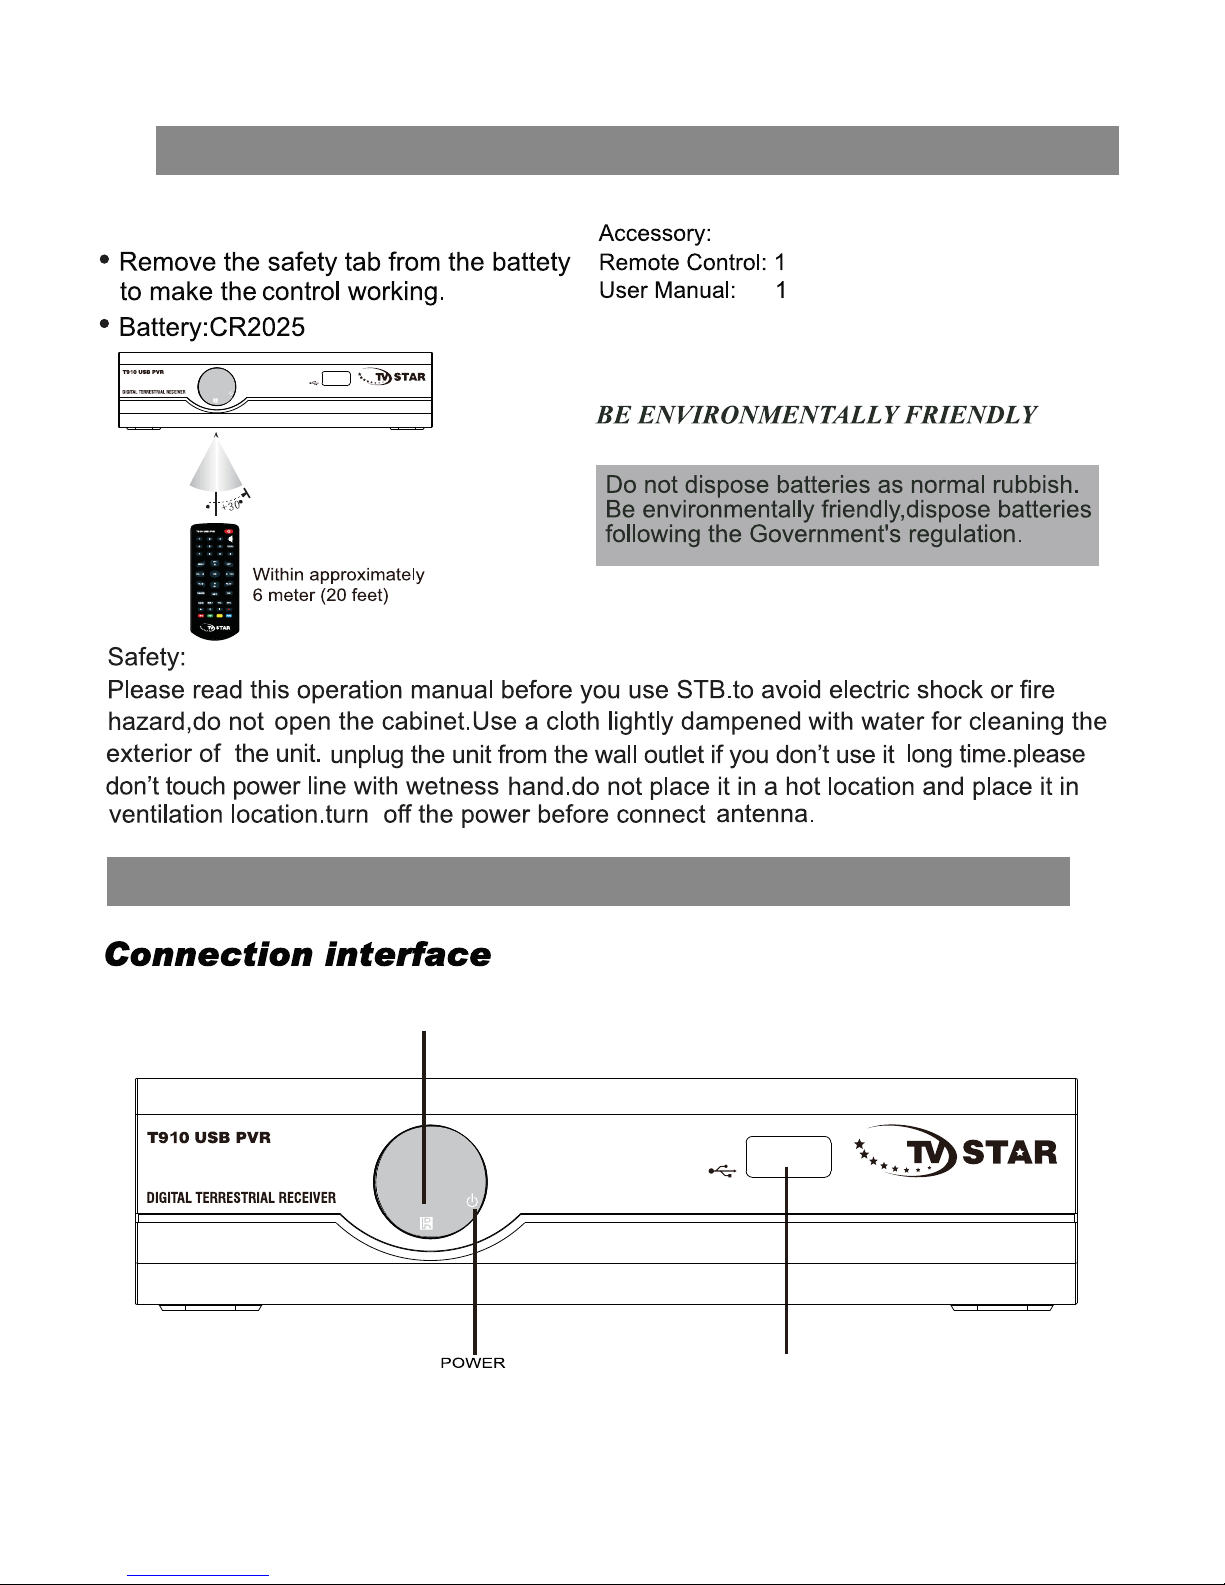
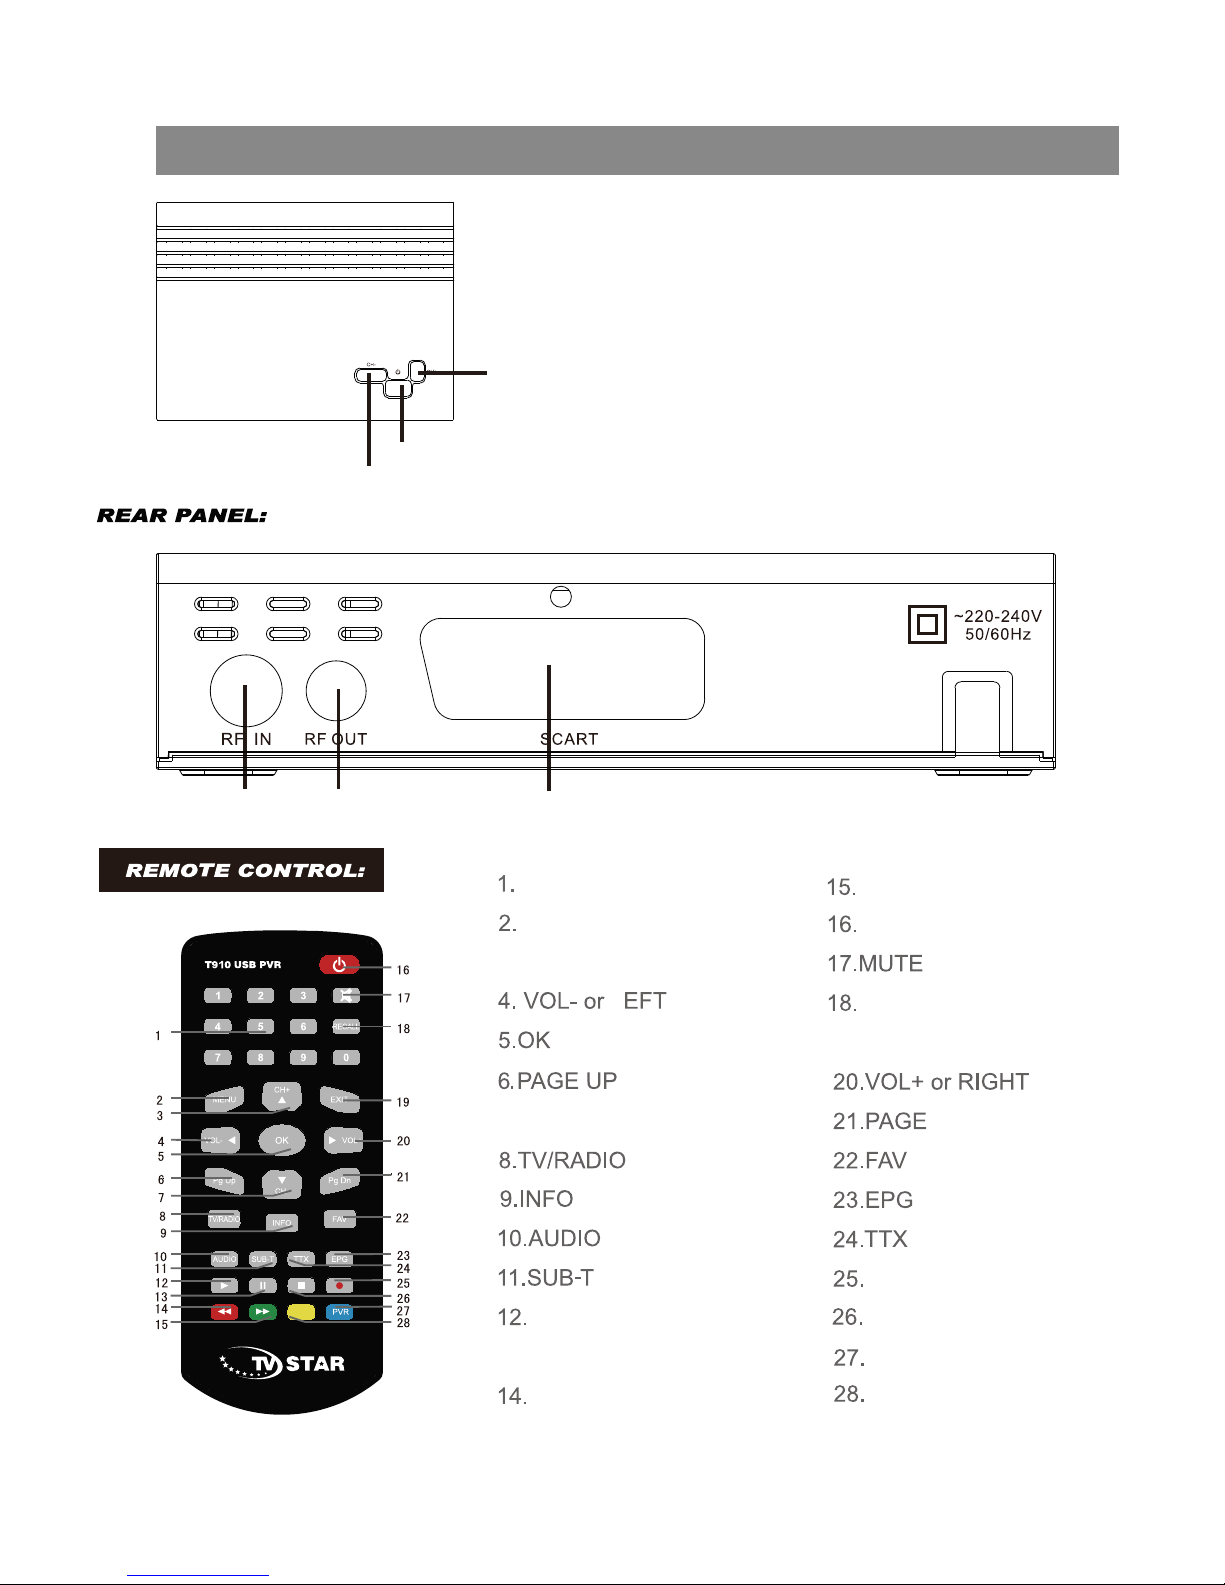
Remote control
IR RECEIVER
USB PORT
Introduction
Page 6
Introduction
CHANNEL+
POWER
CHANNEL-
TV SCART
RF LOOP through
RF IN
POWER
RECORD
STOP
BLUE BUTTON/PVR
YELLOW BUTTON
DN
19.EXIT
RECALL
GREEN BUTTON/FF
RED BUTTON/FB
PLAY
13.PAUSE
NUMERIC ENTRY
3.CH+
7.CH-
MENU
L
Page 7
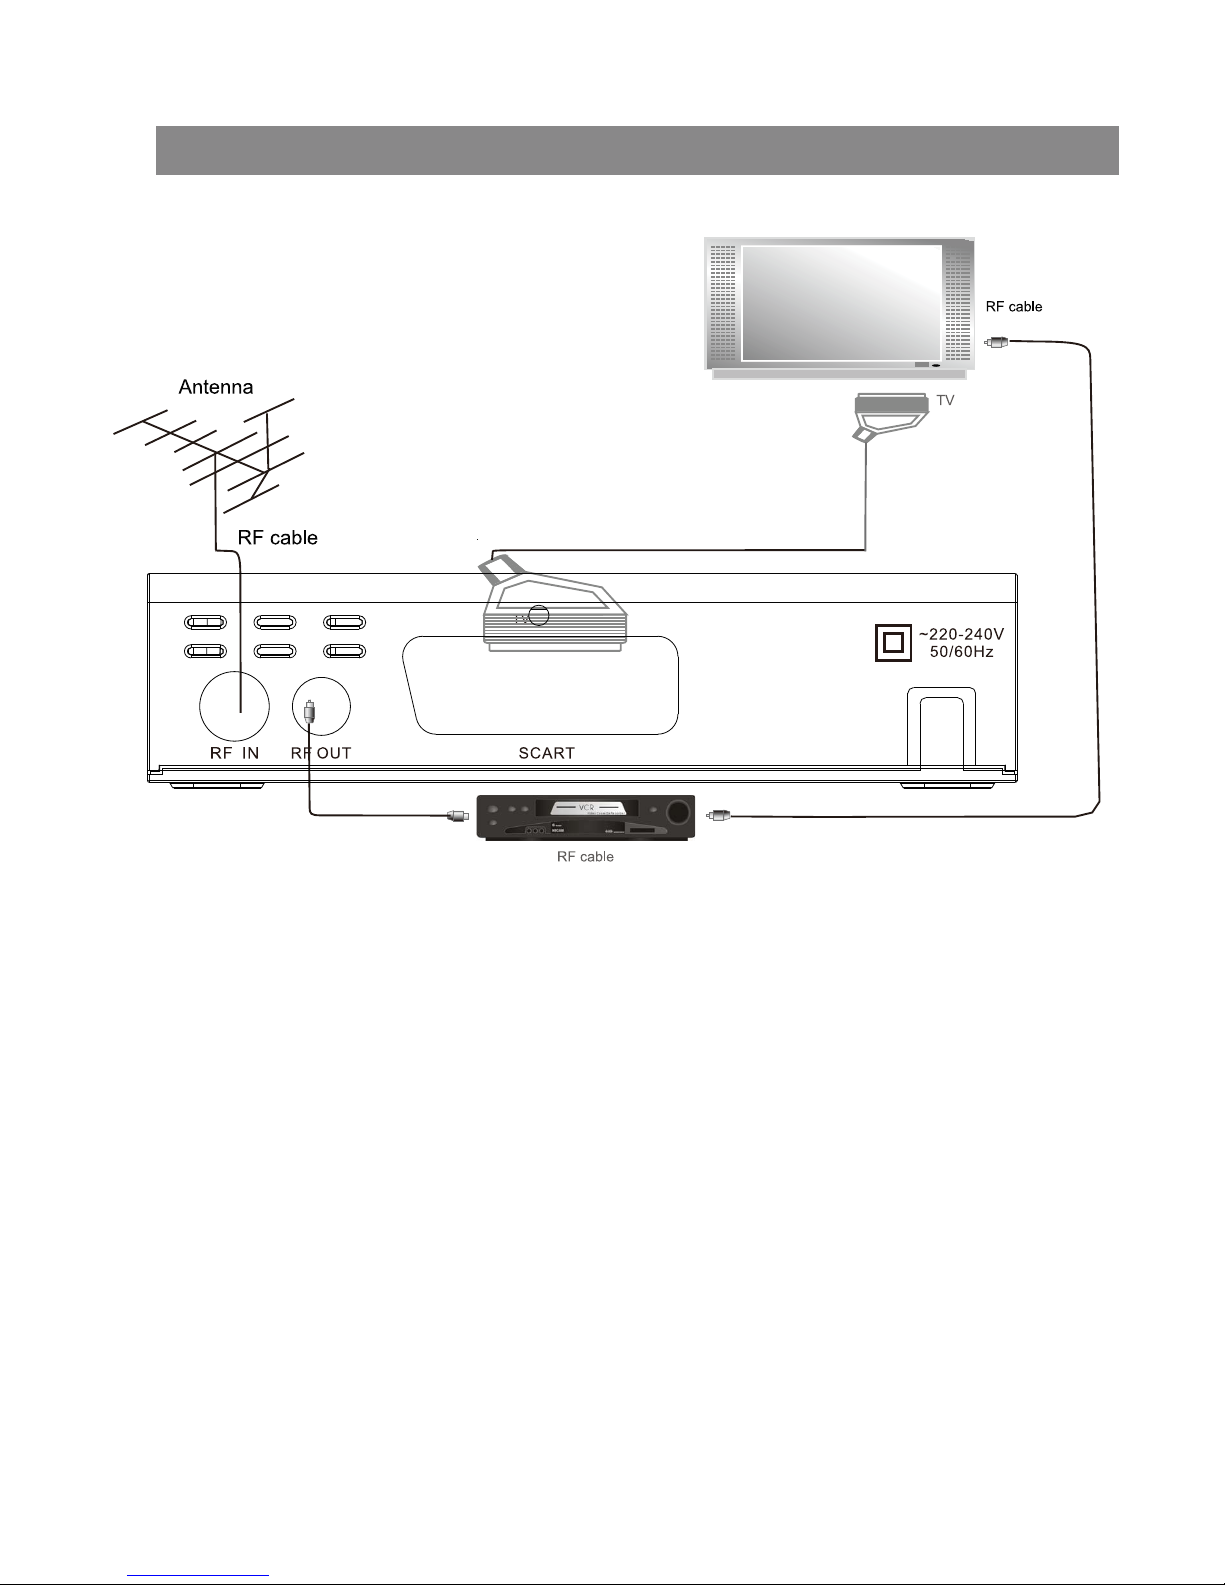
System Connection
Page 8
4. Welcome Page
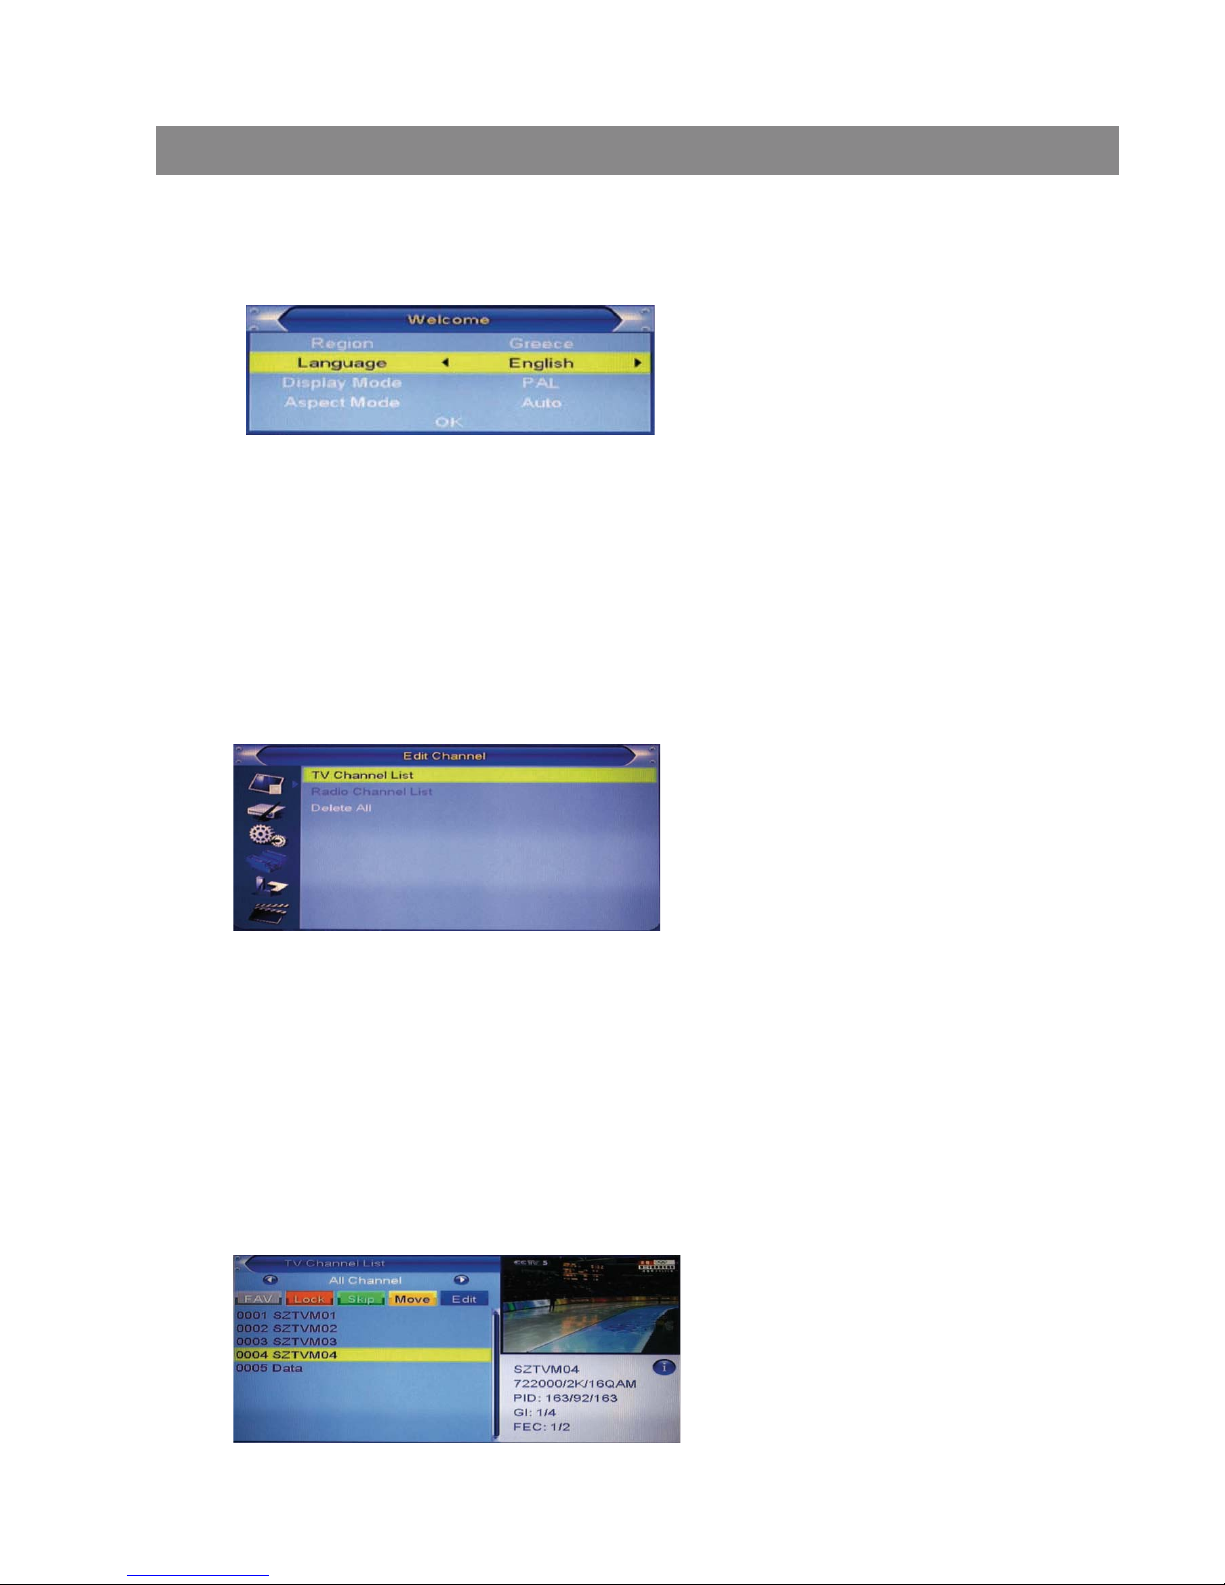
When turn on the power for the first time, the welcome page will be shown as
below:
4 Press [Exit] key to exit welcome page and enter into main menu.
1 Press [Up/Down] key to move highlight.
2 Press [Left/Right] key to select region, language, Display mode, Aspect
mode.
3 Move highlight to [OK] button and press [OK] key to begin the auto scan.
1 Press [Up/Down] key to select menu pages among Edit Channel,
Installation, System Setup, Tools, Game, and REC.
2 Press [OK] or [Right] key to enter the “Edit Channel”. If Menu Lock is “On”,
a dialogue inquires the password, “0000” is for default.
3 Press [Up/ down] key to select menu items among TV Channel List,
Radio Channel List and Delete All.
4 Press [Left] key or [Exit] key to go back to main menu.
5.1 TV Channel List
When entering the “TV Channel List” menu, the window shows as below.
5. Edit Channel
When pressing the [MENU] key to enter the main menu, which shows
as below:
Basic Operations
Page 9

1 Move the highlight by pressing [Channel Up/Channel Down] key then press
[OK] key to preview the current highlighted program in the preview window.
2 By pressing [Page Up/Page Down] key to execute the Page Up/Page
down function.
3 By pressing the [Volume Up/Volume Down] key to switch to different
Program Group.
4 By pressing the [MENU] or [Exit] keys to go back to the “Edit Channel”
menu.
5 By pressing the color key to execute the corresponding functions in
“Channel List.
5.1.1 Favorite
1 Press the [FAV] key, and then [OK] key to open the “Favorite” window .
2 Move the highlight among the 8 favorite groups by pressing [Channel
Up/Channel Down] key, and press [OK] key to make a favorite mark in
the left side of the selected Favorite group.
3 Press [OK] key on the marked Favorite group to cancel the existing
favorite mark.
4 After marking, press [Exit] key to go back to “TV Channel List”, there
will be a favorite mark beside the marked channel
5.1.2 Lock
1 Press [Red] key to enter the lock mode.
2 Press [Up/Down] key to move the highlight, and press [OK] key to
display a dialogue to ask you to input password, “0000” is for default.
If the correct password is entered, then a “lock mark” can be seen on
the right side of the highlighted channel.
3 After saving and exiting the menu, the password dialog will be required
while you want to watch the locked channel.
5.1.4 Move
1 Press [Yellow] key, then press [Up/Down] key to move the highlight
and press [OK] key to make a mark. There will be a “moving mark” in the
right side of the selected channel .
5.1.3 Skip
1 Press [Green] key to enter skip mode.
2 Press [Up/Down] key to move the highlight and press [OK] to make a
“skip mark” in the right side of the highlighted channel.
3 After saving and exiting menu, the channel will be skipped while user
change channel in the full screen
Basic Operations
Page 10
5.1.5 Edit
1 Press [Blue] key to open “Edit” menu.
2 Press [Exit] to exit “Edit Channel” menu. If you have done some modification
in “Edit Channel” menu, the system will show up a message box to
inquire you whether saving or not when exiting.
5.1.5.1. Sort
1 Press [Red] key can open the “Sort” window. There are four kinds of
sorting approaches. By Press [Channel Up/Channel Down] key to move
highlight and press [OK] key to confirm your selection.
2 The four kinds of sorting approaches are:
Name (A-Z): Sorting in Alphabetical descending Order.
Name (Z-A): Sorting in Alphabetical ascending Order.
Lock: Collecting all locked channels and list in the bottom of TV Channel List.
Default: Return to original setting order.
2 By pressing [Up/ down] key to move the selected channel to the
position that you want to place. Press [OK] key to confirm your decision.
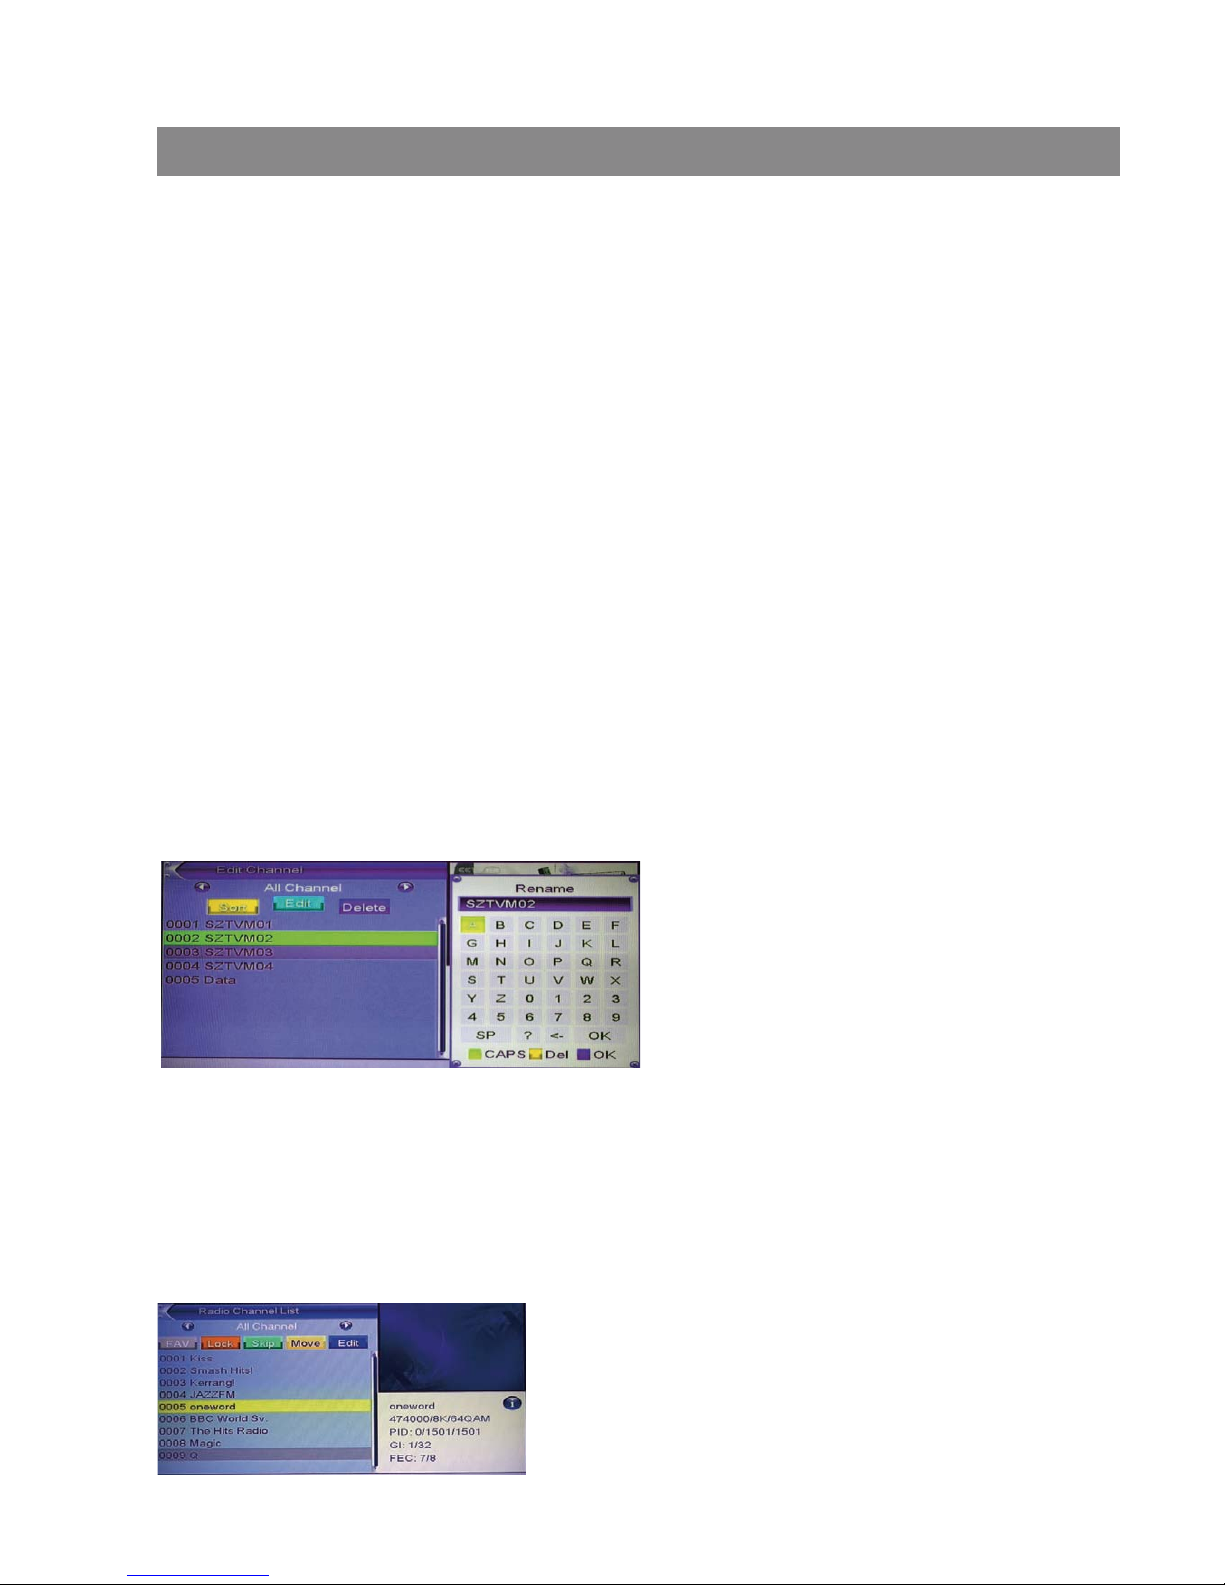
5.1.5.2. Edit
In “Edit Channel” menu, press [Green], then press [Up/Down] key to move
the highlight and press [OK] key to open the “Rename” window. Which shows
as below:
5.2 Radio Channel List
Basically, the operations in “Radio Channel List” are almost the same as
those of the “TV Channel List”.
5.1.5.3. Delete
Press [Blue] key, then press [Up/Down] key to move the highlight and press
[OK] key to make a delete mark in the right side of the highlighted channel.
After save and exit “Edit Channel” menu, the marked channel will be deleted.
1 Press [Yellow] key to switch whether capital or not.
2 Press [Red] key to delete the char
on the cursor.
3 Press [Blue] key to save the
modification.
Basic Operations
Page 11
5.3 Delete All
Press [OK] key, it will pop up a warning message to inquire you whether
delete all services or not .
1 If the selection is “Yes”, all channels will be deleted.
2 If the selection is “No” or press [Exit] key, this function will be ignored
directly without saving.
Frequently asked Questions
Q: IF I recklessly delete all channels, what should I do?
A: There are two ways to restore:
To re-search all channels in “Installation” functions.
Use “load Factory setting” function to restore all channels in “Tools” function.
6. Installation
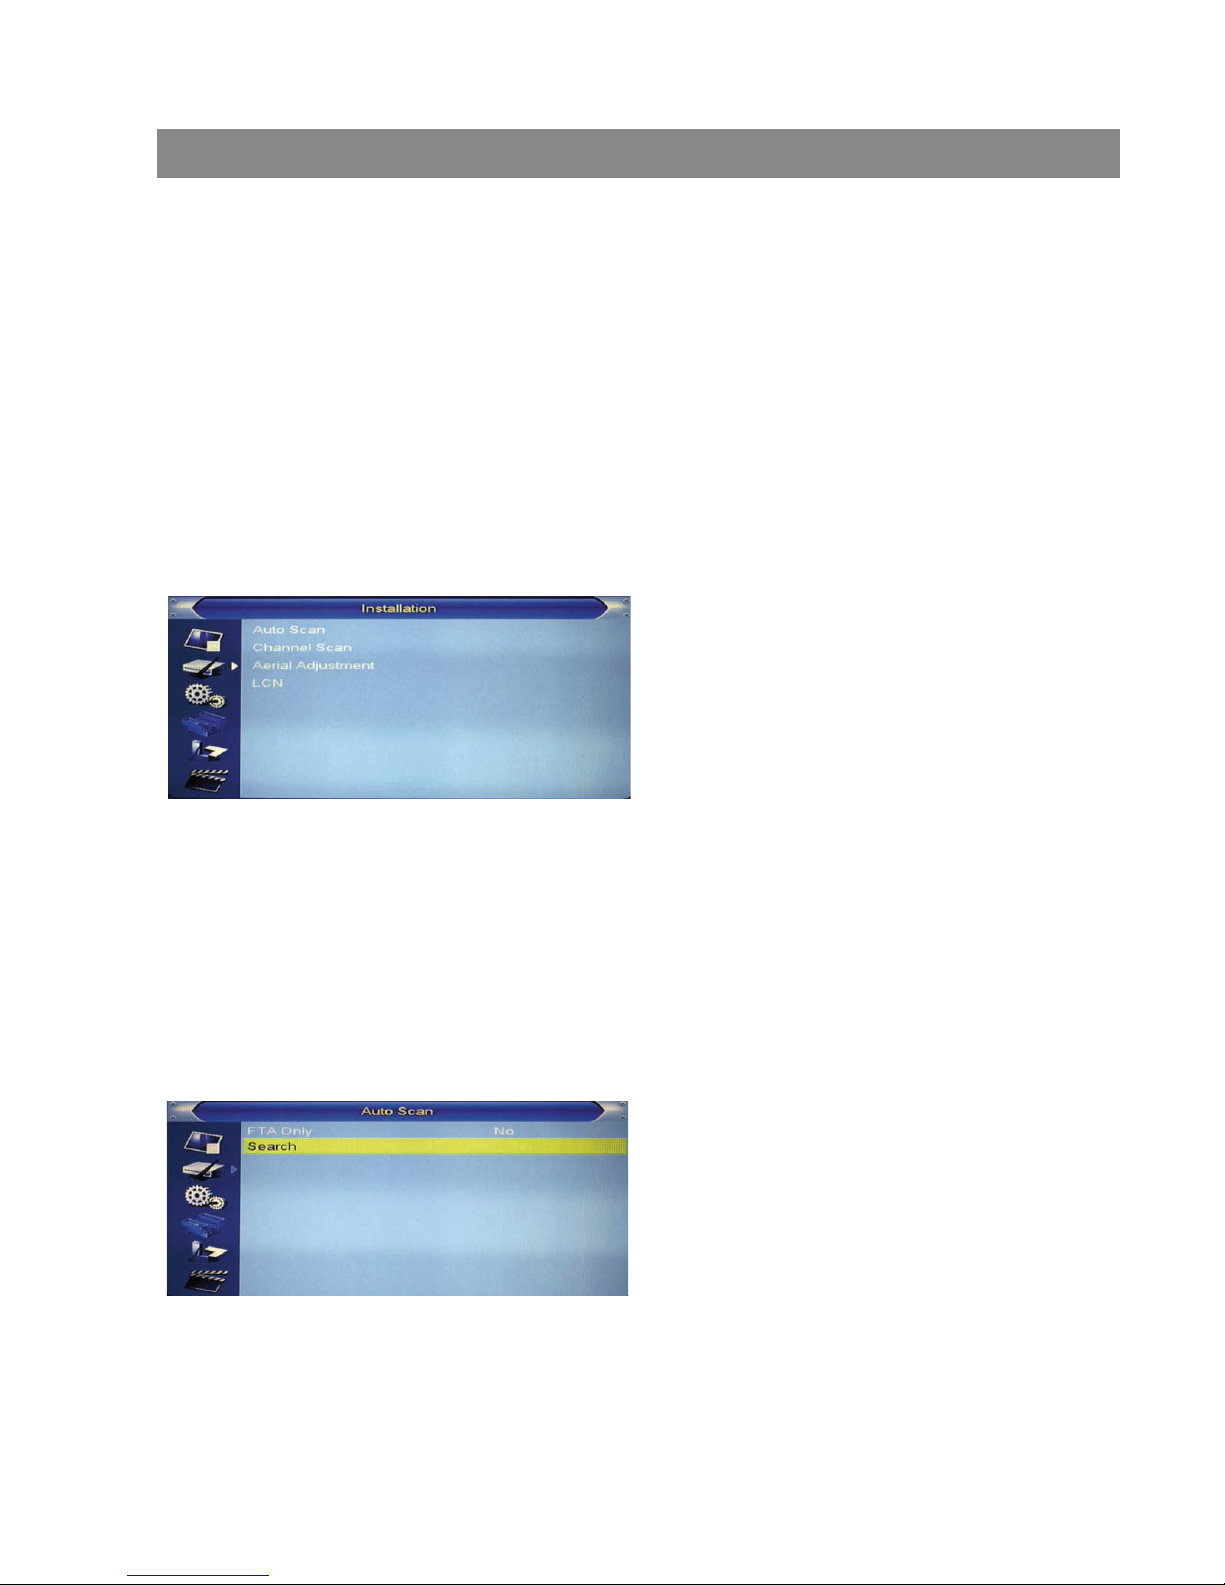
When you enter the “Installation” menu, the menu will be displayed as below:
1 Press [Up/Down] key to select menu pages among Auto scan, Channel
scan, Aerial adjustment, LCN.
2 Press [OK] or [Right] key to enter the “Installation”. If Menu Lock is “On”,
then a dialogue to inquiry the password will be shown. The default
Password is “0000”.
3 Press [Up/ down] key to select menu items.
4 Press [Left] key or [Exit] key to go back to main menu.
6.1 Auto Scan
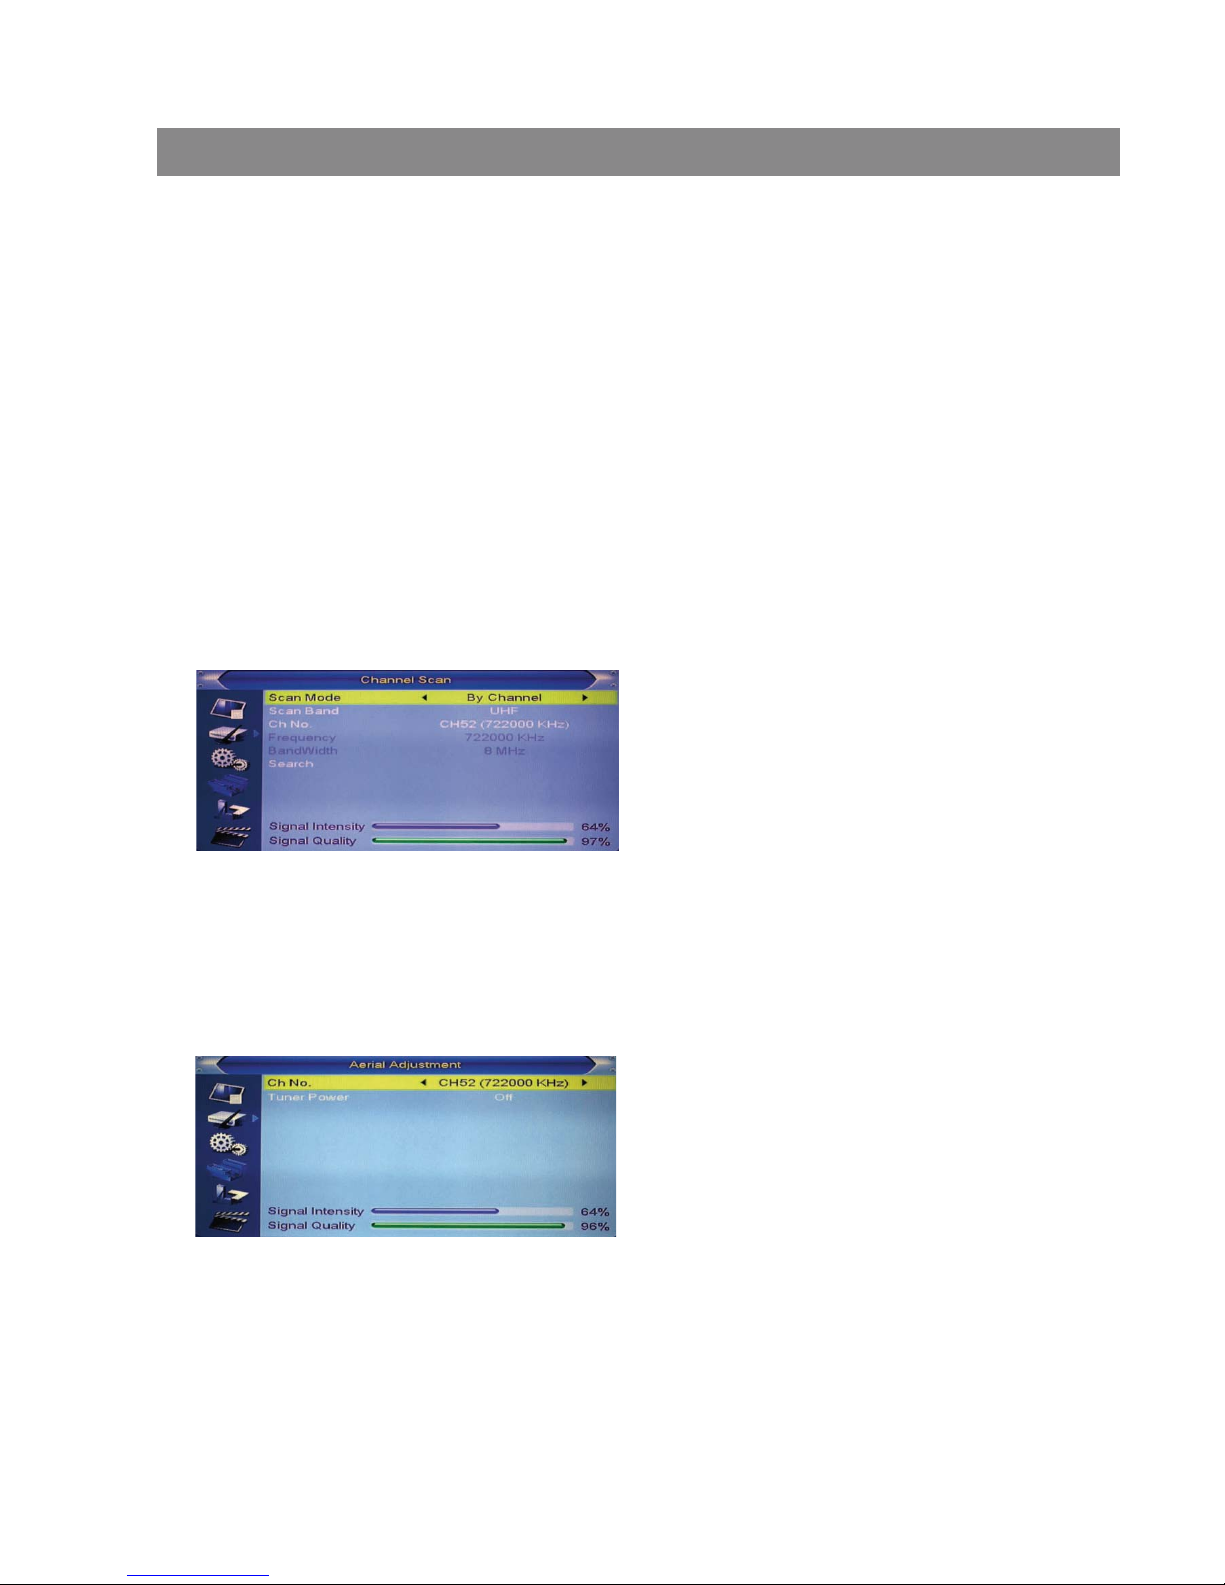
When you enter to “Auto Scan” menu, there will display the screen like below:
1 In “FTA only” item, press [Left/Right] key to turn yes/no.
2 Moving the highlight to “Search” item and press [OK] key to start scanning.
3 In the “Auto Scan” menu, press [Exit] key to draw back from the scanning.
Basic Operations
Page 12
7 Press [Exit] key to exit the scanning.
6.2 Channel Scan
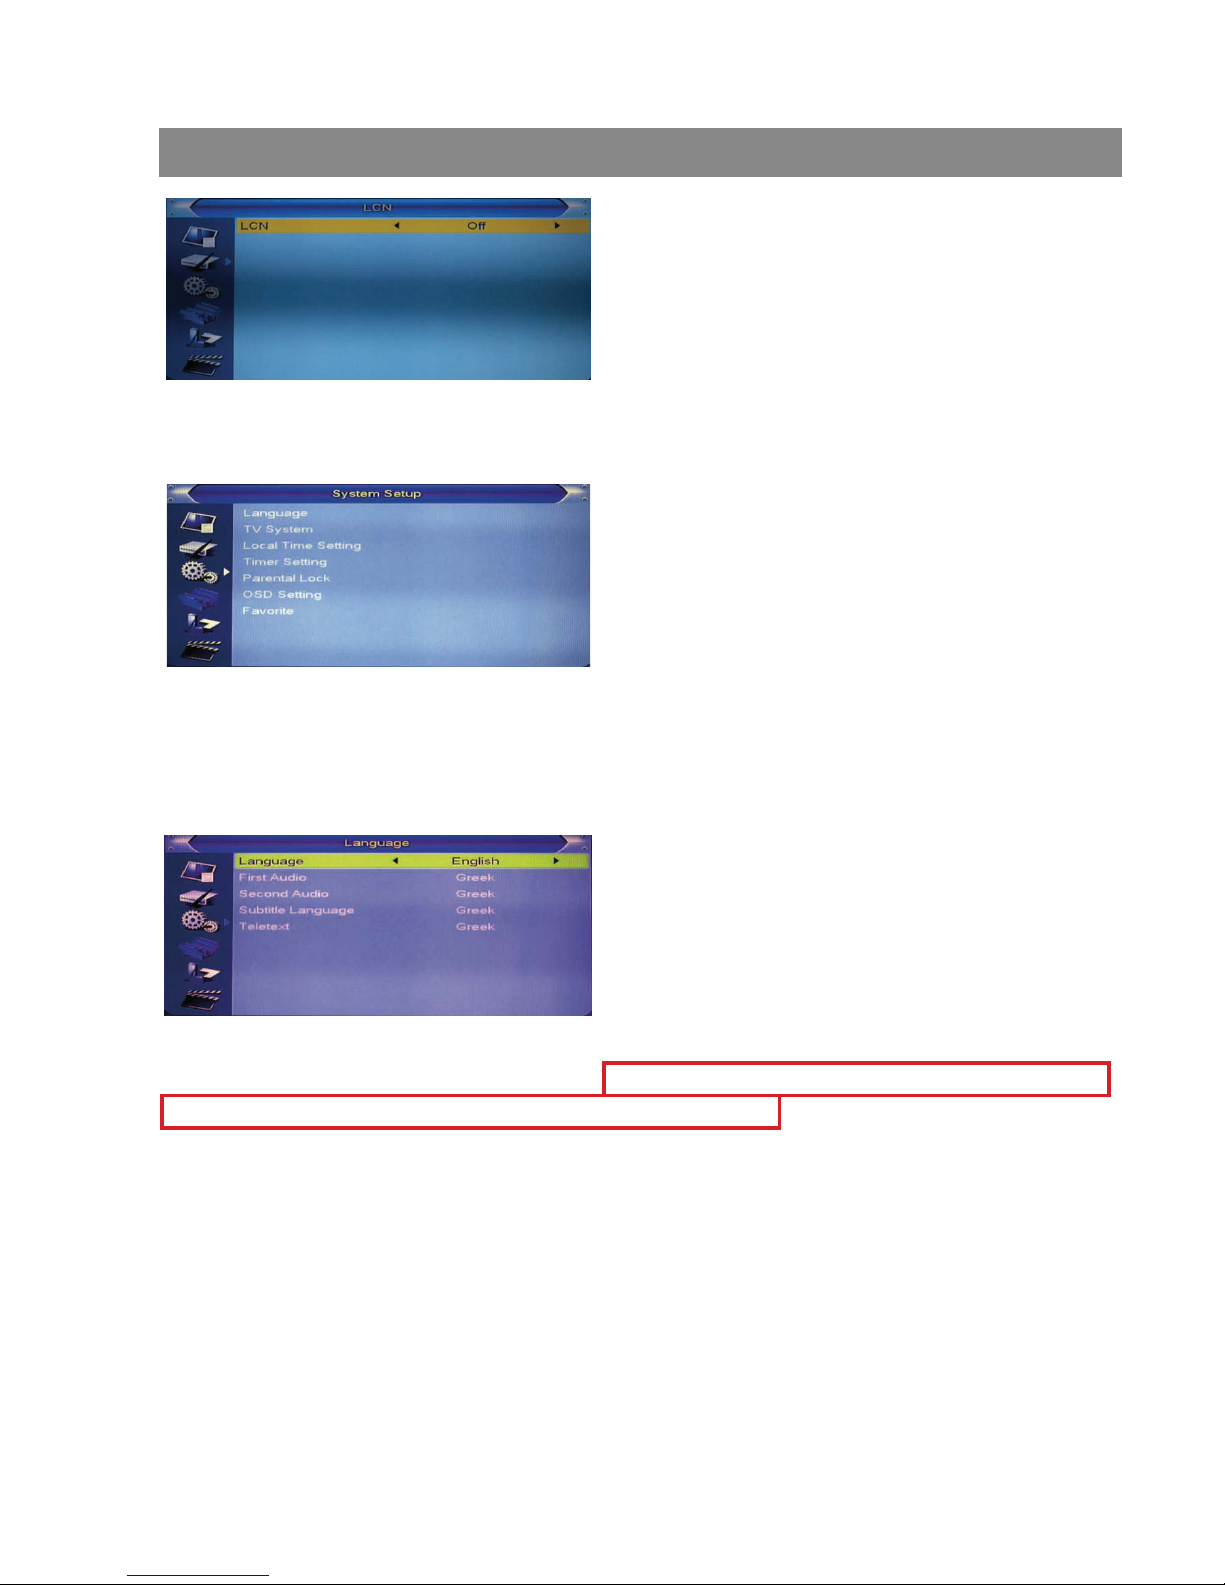
When entering to “Channel Scan” menu, a channel scan menu will be
shown as below:
1 There are two choices of “Scan Mode,” by channel or by frequency.
If you scan by channel, “Scan Band” and “Ch No” are available to be
adjusted. If you scan by frequency, “Frequency” and “Bandwidth” are
available to de adjusted.
2 There are two choices of “Scan Band,” “UHF” or “VHF.”
3 There are 56 choices of “CH No” ranging from In frequency
“CH05(177500Hz) ” to “CH69(858000Hz).”
4 You can adjust any frequency to search by.
5 There are three choices of “Bandwidth”, 6, 7, and 8 MHz.
6 When you complete your modification, move highlight to “Search” item
and press [OK] key, then it will begin to scan.
6.4 LCN
LCN: To toggle the LCN mode On/Off
Basic Operationss
6.3 Aerial Adjustment
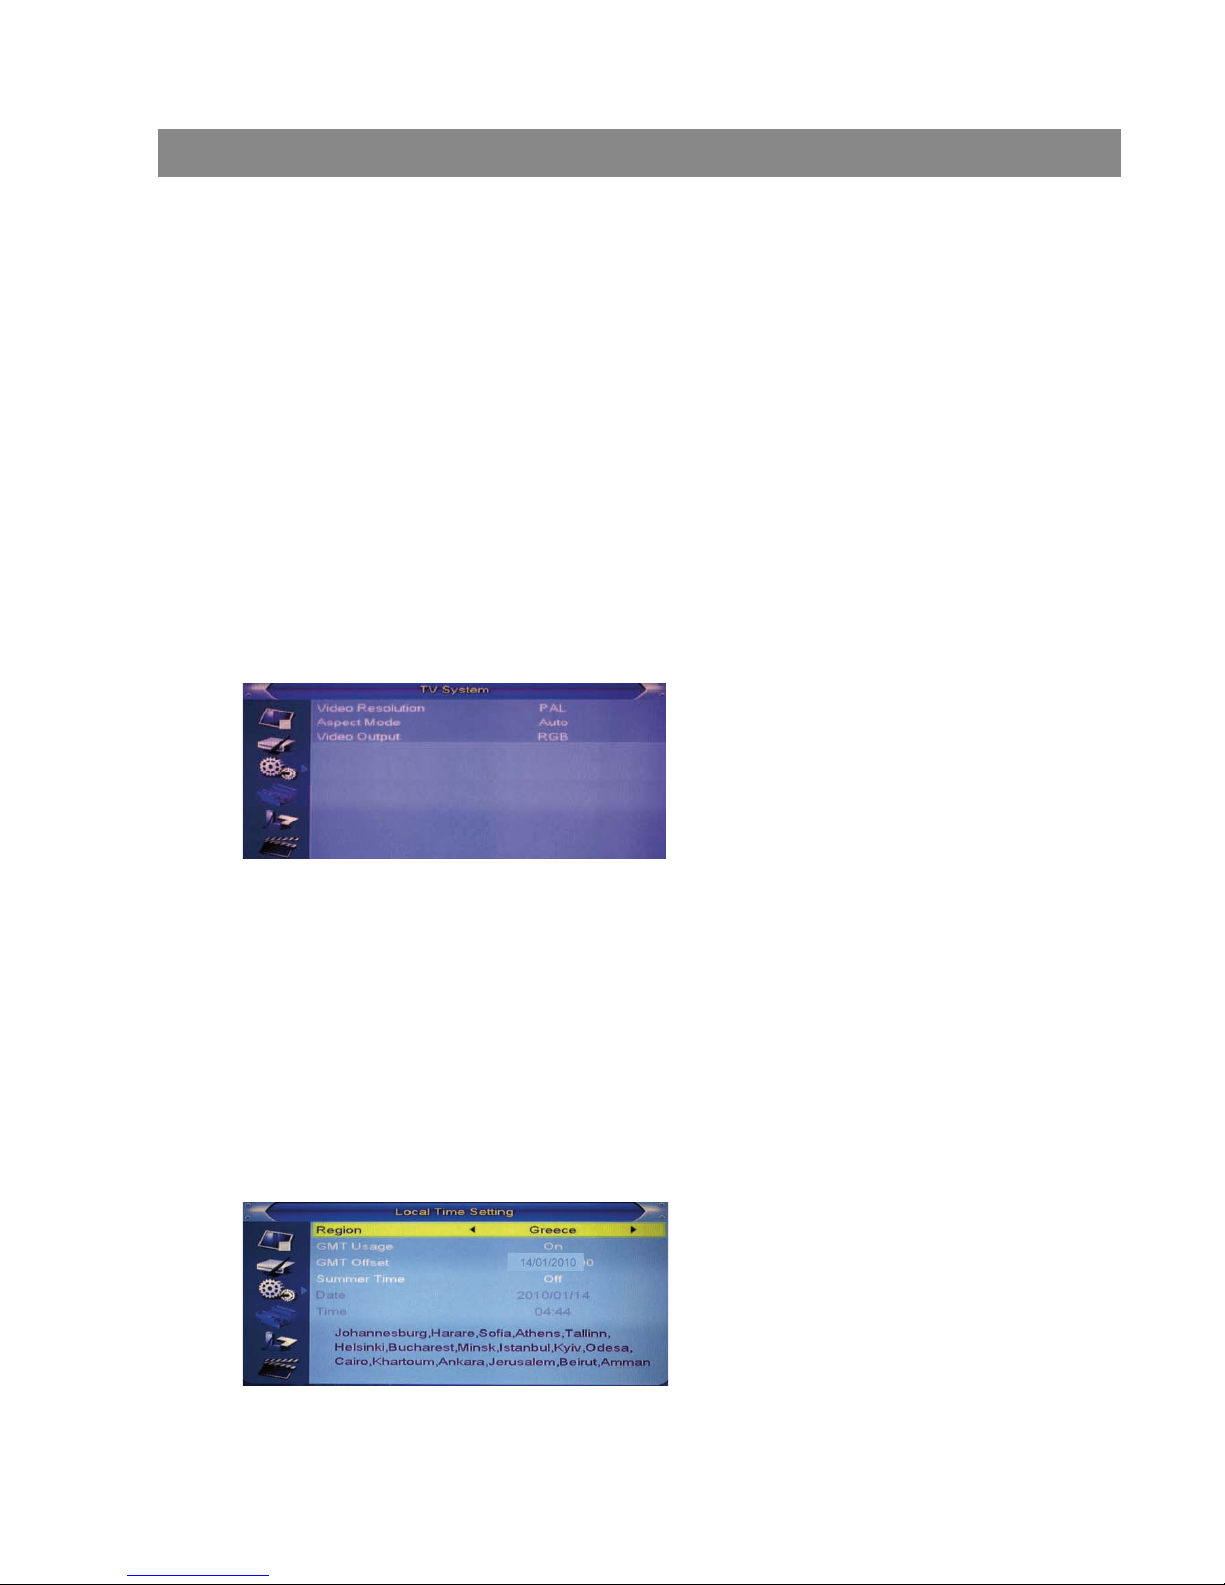
When entering to “Aerial Adjustment” menu, a menu will be displayed as below:
1 The user can check and adjust the Signal Intensity and Signal Quality of every C
2 Tuner Power :on/off
and Signal Quality of every Ch No.
Page 13
Press [Up/Down] key to select menu pages among Language,TV system,
Local time setting, Time setting Parental lock, Osd setting,Favorite.
7.1 Language
When entering the “Language” menu, you will see the screen as below:
1 Language: press [Volume Up/ Volume Down] key to select menu languages,
the selections of languages include:English, French,Poland,Lithuania, Italian,
Portuguese, Russia, Latvia, Latvia, Slovenia.
,
,,
2 First Audio: Some channels have more than one available audio
language; with this function, a user can set the first audio for this channel.
If the playing channel has the same audio as the “First Audio” you set, system
will play this audio language as default. If the channel hasn’t the suited
audio language, then the system will compare automatically with the
second audio language.
3 Second Audio: If the channel contains the audio track corresponding to
the “Second Audio” instead of the “First Audio”, system will play the
second audio language as default. If no audio language corresponds to
Basic Operations
When entering to “System Setup” menu, a menu will be displayed as below:
7. System Setup
Auto Standby
Page 14
The following options are provided:
4:3 PS, 4:3 LB, 16:9, AUTO
Auto means system won’t do any aspect ratio switching.
4 Press [Exit] key to draw back from “TV System” menu
1 Video Resolution:To switch the system output video resolution.
2 Aspect Mode:To switch the screen aspect ratio. By pressing [Left/Right] key
to select each mode circularly.
7.2 TV System
When entering the “TV System” menu, you will see the screen as below:
1 Region: Select the country which the user is in.
2 GMT Usage: Set to be ON/OFF.
7.3 Local Time Setting
Basic Operations
the “Second Audio”, then the default language of current channel will
be played automatically.
4 Subtitle Language: Some channels have more than one subtitle for
choosing.With this function, a user can set the specified subtitle language.
If the playing channel has the same subtitle language as the “Subtitle
Language” the user set, system will play this subtitle language as
default. If the channel hasn’t the suited subtitle language, then the
default subtitle language of current channel will be played automatically.
5 Teletext: The user can set teletext language. If the streams have this
language you can see the teletext in language you set.
6 Press [Exit] key to draw back from “Language” menu.
3 Video out: setting the TV video output mode, there are two options are
procvide: RGB/CVBS
Page 15
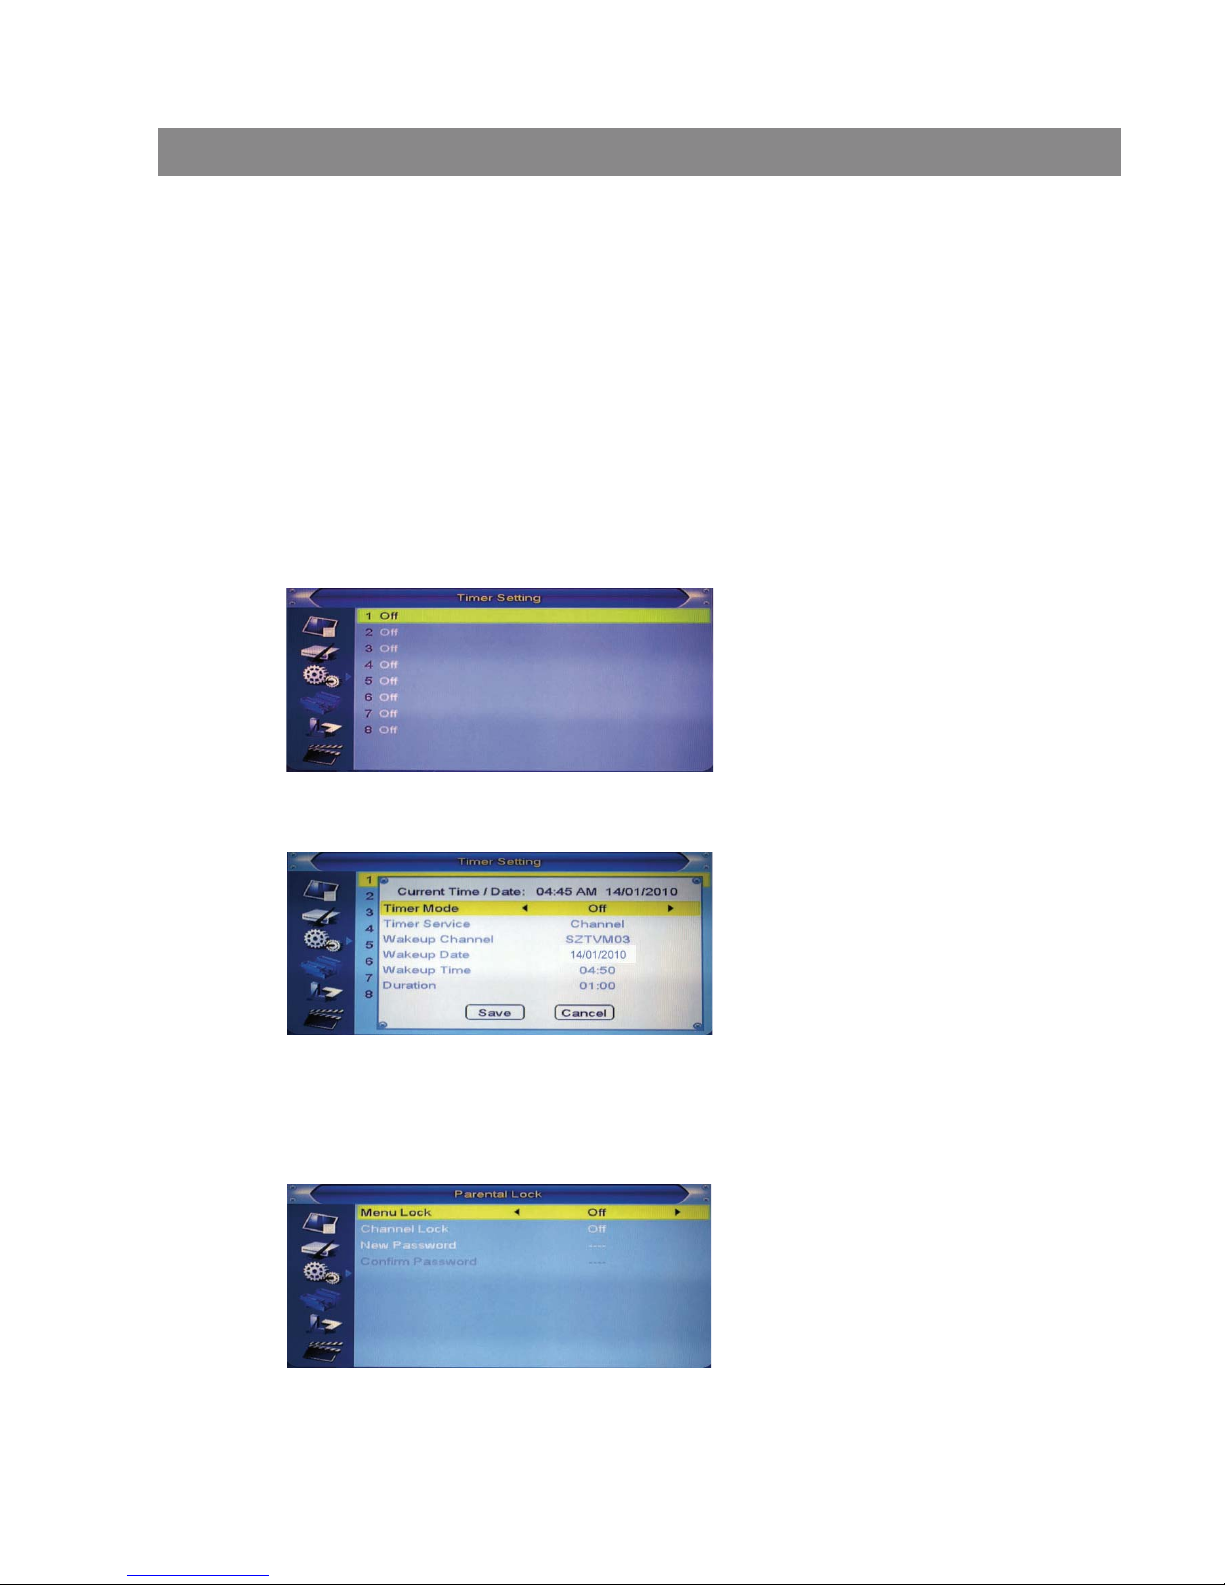
7.4 Timer Setting
Select “Timer Setting” item and press [OK] key to enter “Timer list” menu.
Press [up/down] key to select a timer, then press [ENTERZ] key to open and
adjust the timer menu.
7.5 Parental Lock
Press [OK] key on “Parental Lock” item, a dialogue will be pop up to ask
for the password (“0000” for default.) Once the user make the password
correct, a screen will be shown as below.
1 Menu Lock: determining the users’ intention to block the following menus
with password: “Edit Channel /Installation/Tools”.
Basic Operations
3 GMT Offset: Valid only when the setting of “GMT Usage” is “On”. By
pressing [Left/Right] keys to switch “GMT Offset” values ranging from
-11:30 ~ +12:00, with the increment unit by half an hour.
4 Summer Time: Valid only when the setting of “GMT Usage” is “On”. When
“Summer Time” is “On”, one hour will be added .
5 “Date” and “Time” items: Valid only when the setting of “GMT Usage”
is “Off”. By pressing [Left/Right] keys to moving highlight and the number
keys for inpout.
6 Press [Exit] key to draw back from “Time” menu
Page 16
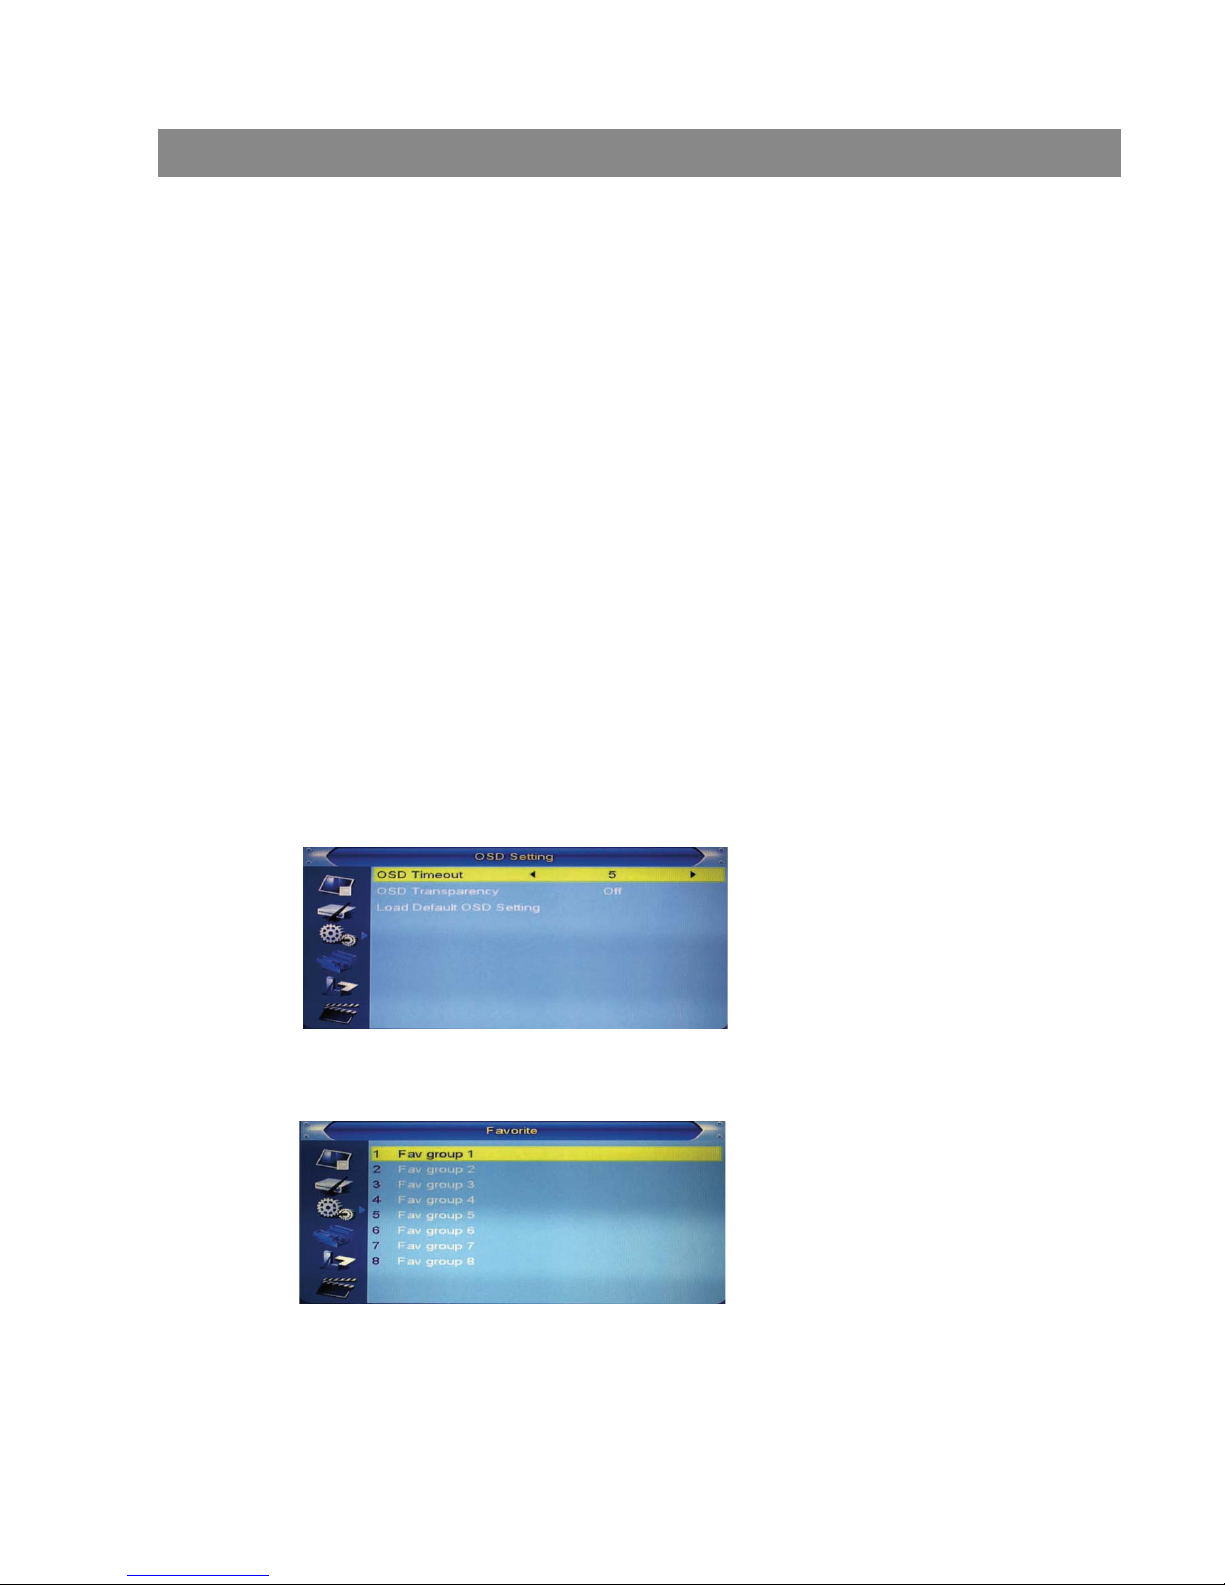
When entering the “OSD Setting” menu, a screen will be shown as below:
1 OSD Timeout: set the duration of showing up for the program banner which
contains some information about the channel and shows up once the
channel is changed.
2 OSD Transparency: set the transparency of OSD.
Press [Left/Right] key to select the values. There are 5 levels of
transparency, 10%, 20%, 30%, 40%, and “Off” (Opaque of the OSD).
3 Load Default OSD Setting: press OK to restore default OSD setting.
4 Press [Exit] key to draw back from the “OSD Setting” menu.
7.7 Favortie
When entering the “Favorite” menu, a screen will be shown as below:
press [OK] key to rename the favorite group. A dialog shows as below:
Basic Operations
7.6 OSD Setting
2 Channel Lock: determining the users’ intention to play or lock channels
with password. If the setting is “Yes”, then the password will be asked
to play the channels with lock mark.
3 New Password: used for revising password, by keying in the new
password in this item. After the 4 digital numbers are filled, the Confirm
Password item will ask you to input the new password again. If the password
is correct, the screen will show up a message of “Saving Data, Please
Wait…” After finishing saving and drawing back to “System Setup” menu,
the revising is completed.
4 Press [Exit] key to draw back from the “Parental Lock” menu.
Page 17
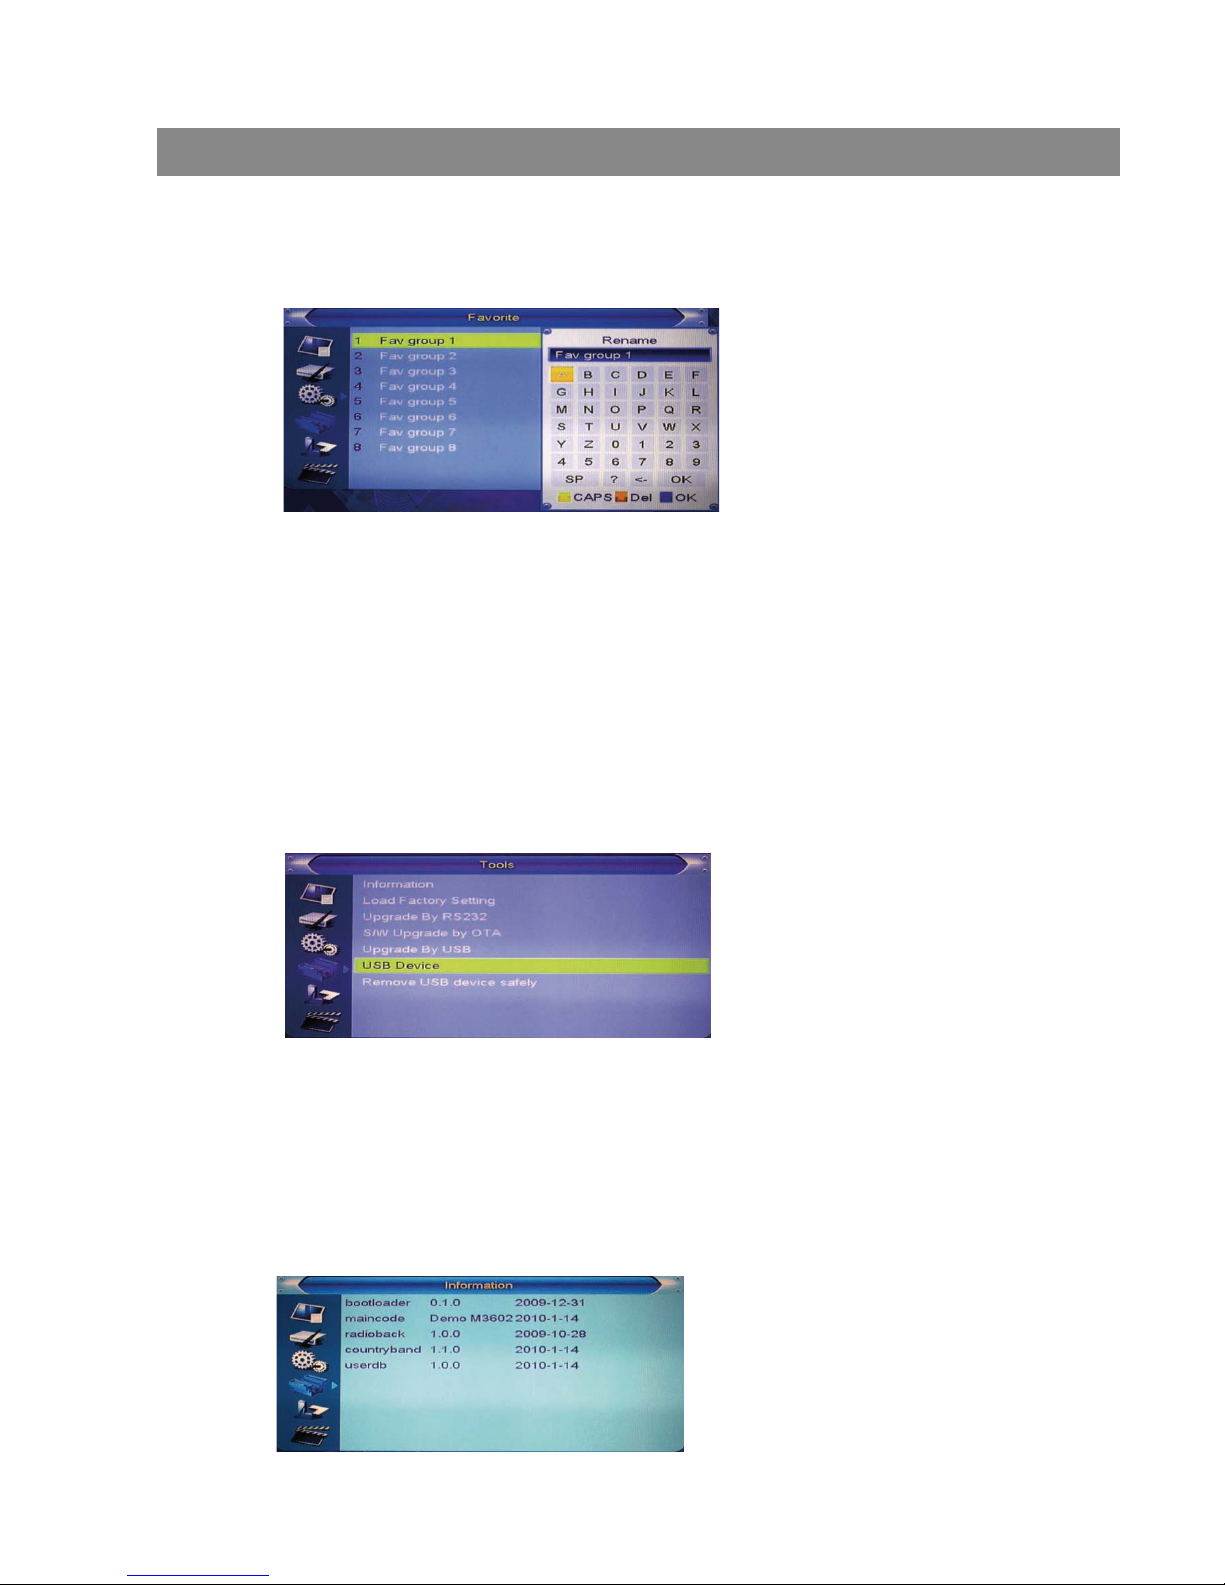
In “Tools” menu:
1 Press [Up/Down] key to select menu pages among Information, Load
factory setting, S/W Upgrade by OTA, Upgrade by USB, USB device,
Remove USB device safely.
8.1 Information
When entering the “Information” menu, a screen will be shown as below.
It shows the version and date for the items such as “boot loader, main
code, radio back, country band, user db” information.
Basic Operations
1 Press [Yellow] key to switch whether capital or not.
2 Press [Red] key to delete the char on the cursor.
3 Press [Blue] key to save the modification.
8. Tools
Press [OK] or [Right] key to enter the “Tools”. If Menu Lock is “On”, it will
display a dialogue for user to key in password. The default Password is “0000”.
7.8 Auto Standby
The STB will be automatically switched into standby
mode after three hours in active mode following the
last user interaction and/ or a channel change,an alert
message will show 2 minutes before going into standby
mode.
Page 18
Basic Operations
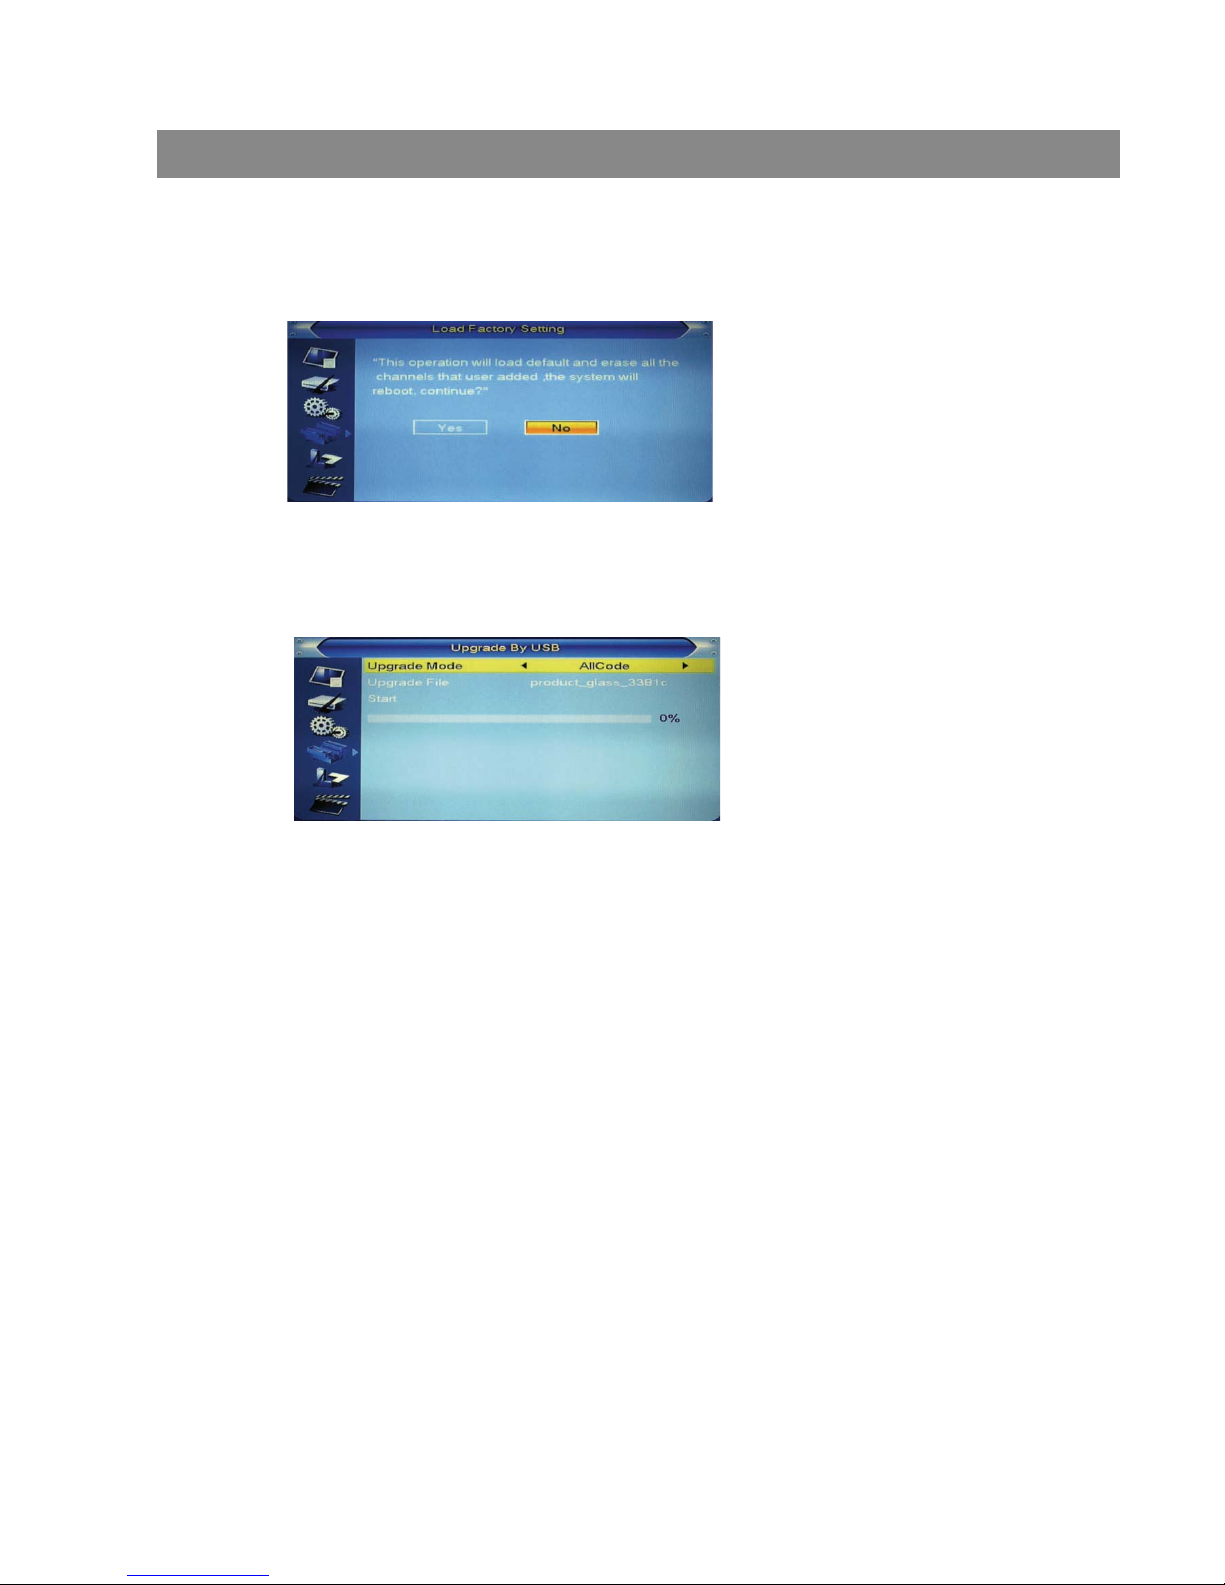
8.2 Load Factory Setting
press [OK] to load defaults settings, warning inquiry will be popup as below.
Once the “Yes” option is chosen, the all revised parameters of the receiver
will be reset to the default alue. Please use this function carefully.
8.3 Upgrade by USB
This function is only valid when the USB device has been plugged-in and
attached at the receiver box. Open Upgrade by USB menu according to
Menu -> Tools-> Upgrade By USB.
1. All Code: the user can only upgrade whole file to the STB flash ROM.
Please rename the new file name
to be the format as “all*.bin”, Then
Press OK key to start upgrade by USB.
8.4 USB Device
USB menu will automatically be shown once inserting the USB disk to
USB port, except the status of auto scanning, multi picture displaying,
and upgrading.
Another way to open USB menu is to go step by step
according to SETUP ->Tools->USB Device. USB menu will be disabled when
the USB device is unplugged. Media Player List will not be saved after
unplugging USB and/or going to standby and power off.
Media player menu will be shown as below:
2. Main Code: the user can only upgrade part of the main code. Please
confirm the upgrading file format is “mcd*.bin” Radio Back: the user
can upgrade the background logo. Please confirm the associated file
name of the upgrading file to be as “*.m2v”
Page 19
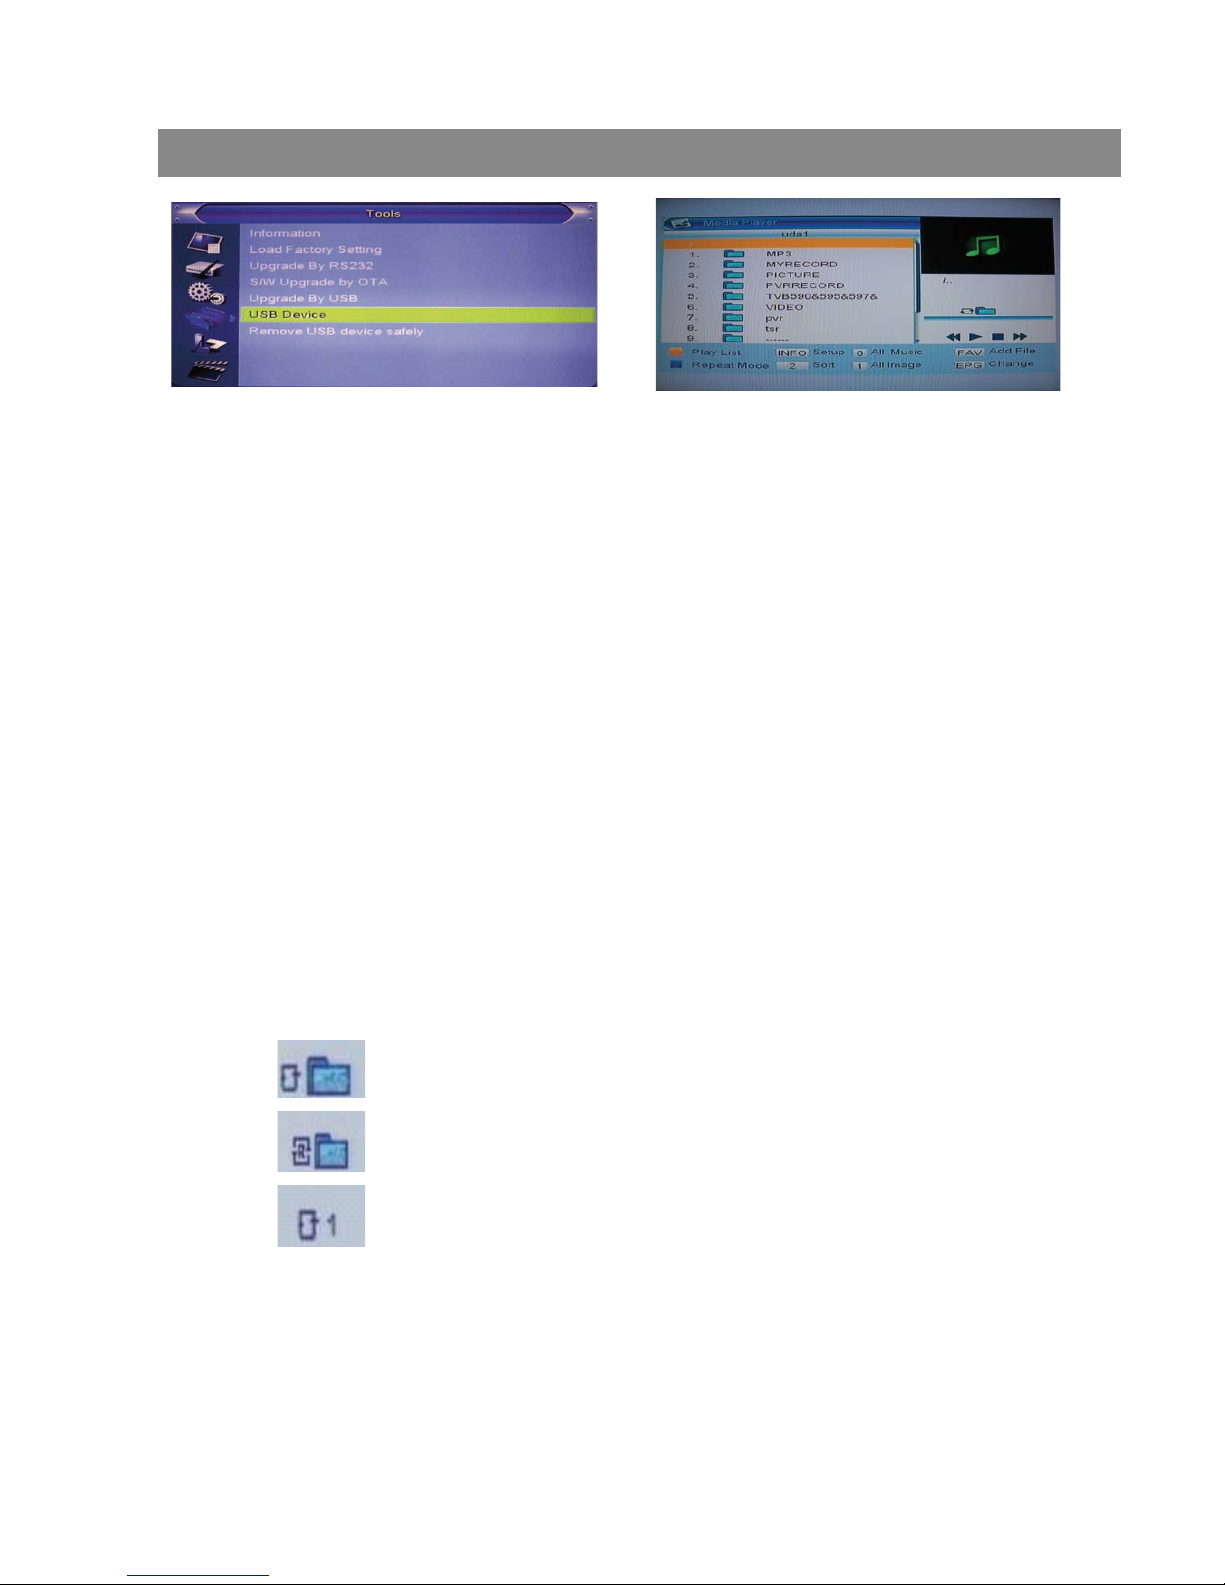
Music/Image play operation
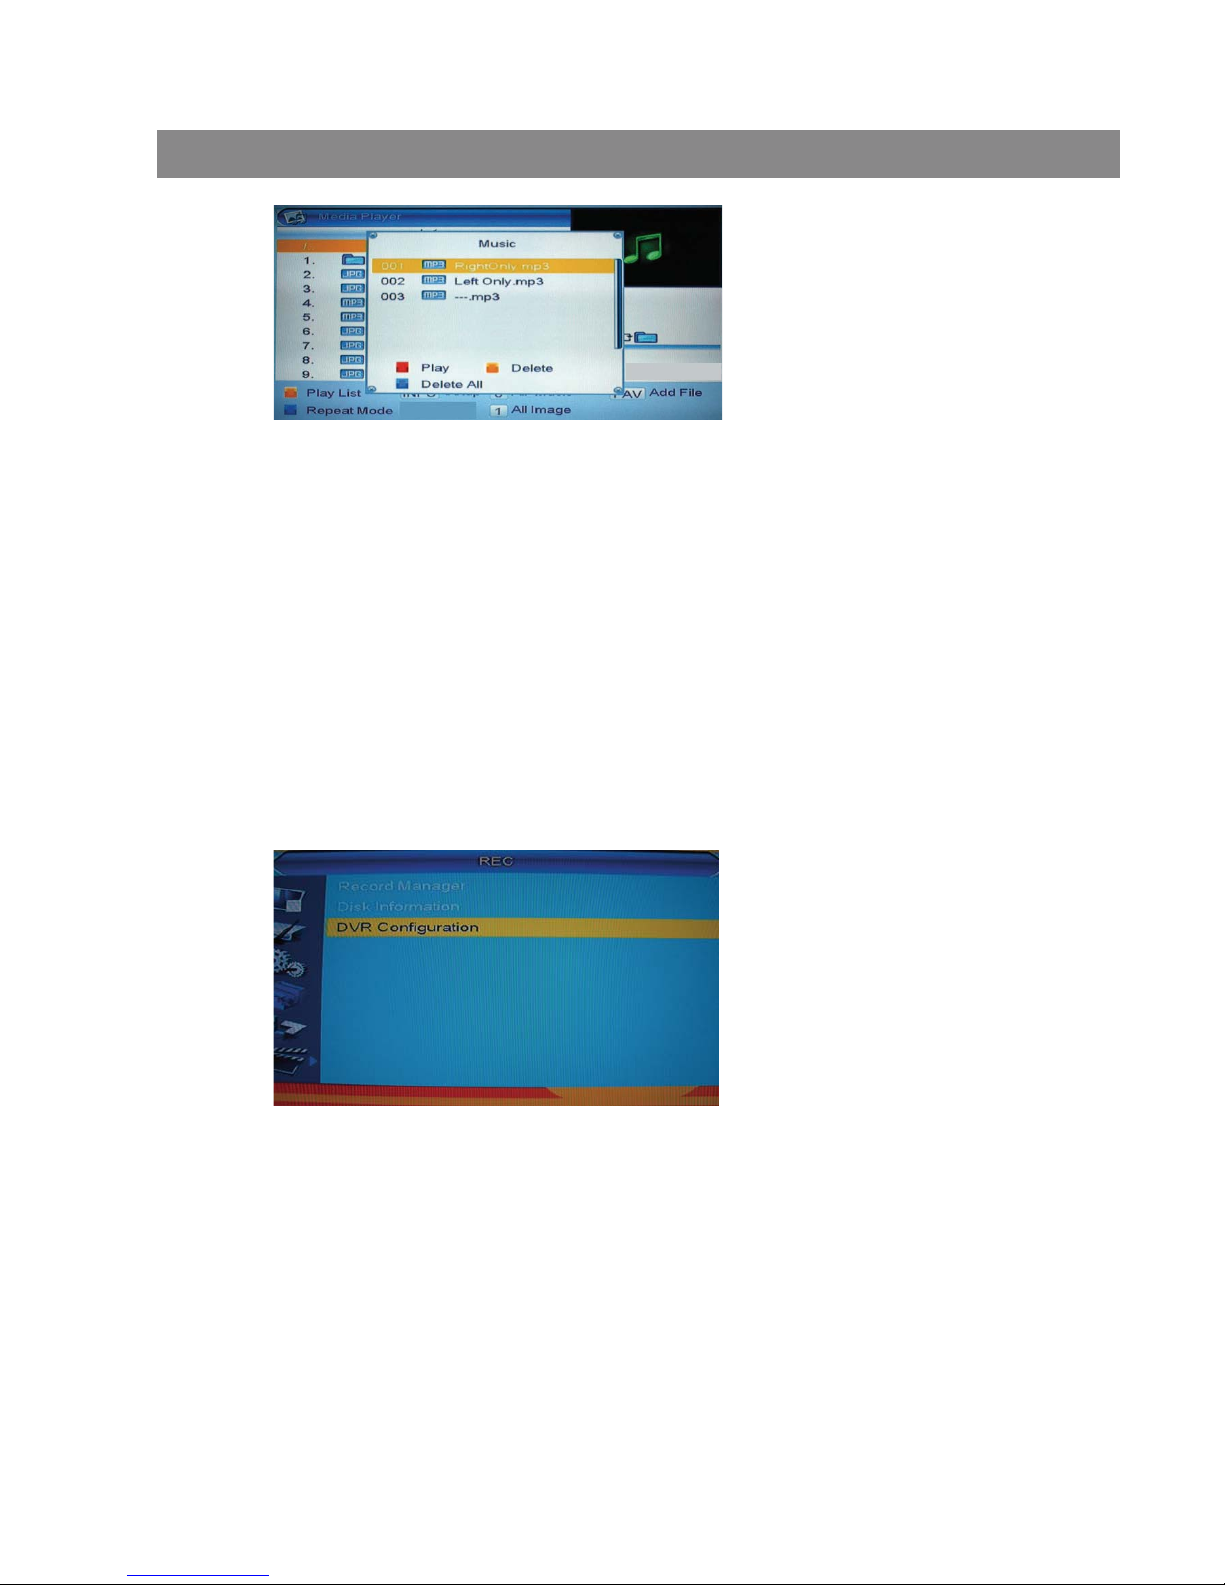
Press Yellow key to enter into playlist and select music/group image
Basic Operations
key operations:
FAV key: Put the selected file to play list .
0 Key: All the MP3 files in current directory will be added into MP3 play list .
1 Key: All the Image files in current directory will be added into Image play list.
2 Key:There are four kinds of sorting approaches. By Press [Channel Up/
Channel Down] key to move highlight and press [OK] key to confirm your
selection.
The four kinds of sorting approaches are:
Name (A-Z): Sorting in Alphabetical descending Order.
Name (Z-A): Sorting in Alphabetical ascending Order.
Lock: Collecting all locked channels and list in the bottom of TV Channel List.
Default: Return to original setting order.
Yellow Key: The “Please select play list type” operation window will be shown
by pressing Yellow key. After that, the user can play the image or music by choosing
the files. If here is no file in the directory, an operation window “This type of play list
doesnot exist” will be shown.
INFO: Set up slide show of images.
Blue Key: To rotate among the 3 repeat modes provided
as below:
Repeat Folder
The entire Random Folder
Repeat Single
EPG Key: Change the different disk.
Page 20
3 Press [Up/Down] key and [OK] key to select menu items
4 Press [Left] key or [Exit] key to go back to main menu.
Basic Operations
Yellow key.
9. Game
There are two games for selection:Othello/Sodolcu.
Red Key: Play the file list from the 1st music file.
Yellow Key: Delete the file highlighted by
Blue Key: Delete all files by blue Key, with a remind “Are you sure to save?”
8.5 Remove USB device safely
Before removing the USB device, press “Remove USB device safely” first,
with a reminding “You can safely remove USB device now!”. Then the USB
device can be removed without concern.
1 Press [Up/Down] key to select menu pages among record manager Record
manager, DVR HDD Information, HDD FORMAT, Dvr configuration.
2 Press [OK] or [Right] key to enter the “REC”. If Menu Lock is “On”, it will
display a dialogue for user to key in password. The default Password is “0000”.
10. REC
When you enter to “REC” menu, you will see the screen like below:
NOTE :
- We cannot guarantee compatibility (operation and/or bus
power) with all USB mass storage
devices and assume no responsibility for any loss of data
that may occur when connected to this unit.
- With large amounts of data, it may take longer for the
system to read the contents of a USB device.
- Some USB devices may not be properly recognized.
- Even when they are in a supported format, some files may
not play or display depending on the file codecs and content.
Page 21
Basic Operations
1 Press [Green] key to lock a program on HDD.
2 If you want to cancel the lock mark for a program, press [Green] key
again. It will ask you to input password. Once you input the correct
password, it will cancel the lock feature for the program.
10.1.1 Lock
10.1.2 Delete
1 Press [Blue] key to make a delete mark on the highlight program.
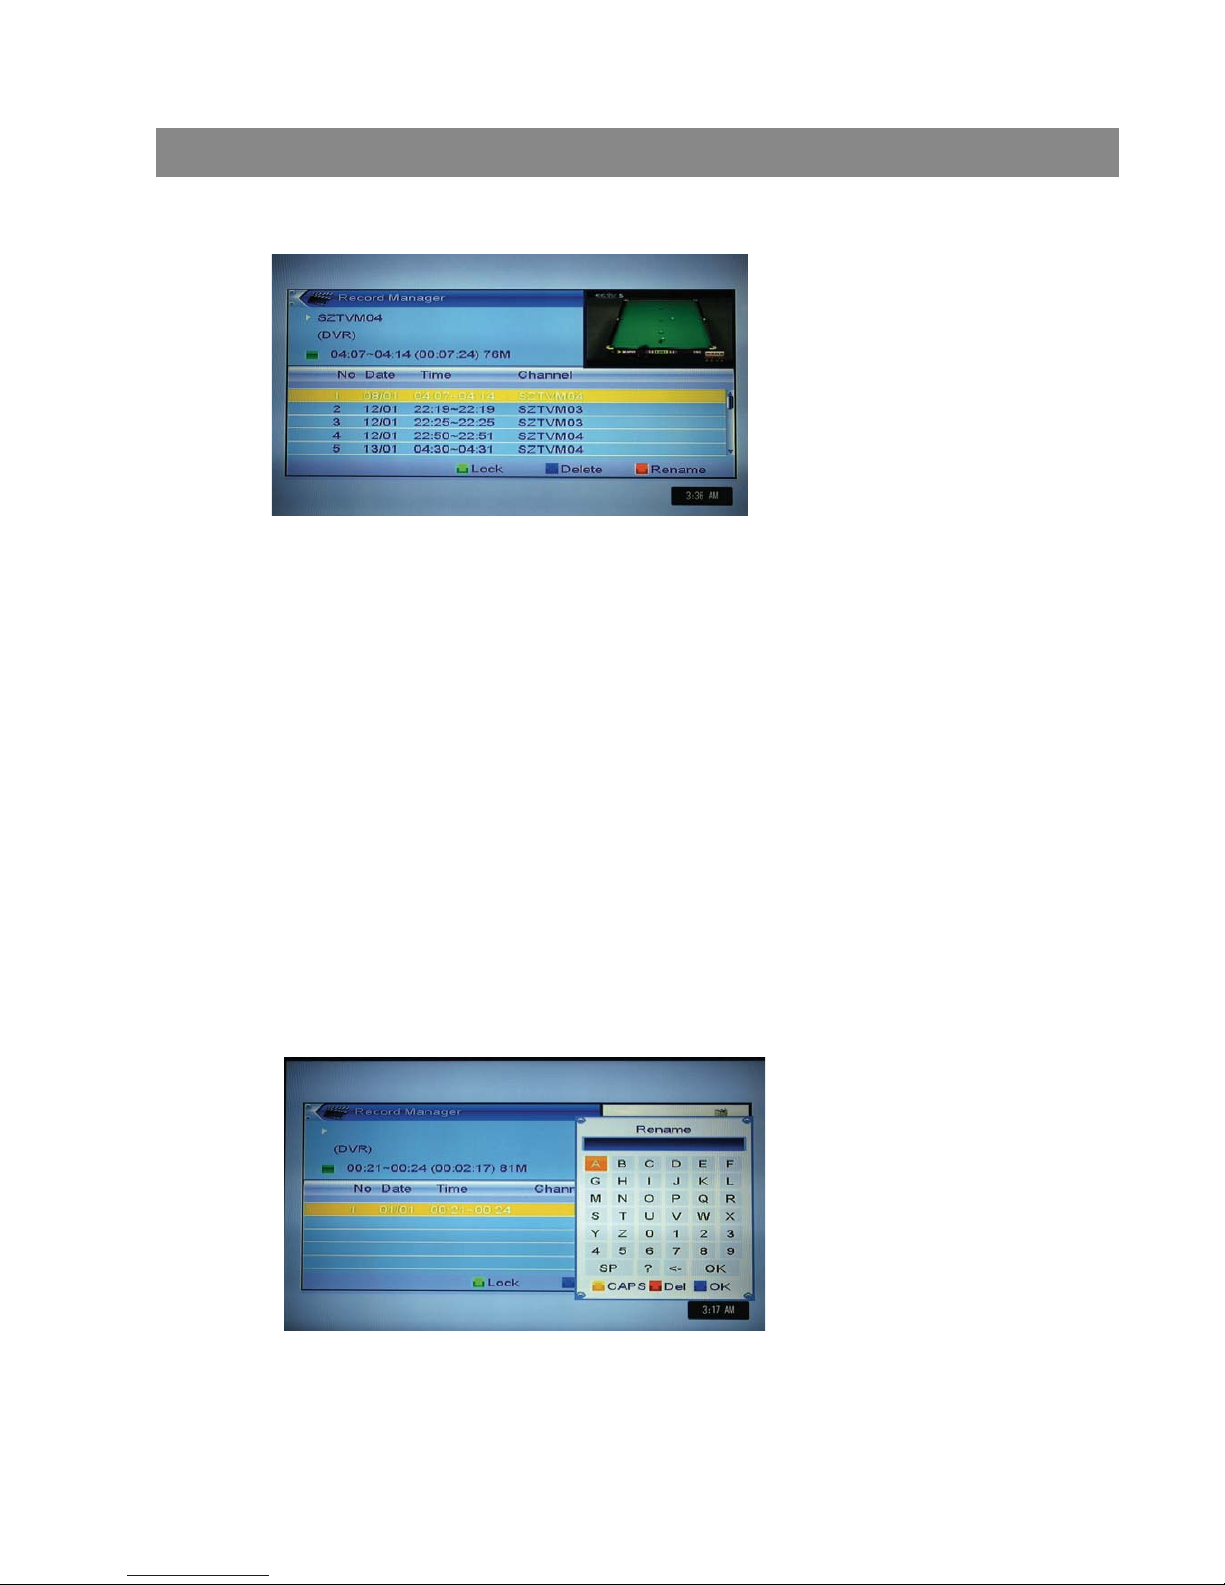
10.1 Record manager
.
10.1.3 Rename
1 Press [Red] key to rename the highlight program. It will show the “Rename”
window.
2 You can press [Yellow] key to switch capital and lowercase.
3 Press [Red]key to delete the char on the cursor.
4 Press [Blue]key to save the modification.
2 If you want to cancel the delete operation, press [Blue] key again to
cancel the delete mark.
3 When exit the “Record Manager” menu, all the delete mark channel will
be deleted directly.
1 Move the highlight to “DVR HDD Information” and press [OK] key. It will
display “DVR HDD information” as below:
10.2 Disk Information
Page 22
Basic Operations
10.3 DVR Configuration
Set up digital video recording
1. Turn ON/OFF timeshift
2. Set record type: TS/PS
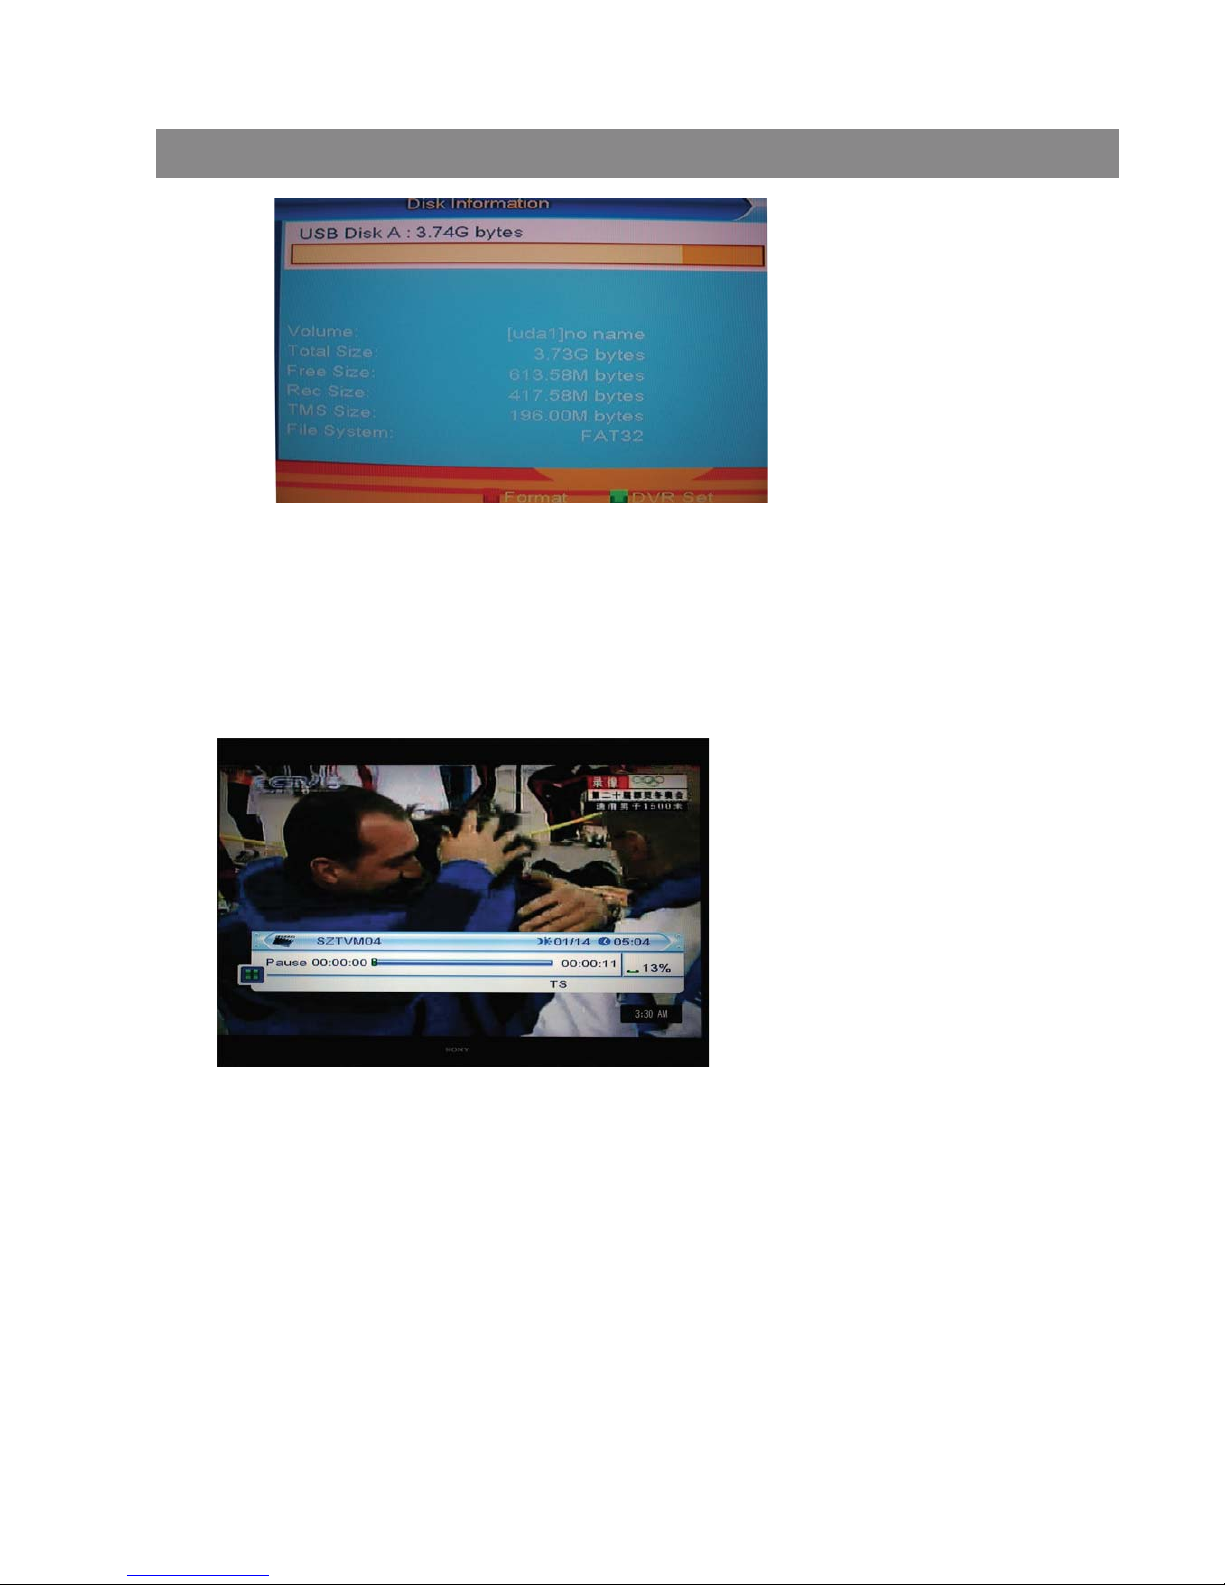
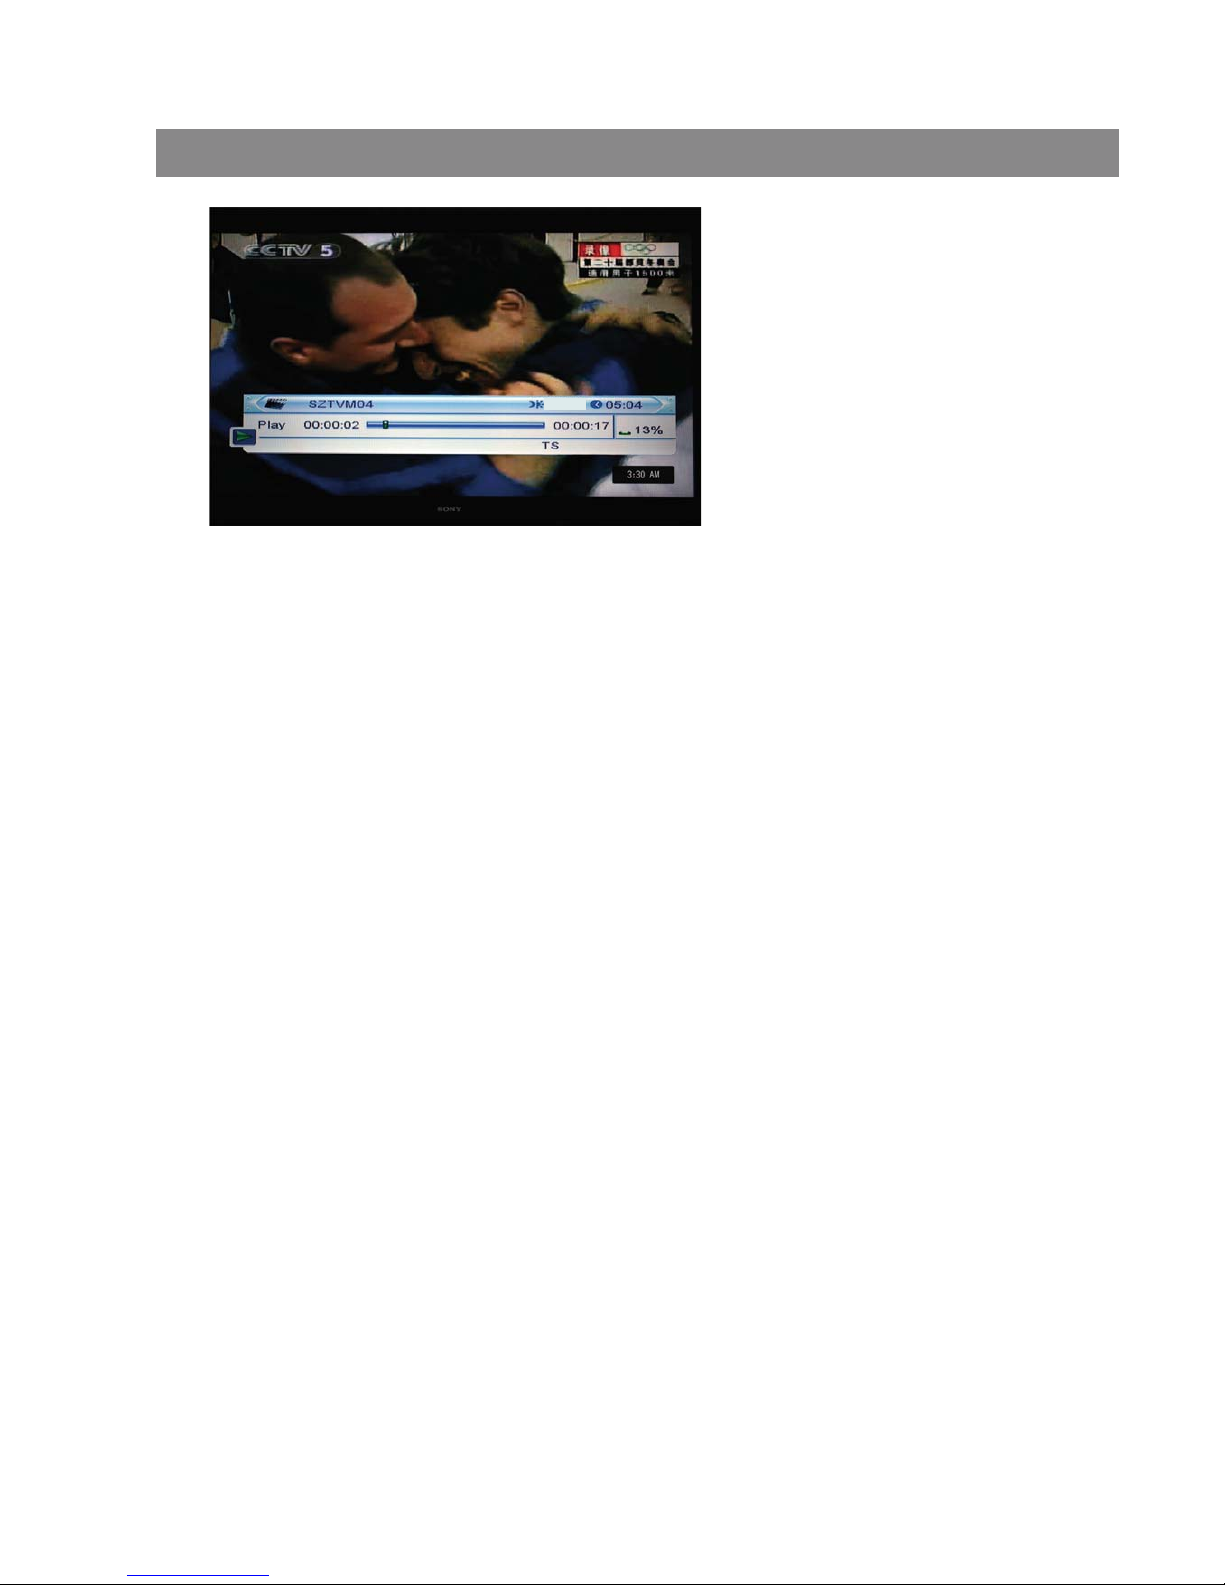
1 Press [PAUSE] key to see time shift OSD as below:
2 You can press [Left/Right] to move the slide to left or right. Press [OK] key
to play the point where the slide is.
3 You also can press [Pause] /[fast back]/[slow /back] can realize these function.
Then it will enter the mode which is playing the recorded program on HDD.
(like the picture below) Then you can do pause, fast forward, fast back, slow
forward, and slow back.
10.3.1 Timeshift
10.3.2 Record
Page 23
11.6 Audio
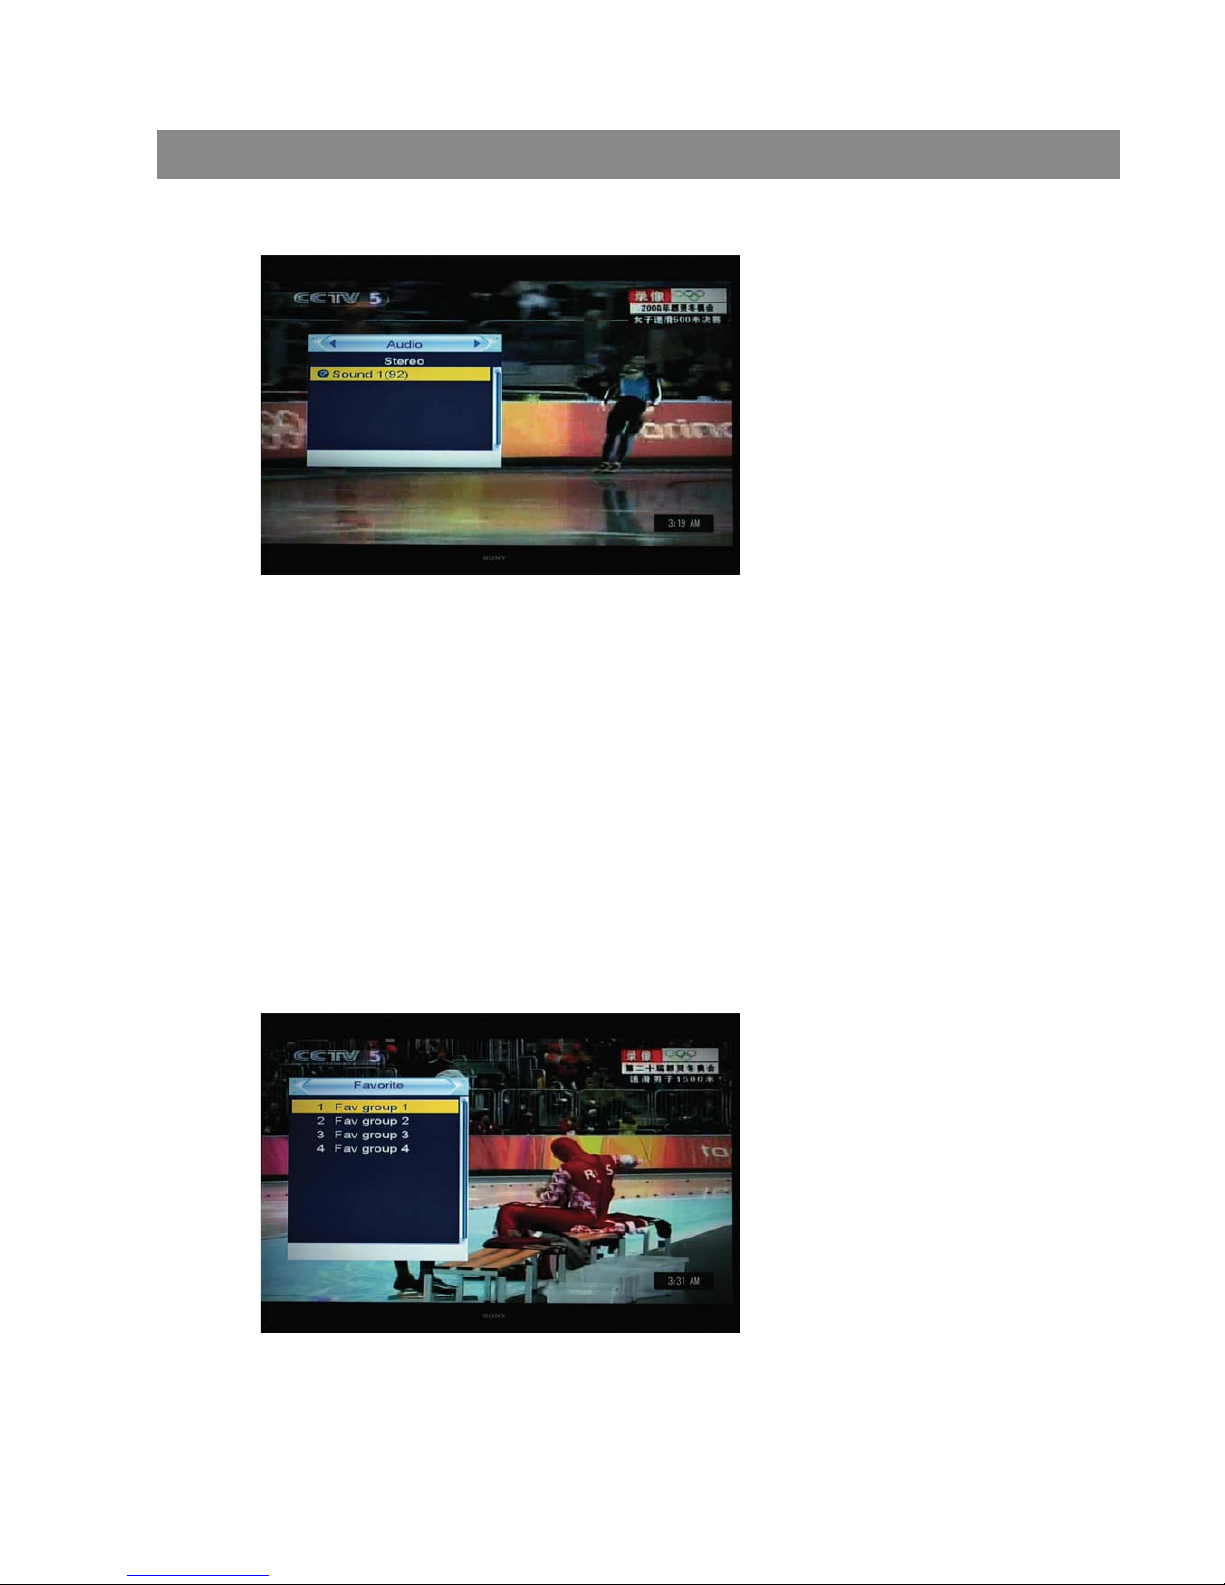
1 In full screen, press [AUDIO] key can open the “Audio” window on the screen.
2 You can modify the audio track by press [Channel Up / Channel Down]
key and modify the audio mode by press [Volume Up / Volume Down] key.
Basic Operations
11. Hotkey
11.1 Power
1 Press [Power] Key can enter the Standby state
2 In Standby state, press [Power] Key again can call back the unit and go
on play the previous channel
3 User can also disconnect the device’s main power to end the Standby state.
11.2 Channel Up/Channel Down
In full screen, press [CH+/CH-] to change channel.
11.3 Volume Up/Volume Down
In full screen, press [VOL+/VOL-] to adjust volume.
11.4 Number 0~9
In full screen, use number key and press [OK] on the Remote Control Unit to
change channel.
11.5 TV/RADIO
In TV mode, pressing [TV/RADIO] key can switch to Radio mode. In Radio mode,
press [TV/RADIO] key to switch to TV mode.
14/01
1. Press record key to start recording
2. Press record key again to set and adjust recoring duration time
3. Press [Stop] key first time to end the playing mode. Press [Stop] key second time
to stop the recording
4. Press blue key to show the recorded files fastly,press OK to play the selected file.
Notes: Time Shifting/recording will only be available when USB/ HDD is
connected to system and read/write speed is high enough to do that.
Page 24
Basic Operations
11.7 Mute
1 Press [MUTE] key to mute the sound and the screen will show up mute OSD.
2 Press [MUTE] key again to restore sound.
11.8 Favorite
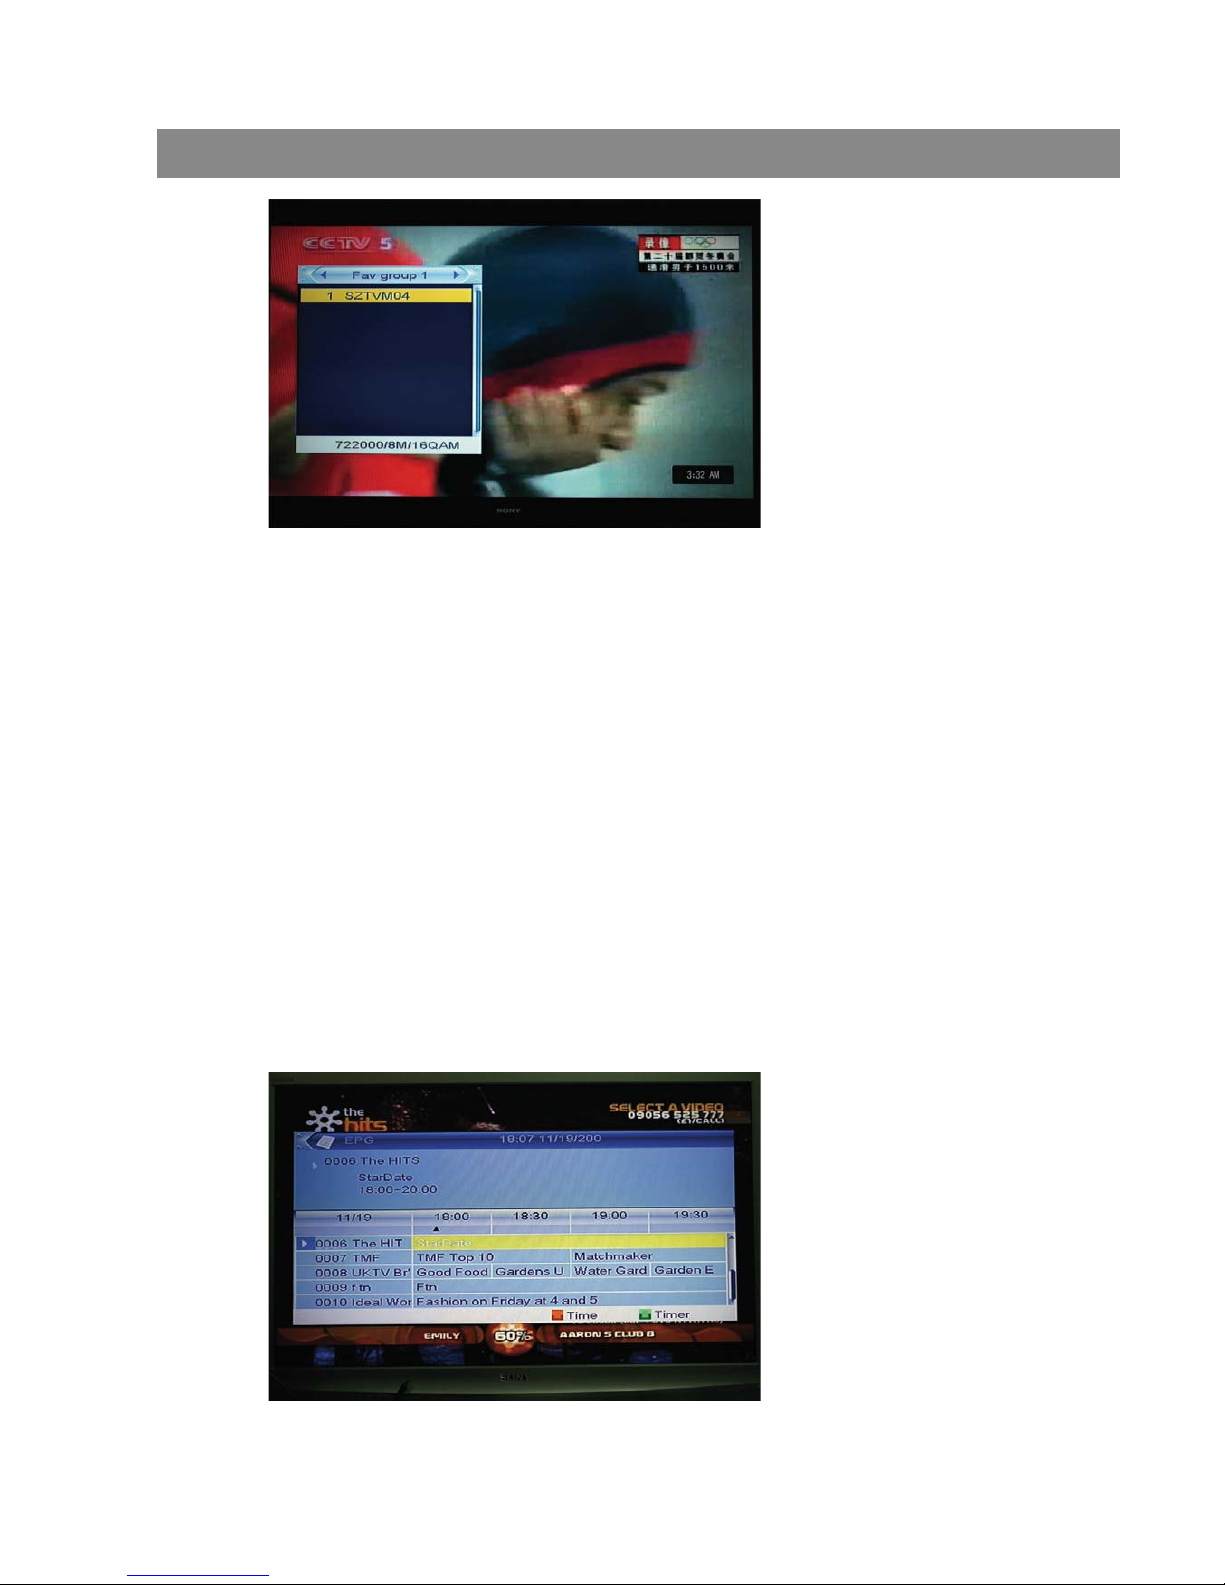
1 In full screen, press [FAV] key, it will display a window of “Favorite
Group” on the left of the screen, which you can watch like below.
3 Mode: Left/Right/Stereo/Mono
2 In the window of “Favorite”, you can move highlight by press [Channel
Up/Channel Down] key and press [OK] key to select favorite group.
3 In the window of “FAV group X”, you can move highlight by press
[Channel Up/Channel Down] key and press [OK] key to select favorite
channels. Pressing [Page Up/Page Down] keys can implement the “Page
up/Page down” function
Page 25
Basic Operations
11.9 Recall
Press [RECALL] key will directly switch to the previous channel that you
played before current channel.
Q: Why the screen displays “No Favorite Channel”, after pressing
[Favorite] key?
A: It is because that you haven’t set any channels as “favorite channel”.
Please refer to Favorite
11.10 EPG
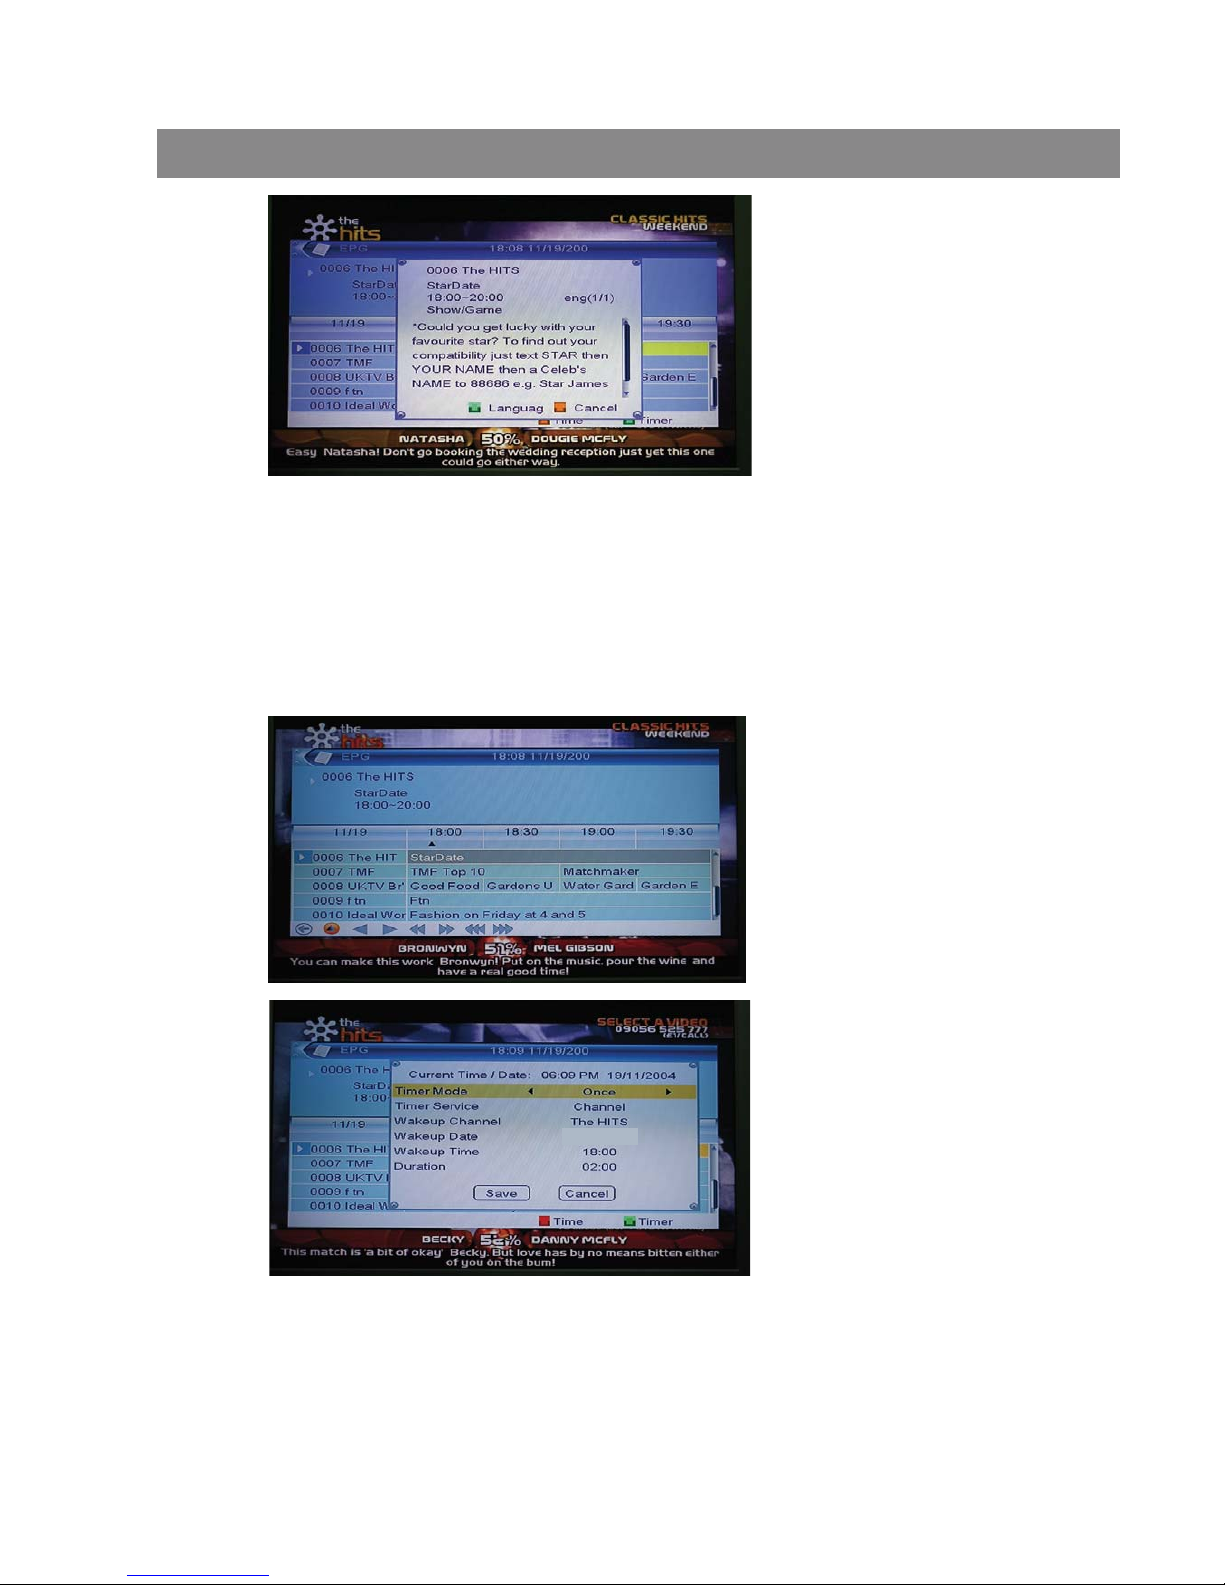
1 The STB has an Electronic Program Guide (EPG) to help you navigate
channels through all the possible viewing options. The EPG supplies
information such as channel listings and starting and ending times for all
available channels. Press [EPG] key to display EPG screen.
4 You also can press [Volume Up/Volume Down] keys to select different
“Favorite Group”.
5 Press [Exit] key to exit the current window.
Frequently Asked Question
2 Press [OK] key in each item can see more detail information and press
[Red] key to cancel
Page 26
11.11 Subtitle
Press [SUBTITLE] key in full screen, you can select subtitle and teletext
subtitle language or switch subtitle off.
11.12 TEXT
4 Press [Green] key in EPG menu can open timer menu. User can save
a timer as he want.
5 In EPG menu, press [Exit] to close EPG screen.
3 Press [Red] key in EPG menu can display “Time Bar” Menu. In “Time
Bar” menu, you can press [Left/Right] to select “back/current time/last
program or –0:30/next program or +0:30/-2:00/+2:00/last day /next day”.
Press [Up/Down] key to channel change.
19/11/2004
Basic Operations
Page 27
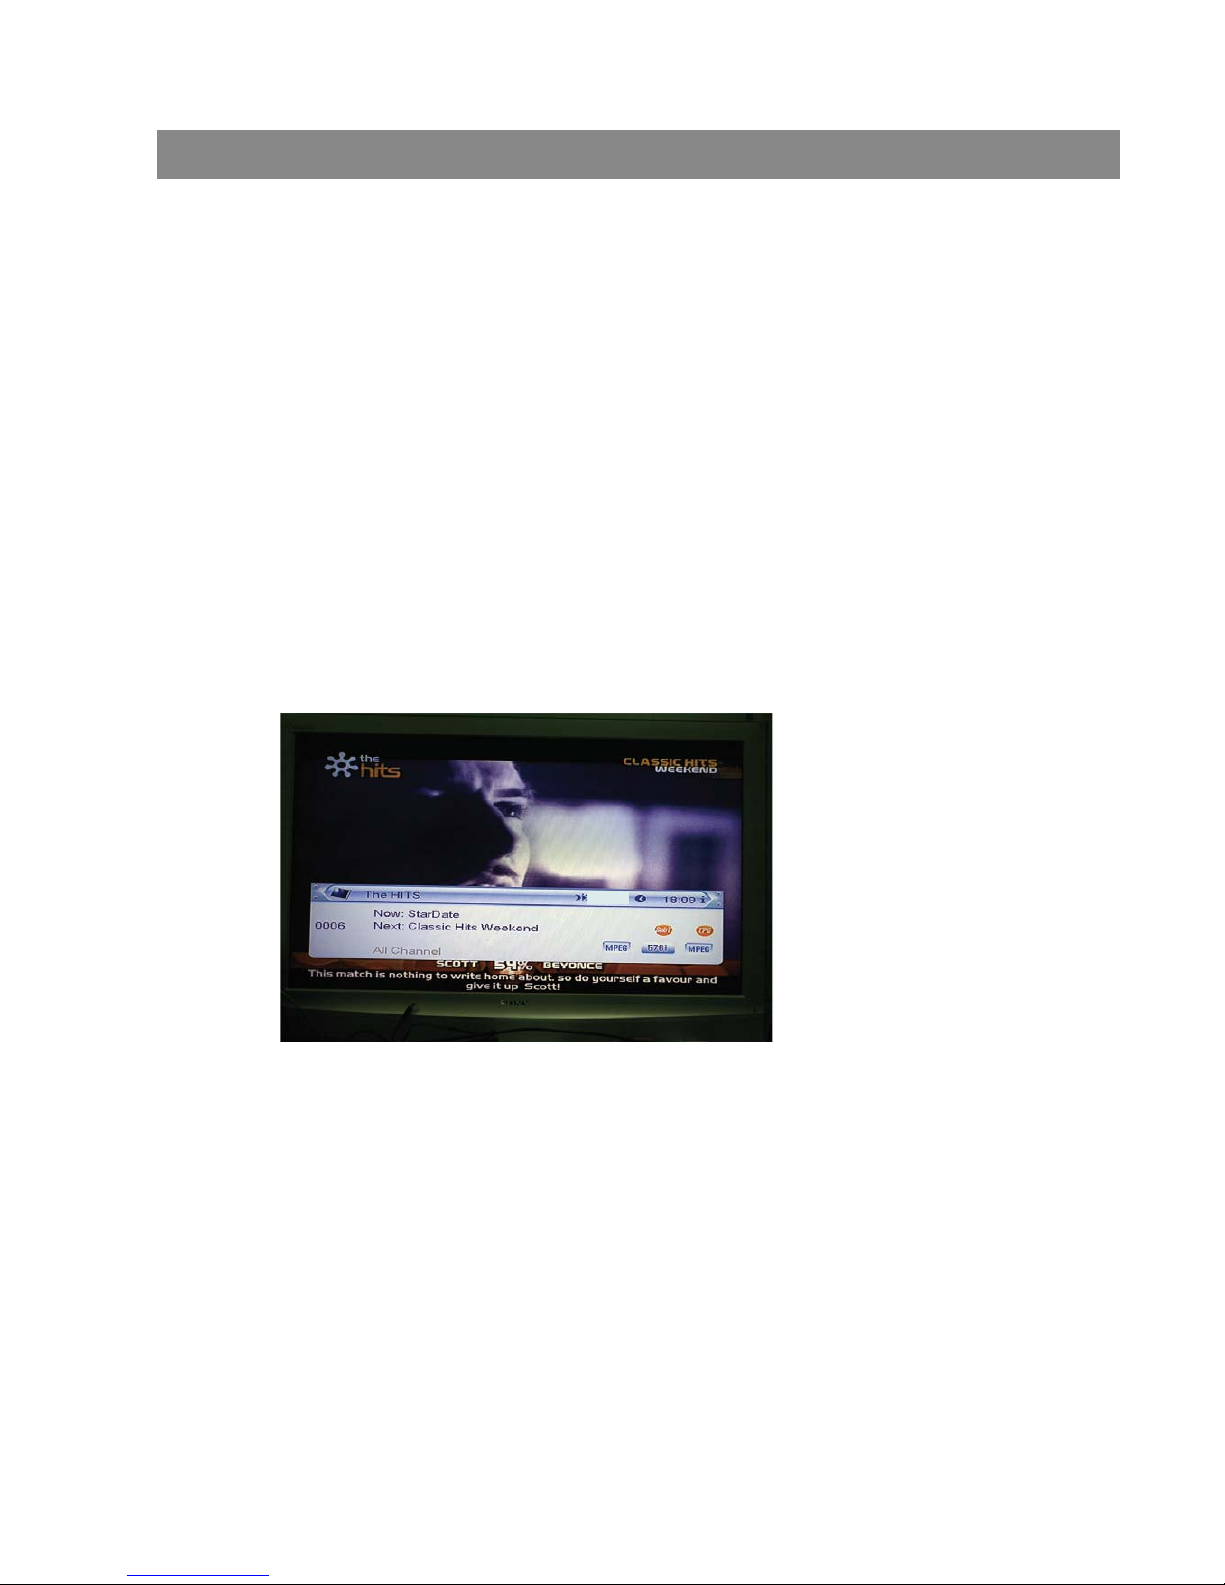
4 Press [Page Up/Down] key to page up and page down.
5 Press [Exit] key to exit the channel list.
11.14 Exit
Press [EXIT] key can exit the current menu to last menu or close the window.
11.16 Channel List
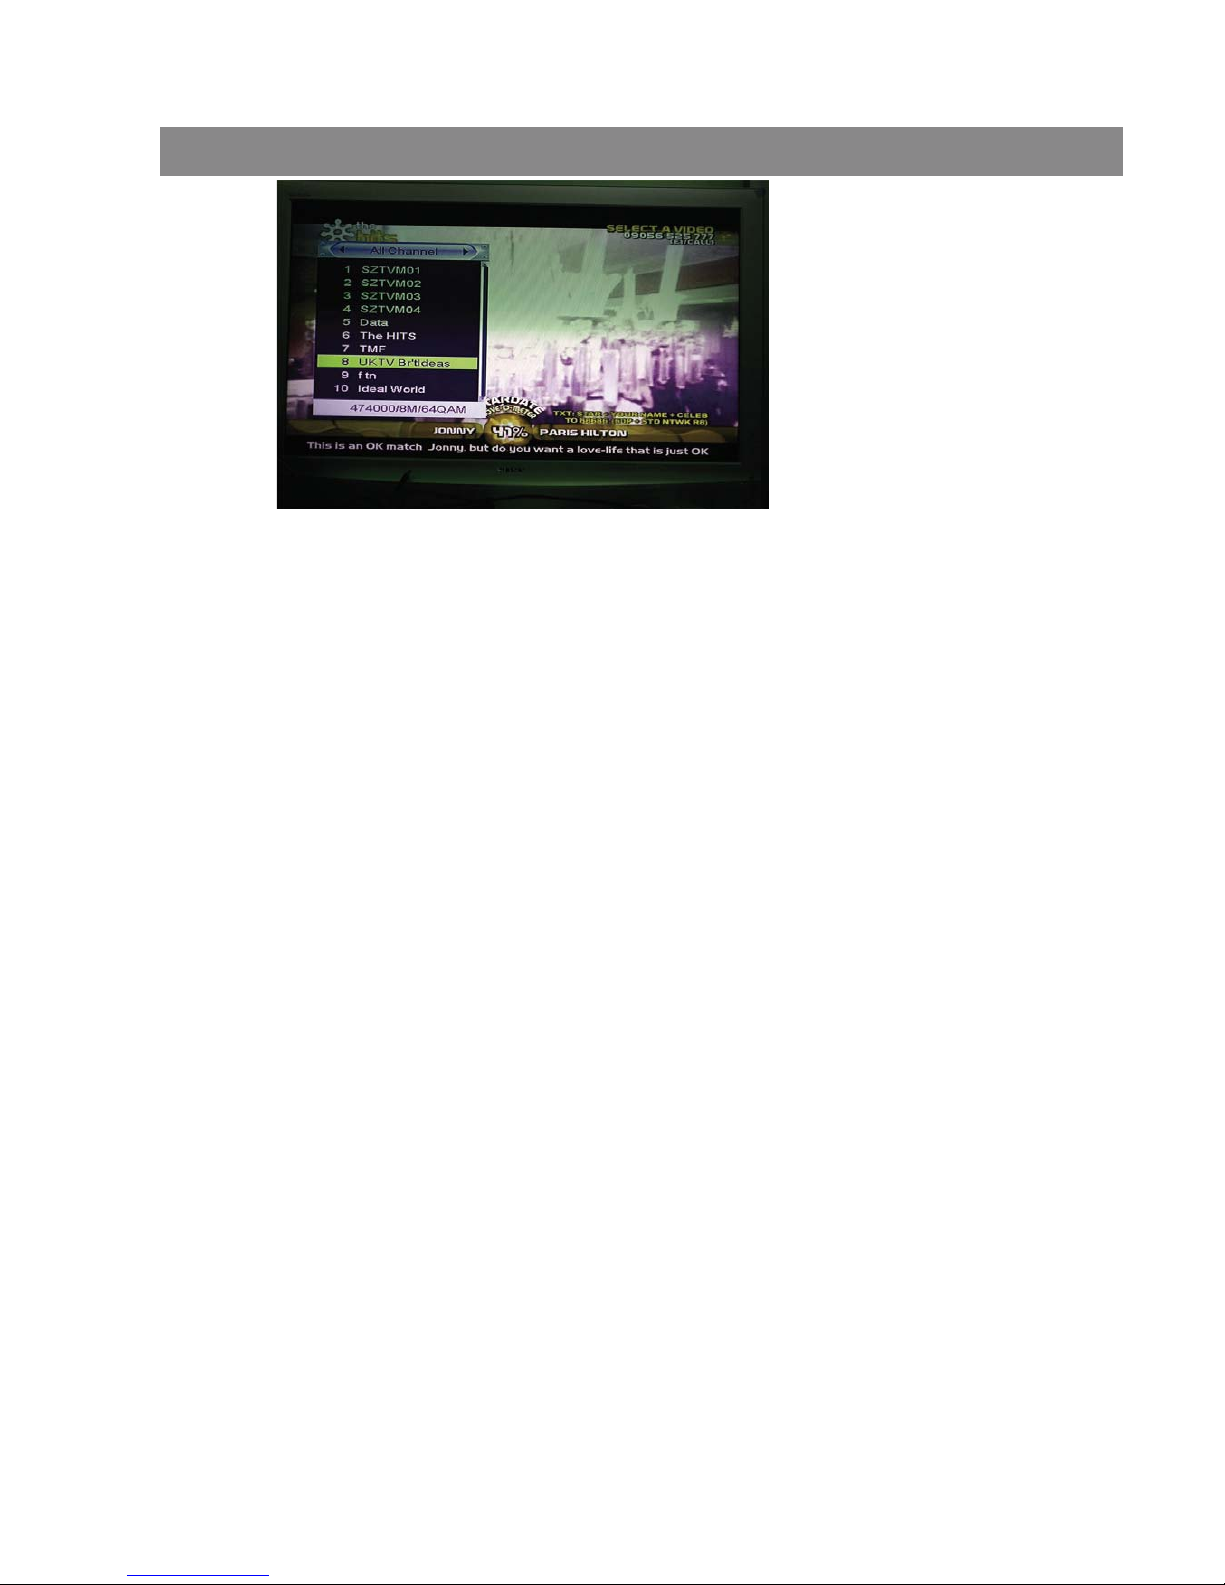
1 In full screen, press [OK] key or [CH.LIST] can enter “Channel List”.
2 Press [Left/Right] key to change favorite.
3 Press [Up/Down] key to move highlight and press [OK] key to play the
highlighted channel.
19/11
1 Press [TEXT] key in full screen, you can open teletext page on the
channel which has teletext information.
2 If the channel has no teletext information, it will show “No Data” on the
screen.
11.13 Menu
1 Press [SETUP] key can open the menu, exit the current menu to last
menu or close the window.
11.15 Information
1 In full screen, press [INFO] key can open information screen, it will shows
program banner.
2 In the program banner, press [INFO] key again, the window shows the
parameters of current channel.
Basic Operations
Page 28
11.17 Page Up/Page Down
1 In Channel list, press [Page+/Page-] key can page up and page down
the channel list.
11.18 Record
1 Press [Record] key can record current program to USB disc. The
default record duration is 2 hrs.
2 Press [Record] key again can input record duration.
11.19 PLAY
Press [PLAY] key can change to normal playback mode while other trick
mode is enabled such as PAUSE, Forward or Reverse.
11.20 Pause
1 In playing mode, press [Pause] key, the picture will be paused, but the sound
of the channel will still continues.
2 Press [PAUSE] key again, the screen’s picture will skip over to the current
playing picture, and the sound of the channel will correspond playing.
3 In playing mode, press [Pause] key, the picture will be paused, but the sound
of the channel will still continues.
4 Press [PAUSE] key again, the screen’s picture will skip over to the current
playing picture, and the sound of the channel will correspond playing.
11.21 STOP
1 In the time-shift mode, press [STOP] key can stop time-shift play and
comeback to life position.
2 When recording, press [STOP] key will list the recording programs. Press
[STOP] again will stop recorder.
3 When playing recorded file from record manager, press [stop] key will stop
playing file and comeback to record manager menu.
Basic Operations
Page 29

Basic Operations
11.22 FB
Press [FB] button rewinds backward with X2, X4, X8, X16 and X24 speed
Press [FF] button plays forward with X2, X4, X8, X16 and X24 speed.
11.23 FF
Page 30
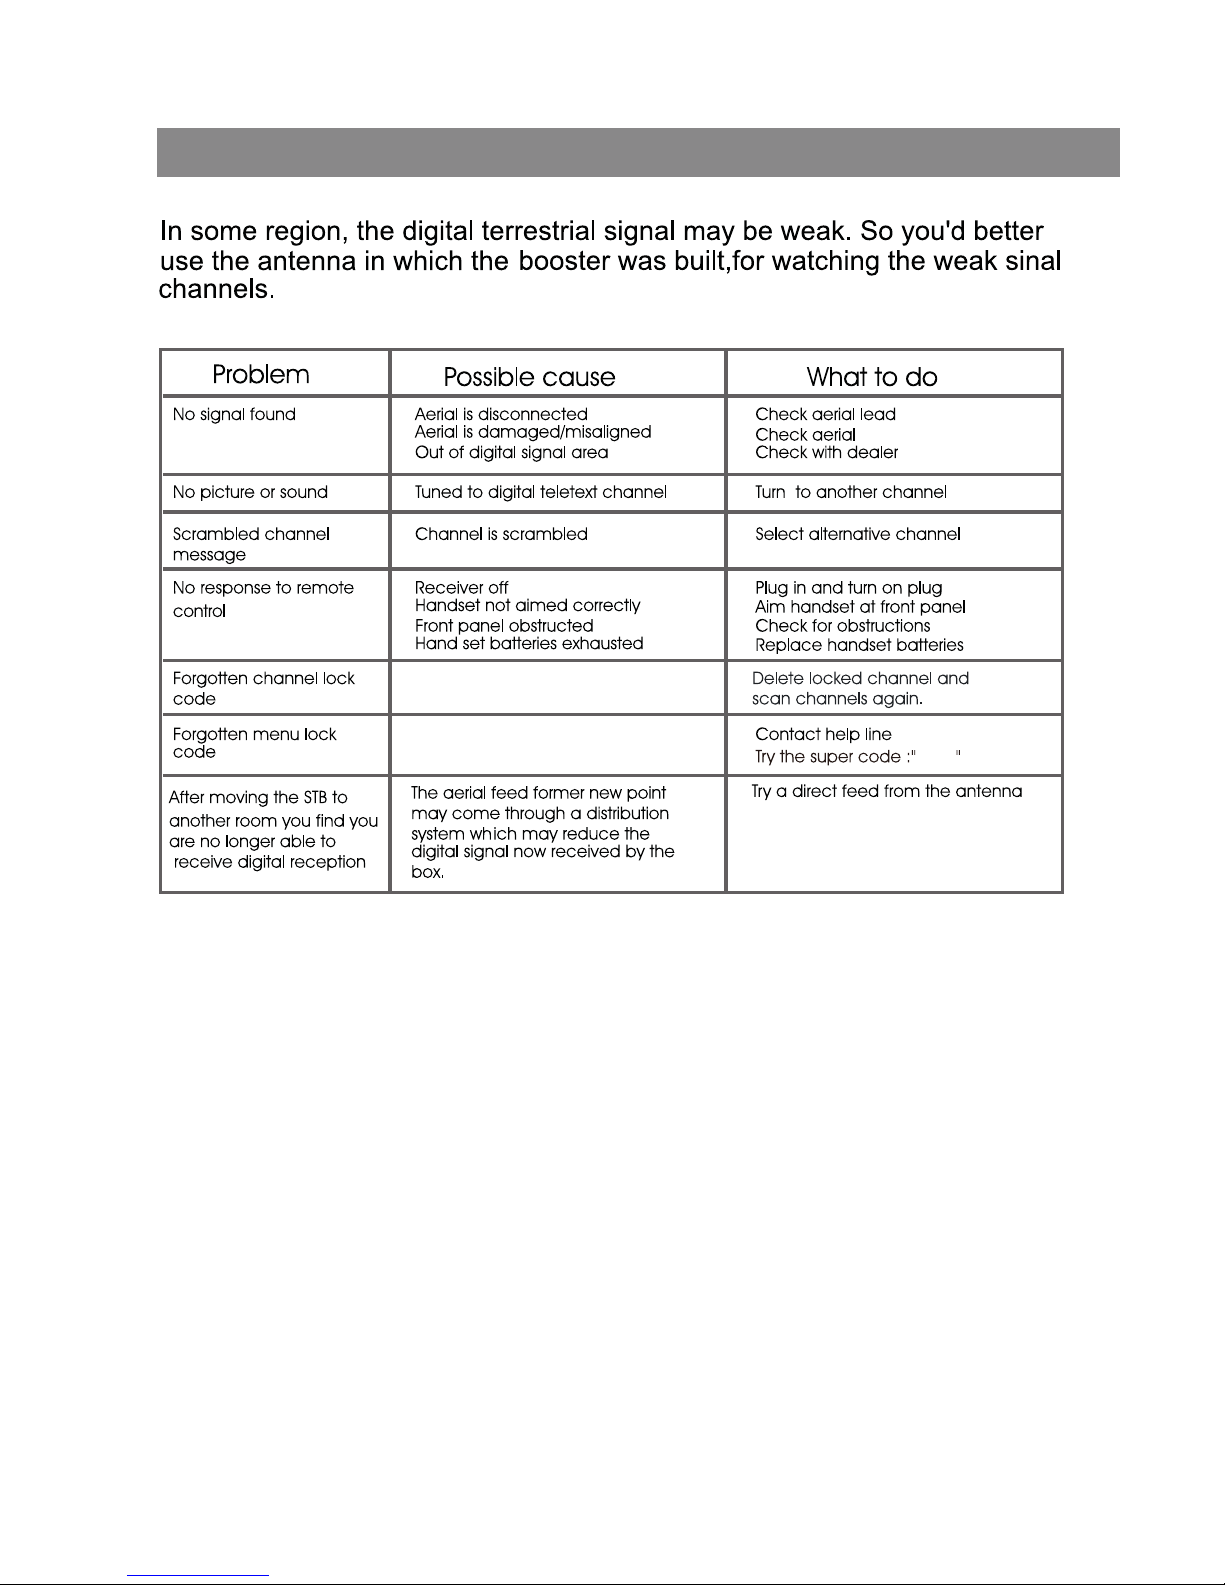
0000
TROUBLESHOOTING
Page 31
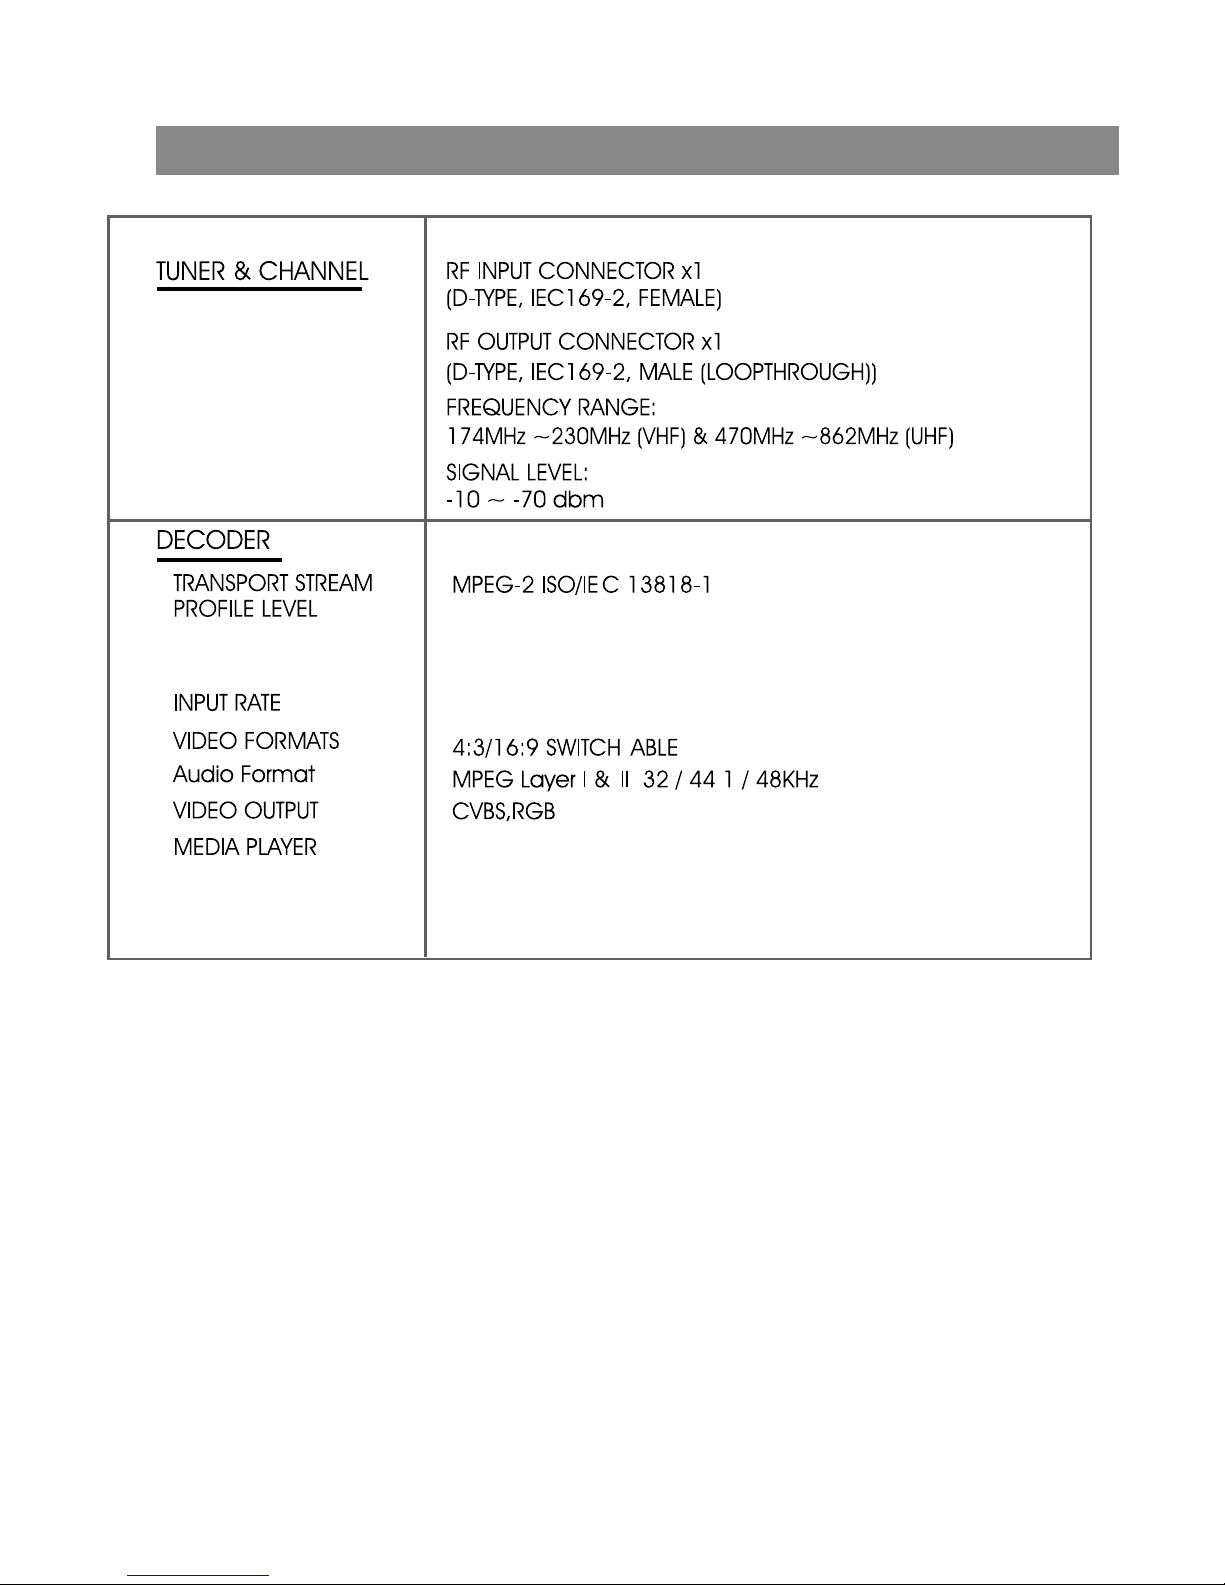
Specifications
MP3/JPEG/BMP
.
VIDEO PROFILE
AND LEVEL
MPEG-1 MPEG-2 MP@ML
MPEG-4 AVC/H.264 HP@L3
MAX. 15Mbit/s@MPEG2 MP@ML
MAX. 12.5Mbit/[email protected]/AVC
MP4: Divx4.5.6; Maximal 1280x720 30fps;
(defined video codec)
AVI: Max L3.1 1280x720 30fps; (defined video codec)
Page 32
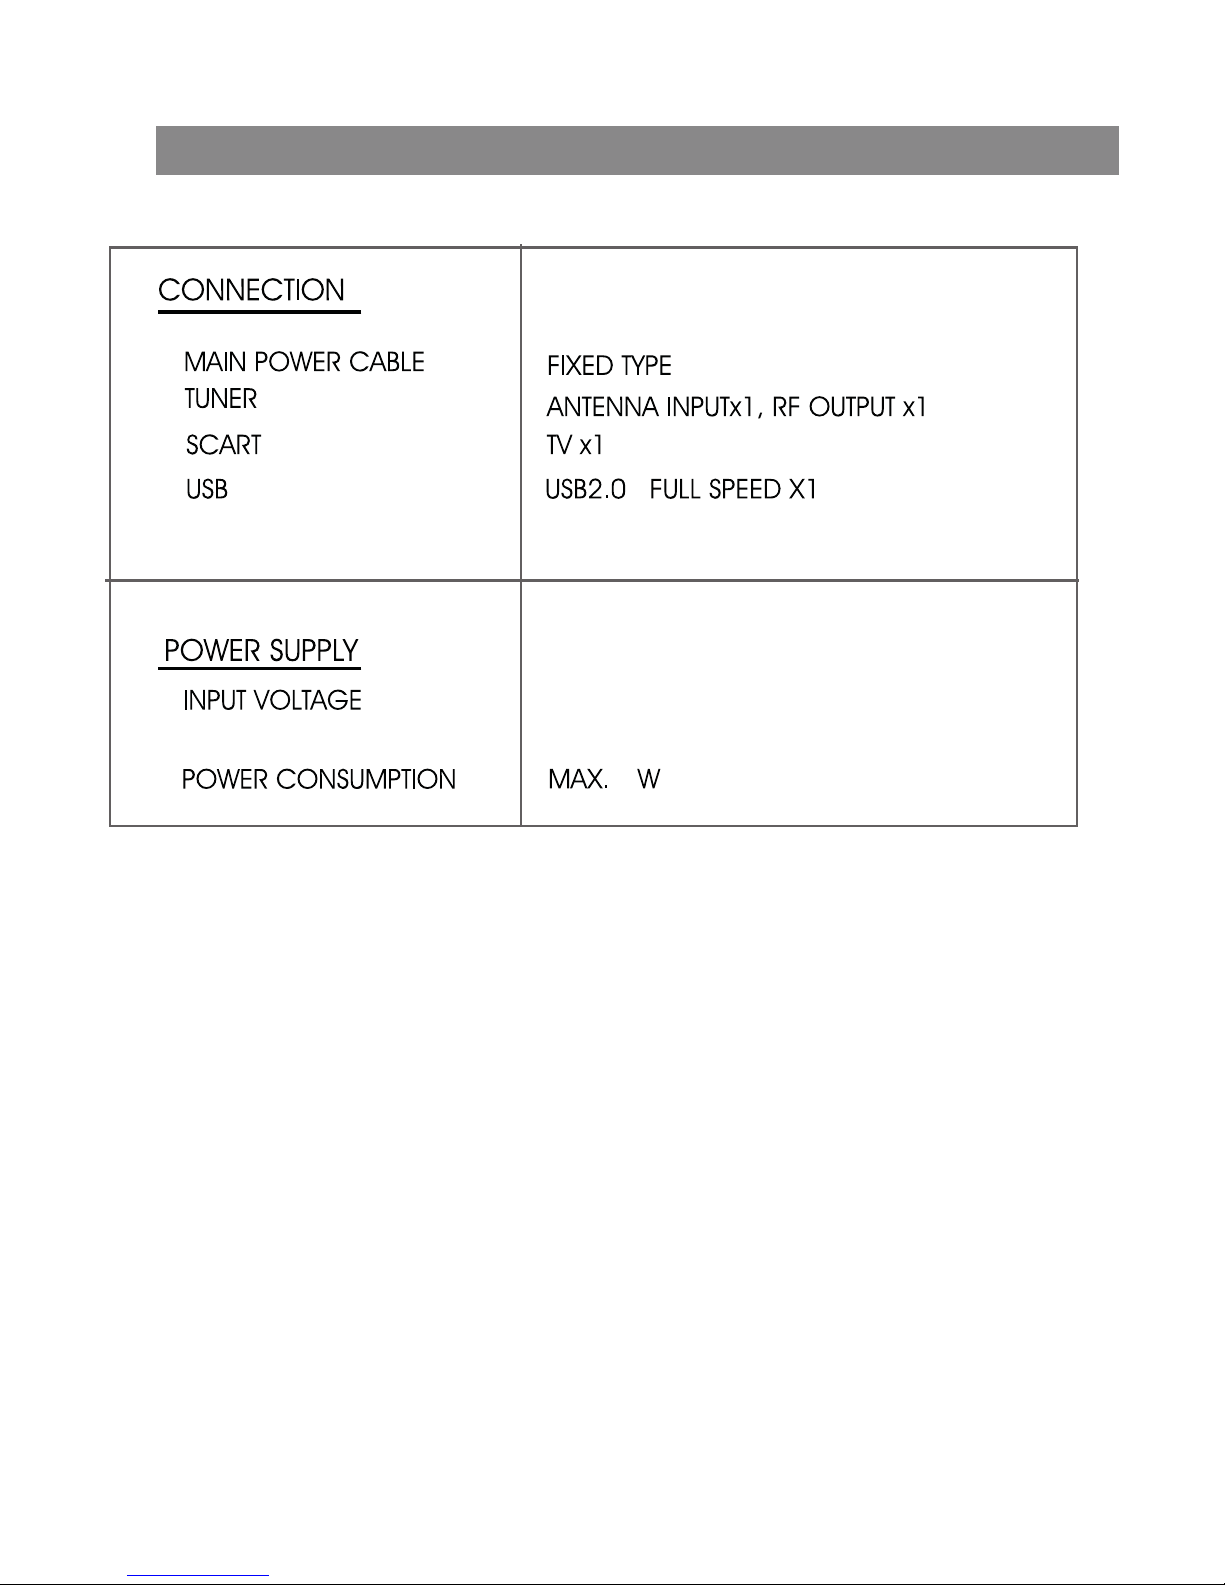
Specifications
~220-240V 50/60Hz
5
STANDBY CONSUMPIION MAX.1W
( USB Max Load: DC 5V, 300mA)
 Loading...