

TVS electronics Proton User Manual

All rights reserved. No part of this publication may be reproduced
or transmitted in any form or by any means, electronic,
mechanical, photocopying, recording, or otherwise, without the
prior written permission of TVS Electronics. The information
contained here is designed only for use with this TVS Proton
printer. TVS Electronics is not responsible for any use of this
information as applied to other printers.
Neither TVS Electronics nor its affiliates shall be liable to the
purchaser of this product or third parties for damages, losses,
costs or expenses incurred by the purchaser or third parties
as a result of accident, misuse or abuse of this product or
unauthorized modifications, repairs or alterations to this product
or other than designed as a original TVS Electronics products.
Every effort has been made to ensure that the information in
this document is complete, accurate and up-to-date. TVS-E
assumes no responsibility for the results of errors beyond its
control.
Copyright C 2004 by TVS Electronics, Chennai, India.
TVS Electronics Limited, 34, Developed Plots, South Phase,
Industrial Estate, Guindy , Chennai - 600 032. INDIA.
Tel: (+91) 44 - 2232 5506/09/5200 5200
Fax:(+91) 44 - 2232 7577
www.tvs-e.com
REL - 2004, 22
th
July.

CONTENTS
1. Introduction 1
2. Know your TVS Proton 2
The TVS Proton Advantage 3
Important Safety Instructions 4
3. Installation
Unpacking the printer 7
Opening printer stand 9
Choosing a place for the printer 10
Installing the ribbon cassette 11
Installing the Inkbank 13
Connecting the printer to your computer 14
Connecting the printer to power 15
Installing the driver 16
4. Loading the paper 20
Loading continuous stationery 21
Loading single sheet 24
Loading roll paper 25
Setting the paper thickness adjust lever 28
Changing the paper path (Paper parking) 29
Adjust the top-of-form position 31
5. Operation Panel
Operation Panel - Introduction 32
Switching the Printer ON/OFF 33
Control Panel Usage 34
Entering Menu Settings 38

Changing the Settings 39
Menu mode Settings 41
Macro Settings 44
6. Maintenance
Cleaning your Printer 45
Preserving the Ribbon Cassette 46
Shifting the printer 47
DOs and DON’Ts 48
7. Troubleshooting 49
Power supply problems 50
Continuous paper loading or feeding problems 51
Single sheet paper loading or feeding problems 52
Roll paper loading or feeding problems 53
Paper parking problems 54
Printing or printout quality problems 55
8. Specifications
Printer Specifications 5 7
Paper Specifications 60
9. ASCII Table 63
10. Customer Support 69
1 1. CD contents 70
12. Website Details 71
13. Glossary 72

FCC Compliance
This equipment has been tested and found to comply with the
limits for a Class B Digital device, pursuant to part 15 of the
FCC Rules. These limits are designed to provide reasonable
protection against harmful interference in a residential
installation. This equipment generates, uses and can radiate
radio frequency energy and, if not installed and used in
accordance with the instructions, may cause harmful
interference to radio communications. However, there is no
guarantee that interference will not occur in a particular
installation. If this equipment does cause harmful interference
to Radio or Television reception, which can be determined by
turning the equipment OFF and ON, the user is encouraged to
try to correct the interference by one or more of the following
measures:
Reorient or relocate the receiving antenna.
Increase the separation between the equipment and the
receiver.
Connect the equipment into an outlet on a circuit different
from that to which the receiver is connected.
Consult the dealer or any authorized service person for
help.
The Manufacturer is not responsible for any Radio or TV
interference caused by unauthorized modifications to this
equipment. Such modifications could avoid the user’s authority
to operate the equipment.
Energy Star Compliance
As an Energy Star Partner,
TVS Electronics has determined
that this product meets the Energy Star guidelines for Energy
efficiency.
The International Energy Star Office Equipment program is a
voluntary partnership with the computer and office equipment
industry to promote the introduction of energy-efficient Personal
Computers, Monitors, Printers, Fax machines, Copiers and
Scanners in an effort to reduce air pollution caused by power
generation.

1. TVS ELECTRONICS - AN INTRODUCTION
TVS Electronics, founded in 1986, started as an IT peripherals
manufacturer in India and has today transformed itself into an
IT Transaction Solution provider and Business Process
Outsourcing partner.
True to its Credo “ Productivity through Intelligence”, the
organization has over the years made significant investments
in organizational development, in creating a transparent and
entrepreneurship driven culture, with a vibrant team of people.
Its commitment to quality and innovations has won many
accolades over the years. TVS Electronics
is implementing
one of the most advanced quality control processes in the
country - Six Sigma, to ensure all products and services provide
complete customer satisfaction, while meeting world quality
standards. For this reason, TVS Electronics’ Quality Policy is
customer-focused and places strong emphasis on continuous
improvement with deep employee involvement. Based on these
initiatives, the company has received a number of awards and
recognition for its manufacturing facilities and superior services.
Its offering include:
1. Transaction Automation Products and Solutions
Dot Matrix Printers
Power Products - UPS Systems
Peripherals and Keyboards
Supplies
Point of Sale Applications
2. Electronic Manufacturing Services
Product and Engineering Development
Sourcing
Contract Manufacturing
Field Support
Tech Support
For more details, log onto www.tvs-e.com
1

2. KNOW YOUR TVS P ROTON
Your TVS Proton is equipped with TVS Electronics' new
generation 9 pin printer head. This printer is capable of
printing both text and graphics in bi-directional mode.
TVS Proton comes with an innovative ribbon cassette,
which has user-replaceable ‘Inkbank’ as the refilling
mechanism. Each Inkbank is capable of printing upto 10
million characters.
TVS Proton's improved straight paper path ensures
smooth paper flow thus practically eliminating paper jams.
This printer is designed for usage of continuous sheet and
roll paper for business environments.
TVS Proton is equipped with built-in roll paper feeder which
is a primary need for all retail and whole sale super market
bill printing applications.
TVS Proton has a unique “Selicon” self lubrication
mechanism making it a maintenance free dot matrix printer .
The front paper path has a dust collector , which simplifies
the cleaning of the printer. So no more carriage struck!
TVS Proton has a compact All-in-one-design with an
integral stand, a roll paper feeder and a stainless steel tear
bar . This saves upto 40% space than most printers today.
2
India’s largest manufacturer of Peripherals
Dot Matrix Printers UPS Systems Keyboards
1. Quick Bill Printing
Quicker Print head firing
frequency
Quicker Paper feed rate
Stainless Steel tear bar
2. Ink Savings Bank
Patented InkBank
Technology
Unique Ribbon Design
3. Easy paper handling
Built-in Roll paper
Feeder
Front feeding with
option to stack paper
Straight paper path
4. Beautifully Strong
Elegant All-in-one
Design: Integral
Printer Stand, Built-in
Roll paper holder,
Stainless Steel
Tear bar
Bullet Proof Strong with
Polycarbonate material
Stainless Steel Tear bar
5. Maintenance Free
Unique "Selicon"
Self-lubrication
mechanism
Quicker cycle time -
from "Enter" to
"Tear"
Lowest Cost of
printing
High Ribbon
Cassette Life
Drop-in roll paper
feed for loading
paper
Convenient to stack
& load paper with
smooth flow of
paper
Low foot print,
occupies 40% less
table space
No extra
accessories
required for printer
Tear bar lasts
through the life of
the printer
No oiling required.
Minimal dust
accumulation
Quicker Printouts
Cuts printing costs
by 50%. Churns out
10 million characters,
or 16340 pages /
Inkbank.
Upto 40% Savings
on space
No paper jams
Saving the cost of
additional accessories
Rugged and Elegant
No more carriage
stuck - Non stop
printing
Lowest downtime,
50% less servicing
requirements
Never Before Feature
Advantage Benefit
The TVS Proton Advantage
3

Important Safety Instructions
Y our TVS Proton has been carefully designed to give you years
of safe, reliable performance. However, there are a few
basic precautions you should take to avoid hurting yourself
or damaging the unit:
Read the setup and operation instructions in the manual
carefully. Be sure to save it for future reference.
Do not place the printer on an unstable surface or near
a radiator or heat source.
Use only the type of power source indicated on the printer’s
label.
Do not use a damaged or frayed power cord.
If you use an extension cord with the printer, make sure
the total ampere rating of all devices plugged into the
extension cord does not exceed the cord’s ampere rating.
During long printing time the printhead might get hot.
Do not touch the Printhead until it cools down.
Unplug the printer before cleaning, and use only damp cloth
for cleaning.
Do not spill liquid on the printer.
Except as specifically explained in this guide, do not
attempt to open or repair the printer yourself.
4

Front View:
Rear View:
TVS Proton
5
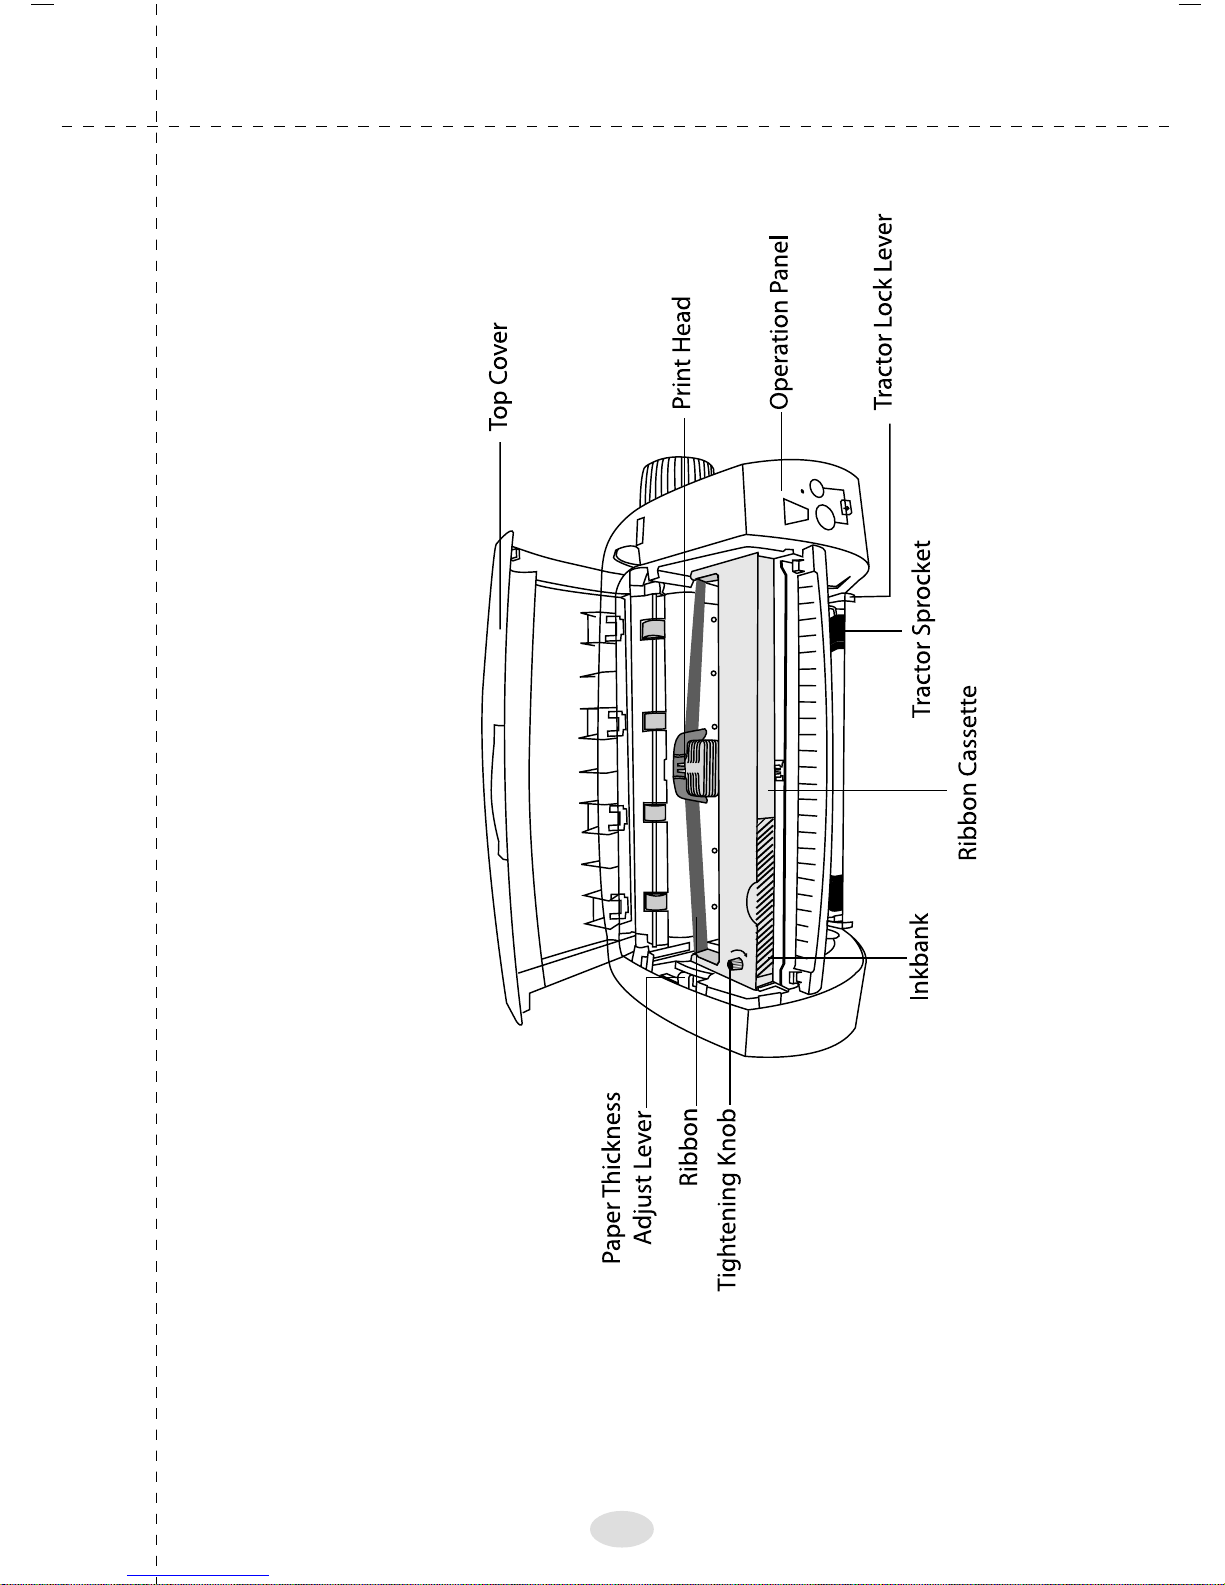
Open View:
TVS Proton
6
3. INSTALLATION
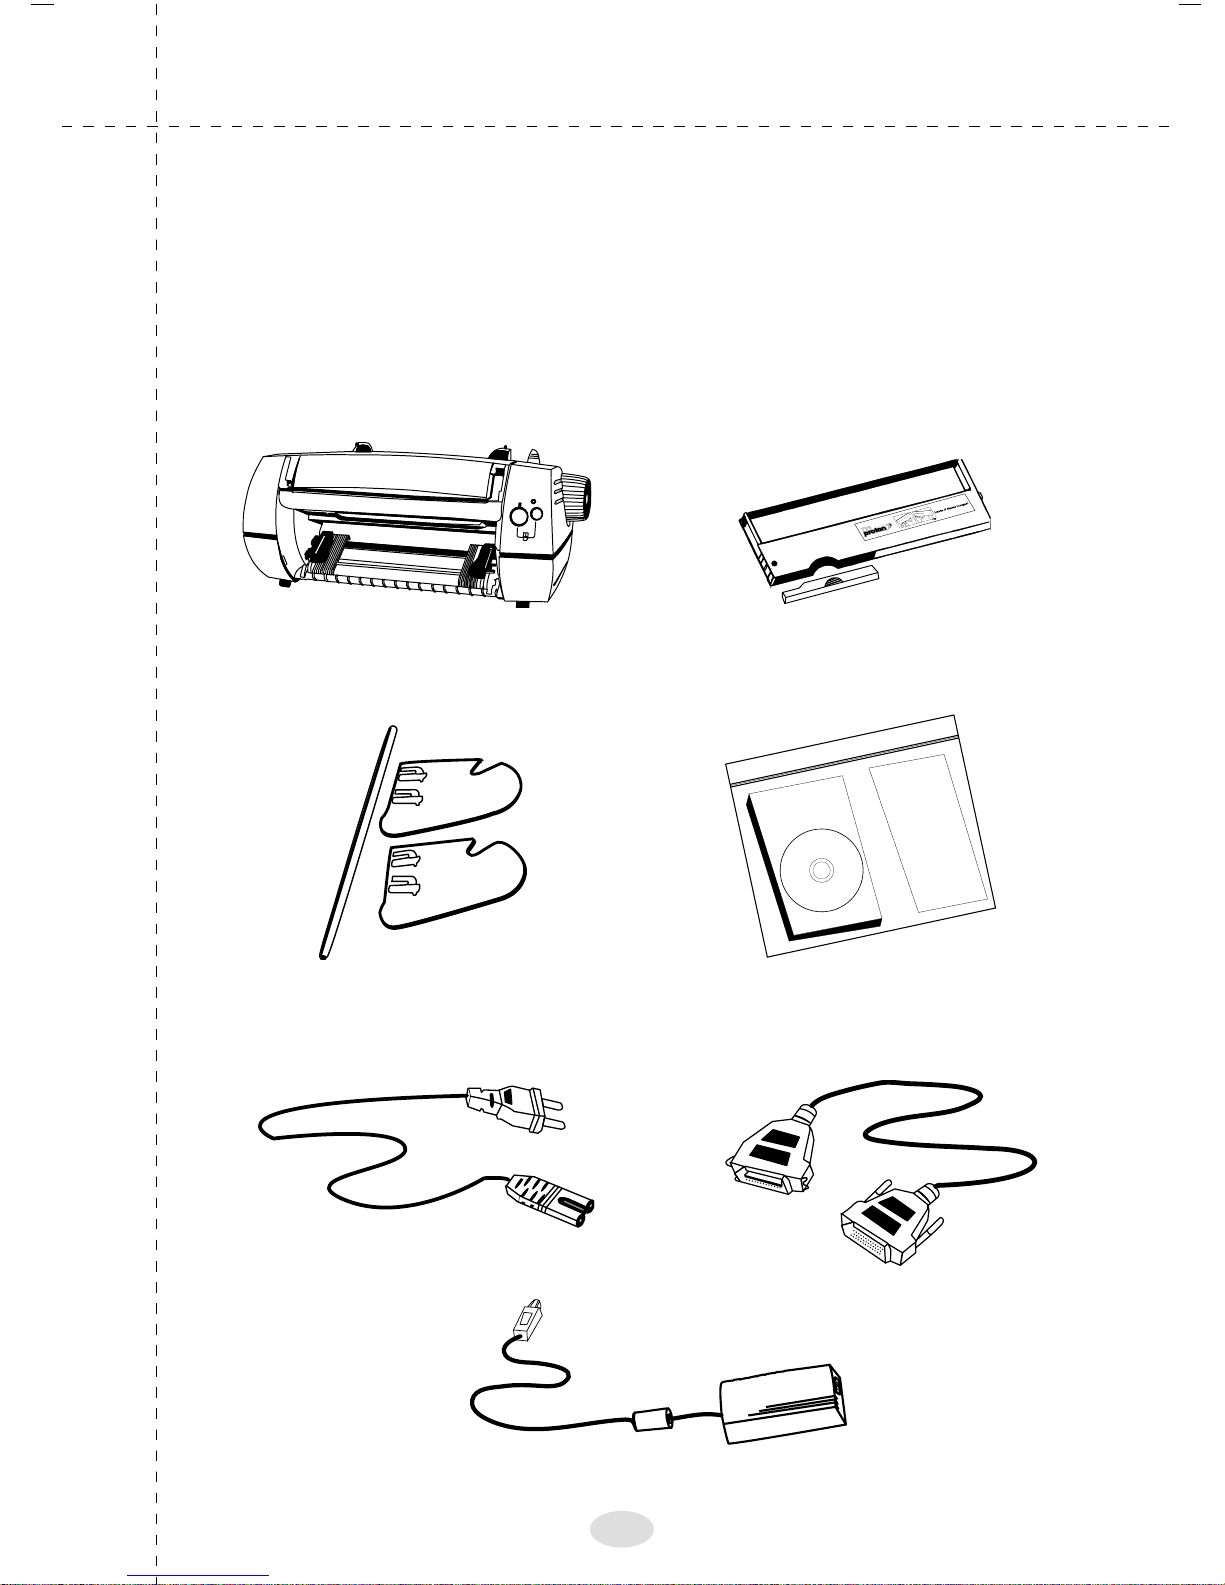
Unpacking the printer
In addition to this guide, your printer box should include a TVS
Proton printer software CD-ROM, and the following items:
W
ar
ranty Kit
CD
-R
O
M
U
se
r G
uide
TVS Proton
Ribbon Cassette &
Inkbank
Printer Driver CD-ROM
User Guide &
Warranty Kit
Roll Paper
Support Holder
Powercord Cable
Power Adaptor
Interface Cable
7

Remove all the protective materials packed around and
inside your printer first, then place the printer on the table.
Save all packing and protective materials in case you need
to ship the printer in the future. It should always be
transported in its original packaging or equivalent materials.
8

Opening printer stand
Unpack the printer from the carton. Open the printer stand
and place it properly on a flat surface as shown. You can also
operate the printer without the stands. All four stands when
opened fully will give you additional space for loading
continuous stationery below the printer as and when required.
9

Choosing a right place for the printer
TVS Proton has been designed to withstand rugged
environmental conditions. But to get the best performance from
your TVS Proton kindly take care of the following points:
Follow the guidelines given below carefully when selecting a
location for your printer .
Make sure you place your TVS Proton on a flat, clean
surface.
Do not forget that your printer will not function properly if it
is kept tilted or at an angle.
Always place the printer at connecting distance to the
network interface cable.
Leave sufficient free space around the printer for easy
operation and maintenance.
Avoid using or keeping the printer in places subject to rapid
changes in temperature and humidity. Keep it away from
direct sunlight, strong light, heat sources, excessive
moisture or dust.
Do not keep the printer near the places subject to shocks
and vibrations.
Make sure your electrical outlet is not controlled by wall
switches or automatic timers. Even a simple power
interruption can erase information in the memory of your
printer or computer.
Do not use the printer electrical outlet for operating large
motors or other appliances, as these can cause voltage
fluctuations.
Always keep the printer and computer system away from
loudspeakers or the base unit of cordless telephones, as
these are potential sources of electromagnetic
interference.
10

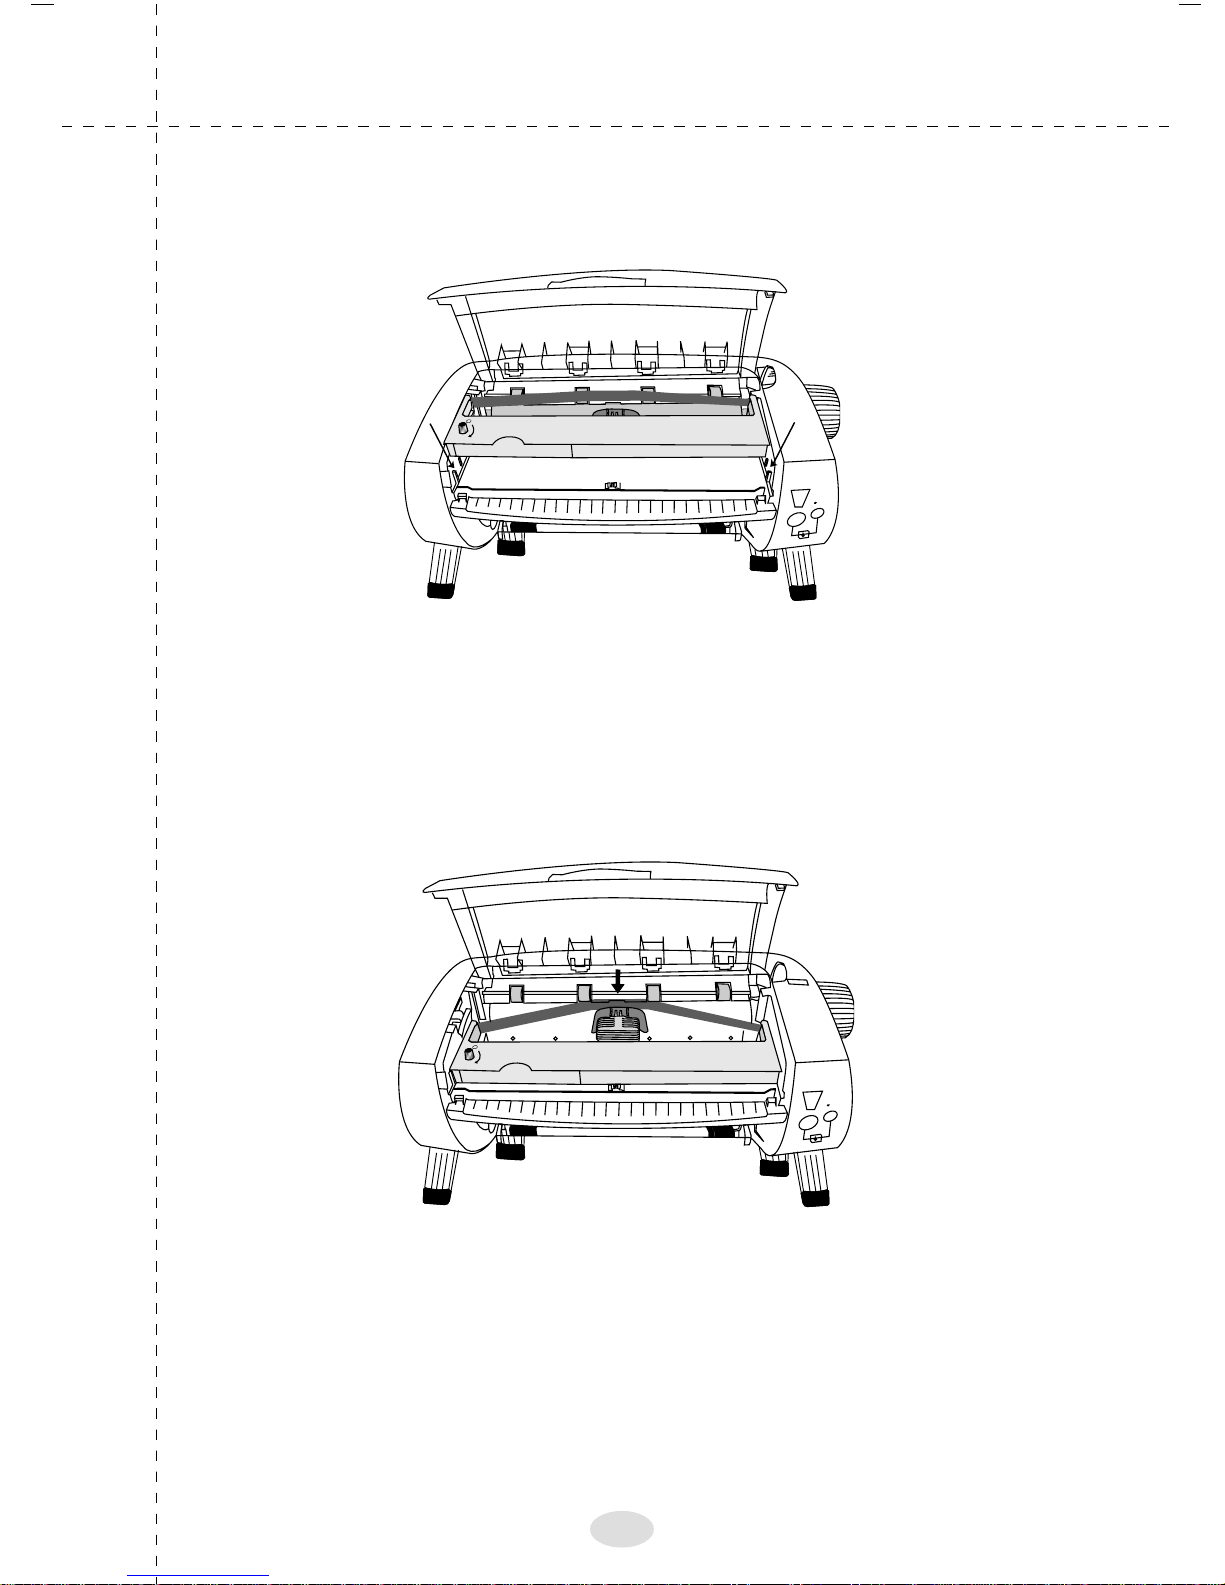
Installing the ribbon cassette
Open the printer cover
Slide the print head to the middle of the printer as shown
below
Turn the ribbon-tightening knob in the direction of the
arrow as shown below.
Insert the ribbon cassette into the printer then press both
sides of the cassette as firmly to fit the plastic hooks in the
printer slots as shown in the picture.
11
Use a point object, such as ball point pen, to guide the
ribbon between the print head and ribbon guide.
12
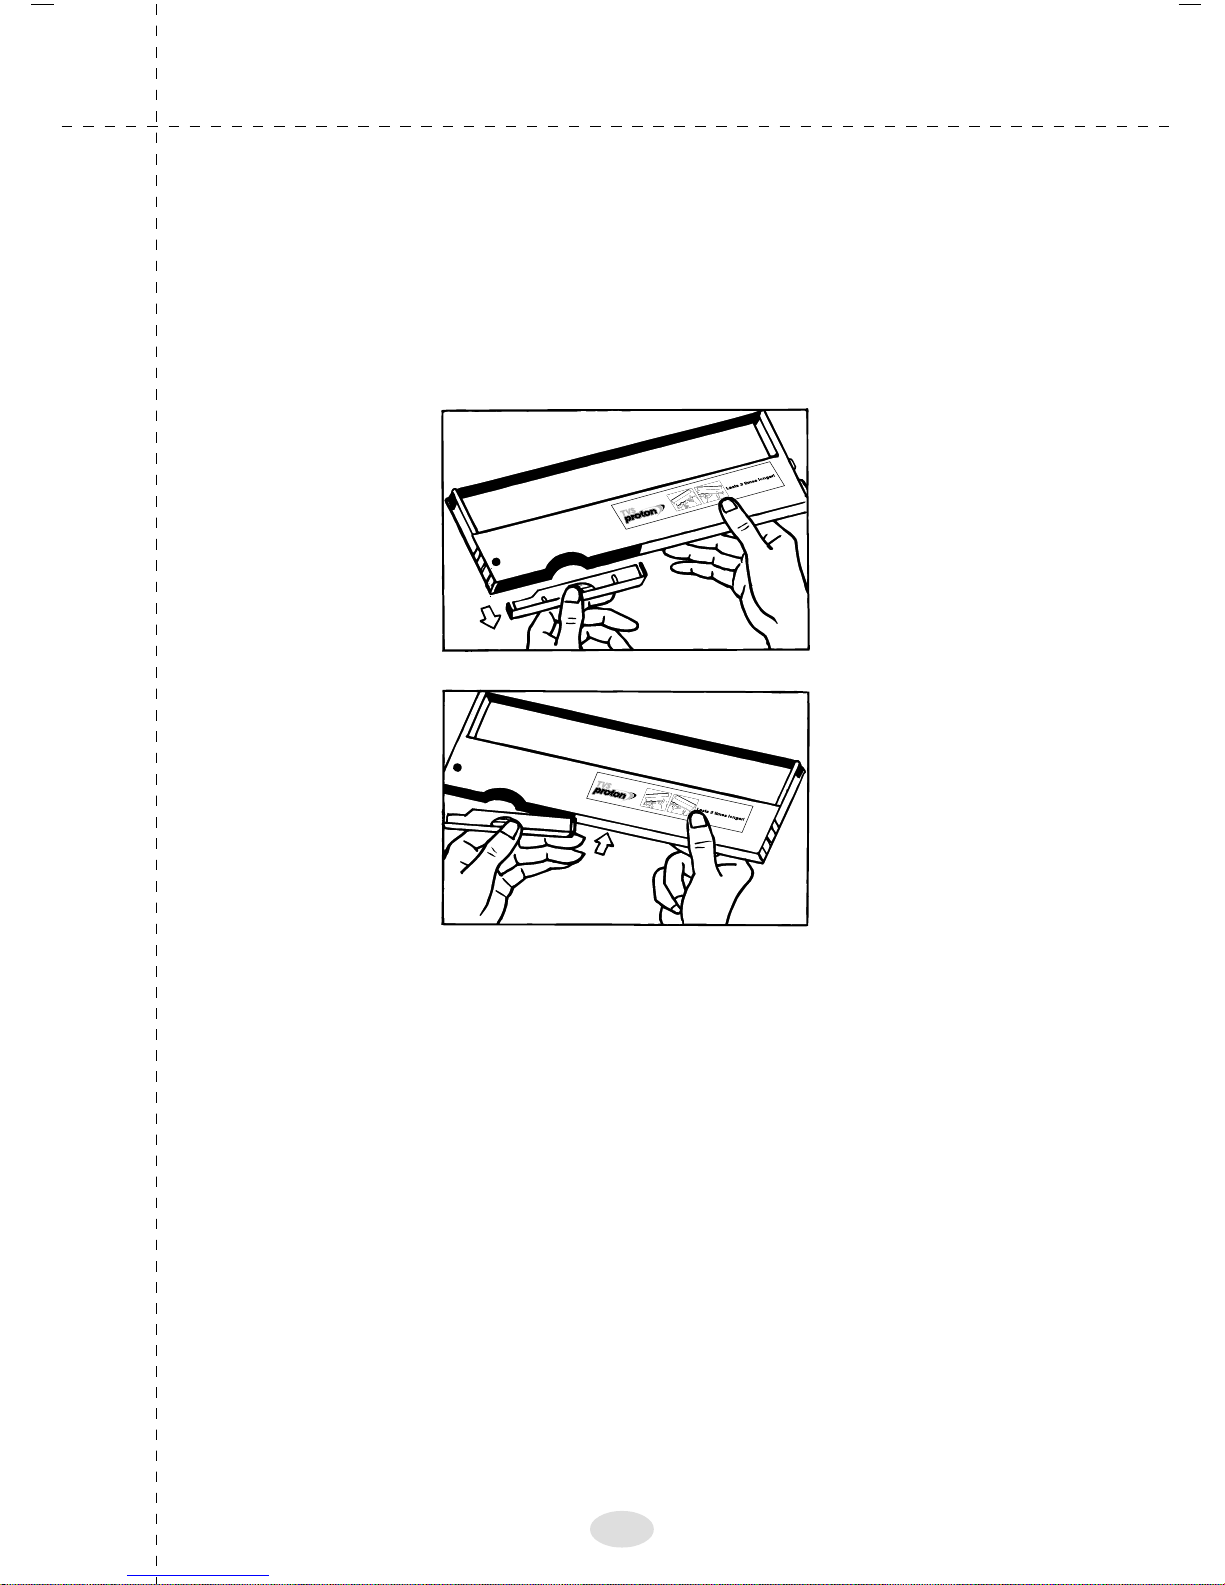
Installing the Inkbank
TVS Proton comes with a patented Inkbank, that increases the
life of the Ribbon Cassette upto 10 million characters. To insert
the Inkbank in the cassette follow the illustration given below:
In order to replace the Inkbank, pull the Inkbank and insert the
new one as shown above.
13

Connecting the printer to your computer
Proton supports a parallel port for interfacing to a computer
and the port is positioned at the back of the printer
Plug one end of the interface cable supplied along
with the printer firmly and evenly into the port socket
and the other end to the port of your computer (host)
Lock the parallel interface using the metal clip on top and
bottom to prevent loose connection or disconnection,
as shown in the picture.
14
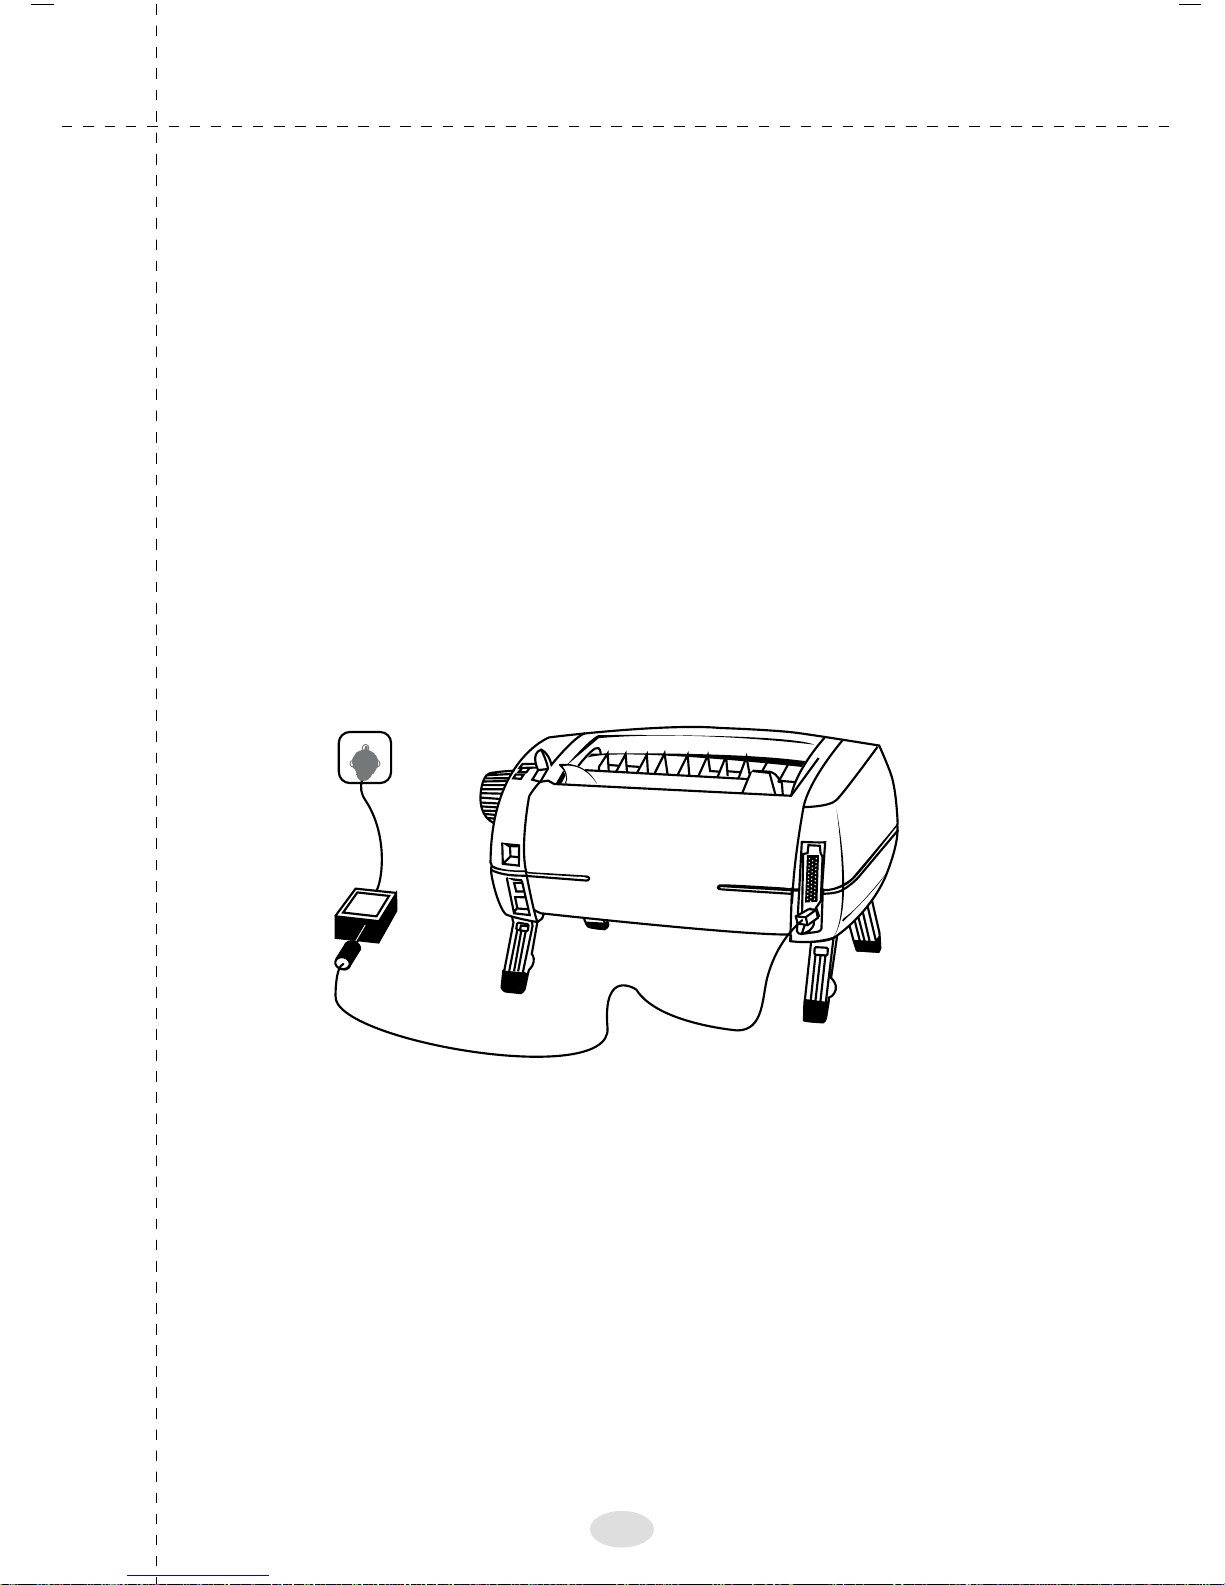
Connecting the printer to power
Power supply unit of TVS Proton is housed externally as a
separate unit.
1. It has to be connected to the main Printer unit, through the
power supply socket positioned at the back, just below
the parallel port.
2. Insert the power supply connector into this socket firmly
and the power plug into the mains power supply.
3. Once the mains supply is switched ON, the printer is
powered on and ready for use.
Note:
Connect the Printer power supply and the PC at the same Earth
Potential (Neutral to Earth voltage of PC and Neutral to Earth
voltage of printer should be the same).
15
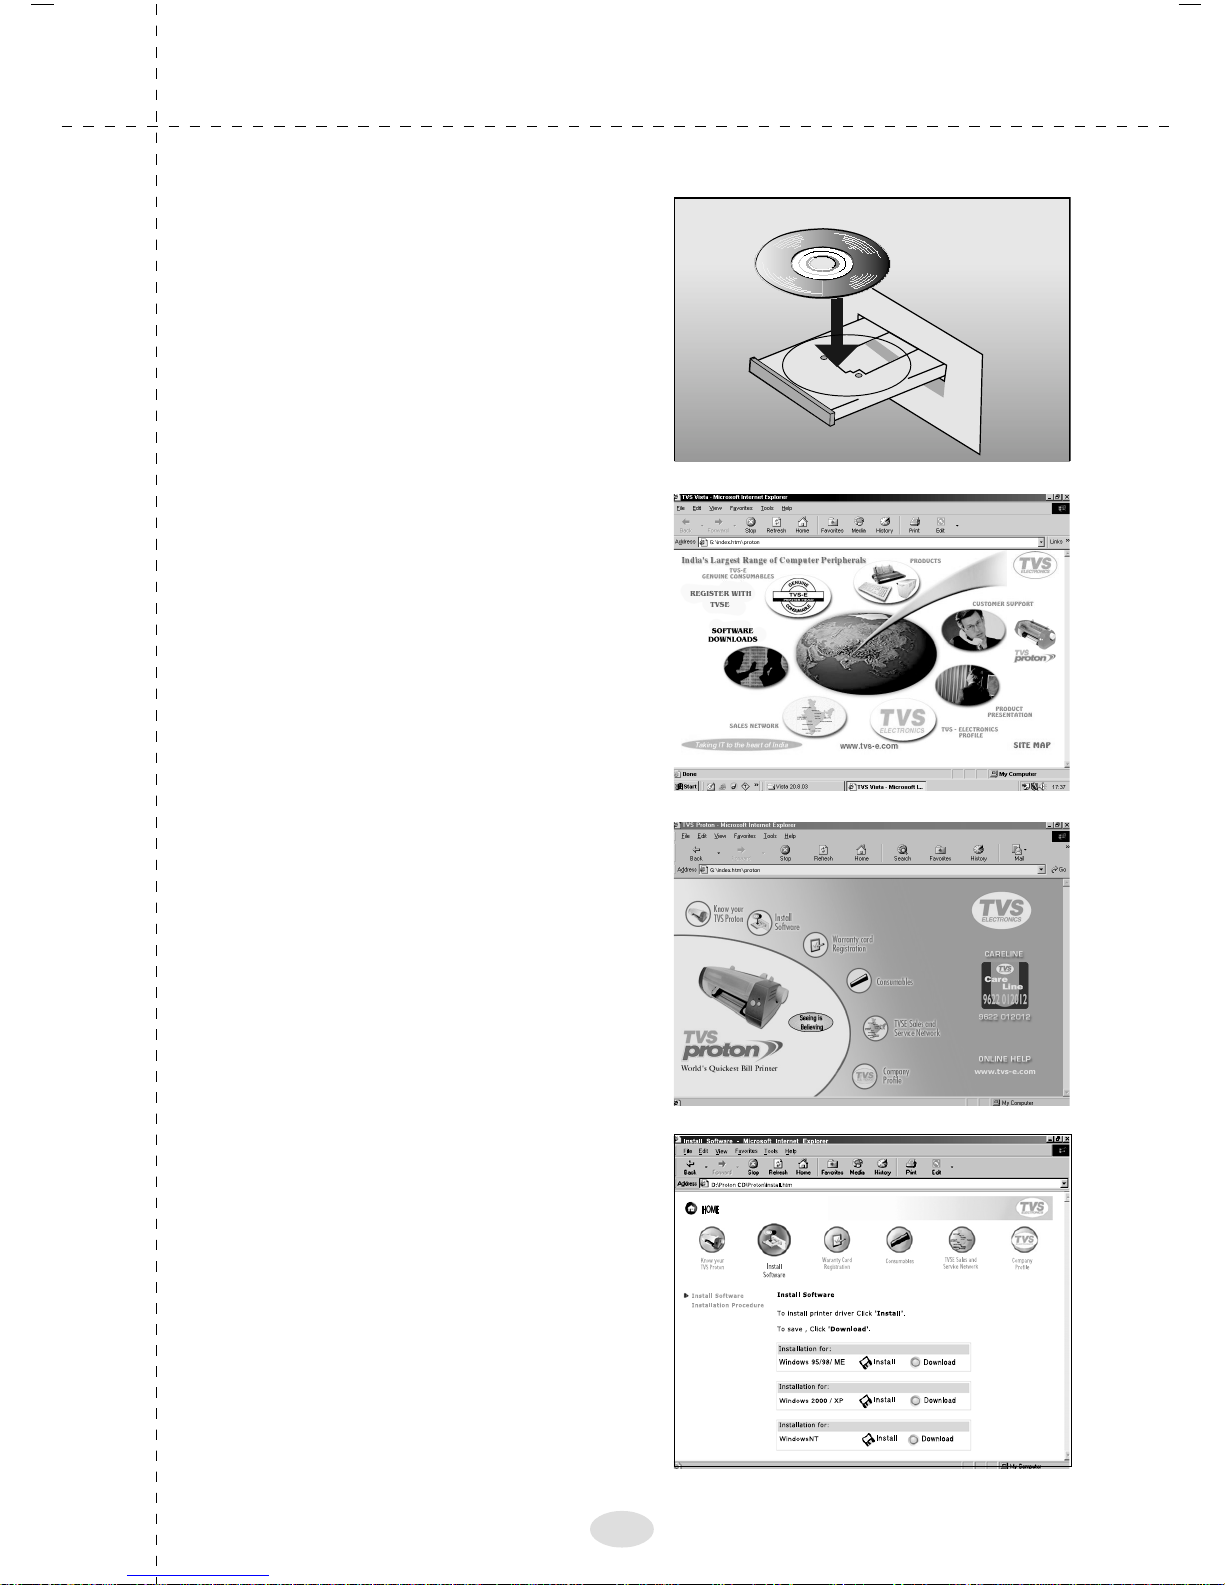
Installing the Driver
1. Insert CD
2. The adjacent screen will
appear in the desktop. Click
"TVS Proton"
3. The adjacent screen will
appear in the desktop. Click
"Install Software"
4. The adjacent screen will
appear in the desktop. Click
"Install" corresponding to
OS.
16
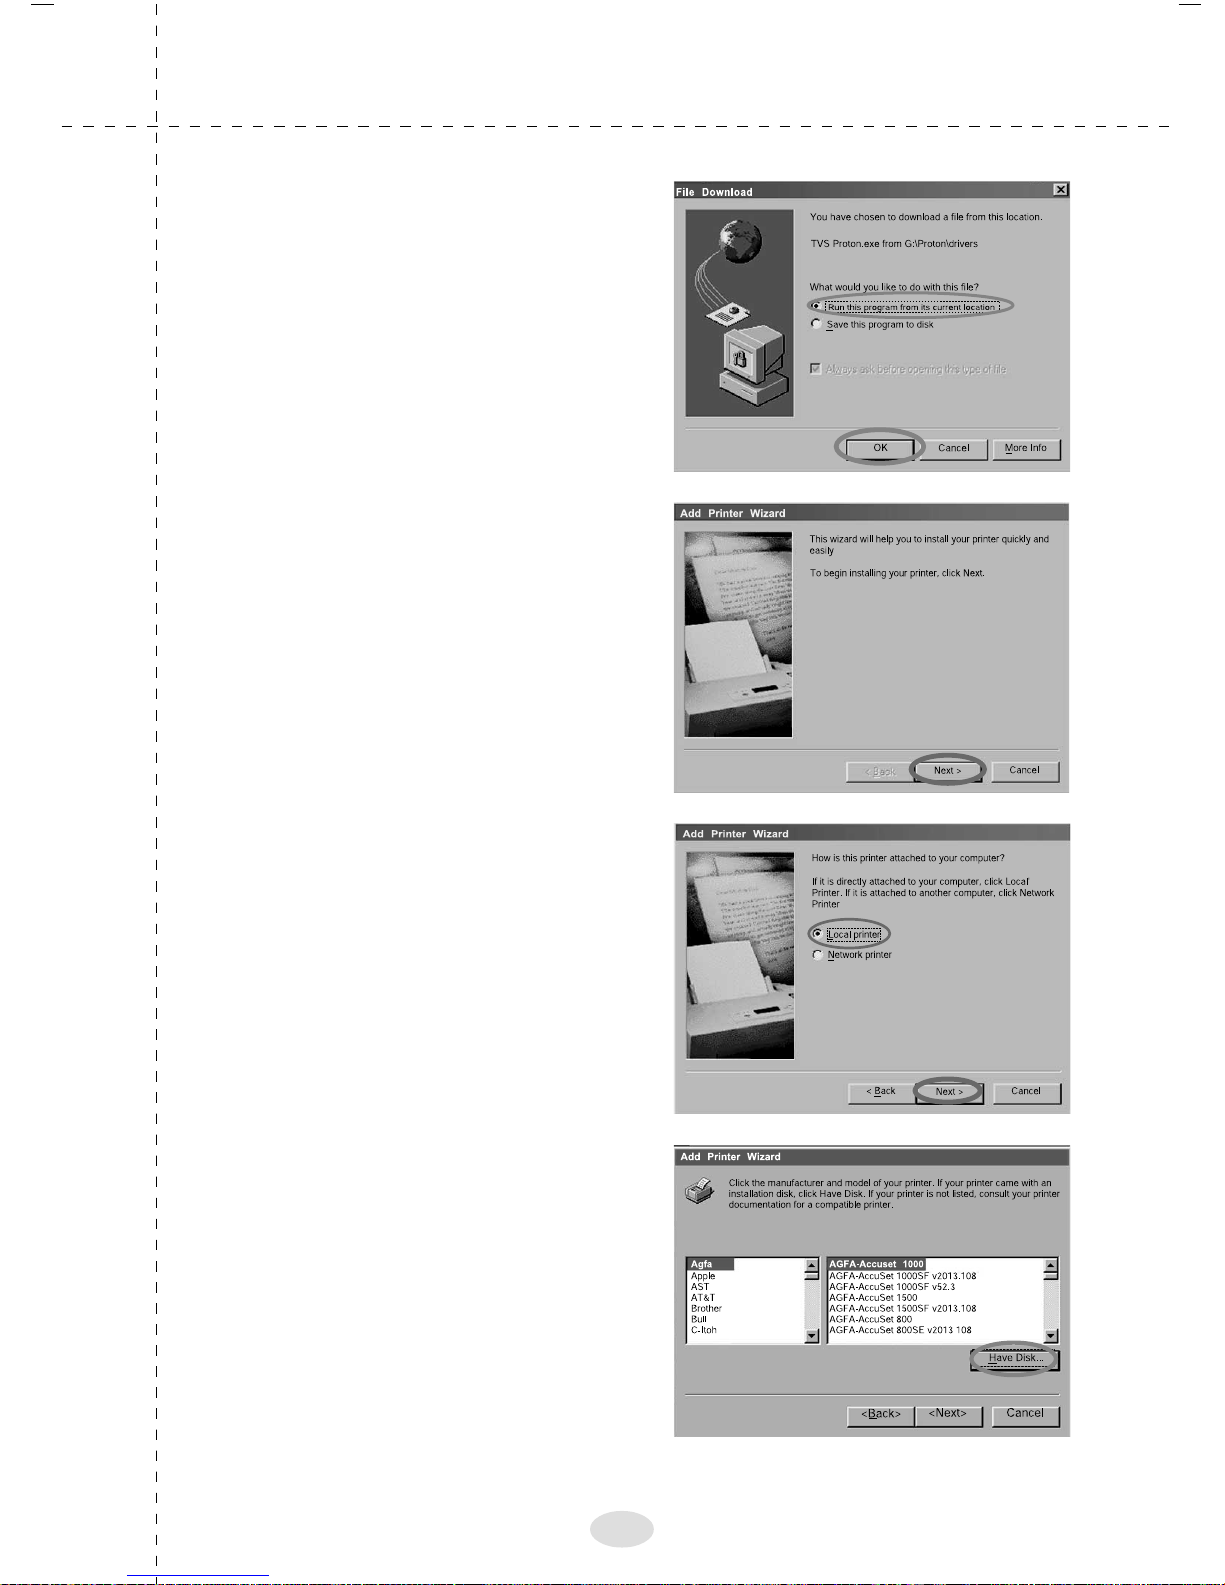
5. The adjacent screen will
appear in the desktop. Click
"Run this program from its
current location" click
"OK".
6. The adjacent screen will
appear in the desktop. Click
“Next”
7. Select the location for the
printer. Click “Next”
8. The adjacent screen will
appear in the desktop. Click
"Have Disk"
17
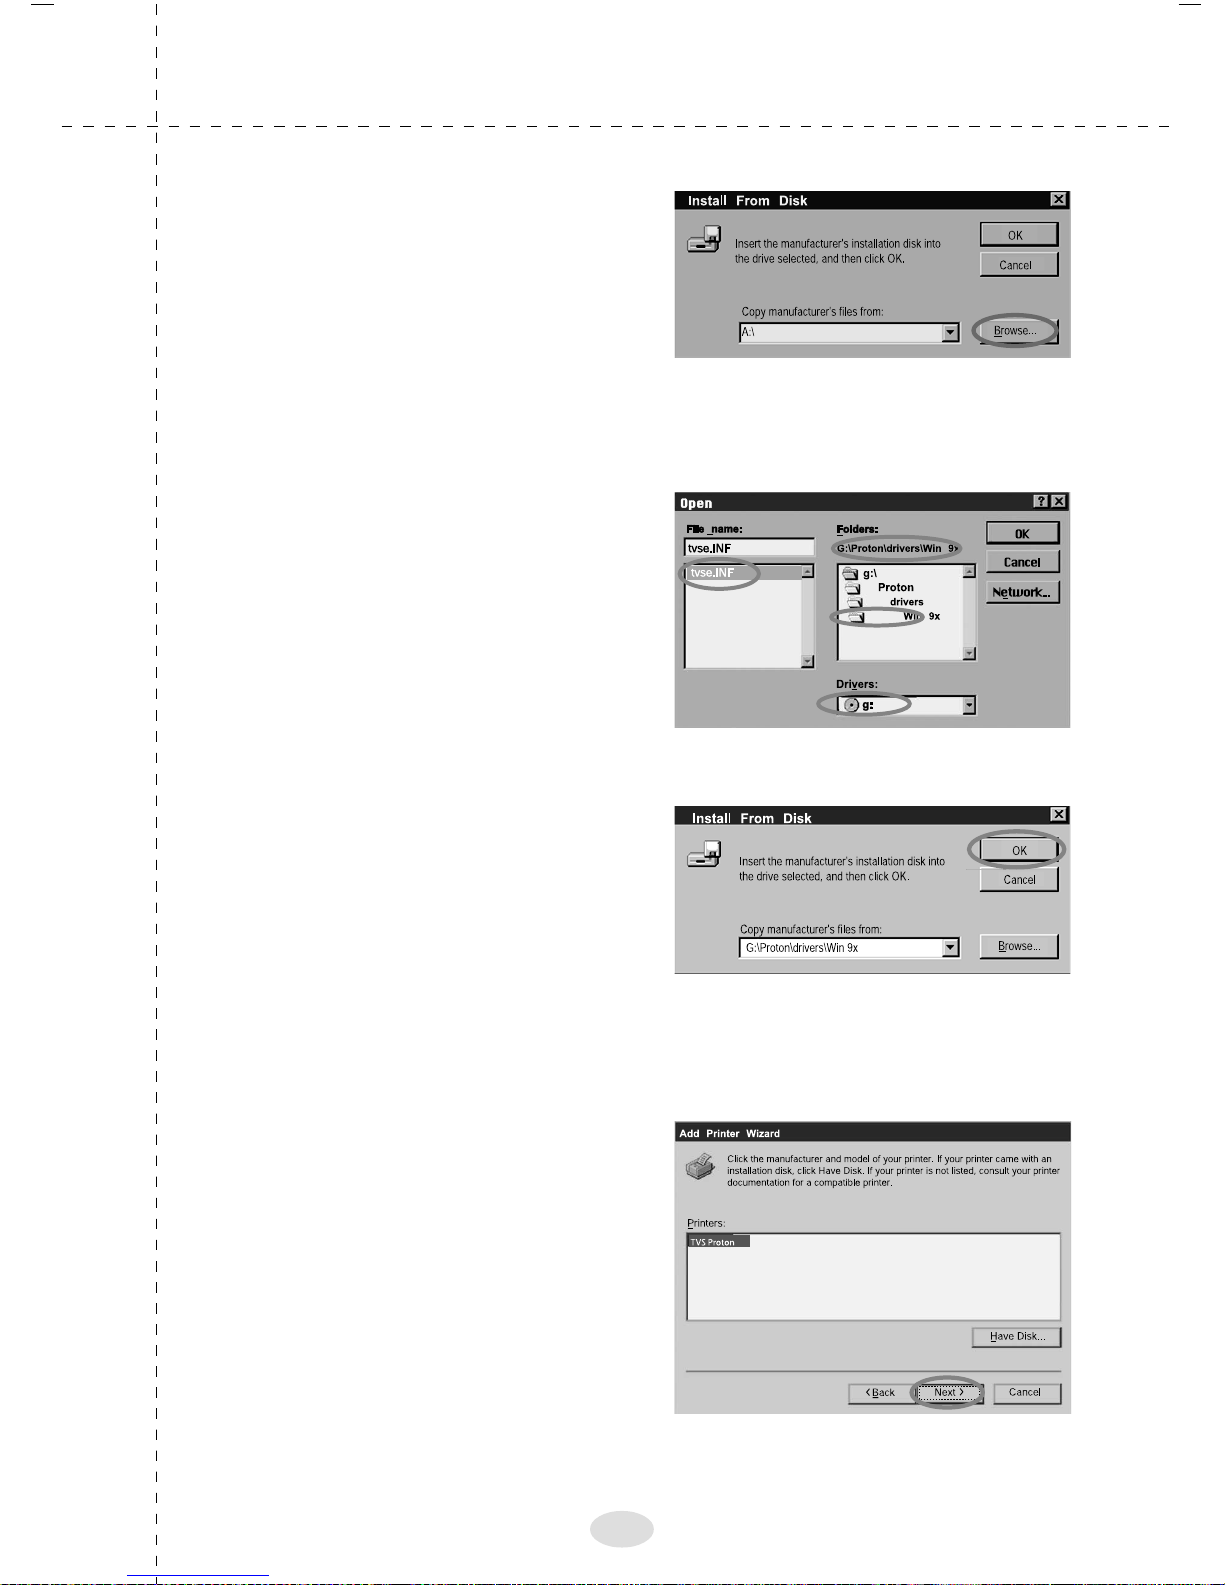
9. The adjacent screen will
appear in the desktop. Click
"Browse"
10. Select CD ROM Select
the "Proton.inf" in the path,
as shown in the adjacent
screen. Click "OK"
11. The adjacent screen will
appear in the desktop. Click
"OK" to select the driver
12. The adjacent screen will
appear in the desktop. Click
"NEXT" The installation files
will be copied
18
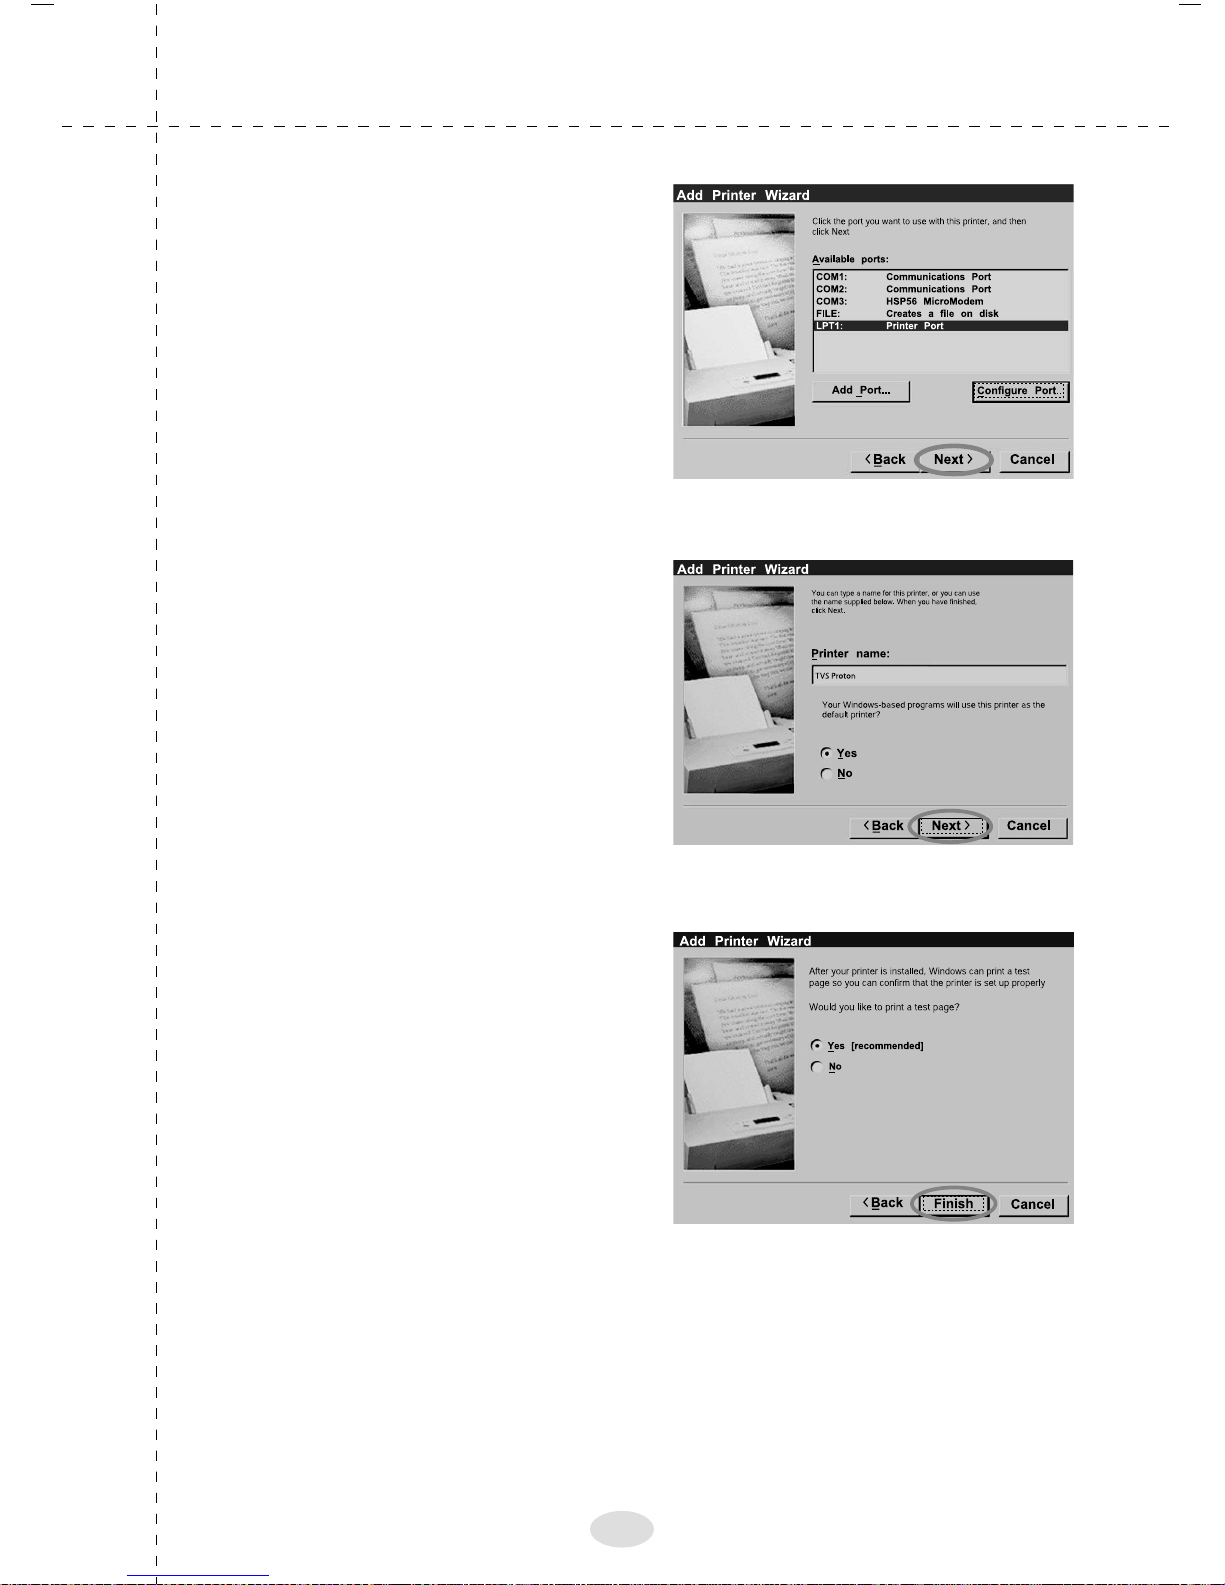
13. Add Printer Wizard will
appear as shown in the
adjacent screen. Select "LPT
1" port and Click "Next"
14. Add Printer Wizard will
ask if you want to set
PROTON as Default Printer.
By selecting "Y es"we can
make TVS PROTON as
Default Printer Click "Next" to
continue.
15. Select "Yes" and Click
"Finish" to continue Printer
will start printing Windows
Test Page.
19
 Loading...