

Page 1

All rights reserved. No part of this publication may be reproduced or transmitted
in any form or by any means, electronic, mechanical, photocopying, recording,
or otherwise, without the prior written permission of TVS Electronics. The
information contained here is designed only for use with this TVS printer. TVS
Electronics is not responsible for any use of this information as applied to
other printers.
Neither TVS Electronics nor its affiliates shall be liable to the purchaser of this
product or third parties for damages, losses, costs or expenses incurred by
the purchaser or third parties as a result of accident, misuse or abuse of this
product or unauthorized modifications, repairs or alterations to this product
or other than designed as a original TVS Electronics products.
Every effort has been made to ensure that the information in this document is
complete, accurate and up-to-date. TVS-E assumes no responsibility for the
results of errors beyond its control.
Copyright © 2004 by TVS Electronics, Chennai, India.
TVS Electronics Limited, 34, Developed Plots, South Phase,
Industrial Estate, Guindy, Chennai - 600 032. INDIA.
Tel: (+91) 44 - 2232 5506/09/5200 5200
Fax:(+91) 44 - 2232 7577
www.tvs-e.com
REL - 2004, 20
th
September.
Page 2

FCC Compliance
This equipment has been tested and found to comply with the limits for a
Class B Digital device, pursuant to part 15 of the FCC Rules. These limits are
designed to provide reasonable protection against harmful interference in a
residential installation. This equipment generates, uses and can radiate radio
frequency energy and, if not installed and used in accordance with the
instructions, may cause harmful interference to radio communications.
However, there is no guarantee that interference will not occur in a particular
installation. If this equipment does cause harmful interference to Radio or
Television reception, which can be determined by turning the equipment OFF
and ON, the user is encouraged to try to correct the interference by one or
more of the following measures:
Reorient or relocate the receiving antenna.
Increase the separation between the equipment and the receiver.
Connect the equipment into an outlet on a circuit different from that to
which the receiver is connected.
Consult the dealer or any authorized service person for help.
The manufacturer is not responsible for any Radio or TV interference caused
by unauthorized modifications to this equipment. Such modifications could
avoid the user’s authority to operate the equipment.
Page 3

Energy Star Compliance
As an Energy Star Partner, TVS Electronics has determined that this product
meets the Energy Star guidelines for Energy efficiency.
The International Energy Star Office Equipment program is a voluntary
partnership with the computer and office equipment industry to promote the
introduction of energy-efficient Personal Computers, Monitors, Printers, Fax
machines, Copiers and Scanners in an effort to reduce air pollution caused by
power generation.
Page 4

CONTENTS
1. Introduction 1
2. Know your MSP 450 Champion
✦✦
✦✦
✦ The MSP 450 Champion Advantage 2
✦✦
✦✦
✦ Important Safety Instructions 3
3. Installation
✦✦
✦✦
✦ Unpacking the printer 8
✦✦
✦✦
✦ Identifying Printer Components 9
✦✦
✦✦
✦ Choosing a place for the printer 10
✦✦
✦✦
✦ Installing the ribbon cassette 11
✦✦
✦✦
✦ Installing the Inkbank 14
✦✦
✦✦
✦ Connecting the printer to power 15
✦✦
✦✦
✦ Connecting the printer to your computer 16
✦✦
✦✦
✦ Installing the driver 17
4. Control Panel
✦✦
✦✦
✦ Control Panel Usage 20
✦✦
✦✦
✦ Entering Menu Settings 26
✦✦
✦✦
✦ Changing the settings 27
✦✦
✦✦
✦ Menu mode settings 29
5. Loading the paper
✦✦
✦✦
✦ Setting the Paper select lever and
Tractor select lever 32
✦✦
✦✦
✦ Setting the paper thickness lever 33
✦✦
✦✦
✦ Installing the Tractor Unit 34
✦✦
✦✦
✦ Installing the Tractor in the Push position 36
✦✦
✦✦
✦ Installing the Tractor in the Pull position 37
✦✦
✦✦
✦ Installing Paper Insertion Guide 38
✦✦
✦✦
✦ Loading single sheet 39
✦✦
✦✦
✦ Loading continuous stationery 41
✦✦
✦✦
✦ Bottom Paper Feeding 44
Page 5

✦✦
✦✦
✦ Paper Tear-Off 46
✦✦
✦✦
✦ Paper Park 48
✦✦
✦✦
✦ Printing on Multi-part forms 51
✦✦
✦✦
✦ Copy Mode 52
✦✦
✦✦
✦ Adjust the top-of-form position 53
6. Maintenance
✦✦
✦✦
✦ Cleaning your MSP 450 Champion 55
✦✦
✦✦
✦ Preserving the Ribbon Cassette 56
✦✦
✦✦
✦ Shifting the printer 57
✦✦
✦✦
✦ DOs and DON’Ts 58
7. Troubleshooting
✦✦
✦✦
✦ Power 59
✦✦
✦✦
✦ Paper feeding 60
✦✦
✦✦
✦ Printing 62
8. Specifications
✦✦
✦✦
✦ Printer Specifications 65
✦✦
✦✦
✦ Paper Specifications 68
9. ASCII Table 71
10. Customer Support 77
11. Website Details 78
12. Glossary 79
Page 6

1. TVS ELECTRONICS - AN INTRODUCTION
TVS Electronics, founded in 1986, started as an IT peripherals manufacturer in
India and has today transformed itself into an IT Transaction Solution provider
and Business Process Outsourcing partner.
True to its Credo “Productivity through Intelligence”, the organization has
over the years made significant investment in organizational development, in
creating a transparent and entrepreneurship driven culture, with a vibrant
team of people. Its commitment to quality and innovations has won many
accolades over the years. TVS Electronics is implementing Six Sigma, to ensure
all products and services provide complete customer satisfaction, while meeting
world quality standards. For this reason, TVS Electronics’ Quality Policy is
customer-focused and places strong emphasis on continuous improvement with
deep employee involvement. Based on these initiatives, the company has
received a number of awards and recognition for its manufacturing facilities
and superior services. Its offering includes:
1. Transaction Automation Products and Solutions
Dot Matrix Printers
Power Products - UPS Systems
Peripherals and Keyboards
Supplies
Point of Sale Applications
2. Electronic Manufacturing Services
Product and Engineering Development
Sourcing
Contract Manufacturing
Field Support
Tech Support
For more details, log onto www.tvs-e.com
1
Page 7

2. KNOW YOUR MSP 450 CHAMPION
✦✦
✦✦
✦ The MSP 450 Champion Advantage
It is the best-in class office printer offering true language printing - for
printing letters, documents, proposals and invoices.
Your MSP 450 CHAMPION is equipped with the new generation 9 pin
printhead from TVS Electronics. This printer is capable of printing both
text and graphics in bi-directional mode.
Your MSP 450 CHAMPION comes with 200 million characters printhead.
The performance of the printer depends on the life of the printhead.
Therefore, HIGHER THE LIFE, BETTER THE PERFORMANCE.
Your MSP 450 CHAMPION has an excellent Multi-part priting capability.
The uniquely designed pins in the printhead create an extra impact on
the multi-part paper thus, delivering higher copy capability with excellent
clarity even on the last copy.
Your MSP 450 CHAMPION comes with an innovative ribbon cassette, which
has user replaceable ‘Inkbank’ as the refilling mechanism. Each Inkbank
is capable of printing upto 10 million characters.
Your MSP 450 CHAMPION is equipped with a specially made carriage design
with a self lubricating “SELICON” bush making carriage stuck problem
a thing of the past. This reduces down time. So, No more oiling! No
more Carriage stuck!!
2
Page 8

✦✦
✦✦
✦ Important Safety Instructions
Your MSP 450 Champion has been carefully designed to give you years of safe,
reliable performance. However, there are a few basic precautions you should
take to avoid hurting yourself or damaging the unit:
1. Read all of these instructions and save them for later reference.
2. Follow all warnings and instructions marked on the product.
3. Unplug this product from the wall outlet before cleaning. Do not use
liquid or aerosol cleaners. Use a damp cloth for cleaning.
4. Do not use this product near water.
5. Do not place this product on an unstable cart, stand or table. The
product may fall causing serious damage to the product.
6. Slots and openings at the back or bottom of the cabinet are provided
for ventilation. To ensure reliable operation of the product and to
protect if from overheating, do not block or cover these openings.
This product should never be placed near or over a radiator or
heat register. This product should be placed in a built-in installation
unless proper ventilation is provided.
7. This product should be operated from the type of power source
indicated on marking label. If you are not sure of the type of power
available, consult your dealer or local power company.
8. This product is equipped with a 3-wire grounding-type plug, a plug,
having a third grounding pin. This plug will only fit into a grounding
type power outlet. This is a safety feature. If you are unable to insert
the plug into the outlet, contact your electrician to replace your obsolete
outlet. Do not defeat the safety purpose of the grounding-type plug.
9. Do not allow anything to rest on the power cord. Do not locate this
product at such a place where the cord will be walked on.
3
Page 9

10. If an extension cord is used with this product, make sure that the
total of the ampere ratings on the product plugged into the wall outlet
does not exceed 15 amperes.
11. Never push objects of any kind into this product through cabinet slots
as they may touch dangerous voltage points or short out parts that
could result in a risk of fire or an electric shock. Never spill liquid of
any kind on the product.
12. Except as explained elsewhere in this manual, don’t attempt to service
this product yourself. Opening and removing those covers that are
marked “Do Not Remove” may expose you to dangerous voltage points
or other risks. Refer all servicing on those compartments to service
personnel.
13. Unplug this product from the wall outlet and refer servicing to qualified
service personnel under the following conditions:
When the power cord or plug is damaged or frayed.
If liquid has been spilled onto the product.
If the product has been exposed to rain or water.
If the product does not operate normally when the operating
instructions are followed. Adjust only those controls that are
covered by the operating instructions since improper adjustment
of other control may result in damage and will often require
extensive work by a qualified technician to restore the product
to normal operation.
If the product has been dropped or the cabinet has been damaged.
If the product exhibits a distinct change in performance, indicating
a need for service.
4
Page 10
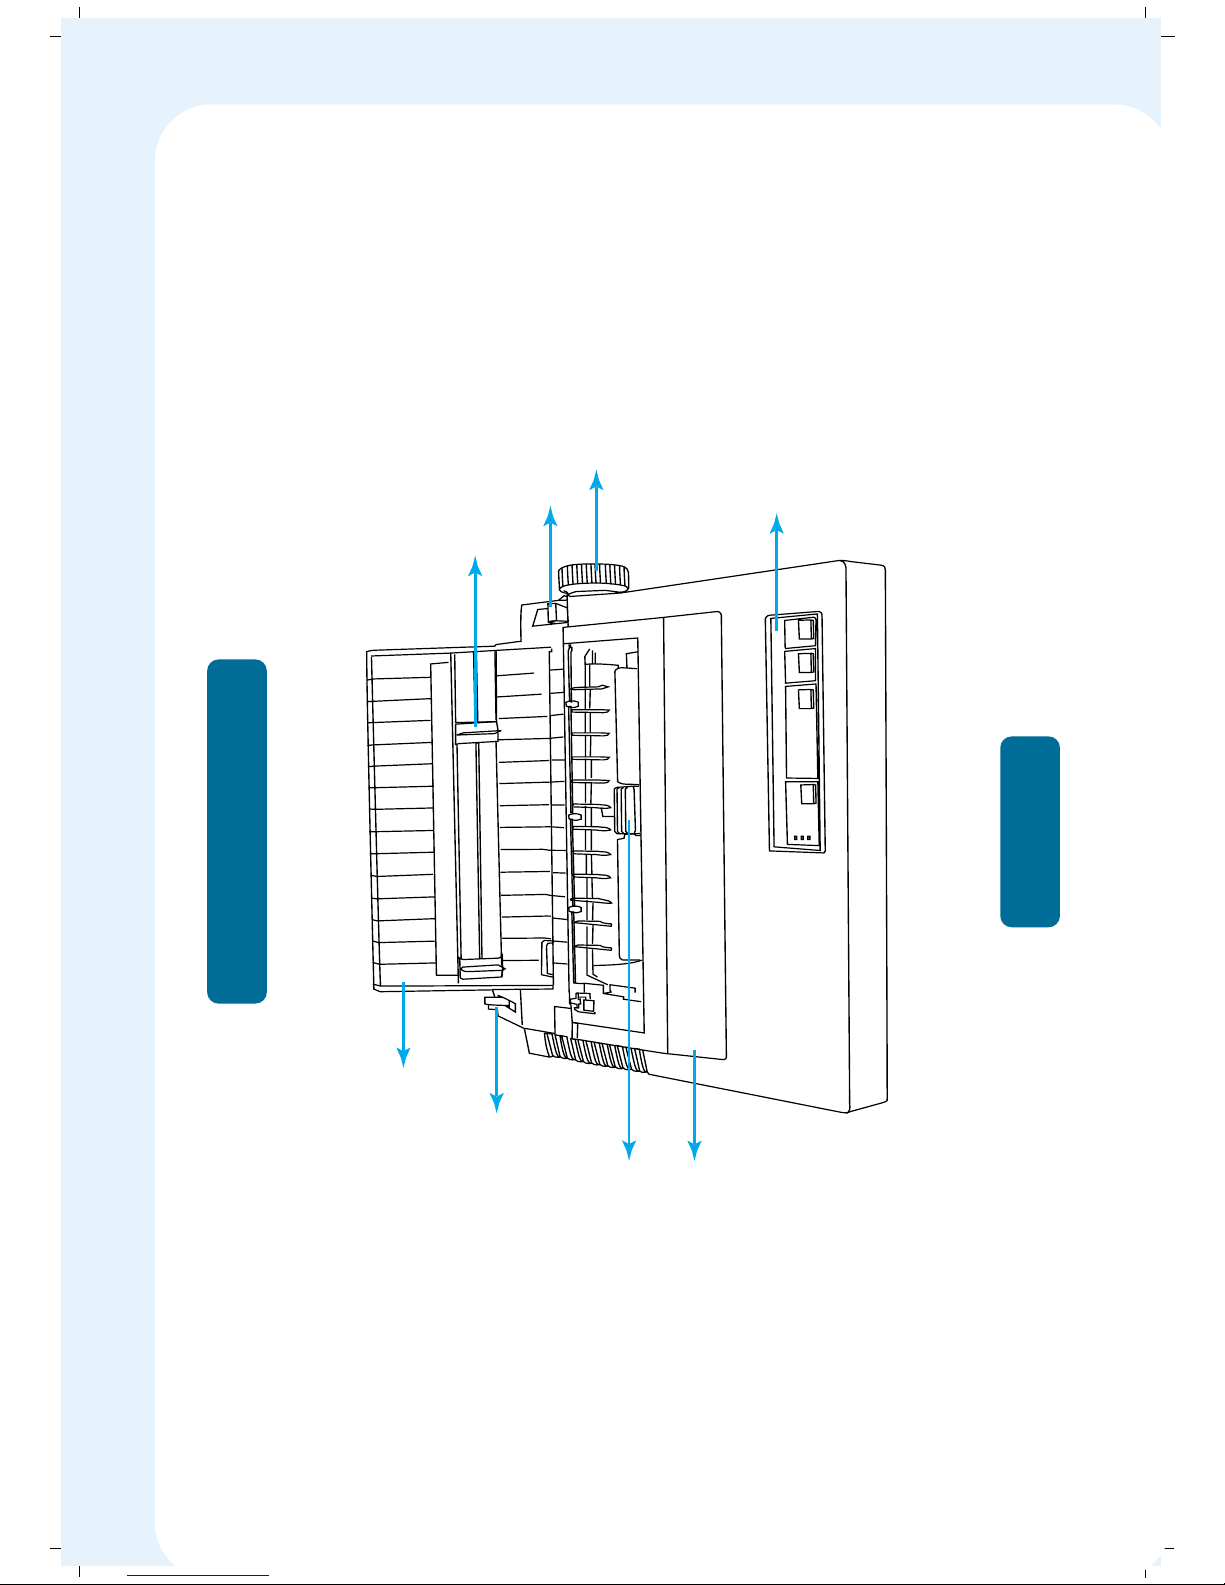
Platen knob
5
Paper Insertion Plate
Paper Guides
Print Head
Paper Select Lever
Control Panel
Tractor Select Lever
Top Cover
MSP 450 Champion
Front View
Page 11
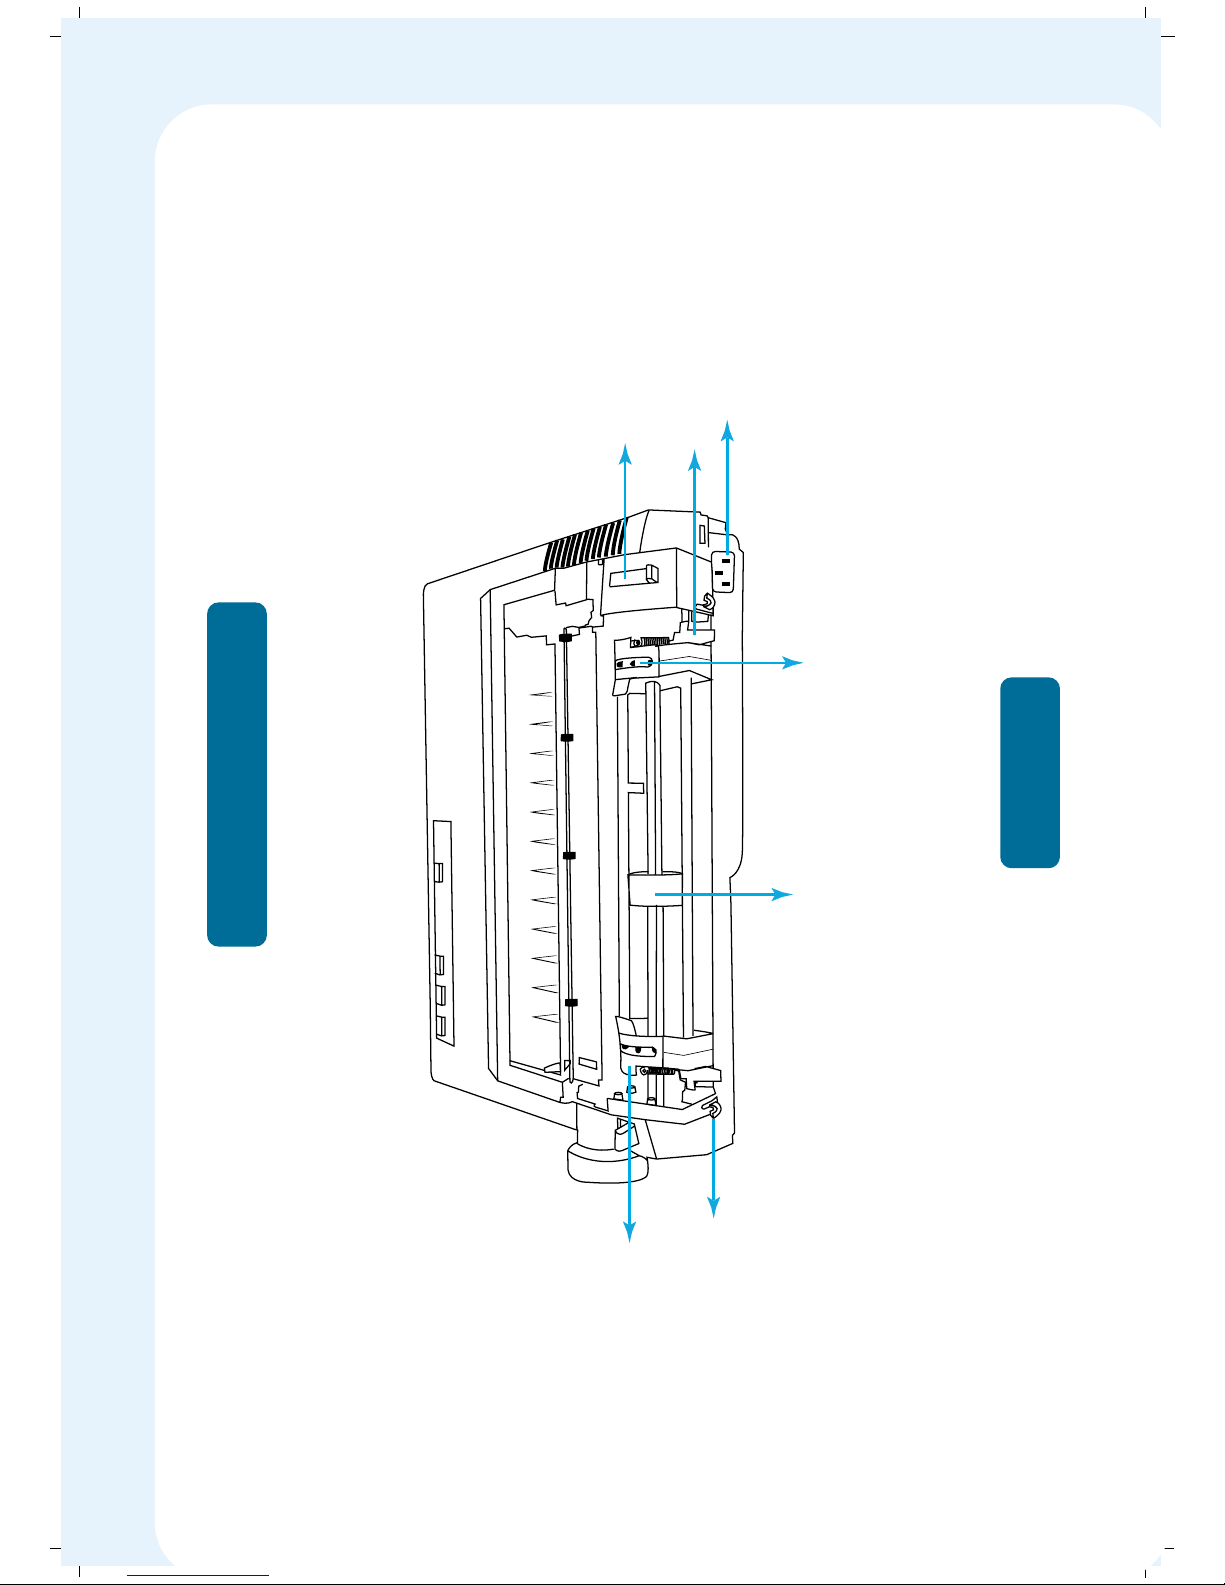
Tractor Unit
Tractor Release Lever
Tractor Select Lever
Power Inlet
Tractor Lock Lever
Tractor Wheel
Rear View
MSP 450 Champion
Sprocket Pins
6
Page 12
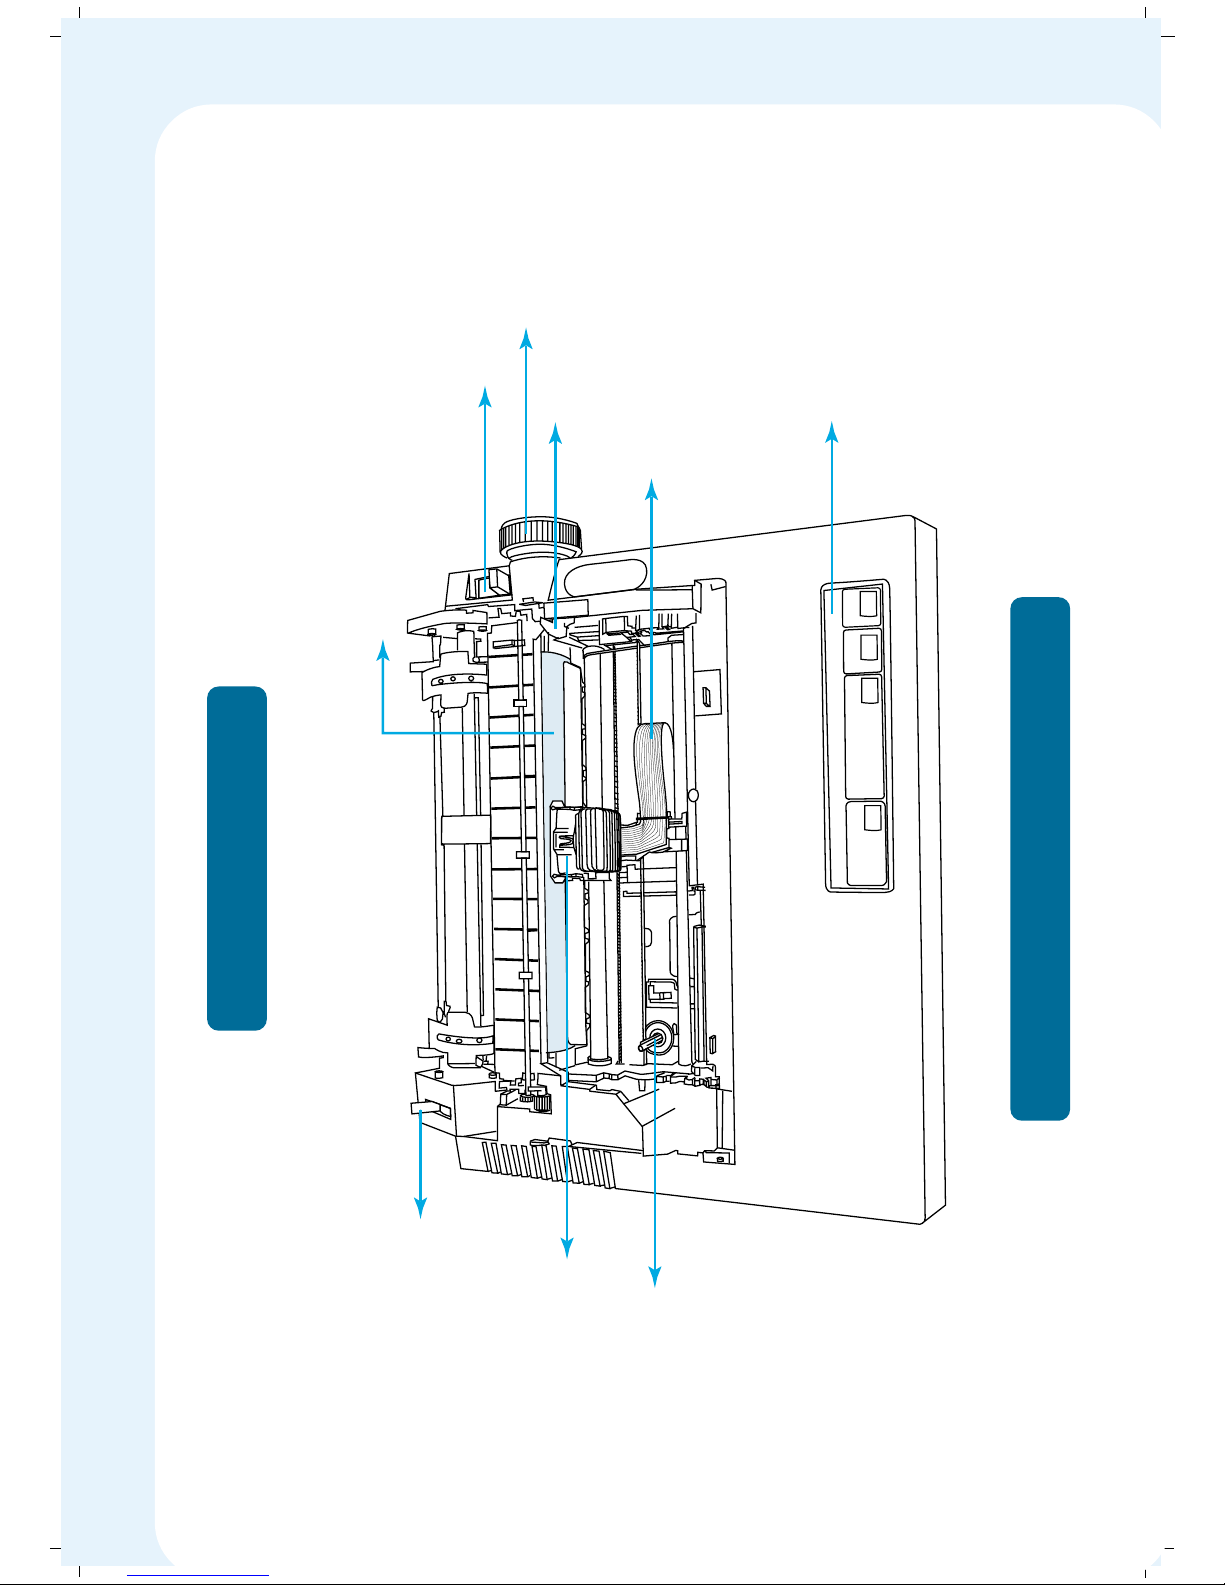
Print Head
Paper Select Lever
Ribbon Gear
Print Head Cable
Control Panel
Tractor Select Lever
Platen
Platen Knob
Top View with Top Cover Removed
MSP 450 Champion
Paper Thickness Lever
7
Page 13
3. INSTALLATION
✦✦
✦✦
✦ Unpacking the printer
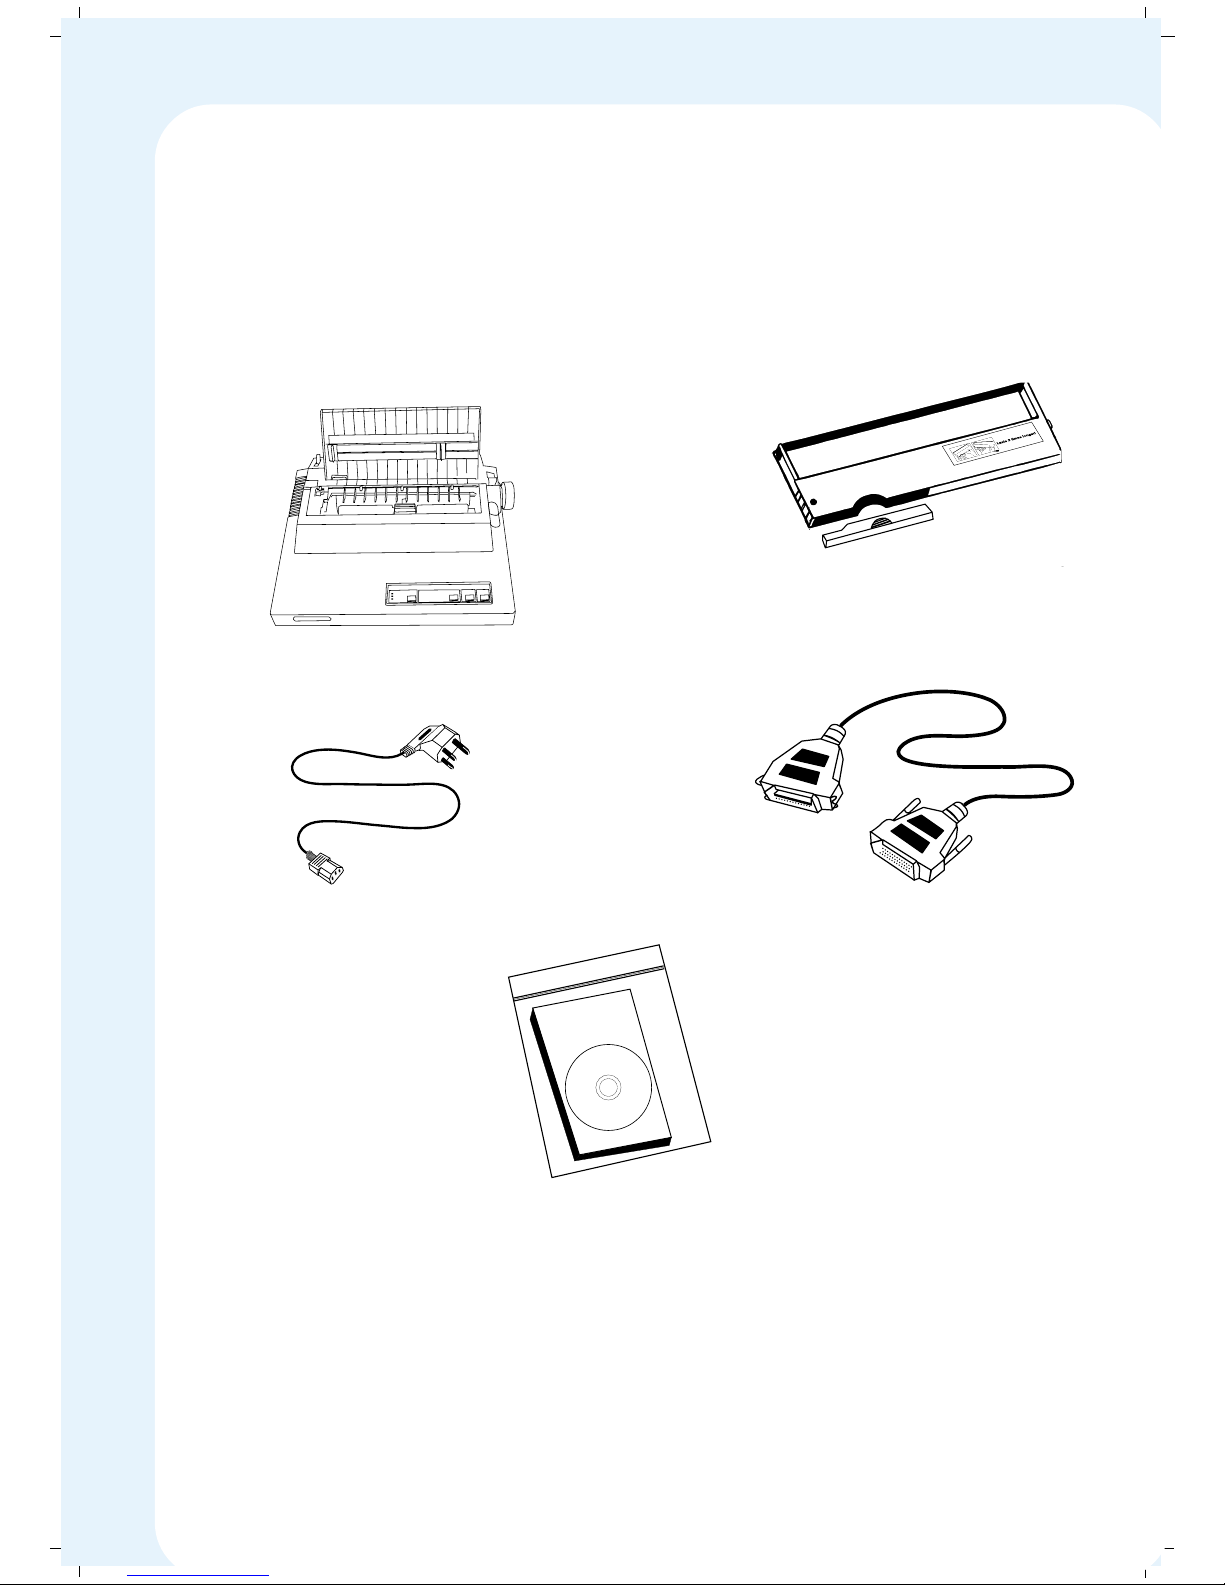
In addition to this guide, your printer box should include a MSP 450 Champion
printer software CD-ROM, and the following items:
Remove all the protective materials packed around and inside your printer
first, then place the printer on the table.
Save all packing and protective materials in case you need to ship the
printer in the future. It should always be transported in its original
packaging or equivalent materials.
CD-ROM
User Guide
MSP 450 Champion
Ribbon Cassette &
Inkbank
Powercord Cable
Parallel Interface Cable
User Guide
8
Page 14

✦✦
✦✦
✦ Identifying Printer Components
The main components of your MSP Series printer are:
ON/OFF switch
Top Cover
Paper Insertion Guide
Tractor Unit
Paper Select lever
Platen Knob
Control Panel
Parallel Interface Connector
Print head and
Ribbon Cassette and InkBank
9
Page 15

✦✦
✦✦
✦ Choosing a right place for the printer
MSP 450 Champion has been designed to withstand rugged environmental
conditions. But to get the best performance from your printer kindly take care
of the following points:
Follow the guidelines given below carefully when selecting a location for your
printer.
Make sure you place your printer on a flat, clean surface.
Do not forget that your printer will not function properly if it is kept
tilted or at an angle.
Always place the printer at connecting distance to the network interface
cable.
Leave sufficient free space around the printer for easy operation and
maintenance.
Avoid using or keeping the printer in places subject to rapid changes in
temperature and humidity. Keep it away from direct sunlight, strong light,
heat sources, excessive moisture or dust.
Do not keep the printer near places subject to shocks and vibrations.
Make sure your electrical outlet is not controlled by wall switches or
automatic timers. Even a simple power interruption can erase information
in the memory of your printer or computer.
Do not use the printer electrical outlet for operating large motors or other
appliances, as these can cause voltage fluctuations.
Always keep the printer and computer system away from loudspeakers or
the base unit of cordless telephones, as these are potential sources of
electromagnetic interference.
10
Page 16
✦✦
✦✦
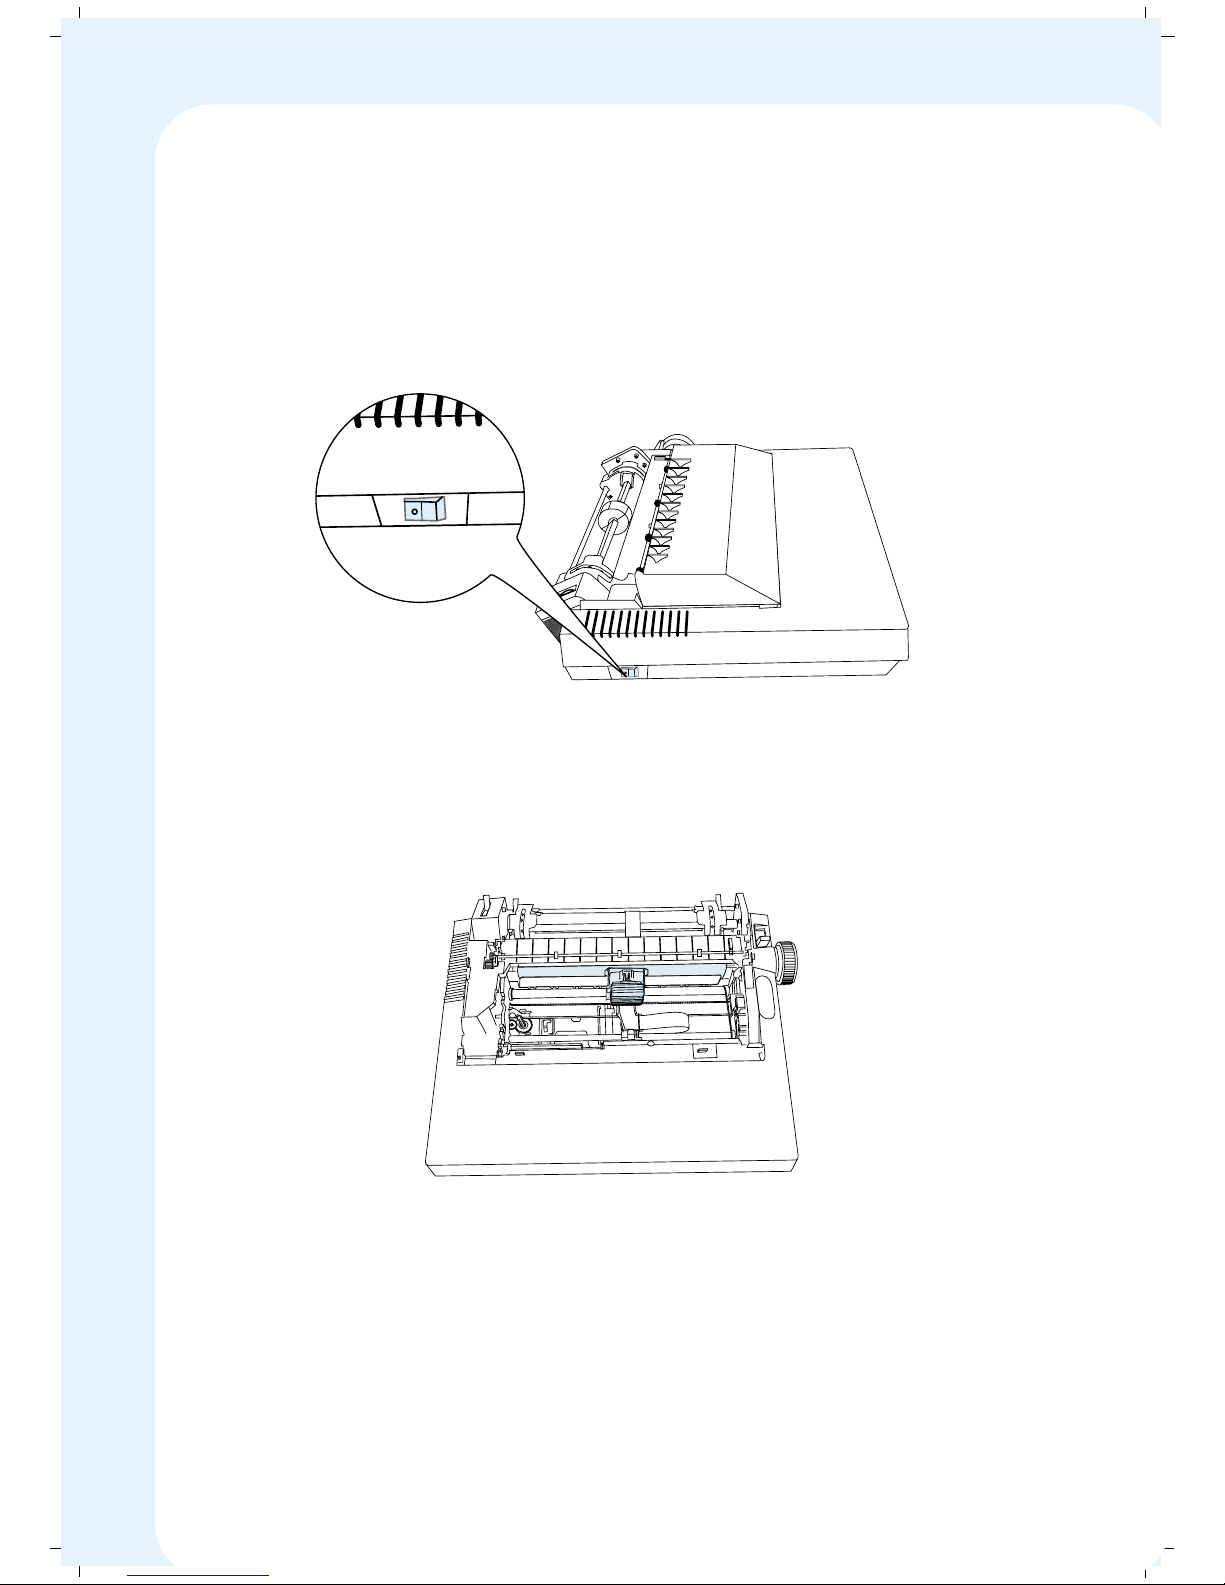
✦ Installing the ribbon cassette
To install the ribbon, follow these steps:
Turn OFF the printer power switch
Open the top cover, and slide the printhead to the center of the platen.
11
Page 17

Remove the new cassette from its packaging and position it with the
ribbon knob which should be aligned over the post protruding from the
left end of the floor of the printer opening.
Lower the ribbon cassette into place and snap it down.
Ribbon groove
Ribbon gear
12
Page 18
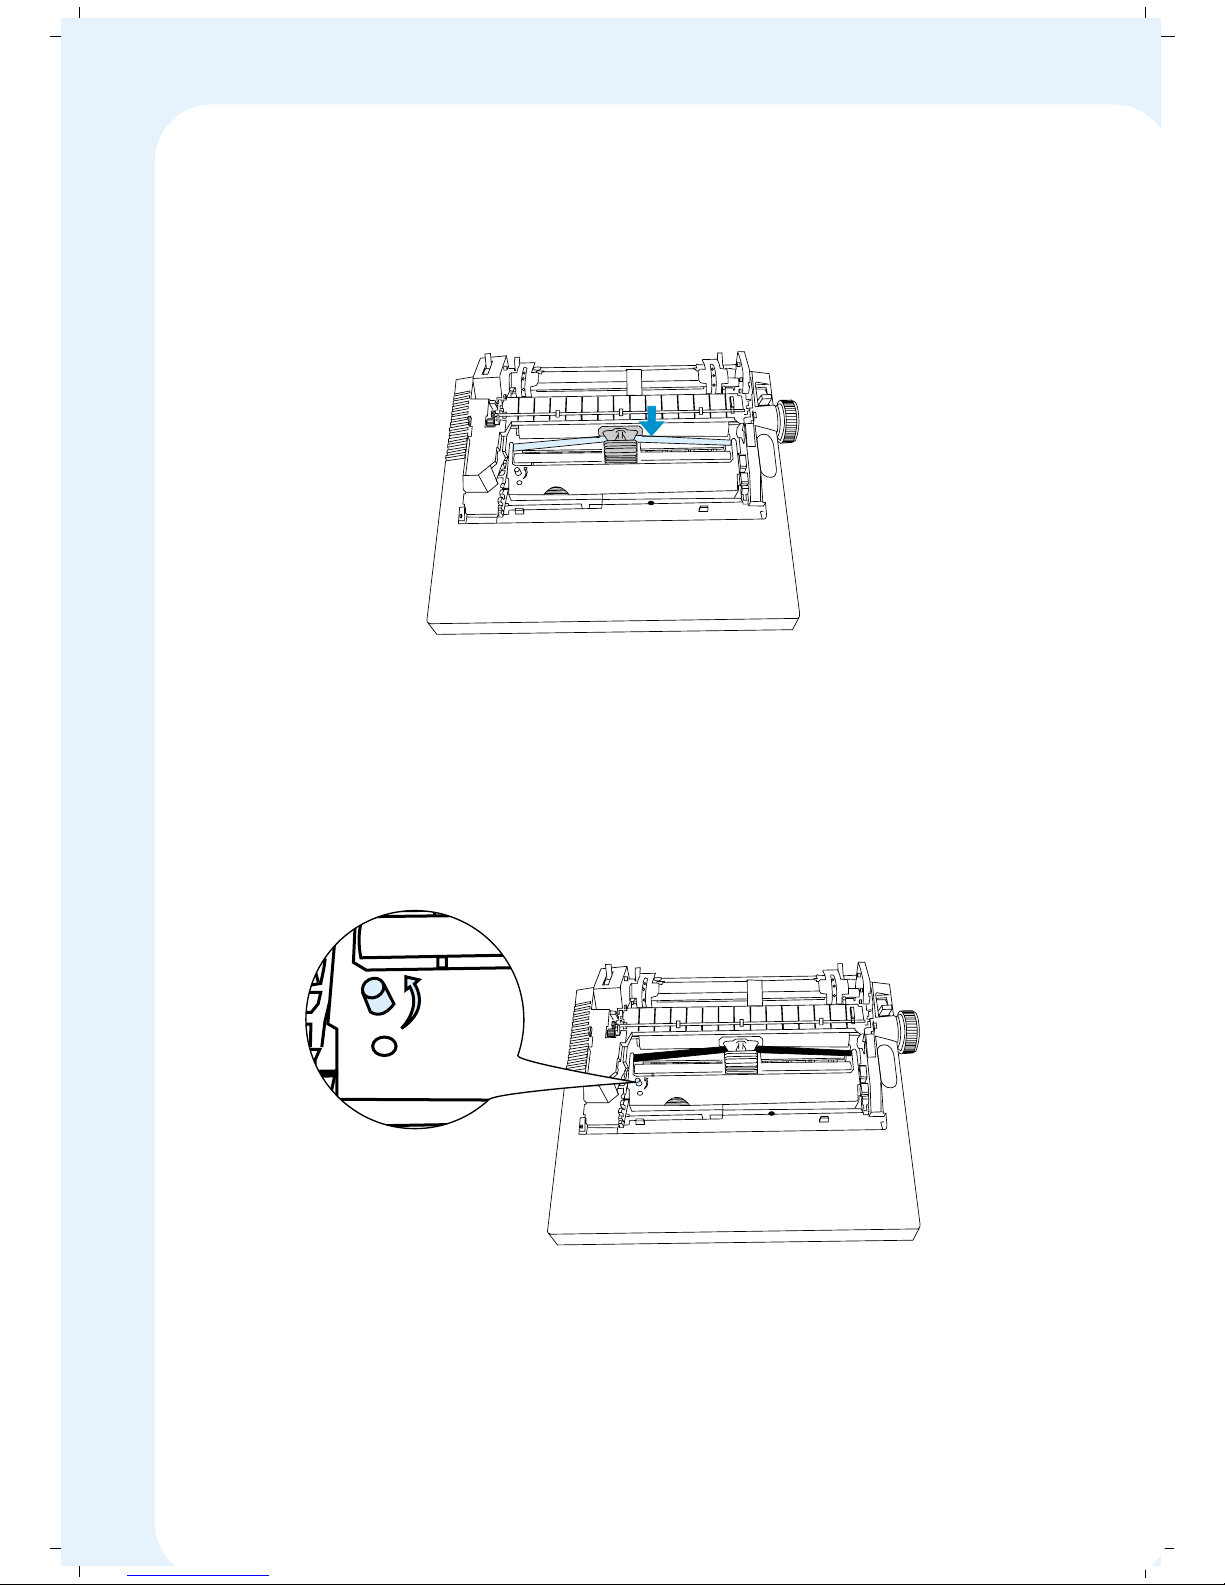
Slide the ribbon down into position between the printhead and the
metal ribbon mask. Do not force the ribbon between the ribbon mask and
the ribbon guide (the black plate close to the platen).
Turn the ribbon knob anti-clockwise for advancing the ribbon until there
is no slack.
Slide the printhead right and left a few times to be sure that it moves
smoothly without snagging the ribbon.
C
au
tio
n
C
a
u
tio
n
13
Page 19
✦✦
✦✦
✦ Installing the Inkbank
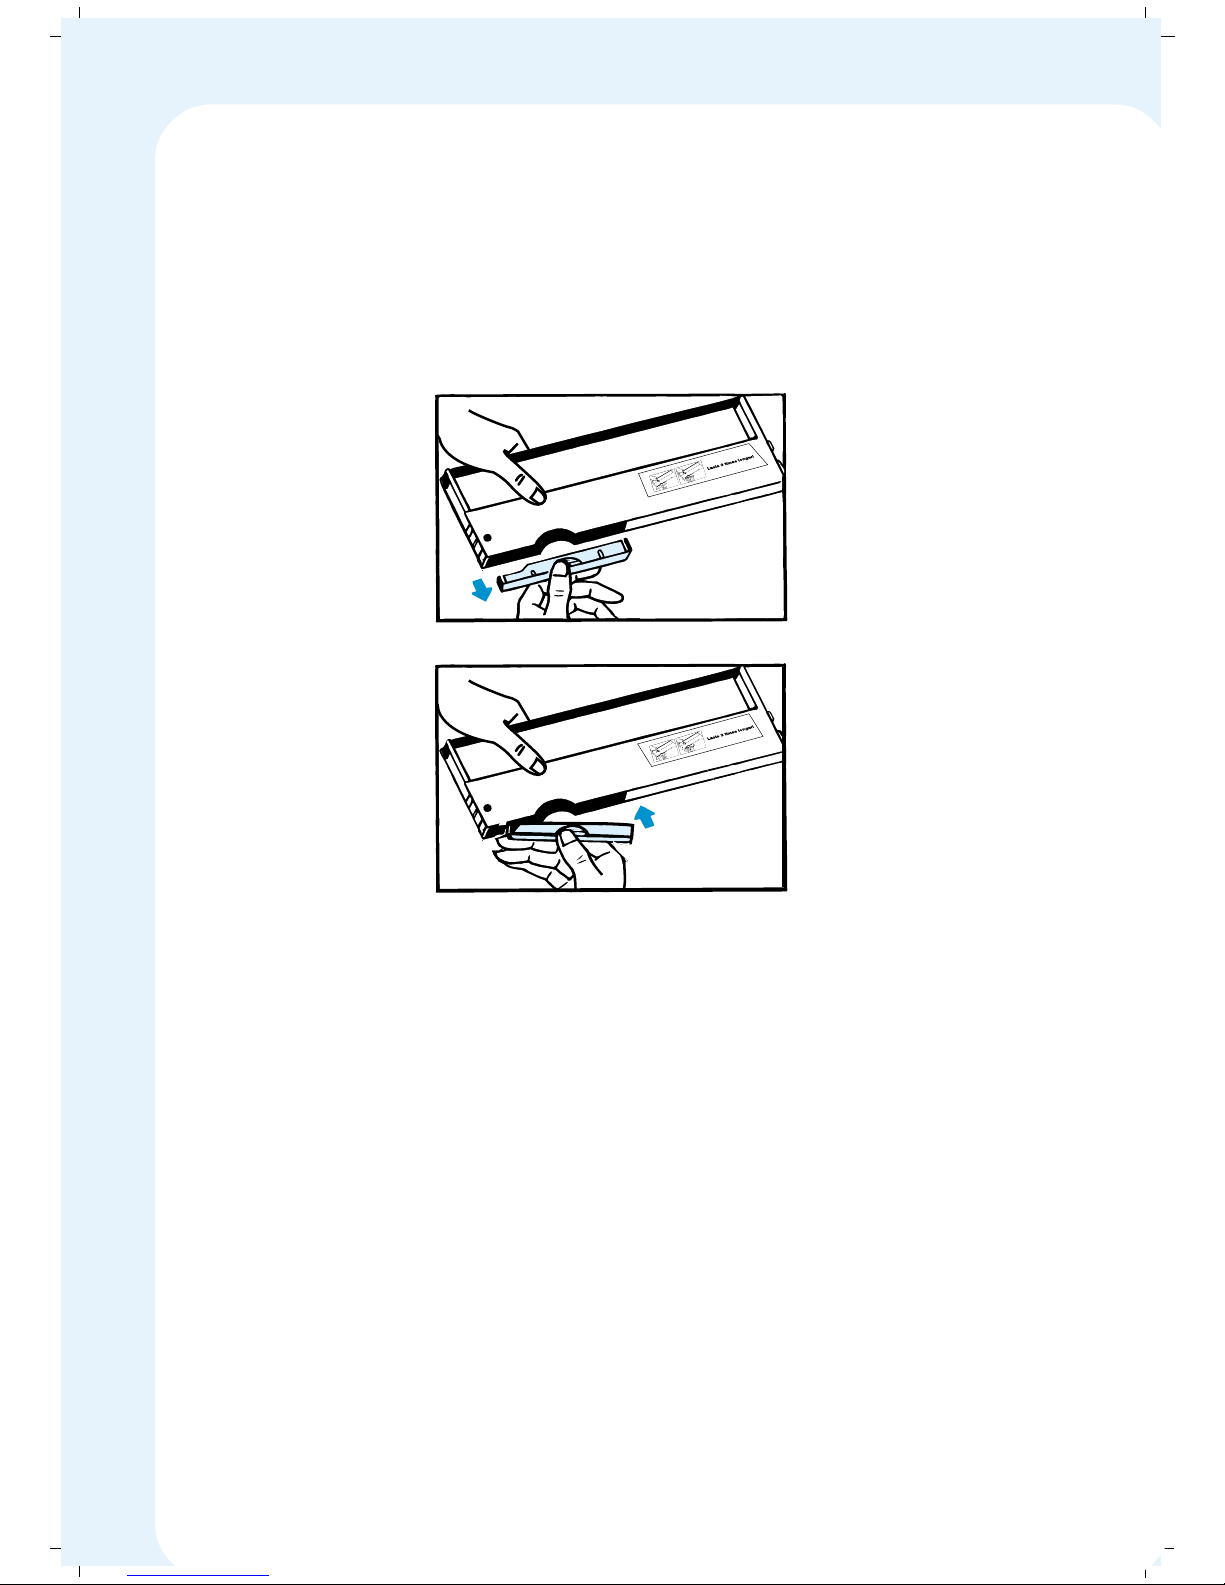
Your MSP 450 Champion comes with a patented Inkbank, it is the refilling
mechanism with a life of 10 Million Characters. To insert the Inkbank in the
cassette follow the illustration given below:
In order to replace the Inkbank, pull the Inkbank and insert the new one as
shown above.
Caution: If you are replacing a ribbon, be sure the printer is OFF and the
printhead has time to cool.
Caution: Carefully follow the instructions for correct ribbon placement.
Improper placement can cause smudged printing and may jam the ribbon.
14
Page 20
✦✦
✦✦
✦ Connecting the Printer to Power
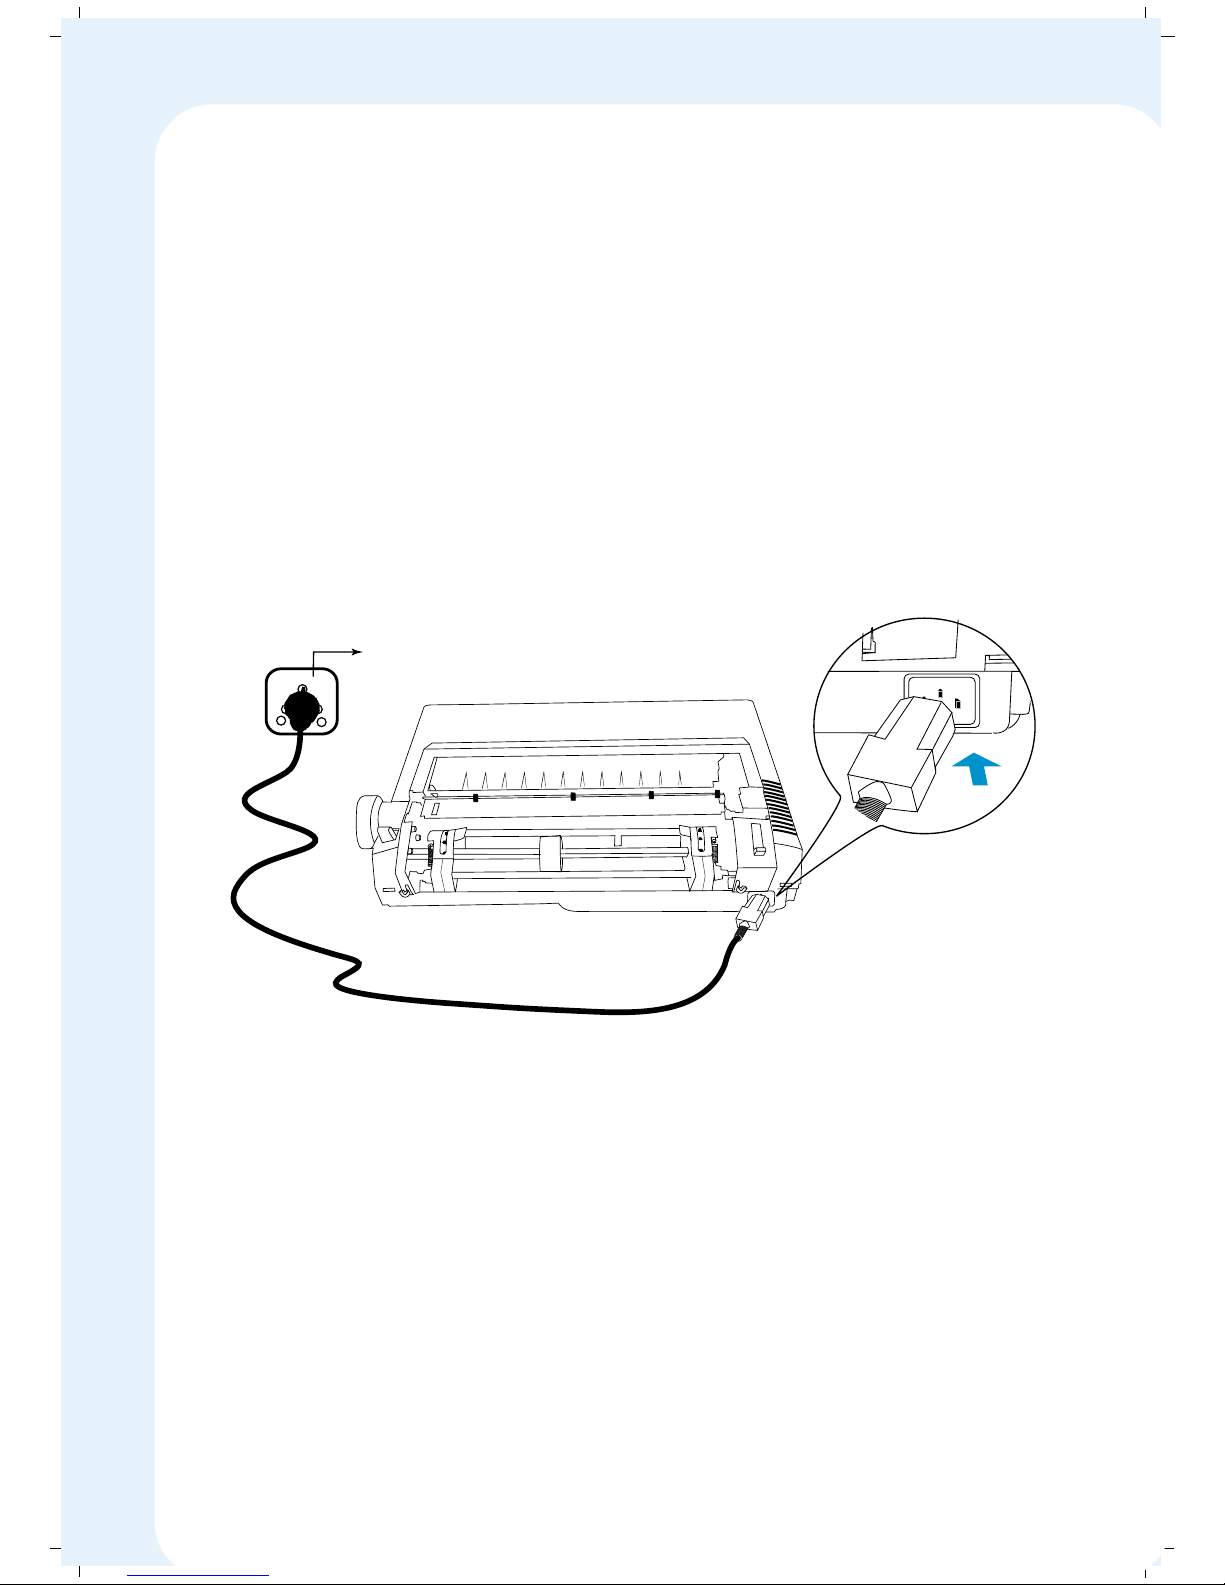
Power supply unit of MSP 450 Champion is housed externally as a separate
unit.
1. It has to be connected to the main Printer unit, through the power supply
socket positioned at the back of the printer.
2. Insert the power supply connector into this socket firmly and the power
plug into the mains power supply.
3. Once the mains supply is switched ON, the printer is powered on and
ready for use.
Mains
15
Page 21
✦✦
✦✦
✦ Connecting the printer to your computer
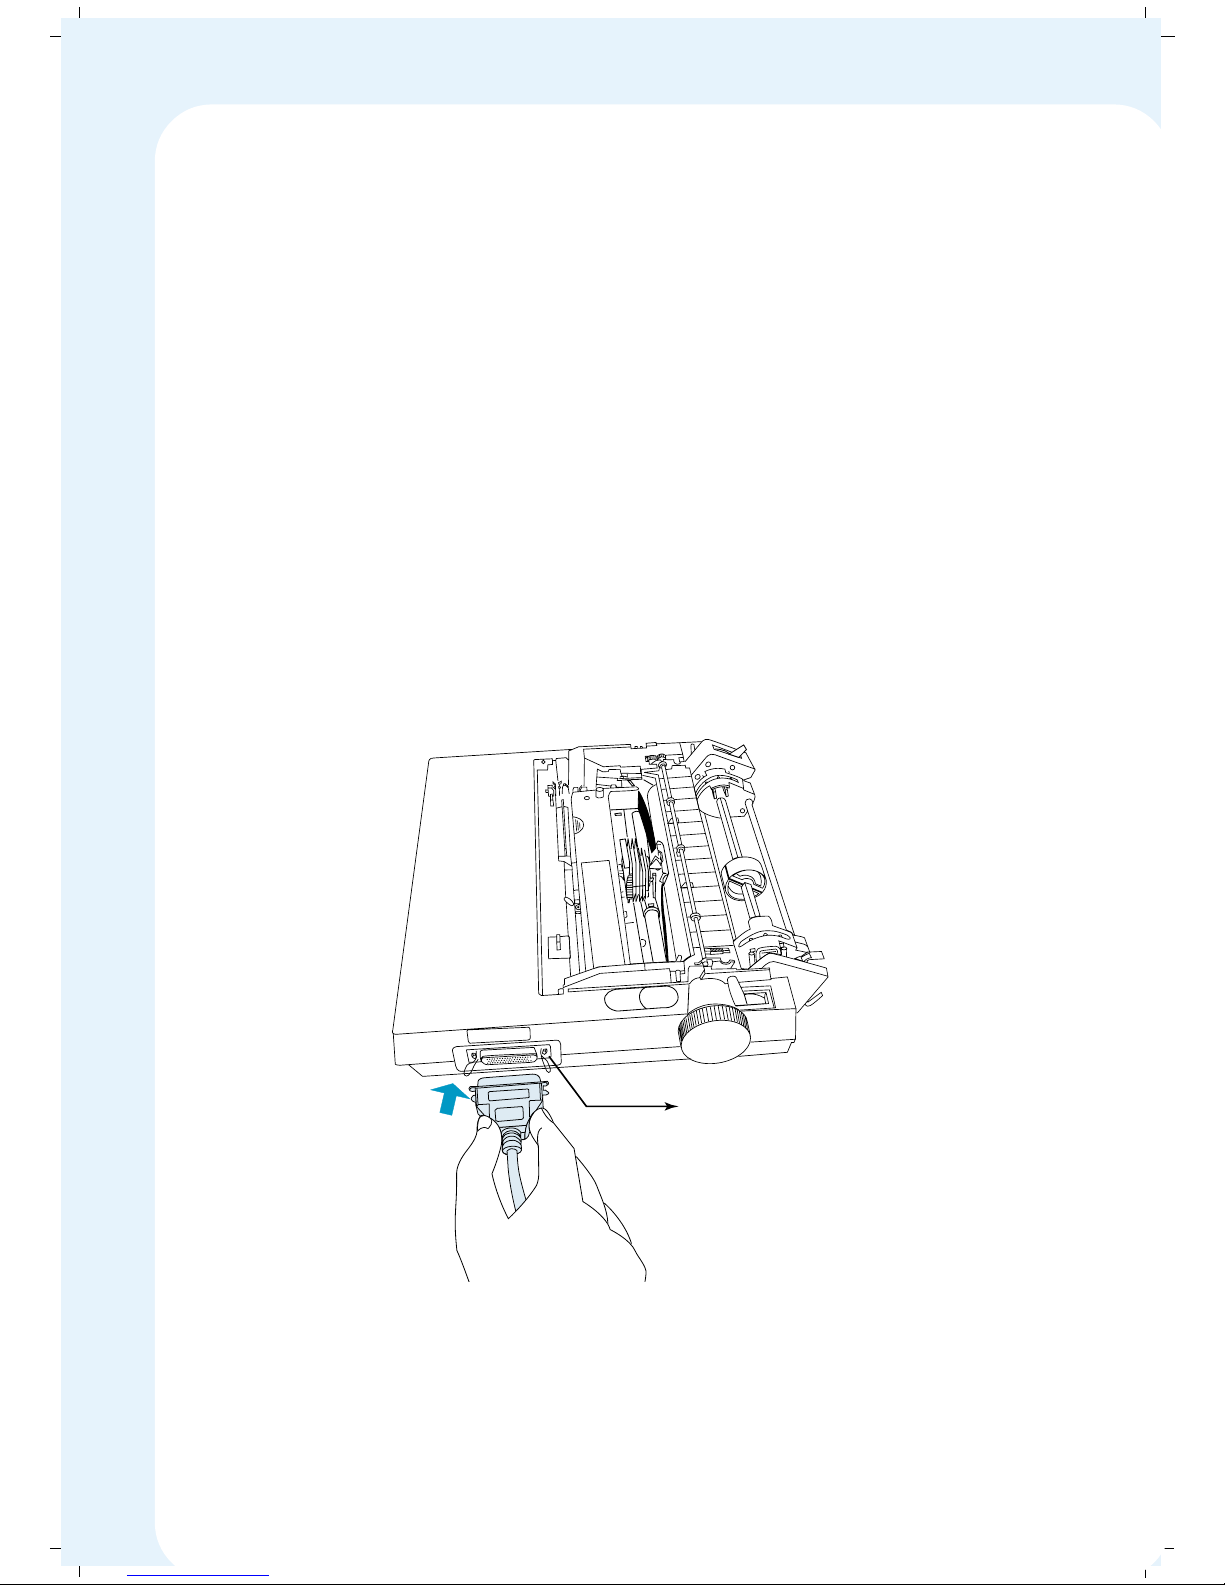
Your MSP 450 champion communicates with the computer through Centronics
Parallel Printer cable, which comes along with your printer. Before making any
connections, turn off both your printer and your computer.
To connect the parallel cable to your printer, follow these steps:
Switch off the printer.
The connector is on the right side of the printer as shown in the figure.
Move the wire latches out of the way and fit the cable connector onto the
printer connector. Be sure the connectors are firmly attached, but do not
use a lot of force; it is possible to bend or break the connector pins.
Press the wire latches into place to secure the cable connector.
Wire Latches
16
Page 22
✦✦
✦✦
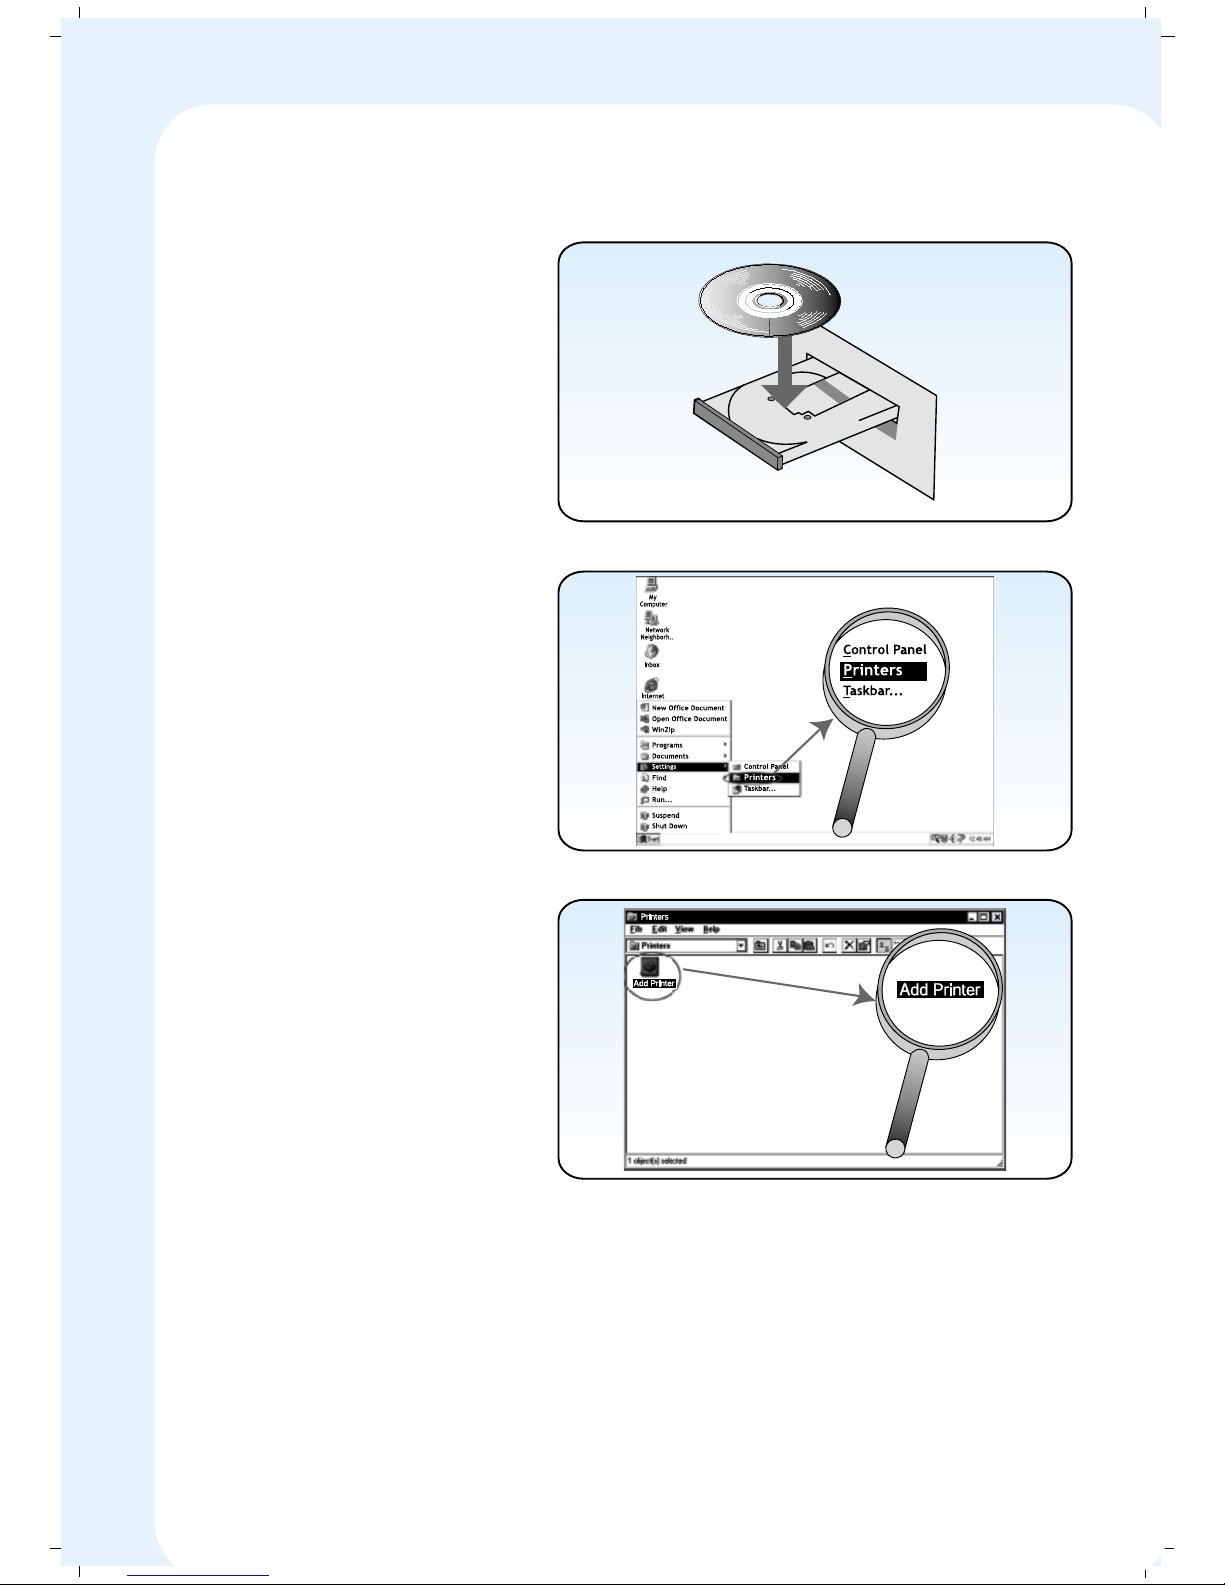
✦ Installing the Driver
1. Insert CD
2. Click Settings - Printer
3. Select Add Printer
17
Page 23
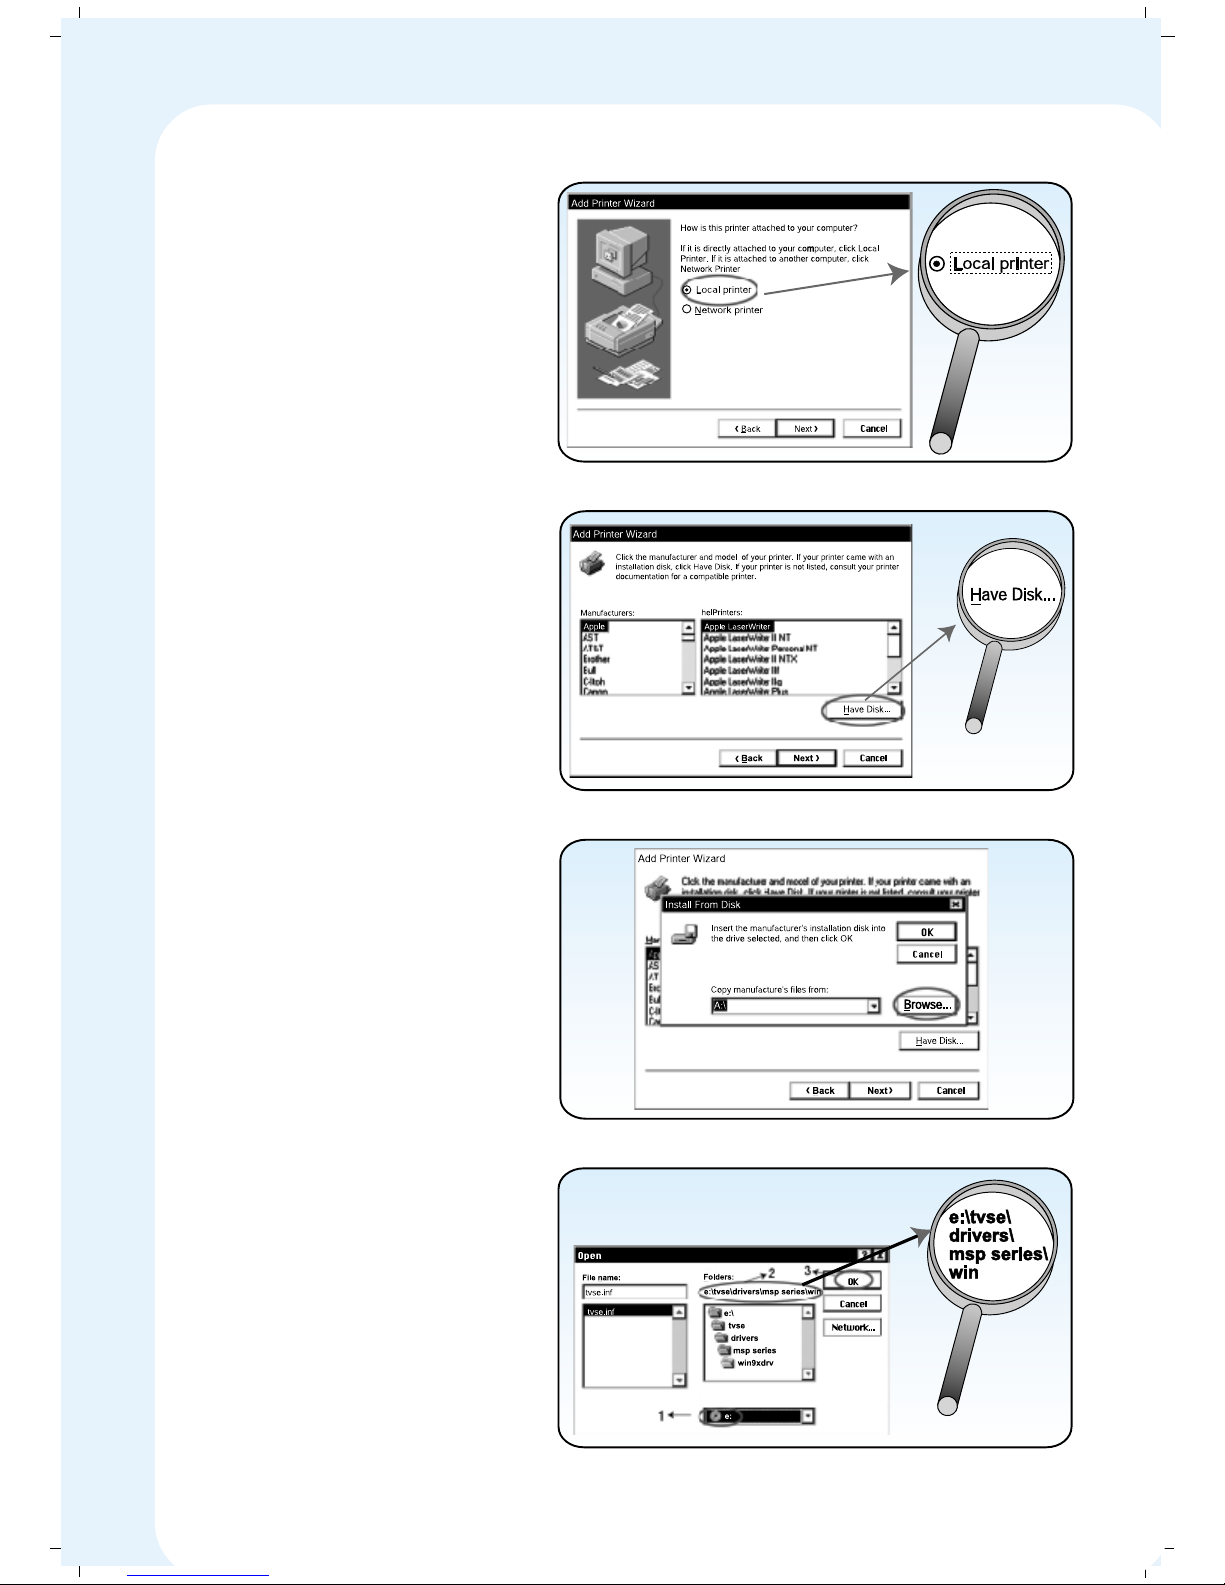
4. Choose Local Printer and
Click Next
5. Click Have Disk
6. Click Browse
7.
1. Choose from CD-Driverfor TVS-E MSP
2. (Select Driver files from
the Cd
path):tvse\drivers\MSP
Series\
(Operating System)
3. After Selecting OS,
Click OK
18
Page 24
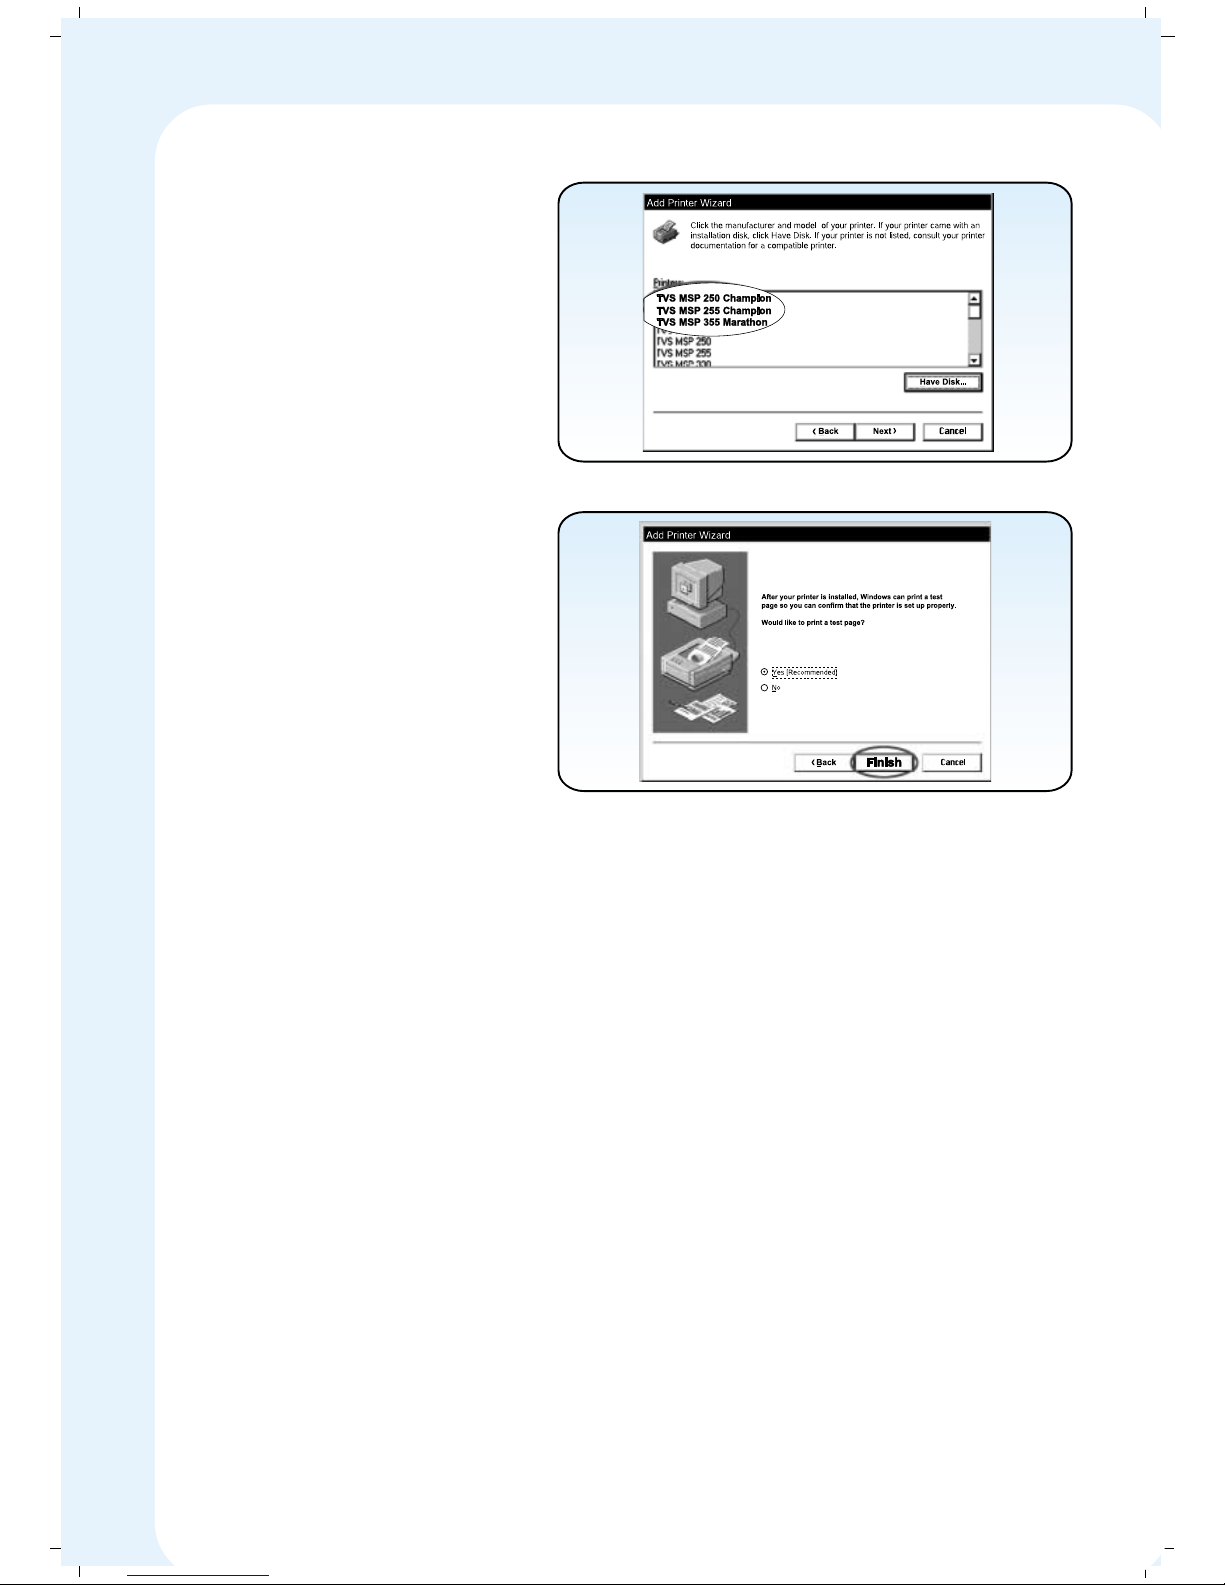
8. Select your Printer Model
and Click OK
9. Finish Installation
19
Page 25
4. CONTROL PANEL
✦✦
✦✦
✦ Control panel usage
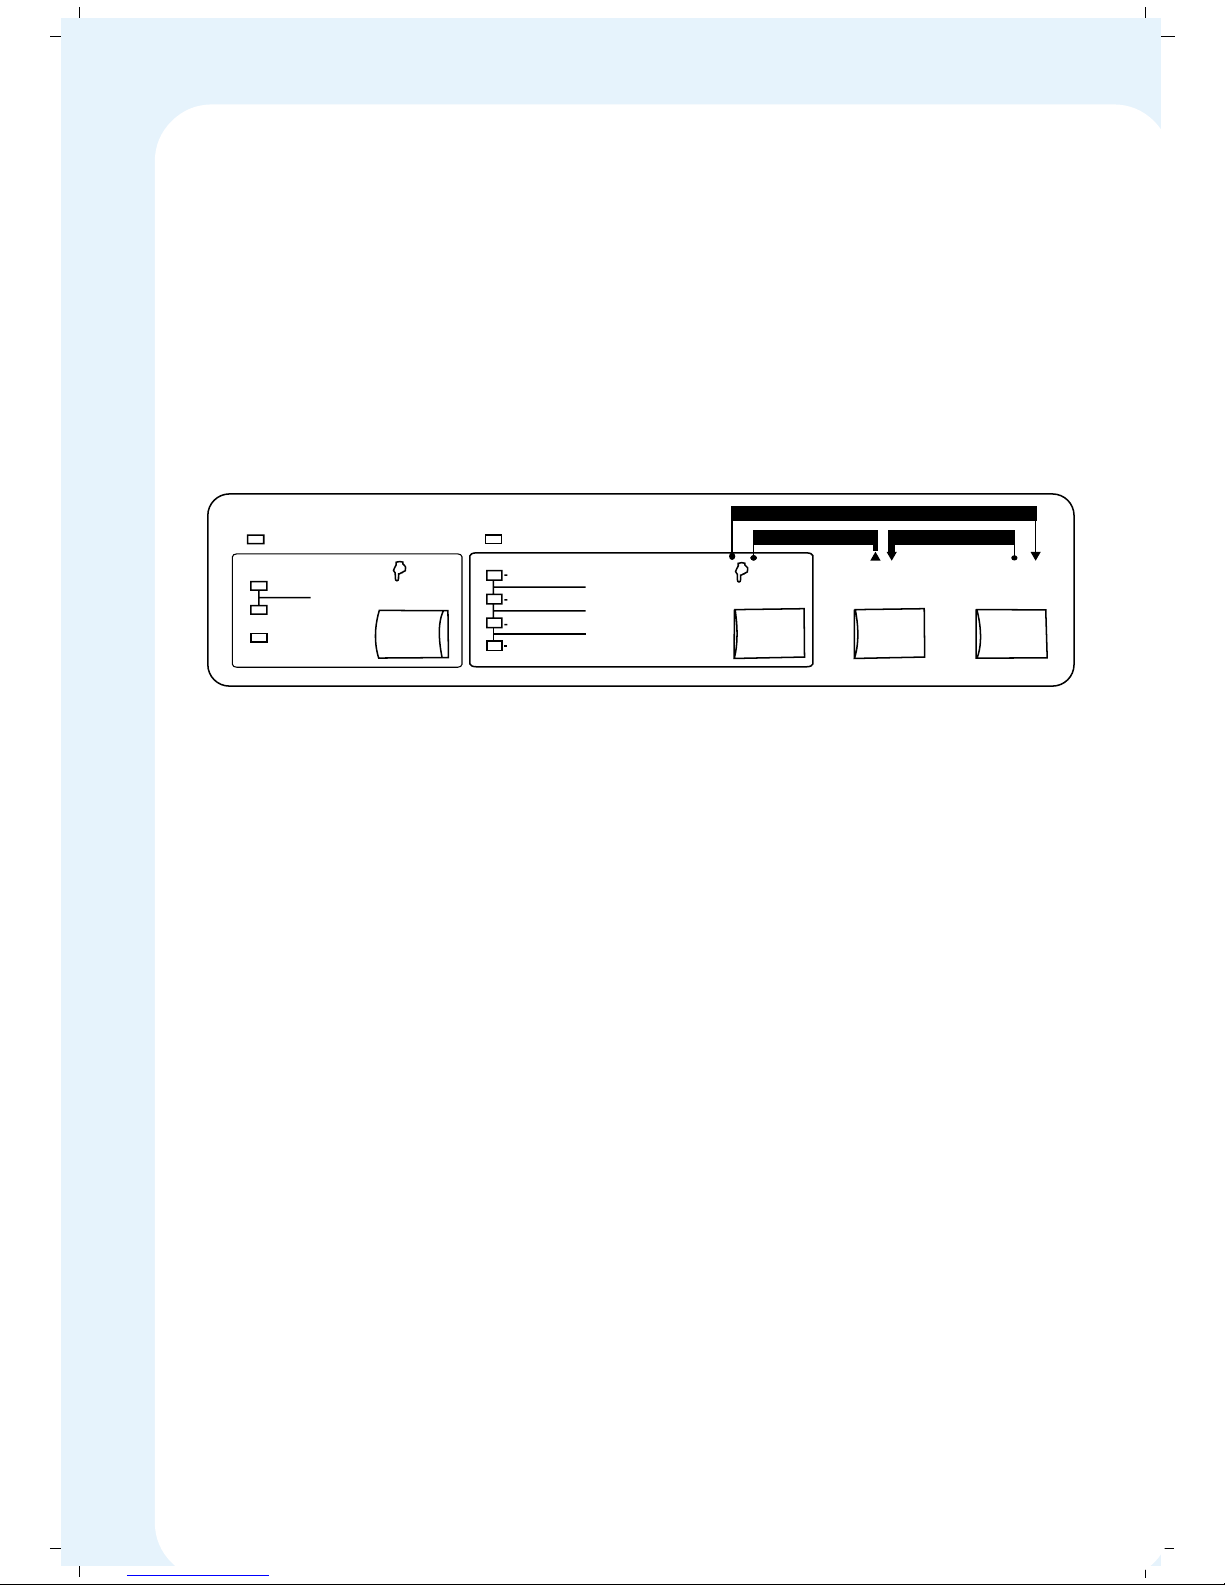
Your MSP 450 Champion has a user friendly and easy to use Control Panel.
Control Panel has tactile switches, which produces click sound, and ensures
you that the switch is operated.
Control Panel is as shown below:
Control Panel has four tactile switches:
ONLINE
LF/FF (Line Feed/Form Feed)
FONT
PITCH
Control Panel also has nine indicator lights.
ONLINE (indicates ONLINE Mode, OFFLINE Mode, and Paper Out Mode)
PITCH - 3 nos. (indicates the Pitch selected)
FONT - 4 nos. (indicates the Font selected)
COPY Mode
MENU
Mode
DRAFT
ROMAN
SANS SERIF
COURIER
FONT
MENU
SELECT
Save
PRESTIGE
ORATOR
SCRIPT
PAPER TEAR
ONLINE
LF/FF
PAPER PARK
FORWARD MICROFEED REVERSE MICROFEED
10 CPI
PROPORTIONAL
Copy
Mode
PITCH
Exit
12 CPI
CONDENSED
ON LINE COPY MODE
20
Page 26
Modes
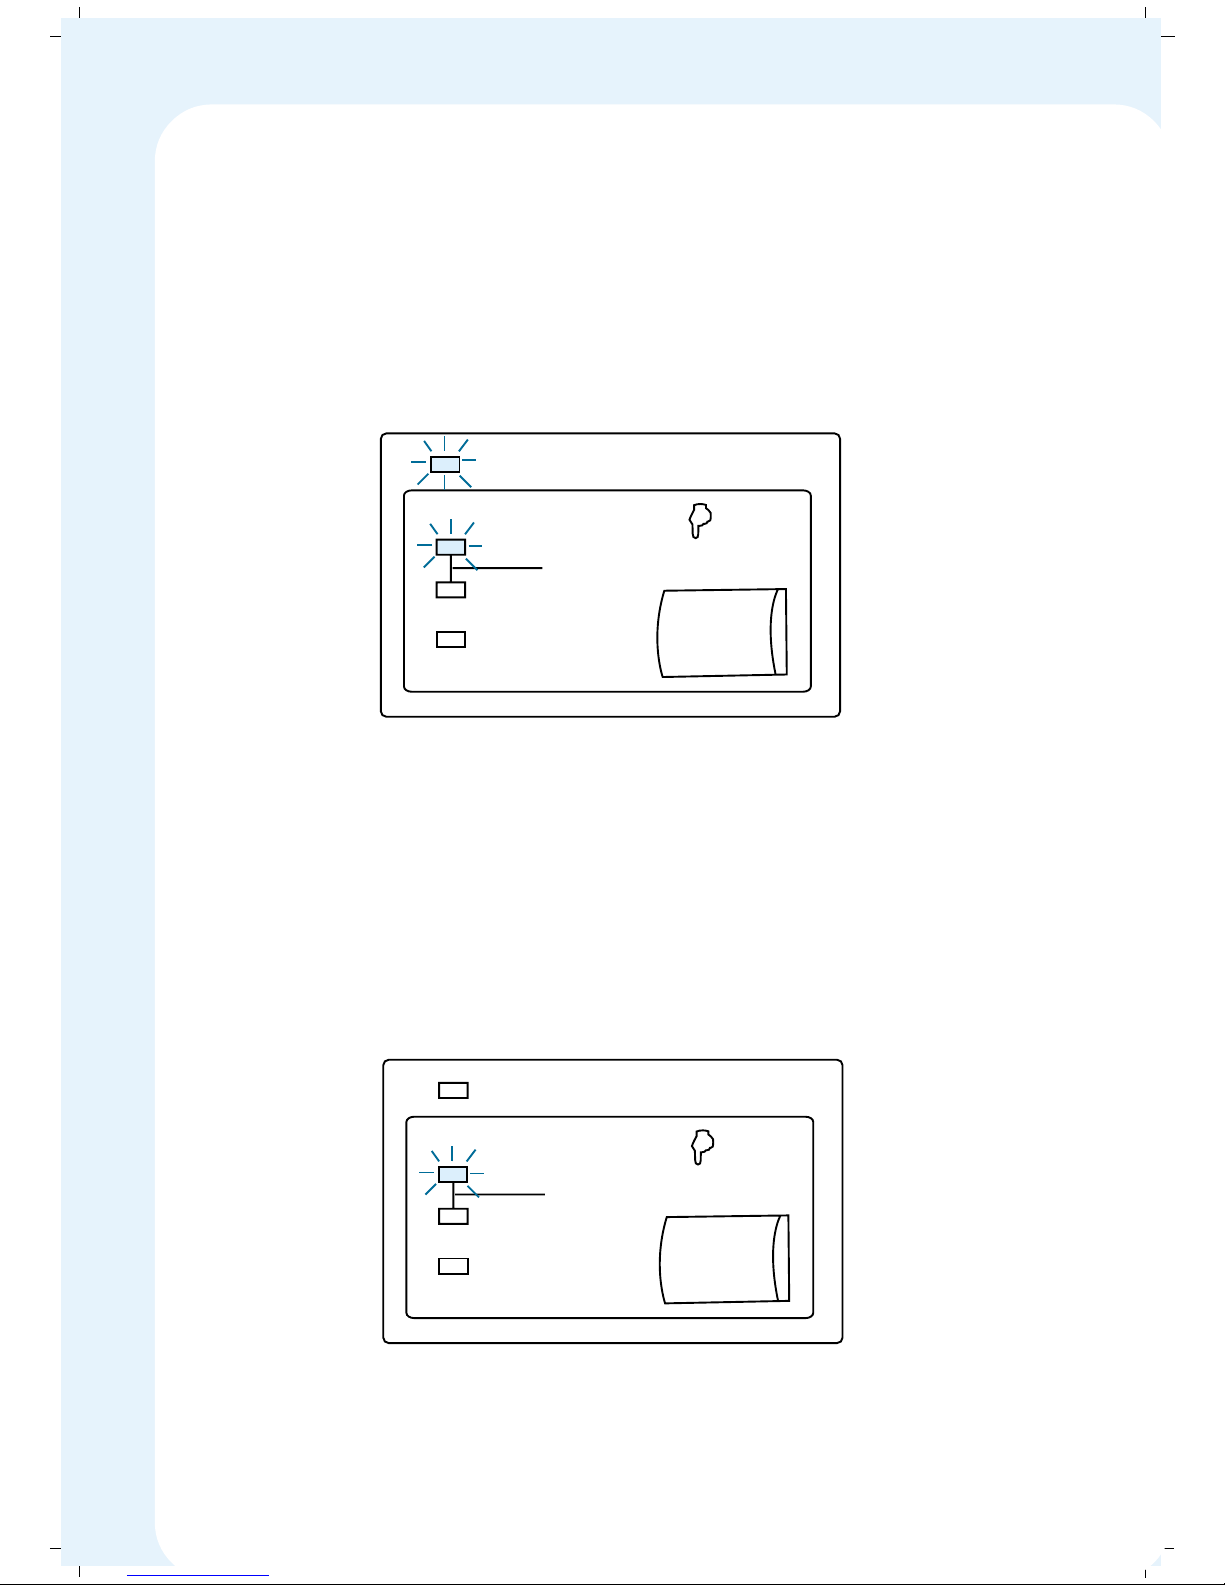
ONLINE Mode
You can print either text or graphics, only in ONLINE Mode. The printer will
receive data from printer only in ONLINE Mode. The ONLINE Indicator LED
glows green when the printer is in this mode.
OFFLINE Mode
The printer will not print in OFFLINE Mode. The ONLINE Indicator LED goes
OFF in this mode.
If you wish to stop the printer while printing you can just go to this mode by
pressing ONLINE Switch. The printing can be resumed by going to ONLINE
Mode by pressing ONLINE Switch once again.
10 CPI
PROPORTIONAL
Copy
Mode
PITCH
Exit
12 CPI
CONDENSED
ON LINE
10 CPI
PROPORTIONAL
Copy
Mode
PITCH
Exit
12 CPI
CONDENSED
ON LINE
21
Page 27
Paper Out Mode
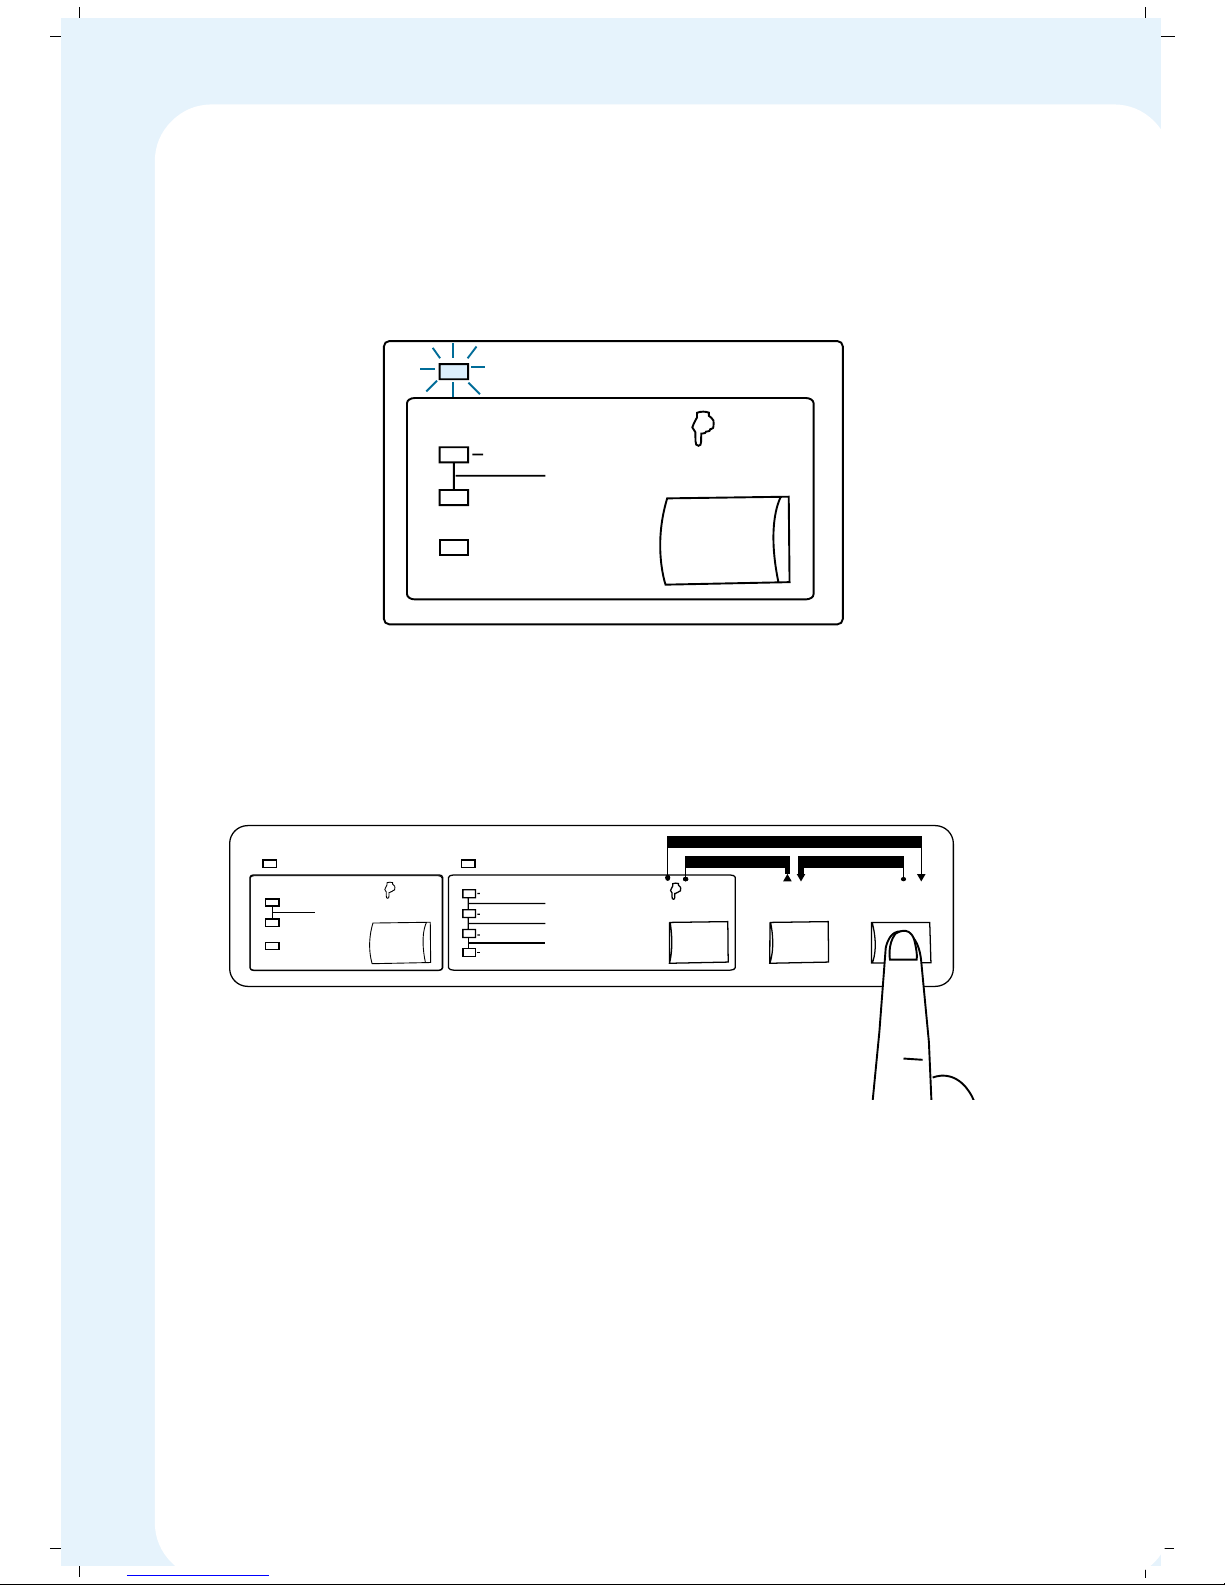
When there is no paper for the printer to print, the printer automatically
enters Paper Out Mode. The ONLINE Indicator LED blinks in this mode.
This indicates you to feed paper for further printing. Once the paper is fed,
the printer goes to OFFLINE Mode. Now press ONLINE Switch to enter into
ONLINE Mode.
10 CPI
PROPORTIONAL
Copy
Mode
PITCH
Exit
12 CPI
CONDENSED
ON LINE
MENU
Mode
DRAFT
ROMAN
SANS SERIF
COURIER
FONT
MENU
SELECT
Save
PRESTIGE
ORATOR
SCRIPT
PAPER TEAR
ONLINE
LF/FF
PAPER PARK
FORWARD MICROFEED REVERSE MICROFEED
10 CPI
PROPORTIONAL
Copy
Mode
PITCH
Exit
12 CPI
CONDENSED
ON LINE COPY MODE
22
Page 28
SWITCHES
ONLINE Switch
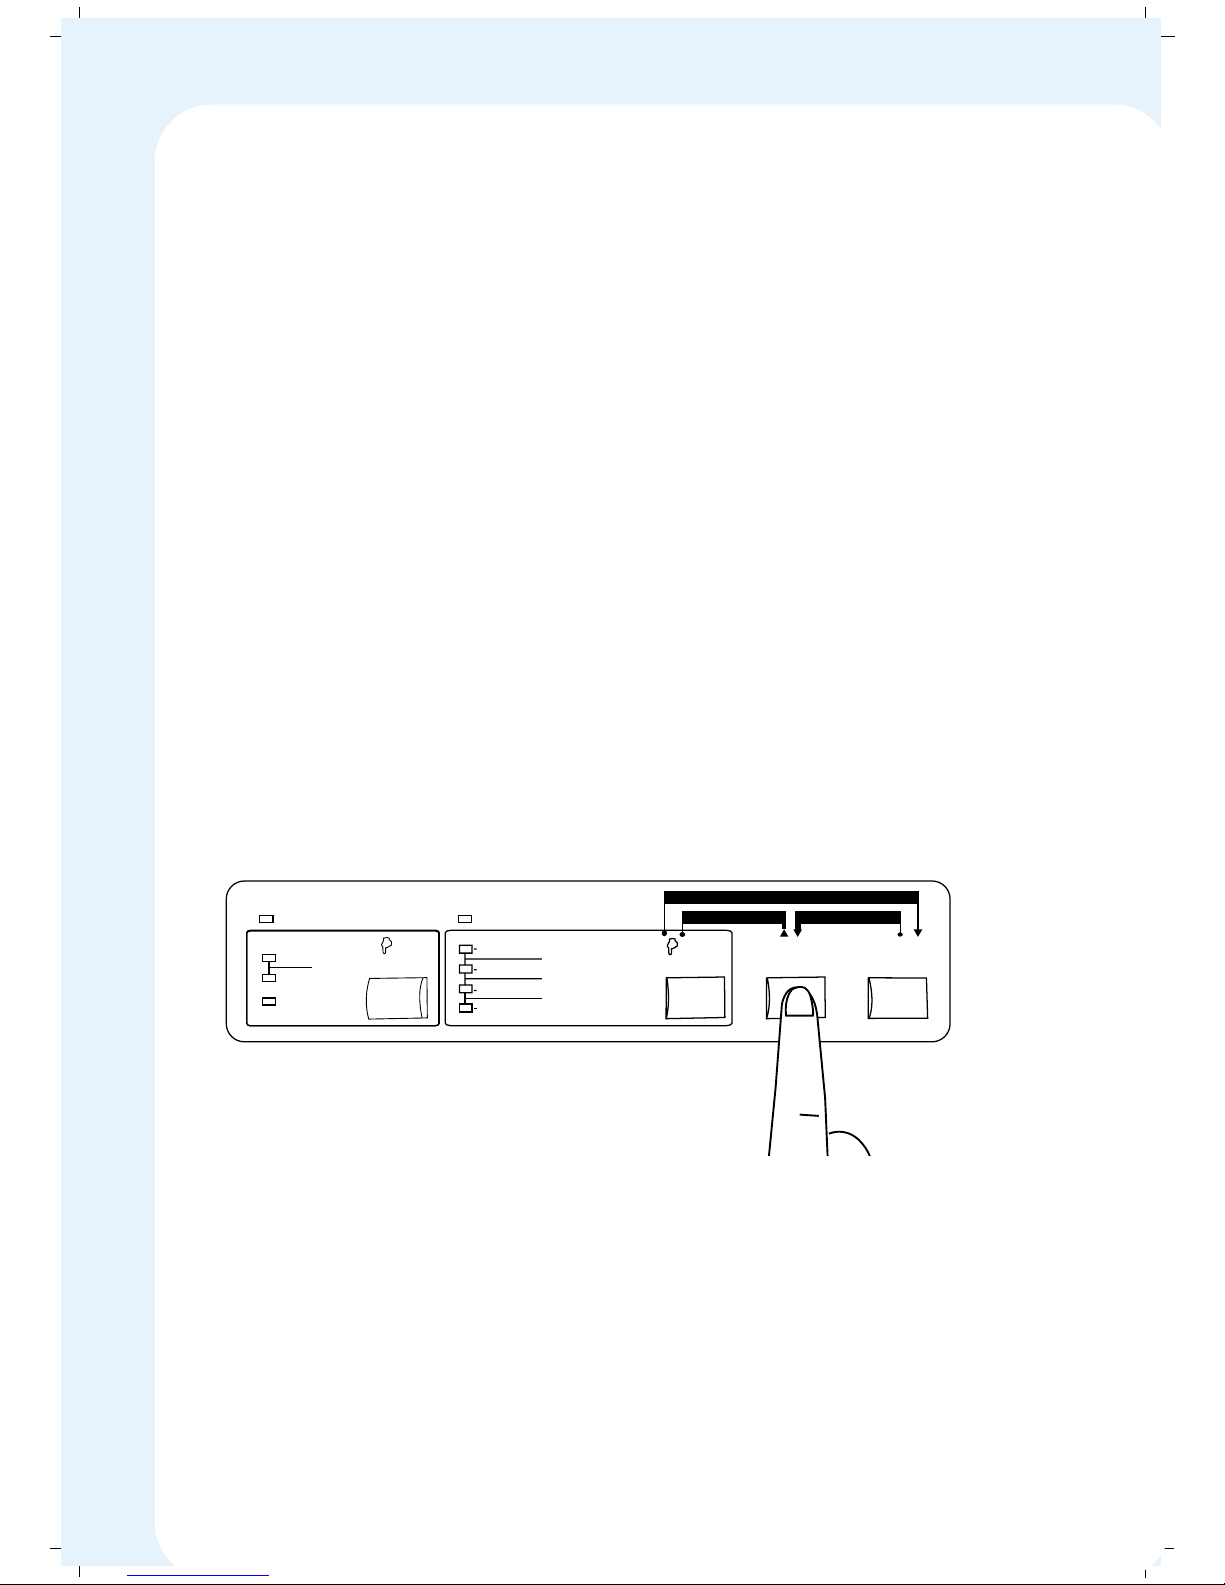
You can press this switch to toggle the printer between ONLINE Mode
and OFFLINE mode. However, you can’t enter into ONLINE Mode, when
the printer senses paper out.
If you wish to stop the printer while printing, you can just go to OFFLINE
Mode by pressing ONLINE Switch. The printing can be resumed by
going to ONLINE Mode by pressing ONLINE Switch once again.
LF/FF Switch (Line Feed/Form Feed)
First, let us see how the printer behaves in OFFLINE Mode when you press LF/
FF (Line Feed/Form Feed) Switch.
1. When you press and release this switch once, a line feed is given, the
printer leave a blank line (i.e.) the paper is moved one step forward. If
you want to skip give two line feeds, you have to press and release this
switch twice.
2. If you this press and hold this switch for about 2 seconds, a form feed is
given. The printer ejects the paper out in case of single sheet or advances
to the next sheet at Top-Of-Form position.
3. When you press LF/FF Switch in ONLINE Mode, Paper Tear gets invoked.
MENU
Mode
DRAFT
ROMAN
SANS SERIF
COURIER
FONT
MENU
SELECT
Save
PRESTIGE
ORATOR
SCRIPT
PAPER TEAR
ONLINE
LF/FF
PAPER PARK
FORWARD MICROFEED REVERSE MICROFEED
10 CPI
PROPORTIONAL
Copy
Mode
PITCH
Exit
12 CPI
CONDENSED
ON LINE COPY MODE
23
Page 29

FONT Switch
This switch is used to select the built-in fonts of your choice.
Your MSP 450 Champion supports
1. Draft
2. High Speed Draft
3. Roman
4. Sans Serif
5. Courier
6. Prestige
7. Orator
8. Script
9. OCR-B (selectable through software or Menu mode)
10. Orator-S (selectable through software or Menu mode)
11. Script-C (selectable through software or Menu mode)
Note: If OCR-B, Orator-S, or Script-C is selected, the Font Indicator LED status
will be Roman.
The following diagram shows FONT Indicator LED status and the corresponding
Font selected.
24
MENU
Mode
DRAFT
ROMAN
SANS SERIF
COURIER
FONT
MENU
PRESTIGE
ORATOR
SCRIPT
Font Selected is
Draft
Page 30
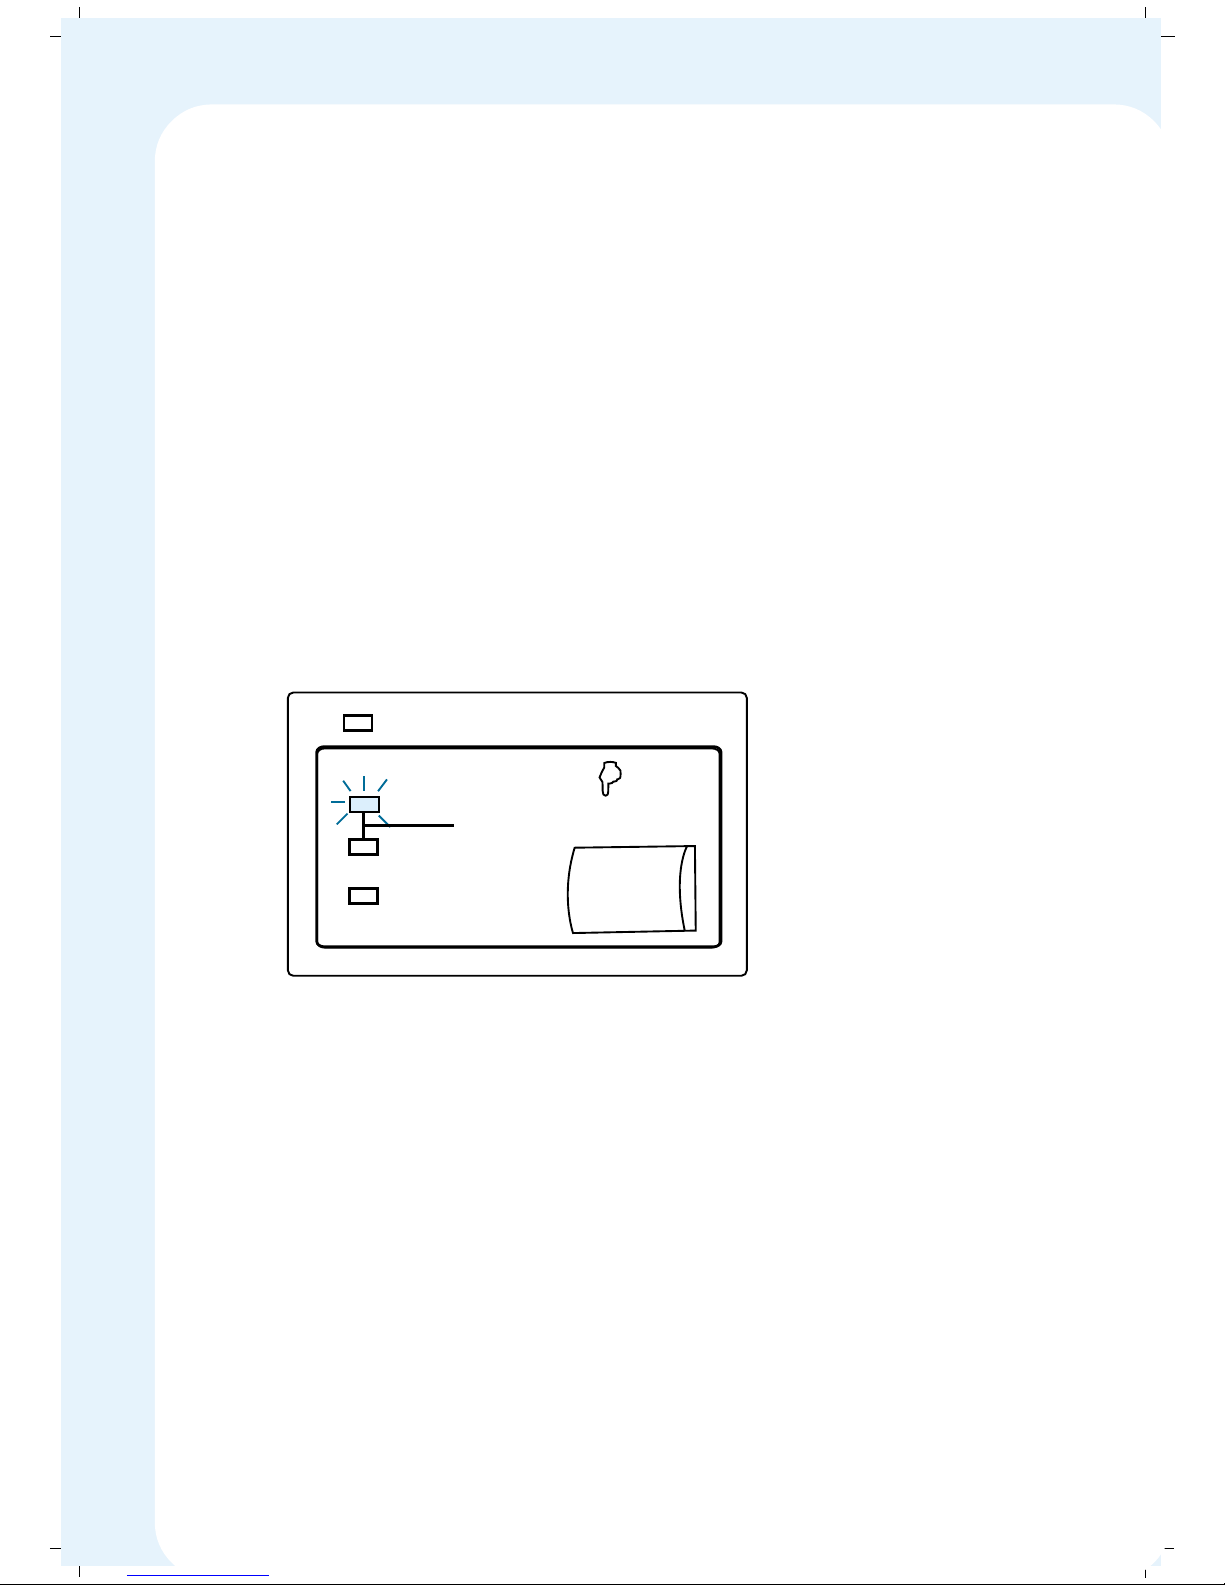
PITCH Switch
This switch is used to select the built-in fonts of your choice.
Your MSP 450 Champion supports
1. 10 cpi
2. 12 cpi
3. Condensed (17 cpi)
4. Proportional
The following diagram shows PITCH Indicator LED status and the corresponding
Pitch size selected.
25
10 CPI
PROPORTIONAL
Copy
Mode
PITCH
Exit
12 CPI
CONDENSED
ON LINE
Pitch Selected is
10 CPI
Page 31

✦✦
✦✦
✦ Entering Menu mode Settings
First remove the printer’s Top Cover, so you can see the printed Menus
and Options.
Just press the FONT Switch for about 5 seconds in OFFLINE, you will
enter into Menu Mode.
Now your Control Panel switches gets a new name and meaning attached
to it.
ONLINE Switch now becomes SAVE Key
LF/FF Switch now becomes SELECT Key
FONT Switch now becomes MENU Key
PITCH Switch now becomes EXIT Key
Your printer prints the Menu Programming Instructions followed
by the Options for the first Menu Item.
It underlines the current setting, and awaits your instructions.
Using the menu mode you can change the setting of your printer.
In the following page we have illustrated how to change the settings of the
printer
26
Page 32
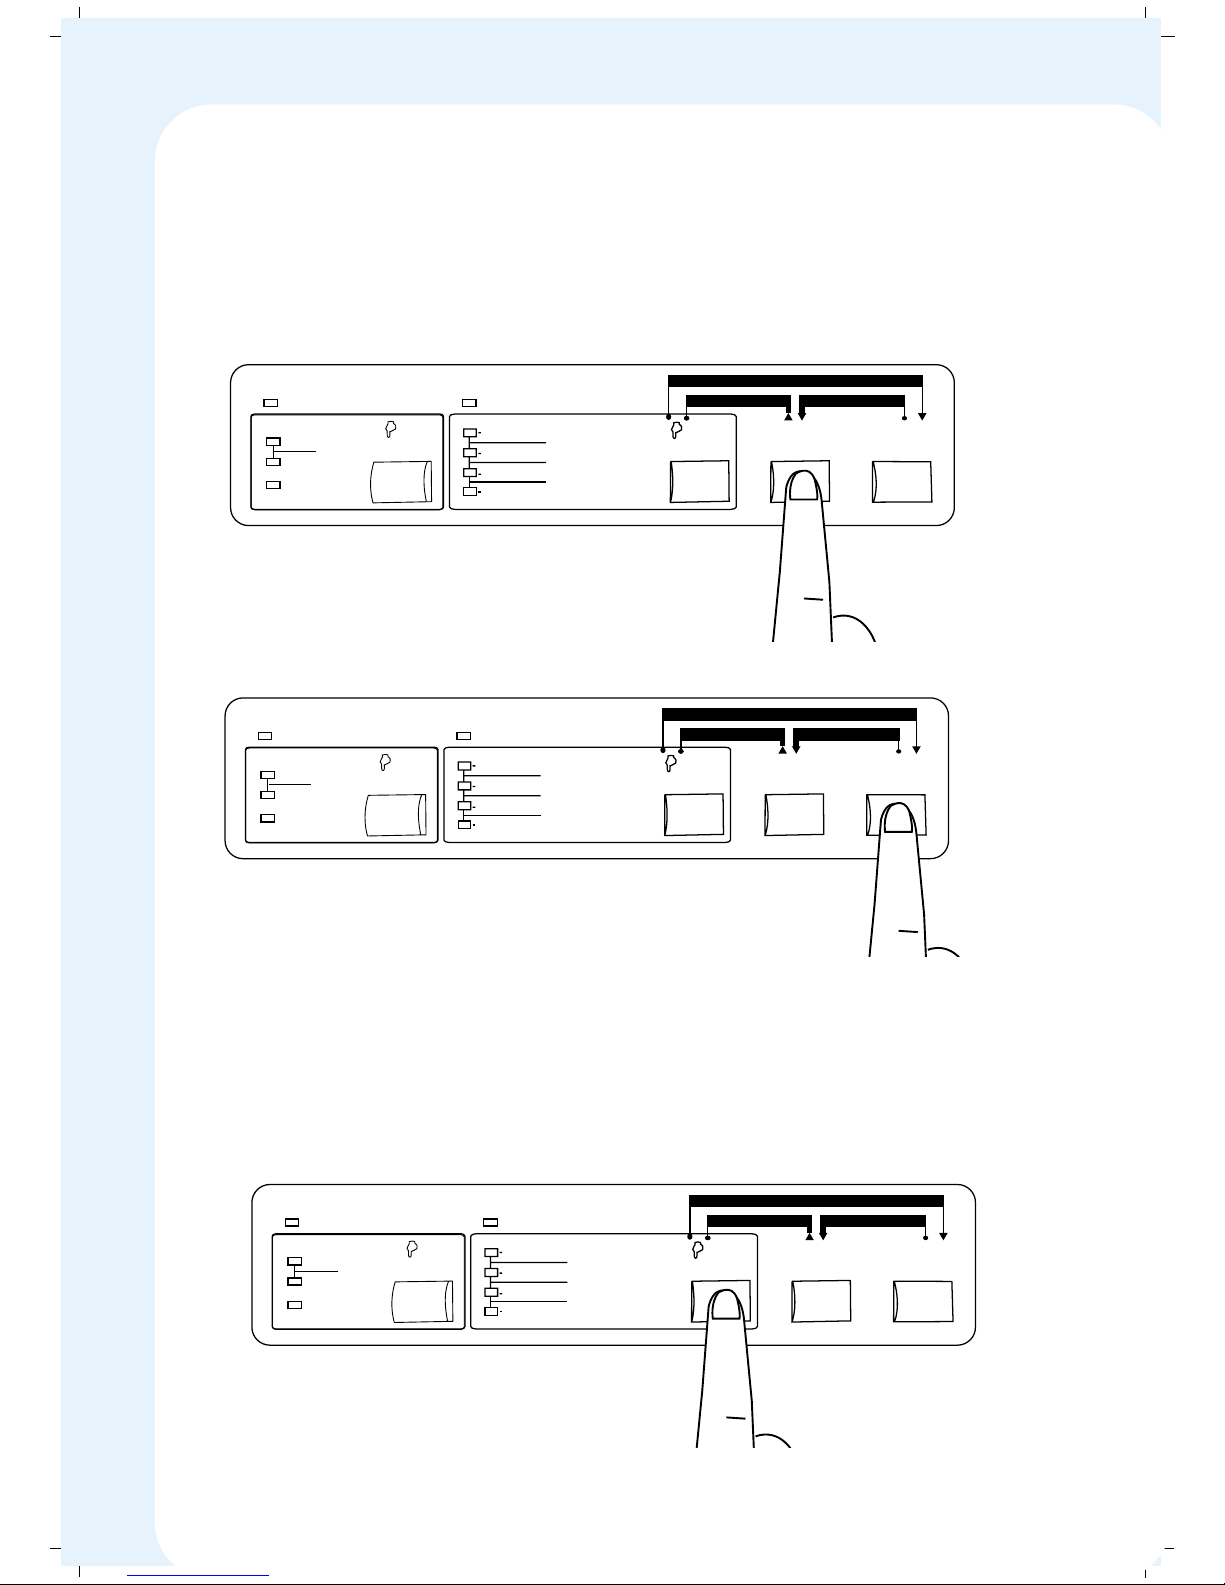
✦ Changing the settings
To change the current setting, press the SELECT key until the printhead is
beneath the option you want. Then press the SAVE key. The printer fills in
the new setting and advances to the next menu item.
To advance to next Menu Item without changing the current setting (even
if you have moved the printhead with the SELECT key), press the MENU
key without pressing the SAVE key.
MENU
Mode
DRAFT
ROMAN
SANS SERIF
COURIER
FONT
MENU
SELECT
Save
PRESTIGE
ORATOR
SCRIPT
PAPER TEAR
ONLINE
LF/FF
PAPER PARK
FORWARD MICROFEED REVERSE MICROFEED
10 CPI
PROPORTIONAL
Copy
Mode
PITCH
Exit
12 CPI
CONDENSED
ON LINE COPY MODE
MENU
Mode
DRAFT
ROMAN
SANS SERIF
COURIER
FONT
MENU
SELECT
Save
PRESTIGE
ORATOR
SCRIPT
PAPER TEAR
ONLINE
LF/FF
PAPER PARK
FORWARD MICROFEED REVERSE MICROFEED
10 CPI
PROPORTIONAL
Copy
Mode
PITCH
Exit
12 CPI
CONDENSED
ON LINE COPY MODE
MENU
Mode
DRAFT
ROMAN
SANS SERIF
COURIER
FONT
MENU
SELECT
Save
PRESTIGE
ORATOR
SCRIPT
PAPER TEAR
ONLINE
LF/FF
PAPER PARK
FORWARD MICROFEED REVERSE MICROFEED
10 CPI
PROPORTIONAL
Copy
Mode
PITCH
Exit
12 CPI
CONDENSED
ON LINE COPY MODE
27
Page 33
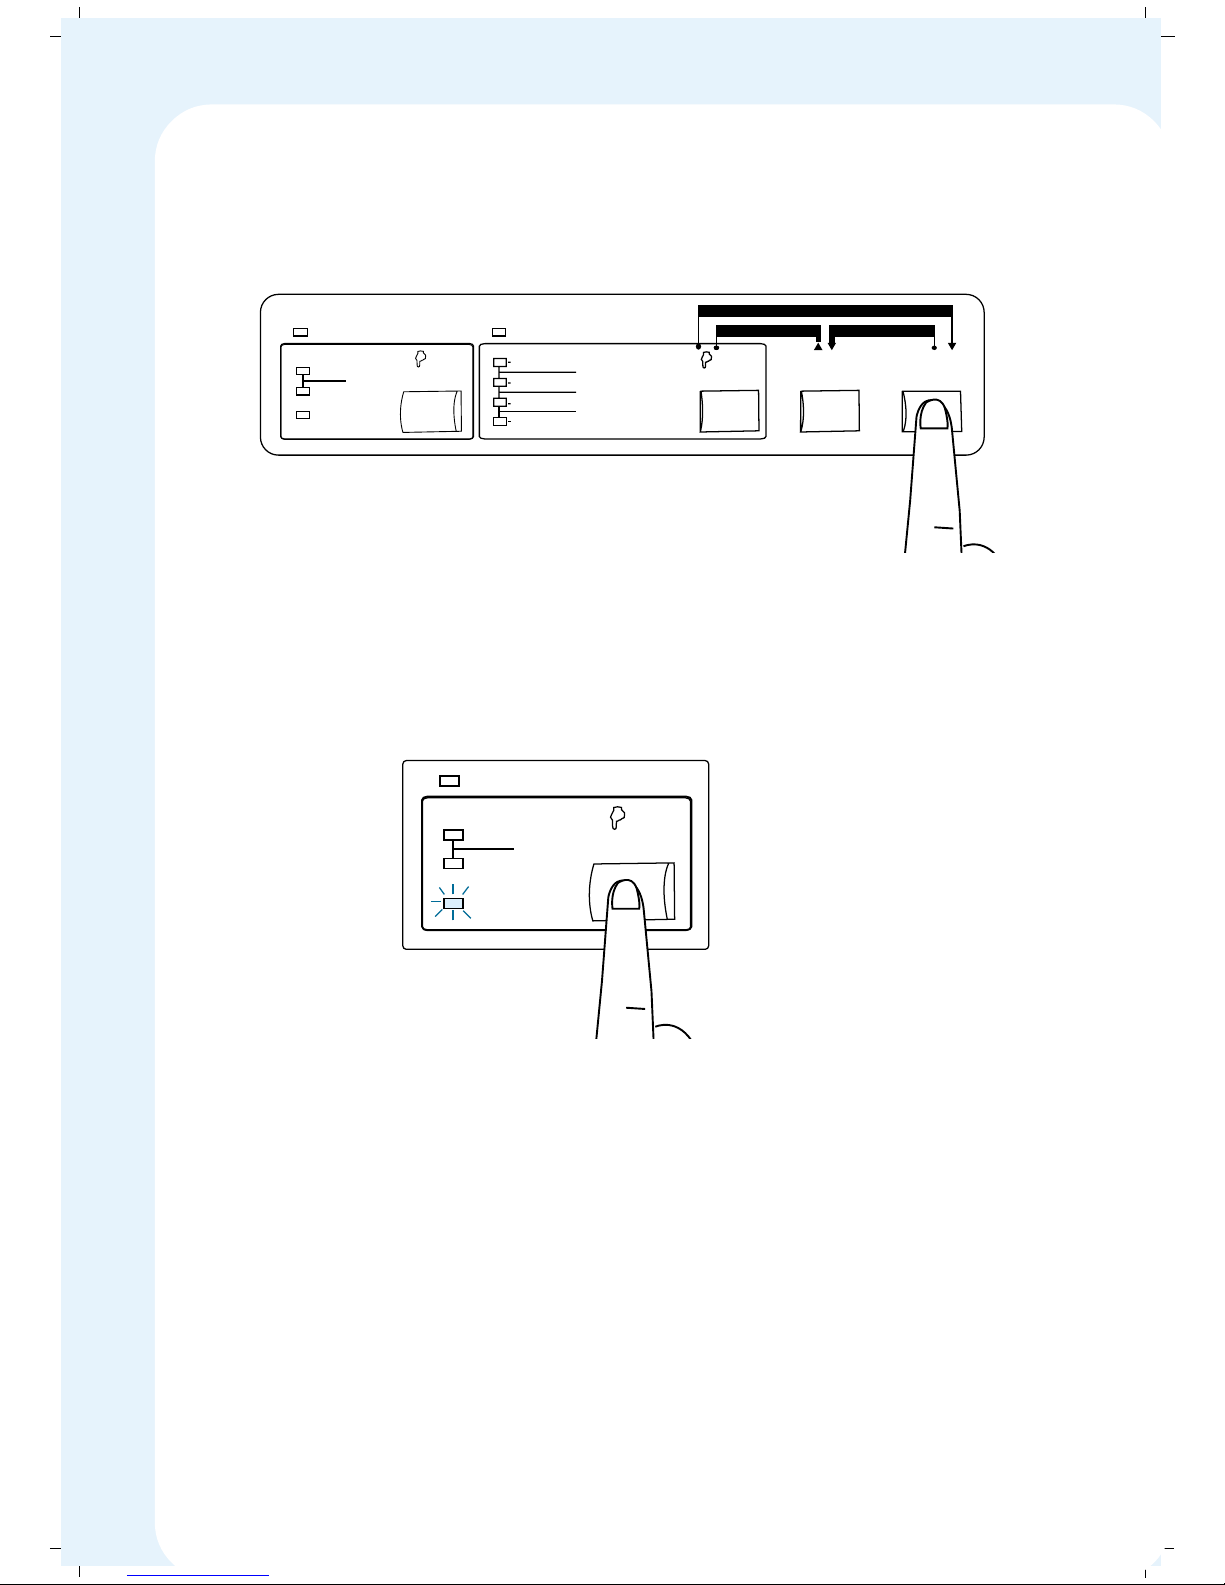
The printer automatically exits the Menu Programming when you press
MENU or SAVE at the last menu item.
To exit the Menu Programming in between, press EXIT key. All settings you
have saved using the SAVE key, till then, are retained in the printer’s
memory and become the printer’s new default settings.
The new defaults will take effect automatically the next time you turn the
printer power OFF and ON.
If you want to have your printer set to the Factory Default Settings, simply
switch the printer power ON by pressing the ONLINE Switch. The bottom FONT
light will flash for a while as an indication.
10 CPI
PROPORTIONAL
Copy
Mode
PITCH
Exit
12 CPI
CONDENSED
ON LINE
MENU
Mode
DRAFT
ROMAN
SANS SERIF
COURIER
FONT
MENU
SELECT
Save
PRESTIGE
ORATOR
SCRIPT
PAPER TEAR
ONLINE
LF/FF
PAPER PARK
FORWARD MICROFEED REVERSE MICROFEED
10 CPI
PROPORTIONAL
Copy
Mode
PITCH
Exit
12 CPI
CONDENSED
ON LINE COPY MODE
28
Page 34

29
✦✦
✦✦
✦ Menu mode settings
The following is a list of setting available. You can set the printer
to any of the settings.
MSP 450 CHAMPION DEFAULT PRINT SETTINGS ARE UNDERLINED
INSTALL 1 :
LANGUAGE ENGLISH
DEVAN
TAMIL
PRINT STYLE
LANG-STD PCISCII
1SCII91
TAMNET99
EMPHASIZED OFF
ON
EMULATION EPSON
IBM
AUTO
FONT DRAFT, HS-DRAFT, ROMAN,
SANS SER, COURIER , PRESTIGE,
SCRIPT, OCR-B, ORATOR,
ORATOR-S, SCRIPT-C
PAGE LAYOUT
LINE SPACING 4 CPI 4 LPI
5 CPI “
6 CPI “
7 CPI “
8 CPI “
Page 35

FORM LENGTH: 3.67 INCHES
4.00 INCHES
6.00 INCHES
7.00 INCHES
8.00 INCHES
11.00 INCHES
12.00 INCHES
14.00 INCHES
PAGE SKIP OFF
ON
PRINT MODE
TEXT DIR BI-DIRECTION
UNI-DIRECTION
GRAPHIC DIR BI-DIRECTION
UNI-DIRECTION
PROP-ALIGN OFF
ON
CHARACTER
SLASH ZERO OFF
ON
CHARACTER SET: ITALICS
GRAPHICS
INT. CHAR. SET.: USA, FRANCE, GERMANY, UK,
DENMARK 1, SWEDEN, ITALY, SPAIN 1,
JAPAN, NORWAY, DENMARK 2, SPAIN 2,
LATIN AM, LEGAL, KOREA, NETHER &
TURKEY
30
Page 36

31
CHARACTER SET SET1 1
SET 2
PITCH: 10 CPI
12 CPI
15 CPI
PROPORTIONAL
INSTALL 2
OPTION RAM BUFFER
DOWNLOAD
TEAR OFF OFF
ON
MOT_COM NEW
OLD
AUTO CR OFF
ON
AUTO LF OFF
ON
COPY MODE OFF
ON
LANGUAGE ENGLISH, FRACAIS, DEUTSCH,
ITALINO, ESPANOL, PORTUG & NEDERL
PNP ENABLE
DISABLE
FONT LOCK OFF
ON
Page 37
5. LOADING THE PAPER
✦✦
✦✦
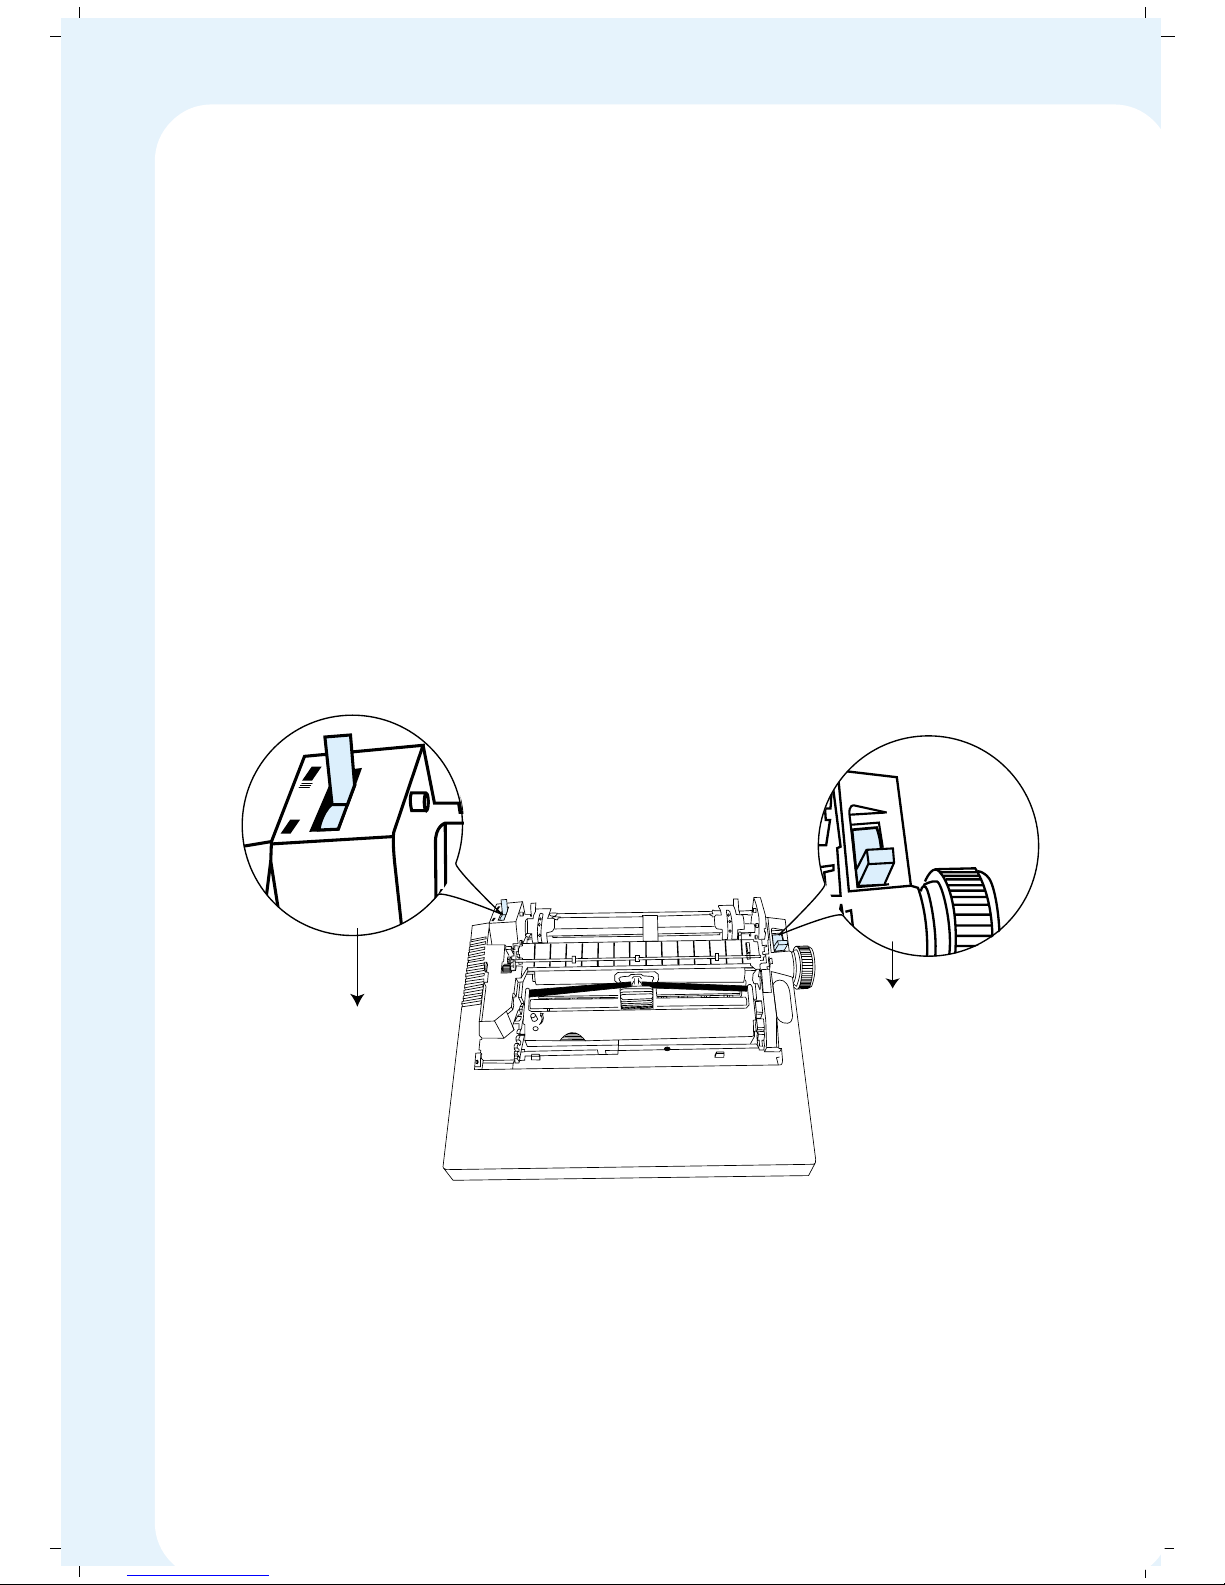
✦ Setting the Paper Select Lever and the Tractor Select Lever
You can either use single sheet stationery or continuous stationery with your
MSP 450 Champion. You can select the type of stationery you use, by setting
the Paper Select Lever and the Tractor Select Lever.
The paper select lever is located on the right side of your printer. The paper
select lever can be set either in PIN position or FRIC (friction) position.
Set the Paper Select Lever in PIN position if you are using Continuous
Stationery.
Set the Paper Select Lever in FRIC (friction) position if you are using Cut
Sheets / Single Sheets.
The Tractor Select Lever is located on the left side frame of the Tractor. A
drawing of paper stack and single sheet are embossed. This indicates the
position of the lever to be set.
Tip: With proper setting of Paper Select Lever and Tractor Select Lever makes
them to face the same direction at all times.
P
I
N
F
R
I
C
Paper Select Lever
Tractor Select Lever
32
Page 38
✦✦
✦✦
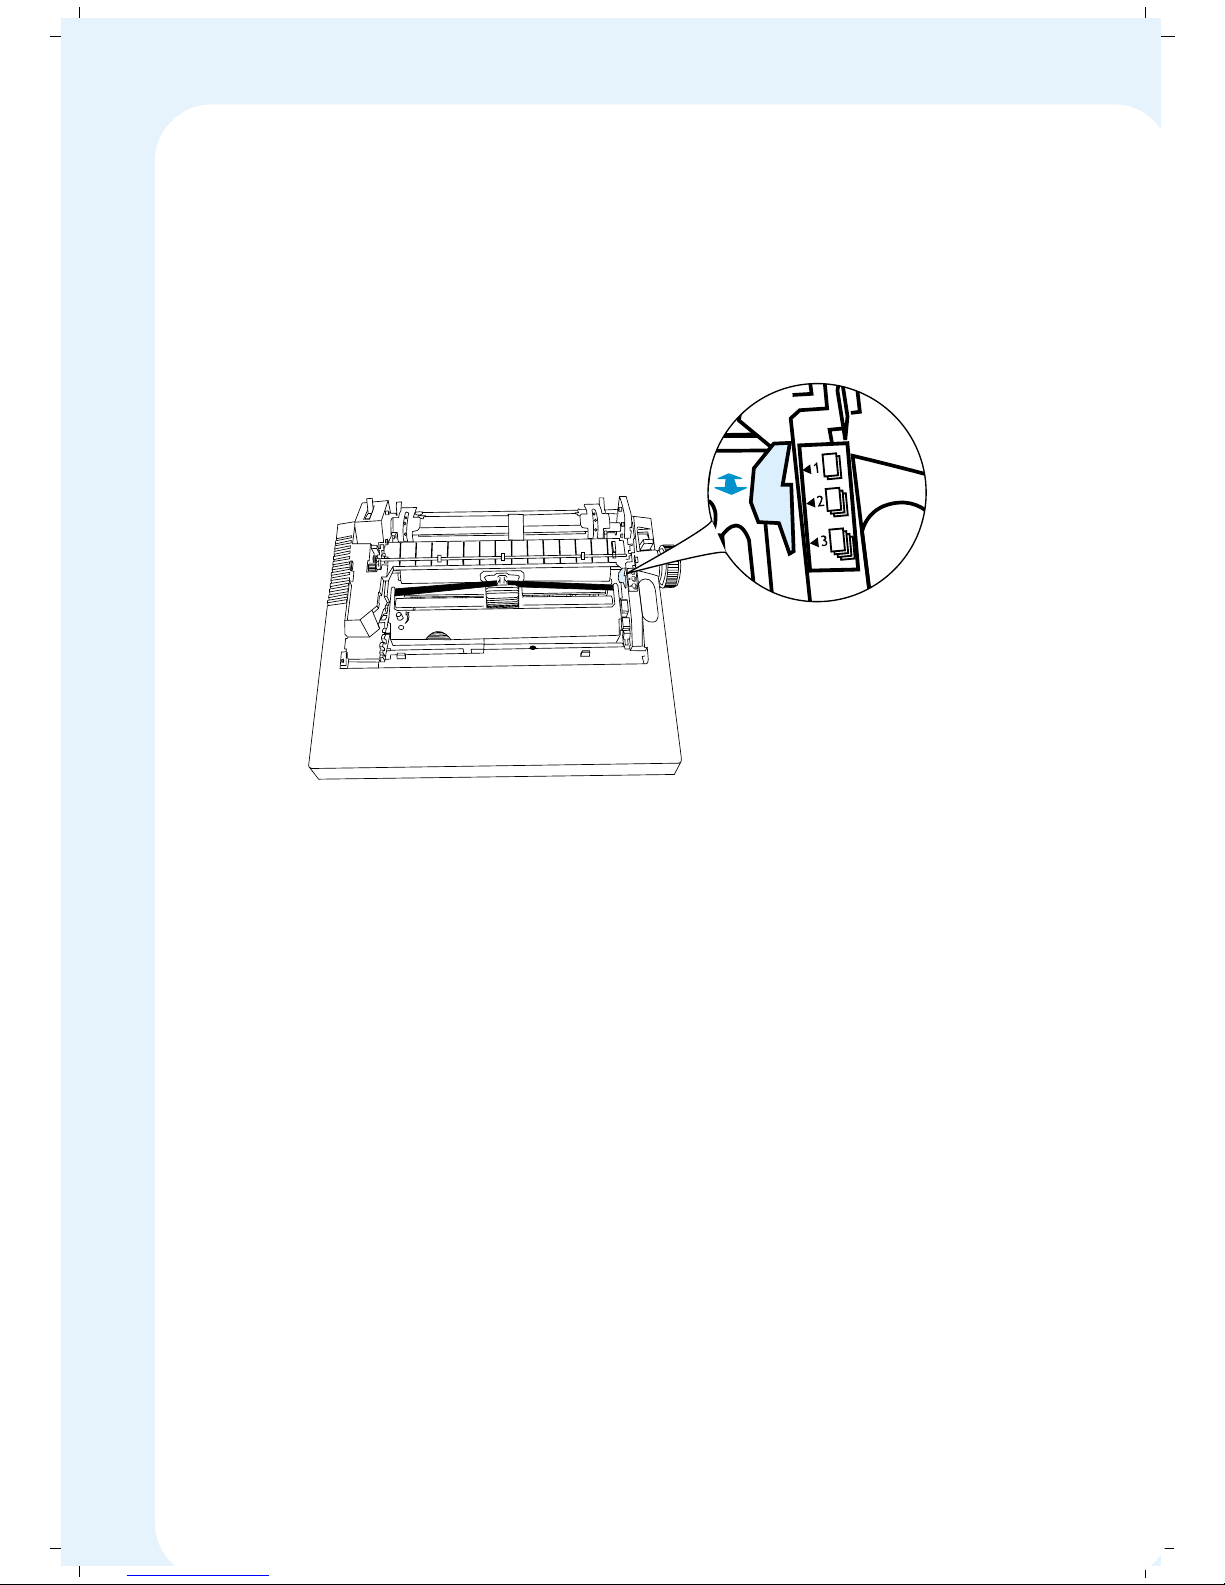
✦ Setting the Paper Thickness Lever
Your MSP 450 Champion is capable of printing multi-part stationery, up to four
copies (including original). You can set the paper thickness lever accordingly
and take multicopies.
To print in multi-part stationery, the printhead must be adjusted to allow for
the extra thickness of the paper. For proper print quality the gap between the
printhead and the paper should be maintained at a constant level. Paper
Thickness Lever helps to keep this gap constant.
When you open the Top Cover of the printer, you can locate a yellow colour
lever on the right side. Move the lever towards you to increase the gap. A
sticker is provided that indicates the recommended gap setting for different
multi-part stationery.
Paper Thickness Lever Position No. of Copies
1 1 + 1
2 1 + 2
3 1 + 3
33
Page 39
✦✦
✦✦
✦ Installing the Tractor Unit
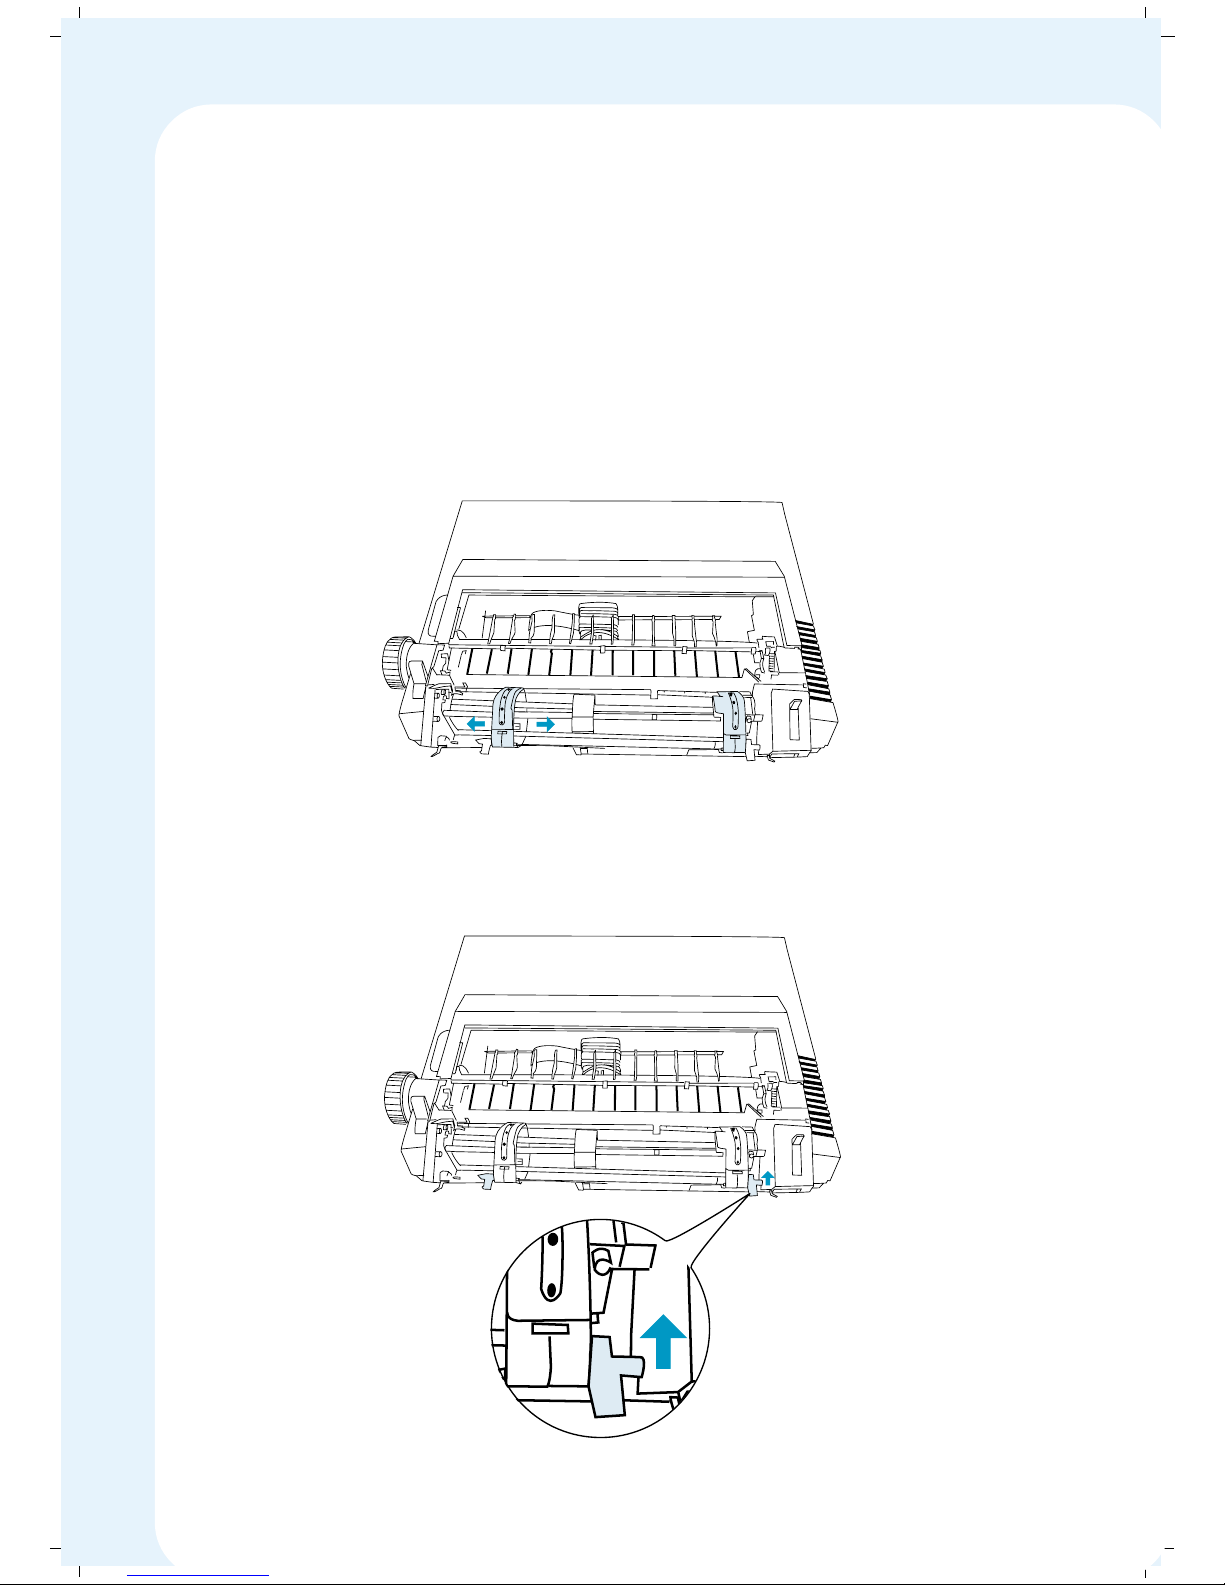
Your MSP 450 Champion comes with a convertible Push and Pull Tractor Unit.
The Tractor Unit is a paper feed mechanism used for printing on continuous
stationery.
The tractor has sprockets (or tractors) on either end, that can slide left
or right to adjust to the paper width.
The tractors are held in position with locking levers.
34
Page 40
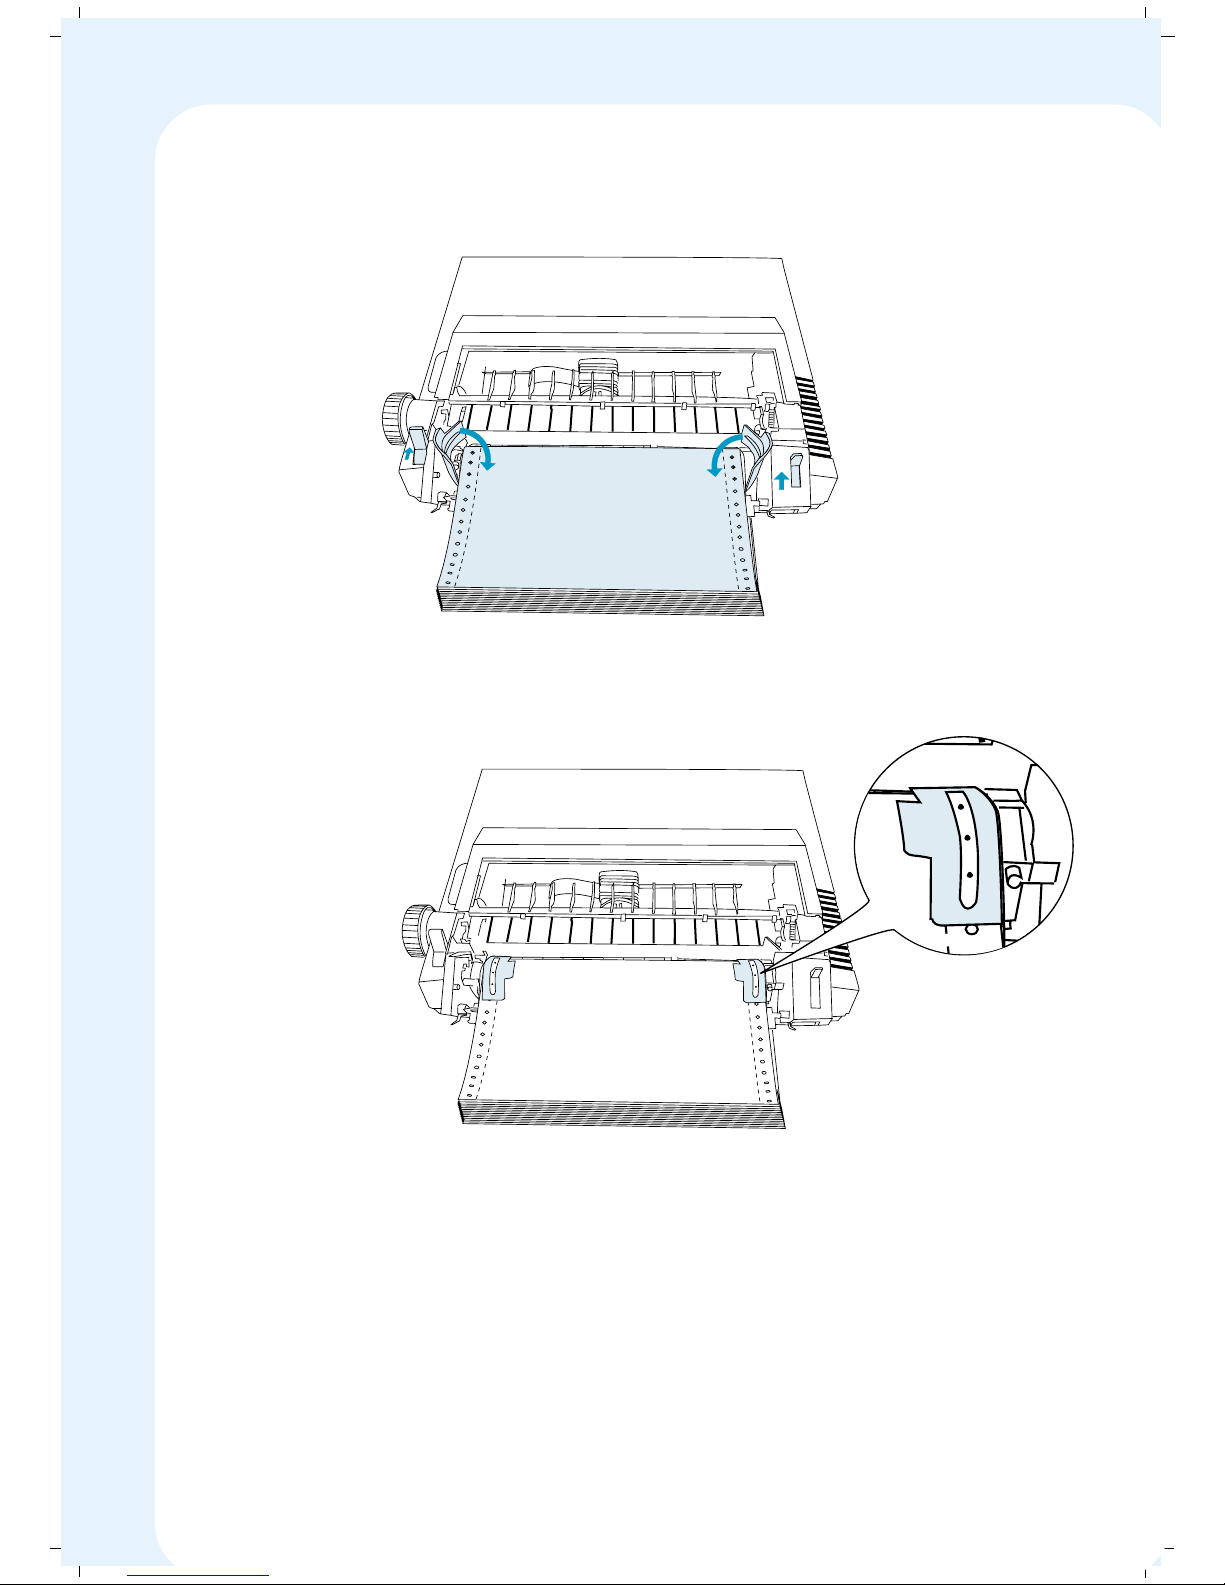
The sprocket pins on the tractors fit into the holes along the edge of the
paper.
The flip-up covers on the tractor, clamps the paper in place over the pins.
With each new line, the tractor wheel rotates, making the paper move
through the printer.
Paper supports, which can be adjusted left or right, guides the paper out
of the printer.
The tractor unit can be in either Push or Pull position to accommodate
different types of paper.
35
Page 41
✦✦
✦✦
✦ Installing the Tractor in the Push Position
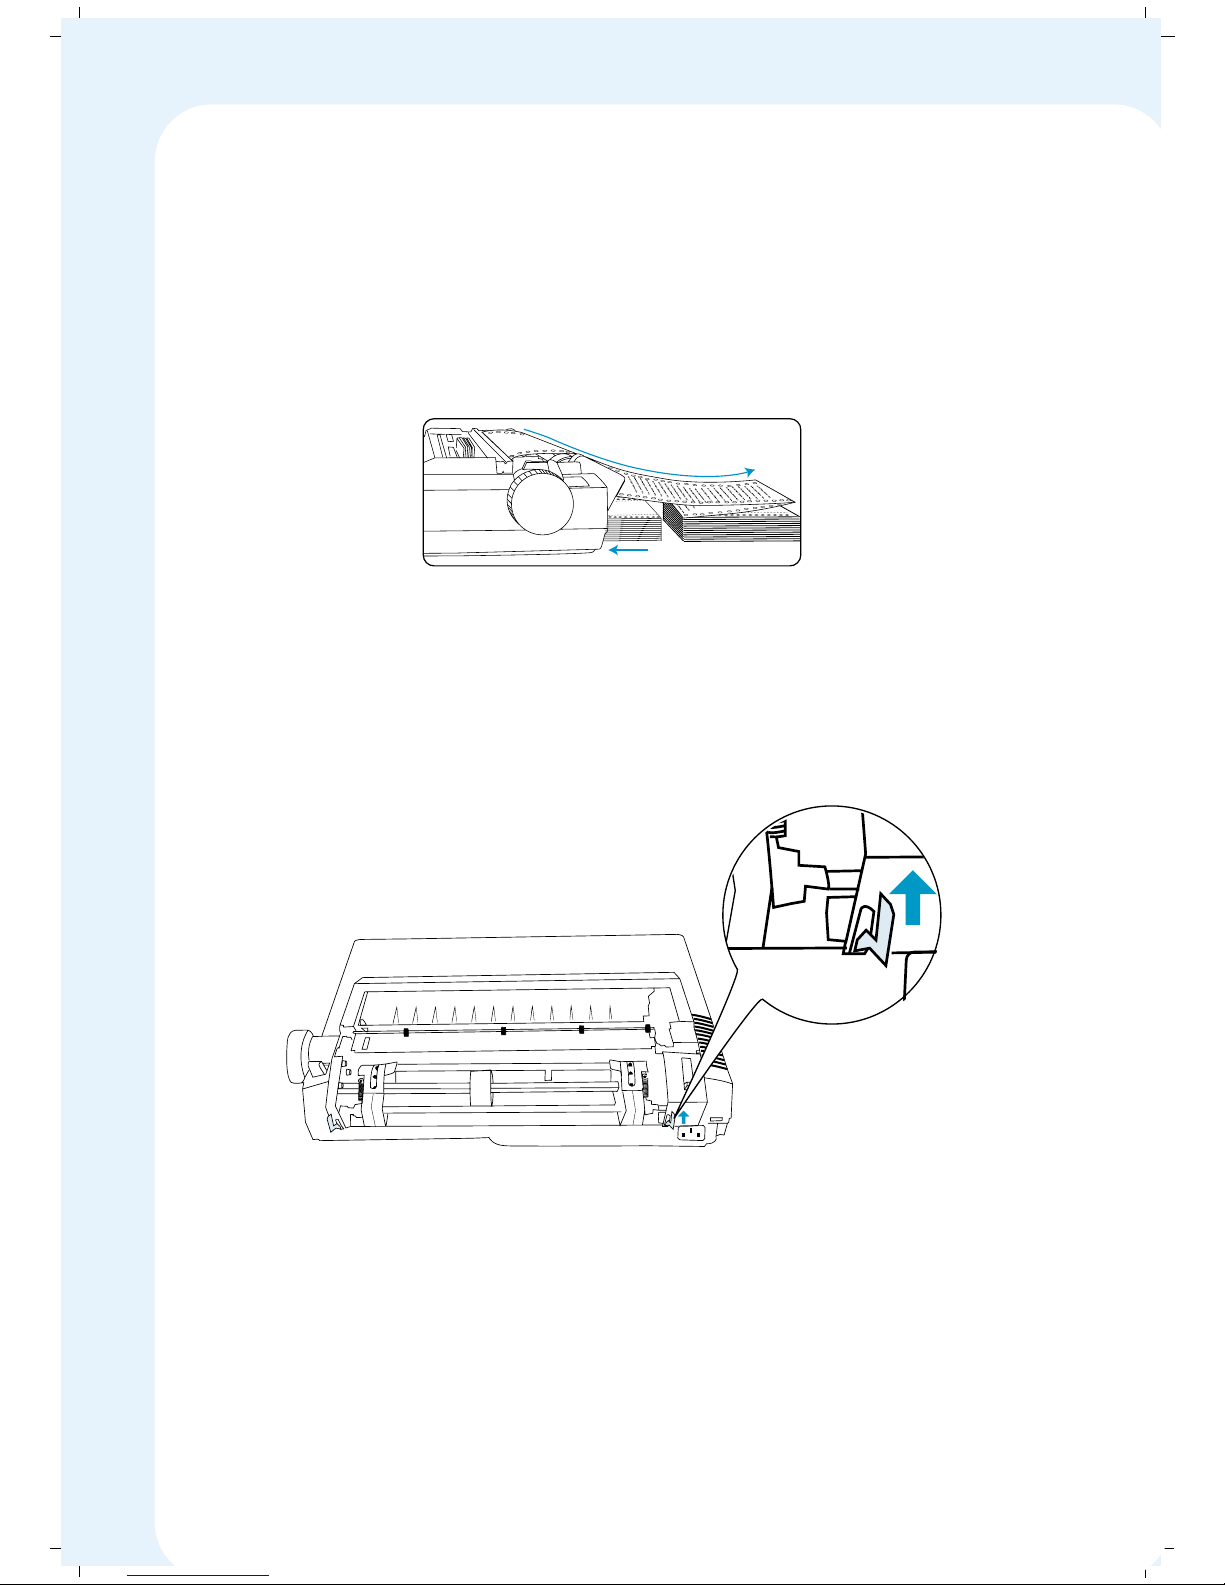
Your printer comes from the factory with the push position as the default
position for Tractor Mechanism.
When the tractor is in the push position, paper first passes through the tractor
that “pushes” the paper around the platen and through the printer.
To install the tractor feed mechanism in Push Position
1. Switch the printer power OFF.
2. Push in two release levers at back of the tractor mechanism (each
end), and place the mounting feet into the slots on the rear of printer.
3. Secure the tractor unit and let go off the release levers; the tractor will
lock into place.
4. Slide the paper supports on the tractor bars and space them evenly
between the adjustable tractors
5. Now you can turn the paper feed knob to make sure the gears are
turning properly.
a
b
c
d
efg
h
u
j
i
k
l
m
n
op
q
r
st
u
v
w
x
y
a
b
c
d
efg
hu
j
ik
l
m
n
opq
rstuvw
x
y
a
b
cdef
g
h
u
j
i
k
l
m
n
opqr
st
u
vw
x
y
a
b
c
d
ef
g
huj
i
kl
mn
o
pqr
s
t
u
a
b
c
d
efgh
u
j
i
k
l
m
n
o
pq
r
s
t
u
a
b
c
d
e
f
g
h
uji
k
l
m
n
o
p
q
r
s
a
b
c
d
e
fghujik
l
m
n
a
bc
d
e
f
g
h
u
a
b
36
Page 42
✦✦
✦✦
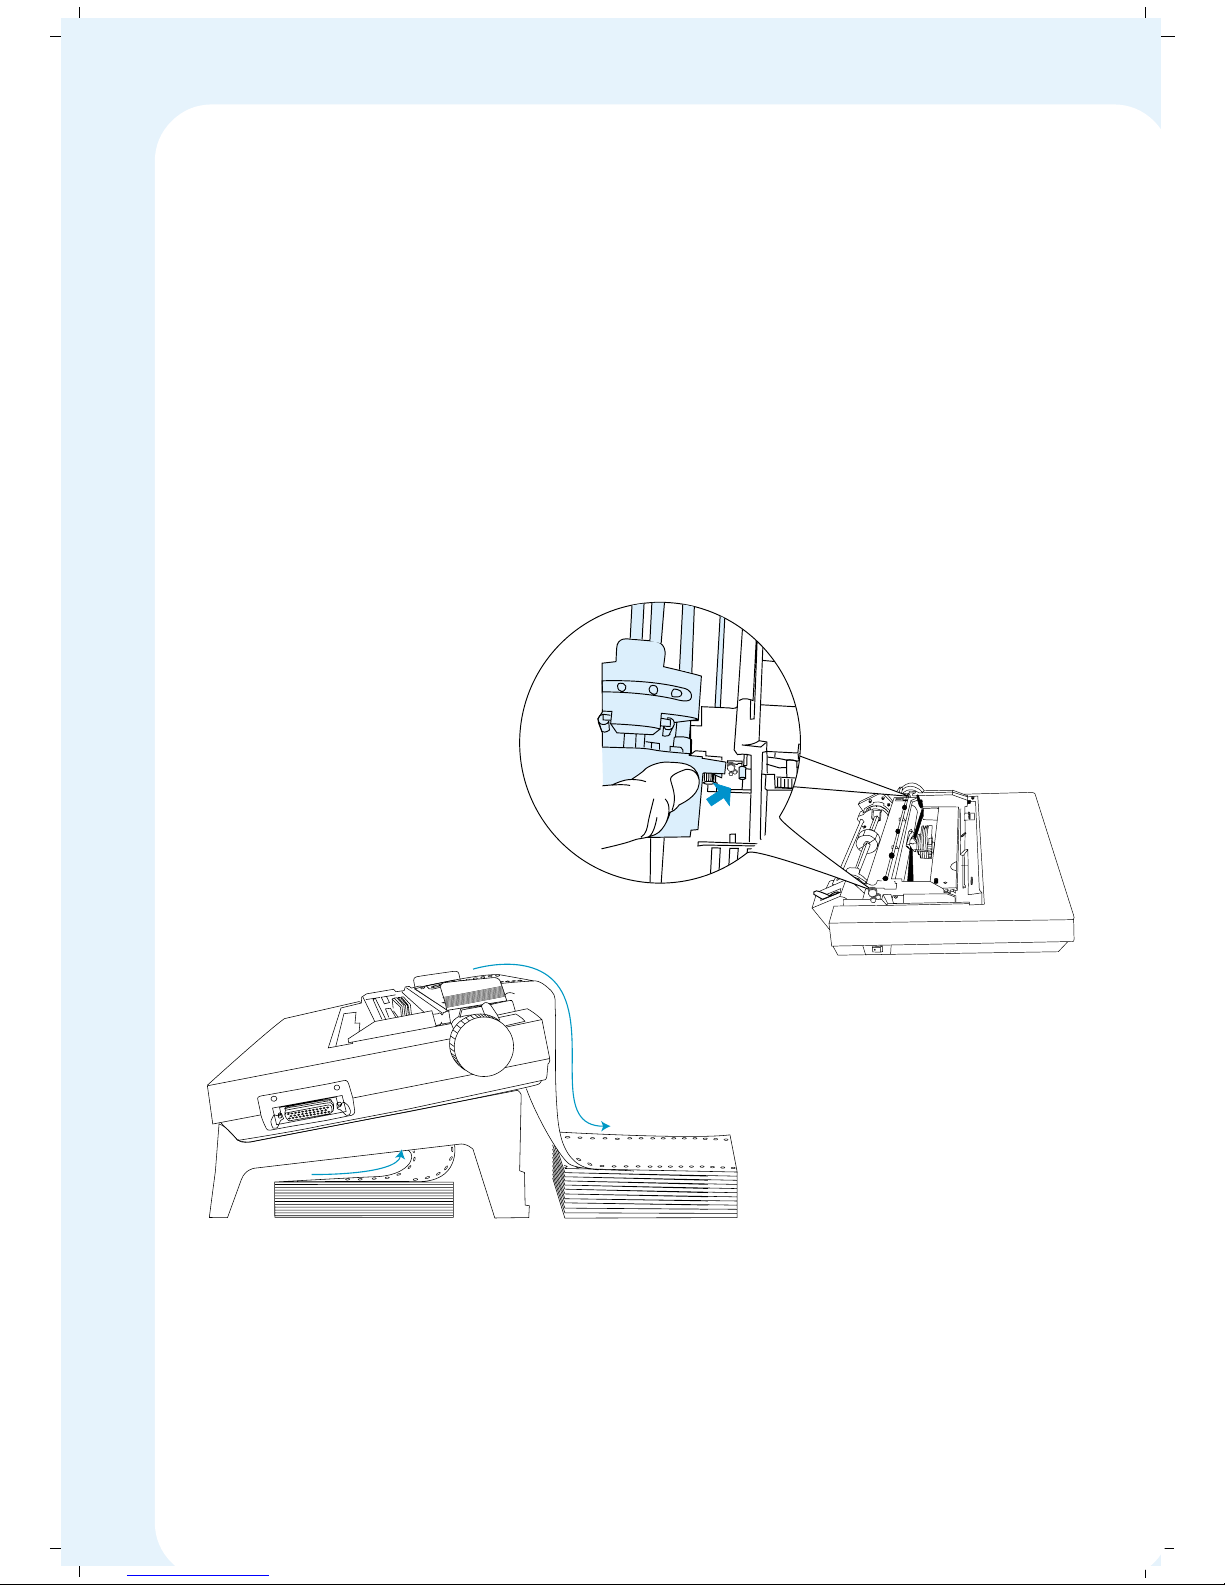
✦ Installing the Tractor in the Pull position
When the tractor feed mechanism is in the Pull Position, the paper first passes
around the platen and then the tractor “pulls” the paper through the printer.
Here’s how to install the tractor-feed mechanism in the Pull Position
1. Switch the printer power OFF.
2. Open or remove the top cover
3. Push in the two release levers at back of the tractor mechanism
(each end), and place the mounting feet into the slots on the top of
printer.
4. Secure the tractor unit on top of the printer and let go off the release
levers - the tractor will lock into place.
5. Now you can turn the paper feed knob to make sure the gears are turning
properly.
37
Page 43
✦✦
✦✦
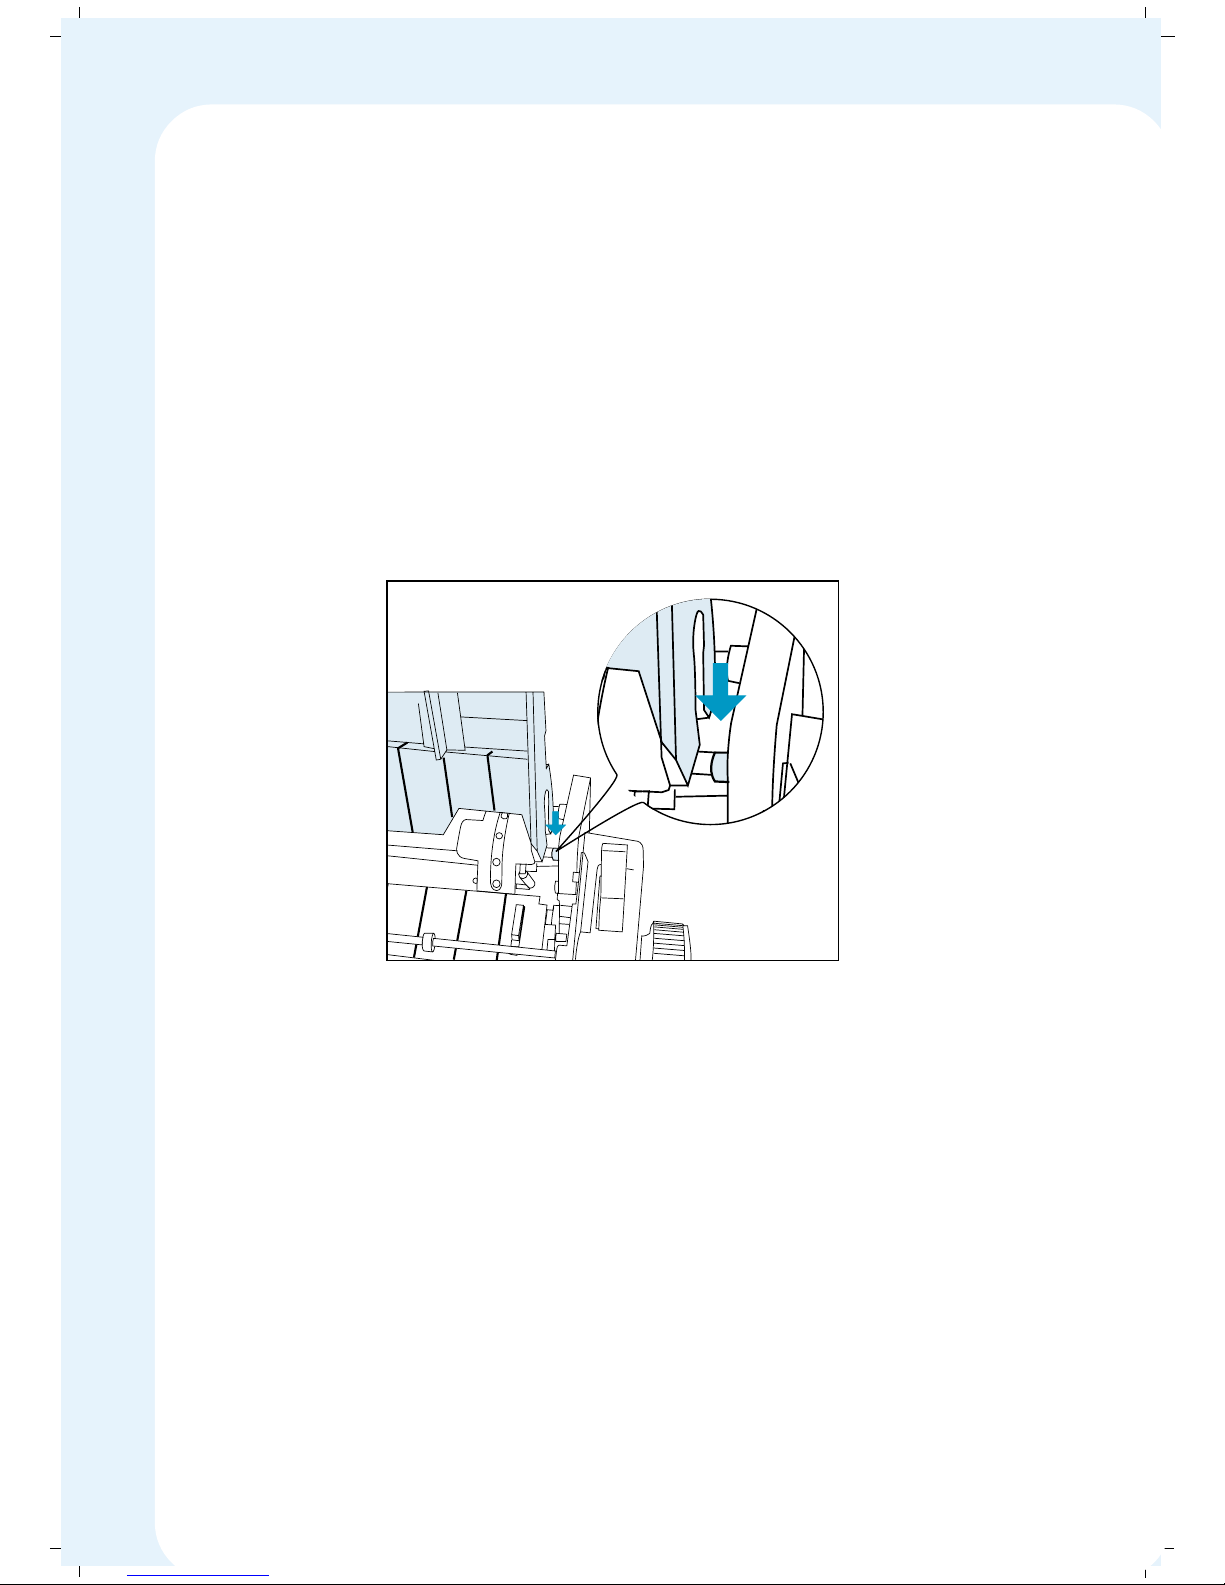
✦ Installing Paper Insertion Guide
Before you try to install the paper insertion guide, ensure the Tractor
Unit is in Push Position.
First, fit the guide slots on each end of the paper insertion guide on the
guide pins provided in both side of the Tractor Unit.
Slide the sheet guide down until the ends rest on the guide pins.
In this position the sheet guide can be used for printing single sheets.
38
Page 44
✦✦
✦✦
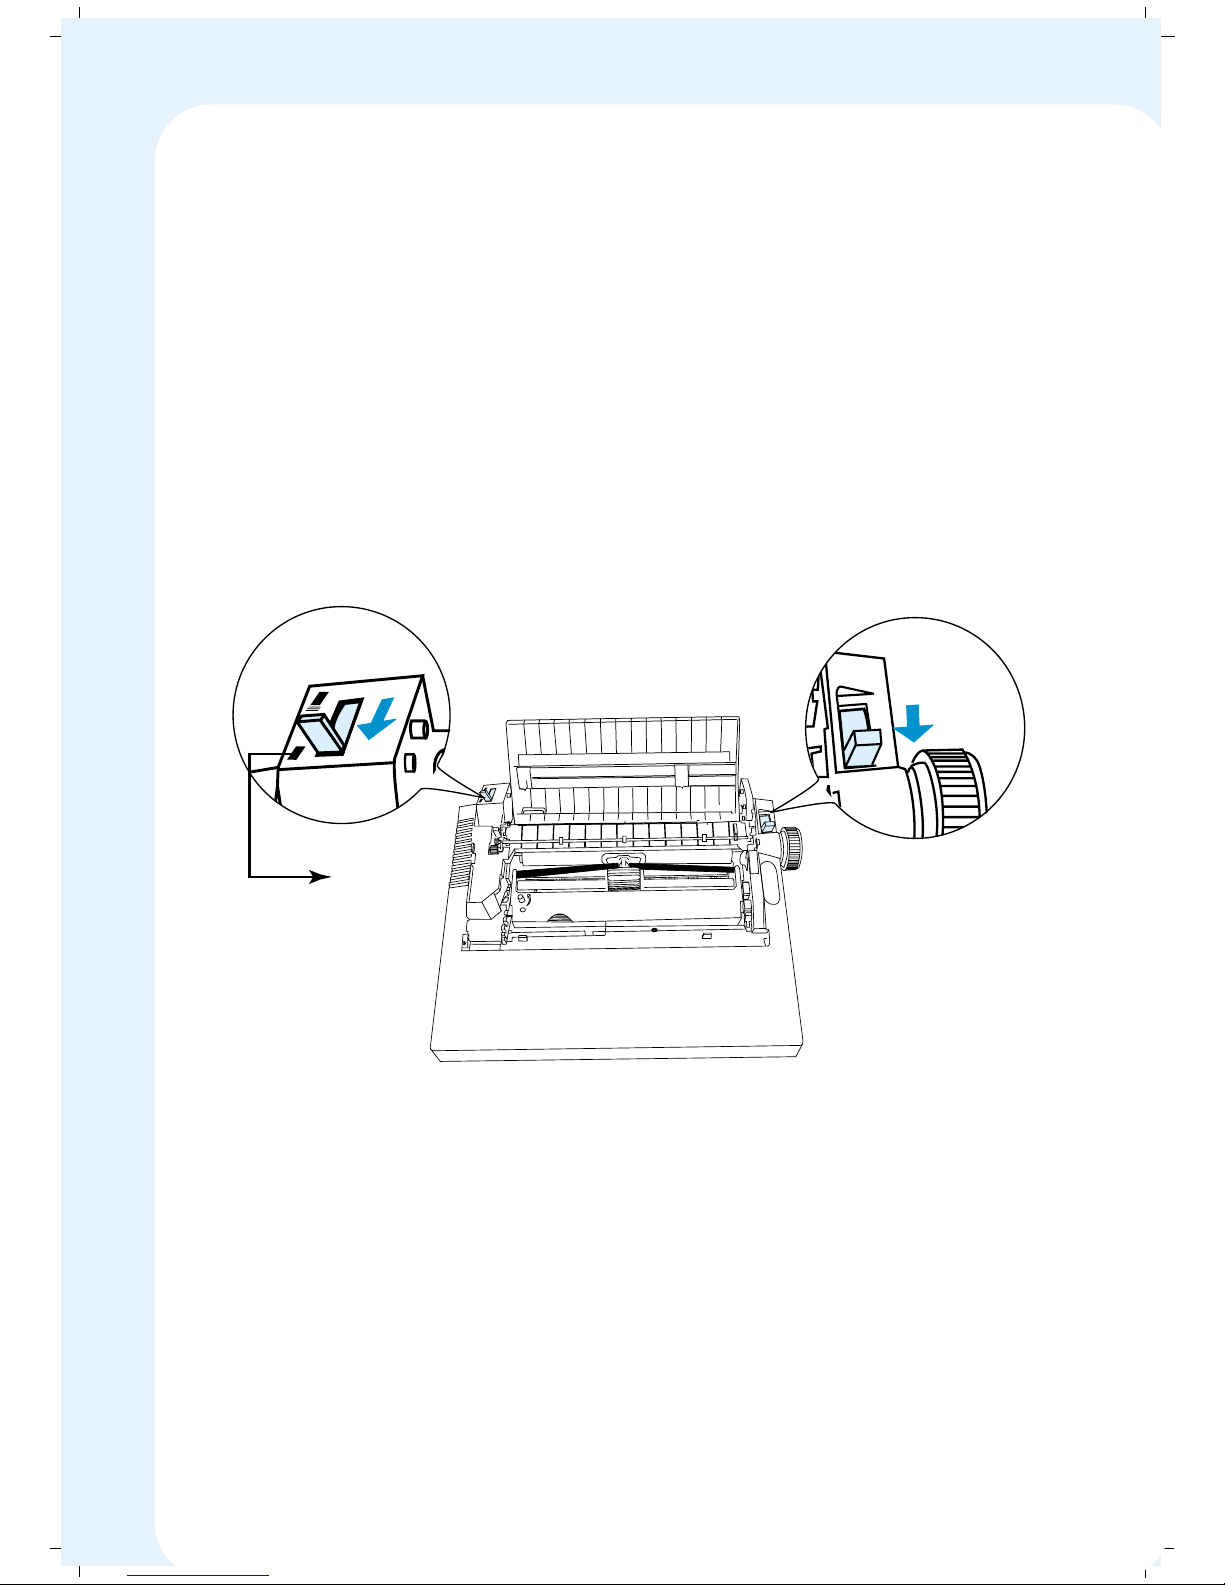
✦ Loading single sheet (A4)
Using MSP 450 Champion you can print on Letter Heads and other types of
stationeries that are not available in continuous format. Your printer has the
automatic paper loading feature to load single sheets.
1. Ensure Paper Insertion Guide is installed properly.
2. Switch your printer power ON.
3. Set the Paper Select Lever in FRIC position.
4. Set the Tractor Select Lever in Cut Sheet position.
P
I
N
F
R
I
C
Cutsheet
Position
39
Page 45
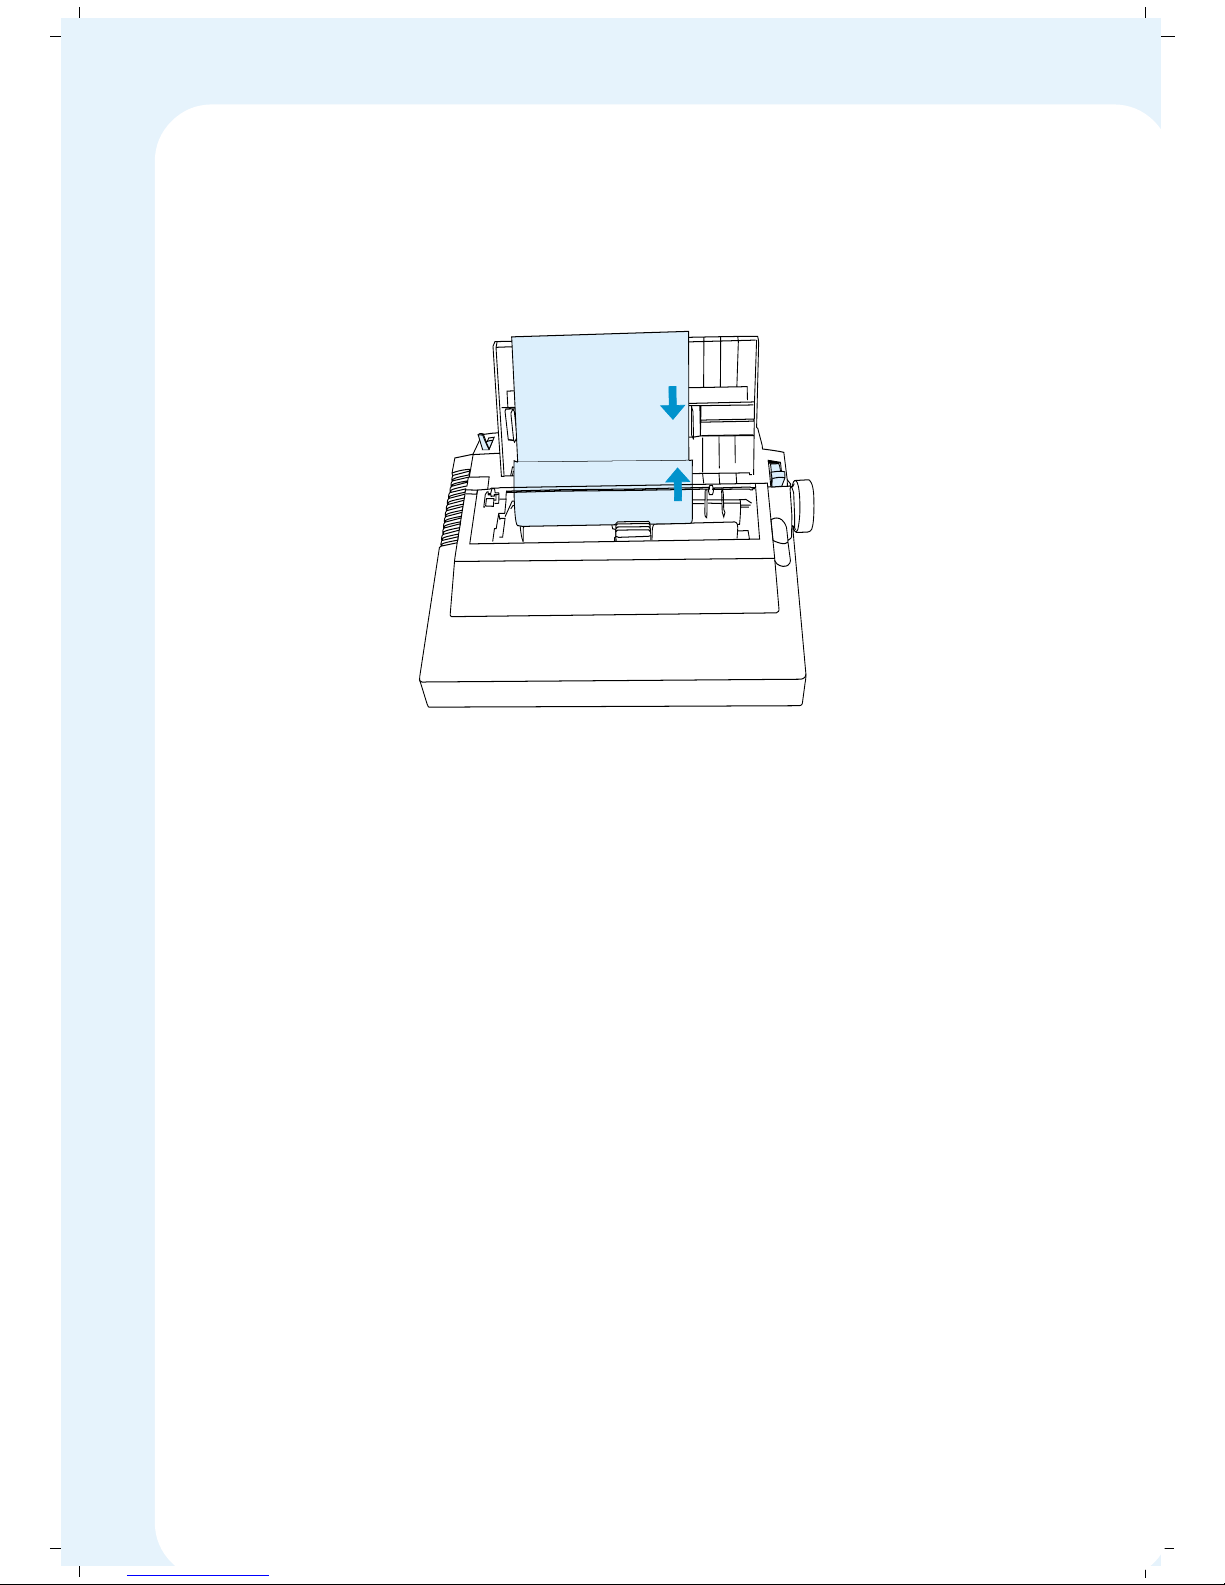
5. Move the left paper guide on the Paper Insertion Guide to the initial
printing position. Insert the single sheet and adjust the right paper guide
to the paper width.
6. Slide the cut sheet behind the platen through the paper guides. The paper
should be inserted about 1 inch.
7. After about one second, the paper will automatically advance around the
platen and position itself in front of the print head. The Print head will
also centre itself.
8. If necessary, make any adjustments for paper alignment with the paper
select lever in the PIN position, and then return it to the FRIC position.
Note: When using narrow paper, position the paper as far left as possible
in order to activate the printer’s paper sensor. You can tell that the sensor
is activated when the control panel’s ONLINE indicator LED stops flashing.
If the LED does not stop flashing when you insert paper, reposition the
paper. You will not be able to put the printer ONLINE to print unless the
paper sensor is activated and the ONLINE light stops flashing.
A4 Cut Sheet
40
Page 46
✦✦
✦✦
✦ Loading continuous stationery
Your printer can print from 3.5 to 10 inches form lengths of continuous paper.
You can feed standard continuous paper through the provision provided in
Rear or Bottom of the printer.
Rear feed continuous Paper
To load continuous paper for rear feeding, follow these steps:
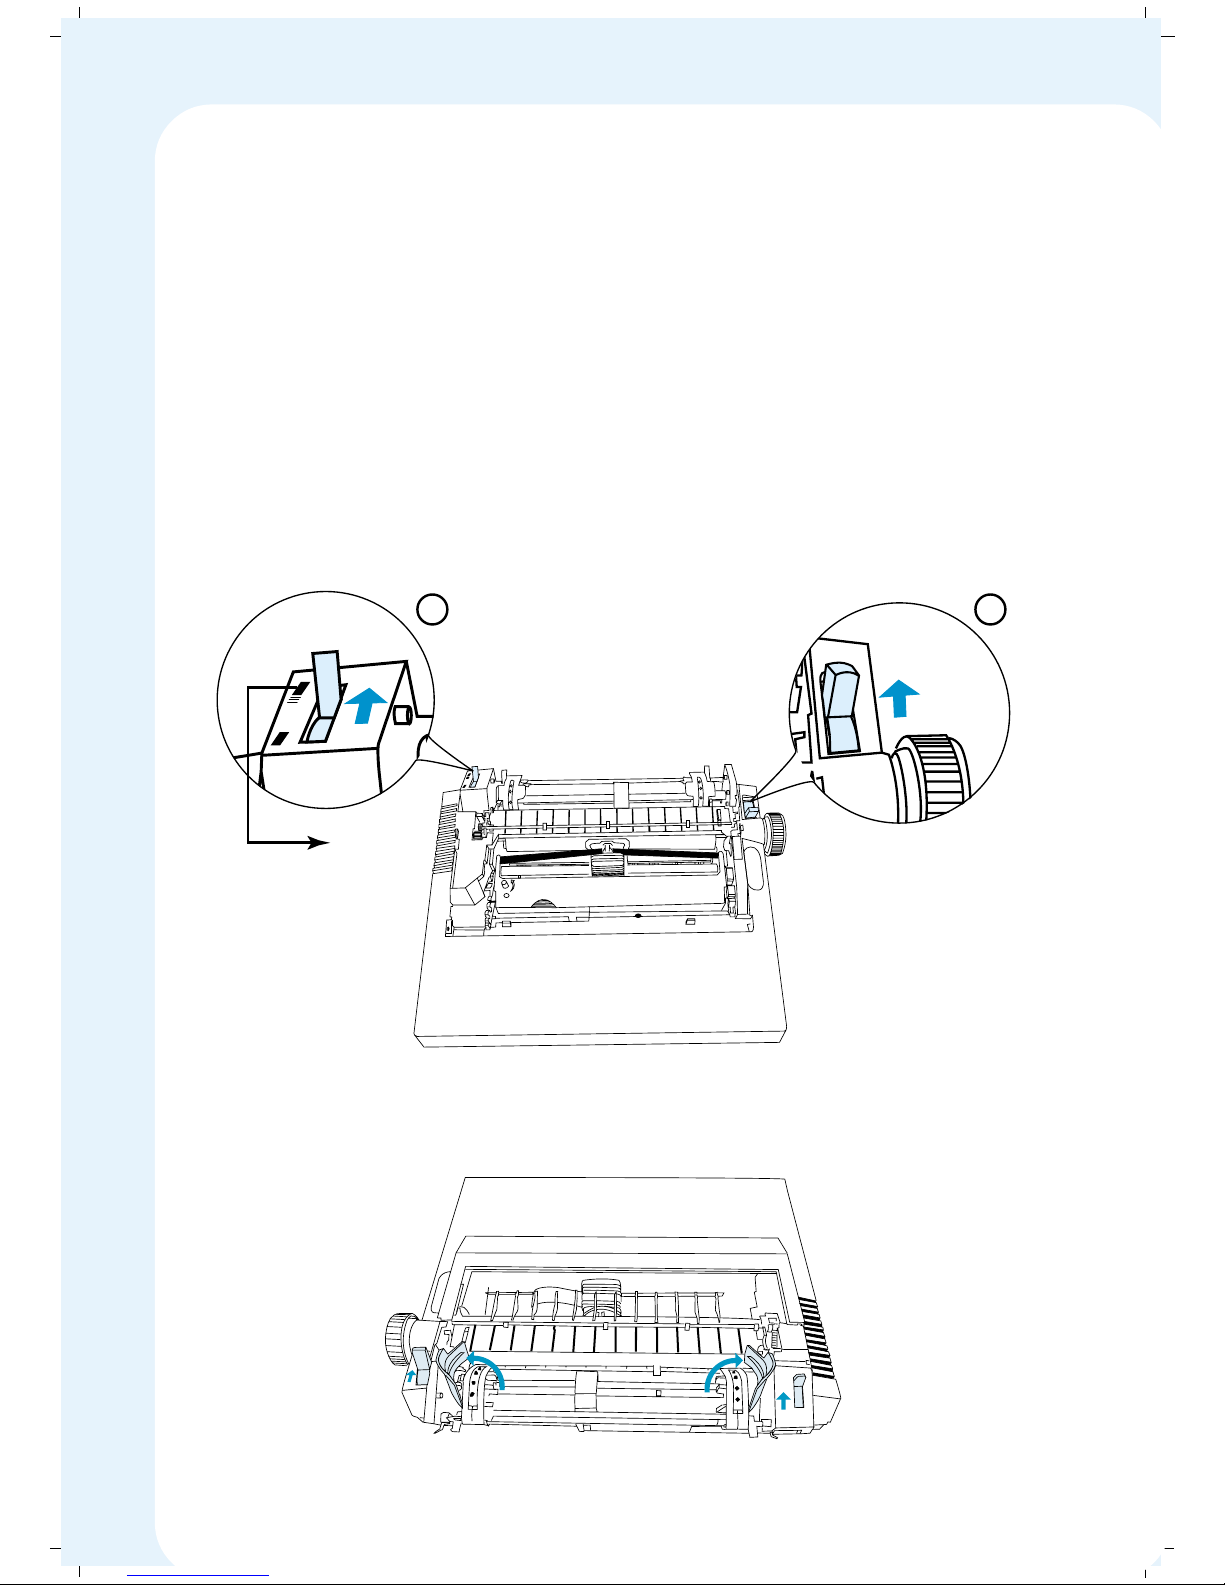
1. Move the Paper Select Lever to the PIN position
2. Move the Tractor Select Lever to the Paper Stack position.
3. Open the tractor covers
P
I
N
F
R
I
C
Paper
Stack
Position
12
41
Page 47
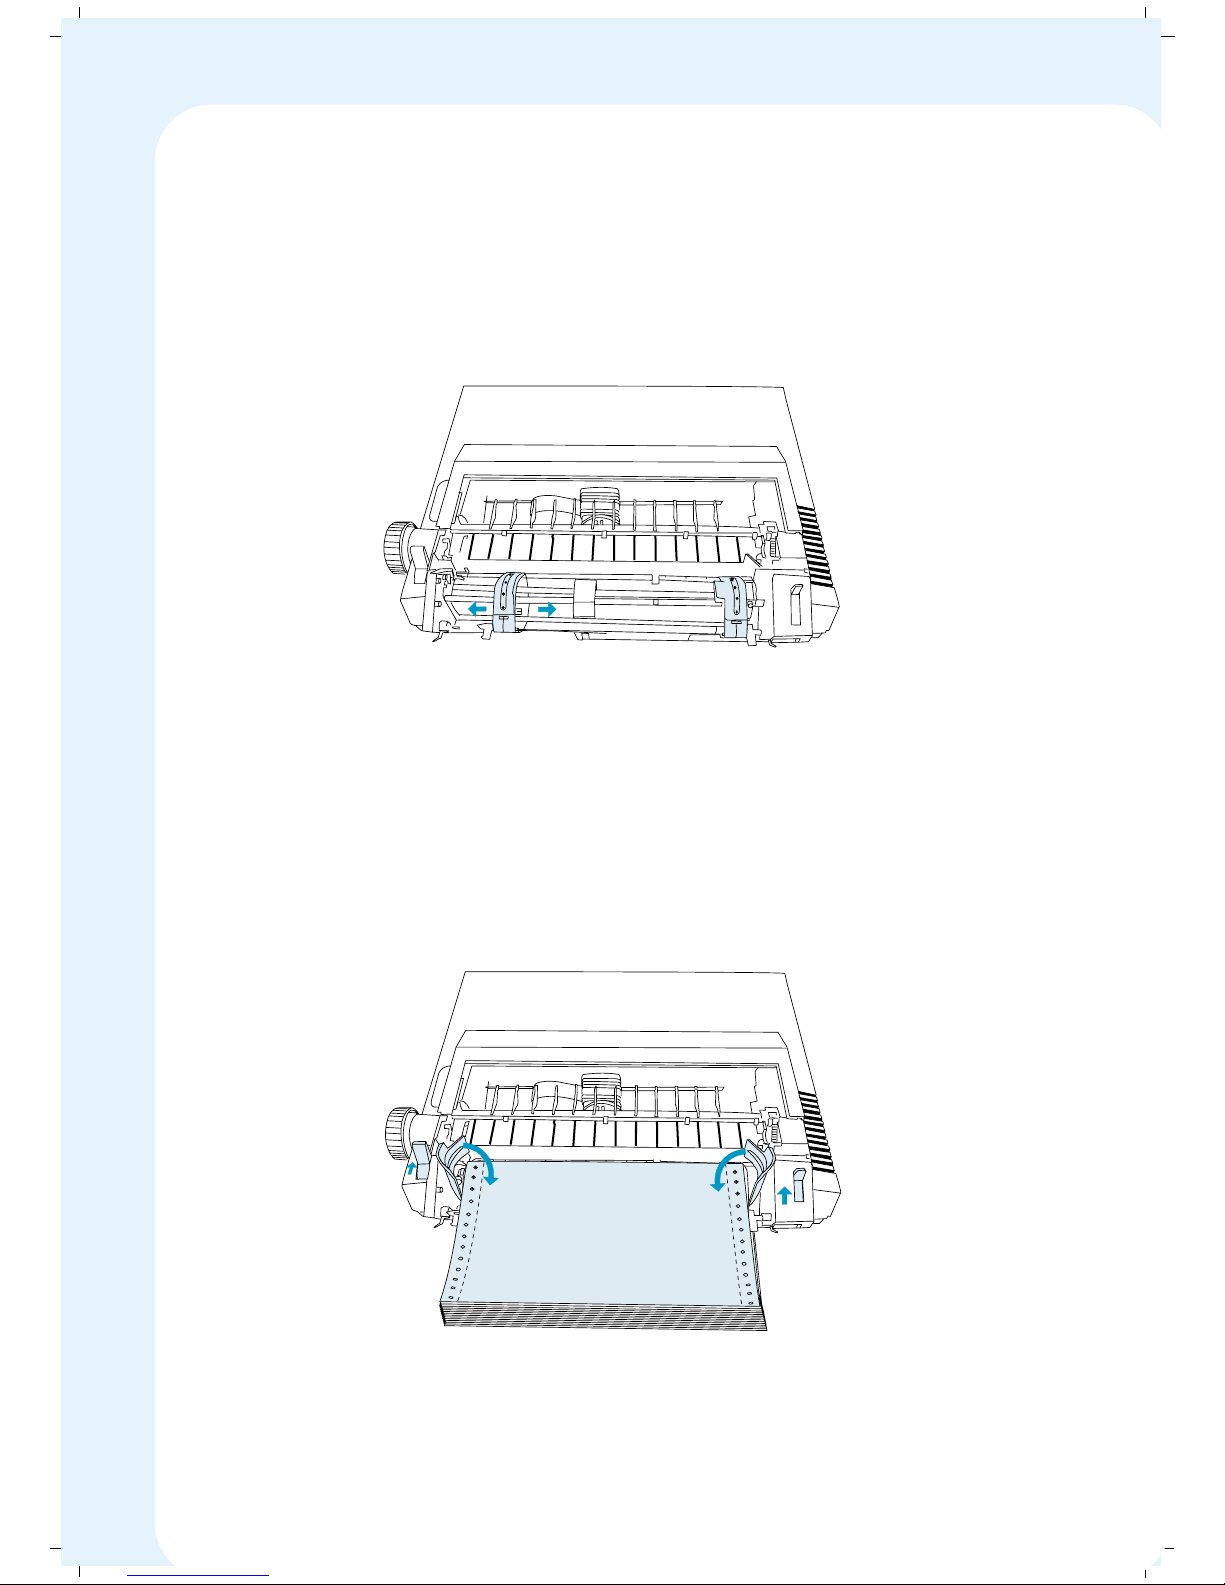
4. Flip the locking levers forward and adjust the tractors to the approximate
paper width. You can use the small arrow on the edge of the top cover as
a guide for the left edge of the paper. Adjust the paper supports so that
they are evenly spaced.
5. Place a stack of paper on a level surface behind the printer. As shown in
figure, bring the top sheet of paper forward and fit the punched holes of
the paper over the sprocket pins moving the tractors as needed to
accommodate the paper width. Close the tractor covers.
42
Page 48
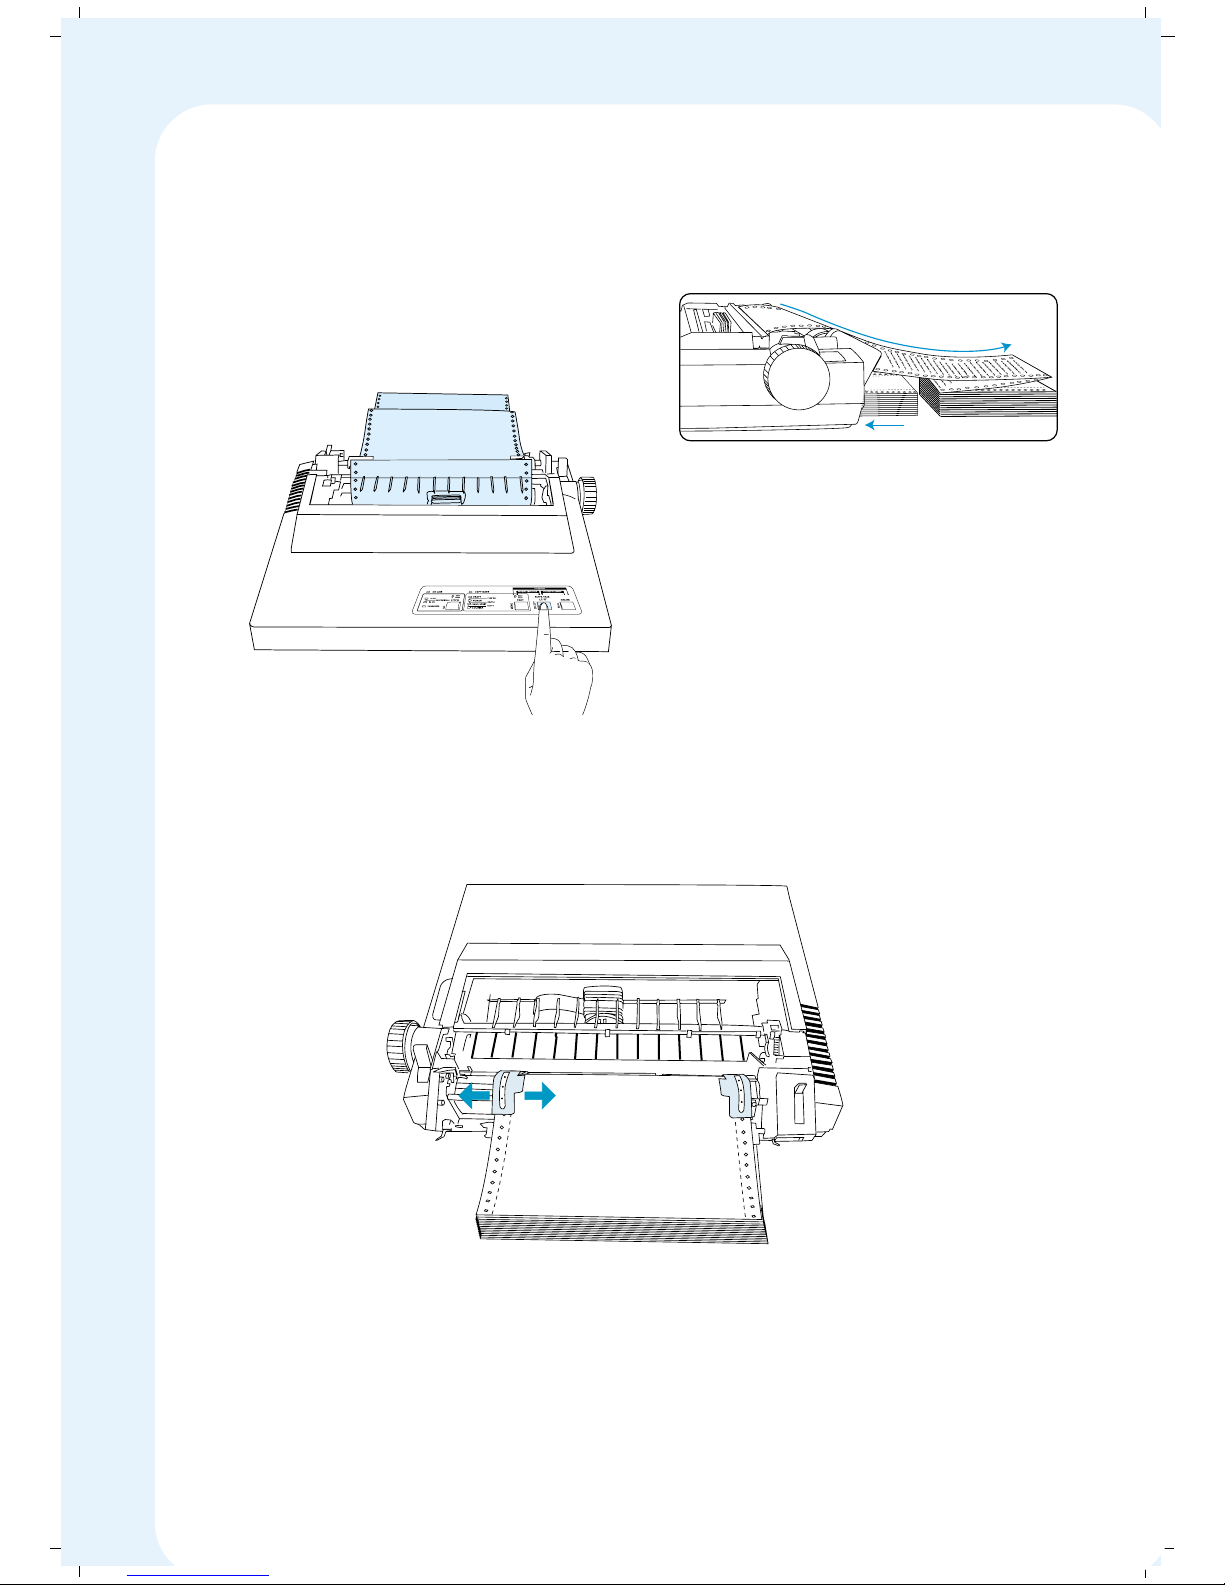
6. Press LF/FF Switch to advance the paper step by step. When the paper is
sensed by the sensor at the rear end, the paper advances automatically
to the Top-of-Form position.
7. Adjust the paper left or right as needed by sliding the tractors. When the
paper is positioned, lock the tractors in place by flipping the locking levers
towards the back.
8. Install the Paper Insertion Guide in the sheet separator position as shown.
9. Move the paper holders on the paper guide to the middle of the guide.
This prevents the printed output from jamming on its way out of the
printer.
a
b
c
d
efg
h
u
j
i
k
l
mnop
q
r
st
u
v
w
x
y
a
b
c
d
e
fg
h
u
j
i
k
l
m
n
opq
r
st
uvwx
y
a
b
cdef
g
h
u
j
i
k
l
m
n
opq
r
s
t
uvwx
y
a
b
c
d
e
f
g
h
u
j
i
kl
m
n
o
pqr
s
t
u
a
b
c
d
efghuj
i
k
l
m
n
o
pq
r
s
t
u
a
b
cdef
ghu
j
i
k
l
m
n
o
p
q
r
s
a
b
c
d
e
fghujik
l
m
n
a
b
cde
f
g
h
u
a
b
43
Page 49
✦✦
✦✦
✦ Bottom Paper Feeding
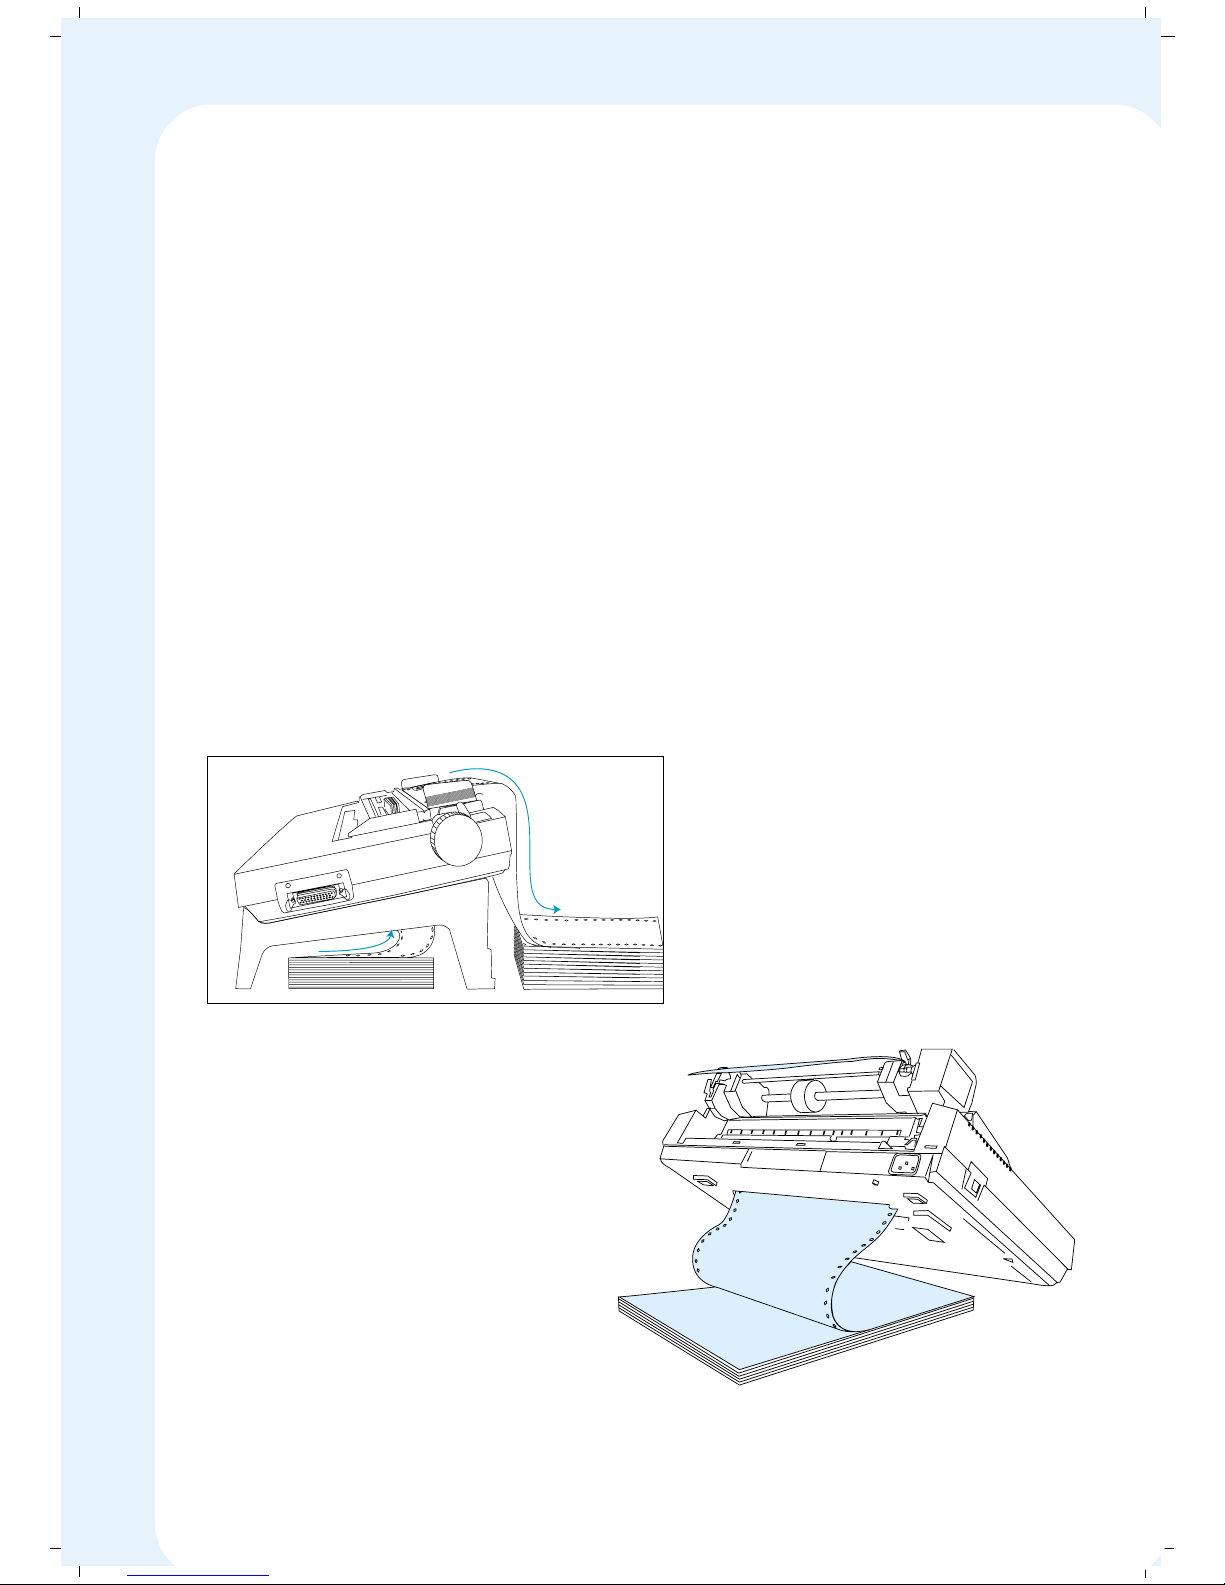
Bottom paper feeding with the Tractor Unit in the Pull Position is idle for
printing multi-part forms. The features like Paper Tear Off, Top-of-Form
adjustment and Paper Parking are not available with Bottom Paper Feeding.
To load continuous forms for bottom feeding follow these steps :
Be sure the tractor is in the pull position. The Printer comes with the
tractor in the push position.
Switch the printer Power Off.
Remove the top cover, and set the printer on its rear side.
Insert the forms through the slot in the bottom of the printer. Pull the
forms through so that 4 or 5 inches extend out of the printer.
44
Page 50
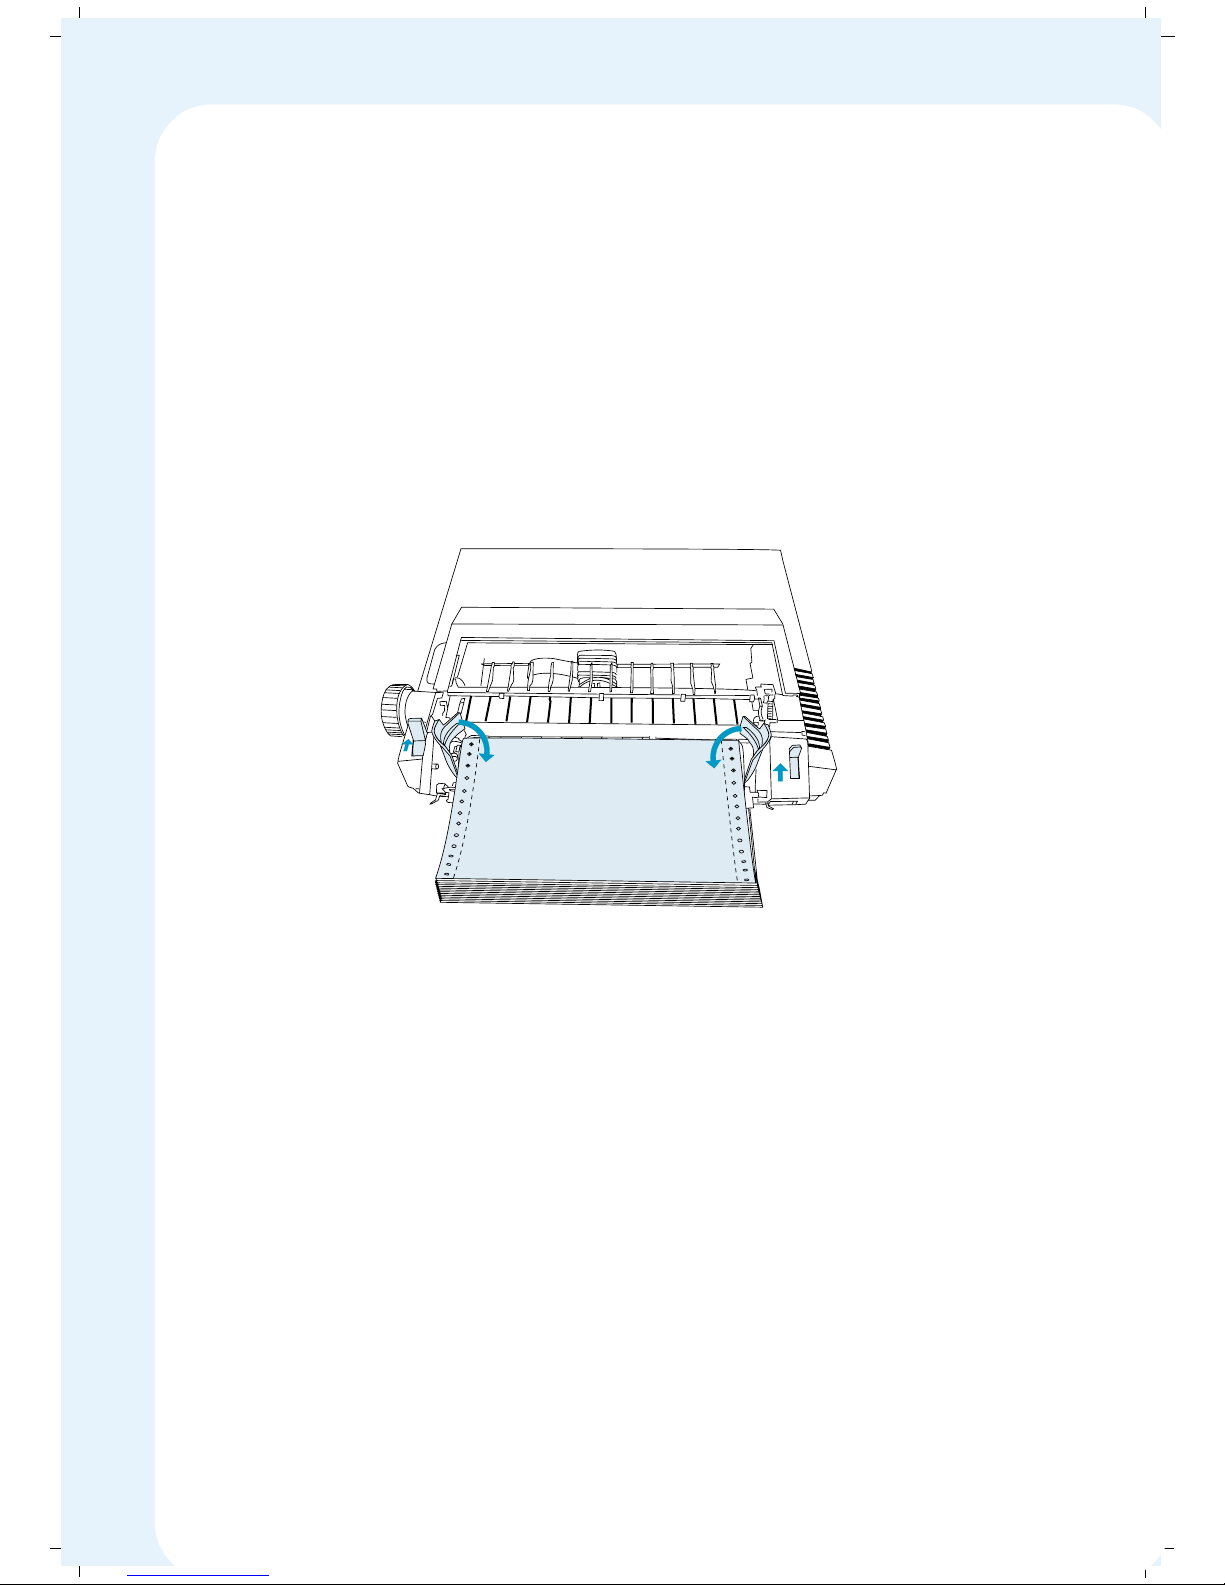
Position the forms in the printer as far left as possible in order to activate
the printer’s paper sensor. You can tell that the paper sensor is activated
when the control panel’s Online Indicator LED stops flashing.
Set the printer right-side up.
Open the tractor covers, position the forms on the sprockets and close the
covers. Be sure the paper is straight. Adjust the distance between the
tractor, if necessary, by unlocking the lock levers and sliding the tractors
until the paper is taut. Relock the levers
Move the Paper select lever to the PIN position.
Turn the Paper Feed knob and set the second sheet of the continuous
paper to the correct starting position. When printing with the Tractor Unit in
the Pull Position the first sheet is unusable.
Replace the top cover and turn on the printer. Be sure the rear part of the
cover rests against the tractor unit.
45
Page 51
✦✦
✦✦
✦ Paper Tear-Off
This is a very useful feature if you use your printer for invoicing, ticketing or
documents that are printed and issued immediately. Paper Tear-Off feature is
selected by enabling “Tear Off” in the MENU Programming.
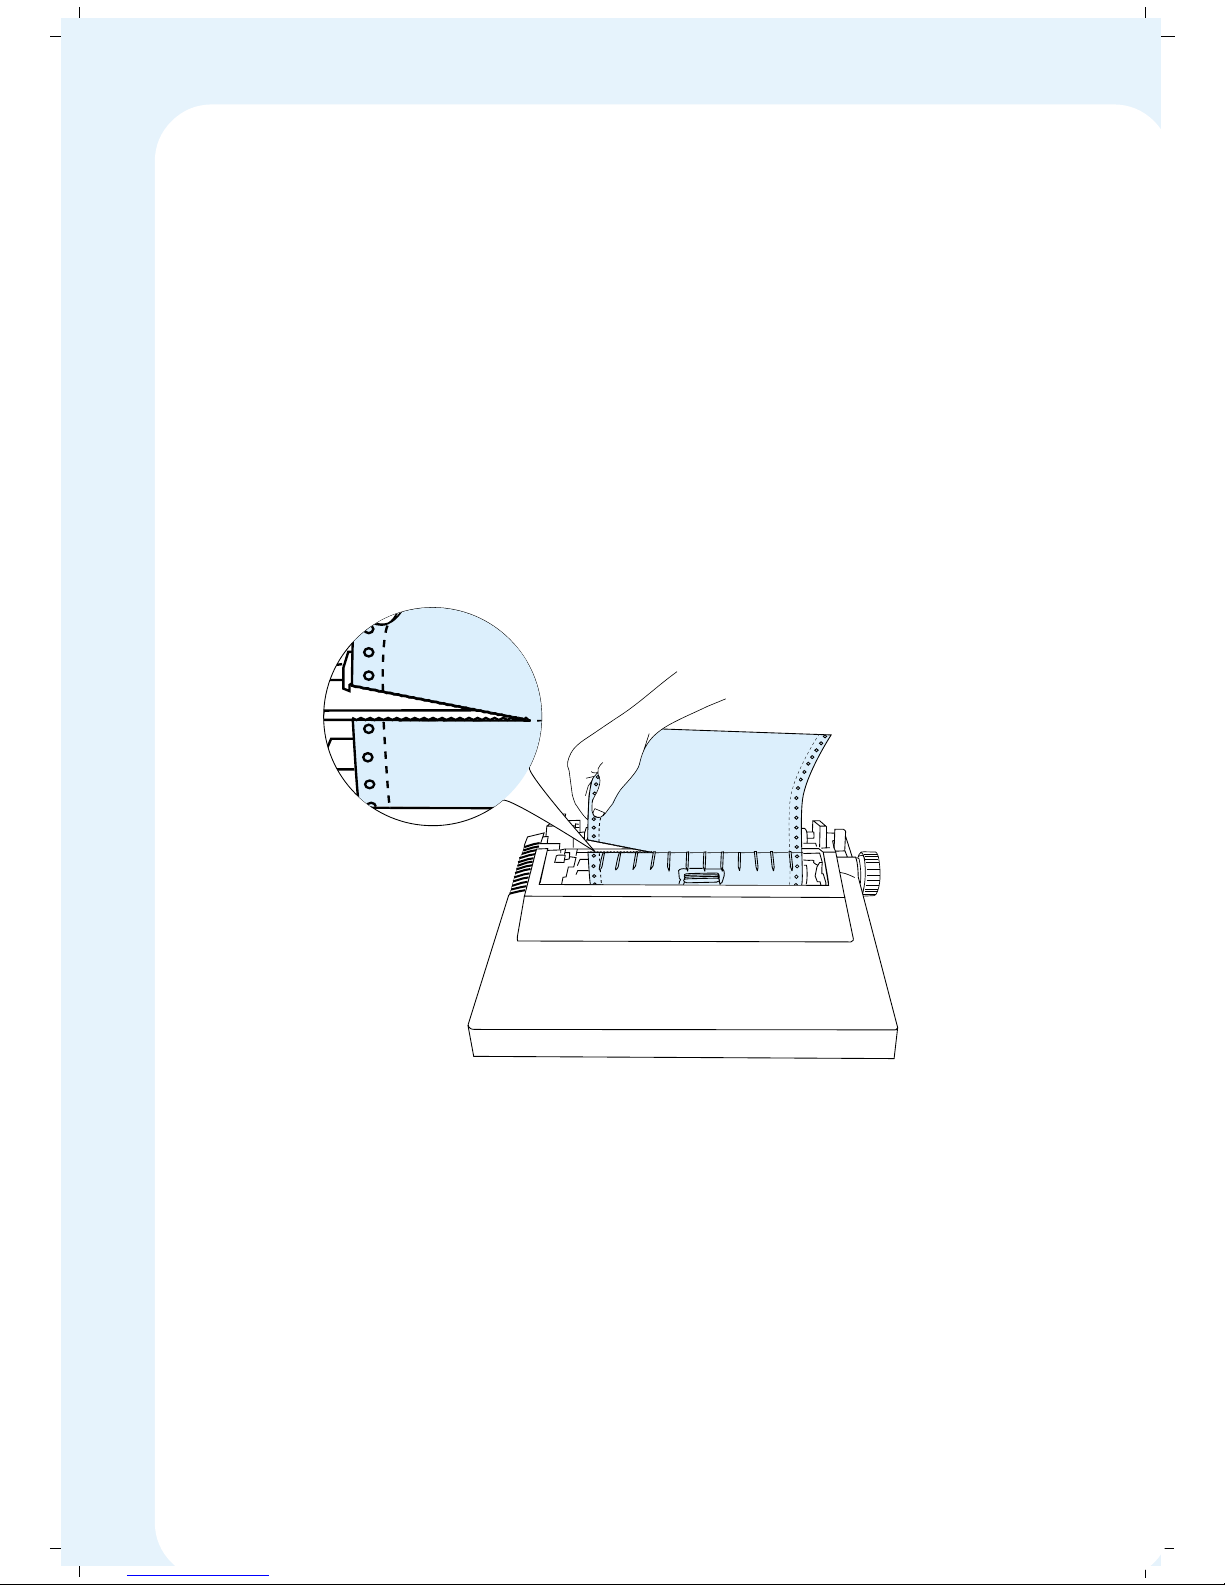
The top cover of your printer has a tear bar at the rear edge so you can easily
tear off perforated sheets with ease.
To use the Paper Tear-Off feature, you must be printing on continuous paper
with the Tractor Unit in the Push Position.
Follow these steps for Paper Tear-Off:
1. When the paper is loaded from the tractor it stops just a bit above the
printhead, in the first Printing position, based on your Top-of-Form setting.
2. After a form (say ticket) has been printed, your computer indicates printer
the end of a print job by sending a form feed command and no further
data. So, the printer automatically feeds the form till the perforation on
the stationery is aligned to the sharp edge on the top cover. This enables
you to conveniently tear the printed form away from the printer.
46
Page 52
3. When the next set of data is sent to the printer (say the data for next
ticket), the paper is automatically retracted to the appropriate printing
position. Then the printing starts.
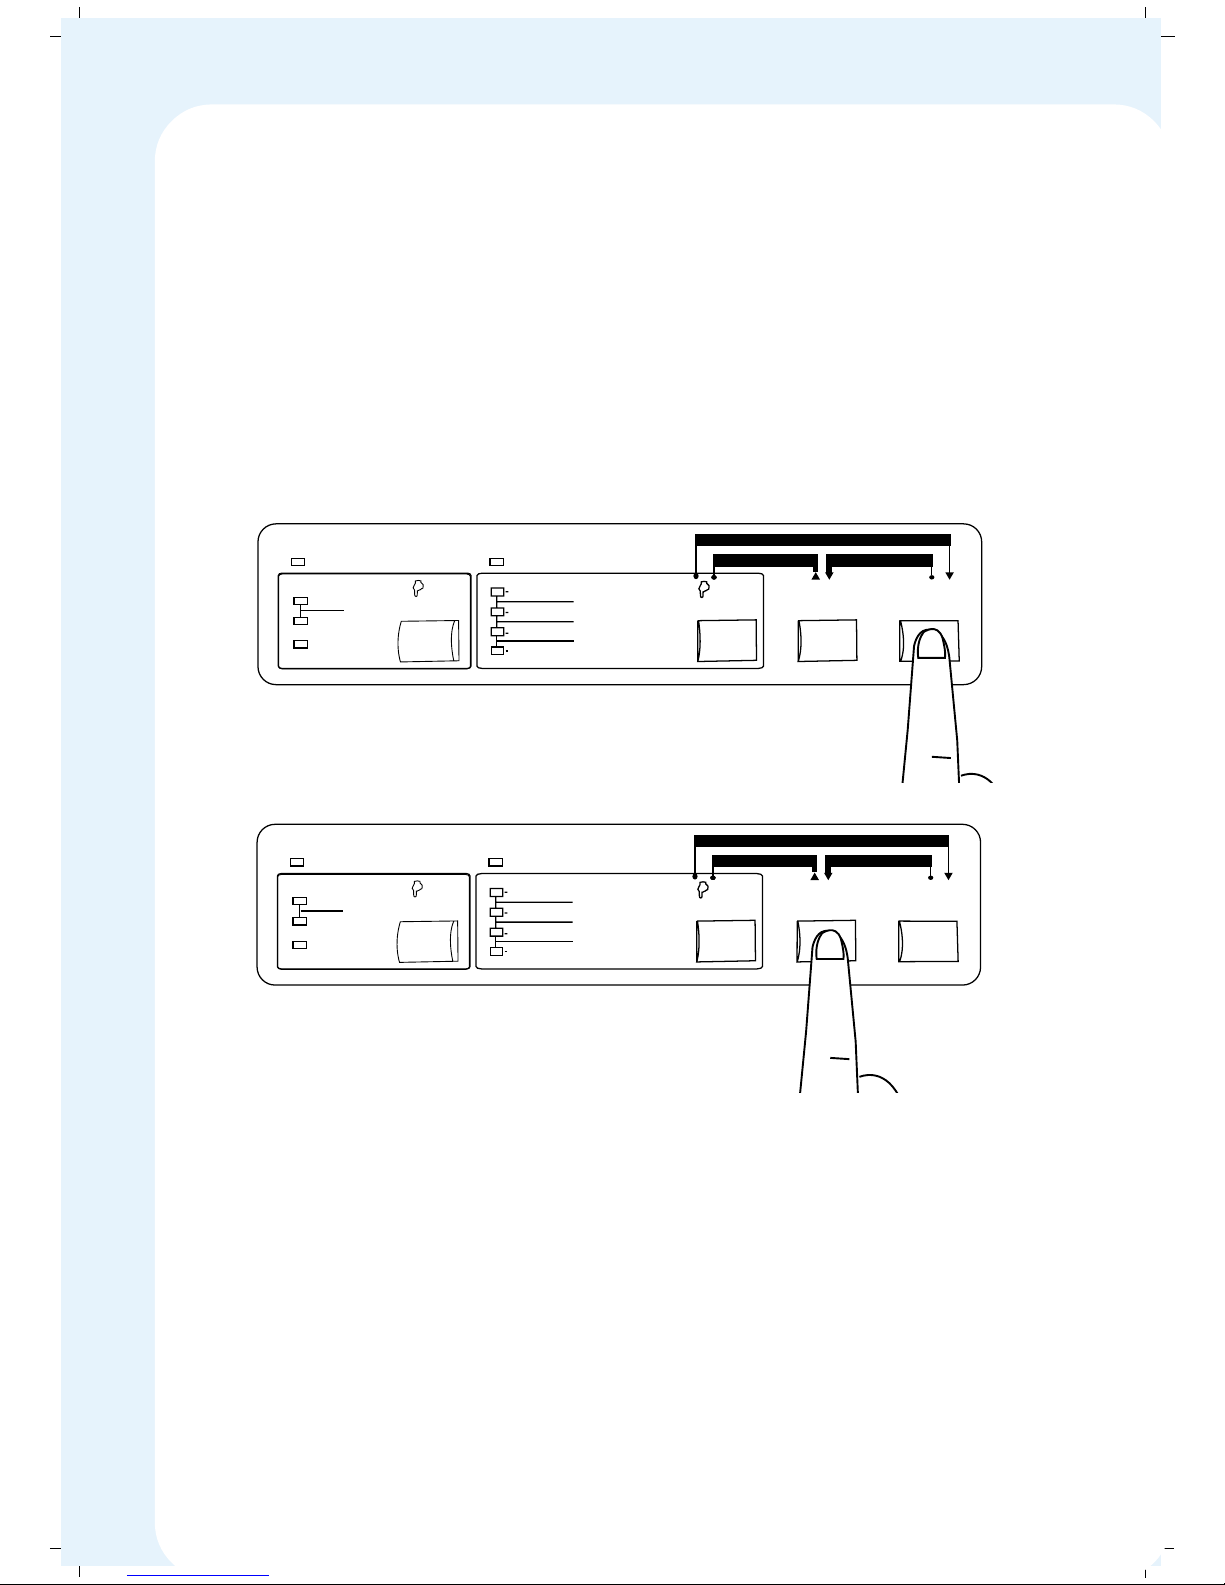
4. When a print job ends in the middle of a page, press the ONLINE key to
take the printer OFFLINE, and then hold the LF/FF key for 2 to 3 seconds
to advance the paper to tear-off position. Do not use the paper feed knob
to adjust the paper position. The paper perforation lines up with the Tear
bar only if the Tear-Off feature is ENABLED in the MENU Programming.
5. Please note that for the Paper Tear-off feature to work properly, the Form
Length in the MENU Programming should be set to the exact length of the
form you use. If the Paper perforation does not line up with the tear bar,
check the length of the paper against the form length setting on your
printer.
6. If you do not want the paper to automatically advance to the Tear-Off
position, disable the Tear-Off feature in the Menu programming. If the
Tear-Off feature is disabled, press LF/FF switch ONLINE to advance
the paper to tear-off position.
MENU
Mode
DRAFT
ROMAN
SANS SERIF
COURIER
FONT
MENU
SELECT
Save
PRESTIGE
ORATOR
SCRIPT
PAPER TEAR
ONLINE
LF/FF
PAPER PARK
FORWARD MICROFEED REVERSE MICROFEED
10 CPI
PROPORTIONAL
Copy
Mode
PITCH
Exit
12 CPI
CONDENSED
ON LINE COPY MODE
MENU
Mode
DRAFT
ROMAN
SANS SERIF
COURIER
FONT
MENU
SELECT
Save
PRESTIGE
ORATOR
SCRIPT
PAPER TEAR
ONLINE
LF/FF
PAPER PARK
FORWARD MICROFEED REVERSE MICROFEED
10 CPI
PROPORTIONAL
Copy
Mode
PITCH
Exit
12 CPI
CONDENSED
ON LINE COPY MODE
47
Page 53
✦✦
✦✦
✦ Paper Park
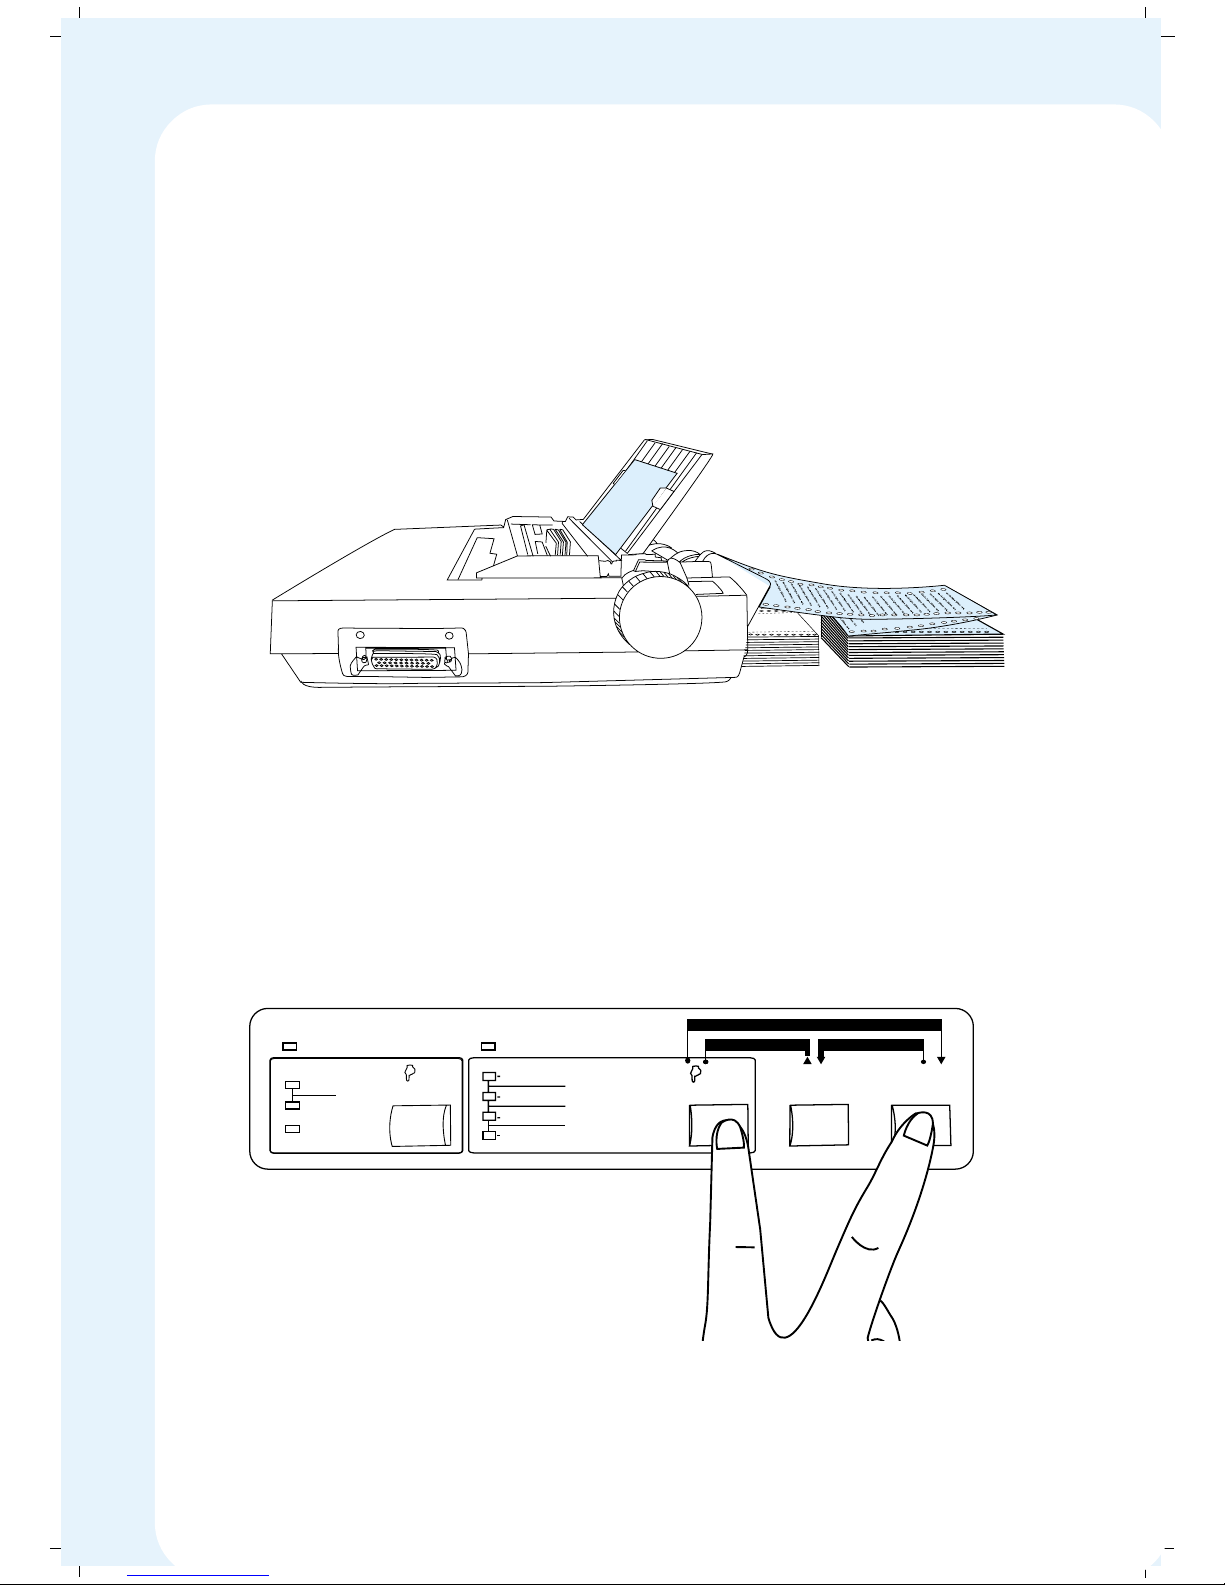
Your printer is equipped with a feature called Paper Park. If you have applications
to print both with cut sheets and continuous stationery you need not unload
your continuous stationery and load cut sheets. This is done with a Paper Park
command through control panel.
The following steps tell you how to accomplish the above task using Paper Park
feature.
Hold the Font Switch and press the Online Switch.
MENU
Mode
DRAFT
ROMAN
SANS SERIF
COURIER
FONT
MENU
SELECT
Save
PRESTIGE
ORATOR
SCRIPT
PAPER TEAR
ONLINE
LF/FF
PAPER PARK
FORWARD MICROFEED REVERSE MICROFEED
10 CPI
PROPORTIONAL
Copy
Mode
PITCH
Exit
12 CPI
CONDENSED
ON LINE COPY MODE
48
Page 54
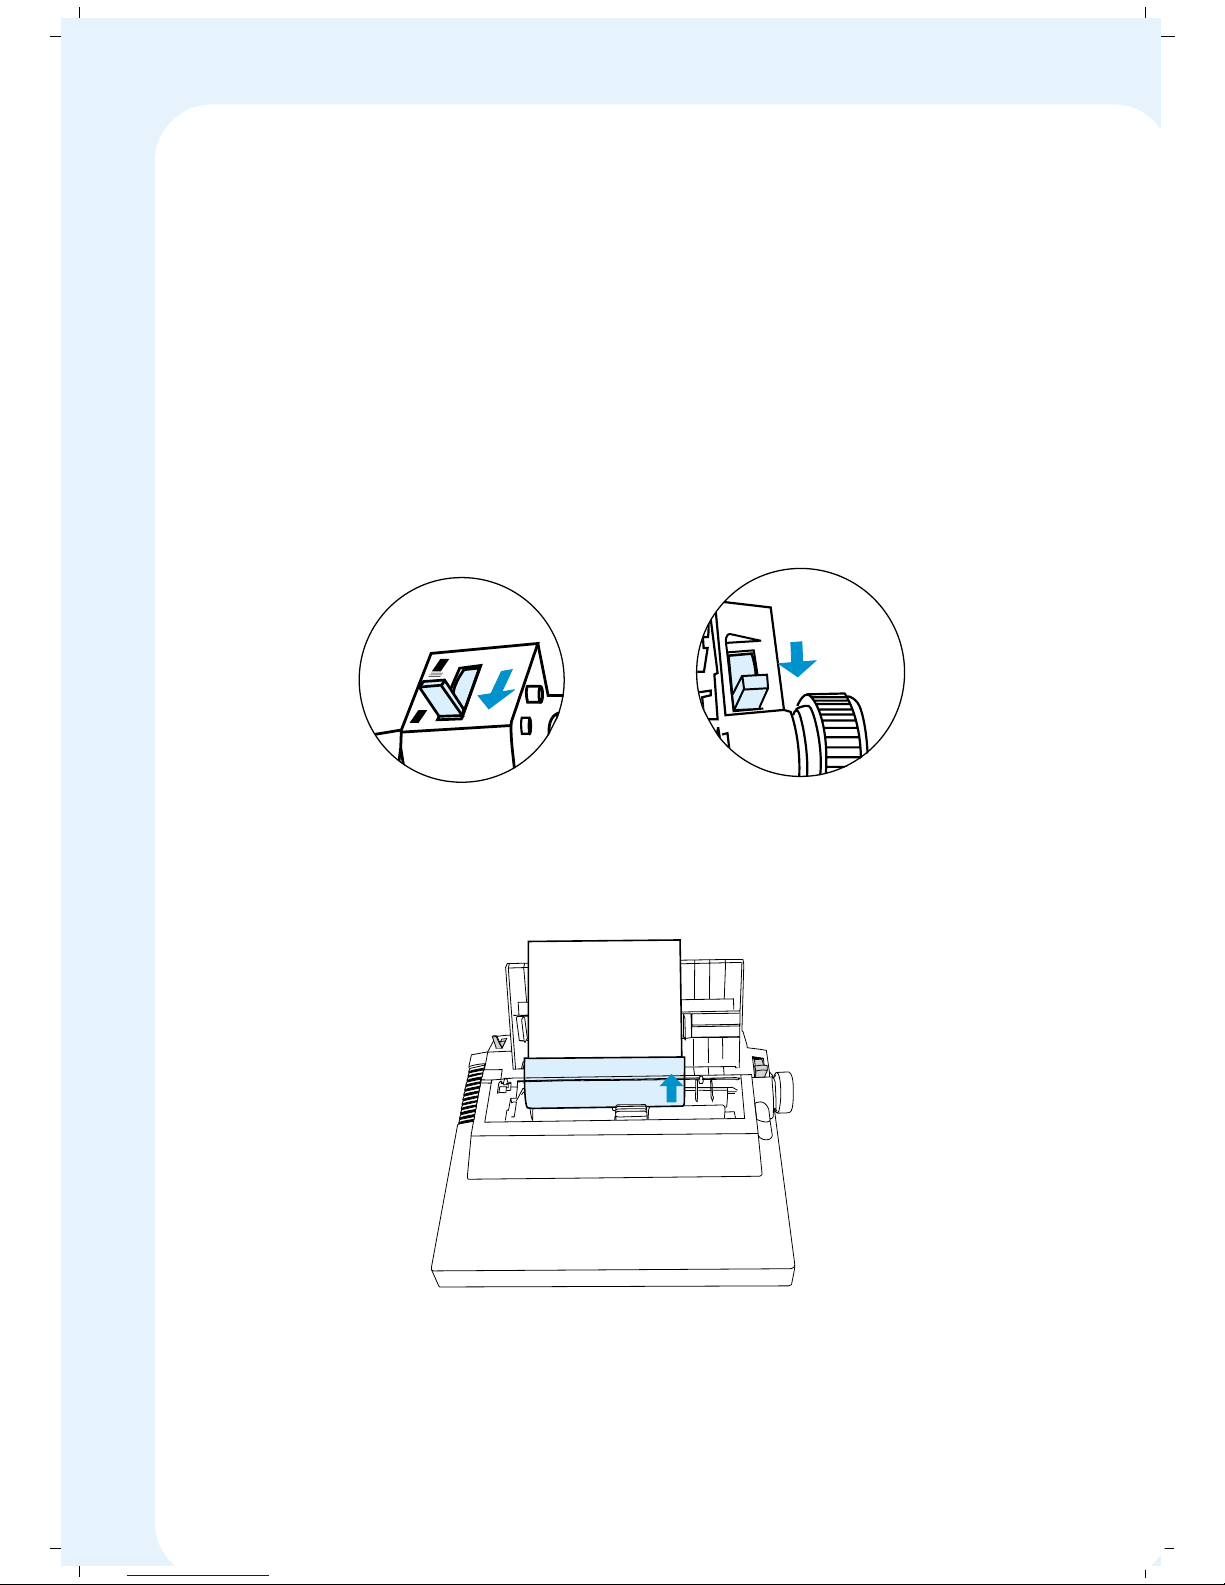
The continuous paper goes back out of the Paper End Sensor, no longer
touching the platen and rests on the tractor. However, it is ready to feed
into the printer.
Repeat the above step if the stationery is not fully parked. The printer
reverses the paper a maximum of 15 inches each time you give a Paper
Park command.
Now set the Paper Select Lever in the FRIC Position and the Tractor Select
Lever in the Single Sheet Position. This disengages the Tractor Unit
mechanism.
Load the cut sheet through the Paper Insertion Guide. The paper should
be inserted to about one inch.
P
I
N
F
R
I
C
ABCDEFGHIJKLMNOPQRSTUVWXYZ 1234567890
49
Page 55

The paper gets automatically fed and stops in the Top-of-Form position.
If necessary, make any adjustments for paper alignment with the Paper
Select Lever in the PIN Position; then return it to the FRIC position.
Press the Online Switch to set the printer to ONLINE Mode.
Note: Paper Park feature is available only with the Tractor in the Push Position.
CAUTION: If a job while printing on continuous stationery is interrupted,
to print another job on single sheets, make sure to erase previous job
from the buffer before you start printing on single sheets. This is done by
holding down the FONT switch for about five seconds in OFFLINE Mode.
You can print as many single sheets as wish. When you have finished, follow
these steps to reload continuous paper.
Give a Form Feed to eject any paper that may still be in the printer.
Set the Paper Select Lever in the PIN position and Tractor Select Lever in
the Paper Stack Position. This engages the tractor mechanism again.
Press the LF/FF switch to feed the continuous paper back into the printer.
The paper will stop at the current Top-of-Form position. The Online
Indicator LED will stop blinking.
Press the ONLINE Switch to set the printer in ONLINE Mode.
Now you are ready to print with continuous paper again.
50
Page 56

✦✦
✦✦
✦ Printing on Multi-part forms
Your printer is capable of printing multi-part stationery, up to four copies
(including original).
Set the paper thickness lever according to the number of copies you take.
Enable COPY Mode only when you are printing 1+3 copies.
Caution: If COPY Mode is enabled while printing in single sheet or other than
1+3 copies then the print head might be damaged.
Note: Do not use Rear Feeding or the Tractor in the Push Position, while
printing with multi-part forms. Use Bottom Feeding Paper path with Tractor
in Pull Position. This method allows the forms to feed through the printer
with minimum curling
51
Page 57
✦✦
✦✦
✦ COPY Mode
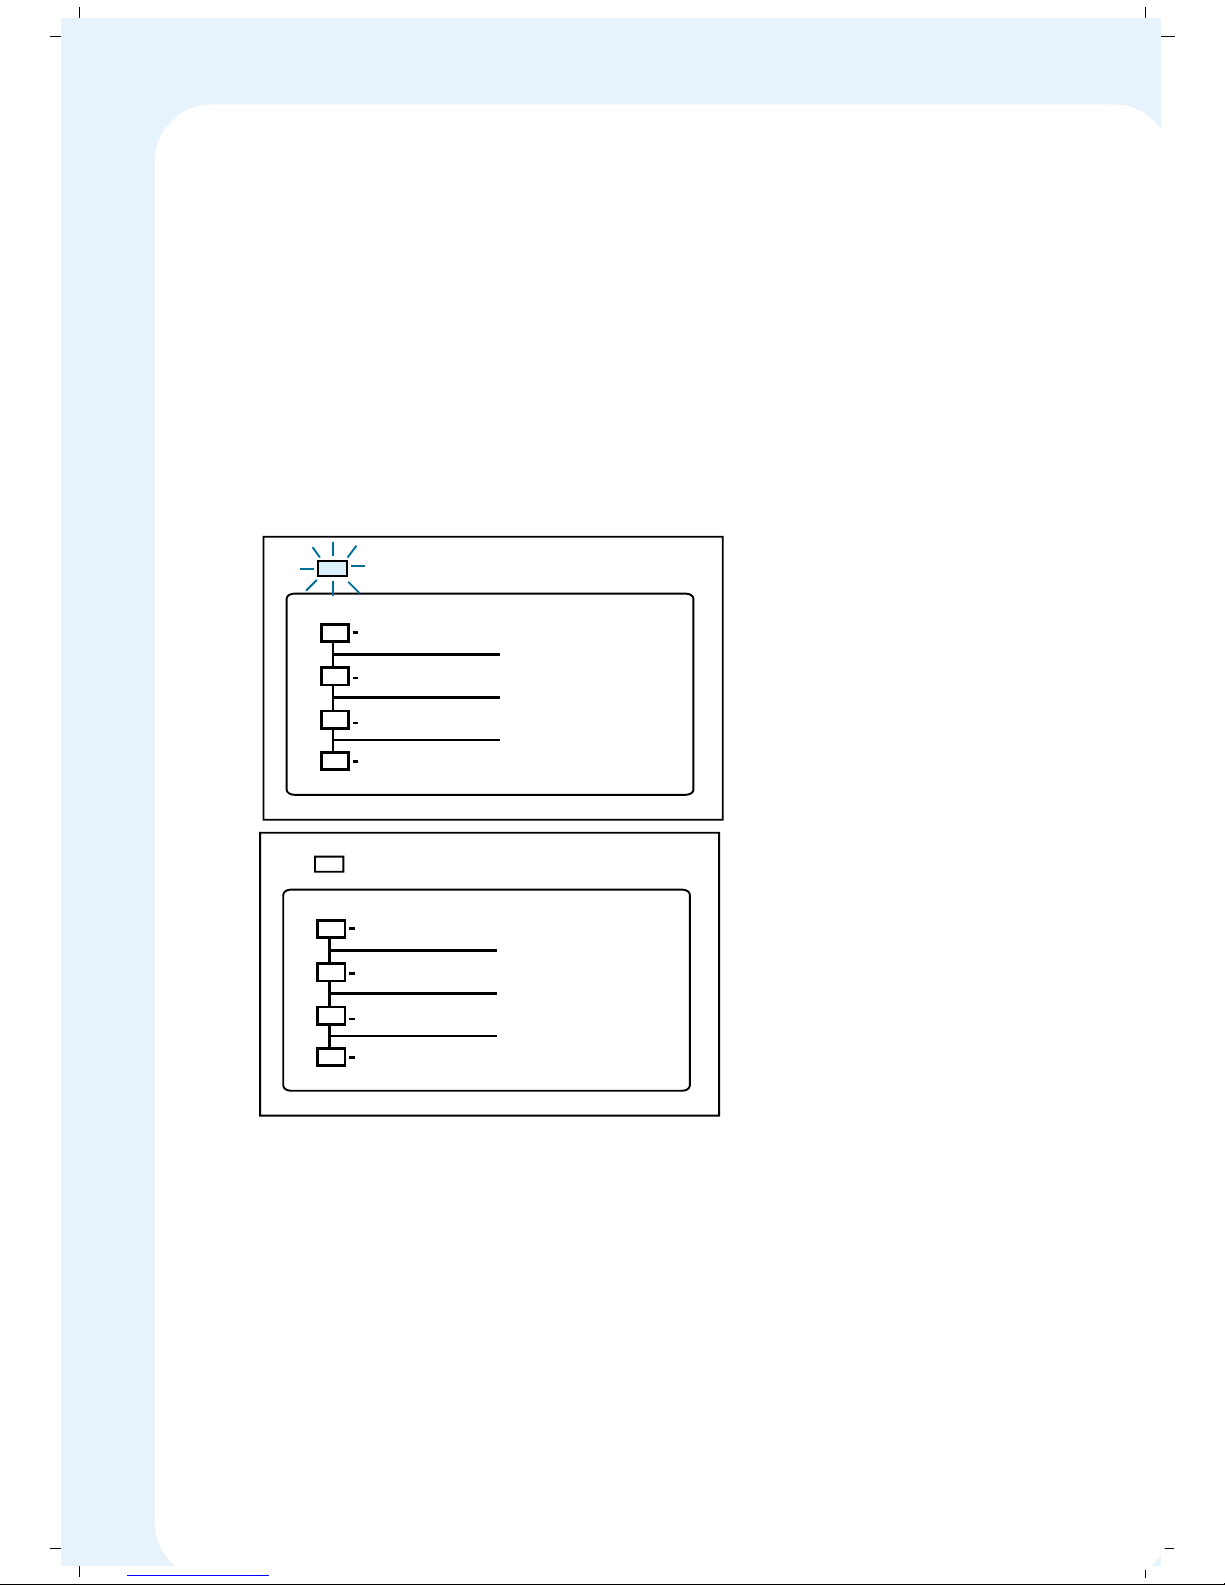
Only when you are printing a multi-part stationery (1+3 copies), enable
COPY Mode to get clear impression even in the last copy.
Ensure the printer is in ONLINE Mode and there is no print job in process.
COPY Mode is enabled by holding the PITCH Switch for 5 seconds in ONLINE
Mode.
To disable COPY Mode once again hold the PITCH Switch for 5 seconds in
ONLINE Mode.
When the printer is in COPY Mode, the COPY Mode Indicator LED glows.
COPY Mode Indicator Status COPY MODE
Enabled
Disabled
Note: Please remember to set the Paper Thickness Lever appropriately
when using the multipart forms.
Caution: Please do not enable COPY mode to print on single sheets. This
may cause damage to the printer.
DRAFT
ROMAN
SANS SERIF
COURIER
PRESTIGE
ORATOR
SCRIPT
COPY MODE
52
DRAFT
ROMAN
SANS SERIF
COURIER
PRESTIGE
ORATOR
SCRIPT
COPY MODE
Enabled
Disabled
Page 58
✦✦
✦✦
✦ Adjusting the top-of-form position
The “Top-of-Form” is the distance from the top edge of the paper to the top
of the first line of print. The default Top-of-Form setting is 1 inch.
This feature is useful when you need to print in preprinted stationery like
letterheads, invoice, etc. You might wish to start printing the first line in
different Top-of-Form length in these stationeries. The Top-of-Form setting
and fine adjustment feature helps you to achieve this with ease.
You can set different Top-of-Form according to your requirement. To customise
the Top-of-Form (TOF) perform the following steps:
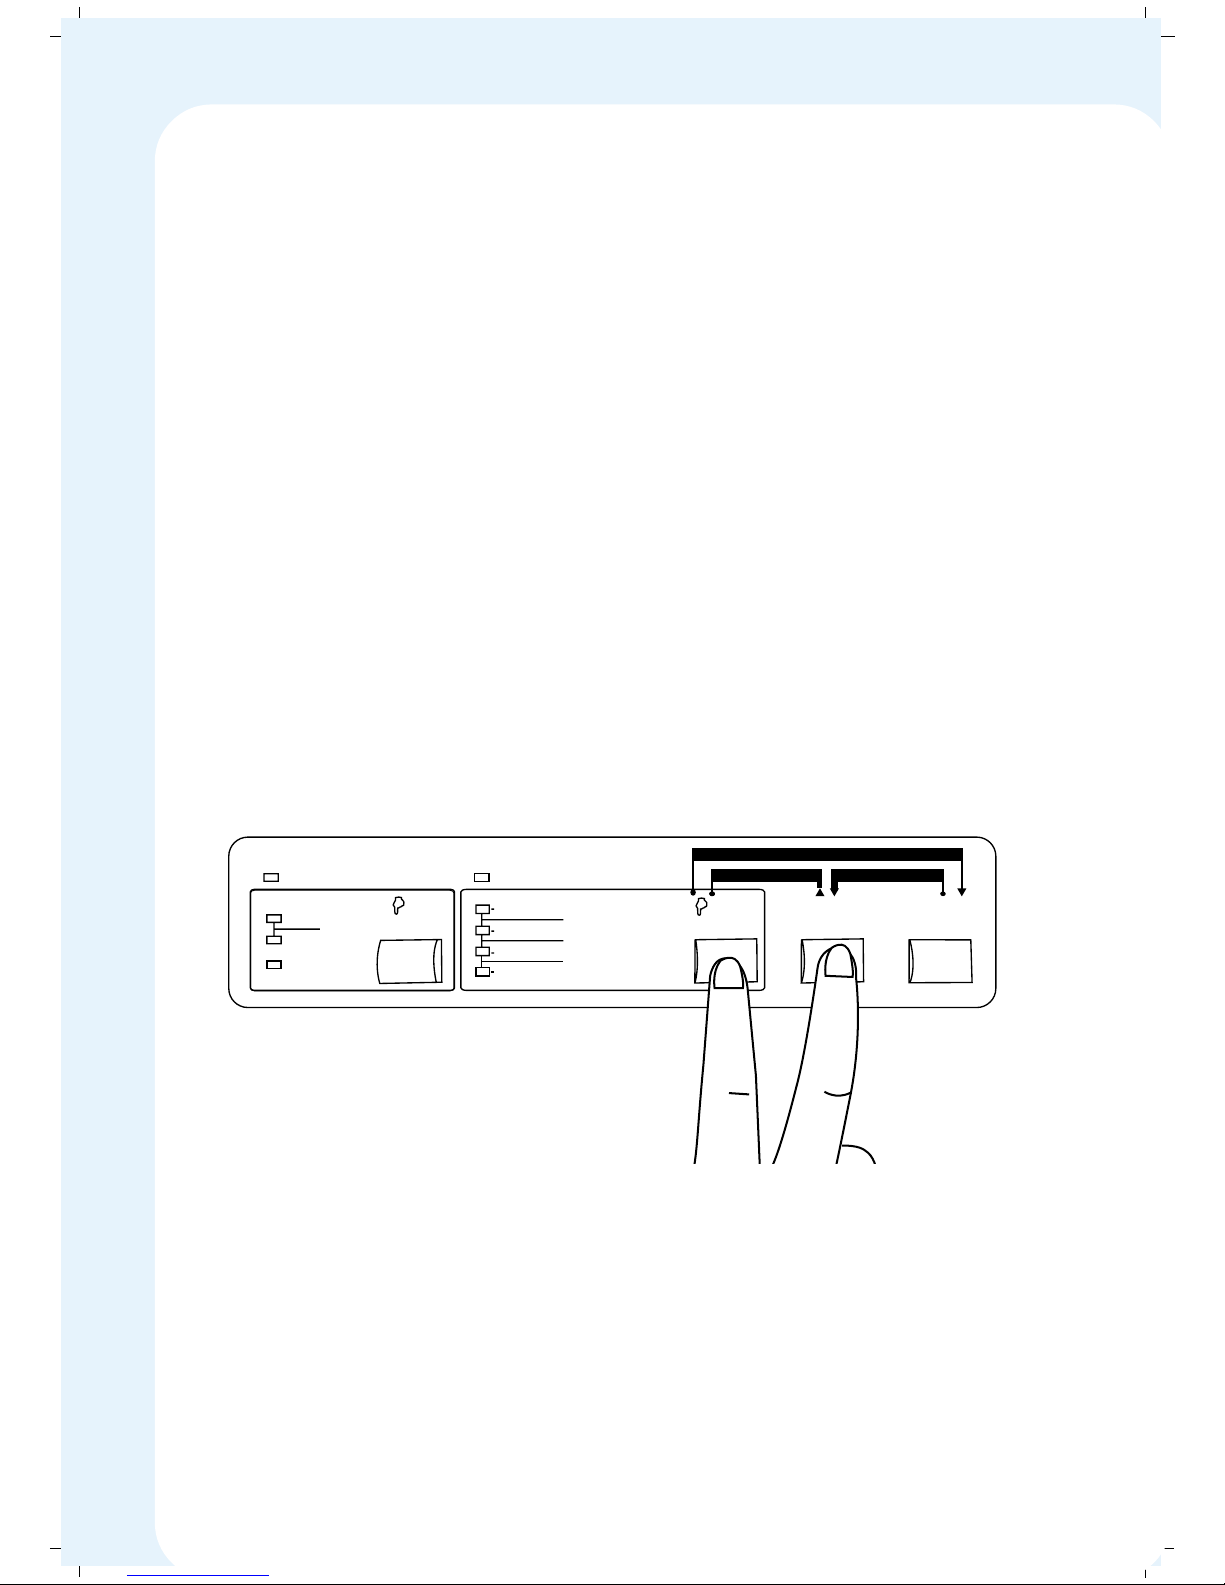
1. Load the stationery after powering on the printer. The paper gets loaded
to the current TOF.
2. Hold the FONT Switch and Press LF/FF Switch. The paper advances in
micro steps (i.e.) it moves the paper 1/72th of an inch in forward
direction. This is called forward microline feed.
3. Hold the ONLINE Switch and Press LF/FF Switch. The paper retracts in
micro steps (i.e.) it moves the paper 1/72th of an inch in reverse direction.
This is called reverse microline feed.
MENU
Mode
DRAFT
ROMAN
SANS SERIF
COURIER
FONT
MENU
SELECT
Save
PRESTIGE
ORATOR
SCRIPT
PAPER TEAR
ONLINE
LF/FF
PAPER PARK
FORWARD MICROFEED REVERSE MICROFEED
10 CPI
PROPORTIONAL
Copy
Mode
PITCH
Exit
12 CPI
CONDENSED
ON LINE COPY MODE
53
Page 59
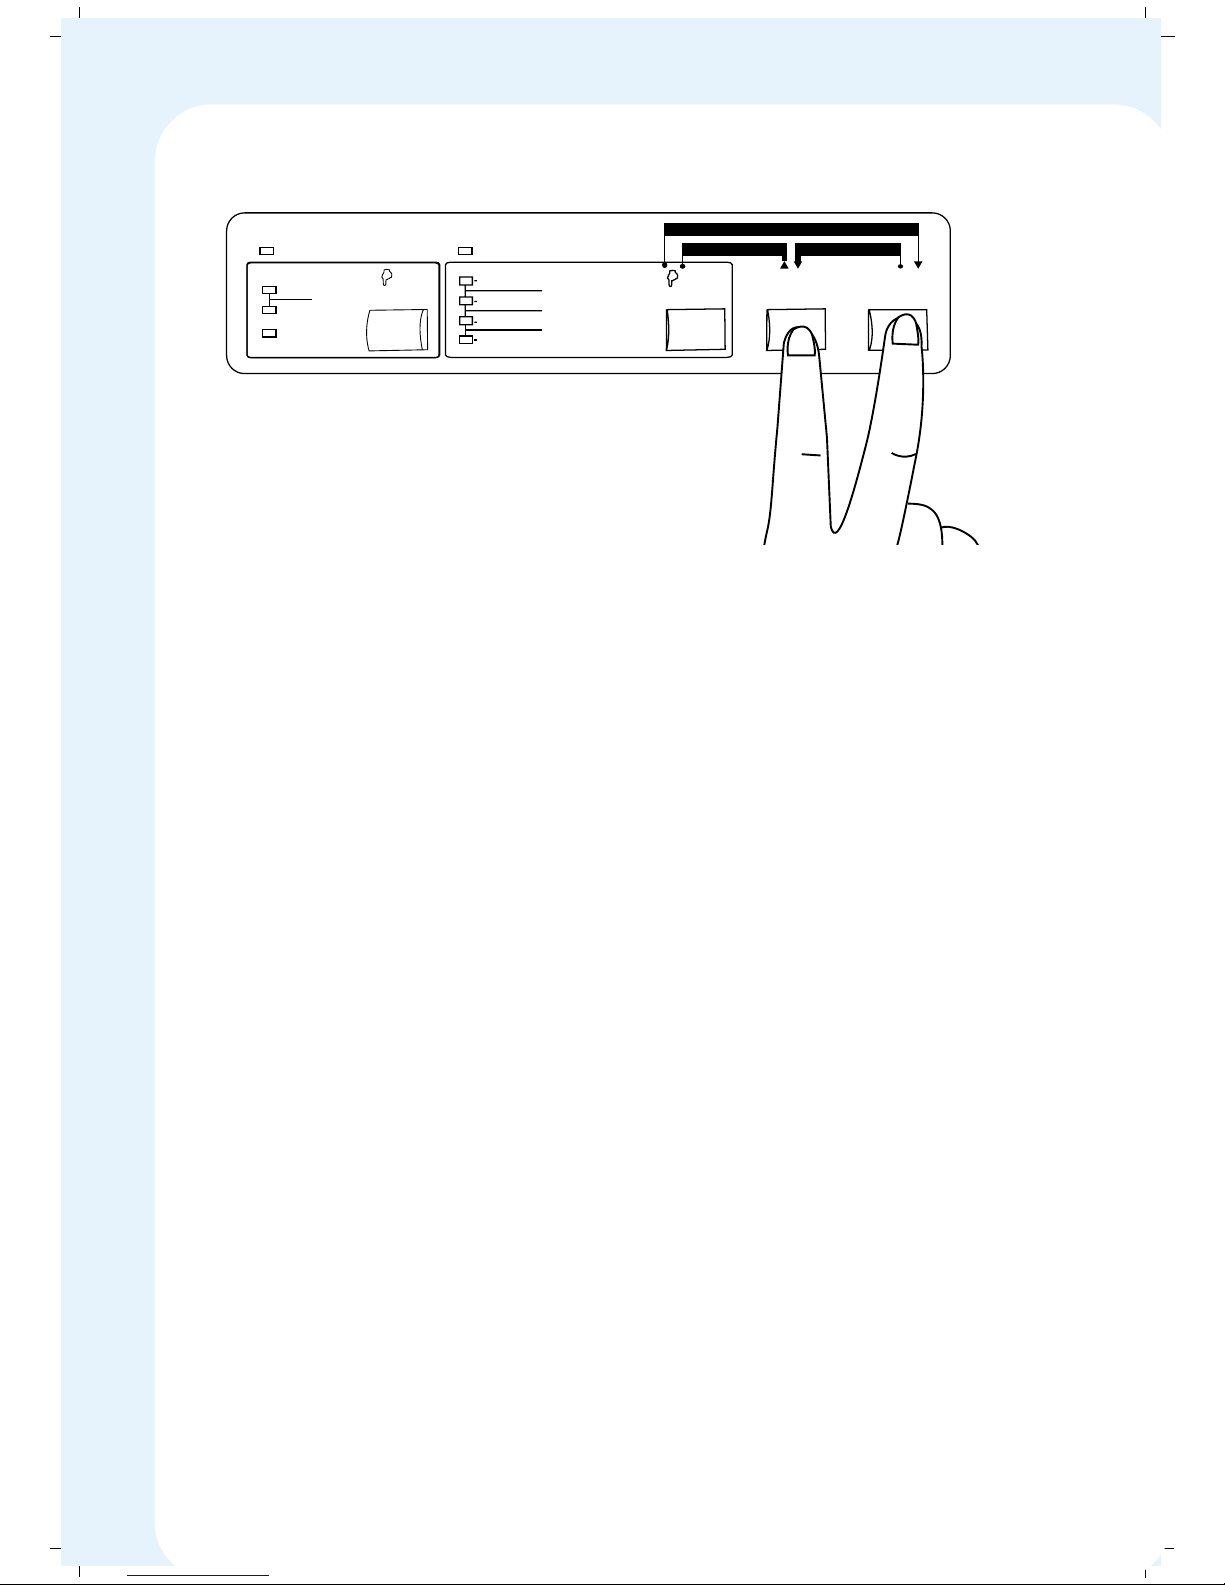
4. Use Micro line feeds (forward and reverse) to adjust the TOF and set to
your requirement.
5. Press ONLINE Switch to save the desired TOF position in the printer’s
non-volatile memory.
Once you have set a TOF the printer loads paper and brings the first print
position to the TOF position.
Note: Micro line feeds given at non TOF position also alters the TOF but does
not get stored in the non-volatile memory. Hence once the printer is powered
off the TOF gets reset.
Note: A TOF position is the first print position and the printer goes to non TOF
position once it receives a Line feed (either through a print job or through
front panel).
MENU
Mode
DRAFT
ROMAN
SANS SERIF
COURIER
FONT
MENU
SELECT
Save
PRESTIGE
ORATOR
SCRIPT
PAPER TEAR
ONLINE
LF/FF
PAPER PARK
FORWARD MICROFEED REVERSE MICROFEED
10 CPI
PROPORTIONAL
Copy
Mode
PITCH
Exit
12 CPI
CONDENSED
ON LINE COPY MODE
54
Page 60

6. MAINTANENCE
✦✦
✦✦
✦ Cleaning your MSP 450 Champion
To keep your MSP 450 Champion operating at its best, you need to clean it
periodically.
Before cleaning:
1. Make sure the printer is switched off. Switch off the mains power supply
Unplug the power cord from the electrical outlet.
2. Unplug the external power adaptor and interface cable from the printer.
3. Remove paper/print media from the tractor.
For cleaning:
1. Wipe the outside surfaces, with a lint-free cloth that has been moistened
with a mild detergent solution.
2. Remove the top cover, and snap out the ribbon cassette.
3. Use a soft brush to whisk paper lint and dust away from the area around
the platen, printhead, and carriage shaft. Move the printhead as necessary,
taking care not to damage the cables and pulleys.
4. Turn the paper feed knob, and wipe the surface of the platen with a soft
cloth dampened with ethyl alcohol.
5. Reinstall the ribbon cassette and the top cover.
Note: Use only denatured ethyl alcohol to clean the platen. Denatured
alcohol is available at hardware and paint stores. Do not use rubbing
(isopropyl) alcohol. Rubbing alcohol can damage the platen surface.
55
Page 61

✦✦
✦✦
✦ Preserving the Ribbon Cassette
To ensure a long life for your cassette and optimum performance from your
MSP 450 Champion:
1. Keep the new ribbon cassette in its packaging untill you are ready to
install it.
2. Remove the ribbon and TVS Inkbank only if necessary.
3. For best result, always use genuine TVS-E recommended ribbons and
Inkbanks.
4. Once the Inkbank is removed from the packing carton, place it into the
ribbon cassette as early as possible, since the ink might dry up.
Caution: Be careful not to touch the Printhead, it may be HOT!
56
Page 62

✦✦
✦✦
✦ Shifting the Printer
The following steps should be followed for shifting / transporting the printer
from one location to another location:
1. Unplug the power supply.
2. Detach the external power adaptor.
3. Detach interface cable from the printer.
4. Remove any paper loaded in the printer.
5. Make sure the Printhead is not HOT. Then remove the ribbon cassette.
6. Repack it carefully in the original carton using the packing material.
57
Page 63

✦✦
✦✦
✦ DOs and DON’Ts
DOs
1. Do place the printer on uniform surface.
2. Do use TVS-E Genuine Ribbons and Inkbanks, for better print quality and
long Printhead life.
3. Rotate the ribbon in the direction shown on the ribbon cassette.
4. Do adjust head gap while using multi-part stationery.
5. Always stack the continuous sheet below the printer stand to avoid paper
jam.
6. Close the Top cover while printing, to guide the paper properly to exit
path. This also prevents dust entering into the printer.
DON’Ts
1. Avoid placing your printer exposed to direct heat or sunlight.
2. Do not print on platen / paper when the ribbon is not installed.
3. Do not unplug / plug the interface cable when the printer is ON.
4. Do not lubricate the plastic parts, Printhead, paper moving paths.
5. Do not hold or reverse the platen knob while the printing is ON.
6. Do not use abrasive cloth, alcohol, paint thinner or similar agents to
avoid discoloration and scratching.
7. Do not move the Printhead, when the printer is in ON condition.
58
Page 64

7. TROUBLESHOOTING
✦✦
✦✦
✦ POWER
PROBLEM:
Printer is turned ON but the POWER light on the control panel does not glow.
CHECKS:
Check the power cord.
Is it firmly connected to the wall outlet?
Plug a lamp or other device into the wall outlet to be sure it is working.
PROBLEM:
The control panel lights come on briefly and go off
CHECKS:
1. Check the printer and outlet voltage ratings.
2. If the voltage does not match, unplug the printer immediately and contact
your dealer.
Warning:
Do not reconnect the power cord to an electric outlet that has the wrong
voltage for your printer.
59
Page 65

✦✦
✦✦
✦ PAPER FEEDING
PROBLEM:
Continuous stationary does not feed properly.
CHECKS:
Make sure the continuous paper is set in the tractors correctly
Be sure the paper select lever is in the correct position.
Make sure the paper is stacked properly Make sure the paper is loaded properly
as per the instructions given in the manual.
Make sure the paper thickness lever is set correctly to match the thickness of
your paper.
PROBLEM:
Single sheet does not feed properly.
CHECKS:
Set the paper thickness lever to match the thickness of your paper.
Make sure that you are using new, clean sheets of paper and not the creased,
old paper.
Be sure the paper select lever is in the correct position
PROBLEM:
Paper parking does not operate or paper doesn’t advance to the tear-off
position.
CHECKS:
The paper select lever must be set in PIN position (reverse position) to park
the paper.
60
Page 66

Check the tractor. It must be in the Push position.
Be sure the printer is in OFFLINE Mode.
PROBLEM:
Continuous-feed paper jams.
CHECKS:
Make sure the tractors are locked.
Make sure the paper select lever is set in PIN position.
Make sure the paper thickness lever is correctly set for the type of paper you
are using.
Make sure the top cover is installed and closed properly.
Make sure the unprinted paper stack is straight.
Make sure the exiting paper has a clear path which does not interfere with the
incoming paper.
Make sure the incoming paper is not tangling with the power cord and/or
interface cable.
Make sure that paper is not jammed under the platen.
PROBLEM:
Tear-off position is not at the perforation.
CHECKS:
Make sure the length of your paper matches with the form length setting in the
Macro.
Make sure the paper feed knob is not turned manually. If it is, then, try parking
the paper again.
61
Page 67

✦✦
✦✦
✦ PRINTING
PROBLEM:
Printhead does not move.
CHECKS:
Open the top cover and try turning the ribbon knob. If it is jammed, replace
the ribbon cassette with a new one.
Check inside the printer for excessive dust or dirt that may be restricting the
printhead’s movement.
PROBLEM:
Printer does not print at all.
CHECKS:
Make sure the ribbon cassette is properly installed.
Make sure the ribbon feeds between the printhead and the ribbon mask.
Make sure the printhead cables are attached to the printhead.
PROBLEM:
Printing is faint.
CHECKS:
Make sure the paper thickness lever is in correct position.
Remove the ribbon cassette and try turning the ribbon knob. If it is jammed,
replace the cassette.
PROBLEM:
Printing is faint on fourth copy.
62
Page 68

CHECKS:
Four-part forms should always be bottom-fed through the printer.
Old carbonless forms don’t create as dark an image as fresh forms.
We recommend using the Sans Serif font because it is the most readable font.
Adjust the paper thickness lever to the correct position.
Set EMPHASIZED print ON for better results.
PROBLEM:
Ink smudges on paper.
CHECKS:
Make sure you are using genuine TVS-E ribbon.
Check the paper thickness lever.
Adjust the lever 1 or 2 notches away from the platen when printing on thick
paper or multi-part forms.
✦✦
✦✦
✦ PRINTING CHARACTERISTICS
PROBLEM:
Printer does not produce expected printing characteristics.
CHECKS:
Be sure that the printer selected in your software matches the printer emulation
you have selected with the Menu.
PROBLEM:
The font setting on the control panel is cancelled when you print with your
word processing software.
63
Page 69

CHECKS:
Your word processing software may be sending a reset command that cancels
this control panel setting.
Set FONT LOCK to ON using the control panel to protect font settings from
software override.
To avail Online Support visit us at: www.tvs-e.com or [email protected]
DO NOT TRY TO REPAIR THE PRINTER YOURSELF
64
Page 70

8. SPECIFICATIONS
✦✦
✦✦
✦ Printer Specification
Model Name MSP 450 Champion
Print Head Type 24 Pin
Print Direction Bi-directional logic seeking
Print Width 80 column
Print Head Life 200 Million Characters
Print Speed
Character Pitch (cpi) 10 12 15
High Speed Draft (cps) 300 - -
Draft (cps) 250 300 375
Letter Quality (cps) 83 100 125
Draft ISCII (cps) 250
LQ ISCII (cps) 50
Resident Printer Fonts
Draft Draft, High Speed Draft
Letter Quality Roman, Sans Serif, Script,
Courier,Prestige, Orator Script-C,
OCR-B, Orator-S
Letter Quality Scalable Fonts Roman & Sans Serif
(8 to 40 points)
Printer Built-in Fonts English & Hindi
Third Language Downlodable Fonts Bengali, Tamil, Sinhalese
Barcode Code 3 of 9
65
Page 71

Paper Handling
Paper Path Standard Top, Rear, Bottom
Continuous-Tractor Feed Standard Convertible Push & Pull
Paper Size
Cut Sheets Width 3.5-10"
Continuous Form Width 3.5-10"
Paper Thickness Tractor feed - 0.3mm(max)
Friction feed - 0.3mm(max)
Copy Capability 1+3*
Consumables - Ribbon
Type Unique TVS Ribbon Cassette with
Replaceable Inkbank
Colour Standard Black
Ribbon Life 40 Million Characters**
Cassette Refill Mode Through Inkbank
Inkbank Life 10 Million Characters***
Input Buffer (Kilo Bytes) 40 KB
Reliability
MTBF (Power on Hours) 6000 POH
Accoustics - Noise Level ~55db(A)
Emulation Epson ESC P/2, IBM Proprinter
Interface
Standard Centronics IEEE -P1284A Parallel
Optional RS 232C Serial
66
Page 72

67
Software Specifications
Drivers Windows 95, 98, NT 4.0, 2000,
Me, XP, Linux Redhat
Electronic Guide HTML Based
Electrical Specifications
Operating Voltage 150 VAC-270 VAC
Mains Frequency 47-63 Hz
Power (Standby) ~12W
Environmental
Operating Conditions
Temperature +5 to +45 deg C
Relative Humidity 10% to 80%
Physical Dimensions
Width x Depth x Height (mm) 433 x 79 x 147
Weight (kg) 5.7
* Max.possible copy capability ** with 3 additional inkbanks
***At 10 cpi draft
Note:
Microsoft Windows and Windows NT are registered trademarks or trademarks
of Microsoft Corporation in the United States and / or other Countries, EPSON
ESC/P is a trademark of SEIKO EPSON CORPORATION.
All other product names and other company names used herein are for
identification purpose only and maybe the trademarks or registered trademarks
of their respective owners. TVS-E disclaims any and all rights in those marks.
Specifications are subject to changes without notice.
Page 73

✦✦
✦✦
✦ Paper Specification
Note:
Use recycled paper and envelopes only under normal
temperature and humidity conditions, as follows:
Temperature 15 to 25 ºC (59 to 77 ºF)
Humidity 30 to 60% RH
Do not load paper that has been folded or is damaged,
wrinkled, or curled.
Ordinary single sheets:
Width - Top 3.9 to 8.5 “
Length - Top 100 to 364 mm (3.9 to 14.3“)
Thickness 0.065 to 0.14 mm (0.0025 to 0.0055”)
Weight: 52 to 90 g / m2 (14 to 24 lb) Cut sheet
Single-sheet multipart
forms: Top entry only
Width 100 to 254 mm (3.9 to 10.0 “)
Length 100 to 365 mm (3.9 to 14.3 “)
Copies 1 original + up to 3 copies
Thickness 0.12 to 0.35 mm (0.0047 to 0.01378“)
Weight 40 to 58 g/m2 (12 to 15 lb)
Binding Line glue at the top of form
Envelopes: Top entry only
Size No.6: 165 x 92 mm (6.5 x 3.6” )
68
Page 74

No. 10:241 x 105 mm (9.5 x 4.1”)
Thickness 0.16 to 0.35 mm (0.0063 to 0.01378”)
Weight 45 to 90 g/m2 (12 to 24 lb)
Continuous paper
(standard and multipart): Front entry only
Width 101.6 to 254 mm (4.0 to 10.0”)
Length 101.6 to 558.8 mm (4.0 to 22.0”)
(one page)
Copies 1 original +up to 3 copies
Thickness Printable area 0.065 to 0.35 mm (0.0025
to 0.01378“) Perforated edges upto
0.9 mm (0.035”)
Weight 52 to 82 g/m2 (14 to 22 lb) (not multipart)
Weight 40 to 58 g/m2 (12 to 15 lb) (one sheet of
multipart)
Binding Point glue or paper staples on both sides
The continuous multipart forms should be securely joined
together along the left and right edges by crimping.
Crimping should be pressed in from the original sheet
side and go completely through all copy sheets.
The ratio of the cut / uncut length at the perforation should
be between 3:1 and 5:1
The perforation between pages should not extend all the
way to the edges of the paper.
At the perforation between pages, the horizontal and
vertical perforation cuts should not cross.
69
Page 75

The thickness of the perforation part when extended
should be 1 mm or less.
Continuous paper
with labels: Front and Bottom entry
Label size 23.8 x 63.5 mm (15/16 x 2.5”)
Minimum 2.5 mm (0.1)
cornerradius, minimum
Backing sheet width 101.6 to 254 mm (4.0 to 10.0)
Backing sheet length 101.6 to 558.8 mm (4.0 to 22.0)
(one page)
Backing sheet thickness 0.07 to 0.09 mm (0.0028 to 0.0035)
Total thickness 0.16 to 0.19 mm (0.0063 to 0.0075)
Label weight 64 g/m2 (17 lb)
Roll Paper
(with external support)
Feed Type Rear entry with std roll paper holder
Width 2.7 to 8.0”
Paper Roll Diameter 8.5 mm max
Roll Paper Type Std, 1+1 (multi-part)
Thickness 0.07 to 0.09 mm (0.0028 to 0.0035”)
Weight 52 to 82 g / m2 (14 to 22 lb)
70
Page 76

9. ASCII TABLE
This table lists the ASCII characters and their decimal, octal and hexadecimal
numbers. Characters which appear as names in parentheses (e.g., (nl)) are
non-printing characters.
Char Dec Oct Hex | Char Dec Oct Hex |Char Dec Oct Hex |Char Dec OctHex |
(nul) 0 0000 0x00| (sp) 32 0040 0x20| @ 64 0100 0x40| ‘ 96 0140 0x60
(soh) 1 0001 0x01| ! 33 0041 0x21| A 65 0101 0x41| a 97 0141 0x61
(stx) 2 0002 0x02| “ 34 0042 0x22| B 66 0102 0x42| b 98 0142 0x62
(etx) 3 0003 0x03| # 35 0043 0x23| C 67 0103 0x43| c 99 0143 0x63
(eot) 4 0004 0x04| $ 36 0044 0x24| D 68 0104 0x44| d 100 0144 0x64
(enq) 5 0005 0x05| % 37 0045 0x25| E 69 0105 0x45| e 101 0145 0x65
(ack) 6 0006 0x06| & 38 0046 0x26| F 70 0106 0x46| f 102 0146 0x66
(bel) 7 0007 0x07| ‘ 39 0047 0x27| G 71 0107 0x47| g 103 0147 0x67
(bs) 8 0010 0x08| ( 40 0050 0x28| H 72 0110 0x48| h 104 0150 0x68
(ht) 9 0011 0x09| ) 41 0051 0x29| I 73 0111 0x49| i 105 0151 0x69
(nl) 10 0012 0x0a| * 42 0052 0x2a| J 74 0112 0x4a| j 106 0152 0x6a
(vt) 11 0013 0x0b| + 43 0053 0x2b| K 75 0113 0x4b| k 107 0153 0x6b
(np) 12 0014 0x0c| ‘ 44 0054 0x2c| L 76 0114 0x4c| l 108 0154 0x6c
(cr) 13 0015 0x0d| - 45 0055 0x2d| M 77 0115 0x4d| m 109 0155 0x6d
(so) 14 0016 0x0e| . 46 0056 0x2e| N 78 0116 0x4e| n 110 0156 0x6e
(si) 15 0017 0x0f| / 47 0057 0x2f| O 79 0117 0x4f| o 111 0157 0x6f
(dle) 16 0020 0x10| 0 48 0060 0x30| P 80 0120 0x50| p 112 0160 0x70
(dc1) 17 0021 0x11| 1 49 0061 0x31| Q 81 0121 0x51| q 113 0161 0x71
(dc2) 18 0022 0x12| 2 50 0062 0x32| R 82 0122 0x52| r 114 0162 0x72
(dc3) 19 0023 0x13| 3 51 0063 0x33| S 83 0123 0x53| s 115 0163 0x73
(dc4) 20 0024 0x14| 4 52 0064 0x34| T 84 0124 0x54| t 116 0164 0x74
(nak) 21 0025 0x15| 5 53 0065 0x35| U 85 0125 0x55| u 117 0165 0x75
(syn) 22 0026 0x16| 6 54 0066 0x36| V 86 0126 0x56| v 118 0166 0x76
(etb) 23 0027 0x17| 7 55 0067 0x37| W 87 0127 0x57| w 119 0167 0x77
(can) 24 0030 0x18| 8 56 0070 0x38| X 88 0130 0x58| x 120 0170 0x78
(em) 25 0031 0x19| 9 57 0071 0x39| Y 89 0131 0x59| y 121 0171 0x79
(sub) 26 0032 0x1a| : 58 0072 0x3a| Z 90 0132 0x5a| z 122 0172 0x7a
(esc) 2 7 0033 0x1b| ; 59 0073 0x3b| [ 91 0133 0x5b| { 123 0173 0x7b
(fs) 28 0034 0x1c| < 60 0074 0x3c| \ 92 0134 0x5c| | 124 0174 0x7c
(gs) 29 0035 0x1d| = 61 0075 0x3d| ] 93 0135 0x5d| } 125 0175 0x7d
(rs) 30 0036 0x1e| > 62 0076 0x3e| ^ 94 0136 0x5e| ~ 126 0176 0x7e
(us) 31 0037 0x1f| ? 63 0077 0x3f| _ 95 0137 0x5f| (del) 127 0177 0x7f
71
Page 77

ASCII Name Description C Escape Sequence
nul null byte \0
bel bell character \a
bs backspace \b
ht horizontal tab \t
np formfeed \f
nl newline \n
cr carriage return \r
vt vertical tab
esc escape
sp space
72
Page 78

ESC SEQUENCES FOR MSP 450 CHAMPION
The following section lists ESC sequences used in MSP 450 Champion
COMMAND COMMAND DESCRIPTION
Character Sets
ESC 7 Select IBM character set 1
ESC 6 Select IBM character set 2
ESC ( T Select Code Page
Character size/spacing
DC2 Select 10 cpi pitch
ESC: Select 10 cpi pitch
SI Set Compressed pitch
ESC S Subscript printing ON
ESC T Subscript/Subscript printing OFF
SO Start Double width printing line by
line.
DC4 End Double width printing line by line
ESC W Double width printing ON
ESC W Double Printing OFF
ESC P Proportional Spacing ON
ESC P Proportional Spacing OFF
Character style
ESC I Select Font
ESC E Emphasized printing ON
ESC F Emphasized printing OFF
ESC G Enhanced Printing ON
ESC H Enhanced Printing OFF
ESC - Underline ON
ESC - Underline OFF
73
Page 79

COMMAND COMMAND DESCRIPTION
ESC _ Overscore ON
ESC_ Overscore OFF
Vertical control
ESC C 0 Page length, set in n inches
ESC C n Page length set in lines
ESC N Skip over perforation ON
ESC O Skip over perforation OFF
FF Form Feed
LF Line Feed
ESC 1 Set line spacing to 7/72 inch
ESC 0 Set line spacing to 1/8th inch
ESC 3 Set line spacing n/216th inch
ESC A Set line spacing to n/72 inch
ESC A n command
VT Vertical Tab
ESC B Set vertical tab
Character size and
pitch commands
ESC ^ Enables printing of all character code
on next character
ESC [ | Select print mode
Extra commands
Bar Code Commands
ESC DLE A Select bar code type and size
ESC DLE B Print bar code data
ESC DLE C Print postnet bar code data
Character Sets
ESC \ Print from IBM character set 3
ESC ! Set International character set *
74
Page 80

COMMAND COMMAND DESCRIPTION
Character size/spacing
ESC g Select 15 cpi pitch*
ESC SI Select 20 cpi pitch*
ESC S Superscript printing ON
ESC V Set Intercharacter spacing*
Character style
ESC # HSD print mode ON
ESC % G Italics ON
ESC % H Italics OFF
ESC DEL F Select Font by pitch and point
Custom Characters
ESC = Down line load characters
ESC $ Copy ROM character set to RAM
character set.*
Cut-sheet feeder control
ESC EM Insert /eject paper*
Graphics
ESC K Single density graphics
ESC L Double density graphics
ESC Y Double Speed/double density graphics
ESC Z Quadruple Density graphics
Horizontal control
BS Backspace
CR Carriage return
ESC X Margin setting, left & right
HT Horizontal Tab
ESC D Set horizontal tab
ESC D Clear Horizontal tab settings
ESC % B Set 4-column tabulation*
ESC DLE @ Set print position*
ESC | Set relative dot position*
75
Page 81

COMMAND COMMAND DESCRIPTION
ESC U Uni-directional print ON
ESC U Uni-directional print OFF
Vertical control
ESC J Perform n/216th line feed
ESC % 5 Perform n/144th line feed
ESC 5 Auto Line Feed ON
ESC 5 Auto Line Feed OFF
ESC % 9 Set line spacing to 7/144 inch*
ESC DLE H Line feed compound command.
ESC A n command
ESC R Reset vertical tab to default
Miscellaneous
CAN Cancel
ESC { Change Emulation*
ESC Q STX Print suppress mode ON ,ML 320
turbo
ESC Q STX Print supress mode ON,ML 321 turbo
DCI Print Supress mode OFF(either
model)
ESC [ K Set initial conditions
ESC } Software I-Prime*
ESC j Stop printing
76
Page 82

10. CUSTOMER SUPPORT
If your printer is not operating properly and you cannot solve the problem using
the Troubleshooting information, contact customer support services for
assistance.
We will be able to help you much more quickly if you give us the following
information:
Printer model
Serial number of your printer (the serial number is on the back of the
printer)
Brand and model of your computer
Printer software version
Window version software applications you normally use
with the printer and their version numbers
77
Page 83

11. WEBSITE DETAILS
For further information and product details visit us at www.tvs-e.com
If you cannot solve the problem using the troubleshooting information you can
contact us at [email protected]
You can register your call with the following details:
Name
Printer model
Serial number
Country
Problem faced
78
Page 84

12. GLOSSARY
GLOSSARY - A ,B
APPLICATION PROGRAM
Software purchased or written for performing specific tasks. It makes a person’s
job easier and more efficient. Some of the popular programs are WordStar, dBASE,
WordPerfect, Lotus 1-2-3 and PageMaker.
ASCII (AMERICAN STANDARD CODE FOR INFORMATION INTERCHANGE)
A standardised coding system for letters and symbols.It contains characters found
on a keyboard and a few control commands. It is widely used by most manufacturers
of computers, printers and software developers.
BAUD
A method for denoting data transmission rate: it is equivalent to bits per second.
This term is normally associated with serial communication.
BI-DIRECTIONAL PRINTING
A printing mode where the print head can print both from left to right and right
to left.
BINARY
A number system where combinations of 1s and 0s are used to represent all types
of data.
BIT
The smallest unit for representing data: a binary digit(0 or 1). In the computer
world it is represented by a voltage pattern-low for 0 and high for 1. Eightbits
make a byte. And one byte is the equivalent of a character or symbol.
BIT MAP
A method of describing what is to be printed. The software specifies the value of
each pixel or dot to be printed. Computer software send graphics in bitmap form
to the printers.
BUFFER
Just like a computer, a printer also has a memory. The buffer refers to that portion
in the memory that stores the characters not yet printed. When the data transfer
from the computer to the printer is faster than the printer’s printing capability
the extra characters are stored in this buffer.
BUILT-IN FONT
Fonts (styles of character sets) that a printer comes with, located in ROM (Read
Only Memory) chips on the logic board of a printer.
79
Page 85

BYTE
A group of 8 bit that a computer stores in one location. Each letter pressed on
the keyboard generates a byte.
GLOSSARY - C
CHARACTER GRAPHICS
The characters sent to the printer that represent symbols not found on a
typewriter keyboard. These symbols are lines used in drawing boxes, foreign letters,
math symbols etc.
CHARACTER SET
A character set is a collection of printable characters like alphabets, numerals,
punctuation marks and special symbols. The printer has three kinds of characters
- standard ASCII, Extended Epson and Extended IBM. The standard ASCII set contains
normal English alphabets, numerals and symbols. The Extended Epson character
set includes slant characters and symbols. The Extended IBM character set includes
special accent characters and line and block graphics characters and useful for
making simple graphics.
COMPRESSED/CONDENSED
A printing mode where the characters are printed with reduced width. For instance,
a 136 column output can be printed on a 80 column width by choosing the
compressed pitch from the operation panel or “17 cpi” pitch from the menu.
CONFIGURATION FILES
For the printer and application program to work in harmony, both must be
configured. Software configuration is done through an appropriate menu where
the right printer model is chosen and paper length, resolution etc. are chosen.
For instance, the CONTROL PANEL application of windows helps you to configure
the printer settings on the software sider. The printer side configuration is done
through VuePrint Menu Mode.
CONTINUOUS FEED PAPER
A type of stationery that has pin-feed holes on each side and is perforated between
pages to enable easy tear off. It could be in the fan fold form or continuous roll
form.
CONTROL CODES
These are a specific group of 32 binary patterns of ASCII codes that control the
actions of the printer. Some examples are,
0x0A - Line feed moves paper up by a line.
0x0C - Form feed ejects a form.
80
Page 86

COPY MODE
Increases multi-copy capability by increasing the pin (in the print head) intensity
and correspondingly reduces the speed.
CPI (CHARACTERS PER INCH)
A measure of character spacing in printing.
CPS (CHARACTERS PER SECOND)
A measure of the speed at which characters are printed.
GLOSSARY - D
DEFAULT
Printer settings which are used by the printer when it is turned on, reset or
initialised are called default settings.
DEVICE DRIVER
A program that accepts input from an application program and translates it into a
form the printer can understand. For example, Word Perfect offers drivers for
more than 100 printer models.
DOT MATRIX PRINTER
A printer that uses tiny wires (pins) which are fired at a ribbon to create dots on
paper. By controlling the wires different dot patterns and thus characters are
formed.
DOUBLE-STRIKE
A print mode in which each character is printed twice, with the second slightly
below the first.
DOWNLOAD
This refers to the transmission of information from a computer to a printer. Usually
it pertains to font information that is retained in the printer’s volatile memory,
and that which can temporarily replace characters programmed in the printer’s
ROM.
DOTS PER INCH (DPI)
A measure of the printer’s resolution. The larger the number and the smaller the
dots, the better looking the characters will be and the smoother will be the
curves.
DRAFT
A printing method where a minimum number of dots are used for character
formation. This helps in high speed printing. In contrast, in LQ (Letter Quality) the
print quality is increased by printing at a reduced speed.
81
Page 87

GLOSSARY - E, F, G
ELITE
A Pitch where characters are printed 12 characters per inch.
EMPHASIZED (ENHANCED)
A printing mode in which each dot is printed twice, with the second slightly to
the right of the first. This makes the printed text bold.
ESCAPE (ESC)
A special control code used to begin most printer commands. It is followed by
characters, numbers or symbols. Such software commands help in selecting/
deselecting any feature. These kinds of commands offer the highest level of control
over the features.
EXPANDED
A printing mode where the print width of each character is twice as wide as
normal characters.
FIRM WARE
This is a program that is stored in ROM (Read only Memory) chip on the printer’s
logic board. The firmware controls the printer with the help of the microprocessor.
FIXED SPACING (MONO SPACING)
A print mode in which the gap between any two characters(refer pitch) is always
uniform regardless of the actual width of the character.
FONT
A way of describing shapes of characters in a character set.It defines the shape
uniquely. A given font can have many stylesItalics,Underlined,Superscript; and many
sizes: 10,12,15,17 pitches, expanded,tall etc. Some examples of popular fonts are
Times, Roman,Sans serif,Courier and Orator.
FORM FEED (FF)
A feature in the printer that enables the paper(form) to advance to the top of the
next page. It can be activated through the front panel or through a control code.
GRAPHICS MODE
The mode in which dot or pixel information is sent to the printer.Application
software packages like Lotus 1-2-3 print charts in this mode.Microsoft Windows
applications print almost all the information in this mode only.
82
Page 88

GLOSSARY - H, I
HEX DUMP
A trouble-shooting feature: In this mode each code that is received by the printer
is printed in hexadecimal notation.The control codes are also printed as hex
codes rather than being executed. It helps to diagnose any malfunctioning in data
transfer between the computer and printer. Hexadecimal is a type of number
system with base as 16 where the contents of byte are described using the symbols
0,1,2,3,4,5,6,7,8,9,A,B,C,D,E and F.
HOME POSITION
The left most printing position on powering on, is the home position. The left
most position will change whenever the left margin is adjusted. But the home
position does not change.
IMAGE DATA (BIT IMAGE)
Data created in the memory of a printer that is directly related to the dots to be
printed.
IMMEDIATE MODE
This is a useful feature that allows you to send text immediately to the printer. In
other words the printer does not wait for the buffer to be full or for a line feed
command. After printing the text, the paper advances approximately 1 inch so
that you can see what you’ve printed. When the printer receives the next byte of
data the paper automatically reverses to its previous position, prints the text and
again advances the paper to enable you see the line. The tractor should be in the
PUSH position to accommodate reverse paper movement.
INITIALISE
Initialisation is the process followed by the printer during power up. The printer
brings the print head to home position. After this is successful, the printer is
ready to use. Many software also initialise the printer through software control.
Initialisation resets all the changes done through software (fonts, page lengths
etc.) to the default settings selected through VuePrint Menu Mode.
INTERFACE (SERIAL AND PARALLEL)
The connection between the computer and the printer. Interfaces are of two
types: Serial interface allows data transmission one bit at a time; Parallel interface
allows data transmission in blocks of 8 bits(i.e), one character or code at a time.
The serial interface standards widely in use are RS232C, RS422 etc. and the parallel
interface standards are Centronics,IEEE P1284, IEEE 488, etc. ITALIC A type-style in
which the characters are slant. This sentence is in Italics.
83
Page 89

GLOSSARY - L, M, O
Letter Quality
A superior method of printing in a 24 wire Dot matrix printers. LQ reduces the
print speed and increases the number of dots per character to increase the print
quality.
LINE FEED (LF)
A feature in the printer that enables the paper to advance one line. This may be
invoked either through the control panel or through a control code.
LINE SPACING
The distance that the paper moves between lines. Standard line spacing is 1/6 th
of an inch, but it can be changed by software commands. This is measured in lines
per inch(LPI).
LOGIC BOARD
The main circuit inside a printer.
MACRO
A macro is a group of printer settings that describe the printer environment. They
are stored in printer’s non-erasable memory. Macro is automatically restored when
you turn the printer power on.
MEMORY
The printer contains 3 kinds of memory - Read Only Memory(ROM), Macro Memory
and Random Access Memory(RAM).Please refer Buffer, ROM, Macros and RAM.
MODE
Printers operate in various modes. On-line, off-line, text and graphics are examples.
MONOSPACING A print mode in which the gap between any two characters(refer
pitch) is always uniform regardless of the actual width of the character.
OFF-LINE
The state in which the printer stops being sensitive to data and commands from
the computer. In this state various options from the control panel can be set.
ON-LINE
The state in which the printer can receive printable characters or instructions
from the computer.
84
Page 90

GLOSSARY - P
PAPER PARK
A feature that permits you to switch from continuous stationery to single sheets
without completely retracting the former. Thus the stationery not in active use is
“parked” till such time it is required again for printing. This feature is possible
only with the tractor in the push mode.
PAPER-OUT SENSOR
A small switch located behind the platen that senses the absence of paper and
sends a signal to the printer instructing it to stop further printing.
PARALLEL INTERFACE
Parallel interface is the most popular way of establishing communication between
the computer and the printer. The parallel interface communicates data to the
printer one byte (8 bits) at a time. This differs from the serial interface which
sends data to the printer one bit at a time. The parallel interface port on the
computer is referred to as the printer port. The application programs refer to it
as LPT1, LPT2 etc.
PICA
A pitch where characters are so spaced that 10 characters can be printed in
every inch.
PITCH
The number of characters per inch when fixed-spaced or mono-spaced fonts are
used. For example 10 pitch means 10 characters per inch.
PIXEL (An abbreviation for picture element)
The smallest unit on a computer screen or printer(a dot).
PLATEN
The rubber cylinder around which paper wraps in a dot-matrix printer or typewriter.
It provides a backing for the paper on which printing is done.
Plug and Play
TVS MSP Series printer come with the unique Plug ‘n’ Play feature. Thanks to this
feature, Windows automatically detects the TVS MSP Series printer and helps you
install the appropriate driver easily.
POINT
A standard unit of measurement in printing equivalent to 1/72 of a inch.
85
Page 91

PORT
The connector that a cable plugs into. Hence terms such as parallel port;
communication port are commonly used.
PRINTER DRIVER
A software program that translates features of application software to commands
that the specific printer can interpret.
PROPORTIONAL SPACING
A printing mode in which the space given to each character is proportional to its
width. Thus a capital W, for instance, would receive much more space than a
lower space l. Proportional spacing improves aesthetics in printing.
GLOSSARY - R, S
RAM (RANDOM ACCESS MEMORY)
In the form of an IC(Integrated Circuit) chip, it is used to execute programs, store
down loaded fonts, and store image. Data stored in RAM is lost when the printer
is turned off.
RESET
Bringing the printer to its default status through either an Escape code, and INIT
signal or by turning the printer off and on.
RESOLUTION
This in printers refers to how closely the dots can be printed. In high resolution,
more dots are used to define the image and hence better print quality. The
printer prints slow in high resolution. Resolution is indicated in dots per inch(dpi).
ROM (READ ONLY MEMORY)
In the form of an IC (Integrated Circuit) chip, it stores certain information on a
permanent basis. This cannot be changed by the user. The control program firmware
which controls the printer resides in the ROM as also the dot patterns which
form the characters. Some examples of information stored are self-test program,
fonts and motor control tables.
Scalable Fonts
Fonts which can be printed in almost any size without sacrificing the appearance.
In contrast bitmap fonts cannot be scaled.
TVS MSP 3xx printers support two built-in scalable fonts - Roman & Sans Serif
which can be scaled from 8 pt to 40 pt. Example of bitmap fonts are : Courier,
Prestige, Orator, etc.
86
Page 92

SELF TEST
A diagnostic feature in the printer. Without being connected to a computer, under
this mode the printer would print characters stored in the ROM.
SERIAL INTERFACE
Serial interface is also called as the communication port or the COM port. Normally
this interface is used for connecting a modem or a mouse. But a printer can also
be connected to this interface. This interface sends data to the printer one bit
at a time.
SHEET FEEDER
Cut sheet feeder is a mechanism which holds and feeds single sheets. This also
acts as paper seperator while using continuous sheets to prevent paper jams.
SUBSCRIPT
Characters that are printed in the lower part of the character space.
SUPERSCRIPT
Characters that are printed in the upper part of the character space.
GLOSSARY - T, U
TOP OF FORM
A setting that instructs the printer where the top of page is so that printing can
begin in the proper place. On receiving a from feed command it correctly advances
the page.
TRACTOR FEED
A method of putting continuous stationery using sprockets that positively engage
onto the holes in the paper and drive it.
TYPEFACE
A single type family of one design in all sizes and styles. Each typeface has many
fonts. Example: Helvetica is a typeface: Helvetica Light, Helvetica Medium, Helvetica
Bold, Helvetica Narrow are fonts belonging to the Helvetica Typeface family.
UNIDIRECTIONAL PRINTING
A printing mode where printing occurs only from left to right(i.e), only in one
direction. This allows for more precise vertical alignment than bi-directional printing,
especially for graphics output.
USER DEFINED CHARACTERS
Characters defined and stored in the printer’s RAM by the user. The user defined
characters can temporarily replace the bit patterns stored in the printer. Userdefined characters are also known as “Downloadable characters”. These character
patterns are lost when the printer is switched off.
87
1M160212/A
 Loading...