

TVR Tuscan, Tuscan S Owner's Handbook Manual
Owners Handbook
Tuscan Tuscan S

The Owners Handbook
Thank you for purchasing your TVR Tuscan, we trust that you will enjoy it. The car has
been designed and manufactured to be safe, rewarding to drive and have a long life.
Whilst many new customers of TVR may have previously owned high performance vehicles
we feel that a few words of caution are necessary.
Your first impression of the Tuscan, we hope, will be one of sophistication and comfort but
please be aware of its very high performance. The power to weight ratio coupled with the
progressive nature of the power curve can be deceptive. Consequently, it would be wise
to gradually acquaint yourself with the abilities of your new car.
For all cars fitted with high performance tyres, there is a much greater difference between
the amount of adhesion on dry roads than on a wet or slippery surface compared with
normal cars. In addition it is essential you bed the tyres in for approximately. 1000miles.
Please drive safely and have fun.
This handbook is designed to help you understand and enjoy the TVR Tuscan by providing
detailed information on controls, equipment and general car care.
If there are any queries, or if more information is required please contact your dealer.
TVR do not accept any responsibility for any inaccuracies, errors or omissions contained
within this handbook, although every effort has been taken to make it as complete and
accurate as possible.
TVR do not accept any liability for any consequential or other losses whatsoever arising
as a result of any of the recommendations contained within this handbook, save for any
loss or damage arising as a result of the negligence of the company or its employees.
© TVR Cars Limited - Issue 1 March 2005
TVR Cars Limited,
Bristol Avenue, Blackpool, Lancashire, FY2 0JF
Tel•01253 509000 Fax•01253 356097
email•sales@tvr.co.uk web•www.tvr.co.uk
ii iii

Contents Contents
Tuscan in Brief
Instrumentation
Routine Maintenance
1.1 Dashboard 1
1.2 Dash Pod Warning Lights 2
1.3 LCD Display In Brief 3
1.4 LCD Warning Screens In Brief 3
1.5 Ignition 3
1.6 Starting the Engine 4
1.7 Horn 4
1.8 Cigar Lighter 4
1.9 Running in 5
1.10 Tyres 5
1.11 Brakes 6
1.12 Doors 6
1.13 Refuelling 6
1.14 Fuel Type 6
1.15 Tyre Pressures 6
2.1 Main Beam/Flash 9
2.2 Headlight/Fog Light 9
2.3 LCD Function Switches 9
2.4 LCD Display Information 10
2.5 LCD Adjustment 15
2.6 LCD Warning Screens 15
2.7 Horn 16
2.8 Hazard Waring Lights 16
2.9 Turn Indicator Stalk 17
2.10 Windscreen Wiper 17
2.11 Windscreen Washers/ Flick Wipe 18
2.12 Intermittent Wipe Speed 18
2.13 Dashboard Buzzer 18
2.14 Steering Column Adjust 19
2.15 Stereo Radio Cassette 19
2.16 Bonnet Release 20
2.17 Gear Lever 21
2.18 Door Mirror Controller/Demist 21
2.19 Handbrake 22
2.20 Immobiliser Disarm Socket 22
2.21 Interior Light 23
2.22 Seat Adjustment 23
2.23 Seat Belts 24
2.24 Demist/Temperature Controls 25
2.25 A/C Controls 25 - 26
2.26 Window Position 27
2.27 Internal Door Lock Switch 27
2.28 Door Release 28
2.29 Emergency Door Release 28
2.30 Keys 28
2.31 Rear Screen 29
2.32 Roof Panel 30
2.33 Alarm 33 - 34
2.34 Radio Key 33 - 34
3.1 Cooling System 37
3.2 Power Steering 38
3.3 Windscreen Washer Reservoir 38
3.4 Engine Oil Dipstick 39
3.5 Brake/Clutch Fluid Reservoir 40
3.6 Battery 41
3.7 Fuses 42
3.8 Bulb Replacement 43
3.9 Interior Light Replacement 43
3.10 Sidelight Replacement 43
3.11 Headlamp Replacement 44
3.12 Indicator Replacement 44
3.13 Rear Light Replacement 45
3.14 Rear Number Plate Replacement 45
3.15 Bulb Specification Chart 46
3.16 Puncture Repair 47
3.17 Towing 47
3.18 Jump Starting 48
3.19 Brake Down Cover 49
3.20 Running in the Vehicle 49
3.21 Cleaning the Vehicle 50 - 51
3.22 Checks and Servicing 52
3.23 Resetting the Inertia Switch 55
Technical Specification
Warranty
4.1 Oils and Lubricants 59
4.2 Bodyshell 59
4.3 Interior 59
4.4 Chassis 59
4.5 Suspension 60
4.6 Braking 60
4.7 Steering 60
4.8 Wheels and Tyres 60
4.9 Transmission 61
4.10 Slip Differential 61
4.11 Engine 62
4.12 Fuel and Ignition Systems 62
4.13 Dimensions 62
5.1 General Warranty Coverage 65
5.2 Body Warranty Coverage 65
5.3 Replacement Parts Coverage 65
5.4 Extent of Company Obligations 65
5.5 Exclusion from Warranty Cover 66
5.6 Maintenance 66
5.7 Motor Racing 66
5.8 Loss of Damage 66
5.9 Limitations of Warranties 66
5.10 Obligations of the Owner 67
5.11 Disputes 67
5.12 Warranty Acknowledgement 67
Details
Index
1
9
37
59
65
72
75
iv v
1.1 Dashboard 1
1.2 Dash Pod Warning Lights 2
1.3 LCD Display In Brief 3
1.4 LCD Warning Screens In Brief 3
1.5 Ignition 3
1.6 Starting the Engine 4
1.7 Horn 4
1.8 Cigar Lighter 4
1.9 Running in 5
1.10 Tyres 5
1.11 Brakes 6
1.12 Doors 6
1.13 Refuelling 6
1.14 Fuel Type 6
1.15 Tyre Pressures 6
Tuscan in Brief
1.2 Dash Pod Warning Lights
Tuscan in Brief
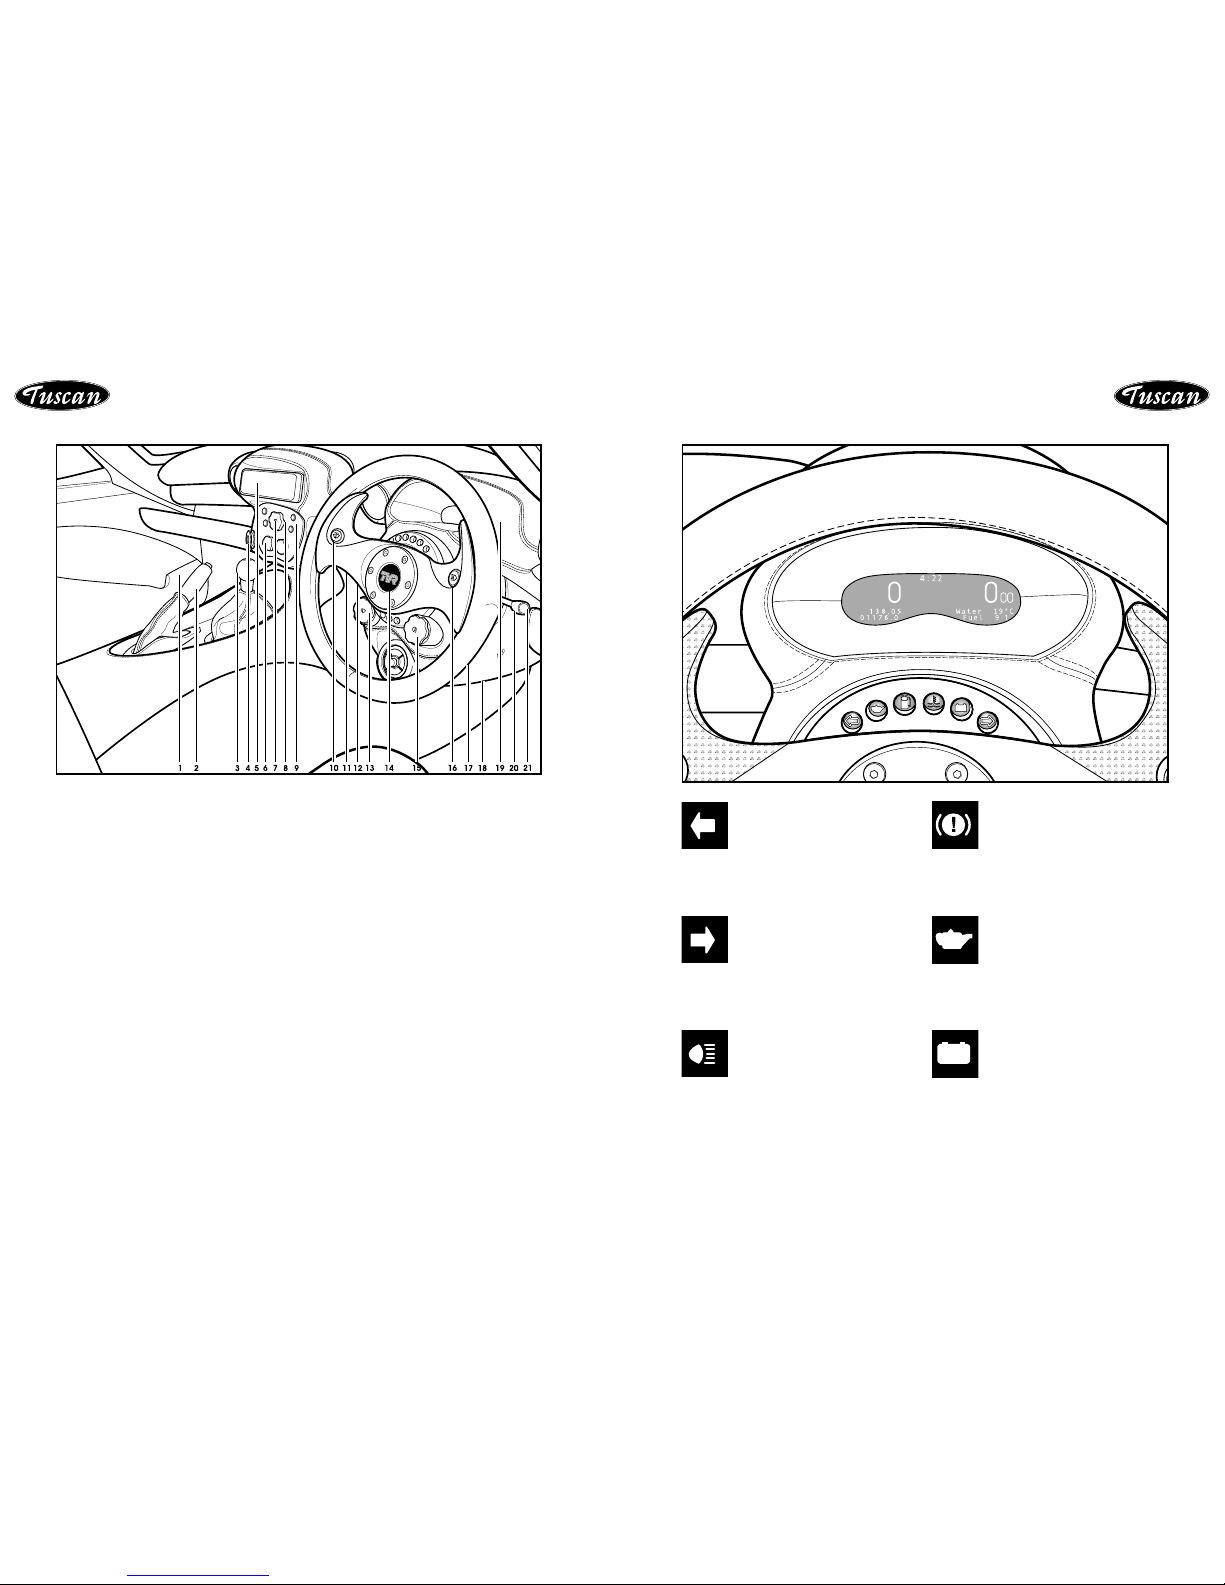
1.1 Dashboard
1 Ashtray /
2 Handbrake lever 30
3 Gear lever 21
4 Cigar lighter 4
5 Audio head unit 19
6 Heating & ventilation controls 25
7 Internal door lock switch 27
8 Door release 28
9 Drivers window control 27
10 Washer/Wipe button 27
11 Immobiliser socket 22
12 LCD adjustment switches 28
13 Windscreen wiper control 17
14 Horn button 15
15 Headlights/Rear fog light switch 9
16 Flash/Main beam 9
17 LCD function switch 9
18 Steering column adjustment lever 19
19 Gear shift lights 14
20 Indicator stalk 17
21 Hazard warning light switch 15
Tuscan in Brief
Left turn indicator light
Flashes simultaneously with the
left hand indicator.
Right turn indicator light
Flashes simultaneously with the
right hand indicator.
High beam headlights
Illuminates when the headlights
are on high beam.
Brake system warning light
Illuminates when the handbrake
is applied or if the brake fluid
level is too low.
Ignition warning light
Goes out when the engine is
started. If the light remains
on or comes on while driving,
switch off engine immediatly and
consult your dealer.
Oil Pressure warning light
Goes out when the engine is
started. If the light remains
on or comes on while driving,
switch off engine immediatly and
consult your dealer.
1 2

1.6 Starting the Engine
1 Apply the handbrake and insert the immobilser key into the lock situated on the
side of the centre pod.
2 Depress the clutch pedal. Put the gear lever into neutral.
3 Press and release the start / stop button. The ignition lights will illuminate and
the button will light green.
If the immobiliser is on (if it is more than 10 seconds since you unlocked the
car) press the black key fob button once.
4 Press and hold the start / stop button for approx 2 seconds until the engine
starts then release the button. The engine will start (minimal use of the throttle
pedal may be needed during the engine start sequence.)
6 To stop the car press and release the start / stop button.
IMPORTANT: Where necessary only short repeated engine cranking periods
should be used, as long cranking periods cause unnecessary wear to the starter
motor and causes unburnt fuel to be deposited into the catalyst/exhaust
system.
1.7 Horn
Press the centre of the steering wheel to sound the horn. The horn works
independently of the ignition being switched on.
1.8 Cigar Lighter
The cigar lighter is located on the centre console. To operate, fully depress the
button to heat the element. The button will eject back to its original position when
ready for use (after approximately ten seconds). Withdraw the complete unit to reveal
the element.
Tuscan in Brief
1.3 LCD Display in Brief
The LCD screen in the middle of your dash pod has been designed to display
selectable information screens.
The information can be accessed by pressing the function switches located on the
back of the steering wheel (see page 9).
For information on how to use the LCD screen display see pages 10-15
Note
The system has a memory function, so when the ignition is switched on, the setup
of the last screen displayed, will be shown.
1.4 LCD Warning Screens in Brief
LCD Warning screens have been programmed automatically to override information
screens.
1.5 Ignition
1. Press and release the start / stop button. The ignition lights will illuminate and
the button will light green.
If the immobiliser is on (if it is more than 10 seconds since you unlocked the
car) press the black key fob button once.
2. Press and hold the start / stop button for approx 2 seconds until the engine
starts then release the button.
To restart the car (after stalling for example) repeat the last step.
3. To stop the car press and release the start / stop button.
Tuscan in Brief
3 4

1.11 Brakes
To bed the brake pads in correctly, avoid excessive braking during the first 500
miles, unless required to do so in an emergency.
1.12 Doors - Opening from the outside
As with other TVR models the door release button has been fitted to the
underneath of the door mirror. To enter the vehicle press the release button, the
side window will drop and the door will be released from its catch.
1.13 Refuelling
The fuel filler cap is located in the boot, next to the left boot hinge. Push down
and twist the cap anti-clockwise.
Please note: Any petrol spilt onto the paint work should be washed off
immediately to prevent staining.
1.14 Fuel Type
The TVR Tuscan is designed to run exclusively on unleaded fuel.
Please note: It is fitted with a narrow fuel filler neck, making it compatible
for unleaded fuel pumps only.
For normal everyday use - Super unleaded 98 Ron or
Premium unleaded 95 Ron
For track use - Super unleaded 98 Ron
1.15 Tyre Pressures
See page 60
Tuscan in Brief
1.9 Running In
The purpose of running in is to allow the new engine components to bed in
correctly. To gain maximum performance, service life and general reliability, the
best policy to adopt during the run in period is to avoid high engine rpm and
large throttle openings but most importantly, not allowing the engine to labour
in a high gear.
Recommended rpm during the running in period
Starting the engine from cold. 0-1000 miles, rpm should not exceed 2500 rpm
until the engine is warm.
1. 0-250 miles, max rpm should not exceed 3500 rpm even when the engine is
warm.
2. 250-1000 miles, Although it is important to avoid full throttle or over 4,000
rpm during the first 1,000 miles, occasional bursts (c.5 seconds) of 75%
throttle up to 4,000 rpm, will help to bed the piston rings in.
3. Do not use full throttle accelerations in low gear for at least 1000 miles and
avoid full throttle use in any gear for the first 250 miles
4. Avoid driving at a constant speed within the first 300 miles.
Most importantly, drive fairly normally. Being too gentle with an engine when
running in can be as bad as being too rough.
Mechanical sympathy from cold (after the running in period)
When starting, do not rev the engine. Make sure that you do not apply more than
a tiny bit of throttle while cranking the engine and then lift off as soon as it fires.
Then try to avoid more than 3,000 rpm until the oil (not water) temperature has
exceeded 40˚C, 4,000 rpm until 60˚C and 7,000 rpm until 80˚C. If it climbs
above 110˚C, please keep the revs below 5,000 rpm until the oil temperature
returns to normal.
1.10 Tyres
To obtain the maximum performance from the tyres it is advisable to avoid
excessive braking and cornering whenever possible during the 0-500 mile
period.
Tuscan in Brief
5 6
Instrumentation
2.1 Main Beam/Flash 9
2.2 Headlight/Fog Light 9
2.3 LCD Function Switches 9
2.4 LCD Display Information 10
2.5 LCD Adjustment 15
2.6 LCD Warning Screens 15
2.7 Horn 16
2.8 Hazard Waring Lights 16
2.9 Turn Indicator Stalk 17
2.10 Windscreen Wiper 17
2.11 Windscreen Washers/ Flick Wipe 18
2.12 Intermittent Wipe Speed 18
2.13 Dashboard Buzzer 18
2.14 Steering Column Adjust 19
2.15 Stereo Radio Cassette 19
2.16 Bonnet Release 20
2.17 Gear Lever 21
2.18 Door Mirror Controller/Demist 21
2.19 Handbrake 22
2.20 Immobiliser Disarm Socket 22
2.21 Interior Light 23
2.22 Seat Adjustment 23
2.23 Seat Belts 24
2.24 Demist/Temperature Controls 25
2.25 A/C Controls 25 - 26
2.26 Window Position 27
2.27 Internal Door Lock Switch 27
2.28 Door Release 28
2.29 Emergency Door Release 28
2.30 Keys 28
2.31 Rear Screen 29
2.32 Roof Panel 30
2.33 Alarm 33 - 34
2.34 Radio Key 33 - 34

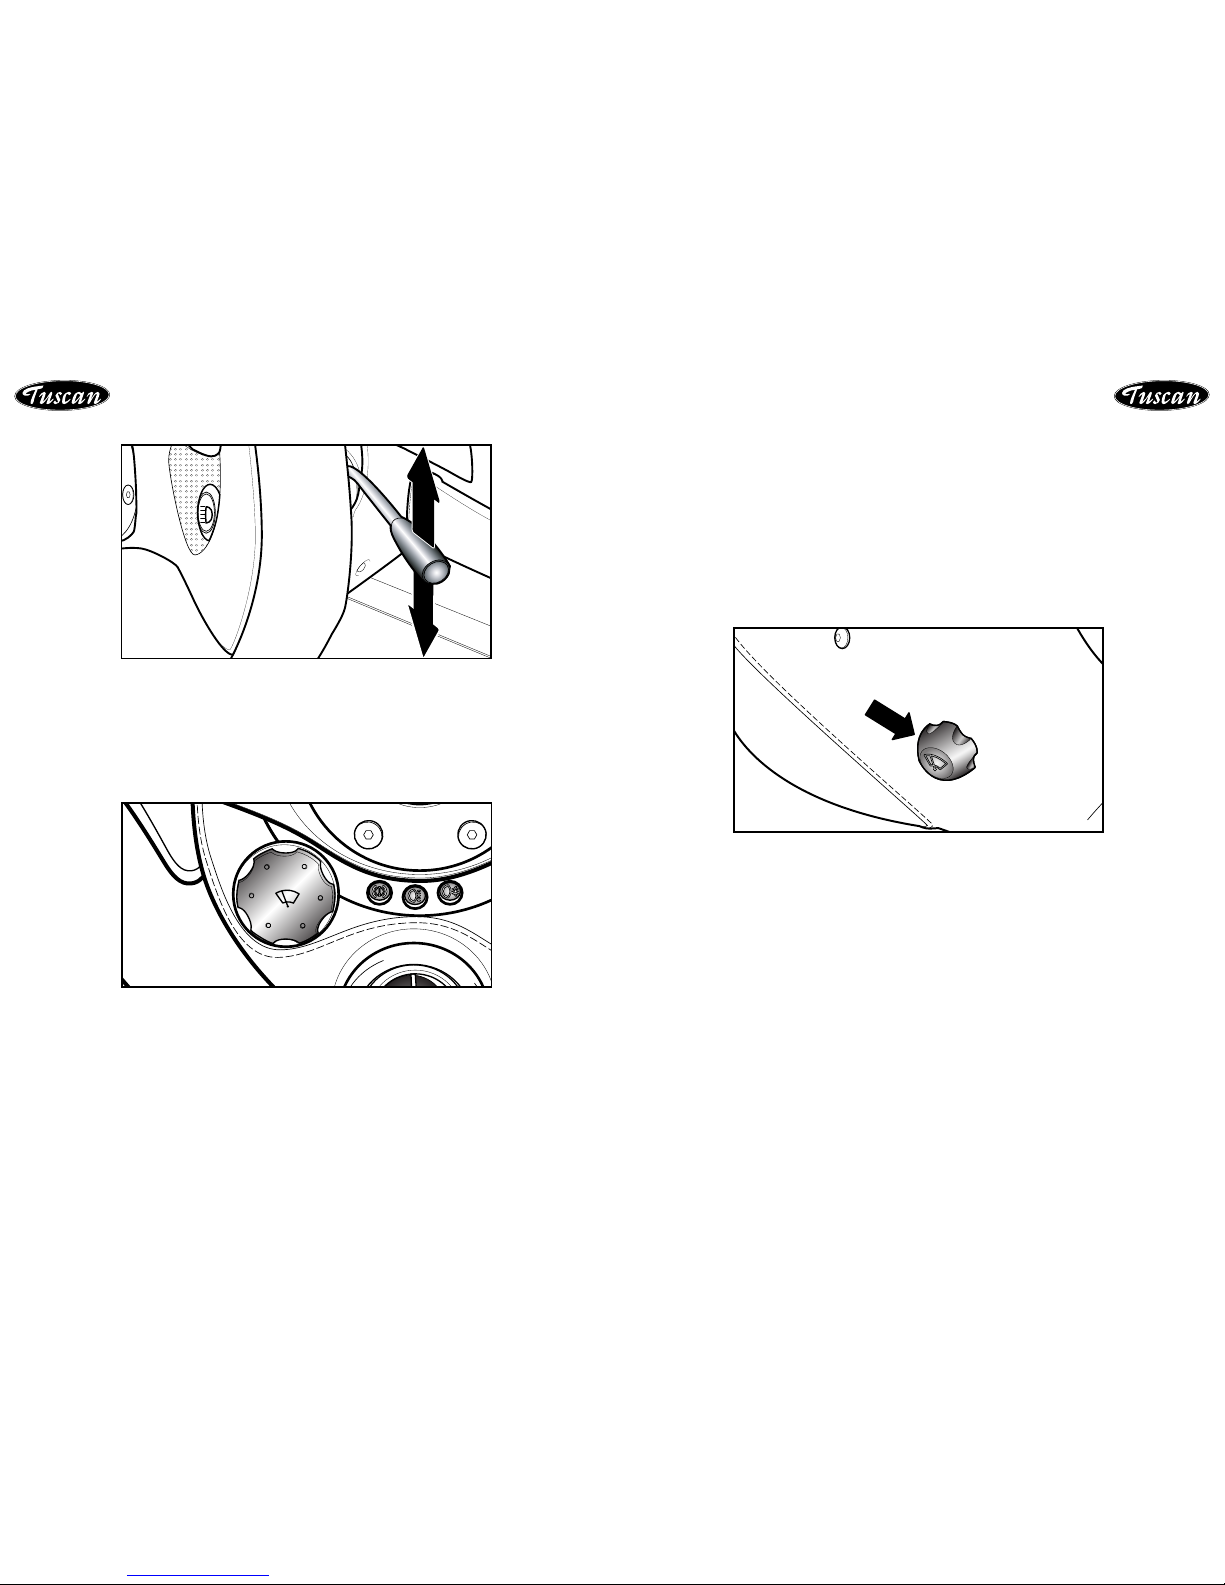
Dash Pod
2.1 Main Beam/Flash (Steering Wheel Button)
When the headlights are off - press the button to ash the main and dipped
beam. The lights will remain on as long as the button is depressed.
When the dipped headlights are on - press the button to activate main beam.
Press again to return to dipped beam.
2.2 Headlight/Fog Light Switch
To activate the lights - rotate the switch clockwise
Position 1. sidelights
Position 2. dipped headlights
Position 3. dipped headlights and Rear fog lights
Please note: take care not to rotate the switch too far when switching the
lights on accidentally activating the rear fog lights. There is a warning
light illuminated when the rear fog lights are on. Only use rear fog lights
in dense fog.
2.3 LCD Function Switches
Located on the back of the steering wheel spokes (inboard) . These switches
enable you to access and alter the different information screens on the LCD
display (left = down, right = up).
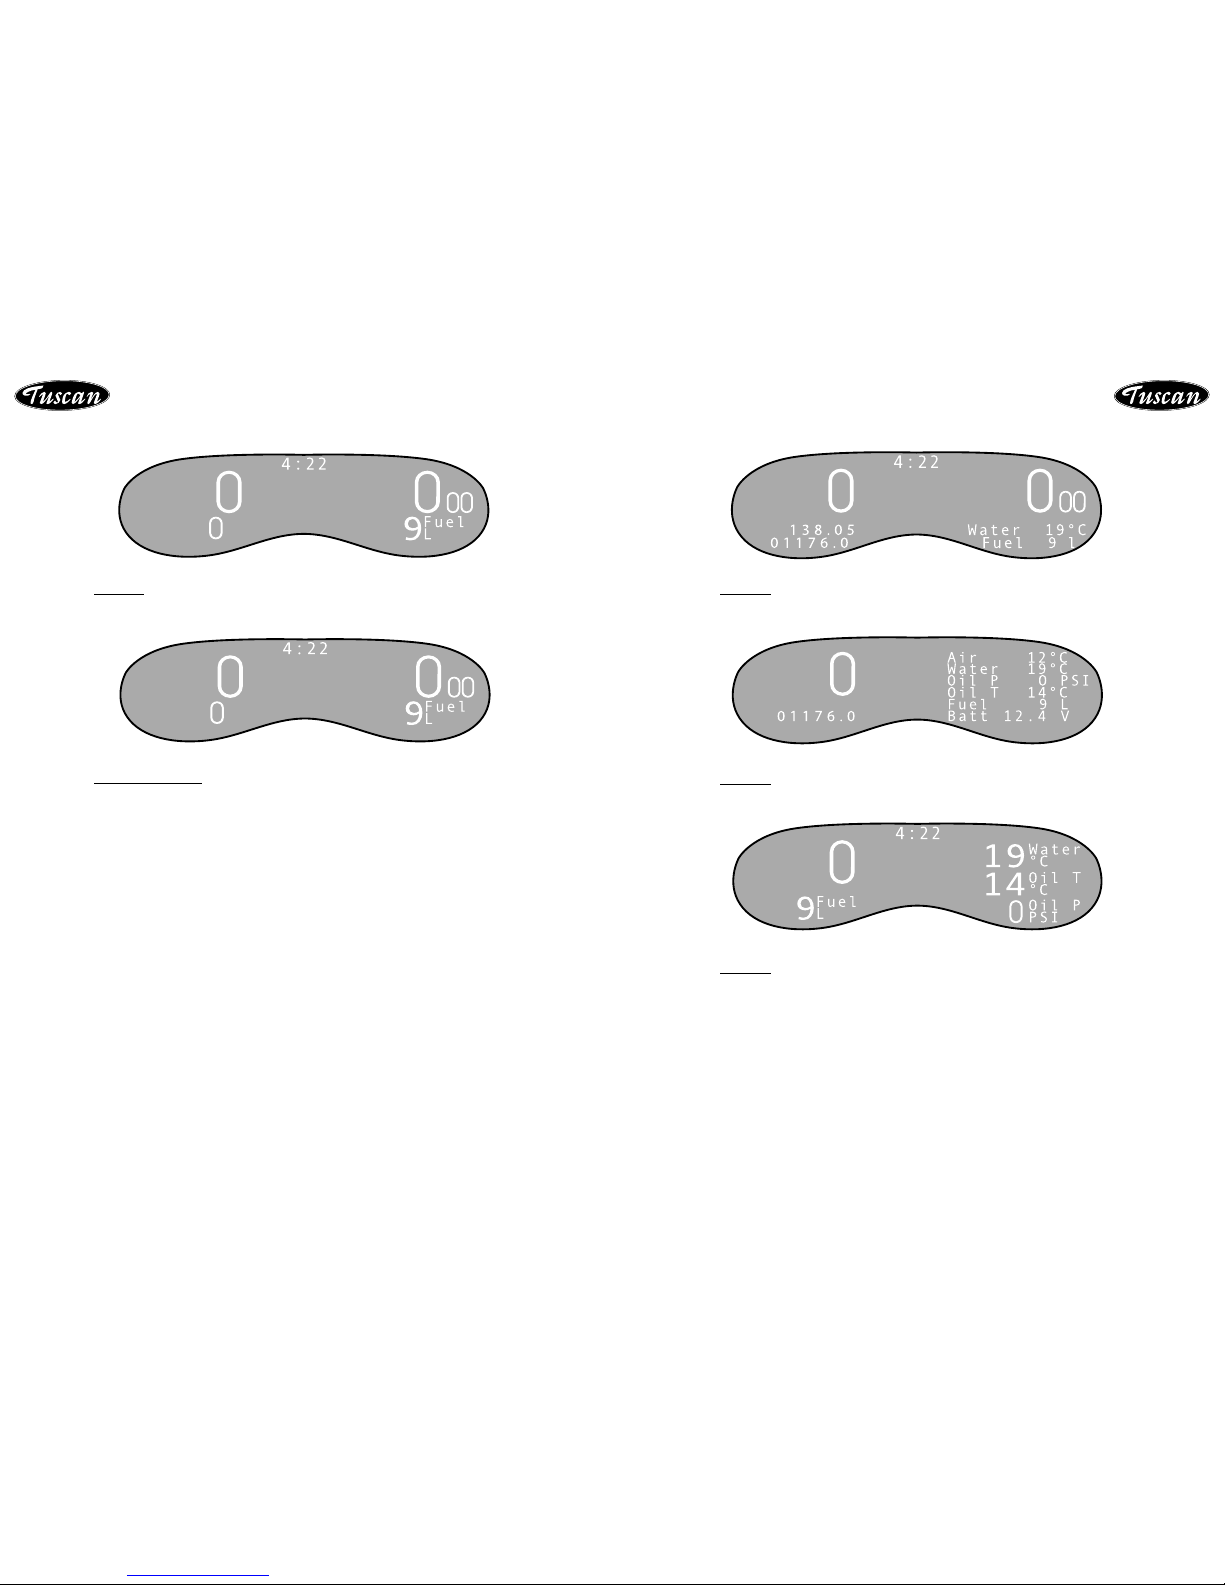
2.4 LCD Display Information
Screen 1
Due to the memory feature when the ignition is turned on the screen displayed will
be the same one that was selected when the ignition was turned off (so the above
screen may not be the one shown).
Screen 2
To cycle through the screens use the up and down LCD function switches
(page 9).
Screen 3
From this screen the trip can be reset by pressing both function switches
simultaneously.
InstrumentationInstrumentation
9 10
Instrumentation
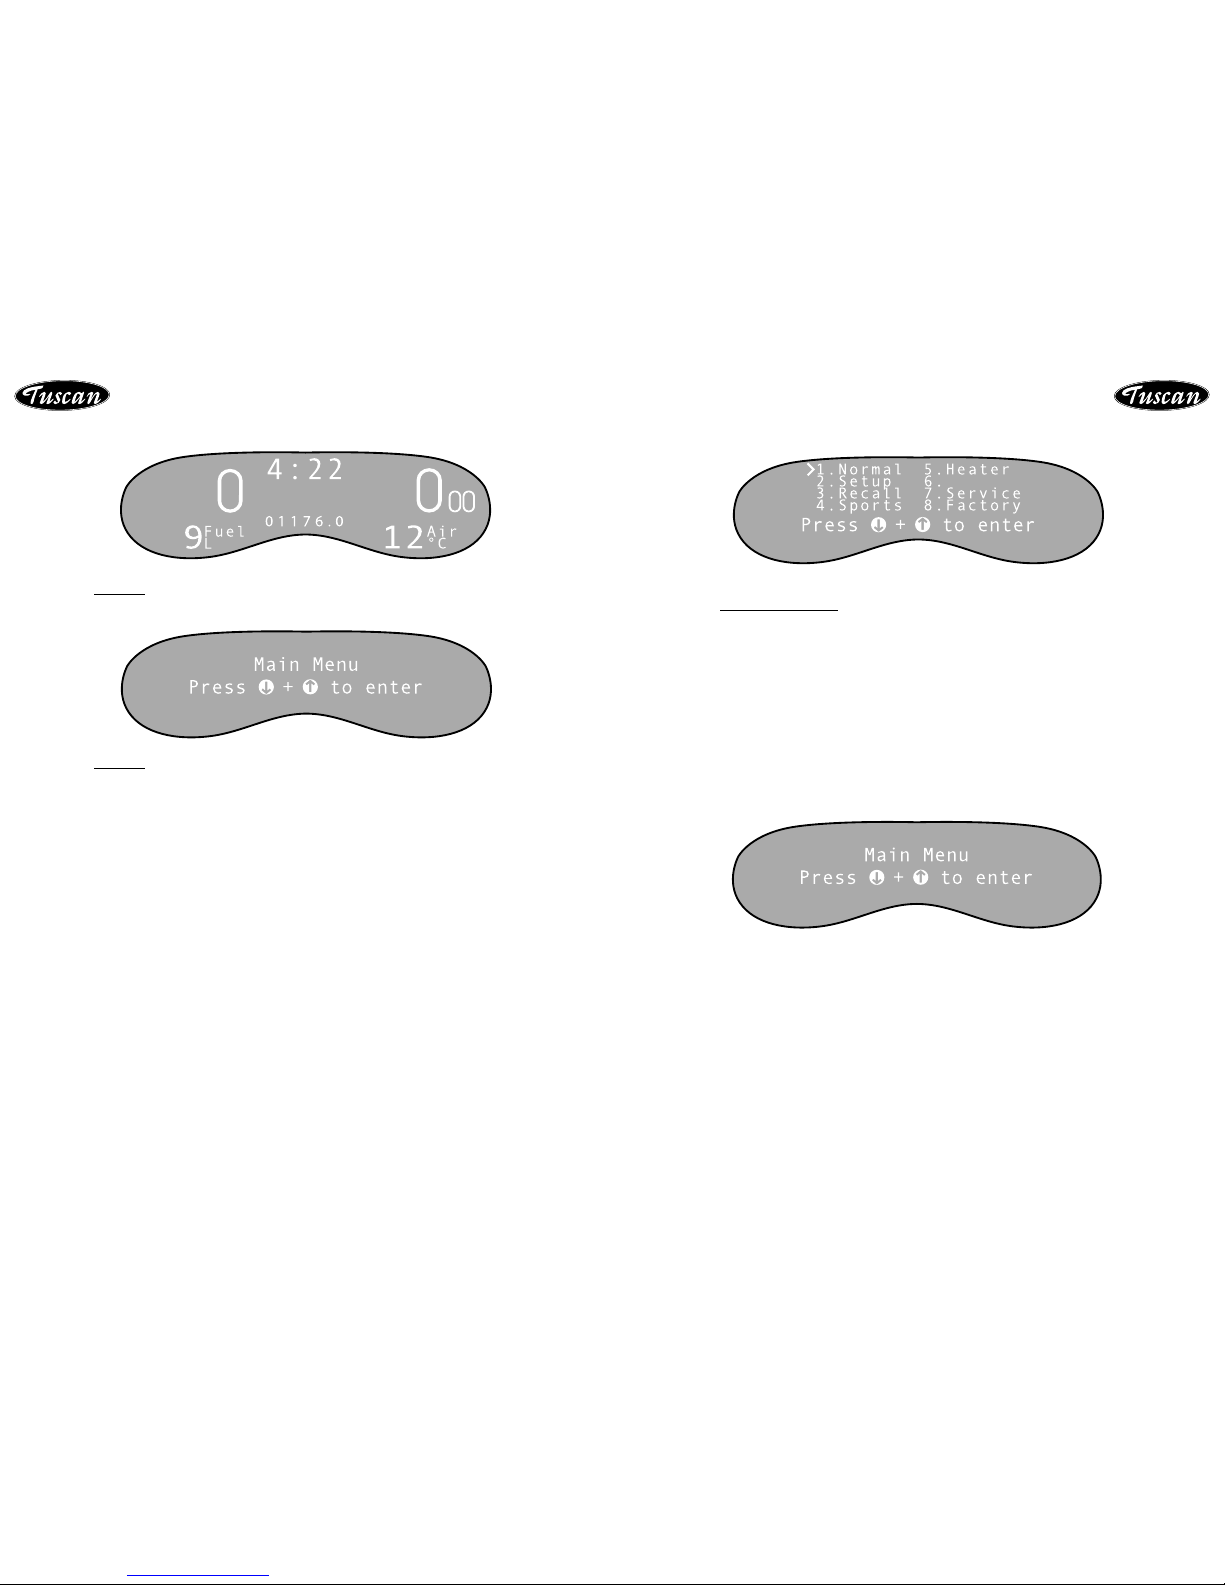
2.4 LCD Display Information
Screen 5
Shows MPH, Mileage and Temperatures
Screen 6
Shows MPH and Temperatures
Screen 7
Shows MPH, Fuel and Temperatures
2.4 LCD Display Information
Screen 4
Changes the right side of the screen to show a selected parameter magnified.
Screen 4 continued
To change the parameter shown on the right side of the screen
press both function switches simultaneously, to enter the select mode. Select>
will appear on the display.
Whilst Select> is shown in the display, use the up and down function switches to
cycle through the various parameters.
KMH -> Oil Temperature -> Water Temperature -> Outside Air Temperature ->
Fuel Level ->
Oil Pressure -> Volts -> RPM.
To accept the required parameter (and leave the select mode), again press both
function switches simultaneously
Instrumentation
11 12
Instrumentation
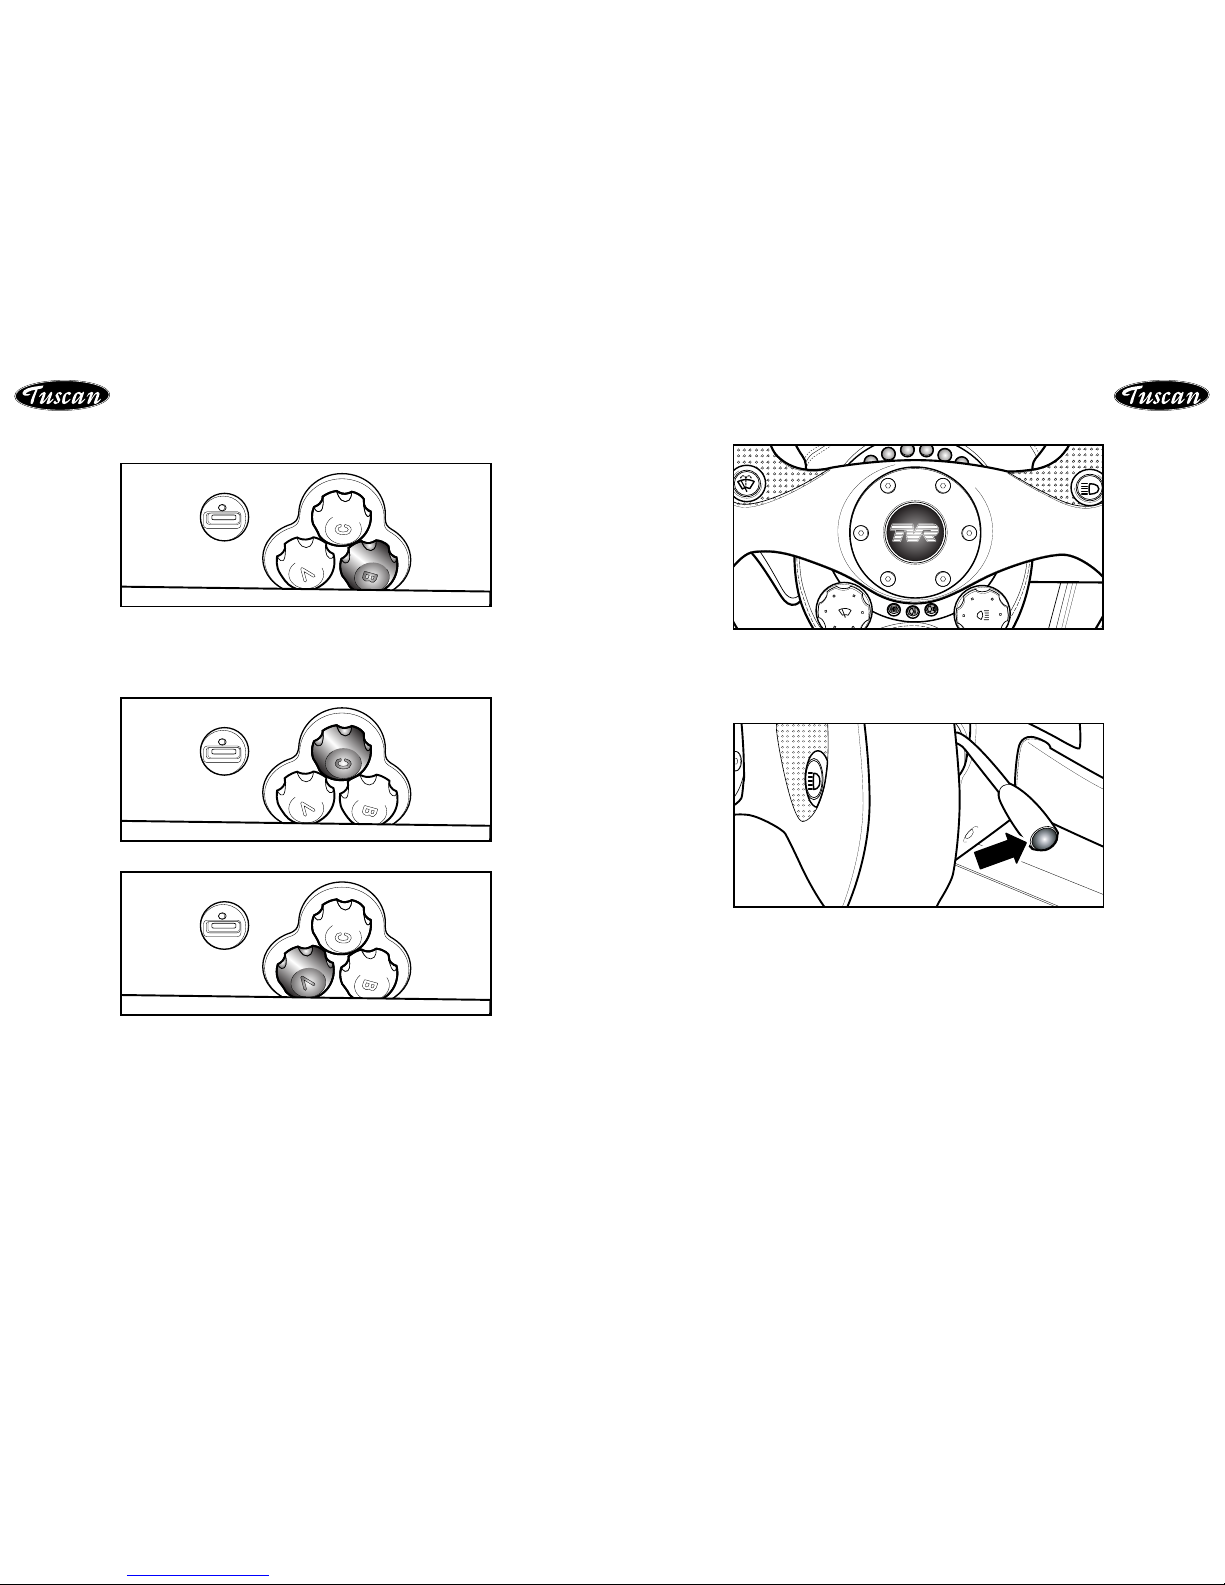
2.4 LCD Display Information
Main Menu Continued
1. Normal The 5 driving screens.
2. Setup To adjust display settings & set the clock.
3. Recall Optional track pack, not yet available.
4. Sports Optional track pack, not yet available.
5. Heater Temperature adjustment in percentage
6. Not used.
7. Service Dealer functions.
8. Factory Factory use.
Use the up and down function switches to scroll the arrow (>) to the desired
position, then press both switches simultaneously to select.
To return to the Main Menu press both function switches simultaneously.
Instrumentation
2.4 LCD Display Information
Screen 8
Shows MPH, Fuel and Temperatures
Screen 1
Main Menu Enter screen.
Press both function switches simultaneously to enter the Main Menu.
13 14
2.7 Horn
Press the centre of the steering wheel to sound the horn. The horn works
independently of the ignition being switched on.
2.8 Hazard Warning Lights
Should the vehicle become immobile or present a hazard to other road users,
indicators may be operated in unison as a hazard warning. Depress button on the
end of the indicator stalk to activate the hazard warning lights. Depress the button
once again to deactivate the hazard warning lights.
Instrumentation
2.5 LCD Adjustment
Contrast, Volume and Brightness Controls
The 3 switches are for secondary adjustment of the dashboard contrast and
brightness and the warning bleeper. They work with and depending on the
settings in the electronic dash eg if the bleeper volume is set to 100% in the
digital dash then the ‘V’ switch will adjust the volume from 0% to 100%. It is
therefore recommended to have the digital dash set to 100%.
Contrast Switch
Volume Switch
2.6 LCD Warning Screens
Critical warning screens have been programmed to automatically override normal
information screens. These will show warnings such as, Low Fuel, EFI Faults, Oil
Pressure, Oil Temperature, Water Temperature, etc.
As well as the warning screen, the dash buzzer will sound.
Instrumentation
15 16
2.11 Windscreen washers / ick wipe
This button is located on the steering wheel
For a single wipe - press and release the button.
To activate the windscreen washers - press and hold the steering wheel button,
this will activate the windscreen wipers and washers, the washers will remain on
as long as the button is pressed.
Once the button is released the washers will stop. The wipers will nish the cycle
they are on and will continue for a further cycle.
2.12 Intermittent Wipe Speed
Your Tuscan has been fitted with a intermittent wipe speed controller. This switch
allows you to alter the speed of the intermittent wipe. The switch is located on the
left hand side of the steering column and will alter the wipe delay from approx. 3
sec to approx. 9 seconds.
2.13 Dashboard Buzzer
A buzzer has been fitted to your Tuscan, which will sound when any of the
following warnings occur:-
(1) Indicator Warning Lights
(2) Low brake fluid
(3) EFI fault
(4) Oil Pressure
(5) Water/Oil Temperature
(6) Gear Shift
Please Note: The volume can be increased or decreased via the LCD
Display Controls (page 15).
Instrumentation
2.9 Turn indicator Stalk
Position 1. Right hand turn indicator.
Position 2. Left hand turn indicator.
If the indicator warning light flashes more frequently than normally a bulb has
blown.
2.10 Windscreen Wipers
To activate the windscreen wipers - rotate the switch clockwise
Position 1. intermittent wipe ( the wiper delay can be adjusted with the
wiper speed switch)
Position 2. normal wipe
Position 3. fast wipe
To switch the wipers off - rotate the switch anticlockwise.
Instrumentation
1
2
17 18
2.16 Bonnet Release
The Tuscan bonnet panel has been designed in two sections. To make general
maintenance easier for you, the lower section is the only part you will need access
to. This lower bonnet will give access to all the necessary filler caps needed for
general maintenance. To open the minor bonnet the following should be followed:
-
(A) To locate the release handle reach behind the o/s minor bonnet. The handle
is located next to the cooling system reservoir cap.(A)
(B) Unlock, and pull lever to release the centre bonnet latch.(B)
(C) Next unclip the o/s ball socket (C)
(D) Then unclip the n/s ball socket (D)
(E) Remove the bonnet stay from its clip and locate the socket on to its
retaining ball joint.
WARNING: To avoid damage to your vehicles paint work please ensure
the above procedure is followed and reversed to close the bonnet.
Instrumentation
2.14 Steering Column Adjustment Lever
Located on the left hand side of the steering column a lever is available to adjust
the height of the steering wheel. Pull the lever towards you to release the column
and adjust to the required position. Release the lever to secure the column.
WARNING: Do not adjust the steering column whilst driving.
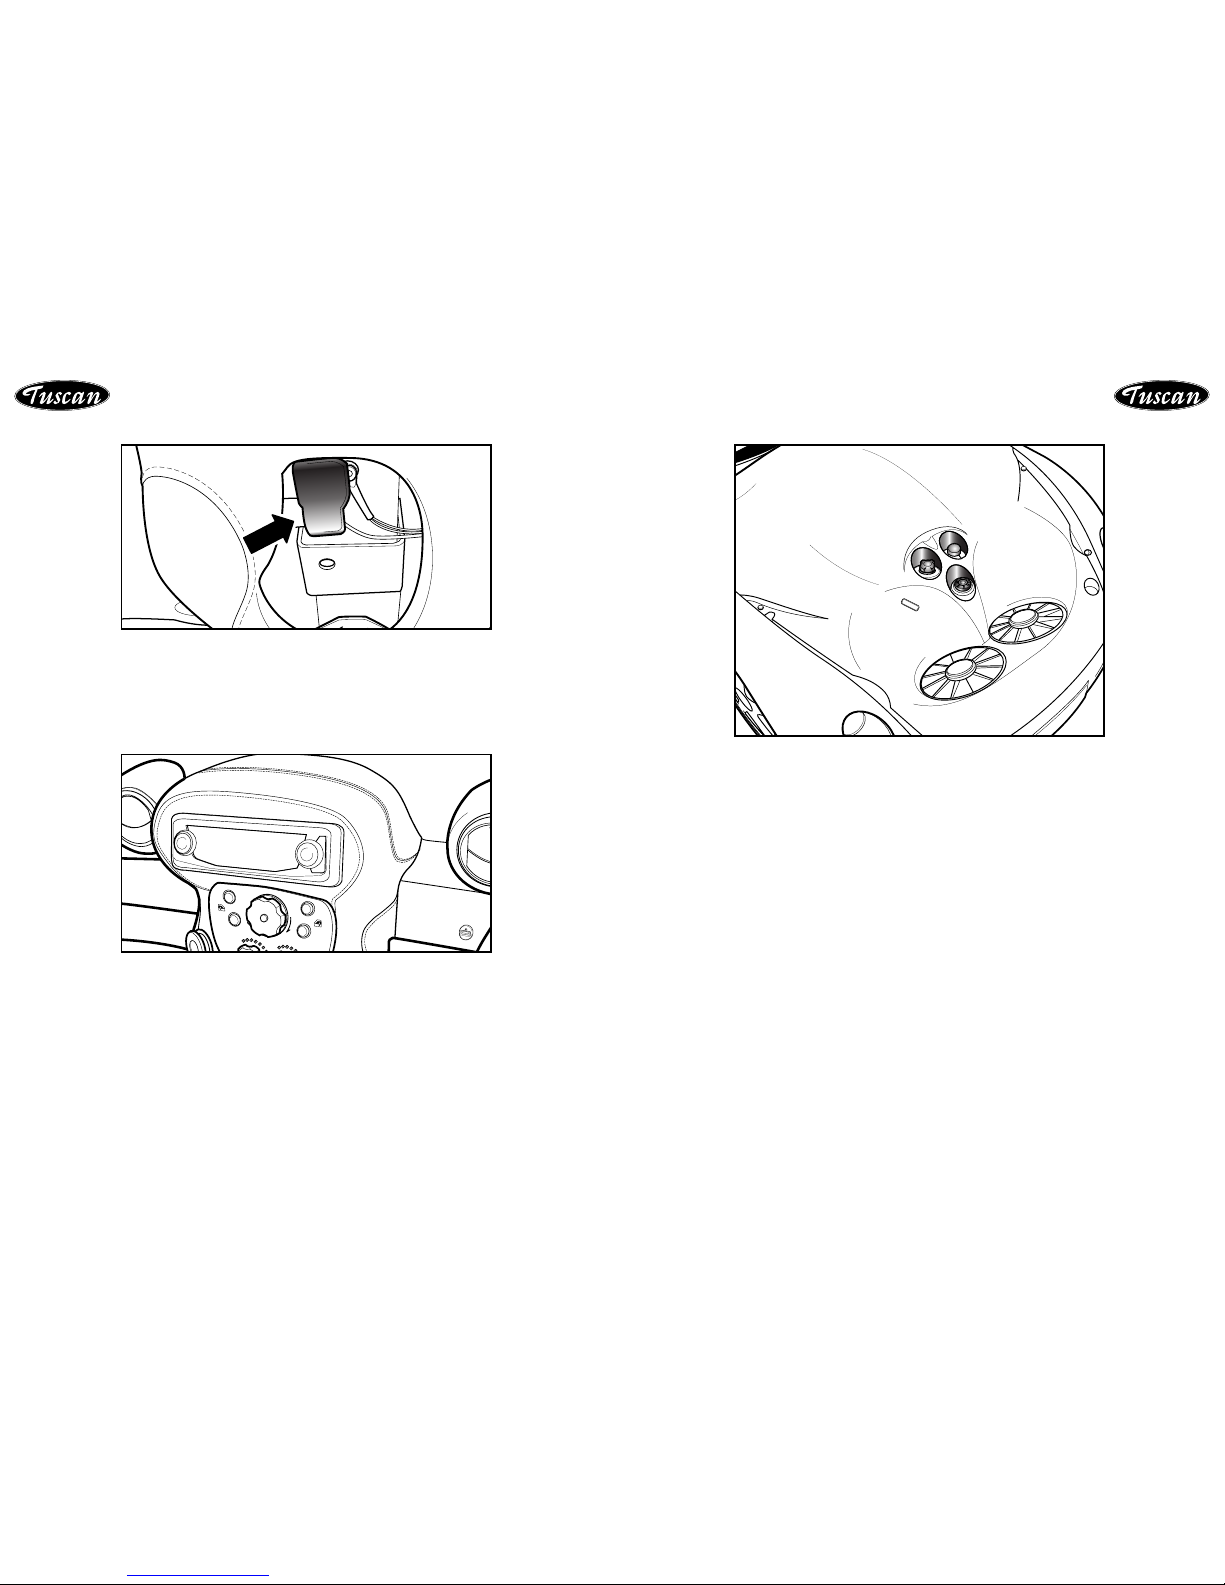
2.15 Stereo Radio CD
For detailed operating instructions please see the enclosed manufacturers
instruction manual.
Instumentation
A
B
C
D
E
19 20
 Loading...