

Tvone CORIOview User Manual
CORIOview™ Multi Window Processor
CORIOgrapher™ V2.6 and above
User Guide V1.00

2 tvONE
In this guide
Welcome to tvONE™ Help ...................................................................................................................................................................................... 4
About CORIOview Made-to-Order (MTO) Variants .............................................................................................................................................. 5
Setting up your CORIOview .................................................................................................................................................................................... 6
Quick start .......................................................................................................................................................................................................... 6
About your CORIOview ..................................................................................................................................................................................... 8
About the buttons of your CORIOview ................................................................................................................................................. 9
About modules ...........................................................................................................................................................................................11
About your Dual Stream In module ................................................................................................................................................... 12
Dual Stream In module - quick start guide ........................................................................................................................................ 13
About your Encoder-100 ............................................................................................................................................................................18
Encoder-100 - quick start guide .......................................................................................................................................................... 19
Configuring your Encoder-100 ............................................................................................................................................................ 23
Restoring factory default settings on your Encoder-100 ................................................................................................................. 27
Hardware recommendations ....................................................................................................................................................................28
Planning and installing ....................................................................................................................................................................................28
Installing display hardware .......................................................................................................................................................................28
Setting up a CORIOview in CORIOgrapher ....................................................................................................................................................30
About CORIOgrapher .................................................................................................................................................................................30
Getting started with CORIOgrapher .........................................................................................................................................................30
Naming input and output ports ................................................................................................................................................................32
Settings the display’s output resolution ...................................................................................................................................................33
Testing your CORIOview installation ........................................................................................................................................................34
Testing your display and sources installation ................................................................................................................................... 34
Test the audio for each input .............................................................................................................................................................. 34
Settings .............................................................................................................................................................................................................35
Device settings ............................................................................................................................................................................................35
Naming your CORIOview ..................................................................................................................................................................... 35
Resetting your CORIOview to factory default settings ..................................................................................................................... 35
Backing up and restoring your settings ............................................................................................................................................. 35
CORIOview settings ....................................................................................................................................................................................37
Configuring the buttons of your CORIOview ..................................................................................................................................... 37
User settings ...............................................................................................................................................................................................38
Creating and editing users .................................................................................................................................................................. 38
Changing other users' passwords ...................................................................................................................................................... 38
Changing your own password ............................................................................................................................................................ 39
Network settings.........................................................................................................................................................................................39
Configuring network settings for your CORIOview ........................................................................................................................... 39
Configuring network settings for streaming media .......................................................................................................................... 40
Playlist settings ..................................................................................................................................................................................... 41
Renaming playlists and moving playlists between modules ........................................................................................................... 42
Deleting playlists .................................................................................................................................................................................. 42
Encoders and streams settings ........................................................................................................................................................... 42
Managing encoders and streams ....................................................................................................................................................... 43
Using CORIOview ..................................................................................................................................................................................................44
Changing between preset, video, and audio selection modes ...................................................................................................................44
Presets ..............................................................................................................................................................................................................44
What is a preset? .................................................................................................................................................................................. 44
Loading a preset ................................................................................................................................................................................... 45

Changing the source playing in a window.....................................................................................................................................................46
Playing audio ....................................................................................................................................................................................................49
Showing window labels ...................................................................................................................................................................................52
Show the window/source information labels on the display ......................................................................................................................53
Standby mode ..................................................................................................................................................................................................54
Locking the front panel buttons .....................................................................................................................................................................55
Media and streams ..........................................................................................................................................................................................56
Playing media and streams .......................................................................................................................................................................56
Creating and managing playlists ...............................................................................................................................................................63
Using the internal drive .............................................................................................................................................................................68
Choosing the best resolution for your playlist or play queue ...............................................................................................................70
Creating and editing custom resolutions from CORIOdiscover ..................................................................................................................72
Troubleshooting and FAQs ..................................................................................................................................................................................79
Minimum specification for CORIOgrapher ....................................................................................................................................................79
Checking and updating the CORIOview firmware ........................................................................................................................................79
I can't see my CORIOview in the Discovered Devices list ............................................................................................................................80
The picture keeps coming and going .............................................................................................................................................................82
My Dual Stream In module keeps overheating ............................................................................................................................................83
The video signal from my Encoder-100 is delayed .......................................................................................................................................84
I can't hear any audio ......................................................................................................................................................................................85
I can't update the firmware of my Dual Stream In module .........................................................................................................................86
CORIOgrapher can't find or connect to my Encoder-100 ............................................................................................................................87
General troubleshooting checklist .................................................................................................................................................................87
Returning a product for repair .......................................................................................................................................................................88
What's the password for my CORIOview? .....................................................................................................................................................88
Can I use HDMI extenders with CORIOview output modules? ...................................................................................................................88
How large is the internal storage on a Dual Stream In module? ................................................................................................................88
How do I find the MAC address of my Dual Stream In module? ................................................................................................................88
How fast is my connection to the Dual Stream In module? ........................................................................................................................88
Which media formats can I add to a play queue? ........................................................................................................................................88
Can I save my play queue? ..............................................................................................................................................................................88
More .......................................................................................................................................................................................................................89
What's new in CORIOgrapherV2.6 .................................................................................................................................................................89
Product specifications .....................................................................................................................................................................................90
CORIOview MWP specifications ................................................................................................................................................................90
Dual Stream In module specifications ......................................................................................................................................................95
Encoder-100 specifications ........................................................................................................................................................................96
End user license agreement for CORIOgrapher ...........................................................................................................................................97
Regulatory compliance for CORIOview, Encoder-100, and all input and output modules ................................................................... 100
Contact us ...................................................................................................................................................................................................... 100
4 tvONE
Welcome to tvONE™ Help
Welcome to tvONE Help, the place to get help with your:
CORIOview
CORIOgrapher
CORIOdiscover™
All CORIOview variants
MWP-4H-1Y
4 x HDMI 1080p In & 1 x HDMI 4K Out
MWP-4Y-1Y
4 x HDMI 4K In & 1 x HDMI 4K Out
MWP-8H-1Y
8 x HDMI 1080p In & 1 x HDMI 4K Out
MWP-4Hi-1Y
4 x HDMI 1080p + AVIP & 1 x HDMI 4K Out
MWP-4D-1Y
4 x DVI_U In & 1 x HDMI 4K Out
MWP-8GS-1Y
8 x 3G SDI In & 1 x HDMI 4K Out
MWP-MTO
Made to Order
This document is also available as a PDF document in CORIOgrapher. To open the PDF, select ? in CORIOgrapher top right-hand
side.
Meet CORIOview
Congratulations on your purchase of CORIOview, Multi-Window Processor re-defined! Your CORIOview works with CORIOgrapher
software allowing you to configure your unit with ease. Your CORIOview is the best tool to make the most of your visual space.
4K Processor with pixel perfect scaling
Crystal clear images with 4K output
Windows labelling allowing source naming
Color borders with adjustable thickness
16 preset layouts ready to use
Intuitive front panel with 21 buttons
Layout activation, Video and Audio routing from front panel
Unique “Info” button
Wide range of inputs, including DVI, SDI, HDBaseT, 4K, and streaming media
Up-down-cross conversion
Custom resolutions
Embedded and S/PDIF audio outputs
Audio embedding and de-embedding
Multiple control methods using CORIOgrapher, API or Crestron/AMX controllers
Ultra compact - up to 8 inputs in ½ RU size
Meet CORIOgrapher
CORIOgrapher V2.6 is packed with features to help you create and manage your visual space.
Intuitive user interface
Designed to be used with touch screen PC tablets as well as mouse-controlled PC [touch not fully supported, under development]
Assign sources to windows
Design window border colors and sizes
Configure labels, borders, and colors
Custom resolution editor on inputs and outputs
Control and configure audio
About CORIOview Made-to-Order (MTO) Variants
CORIOview MTO variants offer ultimate flexibility in mixed input, mixed signal processing. To design your unit simply choose your
output module and up to two of the offered input modules.
Choose output module → Choose up to 2 input modules → Your CORIOview
All output modules currently only support one output port.
Choice of Output Modules
Output Module
Stock code
Single 4K HDMI Scaled Out
CV-HDMI-4K-SC-1OUT-FF
Single DVI-I Scaled Out
CV-DVI-I-SC-2OUT-FF
Single 3G SDI Scaled Out
CV-3GSDI-SC-2OUT-FF
Single HDBaseT Scaled Out
CV-HDBT-SC-2OUT-1ETH-FF
Choice of Input Modules
Input Module
Stock code
Quad 1080p HDMI In
CV-HDMI-4IN-FF
Quad 3G SDI In
CV-3GSDI-4IN-FF
Dual DVI-U In
CV-DVIU-2IN-FF
Dual 4K HDMI In
CV-HDMI-4K-2IN-FF
Dual HDBaseT In on Ethernet
CV-HDBT-2IN-1ETH-FF
Dual Stream In
CV-AVIP-IN-1USB-1ETH-FF
Dual Stream In 128GB Storage
CV-AVIP-IN-1USB-1ETH-128-FF
Quad HD SDI In
CV-HDSDI-4IN-FF
Dual 3G SDI In
CV-3GSDI-2IN-FF
As an example, let us build a hybrid unit with dual 4K inputs, dual streaming input, and a single 4K output:
Output module is
“Single 4K HDMI Out” [Stock code CV-HDMI-4K-SC-1OUT-FF]
Input module is
“Dual 4K HDMI In” [Stock code CV-HDMI-4K-2IN-FF]
IP input module is
“Dual Stream In” [Stock code CV-AVIP-IN-1USB-1ETH-FF]
6 tvONE
Setting up your CORIOview
This section contains everything you need to know about installing and setting up your CORIOview and CORIOgrapher.
Quick start
This Quick Start Guide gives you an overview of the steps involved in setting up your CORIOview hardware and CORIOgrapher
software.
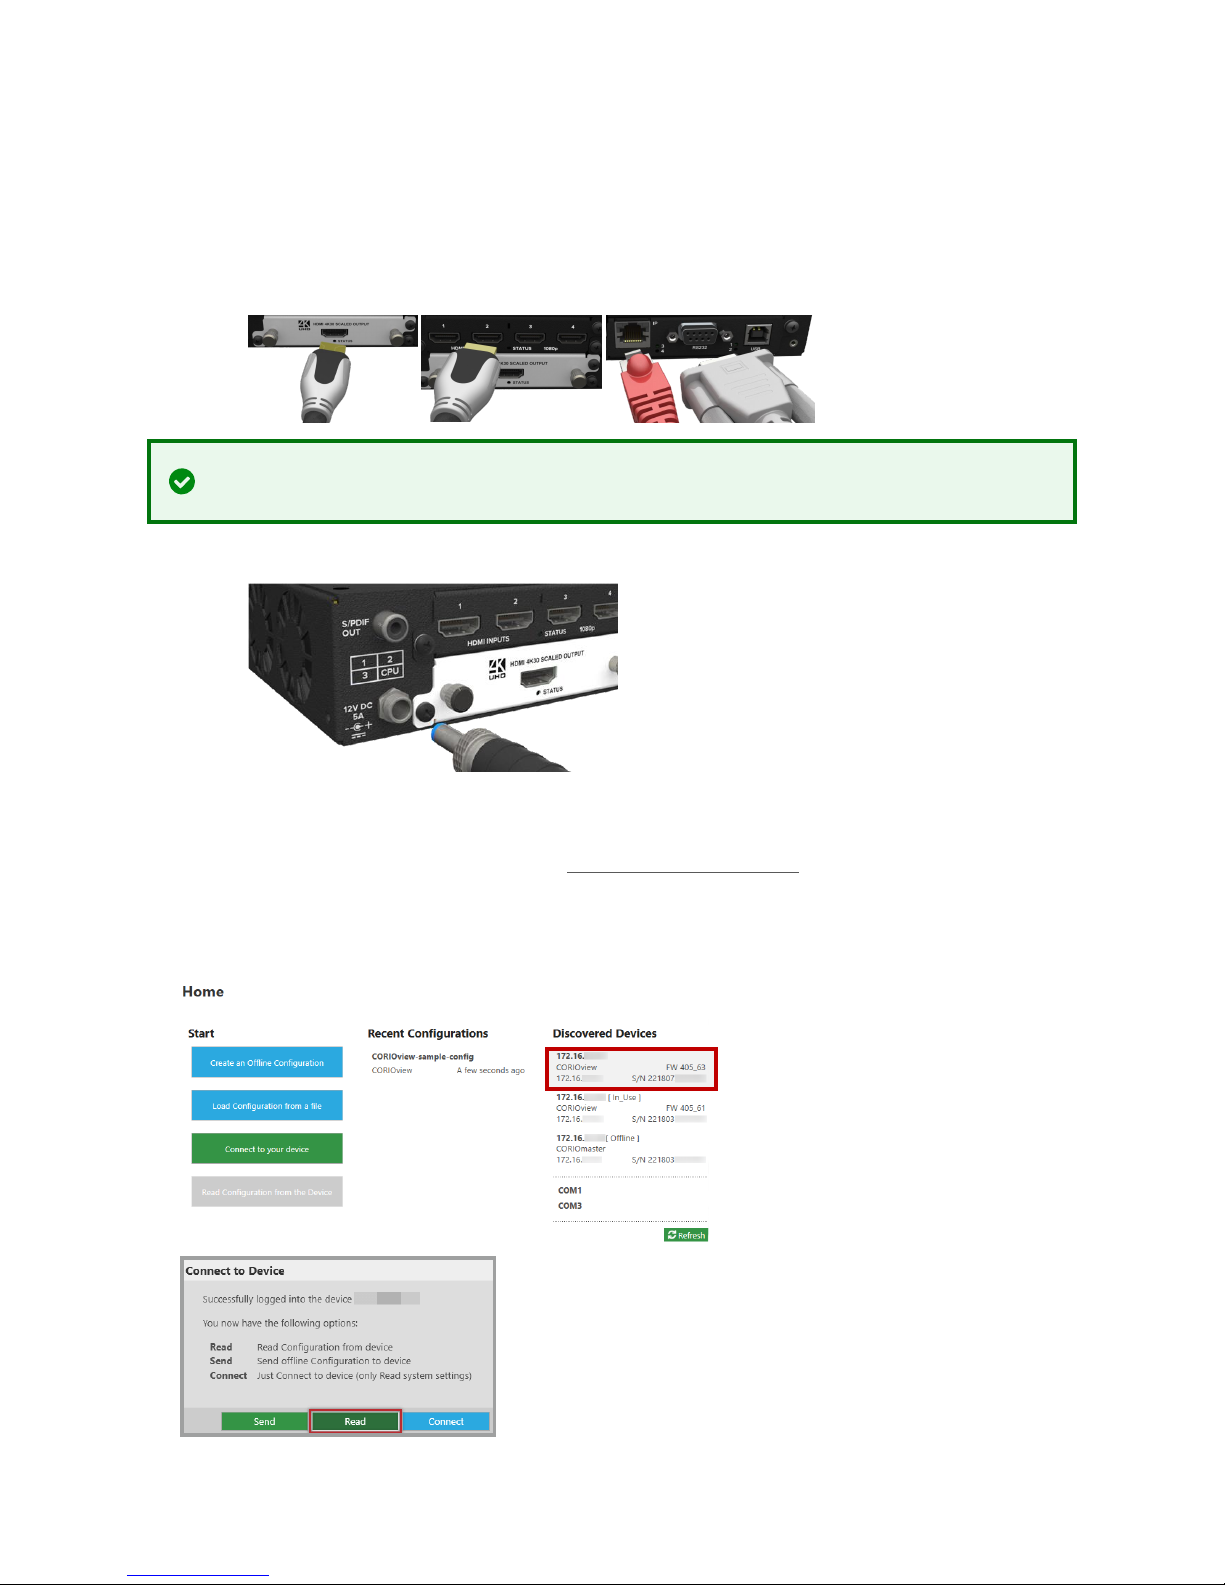
1. Install your hardware
a. Connect your display and sources to your output and input modules. Connect the LAN port of the CPU module to your
network.
Video tearing or stuttering
Using a mixture of resolutions can cause video tearing or stuttering. For best results, make sure all your sources and display use the
same frame rate.
b. OPTIONAL: Connect a digital audio device to the S/PDIF audio output.
c. Power on your CORIOview.
Read more about installing hardware on page 28.
2. Install CORIOdiscover and CORIOgrapher.
Your CORIOview comes with a USB drive, which contains software for installing CORIOdiscover and CORIOgrapher.
You can download the latest versions of software from http://www.tvone.com/softwares
3. Open CORIOgrapher and select your CORIOview. Enter your username and password to login and select Read to load your
configuration.
The default username is admin, and the default password is adminpw. We suggest that you change default user name and
password and keep a record of them.
Read about what to do if you can't find your CORIOview in the list on page 80.
4. OPTIONAL, if you aren't connected to a CORIOview, you can create an offline configuration for your device.
The media player of the Dual Stream In module is not available when you work in an offline configuration.
Read more about your first steps with CORIOgrapher on page 30.
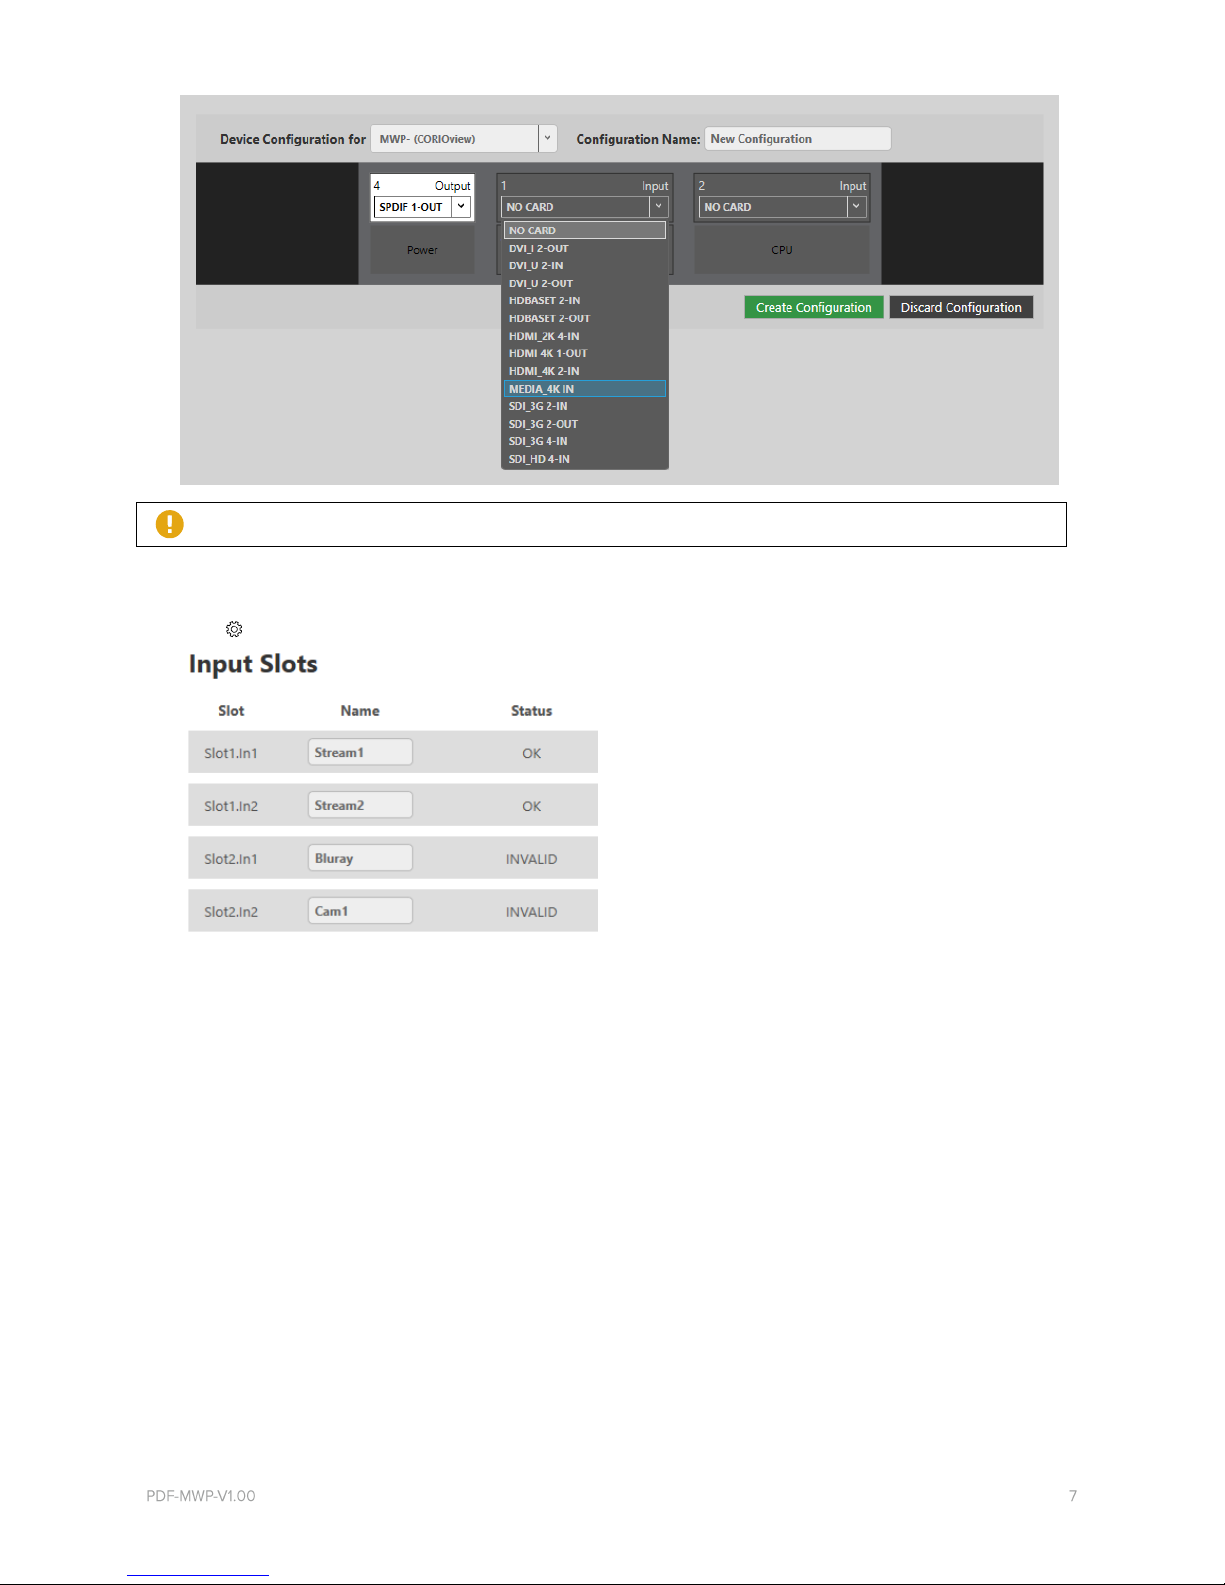
5. OPTIONAL, but recommended: name your input and output ports.
Select > Slot Status. Give each port a name that describes the device connected to it.
Read more about naming input and output ports on page 32.
Read more about testing your display on page 33.
Read troubleshooting advice on page 72.
Next steps
Congratulations, your device is set up!
If your CORIOview contains one or more Dual Stream In modules, you need to set those up too.
Read about setting up Dual Stream In modules on page 12.
8 tvONE
About your CORIOview
Slots
Your CORIOview has four slots that contains a CPU, an output module, and up to two input modules.
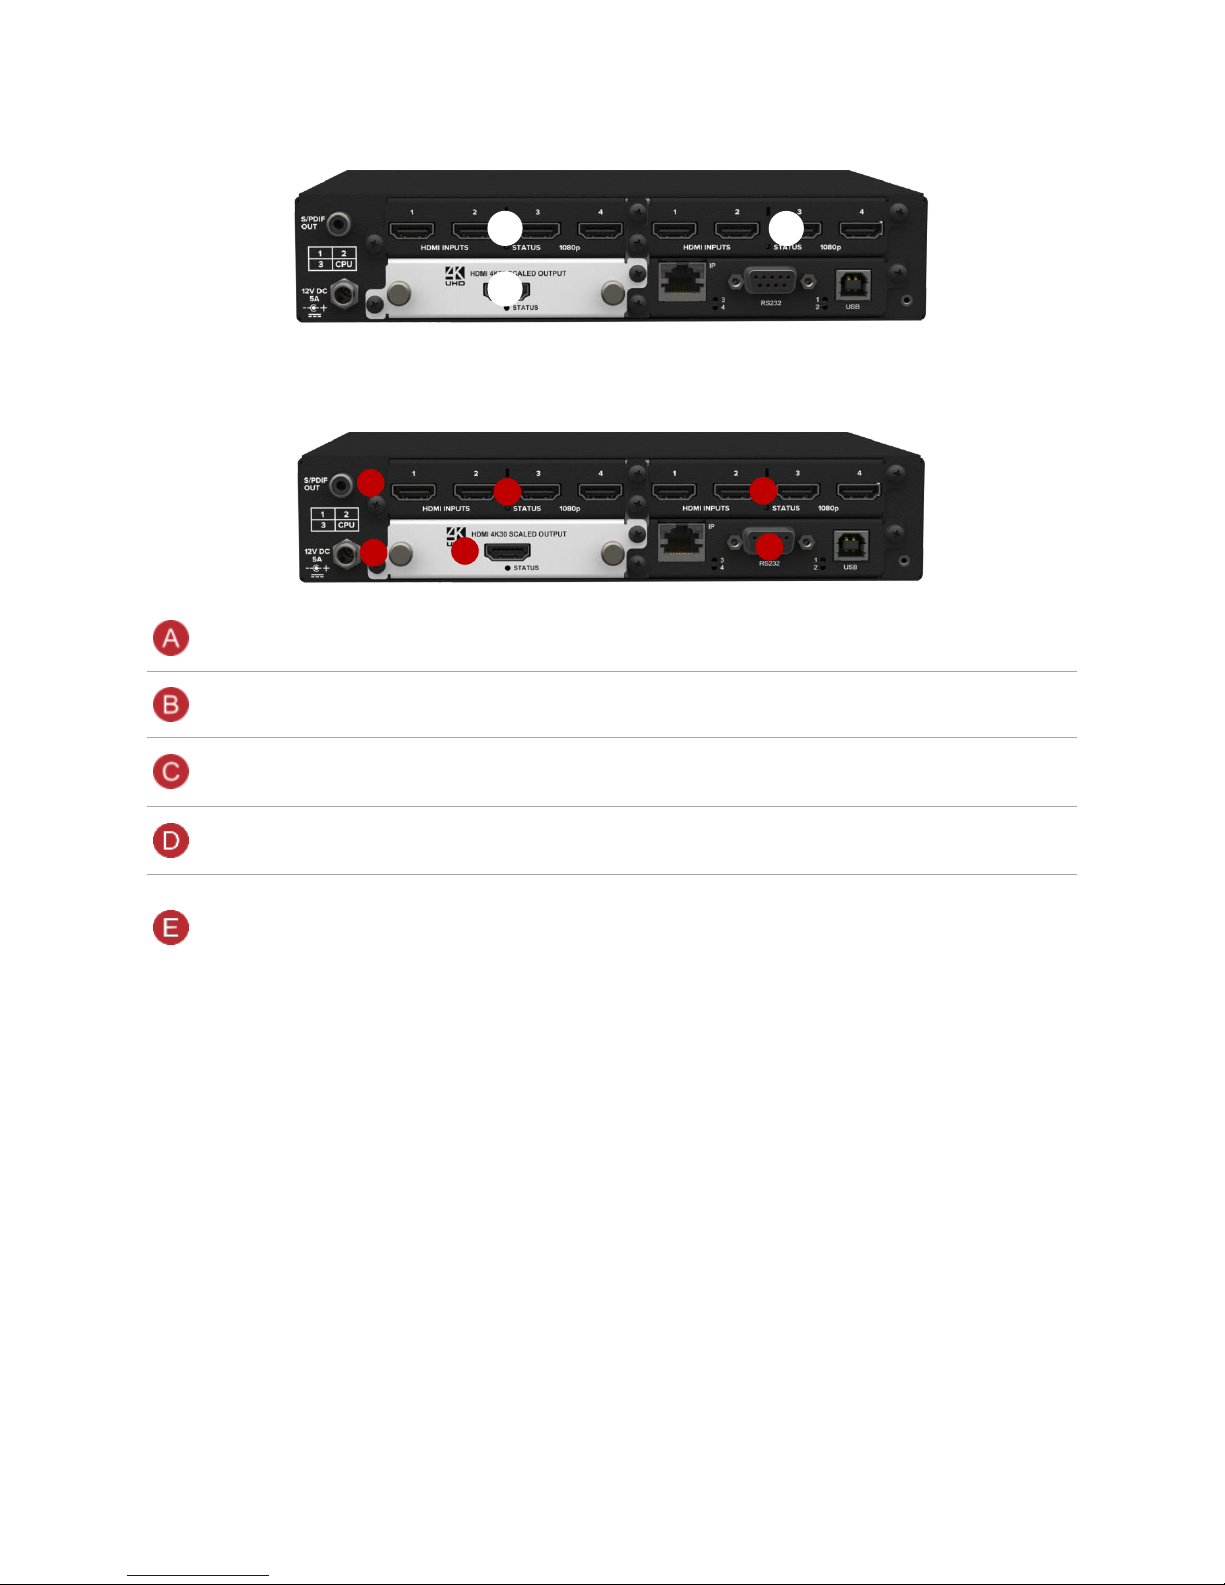
CORIOview rear panel
S/PDIF audio output
Connect to audio device with RCA
Power supply input
Connect to an electrical outlet with PSU
Input module (black)
Connect to sources
Output module (white)
Connect to displays
CPU module
Connect to your network with Ethernet
Optional: connect to serial controller with RS-232
Optional: connect directly to a PC with Ethernet or RS-232
CORIOview mounting accessories
You can mount your CORIOview to a surface, rack, or ONErack system with our mounting accessories, sold separately. Ask your
distributor about:
• RM-CV-1RU-SINGLE mounting for single CORIOview unit, it has space for external power supply
• RM-CV-1RU-DUAL mounting for two CORIOview units
• RM-CV-1RU-HANDLES handles for your rack mount unit
• RM-503-SRF surface mounting kit for CORIOview for mounting CORIOview on a flat surface [e.g. under a table]
1
2
3
A
C
C
B D E
About the buttons of your CORIOview
You can use the buttons of the front panel to load presets, choose which audio to hear, change the source playing in a window, lock
the buttons, enter and exit standby, and display information about the source-to-window assignments.
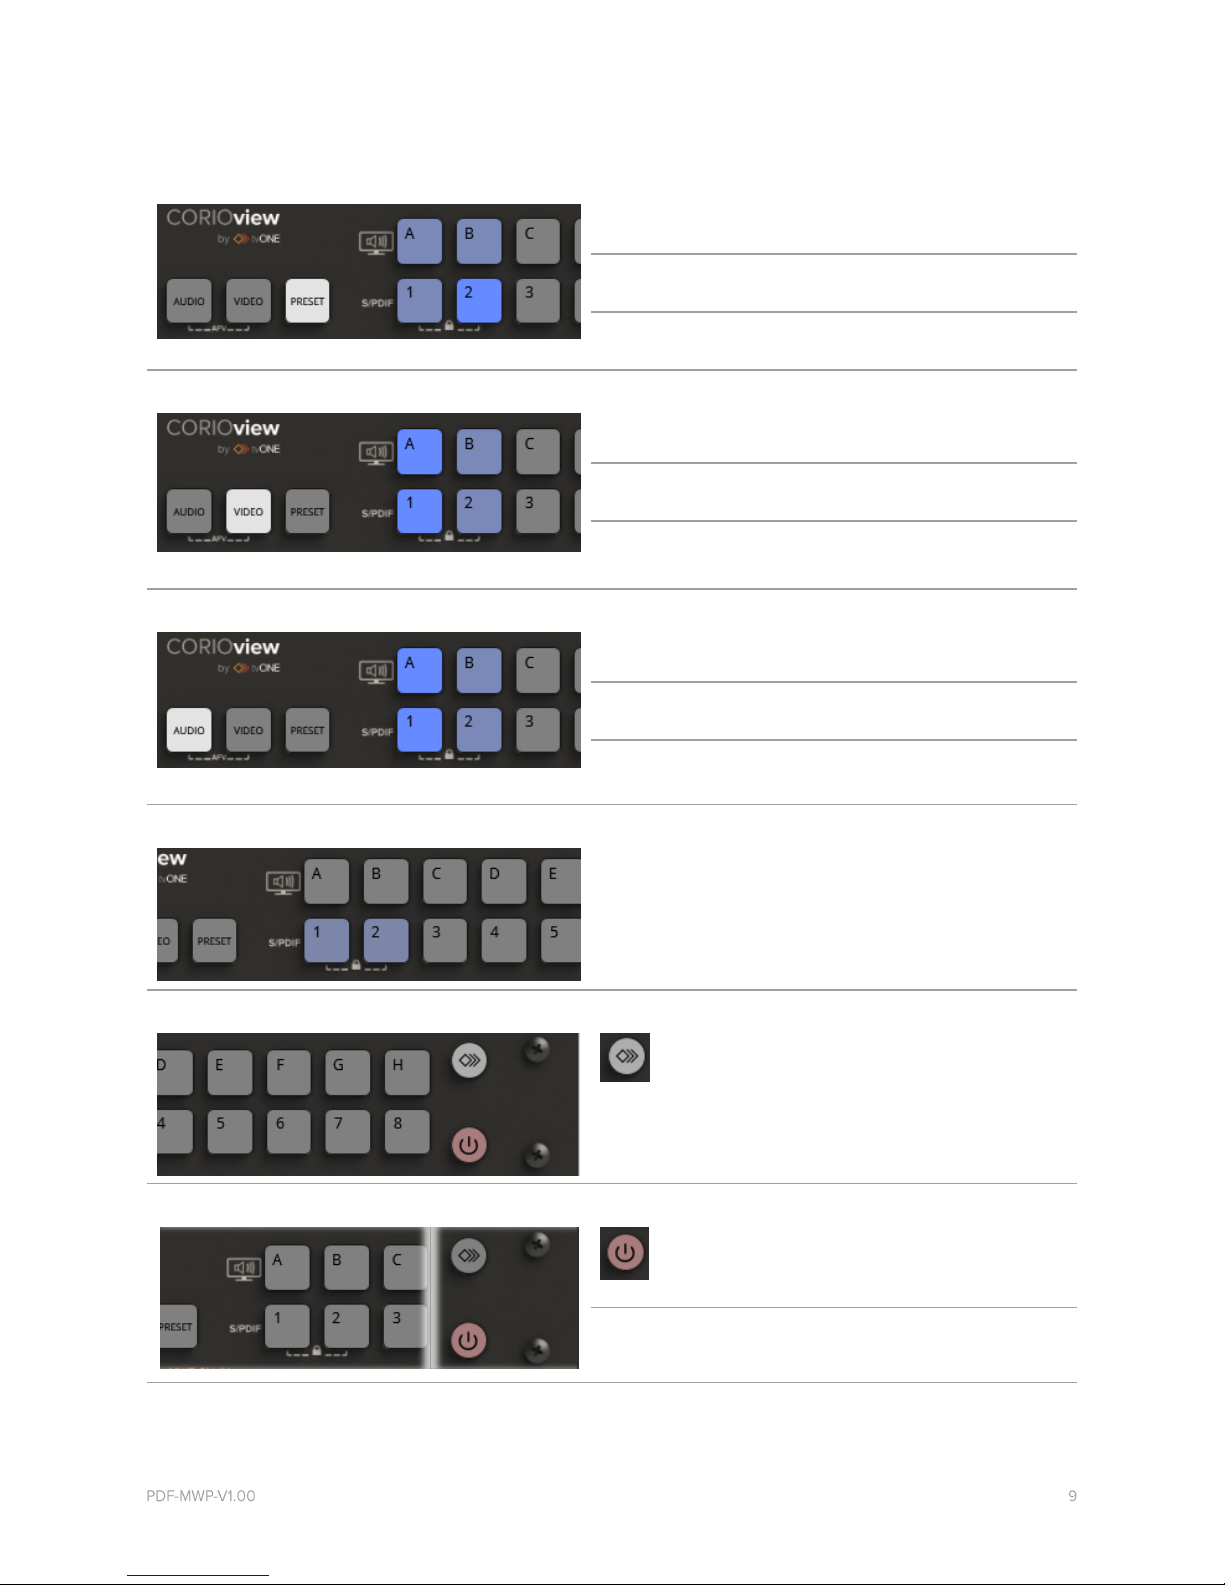
Preset mode
Buttons are lit dimly
blue
Buttons have presets available.
Button is lit more
brightly
The preset corresponding to button 2 is
active.
Buttons are not lit
Buttons do not have corresponding
presets.
Video mode
Buttons are lit dimly
blue
Available but unselected.
Button is lit more
brightly
Source 1 is playing in window A.
Buttons are not lit
Buttons do not have windows or
sources.
Audio mode
Buttons are lit dimly
blue
Available but unselected.
Button is lit more
brightly
Source 1 is playing out of the
embedded and S/PDIF outputs.
Buttons are not lit
Buttons do not have sources.
Front panel lock mode
Buttons 1 and 2 are lit
The buttons of the CORIOview are
locked.
Window/source info mode
info button
Toggles on or off information labels
viewed on the display.
Standby mode
Standby button
lit other buttons not lit
Standby mode CORIOview is in low
power mode and not displaying
content.
Standby button and
other buttons lit
Normal mode

10 tvONE
Selecting the window source
• To select the window source, press and release the VIDEO button, then a window button A to H, then a source button 1 to 8.
Selecting a preset
• To select a preset, press and release the PRESET button, then a preset button A to H or 1 to 8.
Selecting an audio source
• To select a source to hear, press and release the AUDIO button, then a source button 1 to 8.
Locking and unlock the front panel buttons
• To lock or unlock, press and hold buttons 1 and 2.
Show the window/source information labels on the display
• To show or hide the information labels, press and release the button.
Change between standby and normal operational modes
• To enter or exit standby mode, press and hold the button.

About modules
Each module supports specific connections, but our range of adapters means you can connect almost any type of source or display
to your CORIOview.
Input Modules
Module
Stock code
Connections
Quad 1080p HDMI In
CV-HDMI-4IN-FF
4 x HDMI each 1080p @60
HDMI and HDCP compatible
Quad 3G SDI In
CV-3GSDI-4IN-FF
4 x 3G SDI In
For co-axial cable
Dual DVI-U In
CV-DVIU-2IN-FF
2 x DVI-U-In
HDMI and HDCP Compliant
Dual 4K HDMI In
CV-HDMI-4K-2IN-FF
2 x HDMI up to 4096x2160 @30 or
1 x HDMI up to 4096x2160 @60 Hz
HDMI and HDCP compatible
Dual HDBaseT™ In on Ethernet
CV-HDBT-2IN-1ETH-FF
2 x HDBaseT
For CATx cables
Supports up to
2 x 4K @30Hz, or 1 x 4K @60 Hz
Dual Stream In
Read more about this input module on
page 12.
CV-AVIP-IN-1USB-1ETH-FF
1 x Ethernet
1 x USB 2.0/3.0
Dual Stream In 128GB Storage
Read more about this input module on
page 12.
CV-AVIP-IN-1USB-1ETH-128-FF
1 x Ethernet
1 x USB 2.0/3.0
Quad HD SDI In
CV-HDSDI-4IN-FF
4 x HD SDI In
For co-axial cable
Dual 3G SDI In
CV-3GSDI-2IN-FF
2 x 3G SDI In
For co-axial cable
Output Modules
Module
Stock code
Single 4K HDMI Scaled Out
CV-HDMI-4K-SC-1OUT-FF
1 x HDMI up to 4K @30 Hz (UHD)
HDMI and HDCP compatible
Single DVI-I Scaled Out
CV-DVI-I-SC-2OUT-FF
1 x DVI-I (HDCP compliant)
HDMI and HDCP compatible
Single 3G SDI Scaled Out
CV-3GSDI-SC-2OUT-FF
1 x 3G/HD/SD-SDI using BNC, with
scaling
For co-axial cables
Single HDBaseT™ Scaled Out
CV-HDBT-SC-2OUT-1ETH-FF
1 x HDBaseT
For CATx cables
Adapters
You can use our adapters to connect any of the following formats to the DVI input and output modules. Unless stated otherwise, you can use all of
these adapters with both DVI-I and DVI-U modules.
Adapter
Product number
Male connector
Female connector
HDMI adapter
CMD1941
DVI
HDMI
Analog PC adapter
ZDH2040
DVI
VGA
Analog RGBHV adapter
ZDB-2038
DVI Analog
RGBHV
YPbPr/YUV adapter
ZDR2042
DVI
YPbPr/YUV
YPbPr/YUV adapter cable
ZDB2044
DVI
YPbPr/YUV
YC (S-Video) adapter
ZDB2048
DVI-U only
2 x composite video
YC (S-Video) adapter
ZDS2046
DVI-U
only 4-pin mini-DIN
Composite video adapter
ZDC2050
DVI
BNC
12 tvONE
About your Dual Stream In module
The Dual Stream In module allows you to decode and play media and images from a USB drive or internal storage, and video
streams from IP sources. Sources include streaming server, and from any device when used with an IP encoder, such as the Magenta
Encoder-100.
Features
• Play two simultaneous channels of media, including IP streams
• Play video clips from USB drive up to 4K @30 Hz
• Play single IP streams up to 100 Mb/s
• Play dual IP streams up to 40 Mb/s
• Play still images up to 8K
• Play media from streaming server
• Create and save up to 20 playlists
• Primary channel supports up to 4K @30 Hz
• Secondary channel supports 1080p @60 Hz
• IP streams up to 1080p @60 Hz
• Full resolution and frame rate scaling
• Start playing media when your CORIOview starts
• Supports USB 2.0 and USB 3.0
• 16 or 128 GB internal storage
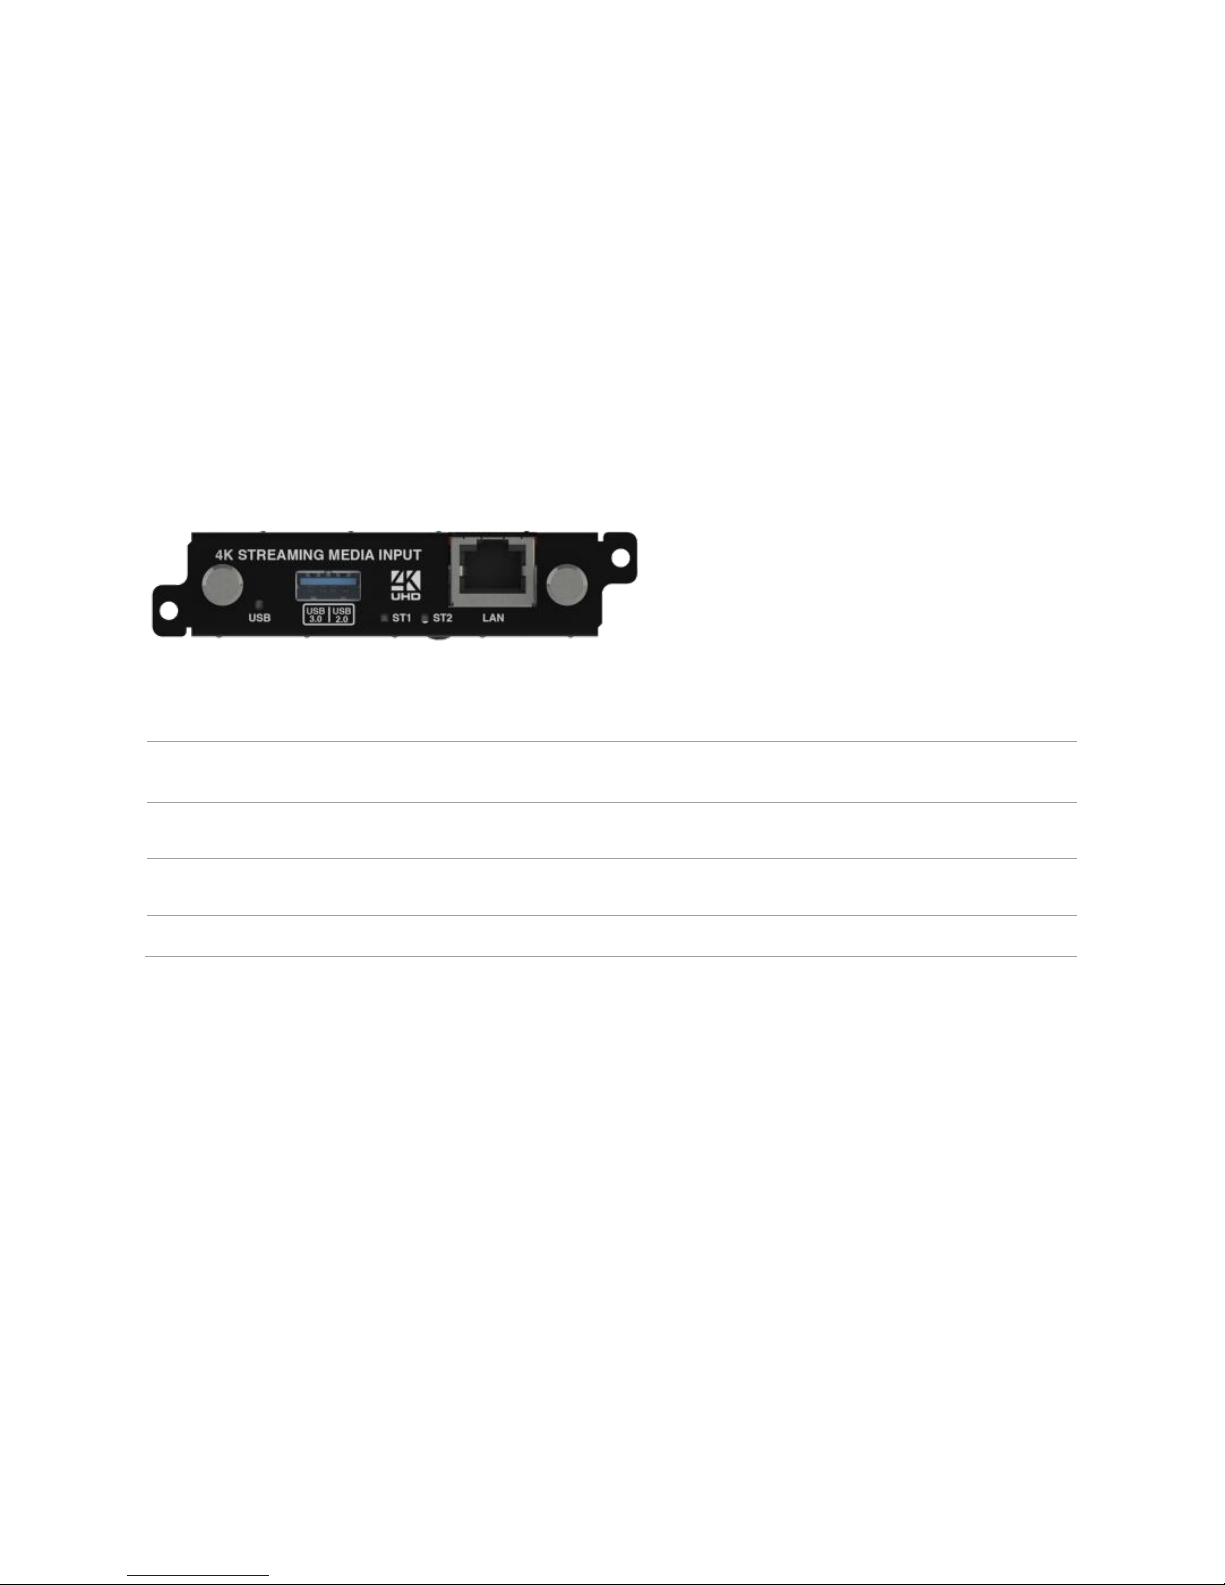
USB (LED)
Indicates the status of the USB drive. Green means that the USB drive is working correctly. Red means that the USB
drive is over current.
USB 3.0
USB 2.0
Connect a USB drive to play media directly.
For best results, we recommend using quality USB drives compatible with USB 3.0.
ST1 (LED)
Indicates the status of the card. Green means that the card is working correctly. Red means that the card is starting,
or that there is a problem.
ST2 (LED)
Indicates the status of the module. Green means that the module is working correctly. Red means that the module is
starting, or that there is a problem.
LAN
Connect an Ethernet cable to play media over IP.
If any status indicator stays red, restart your CORIOview. If that doesn't work, contact tvONE support. Contact details are at the back
of this guide.
Dual Stream In module - quick start guide
Setting up the Dual Stream In module
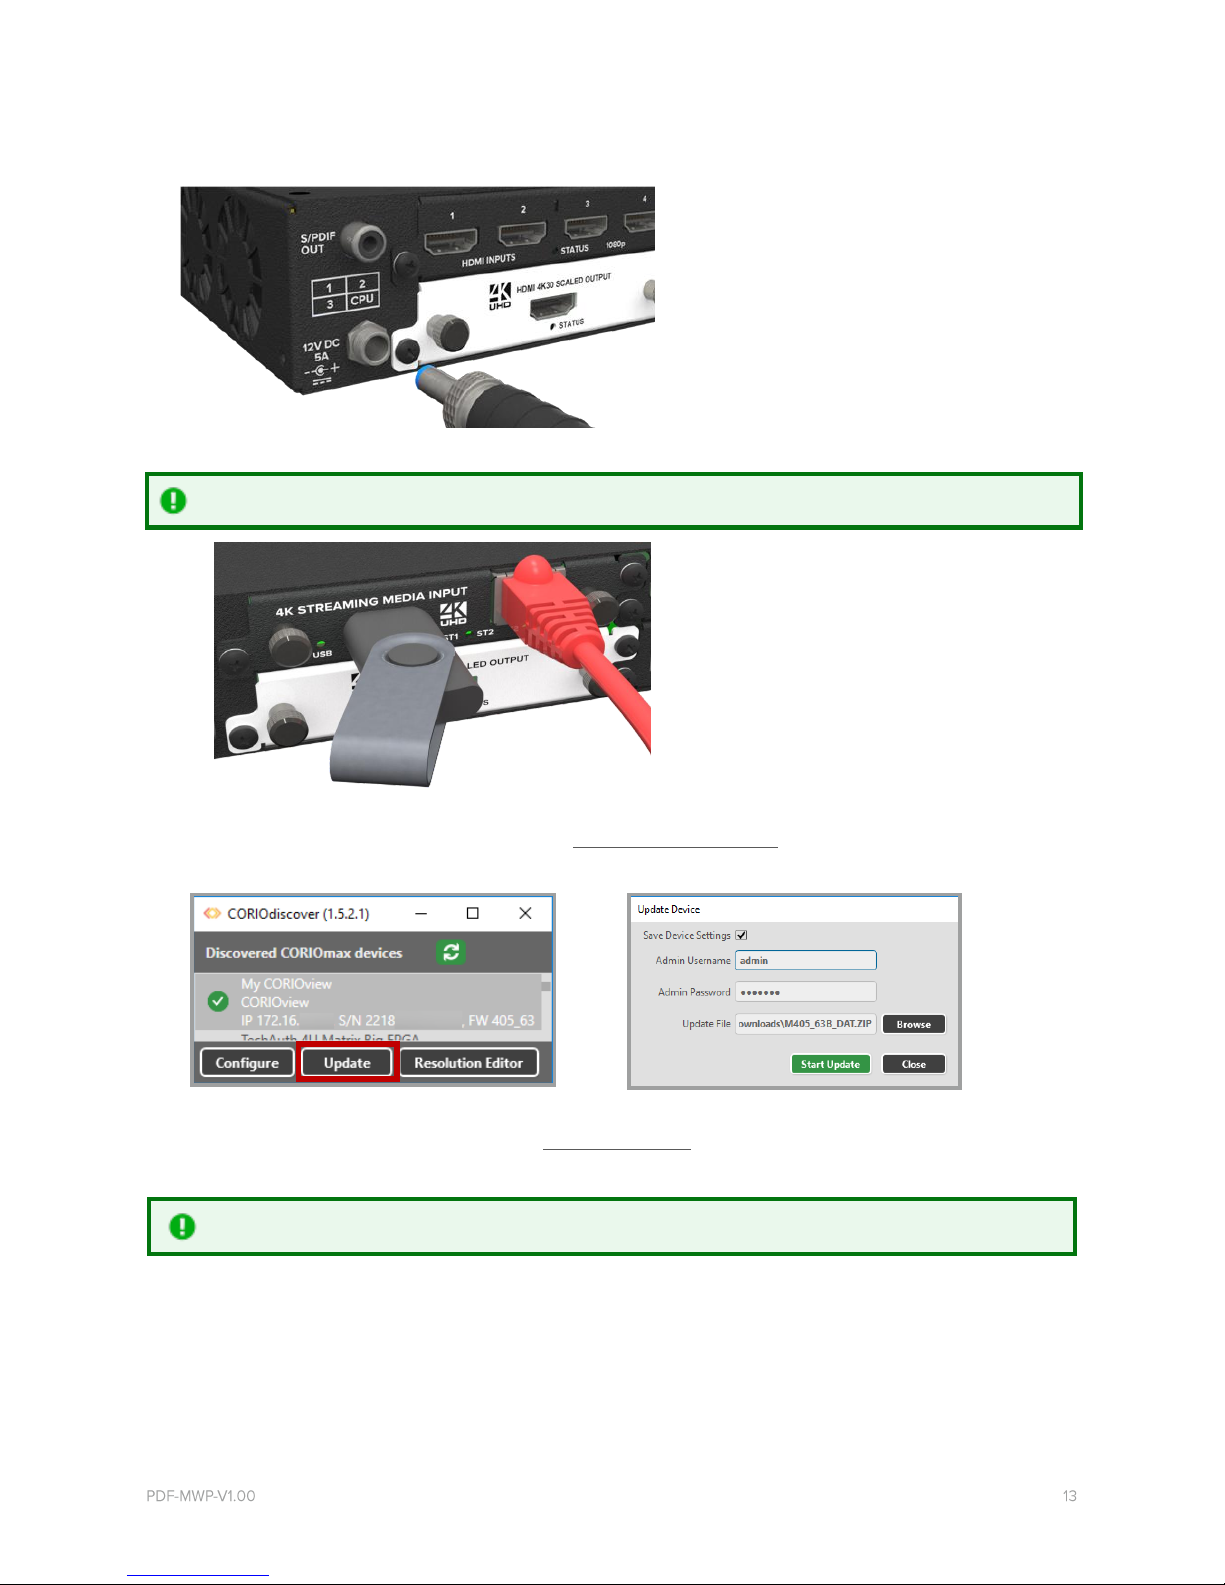
1. Connect your cables and power of your CORIOview.
To stream media, connect an Ethernet cable to the Dual Stream In module, or connect a USB drive to play media directly.
For 4K media, use a good quality, high-speed 3.0 USB drive.
Make sure your CORIOview is connected to your display devices and to an AC power outlet.
2. Download the latest firmware for your CORIOview from tvone.com/firmware-updates.
3. Use CORIOdiscover to update your firmware.
Read more about updating firmware on page 79.
4. Download the latest version of CORIOgrapher from tvone.com/softwares.
5. Install the latest software.
The latest version of CORIOgrapher includes help files. If you need help with any of the following steps, select ? in CORIOgrapher and
search, or ask a question.
14 tvONE
Connecting to CORIOgrapher and choosing network settings
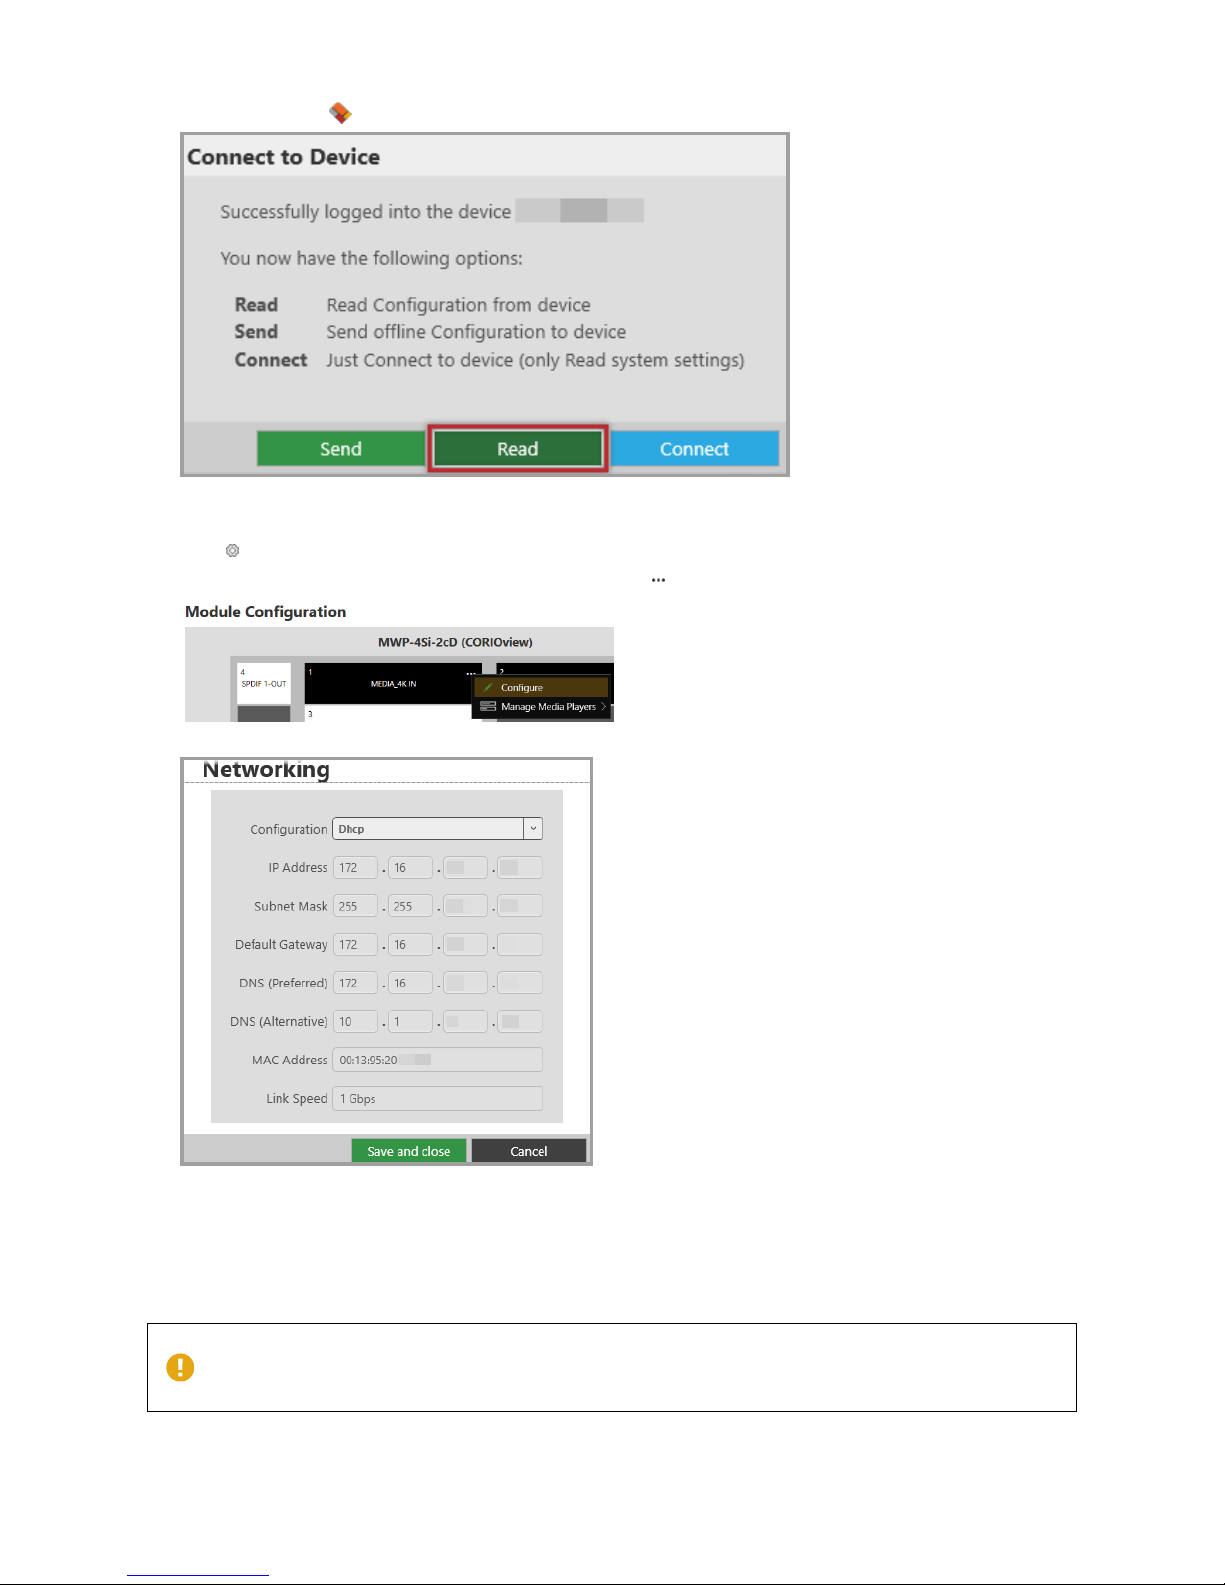
1. Open CORIOgrapher , connect to your CORIOview, and read the configuration from your device.
2. OPTIONAL: if you only want to play media from a USB drive, you don't need to do this step.
If you want to stream media over IP, choose network settings for your Dual Stream In module.
Select > Module Configuration.
Find the Dual Stream In module that you want to set up, and select > Configure.
If you choose DHCP, the network assigns you an IP address.
If you choose a static IP address:
• Enter a value for your IP address and subnet mask.
• If you want to stream from the internet, enter a value for your gateway.
• If you want to refer to a source by name, enter a value for DNS.
Static IP address
If you choose a static IP address, make sure you enter a unique value for your IP address. Using the same IP address for multiple devices
can cause your devices to disconnect.
If you need help with network settings, contact your network administrator.
Playing media and streams
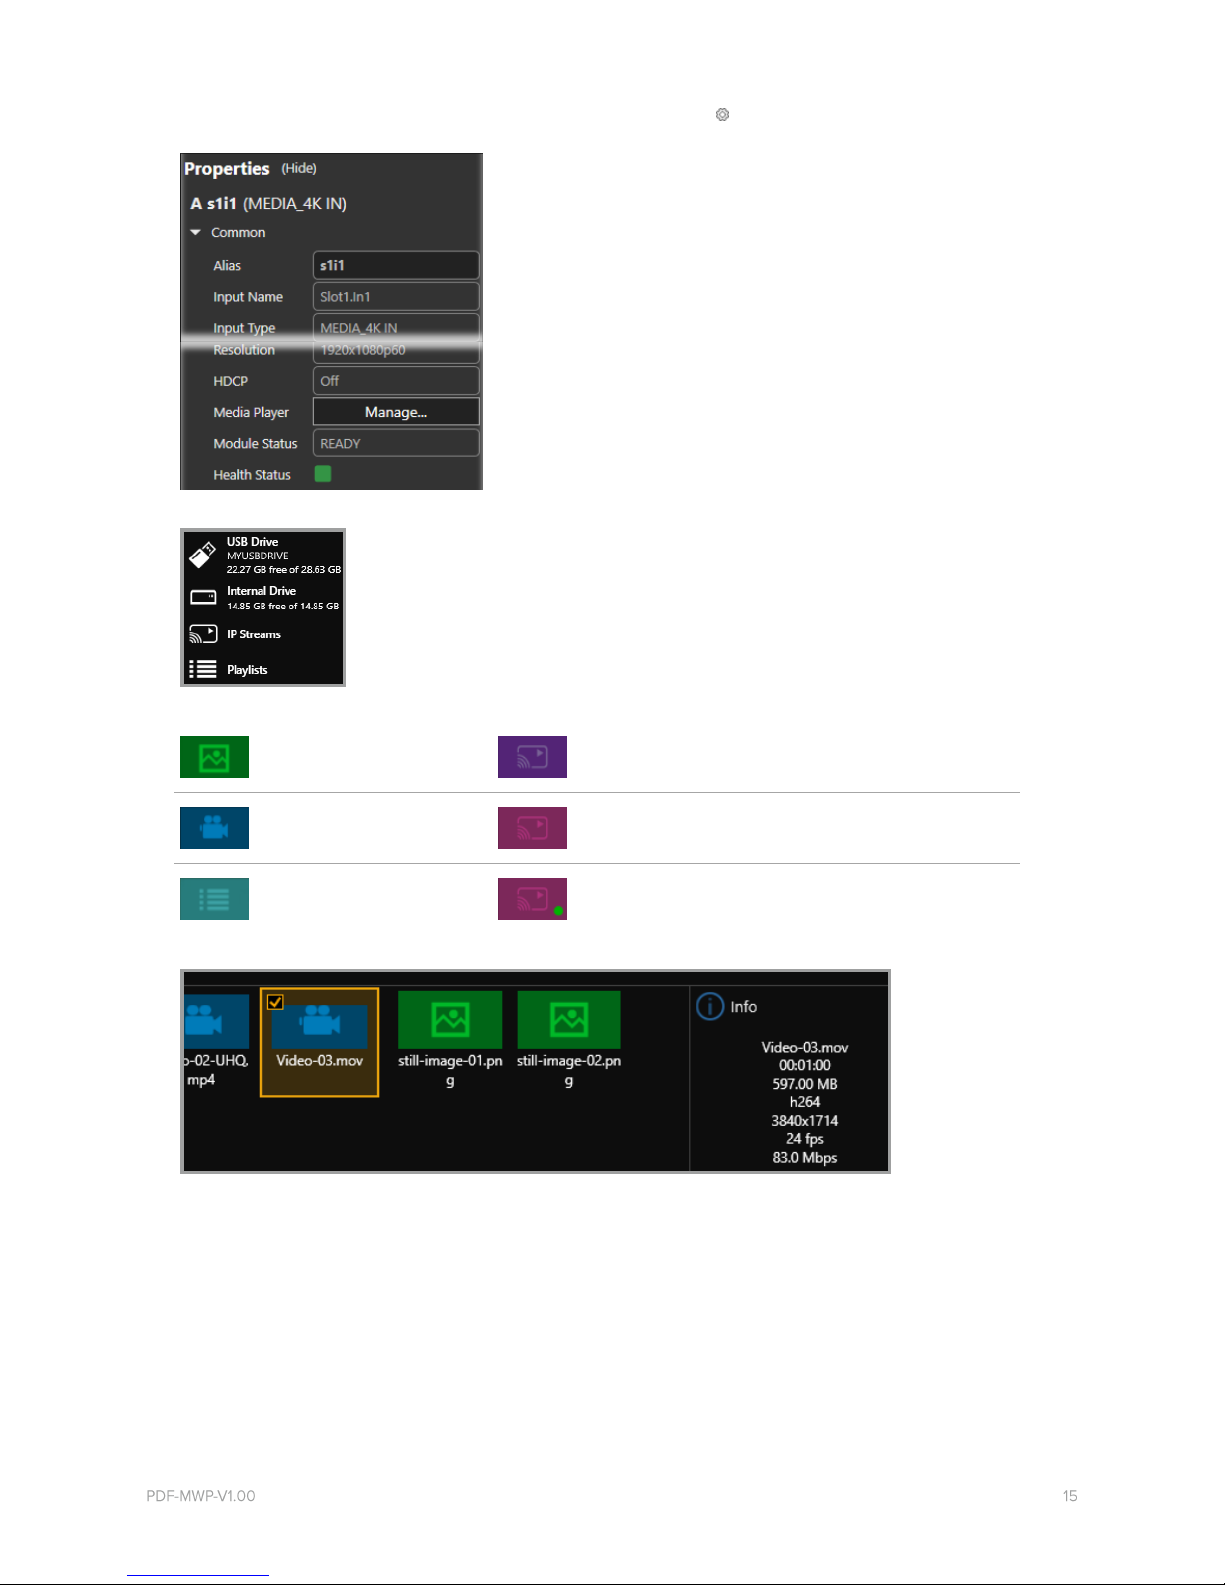
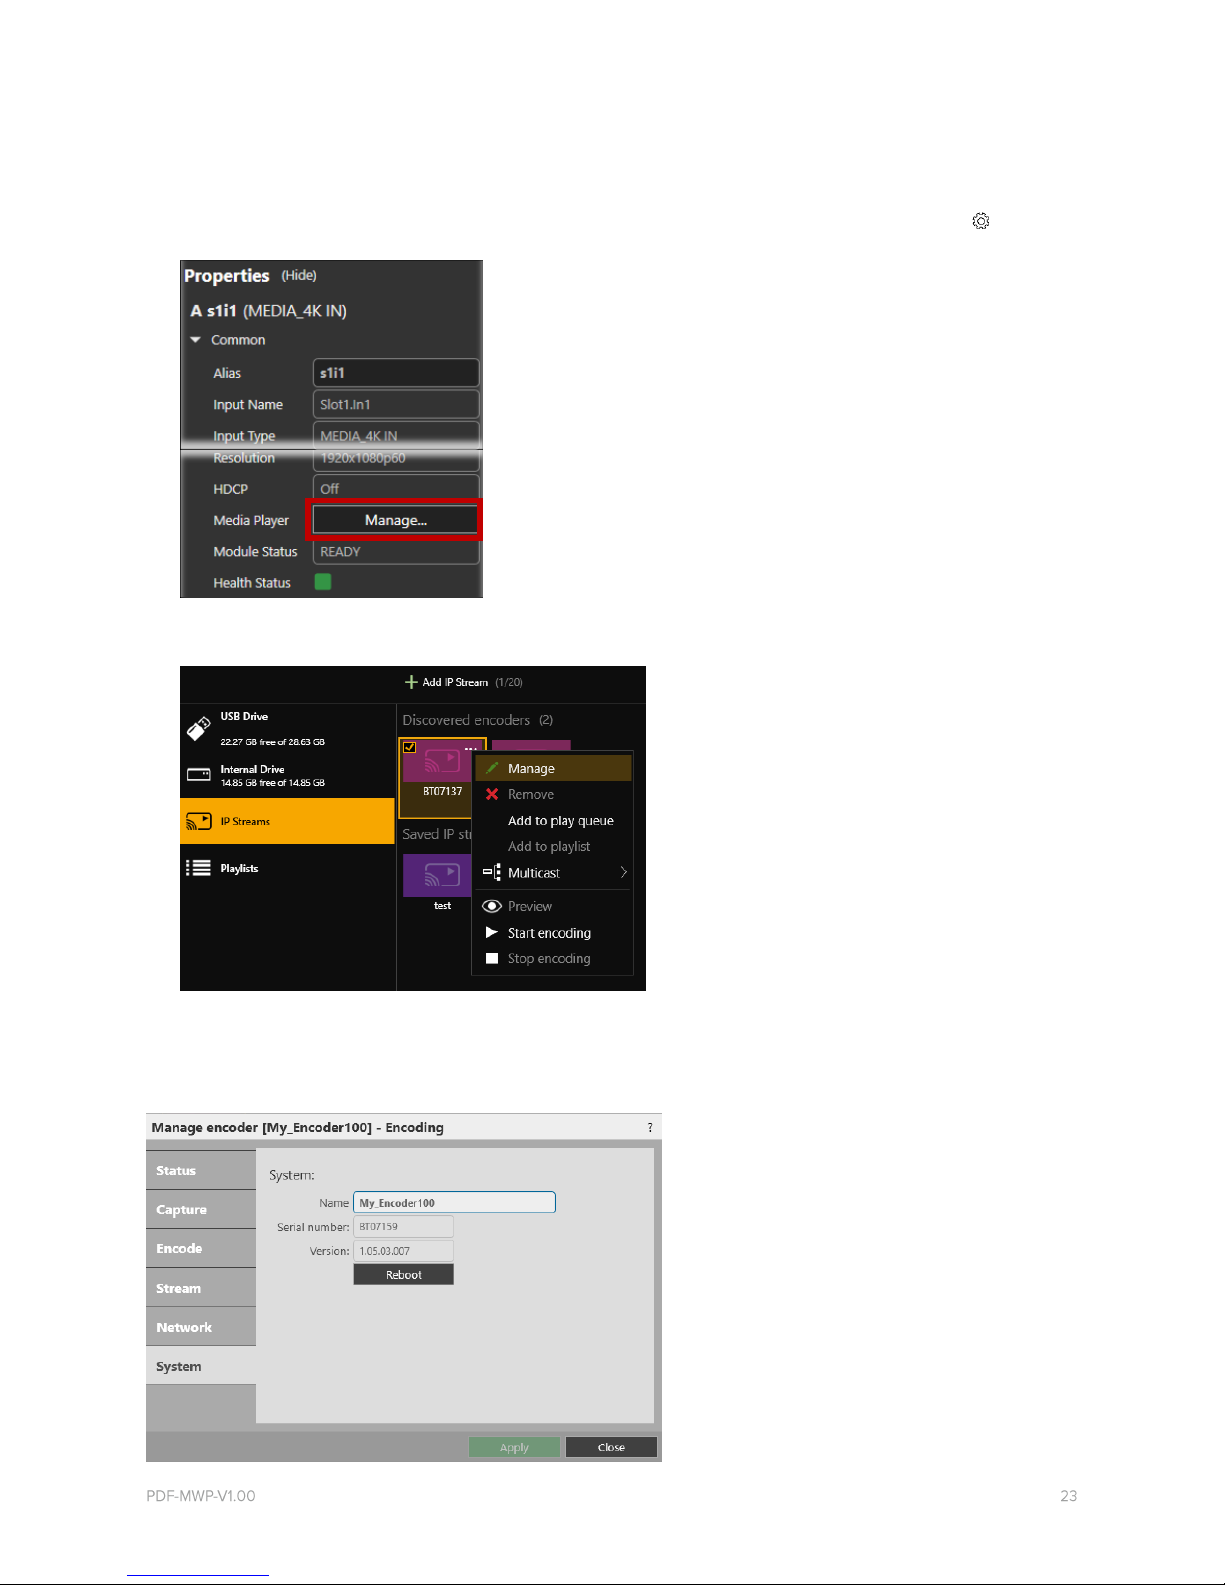
1. Select the window you wish to play streaming media, select show properties , and select (Media Player) Manage.
2. Select your media source.
Your media items appear as icons.
Still image
Saved stream
Video clip
Found encoder
Playlist
Found encoder, streaming
Information about the media item appears on the right.
16 tvONE
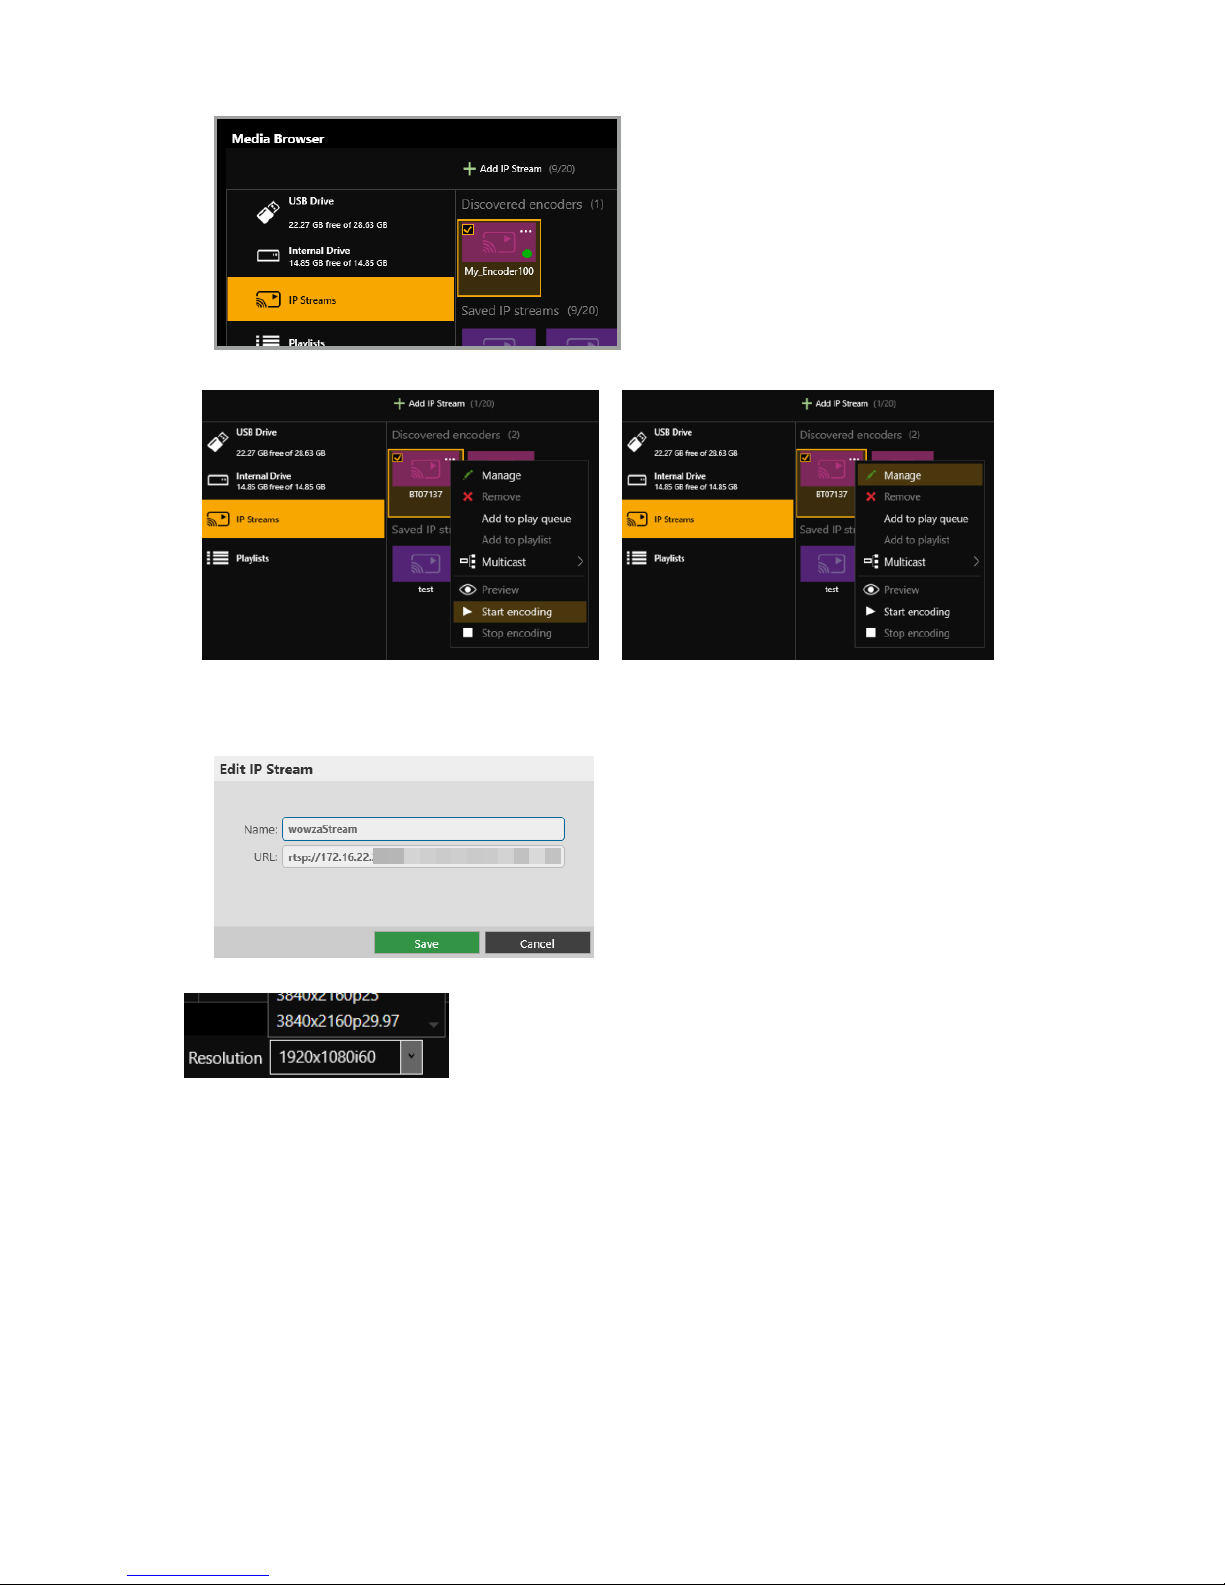
3. OPTIONAL: if you want to stream media, add your streams.
• If you want to stream from an Encoder-100, check that it is encoding. Look for the green spot.
If the encoder is not encoding, you might need to start or configure it.
Read more about starting and configuring the Encoder-100 on page 23.
• If you want to stream from the internet, or from an encoder that does not appear in Discovered encoders, add the
stream. Select IP Streams > Add IP Stream and enter a useful name and the URL of the media stream.
4. Choose a resolution for your media stream.
Read tips and recommendations for choosing the best resolution on page 70.
5. Drag media items and streams into the play queue and use the playback controls to play your media. Check that the media is
playing on your video wall.
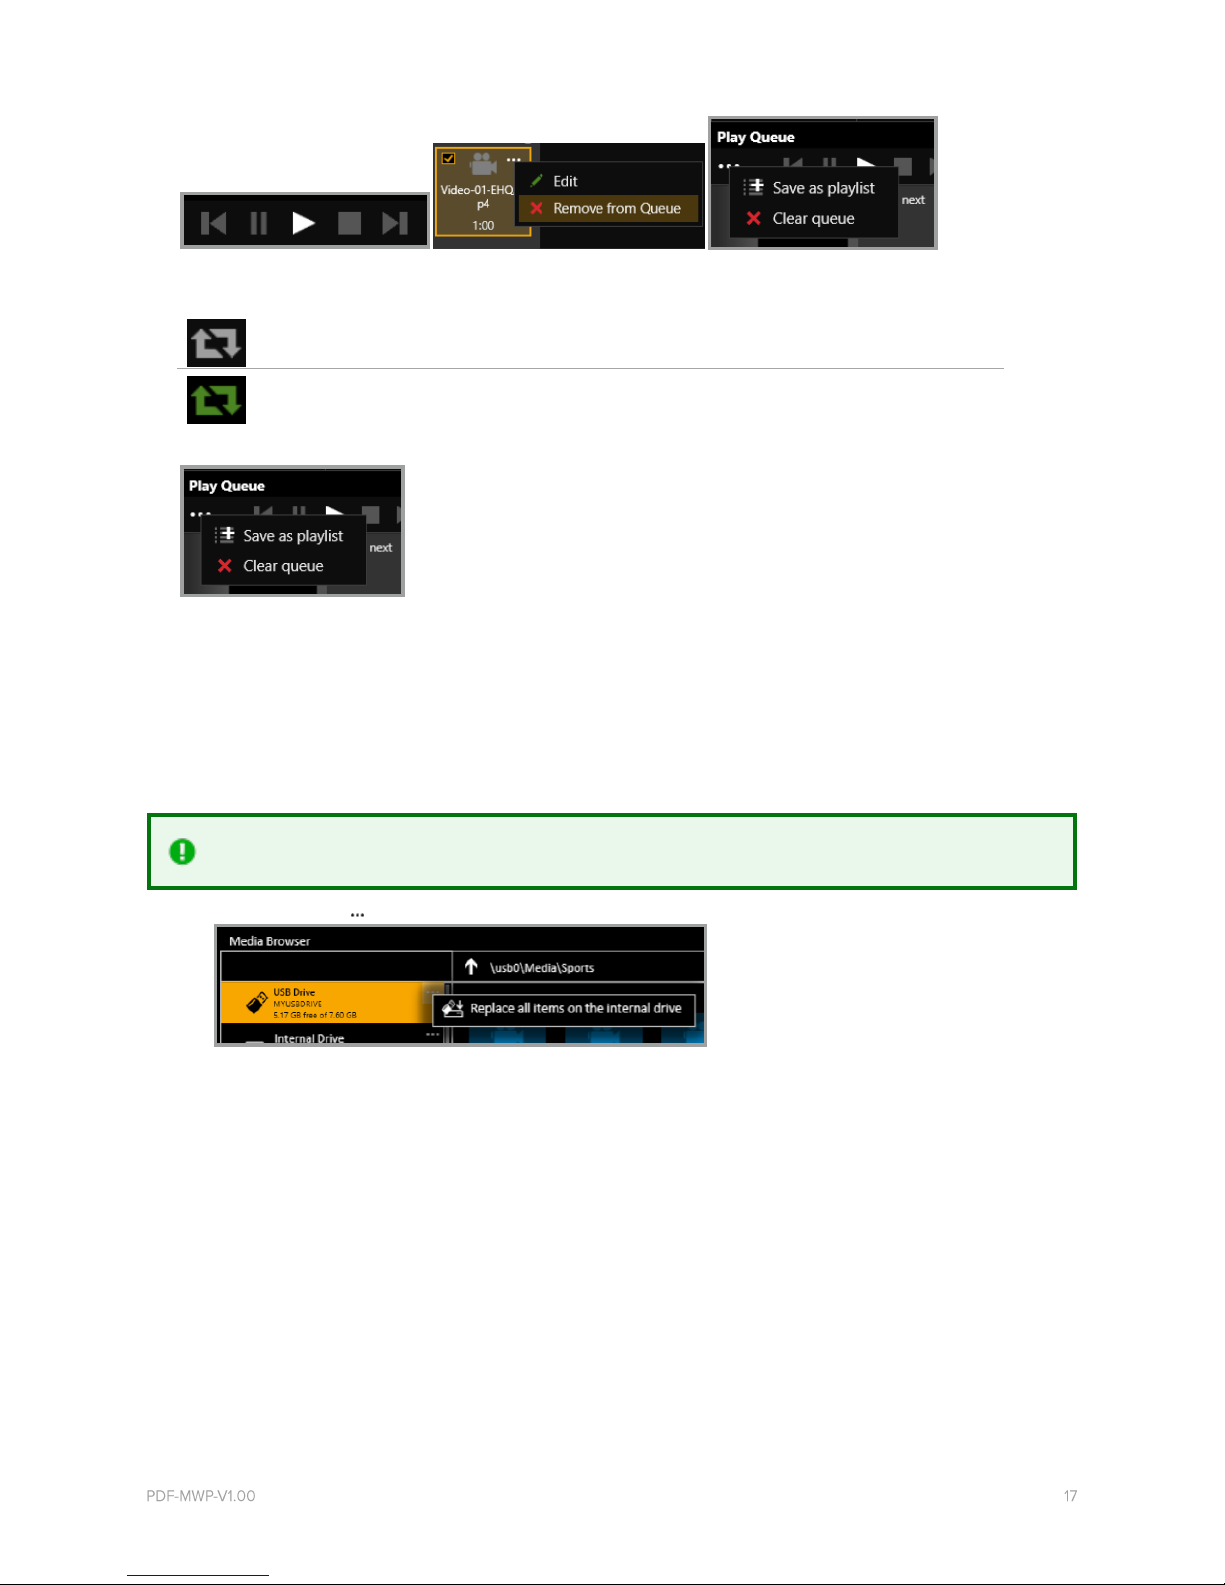
6. Use the playback controls start, stop, pause, skip to the next item, and return to the previous item. You can select and delete
media items, or clear the entire play queue.
To loop the play queue, first stop playback.
Media player will stop after the last item.
Media player will loop back to the first item.
7. OPTIONAL: you can save your play queue as a playlist.
You can also create playlists in the playlist editor.
Read about creating and managing playlists on page 63.
Setting up the internal drive
You can save media items from your USB drive to the internal drive.
When you first set up your internal drive, it is useful to copy the entire contents of your USB drive to the internal drive. All your
media items and folders are copied exactly to the internal drive, for pathways up to 480 characters, or fewer, depending on the
language you use.
Unsupported items are also copied to the internal drive. You can't see these items but they still take up space. Check that your USB drive
contains only supported items before you start.
See a list of supported items on page 95.
• Select (USB Drive) > Replace all items on the internal drive.
Read about creating and managing playlists on page 63.
18 tvONE
About your Encoder-100
The Encoder-100 streaming media encoder allows you to stream high quality video and audio from a range of sources to the Dual
Stream In module of your CORIOview.
Features
• Convert video and audio to high quality digital stream.
• High quality, low bandwidth encoding with H.264 compression.
• Full 1080p HD support at up to 60 frames per second.
• Single channel encoder.
• Supports unicast and multicast streaming.
• HDMI video and audio input and output.
• Analog audio input and output.
• Preview your video signal and stream separately.
Recommendations
• For best results, use Gb Ethernet cables and equipment.
• In industrial environments, use shielded Ethernet cables.
• Shielded Ethernet cables are often marked F/UTP or FTP.
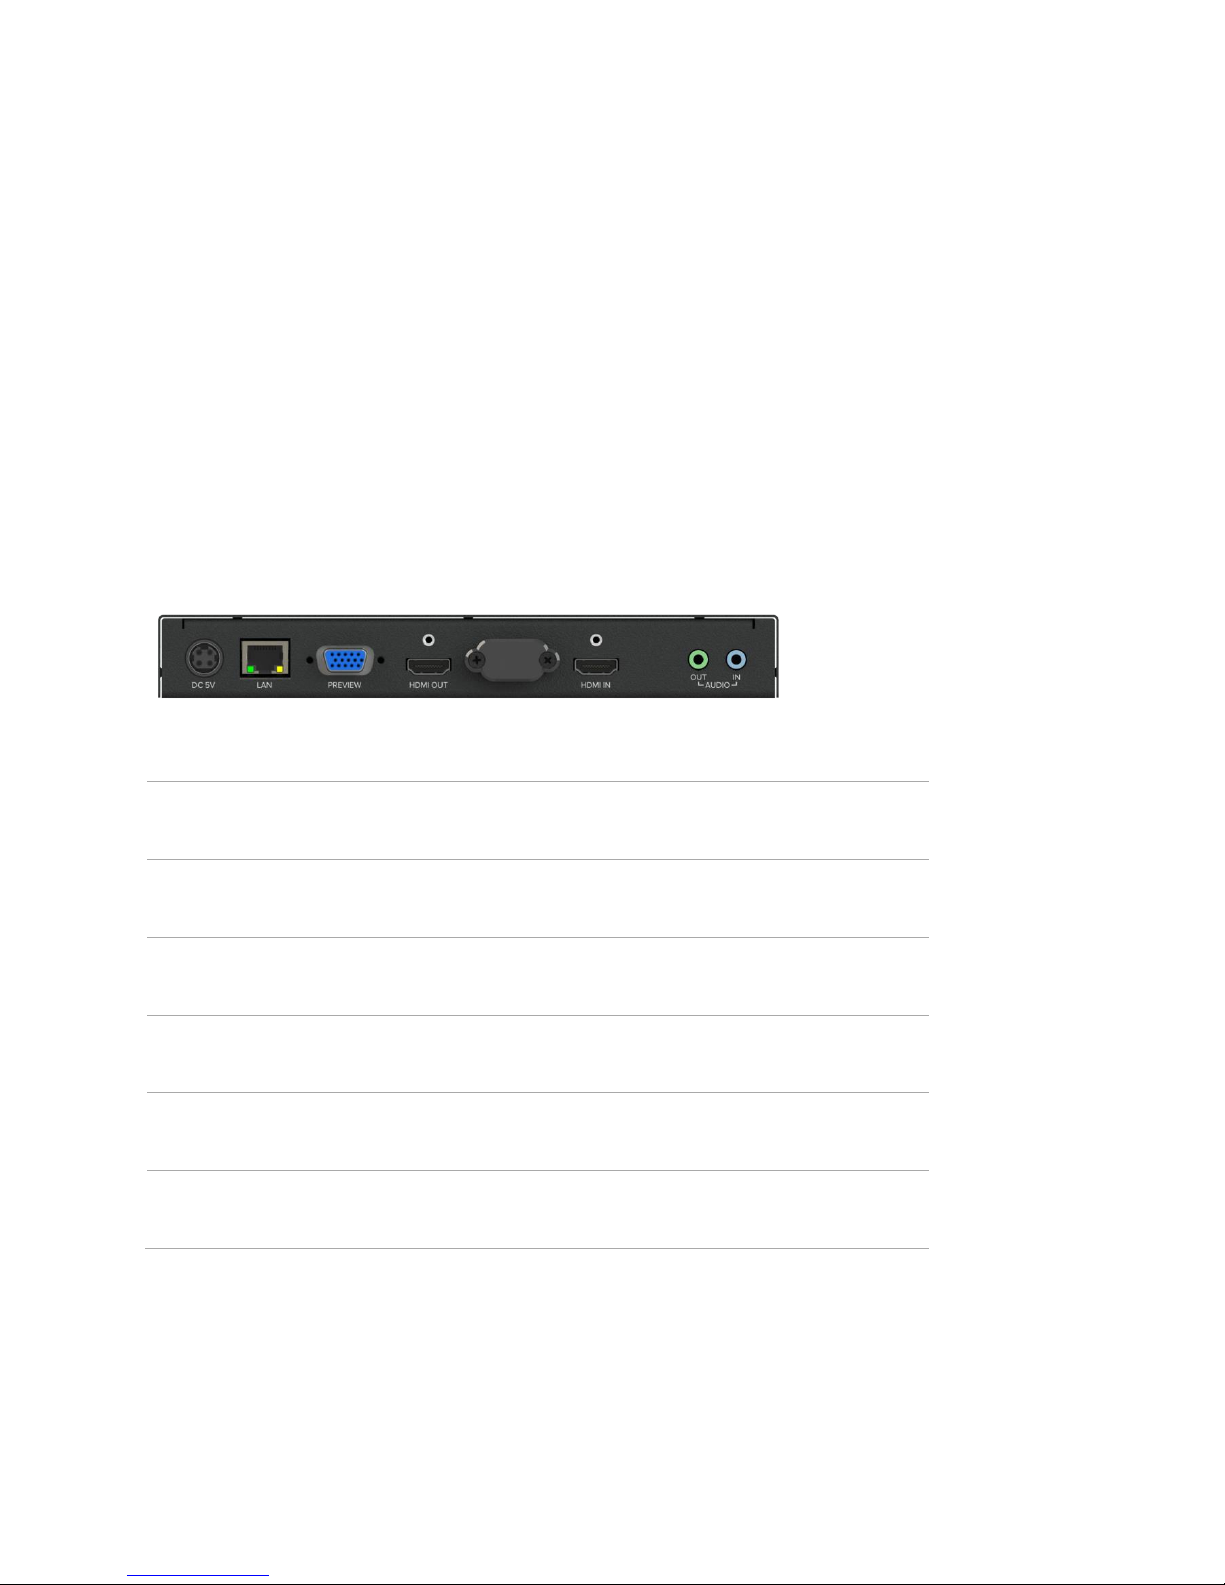
Encoder-100 rear panel
DC 5V
Connect to an electrical outlet
LAN
Sends encoded signal to your network
Connect to your network with Ethernet
PREVIEW
Allows you to preview your encoded signal
Connect to a display with a VGA cable
HDMI OUT
Allows you to preview your encoded signal
Connect to a display with an HDMI cable
HDMI IN
Receives video and digital audio signal from a source
Connect to a source with an HDMI cable
AUDIO OUT
Allows you to preview your audio signal
Connect a speaker with a 3.5 mm jack audio cable
AUDIO IN
Receives analog audio from a source
Connect a 3.5 mm jack audio cable

Encoder-100 - quick start guide
It's easy to get started with the Encoder-100, but if you want more help with any of these steps, select in CORIOgrapher™ and search, or
ask a question.
The Encoder-100 cannot encode HDCP encoded sources.
Before you start
To use an Encoder-100, you must have a Dual Stream In module installed in your CORIOview
Setting up the Encoder-100
Connect your cables.
A. Connect the power supply to an electrical outlet.
B. Connect an Ethernet cable to a DHCP-enabled network, or, connect an Ethernet cable directly to a DHCP-enabled PC.
C. Connect an HDMI™ cable to the video source that you wish to stream.
For example, you could connect a camera, an endoscope, or a media player.
• OPTIONAL: if you want to stream analog audio, or preview your audio, connect a 3.5 mm jack audio cable.
• OPTIONAL: if you want to see a preview of your stream, connect a VGA cable to PREVIEW, or an HDMI cable to HDMI OUT, and
to a display.
The power connector is a latching power connector. To remove the power connector from your Encoder 100, slide the sleeve backward.

20 tvONE
Configuring the Encoder-100 with CORIOgrapher
The Encoder-100 uses DHCP. Before you configure your Encoder-100, make sure DHCP is enabled on your PC.
1. Open CORIOgrapher , connect to your CORIOview, and read the configuration from your device.
2. From the Dashboard, select the window bubble you wish to play streaming media to expand the options, select , and select
(Media Player) Manage.
3. Select IP Streams, select your Encoder-100, and select Manage.
• When you first connect, your Encoder-100 is named with its Device ID. Find the Device ID on the bottom of your Encoder-
100.
• If your Encoder-100 isn't displayed, select Find and enter the URL of your Encoder-100.
• If you can't find or connect to your Encoder-100, read troubleshooting advice on page 86.
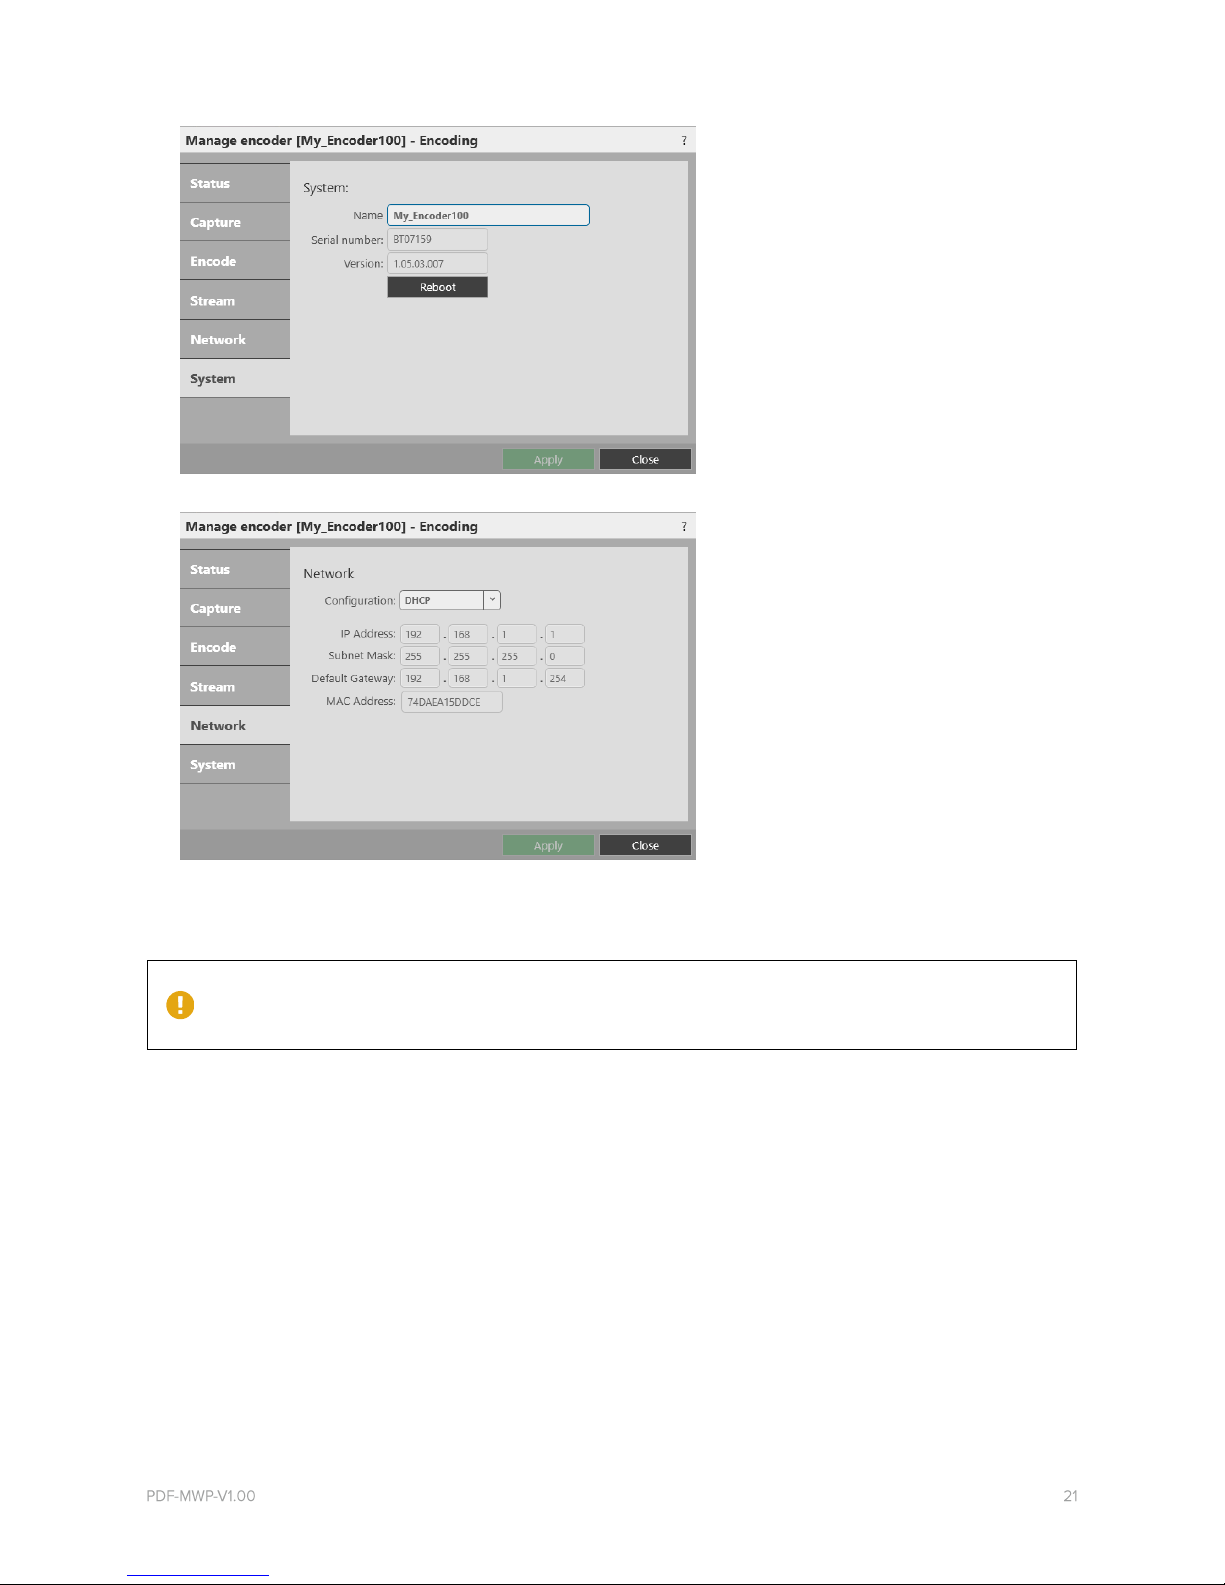
4. Select System, and name your Encoder-100.
Names can be up to 62 characters long, and can't be blank.
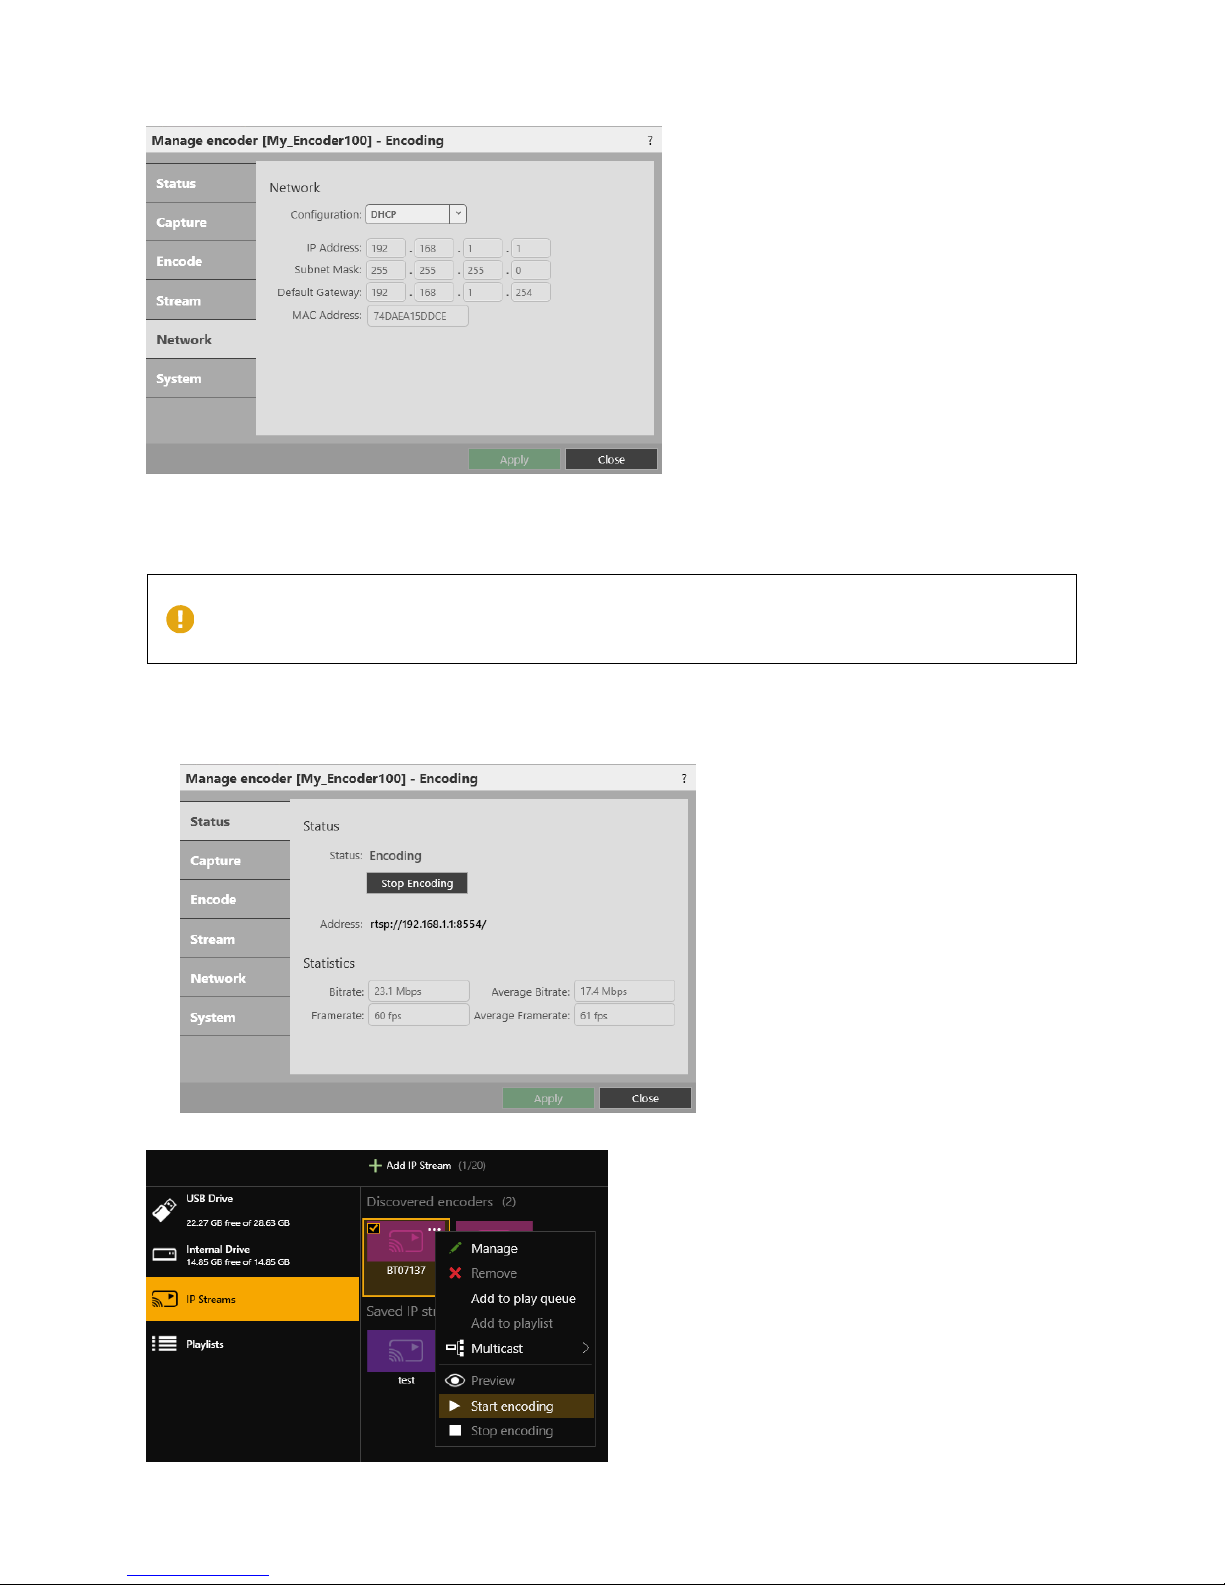
5. Select Network, and choose network settings for your Encoder-100.
• If you choose DHCP, the network assigns you an IP address.
• If you choose a static IP address, enter a value for your IP address, subnet mask, and gateway.
If you need help with network settings, contact your network administrator.
Static IP address
If you choose a static IP address, make sure you enter a unique value for your IP address. Using the same IP address for multiple devices
can cause your devices to disconnect. Contact your network administrator for help.
22 tvONE
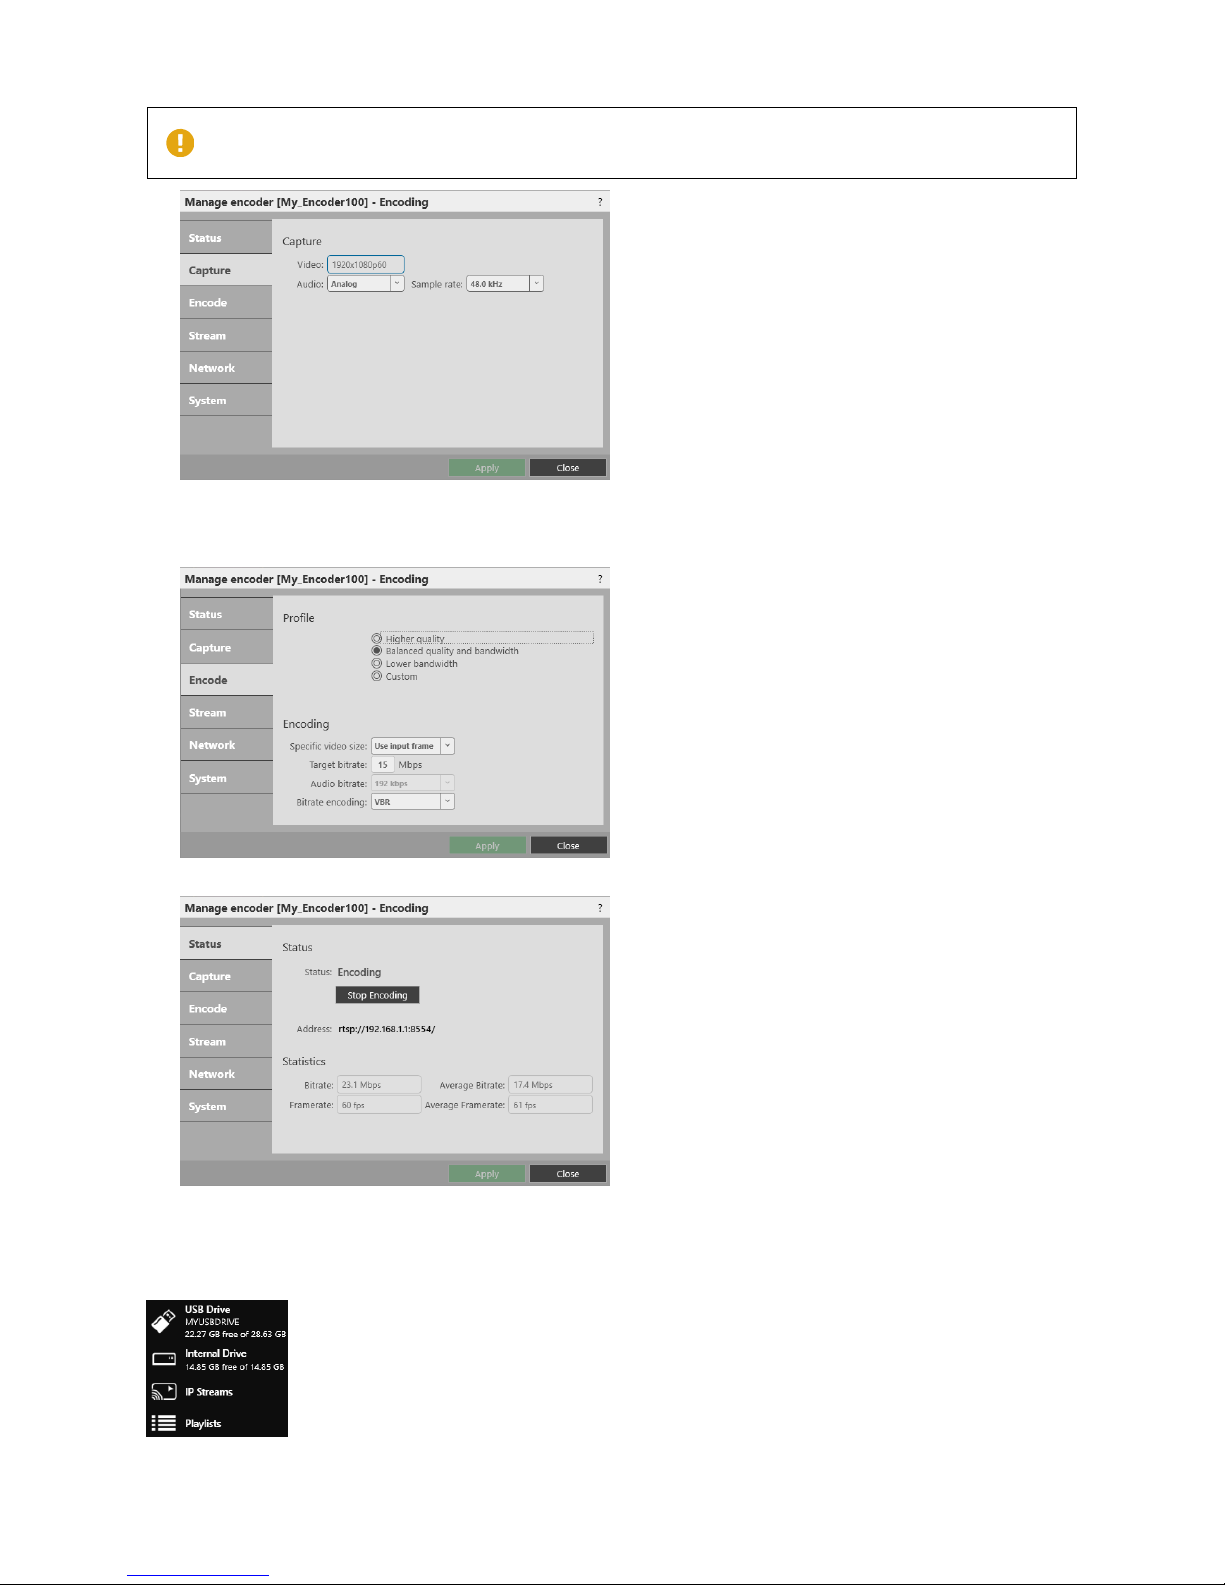
6. Select Capture, and check that your audio source is correct.
Risk of delayed signal
If your HDMI™ video doesn't contain embedded audio, select None or Analog from Audio.
7. Select Encode, and choose a profile.
The profile you choose depends on the bandwidth of your connection and your quality requirements. The default settings
produce a high quality stream.
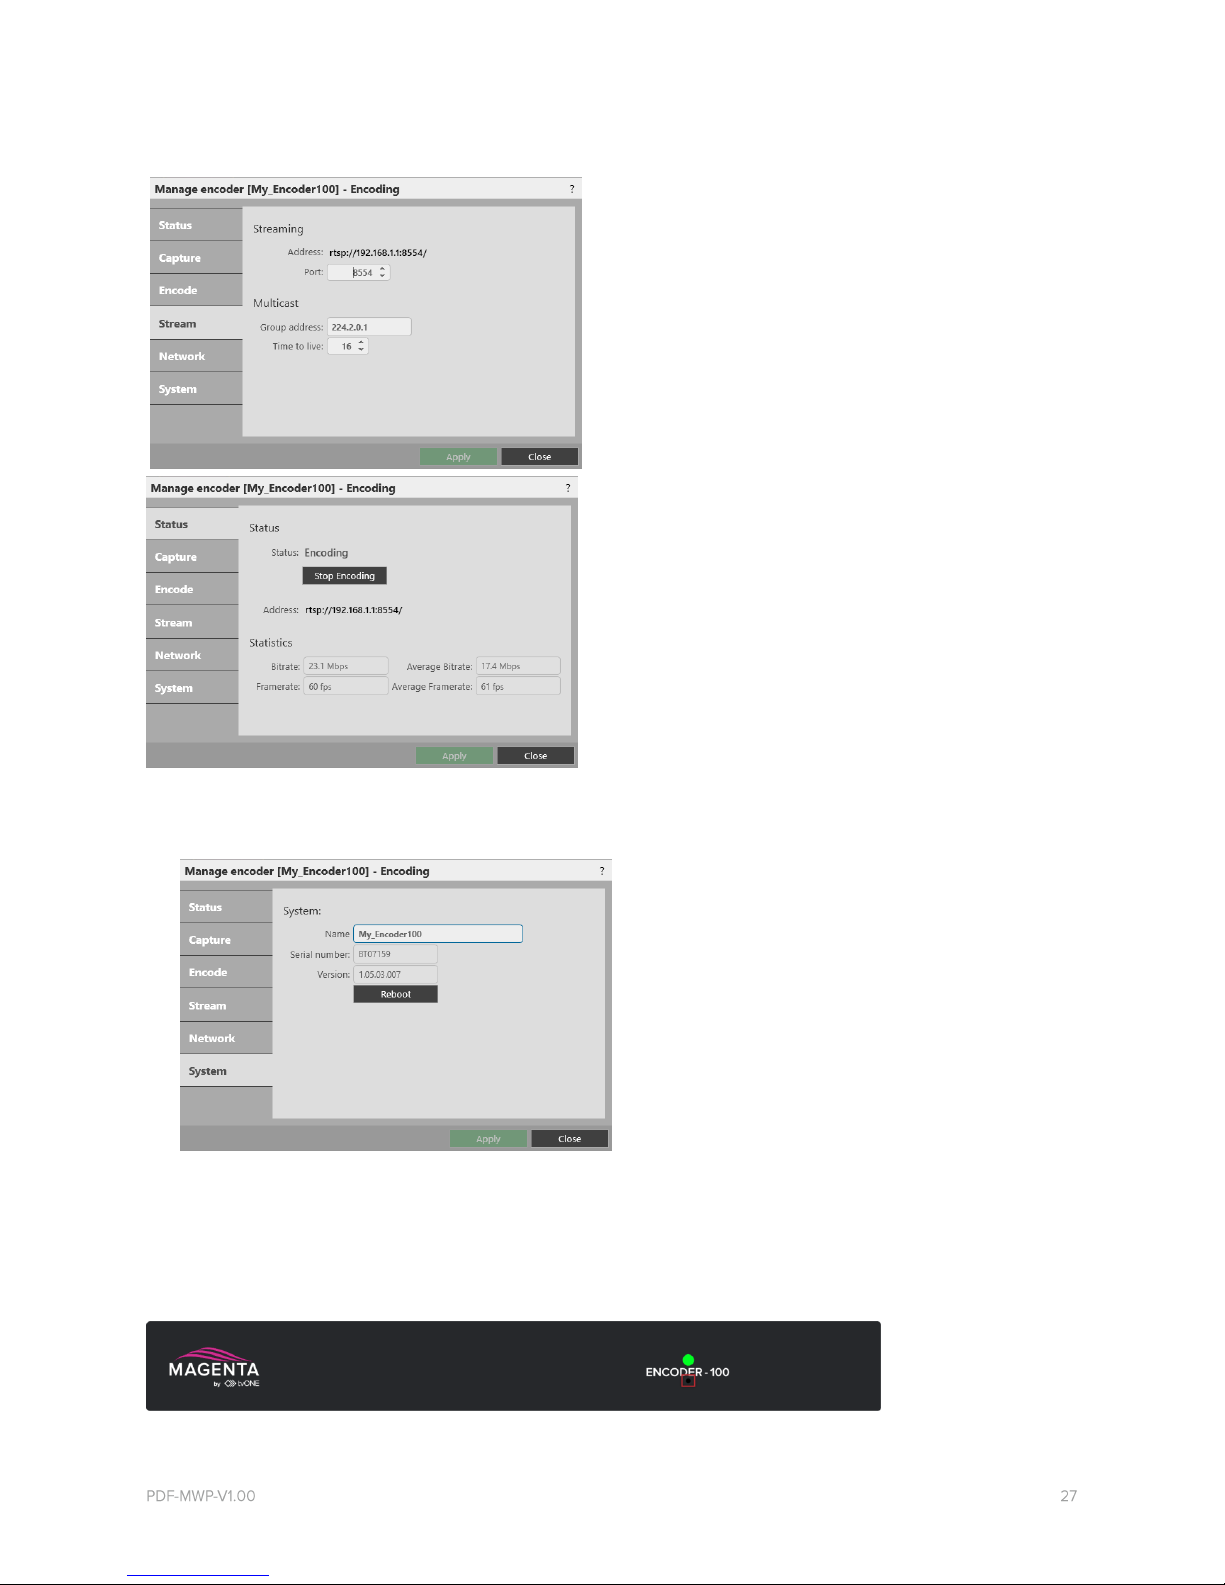
8. Select Status > Start encoding.
Read more about configuring encoders on page 23.
Playing streaming media
Select IP Streams and drag the stream from your Encoder-100 into the play queue. Use the playback controls to play your media.
Read more about playing streaming media on page 15.
Configuring your Encoder-100
You can configure your Encoder-100 for first use, start and stop encoding, and change your settings in Encoder settings.
CORIOgrapher automatically detects all Encoder-100 units on your network.
To open Encoder settings for a specific Encoder-100
1. From the Dashboard, select the window bubble you wish to play streaming media to expand the options, select , and select
(Media Player) Manage.
2. Select IP Streams, select your Encoder-100, and select Manage.
When you first connect, your Encoder-100 is named with its Device ID. Find the Device ID on the bottom of your Encoder-100.
If you can't see your Encoder-100 in the list, select Find and enter the IP address of the encoder.
Naming your Encoder-100
Select System, and enter a name for your Encoder-100. Names can be up to 62 characters long, and can't be blank.
24 tvONE
Configuring network settings
Select Network, and choose network settings for your Encoder-100.
• If you choose DHCP, the network assigns you an IP address.
• If you choose a static IP address, enter a value for your IP address, subnet mask, and gateway.
If you need help with network settings, contact your network administrator.
Static IP address
If you choose a static IP address, make sure you enter a unique value for your IP address. Using the same IP address for multiple devices
can cause your devices to disconnect. Contact your network administrator for help.
Starting and stopping encoding
• To start encoding, select Status > Start encoding.
• To stop encoding, select Status > Stop encoding.
You can also start and stop encoding from Media Browser.
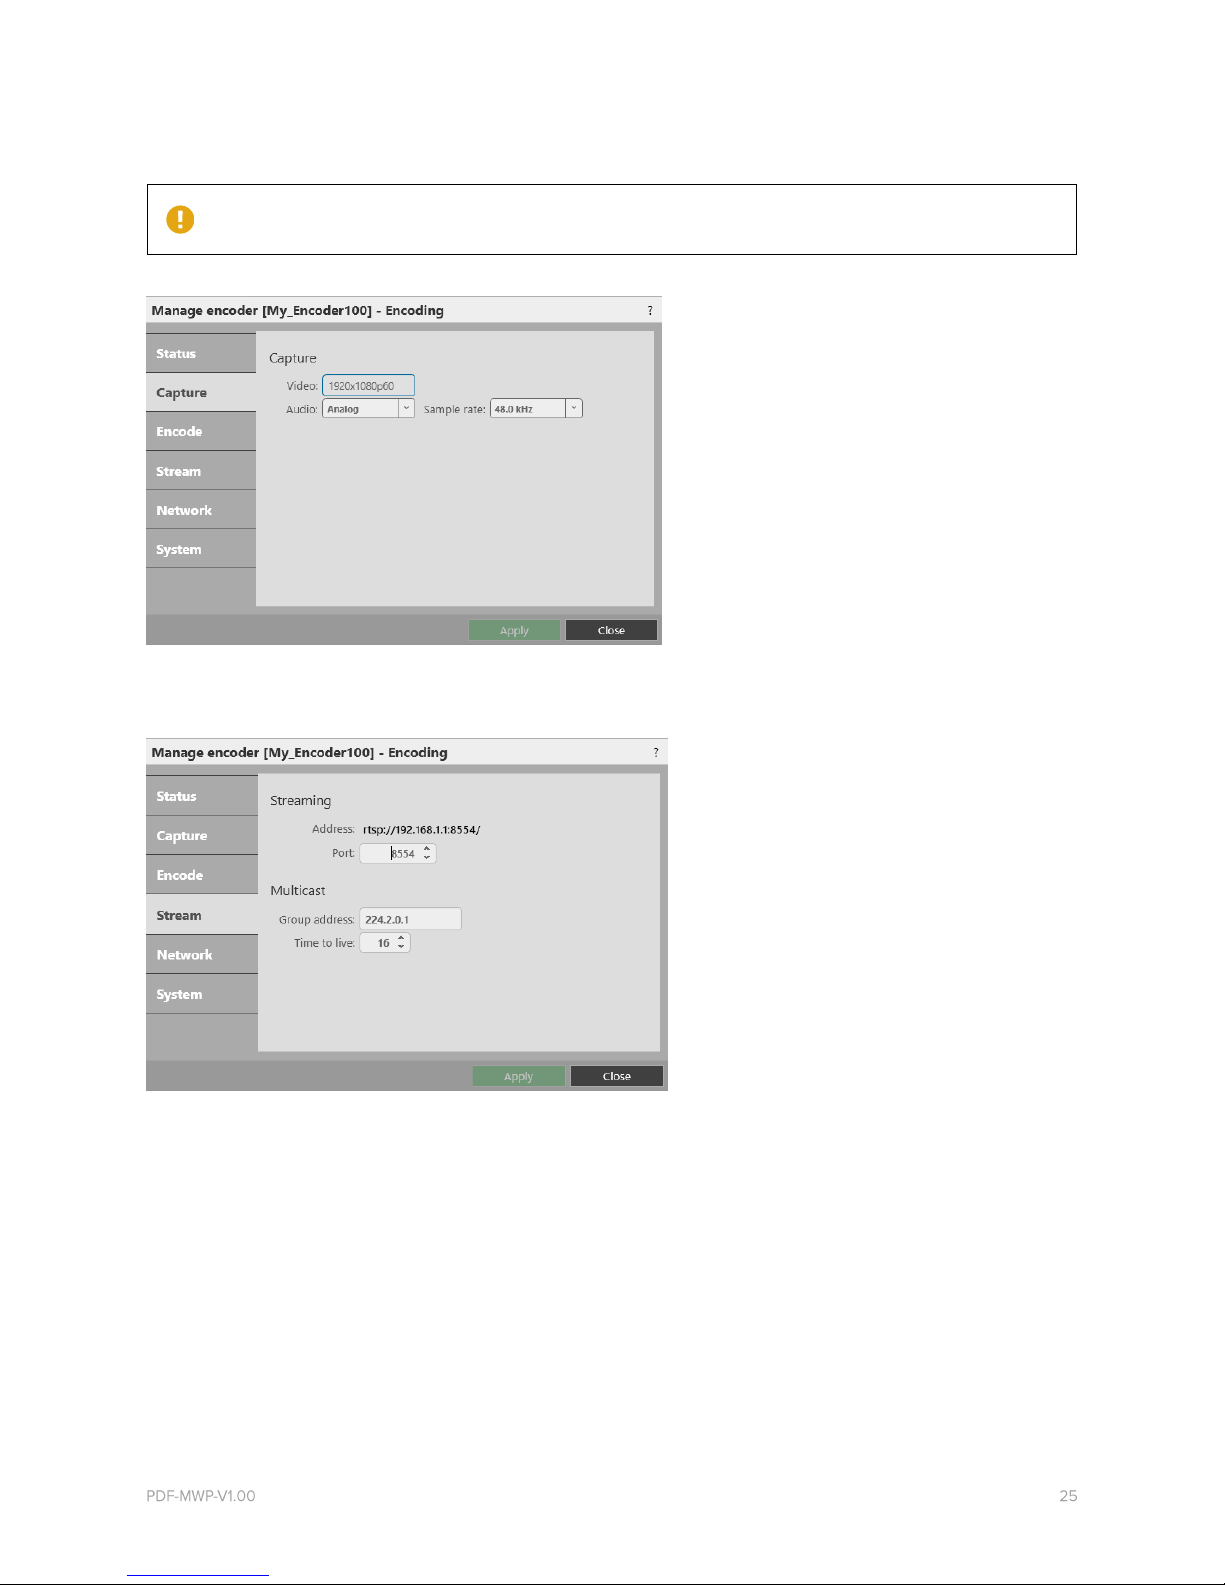
Configuring audio
This task is optional.
The Encoder-100 can receive digital audio by HDMI and analog audio by 3.5 mm jack. You can choose which source to include in your
stream in Capture. The default audio source is HDMI.
Risk of delayed signal
If your HDMI™ video doesn't contain embedded audio, select None or Analog from Audio.
If you choose to include analog audio, choose an appropriate sample rate. The default sample rate is 48.0 kHz.
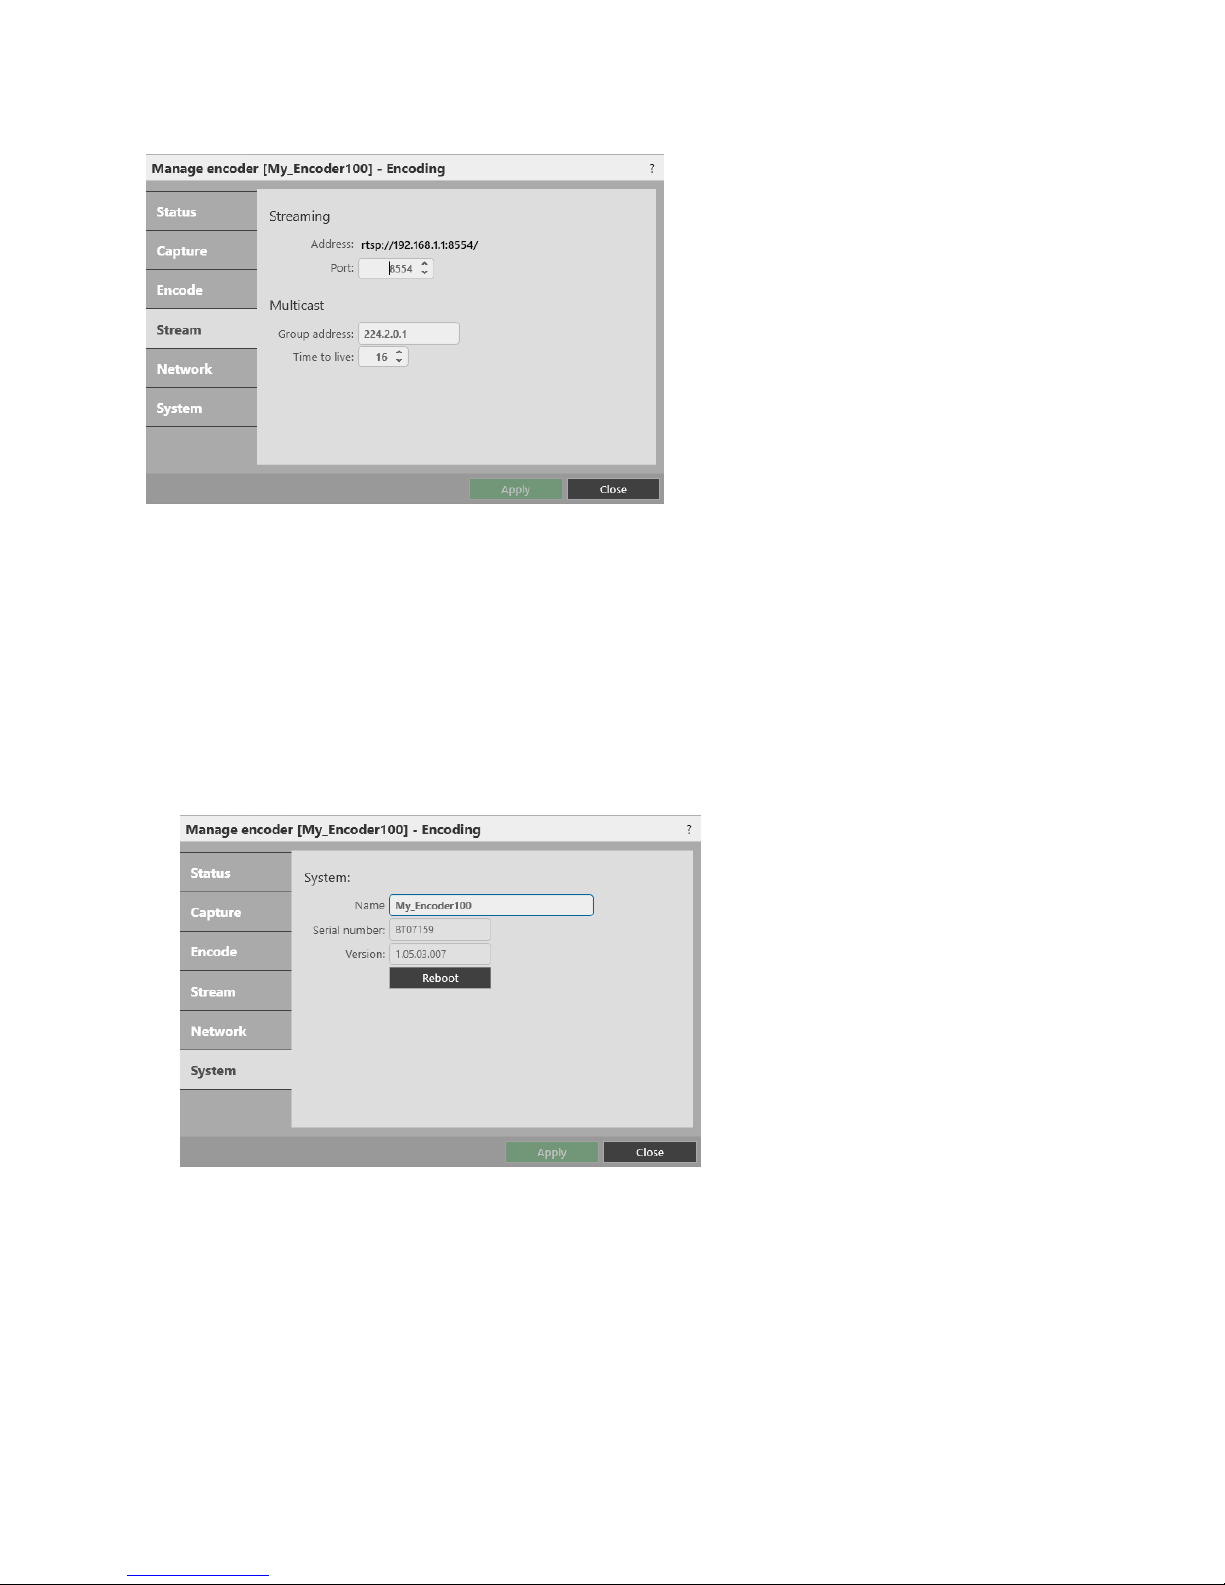
Changing the port number
This task is optional.
You can change the port number of your Encoder-100 in Stream.
26 tvONE
Multicasting
This task is optional.
You can configure multicasting in Stream.
Group address
Enter the address of the group of devices to receive the stream.
We recommend you use addresses in the range 224.2.0.1 to 224.2.255.255.
Time to live
Enter a value between 1 and 255.
Contact your network administrator for recommended time to live values.
Time to live is an advanced setting, for experienced users only. Contact your network administrator for help.
Restarting your Encoder-100
If you're having problems, you can restart your Encoder-100. You don't need to restart your Encoder-100 when you change your
settings.
• Select System > Reboot.
Finding the address of your stream
If you want to save your encoder as a saved stream, or your encoder doesn't appear in Discovered encoders, you need to know
the address of your stream.
Find the address of your stream in Stream or Status.
Read more about saving streams on page 15.
Finding the serial number and firmware version of your Encoder-100
• Find the serial number and firmware version of your Encoder-100 in System.
You can also manage your encoders in Settings > IP Streams.
Read more on page 42.
Restoring factory default settings on your Encoder-100
To restore factory default settings, use a paperclip or other slim object to press and hold the reset button on the front of the
Encoder-100 until the LED light turns orange.
28 tvONE
Hardware recommendations
At tvONE, we design our products to the highest quality standards. To get the best results from our products, we recommend that
you use the best quality connectors, cables, and adapters. Consider the points below when choosing accessories and positioning
equipment.
• For best results with HDMI/DVI, use cables under 15 m long, or shorter if you use connection adapters. If you need to place
your products more than 15 m apart, use a signal extender.
See our range of signal extenders at tvone.com/signal-extension-systems.
• For best results with HDMI, use High Speed or Premium High Speed HDMI cables.
• In industrial environments, use shielded Ethernet cables.
Shielded Ethernet cables are often marked F/UTP or FTP. This is relevant when using HDBaseT modules for Cat 6 and AVIP
module for USB.
• Use good quality USB drives compatible with USB 3.0.
Planning and installing
Video tearing
Using a mixture of resolutions can cause video tearing. For best results, make sure all your sources and display use the same frame rate.
Display
• What size is the display?
• What is the native resolution of the display?
• Do you need a display that support HDCP (High-bandwidth Digital Content Protection)?
• Do you need a projector?
Sources or inputs
• What types of source do you need?
• What is the native resolution of each source?
• What is the frame rate of each source?
• Will the sources be available at all times that the CORIOview is operating?
• Is there any switching or processing before the source reaches your CORIOview?
Installing display hardware
Once you have planned and collected your hardware, you can set it up. First, install your displays and place your sources. Then
connect your displays to your output modules and your sources to your input modules.
Who can do this?
Anyone can do this task, but we recommend that you consult a qualified AV installer.
Placing your CORIOview and display
When you decide where to place your hardware, consider these points:
• Availability of electrical outlets
• Distance from CORIOview to sources and display
For best results, use cables under 15 m long, or shorter if you use connection adapters. If you need to place your CORIOview
more than 15 m away from your video wall or sources, use a signal extender.
Read about our adapters on page 11.
See our range of signal extenders at tvone.com.
• Installation environment
In industrial environments, use shielded Ethernet cables.
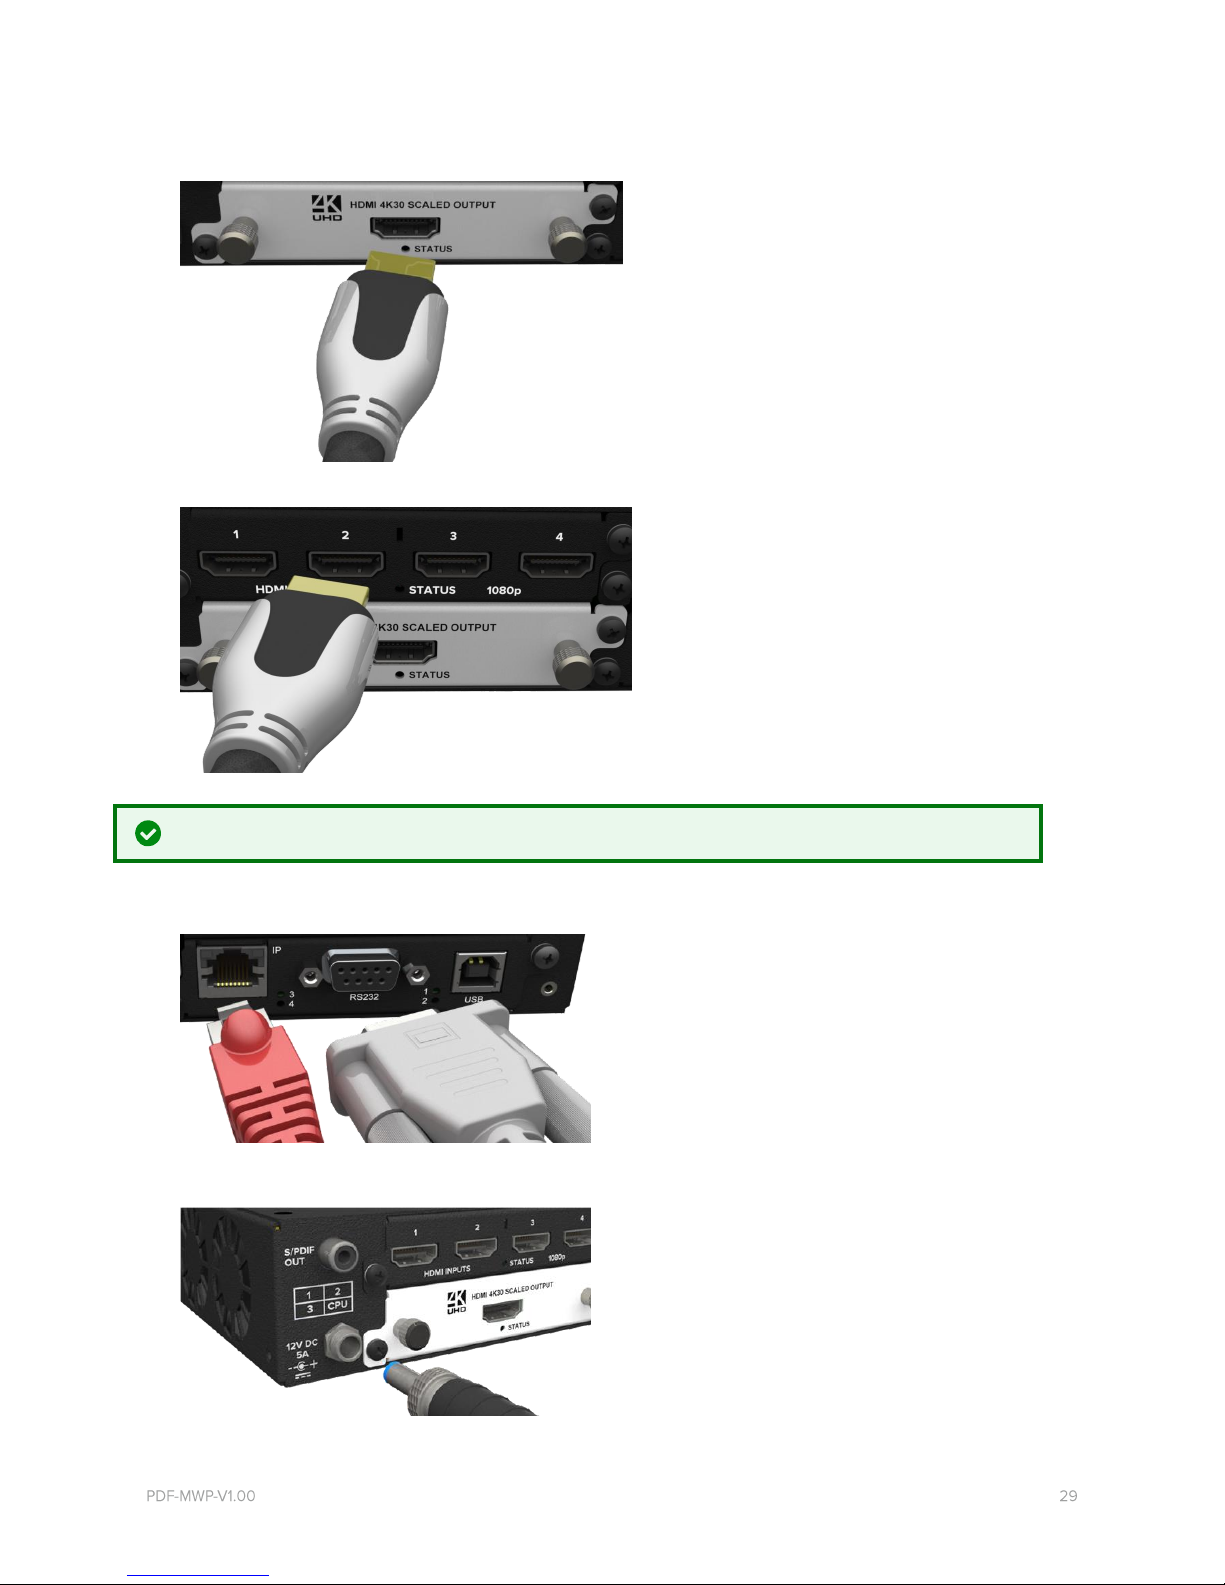
Position your displays and sources
1. Position your sources. Follow the advice above when you choose where to put your sources.
2. Connect your display or projector to the output module of your CORIOview.
3. Connect your sources to the input modules of your CORIOview.
Keep a note of which source is connected to which port. You can use this information later when you name inputs and outputs in
CORIOgrapher.
4. Connect your CORIOview to your network. If you want to control your CORIOview with a serial controller, connect a serial
controller.
5. Connect your CORIOview to an electrical outlet and power on.
You can now create your video wall in CORIOgrapher.
30 tvONE
Setting up a CORIOview in CORIOgrapher
About CORIOgrapher
CORIOgrapher is the software that controls your CORIOview for example window sources, preset layout, and transitions for a stateof-the-art dynamic video wall experience.
CORIOgrapher:
• Works with PCs running Windows® 7 and 10
• Works with Surface Pros and similar touch screen devices [touch not fully supported, under development]
• Does not work with touch-screen-only devices such as tablets or phones
• Installs Windows® .NET 4.6, if you don't have it
• Needs 600 MB of disk space during installation
• Is approximately 50 MB in size once installed
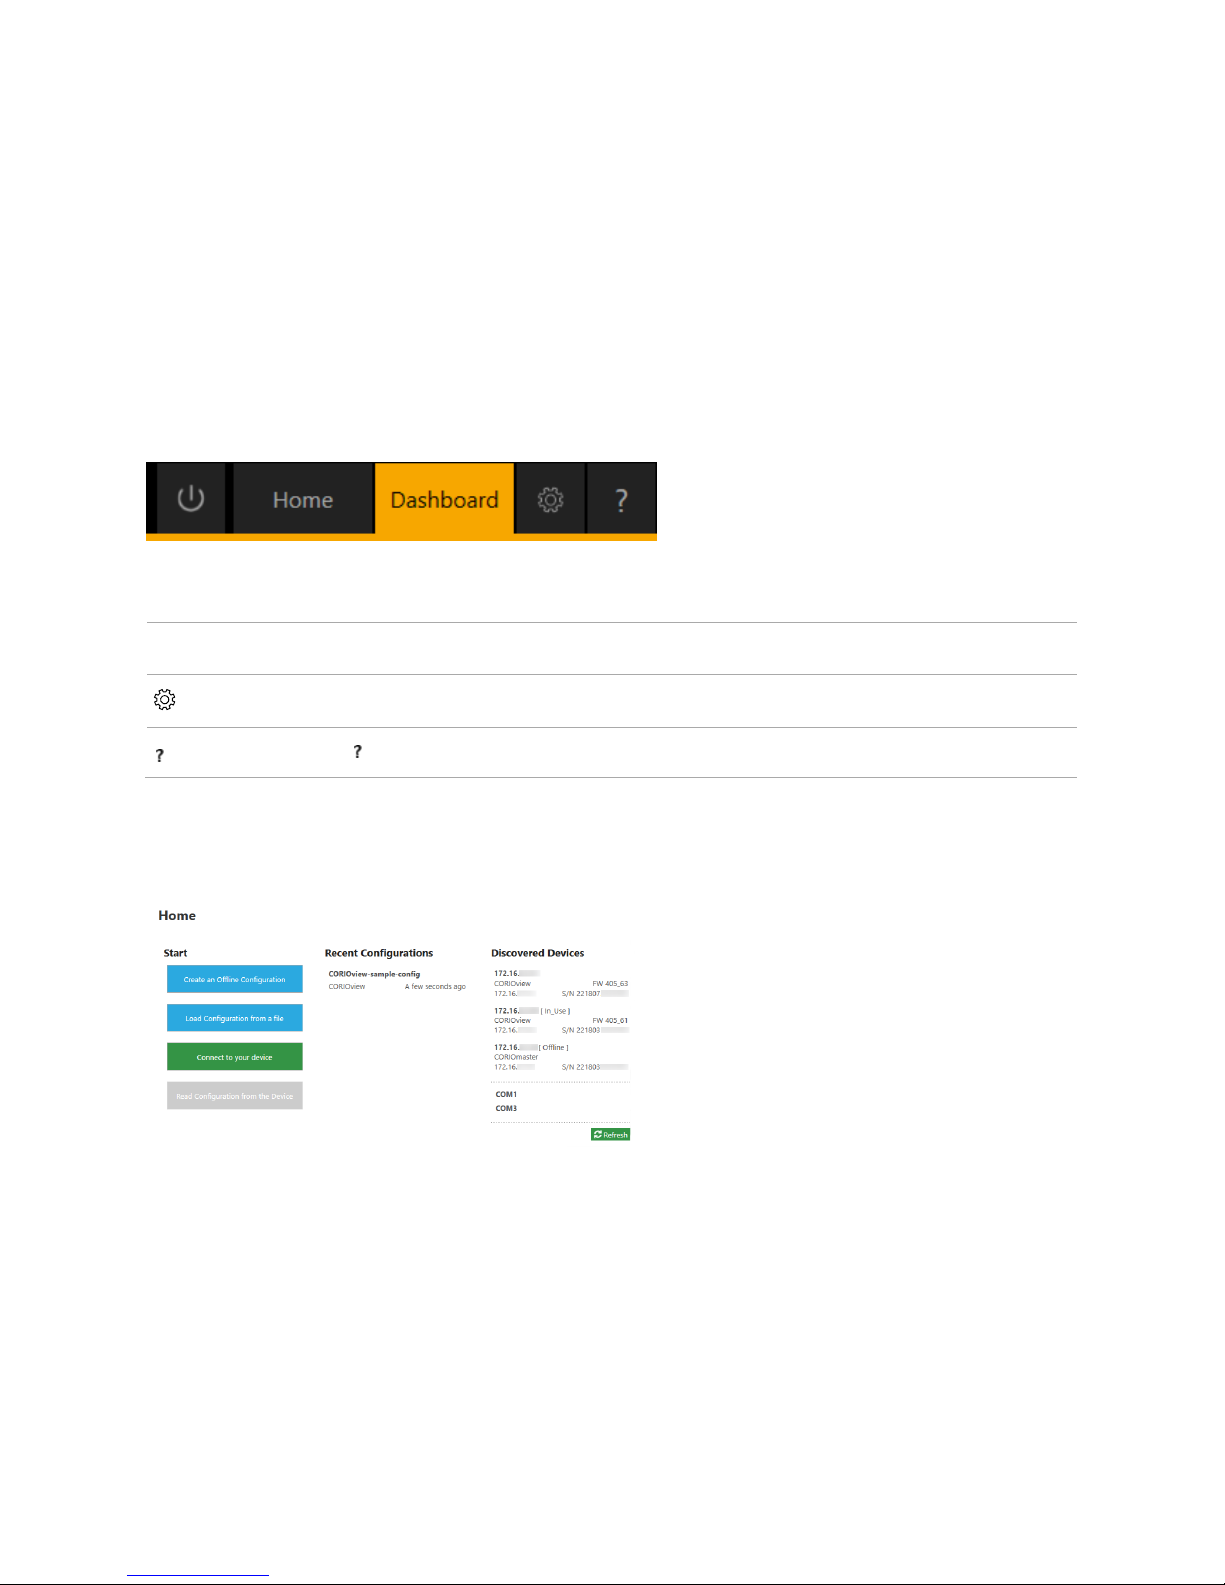
CORIOgrapher main areas
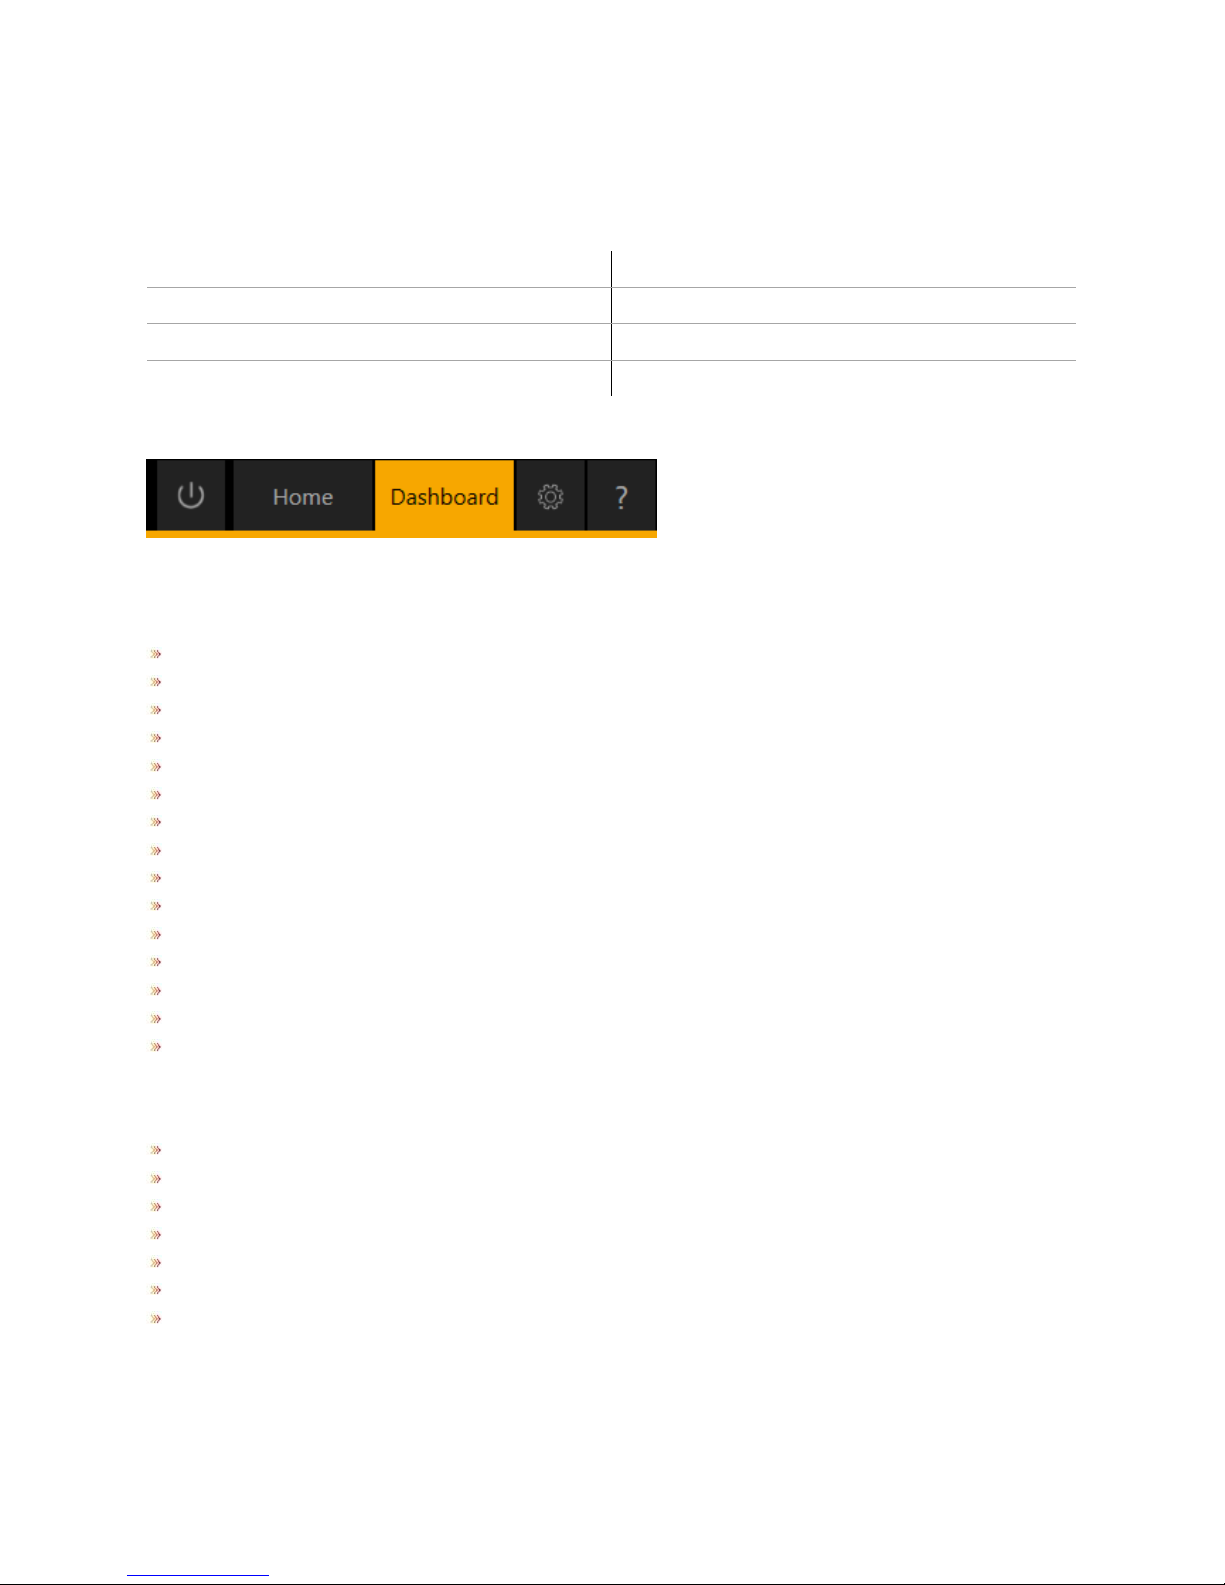
Home
Home is where you connect to a CORIOview, load a configuration from a file, or create an offline
configuration.
Dashboard
Dashboard is where you control the actions of your CORIOview.
Settings is where you configure your system, network, modules, and more.
opens the help.
Getting started with CORIOgrapher
When you first open CORIOgrapher, you see the Home window.
• You can connect to your CORIOview and get information about its configuration of input and output modules.
• You can create a configuration offline, or, if you have one, you can load a configuration from a file. You can save your
configuration and send the configuration to your CORIOview later or configure other CORIOviews with same configuration.
Read about setting up hardware on page 28.
 Loading...