

Tvone C3-540 CORIOmaster, C3-503 CORIOmaster micro, C3-510 CORIOmaster mini Quick Start Manual
Firmware versionM404and above
QSG-C3-5x0-V2.20
Jun 2017
C3-540CORIOmaster™
C3-510CORIOmaster mini™
C3-503 CORIOmaster micro™
CORIOgrapher™V2.5 and above
Quick Start Guide V2.20


In this guide
Welcome 1
Hardware recommendations 2
About your CORIOmaster™ 3
About your CORIOmaster mini™ 4
About your CORIOmaster micro™ 5
About the buttons of your CORIOmaster micro™ 6
About audio and your CORIOmaster micro™ 8
About CORIOgrapher™ 10
Quick start 11
Regulatory compliance 18
Contact us 18
Video wall worksheet 19
Get more help
There are more QuickStart Guides available on the USB drive that came with
your CORIOmaster™. CORIOgrapher™ now comes with fullysearchable help,
just select and search, or ask a question.

1 tvONE
Welcome
Thanks for buying this CORIOmaster™, CORIOmaster mini™, or
CORIOmaster micro™. CORIOmaster™ connects to a wide range of
sources and displays, and works with CORIOgrapher™ software to
allow you to build dynamic video walls with an easy-to-use visual
interface.
Features
Output up to four video walls to monitors, LED screens, and
projectors, including devices that support 4K
Wide range of inputs, including DVI, SDI, HDBaseT™, 4K, and
streaming media
Audio support with CORIOmaster micro™
Combination of different size and resolution of displays can be
used
Adjustable bezel compensation
Edge blending of projectors
Up-down-cross conversion
Control your video wall with CORIOgrapher™, IP, or serial
connection
Horizontal alignment on analog PC inputs
AMX & Crestron modules available
CORIOmaster™: 4RU frame size
CORIOmaster mini™: 1RU frame size
CORIOmaster micro™: 1RU half rack size, up to two video walls

QSG-C3-5x0 2
Hardware recommendations
At tvONE™, we design our products to the highest quality standards.
To get the best results from our products, we recommend that you
use the best quality connectors, cables, and adapters. Consider the
points below when you choose accessories and position equipment.
n For best results with HDMI/DVI, use cables under 15m long, or
shorter if you use connection adapters. If you need to place your
products more than 15m apart, use a signal extender.
See our range of signal extenders at tvone.com/signal-extensionsystems.
n For best results with HDMI, use High Speed or Premium High
Speed HDMI cables.
n In industrial environments, use shielded Ethernet cables.
Shielded Ethernet cables are often marked F/UTP or FTP.
n Use good quality USB drives compatible with USB 3.0.
3 tvONE
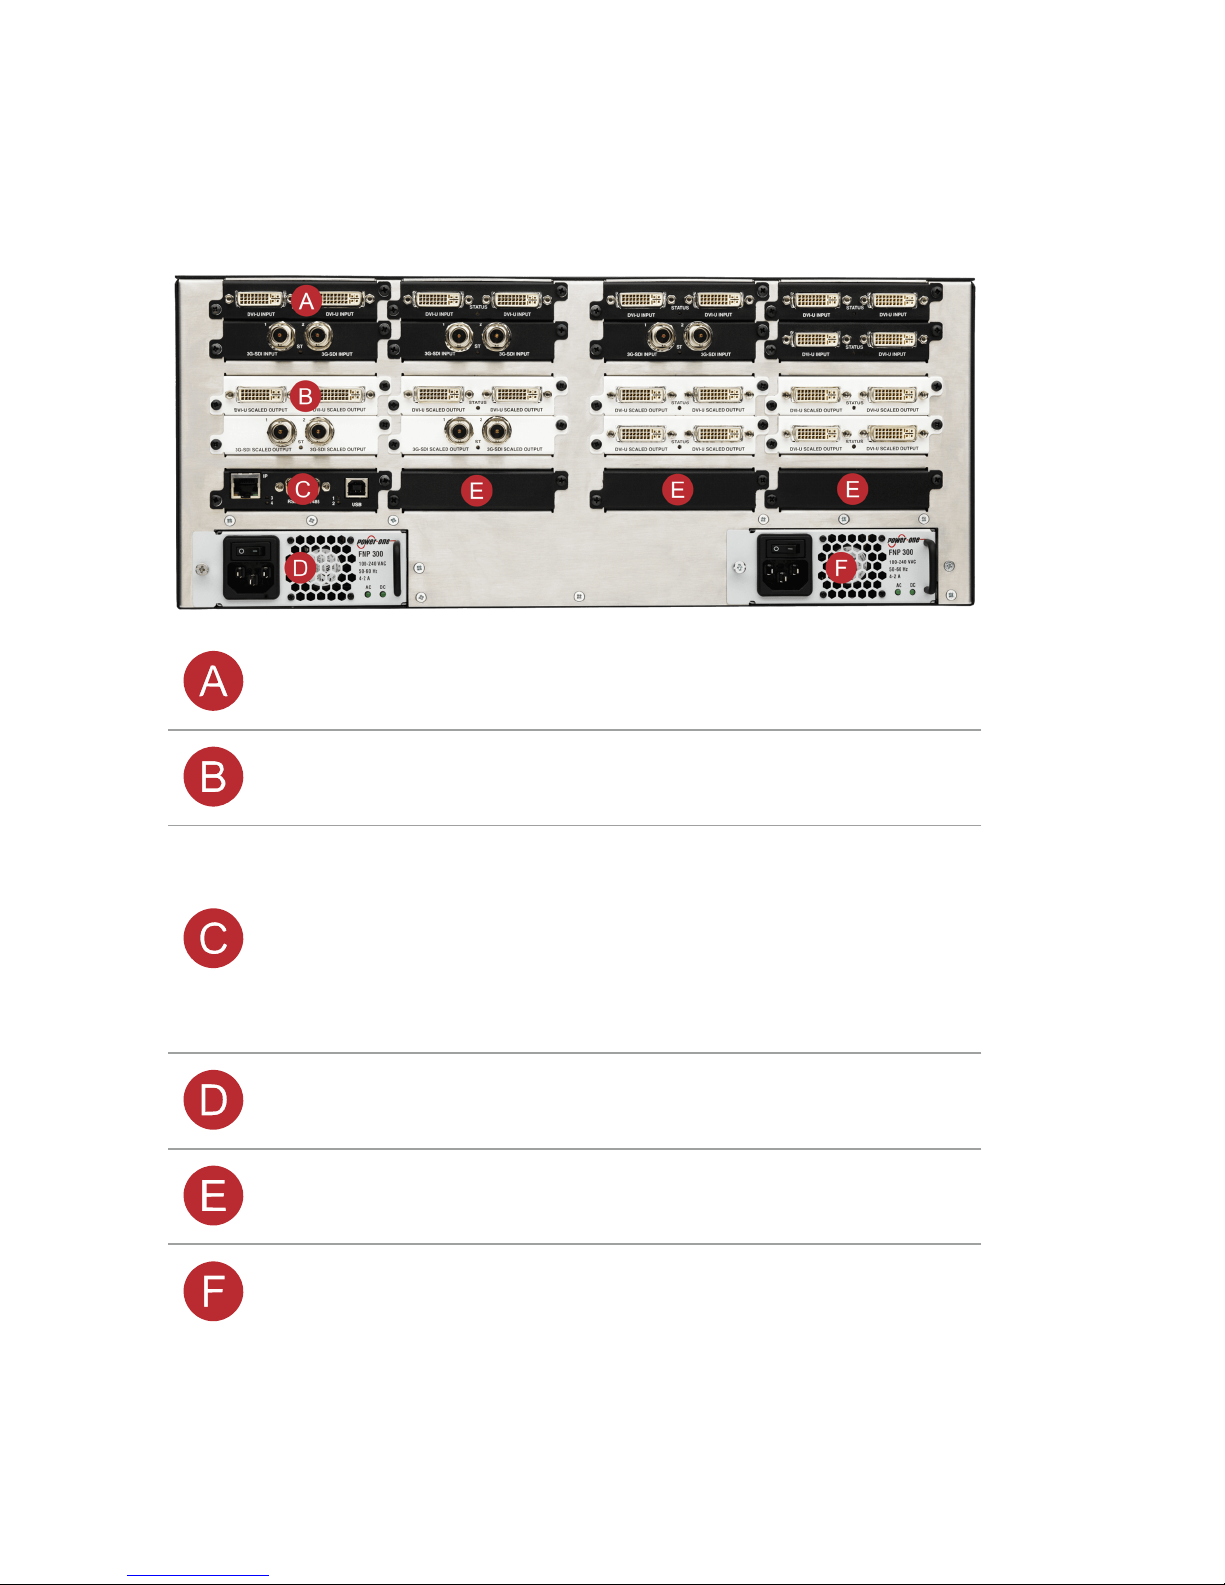
About your CORIOmaster™
CORIOmaster™ rear panel
Input module (black) Connect to sources
Output module (white) Connect to displays
CPU module
Connect to your network with
Ethernet
Optional: connect to serial
controller with RS-232
Optional: connect directly to a PC
with Ethernet or RS-232
Optional second PSU,
sold separately
Optional: connect to electrical
outlet
Sealed slots Not available for use
Power supply unit
(PSU)
Connect to electrical outlet

QSG-C3-5x0 4
About your CORIOmaster mini™
This guide uses the name CORIOmaster™ to mean CORIOmaster™,
CORIOmaster mini™, and CORIOmaster micro™ systems, unless
specifically stated.
CORIOmaster mini™ rear panel
Power supply
unit (PSU)
Connect to electrical outlet
CPU module
Connect to your network with Ethernet
Optional: connect to serial controller with
RS-232
Optional: connect directly to a PC with
Ethernet or RS-232
Output
module
(white)
Connect to displays
Input module
(black)
Connect to sources
Note: slot 6 is a fixed input slot, included
with every CORIOmaster mini™.
5 tvONE
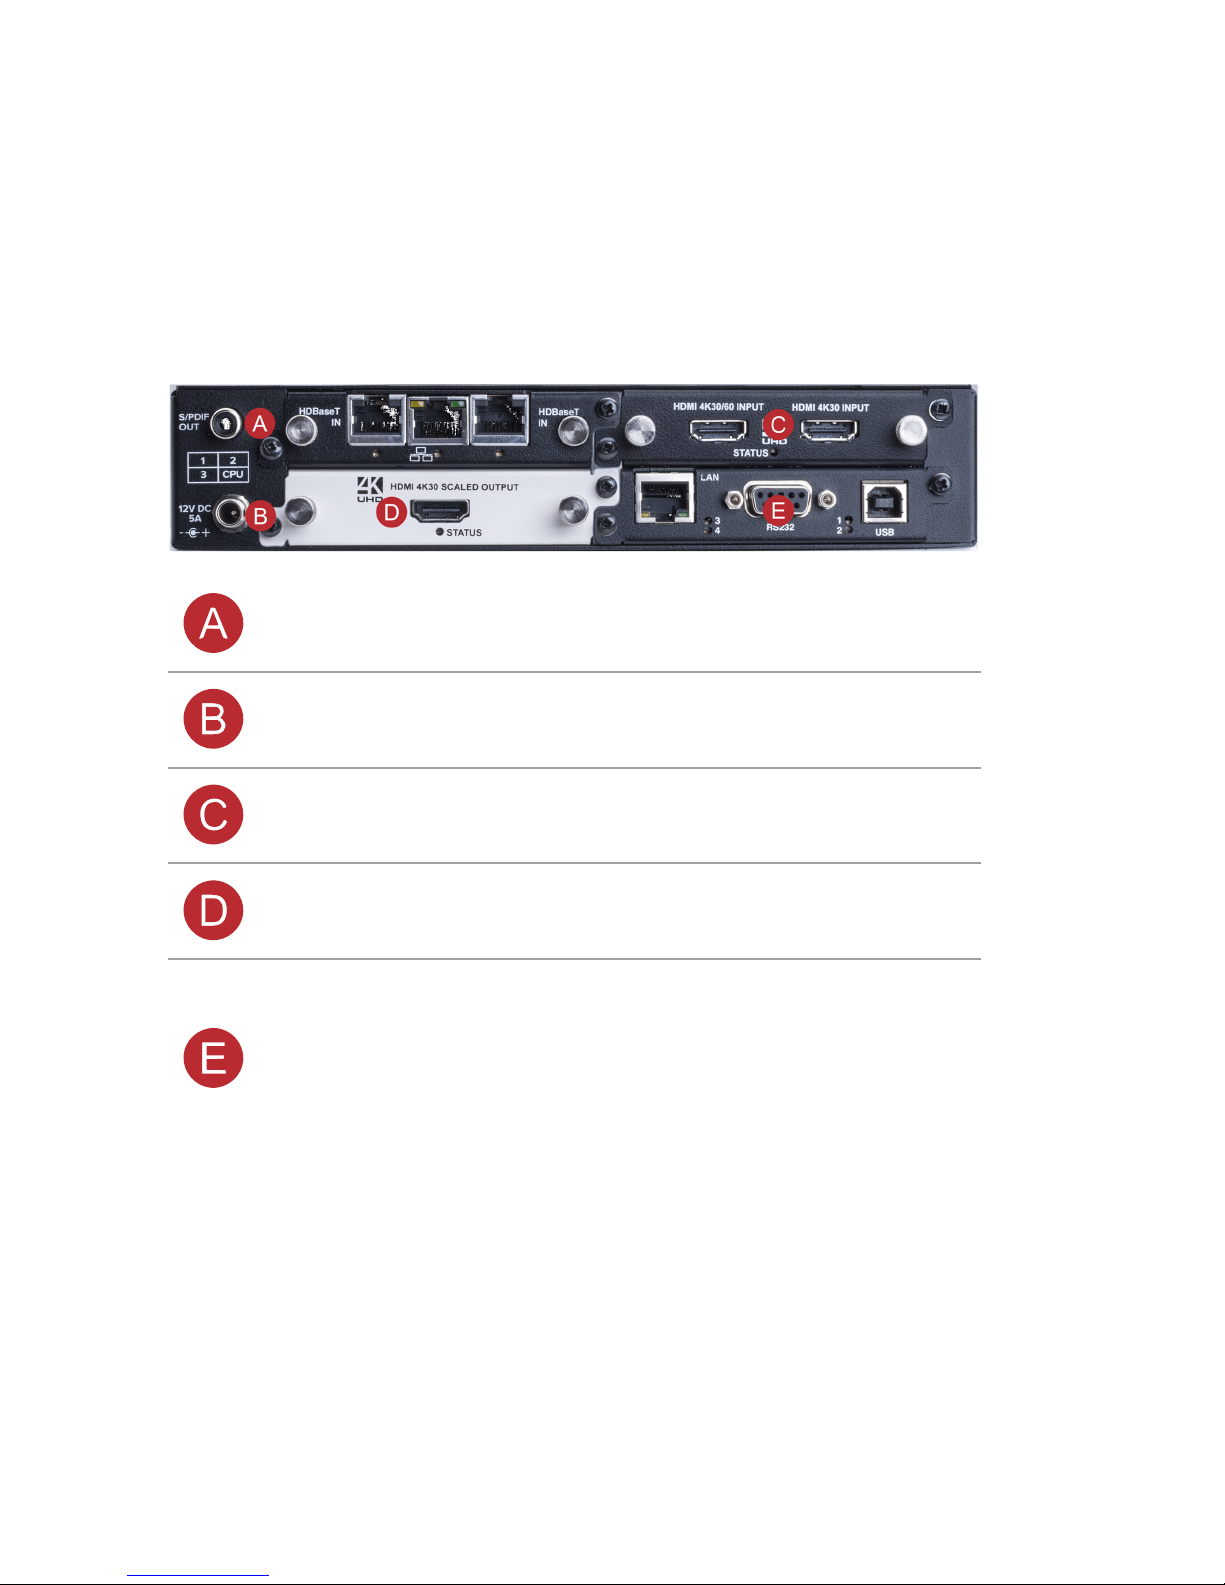
About your CORIOmaster micro™
This guide uses the name CORIOmaster™ to mean CORIOmaster™,
CORIOmaster mini™, and CORIOmaster micro™ systems, unless
specifically stated.
CORIOmaster micro™ rear panel
S/PDIF audio
output
Connect to audio device with RCA
Power supply
input
Connect to an electrical outlet with PSU
Input module
(black)
Connect to sources
Output module
(white)
Connect to displays
CPU module
Connect to your network with Ethernet
Optional: connect to serial controller with
RS-232
Optional: connect directly to a PC with
Ethernet or RS-232
QSG-C3-5x0 6
CORIOmaster micro™ mounting accessories
You can mount your CORIOmaster micro™ to a surface, rack, or
ONErack system with our mounting accessories, sold separately. Ask
your distributor about:
n RM-503-1RK-MOD ONErack mounting module for CORIOmaster
micro™
n RM-503-1RU-DUAL rack mounting kit for one or two CORIOmaster
micro™ units
n RM-503-SRF surface mounting kit for CORIOmaster micro™
About the buttons of your CORIOmaster
micro™
You can use the buttons of the front panel to load presets, choose
which window to hear, change the source playing in a window, and
lock the buttons.
By default, the buttons correspond to the first eight presets, sources,
or windows in your system. You can choose which button
corresponds to which preset, source, or window.
Read more about mapping the buttons of your CORIOmaster micro™ in
CORIOgrapher™. Just select and search, or ask a question.
The buttons light up different colors depending on the mode and
status of your CORIOmaster micro™.
 Loading...