

Page 1
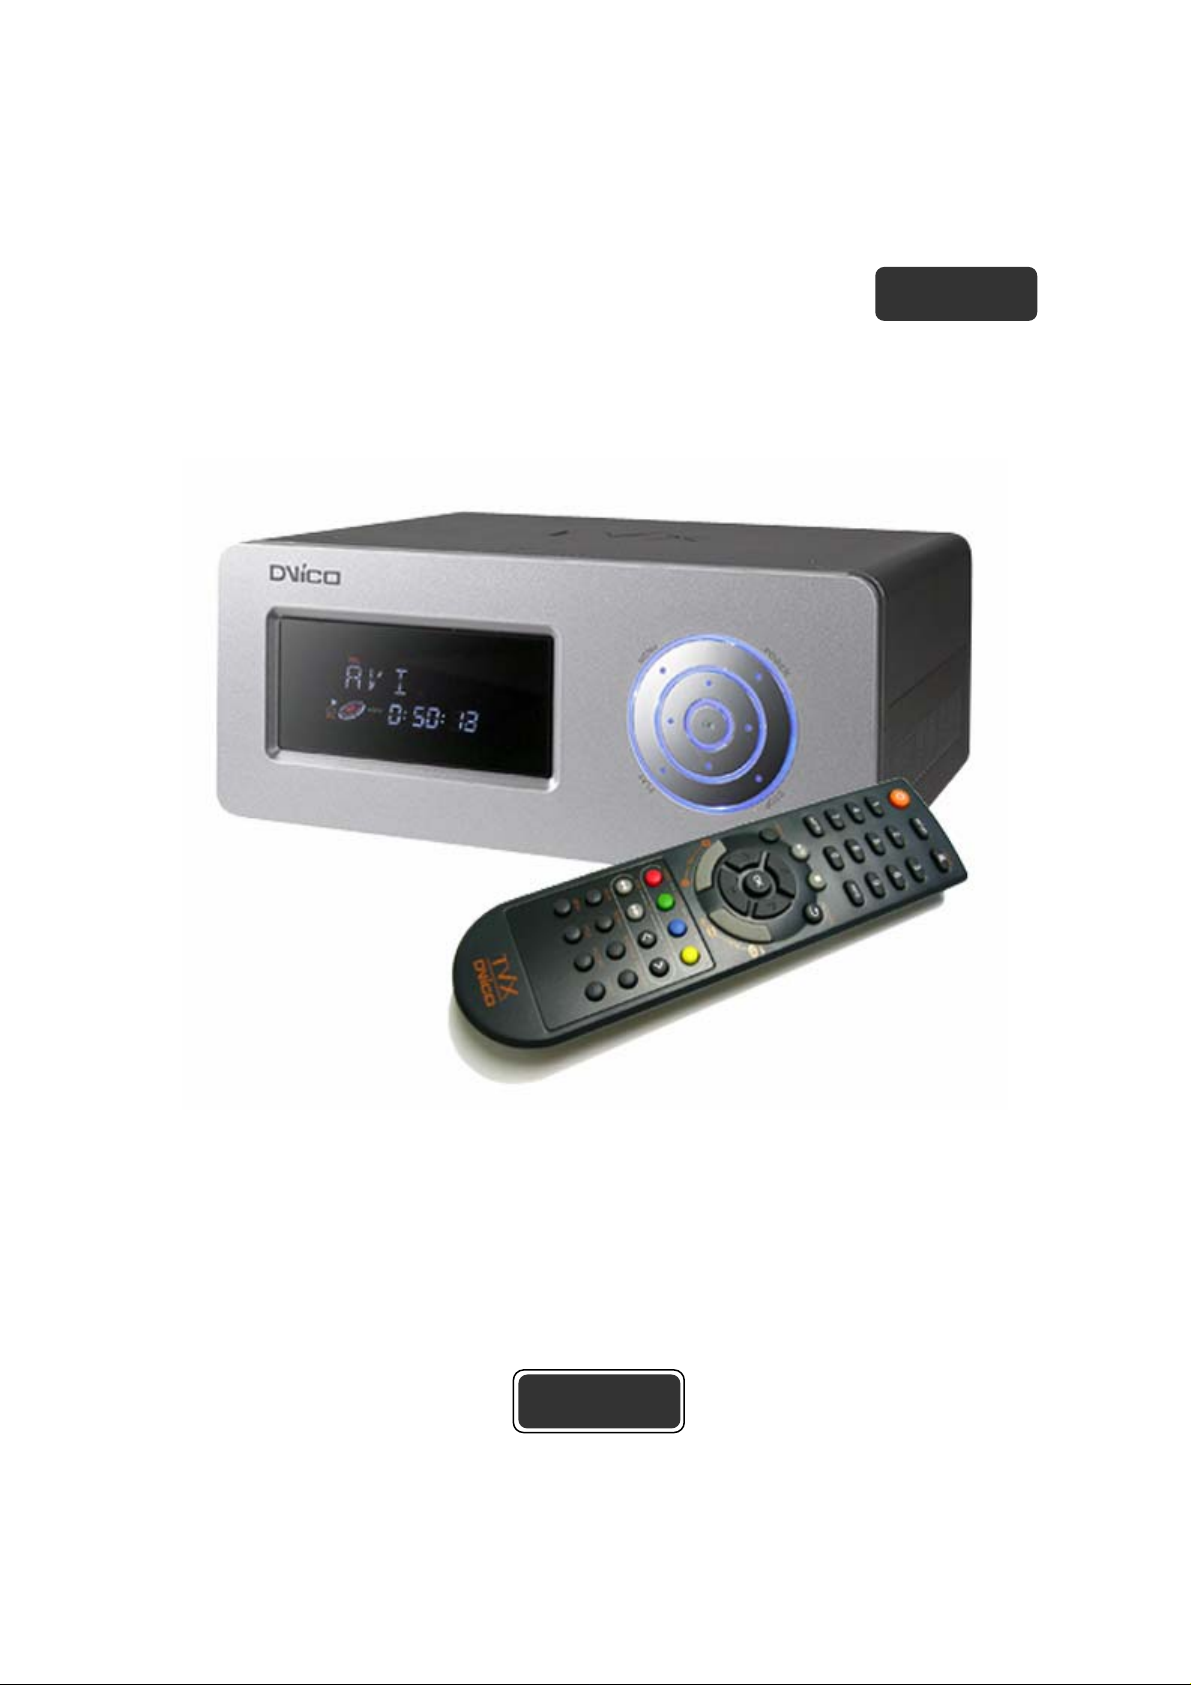
T V i X
M - 3100U
ENGLISH
Page 2

Table of Contents
1
Introduction.................................................................................................3
1.1 What the TViX is?....................................................................................................................... 3
1.2 Specification................................................................................................................................ 3
1.3 TViX Connection......................................................................................................................... 4
2
Caution........................................................................................................5
2.1 Safety notice............................................................................................................................... 5
2.2 Note for Win98SE USB user ...................................................................................................... 5
3
Name of each part ......................................................................................6
3.1 Control Panel.............................................................................................................................. 6
3.2 Cable connection ( Audio, Video, Power, USB interface ).......................................................... 6
3.3 Package contents....................................................................................................................... 6
4
Installation and connection.......................................................................7
4.1 Video Connection ....................................................................................................................... 7
4.2 Audio connection........................................................................................................................ 9
4.3 HDD Installation/Exchange....................................................................................................... 10
4.4 TViX Setup Menu...................................................................................................................... 12
5
Using remote controller...........................................................................15
5.1 Basic function ........................................................................................................................... 15
5.2 Descriptions on each buttons................................................................................................... 16
5.3 Extra feature............................................................................................................................. 20
6
Firmware upgrade ....................................................................................26
7
Using USB connection with PC...............................................................28
7.1 Windows 98SE Driver Installation ............................................................................................ 28
7.2 Making partition and formatting the HDDs under Windows 98SE / ME ................................... 31
7.3 Making partition and formatting the HDDs under Windows 2000 / XP..................................... 33
7.4 Unplug or eject hardware ......................................................................................................... 35
8
Appendix - Technical Terms....................................................................36
9
GNU General Public License...................................................................38
2
Page 3
1 Introduction
1.1 What the TViX is?
Enjoy your digital movies, music and photos on your TV!! T ViX c an be us ed as a multimedia jukebox,
music tank, photo album a nd even as a por table stora ge. TViX br ings all of your dig ital c onte nts to the
living room so that you can enjoy movie, music and photos with your family, friends or colleagues.
Multimedia Jukebox
TViX supports most of the video formats inclu ding MPEG-1, MPEG -2 (AVI, VO B) and MPEG-4 (AVI,
XviD) movies on th e internet. CD or DVD can be copied into T ViX and you c an enjoy your favorite
contents on TV. Download your favorite contents into TViX and go vacation with it.
TViX is a portable multimedia jukebox!!
- Supporting ISO file format (4GB or more), but not available AVI file of 2GB or above.
- Under the NTFS format system, over 4 GB of video file(mpg) is supported
Music Tank
Put all of your m usic files in to TViX and travel with it!! TViX can play var i et y of audi o f iles su ch as MP3 ,
Ogg Vorbis or WMA through the TV speaker or your existing audio system. To listen to your favorite
music files continuous ly, you can organize a custom play list and e njoy m usic all day without c hanging
CDs.
Photo Album
TViX is also a Digital photo album which can hol d tens of thousands of high resolution di gital photos.
Take digital pictures and store the files in TViX. Instead of bringing your whole family to your PC
monitor to watch the d igital photos, e njoy the ph otos on T V sitting on a com fortable sofa in your living
room. Life is so good.
Portable Storage
TViX uses a 3.5” HDD as its contents storage and it works j ust lik e a external US B 2.0 h ard dri ve when
you connect it to your PC. When sharing multim edia files with your fr iends, you can do it so fast b y
using the latest USB2.0 interf ac e. USB2.0 lets you trans f er data at 480Mbps!!
1.2 Specification
Video AVI 3.x/4.x/5.x , XviD, AVI, MPG, mp2,DAT, VOB, IFO, ISO
File format supported
Video Output S-Video, Composite ,HD Component (Progressive mode support)
Audio output Digital 5.1CH, Analog 2 CH
VFD Display
Interface USB2.0 ( data transfer rate: 480Mbps )
OS Supported
SubTitle Smi, SMIL, .SUB (bitmap) + .idx
File System NTFS, FAT32
Size 183x139x75 mm
Weight 1.3Kg (HDD included)
Operating
Temperature
Power supply
music MP3, WMA, WAV, Ogg Vorbis
Image JPEG
7 Alpha-Numeric Character
5 Digit Numeric Display
Windows98SE/ Me/ 2000/ XP or later
0 - 40℃
Power Supply embedded( You don’t need additional adapter), Free Voltage(AC90250V~50/60Hz)
3
Page 4
1.3 TViX Connection
When TViX is connected to PC, it is recognized as a USB external storage.
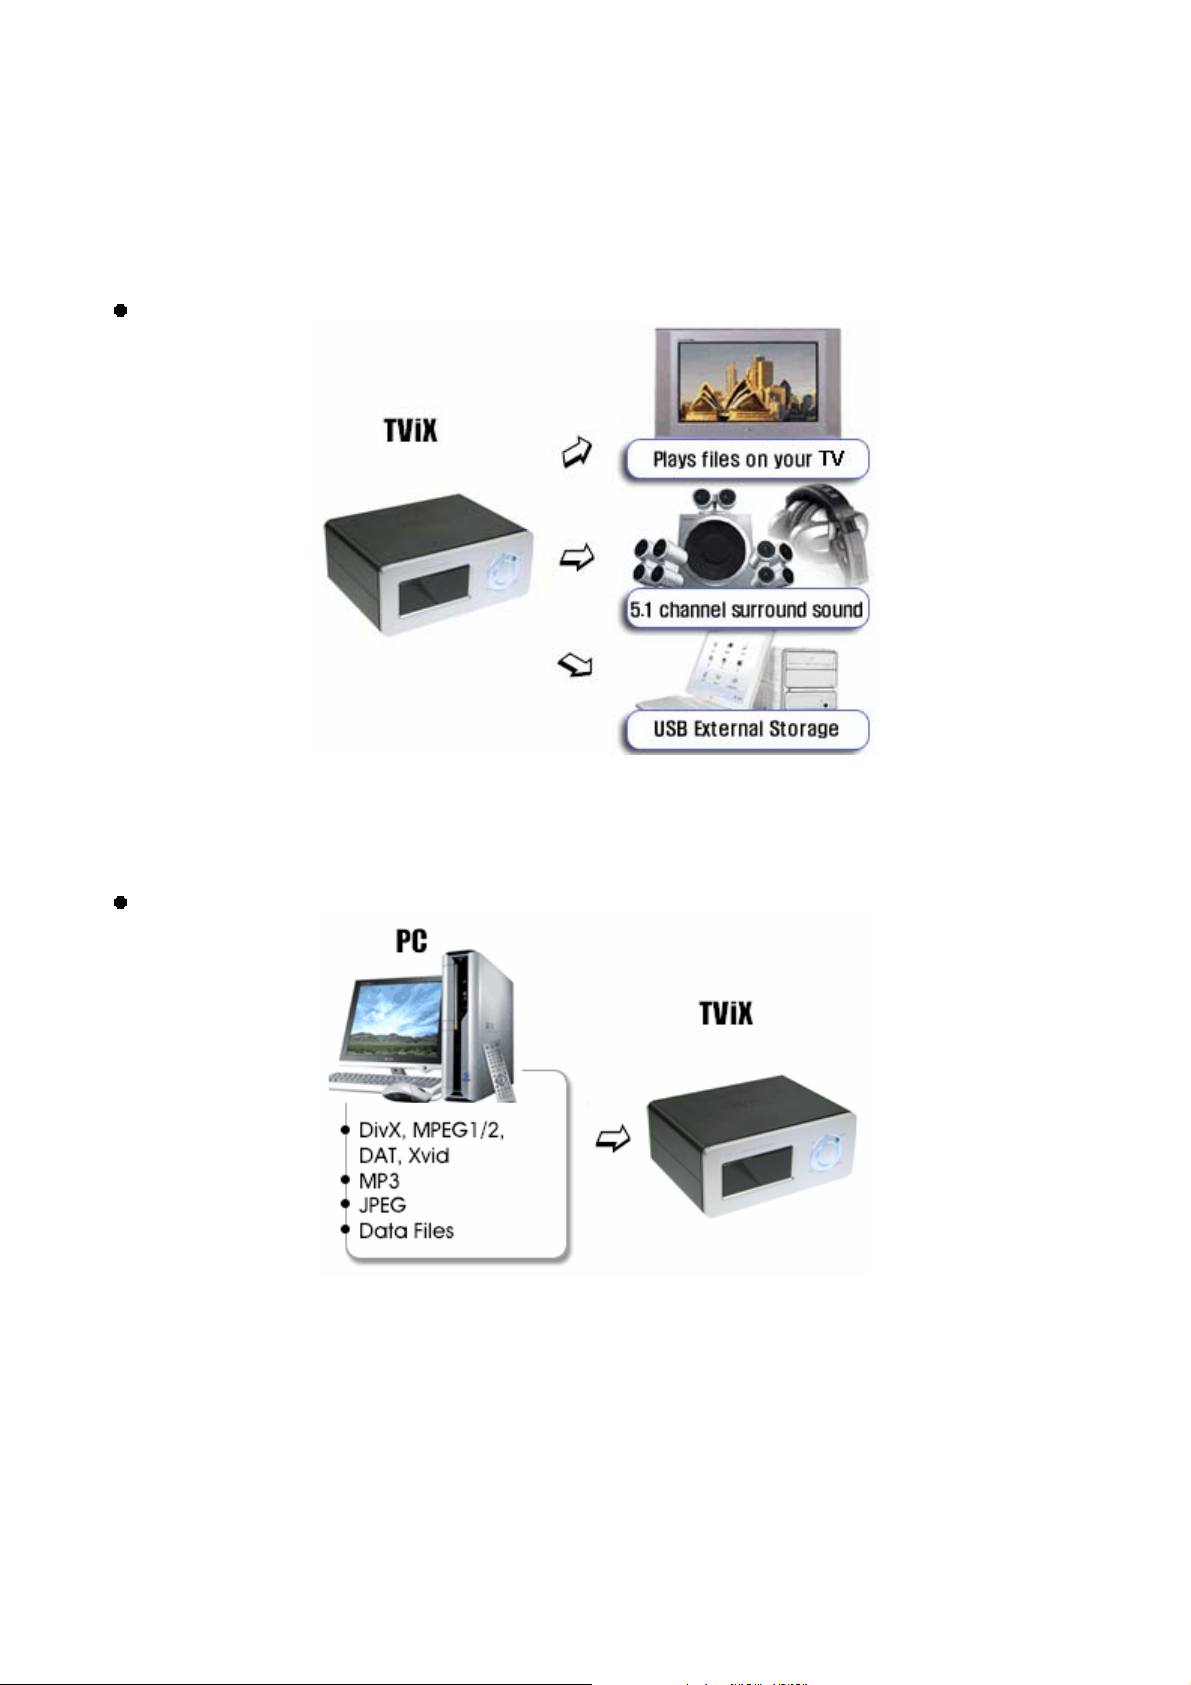
Multimedia Player Mode ( Connecting with the Video or Audio Cable )
[ Connecting TViX to a TV ]
TViX serves as a player and you can playback multimedia files(movie, music, picture).
Portable Storage Mode ( Connecting with USB/ Cable )
[ Connecting TViX to a Computer ]
When the TViX is connec te d to US B p or t a nd Vide o p o rt at th e s ame time, if you press the “ Po wer b utto n”,
TViX serves as a player and if you press the “Mute button”, TViX serves as an external storage
4
Page 5
2 Caution
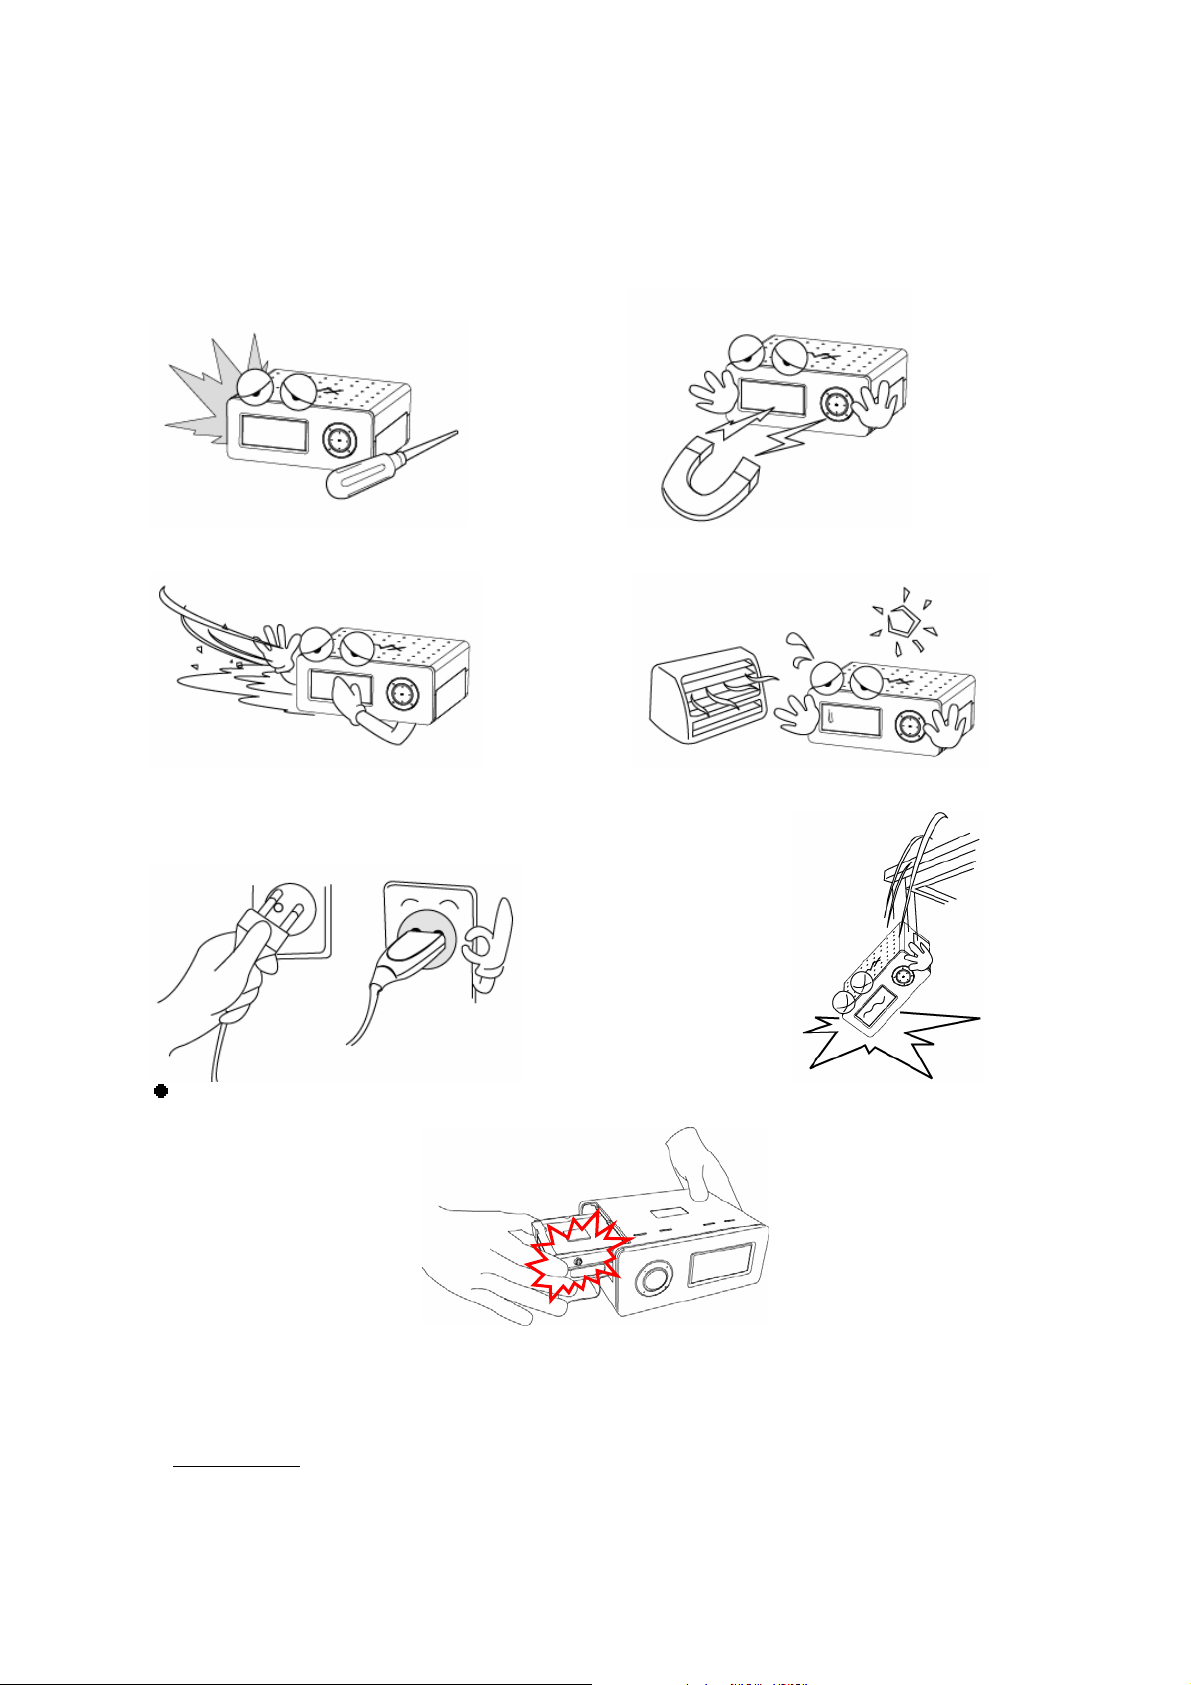
2.1 Safety notice
Do not disassemble the de vice; it may
cause malfunction or fire
Do not expose TViX to oil, smoke, water,
humidity and dust.
Do not touch power plug with wet hands or do
not use defective power cable & loose outlet. It
may cause electric shock or fire
.
.
Magnetic material m ay erase the data in TViX.
Keep any magnetic material away from TViX.
Keep TViX away from heat or fire.
Do not block any ventilatio n openings. Ensure
that a free airflow is maintained around the
appliance.
Be careful not to drop TViX from a height. It
will damage the internal hard drive.
.
Do not take out the inter nal hard drive by yourself. T he internal hard drive is very ho t when it is
working. The warranty will be void if any other hard dri ve is inserted into TViX.
"Do not block any ventilation openings. Ensure that a free airflow is maintained around the appliance."
2.2 Note for Win98SE USB user
If you are a Windows98SE user, you should download a USB storage driver from our web site
www.tvix.co.kr
Windows ME/2000/XP.
5
before you connect your TViX with your s ystem . You do not need to install driver under
Page 6
3 Name of each part
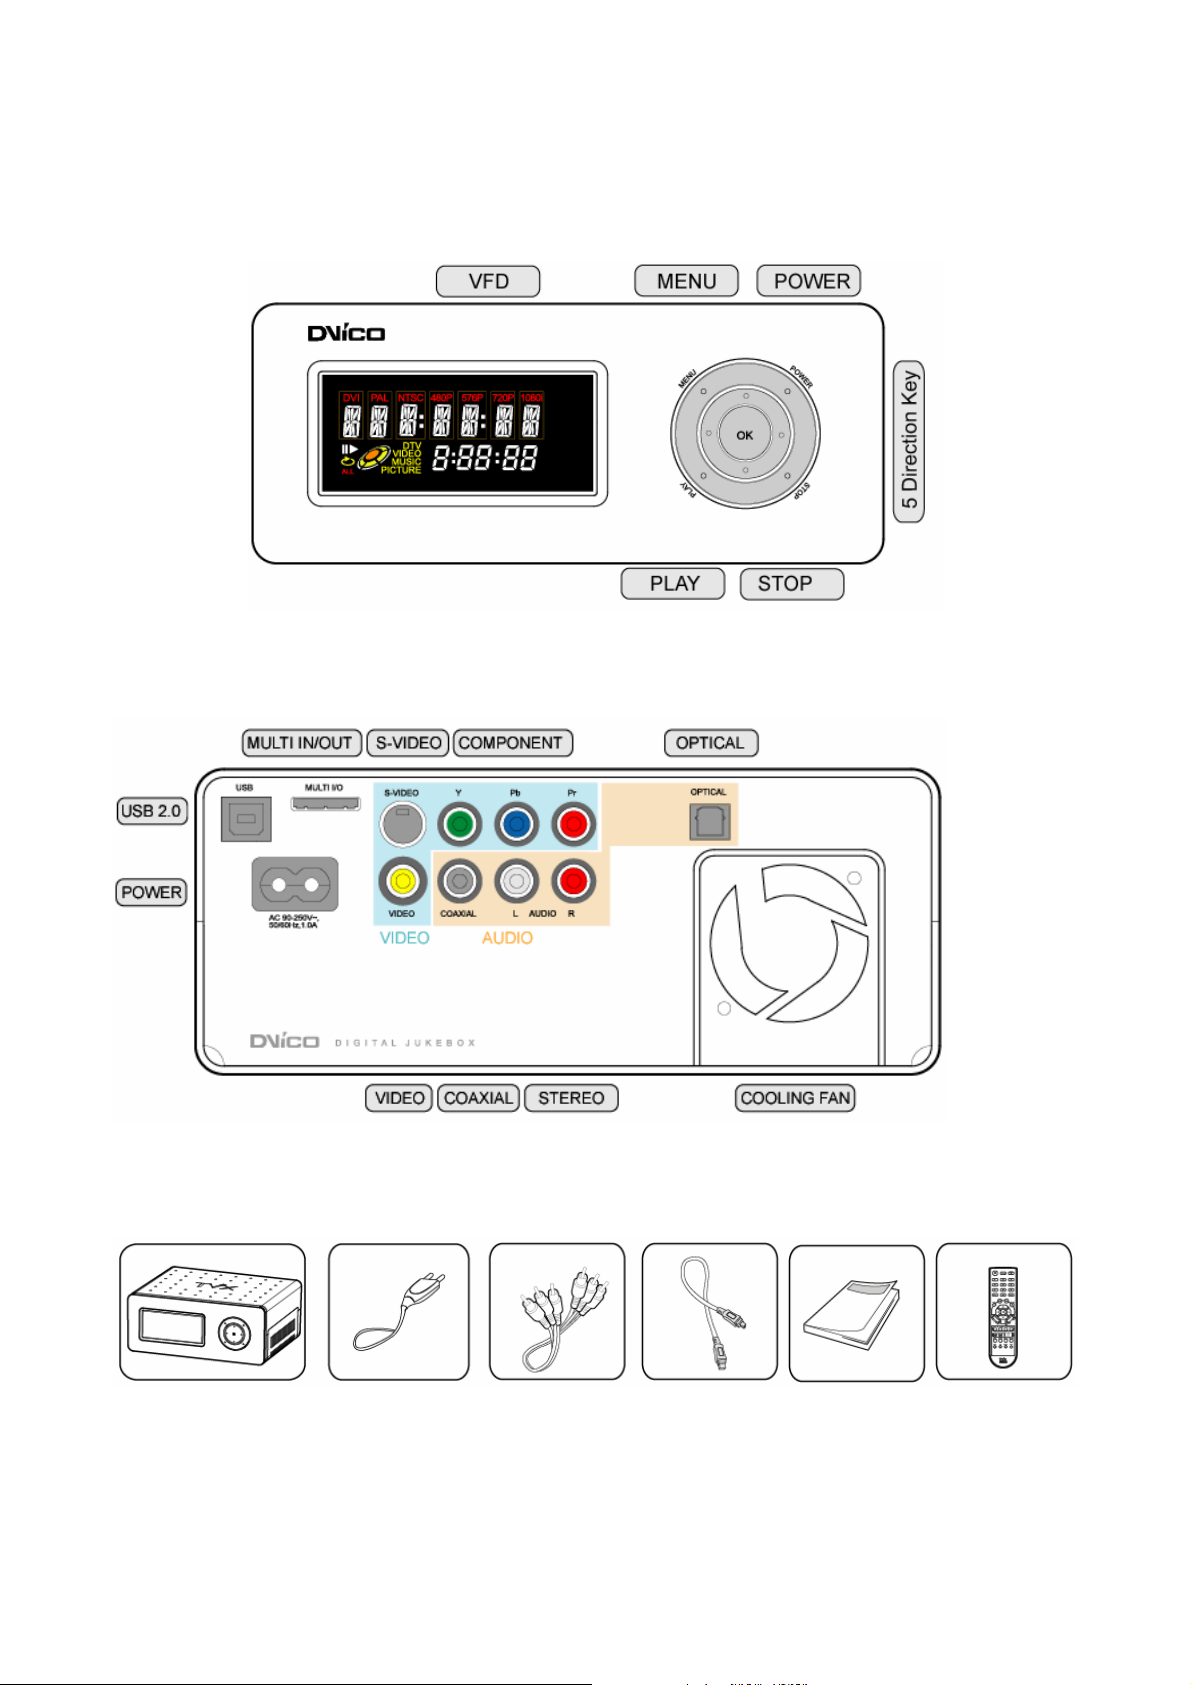
3.1 Control Panel
You can do basic operation without remote controller.
3.2 Cable connection ( Audio, Video, Power, USB interface )
Please connect appropriate output to a TV or a digital decoder/amp.
3.3 Package contents
TViX main unit Power cable A/V cable USB Cable Manual TViX Remote
* Multi In/Out is optional.
6
Page 7
4 Installation and connection
4.1 Video Connection
4.1.1 Connection with ordinary(Composite) TV output
Connect TViX and your TV using the yellow video cable.
Turn on the TViX and TV. Select appro priate video input m ode on your TV until you can get th e initial TViX
screen.
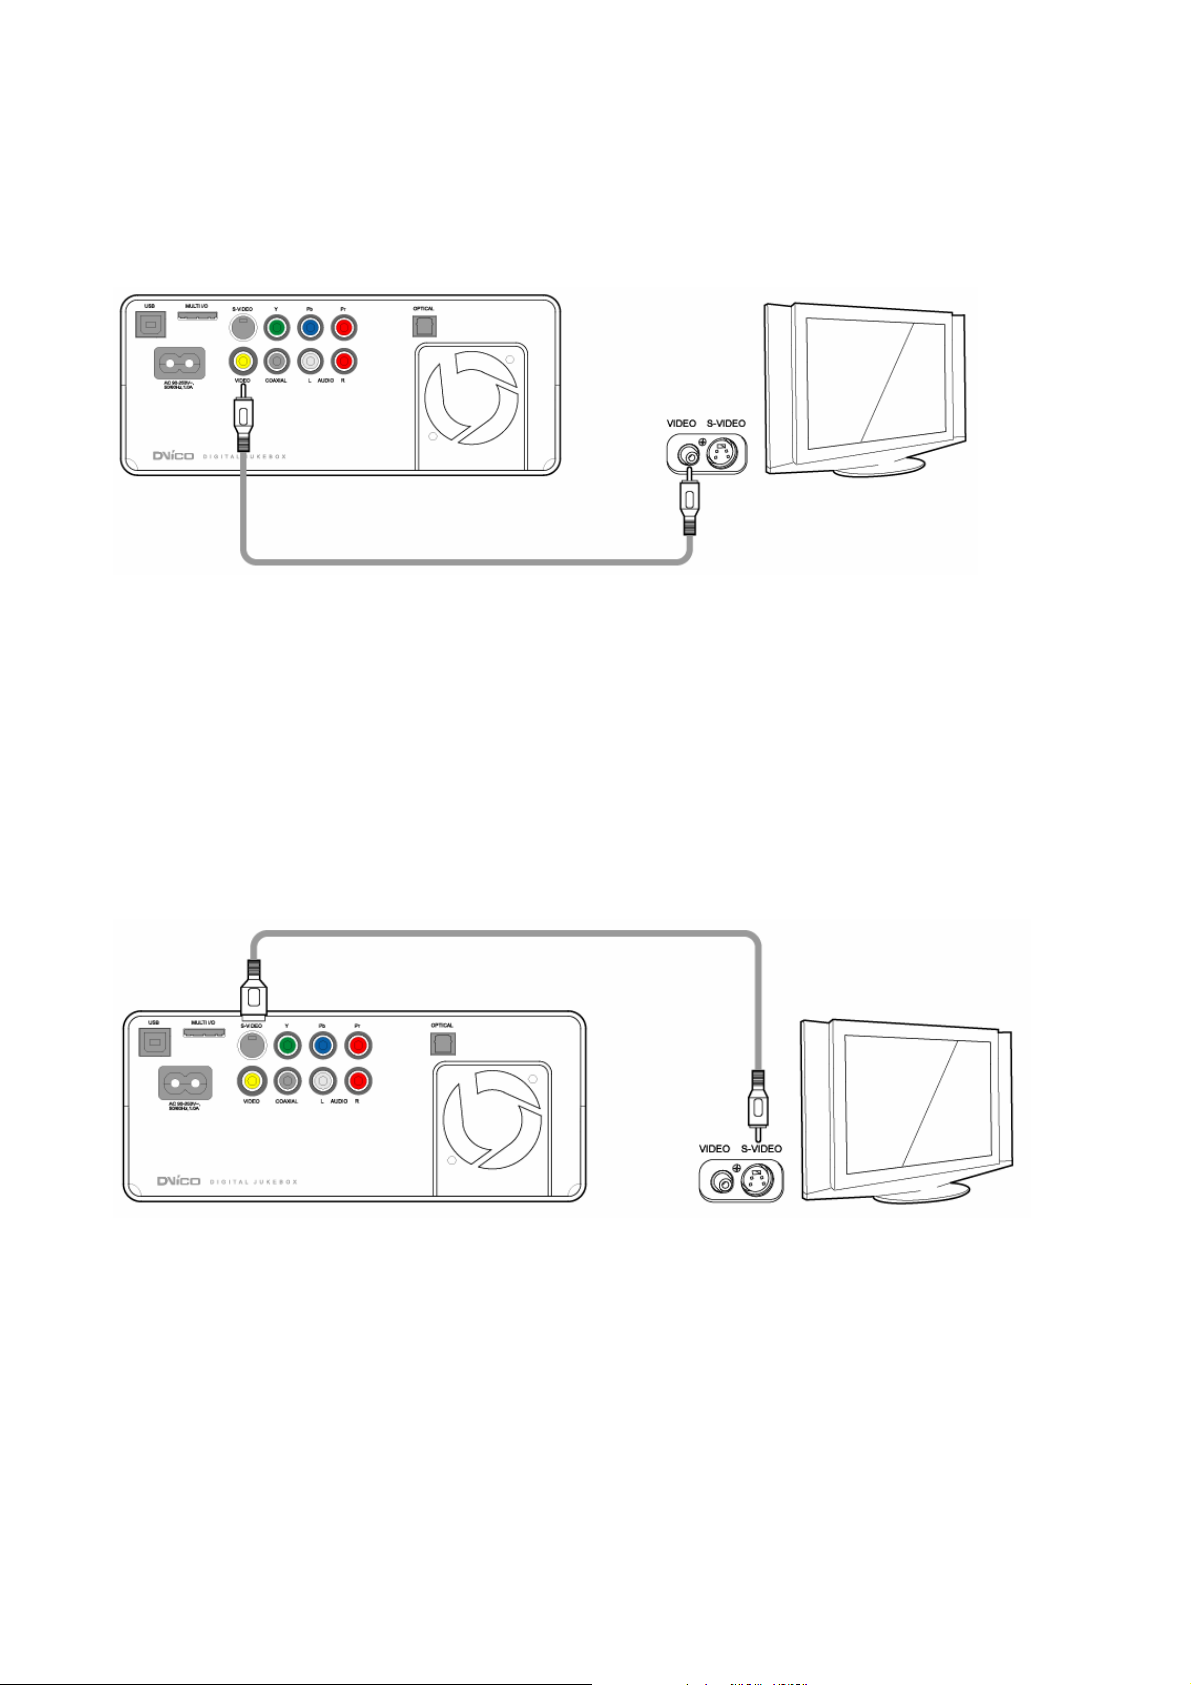
4.1.2 Connection to S-VIDEO output
Connect TViX and your TV using the S-Video cable.
Turn on the TViX and TV. Select appro priate video input m ode on your TV until you can get th e initial TViX
screen.
(S-Video cable is not included and should be purchased separately)
7
Page 8
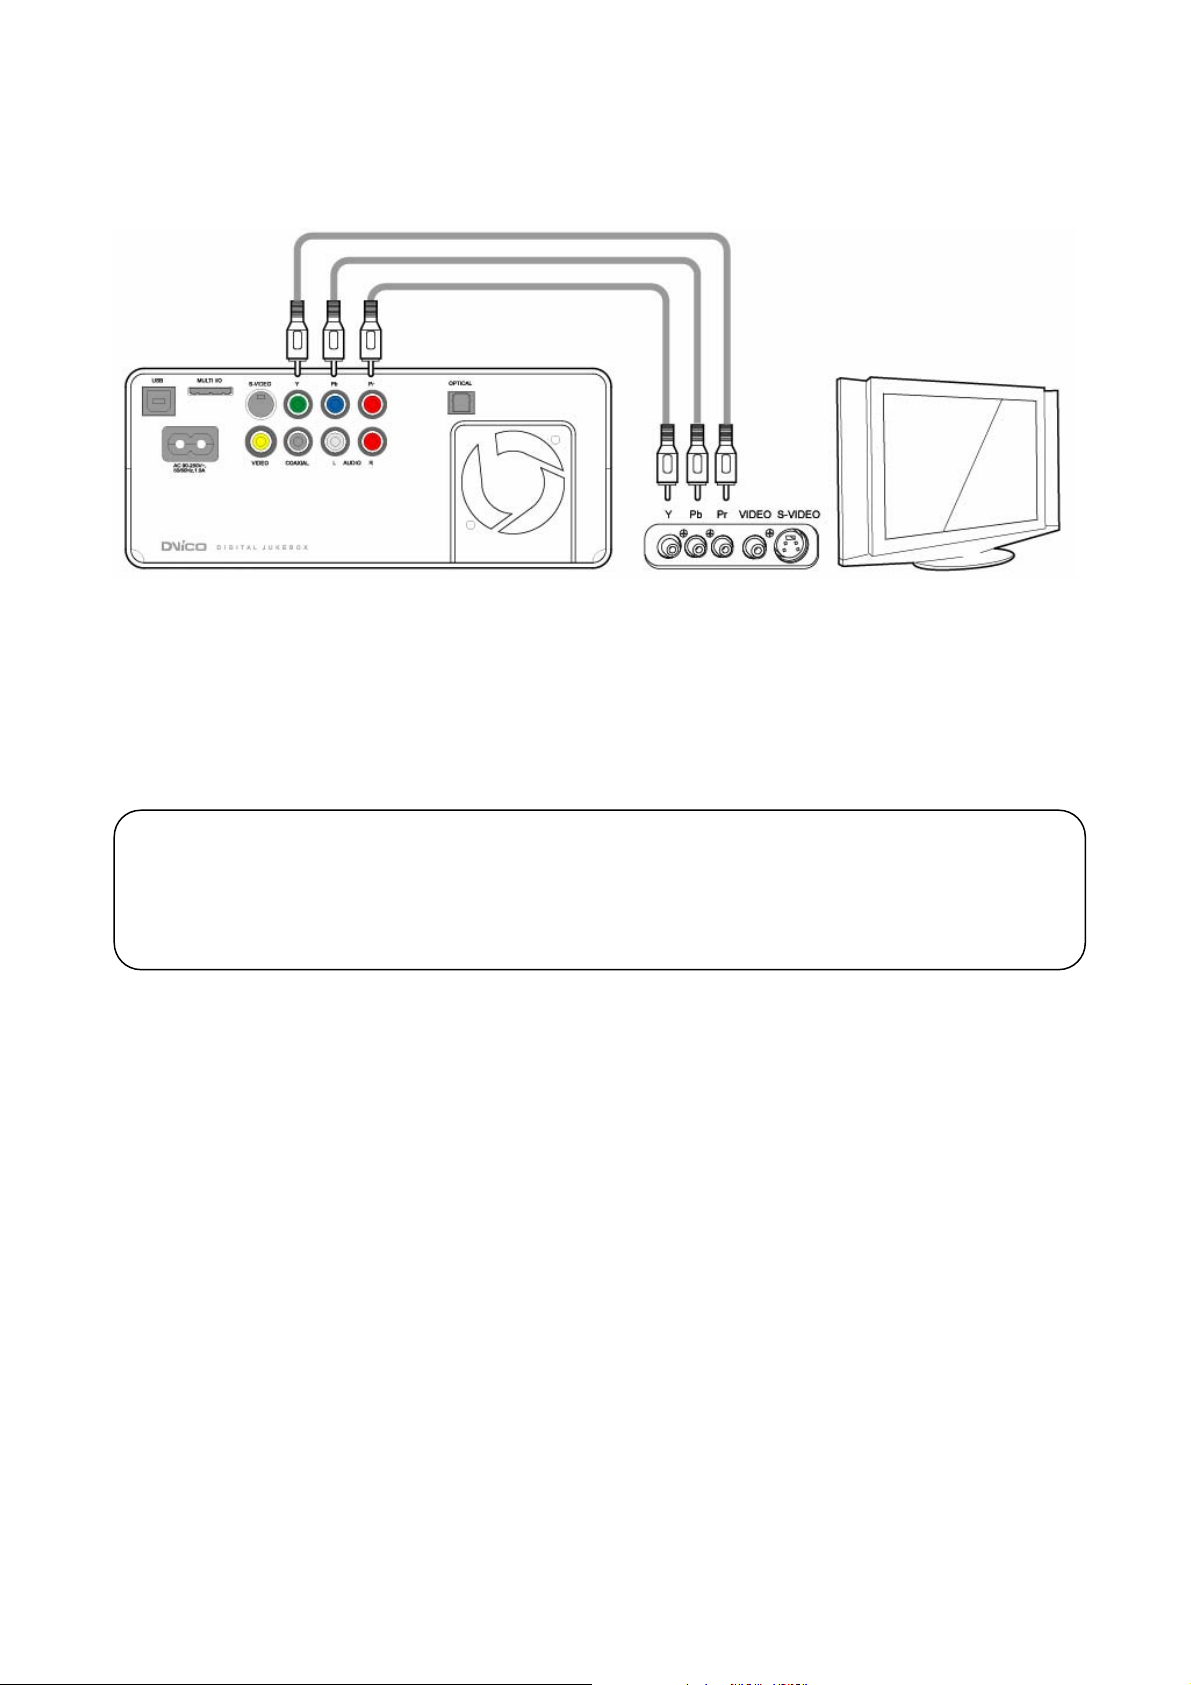
4.1.3 Connection to component output
Connect TViX and your TV with component cable as the image above.
Turn on the TViX and TV. Select appropria te video input mode on your TV ( in this case, Component input
mode )
NOTE: After you connect t he video cable to your TV, press the TV out button repeatedl y on your rem ote
controller until you can get stable TViX initial screen.
* Component cable is not included in the TViX. It should be purchased separately.
CAUTION
After you connect the video cable to your T V, press the TV Out button repeatedly on your rem ote control
until you get the initial TViX screen.
* The component cable is not included in the TViX and must be purchased separately.
8
Page 9
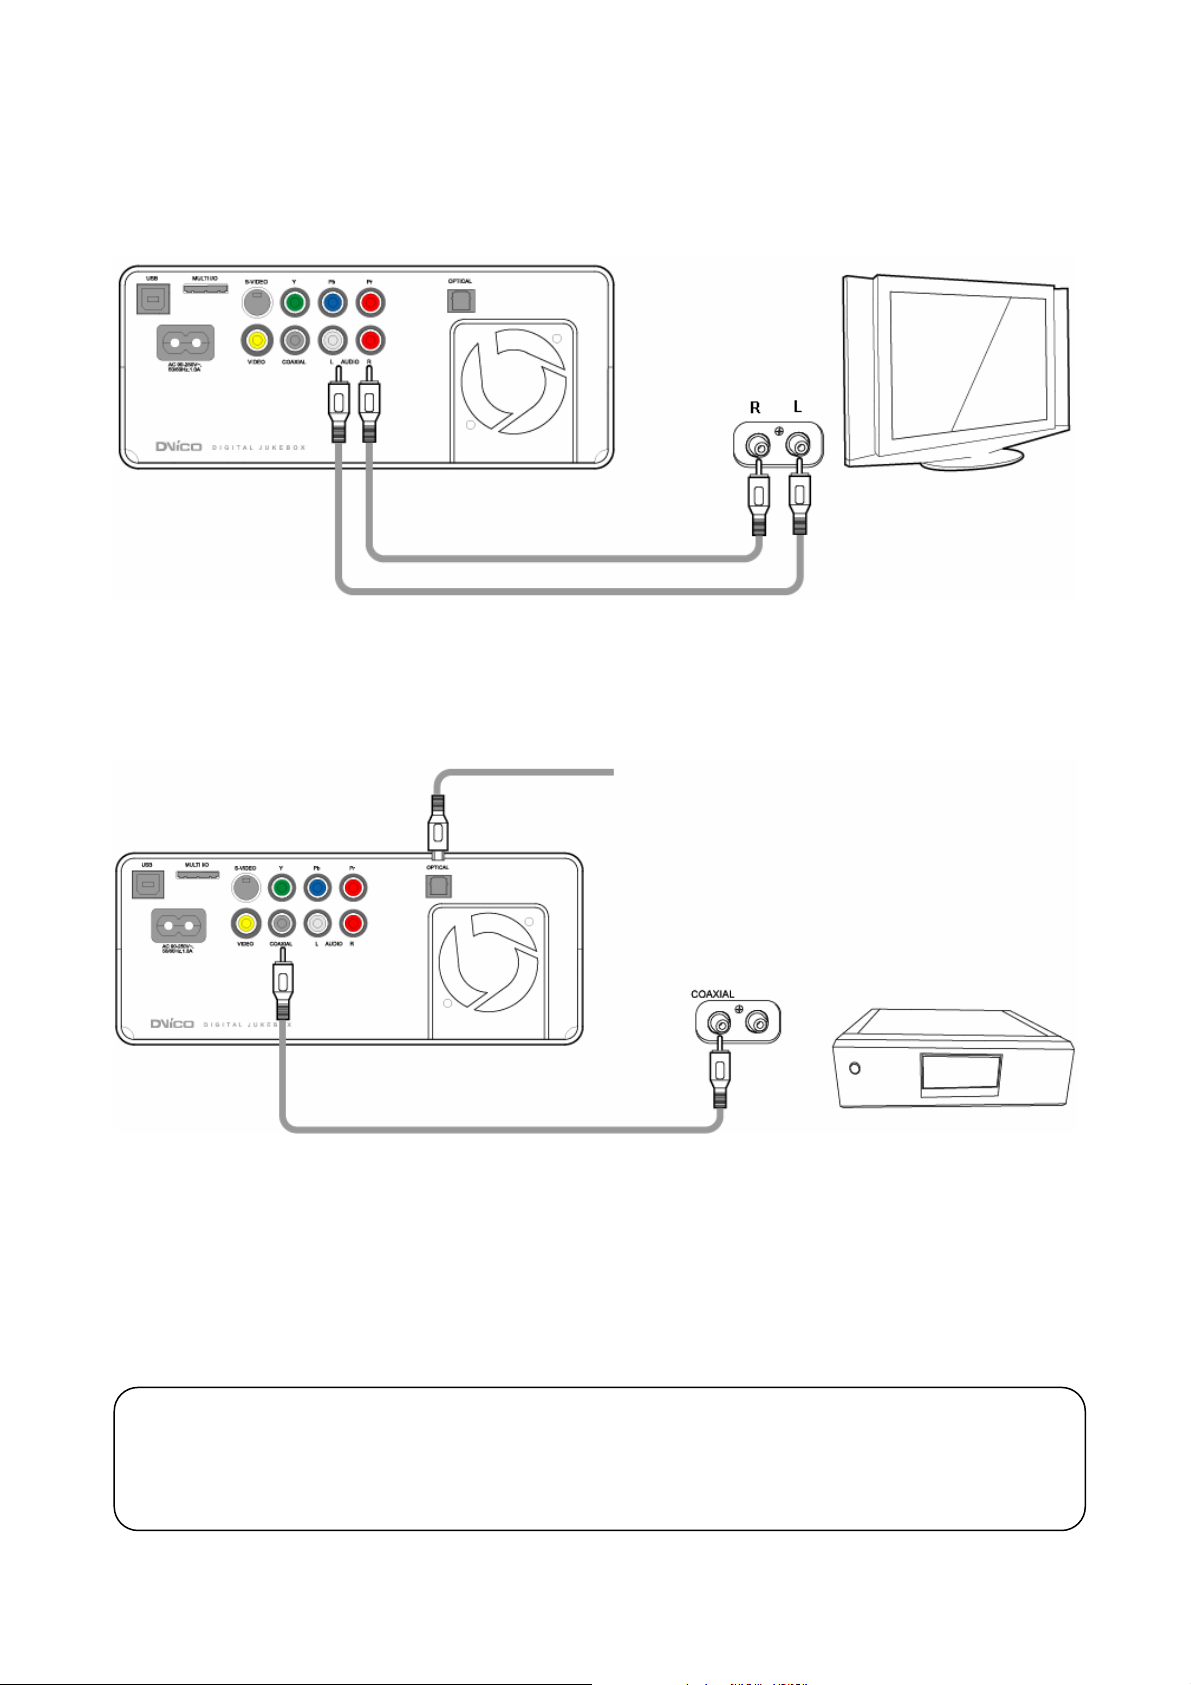
4.2 Audio connection
4.2.1 Connection to 2 CH of normal TV
Connect left(white), right(red) sound output to the appropriate terminal of your TV or Hi-Fi.
4.2.2 Connection to 5.1CH amplifier(Digital)
Optical cable
When you have a multi channel decoder/amplifier with optical/coaxial input, you can enjoy 5.1 CH high
quality sound through coaxial or optical cable.
The illustration on t he left s ho ws h o w to conn ec t with coaxial cable. Optical c a ble connec ti on c a n b e d one by
similar method.
(Those cables are not included in the package and should be purchased separately)
** You may not connect the sound cables both optical cable and coaxial cable.
CAUTION
If no sound is heard after connecting the Optical or Coaxial Cable, you have to change the audio setup of
TViX to Digital.
9
Page 10
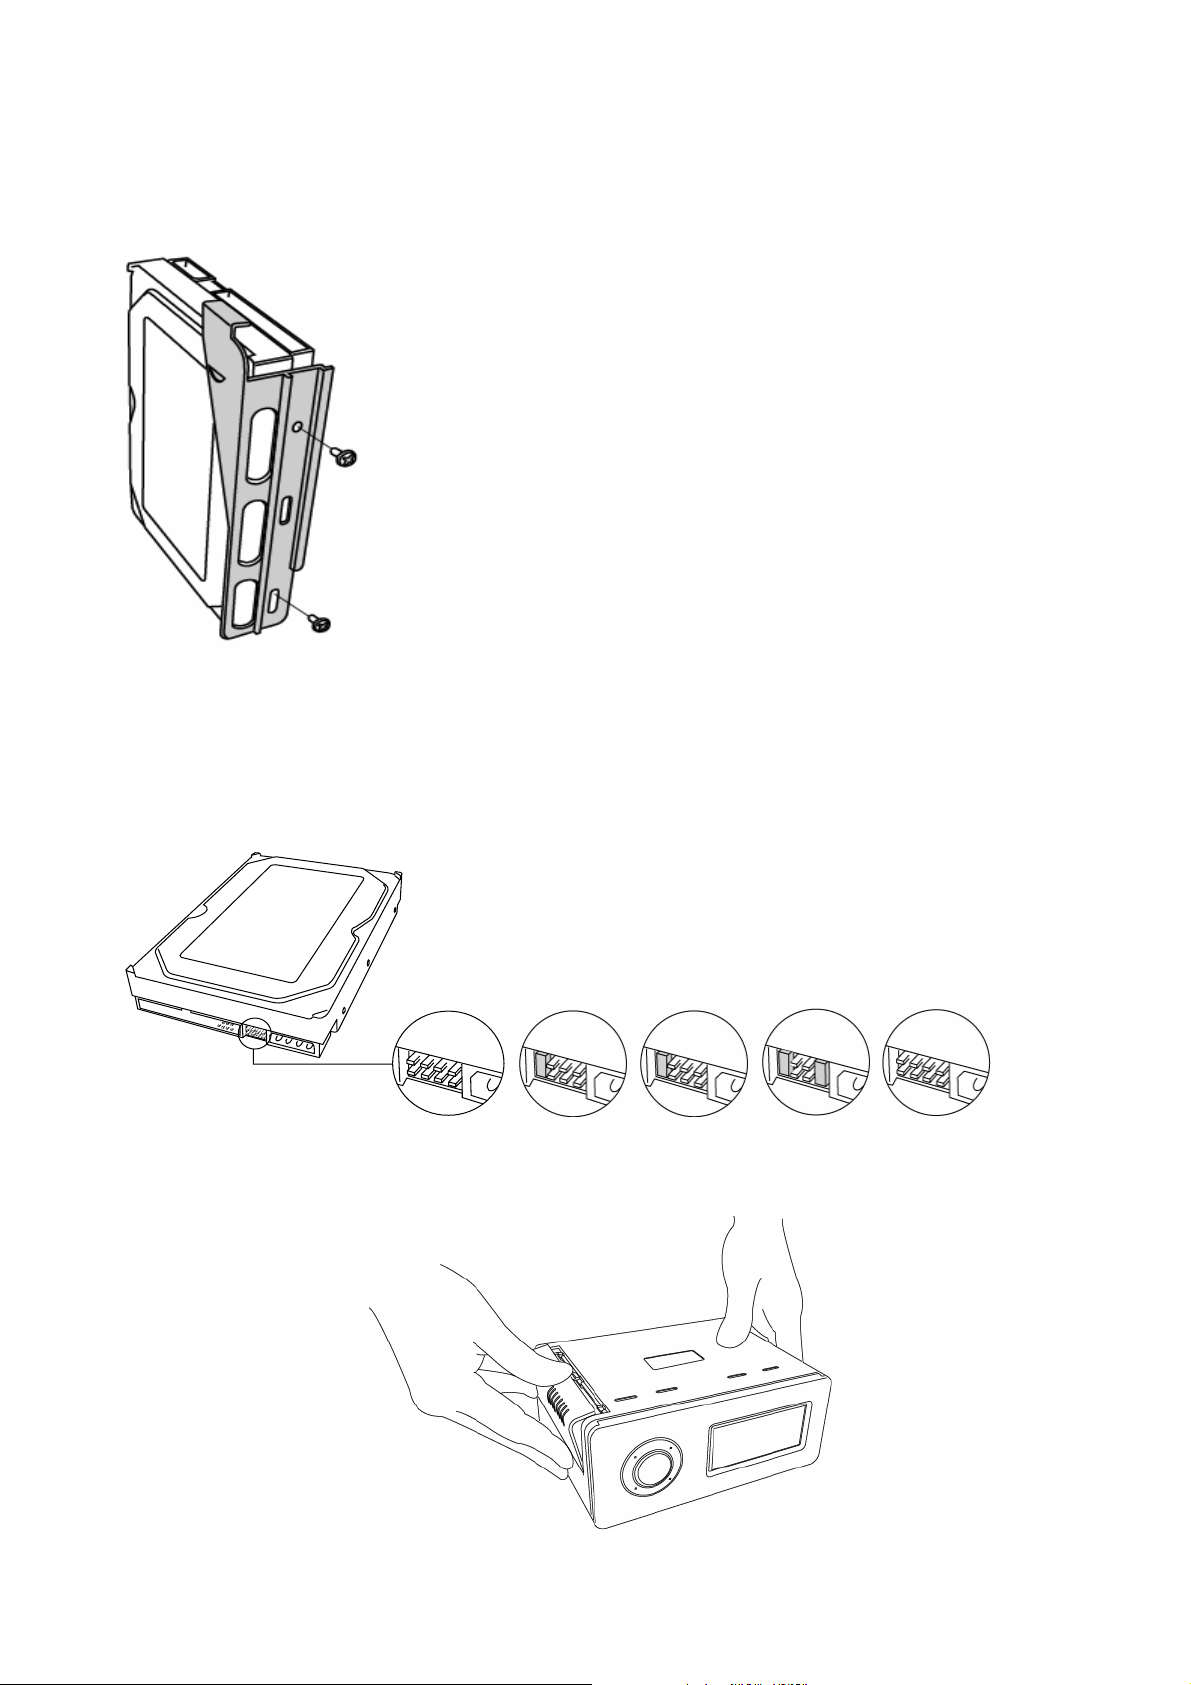
4.3 HDD Installation/Exchange
Warning: If you change the HDD of a TViX equipped with an HDD, the warranty will be voided.
Power Connector
< Jumper Settings >
The ‘Jumper Setting’ differs according to the HDD manufacturers, so please refer to the instruction s
of the specific HDD provided by the HDD manufacturers.
1. Assembling the TViX HD is very easy. Just follow the instructions below:
Use a driver and screw the hard disk on to the guide board.
Set the jumper to ‘Single Master’.
SAMSUNG Seagate IBM Western Digital
2. Open the lid of the TViX by sliding the lid like pictures.
10
Page 11
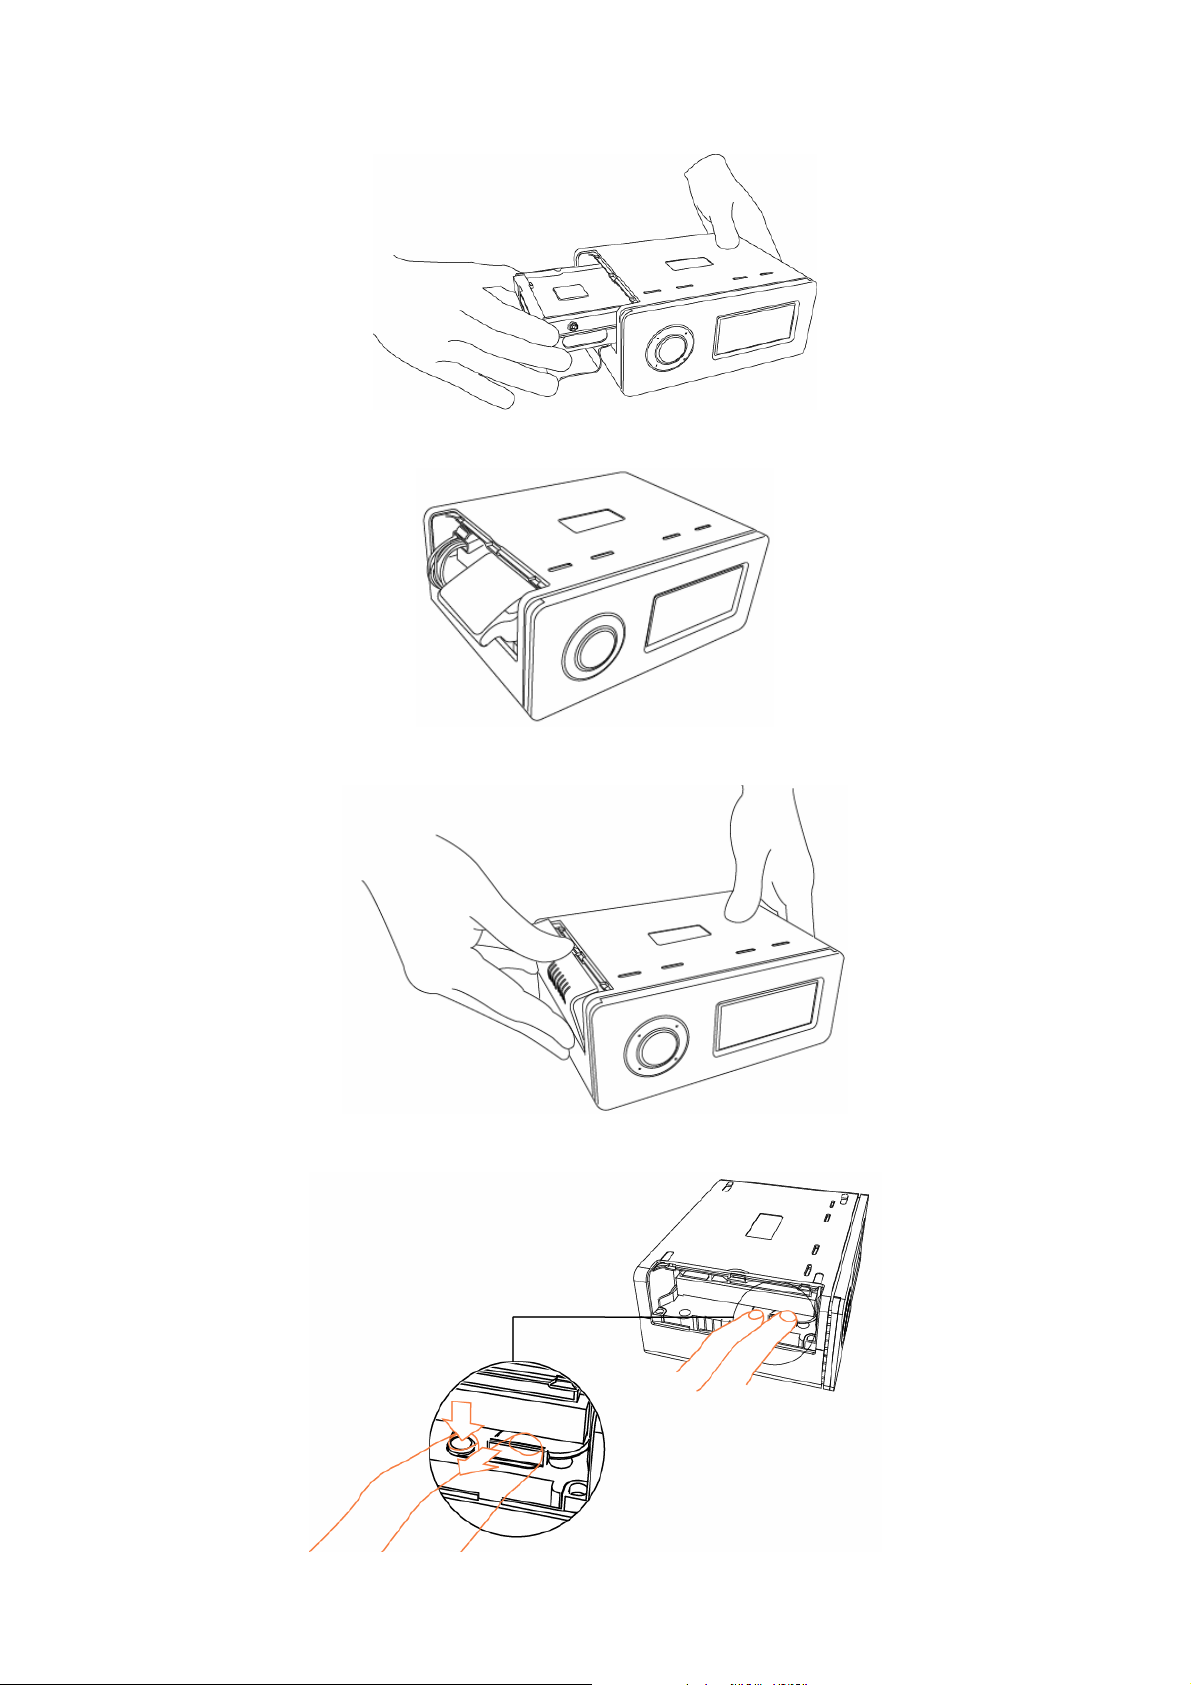
3. Set the jumper to Master and connect power cable and IDE cable
4. Put the HDD into the TViX after spreading the IDE cable to avoid damage
5. Close the lid of TViX.
6. To change the hard disk, pull the hdd’s guide while pushing the locking.
11
Page 12
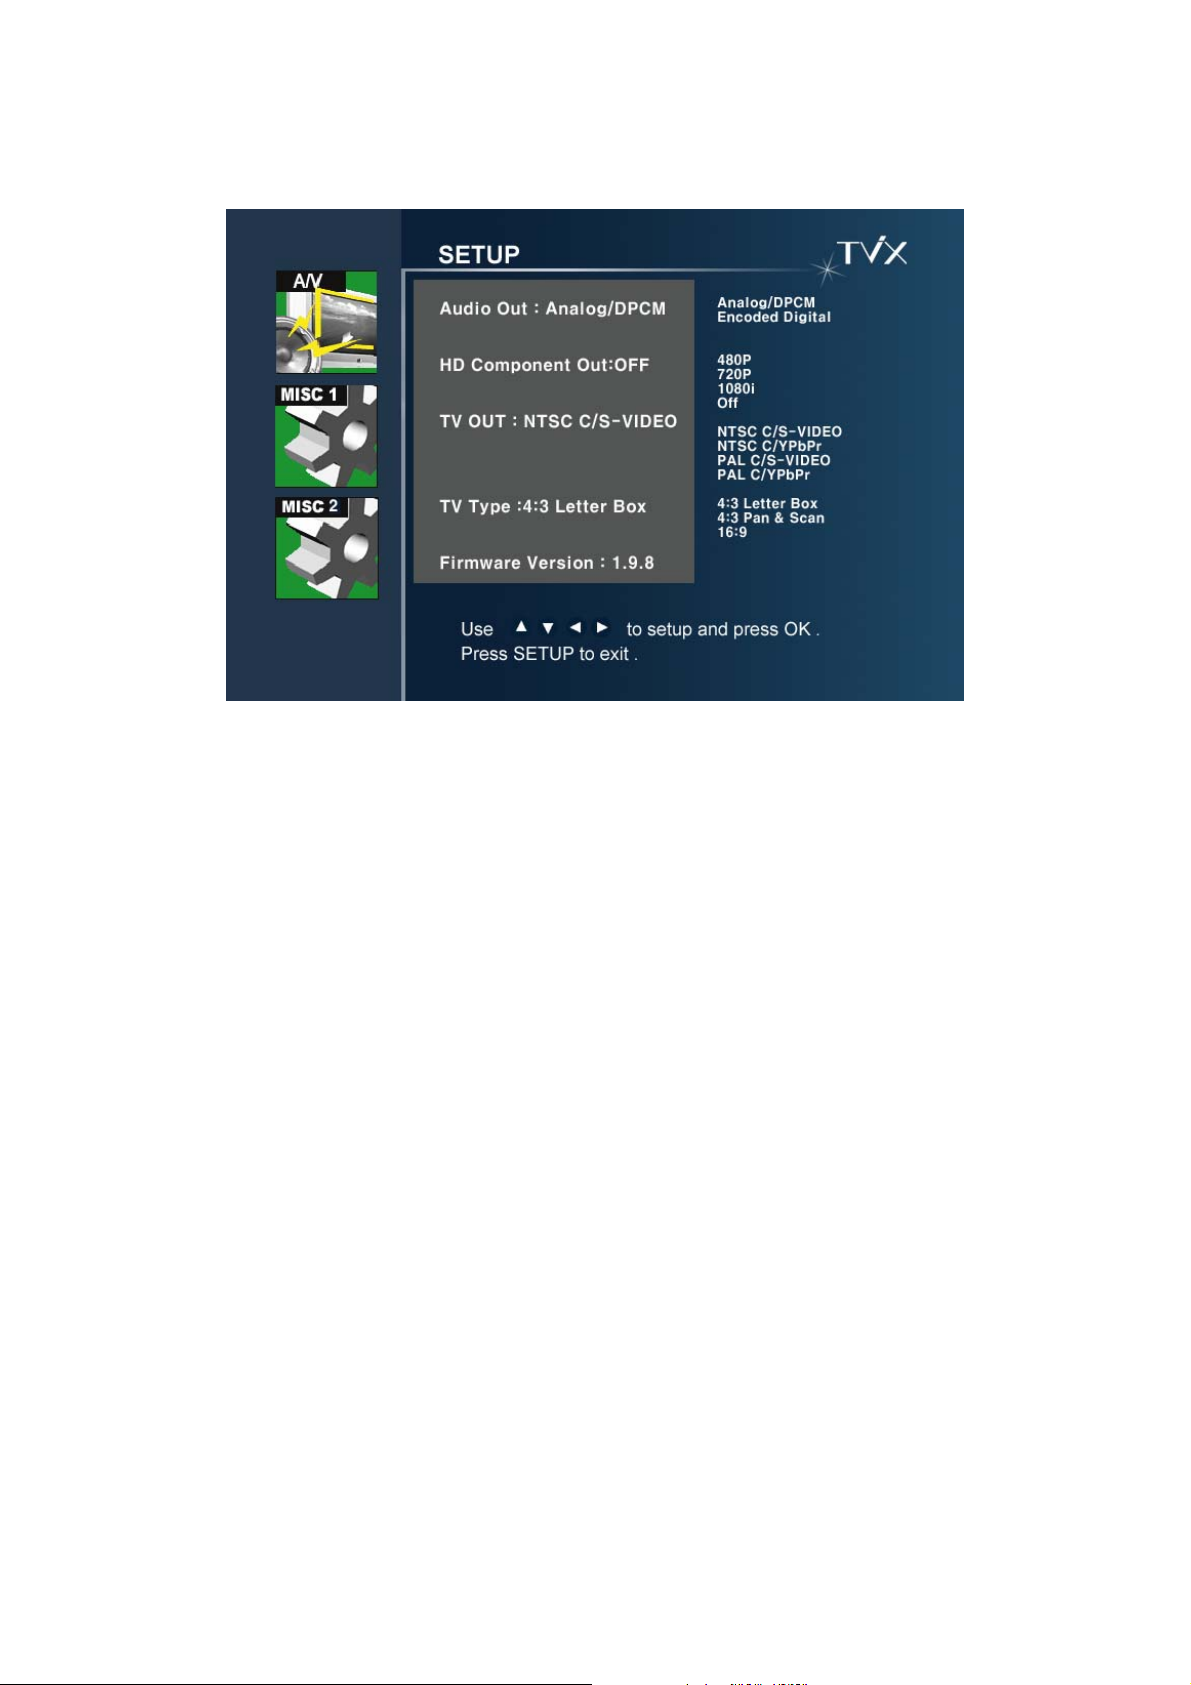
4.4 TViX Setup Menu
4.4.1 Audio/Video Setting
* Analog/DPCM
Select this when you connect the audio with stereo RCA cable.(RED and White)Output PCM data.
* Encoded Digital
Select this when you connect the audio with optical or coaxial cable for digital audio connection to the
Decoder/Amplifier. There will not be analog audio out from the analog audio port of TViX.
* HD Component Out
Select this when you connect the video through component(YPbPr) cable. You can select the output
resolution among 480P/720P/1080i. Setting to 1080i will work on all of the HD grade TVs.
* TV OUT
Default video setti ng of T ViX is COMPOS ITE (NT SC/S- VIDEO or PAL C /S-VIDE O) T his is the mos t general
setting that works with most of the TV.
NTSC C/YPbPr(480 i), PAL C/YPbPr( 576i) is a specia l case. Selec t these settin gs if your TV is connec ted
to TViX with component output.
Note : If you fail to see the initial T ViX screen after the unit a nd TV are turned on, make s ure you have
chosen the right TV out option by repeatedly pressing TV Out button on the remote controller.
* TV Type : 4:3 Letter Box / 4:3 Pan & Scan for ordinary TV.
16:9 for Wide TVs like HDTV or Plasma TV.
If the ratio of TV is 4:3, select 4:3 letter box or 4:3 Pan & Scan, if the ratio of TV is 16:9, select 16:9
12
Page 13
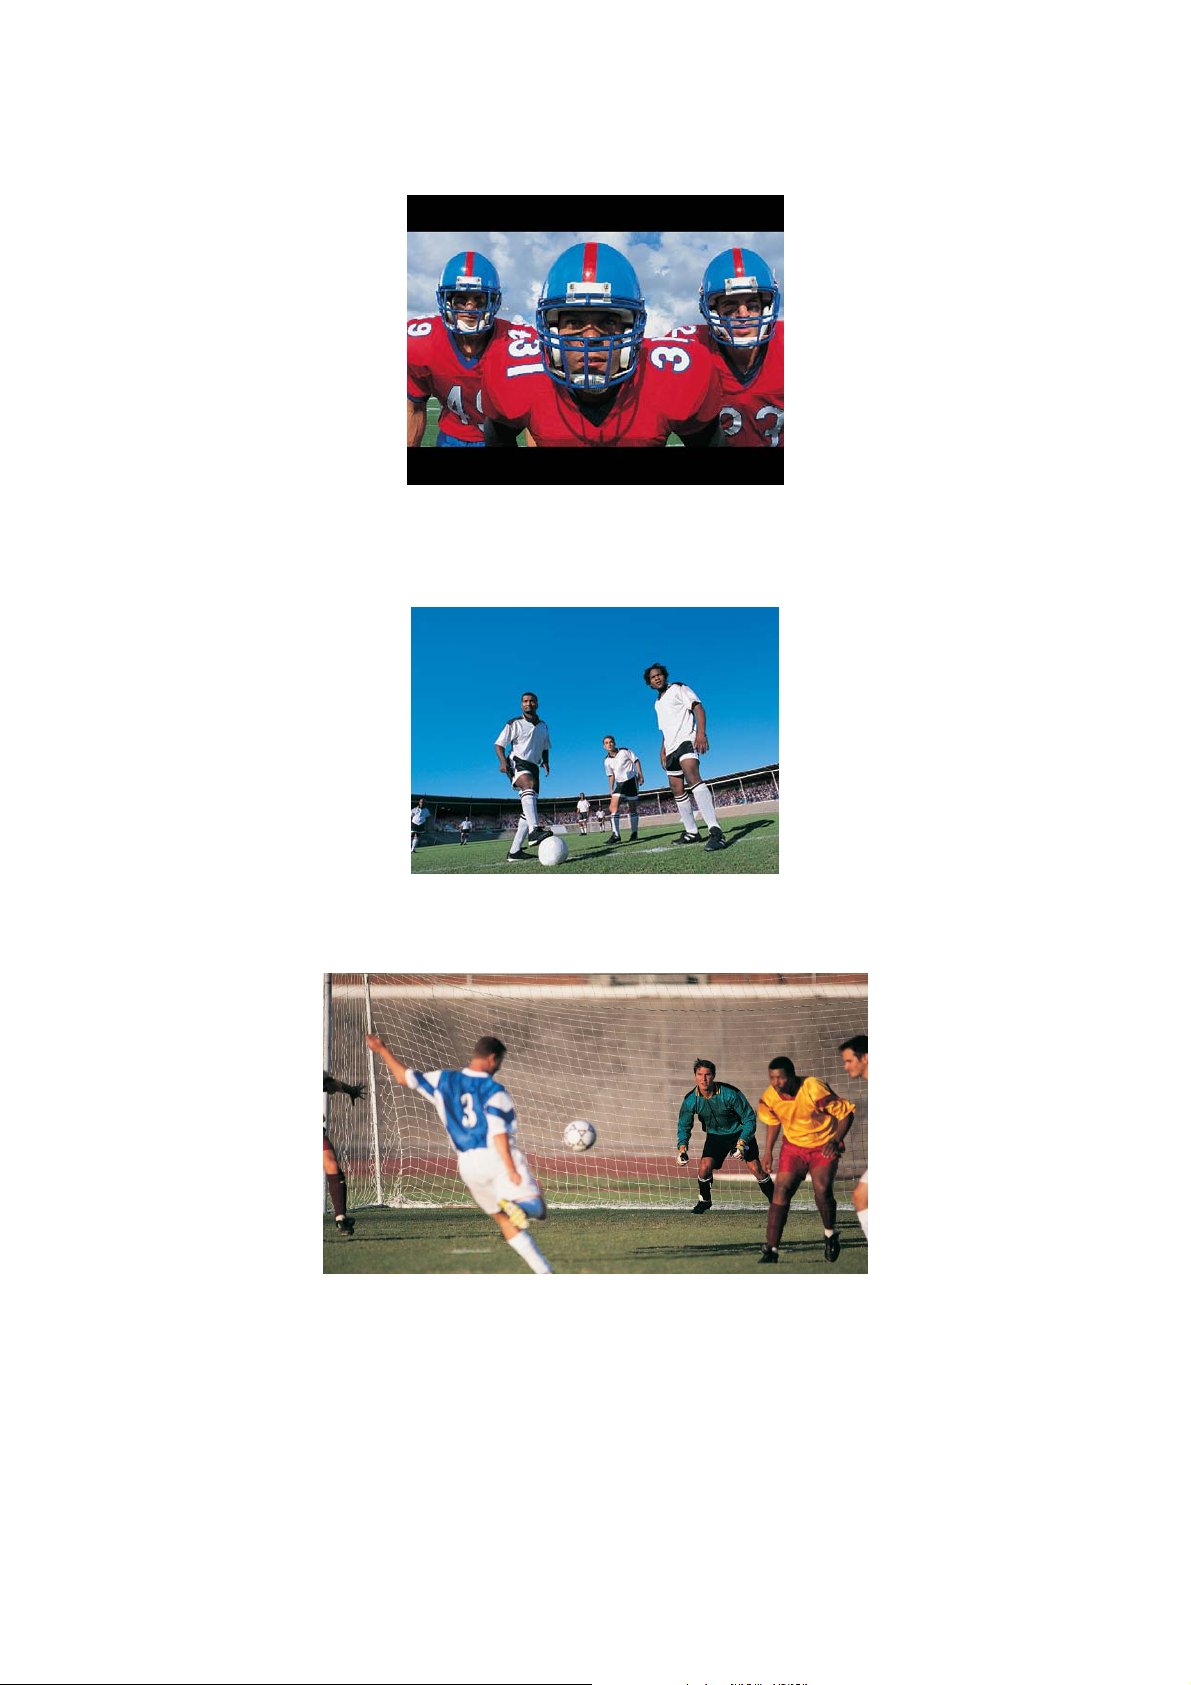
4:3 Letter letter box can show the original ratio f the multimedia file of 16:9.①
4:3 Pan & Scan adj ust the image of the 16:9 m u② ltimedia file to t he 4:3 of the TV screen b y cutting the
image.
16:9 can adjust any ratio of multimedia file to the TV screen with original image ③
* Firmware Version: Displa ys installed firm ware versi on (the versi on number m ay vary depends on the time
of purchase)
13
Page 14

4.4.2 MISC1 setting
* Slide Show Delay Time: You can set the slide show time interval (1 sec – 10 sec).
* Subtitle Font Size: You can select the subtitle font size.
* Subtitle/Outline: You can change the color of the subtitle and its outline.
* Font Color : You can change the color of font.
* Language Selection: Select the language you prefer. It supports English, French, and German
* AutoRun : You can listen to music(audio files) without display(TV). If you select “shuffle”, it plays randomly.
* OSD : You can turn On/Off OSD while you playback or load a file.
4.4.3 MISC2 setting
The FF/REW and LEFT/RIGHT buttons have been upgraded so users can select their preference.
Instead of using setup, you can change the time setup by pressing the up/down arrow buttons which will then
display an OSD, such as “+15.
Fan Speed : You can select your Fan Speed. We recommend the Normal setting.
14
Page 15

5 Using remote controller
5.1 Basic function
Play/Pause STOP
Image Rotate
Navigation Arrow Button
Audio Volume
Show Only Audio Files
Show Only Video Files
FAST FORWARD
ZOOM IN
Power
GOTO
Rewind
SETUP
MUTE
Number button
File Info
Go to Previous Menu
OK
SKIP
Show Only Still Pictures
Random Play
Subtitle Sync
BOOKMARK
SCREEN SCROLL
DVD MENU
DVD TITLE
< Battery change>
- Use new batteries.( 2 AAA size batteries are included in the package )
SUBTITLE
Select Video Out
BRIGHTNESS/CONTRAST/
SATURATION
15
Page 16

r
5.2 Descriptions on each buttons
Playback of Multimedia files
Basically you can point the file you want and press OK button.
For playback of DVD files copied to HDD, please locate the cursor to VIDEO_TS.IFO file and press OK.
You can do the full DVD navigation like you do with DVD player.
5.2.1 Video Playback
You can go to the frame you want by
Inputting the time you want.
Play, Pause will toggle
Navigation Arrow Button
REW / FF
Volume
Video file filte
Fast Forward
Fast Rewind
Screen zoom
Screen scroll
Brightness/Contrast
/Saturation Control
File info
Stop
Go to previous menu
Confirm operat i on
PLAY
When playing contents, pressing the
button will skip or go to previous
content
When stopped, it operates as page
up/down keys
You can change the subtitle sync.
Bookmark
Change the sub title
Select TV out type
<NOTE>
INFO button :
• First Press – Shows content information.
• Second Press – Shows elapsed time (The progress bar is displayed on the upper left
hand corner of the screen.)
• Third Press – INFO off
SUBTITLE button :
• Supports SMI Multi-subtitle control with Subtitle button.
• Subtitle font size configurable on SETUP menu.
• Supports .SUB (bitmap) + .idx subtitle files
16
Page 17

cannot be applied clearly to .SUB subtitles, you can change the color of the outline in
setup.
ZOOM button :
• First Press – Zoom, you can change the size by pressing the arrow buttons.
• Second Press – Full screen
• Third Press – PAN&SCAN full screen
• Fourth Press – Zoom Off
PICTURE button
• Picture adjustment. Contrast Æ Brightness Æ Saturation.
TV OUT button
• NTSC Composite/SVIDEO
• NTSC Composite/YPbPr(480i)
• PAL Composite/SVIDEO
• PAL Composite/YPbPr(576i)
• YPbPr (480p) (No composite output)
• YPbPr (720p) (No composite output)
• YPbPr (1080i) (No composite output)
When using the GOTO function, the present playing time will be displayed.
BOOKMARK : If you stop the movie, the stop position is automatically saved and later you can
resume it by pressing the "bookmark" button on the remote control.
* Press VIDEO button and you can filter video files only among the files stored in TViX.
TIPS
-You can resolve the following problems by pressing O.K button .
When the audio and video are not synchronized
When you have some noise on the audio
When you have some freezing prob lem
- Improved to sa ve up to five bo okmarks on f ive individual f iles. (It cannot save five bookm arks
on a single file.)
- Recognizes AVI, MPG, VOB, CAT, M2P video files only.
- A video file where the folder is setup with a password cannot be saved.
- When replaying the same file, only the last play position will be saved (thus, bookmarked).
- Among the bookmark list, a file deleted from the hard disk will be automatically deleted from the
bookmark list as well.
< DVD Jukebox KEY >
Arrow button - When movie is playing it operates as a FF/REW button. In the m enu screen you can
move your curser.
OK button - W hen movie is pla ying it operates as a play button. In the menu sc reen it operates as a
choose button.
PAGE-DOWN - Go to next chapter.
PAGE-UP - Go to previous chapter.
AUDIO button - You can change the audio. (international dubbing, DOLBY, 2CH, 5.1CH, DTS etc.)
SUBTITLE - It shows subtitle menu.
MENU button - It shows DVD menu screen.
TITLE button - It shows DVD title menu.
ANGLE button - If the DVD title has angle, you can change the angle.
GOTO button - You can choose the time, chapter and title. After choosing you can play directly.
Number + OK - Play the chapter of the number directly.
** The operation of “PICTURE” and “VOLUEM UP/DOWN” is same to the Video operation.
17
Page 18

5.2.2 Audio Playback
Go to the designate time frame
Input time and press OK
y/ Stop
Pla
Displays audio file information being played
Stop
Stop Playing and return to the previous menu
Arrow Keys to move t he c ursor
position
Volume
Audio File Filter
Fast Forward
Fast Rewind
Confirm Selection.
Go to Previous or Next music
Random Play
<NOTE>
Press AUDIO bu tton and you can filter audio f iles only among the files s tored in TViX. It applies onl y to
the active partition if you have more than one partition
Shuffle Function (Random Playback)
- Press the SHUFFLE button to play the files of present directory randomly.
- Press Shuffle button again to release from shuffle mode
Supports FF/REW, GOTO functions when playing WMA, WAV files.
Supports lyric files (.lrc)
If the file name of a music file and .lrc file are the same, the lyrics will be displayed automatically.
Supports ID3 TAG (ID3V1) when playing MP3 files
- Press the INFO button to view ID3 TAG (ID3V1).
- You can see additional information recorded on the MP3 files, such as the artist, album etc.
- OGG also displays basic Tag information
18
Page 19

g
p
5.2.3 Image Playback
Show still image or stop slide show
Rotate image 90° Clockwise
Stop playing and return to the
revious menu
Filter Ima
e files only
<NOTE>
You can set the slide show time interval in the SETUP menu.
Some non-standard JPEG files may not be displayed
If you press PICTURE button, you can see the Contrast Æ Brightness Æ Saturation menus in sequence.
In these menus, you can adjus t the Contrast, Brightness and Saturation by press ing the left/right arrow
buttons
When you press the IMAGE button on the remote controller, only the image files stored in TViX.
It applies only to the active partition if you have mor e than one partition.
19
Page 20

5.3 Extra feature
5.3.1 Using AutoRun
When you want to pla y music with the T ViX, if you don’t have an y disp lay devic es, you ca n use this f unction
usefully.
1. Make folder & name it as an “autorun” on root directory of First partition.
2. Copy a media files or make a sub-folders in the “autorun” folder.
3. If you want to c hang e th e setup, push the SET UP button on t he rem ote. And go to SET UP/MISC ’ tap. Set
AutoRun option on. If you set the AutoRun option off, the function will not operate. If you select the
“shuffle” files are played randomly.
4. After the setting, turn off the TViX & turn i t on again. The T ViX will play the m edia file in the firs t (as an
order) sub-folder under ‘/HDD1/autorun’.
<NOTE>
The T ViX will pl a y the f iles in the sub-folders first and then it will p lay the files in ‘/HDD1/autorun’. After the
TViX plays all media files, it will repeat from the beginning.
W hen you pus h the 1~9 buttons o n the rem ote during the pla ying, the TViX will play the firs t sub-folder ~
9th sub-folder in the order.
Now, the TViX supports only 9 sub-folders max imum. AutoRun funct ion will work with PLAY button on the
remote also (OK button will not work).
20
Page 21

5.3.2 Lock the TViX with password
1. First scan the m edia f iles with the TViX Manager. And right-click on th e f ile. When the menu appears, click
on ‘Set Password’.
2. Set the 4 digit number for password.
3. While you are pla ying TViX, if you c lick on the fold er that you set the pass word before, T ViX will ask you
the password to get in that folder.
4. If you put the right password you can get into the folder, but if you not, you can’t get in.
5. If you select the directory at the File-Password menu of the TViX Manager, You can lock the whole
directory you want to lock.
<< Using WinAMP Playlist ( .m3u ) >>
(1) Connect TViX to PC.
(2) Open the files that is stored at TViX in " Winamp " Program.
(3) Select the folder you want at Winamp after pressing SaveList,
You should save the files at the same partition where the opened files were stored.
(4) Disconnect TViX from PC/Mac safely.
21
Page 22

5.3.3 Using Wallpaper
(1) If you put a JEPG file at the name of "tvix.jpg" under th e folder you want to change the wallpaper, the
wallpaper of the folder is changed.
(2) You can select any wallpaper you want by using the various JEPG files of the different folders.
<Tip>
If you want to change the basic wallpaper, put a JPEG file at the name of tvix.jpg under Root
directory.
In the name of “tvix.jpg”, both lowercase letter and uppercase letter can be used.
720*480 pixel is recommended for the size of wallpaper.
(Bigger size of the wallpaper can need longer moving time.
The wallpaper with high resolution may take longer loading time.
In Windows X P, when you name the JEPG file, “Hide Extensions for known file types” shoul d be
unchecked at Tool-Folder Option-View-File/Folder. Otherwise the JEPG file can be named as
tvix.jpg.JPG and you can not see the desired wallpaper.
5.3.4 Playing background music while watching a picture slide show
[ Make new folder for background music ]
(1) Make automp3 folder in root directory of TViX.
22
Page 23

(2) Copy the MP3 files into automp3 folder
(3) While users are watching the picture slide show, the MP3 files in automp3 will be played as its
background music
[ Set the existing folder for background music ]
(1) Move the curser to the folder that users wish to set as the background music.
(2) On the folder, push number 0 button to set
(3) Make sure that TViX show the message that the folder is set.
23
Page 24

5.3.5 Displaying picture slide show while playing MP3
[ Creating the default slide show folder ‘autojpg” in the TVIX directory ]
(1) Connect TVIX to PC.
(2) In the TVIX root direc tory (if your HDD is multi-part itioned, use the first partition), cr eate a folder called
“autojpg” (case sensitive, all lower case).
(3) Copy your JPG files into the “autojpg” folder
(4) Connect TVIX to TV and/or Receiver
(5) Using the JPG files f rom the “ autoj pg” f older, TVIX will autom atic all y beg in th e s lide s ho w when you begin
playing MP3 files from the TVIX directory (must use the ‘Play” button on your remote to play MP3 files).
[ Using the existing folders for the picture slide show ]
(1) Turn on your TVIX (TVIX is connected to your TV).
(2) Place the cursor on a fold er in the T VIX director y that you want to set as a picture s lide show fol der (we
will use the “Photo” folder as an example)
When playing the sl ideshow, JPEG images will be d isplayed if there ar e JPEG images in the MP3 folder. If
there aren’t any JPEG images, the contents of the autojpg folder will be displayed.
24
Page 25

(3) After starting the music slideshow, the displayed list will automatically disappear after 5 seconds.
If you wish to display the MP3 list again, press the “0” button on the remote control.
(4) TVIX will dis pla y “AUT O JPG” c onfir m ing that t he f old er your ha ve s elect ed is set as a pictur e s lide s how
folder.
(5) Using the JPG f il es from the selected folder ( “P ho to” f older in this example), TVIX will automatically begin
the slide show when you begi n pla ying MP3 f iles f rom the T VIX direc tory (m ust us e the ‘Pla y” button on your
remote to play MP3 files).
[ Few tips when users are using this function ]
(1) You can hide the M P3 file list whil e playing MP3/Sl ide Show by pressing the number “0” on your remote
control. Pressing the number “0” again will display the MP3 list again.
(2) You can pla y both of your MP3 and JPG files in shuffle pla ying mode by press ing the “Shuffle” button to
begin playing your MP3 files.
(3) If the SHUFFLE b utton is pressed after you have beg un playing MP3 files with the “Pl ay” button, only
MP3 files will play in shuffle playing mode (JPG files will be played in order)
(4) Slide show delay time can be adjusted in the setup menu (press the “setup” button on your remote
control).
* Recommended picture size for the slide show function is 1024x768 or smaller.
25
Page 26

6 Firmware upgrade
Firmware version check.
Connect TViX to your TV and turn on TViX
1.
2.
Press menu button on the top panel and the setup screen will be displayed.
3. Navigate with buttons to move to ‘MISC’ menu and check your current firmware version.
4.
Check the latest firmware version of TViX at www.tvix.co.kr
*** You’ll be posted for any firmware updates or news if you fill out the customer registration form
at http://www.tvix.co.kr
How to download firmware.
1.
Download the latest firmware from http://www.tvix.co.kr to your PC.
2.
Unzip the tvixfw.zip file and you’ll have flash.bin and tvixfw.bin
3.
Connect TViX to your PC through USB connection and turn it on.
4.
Your system will recognize TViX as an external hard drive.
5.
Copy those two firmware files into tvixfw folder of the TVIX hard drive.
Turn off TViX and bring it to your TV for firmware upgrade.
6.
How to upgrade firmware
1.
Connect TViX to your TV
2.
Press the menu button on the top panel and turn on TViX.
3.
Keep the menu button pressed until the LED starts blinking or turned on.
The following blue screen will be displayed. Follow the next instruction on the screen.
4.
TViX Firmware Update
(Version : 1.X.X , Date : 2006-04-30)
This will update the firmware to version 1.X.X!
Press <play> to continue with existing setting
Press <ok> to continue with Factory default setting
Press <STOP> to abort
5. New firmware upgrade is in process
TViX Firmware Update
(Version : 1.X.X , Date : 2006-04-30)
ERASING…
(Please wait…)
Flashing tvixfw.bin
26
Page 27

TViX Firmware Update
(Version : 1.X.X , Date : 2006-04-30)
ERASING…
(Please wait…)
WRITING…
Flashing tvixfw.bin
6. When the upgrade is finished successfully, turn off TViX and turn it on again
TViX Firmware Update
(Version : 1.X.X , Date : 2006-04-30)
Update successfully done ! Power off your TViX
player !
7. You can now use TViX with a new firmware.
T I P
** Supporting safer firmware upgrade
- Even if TViX is accidentally turned off during the firmware upgrade, the safe mode enables TViX
upgraded by retrial of upgrading
27
Page 28

7 Using USB connection with PC
7.1 Windows 98SE Driver Installation
1) You should download a USB storage driver from our web site www.tvix.co.kr
connecting the TViX .
Press “Next” on the following pop up screen.
and run installer before
2) Please reboot after pressing “Finish” button.
3) After rebooting the system, please connect TViX. Add New Hardware Wizard will pop up automatically.
28
Page 29

4) Select “Search for the best driver for your device” menu and press Next button.
5) Do not check any of the menus. Just press “Next”.
6) The system will find DVICO USB-ATA Bridge automatically as the pop up shows. Press “Next” button.
7) By pressing the “Finish” button, the driver installation is done.
29
Page 30

8) You will be able to see the disk drive inside the TViX on the Device Manager tab.
T I P
Windows ME or Windows 2000, XP offer driver by itself. so you don’t need to install software. If connect TViX,
run Plug & Play. Right click the “My computer” icon Æ properties Æ hardware Æ device manager to see TViX
is properly installed
30
Page 31

7.2 Making partition and formatting the HDDs under Windows 98SE / ME
Click “Start” and select “Run” and the “Run” window will app ear as shown be low. Type “fdisk” in the text box
of the “Run” window then click the “OK” button
1) The DOS window will appear as shown below for the partition program.
2) Choose number 5 to select the HDD in TViX to make new partition.
3) Choose the partition type and the size to make the partition for the HDD. Make the partition when done
choosing.
4) After making partitions, do not reboot the system but instead turn TViX’s power off and turn back on.
By doing so your system will reinitialize TViX.
31
Page 32

5) Run window explorer and you will find the new disk created. Right click the new disk and choose
“Format” from pop up menu. Then start format your HDD in TViX.
32
Page 33

7.3 Making partition and formatting the HDDs under Windows 2000 / XP
1) Under Windows 2000, you can make partition and format the HDD using Disk Manager utility.
2) Right click “My Computer” Æ Choose “manage” from the pop up menu and “Computer Management”
widow will appear Æ choose “Disk Management” folder.
3) The disk list will appear on the right side of the “Computer Management” windows. Right click the TViX
HDD from the list and from the pop up menu choose “make partition” to make partitions on the chosen disk.
4) When New Partiton Wizard appeas , Press the “Next>”.
5) Choose the partition type and format the HDD. If you want the several partition, Select the Extended
Partition.
33
Page 34

6) Select the partition Size. If you want one partition, Press the “Next>”. For the FAT32, it is limited under
32000MB
7) Select the Driver letter. We recommend to press the “Next>”.
8) Select the partition Format. If you want the FAT32, it is limited under 32GB.
9) When it is completed, detailed information will appear as shown below. Click the “OK” button to complete
the work.
34
Page 35

7.4 Unplug or eject hardware
1) On the window tray, double the clic k hot swap ic on and th e “Unplu g or Ejec t Hardware”
window will show. Press Stop button if you want to unplug the device.
2) Press OK on the “Stop a Hardware device” window.
3) Press OK and unplug the device.
35
Page 36

8 Appendix - Technical Terms
DivX
-------------------------------------------------------------------------------DivX is the name of a revolutionary new video codec which is based on the new MPEG-4 compression
standard for video. W hen you install a video codec on your system it bas ically works as an add- on to your
system with instructions how to compress /decompress video in t hat video format. Onc e you've installed the
DivX codec on your system you will be able t o play DivX m ovies using W indows Media Pl ayer or an y other
DivX-enabled player.
Despite the fact that DivX movies offer better compression and higher quality video then regular MPEG
movies they take less tim e to encode due to th e incredib le compres sion technolog y. The DivX codec makes
it possible to compres s/encode a full-len gth movie at near DVD-q uality that's sm all enough to fit on a single
CD (700MB). The DivX v ideo is usually combined with MP3 au dio to produce both high quality vi deo and
audio.
XviD
-------------------------------------------------------------------------------XviD is the name of a new open-source video codec, which just like DivX is based on the new MPEG-4
compression standard f or video. It's curr ently being deve loped by people fr om all over the wor ld. When you
install a video codec on your s ystem it basicall y works as an add- on to your s ystem with inst ructions ho w to
compress/decom press video in t hat video f ormat. Once you've installed the XviD c odec on your s ystem you
will be able to play XviD movies using Windows Media Player or any other XviD-enabled player.
MPEG
-------------------------------------------------------------------------------MPEG stands for Motion Pic ture Experts Group. This is the same group that made the MPEG-1 (used in
VideoCDs), MPEG-2 (used in DVD and SuperVCDs a nd other hi gh bandwidth s ystems) and M PEG-4 (ASF,
DivX, WMV, low-mid bandwidth systems) standards. They are also r esponsi ble for MP3 (MP EG Audio La yer
3) and AAC audio compression standards.
VOB
-------------------------------------------------------------------------------VOB stands for Video OBjects. DVD movies are stored in VOB files. Each VOB file has a number of
video/audio/subpicture streams.
SUBPICTURE
-------------------------------------------------------------------------------A subpicture stream found in VOB f iles normally ref ers to the subtitl es. Subtitles on DVDs are not store d as
"text", but rather, as a video stream. A subpicture stream is one that overlays on top of the main picture
stream (ie. the movie), and on a DVD, the subpicture stream can be turned on and off.
AVI
-------------------------------------------------------------------------------AVI stands f or Aud io Vide o Interl ea ve. AVI is a file format, like MP3 or JPG. But unlik e these formats, AVI is a
container format, meaning it can contain video/audio compressed using many different combinations of
codecs. So while MP3 and JPG can only contain a certain k ind of compression (MPEG Audio Layer 3 and
JPEG), AVI can contain many different k inds of c ompress ion (eg. Di vX vi deo + W MA audio or Indeo vi deo +
PCM audio), as lon g as a codec is availa ble for encodin g/decoding. AVI all look the same on the "o utside",
but on the "inside", the y may be com pletely different. Alm ost all tools on this s ite are not just D ivX tools, but
also AVI tools, so will probably work with other codecs.
AC3
-------------------------------------------------------------------------------Initially known as Audio Coding 3 AC3 is a synonym for Dolby Digital these days. Dolby Digital is an
advanced audio compression technology allowing to encode up to 6 separate channels at bitrates up to
448kbit/s. For more information please check out the Dolby website.
DTS
-------------------------------------------------------------------------------By supplying film studios with outstanding techniques for delivering soundtracks to an attentive audience,
36
Page 37

DTS digital sound is no w featured on virtuall y 100% of major Hollywood r eleases. Although the t echnology
used for motion pictures differs from that featured in consumer and professional audio music and home
theater systems, their DTS heritage means end users can enjoy sound that closely matches the original.
WMA
-------------------------------------------------------------------------------WMA stands for Windows Media Audio. It is a proprie tary format deve loped by Mic rosoft for audio str eaming
and compression. WMA files, theoretically, has double the compression rate of MP3s, although this is
debatable.
Ogg Vorbis
-------------------------------------------------------------------------------Ogg Vorbis is a new aud io compression f ormat. It is roughl y comparable to other formats used to stor e and
play digital mus ic, such as MP3, VQF, AAC, and ot her digital audio form ats. It is different from these other
formats because it is completely free, open, and unpatented.
Ogg Vorbis has been desi gned to completely replace all proprietar y, patent ed audio formats. That means
that you can encode all your music or audio content in Vorbis and never look back.
480p
-------------------------------------------------------------------------------480 progressive; for m of standard-defini tion digital tel evision (SDTV) c omparable to VGA computer disp lays
but not considered high-d efinition tele vision (HDTV), thoug h 480p is discer nibly cleaner and sl ightly sharper
than analog televisi on. The native resolu tion of DVD is 480p, but that resolution c an be seen only if a DVD
player outputs a progres sive-s can signal and the DT V has pr ogressive- scan or com ponent-video i nputs; it is
also known as EDTV.
480i
-------------------------------------------------------------------------------480 interlaced; form of standard-definition digital televisi on (SDTV) that approximates the quality of analog
television but not c onsidere d high-def inition te levisi on (HDT V). Even thou gh the n ative reso lution of DVDs is
480p, they are viewed at 480i on an NTSC analog tel evis ion.
720p
-------------------------------------------------------------------------------720 progressive. O ne of two c urr ent l y used f or mats designated as high-definit ion television in the ATSC DTV
standard, this technology comprises 720 vertical pixels and 1,280 horizontal pixels. The p stands for
progressive, as oppos e d t o int er lace d, s c an ni ng, whic h is used i n t he other accepted HDTV standard, known
as 1080i. Contrar y to myth, 720p is not inferior to 1080 i; 7 20p has f e wer l ines but als o h as the ad va ntages of
progressive scanning and a constant vertical resolution of 720 lines, making it better able to handle motion.
1080i
-------------------------------------------------------------------------------1080 interlaced; on e of two f ormats designa ted as high- definition t elevision in the ATSC DTV standard, with
1,080 vertical pixels by 1,920 horizontal pixels. The i stands for interlaced, as opposed to progressive
scanning, used in the s econd HDTV standard, 720p. Contrary to myth, 1080 i is not superior to 720 p; 1080i
has more scanning lines but also suffers the disadvantages of interlaced scanning.
NTSC
-------------------------------------------------------------------------------The NTSC (National Television Standards Committee) was responsible for developing, in 1953, a set of
standard protocol f or television (TV) broadc ast transmission and reception in the Unit ed States. Two other
standards - Phase Alternation Line (PAL) and Sequential Couleur avec Memoire (SECAM) - are used in
other parts of the world. The NTSC s tandards have n ot c hanged s ignif icantl y since the ir incep tion, ex cept f or
the addition of new parameters for color signals. NTSC signals are not directly compatible with com puter
systems.
An NTSC TV im age has 525 horizontal lines p er frame (complete s creen image). Thes e lines are scanned
from left to right, and from top to bottom. Every other line is skipped. Thus it takes two screen scans to
complete a frame: one s ca n for the od d-num bered h ori zontal lines , and an other s can f or the even- num bered
lines. Each half-frame screen scan takes approximately 1/60 of a second; a complete frame is scanned
every 1/30 second. This alternate-line scanning system is known as interlacing.
PAL
-------------------------------------------------------------------------------Phase Alternation L ine (PAL) is the analog televis ion display standard that is used in Europe and certain
other parts of the world. PAL is one of the thre e major TV standards together with the American Nati onal
Television Systems Committee(NTSC) color television system and the French Sequential Couleur avec
Memoire (SECAM). NTSC is also used in Japan. SECAM is used in countries of the former Soviet Union.
Like SECAM, PAL scans the cathode ray tube (CRT) horizontall y 625 times to form the video image. NT SC
scans 525 lines. Color definitions between the systems vary slightly.
37
Page 38

9 GNU General Public License
Dvico Co., Ltd is using a part of Fr ee Software cod e under the GNU General Public License in operat ing
TViX player. This General Public Lic ense app lies to most of the Fr ee Softwar e Founda tion’s code and to a ny
other program whose authors commit by using it. The Free Software is copyrighted by Free Software
Foundation, Inc. and the progr am is licensed “As is” without warranty of any kind. Users are free to download
the base source code of the Dvico TViX players at the following Address: www.tvix.co.kr/gpl The source code
can be sent to your address via airmail for a charge of actual expense executed. Please contact us at
sales@dvico.com
GNU GENERAL PUBLIC LICENSE
Version 2, June 1991
Copyright (C) 1989, 1991 Free Software Foundation, Inc.
51 Franklin Street, Fifth Floor, Boston, MA 02110-1301, USA
Everyone is permitted to copy and distribute verbatim copies
of this license document, but changing it is not allowed.
Preamble
The licenses for most software are designed to take away your freedom to share and change it. By contrast,
the GNU General Public License is intended to guarantee your freedom to share and change free software-to make sure the software is free for all its users. This General Public License applies to most of the Free
Software Foundation's software and to any other program whose authors commit to using it. (Some other
Free Software Foundation software is covered by the GNU Lesser General Public License instead.) You can
apply it to your programs, too.
When we speak of free software, we are referring to freedom, not price. Our General Public Licenses are
designed to make sure that you have the freedom to distribute copies of free software (and charge for this
service if you wish), that you receive source code or can get it if you want it, that you can change the
software or use pieces of it in new free programs; and that you know you can do these things.
To protect your rights, we need to make restrictions that forbid anyone to deny you these rights or to ask you
to surrender the rights. These restrictions translate to certain responsibilities for you if you distribute copies of
the software, or if you modify it.
For example, if you distribute copies of such a program, whether gratis or for a fee, you must give the
recipients all the rights that you have. You must make sure that they, too, receive or can get the source code.
And you must show them these terms so they know their rights.
We protect your rights with two steps: (1) copyright the software, and (2) offer you this license which gives
you legal permission to copy, distribute and/or modify the software.
Also, for each author's protection and ours, we want to make certain that everyone understands that there is
no warranty for this free software. If the software is modified by someone else and passed on, we want its
recipients to know that what they have is not the original, so that any problems introduced by others will not
reflect on the original authors' reputations.
Finally, any free program is threatened constantly by software patents. We wish to avoid the danger that
redistributors of a free program will individually obtain patent licenses, in effect making the program
proprietary. To prevent this, we have made it clear that any patent must be licensed for everyone's free use
or not licensed at all.
The precise terms and conditions for copying, distribution and modification follow.
38
Page 39

TERMS AND CONDITIONS FOR COPYING, DISTRIBUTION AND MODIFICATION
0. This License applies to any program or other work which contains a notice placed by the copyright holder
saying it may be distributed under the terms of this General Public License. The "Program", below, refers to
any such program or work, and a "work based on the Program" means either the Program or any derivative
work under copyright law: that is to say, a work containing the Program or a portion of it, either verbatim or
with modifications and/or translated into another language. (Hereinafter, translation is included without
limitation in the term "modification".) Each licensee is addressed as "you".
Activities other than copying, distribution and modification are not covered by this License; they are outside
its scope. The act of running the Program is not restricted, and the output from the Program is covered only if
its contents constitute a work based on the Program (independent of having been made by running the
Program). Whether that is true depends on what the Program does.
1. You may copy and distribute verbatim copies of the Program's source code as you receive it, in any
medium, provided that you conspic uo us ly and appr opr i ately publish on each copy an appropriate copyright
notice and disclaimer of warranty; keep intact all the notices that refer to this License and to the absence of
any warranty; and give any other recipients of the Program a copy of this License along with the Program.
You may charge a fee for the physical act of transferring a copy, and you may at your option offer warranty
protection in exchange for a fee.
2. You may modify your copy or copies of the Program or any portion of it, thus forming a work based on the
Program, and copy and distribute such modifications or work under the terms of Section 1 above, provided
that you also meet all of these conditions:
a) You must cause the modified files to carry prom inent notices stating that you chang ed the files
and the date of any change.
b) You must cause an y work that you distribute or publish, that in whole or in part contains or is
derived from the Pr ogram or any part thereof, to be l icensed as a whole at no charge t o all third
parties under the terms of this License.
c) If the modified program normally reads commands interactively when run, you must cause it,
when started running for such interactive use in the most ordinary way, to print or display an
announcement includ ing an appropriate copyright notice and a notice that there is no warranty (or
else, saying that you provide a warranty) and that user s may redistribute the program under these
conditions, and t el ling the user how to vie w a c opy of this License. (Exc ept ion: if the Program itself is
interactive but does not normally print such an announcement, your wor k based on the Program is
not required to print an announcement.)
These requirements apply to the modified work as a whole. If identifiable sections of that work are not
derived from the Program, and can be reasonably considered independent and separate works in
themselves, then this License, and its terms, do not apply to those sections when you distribute them as
separate works. But when you distribute the same sections as part of a whole which is a work based on the
Program, the distribution of the whole must be on the terms of this License, whose permissions for other
licensees extend to the entire whole, and thus to each and every part regardless of who wrote it.
Thus, it is not the intent of this section to claim rights or contest your rights to work written entirely by you;
rather, the intent is to exercise the right to control the distribution of derivative or collective works based on
the Program.
In addition, mere aggregation of another work not based on the Program with the Program (or with a work
based on the Program) on a volume of a storage or distribution medium does not bring the other work under
the scope of this License.
3. You may copy and distribute the Program (or a work based on it, under Section 2) in object code or
executable form under the terms of Sections 1 and 2 above provided that you also do one of the following:
a) Accompany it with the complete corresponding machine-readable source code, which must be
distributed under th e terms of Sections 1 and 2 above on a medium c ustomarily used for software
interchange; or,
39
Page 40

b) Accompany it with a wr it ten off er, valid for at least three years, to give a n y thir d party, for a charg e
no more than your c ost of physically perform ing source distribution, a com plete machine-readable
copy of the correspond ing source c ode, to be distr ibuted un der the term s of Secti ons 1 and 2 a bove
on a medium customarily used for software interchange; or,
c) Accompany it with the inf ormation you received as to the offer to distribute cor responding sourc e
code. (This alter native is allowed only for n oncommercial distribution a nd only if you received the
program in object code or executable form with such an offer, in accord with Subsection b above.)
The source code for a work means the preferred form of the work for making modifications to it. For an
executable work, complete source code means all the source code for all modules it contains, plus any
associated interface definition files, plus the scripts used to control compilation and installation of the
executable. However, as a special exception, the source code distributed need not include anything that is
normally distributed (in either source or binary form) with the major components (compiler, kernel, and so on)
of the operating system on which the executable runs, unless that component itself accompanies the
executable.
If distribution of executable or object code is made by offering access to copy from a designated place, then
offering equivalent access to copy the source code from the same place counts as distribution of the source
code, even though third parties are not compelled to copy the source along with the object code.
4. You may not copy, modify, sublicense, or distribute the Program except as expressly provided under this
License. Any attempt otherwise to copy, modify, sublicense or distribute the Program is void, and will
automatically terminate your rights under this License. However, parties who have received copies, or rights,
from you under this License will not have their licenses terminated so long as such parties remain in full
compliance.
5. You are not required to accept this License, since you have not signed it. However, nothing else grants
you permission to modify or distribute the Program or its derivative works. These actions are prohibited by
law if you do not accept this License. Therefore, by modifying or distributing the Program (or any work based
on the Program), you indicate your acceptance of this License to do so, and all its terms and conditions for
copying, distributing or modifying the Program or works based on it.
6. Each time you redistribute the Program (or any work based on the Program), the recipient automatically
receives a license from the original licensor to copy, distribute or modify the Program subject to these terms
and conditions. You may not impose any further restrictions on the recipients' exercise of the rights granted
herein. You are not responsible for enforcing compliance by third parties to this License.
7. If, as a consequence of a court judgment or allegation of patent infringement or for any other reason (not
limited to patent issues), conditions are imposed on you (whether by court order, agreement or otherwise)
that contradict the conditions of this License, they do not excuse you from the conditions of this License. If
you cannot distribute so as to satisfy simultaneously your obligations under this License and any other
pertinent obligations, then as a consequence you may not distribute the Program at all. For example, if a
patent license would not permit royalty-free redistribution of the Program by all those who receive copies
directly or indirectly through you, then the only way you could satisfy both it and this License would be to
refrain entirely from distribution of the Program.
If any portion of this section is held invalid or unenforceable under any particular circumstance, the balance
of the section is intended to apply and the section as a whole is intended to apply in other circumstances.
It is not the purpose of this section to induce you to infringe any patents or other property right claims or to
contest validity of any such claims; this section has the sole purpose of protecting the integrity of the free
software distribution system, which is implemented by public license practices. Many people have made
generous contributions to the wide range of software distributed through that system in reliance on consistent
application of that system; it is up to the author/donor to decide if he or she is willing to distribute software
through any other system and a licensee cannot impose that choice.
This section is intended to make thoroughly clear what is believed to be a consequence of the rest of this
License.
8. If the distribution and/or use of the Program is restricted in certain countries either by patents or by
copyrighted interfaces, the original copyright holder who places the Program under this License may add an
40
Page 41

explicit geographical distribution limitation excluding those countries, so that distribution is permitted only in
or among countries not thus excluded. In such case, this License incorporates the limitation as if written in
the body of this License.
9. The Free Software Foundation may publish revised and/or new versions of the General Public License
from time to time. Such new versions will be similar in spirit to the present version, but may differ in detail to
address new problems or concerns.
Each version is given a distinguishing version number. If the Program specifies a version number of this
License which applies to it and "any later version", you have the option of following the terms and conditions
either of that version or of any later version published by the Free Software Foundation. If the Program does
not specify a version number of this License, you may choose any version ever published by the Free
Software Foundation.
10. If you wish to incorporate parts of the Program into other free programs whose distribution conditions are
different, write to the author to ask for permission. For software which is copyrighted by the Free Software
Foundation, write to the Free Software Foundation; we sometimes make exceptions for this. Our decision will
be guided by the two goals of preserving the free status of all derivatives of our free software and of
promoting the sharing and reuse of software generally.
NO WARRANTY
11. BECAUSE THE PROGRAM IS LICENSED FREE OF CHARGE, THERE IS NO WARRANTY FOR THE
PROGRAM, TO THE EXTENT PERMITTED BY APPLICABLE LAW. EXCEPT WHEN OTHERWISE
STATED IN WRITING THE COPYRIGHT HOLDERS AND/OR OTHER PARTIES PROVIDE THE
PROGRAM "AS IS" WITHOUT WARRANTY OF ANY KIND, EITHER EXPRESSED OR IMPLIED,
INCLUDING, BUT NOT LIMITED TO, THE IMPLIED WARRANTIES OF MERCHANTABILITY AND
FITNESS FOR A PARTICULAR PURPOSE. THE ENTIRE RISK AS TO THE QUALITY AND
PERFORMANCE OF THE PROGRAM IS WITH YOU. SHOULD THE PROGRAM PROVE DEFECTIVE,
YOU ASSUME THE COST OF ALL NECESSARY SERVICING, REPAIR OR CORRECTION.
12. IN NO EVENT UNLESS REQUIRED BY APPLICABLE LAW OR AGREED TO IN WRITING WILL ANY
COPYRIGHT HOLDER, OR ANY OTHER PARTY WHO MAY MODIFY AND/OR REDISTRIBUTE THE
PROGRAM AS PERMITTED ABOVE, BE LIABLE TO YOU FOR DAMAGES, INCLUDING ANY GENERAL,
SPECIAL, INCIDENTAL OR CONSEQUENTIAL DAMAGES ARISING OUT OF THE USE OR INABILITY TO
USE THE PROGRAM (INCLUDING BUT NOT LIMITED TO LOSS OF DATA OR DATA BEING RENDERED
INACCURATE OR LOSSES SUSTAINED BY YOU OR THIRD PARTIES OR A FAILURE OF THE
PROGRAM TO OPERATE WITH ANY OTHER PROGRAMS), EVEN IF SUCH HOLDER OR OTHER
PARTY HAS BEEN ADVISED OF THE POSSIBILITY OF SUCH DAMAGES.
41
 Loading...